1
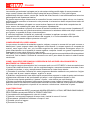
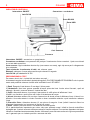
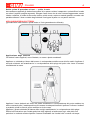
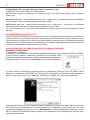
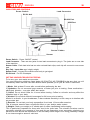
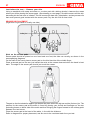
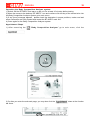
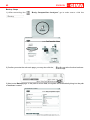
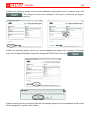
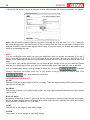
Gima S.p.A. - Via Marconi, 1 - 20060 Gessate (MI) Italy
Italia: tel. 199 400 401 - fax 199 400 403
Export: tel. +39 02 953854209/221/225 fax +39 02 95380056
[email protected] - [email protected]
www.gimaitaly.com
ANALIZZATORE DI MASSA CORPOREA
BODY COMPOSITION ANALYZER
M27349-I-G-Rev.0-04.10
MANUALE D’USO E MANUTENZIONE
USE AND MAINTENANCE BOOK
ATTENZIONE: Gli operatori devono leggere e capire completamente questo manuale
prima di utilizzare il prodotto.
ATTENTION: The operators must carefully read and completely understand the present
manual before using the product.
ITALIANO
2
INTRODUZIONE
La metodica generalmente impiegata per la misurazione della quantità totale di acqua presente nel
corpo umano si basa sulla diluizione degli isotopi dell’acqua (Deuterio o Tritio) che vengono
metabolizzati dal corpo umano, mentre per l’analisi dei diversi tessuti si usa tradizionalmente la tecnica
pletismografica ad impedenza elettrica.
Da quanto sopra emerge chiaramente la necessità di trovare una tecnica rapida, sicura, non invasiva,
sufficientemente accurata ed economica che permetta la misurazione della composizione totale del
corpo umano.
Recentemente abbiamo sviluppato un nuova tecnica d’approccio alla stima della composizione del
corpo umano che soddisfa gran parte delle esigenze sopradescritte.
Questa nuova metodica si propone di misurare la resistenza elettrica del corpo umano (impedenza). E’
così possibile misurare con grande accuratezza, attraverso la resistenza elettrica del corpo umano nel
suo insieme, la quantità di acqua e tessuto adiposo.
E’ sufficiente applicare 4 elettrodi sui metacarpi e metatarsi e applicare corrente a 50 KHz.
Il segnale rilevato, corretto rispetto all’altezza del soggetto, è un indice attendibile della quantità
totale di acqua e tessuto adiposo presente nel corpo.
COMPOSIZIONE DEL CORPO UMANO
Il corpo umano è costituito da materiale organico, adiposo e acqua: la somma dei loro pesi concorre a
determinare il peso corporeo totale che leggiamo sulla bilancia. La massa organica è composta da
muscoli, ossa, organi vitali, ecc.; sia la massa organica che quella adiposa contengono acqua. Un
giusto bilanciamento tra la quantità di massa organica e adiposa riveste una grande importanza per
mantenere in buona salute e forma il corpo umano.
Il BT-905PC è uno strumento di grande utilità che permette di gestire con semplicità ed efficacia problemi
nutrizionali, fisici e dietetici. Permette di conoscere non solo il peso ideale ma anche lo stato di salute
nutrizionale.
COME L'ANALIZZATORE DI MASSA CORPOREA MI PUÒ AIUTARE A RAGGIUNGERE E A
MANTENERE LA FORMA IDEALE?
Qui di seguito vengono elencati alcuni tra i numeroso modi con cui il BT-905PC vi aiuta a massimizzare
il vostro livello ideale di forma fisica - sia che vogliate dimagrire, aumentare la massa muscolare, il tono
e l’assetto muscolare, o solo e semplicemente mantenere la vostra forma attuale:
1) Permette di controllare l’efficacia del vostro programma dietetico stabilendo con precisione l’origine
del vostro calo di peso: tessuto adiposo, organico o acqua.
2) Stabilisce una parametro base della vostra composizione corporea in modo da poter monitorizzare
regolarmente sulla base di dati confrontabili nel tempo i vostri miglioramenti dietetici o fisici.
3) Fornisce una risposta possibile ai “plateau” di peso - nota dolente per molti dietologi.
4) Aiuta a monitorare miglioramenti nella massa muscolare come risultato di esercizi fisici e/o dieta e vi
allerta nel caso di una diminuzione della massa muscolare dovuta a inattività, invecchiamento o malattia.
5) Aiuta a fornire spiegazioni sul perché di un aumento o diminuzione “misteriosa” di peso.
CARATTERISTICHE
1) Risultati: percentuale ADIPE, percentuale MASSA ORGANICA, ACQUA, METABOLISMO BASALE,
PESO FORMA e percentuale IDEALE di TESSUTO ADIPOSO.
2) Accuratezza sia dell’apparecchio che dei risultati.
3) Velocità e conseguente risparmio di tempo: test e risultati in meno di 2 minuti.
4) Riservatezza: possibilità di effettuare ovunque il test.
5) Portatile: piccolo e leggero.
6) Durevole nel tempo.
3
ITALIANO
INDICATORI E CONTROLLI
Interruttore ON/OFF
Connettore conduttore
Jack DC-IN
Porta RS-232
Porta USB
Cavi sensore
Sensore
Interruttore ON/OFF: accensione e spegnimento.
Connettore conduttore: sono presenti due jack per l’inserimento di due connettori. I jack sono ubicati
su un lato della macchina.
Cavo sensore: Ogni conduttore ha due clip (una rossa e una nera), ogni clip serve per il collegamento
di un elettrodo.
Tasto elettrodo: inserimento di dati: età, altezza, peso.
Elettrodi: collegano il corpo alla macchina per ottenere il segnale.
Jack DC-IN: per adattatore 9V DC.
PREPARAZIONE AL TEST
Per essere sicuri che i risultati del test siano accurati …
é necessario seguire le indicazioni riportate di seguito IL PIU PRECISAMENTE POSSIBILE: solo in questo
modo sarà possibile ottenere risultati validi e affidabili con il BT-905PC.
1) Pasti. Eseguire il test almeno 5 ore dopo l’ultimo pasto.
2) Idratazione. Non bere grosse quantità d’acqua prima del test. Anche alcuni farmaci, quali ad
esempio i diuretici, possono alterare i risultati del test.
3) Caffè. Attendere almeno 4 ore dopo l’assunzione di caffè prima di effettuare il test.
Il caffè é un diuretico e può influire sul livello di idratazione del corpo.
4) Alcool. Attendere almeno 24 ore dopo l’assunzione di alcool prima di effettuare il test. L’alcool é un
diuretico. Una volta entrato in circolo é anche un buon conduttore elettrico e può interferire e alterare
il test.
5) Esercizio fisico. Attendere almeno 12 ore prima di eseguire il test (infatti l’esercizio fisico ha
importanti ripercussioni sul contenuto di liquidi nel corpo).
6) Peso. Pesarsi prima del test su una bilancia di buona qualità.
Ciò è particolarmente importante per coloro che sono piuttosto magri. Infatti le formule scientifiche
impiegate per il calcolo accurato delle percentuali di tessuto adiposo e muscolare dipendono dal peso
rilevato su una bilancia estremamente precisa. Utilizzare il peso misurato anche solo il giorno precedente
non é garanzia per un risultato preciso e accurato del test.
4
ITALIANO
Subito prima di procedere al test …. pulire la cute
dove andranno applicati gli elettrodi servendosi di un panno umido e insaponato o un batuffolo di ovatta
con alcool (vedere a pagina seguente). Sfregare l’area sino a che la cute si arrossi leggermente, senza
irritarla o scalfirla, in modo da rimuovere tutte le cellule morte, sudore e materia grassa in eccesso che
potrebbe alterare il buon contatto degli elettrodi. Asciugare la pelle con un panno asciutto.
APPLICAZIONE DEGLI ELETTRODI
(generalmente mano destra e piede destro o il lato generalmente utilizzato)
ROSSO
Metacarpo
Metatarso
NERO
Applicazione degli elettrodi
Gli elettrodi vanno applicati, come illustrato, su mano e piede omolaterali.
Applicare un elettrodo sul dorso della mano in corrispondenza della nocca del dito medio. Applicare il
secondo elettrodo sull’avambraccio in corrispondenza della piega del polso che viene a formarsi
retroflettendo la mano.
Applicare il terzo elettrodo sul dorso del piede omolaterale in corrispondenza del punto mediano tra
alluce e secondo dito. L’esatta posizione può essere trovata posizionando il pollice e l’indice sui malleoli
e portando quindi le dita nel punto mediano tra le due ossa.
Applicare il quarto elettrodo all’altezza della caviglia medialmente, in corrispondenza della piega.
Riferirsi all’illustrazione per l’esatta posizione degli elettrodi ed assicurarsi ogni volta della loro
posizione in modo da rendere ripetitivo l’esame ed affidabili sia i risultati che i controlli nel tempo.
5
ITALIANO
Collegamento dei cavi agli elettrodi tramite connettori a clip
In dotazione ci sono due lunghi cavi porta elettrodi.
Alle estremità di ognuno di questi cavi si trovano due clip - una rossa e una bianca - (per un totale di
quattro clip).
Sul piede: applicare - usando indifferentemente l’uno o l’altro cavo - sul piede la clip bianca all’elettrodo
vicino all’alluce, quella rossa all’elettrodo vicino alla caviglia.
Sulla mano: applicare - usando indifferentemente l’uno o l’altro cavo - sulla mano la clip bianca
all’elettrodo vicino alla nocca, quella rossa all’elettrodo vicino al polso.
- E’ utile ricordare che le clip rosse vanno sempre posizionate più vicine al cuore rispetto a quelle
bianche.
POSIZIONAMENTO DURANTE IL TEST
Il test va eseguito con paziente in posizione supina su di una superficie dura e piatta (di preferenza sul
nudo pavimento o su di un tavolo). Durante l’esecuzione del test le braccia non devono toccare il corpo.
Le braccia devono giacere lungo i fianchi e le palme piatte sul pavimento, ad una distanza confortevole
rispetto al tronco. Le gambe devono essere distese (non piegate) e leggermente divaricate in modo che
il corpo sia perfettamente simmetrico all’inizio del test.
INSTALLAZIONE DEL SISTEMA DI ANALISI DELLA MASSA CORPOREA
Procedura d’installazione
1) Accendere il computer.
2) Inserire il CD di installazione del software dell’analizzatore della massa corporea nel drive CD-ROM.
3) Sullo schermo saranno visualizzati i principali file di Windows. Nella
finestra principale verrà visualizzato il contenuto della cartella Analizzatore
di massa corporea. Fare clic su “set-up.exe” per avviare l’installazione.
4) Sullo schermo comparirà la procedura guida di installazione “Welcome to the BT-905PC Setup
Wizard” per l’installazione di BT-905PC sul computer. È consigliabile chiudere tutte le altre applicazioni
prima di continuare. Fare clic su “next” per procedere o “cancel” per uscire dall’installazione.
5) Informazioni di setup. Se non si tratta della prima installazione, prima di procedere, fare un backup dei
file di dati, perché l’installazione di un nuovo programma va a sostituire i vecchi file di dati. Una volta
completata l’installazione, utilizzare l’icona “Export/Import” (Esporta/Importa) per ripristinare i vecchi
dati nel sistema di analisi della massa corporea. Se l’installazione viene effettuata per la prima volta,
procedere direttamente.
ITALIANO
6
Il percorso predefinito per il sistema di analisi della massa corporea è “C:\Program files\Bodily
composition analyzer\BT 905-Data\BT-905.mdb”. Per continuare l’installazione, fare clic su “Next”.
6) Destinazione. La procedura di set-up installerà BT-905PC nella seguente cartella “C:\Program
files\BT-905PC”. Per selezionare un’altra cartella, fare clic su “Browse”.
7) Select Start Menu Folder (Selezione della cartella del menu di avvio). La procedura di set-up crea
i collegamenti nella seguente cartella del menu di avvio “BT-905PC”. Per continuare, fare clic su “Next”.
Per selezionare un’altra cartella, premere “Browse”.
8) Select Additional Tasks (Selezione di altre funzioni). Selezionare altre funzioni che si desidera
eseguire durante l’installazione di BT-905PC. Ad esempio “Create a desktop icon” (Creare un’icona
sul desktop) e/o “Create a Quick Launch icon” (Creare un’icona di lancio rapido). Quindi premere
“Next”.
7
ITALIANO
Creare un’icona di collegamento rapido di BT-905PC sul desktop o un’icona di avvio veloce. Ciò consente
all’utente, una volta acceso il computer di selezionare l’icona sul desktop e avviare il sistema di analisi
della massa corporea.
9) Ready to Install (Pronto all’installazione). La procedura di set-up è ora pronta per iniziare l’installazione
BT-905PC sul computer. Fare clic su “Install” per continuare con l’installazione, o fare clic su “Back”
per controllare o modificare le impostazioni.
10) Estrarre ed installare i file. Attendere che BT-905PC venga installato sul computer. Se il display
visualizza “Error”, è consigliabile mantenere il file esistente. Fare clic su “Yes” per mantenere il file
esistente e continuare l’installazione, oppure su ”No” per copiare il file e continuare l’installazione.
ITALIANO
8
11) Completare l’installazione guidata di BT-905PC. A questo punto è possibile lanciare l’applicazione
selezionando l’icona “Launch BT-905PC.EN” (Lancia BT-905PC.EN), quindi fare clic su “Finish” per
uscire dalla procedura di set-up guidata.
Nota: non è necessario riavviare il computer.
SCHEMA DI COLLEGAMENTO DELLO STRUMENTO DI ANALISI DELLA MASSA CORPOREA
1) Collegare il filo RS-232 al jack RS-232 TRANSMIT o il filo USB al jack USB TRANSMIT dell’unità BT905PC.
2) Collegare l’estremità 9PIN (RS-232) o porta USB al computer.
3) Collegare un’estremità dell’adattatore al jack DC-IN e inserire l’altra estremità nella presa 110VAC o
220VAC.
4) Collegare i connettori a clip del cavo del sensore agli elettrodi.
PROCEDURA OPERATIVA
Collegamento PC – BT-905PC
1) Collegare il PC e BT-905PC.
2) Accendere il computer e attendere che lo schermo visualizzi il desktop.
3) Collegare il filo RS-232 al jack RS-232 TRANSMIT o il filo USB al jack USB TRANSMIT dell’unità BT905PC.
4) Collegare l’estremità 9PIN (RS-232) o porta USB al computer.
5) Collegare un’estremità dell’adattatore al jack DC-IN e inserire l’altra estremità nella presa 110VAC o
220VAC.
6) Collegare i connettori a clip del cavo del sensore agli elettrodi.
9
ITALIANO
Applicazione degli elettrodi
In dotazione ci sono due lunghi cavi porta elettrodi.
Alle estremità di ognuno di questi cavi si trovano due clip - una rossa e una bianca - (per un totale di
quattro clip).
Gli elettrodi vanno applicati, come illustrato, su mano e piede omolaterali (solitamente il lato generalmente
usato).
Funzionamento del sistema di analisi della massa corporea
1) Accendere BT-905PC e lasciare che l’unità si riscaldi per almeno 10 minuti prima di iniziare il test.
2) Posizionare il mouse sull’icona “BT-905PC” sul desktop e con il tasto sinistro del mouse fare clic due
volte per entrare nel sistema di analisi della massa corporea.
3) Se il sistema visualizza dei messaggi (di errore), verificare che gli elettrodi siano correttamente
posizionati, assicurarsi che i connettori dei conduttori siano saldamente in posizione e riavviare l’unità
BT-905PC.
4) Accedere di nuovo al sistema di analisi della massa corporea.
Procedura Appointment (Appuntamento)
1) Dopo aver eseguito l’applicazione
fare clic su
“Body Composition Analyzer” andare al menu principale,
.
2) È possibile anche entrare nella sottopagina principale e fare clic su
funzioni in basso.
nella barra delle
10
ITALIANO
3) Entrare nella pagina “Appointment”, fare clic su
o scegliere il nome della persona da
esaminare e l’unità di misura, quindi inserire altezza e peso.
4) Fare clic su
(Salva & Analizza) e attendere circa un minuto e mezzo, il tempo
necessario per l’elaborazione dei dati.
11
5) Se viene visualizzato un messaggio di “errore”, fare clic su
ottenere il rapporto di analisi.
ITALIANO
di nuovo, per
12
ITALIANO
6) Fare clic su
per stampare il rapporto di analisi.
Operazioni preliminari
1) Dopo aver eseguito l’applicazione
e fare clic su
“Body Composition Analyzer” andare al menu principale
(Operazioni preliminari).
2) È possibile anche entrare nella sottopagina principale e fare clic su
funzioni in basso.
nella barra delle
13
ITALIANO
3) Entrare nella pagina “Preliminary” e inserire le informazioni personali di base (altezza e peso) e
selezionare l’unità di misura.
4) Fare clic su
l’elaborazione dei dati.
e attendere circa un minuto e mezzo, il tempo necessario per
14
ITALIANO
5) Se viene visualizzato un messaggio di “errore”, fare clic su
di nuovo, per ottenere il rapporto di analisi.
6) Fare clic su
per stampare il rapporto di analisi.
, quindi su
15
ITALIANO
Ricerca/lettura dei dati
1) Dopo aver eseguito l’applicazione
fare clic su
“Body Composition Analyzer” andare al menu principale,
(Ricerca).
2) È possibile anche entrare nella sottopagina principale e fare clic su
nella barra delle funzioni
in basso.
3) Entrare nella pagina “Search”. La ricerca può essere effettuata per nome, ID e numero sanitario.
16
ITALIANO
4) Dopo aver effettuato la ricerca, far clic su
(Registra).
5) Tutte le registrazioni relative alla persona specificata verranno visualizzate.
17
6) Scegliere la registrazione desiderata e fare clic su
ITALIANO
(Grafico analisi)
7) Verrà visualizzato il grafico animato dell’analisi relativa alla registrazione selezionata.
ITALIANO
18
Aggiungere dati
Dopo aver eseguito i passaggi relativi alla ricerca da 1) a 4), fare clic su
(Aggiungi).
Seguire le operazioni preliminari da 3) a 6).
Modificare dati
Dopo aver eseguito i passaggi relativi alla ricerca da 1) a 4), fare clic su
(Modifica) e
scegliere il nome del paziente e l’unità di misura, inserire quindi altezza e peso.
Cancellare dati
Dopo aver eseguito i passaggi relativi alla ricerca da 1) a 5), fare clic su
(Cancella) per
cancellare i dati.
Confronto multiplo
1) Storico multiplo: dopo aver eseguito i passaggi relativi alla ricerca da 1) a 4), fare clic su
(Confronto Multiplo)
19
ITALIANO
2) Scegliere 2-3 dati dalle registrazioni e fare clic su
3) Fare clic su
per stampare il grafico dell’analisi.
.
ITALIANO
20
1) Dopo aver eseguito l’applicazione
“Body Composition Analyzer” andare al menu principale,
Backup
fare clic su
.
2) È possibile anche entrare nella sottopagina principale e fare clic su
nella barra delle
funzioni in basso.
3) Entrare nella pagina di Backup. Nel percorso dei dati sorgente, il sistema passerà automaticamente
al percorso dei database localizzati.
21
ITALIANO
4) Durante l’esportazione del file, scegliere il database sorgente e il percorso anticipatamente, quindi
fare clic su
(Esporta). La finestra di dialogo con il messaggio di esportazione
riuscita verrà visualizzata al completamento dell’esportazione del file.
5) Durante l’importazione del file, scegliere il database sorgente e il percorso anticipatamente. Il percorso
di destinazione è il seguente: C:\Program Files\Body Composition Analyzer\BT-509PC-Data. Quindi fare
clic su
(Importa).
6) Durante l’importazione, il file importato sostituirà automaticamente il database corrente e il nome del
file verrà modificato in un nome di file in uso nel sistema.
22
ITALIANO
7) Al termine dell’importazione, una finestra di dialogo verrà visualizzata con il messaggio di importazione
riuscita.
Nota: Se l’unità BT-509PC rimane inattiva per oltre 5 minuti, il display LCD visualizza “++++++++” ed
entra nella modalità di risparmio energetico. Per iniziare una nuova analisi, è necessario spegnere e
riaccendere l’unità. Non è necessario attendere altri 10 minuti perché l’unità si riscaldi quando viene
riavviata ed è possibile procedere immediatamente ad un nuovo test.
NOTA
1) Se state usando il sistema metrico inglese dovete immettere i dati riferiti all’altezza in pollici. I dati
vanno sempre inseriti utilizzando tre cifre e nel caso del sistema inglese l’ultima cifra rappresenta la
prima cifra decimale, pertanto nel caso la conversione in pollici dovesse dare un valore a due cifre
senza decimali, sarà necessario durante la digitazione aggiungere uno zero.
2) Se volete essere sicuri del risultato non cercate mai di inventare o tentare di ricordare il vostro peso.
Indicate sempre prima del test il vostro peso attuale pesandovi possibilmente sempre sulla stessa
bilancia.
3) Nell’eventualità premeste per errore un numero o una lettera, non premere il tasto
, ma il tasto corrispondente a quello corretto. Premendo un numero scorretto di
lettere e quindi
, sarete costretti a ricominciare l’inserimento dati dall’inizio.
COME INTERPRETARE I RISULTATI
Kg FAT
Chilogrammi di massa adiposa: il peso attuale della massa adiposa. Ad ogni kg di massa adiposa
corrispondono circa 3.500 calorie.
Kg LEAN
Chilogrammi di massa muscolare: il peso attuale della massa muscolare composta principalmente da
muscoli, organi vitali.
Lt WATER
Litri di acqua: questo dato è di grande importanza diagnostica e permette di spiegare repentini aumenti
o perdite di peso. Un litro di acqua corrisponde a circa 1 Kg. La maggior parte dei fluidi corporei è
contenuta nella massa muscolare di cui normalmente circa il 70-75% è formato da acqua.
% FAT
Percentuale di grasso: la percentuale di materia adiposa rispetto al peso totale del corpo.
% LEAN
Percentuale di massa muscolare: la percentuale di massa muscolare rispetto al peso totale del corpo.
23
ITALIANO
BMR
Metabolismo basale riferibile al numero di calorie impiegate dal corpo ogni giorno per svolgere le
“funzioni vitali” - respirazione, circolazione sanguigna, funzioni intellettive ecc. Non sono comprese
le calorie necessarie all’esercizio fisico.
Il metabolismo basale è strettamente correlato alla quantità di tessuto muscolare presente nel corpo.
Maggiore è la quantità di tessuto muscolare, maggiore sarà il valore del metabolismo basale - in altre
parole più alto sarà il numero di calorie che il corpo “consumerà” per svolgere le funzioni vitali.
Target Weight
Peso forma: vuole semplicemente essere l’indicazione del traguardo che si dovrebbe raggiungere per
essere nelle migliori condizioni fisiche. Questo dato si basa sul presupposto che il peso che venga
eventualmente perso sia rappresentato solo da perdita di materia adiposa e che il tessuto muscolare
resti invariato in quantità e peso. In condizioni ideali, tutto il peso perso è rappresentato da tessuto
adiposo mentre si registrerà un lieve aumento della massa muscolare. Si spiega così perché il peso
forma fluttuerà leggermente nel caso di variazioni nella dieta e nel piano atletico. Mantenendo un sano
tenore di vita si ha la possibilità di far coincidere il peso forma con quello obiettivamente registrato.
Target % Fat
Percentuale ideale della massa adiposa: questo dato rappresenta la “normale” percentuale di materia
adiposa rispetto al sesso ed all’età. Non rappresenta necessariamente la vostra percentuale “ideale” di
massa adiposa. Spesso, infatti, individui in ottima forma fisica presenteranno dei valori che cadranno
molto al di sotto dei dati ideali. Questo valore ideale è un dato utile soprattutto come traguardo da
raggiungere per coloro che tendono ad essere sovrappeso pur essendo generalmente in buona
salute. Per ottenere questo dato bisogna premere prima il tasto “Program” e poi “Target Weight”.
MANUTENZIONE DELL’UNITÀ BT-905PC
Da fare:
1) Pulire periodicamente l’unità BT-905PC con un panno umido senza danneggiare i componenti interni
dello strumento.
2) Per rimuovere i connettori, afferrare la spina e non il cavo.
Da non fare:
1) Non esporre l’unità ad un’eccessiva umidità e non immergerla in acqua.
2) Non lasciare l’unità esposta alla luce diretta del sole per periodi prolungati.
3) Non far cadere oggetti sull’unità e non urtarla contro altri oggetti. Trattarla come qualsiasi altro
dispositivo elettronico sofisticato, come un computer o un registratore.
RISOLUZIONE DEI PROBLEMI
Mancata visualizzazione dati
Se, una volta acceso l’apparecchio, i dati non apparissero sul display:
1) Verificare la presenza di alimentazione. Se il guasto dovesse ripetersi, rispedire l’unità al
fabbricante.
2) Messaggio di errore: questo messaggio sul display può essere dovuto a diverse cause. La
causa più comune è la mancata osservazione o precisione nell’esecuzione delle procedure del test.
Rileggere con attenzione il capitolo di questo manuale “Preparazione al test” e “Procedura
operativa”. Poi iniziare il test da capo.
3) Controllare nuovamente i dati riferiti ad altezza e peso, poi iniziare il test da capo. Questo si rivela
molto importante, in particolare per individui magri. Sono sufficienti lievi fluttuazioni giornaliere di peso
non correttamente inserite per causare l’invalidità dei risultati.
4) Il metodo basato sulla bioresistenza non è applicabile ad una bassissima percentuale di individui
estremamente magri o alti. E’ un caso rarissimo, per cui si deve comunque ritenere quale causa più
probabile una mancata osservazione o precisione nell’esecuzione del test. Assicurarsi di seguire
sempre attentamente il protocollo.
ITALIANO
24
5) Disidratazione. Un insolito basso livello di liquidi (ad esempio in un atleta maratoneta o durante
l’assunzione di diuretici) può causare l’invalidità dei dati. Per effettuare un test valido è necessario che
il consumo di liquidi sia stabile.
Controllare gli elettrodi
Questo messaggio indica che il segnale trasmesso dal corpo all’apparecchio non è sufficientemente
forte per essere letto e interpretato.
1) Controllare gli elettrodi. Assicurarsi che siano ben applicati alla superficie cutanea (ricordarsi di
pulire con attenzione la cute prima di applicarli)
2) Controllare che il jack del cavo porta elettrodi sia stato ben collegato al connettore.
3) Controllare che le clip siano fermamente collegate agli elettrodi.
Una volta eseguiti questi controlli, iniziare da capo il test.
SPECIFICHE
Alimentazione: mediante adattatore 9VDC
Dimensioni: 66x176x208 mm
Smaltimento: Il prodotto non deve essere smaltito assieme agli altri rifiuti domestici.
Gli utenti devono provvedere allo smaltimento delle apparecchiature da rottamare
portandole al luogo di raccolta indicato per il riciclaggio delle apparecchiature elettriche
ed elettroniche. Per ulteriori informazioni sui luoghi di raccolta, contattare il proprio
comune di residenza, il servizio di smaltimento dei rifiuti locale o il negozio presso il
quale è stato acquistato il prodotto. In caso di smaltimento errato potrebbero venire
applicate delle penali, in base alle leggi nazionali.
CONDIZIONI DI GARANZIA GIMA
Ci congratuliamo con Voi per aver acquistato un nostro prodotto.
Questo prodotto risponde a standard qualitativi elevati sia nel materiale che nella fabbricazione. La
garanzia è valida per il tempo di 12 mesi dalla data di fornitura GIMA.
Durante il periodo di validità della garanzia si provvederà alla riparazione e/o sostituzione gratuita di
tutte le parti difettose per cause di fabbricazione ben accertate, con esclusione delle spese di mano
d’opera o eventuali trasferte, trasporti e imballaggi.
Sono esclusi dalla garanzia tutti i componenti soggetti ad usura. La sostituzione o riparazione effettuata
durante il periodo di garanzia non hanno l’effetto di prolungare la durata della garanzia.
La garanzia non è valida in caso di: riparazione effettuata da personale non autorizzato o con pezzi di
ricambio non originali, avarie o vizi causati da negligenza, urti o uso improprio.
GIMA non risponde di malfunzionamenti su apparecchiature elettroniche o software derivati da agenti
esterni quali: sbalzi di tensione, campi elettromagnetici, interferenze radio, ecc.
La garanzia decade se non viene rispettato quanto sopra e se il numero di matricola (se presente) risulti
asportato, cancellato o alterato. I prodotti ritenuti difettosi devono essere resi solo e soltanto al rivenditore
presso il quale è avvenuto l’acquisto. Spedizioni inviate direttamente a GIMA verranno respinte.
25
ENGLISH
INTRODUCTIONS
The accepted method of measuring total body water is based on the dilution of isotopes of water
Deuterium or Tritium as it is metabolized in the human subject over time. And the traditionally estimate
body composition is to use electrical impedance plethysmography.
However, there is a need for a total body composition measurement technique that is rapid, safe,
noninvasive and sufficiently accurate and convenient to permit its use in body composition. Recently,
we used a new approach to human body composition estimation that appears to fulfill many of these
requirements.
This new technique entails measuring total body electrical resistance impedance. The amount of
water, fat free mass in man can be accurately estimated by measuring total body electrical resistance.
Specifically, four electrodes are placed over metacarpals and metatarsals where a 50 KHz current is
introduced. The detected signal level when corrected for subject height will be an index of total body
water and fat free mass.
BODY COMPOSITION
The body is made up of both lean and fat tissue, as well as water.
Together they equal the weight you see on your weight scales.
Lean tissue includes muscle, bone, vital organs, etc; both fat and lean tissues contain water. To have
a healthy, well-functioning body, it is extremely important that the lean and fat tissue weights are
properly balanced.
Now the BT-905PC will help you to manage your nutrition, fitness and weight. It not only can tell if you
are at the right weight but also tell you whether or not your are nutritionally healthy.
HOW CAN THE BODY COMPOSITION ANALYZER HELP ME GET AND STAY FIT?
Listed below are some of the many ways BT-905PC will help maximize your personal level of fitnesswhether you want to lose weight, build muscle, tone and trim, or simply be sure you are maintaining
your current level of fitness
1) It allows you to check the effectiveness of your weight loss program by telling you exactly where
your weight loss is coming from-fat, lean, or water.
2) It establishes a baseline for your body composition so that nutritional and fitness improvements can
be monitored on a regular basis.
3) If provides possible answers to weight “plateaus” -a common plague of dieters.
4) It helps you monitor improvements in muscle mass as a result of exercise and/or diet, and it warns
you of muscle loss caused by inactivity, the aging process, or illness.
5) It help explain “mysterious” weight gains or losses associated
FEATURES
1) Results - FAT%, LEAN %, Water, BMR, Target Weight and Target FAT%.
2) Accurate - The results accurate same as the instruments cost thousands of US dollars.
3) Time saving - Testing and results take less than 2 minutes.
4) Private - You can perform the test almost anywhere.
5) Portable - Small size and light weight.
6) Warranty - One year limited warranty.
7) Durable.
26
ENGLISH
INDICATORS AND CONTROLS
Power Switch
Lead Connector
DC-IN Jack
RS-232 Port
USB Port
Sensor Cables
Sensor
Power Switch - Power ON/OFF control.
Lead Connector - There are two jacks for two lead connectors to plug in. The jacks are on one side
of the machine.
Sensor Cable - Each lead wire has two color red and black clips, each clip will connect to one sensor
pad.
Key Pad - Input data age, height, weight.
Sensor Pads - Connect the machine and body to get signal.
DC-IN Jack - For DC 9V adaptor.
GETTING YOURSELF READY FOR TESTING
To be sure your test results are accurate...
You must follow the guidelines listed below AS EXACTLY AS POSSIBLE to be sure that you will
consistently obtain the most valid and reliable results possible you’re your BT-905PC Instrument.
1) Meals. Wait at least 5 hours after a meal before performing the test.
2) Hydration. Do not consume large amounts of water just prior to testing. Some medications particularly diuretics - may also affect test results.
3) Coffee. Do not drink coffee for 4 hours before testing. Coffee is a diuretic and may affect the
hydration level of your body.
4) Alcohol. Do not drink alcoholic beverages for 24 hours prior to testing.
Alcohol is a diuretic. In your bloodstream, it also conducts electricity in such a way as to interfere with
an accurate test.
5) Exercise. Do not test your body composition for at least 12 hours after exercise.
This is because exercise has a significant effect on your body’s water content.
6) Weight. Check your weight on a reliable pair of scales immediately before testing.
This is particularly important for those who tend to be quite lean. The scientific formulas used to
accurately calculate your percents of lean and fat are dependent on an accurately calculate your
percents of lean and fat are dependent on an accurately scale weight. Even using yesterday’s weight
is not close enough to assure a valid test.
27
ENGLISH
Just before the test ... Cleanse your skin.
Using a washcloth with soap and water or a cotton pad with rubbing alcohol, cleanses the areas
where you will be placing the sensor pads. (See drawing on next page). Scrub the areas until the skin
becomes pink but not sore or irritated. This will remove all dead skin, perspiration, and any excess oils
that could prevent good contact with the sensor pads. Dry the skin with a clean cloth.
SENSOR PAD PLACEMENT
(Right foot & right hand or usually use side)
Stick on the sensor pads.
Sensor pads should be placed on one hand and one foot, the side use usually, as shown in the
accompanying diagrams.
On the back of the hand, place a sensor pad on the third knuckle of the middle finger.
Place a second pad on the arm just behind the wrist at the crease observed when the hand is bent
back. The edge of the sensor pad should just touch the crease.
The pad on the foot should be applied just behind the place where the big toe and the first tore join. The
position for the sensor pad at the ankle is found by placing your thumb and forefinger on the two
protruding bones on either side of the ankle and then bringing the fingers forward to the midway point
between the two bones.
Place the sensor pad at the bend of the ankle, in line with the shinbone.
Refer to diagrams for proper placement, and be sure to be consistent each time you test.
ENGLISH
28
Connect the sensor cable clips to the sensor pads.
There are two long sensor cable wires.
At the ends of each of these wires are tow clips - a red clip and a white clip (a total of four clips).
On the foot - Using either of the main wires - the white clip should be attached to the sensor pad near
the big toe; the red clip should be attached to the sensor pad on the ankle.
On the hand, the white clip on the remaining wire should be attached to the sensor near the knuckle;
the red clip should be attached to the sensor at the wrist.
- It may help to remember that the red clips are always placed closer to your heart than the white clips.
GET YOUR BODY IN POSTION FOR THE TEST
For testing, lie flat on your back on a hard, flat surface (Preferably uncarpeted floor or table). Do not
touch your arms to your body while testing. Arms should be at your ide, palms flat on the floor, a
comfortable distance from your trunk. Legs should be unbent and slightly apart so that your body is
perfectly symmetrical when the display counts down for your test.
BODY COMPOSITION ANALYZER SYSTEM INSTALLATION
Installation procedure
1) Turn on the computer.
2) Put the CD of the Body Composition Analyzer software into the CD-ROM drive.
3) The screen will display main windows file. In the main windows, it will
display the Body Composition Analyzer content. Click the “setup.exe”,
the main unit can automatically carry on the installment.
4) At the same time¡Athe screen will appear “Welcome to the BT-905PC Setup Wizard” chart. This will
install BT-905PC on your computer. It is recommended that you close all of other applications before
continuing. Click “Next” to continue, or “Cancel” to exit Setup.
5) Setup Information. If not first time install, before install the program, please backup the data file,
because when install the new program will cover the old data file. After finish the installs, please use
the icon “Export/Import” to restore the old data to Body Composition Analyzer system. If the first time
install, you can install directly.
29
ENGLISH
The preset pathway of Body Composition Analyzer system is “C:\Program files\ Bodily composition
analyzer\BT 905- Data\BT-905.mdb”. When you are ready to continue with Setup, click “Next”.
6) Destination Location. Setup will install BT-905PC into the following folder “C:\Program files\BT905PC”. To continue, click “Next”. If you would like to select a different folder, click “Browse”.
7) Select Star Menu Folder. Setup will create the program’s shortcuts in the following Start Menu
folder “BT-905PC”. To continue, click “Next”. If you would like a different folder, click “Browse”.
8) Select Additional Tasks. Select the Additional tasks you would like Setup to perform while
installing BT-905PC “Create a desktop icon” or/and “Create a Quick Launch icon”. Then click
“Next”.
ENGLISH
30
Set the BT-905PC as a shortcut to the desktop icon or Quick Launch icon, user enter the WINDOWS
desktop after the computer is on¡Aclick the icon and enter the process of Body Composition Analyzer
system.
9) Ready to Install. Setup is now ready to begin installing BT-905PC on your computer. Click “Install” to
continue with the installation, or click “Back” if you want to review or change any settings.
10) Installing and Extracting files. Please wait while setup installs BT-905PC on your computer. If the
screen display “Error”, it is recommended that you keep the existing file. Click “Yes” to keep the existing
file and to continue install, or “No” to copy file and to continue install.
31
ENGLISH
11) Completing the BT-905PC Setup Wizard. Setup has finished installing BT-905OC on your computer.
The application may be launched by selecting the installed icon “Launch BT-905PC.EN”, then click
“Finish” to exit setup.
Note: There is no need to restart the computer, it can be operate right the way.
CONNECTION DIAGRAM OF BODY COMPOSITION ANALYZER INSTRUMENT
1) Connect the RS-232 wire to RS-232 TRANSMIT jack or USB wire to USB TRANSMIT jack of BT-905PC
main unit.
2) Connect the 9PIN (RS-232) end or USB port to the computer.
3) Connect one end of adaptor into the DC-IN jack and plug the other end to 110VAC or 220VAC socket.
4) Connect the sensor cable clips to the sensor pads.
OPERATION PROCEDURE
Connection PC and BT-905PC
1) Connect PC and BT-905PC.
2) Turn on the computer and waiting for the processing into the WINDOW desktop.
3) Connect the RS-232 wire to RS-232 TRANSMIT jack or USB wire to USB TRANSMIT jack of BT-905PC
main unit.
4) Connect the 9PIN (RS-232) end or USB port to the computer.
5) Connect one end of adaptor into the DC-IN jack and plug the other end to 110VAC or 220VAC socket.
6) Connect the sensor cable clips to the sensor pads.
Stick on the sensor pads
There are two long sensor cable wires. At the ends of each of these wires are tow clips - a red clip
and a white clip (a total of four clips).
Sensor pads should be placed on one hand and one foot, the side use usually, as shown in the
accompanying diagrams.
ENGLISH
32
Operation the Body Composition Analyzer system
1) Switch ON the BT-905PC and warm up the unit for at least 10 minutes before testing.
2) Move the mouse to the desktop “BT-905PC” icon and continue click left key of the mouse twice into
the Body Composition Analyzer system go to main menu.
3) If any [error] message appears , please check the electrodes in proper positions, make sure lead
wires connectors are firmly seated and restart the BT-905PC main unit.
4) Once again for the Body Composition Analyzer system.
Appointment Steps
1) After executing the
“Body Composition Analyzer” go to main menu, click the
.
2) Or after you enter the sub-main page, you may also click the
bar there.
down at the function
33
ENGLISH
3) Next, enter “Appointment” page, please click
or choose the examinee and measurement
unit, and then input height and weight.
4) Next, Click
and wait for approximately one and a half min for processing.
ENGLISH
5) If any “error” message appears, please click
chart.
34
once again for the analysis
35
ENGLISH
6) Click
to print out the analysis chart.
Preliminary Steps
1) After executing the
“Body Composition Analyzer” go to main menu, click the
.
2) Or after you enter the sub-main page, you may also click the
there.
down at the function bar
ENGLISH
36
3) Next, enter “Preliminary” page, please input basic personal data, height and weight, and select
measurement unit.
4) Next, Click
and wait for approximately one and a half min for processing.
37
ENGLISH
5) If any “error” message appears , please click
for the analysis chart.
6) Click
to print out the analysis chart.
, then click again
ENGLISH
38
Read Data Steps / Search Steps
1) After executing the
“Body Composition Analyzer” go to main menu, click the
.
2) Or after you enter the sub-main page, you may also click
on the at the function bar there.
3) Next, enter “Search” page. You could search by Name, ID and medical history number accordingly.
39
4) After search, click
ENGLISH
.
5) All history records will be listed of the specified.
40
ENGLISH
6) Choose the record and click
.
7) The animated analysis chart will appear according to your appointed record.
41
ENGLISH
Add Data Steps
After “Search Steps” 1) to 4), click
. Please follow the “Preliminary Steps” 3) to 6).
Modify Data Steps
1) After “Search Steps” 1) to 4), please click
and choose the examinee and measurement
unit, and then input height and weight.
Delete Data Steps
After “Search Steps” 1) to 5), please click
Multiple Comparison Steps
1) Multiple history: after “Search Steps” 1) to 4), click
to delete data.
42
ENGLISH
2) Choose 2-3 data from the records and click
3) Click
to print out the analysis chart.
.
43
ENGLISH
Backup Steps
1) After executing the
“Body Composition Analyzer” go to main menu: click the
.
2) Or after you enter the sub-main page, you may also click the
at the function bar there.
3) Next, enter Backup page. In the path of source data, the system will automatically bring into the path
of database located.
ENGLISH
44
4) When file exporting, please choose source database and purpose route in advance, then click
. The dialogue window with message of file export successfully will appear
when completing file exporting.
5) When file importing, please choose your source database and target route in advance. The target
route is at C:\Program Files\Body Composition Analyzer\BT-905PC-Data. Then click
.
6) While importing the file, the importing file will automatically replace the current database and file name
will be changed to a system use file name.
45
ENGLISH
7) When the file import is done, a dialogue window with message file import successfully will appear.
Note: If the BT-905PC machine idled for more than 5 minutes, the LCD will show “++++++++” and enter
the power saving mode. You need to turn OFF the machine first and then turn ON again to begin a new
analysis. It doesn’t need to warm up the unit for extra 10 minutes when you re-start the machine and
continue to operating the test.
NOTE
1) If you use English units, when you input your height the units is in inches, for example: If you are 5
feet 1/2 inch tall, you would key in 60.5 inches tall. If you are an even 6 feet tall, you should key in 7.2
inches. In the event that you are an even number of inches tall, be sure to include a zero as your final
entry.
2) To be sure your results are accurate, do not guess at your weight or rely on your memory. Please
indicate your weight just before your test, and use the same scale each time you test, if possible.
3) If you accidentally press a wrong number or letter, do not hit the
, then the
correct response, and then click the. If you press a wrong number of letters and click
, you must restart the entire test.
INTERPRETING THE RESULTS
lbs FAT
Pounds of FAT, the actual weight of fat on your body. There are approximately 3500 calories stored in
each pound of body fat.
lbs LEAN
The pounds of tissue in your body mostly muscle and vital organs represent the amount of your weight
that is not fat.
Pints of water
A measure of the pints of water in your body can be very helpful in explaining rapid weight loss or gain,
A Pints of water weights about one pound. Most of the body’s fluid is contained in the lean body mass,
which normally consists of 70~75% water.
% FAT
The percent of fat weight in total body weight.
%LEAN
The percent of tissue weight in total body weight.
ENGLISH
46
BMR
Basal metabolic rate refers to the number of calories your body uses each day just to “stay alive” breathing, pumping blood, thinking, and so on. It doesn’t include calories your burn by exercising.
Your basal metabolic rate is directly related to the amount of lean tissue in your body. The more lean
tissue you have, the higher your metabolic rate - in other words, the more calories you will “use up”
just by being alive.
Target Weight
Target weight is simply a weight goal to aim for under optimal conditions. It is based on the assumption
that all the weight you lose will be fat and that lean tissue will be neither lost nor gained. Under an idea
condition, all weight loss would be fat and a small amount of lean would be increased. This is why your
target weight may changes slightly as you alter your diet and exercise plan. With a healthy lifestyle,
eventually your actual weight and target weight should match.
Target Percent Fat
Target percent fat is a value which represents a “normal” percent for your sex and age.
It does not necessarily represent the “best” percent fat for you. For example, very fit individuals often
fall well below these target values. The importance of the target percent fat is that it is a worthy goal
for those who tend to be over fat and is generally considered healthy. This value can be seen in the
display only when Program, Target Weight is entered.
TAKING CARE OF YOUR BT-905PC
Do
1) Cleaning - Periodically you may wipe BT-905PC with a damp cloth without injury to the internal
components of the instrument.
2) When removing lead connectors, grasping them by the plug, not the cord.
Don’t
1) Don’t
2) Don’t
3) Don’t
such as
expose to excessive amounts of moisture and definitely don’t immerse in water.
leave in direct sunlight for extended periods of time.
drop or hit against other objects. Treat it as you would other sophisticated electronic devices
a calculator or recorder.
TROUBLE SHOOTING
No Display
If you turn on you BT-905PC and there is no display in the window, you should
1) Check power: If the above attempts fail, return the machine to the manufacturer.
2) “error” message: This error message pop up results from one of several possibilities. The most
likely cause is failure to follow protocol closely enough. Carefully re-read the sections in your manual
entitled “Getting Yourself Ready for Testing” and “Operate Procedure” Then retest.
3) Recheck your exact scale weight and your height; then repertory the test. This is absolutely
necessary for thin individuals in particular. Weight fluctuates from day to day enough to produce invalid
data if not entered correctly.
4) A Very small percent of the extremely thin and tall population may not be possible to measure using
bioresistance methods. This would be a very rare situation, and the Invalid Data message is probably
due to improper testing protocol rather than to being immeasurable lean. Be sure to follow protocol.
5) Dehydration. Body water levels that are unusually low can cause unusual readings. If you are an
endurance athlete or if you take diuretics, this may invalidate your data. To receive a valid test, be sure
you are stable in your water consumption.
47
ENGLISH
Check Probes
This message indicates that the electrical signals from your body are not strong enough for your BT905PC to read and interpret.
1) Check the sensor pads. Make sure they fit snugly against your skin. Did you remember to cleanse
your skin thoroughly before application?
2) Check the cable connector to be sure it is properly inserted in the jack.
3) Check the sensor cable clips to be sure each one is clipped firmly onto the sensor pads.
When these checks have been completed, retake the test.
SPECIFICATION
Power source: operated by 9VDC adaptor
Size: 66x176x208 mm
Disposal: The product must not be disposed of along with other domestic waste. The
users must dispose of this equipment by bringing it to a specific recycling point for
electric and electronic equipment.
For further information on recycling points contact the local authorities, the local recycling
center or the shop where the product was purchased. If the equipment is not disposed of
correctly, fines or penalties may be applied in accordance with the national legislation
and regulations.
GIMA WARRANTY CONDITIONS
Congratulations for purchasing a GIMA product.
This product meets high qualitative standards both as regards the material and the production. The
warranty is valid for 12 months from the date of supply of GIMA.
During the period of validity of the warranty, GIMA will repair and/or replace free of charge all the
defected parts due to production reasons. Labor costs and personnel traveling expenses and packaging
not included.
All components subject to wear are not included in the warranty.
The repair or replacement performed during the warranty period shall not extend the warranty.
The warranty is void in the following cases: repairs performed by unauthorized personnel or with nonoriginal spare parts, defects caused by negligence or incorrect use.
GIMA cannot be held responsible for malfunctioning on electronic devices or software due to outside
agents such as: voltage changes, electro-magnetic fields, radio interferences, etc.
The warranty is void if the above regulations are not observed and if the serial code (if available) has
been removed, cancelled or changed.
The defected products must be returned only to the dealer the product was purchased from. Products
sent to GIMA will be rejected.
Skylark Device & Systems Co. Ltd., 16F., n.191, Fu-Sing N.Rd., Taipei, Taiwan