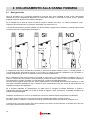
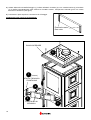
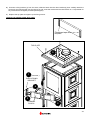
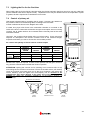
1
ISTRUZIONI PER L’INSTALLAZIONE
USO E MANUTENZIONE
INSTALLATION, USE AND MAINTENANCE
INSTRUCTION
MICAELA
MANUELA
MIRIAM
MADDALENA
MILENA
SANDRA
STEFANIA
SILVIA
SARA
SIMONA
Per l’installazione, l’utilizzo e manutenzione leggere prima attentamente
le istruzioni.
Read carefully this installation, use and maintenance manual.
Il libretto istruzioni è parte integrante del prodotto.
This manual is an integral part of the product.
Complimenti per aver scelto uno dei nostri prodotti , frutto di esperienze tecnologiche e di una
continua ricerca per un prodotto superiore in termini di sicurezza , affidabilità e prestazioni.
In questo manuale troverete tutte le informazioni ed i consigli utili per poter operare nel massimo
della sicurezza ed efficienza del vostro prodotto.
INDICAZIONI IMPORTANTI
Questo manuale è stato redatto dal costruttore e costituisce parte integrante del prodotto. Le informazioni in
esso contenute sono indirizzate all’acquirente, e a tutte quelle persone che a vario titolo concorrono
all’installazione, all’uso e alla manutenzione del prodotto.
Leggete con attenzione le istruzioni e le informazioni tecniche contenute in questo manuale, prima di procedere
all’installazione, all’utilizzo e a qualsiasi intervento sul prodotto.
L’osservanza delle indicazioni contenute nel presente manuale garantisce la sicurezza dell’uomo e del prodotto,
l’economia di esercizio ed una più lunga durata di funzionamento.
L’istallazione e l’utilizzo del prodotto deve essere in conformità con le istruzioni del fabbricante e delle normative
di abitabilità locali.
L’attenta progettazione e l’analisi dei rischi fatti dal Gruppo Piazzetta S.p.A. hanno permesso la realizzazione di
un prodotto sicuro; tuttavia prima di effettuare qualsiasi operazione, si raccomanda di attenersi
scrupolosamente alle istruzioni riportate nel seguente documento, e di tenerlo sempre a disposizione.
Fare molta attenzione nel movimentare i particolari in ceramica.
Controllare l’esatta planarità del pavimento dove verrà installato il prodotto.
Per compensare eventuali errori di planarità e irregolarità, in dotazione al prodotto troverete una nastro di fibra
vetro adesiva.
Non bloccare l’inserto in alcun modo, accostarlo al rivestimento lasciandolo libero.
La parete dove va posizionato il prodotto non deve essere di legno o comunque di materiale infiammabile;
inoltre, è necessario mantenere le distanze di sicurezza (riferimento alla sezione “Prevenzione incidenti
domestici” contenuta nel libretto uso e manutenzione della stufa).
Nel movimentare le parti in acciaio del rivestimento si consiglia di utilizzare guanti puliti in cotone, evitando di
lasciare impronte difficili da togliere per la prima pulizia.
Durante il funzionamento, alcune parti della stufa (porta, maniglia, registri, pezzi in ceramica) possono
raggiungere temperature elevate. Fate dunque molta attenzione ed usate le dovute precauzioni.
Quando dovete ricaricare di legna il focolare o regolare l'afflusso d'aria, usate il guanto in dotazione.
Il montaggio del rivestimento deve essere eseguito da due persone.
Schemi e disegni sono forniti a scopo esemplificativo e a titolo di favore gratuito; il costruttore nell’intento di
perseguire una politica di costante sviluppo e rinnovamento del prodotto può apportare, senza preavviso
alcuno, le modifiche che riterrà opportune.
Questo documento è di proprietà del Gruppo Piazzetta S.p.A.; non può essere divulgato totalmente o in parte a
terzi senza autorizzazione scritta del Gruppo Piazzetta S.p.A.
Il Gruppo Piazzetta S.p.A. si riserva i diritti a rigore di legge.
2
Congratulations for having chosen one of our products. It is the fruit of technical experience and
continuing research for a superior product in terms of safety, reliability and performance. In this
manual you will find all the necessary information and useful advise for operating your stove
with maximum safety and efficiency.
IMPORTANT INFORMATION
This manual is issued by the manufacturer and constitutes an integral part of the product. The information
contained in it is directed at the purchaser and to all those who may in any way have a part in the installation,
use and maintenance of the product.
Read the instructions and technical information contained in this manual carefully before proceeding with the
installation, use or any type of operation on the product.
Observation of the information contained in this manual will guarantee the safety of the product and those
associated with it, economy of use and a longer life.
The installation and use of this product should be according to the manufacturer’s instructions, local norms and
building codes.
Careful design and risk analysis on the part of the Gruppo Piazzetta S.p.A. has resulted in the construction of a
safe product; nevertheless, when carrying out any operation, it is recommended that you adhere precisely to the
instructions given in the following document, and always keep it close at hand.
Be very careful when moving the ceramic parts.
Check the floor where the product is to be installed to see whether it is completely flat.
You will find a strip of adhesive glass fibre provided with the product to use to compensate where the floor is not
flat or horizontal.
Do not seal in the insert fire in any way; place it close to the fireplace but leave it detached.
The wall where the fire is to be placed must not be constructed of wood or any other inflammable material;
furthermore, a safety zone must be maintained (refer to the section “Prevention of fire in the home” contained in
the booklet for use and maintenance of the stove).
When moving the steel sections of the cladding, you are advised to wear clean cotton gloves so as to avoid
leaving marks which may be difficult to clean off later.
During operation, some parts of the stove (door, handle, control levers, ceramic parts) can reach very high
temperatures. So be very careful and take due precautions.
When you have to stoke the fire or regulate the air intake, use the glove supplied
Assembly of the cladding must be carried out by two people.
Diagrams and pictures are provided as examples for your assistance; the manufacturer may make any changes
which he considers appropriate, without any prior warning, in line with his aim of pursuing a policy of constant
development and innovation.
This document is the property of the Gruppo Piazzetta S.p.A.; it cannot be published wholly or in part to third
parties without the written authority of the Gruppo Piazzetta S.p.A.
The Gruppo Piazzzetta S.p.A. reserves all its legal rights.
3
ASSEMBLY INSTRUCTIONS __________________________
PAG. 26
ISTRUZIONI DI MONTAGGIO
INDICE
INDICE ..........................................................................................................................................................................................4
1
NORME GENERALI.............................................................................................................................................................5
1.1
1.2
1.3
1.4
1.5
1.6
2
CAMINO O CANNA FUMARIA ...........................................................................................................................................5
COMIGNOLO ....................................................................................................................................................................6
PRESA D’ARIA ESTERNA ..................................................................................................................................................7
COLLEGAMENTO ALLA CANNA FUMARIA ........................................................................................................................7
PREVENZIONE DEGLI INCENDI DOMESTICI .......................................................................................................................7
RIVESTIMENTO IN CERAMICA ..........................................................................................................................................7
DATI TECNICI......................................................................................................................................................................8
2.1
DATI TECNICI ..................................................................................................................................................................8
3
DIMENSIONI STUFE ...........................................................................................................................................................9
4
COLLEGAMENTO ALLA CANNA FUMARIA ...............................................................................................................12
4.1
4.2
5
NOTE GENERICHE ..........................................................................................................................................................12
SCARICO FUMI SUPERIORE........................................................................................................................................13
INSTALLAZIONE CERAMICHE ......................................................................................................................................14
5.1
5.2
STUFE MANUELA, MIRIAM, STEFANIA, SILVIA..................................................................................................14
STUFE MADDALENA, MILENA, SARA, SIMONA..................................................................................................15
6
DISTANZE MINIME DI SICUREZZA ..............................................................................................................................17
7
USO ......................................................................................................................................................................................18
7.1
7.2
7.3
7.4
7.5
7.6
7.7
7.8
7.9
7.10
8
REGOLE D’USO FONDAMENTALI ....................................................................................................................................18
COMBUSTIBILE ..............................................................................................................................................................18
PRIMA ACCENSIONE ......................................................................................................................................................20
REGISTRI ARIA COMBURENTE ........................................................................................................................................20
ACCENSIONE E FUNZIONAMENTO NORMALE..................................................................................................................21
APERTURA DELLA PORTA ..............................................................................................................................................21
FUNZIONAMENTO NOTTURNO........................................................................................................................................21
SMALTIMENTO DELLE CENERI .......................................................................................................................................21
SURRISCALDAMENTO E SICUREZZA ...............................................................................................................................21
USO DEL FORNO ............................................................................................................................................................22
MANUTENZIONE ..............................................................................................................................................................23
8.1
8.2
8.3
8.4
8.5
8.6
8.7
8.8
PULIZIA DELL'APPARECCHIO E CANNA FUMARIA ...........................................................................................................23
PULIZIA DEL RIVESTIMENTO IN CERAMICA ....................................................................................................................23
PULIZIA DELLE PARTI IN METALLO ................................................................................................................................23
PULIZIA DEL VETRO .......................................................................................................................................................23
SMONTAGGIO DEFLETTORI FUMI ................................................................................................................................... 24
PULIZIA CONDOTTO FUMI (SOLO STUFE CON FORNO).....................................................................................................24
MONTAGGIO DELLA PORTA ...........................................................................................................................................24
SOSTITUZIONE DEL VETRO ............................................................................................................................................25
Dichiarazione di conformità …………………………………………………………………………………………………….44
4
1 NORME GENERALI
1.1
Camino o Canna fumaria
Ogni apparecchio deve avere un condotto verticale, denominato canna fumaria, per scaricare all’esterno i fumi
prodotti della combustione, mediante tiraggio naturale.
La canna fumaria dovrà rispondere ai seguenti requisiti:
non dovrà essere collegato nessun altro caminetto, stufa, caldaia, o cappa aspirante di nessun tipo (fig.1);
deve essere adeguatamente distanziata da materiali combustibili o infiammabili mediante intercapedine d’aria o
opportuno isolante;
la sezione interna deve essere uniforme, preferibilmente circolare: le sezioni quadrate o rettangolari devono
avere spigoli arrotondati con raggio non inferiore a 20 mm; rapporto massimo tra i lati di 1,5; pareti il più
possibili lisce e senza restringimenti; le curve regolari e senza discontinuità, deviazioni dall’asse non superiori a
45° (fig.2);
ogni apparecchio deve avere una propria canna fumaria di sezione uguale o superiore del diametro del tubo di
scarico fumi della stufa e di altezza non inferiore a 3,5-4 m;
non si devono mai utilizzare nello stesso ambiente due stufe, un camino ed una stufa, una stufa e una cucina a
legna, ecc... poiché il tiraggio di uno potrebbe danneggiare il tiraggio dell’altro. Non sono ammessi inoltre,
condotti di ventilazione di tipo collettivo che possono mettere in depressione l’ambiente di installazione, anche
se installati in ambienti adiacenti e comunicanti con il locale di installazione;
è proibito praticare aperture fisse o mobili sulla canna fumaria per collegare apparecchi diversi da quello a cui è
asservita;
è vietato far transitare all’interno della canna fumaria, sebbene sovradimensionata, altri canali di adduzione
d’aria e tubazioni ad uso impiantistico;
è consigliato che la canna fumaria sia dotata di una camera di raccolta di materiali solidi ed eventuali condense
situata sotto l’imbocco della canna, in modo da essere facilmente apribile ed ispezionabile da sportello a tenuta
d’aria;
qualora si utilizzino canne fumarie ad uscite parallele si consiglia di alzare un elemento la canna controvento.
(fig.3)
Fig. 1
NO
Fig. 2
NO
SI
MAX 45°
NO
5
1.2
Comignolo
La canna fumaria deve essere dotata sulla sommità di un dispositivo, denominato comignolo, atto a facilitare la
dispersione in atmosfera dei prodotti della combustione.
Il comignolo dovrà rispondere ai seguenti requisiti:
avere sezione e forma interna equivalente a quella della canna fumaria;
avere sezione utile di uscita non minore del doppio di quella della canna fumaria;
il comignolo che fuoriesce dal tetto o che rimane a contatto con l’esterno (per esempio nel caso di solaio
aperto), deve essere rivestito con elementi in laterizio e comunque ben isolato. Essere costruito in modo da
impedire la penetrazione nella canna fumaria della pioggia, della neve, di corpi estranei ed in modo che in caso
di venti di ogni direzione ed inclinazione sia comunque assicurato lo scarico dei prodotti della combustione;
(comignolo antivento)
il comignolo deve essere posizionato in modo da garantire un’adeguata dispersione e diluizione dei prodotti
della combustione e comunque al di fuori della zona di reflusso. Tale zona ha dimensioni e forme diverse in
funzione dell’angolo di inclinazione della copertura, per cui risulta necessario adottare le altezze minime
riportate in fig.4 e in fig.5;
il comignolo dovrà essere del tipo antivento e superare l’altezza del colmo Fig.4 e fig.5;
eventuali fabbricati od altri ostacoli che superano l’altezza del comignolo non dovranno essere a ridosso del
comignolo stesso (fig.4).
Fig. 3
Fig. 5
6
Fig. 4
1.3
Presa d’aria esterna
La stufa deve poter disporre dell’aria necessaria a garantire il regolare funzionamento della combustione e un
buon benessere ambientale.
Assicurarsi che nella stanza in cui è installata la stufa ci sia un’aerazione sufficiente e, se necessario installare
un condotto di adduzione d’aria dall’esterno con sezione minima consigliata è di 100 cm².
La presa d’aria deve essere comunicante direttamente con l’ambiente di installazione della stufa, posizionata in
modo da evitare che possa essere ostruita e protetta con una griglia o idonea protezione purchè non riduca la
sezione minima.
L’afflusso d’aria può essere ottenuto anche da un locale adiacente a quello di installazione purchè tale flusso
possa avvenire liberamente attraverso aperture permanenti comunicanti con l’esterno.
Il locale adiacente rispetto a quello d’installazione non deve essere messo in depressione rispetto all’ambiente
esterno per effetto del tiraggio contrario provocato dalla presenza in tale locale di altro apparecchio di
utilizzazione o di dispositivo di aspirazione. Nel locale adiacente le aperture permanenti devono rispondere ai
requisiti di cui ai punti sopra. Il locale adiacente non può essere adibito ad autorimessa, magazzino di materiale
combustibile né comunque ad attività con pericolo d’incendio.
1.4
Collegamento alla canna fumaria
( vedi sezione 4 )
1.5
Prevenzione degli incendi domestici
L'installazione e l'utilizzo della stufa deve essere in conformità con le istruzioni del fabbricante e con le normative di
abitabilità locali.
ATTENZIONE: quando un tubo scarico fumi passa attraverso una parete o un soffitto è necessario applicare
modalità di installazioni particolari (protezione, isolamento termico, distanze da materiali sensibili al calore, ecc...)
Il tubo di raccordo del camino non deve mai passare attraverso una superficie combustibile.
Non collegare questa unità al condotto fumario utilizzato già per un altro apparecchio.
Si raccomanda inoltre di mantenere al di fuori della zona di irraggiamento del focolare, e comunque alla
distanza di almeno 1mt. dal blocco riscaldante tutti gli elementi di materiale combustibile o infiammabile quali
travature, arredi in legno, tendaggi, liquidi infiammabili, ecc... .
Nel caso in cui nello spazio circostante esistano coperture in materiale combustibile, o sensibile al calore, deve
essere interposto un diaframma di protezione in materiale isolante e non combustibile. Se il pavimento è
costituito da materiale combustibile, deve essere realizzata in corrispondenza della bocca del focolare, una
protezione in materiale incombustibile che sporga lateralmente di 30cm e frontalmente di 60cm.
Per ulteriori informazioni fare riferimento alla norma locale vigente ( “GENERATORI DI CALORE A LEGNO REQUISITI DI INSTALLAZIONE” UNI 10863, “DIN .
1.6
Rivestimento in ceramica
Fare molta attenzione nel manovrare i particolari in ceramica.
Controllare l’esatta planarità del pavimento dove verrà installato il prodotto.
Per compensare eventuali errori di planarità in dotazione troverete una guarnizione di fibra vetro adesiva.
Il montaggio deve essere eseguito da almeno due persone.
NOTA: Il rivestimento della stufa è realizzato in maiolica semirefrattaria (da non confondere però con altri materiali
come per esempio la porcellana). Il cavillo e i puntini o vulcani d’aria sono, caratteristiche di tale maiolica fatta a
mano e quindi non sono da considerarsi difetti e non influiscono minimamente sulla durata del prodotto.
7
2 DATI TECNICI
2.1
Dati tecnici
Combustibile …………………………………………. legna
Focolare ………………………………………………. in ghisa
Registri aria primaria e secondaria ………………… regolabili
Riscaldamento ……………………………………….. per convenzione naturale e irraggiamento
Potenza termica nominale
Consumo nominale
Rendimento termico
Contenuto CO (al 13% O2)
Omologato secondo norma
N° rapporto di prova
N° registrazioni VKF AEAI
Diametro scarico
Apertura focolare
Dimensioni forno
Superficie focolare
Peso stufa
S45 L-S45 C
S45 F/FL
S55 L-S55 C
S55 F/FL
Unità
di misura
MICAELA
MANUELA
MIRIAM
MADDALENA
MILENA
SANDRA
STEFANIA
SILVIA
SARA
SIMONA
[kW]
[kg/h]
%
%
[cm]
[cm]
[cm]
[cm2]
6
1,85
77,5
0,18
EN 13240
CS–06–107
6,5
1,9
82,5
0,19
EN 13240
CS–06–107
7
2,35
75,3
0,18
EN 13240
CS–06–107
8
2,4
85,4
0,19
EN 13240
CS–06–107
Z13797/N13797
Z13797/N13797
Z13797/N13797
Z13797/N13797
Ø12
27 x 25
785
120
Ø12
27x25
26x31,5x31
785
Ø15
35x35
1300
170
Ø15-18
35x35
32x31.5x39
1300
[kg]
160
( S 45 L 96 )
( S 55 L 140 )
225
Presa d’aria esterna a sezione utile
[cm2]
100
100
100
100
minima
Questi dati sono ottenuti utilizzando legna di faggio con umidità inferiore al 20% ad intervalli per ogni singola
ricarica di circa un’ora.
Apparecchio ad uso intermittente.
Dati tecnici a focolare chiuso per il calcolo della canna fumaria
S45 F/FL
S55 L-S55 C
S55 F/FL
MICAELA
MANUELA
MIRIAM
MADDALENA
MILENA
SANDRA
STEFANIA
SILVIA
SARA
SIMONA
kW
g/s
6
6
6,5
6,34
7
9,2
8
7,38
°C
321
244
276
272
Pa
10
10
10
10
S45 L-S45 C
S45 F/FL
S55 L-S55 C
S55 F/FL
MADDALENA
MILENA
SANDRA
STEFANIA
SILVIA
SARA
SIMONA
6,5
7
8
131
78
53
148
86
59
182
105
71
Unità di
misura
Potenza termica nominale
Portata fumi
Temperatura media dei fumi nel
tubo di scarico
Tiraggio minimo
S45 L-S45 C
Capacita’ calorica per stanza
Unità
di misura
La potenza nominale della stufa è in
grado di soddisfare le seguenti
condizioni:
kW
-favorevoli
-un po’ meno favorevoli
-non favorevoli
m3
m3
m3
condizioni
sufficienti
per
MICAELA
MANUELA
MIRIAM
116
69
47
I valori sopraindicati della capacità calorica per stanza sono secondo la normativa DIN 18893 per stanze che non
sono costruite secondo le normative per il risparmio calorico.
Per stanze che sono costruite secondo le normative per il risparmio calorico, sono necessarie capacità caloriche
minori.
8
3 DIMENSIONI STUFE
MICAELA
SANDRA
MANUELA
STEFANIA
9
10
MIRIAM
SILVIA
MADDALENA
SARA
MILENA
SIMONA
11
4 COLLEGAMENTO ALLA CANNA FUMARIA
4.1
Note generiche
Prima di procedere con il montaggio scegliere la posizione dove verrà installata la stufa, quindi, determinata
l‘altezza dei tubi di collegamento praticare il foro alla canna fumaria e, posizionare il rosone a muro, tenendo
presente le altezze da terra come indicato nelle figure.
Per il collegamento di stufe al camino si possono usare al massimo due curve, con cambio di direzione >=90°,
lunghezza del canale da fumo in proiezione orizzontale non superiore a 2 m.
I raccordi devono essere il più brevi possibili, privi di strozzature e spigoli interni, realizzati in materiali resistenti alla
corrosione dei fumi e a temperature di 550-600° C.
SI
SI
NO
MAX 2 m
Il collegamento alla canna fumaria deve avvenire in conformità a quanto indicato ai punti “1. Norma generali ” e
“2.2 Requisiti tecnici dell’impianto richiesti” e con le norme in vigore nel luogo di installazione, per consentire un
corretto smaltimento dei fumi e conseguente buon funzionamento della stufa.
Per il collegamento alla canna fumaria, si consiglia di usare tubi e curve del GRUPPO PIAZZETTA S.p.A., in
quanto lo scarico fumi del prodotto è dimensionato per l‘innesto di questi, inoltre le curve sono dotate d’ispezione
che consentono il controllo, la pulizia, e la manutenzione su tutti gli interventi dell‘impianto.
Possono essere applicati anche altri tubi, previo adeguamento o compatibilità del manicotto d‘inserimento. In tale
caso però il GRUPPO PIAZZETTA S.p.A. assicura il buon funzionamento solo per quanto di sua produzione ed
impiegato secondo le sue specifiche.
Se si dovesse realizzare un disassamento con delle curve si consiglia di prestare attenzione, in quanto il
collegamento eseguito potrebbe non avere la facoltà di reggere il peso soprastante, e potrebbe richiedere dei
sistemi di supporto adeguati.
Rispettare la distanza min. di 40 cm su elementi di costruzione sensibili alle alte temperature (rivestimento).
Nel raggio di 200 mm dal muro non ci devono essere materiali infiammabili o sensibili al calore.
Nel caso contrario, sostituire con materiali secondo le normative DIN 18160 seconda parte, paragrafo 5.1.4.
Controllare che i vari pezzi del tubo siano bene innestati con la stufa e la canna fumaria. Controllare che il tubo non
entri troppo all’interno della canna fumaria.
12
4.2
Scarico fumi SUPERIORE
Praticare il foro per l’allacciamento all’altezza da terra riportata in figura e fissare, se previsto, il rosone a muro.
Tagliare se necessario uno spezzone di tubo, la cui misura dipende dalla distanza E più la parte da incassare;
inserirlo nella canna fumaria e sigillare dove necessario.
Misure in cm
Quote in cm (vedi figura a lato)
S45 L- S45 C
S45 F
S55 L-S55 C
S55 F
MICAELA
SANDRA
MADDALENA
SARA
MANUELA
STEFANIA
MILENA
SIMONA
MIRIAM
SILVIA
C
90.5
133
100.5
143
D
32
32
32
32
H
paragrafo seguente
La quota H riportata nella figura qui a lato, varia a seconda dei tubi
di raccordo.
Per esempio se si usano un tubo da metro T100 ed una curva
C6 con diametro 15 (misure di ingombro cm 32x32) risulta H =
(100–5) + (32–7) = 120 cm dove (100 – 5) è la lunghezza del tubo
meno il bicchiere, e (32 – 7) è l’ingombro della curva meno metà
diametro , cioè la quota tra asse e bordo inferiore della curva.
Se invece del T100 si usassero due tubi da 50 cm la quota
risulterebbe inferiore di altri 5 cm circa, in quanto si avrebbe
un ulteriore innesto.
ATTENZIONE: le misure riportate nelle figure sono indicative in
quanto prevedono un pavimento ed una parete regolari, per cui si
può riscontrare una certa differenza.
C6
T50
T100
95
90
25
32
T50
ATTENZIONE: Nel caso di tubi del GRUPPO PIAZZETTA S.p.A. , questi vanno collegati con il bicchiere
rivolto verso il basso.
Se necessario inserire tra collare di scarico e tubo del nastro fibra vetro in dotazione per
garantire l’innesto.
NOTA: per le stufe SARA e SIMONA si ricorda che nel caso di una canna fumaria di altezza inferiore a 5 m
non si possono installare le stufe con diametro di scarico 150, bensì 180 utilizzando l’apposito collarino in
dotazione.
TUBO D.180
COLLARE DI RACCORDO
COLLARE PIANO IN GHISA
13
5 INSTALLAZIONE CERAMICHE
5.1
Stufe MANUELA, MIRIAM, STEFANIA, SILVIA
1) Sballare il monoblocco e collocarlo nella posizione voluta in prossimità dell’imbocco alla canna fumaria, tenendo
presente le norme tecniche (canna fumaria, tubi, comignolo, prese d’aria, ecc.) riportate nel presente libretto.
2) Livellare il monoblocco e controllare che all’interno del focolare sia tutto in ordine, assicurarsi che tutti i pannelli
interni siano nella loro posizione e che non ci sia altro all’interno del focolare.
3) Togliere il piano superiore in ghisa svitando le viti di fissaggio.
4) Inserire i laterali in ceramica nella loro posizione e assicurarli con le relative staffette (figure in basso);
compensare eventuali giochi con nastro fibravetro in dotazione.
STAFFA
LATERALE
PROFILO
LATERALE
BASAMENTO
5) Inserire il frontalino nella relativa sede; compensare eventuali giochi con nastro fibravetro in dotazione.
6) A seconda delle necessità regolare eventualmente la posizione dei profili in metallo allentando le viti di
fissaggio.
7) Posizionare il piano superiore e avvitare le viti di fissaggio.
MANEGGIARE CON CAUTELA LE CERAMICHE.
Eventuale nastro
fibra vetro
14
5.2
Stufe MADDALENA, MILENA, SARA, SIMONA
1) Sballare il monoblocco e collocarlo nella posizione voluta in prossimità dell’imbocco alla canna fumaria, tenendo
presente le norme tecniche (canna fumaria, tubi, comignolo, prese d’aria, ecc.) riportate nel presente libretto.
2) Livellare il monoblocco e controllare che all’interno del focolare sia tutto in ordine, assicurarsi che tutti i pannelli
interni siano nella loro posizione e che non ci sia altro all’interno del focolare.
3) Togliere il piano superiore in ghisa svitando le viti di fissaggio.
4) Infilare i laterali in ceramica nella loro sede come in figura con attenzione al verso. Compensare eventuali giochi
con nastro fibravetro in dotazione.
DENTE ALTO
Eventuale
nastro
fibravetro sui
laterali in
ceramica
DENTE BASSO
DENTE ALTO
15
5) Svitare dalla stufa una staffa fissaggio (1), infilare nell’altra il frontalino (2) e con cautela inserire (3) e riavvitare
(4) la staffa precedentemente tolta assieme al frontalino stesso. Compensare eventuali giochi con nastro
fibravetro in dotazione (vedi figure).
6) Posizionare il piano superiore e avvitare le viti di fissaggio.
MANEGGIARE CON CAUTELA LE CERAMICHE.
Eventuale nastro
fibra vetro
PIANO SUPERIORE
5
1
( svitare )
STAFFA FISSAGGIO
FRONTALINO
4
3
FRONTALINO IN
CERAMICA
16
2
6 DISTANZE MINIME DI SICUREZZA
Parete posteriore
A
Stufa
Parete laterale
Protezione a pavimento
Zona radiante
Con riferimento alla figura superiore, le distanze minime di sicurezza da materiali sensibili al calore o infiammabili
così come da muri portanti e altre pareti è di:
A
B
C
20 cm dalla parete posteriore alla stufa
20 cm dalla parete laterale
100 cm nella zona radiante
Nel caso di pavimentazione sensibile al calore o infiammabile è necessario usare una protezione per il pavimento
(per es. lastra di lamiera d’acciaio), marmo o piastrelle. Le misure minime sono:
D
E
50 cm
30 cm (misurato dallo spigolo interno dell’apertura del focolare)
In generale
Assicurarsi che nella stanza in cui viene installata ci sia una aerazione sufficiente (vedi sezione “1.3 Presa
d’aria esterna”).
Tenere qualsiasi prodotto infiammabile ben lontano dalla stufa durante il suo funzionamento (MINIMO: 100 cm
dalla parete frontale).
Durante il funzionamento la porta deve rimanere chiusa, altrimenti si può danneggiare l’interno del focolare.
17
7 USO
7.1
Regole d’uso fondamentali
Nonostante i tipi d'impianto siano diversi, alcune importanti istruzioni possono essere d'aiuto per evitare l'emissione
di fumi inquinanti.
La pezzatura del materiale da bruciare influenza in modo determinante il contenimento delle emissioni dell'impianto
termico, infatti una maggiore superficie del combustibile favorisce l'andamento della combustione e lo stesso dicasi
per la secchezza, la disgregazione termica e la liberazione del gas.
Per l'accensione deve essere usata legna minuta. Se si usa legna di grossa pezzatura la combustione inizia solo
tardivamente. Nella conduzione della stufa bisogna inoltre badare che all'avviamento il focolare non sia troppo
pieno. Quando poi la combustione è avviata, è meglio aggiungere di frequente piccole quantità di combustibile che
grandi quantità a distanza di tempo.
Altrettanto importante è un apporto d'aria sufficiente, soprattutto nella fase di accensione. La combustione
dovrebbe venir regolata da un apporto dosato di combustibile ed aria.
La combustione è buona se:
dal camino non escono fumi visibili;
le ceneri sono di colore grigio o bianco;
c'è poca fuliggine nella canna fumaria e nel focolare;
il consumo di combustibile è contenuto.
I principali presupposti per una combustione ecologica della legna sono:
utilizzare solo legna secca;
assicurare una temperatura elevata nella camera di combustione, possibilmente in tutte le fasi di carico;
mantenere un giusto apporto d’aria durante la combustione;
all'accensione non sovraccaricare la camera di combustione;
Una cattiva combustione è caratterizzata da:
emissione di fumi molto densi;
fumo di colore giallo o grigio scuro;
odore sgradevole, dovuto a sostanze inquinanti;
cenere molto scura;
imboccatura nera del comignolo;
elevato consumo di combustibile.
7.2
Combustibile
Possono essere usati i seguenti materiali da combustione: legno (Faggio o Betulla) secondo la normativa DIN
51731, classe di misura HP2.
Usare soltanto questi materiali per la combustione. Non usare mai legno umido o legno con pece.
Inoltre non possono essere usati scarti (immondizie), legno verniciato o legni impellicciati con materiale sintetico,
perché potrebbero danneggiare la stufa, la canna fumaria e non come ultimo inquinare la natura.
Le caratteristiche del legno o combustibile usato (umidità; dimensioni; densità) influiscono sulla qualità della
combustione. Per questo è importante conoscere la tipologia della legna.
Riportiamo qui di seguito alcune informazioni in merito.
Solitamente la legna da ardere viene suddivisa in due categorie: legna forte e legna dolce.
Le caratteristiche della legna forte sono rappresentate da un legno duro e pesante, fornendo al focolare una
fiamma sostenuta e persistente.
Le caratteristiche del legno dolce sono rappresentate da un legno tenero e leggero, fornendo al focolare una
fiamma si vivace ma di breve durata, il che a parità di potenza, comporta un consumo superiore. Un’altra
caratteristica di alcuni tipi di legno dolce è che possono essere resinosi, presentando quindi diversi inconvenienti
alla combustione. Per esempio: fuliggine consistente; poca brace; particelle incandescenti; scoppiettii; richiesta di
una pulizia più frequente alla canna fumaria e alla stufa.
18
LEGNA FORTE
Acero campestre
Alloro
Betulla*
Carpino bianco
Carpino nero
Cerro
Ciliegio
Faggio
Frassino
Leccio
Maggiociondolo
LEGNA DOLCE
Ailanto
Bagolaro
Carrubo
Castagno
Cipresso
Corniolo
Gelso
Ontano napoletano
Ontano nero
Ornello
Pioppo cipressino
Marasco selvatico
Nocciolo
Noce comune
Olivo
Olmo siberiano*
Pero
Pesco selvatico
Platano
Pruno selvatico
Robinia
Roverella
Pioppo tremolo
Salicone
Sambuco
Tiglio
* N.B. Non sempre viene considerata LEGNA FORTE
P o te re c a lo rific o
(K W h /d m ³ w = 2 0 % )
3.5
3
2.5
2
1.5
1
0.5
C
R
O
AN
AB
ET
E
BI
ET
E
AB
T ip o lo g ia le g n a m i
SS
O
O
E
LI
C
SA
O
TA
N
O
O
N
PP
N
O
PI
O
PI
LA
R
IC
E
LL
A
TU
BE
G
G
IO
O
SI
N
AS
C
FR
ER
U
FA
IA
IA
N
Q
R
O
BI
FA
G
G
IO
BI
AN
C
O
0
Valori indicativi riferiti ad 1°decimetro cubo di legna di forma omogenea con una percentuale di umidità (W) di circa
20%.
• Per quanto sopra citato si consiglia di bruciare latifoglie forti (Faggio, Betulla, Quercia, ecc.) tenendo
presente le indicazioni del paragrafo “7.1 Regole d’uso fondamentali”.
• Si consiglia inoltre di non bruciare: la carta straccia; le bricchette di carta; i rifiuti; il legno laccato o rivestito di
laminati plastici; il legno compensato o truciolare; i pannelli fibrosi; il legno trattato con prodotti protettivi; gli
imballaggi; perché potrebbero danneggiare la stufa e la canna fumaria.
L'umidità influisce in modo notevole sulla qualità della combustione, perché l'acqua nella legna abbassa la
temperatura della combustione. Quindi come si vede dalla tabella sottostante all’aumentare dell’umidità diminuisce
il potere calorifico.
Ciò non solo può portare a più elevate emissioni di fumi, ma indica anche un pessimo utilizzo del combustibile a
causa del diminuito potere calorifico. Inoltre, per la comparsa di condense, parti dell'impianto e le condutture dei
fumi possono subire danni; si deve perciò bruciare solo legna secca.
Per questo è importante anche l’accatastamento e la conservazione della legna in un luogo asciutto e arieggiato, e
l’uso dopo almeno 2 anni dal taglio.
PERCENTUALE
DI UMIDITA’ (W)
20
30
40
Valori indicativi
Tempo di
stagionatura
dopo 2 anni
dopo 1 anni
dopo 6 mesi
kWh/Kg
4
3.4
2.8
POTERE CALORIFICO DELLA LEGNA (Faggio)
Kcal/Kg
3400
2900
2410
kWh/dm³
2.9
2.8
2.7
19
7.3
Prima accensione
Per la prima accensione della stufa, o anche nel caso non sia stata usata per lungo tempo, usare poco
combustibile (tutti i materiali devono adattarsi al calore), in quanto potrebbero sprigionarsi degli odori dovuti
all'evaporazione delle vernici o dei grassi. Per ovviare il problema è sufficiente aerare il locale.
7.4
Registri aria comburente
Con i registri aria si determina la resa termica. Pertanto, fate attenzione alle
posizioni riportate nella tabella seguente a seconda dei combustibili usati.
La regolazione si effettua come indicato nella figura a lato.
Se nella camera di combustione si formerà uno strato duro e lucente di catrame e lo
stesso si noterà all'interno della porta, vuol dire che la combustione e il consumo di
gas non è corretto: sarà necessario aumentare l'entrata dell'aria e controllare la
percentuale di umidità della legna.
Le posizioni sotto indicate si riferiscono naturalmente alla resa nominale. Poiché la
resa dipende anche dalle condizioni atmosferiche, climatiche, e quindi dal tiraggio,
l'esperienza vi insegnerà a scegliere la posizione più idonea.
SECONDARIA
Regolazione e quantità di materiale da bruciare per potenza nominale:
Modello stufa
Materiale da bruciare
Posizione primaria
registri
secondaria
Quantità massima di
materiale da bruciare
S45 L – S45 C
MICAELA
MANUELA
MIRIAM
minimo
3 mm
S45 F
S55 L – S55 C
SANDRA
MADDALENA
STEFANIA
MILENA
SILVIA
Brikette di legno / Legno
minimo
minimo
5 mm
3 mm
Kg. 1,85
Kg. 1,9
Kg. 2,35
MIN
MAX
MAX
MIN
S55 F
SARA
SIMONA
minimo
3 mm
Kg. 2,4
Nel caso si desideri una potenza minore, scegliere una posizione inferiore a quella
data, cioè spingere ulteriormente i registri verso la posizione di minimo.
ATTENZIONE: un’eccessiva apertura dei registri (quindi eccessivo afflusso d’aria
comburente) e un’alimentazione della stufa con una quantità di combustibile
superiore a quanto indicato nella precedente tabella, provoca un aumento della
cessione del calore da parte della stufa; ne conseguono però una diminuzione del
rendimento della stufa (e quindi maggior consumo di combustibile) e un aumento
delle temperature con possibili danni alla stufa e alla struttura dell’abitato per
i quali il GRUPPO PIAZZETTA S.p.A. declina ogni responsabilità.
PRIMARIA
REGISTRO ARIA SECONDARIA
INDICATORE DI POTENZA
MIN
MAX
POTENZA
MINIMA
20
MIN
MAX
POTENZA
NOMINALE
MIN
MAX
POTENZA
MASSIMA
7.5
Accensione e funzionamento normale
Per l'accensione usare carta e legna minuta secca. E’ vietato l’uso di qualsiasi sostanza solida o liquida
(alcool, benzine, solventi, ecc), altamente infiammabile od esplosiva. Sono consentiti i prodotti
accendifuoco normalmente reperibili in commercio. I registri devono essere aperti al massimo. Caricare
l'apparecchio con il combustibile scelto, lasciare bruciare sempre con i registri aperti e se necessario mantenere
socchiusa la porta del focolare.
Appena le fiamme si saranno smorzate e la combustione è avviata, ridurre l’ingresso d’aria regolando i registri in
posizione idonea e chiudere la porta.
Prima di aggiungere combustibile si consiglia di ammucchiare le braci. Inoltre dopo ogni aggiunta di combustibile si
consiglia di aprire i registri per il tempo sufficiente a fra riprendere la fiamma.
Quando la stufa è ben avviata, riportare i registri nella posizione sopra indicata. Se lavorate con la sola secondaria,
si avrà cosi una combustione più lenta, ed una migliore pulizia del vetro.
Durante il funzionamento la porta del cassetto cenere deve rimanere chiusa, può essere aperta solo a stufa
spenta e fredda per lo svuotamento del cassetto cenere, per evitare un uso inadeguato e gravoso della stufa.
Non sottoporre la stufa a bruschi riscaldamenti con eccessivi carichi.
7.6
Apertura della porta
Durante il funzionamento la porta deve rimanere chiusa, altrimenti si può danneggiare l’interno del focolare.
L'apertura della porta va fatta lentamente ( e dopo l’apertura dell’eventuale registro fumi ), tenendola per
qualche secondo leggermente scostata dall'apparecchio prima della completa apertura. Aprire la porta quando la
fiamma è smorzata o comunque mai quando è troppo intensa, ed usare sempre il guanto in dotazione.
Fate attenzione che la porta autochiudente non si chiuda con violenza perché si potrebbe rompere il vetro.
ATTENZIONE: il guanto non è fatto per poter prendere in mano le braci !!!
Nel caso durante l'alimentazione fuoriuscisse del fumo, ciò non comporta alcun pericolo; aprire momentaneamente
la finestra.
7.7
Funzionamento notturno
Utilizzando un legno abbastanza duro, se il vento e le condizioni di tiraggio sono ragionevolmente stabili, la stufa
continuerà a bruciare per alcune ore durante la notte.
L'ultima cosa da fare alla sera è assicurarsi che il letto di braci sia ridotto ma vivo ed aggiungere combustibile
prima di chiudere porta e ridurre l’alimentazione dell'aria.
7.8
Smaltimento delle ceneri
Il cassetto cenere deve essere svuotato regolarmente, in modo da impedire che la cenere arrivi alla griglia del
focolare perché potrebbe danneggiarlo.
Le ceneri devono essere poste in un contenitore in metallo con coperchio a tenuta. Fino allo spegnimento definitivo
delle ceneri, il contenitore chiuso deve essere posto su una base non combustibile o terra e ben lontano da
materiali combustibili.
ATTENZIONE: la cenere mantiene a lungo la brace accesa !!!
7.9
Surriscaldamento e sicurezza
Durante il funzionamento, alcune parti della stufa (porta, maniglia, registri, pezzi in ceramica) possono raggiungere
temperature elevate.
Ricordarsi di mantenere le distanze di sicurezza precedentemente indicate.
Fate dunque molta attenzione ed usate le dovute precauzioni e seguite sempre le istruzioni.
Quando poi dovete ricaricare di legna il focolare o regolare l'afflusso d'aria, usate il guanto in dotazione.
Se durante l'alimentazione una parte dell'apparecchio diviene rossa, significa che è surriscaldato.
Interrompere immediatamente l'alimentazione. Chiudere la porta ed i registri aria controllando che il rossore
diminuisca.
Se durante il funzionamento, qualsiasi parte della stufa o del tubo di uscita fumi perdesse fumo, bloccare
immediatamente l'alimentazione sia di aria che combustibile come indicato sopra; quindi una volta raffreddato
controllare il motivo della perdita e se necessario chiamare personale specializzato del rivenditore. Nel frattempo
aerare il locale.
21
7.10 Uso del forno
Per la cottura dei cibi non vi viene fornito un manuale , in quanto solo l’ esperienza può farvi maestra ed unita alla
fantasia e alle capacità personali , vi permetterà di creare piatti succulenti. Di aiuto sono senza dubbio il
termometro in dotazione che vi indica il momento giusto per introdurre i cibi e, l ‘ampio sportello in vetro ceramico
che consente di seguire in ogni momento la cottura.
Tuttavia alcuni suggerimenti vi saranno sicuramente utili:
portate inizialmente la stufa in temperatura iniziando con cariche di legna di piccola pezzatura e solo
successivamente introducete ceppi più grandi e comunque non superiori a circa 2 kg;
il cibo non va introdotto appena viene raggiunta la temperatura desiderata , in quanto con molta probabilità i
gradi continueranno a salire, rischiando di rovinare il cibo introdotto nel forno;
ad un certo punto la temperatura inizierà a scendere ; quando si sarà stabilizzata per qualche minuto sarà il
momento migliore per introdurre il cibo;
si consiglia di non superare la temperatura di 250 °C in quanto tale limite è più che sufficiente per ogni tipo di
cottura; solo nella fase iniziale è consentito arrivare fino ad una punta massima di 280-300°C; temperature
superiori oltre che essere inadatte per una corretta cottura, possono sottoporre le strutture a dilatazioni
eccessive;
una volta introdotto il cibo sarà sufficiente mantenere la temperatura costante con una calibrata aggiunta di
legna ed idonea regolazione dei registri aria ; solo l’esperienza vi potrà indicare quali saranno le condizioni
migliori per la cottura di un cibo , la quantità di legna da bruciare in un certo tempo e la posizione dei registri ,
tenendo presente che il tutto dipende anche da fattori esterni quali tiraggio e condizioni atmosferiche;
tenete presente che più sottili sono i cibi da cucinare e meno tempo e più calore sono necessari; ad esempio un
pollo richiede una lunga cottura ( circa 3 ore ) a fuoco ridotto ( 150-180°C ) mentre una pizza si cuoce in poco
tempo ( circa 10 minuti ) con temperature più alte ( 220-230°C );
se la canna fumaria provoca un eccessivo tiraggio o comunque la legna brucia in maniera violenta sviluppando
eccessivo calore con difficoltà nel controllo della combustione, il calore non viene ceduto correttamente al forno
, bensì passa direttamente nella canna fumaria; si consiglia di effettuare un’ adeguata alimentazione di
combustibile e regolazione dei registri aria e, solo se strettamente necessario installare un tubo con registro;
per una cottura a fuoco ridotto chiudete l’aria primaria , mantenete la secondaria aperta per circa ½ o ¼ e
tenete socchiuso l’eventuale registro fumi per assicurare un tiraggio adeguato;
una buona cottura dipende anche dalla legna utilizzata : legno duro ( es. faggio ) e grossi ceppi bruciano in
modo più lento e duraturo , mentre piccoli ceppi e legno più dolce sviluppano un fuoco più breve ed intenso;
quando togliete il cibo dal forno per controllare la cottura chiudete la porta al fine di evitare un abbassamento
della temperatura del forno stesso;
Una variazione di tonalità del forno è una caratteristica normale dell’acciaio sottoposto a temperature.
22
8 MANUTENZIONE
Tutte le operazioni di manutenzione (pulizia, eventuali sostituzioni, ecc...) vanno
effettuate a fuoco spento e quando la stufa è fredda. Inoltre non usare in nessun
caso sostanza abrasive.
8.1
Pulizia dell'apparecchio e canna fumaria
Quando la legna viene bruciata produce pece e altri vapori organici i quali, assieme all'umidità espulsa dalla legna,
formano il creosoto.
Se il creosoto si è accumulato, deve essere rimosso per ridurre il rischio d’ incendio della canna fumaria e
per favorire lo scambio termico.
N.B. L'autoaccensione del creosoto all'interno della canna fumaria può provocare seri danni alla stessa ed
alla struttura dell'abitato.
Per determinare se si è formato il creosoto, i tubi di raccordo e la canna fumaria, nella stagione in cui si utilizza la
stufa, devono essere ispezionati almeno 1 volta ogni 2 mesi.
La camera di combustione , i tubi di raccordo e la canna fumaria devono essere puliti dal creosoto normalmente
una volta all'anno (se necessario, più spesso)
Qualora sorgessero dubbi sulla manutenzione e l'uso giornaliero, prendere contatto con il rivenditore e consultare
la normativa in vigore.
8.2
Pulizia del rivestimento in ceramica
Il rivestimento in ceramica deve essere pulito con un panno morbido e asciutto prima di utilizzare detergenti (anche
se delicati) con un panno umido.
NON BAGNARE E NON PULIRE MAI LA CERAMICA CON ACQUA FREDDA QUANDO QUESTA E' CALDA,
LO SHOCK TERMICO POTREBBE ROMPERLA.
8.3
Pulizia delle parti in metallo
Per pulire le parti in metallo della stufa usare un panno morbido inumidito con acqua.
NON PULIRE MAI LE PARTI IN METALLO CON ALCOOL, DILUENTI, BENZINE, ACETONI O ALTRE
SOSTANZE SGRASSANTI.
In caso d’uso di tali sostanze la Superior declina ogni responsabilità per i danni provocati.
Eventuali variazioni di tonalità delle parti in metallo possono essere imputabili ad un uso non
adeguato della stufa.
8.4
Pulizia del vetro
Il vetro della porta deve essere pulito (a freddo) con sostanze sgrassanti a base di ammoniaca e non corrosive il
come diluente.
Se il vetro è caldo, prima di procedere alla pulizia, la porta dovrà sempre rimanere aperta il tempo necessario
affinché si raffreddi.
Se il riscaldamento è molto lento a causa di legna non secca, è probabile che sul vetro si accumuli catrame che si
brucerà con l'apertura dell'aria secondaria. Se lasciate che il catrame si accumuli per troppo tempo, farete più fatica
a rimuoverlo.
Non usate comunque materiali che possono graffiare o rovinare i vetri, in quanto le graffiature possono diventare
crepe o rotture.
23
8.5
Smontaggio deflettori fumi
Per la pulizia del focolare ricordarsi di togliere anche il deflettore fumi.
Per questa operazione si consiglia di essere in due persone, quindi:
osservare l’orientamento e gli appoggi del deflettore;
sollevare anteriormente il deflettore facendo perno sullo schienale e farlo avanzare (Fig.1);
farlo scendere verso il focolare (Fig.2);
Deflettore fumi inferiore
estrarlo dalla stufa ruotandolo;
Untere Umlenkplatte
quindi pulire e rimontarlo con ordine inverso.
Lower smoke deflector
Fig. 1
8.6
Fig. 2
Pulizia condotto fumi (solo stufe con forno)
PIANO SUPERIORE
Il condotto fumi ai lati del forno va pulito almeno una volta all’anno
eliminando eventuali depositi di creosoto o fuliggine.
Per questa operazione procedere come segue:
Togliere il piano superiore in ghisa svitando le viti di fissaggio.
Eliminare con un aspirapolvere e uno scovolo di piccole dimensioni FORNO
gli eventuali depositi.
Controllare lo stato della guarnizione presente sul piano superiore in
ghisa, se necessario sostituirla.
Posizionare il piano superiore e avvitare le viti di fissaggio.
CONDOTTO FUMI
PIANO SUPERIORE
VITI DI FISSAGGIO
8.7
Montaggio della porta
Osservare l’orientamento e l’installazione della molla.
Per togliere la porta è sufficiente sfilare i perni delle cerniere.
Per la porta del cassetto cenere può invece essere utile svitare e togliere la porta assieme alla relativa cornice e,
successivamente estrarre il perno cerniera.
24
8.8
Sostituzione del vetro
L'apparecchio è dotato di un vetro ceramico di spessore 4 mm, resistente ad uno schock termico di 750° C; il vetro
può essere rotto solamente a causa di un forte impatto o di un uso improprio.
Non sbattere la porta e non urtare il vetro. Alla chiusura della porta assicurarsi che nessun pezzo di legno o altri
oggetti sbattano contro il vetro.
In caso di rottura sostituire il vetro solo con ricambio originale del GRUPPO PIAZZETTA S.p.A. .
Per la sostituzione procedere come segue:
premunirsi di un paio di guanti anti-taglio;
togliere la porta e appoggiarla su un piano;
svitare le viti che si vedono sulla parte interna della porta;
togliere con attenzione fermavetro e vetro;
se la guarnizione in fibra di vetro e il cordone sono usurati, sostituirli;
sostituire il vetro e rimontare il fermavetro serrando con cura le viti, ma non eccessivamente;
montare la porta.
Se sorgono altri problemi si consiglia di interpellare il rivenditore di zona.
25
ASSEMBLY INSTRUCTION
INDEX
INDEX .........................................................................................................................................................................................26
1
GENERAL RULES..............................................................................................................................................................27
1.1
1.2
1.3
1.4
1.5
1.6
2
CHIMNEY OR SMOKE STACK ..........................................................................................................................................27
CHIMNEY POT................................................................................................................................................................28
EXTERNAL AIR INTAKE ..................................................................................................................................................29
CONNECTION TO THE SMOKE STACK .............................................................................................................................29
FIRE PREVENTION IN THE HOME ....................................................................................................................................29
CERAMIC CLADDING .....................................................................................................................................................29
TECHNICAL DATA ...........................................................................................................................................................30
2.1
TECHNICAL DATA ..........................................................................................................................................................30
3
DIMENSIONS (LOOK PAGE N° 9)...................................................................................................................................31
4
CONNECTION TO THE SMOKE STACK ........................................................................................................................31
4.1
4.2
5
GENERAL NOTES ...........................................................................................................................................................31
TOP SMOKE FLUE .........................................................................................................................................................32
INSTALLATION OF THE CERAMIC PANELS ...............................................................................................................33
5.1
5.2
STOVES MANUELA, MIRIAM, STEFANIA, SILVIA ...............................................................................................33
STOVES MADDALENA, MILENA, SARA, SIMONA ...............................................................................................34
6
MINIMUM SAFETY DISTANCE ......................................................................................................................................36
7
USE ......................................................................................................................................................................................37
7.1
7.2
7.3
7.4
7.5
7.6
7.7
7.8
7.9
7.10
8
FUNDAMENTAL RULES FOR USE.....................................................................................................................................37
FUEL .............................................................................................................................................................................37
LIGHTING THE FIRE FOR THE FIRST TIME........................................................................................................................39
CONTROL OF PRIMARY AIR ............................................................................................................................................39
LIGHTING AND NORMAL OPERATION .............................................................................................................................40
OPENING THE DOOR ......................................................................................................................................................40
OVERNIGHT OPERATION ................................................................................................................................................40
DISPOSAL OF THE ASHES ...............................................................................................................................................40
OVERHEATING AND SEFETY ..........................................................................................................................................40
USE OF THE OVEN ..........................................................................................................................................................41
MAINTENANCE.................................................................................................................................................................42
8.1
8.2
8.3
8.4
8.5
8.6
8.7
8.8
CLEANING THE DEVICE AND SMOKE STACK ...................................................................................................................42
CLEANING THE CERAMIC CLADDING .............................................................................................................................42
CLEANING METAL PARTS ...............................................................................................................................................42
CLEANING THE GLASS ...................................................................................................................................................42
REMOVAL OF THE SMOKE DEFLECTOR ...........................................................................................................................42
FLUE OUTLET (ONLY STOVES WITH OVEN) MAINTANCE ................................................................................................43
DOOR ASSEMBLY ..........................................................................................................................................................43
REPLACING THE GLASS ..................................................................................................................................................43
DECLARATION OF CONFORMITY......................................................................................................................................44
26
1 GENERAL RULES
1.1
Chimney or smoke stack
Every stove must have a vertical duct, called a smoke stack, to discharge to the external air by means of natural
draught, the smoke and fumes produced by combustion.
The smoke stack must conform to the following requirements:
It must not be connected to any other fireplace, stove, boiler or ventilation canopy of any type (fig.1)
It must be adequately separated from combustible or inflammable materials by air gaps or appropriate
insulation;
Its internal cross section must be uniform and preferably circular: square or rectangular sections must have
rounded corners with a radius not less than 20mm.and a maximum ratio between the walls of 1 to 5; interiors as
smooth as possible and without restrictions; smooth, uninterrupted bends with no bends greater than 45° (fig.
2);
Each appliance must have its own smoke stack with a cross section equal to or greater than the outlet flue from
the stove and with a height not less than 3.5-4 m.;
Two stoves, a fireplace and a stove, a stove and a wood burning oven etc. must never be used together in the
same room…. because the draught from one could adversely affect the draught of the other. Neither should
collector ventilation ducts be allowed as these can reduce the air pressure in the room where the appliance is
installed, even if they are installed in adjacent but communicating rooms;
Fixed or adjustable openings must never be made in the smoke stack for the purpose of connecting different
appliances from the one it has been designed to serve;
Even if the smoke stack is oversized, it must not be used for the passage of other air ducts or pipework
installations;
It is recommended that the smoke stack is equipped with a chamber at the base of the stack for the collection of
solid materials and any condensation, designed to be checked through an air-tight window and easily opened;
When parallel smoke stacks are used it is advised that one of the wind-proof chimney pots be higher than the
other (fig.3).
NO
NO
YES
Fig. 1
MAX 45°
Fig. 2
NO
YES
27
1.2
Chimney pot
The smoke stack must be equipped with a device at the top, a chimney pot, which is designed to facilitate the
dispersal into the atmosphere of the by-products of combustion.
The chimney pot must comply with the following requirements:
An internal cross section and shape which conforms to that of the smoke stack;
An available exit area not less than double that of the smoke stack;
The part of the chimney which is above the roof or which remains in contact with the outside air (for example in
the case of open roof gardens), should be clad in brick and at any rate be well insulated. It must be constructed
in such a way to prevent rain, snow or foreign objects from entering the smoke stack, and in such a way as to
ensure that the by-products of combustion are discharged, whatever the wind direction or angle; (wind-proof
chimney pot);
The chimney pot must be located so as to guarantee adequate dispersal and dilution of the products of
combustion and in particular they must be carried away from the area from where these might be drawn back
down the chimney. Such an area varies in size and shape depending on the angle of slope of the roof, so that it
is necessary to apply the minimum heights shown in figures 4 and 5;
The chimney pot must be of the wind-proof kind and exceed the height of the roof ridge, figures 4 and 5;
Any buildings or other obstacles which exceed the height of the chimney pot must not be close to the chimney
itself (fig.4).
Fig. 3
Fig. 4
NO
YES
a) flat roof
Fig. 5
Distance > A
Distance < A
From the ridge
AREA OF
BACK DRAUGHT
a) flat roof
Height of area
of back draught
Roof axis
ROOF ANGLE
HORRIZONTAL WIDTH
MIN. HEIGHT OF THE
OF BACK DRAUGHT AREA CHIMNEY TERMINAL
FROM ROOF AXIS
α
28
HEIGHT OF AREA
OF BACK-DRAUGHT
ABOVE THE ROOF
A
H min = Z+0,50
Z
[°]
[m]
[m]
[m]
15
1,85
1
0,5
30
1,5
1,3
0,8
45
1,3
2
1,5
60
1,2
2,6
2,1
1.3
External air intake
The stove must be able to rely on the supply of air necessary to guarantee correct combustion and a safe
environment.
Make sure that there is adequate ventilation in the room in which the stove is installed; the recommended
minimum cross section of the air intake is 100cm².
The air intake must communicate directly with the room in which the stove is installed and should be protected
by a grille or some similar device, provided that the minimum cross section is not reduced.
The required inflow of air can also be obtained from a room adjacent to that of the appliance as long such
airflow can enter freely through permanent openings connected with the outside of the building.
The room adjacent to the appliance must not have a lower pressure than that of the external environment as the
result of a contrary draught created by another heating or ventilation appliance in that room. The permanent
openings in the adjacent room must comply with the requirements listed previously. The adjacent room cannot
be used as a garage, or a store for combustible materials, nor for any activity which carries a fire risk.
1.4
Connection to the smoke stack
(See section 4)
1.5
Fire prevention in the home
The installation and use of the stove must conform to the manufacturer’s instructions and to the local building
regulations.
WARNING: when a discharge flue passes through a wall or ceiling, special installation methods must be used
(protection, heat insulation, distances from heat sensitive materials, etc…)
The outlet flue from the fire must never pass through a combustible surface.
Do not connect this product to a smoke duct which is already used by another appliance.
It is also recommended that any item of combustible or inflammable material such as wood trusses, furniture,
curtains, inflammable liquids, etc…should be kept out of the immediate area of the fire and at least 1m. from the
body of the stove.
In cases where there are coverings in combustible or heat sensitive materials in the space around the stove a
protective shield of insulating and non-combustible material must be placed in between. If the flooring is made
of combustible material, protection in the form of incombustible material must be provided at the location of the
stove door, extending 30cm to the sides and 60 cm. to the front.
For further information refer to the regulation.
1.6
Ceramic cladding
Be very careful when handling the ceramic parts.
Check that the floor where the product will be installed is perfectly flat.
You will find some packing material made of adhesive glass fibre supplied with the product to be used to adjust
any differences in level.
Assembly of the cladding must be carried out by at least two people.
NOTE: The stove cladding is made of semi-refractory majolica (which should not be confused with other materials
such as porcelain). Hairline cracks and small spots or air bubbles are a characteristic of such hand-made majolica
and therefore should not be considered as defects. They do not have the slightest affect on the longevity of the
product.
29
2 TECHNICAL DATA
2.1
Technical data
Fuel ................................................................ wood
Firebox ........................................................... cast iron
Primary and secondary air ............................. manual controls
Radiant and convective heating
S45 L-S45 C
Rated heat output
Consumption at rated heat output
Thermal efficiency
CO content (with 13% O2)
Approved in accordance with standard
Test report No.
N° registrazioni VKF AEAI
Flue diameter
Hearth opening (WxH)
Oven dimensions
Grate surface area
Weight
S45 F/FL
S55 L-S55 C
S55 F/FL
U. M.
MICAELA
MANUELA
MIRIAM
MADDALENA
MILENA
SANDRA
STEFANIA
SILVIA
SARA
SIMONA
[kW]
[kg/h]
%
%
[cm]
[cm]
[cm]
[cm2]
6
1,85
77,5
0,18
EN 13240
CS–06–107
6,5
1,9
82,5
0,19
EN 13240
CS–06–107
7
2,35
75,3
0,18
EN 13240
CS–06–107
8
2,4
85,4
0,19
EN 13240
CS–06–107
Z13797/N13797
Z13797/N13797
Z13797/N13797
Z13797/N13797
Ø12
27 x 25
785
120
Ø12
27x25
26x31,5x31
785
Ø15
35x35
1300
170
Ø15-18
35x35
32x31.5x39
1300
[kg]
( S 45 L 96 )
160
( S 55 L 140 )
225
Fresh air intake (recommended
100
100
100
100
[cm2]
minimum section)
These data are obtained using beech wood with moisture content below 20% and with intervals between stoking-up of
approximately one hour.
Appliance for intermittent use.
Technical data with closed grate for flue calculations
S45 L-S45 C
S45 F/FL
S55 L-S55 C
S55 F/FL
U. M.
MICAELA
MANUELA
MIRIAM
MADDALENA
MILENA
SANDRA
STEFANIA
SILVIA
SARA
SIMONA
kW
g/s
°C
Pa
6
6
321
10
6,5
6,34
244
10
7
9,2
276
10
8
7,38
272
10
S45 L-S45 C
S45 F/FL
S55 L-S55 C
S55 F/FL
U. M.
MICAELA
MANUELA
MIRIAM
MADDALENA
MILENA
SANDRA
STEFANIA
SILVIA
SARA
SIMONA
The nominal output of the stove is
capable of providing:
kW
6
6,5
7
8
-in favourable conditions
Sufficient
-in less favourable conditions
for
-in unfavourable conditions
m3
m3
m3
116
69
47
131
78
53
148
86
59
182
105
71
Rated heat output
Smoke flow rate
Average temp. of smoke in the flue
Minimum draught
Heating capacity per room
The values indicated above for the heating capacity per room follow the regulations of DIN 18893 for rooms which
are not constructed in accordance with the rules for energy efficiency.
For rooms that have been constructed according to energy efficiency rules, lower calorific capacities are required.
30
3 DIMENSIONS (look page n°9)
4 CONNECTION TO THE SMOKE STACK
4.1
General notes
Before starting to assemble the stove, choose the position where it will be installed and then, having determined
the height of the connection tubes bearing in mind the height above ground given in the tables, make the hole
through to the smoke stack, and place the rosette on the wall.
A maximum of two bends may be used to connect the stove to the chimney, with a change in direction of less than
90°, and the length of the smoke flue which runs horizontally must not exceed 2 metres.
The connecting tubes should be as short as possible, without any constrictions or internal rough patches,
constructed of material which is resistant to being corroded by the smoke and fumes and able to withstand
temperatures of 550-600°C.
The connection to the smoke stack must be carried out in conformity with the GENERAL RULES on page 27 and
with the regulations in force in the area where the stove is to be installed, to allow correct dispersal of the smoke
and fumes and the consequent good operation of the stove.
You are advised to use pipes and bends supplied by GRUPPO PIAZZETTA S.p.A. to make the connection to the
smoke stack because the smoke flue and the pipe couplings are the same size and the bends are equipped with
inspection openings, which allow the checking, cleaning and maintenance of all parts of the equipment.
Other pipes can be used, as long as they are adapted or suitable for the pipe joint. In such an event, however,
GRUPPO PIAZZETTA S.p.A. will only guarantee efficient operation for its own products, used in accordance with
the specifications.
If it is necessary to use pipe bends to create an off-centre connection, it is advisable to take care as it is possible
that the connection constructed may not be able to carry the weight placed on it and it may require additional
means of support.
A minimum distance of 40 cm. from construction parts sensitive to high temperatures (cladding) must be respected.
There must be no inflammable or heat sensitive materials without a radius of 200 mm. from the wall.
If this is not the case, substitute materials according to the regulations of DIN 18160, second part, paragraph 5.1.4
Check that the various parts of the tube are well engaged with the stove and the smoke stack. Check that the pipe
does not protrude too far inside the smoke stack.
31
4.2
TOP smoke flue
Make the hole for the connection at the height above the ground indicated in the drawing and fix the decorative
plate, if provided, to the wall. If necessary, shorten the pipe, the lenght of which will be distance “E” plus the section
to be enclosed: then insert the pipe into the smole stack and seal as necessary.
Size (cm)
Distances in cm (see figure as side)
S45 L-S45 C
S45 F
S55 L-S55 C
S55 F
MICAELA
SANDRA
MADDALENA
SARA
MANUELA
STEFANIA
MILENA
SIMONA
MIRIAM
SILVIA
C
90.5
133
100.5
143
D
32
32
32
32
H
See following paragraph
The height H quoted in the figures here, varies according to the
connector pipes chosen.
For example, if one metre pipes are used, the T100 and a C6
bend with a diameter of 15 (external size 32x32) H is (100-5) +
(32-7) = 120 cm. where (100-5) is the length of the pipe minus
the bowl, and (32-7) is the external length of the bend less half its
diameter, i.e. the distance between the axis and the lower level of
the bend.
If two 50 cm. pipes are used instead of the T100 the height
will be about 5 cm. less, as there will be an additional
coupling.
ATTENTION:the measurements in the diagrams are indicative
only as they presume flat floors and walls and this could make a
certain difference.
C6
T50
T100
95
90
32
25
T50
ATTENTION: in the case of pipes supplied by GRUPPO PIAZZETTA S.p.A. those must be connected with
the bowl facing downwards.
If necessary insert some of the fibreglass tape supplied between the collar of the smoke
outlet and the pipe, to ensure then the joint is sound.
NOTE: with the SARA and SIMONA stoves remember that in case of a smoke stack less than 5 m high, stoves
cannot be installed with a waste outlet diameter of 150 mm, instead use a 180 mm pipe and the collar supplied.
PIPE DIAMETER 180 mm
CONNECTING COLLAR
COLLAR OF THE CAST IRON STOVE TOP
32
5 INSTALLATION OF THE CERAMIC PANELS
5.1
Stoves MANUELA, MIRIAM, STEFANIA, SILVIA
0) Unpack the monoblock and place it in the desired position near the entrance to the smoke stack, bearing in
mind the technical rules (smoke stack, pipes, chimney pot, air intake, etc.) listed in this booklet.
1) Level the monoblock and check that everything is in order inside the stove, making sure that all internal panels
are in the correct position and that there is nothing else inside the stove.
2) Remove the top cast iron plate, undoing the fixing screws.
3) Insert the ceramic side panels into position and secure them with the relevant brackets (diagram below);
compensating for any slack with the fibreglass tape provided.
BRACKET
SIDE PANEL
SHAPED TRIM
SIDE PANEL
BASE
4) Insert the fascia into its correct position; compensate for any slack using the fibreglass tape provided.
5) Adjust the position of the shaped metal trims as required, loosening the fixing screws.
6)
Replace the top plate and tighten up the fixing screws.
HANDLE THE CERAMIC PANEL WITH CARE.
Fibreglass tape
as required
33
5.2
Stoves MADDALENA, MILENA, SARA, SIMONA
1) Unpack the monoblock and place it in the desired position near the entrance to the smoke stack, bearing in
mind the technical rules (smoke stack, pipes, chimney pot, air intake, etc.) listed in this booklet.
2) Level the monoblock and check that everything is in order inside the stove, making sure that all internal panels
are in the correct position and that there is nothing else inside the stove.
3) Remove the top cast iron plate, undoing the fixing screws.
4) Slide the ceramic side panels into their slots as shown in the diagram, paying attention to the direction.
Compensate for any slack with the fibreglass tape provided.
TOP PROFILE
Fibreglass tape
on the ceramic
side panels as
required
BOTTOM PROFILE
TOP PROFILE
34
5) Unscrew a fixing bracket (1) from the stove, slide the fascia into the other bracket (2) then carefully attach the
previously removed bracket onto the fascia (3) and screw the bracket and the fascia back on. Compensate for
any slack with the fibreglass provided (see diagram).
6)
Replace the top plate and tighten up the fixing screws.
HANDLE THE CERAMIC PANEL WITH CARE.
Fibreglass tape as
required
TOP PLATE
5
1
( unscrew )
FASCIA FIXING
BRACKET
4
3
CERAMIC
FASCIA
2
35
6 MINIMUM SAFETY DISTANCE
Rear wall
A
Stove
Side wall
Floor protection
Radiating zone
With reference to the above diagram, the minimum safe distances from heat sensitive or inflammable materials,
such as load bearing and other walls are:
A
B
C
20 cm. from the wall behind the stove
20 cm. from the side wall
100cm. in the radiating area
In the case of flooring that is heat sensitive or inflammable the floor should be protected (using for example sheets
of steel plate, marble or tiles). The minimum distances are:
D
E
50 cm.
30 cm. (measured from the internal corner of the door opening)
In general
Ensure that there is adequate ventilation in the room where the stove is to be installed (see section “1.3 External
air intake”).
Keep any inflammable product well away from the stove while it is lit (MINIMUM: 100 cm. from the front wall).
The door must remain closed while the stove is operating, otherwise you could damage the inside of the fire
chamber.
36
7 USE
7.1
Fundamental rules for use
Although different installations may vary, some important information can be helpful in avoiding the emission of
polluting smoke and fumes.
The size of the pieces of fuel to be burnt significantly influences the control of emissions from heating appliances; a
larger surface area of fuel actually assists the burning process and the same is true of the dryness of the fuel, ease
of thermal decomposition and the release of gas. Extremely small pieces of wood should be used when lighting
the fire. If large pieces are used the fire will only begin to burn slowly. When tending the stove it is also necessary
to take care that the firebox is not too full when getting the fire going. Once the fire is well established, it is better to
add small quantities of fuel at frequent intervals rather than large amounts less often. An adequate supply of air is
equally important, especially when the fire is first lit. Combustion should be regulated by the measured supply of
fuel and air.
Indicators of efficient combustion:
no visible smoke is coming out of the fire;
the ashes are grey or white in colour;
there is little soot in the fire or the smoke stack;
fuel consumption is modest.
Fundamental principles for ecological wood-burning:
use only dry wood;
ensure a high temperature in the combustion chamber, if possible whenever the fire is being stoked;
maintain an adequate air supply while the fire is burning;
do not overload the combustion chamber when lighting the fire.
Indicators of poor combustion:
emission of very thick smoke;
smoke that is yellow or dark grey in colour;
unpleasant smell, due to polluting substances;
very dark ashes;
chimney pot that is black at the top;
high fuel consumption.
7.2
Fuel
The following fuels may be used: wood (beech or birch) also in the form of wood Brickettes, according to regulation
DIN 51731, size group HP2.
Only use these materials as fuel. Never use damp wood or wood containing pitch.
Waste (rubbish), painted wood or wood covered with synthetic substances must not be used as these could
damage the stove, the smoke stack and, not least, the natural environment.
The characteristics of the wood or fuel used (dampness; size; density) influence the quality of combustion. For this
reason it is important to know about the different types of wood. We report some relevant information below.
Firewood is usually subdivided into two types: hardwood and softwood.
The characteristics of hardwood are solid, heavy wood, providing the fire with a sustained and persistent flame.
Softwood is a less dense and lighter weight wood, which gives the fire a flame which is lively but of short duration,
and which for the same level of output requires a higher level of consumption. Another characteristic of any type of
softwood is that it may be resinous, thus creating various combustion problems. For example: thick soot; few
embers; red hot particles; sudden sharp cracking sounds; the need to clean the stove and the smoke stack more
frequently.
HARDWOOD
SOFTWOOD
Wild maple
Wild cherry
Ailanthus
Aspen
Laurel
Hazel
Bagolaro
Salicone
Birch *
Walnut
Carob
Common elder
White hornbeam
Olive
Chestnut
Lime
Black hornbeam
Siberian elm *
Cypress
Turkey oak
Pear
Cornelian cherry
Cherry
Wild peach
Mulberry
Beech
Plane
Neapolitan Alder
Ash
Wild thorn
Black alder
Holm oak
False acacia
Manna ash
Laburnam
Roverella
Cypress poplar
*Not always regarded as a HARDWOOD
37
Calorie rating
(KWh/dm³ w=20%)
350
300
250
200
150
100
50
E
PL
AR
PO
PI
N
C
H
LA
R
C
H
H
BI
R
BE
EC
AS
H
O
AK
AL
D
ER
W
IL
LO
W
SI
LV
ER
FI
R
SP
U
R
C
E
W
H
IT
E
BE
FA
EC
LS
H
E
AC
AC
IA
0
Types of timber
Indicative values to the nearest cubic decimetre for wood of equal shape with a humidity level (w) of about
20%
As far as the above woods are concerned it is recommended that broadleaf hardwoods (beech, birch, oak etc.)
are burnt, bearing in mind the information given in paragraph 7.1.
Above all it is recommended that you do not burn: waste paper; paper briquettes; rubbish; wood that has been
painted or faced with plastic laminates; plywood or chipboard; fibreboard; wood treated with protective substances;
packaging – because these could damage the stove and smoke stack.
The dampness of the wood has a substantial effect on the quality of combustion, because water in the wood lowers
the combustion temperature. As can be seen in the following table, the calorific value of the output diminishes as
the water content increases.
This can not only cause higher levels of smoke emission but is also a sign of inefficient use of fuel because of the
reduced power output. Furthermore, parts of the appliance and the flue pipes can be damaged by the
condensation caused. Therefore burn dry wood only.
Moisture content (W)
Seasoning time
20
30
40
After 2 years
After 1 years
After 6 months
Indicative values
38
HEATING POWER OF THE WOOD (Beech)
kWh/dm3
kWh/kg
kcal/kg
4
3400
2.9
3.4
2900
2.8
2.8
2410
2.7
7.3
Lighting the fire for the first time
When lighting the fire for the first time and also when the fire has not been used for a long time, use only a little fuel
(all the materials need time to adjust to heat). Unpleasant fumes may be released due to the evaporation of paint
or grease; all that is required is to ventilate the room a little.
7.4
Control of primary air
Heat output is determined by controlling the air supply. However, pay attention to
the positions referred to the following table, according to the fuel used.
Control is effected as shown in the diagram at the side.
If a hard, shiny layer of tar forms in the combustion chamber or is noticed on the
inside of the door it means that combustion and gas consumption are not occurring
correctly: the air intake needs to be increased and the humidity level of the wood
should be checked.
Obviously, the positions shown below refer to nominal output. Since output also
depends on atmospheric and climatic conditions and on the resultant draught,
experience will teach you how to choose the most suitable position.
SECONDARY
MIN
MAX
MAX
MIN
Air control and quantity of fuel to achieve nominal output:
Model
S45 L-S45 C
MICAELA
MANUELA
MIRIAM
Fuel
Primary
Position
of control Secondary
Maximum quantity of
fuel
min
3 mm
S45 F
S45 L-S45 C
S55 F
SANDRA
MADDALENA
STEFANIA
MILENA
SILVIA
Woodbrikette / Wood
min
min
5 mm
3 mm
Kg. 1,85
Kg. 1,9
SARA
SIMONA
min
3 mm
Kg. 2,35
Kg. 2,4
Should lower output be required, choose a lower position that that given, that is to
say, push the controls further towards the minimum position.
ATTENTION: opening the controls too far (resulting in an excessive influx of air)
and stoking the stove with more fuel than is shown in the table above, will certainly
cause an increase in the heat given out by the stove; however it will reduce the
stove’s efficiency (with the higher fuel consumption) and an increase in the
temperatures may cause damage to the stove and to the structure of the
building for which the GRUPPO PIAZZETTA S.p.A.company declines all
responsability.
PRIMARY
SECONDARY AIR CONTROL
NOMINAL OUTPUT INDICATOR
MIN
MAX
MINIM
OUTPUT
MIN
MAX
NOMINAL OUTPUT
MIN
MAX
MAXIM
OUTPUT
39
7.5
Lighting and normal operation
Use paper and small pieces of wood to light the fire. The use of any highly inflammable or explosive solids
or liquids (alcohol, petrol, solvents etc.) is prohibited. Standard commercially available firelighter
products are permissible.
The controls must be open as fully as possible. Stoke up the fire with the chosen fuel, let it burn with the controls
still open and if necessary leave the door half open. As soon as the flames have died down and the fire has
become established, reduce the air intake moving the controls to the appropriate position and close the door.
It is advisable to heap up the ashes before adding fuel. It is also advisable to open the air controls each time after
extra fuel has been added, for long enough to allow the flame to take hold again.
When the fire is well under way, put the controls back in the positions shown above. If the stove is operated using
the secondary air only combustion will be slower and the glass will be cleaner.
During operation, the door of the ashpan must remain closed. It should only be left open when the stove is
unlit and cold and the ashpan is to be emptied, to prevent inefficient and inapprpriate use of the stove.
Do not subject the stove to sudden heating up by using excessive loads of fuel.
7.6
Opening the door
The door must remain closed while the stove is alight, otherwise it could damage the inside of the stove. The door
must be opened slowly (and after any damper has been opened), holding it slightly ajar for a moment before
opening it completely. Open the door when the flame has died down and certainly never when the flame is
very intense and always use the glove provided.
Ensure that the self-closing door does not bang shut, as this could break the glass.
ATTENTION: The glove is not designed for picking up burning embers!!!
It is not dangerous if smoke comes out while the stove is stoked; just open the window for a while.
7.7
Overnight operation
If wind and draught conditions are reasonably stable, and a rather hard wood is used, the stove will continue to
burn through the night.
Last thing at night check that the bed of embers is low but still alight and add fuel before closing the door and
reducing the air intake.
7.8
Disposal of the ashes
The ashpan must be emptied regularly, so as to prevent the build up of ashes to the level of the fire grill, as this
could damage it.
The ashes must be placed in a container with a close-fitting lid. This container must be put on a non-combustible
surface or on the ground and well away from combustible materials until it is certain that all the ashes are definitely
extinguished.
ATTENTION: ash keeps the embers alight for a long while!!!
7.9
Overheating and sefety
Some parts of the stove (door, handle, controls, ceramic parts) can reach very high temperatures while the fire is
alight.
Remember to maintain the safety distances given previously.
Pa y careful attention, use due care and always follow the instructions.
Use the glove provided when stoking the stove with fuel and when operating the controls.
If any part of the stove becomes red while it is alight, this means that it is overheating.
Immediately stop adding fuel. Close the door and controls and check that the redness is reducing.
If smoke leaks out of any part of the stove or the flue, immediately stop adding fuel and air. Once the stove has
cooled down check the reason for the leak and if necessary ask your supplier for specialist assistance. In the
meantime air the room.
40
7.10 Use of the oven
For cooking foods, no manual is provided in so far that only experience can make you an expert and this together
with imagination and personal capacities, will allows one to create succulent dishes. The thermometer provided
which indicates the correct time to place food in the oven and, the large glass ceramic door that permits
observation throughout the entire cooking process are, without a doubt, helpful.
Nevertheless a few suggestions will certainly be useful:
initially bring the heater up to temperature starting with loads of small pieces of wood and only afterwards
introduce larger logs and, in any case, not greater than about 2 kg.
the food is not to be put in the oven once the desired temperature is attained, in so far that, most probably, the
temperature will continue to increase, running the risk of ruining the food placed in the oven.
at a certain point, the temperature will start to decrease; the best time to put the food in the oven will be after it
has stabilized for a few minutes.
it is recommended not to exceed a temperature of 250 °C in so far that this limit is more than sufficient for all
types of cooking; reaching a maximum peak of 280-300° is permitted only in the initial phase; higher
temperatures, in addition to not being suitable for proper cooking, can subject the structures to
excessive dilations.
once having placed the food in the oven, it will be sufficient to keep the temperature constant with a calibrated
addition of wood and proper regulation of the air registers; only experience can indicate be the best conditions
for cooking a given type of food, the quantity of wood to be burned in a certain amount of time and the position
of the registers, taking into account that all this also depends on external factors such as draft and atmospheric
conditions.
remember that the thinner the foods are to be cooked, the lesser is the amount of time and the greater is the
amount of heat necessary; for example a chicken requires a long cooking time ( about 3 hours ) at a low flame (
150-180°C ) whereas a pizza cooks quickly ( about 10 minutes ) with higher temperatures ( 220-230°C ).
if the flue causes an excessive draft, the wood burns violently developing more heat and causing difficulty
controlling combustion; the heat is given up to the oven, but rather, passes directly into the flue; it is advisable
to ensure a suitable supply of fuel and regulation of the air intake and only if stricly necessary install a control
mechanism in the pipe.
to cook with a low flame, close the primary air, keep the secondary air opened for about ½ or ¼ of the way and
keep any eventual smoke registers half-closed to insure a suitable draft;
proper cooking also depends on the wood used: hard wood ( ex. beech ) and large logs burn slower and longer,
whereas small logs and softer wood develop a briefer and more intense flame.
when removing the food from oven to congtrol cooking, close the door in order to refrain from lowering the
temperature of the oven itself.
A variation of the oven's hue is a normal characteristic for steel subject to temperatures.
41
8 MAINTENANCE
All maintenance operations (cleaning, any replacement of parts, etc…) must be carried out
when the fire is out and the stove is cold. Abrasive substances must not be used in any
circumstances.
8.1
Cleaning the device and smoke stack
When wood is burnt it produces tar and other organic substances which, together with the moisture released by the
wood, forms creosote.
If creosote has built up it must be removed in order to reduce the risk of fire in the smoke stack and to
improve heat output.
N.B. Spontaneous combustion of the creosote inside the smoke stack can cause serious damage to it and
to the structure of the building.
The connector pipes, and the smoke stack must be inspected at least once every two months while the stove is in
use to see whether creosote has formed or not
Under normal circumstances the combustion chamber, the connector pipes and the smoke stack should be
cleaned of creosote at least once a year (and more often if necessary).
If any doubts arise about maintenance or everyday use, get in touch with your supplier and consult the current
regulations.
8.2
Cleaning the ceramic cladding
The ceramic cladding of the stove must be cleaned with a soft, dry cloth before using detergents (even gentle
ones) with a wet cloth.
NEVER WET OR CLEAN THE CERAMIC WITH COLD WATER WHEN THE STOVE IS HOT AS THE SUDDEN
CHANGE IN TEMPERATURE COULD BREAK IT.
8.3
Cleaning metal parts
For clean painted metal stove parts, use a damp cloth wetted with water.
NEVER CLEAN THE PAINTED METAL PARTS WITH ALCOHOL, DILUENTS, BENZINE, VINEGAR OR OTHER
DEGREASING SUBSTANCES.
If these substances are used, Gruppo Piazzetta declines all responsibility for the damage caused.
Possible variations in the hue of metal parts can be attributed to an improper use of the heater.
8.4
Cleaning the glass
The glass in the door should be cleaned (when cold) with ammonia based, non-corrosive, degreasing agents such
as solvents.
If the glass is warm, it must be left open for as long as is required to cool it down before starting to clean it.
If the wood is not dry and causes the fire to burn very slowly, it is likely that tar will build up on the glass and this
will burn when the secondary air supply is open. If tar is allowed to accumulate over too long a time, it will be much
harder to remove.
Do not use any material which could scratch or spoil the glass, as scratches may develop into cracks or breaks.
8.5
Removal of the smoke deflector
When cleaning the stove, remember to romove the smoke deflector as well.
It is recommended that this operation is carried out by two people, as follows:
note the direction of and supports for the deflector;
raise the deflector at the front making it pivot on the back part
move it forward and lower it towards the firebed;
turning it, remove it from the stove;
then clean and remount it, working in the reverse order.
42
8.6
Flue outlet (only stoves with oven) maintance
The smoke vent at the side of the oven must be cleaned at least once a year and any deposits of creosote or soot
removed.
Proceed as follows to carry this out:
Undo the fixing screws and remove the cast iron top plate.
Remove any deposits using a vacuum cleaner and a small cleaning rod.
Check the condition of the gasket on the cast iron plate, replacing it if necessary.
Replace the top plate and fixing screws.
8.7
Door assembly
Note the direction and the installation of the spring.
To remove the door, just slide the pins out of the hinge.
With the door of the ashpan, however, it can be useful to unscrew and remove the door together with its frame and
then to remove the hinge pin subsequently.
8.8
Replacing the glass
The door of the device is equipped with a ceramic glass window 4mm. thick, resistant to temperatures up to 750°C;
the glass can only be broken by a strong blow or improper use.
Do not slam the door or hit the glass. When closing the door make sure that there are not any pieces of wood or
other objects which could bang against the glass.
Should the glass break, only replace it with a spare part from the GRUPPO PIAZZETTA S.p.A.
Proceed as follows to replace the glass:
equip yourself with an appropriate pair of protective gloves
remove the door and lay it on a flat surface
unfasten the screws which can be seen on the inner side of the door
carefully remove the glass clips and the glass
if the fibre glass washer and sealing strip are worn, replace them
replace the glass and relocate the clips, refasten the screws taking care not to overtighten them
re-hang the door.
If other problems arise it is recommended that you speak to the local supplier.
43
44
COPIA
45
46
47
N° matricola prodotto da comunicare al Centro
Assistenza Tecnica del Gruppo Piazzetta in caso di
richiesta assistenza.
S.p.A.
Via Montello, 22
31011 Casella d’Asolo (TV) - ITALY
Tel. +39.04235271 - Fax +39.042355178
http://www.superiorcaminetti.it
e-mail:[email protected]
48
Gruppo Piazzetta S.p.A. Technical department - Cod. H07020740 / DT2000249 – Rev.01 – (02/2008)
Product serial number, to be quoted when requesting
service from the Gruppo Piazzetta After-Sales Service
Centre.