1
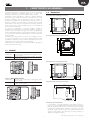
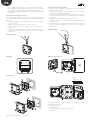
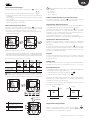
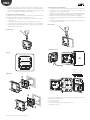
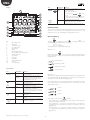
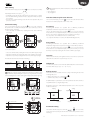
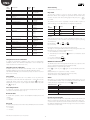
thT
Electronic thermostat for
residential applications
Manuale d’uso
User manual
H i g h
E f f i c i e n c y
S o l u t i o n s
ITA
SMALTIMENTO
AVVERTENZE
CAREL basa lo sviluppo dei suoi prodotti su una esperienza pluridecennale nel
campo HVAC, sull’investimento continuo in innovazione tecnologica di prodotto,
su procedure e processi di qualità rigorosi con test in-circuit e funzionali sul 100%
della sua produzione, sulle più innovative tecnologie di produzione disponibili nel
mercato. CAREL e le sue filiali/affiliate non garantiscono tuttavia che tutti gli aspetti
del prodotto e del software incluso nel prodotto risponderanno alle esigenze
dell’applicazione finale, pur essendo il prodotto costruito secondo le tecniche dello
stato dell’arte.
Il cliente (costruttore, progettista o installatore dell’equipaggiamento finale) si
assume ogni responsabilità e rischio in relazione alla configurazione del prodotto
per il raggiungimento dei risultati previsti in relazione all’installazione e/o
equipaggiamento finale specifico.
CAREL in questo caso, previ accordi specifici, può intervenire come consulente per
la buona riuscita dello start-up macchina finale/applicazione, ma in nessun caso
può essere ritenuta responsabile per il buon funzionamento del equipaggiamento/
impianto finale.
INFORMAZIONE AGLI UTENTI PER IL CORRETTO TRATTAMENTO DEI RIFIUTI
DI APPARECCHIATURE ELETTRICHE ED ELETTRONICHE (RAEE)
In riferimento alla Direttiva 2002/96/CE del Parlamento Europeo e del
Consiglio del 27 gennaio 2003 e alle relative normative nazionali di attuazione,
Vi informiamo che:
1.
sussiste l’obbligo di non smaltire i RAEE come rifiuti urbani e di effettuare,
per detti rifiuti, una raccolta separata;
2.
Per lo smaltimento vanno utilizzati i sistemi di raccolta pubblici o privati
previsti dalla leggi locali. È inoltre possibile riconsegnare al distributore
l’apparecchiatura a fine vita in caso di acquisto di una nuova;
3.
questa apparecchiatura può contenere sostanze pericolose: un uso
improprio o uno smaltimento non corretto potrebbe avere effetti
negativi sulla salute umana e sull’ambiente;
4.
il simbolo (contenitore di spazzatura su ruote barrato) riportato
sul prodotto o sulla confezione e sul foglio istruzioni indica che
l’apparecchiatura è stata immessa sul mercato dopo il 13 agosto 2005 e
che deve essere oggetto di raccolta separata;
5.
in caso di smaltimento abusivo dei rifiuti elettrici ed elettronici sono
previste sanzioni stabilite dalle vigenti normative locali in materia di
smaltimento.
Il prodotto CAREL è un prodotto avanzato, il cui funzionamento è specificato nella
documentazione tecnica fornita col prodotto o scaricabile, anche anteriormente
all’acquisto, dal sito internet www.carel.com.
Ogni prodotto CAREL, in relazione al suo avanzato livello tecnologico, necessita di
una fase di qualifica / configurazione / programmazione / commissioning affinché
possa funzionare al meglio per l’applicazione specifica. La mancanza di tale fase di
studio, come indicata nel manuale, può generare malfunzionamenti nei prodotti
finali di cui CAREL non potrà essere ritenuta responsabile.
Soltanto personale qualificato può installare o eseguire interventi di assistenza
tecnica sul prodotto.
Il cliente finale deve usare il prodotto solo nelle modalità descritte nella
documentazione relativa al prodotto stesso.
Garanzia sui materiali: 2 anni (dalla data di produzione, escluse le parti di
consumo).
Omologazioni: la qualità e la sicurezza dei prodotti CAREL INDUSTRIES Hq
sono garantite dal sistema di progettazione e produzione certificato ISO 9001.
Senza che ciò escluda la doverosa osservanza di ulteriori avvertenze presenti nel
manuale, si evidenza che è in ogni caso necessario, per ciascun Prodotto di CAREL:
• Evitare che i circuiti elettronici si bagnino. La pioggia, l’umidità e tutti i tipi di
liquidi o la condensa contengono sostanze minerali corrosive che possono
danneggiare i circuiti elettronici. In ogni caso il prodotto va usato o stoccato
in ambienti che rispettano i limiti di temperatura ed umidità specificati nel
manuale.
• Non installare il dispositivo in ambienti particolarmente caldi. Temperature
troppo elevate possono ridurre la durata dei dispositivi elettronici, danneggiarli
e deformare o fondere le parti in plastica. In ogni caso il prodotto va usato o
stoccato in ambienti che rispettano i limiti di temperatura ed umidità specificati
nel manuale.
• Non tentare di aprire il dispositivo in modi diversi da quelli indicati nel manuale.
• Non fare cadere, battere o scuotere il dispositivo, poiché i circuiti interni e i
meccanismi potrebbero subire danni irreparabili.
• Non usare prodotti chimici corrosivi, solventi o detergenti aggressivi per pulire
il dispositivo.
• Non utilizzare il prodotto in ambiti applicativi diversi da quanto specificato nel
manuale tecnico.
ATTENZIONE: separare quanto più possibile i cavi delle sonde e degli
ingressi digitali dai cavi dei carichi induttivi e di potenza per evitare
possibili disturbi elettromagnetici.
Non inserire mai nelle stesse canaline (comprese quelle dei quadri
elettrici) cavi di potenza e cavi di segnale
NO POWER
& SIGNAL
CABLES
TOGETHER
READ CAREFULLY IN THE TEXT!
Tutti i suggerimenti sopra riportati sono validi altresì per il controllo, schede
seriali, chiavi di programmazione o comunque per qualunque altro accessorio del
portfolio prodotti CAREL.
CAREL adotta una politica di continuo sviluppo. Pertanto CAREL si riserva il diritto
di effettuare modifiche e miglioramenti a qualsiasi prodotto descritto nel presente
documento senza previo preavviso.
I dati tecnici presenti nel manuale possono subire modifiche senza obbligo di
preavviso
La responsabilità di CAREL in relazione al proprio prodotto è regolata dalle condizioni
generali di contratto CAREL editate nel sito www.carel.com e/o da specifici accordi
con i clienti; in particolare, nella misura consentita dalla normativa applicabile, in
nessun caso CAREL, i suoi dipendenti o le sue filiali/affiliate saranno responsabili
di eventuali mancati guadagni o vendite, perdite di dati e di informazioni, costi
di merci o servizi sostitutivi, danni a cose o persone, interruzioni di attività, o
eventuali danni diretti, indiretti, incidentali, patrimoniali, di copertura, punitivi,
speciali o consequenziali in qualunque modo causati, siano essi contrattuali, extra
contrattuali o dovuti a negligenza o altra responsabilità derivanti dall’installazione,
utilizzo o impossibilità di utilizzo del prodotto, anche se CAREL o le sue filiali/affiliate
siano state avvisate della possibilità di danni.
3
“manuale thT” +0300077IE - rel. 1.2 - 16.07.2015
ITA
Indice
CARATTERISTICHE GENERALI
7
Modelli ................................................................................................................................7
Dimensioni .......................................................................................................................7
Specifiche Tecniche .................................................................................................13
5
“manuale thT” +0300077IE - rel. 1.2 - 16.07.2015
ITA
1. CARATTERISTICHE GENERALI
Il termostato thT Carel è il termostato idoneo per un uso in ambienti
domestici, commerciali o industriali leggeri per il controllo della
temperatura ambiente, dotato di una semplice interfaccia utente.
L’impostazione della temperatura è semplice e intuitiva utilizzando
la manopola posta sul pannello anteriore. Il termostato thT consente
all’utente di effettuare tutte le impostazioni, come ad esempio la
modalità di programmazione di funzionamento delle fasce orarie. Le
dimensioni compatte e il design elegante lo rendono adatto per tutti i
tipi di ambienti, ed è ideale sia come terminale utente per: pompe di
calore, unità roof top e centrali di trattamento aria, o come terminale di
zona per sistemi centralizzati.
La connessione seriale RS485 con protocollo Modbus® permette di
implementare un’architettura con terminali multizona collegati al
controllo, creando una logica di sinergia con controllore programmabile.
Funziona in modalità stand-alone come termostato ambiente, o collegato
con linea seriale ai controllori programmabili per il controllo di zona in
sistemi a radianti.
Il termostato thT è disponibile nella versione con montaggio a incasso
o a parete, con alimentazione a 230 Vac. Per gestire il grado di comfort
di ambienti residenziali su tutti i modelli è disponibile unsensore di
temperatura, e su specifici modelli il sensore di umidità.
Il termostato thT è compatibile con le principali cassette di distribuzione
a incasso disponibili sul mercato.
1.2 Dimensioni
86
48
Dimensioni per il montaggio a incasso
8
86
22,55
28
74
60
Dimensioni della parte posteriore (mm)
1.1 Modelli
60
74
Codici per MONTAGGIO A INCASSO:
THB000AAF0 Termostato thT per temperatura - montaggio a incasso
- versione neutra
THB000ACF0 Termostato thT per temperatura e umidità - montaggio
a incasso - versione neutra
86
Dimensioni per il montaggio a parete
143
Codici per MONTAGGIO A PARETE:
THB000AAW0 Termostato thT per temperatura - montaggio a parete
- versione neutra
THB000ACW0 Termostato thT per temperatura e umidità - montaggio
a parete - versione neutra
8
28
Dimensioni della parte posteriore (mm)
131
83,5
86
E
Avvertenze per l’installazione
• I termostati thT sono stati progettati per il montaggio a parete o a
incasso, con cassette di distribuzione compatibili con le norme in vigore;
• prima di eseguire qualsiasi operazione sul termostato, disconnettere
il dispositivo dall’alimentazione mediante l’interruttore principale
del quadro elettrico (posizione OFF). Successivamente rimuovere e
separare la parte anteriore del termostato da quella posteriore per
effettuare i collegamenti elettrici;
7
“manuale thT” +0300077IE - rel. 1.2 - 16.07.2015
ITA
• per il collegamento seriale, usare cavo schermato tripolare AWG 20-
Istruzioni per il montaggio a parete
1. Separare la parte anteriore del dispositivo da quella posteriore,
utilizzando un cacciavite;
2. Per rimuovere il coperchio A1, svitare la vite A2 e premere sul punto
di incastro; accedere alla morsettiera A3;
3. Praticare i fori nella parete (diam. 5 mm), quindi inserire i tasselli e le
viti in dotazione, accertandosi che i cavi elettrici passino attraverso
l’apertura E;
4. Effettuare i collegamenti elettrici secondo lo schema;
5. Chiudere il coperchio A1, completando a ritroso le stesse operazioni
sopra descritte;
6. Infine, riposizionare correttamente il termostato thT nella posizione
originale, e assicurarsi tramite la pressione a scatto che si agganci
dopo il click.
22. La lunghezza della rete seriale non deve superare i 500 m. Per reti
estese, montare una resistenza da 120 Ohm tra i morsetti RX/TX+ e RX/
TX- sul primo e sull’ultimo dispositivo, per evitare possibili problemi di
comunicazione.
Istruzioni per il montaggio a incasso
Per montare la parte posteriore del dispositivo, utilizzare una scatola ad
incasso di diametro minimo pari a 65 mm e con una profondità minima
di 31 mm.
1. Separare la parte anteriore del termostato thT da quella posteriore
con un cacciavite;
2. Effettuare i collegamenti elettrici secondo lo schema;
3. Fissare la parte posteriore alla cassetta a incasso con le 2 viti in
dotazione:
4. Infine, riposizionare correttamente il termostato thT nella posizione
originale, e assicurarsi tramite la pressione a scatto che si agganci
dopo il click.
Disassemblaggio
Disassemblaggio
b
Rimozione del coperchio
Cablaggio
A3
N 230V~ Power
L 50/60Hz supply
Relay
Rx+/Tx+
Rx–/Tx–
GND
NC
Com
NO
A
B
GND
Serial connections
A1
A2
Relay
click
N 250 V~
POWER
SUPPLY
A3
4
6
NO
Com
B
NC
A
GND
Rx-Tx-
5
Rx+Tx+
Serial connection
L 50/60 Hz
Vista esplosa
E
5
click
6
“manuale thT” +0300077IE - rel. 1.2 - 16.07.2015
E’ possibile modificare la rotazione del display spostando la base nelle
altre tre posizioni possibili:
1. rimuovere la vite;
2. rimuovere la base;
3. ruotare la base e fissarla nella posizione scelta;
4. serrare la vite.
4
8
ITA
Esempio di connessioni di rete
AC85~ 250 V 50/60 Hz
N L
thT - ID50
L
N
Power line
NO
COM
Load
NC
GND
B(-)
A(+)
120Ω
Disassemblaggio
Inserire un cacciavite nella scanalatura della parte alta e premere verso il
basso per rimuovere il display.
thT - ID51
L
Note generali
Evitare di installare il dispositivo in ambienti con le seguenti caratteristiche:
• Umidità relativa superiore al valore specificato;
• Forti vibrazioni o urti;
• Esposizione a spruzzi d’acqua;
• Esposizione ad atmosfere aggressive e inquinanti (ad es.: zolfo e vapori
di ammoniaca, vapori salini, fumo), in modo da evitare fenomeni di
corrosione e/o ossidazione;
• Forti interferenze magnetiche e/o di radio frequenze (per esempio, in
prossimità di antenne trasmittenti);
• Esposizione alla luce diretta del sole o agli agenti atmosferici in generale;
• Ampie e rapide fluttuazioni della temperatura ambiente;
• Ambienti con presenza di esplosivi o miscele di gas infiammabili;
• Esposizione a polveri (formazione di patina corrosiva con possibilità di
ossidazione e riduzione dell’isolamento).
N
Power line
NO
COM
Load
NC
GND
B(-)
A(+)
thT - ID81
L
N
Power line
NO
Collegamenti elettrici
COM
thT
GND
L
N
B(-)
Power line
A(+)
Digital
output
A (Rx+/Tx+)
B (Rx-/Tx-)
GND
COM
120Ω
NO
NC
GND
B(-)
A(+)
Load
NC
AC85~ 250 V 50/60 Hz
N L
Serial
connection
Serial connection
RS485 Modbus
A+ B- Gnd NC Com NO
N
L
9
“manuale thT” +0300077IE - rel. 1.2 - 16.07.2015
ITA
Display
Tasto
1
Descrizione Funzione
Impostazione Se si desidera impostare i parametri, è
dei parametri possibile operare come segue:
a. Spegnere il termostato
+
7
+
" per
b. Tenere premuto "
5 secondi
c. Ruotare la manopola, e impostare la
password su 22
d. Selezionare il parametro e cambiare il
valore ruotando e premendo la manopola.
Uscire dal menu:
• Attendere 20 secondi senza effettuare
alcuna operazione;
• Confermare premendo uno qualsiasi
dei 4 tasti;
8
9
2
10
11
3
4
12
13
5
6
Tasti:
1.
2.
3.
4.
5.
6.
7.
8.
9.
10.
11.
12.
13.
14.
15.
14
Controllo umidità
15
Attivare il termostato (modello con versione umidità); tenendo premuto il tasto
“modalità” per 3 secondi, il display visualizzerà “ %rH value”. Se il thT è dotato solo
di sensore di temperatura (senza umidità), il display visualizzerà “no H”.
Tasto ventilazione/riscaldamento
Modalità di funzionamento
Campo principale
Fascia oraria attiva
Campo secondario
Giorno della settimana
Allarme
Funzione ventilazione/riscaldamento
Velocità di ventilazione/ Durata del riscaldamento forzato
Unità di misura della temperatura
Tasto di blocco
Setpoint (valore di riferimento)
Umidità
Fascia oraria attuale
Valvola attivata
Riscaldamento forzato
Il tasto “
” viene configurato come modalità ventilazione (
) o riscaldamento (
) secondo il parametro FH (ventilazione riscaldamento).
• FH = 00 -> ventilazione
• FH = 01 -> Riscaldamento
Questa informazione è inviata dal modbus (coil 53).
Quando “FH” = 0
Premendo il tasto
, è possibile selezionare la velocità desiderata
(min, med, max) o quella automatica (Auto) e inviare queste informazioni
tramite il modbus RTU (registro 7)
Velocità minima di ventilazione
Funzione dei tasti
Tasto
Velocità media di ventilazione
Descrizione
Selezione
della modalità
Controllo
dell'umidità
Funzione
Premendo brevemente, è possibile
selezionare le diverse modalità desiderate.
Premendo per 3 secondi, è possibile
controllare l'umidità corrente con
l'indicazione "XX%rH"; se non è presente
alcun sensore di umidità, il display
visualizzerà "no H"
Ventilazione Se è visualizzata l'icona di ventilazione,
premendo il tasto è possibile selezionare
diverse velocità di ventilazione.
Riscaldamento Se è visualizzata l'icona di riscaldamento,
premendo il tasto è possibile selezionare
la durata del riscaldamento forzato.
Orologio
Premendo brevemente, è possibile
attivare fascia oraria, funzioni Eco o Party
e cancellarle.
Premendo per 3 secondi, è possibile
selezionare l'impostazione dell'orologio,
della fascia oraria, il setpoint della
funzione Eco o di quella Party.
Tasto On/Off Premendo brevemente, è possibile
accendere/spegnere il termostato.
Tasto di
Premendo per 3 secondi, è possibile
blocco
bloccare/sbloccare tutti i tasti.
Manopola
Ruotando la manopola, è possibile
regolare i parametri o i setpoint.
“manuale thT” +0300077IE - rel. 1.2 - 16.07.2015
Velocità massima di ventilazione
Velocità automatica di ventilazione
Quando “FH” = 1
Il tasto è configurato per la gestione del dispositivo in riscaldamento;
premendo questo tasto si può selezionare l’intervallo di tempo durante
il quale l’unità verrà forzata al 100% (20, 40 o 60 minuti). Questa
informazione è inviata dal modbus RTU (registro 8)
Premendo il tasto, si può impostare la durata desiderata del riscaldamento
forzato. Ogni pressione del tasto, incrementa la durata di: 20, 40, o 60
minuti, come visualizzato sul display.
+
=
+
=
+
=
20 min
40 min
60 min
Quando il relè è attivo, viene visualizzata l’icona
.
• Se il parametro “FS” è = 0 (controllo del termostato), lo stato del tasto
ventilazione/riscaldamento viene deciso dal termostato.
• Se il parametro”FS” è = 1 (controllo del supervisore) e “FH” = 0, il tasto
è configurato come “tasto della velocità di ventilazione” e lo stato è
deciso dal supervisore (registro 70).
• Se il parametro “FS” = 1 (controllo del supervisore) e “FH” = 1, il tasto
è configurato come “tasto del riscaldamento” e lo stato è deciso dal
supervisore (registro 71).
10
ITA
Impostazione dell’orologio
Accendere il termostato, premere continuamente “
Nota: Le informazioni di “hh”, “mm” e “settimana” vengono inviate dal
modbus RS485:
• hh - registro 6
• mm - registro 7
• giorno - registro 8
“ per 5 secondi;
quando il campo secondario visualizza “hh:mm”, premere “
”,
• hh lampeggia: ruotare la manopola per impostare l’ora e premerla per
confermare;
• mm lampeggia: ruotare la manopola per impostare i minuti e premerla
per confermare;
• il giorno della settimana lampeggia: ruotare la manopola per impostare
il giorno e premerla per confermare.
Selezione delle funzioni Fascia oraria/Eco/Party
Accendere il termostato e premere “ ” per selezionare la funzione
prescelta. Le funzioni disponibili dipendono dal valore del “tE”.
Impostazione della funzione Eco
Impostazione della fascia oraria
L’attivazione di questa funzione consente di avere una temperatura differente
e prestabilita, inferiore al setpoint, in modalità risparmio energetico.
Accendere il termostato, premere continuamente “ ” per 5 secondi,
ruotare la manopola e premerla quando il campo secondario visualizza
“F5-2 “. Ora, è possibile impostare la fascia oraria come segue:
• Selezionare “giorno lavorativo” o “week end” ruotando la manopola, e
confermare premendola.
“ per 5 secondi,
Accendere il termostato, premere continuamente “
quindi ruotare la manopola e premerla quando il campo secondario
visualizza “F Lo”. Ora, è possibile impostare il setpoint della funzione Eco,
ruotando la manopola e confermare premendola.
Il setpoint della funzione Eco è -3 °C in inverno e +3 °C in estate.
L’informazione sul “setpoint Eco” viene inviata dal modbus RS485 (registro 52)
Impostazione della funzione Party
1
5 Giorni
L’attivazione di questa funzione consente di avere una temperatura
differente e prestabilita, superiore al setpoint, da attivare in situazioni
straordinarie.
1
“ per 5 secondi,
Accendere il termostato, premere continuamente “
ruotare la manopola e premerla quando il campo secondario visualizza “F
Hi”. Ora è possibile impostare il setpoint della funzione Party ruotando la
manopola, e confermare premendola.
2 giorni
1. Rotazione della manopola "encoder"
• Selezionare una fascia oraria ruotando la manopola, e confermare premendola.
• Impostare l’orario di avvio ruotando la manopola, e confermare premendola.
• Impostare il setpoint, ruotando la manopola, e confermare premendola.
Setpoint
Accendere il termostato, girare la manopola verso destra per aumentare
il setpoint, e girare verso sinistra per ridurre il setpoint, in incrementi/
decrementi di 0,5 °C.
I valori predefiniti nel termostato sono i seguenti:
Giorno lavorativo/
week end
Giorno lavorativo
(lunedì - venerdì)
Week end (sabato domenica)
Orario 1
Orario 2
Orario 3
Orario 4
Avvio/Passo Avvio/Passo Avvio/Passo Avvio/Passo
Differenziale
Per effettuare questa operazione, accedere al menu dF (differenziale) e
selezionare il nuovo valore con incrementi di 0,5. (0,5 – 1,0 – 1,5 – 2,0 °C).
7:00/15.0
17:00/22.0
21:00/20.0
22:00/18.0
Controllo dell’uscita
7:00/22.0
09:00/20.0
17:00/22.0
22:00/18.0
La modalità di controllo è disponibile sia in modalità di raffreddamento
che di riscaldamento, ed è gestita dall’utente.
• Setpoint invernale (lo schermo visualizza l’icona “ “ )
• Setpoint estivo (lo schermo visualizza l’icona “ “ )
Nota: la sequenza delle fasce orarie è fissa ed è possibile visualizzarla e
scorrerla come è impostata (ossia per tornare indietro è necessario
continuare a ruotare l’encoder fino all’avvio, e ripetere la procedura dall’inizio).
Il parametro dF (differenziale) viene impostato nel menu impostazione
parametri ed il valore differenziale in modalità raffreddamento/
riscaldamento che agisce sul relè di uscita.
La regolazione si basa sul valore della temperatura rilevato dal sensore,
con i setpoint definito dall’utente.
1
cooling
heating
Output
Output
2
R1
dF
1
1
2
3
4
Pressione dell' "encoder"
Selezionare una delle 4
"fasce orarie" o "esc"
Setpoint
Orario di inizio della fascia
oraria selezionata
Push of
“ENCODER”
R1
Temp.
dF
Temp.
set point
set point
Impostazione dei parametri
3
Spegnere il termostato, premere e tenere premuti “
+
“
per 5 secondi, quindi inserire la password e premere la manopola per
confermare. L’elenco dei parametri è il seguente:
4
11
“manuale thT” +0300077IE - rel. 1.2 - 16.07.2015
ITA
Visualiz. Descrizione
LCD
PS
Password
FH
Configurazione VENTILAZIONE/
RISCALDAMENTO
Co
Configurazione tasto "modalità"
tC
Compensazione del sensore di
temperatura
HC
Compensazione del sensore di
umidità
FE
Abilitazione della modalità
sbrinamento
Ft
Temperatura di sbrinamento
Id
Indirizzo BMS
Br
Velocità di trasmissione dati
bE
dF
LE
rC
Ar
tE
tM
IE
dS
FS
Valore
predef.
00
00
3
0,0 °C
Ripristino automatico
Nota
Per uso interno. Viene fissato a 1;
La Password è: 22
• 00:VENTILAZIONE
• 01:RISCALDAMENTO
Intervallo da 1 a 511
da - 5,0 a + 5,0 °C
Tasto orologio
Per selezionare la sequenza di icone da visualizzare sul display, accedere
al menu parametri e configurare il parametro “tE” quindi, tramite la
manopola, selezionare il nuovo valore girando a destra o a sinistra, e
0,0 % UR da - 10,0 % a + 10,0
% UR
01
• 00: Disabilitata
• 01: Abilitata
5,0 °C
da 5 a 17 °C
50
da 50 a 81
00
• 00:19200
• 01:9600
• 02:4800
Abilitazione del buzzer
01
• 00: Disabilitato
(avvisatore acustico)
• 01: Abilitato
Differenziale
0,5 °C
• 0,5 °C
• 1,0 °C
• 1,5 °C
• 2,0 °C
Abilitazione del blocco tasti
0
• 00: Disabilitato
• 01: Abilitato
Gestione del relè
00
• 00: Automatica
• 01: Manuale
Ripristino automatico
01
Fisso
Tasto di configurazione orologio 07
da 01a 07
ON/OFF comandato da:
00
• 00: Termostato
• 01: RS485
Numero di variabili da visualizzare 00
da 00 a 05
Tasto di modalità comandato da 00
• 00: Termostato
• 01: RS485
VENTILAZIONE/RISCALDAMENTO 00
• 00: Termostato
comandato da:
• 01: RS485
premere “
” per confermare.
I simboli possono essere attivati separatamente o in coppia, e la sequenza
è definita impostando su “1” i vari bit del parametro di configurazione.
Numero
di bit
00
Valore
Simbolo
Azione
0/1
01
0/1
Abilita il setpoint Eco
02
0/1
Abilita il setpoint
Party
+ icona della fascia
oraria attiva
Abilita la fascia oraria
Ad esempio:
Se i bit 00, 01 e 02 sono impostati su “1”, il valore della variabile di
configurazione è uguale a 7 (codice binario convertito in codice
decimale) e la sequenza di pressione del tasto “orologio” è:
->
->
Nessuna fascia oraria ->
(Nessuna icona visualizzata)
e icona della fascia oraria attiva
Premendo il tasto, è possibile selezionare la fascia oraria desiderata.
La logica è quella di cambiare le diverse fasce orarie premendo il tasto; il
relativo ciclo può gestire 4 diverse scelte:
1. Nessuna fascia oraria (nessuna icona visualizzata)
Taratura del sensore di temperatura
Per regolare la taratura della temperatura, accedere al menu tC (taratura
della temperatura). La variazione minima di temperatura del sensore
tramite rotazione dell’encoder è di ± 0,1 °C, in un range compreso tra
-5 e + 5 °C;
2.
Funzione fascia oraria (le icone attivate sono “
fascia oraria corrente)
3.
Funzione Eco (l’icona attivata è “
4.
Funzione Party (l’icona attivata è “
” e l’icona relativa alla
”)
”)
Spegnimento e accensione del termostato (ON/OFF)
Lo spegnimento e l’accensione del termostato sono gestiti dal
termostato stesso o dal supervisore. La scelta viene effettuata nel menu
parametri (parametro “tM”).
Se il parametro”tM” = 0 (controllo del termostato)
Taratura del sensore di umidità
Disponibile solo sui modelli con sensore di umidità. Per regolare la
taratura dell’umidità, accedere al menu hC (taratura dell’umidità).
La variazione minima di umidità del sensore tramite la rotazione
dell’encoder è di ± 0,1 UR%, in un range compreso tra -10 a +10 UR %;
Se la funzione sbrinamento è abilitata (FE - Abilitazione sbrinamento
impostata su 01), quando il termostato è spento e la temperatura
“; premere “
“ nuovamente per spegnere
Per accendere premere “
il termostato e la sua uscita.
Se il parametro “tM” = 1 (controllo del supervisore) -> coil 58
Lo spegnimento e l’accensione del termostato vengono effettuati da un
supervisore (coil 50).
Lo stato On-Off viene inviato dall’RS485 (coil 8).
è inferiore a “Ft”, l’uscita attiva il relè, e il display LCD visualizza “ ”;
quando la temperatura aumenta fino a “Ft+2 °C, l’uscita disattiva il relè e
Allarme
Modalità sbrinamento
l’icona “
Quando è presente uno dei seguenti allarmi, viene visualizzato il codice
di errore sul display LCD, e il buzzer viene attivato (in accordo con il
parametro bE - Abilitazione del buzzer). L’uscita del relè si chiude, ed
” scompare.
Temperatura di sbrinamento
appare “
Per effettuare questa operazione, accedere al menu Ft (Temperatura di
sbrinamento) e selezionare il nuovo valore compreso tra 5,0 e 17,0 °C.
Visualizzazione
sull'LCD
E1
E2
EE
HI
LO
AC
Abilitazione del buzzer
Per effettuare questa operazione, accedere al menu bE (Abilitazione del
buzzer) e confermare:
• 0= Disabilitato;
• 1= Abilitato;
Blocco dei tasti
Allarme
Allarme di corto circuito del sensore
Allarme di circuito del sensore aperto
Anomalia dell'eeprom
Temperatura superiore a 55 °C
Temperatura inferiore a 0 °C
Sveglia
Visualizzazione del messaggio CN
Per effettuare questa operazione, accedere al menu LE (Attivazione del
blocco) e confermare il nuovo valore.
• 0 = Disabilitato;
• 1 = Abilitato;
“manuale thT” +0300077IE - rel. 1.2 - 16.07.2015
”.
All’accensione, dopo i primi 30 secondi dalla rilevazione del traffico dati
sulla linea seriale, il termostato verrà riconosciuto come dispositivo di
rete. Quando la comunicazione si interrompe o il cavo viene tagliato
o disconnesso, dopo 30 secondi nel secondo campo del display
viene visualizzato in modo lampeggiante il messaggio “CN” alternato
all’orologio (10 secondi per l’orologio e 2 secondi per il messaggio CN).
12
ITA
1.3 Specifiche Tecniche
Indirizzo Tipo
R o R/W
Alimentazione
Potenza assorbita
Condizioni di funzionamento
Dal 5% fino al 90% di umidità relativa (UR)
Condizioni di stoccaggio
Dal 5% fino al 90% di umidità relativa (UR)
Indice di protezione
Display
Valore di temperatura visualizzato
Precisione di misurazione della
temperatura
Precisione di misurazione dell'umidità
Carico max. di corrente per il relè
Norme
Da 85 a 260 V ca, 50/60 Hz
2 VA
Da 0 fino a +45 °C
56
Coil
R/W
57
Coil
R/W
Da -10 fino a +55 °C
58
Coil
R/W
IP 20
LCD (retro illuminato bianco)
Da -10 a + 60 °C -> ± 0,1 C°
Da 0 fino a + 45 °C -> ± 0,5 C°
59
Coil
R/W
60
Coil
R/W
Mantenimento dei param. impostati
Tipo di relè
Tensione del relè
Dal 20 all'80% UR: ± 5% UR
Max. 5 A (Resistivo) / 2 A (induttivo)
Conforme alla norma EN60730 Categoria II
Conformità REACH
Conformità RoHS
3 anni
SPDT (N.A./N.C.)
230 V ca
Descrizione delle
Interpretazione dei
variabili
dati
Abilitazione del buzzer 0: Off
1: Abilitato
Abilitazione della fascia 0: Off
oraria
1: Abilitata
Selezione On/Off del 0: Off
termostato
1: On
Selezione del tasto
0: mediante
modalità
termostato
1: mediante linea
seriale RS485
Selezione del
0: mediante
tasto Ventilazione/
termostato
1: mediante linea
Riscaldamento
seriale RS485
Comandi dei registri di ingresso/memoria
Indirizzo Tipo
1
2
Registro
Registro
Ro
R/W
R
R
3
Registro
R
Descrizione delle
variabili
Codice macchina
Revisione di hardware e
firmware
Versione del firmware
Modalità di comunicazione
4
Registro
R
Temperatura ambiente
Tipo di protocollo: RTU
Bit dati: 8
Bit stop: 2
Parità: Nessuno
5
6
7
Registro
Registro
Registro
R
R
R
Velocità di trasmissione dei dati BMS
8
Registro
R
Per effettuare questa operazione, accedere al menu Br (velocità di
trasmissione dei dati) e confermare il valore:
• 0= 19200 (impostazione predefinita)
• 1= 9600
• 2= 4800
9
10
11
Registro
Registro
Registro
R/W
R/W
R/W
Umidità ambiente
Stato della modalità
Valore di variabile
Modalità di ventilazione 00 Alta
01 Media
02 Bassa
03 Automatica
Modalità di
00 Disabilitata
riscaldamento
01 20 minuti
02 40 minuti
03 60 minuti
Impostazione dell'ora
Da 0 a 23
Impostazione dei minuti Da 00 a 59
Impostazione del giorno 0= Domenica
della settimana
…
6= Sabato
51
Registro
R/W
52
Registro
R/W
53
Registro
R/W
54
Registro
R/W
55
Registro
R/W
0 normale; 1 guasto
0 normale; 1 guasto
56
Registro
R/W
0 normale; 1 guasto
57
Registro
R/W
58
59
Registro
Registro
R/W
R/W
60
Registro
R/W
61
Registro
R/W
62
Registro
R/W
63
Registro
R/W
64
Registro
R/W
65
Registro
R/W
69
Registro
R/W
70
Registro
R/W
Connessioni RS485
Bus seriale RS485: AWG da 20 a 22, cavo schermato, Lmax=500 m
Alimentazione: Sezione dei cavi: da 0,5 mm2 a 1,5 mm2
Impostazione di indirizzo dell’RS485
Per effettuare questa operazione, selezionare il parametro Id (Identificazione
del dispositivo) per confermare l’indirizzo seriale RS485 del termostato.
È possibile collegare fino a 32 termostati. L’indirizzo seriale è definito
nell’intervallo da 50 a 81 (Indirizzo predefinito 50).
Tabella riassuntiva dei parametri di funzionamento
Elenco delle bobine
Indirizzo Tipo
R o R/W
1
2
Coil
Coil
R
R
3
4
Coil
Coil
R
R
5
Coil
R
6
Coil
R
7
Coil
R
8
Coil
R
50
Coil
R/W
51
Coil
R/W
52
Coil
R/W
53
Coil
R/W
54
Coil
R/W
55
Coil
R/W
Descrizione delle
variabili
Sonda di corto circuito
Sonda di circuito
aperto
Anomalia E²
Allarme di temperatura
elevata
Allarme di temperatura
bassa
Stato dell'allarme
Interpretazione dei
dati
0 normale; 1 guasto
0 normale; 1 guasto
0: Nessun allarme
1: Allarme
Stato On/Off
0: Off
1: On
Stato On/Off del
0: Off
termostato
1: On
Comando On/Off del 0: Off
termostato
1: On
Configurazione della 0: Automatica
gestione dei relè
(impostazione
predefinita)
1: Manuale
Regolazione dei relè in 0: Off
modalità manuale
1: On
Configurazione del
0: Ventilazione
tasto Ventilazione/
1: Riscaldamento
Riscaldamento
Abilitazione
0: Off
della modalità di
1: Abilitata
sbrinamento
Abilitazione della
0: Off
funzione di blocco tasti 1: Abilitata
13
Interpretazione
dei dati
Stabilito in 314
1.021
In funzione della
versione del
firmware (ad es.:10
per firmware 1.0)
Valore di temperatura
(0T60 °C)
Setpoint di temperatura Valore della
temperatura (5,0
…35,0 °C)
Setpoint Eco
Valore di
temperatura (da 5,0
a 35,0 °C)
Setpoint Party
Valore di
temperatura (da 5,0
a 35,0 °C)
Configurazione del tasto Valore intero
modalità
Configurazione del tasto Valore intero
orologio
Taratura del sensore di
Valore di
temperatura
temperatura (da
-5,0 a +5,0 °C)
Taratura del sensore di
Valore di umidità (da
umidità
-10,0 a +10,0 UR%)
Differenziale
0,5 -1,0 -1,5 -2,0 °C
Temperatura di
Da 5 a 17 °C
sbrinamento
Impostazione del menu Da 0 a 5
informazioni
Menu informazioni valore della variabile 1
Menu informazioni valore della variabile 2
Menu informazioni valore della variabile 3
Menu informazioni valore della variabile 4
Menu informazioni valore della variabile 5
Impostazione del tasto
modalità
Impostazione del tasto 00 Alta
della ventilazione
01 Media
02 Bassa
03 Automatica
“manuale thT” +0300077IE - rel. 1.2 - 16.07.2015
ITA
Indirizzo Tipo
71
Registro
Ro
R/W
R/W
101
Registro
R/W
102
Registro
R/W
103
Registro
R/W
104
Registro
R/W
105
Registro
R/W
106
Registro
R/W
107
Registro
R/W
108
Registro
R/W
109
Registro
R/W
110
Registro
R/W
111
Registro
R/W
112
Registro
R/W
113
Registro
R/W
114
Registro
R/W
115
Registro
R/W
116
Registro
R/W
117
Registro
R/W
118
Registro
R/W
119
Registro
R/W
120
Registro
R/W
121
Registro
R/W
122
Registro
R/W
123
Registro
R/W
124
Registro
R/W
Descrizione delle
variabili
Impostazione del tasto
del riscaldamento
hh Fascia oraria 1 dal
lunedì al venerdì
mm fascia oraria 1 dal
lunedì al venerdì
Setpoint fascia oraria 1
dal lunedì al venerdì
hh fascia oraria 2 dal
lunedì al venerdì
mm fascia oraria 2 dal
lunedì al venerdì
Setpoint fascia oraria 2
dal lunedì al venerdì
hh fascia oraria 3 dal
lunedì al venerdì
mm fascia oraria 3 dal
lunedì al venerdì
Setpoint fascia oraria 3
dal lunedì al venerdì
hh fascia oraria 4 dal
lunedì al venerdì
mm fascia oraria 4 dal
lunedì al venerdì
Setpoint fascia oraria 4
dal lunedì al venerdì
hh fascia oraria 1 sabato domenica
mm fascia oraria 1
sabato - domenica
Setpoint fascia oraria 1
sabato - domenica
hh fascia oraria 2 sabato domenica
mm fascia oraria 2
sabato - domenica
Setpoint fascia oraria 2
sabato - domenica
hh fascia oraria 3 sabato domenica
mm fascia oraria 3
sabato - domenica
Setpoint fascia oraria 3
sabato - domenica
hh fascia oraria 4 sabato domenica
mm fascia oraria 4
sabato - domenica
Setpoint fascia oraria 4
sabato - domenica
“manuale thT” +0300077IE - rel. 1.2 - 16.07.2015
Interpretazione
dei dati
00 Disabilitato
01 20 minuti
02 40 minuti
03 60 minuti
00 - 23
00 - 59
5,0 – 35,0
00 - 23
00 - 59
5,0 – 35,0
00 - 23
00 - 59
5,0 – 35,0
00 - 23
00 - 59
5,0 – 35,0
00 - 23
00 - 59
5,0 – 35,0
00 - 23
00 - 59
5,0 – 35,0
00 - 23
00 - 59
5,0 – 35,0
00 - 23
00 - 59
5,0 – 35,0
14
ENG
DISPOSAL
IMPORTANT
CAREL bases the development of its products on decades of experience in
HVAC, on the continuous investments in technological innovations to products,
procedures and strict quality processes with in-circuit and functional testing on
100% of its products, and on the most innovative production technology available
on the market. CAREL and its subsidiaries nonetheless cannot guarantee that all
the aspects of the product and the software included with the product respond
to the requirements of the final application, despite the product being developed
according to start-of-the-art techniques.
The customer (manufacturer, developer or installer of the final equipment) accepts
all liability and risk relating to the configuration of the product in order to reach
the expected results in relation to the specific final installation and/or equipment.
CAREL may, based on specific agreements, act as a consultant for the positive
commissioning of the final unit/application, however in no case does it accept
liability for the correct operation of the final equipment/system.
INFORMATION FOR USERS ON THE CORRECT HANDLING OF WASTE
ELECTRICAL AND ELECTRONIC EQUIPMENT (WEEE)
In reference to European Union directive 2002/96/EC issued on 27 January 2003
and the related national legislation, please note that:
•
WEEE cannot be disposed of as municipal waste and such waste must be
collected and disposed of separately;
•
the public or private waste collection systems defined by local legislation must
be used. In addition, the equipment can be returned to the distributor at the
end of its working life when buying new equipment;
•
the equipment may contain hazardous substances: the improper use or
incorrect disposal of such may have negative effects on human health and on
the environment;
•
the symbol (crossed-out wheeled bin) shown on the product or on the
packaging and on the instruction sheet indicates that the equipment has
been introduced onto the market after 13 August 2005 and that it must be
disposed of separately;
•
in the event of illegal disposal of electrical and electronic waste, the penalties
are specified by local waste disposal legislation.
The CAREL product is a state-of-the-art product, whose operation is specified in the
technical documentation supplied with the product or can be downloaded, even
prior to purchase, from the website www.CAREL.com.
Each CAREL product, in relation to its advanced level of technology, requires setup
/ configuration / programming / commissioning to be able to operate in the best
possible way for the specific application. The failure to complete such operations,
which are required/indicated in the user manual, may cause the final product to
malfunction; CAREL accepts no liability in such cases.
Only qualified personnel may install or carry out technical service on the product.
The customer must only use the product in the manner described in the
documentation relating to the product.
Warranty on the materials: 2 years (from the date of production, excluding
consumables).
Approval: the quality and safety of CAREL INDUSTRIES Hqs products are
guaranteed by the ISO 9001 certified design and production system.
In addition to observing any further warnings described in this manual, the
following warnings must be heeded for all CAREL products:
•
Prevent the electronic circuits from getting wet. Rain, humidity and all
types of liquids or condensate contain corrosive minerals that may damage
the electronic circuits. In any case, the product should be used or stored
in environments that comply with the temperature and humidity limits
specified in the manual.
•
Do not install the device in particularly hot environments. Too high
temperatures may reduce the life of electronic devices, damage them and
deform or melt the plastic parts. In any case, the product should be used
or stored in environments that comply with the temperature and humidity
limits specified in the manual.
•
Do not attempt to open the device in any way other than described in the
manual.
•
Do not drop, hit or shake the device, as the internal circuits and mechanisms
may be irreparably damaged.
•
Do not use corrosive chemicals, solvents or aggressive detergents to clean
the device.
•
Do not use the product for applications other than those specified in the
technical manual.
WARNING: separate as much as possible the probe and digital input
signal cables from the cables carrying inductive loads and power cables
to avoid possible electromagnetic disturbance.
Never run power cables (including the electrical panel wiring) and signal
cables in the same conduits.
NO POWER
& SIGNAL
CABLES
TOGETHER
READ CAREFULLY IN THE TEXT!
All of the above suggestions likewise apply to the controllers, serial boards,
programming keys or any other accessory in the CAREL product portfolio.
CAREL adopts a policy of continual development. Consequently, CAREL reserves
the right to make changes and improvements to any product described in this
document without prior warning.
The technical specifications shown in the manual may be changed without prior
warning.
The liability of CAREL in relation to its products is specified in the CAREL general
contract conditions, available on the website www.CAREL.com and/or by specific
agreements with customers; specifically, to the extent where allowed by applicable
legislation, in no case will CAREL, its employees or subsidiaries be liable for any
lost earnings or sales, losses of data and information, costs of replacement
goods or services, damage to things or people, downtime or any direct, indirect,
incidental, actual, punitive, exemplary, special or consequential damage of any
kind whatsoever, whether contractual, extra-contractual or due to negligence, or
any other liabilities deriving from the installation, use or impossibility to use the
product, even if CAREL or its subsidiaries are warned of the possibility of such
damage.
3
“manuale thT” +0300077IE - rel. 1.2 - 16.07.2015
ENG
Content
1.
GENERAL FEATURES
7
1.1 Models ......................................................................................................................7
1.2 Dimensioni .............................................................................................................7
1.3 Technical specifications...............................................................................13
5
“manuale thT” +0300077IE - rel. 1.2 - 16.07.2015
ENG
1. GENERAL FEATURES
ThT Thermostat is the CAREL room thermostat that allows users to
control the temperature in residential or light commercial environments,
providing of simplified interface that is ideal for end users. Temperature
set is simple and intuitive, using the knob on the front panel. thT also
allows the user to make some settings, such as the operating mode and
time bands. Compact dimensions and elegant design make it suitable for
all types of rooms, as well as being ideal both as a simplified HMI (Human
Unit Interface) for heat pumps, rooftop units, AHUs, etc. and as zone
controller display for centralised systems.
The RS485 serial connection over Modbus® protocol means architecture
can be implemented in which multiple displays are connected to a
controller to create synergic control logic with programmable controllers.
It can works in stand–alone mode as ambient thermostat or connected
to programmable controllers as zone control in the radiator systems too.
Depending on the model, thT thermostat is fitted for Flush or Wall
mounting and power supply is 230 Vac.
A temperature sensor is available in all models in order to manage
the comfort in the residential ambient, and a Humidity sensor only on
specific models.
thT is compatible with the main flush mount distribution boxes available
on the market.
1.2 Dimensioni
86
48
Dimension flush mounting
8
86
22,55
28
74
60
Dimensions of rear part (mm)
1.1 Models
Codes FLUSH MOUNTING:
THB000AAF0 tht thermostat temperature - flush mounting - neutral
version
THB000ACF0 tht thermostat temperature and humidity - flush
mounting - neutral version
60
74
86
Dimension wall mounting
Codes WALL MOUNTING:
THB000AAW0 tht thermostat temperature - wall mounting - neutral
version
THB000ACW0 tht thermostat temperature and humidity - wall
mounting - neutral version
143
8
28
Dimensions of rear part (mm)
131
83,5
86
E
Installation warnings
• These thT thermostats have been designed for wall or flush mount
assembly, on distribution boxes compliant with the standards in force;
• before performing any operations on the thermostat, disconnect the
power supply from the device by switching the main switch on the
electrical panel OFF. Then remove the front part of the thermostat from
the rear to make the electrical connections;
7
“manuale thT” +0300077IE - rel. 1.2 - 16.07.2015
ENG
• for the serial connection use three-wire shielded cable, AWG 20-22. The
Assembly for the wall mounting
1. Separate the front from the rear of the terminal using a screwdriver;
2. To remove cover A1, unscrew screw A2 and press the point of
attachment; access terminal block A3;
3. Drill the holes in the wall (dia. 5 mm); then insert the plugs and screws
supplied, making sure that the electrical wires pass through hole E;
4. Make the electrical connections according with the schematic;
5. Close cover A1, completing the same operations as described above
in reverse;
6. Finally reposition the thT thermostat the original position and ensure
to fix it with clicks into place.
length of the network must not exceed 500 m. For extended networks
fit a 120 Ohm resistor between RX/TX+ and RX/TX- on the first and last
device, to avoid possible communication problems.
Assembly for the flush mounting
To fit the rear part of the terminal use a flush mount box with a min.
diameter of 65 mm and a minimum depth of 31 mm.
1. Detach the front from the rear of the thT thermostat using a
screwdriver;
2. Make the electrical connections according with the schematic;
3. Fasten the rear to the flush mount box using the 2 screws supplied:
4. Finally reposition the thT thermostat the original position and ensure
to fix it with clicks into place.
Dismantling
Dismantling
b
Cover dismantling
Wiring
A3
A2
5
click
Relay
N 250 V~
NO
Com
B
NC
A
GND
Rx-Tx-
Exploded
Rx+Tx+
Serial connection
L 50/60 Hz
Relay
A1
N 230V~ Power
L 50/60Hz supply
Rx+/Tx+
Rx–/Tx–
GND
NC
Com
NO
A
B
GND
Serial connections
POWER
SUPPLY
A3
E
4
6
5
Is It Possible to change the rotation of the display moving the base in the
other three possible positions:
1. remove the screw;
2. remove the base;
3. turn the base and place it in the right position;
4. tighten the screw;
click
6
“manuale thT” +0300077IE - rel. 1.2 - 16.07.2015
4
8
ENG
Example of network connections
AC85~ 250 V 50/60 Hz
N L
thT - ID50
L
N
Power line
NO
COM
Load
NC
GND
B(-)
A(+)
120Ω
Dismantling
Insert a screwdriver into the clot at the top and press downwards to
detach the display.
thT - ID51
L
General notes
Avoid installing the terminal in environments with the following
characteristics:
• relative humidity greater than the value specified;
• strong vibrations or knocks;
• exposure to water sprays;
• exposure to aggressive and polluting atmospheres (e.g.: sulphur and
ammonia fumes, saline mist, smoke) so as to avoid corrosion and/or
oxidation;
• strong magnetic and/or radio frequency interference (for example,
near transmitting antenna);
• exposure to direct sunlight or the elements in general;
• large and rapid fluctuations in the room temperature;
• environments where explosives or mixes of flammable gases are
present;
• exposure to dust (formation of corrosive patina with possible oxidation
and reduction of insulation).
N
Power line
NO
COM
Load
NC
GND
B(-)
A(+)
thT - ID81
L
N
Power line
NO
COM
Load
NC
Electrical connections
GND
AC85~ 250 V 50/60 Hz
N L
thT
B(-)
A(+)
N
120Ω
L
Power line
COM
NC
A (Rx+/Tx+)
B (Rx-/Tx-)
GND
NO
Digital
output
GND
B(-)
A(+)
Serial connection
RS485 Modbus
Serial
connection
A+ B- Gnd NC Com NO
N
L
9
“manuale thT” +0300077IE - rel. 1.2 - 16.07.2015
ENG
Display
Key
Description
Parameter
setting
+
1
7
+
“ for 5
b. press and hold “
seconds
c. rotate the knob, set the password to 22
d. select parameter and change its value
by rotating and press the knob.
Exit form menu:
• Waiting 20s without any operation;
• Confirm with any of the 4 key pressed;
8
9
2
10
11
3
4
5
Key:
1.
2.
3.
4.
5.
6.
7.
8.
9.
10.
11.
12.
13.
14.
15.
12
Humidity Check
13
Turn on the thermostat (model with humidity version), press and hold
“mode” for 3 seconds, the LCD will display “%rH value”, if thT is only
temperature sensor (no humidity), the display will show “no H”.
14
6
Function
If you want to set parameter, you can
operate as following
a. turn off the thermostat
15
Key Fan/Heating
The key “
“ is configured as Fan (
) or Heating (
according with parameter FH (Fan – Heating).
•
FH = 00 -> Fan
•
FH = 01 -> Heating
This information is sent by modbus (Coil 53).
Operating mode
Main field
Time Band active
Secondary field
Day of week
Alarm
Fan/Heating function
Fan speed/Forced heating time
Temperature unit
Key locked
Set point
Humidity
Current time band
Valve on
Forced heating
) mode
When “FH” = 0
, we can select the desired speed (min, med,
Pressing the button
max) or automatic (Auto) and send this information through Modbus
RTU (Register 7)
Min speed fan
Medium speed fan
Maximum speed fan
Key Function
Key
Auto speed fan
Description
Select mode
Check
humidity
Fan
Heating
Clock
On/Off key
Lock key
Knob
Function
Press shortly, you can select different
mode you need.
Press for 3 seconds, you can check
the current humidity with the display
“XX%rH”, if there is no humidity sensor,
the display will show “no H”
If it is Fan key, you can select different fan
speed by pressing it.
If it is Heating key, you can select force
heating time by pressing it.
Press shortly, you can enable time band,
Eco or Party, and cancel them.
Press for 3 seconds, you can select clock
setting, time band setting, Eco set point
or Party set point.
Press shortly, you can turn on/off the
thermostat.
Press 3 seconds, you can lock/unlock all
the keys.
By rotating the knob, you can adjust the
parameter or set point.
“manuale thT” +0300077IE - rel. 1.2 - 16.07.2015
When “FH” = 1
The button is configured for managing heating device, pressing it we can
select the time where the unit will be forced 100% (20, 40 or 60 min). This
information is sent by Modbus RTU (Register 8)
Pressing the button, we can set the desired time of heating forced. Every
press of the button, increment the time to: 20, 40, 60 min, and on the
display will be shown.
+
=
+
=
+
=
20 min
40 min
60 min
When relay is active the icon
is shown.
• If “FS” parameter is = 0 (thermostat control), the fan / heating button
status is decided by thermostat.
• If “FS” parameter is = 1 (supervisor control) and “FH” = 0, the button is
configured as “fan speed button” and status is decided by supervisor
(Registers 70).
• If “FS” parameter is = 1 (supervisor control) and “FH” = 1, the button
is configured as “heating button” and status is decided by supervisor
(Registers 71).
10
ENG
Clock Setting
Note: information “hh”, “mm” and “week” is sent by modbus RS485:
Turn on the thermostat, press and hold “
“ for 5 seconds, the secondary
• hh - Register 6
• mm - Register 7
• day - Register 8
field display “hh:mm”, now , press “
“,
• hh blinking, rotate the knob to adjust the hour and press it to confirm,
• then the mm blinking, rotate the knob to adjust the minute and press
it to confirm,
• then the day of week blinking, rotate the knob to adjust the day and
press it to confirm.
Time band/Eco/Party function selection
Turn on the thermostat, press the “ ”, you can select the function. What
functions are availably depends on the value of “tE”.
Time Band Setting
Eco Setting
Turn on the thermostat, press and hold “ “ for 5 seconds, rotate the
knob, when the secondary field display “F5-2”, press it. Now, you can set
the time band as following:
• Select workday or weekend by rotating the knob and confirm by
pressing it.
1
Activating this function it is possible have a different, predefined
temperature lower than set point in save energy mode.
Turn on the thermostat, press and hold “ “ for 5 seconds, rotate the
knob, when the secondary field display “F Lo”, press it. Now, you can set
the Eco set point by rotating the knob and confirm by pressing it.
Eco set point is -3°C in winter and +3°C in summer time.
“eco setpoint” information is sent by modbus RS485 (Register 52)
1
Party Setting
Activating this function it is possible have a different, predefined
temperature higher than set point to activate in extraordinary situation.
5 days
2 days
1. “encoder” rotation
Turn on the thermostat, press and hold “ ” for 5 seconds, rotate the
knob, when the secondary field display “F Hi”, press it. Now, you can set
the Party set point by rotating the knob and confirm by pressing it.
• Select one time band by rotating the knob and confirm by pressing it.
• Adjust the start time by rotating the knob and confirm by pressing it.
• Adjust the set point by rotating the knob and confirm by pressing it.
Set point
The default value in the thermostat is following:
Turn on the thermostat, turn right the knob, increase the set point, turn
left the knob, reduce the set point in step of 0.5 °C.
working day/
weekend
time 1
Start/St
time 2
Start/St
time 3
Start/St
time 4
Start/St
Differential
To enable this operation, enter in the dF (differential) menu and select the
new value with step 0,5. (0,5 – 1,0 – 1,5 – 2,0 °C).
Working (mon-friday) 7:00/15.0
Weekend (sat-sun)
7:00/22.0
17:00/22.0
09:00/20.0
21:00/20.0
17:00/22.0
22:00/18.0
22:00/18.0
Output Control
Note: the sequence of time bands is fixed and it is possible to view
and finish it only following this sequence (i.e. to go back it’s necessary
to keep rotating the encoder to start again and repeat from the beginning.
The control mode is available in both cooling and heating mode and it
is managed by user.
• Winner set point (icon on LCD display “
• Summer Set point (icon on LCD “ ” )
”)
dF (differential) is a parameter to set in the parameter set menu and it is a
relay differential in cooling/heating mode.
1
Regulation is based on embedded temperature sensor. The set points
need to be defined.
cooling
heating
2
Output
Output
R1
1
1
2
3
4
push of “encoder”
select one of 4 “time bands”
or “esc”
set point
start time of time band
selected
Push of
“ENCODER”
R1
Temp.
dF
set point
dF
Temp.
set point
3
Parameter Setting
4
Turn off the thermostat, press and hold “
+
” for 5 seconds,
insert the password and press the knob to confirm. The parameter list is
following.
11
“manuale thT” +0300077IE - rel. 1.2 - 16.07.2015
ENG
LCD
display
PS
FH
Co
tC
Description
Password
FAN/HEATING configuration
Default
value
00
00
3
0.0 °C
HC
FE
Configuration “mode” button
Temperature sensor
calibration
Humidity sensor calibration
Frost mode enable
Ft
Id
Br
Frost temperature
BMS address
Baud rate
5.0 °C
50
00
bE
dF
Buzzer Enable
Differential
0.0% rH
01
01
0.5 °C
LE
Key Lock Enable
0
rC
Relay management
00
Ar
tE
tM
Auto recovery
Configuration clock button
ON/OFF button by
01
07
00
IE
00
dS
Number of variables to show
on display
Mode button by
FS
FAN/HEATING button by
00
00
Auto recovery
Note
For internal use. It is fix to 1;
Password is: 22
• 00:FAN
• 01:HEATING
Range 1 to 511
-5.0 to 5.0 °C
Key Clock
To select the sequence of icons to show on display, enter in the
Parameters Menu and configure the parameter “tE” and with rotary
encoder select the new value turning right or left, then press “
to confirm.
-10.0% to 10.0% rH
• 00:Disable
• 01:Enable
5 to 17 °C
50 to 81
• 00:19200
• 01:9600
• 02:4800
• 00:Disable
• 01:Enable
• 0.5 °C
• 1.0 °C
• 1.5 °C
• 2.0 °C
• 00:Disable
• 01:Enable
• 00:Automayic
• 01:Manual
fixed
01 to 07
• 00:Thermostat
• 01:RS485
00 to 05
The symbols can be turn on separately or in pairs and the sequence is
defined setting to “1” the different bits of configuration parameter.
Bit
Number
00
Value
0/1
Symbol
Action
+ Act time band icon
Enable Time Band
01
0/1
Eco set point enable
02
0/1
Party set point enable
Example:
If bits 00, 01 and 02 are set to “1” the configuration variable value = 7
(converted binary code to decimal code) and the sequence pressing
“clock” button is:
No Time Band ->
(no icon shown)
->
->
and act band icon
Pressing the button, we can select the desired time band.
The logic is to change the different time bands pressing the button and
the related cycle can manage 4 different choices :
1. No Time Band (no icons shown)
• 00:Thermostat
• 01:RS485
• 00:Thermostat
• 01:RS485
Temperature sensor calibration
To adjust the temperature calibration, enter in the tC (Temperature
Calibration) menu. The minimum temperature sensor variations by
rotary encoder is ± 0,1 K from -5 to +5 °C;
2.
Time Band (icons activated are “
time band)
3.
Eco (icon activated is “
4.
Party (icon activated is “
” and the icon related to actual
”)
”)
ON/OFF the thermostat
The thermostat on-off is managed by thermostat or by supervisor. The
choice is decided in parameters menu (parameter “tM”).
If “tM” parameter is = 0 (thermostat control)
Humidity sensor calibration
Press “ ” to turn on, press “ ” again to turn off thermostat and its
output.
If “tM” parameter is= 1 (supervisor control) -> Coil 58
The thermostat on-off is decided by supervisor (Coil 50).
The On-off status is sent by RS485 (Coil 8).
Available only for the models with humidity sensor. To adjust the
humidity calibration, enter in the hC (Humidity Calibration) menu.
The minimum humidity sensor variations by rotary encoder is ± 0,1 rH%
from -10 to +10 rH%;
Frost mode
Alarm
If enable the frost function (FE - Frost Enable set to 01), when the
thermostat is turned off, and the temperature is lower than “Ft”, the
When there is one of the follow alarm, display will show the error code
on LCD will buzzer switch on (in accord with the parameter bE - Buzzer
output will switch on the relay, and the LCD display “ ”; when the
temperature is up to “Ft+2” °C, the output will switch off the relay with
the “
”
enable). And relay output will be closed with “
” disappear.
LCD abbreviation
E1
E2
EE
HI
LO
AC
Frost temperature
To enable this operation, enter in the Ft (Frost temperature) menu and
select the new value from 5,0 to 17,0 °C.
” appear.
Alarm
Sensor short circuit alarm
Sensor open circuit alarm
eeprom fault
Temperature higher than 55 °C
Temperature lower than 0 °C
Clock alarm
Buzzer enable
To enable this operation, enter in the bE (Buzzer Enable) menu and
confirm:
• 0= Disable;
• 1= Enable;
CN message on display
After power on, the first 30 s once data traffic is detected, this thermostat
will be recognized as network mode. When communication drops off
or cable is cut or disconnected and is 30s timeout in the second field of
the display it will blink between “CN” message and clock (10 seconds for
clock and 2 seconds for CN).
Key Lock
To enable this operation, enter in the LE (Lock Enable) menu and confirm
the new value
• 0 = Disable;
• 1 = Enable;
“manuale thT” +0300077IE - rel. 1.2 - 16.07.2015
12
ENG
1.3 Technical specifications
Power supply
Power consumption
Operating Conditions
5% up to 90% rH
Storage conditions
5% up to 90% rH
Index of protection
Display
Temperature value displayed
Precision of temperature
measurement
Precision of humidity measurement
Current load relay
Norm
Address Type
56
Coil
R or R/W Variable Description
R/W
Buzzer enable
57
Coil
R/W
-10 up to +55 °C
58
Coil
R/W
IP 20
LCD (white backlight)
-10 ÷ 60 °C -> ± 0,1 K
0 up to 45 °C -> ± 0,5 K
59
Coil
R/W
60
Coil
R/W
From 85 to 260 Vac, 50/60 Hz
2 VA
0 up to +45 °C
20 to 80% rH: ±5% rH
Max 5 A (Resistive) / 2 A (Inductive)
according to EN60730 – Category II
REACH Compliant
RoHS Compliant
3 years
SPDT (N.O / N.C.)
230 Vac
Holding registers / Input registers Commands
1
2
Register
Register
R or
R/W
R
R
3
Register
R
RS485 serial: AWG 20 to 22, shielded cable, Lmax=500 m
Power supply: Cross-section of the wires: 0.5 mm2 to 1.5 mm2
4
Register
R
Comunication mode
5
6
7
Register
Register
Register
R
R
R
8
Register
R
9
10
11
Register
Register
Register
R/W
R/W
R/W
51
Register
R/W
52
Register
R/W
53
Register
R/W
54
Register
R/W
55
Register
R/W
56
Register
R/W
Data stored
Type of relay
Voltage relay
Address Type
RS485 Connections
Protocol type: RTU
Data bit: 8
Stop bit: 2
Parity: None
BMS Baud rate
To enable this operation, enter in the Br (Baud rate) menu and confirm
the Baud rate:
• 0= 19200 (default)
• 1= 9600
• 2= 4800
RS485 Address Set
To enable this operation, select the Id (Identify device) parameter to
confirm the thermostat RS485 address.
It is possible connect up to 32 thermostats. The serial address defined in
the range 50 to 81 (Default 50).
Summary table of operating parameters
Coils List
Address
1
2
3
4
Type
Coil
Coil
Coil
Coil
R or R/W
R
R
R
R
5
Coil
R
6
Coil
R
Variable Description
Probe - Short circuit
Probe - Open circuit
E² Fault
High temperature
alarm
Low temperature
alarm
Alarm Status
7
Coil
R
On/Off Status
8
Coil
R
50
Coil
R/W
51
Coil
R/W
52
Coil
R/W
53
Coil
R/W
54
Coil
R/W
Thermostat On/Off
Status
Thermostat on-off
control
Relay management
configuration
Relay regulation in
manual mode
Fan / Heating button
configuration
Frost mode enable
55
Coil
R/W
Keys lock function
enable
Data interpretation
0: Off
1: Enabled
Time band enable
0: Off
1: Enabled
Thermostat on-off
0: Off
selection
1: On
Mode button selection 0: by Thermostat
1: by Serial line RS485
Fan / Heating - button 0: by Thermostat
selection
1: by Serial line RS485
57
Register
R/W
Data interpretation
0 normal; 1 fault
0 normal; 1 fault
0 normal; 1 fault
0 normal; 1 fault
58
59
60
Register
Register
Register
R/W
R/W
R/W
61
Register
R/W
0 normal; 1 fault
62
Register
R/W
0: No Alarms
1: Alarm
0: Off
1: On
0: Off
1: On
0: Off
1: On
0:automatic (default)
1:manual
0: Off
1: On
0: Fan
1: Heating
0: Off
1: Enabled
0: Off
1: Enabled
63
Register
R/W
64
Register
R/W
65
Register
R/W
69
70
Register
Register
R/W
R/W
71
Register
R/W
101
Register
R/W
102
Register
R/W
13
Variable Description
Data interpretation
Machine code
Fixed to 314
Hardware and Firmware 1.021
revision
Firmware release
Depends on
firmware release
(e.g.:10 for firmware
1.0)
Room Temperature
Temperature value
(0T60 °C)
Room Humidity
Mode Status
Variable value
Fan mode
00 High
01 Med
02 Low
03 Auto
Heating mode
00 Disabled
01 20 minutes
02 40 minutes
03 60 minutes
Hour (setting)
From 0 to 23
Minute (setting)
From 00 to 59
Day of the week
0= Sunday
(setting)
…
6= Saturday
Temperature Set point Temperature value
(5,0…35,0 °C)
Eco Set point
Temperature value
(from 5,0 to 35,0 °C)
Party Set point
Temperature value
(from 5,0 to 35.0 °C)
Mode button
Integer value
Configuration
Clock button
Integer value
Configuration
Temperature sensor
Temperature value
calibration
(from -5.0 to +5,0 °C)
Humidity sensor
Humidity value (from
calibration
-10,0 to +10,0 rH%)
Differential
0,5-1,0-1,5-2,0 °C
Frost temperature
From 5 to 17 °C
Information menu
From 0 to 5
setting
Information menu –
variable 1 value
Information menu –
variable 2 value
Information menu –
variable 3 value
Information menu –
variable 4 value
Information menu –
variable 5 value
Mode button setting
Fan button setting
00 High
01 Med
02 Low
03 Auto
Heating button setting 00 Disabled
01 20 minutes
02 40 minutes
03 60 minutes
00 - 23
hh Time 1 MondayFriday
mm Time 1 Monday00 - 59
Friday
“manuale thT” +0300077IE - rel. 1.2 - 16.07.2015
ENG
Address Type
103
Register
R or
R/W
R/W
104
Register
R/W
105
Register
R/W
106
Register
R/W
107
Register
R/W
108
Register
R/W
109
Register
R/W
110
Register
R/W
111
Register
R/W
112
Register
R/W
113
Register
R/W
114
Register
R/W
115
Register
R/W
116
Register
R/W
117
Register
R/W
118
Register
R/W
119
Register
R/W
120
Register
R/W
121
Register
R/W
122
Register
R/W
123
Register
R/W
124
Register
R/W
Variable Description
Data interpretation
Set point Time 1
Monday-Friday
hh Time 2 MondayFriday
mm Time 2 MondayFriday
Set point Time 2
Monday-Friday
hh Time 3 MondayFriday
mm Time 3 MondayFriday
Set point Time 3
Monday-Friday
hh Time 4 MondayFriday
mm Time 4 MondayFriday
Set point Time 4
Monday-Friday
hh Time 1 SaturdaySunday
mm Time 1 SaturdaySunday
Set point Time 1
Saturday- Sunday
hh Time 2 SaturdaySunday
mm Time 2 SaturdaySunday
Set point Time 2
Saturday- Sunday
hh Time 3 SaturdaySunday
mm Time 3 SaturdaySunday
Set point Time 3
Saturday- Sunday
hh Time 4 SaturdaySunday
mm Time 4 SaturdaySunday
Set point Time 4
Saturday- Sunday
5,0 – 35,0
“manuale thT” +0300077IE - rel. 1.2 - 16.07.2015
00 - 23
00 - 59
5,0 – 35,0
00 - 23
00 - 59
5,0 – 35,0
00 - 23
00 - 59
5,0 – 35,0
00 - 23
00 - 59
5,0 – 35,0
00 - 23
00 - 59
5,0 – 35,0
00 - 23
00 - 59
5,0 – 35,0
00 - 23
00 - 59
5,0 – 35,0
14
CAREL S.p.A.
Via dell’Industria, 11 - 35020 Brugine - Padova (Italy)
Tel. (+39) 049.9716611 - Fax (+39) 049.9716600
e-mail: [email protected] - www.carel.com
“manuale thT” +0300077IE - rel. 1.2 - 16.07.2015
Agenzia / Agency: