1
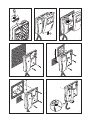
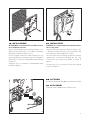
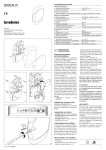
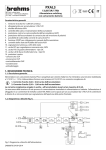
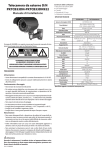
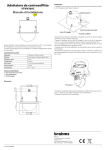
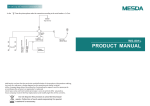
YVL/301I e YVC/301I
IT
Manuale di Installazione
Installation Manual
EN
24801761 – 18-10-10
95 mm
83,5 mm
1
2
1
2
2
6
3
4
5
A
7
2
1
8
IT
- Installazione
9
EN
ATTENZIONE. Si raccomanda di installare il monitor in ambiente asciutto.
Aprire il videocitofono come indicato in figura 1 e 2.
Togliere il connettore (fig. 3) e installare il videocitofono come indicato in figura 4, 5 e 6.
Per un fissaggio ancora più stabile rimuovere il supporto cornetta con un cacciavite attraverso l’apposita
feritoia (fig. 7) e fissare il videocitofono come indicato
in figura 8.
Collegare (fig. 3) e rimontare il videocitofono come
indicato in figura 9.
- Installation
WARNING. It is recommended to install the monitor in a dry place.
Open the video entry control as shown in figures 1 and
2. Remove the connector (fig. 3) and install the video
entry control as shown in figures 4, 5 and 6.
For even more secure fastening, remove the receiver
support with a screwdriver through the slot (fig.
7) and fasten the video entry control as shown in
figure 8.
Connect (fig. 3) an re-install the video entry control
as shown in figure 9.
IT
- Accessori
Pulsantiera opzionale YAP300, unità Allarme e Panico
EN
1
- Accessories
Optional panel YAP300, Alarm and Panic unit.
2
YAP/300
10
3
YVL/301I e YVC/301I
SW3
BUS
HEVC/MI
18VDC
Rosso
Red
Rot
Rouge
Rojo
Vermelho
Blu
Blue
Blau
Bleu
Azul
Azul
A
–
V
+
P1
M1
SW1
Giallo
Yellow
Gelb
Jaune
Amarillo
Amarelo
SW6
CN1
Bianco
White
Weiß
Blanc
Blanco
Branco
CN4
IT
- Morsettiere
EN
- Terminal boards
B Ingresso linea BUS
B BUS line input
+
Alimentazione locale 18VDC
–
+
Power supply local 18VDC
–
M1
M1
IT
A Uscita audio
A Audio Output
– Uscita –
– – Output
V Uscita Video
V Video Output
+ Uscita +
+ + Output
- Selezioni
EN
- Selections
Resistenza di chiusura - Resistive load termination
XDV/304
SW3
SW3
SW3
SW3
Presenza posto esterno - Entry panel presence
SW6
SW6
Attenuazione della chiamata - Call attenuation
SW1
4
SW6
IT
EN
- RegolazionI E CONNETTORI
Regolazione volume microfono HEVC/MI
P1
- Adjusting AND CONNECTOR
HEVC/MI microphone volume adjustment
y I volumi dei dispositivi vengono tarati in fab- y The
CN4
volumes of the devices are calibrated
brica; agire sulle regolazioni solo se strettamente at the factory; act on the adjustments only if
necessario
necessary
Collegamento al monitor
Connection to the monitor
CN1
Collegamento unità allarme panico YAP300
IT
Connector for alarm and panic unit YAP300
- Caratteristiche tecniche – EN - Technical features
Alimentazione - Supply voltage
14-18 VDC
YVL/301I + HEVC/MI
650 mA max (<20 mA stand-by)
YVL/301I
500 mA max (<20 mA stand-by)
YVC/301I + HEVC/MI
400 mA max (<20 mA stand-by)
YVC/301I
250 mA max (<20 mA stand-by)
206 x 215 x 59 mm
-25 °C +70 °C
0 °C +35 °C
IP 20
CCIR (EIA)
PAL
CRT 4” (10 cm)
LCD TFT 3,5”, 4:3
Assorbimento - Absorption
Dimensioni - Dimensions
Temperatura di stoccaggio - Storage temperature
Temperatura di funzionamento - Operating temperature
Grado IP - IP Degree
Standard video - Standard video
Monitor - Monitor
YVL/301I
YVC/301I
YVL/301I
YVC/301I
5
IT
- Programmazione – EN - Programming
beep
A
A
A
Programmazione della melodia associata alla chiamata
dal posto esterno (1 segnale acustico). Per ascoltare in
sequenza le melodie premere il tasto b. Per selezionare la
melodia ed uscire dalla programmazione riporre la cornetta
c. Per selezionare la melodia e proseguire con la programd.
mazione premere il tasto
Programming the melody associated to the call from
the entry panel (1 acoustic signal). To hear the melodies
in sequence, press the key b. To select the melody and exit
programming, replace the receiver c. To select the melody and
d.
continue with programming, press the key
B
C
D
E
F
G
H
J
9
6
X5
Ingresso in Programmazione. Sollevare la cornetta e premere per 5 volte il pulsante A entro 5 s. Un breve segnale acustico
conferma l’ingresso in programmazione a.
Accessing programming. Lift the receiver and press the button A 5 times within 5 s. A brief acoustic signal will confirm that
programming has been accessed a.
Programmazione della melodia associata alla chiamata dal pianerottolo (2 segnali acustici). Per questo
tipo di programmazione e f g procedere come la
“Programmazione della melodia associata alla chiamata dal
posto esterno” precedentemente descritta.
Programming the melody associated with the doorbell
(2 acoustic signals). For this type of programming e f g
proceed as previously described for “Programming the melody
associated to the call from the entry panel”.
Programmazione del numero di squilli di chiamata (3
segnali acustici). Premere il tasto tante volte quanti sono
gli squilli che si è scelto per la chiamata (da 1 a 6 squilli) h.
Dopo 3 s dall’ultima pressione del tasto verrà riprodotta la
chiamata selezionata per il numero di squilli prescelto. Per salvare le impostazioni riporre la cornetta j altrimenti premere
i per ritornare nuovamente alla
il pulsante apriporta
programmazione della melodia di chiamata dal posto esterno.
Programming the number of call rings (3 acoustic signals). Press the key the number of times equal to the rings
selected for the call (1 to 6 rings) h. 3 s after the key is pressed the
last time, the call selected for the selected number of rings will be
will be reproduced. To save the new setting, hang up j; otherwi) i to enter the entry
se, press the door lock release button (
panel call melody programming procedure again.
y Per la programmazione della chiamata, vedere la
documentazione dei posti esterni.
y For call programming, see the entry panel documentation.
7
IT - SMALTIMENTO
Assicurarsi che il materiale d’imballaggio non venga
disperso nell’ambiente, ma smaltito seguendo le
norme vigenti nel paese di utilizzo del prodotto.
Alla fine del ciclo di vita dell’apparecchio evitare che
lo stesso venga disperso nell’ambiente.
Lo smaltimento dell’apparecchiatura deve essere
effettuato rispettando le norme vigenti e privilegiando il riciclaggio delle sue parti costituenti.
Sui componenti, per cui è previsto lo smaltimento
con riciclaggio, sono riportati il simbolo e la sigla del
materiale.
BPT S.p.A.
Via Cornia, 1
33079 Sesto al Reghena-PN-Italy
[email protected]
8
EN - DISPOSAL
Do not litter the environment with packing material:
make sure it is disposed of according to the regulations in force in the country where the product is
used.
When the equipment reaches the end of its life cycle,
take measures to ensure it is not discarded in the
environment.
The equipment must be disposed of in compliance
with the regulations in force, recycling its component
parts wherever possible.
Components that qualify as recyclable waste feature
the relevant symbol and the material’s abbreviation.