1
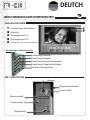
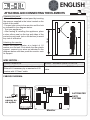
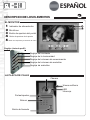
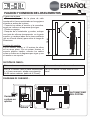
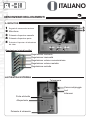
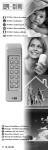
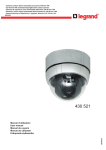
SOFIA 037M Kit portier vidéo couleur 2 fils intégral
SOFIA 037M Video-Türsprechanlage mit Farbbildschirm – 2-Draht-Technologie
SOFIA 037M Colour video door entry kit – 2 wires built-in
SOFIA 037M Equipo de portero con vídeo en color de 2 cables integral
SOFIA 037M Kit videocitofono a colori – Integrale a 2 fili
SOFIA 037M Zestaw wideodomofonowy kolor – 2-przewodowy
Manuel d’installation et d’utilisation
Montage- und Bedienungsanleitung
Installation and user manual
Manual de instalación y uso
Manuale di installazione e d’uso
Instrukcja montażu i użytkowania
V1.11-2008
FRANCAIS
SOMMAIRE
1. Caractéristiques du produit
2. Description des éléments
3. Fixation et connexion des éléments
4. Utilisation des éléments
5. Avertissements à respecter
CARACTÉRISTIQUES DU PRODUIT
1
Ce kit vidéo couleur extrêmement facile à installer dispose, d’une excellente qualité
d’image et vous permet de voir et de discuter avec vos visiteurs.
. Equipé d’un bouton pour l’ouverture d’une gâche ou serrure électrique (Maximum 12V-1A).
. Equipé d’un contact non alimenté pour l’automatisme de portail.
. Adapté à la vision nocturne sans besoin d’éclairage.
. Installation simplifiée grâce au 2 fils intégral.
LA PLATINE DE RUE
. Température de fonctionnement : de -10 à +40°C.
. Vision nocturne : 0.5 Lux. Angle de vue 92°.
. Dimensions: 104x 190x 54 mm.
. Pose en applique.
. Porte étiquette rétro-éclairé.
. Visière antipluie.
LE MONITEUR INTÉRIEUR
. Température de fonctionnement : de -10 à +40°C.
. Ecran couleur 7’’ TFT LCD - 17 cm.
. Câblage de 0-15 mètres par câble fourni. De 15 à 50 mètres avec du 0.75 mm².
. Dimensions : 160 x 225 x 34 mm.
. Pose en applique.
. Durée maximale de monitoring extérieur :40 secondes.
. Durée maximale de communication :2 minutes.
. Mélodies : 8 au choix.
DESCRIPTION DES ÉLÉMENT
FRANCAIS
2
DESCRIPTION DES ÉLÉMENTS
LE MONITEUR
1
2
3
4
5
1
2
Signal de mise sous tension
Microphone
Bouton ouverture portail
Bouton d’ouverture
Bouton de réponse
3
Réglages (vue de profil)
4
Réglage contraste
5
Ecran
Réglage luminosité
Réglage volume communication
Réglage volume mélodies
Réglage mélodies
LA PLATINE DE RUE
Camera
Visière antipluie
Led
infrarouge
Porte étiquette
Haut parleur
Bouton d’appel
FRANCAIS
3
Fixation de la platine
. Démonter la façade de la platine de rue en
insérant la clé fournie dans dans les trous situés
sur les côtés de la platine.
. Raccorder vos fils vers le moniteur et
la serrure comme indiqué sur le schéma cidessous.
. Tester votre appareil.
. Après test & installation, placer un joint de
silicone transparent sur le haut et les côtés de
la caméra extérieur (pas sur le bas ) pour éviter
tout risque d’infiltration.
1.5 m
FIXATION ET CONNEXION DES ÉLÉMENTS
Fixation du moniteur
Fixer le moniteur intérieur à 1.5 mètre de
hauteur sur un mur plat. Fixer d’abord le
support plastique arrière, connecter vos fils
comme indiquer sur le schéma ci-dessous et
venir enficher le moniteur sur son support.
SECTION DES FILS:
Liaison caméra - moniteur
Liaison moniteur - gâche ou serrure
De 0 à 15 mètres : utiliser le câble fourni,
rallonger si nécéssairemaximum 50 mètres
avec du câble 0.75mm²
De 0 à 10 mètres : utilisation de câble RVV2
x 1 mm²
SCHEMA DE CÂBLAGE :
CONTACT SEC
SERRURE
OU GÂCHE
EN OPTION
CAMERA
MONITEUR
UTILISATION DES ÉLÉMENT
FRANCAIS
4
UTILISATION DES ÉLÉMENTS
COMMUNIQUER AVEC SON VISITEUR
Lorque le visiteur appuie sur le bouton d’appel de la caméra, le moniteur intérieur sonne, la vidéo s’allume.
Pour décrocher, appuyer sur et vous pourrez communiquer avec votre visiteur. Le temps de communication est de
120 secondes maximum. Pour raccrocher rappuyez sur .
VISUALISER L’EXTERIEUR
Quand votre visiteur appuient sur le bouton d’appel, l’image apparait automatiquement sur le moniteur intérieur.
Pour visualiser l’extérieur sans pression du bouton d’appel , appuyer simplement sur
. L’image restera environ 40
secondes. Pour couper court, appuyer sur le bouton
.
ACTIVER LA SERRURE
Pour activer la serrure électrique, appuyer sur
, si vous êtes en communication cele-ci sera arretée.
ACTIVER L’AUTOMATSME DE PORTAIL
Pour activer l’automatisme de portail, appuyer sur
REGLER SON MONITEUR
, si vous êtes en communication cele-ci sera arretée.
Pour régler la luminosité de votre écran , tourner la molette
lumière souhaitée.
placée à droite de votre moniteur selon l’intensité de
Pour régler le volume de votre moniteur, tourner la molette placée à droite de votre moniteur selon l’intensité du son
souhaitée.
Pour régler le contraste de votre écran, tourner la molette
placée à droite de votre moniteur selon le contraste
souhaité.
Pour régler le volume de la sonnerie, positionner le curseur L (BAS) ou M (Moyen) ou H (Fort).
Pour choisir votre sonnerie, appuyer sur
et choisisez votre sonnerie.
AVERTISSEMENTS À RESPECTER
5
- Ce kit doit être branché avec le transformateur 230V/15V 50hz fourni.
- Effectuez tous les branchements entre les éléments avant d’alimenter le kit
- Laissez minimum 25 cm entre le moniteur intérieur et toute autre installation.
- Ne jamais couvrir le moniteur ainsi que le transformateur.
- Ne jamais exposer la caméra extérieure au feu ou à une lumière violente.
- Ne jamais exposer les éléments à la vapeur ou à une source d’humidité importante.
- Système utilisable sous tous climats.
- Bien poser les éléments sur des supports verticaux, lisses et en respectant les explications de la notice notamment concernant le joint
d’étanchéité de la platine de rue sous peine de perte de garantie.
- Un appui prolongé sur le bouton d’ouverture de la serrure électrique peut endommager celle-ci.
- Le moniteur intérieur ne doit pas être installé près d’une télévision, à un endroit où l’humidité ou la température ambiante est trop importante.
- Ne pas toucher la caméra avec les doigts. Ne pas ouvrir le moniteur, la caméra ni le transformateur.
Cette action entrainerait la perte automatique de toute garantie sur le produit.
- Nettoyer les parties vitrées avec un chiffon doux. Les liquides de nettoyage pouvant entraîner des corrosions sont déconseillés.
- Ne pas choquer les éléments, leur électronique est fragile.
- En cas de lumière directe sur la caméra extérieure, aucune image ne sera visible sur le moniteur intérieur.
- L’image pourra subir des altérations et des petites coupures lors de l’activation de la serrure ou de la gâche.
- L’image pourra subir des altérations et des petites coupures lors du passage de motos ou de voitures à proximité de la caméra extérieure.
DEUTCH
Inhalt
1. Produkteigenschaften
2. Beschreibung der Komponenten
3. Befestigung und Anschluss der Komponenten
4. Bedienung der Komponenten
5. Warnhinweise
PRODUKTEIGENSCHAFTEN
1
DieseVideo-Türsprechanlage ist kinderleicht zu montieren, bietet eine ausgezeichnete
Bildqualität und ermöglicht Ihnen somit Ihre Besucher zu sehen und mit diesen zu
sprechen.
. Knopf zur Betätigung einer Türöffners oder Öffnung eines elektrischen Schlosses
(12V -1A max.).
. Verfügt über einen nicht versorgten Kontakt für den Torautomatismus.
. Passt sich auch ohne Außenbeleuchtung an Nachtsichtverhältnisse an.
. Einfache Montage durch die 2-Draht-Technologie.
DIE TÜRSTATION
. Betriebstemperatur: von -10 bis +40°C.
. Nachtsicht: 0,5 Lux. Blickwinkel: 92°.
. Abmessungen: 104x 190x 54 mm.
. Wandbefestigung.
. Beleuchtetes Namenschild.
. Regenschutzblende.
DER INNENBILDSCHIRM
. Betriebstemperatur: von -10 bis +40°C.
. 7“ TFT LCD-Farbbildschirm – 17 cm
. Verkabelung von 0 bis 15 Meter über das mitgelieferte Kabel Von 15 bis 50 Meter
mit 0,75 mm²-Kabel.
. Abmessungen: 160 x 225 x 34 mm.
. Wandbefestigung.
. Maximale Überwachungsdauer Außen: 40 Sekunden.
. Maximale Gesprächsdauer: 2 Minuten.
. 8 mögliche Klingeltöne.
DESCRIPTION DES ÉLÉMENT
DEUTCH
2
BESCHREIBUNG DER KOMPONENTEN
DER BILDSCHIRM
1
2
3
4
5
1
2
Piepton beim Einschalten
Mikrofon
Öffnungsknopf Tor
Öffnungsknopf Tür
Verbindungs-und Videoaktivierungsknopf
Einstellungen (Seitenansicht)
3
4
5
Einstellung Kontrast
Einstellung Helligkeit
Einstellung Gesprächslautstärke
Einstellung Klingeltonlautstärke
Einstellung Klingeltöne
DIE TÜRSTATION
Kamera
Regenschutzblende
Infrarot-LED
Namensschild
Lautsprecher
Klingelknopf
FIXATION ET CONNEXION DES
DEUTCH
Befestigung der Türstation
. Den mitgelieferten Schlüssel in die Öffnungen
seitlich der Türstation einschieben und die
Fassade der Türstation somit abbauen.
. Die Drähte an den Bildschirm und das
Schloss, wie auf der Abbildung unten gezeigt,
anschließen.
. Das Gerät testen.
. Nach Installation und Test der Anlage eine
durchsichtige Silikondichtung auf der Oberseite
und den Seiten (aber nicht auf der Unterseite)
der Regenschutzblende anbringen, um diese
vor Wassereindringungen zu schützen.
1.5 m
BEFESTIGUNG DER TÜRSTATION
Befestigung des Bildschirms
Den Innenbildschirm auf 1,5 Meter Höhe an
einer glatten Wand befestigen. Hierfür zuerst
den hinteren Plastikhalter anbringen, die
Drähte wie unten abgebildet anschließen und
den Bildschirm auf den Halter stecken.
KABELQUERSCHNITT :
3
Verbindung Bildschirm-Kamera
Verbindung Bildschirm – Türöffner oder
Schloss
Von 0 bis 15 Meter: Das mitgelieferte Kabel
falls nötig bis zu 50 Meter mit 0,75 mm²Kabel verlängern.
Von 0 bis 10 Meter: RVV2*1 mm²-Kabel.
SCHALTPLAN :
TORAUTOMATISMUS
CONTACT SEC
Schloss
oder
SERRURE
OU GÂCHE
Türöffner
EN OPTION
gegen Aufpreis
Kamera
CAMERA
Bildschirm
MONITEUR
UTILISATION DES ÉLÉMENT
DEUTCH
BEDIENUNG DER KOMPONENTEN
4
MIT DEM BESUCHER SPRECHEN
Wenn der Besucher auf den Klingelknopf der Kamera drückt, ertönt am Innenbildschirm der Klingelton und die Übertragung wird angezeigt.
Drücken Sie auf , um abzuheben und mit Ihrem Besucher zu reden. Die maximale Gesprächsdauer beträgt 120
Sekunden. Drücken Sie erneut auf , um die Verbindung zu unterbrechen.
SICHT NACH AUSSEN
Wenn Ihr Besucher auf den Klingelknopf drückt erscheint das Bild automatisch auf dem Innenbildschirm.
Drücken Sie einfach auf
, um das Außenbild anzuzeigen, ohne dass der Klingelknopf betätigt wurde. Das Bild wird
ca. 40 Sekunden lang angezeigt. Drücken Sie auf
, um die Verbindung zu unterbrechen.
AKTIVIERUNG DES SCHLOSSES
, um das elektrische Schloss zu aktivieren. Die Verbindung wird automatisch unterbrochen.
Drücken Sie auf
AKTIVIERUNG DES TORAUTOMATISMUS
Drücken Sie auf
, um das Torautomatismus zu aktivieren. Die Verbindung wird automatisch unterbrochen.
EINSTELLUNG DES BILDSCHIRMS
Drehen Sie den Knopf
rechts vom Bildschirm, um die gewünscht Helligkeit einzustellen.
Drehen Sie den Knopf rechts vom Bildschirm, um die gewünschte Lautstärke einzustellen.
Drehen Sie den Knopf
rechts vom Bildschirm, um den gewünschten Kontrast einzustellen.
Bringen Sie den Cursor auf L (Leise) oder M (Mittel) oder H (Laut), um die Lautstärke einzustellen.
Drücken Sie auf
, um Ihren Klingelton auszuwählen.
WAHRNHINWEISE
5
- Dieser Bausatz darf ausschließlich mit dem mitgelieferten 230V/15V 50hz Transformator verwendet werden.
- Alle Komponenten müssen vor dem Anschluss des Bausatzes an das Stromnetz angeschlossen werden.
- Mindestens 25 cm Abstand zwischen Innenbildschirm und anderen Geräten bewahren.
- Bildschirm und Transformator nicht abdecken.
- Außenkamera niemals dem Feuer oder starkem Licht aussetzen.
- Komponenten niemals Dampf oder großen Hitzequellen aussetzen.
- System für alle Klimaverhältnisse geeignet.
- Komponenten auf vertikalen und glatten Ober ächen anbringen und dabei die Anweisungen der Bedienungsanleitung bezüglich der Dichtung
der Türstation beachten, um die Garantie nicht zu verlieren.
- Das lange Drücken des Öffnungsknopfes des elektrischen Schlosses, kann dieses beschädigen.
- Der Innenbildschirm darf nicht in der Nähe eines Fernsehers, an einem feuchten oder zu warmen Ort installiert werden.
- Das Kameraobjektiv nicht berühren. Den Bildschirm, die Kamera und den Transformator nicht öffnen. Dies führt zum automatischen Verlust
der Garantie.
- Die Glasober ächen mit einem weichen Tuch reinigen. Es wird davon abgeraten, stark ätzende Reinigungsmittel zu verwenden.
- Die Komponenten nicht anstoßen: die elektronischen Elemente sind sehr emp ndlich.
- Bei direktem Lichteinfall auf die Außenkamera wird kein Bild auf dem Innenbildschirm angezeigt.
- Das Bild kann bei der Aktivierung des Schlosses oder der Türöffnung kurz unterbrochen werden.
- Das Bild kann unterbrochen werden, wenn sich Motorräder oder Autos in der Nähe der Außenkamera bewegen.
ENGLISH
Contents
1. Product characteristics
2. Description of the elements
3. Attaching and connecting the elements
4. Using the elements
5. Warnings to be respected
PRODUCT CHARACTERISTICS
1
This extremely easy to install colour video kit has excellent image quality and lets
you see and talk to your visitors.
. Fitted with a button to open an automatic gate opener or an electric lock (Maximum
12V -1A).
. Fitted with a non-powered switch for the automated gate system.
. Adapted to night vision with no need for outdoor lighting.
. Easy to install by means of 2 integral wires.
THE STREET PANEL
. Operating temperature: -10 to +40°C.
. Night vision: 0.5 lux. Angle shot 92°.
. Dimensions: 104x190x54 mm.
. Surface mounting.
. Backlit label holder.
. Protective rain hood
THE INTERIOR MONITOR
. Operating temperature: -10 to +40°C.
. 7’’ TFT LCD colour screen - 17 cm.
. 0-15 metre cabling with cable supplied. 15 to 50 metres with 0.75 mm².
. Dimensions: 160 x 225 x 34 mm.
. Surface mounting.
. Maximum duration of the exterior monitor: 40 seconds.
. Maximum communication time: 2 minutes.
. Melodies: choice of 8.
DESCRIPTION DES ÉLÉMENT
eNGLISH
2
DESCRIPTION OF THE ELEMENTS
THE MONITOR
1
2
3
4
5
1
2
Power-up signal
Microphone
Gate opening button
Door opening button
Response and video activation button
3
Setting (profile view)
4
Contrast setting
5
Screen
Brightness setting
Communication volume setting
Melody volume setting
Melody setting
THE STREET PANEL
Camera
Protective rain hood
Infrared LED
Label holder
Loudspeaker
Call button
FIXATION ET CONNEXION DES
ENGLISH
Attaching the panel
. Remove the front of the street panel by inserting
the spanner supplied in the holes located on the
sides of the panel.
. Connect your wires to the monitor and the lock
as indicated in the diagram below.
. Test your appliance.
. After testing & installing the appliance, place
a clear silicon seal on the top and sides of the
protective rain hood (not on the bottom) to avoid
any risk of infiltration.
Attaching the monitor
Attach the interior monitor at a height of 1.5
metres on a flat wall. First attach the rear plastic
support, connect your wires as indicated in the
diagram below and then push the monitor onto
its support.
1.5 m
ATTACHING AND CONNECTING THE ELEMENTS
WIRE SECTION :
Monitor-camera link
3
Monitor - automatic opener or lock link
From 0 to 15 metres: use the cable provided. From 0 to 10 metres: use RVV2 *1mm²
Extend it if necessary by a maximum of 50
cable.
metres with 0.75mm² cable.
CABLING DIAGRAM :
AUTOMATED
CONTACT SEC
GATE
SYSTEM
SERRURE
Lock
or
OU GÂCHE
opener
as
EN OPTION
an option
CAMERA
Camera
Monitor
MONITEUR
UTILISATION DES ÉLÉMENT
ENGLISH
4
USING THE ELEMENT
COMMUNICATING WITH YOUR VISITOR
When the visitor presses the camera call button, the interior monitor rings and the video switches on.
To pick up press and you may communicate with your visitor. Communication time is a maximum of 120 seconds.
To hang up, press .
VIEWING THE OUTSIDE
When your visitor presses the call button, their image automatically appears on the interior monitor.
To view the outside without pressing the call button, simply press
. The image will remain on screen for around 40
seconds. To close the image before this, press the
button.
ACTIVATING THE LOCK
To activate the opener or electric lock, press
; if you are speaking, the call will be terminated.
ACTIVATING THE AUTOMATED GATE SYSTEM
To activate the automated gate system, press
; if you are speaking, the call will be terminated.
ADJUSTING YOUR MONITOR
To adjust your screen brightness, turn the
button on the right of your monitor to the brightness you want.
To adjust your monitor’s volume, turn the button placed on the right of your monitor to the volume you want.
To adjust your screen’s contrast, turn the
button on the right of your monitor to the contrast you want.
Set the ring volume by positioning the cursor to L (Low), M (Medium) or H (High).
Choose the ring you want by pressing
then selecting the ring you want.
WARNINGS TO BE RESPECTED
5
- This kit must be connected with the 230V/15V 50hz transformer provided.
- Connect up all the elements before you power up the kit
- Leave a minimum of 25 cm between the interior monitor and any other installation.
- Never cover the monitor or transformer.
- Never expose the exterior camera to re or very bright light.
- Never expose the elements to steam or to a major source of dampness.
- The system can be used in all climates.
- Position the elements on vertical, smooth supports, respecting the explanations in the manual, notably concerning the street panel’s seal.
If not, the warranty will be void.
- Holding down the electric lock’s opening button for a long time may damage it.
- The interior monitor must not be installed near a TV set or in a place where the dampness or ambient temperature is too high.
- Never touch the camera with your ngers. Do not open the monitor, the camera or the transformer. This will automatically void the
product warranty.
- Clean glass parts with a soft cloth. Cleaning uids that may cause corrosion are not recommended.
- Do not cause any impact on the elements as their electronics are fragile.
- No images will be visible on the interior monitor if there is direct light on the camera.
- The image may be altered or cut out slightly when the lock or automatic opener are activated.
- The image may be altered or cut out slightly when motorbikes or bicycles pass near the exterior camera.
españOL
Índice
1. Características del producto
2. Descripción de los elementos
3. Fijación y conexión de los elementos
4. Uso de los elementos
5. Advertencias que hay que respetar
CARACTERISTICAS DEL PRODUCTO
1
Este equipo de vídeo a color es muy fácil de instalar y ofrece excelente una calidad
de imagen, lo que permite ver y hablar con los visitantes.
. Cuenta con un botón para abrir una plancha o cerradura eléctrica (máximo 12V
-1A).
. Con un contacto sin alimentación para el automatismo del portal
. Adaptado a la visión nocturna sin necesidad de iluminación
. Instalación simplificada gracias a los 2 cables integrales
LA PLACA DE CALLE
. Temperatura de funcionamiento: de -10 a +40°
. Visión nocturna: 0,5 Lux. Ángulo de vista 92°
. Dimensiones: 104x 190x 54 mm.
. Instalación en aplique
. Portaetiquetas retroiluminado
. Visera antilluvia
EL MONITOR INTERIOR
. Temperatura de funcionamiento: de -10 a +40°
. Pantalla color de 7 pulgadas TFL LCD – 17 cm
. Cableado de 0-15 metros mediante cable suministrado. De 15 a 50 metros con
cable de 0,75 mm2
. Dimensiones: 160 x 225 x 34 mm.
. Instalación en aplique
. Duración máxima de la vigilancia exterior: 40 segundos
. Duración máxima de la comunicación: 2 minutos
. Melodías: 8 a elección.
DESCRIPTION DES ÉLÉMENT
españOL
2
DESCRIPCION DE LOS ELEMENTOS
EL MONITOR
1 Indicador de alimentación
2 Micrófono
3 Botón de apertura del portal
4 Botón de apertura de la puerta
5 Botón de respuesta y activación de vídeo
Reglaje (vista de perfil)
1
2
3
4
5
Reglaje del contraste
Reglaje de la luminosidad
Reglaje del volumen de comunicación
Reglaje del volumen de melodías
Reglaje de melodías
LA PLACA DE CALLE
Cámara
Visera antilluvia
LED
infrarrojo
Portaetiquetas
Altavoz
Botón de llamada
FIXATION ET CONNEXION DES
españOL
Fijación de la placa
. Desmonte el panel de la placa de calle
insertando la llave suministrada en los agujeros
situados a ambos de la placa.
. Conecte los cables al monitor y la cerradura,
según se indica en el esquema que sigue.
. Pruebe su equipo
. Después de la instalación y prueba, coloque
una junta de silicona transparente en la parte
superior y a ambos lados de la visera antilluvia
(no en el borde inferior) para evitar el riesgo de
filtraciones.
1.5 m
FIJACION Y CONEXION DE LOS ELEMENTOS
Fijación del monitor
Fije el monitor interior a 1,5 metros de altura
en un muro plano. Fije en primer término el
soporte plástico trasero, conecte los cables
como se indica en el diagrama que sigue y una
el monitor a su soporte.
SECCIÓN DE CABLES :
Enlace cámara - monitor
3
Enlace monitor – plancha o cerradura
De 0 a 15 metros: usar el cable suministrado De 0 a 10 metros: se usa cable RVV2 x
y, si fuera necesario, añada una extensión
1mm².
de 50 metros máximo (cable de 0,75mm²).
DIAGRAMA DE CABLEADO :
AUTOMATISMO
CONTACT
SEC
DEL
PORTAL
SERRURE
Cerradura
OU GÂCHE
o placa
en
EN OPTION
opción
Cámara
CAMERA
MONITEUR
Monitor
UTILISATION DES ÉLÉMENT
españOL
4
USO DE LOS ELEMENTOS
COMUNICACIÓN CON LA VISITA
Cuando la visita pulsa el botón de llamada de la cámara, el monitor interior suena y el vídeo se enciende.
Para descolgar, pulse y se podrá comunicarse con la visita. La duración máxima de la comunicación es de
120 segundos. Para terminar pulse nuevamente .
PARA VISUALIZAR EL EXTERIOR
Cuando el visitante pulsa el botón de llamada, la imagen aparece automáticamente en el monitor interior.
Para visualizar el exterior sin pulsar el botón de llamada pulse simplemente
. La imagen se mantendrá
alrededor de 40 segundos. Para terminar pulse el botón
.
ACTIVAR LA CERRADURA
Para activar la cerradura o la placa eléctrica, pulse
interrumpirá.
; si usted se está comunicando, la comunicación se
ACTIVAR EL AUTOMATISMO DEL PORTAL
Para activar el automatismo del portal, pulse
pirá.
; si usted se está comunicando, la comunicación se interrum-
AJUSTAR EL MONITOR
Para ajustar la luminosidad de la pantalla, haga girar el interruptor de rueda
según la intensidad luminosa deseada.
, a la derecha del monitor,
Para ajustar el volumen del monitor, haga girar el interruptor de rueda
, a la derecha del monitor, según la
intensidad sonora deseada.
Para ajustar el contraste de la pantalla, haga girar el interruptor de rueda
, a la derecha del monitor, según
el contraste deseado.
Para ajustar el volumen de melodía, colocar el cursor en L (Bajo), M (Medio) o H ( Alto).
Para elegir la melodía, pulse
y elija la melodía deseada.
ADVERTENCIA QUE HAY QUE RESPETAR
5
– Este equipo se debe conectar con el transformador de 230V/15V 50hz que se suministra.
– Haga todas las conexiones entre los elementos antes de hacer llegar energía al equipo
– Deje no menos de 25 cm entre el monitor interior y cualquier otra instalación.
– No cubra nunca el monitor ni el transformador.
– No exponga nunca la cámara exterior al fuego ni a una luz intensa.
– No exponga nunca los elementos al vapor ni a fuentes de humedad alta
– El sistema se puede usar en cualquier clima.
– Colocar los elementos en soportes verticales y lisos, respetando las explicaciones del aviso sobre la junta estanca de la placa de calle,
pues de lo contrario quedaría anulada la garantía.
– La cerradura eléctrica se puede dañar si se oprime demasiado tiempo el botón de apertura.
– El monitor interior no se debe instalar cerca de un aparato de televisión, ni en lugares donde la humedad o temperatura ambiente es
demasiado alta.
– No tocar la cámara con los dedos. No abrir el monitor, ni la cámara ni el transformador. Abrir el equipo interior o la placa de calle daría lugar a la
pérdida automática de toda garantía del producto.
– Limpiar los elementos de vidrio con un paño suave. Se recomienda no usar líquidos de limpieza que pueden provocar corrosión.
– Evitar golpear los elementos pues los componentes electrónicos son frágiles.
– Si llega luz directa a la cámara exterior, no se verán imágenes en el monitor interior.
– Es posible que la imagen sufra alteraciones e interrupciones breves cuando se activa la cerradura o la alarma.
– Es posible que la imagen sufra alteraciones e interrupciones breves cuando pasan motocicletas o automóviles cerca de la cámara exterior.
ITALIANO
Indice
1. Caratteristiche del prodotto
2. Descrizione degli elementi
3. Fissaggio e collegamento degli elementi
4. Uso degli elementi
5. Avvertenze da rispettare
CARATTERISTICHE DEL PRODOTTO
1
Questo kit videocitofono a colori, estremamente facile da installare, dispone di
un’eccellente qualità di immagine e vi permette di vedere i vostri visitatori e di parlare
con loro.
. Dotato di un pulsante per l’apertura di un apriporta o di una serratura elettrica
(Max.12V-1A).
. Dotato di un contatto non alimentato per l’automatismo di un cancello.
. Adatto alla visione notturna senza necessità di illuminazione.
. Installazione semplificata grazie alla tecnologia integrale a 2 fili.
LA PIASTRA ESTERNA
.Temperatura di funzionamento: da -10 a +40°.
. Visione notturna: 0,5 Lux. Angolo di vista 92°.
. Dimensioni: 104x 190x 54 mm.
. Montaggio a muro.
. Porta-etichetta retro-illuminato.
. Visiera antipioggia.
IL MONITOR INTERNO
. Temperatura di funzionamento: da -10 a +40°.
. Display a colori 7’’ TFT LCD 17 cm.
. Cablaggio 0-15 metri con cavo fornito. Da 15 a 50 metri con cavo da 0,75 mm².
. Dimensioni: 160 x 225 x 34 mm.
. Montaggio a muro.
. Durata massima di monitoraggio esterno: 40 secondi.
. Durata massima di comunicazione: 2 minuti.
. Melodie: 8 a scelta.
DESCRIPTION DES ÉLÉMENT
ITALIANO
2
DESCRIZIONE DEGLI ELEMENTI
IL MONITOR
1
2
3
4
5
1
2
Segnale di messa sotto tensione
Microfono
Pulsante di apertura cancello
Pulsante di apertura porta
Pulsante di risposta e di attivazione
del video
Regolazione (vista di profilo)
3
4
5
Regolazione contrasto
Regolazione luminosità
Regolazione volume comunicazione
Regolazione volume melodie
Regolazione melodie
LA PIASTRA ESTERNA
Telecamera
Visiera antipioggia
Led
infrarossi
Porta-etichetta
Altoparlante
Pulsante di chiamata
FIXATION ET CONNEXION DES
ITALIANO
Fissaggio della piastra
. Smontare il frontalino della piastra esterna
inserendo la chiave fornita nei fori situati sui lati
della piastra.
. Collegare i fili verso il monitor e la serratura
come indicato nello schema riportato in basso.
. Testare l’apparecchio.
. Dopo l’esecuzione del test e l’installazione,
posizionare una guarnizione di silicone
trasparente sulla parte superiore e sui lati della
visiera antipioggia (non sulla parte inferiore),
per evitare eventuali rischi di infiltrazioni.
1.5 m
FISSAGGIO E COLLEGAMENTO DEGLI ELEMENTI
Fissaggio del monitor
Fissare il monitor interno a 1,5 metri di altezza su
una parete piana. Fissare il supporto di plastica
posteriore, collegare poi i fili come indicato nello
schema riportato in basso e inserire il monitor
sul suo supporto.
SEZIONE DEI FILI:
3
Collegamento monitor-telecamera
Collegamento monitor-apriporta o serratura.
Da 0 a 15 metri: usare il cavo fornito, allungare se necessario fino a 50 metri max. con
un cavo da 0,75 mm².
Da 0 a 10 metri: uso del cavo RVV2 *1mm².
SCHEMA DI CABLAGGIO:
AUTOMATISMO
CONTACT SEC
DI UN
CANCELLO
SERRURE
Serratura
OU GÂCHE
o apriporta
EN OPTION
opzionale
Telecamera
CAMERA
MONITEUR
Monitor
UTILISATION DES ÉLÉMENT
ITALIANO
4
USO DEGLI ELEMENTI
COMUNICARE CON I VISITATORI
Quando il visitatore preme il pulsante di chiamata della telecamera, il monitor interno suona e il video si
accende.
Per rispondere, premere il pulsante ; questo consentirà di comunicare con il visitatore. Il tempo di comunicazione è di 120 secondi al massimo. Per riagganciare, premere nuovamente il pulsante .
VISUALIZZARE L’ESTERNO
Quando il visitatore preme il pulsante di chiamata, l’immagine compare automaticamente sul monitor interno.
Per visualizzare l’esterno senza pressione del pulsante di chiamata, premere il pulsante
. L’immagine
resterà visualizzata per circa 40 secondi. Per interrompere la visualizzazione, premere il pulsante
.
ATTIVARE LA SERRATURA
Per attivare la serratura o l’apriporta elettrico, premere il pulsante
; se è in corso una comunicazione,
quest’ultima sarà interrotta.
ATTIVARE L’AUTOMATISMO DI UN CANCELLO
Per attivare l’automatismo di un cancello, premere il pulsante
; se è in corso una comunicazione, quest’ultima sarà interrotta.
REGOLARE IL MONITOR
Per regolare la luminosità dello schermo, ruotare la rotellina
situata sul lato destro del monitor secondo
l’intensità di luce desiderata.
Per regolare il volume del monitor, ruotare la rotellina
situata sul lato destro del monitor secondo l’intensità del suono desiderata.
Per regolare il contrasto dello schermo, ruotare la rotellina
situata sul lato destro del monitor secondo il
contrasto desiderato.
Per regolare il volume della suoneria, posizionare il cursore su L (Basso), M (Medio) o H (Alto).
Per scegliere la suoneria, premere il pulsante
e scegliere la suoneria.
AVVERTENZE DA RISPETTARE
5
- Questo kit deve essere collegato con il trasformatore 230V/15V 50hz fornito.
- Eseguire tutti i collegamenti tra gli elementi prima di alimentare il kit.
- Lasciare almeno 25 cm tra il monitor interno e ogni altra installazione.
- Non coprire il monitor, né il trasformatore.
- Non esporre la telecamera esterna al fuoco o a una luce violenta.
- Non esporre gli elementi al vapore o a una sorgente di forte umidità.
- Sistema utilizzabile con tutti i tipi di clima.
- Posizionare bene gli elementi su supporti verticali e lisci, rispettando tutte le istruzioni fornite, soprattutto per quanto riguarda la guarnizione
di tenuta della piastra esterna, per evitare di causare l’annullamento della garanzia.
- Una pressione prolungata del pulsante di apertura della serratura elettrica potrebbe danneggiare la serratura.
- Il monitor interno non deve essere installato vicino ad un televisore, né in un punto in cui l’umidità o la temperatura ambiente siano
troppo elevate.
- Non toccare la telecamera con le dita. Non aprire il monitor, la telecamera, né il trasformatore. Questa azione comporterebbe l’annullamento
automatico della garanzia del prodotto.
- Pulire le parti vetrate usando un panno morbido. I liquidi detergenti suscettibili di provocare corrosione sono sconsigliati.
- Non urtare gli elementi; la loro elettronica è fragile.
- In caso di luce diretta sulla telecamera esterna, sul monitor interno non sarà visibile alcuna immagine.
- L’immagine potrà subire alterazioni e piccole interruzioni durante l’attivazione della serratura o dell’apriporta.
- L’immagine potrà subire alterazioni e piccole interruzioni durante il passaggio di moto o di auto nelle vicinanze della telecamera esterna.
Polski
Spis treści
1. Parametry produktu
2. Opis elementów
3. Mocowanie i łączenie elementów
4. Zastosowanie elementów
5. Ostrzeżenia
PARAMETRY PRODUKTU
1
Ten zaskakująco łatwy w montażu zestaw wideo kolor charakteryzuje się doskonałą
jakością obrazu. Dzięki niemu można zobaczyć gości i porozmawiać z nimi.
. Jest wyposażony w przycisk służący do otwierania zatrzasku lub zamka
elektrycznego (maksymalnie 12V-1A).
. Jest wyposażony w styk bez zasilania dla mechanizmu bramowego.
. Widzialność nocą bez konieczności zastosowania oświetlenia zewnętrznego.
. Ułatwiona instalacja dzięki zastosowaniu technologii 2-przewodowej.
PANEL ZEWNĘTRZNY
. . Temperatura działania: od -10 do +40°C.
. Widoczność nocą: 0.5 luksa. Kąt widzenia 92°.
. Wymiary: 104x 190x 54 mm.
. Montaż natynkowy.
. Podświetlany szyld na nazwisko
. Daszek chroniący przed deszczem.
MONITOR WEWNĘTRZNY
. Temperatura działania: od -10 do +40°C.
. Kolorowy ekran 7’’ TFT LCD - 17 cm.
. Okablowanie 0-15 metrów przy pomocy kabla znajdującego się w zestawie. Od 15
do 50 metrów przy użyciu kabla 0.75 mm².
. Wymiary: 160 x 225 x 34 mm.
. Montaż natynkowy.
. Maksymalny czas trwania monitoringu zewnętrznego: 40 sekund.
. Maksymalny czas trwania rozmowy: 2 minuty.
. Melodie: 8 do wyboru.
DESCRIPTION DES ÉLÉMENT
Polski
2
OPIS ELEMENTÓW
MONITOR
1
2
3
4
5
1
2
Sygnalizacja napięcia
Mikrofon
Przycisk do otwierania bramy
Przycisk do otwierania drzwi
Przycisk do odpowiadania i aktywacji
urządzenia wideo
3
Regulacja (widok z przodu)
4
5
Regulacja kontrastu
Regulacja jasności
Regulacja głośności rozmowy
Regulacja głośności melodii
Regulacja melodii
PANEL ZEWNĘTRZNY
Kamera
Daszek chroniący przed
deszczem
Podczerwona
dioda led
Szyld na nazwisko
Głośnik
Przycisk wywołania
FIXATION ET CONNEXION DES
Polski
3
MOCOWANIE I ŁĄCZENIE ELEMENTÓW
z
po
1.5 m
Mocowanie panelu zewnętrznego
. Zdemontować przednią osłonę panelu
zewnętrznego. W tym celu należy umieścić klucz
w otworach znajdujących się po bokach panelu.
. Podłączyć przewody monitora i zamka zgodnie
poniższym schematem.
. Sprawdzić, czy urządzenie działa.
. Po zamontowaniu i wypróbowaniu umieścić
silikonową, przezroczystą uszczelkę od góry i
bokach daszku chroniącego przed deszczem
(lecz nie na dole), aby zapobiec przedostaniu się
wody.
Mocowanie monitora
Przymocować monitor wewnętrzny na płaskiej
ścianie na wysokości 1,5 metra. Najpierw
przymocować tylną, plastykową podstawę,
połączyć przewody zgodnie z zamieszczonym
poniżej schematem i umieścić monitor na jego
podstawie.
PRZEKRÓJ PRZEWODÓW:
Połączenie monitor-kamera
Połączenie monitor-zatrzask lub zamek
elektryczny.
Od 0 do 15 metrów: zastosować kabel znajdujący się w zestawie, w razie
konieczności przedłużyć go maksymalnie do
50 metrów używając kabla 0.75mm².
Od 0 do 10 metrów: zastosować kabel
RVV2*1mm².
SCHEMAT OKABLOWANIA :
MECHANIZMU
CONTACT SEC
BRAMY
SERRURE
Zamek elektryczny
OU GÂCHE
lub zatrzask
jako
EN OPTION
opcja
CAMERA
Kamera
Monitor
MONITEUR
UTILISATION DES ÉLÉMENT
Polski
4
ZASTOSOWANIE ELEMENTÓW
ROZMOWA Z GOŚCIEM
Po naciśnięciu przez gościa przycisku wywołania w kamerze, uruchamia się dzwonek w
monitorze wewnętrznym, włącza się przekaz wideo.
Aby odebrać należy nacisnąć na
i można rozmawiać z gościem. Maksymalny czas rozmowy wynosi 120 sekund. Aby zakończyć rozmowę, należy ponownie nacisnąć
.
PRZEKAZ OBRAZU Z ZEWNĄTRZ
Kiedy gość naciska przycisk wywołania, obraz automatycznie pojawia się na monitorze
wewnętrznym.
Aby włączyć wizję bez konieczności naciskania przycisku wywołania, należy po prostu
nacisnąć na
. Obraz pozostanie przez około 40 sekund. Szybkie wyłączenie następuje
po naciśnięciu przycisku
.
WŁĄCZENIE ZAMKA
Aby aktywować zamek lub zatrzask elektryczny należy nacisnąć przycisk
rozmowa, zostanie ona przerwana.
WŁĄCZENIE MECHANIZMU BRAMY
Aby aktywować mechanizm bramy, należy nacisnąć przycisk
zostanie ona przerwana.
; jeżeli trwa
; jeżeli trwa rozmowa,
REGULACJA MONITORA
Regulacja jasności ekranu odbywa się przy pomocy pokrętła
znajdującego się pod
monitorem .
Regulacja głośności odbywa się przy pomocy pokrętła
znajdującego się pod monitorem .
Regulacja kontrastu ekranu odbywa się przy pomocy pokrętła
znajdującego się pod
monitorem .
Aby wyregulować głośność dzwonka, należy ustawić kursor na L (niska) lub M (średnia)
lub też H (wysoka).
Aby wybrać dzwonek należy nacisnąć przycisk
i wybrać dźwięk dzwonka.
OSTRZEŻENIA
5
- Przy podłączaniu zestawu nale y u yć transformatora 230V/15V 50hz znajdującego się w zestawie.
- Przed podłączeniem zasilania nale y wykonać wszystkie połączenia między elementami.
- Nale y zachować minimalną odległość 25 cm między monitorem a innymi instalacjami.
- Nigdy nie nale y przykrywać monitora ani transformatora.
- Nigdy nie nale y wystawiać kamery zewnętrznej na działanie ognia lub gwałtownego światła.
- Nigdy nie nale y wystawiać elementów urządzenia na działanie pary lub ródła du ej wilgotności.
- System mo e być stosowany w ka dym klimacie.
- Nale y dokładnie umieścić poszczególne elementy na pionowych, gładkich podstawach, postępując zgodnie z instrukcją, zwłaszcza je eli
chodzi o uszczelkę w panelu zewnętrznym. Niedostosowanie się do zaleceń mo e skutkować utratą gwarancji.
- Zbyt długie naciskanie przycisku do otwierania zamka elektrycznego mo e spowodować jego uszkodzenie.
- Monitor wewnętrzny nie powinien być zamontowany zbyt blisko telewizora, w miejscu, gdzie panuje zbyt wysoka wilgotność lub zbyt
wysoka temperatura otoczenia.
- Nie dotykać kamery palcami. Nie otwierać monitora, kamery ani transformatora. Czynność ta mo e skutkować automatyczną utratą gwarancji
na produkt.
- Części szklane nale y czyścić przy pomocy miękkiej szmatki. Nie zaleca się stosowania płynów do czyszczenia, które mogą spowodować koroz
- Nie nale y uderzać adnego z elementów, ich elektronika jest wra liwa na uderzenia.
- Je eli na kamerę zewnętrzną będzie padało bezpośrednie światło, na monitorze wewnętrznym nie będzie widoczny aden obraz.
- Istnieje mo liwość zniekształcenia obrazu i wystąpienia przerw w przekazie podczas aktywacji zatrzasku lub zamka elektrycznego.
- Istnieje mo liwość zniekształcenia obrazu i wystąpienia przerw w przekazie podczas przeje d ania w pobli u kamery zewnętrznej motorów lu
samochodów.
- Istnieje mo liwość zniekształcenia obrazu i wystąpienia przerw w przekazie podczas aktywacji zatrzasku lub zamka elektrycznego.
- Istnieje mo liwość zniekształcenia obrazu i wystąpienia przerw w przekazie podczas przeje d ania w pobli u kamery zewnętrznej motorów
lub samochodów..
HOTLINE FRANCE
A votre disposition du lundi au samedi de 9h00 à 12h00
et de 14h00 à 18h00 au 0 892 350 185 (0,34 €/minute)