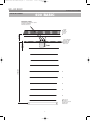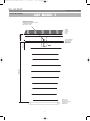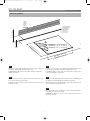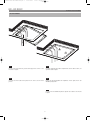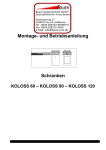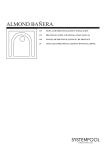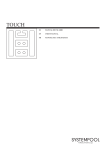
1
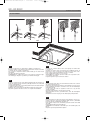
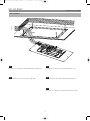
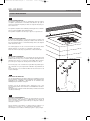
10-E0034 600-420 BASIC:Layout 1
13-10-2011
11:56
Pagina 1
600 - 420 BASIC
MANUALE DI PRE-INSTALLAZIONE E D’INSTALLAZIONE
PRE-INSTALLATION AND INSTALLATION MANUAL
MANUEL DE PRÉ-INSTALLATION ET DE MONTAGE
VORMONTAGE-INSTALLATION UND BENUTZER ANLEITUNG
MANUAL DE PRE-INSTALACIÓN E INSTALACIÓN
SOFFIONE
SHOWER HEAD
PLAFOND DE DOUCHE
KOPFBRAUSE
DUCHA
10-E0034 600-420 BASIC:Layout 1
13-10-2011
11:56
Pagina 2
600 - 420 BASIC
2
10-E0034 600-420 BASIC:Layout 1
13-10-2011
11:56
Pagina 3
600 - 420 BASIC
MANUALE D’INSTALLAZIONE
INDICE
Quote generali pre-installazione
Montaggio soffione
Caratteristiche tecniche
Pulizia e manutenzione
4
9
14
15
EN
INDIX
General pre-installation sizes
Fitting the shower head
Technical Specifications
Cleaning and maintenance
4
9
14
15
FR
TABLE DES MATIÈRES
Mesures générales de pré-installation
Montage du plafond de douche
Caractéristiques techniques
Nettoyage et entretien
4
9
14
15
DE
INHALTSVERZEICHNIS
Allgemeine Abmessungen zur Vormontage
Montage der Kopfbrause
Technische Spezifikationen
Reinigung und wartung
4
9
14
15
ES
ÍNDICE
Medidas generales preinstalación
Montaje ducha
IT
Soffione 600 BASIC
Shower Head
Plafond de douche
Kopfbrause
Ducha
Soffione 420 BASIC
Shower Head
Plafond de douche
Kopfbrause
Ducha
Kit di fissaggio
Fixing kit
Kit de fixation
Befestigungsset
Kit di fissaggio
Características técnicas
Limpieza y mantenimiento
3
4
9
14
15
10-E0034 600-420 BASIC:Layout 1
13-10-2011
11:56
Pagina 4
600 - 420 BASIC
MANUALE D’INSTALLAZIONE
PRE-INSTALLAZIONE
600 BASIC
Alimentazione soffione
Supply to shower head
Alimentation du plafond de douche
Kopfbrausezuführung
Alimentación ducha
min 100
max 1000
Soffitto
Ceiling
Plafond
Decke
Techo
min 12
max 30
Controsoffittatura
Dropped ceiling
Faux-plafond
Abhangdecke
Falso techo
2000/2200
H2O
Piatto doccia
Shower base
Receveur de douche
Duschbecken
Plato ducha
4
10-E0034 600-420 BASIC:Layout 1
13-10-2011
11:56
Pagina 5
600 - 420 BASIC
MANUALE D’INSTALLAZIONE
PRE-INSTALLAZIONE
420 BASIC 2
Alimentazione soffione
Supply to shower head
Alimentation du plafond de douche
Kopfbrausezuführung
Alimentación ducha
min 100
max 1000
Soffitto
Ceiling
Plafond
Decke
Techo
min 12
max 30
Controsoffittatura
Dropped ceiling
Faux-plafond
Abhangdecke
Falso techo
2000/2200
H2O
Piatto doccia
Shower base
Receveur de douche
Duschbecken
Plato ducha
5
10-E0034 600-420 BASIC:Layout 1
13-10-2011
11:56
Pagina 6
600 - 420 BASIC
MANUALE D’INSTALLAZIONE
PRE-INSTALLAZIONE
420 BASIC 1
Alimentazione soffione
Supply to shower head
Alimentation du plafond de douche
Kopfbrausezuführung
Alimentación ducha
min 100
max 1000
Soffitto
Ceiling
Plafond
Decke
Techo
min 12
max 30
Controsoffittatura
Dropped ceiling
Faux-plafond
Abhangdecke
Falso techo
2000/2200
H2O
Piatto doccia
Shower base
Receveur de douche
Duschbecken
Plato ducha
6
10-E0034 600-420 BASIC:Layout 1
13-10-2011
11:56
Pagina 7
600 - 420 BASIC
MANUALE D’INSTALLAZIONE
PRE-INSTALLAZIONE
Soffitto
Ceiling
Plafond
Decke
Plafond
min 12 mm
MAX 30 mm
min 100 mm
MAX 1000 mm
Controsoffittatura
Dropped ceiling
Faux-plafond
Abhangdecke
Falso techo
600 BASIC (n° 3 - G 1/2” F)
420 BASIC 2 (n° 2 - G 1/2” F)
420 BASIC 1 (n° 1 - G 1/2” F)
(6
00
(4
BA
20
BA SIC
)5
SI
90
C)
±
41
2m
0
±
2m m
m
2mm
90 ±
5
)
IC
m
BAS
± 2m
(600
410
)
C
I
BAS
(420
IT
FR
Praticare nel controsoffitto una spaccatura come mostrato in figura per
l’inserimento della piastra di fissaggio del soffione
Pratiquer une fente dans le faux-plafond tel qu'illustré dans la figure
pour l’insertion de la plaque de fixation du plafond de douche
ATTENZIONE! Predisporre nel controsoffitto i tubi per collegamento
idraulico ed elettrico.
ATTENTION! Mettre en place dans le faux plafond les tubes pour la
connexion hydraulique et électrique.
EN
DE
Make an opening in the false ceiling as shown in the picture for the insertion of the shower head’s anchor plate.
Bringen Sie in der Abhangdecke einen Spalt an, wie in der Abbildung für
das Einführen der Klemmplatte der Kopfbrause dargestellt.
CAREFUL! Prearrange the pipes for the water and electrical connections
in the false ceiling.
ACHTUNG! Bereiten Sie die Abhangdecke für die Röhre für den hydraulischen und elektrischen Anschluss vor.
ES
Efectuar en el falso techo una abertura como ilustra la figura para introducir la placa de fijación de la ducha.
ATENCIÓN! Predisponer en el falso techo los tubos para la conexión
hidráulica y eléctrica.
7
10-E0034 600-420 BASIC:Layout 1
13-10-2011
11:56
Pagina 8
600 - 420 BASIC
MANUALE D’INSTALLAZIONE
PRE-INSTALLAZIONE
(1)
Fisher D.8
(2)
(4)
OK
(3)
(fig. 1)
2mm
40 ±
5
)
IC
m
BAS
± 2m
(600
360
)
C
I
BAS
(420
(6
00
(4
BA
20
SI
BA
C)
54
SI
C)
0
±
36
2m
0
±
m
2m
m
IT
TSP 4,5x50
(fig.2)
FR
Praticare nel soffitto 4 fori (figura1) in corrispondenza dello spacco nel
controsoffitto alla distanza indicata tra loro.
Montare in kit di fissaggio (figura2) inserendo il fisher (1) nel soffitto.
Infilare la vite (2) nel nottolino (3) e avvitare fino al completo bloccaggio
del kit (4).
Percer 4 trous dans le plafond (figure1) en correspondance de la fente
dans le faux-plafond à la distance indiquée entre eux.
Monter le kit de fixation (figure 2) en insérant la cheville à expansion
(Fisher) (1) dans le plafond.
Introduire la vis (2) dans le loqueteau (3) et visser jusqu’au blocage complet du kit (4).
EN
DE
Make four holes in the ceiling (figure 1) corresponding with the
opening in the false ceiling, with a distance between each hole as
shown.
Mount the fixing kit (figure 2) inserting the fisher (1) into the ceiling.
Insert the screw (2) into the fastener (3) and screw in until the kit is
held fast (4).
Bohren Sie in die Decke 4 Löcher mit einem Abstand von jeweils
(Abbildung 1) entsprechend dem Spalt in der Abhangdecke.
Verwenden Sie für die Montage das Befestigungsset (Abbildung 2) und
führen Sie den Fisher (1) in die Decke.
Stecken Sie die Schrauben (2) in den Zylinder (3) und ziehen Sie sie bis
zur vollständigen Verriegelung des Sets (4) fest.
ES
Efectuar en el techo 4 orificios (figura1) en correspondencia con la hendidura del falso techo, dejando una distancia entre los mismos.
Montar el kit de fijación (figura2) introduciendo el fisher (1) en el techo.
Introducir el tornillo (2) en el tope (3) y atornillar hasta alcanzar el bloqueo completo del kit (4).
8
10-E0034 600-420 BASIC:Layout 1
13-10-2011
11:56
Pagina 9
600 - 420 BASIC
MANUALE D’INSTALLAZIONE
INSTALLAZIONE
~ 1000 mm
(A)
(B)
OK
IT
FR
Inserire nella spaccatura la piastra di fissaggio del soffione come
mostrato in figura.
Introduire la plaque de fixation du plafond de douche dans la fente, tel
qu’illustré dans la figure.
EN
DE
Insert the shower head anchor plate into the hole as shown in the
picture.
Führen Sie die Klemmplatte der Kopfbrause in den Spalt, wie in der
Abbildung dargestellt.
ES
Introducir en la hendidura la placa de fijación de la ducha como ilustra
la figura.
9
10-E0034 600-420 BASIC:Layout 1
13-10-2011
11:56
Pagina 10
600 - 420 BASIC
MANUALE D’INSTALLAZIONE
INSTALLAZIONE
(2)
(3)
(1)
(4)
(5)
x4
IT
FR
Inserire la cordina nel foro sulla piastra e infilarlo nel tenditore (1).
Inserire il tenditore nel nottolino (2) precedentemente fissato nel soffitto
e avvitarlo fino al completo serraggio (3).
Per regolare la lunghezza della cordina tirarla (4) fino alla misura
desiderata.
Per sbloccarla premere il piolo(5)
ATTENZIONE! La cordina deve essere tesa senza però sollevare la piastra di fissaggio. Ripetere l’operazione per ultimare il fissaggio.
Introduire la cordelette dans l’orifice sur la plaque et l’enfiler dans
le tendeur (1).
Introduire le tendeur dans le loqueteau (2) préalablement fixé au
plafond et le visser à fond (3). Pour régler la longueur de la cordelette, la tirer (4) jusqu’à atteindre la mesure souhaitée.
Pour la débloquer, appuyer sur le téton (5)
ATTENTION !La cordelette doit être tendue sans cependant soulever la plaque de fixation.
Répéter l’opération pour terminer la fixation.
EN
DE
Insert the cord into the hole in the plate and thread it into the stretcher (1).
Insert the stretcher into the fastener (2) already fixed into the ceiling and
screw in until held fast (3).
To adjust the length of the cord, pull it (4) until it reaches the desired length.
To unblock it press the pin (5).
CAREFUL! The cord must be taut but without raising the anchor plate.
Repeat the operation for all four corners to complete the installation.
Führen Sie das Seil in das Loch auf der Platte und ziehen Sie es durch
die Spannschlossmutter (1).
Führen Sie die Spannschlossmutter in den Zylinder (2), bevor Sie ihn
in der Kopfbrause befestigen, und ziehen Sie sie bis zur vollständigen
Verriegelung fest (3).
Um die Länge des Seils zu regulieren, ziehen Sie es (4) auf das
gewünschte Maß.
Zur Entriegelung drücken Sie den kleinen Stift (5).
ACHTUNG! Das Seil muss gestrafft werden, ohne die Klemmplatte
anzuheben.
Wiederholen Sie den Vorgang, um die Befestigung fertigzustellen.
ES
Pasar la cuerda por el orificio de la placa e introducirla en el tensor (1).
Insertar el tensor en el tope (2) previamente fijado al techo y atornillarlo
hasta que quede completamente ajustado (3).
Para regular el largo de la cuerda tirar (4) hasta alcanzar la medida
deseada.
Para desbloquearla presionar la traba (5).
¡ATENCIÓN! La cuerda debe estar tirante pero sin levantar la placa de
fijación.
Repetir la operación para ultimar la fijación.
10
10-E0034 600-420 BASIC:Layout 1
13-10-2011
11:56
Pagina 11
600 - 420 BASIC
MANUALE D’INSTALLAZIONE
INSTALLAZIONE
H2O
IT
FR
Procedere con il collegamento dei tubi di alimentazione dell’acqua.
Procéder au raccordement des tuyaux d’alimentation en eau.
EN
DE
Proceed with the connection of the water supply tubes.
Fahren Sie mit dem Anschluss der Wasserzulaufschläche fort.
ES
Proceder con la conexión de los tubos de alimentación de agua.
11
10-E0034 600-420 BASIC:Layout 1
13-10-2011
11:56
Pagina 12
600 - 420 BASIC
MANUALE D’INSTALLAZIONE
INSTALLAZIONE
(1)
(S)
CH ....
IT
FR
Fissare il soffione (1) alla piastra con le apposite viti, utilizzando l ’adattatore speciale(S) per il corretto serraggio.
Fixer le plafond de douche (1) à la plaque avec les vis prévus à cet effet,
en utilisant l’adaptateur spécial (S) pour le serrage correct.
EN
DE
Fix the shower head (1) to the plate with the appropriate screws, using
the special adaptor (S) for correct tightening.
Befestigen Sie für die korrekte Verriegelung die Kopfbrause (1) auf der
Platte mit den entsprechenden Schrauben, indem Sie den
Spezialadapter (S) verwenden.
ES
Fijar la ducha (1) a la placa mediante los tornillos correspondientes, utilizando el adaptador especial (S) para el ajuste correcto.
12
10-E0034 600-420 BASIC:Layout 1
13-10-2011
11:56
Pagina 13
600 - 420 BASIC
MANUALE D’INSTALLAZIONE
INSTALLAZIONE
OK
IT
FR
Il montaggio del soffione è completato
Le montage du plafond de douche est terminé
EN
DE
The fitting of the shower head is now complete.
Die Montage der Kopfbrause ist damit abgeschlossen.
ES
El montaje de la ducha ha sido completado.
13
10-E0034 600-420 BASIC:Layout 1
13-10-2011
11:56
Pagina 14
600 - 420 BASIC
MANUALE D’INSTALLAZIONE
CARATTERISTICHE TECNICHE
DIMENSIONI SOFFIONI
SHOWER HEAD DIMENSIONS
DIMENSIONS TÊTE DE DOUCHE
DUSCHKOPFMAßE
DIMENSIONES ROCIADOR
DATI PER LA SPEDIZIONE
SHIPMENT DETAILS
RENSEIGMENTS D’EXPÉDITION
DATEN FÜR DIE SPEDITION
DATOS DE EXPEDICIÓN
Soffione
Shower head
Plafond de douche
Kopfbrause
Ducha
Dimensioni
Dimensions
Dimensions
Maße
Dimensiones
Volume
Volume
Volume
Umfang
Volumen
Peso netto
Net weight
Poids net
Nettogewicht
Peso neto
Peso lordo
Gross weight
Poids brut
Bruttogewicht
Peso bruto
Dimensioni
Dimensions
Dimensions
Maße
Dimensiones
600 BASIC
L 705 mm.
W 705 mm.
H 155 mm.
0,076 m3
16 KG
22 KG
L 600 mm.
W 600 mm.
H 50 mm.
420 BASIC
L 525 mm.
W 525 mm.
H 155 mm.
0,043 m3
10 KG
13 KG
L 420 mm.
W 420 mm.
H 50 mm.
GRAFICO PORTATA SOFFIONE - SHOWER HEAD FLOW RATE - DÉBIT DOUCHE FIXE - DIAGRAMM DUSCHKOPFWASSERMENGE - CAUDAL DUCHA FIJA
PRESSIONE (Psi) - PRESSION (Psi) - PRESIÓN (Psi) - DRUCK (Psi) - PRESSURE (Psi)
0
600 BASIC
PORTATA (l/min)
FLOW RATE (l/min)
DÉBIT (l/min)
WASSERMENGE (l/min)
CAUDAL (l/min)
7,2
14,5
21,7
29
35,25
43,5
50,75
58
62,25
72,5
45
40
10,56
35
9,25
30
7,92
25
6,60
20
5,28
15
3,96
10
2,64
5
1,32
PRESSIONE (Bar) - PRESSION (Bar) - PRESIÓN (Bar) - DRUCK (Bar) - PRESSURE (Bar)
Getto completo
Complete jet
Jet complet
Ganzer Strahl
Chorro completo
PRESSIONE (Psi) - PRESSION (Psi) - PRESIÓN (Psi) - DRUCK (Psi) - PRESSURE (Psi)
Getto centrale
Central jet
Jet central
Zentrierter Strahl
Chorro central
0
0
0
420 BASIC 2
420 BASIC 1
PORTATA (l/min)
FLOW RATE (l/min)
DÉBIT (l/min)
WASSERMENGE (l/min)
CAUDAL (l/min)
0,5
7,2
1
14,5
1,5
21,7
2
29
2,5
35,25
3
43,5
3,5
50,75
4
58
4,5
62,25
5
72,5
45
40
10,56
35
9,25
30
7,92
25
6,60
20
5,28
15
3,96
10
2,64
5
1,32
0
0
PORTATA (Gpm)
FLOW RATE (Gpm)
DÉBIT (Gpm)
WASSERMENGE (Gpm)
CAUDAL (Gpm)
0,5
1
1,5
2
2,5
3
3,5
4
4,5
5
PRESSIONE (Bar) - PRESSION (Bar) - PRESIÓN (Bar) - DRUCK (Bar) - PRESSURE (Bar)
500 kPa
5 bar max.
150 kPa
1,5 bar min.
14
Getto nebulizzato
Spray jet
Jet nébulisé
Sprühnebel
Chorro nebulizado
PORTATA (Gpm)
FLOW RATE (Gpm)
DÉBIT (Gpm)
WASSERMENGE (Gpm)
CAUDAL (Gpm)
10-E0034 600-420 BASIC:Layout 1
13-10-2011
11:56
Pagina 15
600 - 420 BASIC
MANUALE D’INSTALLAZIONE
PULIZIA E MANUTENZIONE
IT
PULIZIA E MANUTENZIONE
Per mantenere inalterate nel tempo le caratteristiche del vostro soffione
consigliamo periodicamente di strofinare delicatamente gli ugelli in
gomma come indicato in figura1 per evitare che i depositi di calcare possano ostruire i fori.
Per la pulizia consigliamo di non utilizzare prodotti aggressivi e/o abrasivi e
di non eccedere nell’utilizzo di prodotti anticalcare.
Per la pulizia consigliamo l’uso di acqua e sapone o acqua ed aceto.
EN
CLEANING AND MAINTENANCE
To ensure the characteristics of your shower head do not change over
time we recommend delicately cleaning the rubber nozzles from time to
time, as indicated in figure 1, to avoid the build-up of lime scale deposits
which obstruct the holes.
For cleaning purposes we do not recommend the use of harsh and/or
abrasive products, or excessive use of anti-lime scale products.
Clean the shower head using soap and water or water and vinegar.
FR
NETTOYAGE ET ENTRETIEN
Pour que les caractéristiques de votre plafond de douche demeurent
inaltérées dans le temps, nous conseillons d’astiquer périodiquement et
délicatement les buses en caoutchouc tel qu’indiqué dans la figure 1
pour éviter que les dépôts de calcaire puissent obstruer les orifices.
Pour le nettoyage, nous conseillons de ne pas utiliser de produits agressifs ou abrasifs et ne pas exagérer dans l’utilisation de produit anticalcaire
Pour le nettoyage, nous conseillons d’utiliser de l’eau et du savon ou de
l’eau et du vinaigre.
DE
REINIGUNG UND WARTUNG
Um eine Beeinträchtigung der Eigenschaften Ihrer Kopfbrause mit der
Zeit zu verhindern, empfehlen wir die regelmäßige sanfte Säuberung der
Gummidüsen wie in Abbildung 1 dargestellt, um zu verhindern, dass
Kalkablagerungen die Düsen verstopfen.
Benutzen Sie für die Reinigung keine aggressiven und / oder
Scheuerreinigungsmittel und verwenden Sie Antikalkmittel nicht übermäßig oft.
Für die Reinigung empfehlen wir die Verwendung von Wasser und Seife
oder Wasser und Essig.
(fig. 1)
ES
LIMPIEZA Y MANTENIMIENTO
Para mantener inalteradas en el tiempo las características de vuestra
ducha sugerimos frotar periódica y cuidadosamente las toberas de
goma, como ilustra la figura 1, para evitar que los depósitos calcáreos
obstruyan los orificios.
Para la limpieza recomendamos no utilizar productos agresivos y/o
abrasivos y no excederse con el uso de productos anticalcáreos.
Para la limpieza recomendamos utilizar agua y jabón o agua y vinagre.
15
10-E0034 600-420 BASIC:Layout 1
13-10-2011
11:56
Pagina 16
600 - 420 BASIC
10-E0034
RV.0