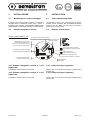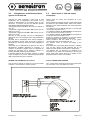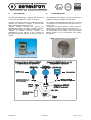
1
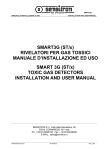
SMART3 NC
MANUALE D’INSTALLAZIONE ED USO
PER RIVELATORI DI GAS INFIAMMABILI E TOSSICI
USER MANUAL FOR
FLAMMABLE AND TOXIC GAS DETECTORS
SENSITRON S.r.l.
Viale della Repubblica, 48
20010 CORNAREDO MI - Italy
Tel: + 39 02 93548155 Fax: + 39 02 93548089
e-mail: [email protected]
MT1450 rev 1
20/04/2011
Page 1 of 14
Attenzione
QUESTO MANUALE DEVE ESSERE LETTO ATTENTAMENTE DA TUTTI COLORO
CHE HANNO O AVRANNO LA RESPONSABILITA' DI INSTALLARE, UTILIZZARE O DI
PRESTARE UN SERVIZIO DI ASSISTENZA SU QUESTO PRODOTTO.
Come ogni componente di un sistema, questo prodotto funzionerà correttamente solo se
installato, utilizzato e controllato come prescritto dal fabbricante. IN CASO CONTRARIO,
POTREBBE NON FUNZIONARE CORRETTAMENTE E LE PERSONE CHE AFFIDANO
LA LORO SICUREZZA A QUESTO PRODOTTO POTREBBERO SUBIRE DANNI
PERSONALI O LETALI.
La garanzia riconosciuta da Sensitron s.r.l. su questo prodotto potrebbe essere nulla se il
prodotto non venisse installato, utilizzato e controllato secondo le istruzioni fornite con il
presente manuale. Per favore, proteggetevi seguendole attentamente.
Invitiamo i nostri clienti a scriverci o a chiamarci per ogni informazione riguardo questo
strumento, il suo uso o una sua eventuale riparazione.
Warning
THIS MANUAL MUST BE CAREFULLY READ BY ALL PERSONS WHO HAVE OR
WILL HAVE THE RESPONSIBILITY FOR INSTALLING, USING OR SERVICING THIS
PRODUCT.
Like any equipment, this product will perform as designed only if installed, used and
serviced in accordance with the manufacturer’s instructions. OTHERWISE, IT COULD
FAIL TO PERFORM AS DESIGNED AND PERSONS WHO RELY ON THIS PRODUCT
FOR THEIR SAFETY COULD SUFFER SEVERE PERSONAL INJURY OR DEATH.
The warranties made by Sensitron s.r.l. with respect to this product are voided if the
product is not installed, used and serviced in accordance with the instructions in this user
guide. Please protect yourself and others by following them.
We recommend our customers to write or call regarding this equipment prior to use or for
any additional information relative to use or repair.
MT1450 rev 1
20/04/2011
Page 2 of 14
INDICE / INDEX
1
1
2
2
3
3
INTRODUZIONE ...................................................................................................................................................... 4
INTRODUCTION...................................................................................................................................................... 4
1.1
Descrizione ....................................................................................................................................................................... 4
1.1
Description........................................................................................................................................................................ 4
1.2
Identificazione rivelatore .................................................................................................................................................. 4
1.2
Gas detectors identification ............................................................................................................................................. 4
1.3
Caratteristiche tecniche ................................................................................................................................................... 5
1.3
Technical specifications................................................................................................................................................... 5
PREDISPOSIZIONE DEL SITO D’INSTALLAZIONE.............................................................................................. 6
INSTALLATION SITE PREARRANGEMENT ......................................................................................................... 6
INSTALLAZIONE..................................................................................................................................................... 7
INSTALLATION ....................................................................................................................................................... 7
3.1
Modalità per il corretto montaggio .................................................................................................................................. 7
3.1
Correct positioning mode ................................................................................................................................................ 7
3.2
Schema topografico circuito............................................................................................................................................ 7
3.2
Detector circuit layout ...................................................................................................................................................... 7
3.2.1 Schema topografico scheda a 1 relè (opzionale)................................................................................................................. 7
3.2.1 1-relay card layout (optional)............................................................................................................................................... 7
3.2.2 Schema topografico scheda a 3 relè (opzionale)................................................................................................................. 7
3.2.2 3-relay card layout (optional)............................................................................................................................................... 7
3.3
Configurazione del rivelatore........................................................................................................................................... 8
3.3
Detector configuration...................................................................................................................................................... 8
3.4
Collegamento, modalità stand alone oppure uscita 4-20 mA......................................................................................... 9
3.4
Stand alone or 4-20 mA output connection..................................................................................................................... 9
3.5
Collegamento uscita seriale RS485 (opzionale)............................................................................................................ 10
3.5
RS485 serial output connection (optional).................................................................................................................... 10
3.5.1 Configurazione indirizzi..................................................................................................................................................... 10
3.5.1 Address configuration ....................................................................................................................................................... 10
4
4
5
5
6.
6.
7
7
8
8
9
9
COLLAUDO E USO............................................................................................................................................... 11
TESTING AND USE............................................................................................................................................... 11
4.1
Accensione ..................................................................................................................................................................... 11
4.1
Power ON ........................................................................................................................................................................ 11
4.2
Collaudo .......................................................................................................................................................................... 11
4.2
Testing............................................................................................................................................................................. 11
4.3
Uso................................................................................................................................................................................... 11
4.3
Use................................................................................................................................................................................... 11
MANUTENZIONE .................................................................................................................................................. 12
MAINTENANCE..................................................................................................................................................... 12
5.1
Manutenzione preventiva ............................................................................................................................................... 12
5.1
Preventive maintenance routines........................................................................................................................................ 12
5.2
Manutenzione correttiva................................................................................................................................................. 12
5.2
Corrective maintenance routines....................................................................................................................................... 12
5.3
Istruzioni per la dismissione .......................................................................................................................................... 12
5.3
Disassembly instructions............................................................................................................................................... 12
ISTRUZIONI PER L'IMBALLAGGIO ..................................................................................................................... 12
PACKING INSTRUCTIONS ................................................................................................................................... 12
SEGNALAZIONI DI ALLARME E DI GUASTO ..................................................................................................... 12
ALARM AND FAULT INDICATIONS..................................................................................................................... 12
ACCESSORI .......................................................................................................................................................... 13
ACCESSORIES ..................................................................................................................................................... 13
TAGLIANDO DI GARANZIA PER LA RIPARAZIONE.......................................................................................... 14
WARRANTY COUPON FOR REPAIRING ............................................................................................................ 14
MT1450 rev 1
20/04/2011
Page 3 of 14
1
INTRODUZIONE
1
INTRODUCTION
1.1
Descrizione
1.1
Description
I Rilevatori di gas della serie SMART3 NC vengono
impiegati per rilevare la presenza di sostanze combustibili
(%LEL) e tossiche (ppm) in aree sicure.
SMART3 NC gas detectors are used to detect the
presence of combustible (%LEL) and toxic (ppm) gases in
non classified areas.
Il sensore catalitico utilizzato nelle versioni standard per
miscele esplosive conferisce una precisione ed una
selettività ottimale, evitando al massimo falsi allarmi.
Le celle elettrochimiche utilizzate per i gas tossici
consentono ai rilevatori di rilevare la presenza di sostanze
tossiche anche a concentrazioni molto basse.
The catalytic sensor employed for the detection of
flammable compounds offers a great precision and
selectivity, thus avoiding false alarms.
The electrochemical cells employed for the detection of
toxic gases allow the measurement of toxic compounds at
very small contents.
Il microprocessore presente sulla scheda elettronica del
rivelatore è provvisto dei seguenti algoritmi software per
correggere fenomeni transitori che potrebbero causare
inprecisioni di lettura o falsi allarmi.
Autodiagnosi del sistema, che verifica costantemente il
corretto funzionamento dell’hardware, sensore compreso.
Durante tale fase il LED rosso lampeggia molto
lentamente
Inseguitore di Zero per il mantenimento del parametro
del sensore prescindendo da possibili derive dovute a
variazioni termiche o fisiche del sensore stesso.
Filtro digitale che consente di correggere fenomeni
transitori che potrebbero causare una instabilità del
sistema o errori di lettura con conseguenti falsi allarmi;
Ciclo d’isteresi applicato alle uscite digitali associate alle
soglie d’allarme per consentire l’eliminazione delle
continue commutazioni in prossimità dei punti di soglia.
Watch-dog per il controllo del microprocessore. In caso
di intervento la corrente di uscita viene forzata a 0 mA.
Il LED rosso di segnalazione resta acceso.
Se sul rilevatore è presente la scheda seriale RS485, la
trasmissione viene interrotta; se sul rilevatore è installata
la scheda 3 relè, il relè di Fault si attiva.
Il Rivelatore fornisce una uscita proporzionale in corrente
(4-20 mA) corrispondente allo 0-100% del fondo scala.
The management software incorporates algorithms
designed to correct the effects of transients, which may
cause unstable operation or incorrect readings with
associated false alarms. Software algorithms are:
Self diagnostic procedure to control the detector main
operational parts, both hardware and sensing element.
During this phase the red LED blinks very slowly
Zero point tracking to maintain the zero parameter of the
sensor apart from possible drifts due to thermal or
physical variations of the sensor.
Digital filter employed in the digital analysis of the
analogue values sampled, it allows correcting phenomena
that might cause system's instability or wrong readouts
thus provoking false alarms.
Hysteresis cycle applied to the digital outputs to
eliminate continuous switching close to the preset alarm
thresholds.
Watch-dog for the microprocessor control. In case of
intervention the output current drops down to 0mA.
The red LED stops blinking and remains on.
If the serial board RS485 has been connected, the
communication will be interrupted; if the 3-relay card is
plugged in, the Fault relay will activate.
The detector offers a proportional output current (4-20mA)
corresponding to 0-100% Full scale range.
Tre schede opzionali sono disponibili per offrire le
seguenti prestazioni:
-Scheda 3 relè (STS3REL) con contatti puliti liberi da
tensione. Un relè è associato all'uscita di Fault e watchdog mentre gli altri due possono essere associati a due
delle tre soglie di allarme presenti.
-Una scheda a 1 relè (STS1REL) che permette di
ottenere un’ uscita con contatto pulito libero da tensione
degli stati di Allarme e/o Guasto del rivelatore.
-una scheda interfaccia seriale (STS/IDI) tramite la quale
il rivelatore è in grado di dialogare in seriale RS485 con le
centrali Sensitron indirizzate.
Three optional cards are available to offer the following
facilities:
-A three-relay card (ST.S3REL) with tension free
changeover contacts. One relay is associated to Fault and
Watch-dog. The remaining two are to be associated to
two out of the three preset thresholds.
-A one-relay card (STS1REL) to offer one tension free
changeover contact, to be either associated to Fault or to
Alarm status.
-A RS485 interface to make the detectors communicate
on RS485 bus with Sensitron's control panels
1.2
1.2
Identificazione rivelatore
Gas da rilevare
Gas to detect
Gas detectors identification
CH4
GPL
LPG
Vap. benzina
Petrol vapors
CO
NO2
CO2
Modello
P/N
S1455ME
S2396ME
S1455GP
S2396GP
S1455VB
S2396VB
S1450CO
S1451ND
S2401CO2
Sensore
Campo
misura
Sensor type
Catalytic
Catalytic
Catalytic
Electrochem.
Electrochem.
IR
0-100% LEL
0-100% LEL
0-100% LEL
0-300 ppm
0-20 ppm
0-5000 ppm
MT1450 rev 1
Range
20/04/2011
Page 4 of 14
1.3
Caratteristiche tecniche
Elemento sensibile
Campo di misura
Risoluzione
Alimentazione
Assorbimento a 12Vcc
Unità di controllo
Segnalazioni luminose
Uscita proporzionale
Resistenza max. di carico
Uscita seriale (opzionale)
Uscite a relè (opzionale)
Procedura di autozero
Filtro digitale
Risoluzione µP
Watch-dog
Precisione
Ripetibilità
Tempo preriscaldamento
Tempo stabilizzazione
Tempo di risposta
Temp. di stoccaggio
Temperatura operativa
Umidità relativa
Pressione di esercizio
Velocità dell’aria
Peso
Dimensioni:
Orientamento
MT1450 rev 1
1.3
%LEL: Catalitico
CO e NO2: cella elettroch.
CO2: Infrarosso
%LEL: 0-100% LEL
CO: 0-300 ppm
NO2: 0-20 ppm
CO2: 0-5000 ppm
Out analog 0,025 mA
12-24 Vcc -20% + 15%
90mA medio; 130 mA max
Microprocessore 10 bit
LED ad intermittenza
4-20 mA (default)
200Ω
RS-485 Modbus RTU
N° 3 relè contatti in scambio
liberi da tensione 24V-1A
Compensazione derive di zero
medie mobili sui valori
acquisiti
1024 punti
Per controllo microprocess.
±5% F.S. o 10% lettura
±5% F.S. o 10% lettura
5 minuti
< 2 minuti
< 20 sec. T50;
< 60 sec. T90
-25 / + 60 °C
-10 / + 60 °C
20-90 % Rh / 40° C
80-110 KPa
< 6 mS
Kg 0.500
mm 106x65 h 180
Installazione verticale con
sensore rivolto verso il basso
Technical specifications
Sensing element
Measurement range
Resolution
Power supply
Consumption at 12Vdc
Control unit
Visual indications
Proportional output
Max.load resistance
Serial Output (optional)
Relay outputs (optional)
Auto zero routine
Digital filter
Resolution µP
Watch-dog
Accuracy
Repeatability
Warm-up time
Stabilization time
Response time
Storage temperature
Operating temperature
Relative humidity
Operative pressure
Air velocity
Weight
Dimensions
Positioning
20/04/2011
%LEL: catalytic sensor
CO and NO2: electroch. Cell
CO2: Infrared
%LEL: 0-100% LEL
CO: 0-300 ppm
NO2: 0-20 ppm
CO2: 0-5000 ppm
Out analog 0,025 mA
12- 24 Vdc - 20% + 15%
90mA medium; 130mA max.
Microprocessor 10 bit
Flickering LED
4-20 mA (default)
200Ω
RS 485 Modbus RTU
3 relays with tension free
changeover contacts 24V-1A
Zero drift compensation
variable average on the
values sampled
1024 dots
For microprocessor control
±5% full scale or 10% reading
±5% full scale or 10% reading
5 minutes
< 2 minutes
< 20 sec. T50
< 60 sec. T90
-25 / + 60 °C
-10 / + 60 °C
20-90 % Rh / 40° C
80-110 KPa
< 6 mS
Kg 0.500
mm 106x65 h 180
To be mounted sensor head
downward
Page 5 of 14
2
PREDISPOSIZIONE DEL SITO
D’INSTALLAZIONE
2
INSTALLATION SITE
PREARRANGEMENT
Durante le operazioni di montaggio e installazione, gli
impianti devono essere messi in sicurezza.
Durante l'installazione è importante tenere in
considerazione alcune norme generali in quanto un
posizionamento non corretto può pregiudicare il
funzionamento ottimale del rivelatore.
Si raccomanda di non installare rivelatori gas nelle
vicinanze di prese d’aria e/o ventilatori che provocano forti
correnti d’aria.
I rivelatori non devono essere altresì posti in zone nelle
quali siano presenti vibrazioni e, sebbene immuni da
disturbi a radiofrequenze è consigliabile non installarle in
prossimità di emettitori radio (ponti radio o
apparecchiature simili).
Altra buona norma è quella di installare il rivelatore in
zone facilmente accessibili per le operazioni di test e
calibrazione e per l’inserimento dell’adattatore del kit di
calibrazione.
At the mounting/installation phase be sure all safety
precautions have been considered.
Always consider how important it is the correct positioning
of gas detectors to get the optimum response. An
incorrect positioning can jeopardise the detector
functioning.
We recommend never installing gas detectors close to air
intakes or fans causing strong air currents.
Be sure the detectors are attached to a firm base to
prevent vibration that can damage them, producing
unreliable results.
Although the electronics comply with the electromagnetic
compatibility rules, it is advised to keep the detectors at a
distance from any radio frequency senders (such as radio
links or similar).
Please be also sure that detectors are placed in a
convenient location for future maintenance and calibration
requirements.
Il METANO è un gas più leggero dell’aria e, disperdendosi
nell’ambiente, tenderà a salire verso l'alto; il rivelatore
deve quindi essere posizionato a 30 cm dal soffitto per
ottenere un efficace intervento.
METHANE is a gas lighter than air and it tends to spread
upwards; the detector should be placed at 30 cm from the
ceiling in order to maximise the effectiveness of the
detection.
GPL e VAPORI DI BENZINA sono gas più pesanti
dell'aria. Disperdendosi stazioneranno nella parte bassa
dell’ambiente ed il rivelatore deve quindi essere
posizionato a 30 cm dal pavimento.
LPG and PETROL VAPOURS are gases heavier than air
and tend to spread downwards; the detector should be
placed at 30 cm from the floor to maximise the
effectiveness of the detection.
Il MONOSSIDO DI CARBONIO (CO) ha un peso specifico
simile a quello dell’aria; è un gas molto tossico e per una
protezione ottimale il rivelatore deve essere installato alla
altezza della respirazione, quindi a circa m 1.60 dal pavimento.
CARBON MONOXIDE (CO) has a specific weight similar
to air's; it is a very toxic gas and to get a reliable
protection, the detector should be placed at the breathing
level, approximately 1.60m above the floor.
L'ANIDRIDE CARBONICA (CO2) è un gas più pesante
dell'aria. Disperdendosi stazionerà nella parte bassa
dell’ambiente ed il rivelatore deve quindi essere
posizionato a 30 cm dal pavimento.
CARBON DIOXIDE (CO2) is a gas heavier than air and
tends to spread downwards; the detector should be
placed at 30 cm from the floor to maximise the
effectiveness of the detection.
Il BIOSSIDO D'AZOTO (NO2) è un gas più pesante
dell'aria. Disperdendosi stazionerà nella parte bassa
dell’ambiente ed il rivelatore deve quindi essere
posizionato a 30 cm dal pavimento.
NITROGEN DIOXIDE (NO2) is a gas heavier than air and
tends to spread downwards; the detector should be
placed at 30 cm from the floor to maximise the
effectiveness of the detection.
Vi sono alcune sostanze che, se presenti nell'atmosfera
da analizzare, possono alterare considerevolmente la
risposta del sensore fino a danneggiarlo irrimediabilmente
(es. siliconi, silicati alogeni, tetraetile di piombo, acido
solfidrico, tetracloruro di carbonio tricloroetilene-trielina ).
Allorché si presuma la presenza di queste sostanze, si
consiglia di verificare frequentemente - e sempre dopo
ogni intervento degli allarmi - la sensibilità del rilevatore
con gas di taratura
There are some substances that, when present in the
atmosphere being analysed, can considerably change the
response of the sensor and even damage it irremediably,
in particular silicones, silicon halides, tetraethyl lead,
hydrogen sulphide, carbon tetrachloride, trichloroethylene
Whenever their presence is presumed, it is recommended
to check the detector's sensitivity at short time intervals,
and always after an alarm intervention, with sample gas
bottles.
Il rilevatore è già calibrato in fabbrica. E’ successivamente
possibile eseguire delle regolazioni utilizzando la tastiera
di calibrazione tipo ST.CKD.
Detectors are factory calibrated. Future adjustments of
the calibration parameters can be carried out via the
ST.CKD calibration keypad.
MT1450 rev 1
20/04/2011
Page 6 of 14
3
INSTALLAZIONE
3
INSTALLATION
3.1
Modalità per il corretto montaggio
3.1
Correct positioning mode
Il rivelatore deve sempre essere installato con l’elemento
sensibile (testa di rivelazione) rivolta verso il basso. Il
contenitore del rivelatore, per nessuna ragione deve
essere forato: per il fissaggio utilizzare i fori già esistenti.
The detector is always to be mounted with the sensing
element placed downward. For no reasons at all the
enclosure can be drilled. To wall mount the detector,
please use the existing holes.
3.2
3.2
Schema topografico circuito
Circuito rivelatore SMART3 NC
Detector circuit layout
Morsettiera di collegamento estraibile
(Main plugin terminal board for connections)
Led di indicazione di stato
(Status led indication)
Connettore per (Plug in terminal for):
- Scheda Rs485 o (RS485 board or)
- Scheda a un rele o due open collector o
(One relay or two open collector board)
1 2 3
DIP-SWITCH per selezionare le soglie
(Thresholds setting point DIP-SWITCH)
1 2 3
4-20mA Uscita negativa “DEFAULT”
(4-20 mA Negative output mode, default)
4-20mA Uscita positiva
(4-20 mA Positive output mode)
J11 Connettore per scheda display o relè
(J11 Plug in connettor for display or relay board)
Connessione elemento sensibile
(Sensing element connection)
Scheda amplificatore
Amplifier Board
3.2.1 Schema topografico scheda a 1 relè
(opzionale)
3.2.1 1-relay card layout (optional)
Consultare il manuale fornito con la stessa
Please refer to the technical instruction supplied along
with the card.
3.2.2 Schema topografico scheda a 3 relè
(opzionale)
3.2.2 3-relay card layout (optional)
Consultare il manuale fornito con la stessa
Please refer to the technical instruction supplied along
with the card.
MT1450 rev 1
20/04/2011
Page 7 of 14
3.3
Configurazione del rivelatore
3.3
Detector configuration
Il rilevatore fornisce un'uscita proporzionale proporzionale
4-20mA.
The detector always provides a 4-20mA proportional
output.
Il rilevatore viene calibrato per il gas specificato al
momento dell'acquisto.
Successivamente è possibile verificarne la taratura
utilizzando la tastiera di taratura come specificato al
paragrafo 8.
Detectors are factory calibrated for the specific gas
required by the customers.
Future adjustments of the preset calibration can be
carried out by using the calibration keypad as detailed at
paragraph 8.
E’ possibile ottenere uscite a 0-10-20mA corrispondenti a:
-0mA: condizione di normale funzionamento o guasto
-10mA: superamento prima soglia di allarme
-20mA: superamento seconda soglia di allarme
It is also possible to get outputs set at 0-10-20mA
corresponding to:
-0mA: correct working condition or Fault
-10mA 1st alarm threshold attainment
-20mA 2nd alarm threshold attainment.
Configurando diversamente i dip-switch presenti sulla
scheda base si possono modificare le soglie di allarme.
Anche disponendo della scheda opzionale a 3 relè è
possibile modificare le soglie di intervento dei relè come
indicato nella tabella seguente:
MT1450 rev 1
By modifying the dipswitches configuration on the PCB,
different alarm thresholds might be obtained.
It is also possible to modify the relay intervention when
using the 3-relay card, as per the following table:
20/04/2011
Page 8 of 14
3.4
Collegamento, modalità stand alone
oppure uscita 4-20 mA
3.4
Stand alone or 4-20 mA output
connection
Verificare che nella confezione ci siano tutte le parti
componenti. Per il collegamento del sensore con la
centrale e alimentazione si raccomanda l'uso di cavo
schermato. La sezione del cavo da utilizzare dipende
dalla distanza del rilevatore dalla centrale:
-per distanze inferiori a m 100 si usino cavi con sezione di
2
0.75 mm ;
-per distanze comprese fra m 100 e 200 si usino cavi con
2
sezione di 1.0 mm ;
-per distanze comprese fra m 200 e 300 si usino cavi con
2
sezione di 1.5 mm .
Nel caso vi siano giunzioni nel cavo di collegamento,
assicurarsi che vi sia continuità anche sulla schermatura
dei cavi.
Ricordasi che la schermatura deve essere collegata a
terra unicamente dal lato unità di controllo o gruppo di
alimentazione, mentre non dovrà mai essere collegata sui
rilevatori.
Assicurarsi che la realizzazione di giunzioni sui cavi di
alimentazione mediante dispositivi di serraggio o a
crimpare, sia eseguito a regola d’arte con capicorda e/o
morsetti che nel tempo non si ossidino o allentino. E’
sempre preferibile eseguire giunzioni saldate.
Il rilevatore SMART3 NC può essere collegato a centrali
di tipo analogico 4-20 mA con indicazione proporzionale
della concentrazione di gas in ambiente.
Please check the carton box comprises all of the
components.
Wiring between the detector and the control panel should
be carried out with shielded cables. Wires' cross section
depends on the distance between the control panel and
the detector:
-for a distance up to m 100 we advice a 3 core wire with
2
cross section area of 0.75 mm ;
-for a distance between m 100 and 200 we recommend a
2
3 core wire with cross section of 1.0 mm ;
-for a distance between m 200 and 300 we recommend a
2
3 core wire with cross section 1.5 mm .
Should any junctions be necessary on the wires, please
make sure there is no interruption on the shield.
Please remember that the shield is to be ground
connected from the control panel side only.
Pay attention never to connect the shield to the
connectors.
Ensure the wire connections, either clutching or crimping
type, are duly carried out with terminals that do not
oxidise or loosen. Better of all would be to solder them.
The SMART3 NC gas detectors are designed to be
connected to any control unit accepting a 4-20 mA input
signal, better when panels have an LC display for the
proportional readout of the concentration.
SCHEMA COLLEGAMENTO per 4-20 mA
4-20 mA CONNECTION DIAGRAM
N.B. Nel caso di centrali con ingresso 4-20 mA è possibile
collegare 1 solo rilevatore a ciascun ingresso.
N.B.: Control panels accepting 4-20mA input signals allow
the connection of only one detector per input.
MT1450 rev 1
20/04/2011
Page 9 of 14
3.5
Collegamento uscita seriale RS485
(opzionale)
3.5
RS485
(optional)
serial
output
connection
In questo tipo di collegamento servono 4 conduttori: 2 per
la seriale RS485 e 2 per l’alimentazione dei dispositivi. A
questo scopo si suggerisce l’utilizzo di due diversi cavi
oppure di un solo cavo che abbia le caratteristiche adatte,
si seguito descritte.
-) Il collegamento della seriale RS485 deve essere
realizzato con cavo per connessioni EIA RS 485: n.2
conduttori con sezione 0,22 / 0,35 mmq + schermo
(COPPIA TWISTATA). Capacità nominale tra i conduttori
< 50 pF/m, impedenza nominale 120 ohm. Con questo
tipo di collegamento la lunghezza totale della linea non
deve superare i 1000 metri. Un esempio di cavo
raccomandato è il BELDEN 9841 o similare (cavo per
trasmissione dati in EIA RS485). Collegare i rilevatori (ed i
moduli IN ed OUT) solo in modalità “cascata”. Si
raccomanda di evitare collegamenti ad albero o a stella in
quanto riducono l’immunità alle interferenze.
-) L’alimentazione dei rilevatori deve essere realizzata con
un cavo a due conduttori di sezione adeguata in base al
numero di dispositivi collegati, alla distanza degli stessi
dall’alimentatore ed alla corrente assorbita da ciascuno
dei dispositivi.
Ad installazione eseguita controllare che su tutti i rilevatori
installati ci sia una tensione minima di 12 Vdc.
In questa configurazione, i dip-switch presenti sulla
scheda base dello SMART3 NC servono per stabilire
l'indirizzo del rilevatore.
Le soglie di allarme si imposteranno automaticamente alla
configurazione di default. Per esigenze particolari
contattare il fornitore.
Utilizzando la RS485 l’uscita proporzionale 4-20mA
rimane attiva.
4 wires are required in this type of connection: 2 for the
RS485 serial bus and 2 for device power supply. For this
reason we suggest you use two different wires or a single
wire with suitable features as described below.
-) The RS485 serial bus must be connected with an EIA
2
RS 485 connection cable: No. 2 wires with 0.22/0.35 mm
section with shield (TWISTED PAIR). Nominal capacity
between conductors < 50 pF/m, nominal impedance 120
ohm. Total line length with this type of connection must
not exceed 1,000 metres. An example of a recommended
cable is a BELDEN 9841 or similar wire (EIA RS485 data
transmission wire). Only connect detectors in cascade.
Avoid tree or star connections since they reduce
interference immunity.
-) The power supply to the detectors must be connected
with a 2-core wire with adequate section based on the
number of connected devices, their distance from the
power supply and each device’s consumption.
Once the installation has been completed and the system
is powered-on, please make sure that each detector
reaches at least 12 Vdc.
When SMART3 NC detectors are connected the RS485
serial mode, the dip-switches on the PCB are to be used
to set the detectors' address.
Alarm thresholds will automatically set to the default
configuration. For particular needs please contact the
supplier.
When detectors are RS485 connected, the proportional 420mA output remains active.
Esempio di collegamento rivelatori SMART3 NC su bus RS485
Example of connection of SMART3 NC detectors to a RS485 bus line
ALIMENTAZIONE
POWER SUPPLY
12 / 24 Vdc
Per il numero massimo di rivelatori collegabili alla linea RS485
e per l’indirizzamento dei rivelatori consultare il manuale tecnico
fornito con la centrale
For the maximum number of detectors connected to each RS485
line and for the address setting, please refert to the instruction manual
supplied along with the control unit
3.5.1 Configurazione indirizzi
3.5.1 Address configuration
Consultare il manuale fornito con la scheda seriale
STS/IDI.
Please refer to the technical instruction along with the
serial interface STS/IDI.
MT1450 rev 1
20/04/2011
Page 10 of 14
4
COLLAUDO E USO
4
TESTING AND USE
4.1
Accensione
4.1
Power ON
Al momento in cui il circuito viene alimentato, il LED rosso
sulla scheda base si accende ad intermittenza lenta.
L’uscita in corrente è 1,5mA circa.
Trascorsi 2 minuti circa, il LED rosso lampeggia con una
frequenza pari allo stato in cui si trova il rilevatore (vedere
tabella al punto 4.3) e l’uscita in corrente è a 4,0mA.
Terminata la fase di preriscaldamento, il rilevatore è in
grado di funzionare correttamente, sebbene siano
necessarie 2 ore circa affinché il rilevatore raggiunga le
prestazioni ottimali.
When the detector is powered on, the red LED on the
motherboard starts blinking at slow intermittence. Output
current is nearly 1.5mA.
After nearly two minutes, the red LED flash rate is
equivalent to the detector working status (see table on
paragraph 4.3) and the output current is 4.0mA.
Once the warm-up is over the detector starts working
correctly and does not need any further operation,
although the optimal performances will be reached after
two hours
4.2
4.2
Collaudo
Testing
Verificare la risposta del rivelatore utilizzando una miscela
a composizione nota gas/aria e l'apposito KIT di taratura.
Vedi figura al punto 8
Testing should be carried out by using a gas mixture in
the appropriate range, along with our calibration kit. See
picture point 8.
4.3
4.3
Uso
Il rivelatore funziona automaticamente e autonomamente
pertanto non è richiesto alcun contributo da parte del suo
utilizzatore.
In caso di malfunzionamento il rilevatore forza l'uscita a
1.8mA circa.
Se la concentrazione di gas misurata supera il 100%
LEL, il LED sul circuito stampato si accende come per la
segnalazione del fault; l’uscita viene forzata a 23 mA e
per ripristinare il corretto funzionamento del rivelatore si
dovrà togliere e ridare alimentazione.
Il LED rosso lampeggiante posto sulla scheda base del
circuito indica lo stato in cui il rilevatore si trova come
illustrato nella tabella sottostante.
Frequenza lampeggio in secondi
(Flash rate seconds)
1 ON - 1 OFF
1 ON - 1 OFF
0,1 ON - 1 OFF
2 x 0,1 ON - 1 OFF
3 x 0,1 ON - 1 OFF
ON
ON
MT1450 rev 1
Use
Once duly connected, the detector starts working
autonomously and automatically.
No further operations are required.
In case of malfunctioning, the output current is forced to
1.8mA
Should the measured gas concentration exceed 100% the
red LED on the motherboard lights up, as for the FAULT
status signalling; output current would be forced to 23mA
and to reset the normal working conditions it would be
necessary power the unit off and on.
The flashing red LED on the motherboard indicates the
detector's working condition as detailed in the following
table:
Significato
Meaning
Tempo pre-riscaldo
Normale funzionamento
Allarme 1
Allarme 2
Allarme 3
Over Range
Guasto-W.D.
Warm-up time
Normal mode
Alarm 1
Alarm 2
Alarm 3
Over Range
Fault-W.D.
20/04/2011
Page 11 of 14
5
MANUTENZIONE
5
MAINTENANCE
5.1
Manutenzione preventiva
5.1
Preventive maintenance routines
Tutti i RIVELATORI DI GAS, anche quelli per aree sicure,
è opportuno che vengano verificati ogni 3-6 mesi secondo
quanto prescritto dalla guida CEI 31-35 CAP. IV, è
opportuno che vengano controllati ogni tre-sei mesi.
I risultati delle prove effettuate dovranno essere registrate
su di un apposito quaderno da esibire alle autorità
competenti e seguito di un eventuale verifica.
Nel caso in cui siano presenti inquinanti nell'ambiente in
grado di alterare le caratteristiche originali dei sensori, le
operazioni di manutenzione dovranno essere effettuate
con maggior frequenza.
All GAS DETECTORS, including those for non classified
ares, are to undergo a working test every three to six
months, as specified in the EN 60079 –10.
Test results are to be recorded in a suitable book to be
shown to the Authority in case of inspection.
In environments where polluting elements might alter the
original sensor performance, periodical testing should be
carried out at shorter time intervals.
5.2
5.2
Manutenzione correttiva
Corrective maintenance routines
Per anomalie riscontrabili durante il test funzionale,
rivedere la fase di collaudo al capitolo 4. Se durante la
manutenzione preventiva il rilevatore non rileva il gas per
cui è tarato, inviare il prodotto al fornitore dello stesso che
a sua volta provvederà ad inviarlo al costruttore.
E’ possibile tarare il rilevatore utilizzando il
dispositivo di acquisizione dei parametri da
richiedere al fornitore (ST.S/CKD, tastiera di
calibrazione per rivelatore SMART3 NC, per la
regolazione dei valori di Zero & Span e del segnale di
uscita 4-20mA).
For any anomaly found during the working test, please
check the tests performances as described on chapter 4.
If during the preventive maintenance routines, the
detector does not react to the gas it has been calibrated
for, please return the instrument to your supplier that on
his turn will return it to the manufacturer for repair.
It is possible to adjust the detector calibration by
using the handheld calibration keypad available on
request (ST.S/CKD, handheld calibration keypad to
adjust the Zero & Span values and the 4-20mA
output).
5.3
5.3
Istruzioni per la dismissione
Disassembly instructions
Togliere alimentazione al rilevatore, scablare la
morsettiera e rimuovere il contenitore dalla tubatura
metallica e dai relativi sistemi di bloccaggio.
Power the unit off, disconnect the wires on the terminals
and dismount the housing from any blocking systems.
6.
6.
ISTRUZIONI PER L'IMBALLAGGIO
PACKING INSTRUCTIONS
Per garantire la protezione agli urti si consiglia di
imballare lo strumento nell'imballo originale o proteggerlo
con fogli di film a bolle (palliato).
To grant a stout protection against impacts we
recommend to use the original package, or protect the
device with bubble wrap sheets.
7
SEGNALAZIONI DI ALLARME E DI
GUASTO
7
ALARM AND FAULT
INDICATIONS
Per l’utilizzo in stand alone del rivelatore SMART3 NC è
necessario disporre della versione con la scheda a 3 relè
Su questa scheda si possono verificare gli stati di allarme
e di guasto tramite gli appositi LED.
Nel caso non sia montata la scheda relè, verificare la
concentrazione di gas sulla centrale a cui è collegato il
rilevatore.
To employ SMART3 NC as stand alone detectors it is
necessary to use the 3 relay card.
The LEDs mounted on the relay card allow an easy check
of alarm and fault status.
Should the relay card not be mounted, verify the gas
concentration and the alarm status on the gas control
panel's display.
MT1450 rev 1
20/04/2011
Page 12 of 14
8
ACCESSORI
8
ACCESSORIES
Per il rilevatore SMART3 NC, è stata prevista una serie di
accessori per l’installazione e l’utilizzo dei rivelatori:
For the SMART3 NC detectors, a range of accessories is
available to make the installation and use easier:
-ST.S/CKD, Tastiera di calibrazione portatile per rivelatore
SMART3 NC. Permette di eseguire la taratura dello
ZERO, dello SPAN e dell’uscita 4-20 mA.
-ZMCAP, adattatore universale per rivelatori gas
SENSITRON; permette di testare il rivelatore facendo
fluire la giusta quantità di gas nella testa dei rivelatori;
-Valigetta
di
taratura
(VTx+xA),
prevista
per
l'alloggiamento di due cartucce di gas, completa di
flussometro e adattatore ZMCAP, per la prova in gas dei
rivelatori.
-ST.S/CKD, Handheld calibration keypad to be connected
to the detector to for adjust the Zero, the Span and the 420mA output.
- Calibration cap adapter ZMCAP; it allows testing the
detector letting the right gas flow to reach the sensor.
-Gas test kit (VTx+xA). It consists of a carrying case that
can accommodate 2 gas bottles, a flow meter and the
ZMCAP adapter, for the gas detectors' bump testing
procedures.
ST.S/CKD, Tastiera di calibrazione
ZMCAP, adattatore universale per rivelatori gas
ST.S/CKD, Handheld calibration keypad
Calibration cap adapter ZMCAP
MT1450 rev 1
20/04/2011
Page 13 of 14
9
TAGLIANDO DI GARANZIA PER
LA RIPARAZIONE
9
WARRANTY COUPON FOR
REPAIRING
La garanzia sui prodotti Sensitron è valida un anno dalla
data di fabbricazione riportata sul prodotto. Si intende
valida comunque per un anno dalla data di installazione,
purché la stessa avvenga entro i dodici mesi successivi la
data di fabbricazione. Fanno fede il timbro e la data posti
dall’installatore sul presente modulo, che l’utilizzatore
dovrà debitamente conservare e rendere allo stesso in
caso di verifiche funzionali e riparazioni.
Warranty on Sensitron products is valid 1 one from the
manufacturing date placed on the product and it is
extended of one year from the date of the installation on
condition that the installation is performed within the first
year of life of the product. As proof will be considered the
stamp and date of the installer placed on the present
coupon which is to be duly kept by the user and returned
to the installer in case of any working tests and repairs
Data di installazione *
Installation date *
Modello/i
Model(s)
Numero di matricola
Part Number(s)
______________ ______________ ______________
______________ ______________ ______________
Timbro installatore
Installer Stamp
Firma installatore
Installer signature
* Utilizzare un singolo modulo per ogni
data di installazione
*Use one single coupon for every
installation date
Nota Bene: si evidenzia che per i
componenti deperibili installati sui
prodotti (sensori, batterie tampone in
genere), la garanzia è vincolata e
limitata ai termini di garanzia dichiarati
dalla casa costruttrice.
ATTENTION: Please be aware that all
perishables installed in our products
(sensors, buffer batteries, etc.) benefit
only of the warranty conditions stated
by the original manufacturer
MT1450 rev 1
20/04/2011
Page 14 of 14