1
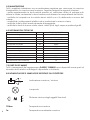
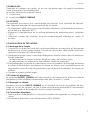
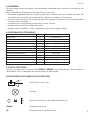
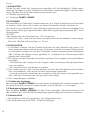
DARDO 1200 MSR
PR1262
Manuale di istruzioni
Instructions
Bedienungshiweisblatt
Instructions
INDICE
1.0 CONTENUTO DELL’IMBALLAGGIO
2.0 SICUREZZA
3.0 INSTALLAZIONE DEL PROIETTORE
3.1 Montaggio della lampada
3.2 Posizionamento del proiettore
3.3 Montaggio su stativo
3.4 Collegamento elettrico
4.0 USO DEL PROIETTORE
4.1 Funzionamento
4.2 Messa a fuoco
4.3 Regolazione assetto lampada
4.4 Diaframma ad iride
4.5 Dimmer
4.6 Accessori
5.0 MANUTENZIONE
6.0 INFORMAZIONI TECNICHE
7.0 PARTI DI RICAMBIO
8.0 NOMENCLATURE E SIMBOLOGIE DEL PROIETTORE
INDEX
1.0 EMBALLAGE
2.0 SECURITE’
3.0 INSTALLATION
3.1 Montage de la lampe
3.2 Position du projecteur
3.3 Montage sur trépied
3.4 Connection électrique
4.0 USAGE DU PROJECTEUR
4.1 Fonctionnement
4.2 Mise au point
4.3 Reglage de la position de la lampe
4.4 Diaphragme à iris
4.5 Dimmer
4.6 Accessoires
5.0 ENTRETIEN
6.0 INFORMATIONS TECHNIQUES
7.0 PIECES DETACHEES
8.0 DESCRIPTIONS ET SYMBOLES DU PROJECTEUR
Pag.
4
4
4
4
4
4
4
5
5
5
5
5
5
5
6
6
6
6
Page
7
7
7
7
7
7
7
8
8
8
8
8
8
8
9
9
9
9
1.0 AUSPACKEN
2.0 SICHERHEIT
3.0 INSTALLATION
3.1 Position des Verfolgers
3.2 Montage auf einem Stativ
3.3 Netzanschluß
4.0 BEDIENUNGSANLEITUNG
4.1 Allgemeines
4.2 Fokus
4.3 Zentrierung der Lampe
4.4 Irisblende
4.5 Dimmer
4.6 Zubehör
5.0 WARTUNG
6.0 TECHNISCHE DATEN
7.0 ERSATZTEILE
INDEX
INDEX
1.0 PACKING
2.0 SAFETY
3.0 INSTALLATION
3.1 Fitting lamp
3.2 Mounting position
3.3 Mounting on tripod
3.4 Electrical connection
4.0 USE OF THE LANTERN
4.1 Operation
4.2 Focus
4.3 Centering the lamp position
4.4 Iris diaphragm
4.5 Dimmer
4.6 Accessories
5.0 MAINTENANCE
6.0 TECHNICAL INFORMATION
7.0 SPARE PARTS
8.0 SIMBOLS
Page
10
10
10
10
10
10
11
11
11
11
11
11
11
12
12
12
Page
13
13
13
13
13
13
13
14
14
14
14
14
14
14
14
14
15
15
1.0 CONTENUTO DELL’IMBALLAGGIO
Controllate attentamente il contenuto del cartone e, in caso di danni al prodotto,
contattate il Vs. trasportatore.
Nell’imballaggio del presente proiettore sono contenuti i seguenti prodotti:
n° 1 Foglio di Istruzioni
n° 1 seguipersona DARDO 1200MSR
2.0 SICUREZZA
Anche se questo apparecchio è dotato di micro interruttore di sicurezza che isola
tutte le parti a vivo durante la sostituzione della lampada, si consiglia di scollegarlo
dalla linea di alimentazione staccando la spina.
• Questo proiettore è stato progettato per utilizzi in ambienti interni. La temperatura ambiente massima non deve superare i 50°C.
• Attenzione: la temperatura della superficie esterna del proiettore può raggiungere 110°C.
• Attenzione : Lampada molto calda, prima della sostituzione attendere almeno 10
minuti.
3.0 INSTALLAZIONE DEL PROIETTORE
3.1 Montaggio della lampada
1- Girate la vite a scatto posta sul fondo della parte posteriore del proiettore ed
abbassate lentamente il carrello portalampada; l'apertura del carrello determina l'immediata disconnessione della lampada dalla rete di alimentazione.
2- Dopo averla sgrassata con l’apposita salvietta detergente, inserite la lampada
nel portalampada con le dovute precauzioni:
- non toccate la lampada con le dita o con stracci sporchi;
- non scuotete la lampada e non fatela urtare contro la lamiera del proiettore o
altri oggetti;
3- Fissate saldamente la lampada al portalampada avvitandone a fondo il pomolo di bloccaggio e fissando il cavetto di alimentazione; la lampada dovrà essere
posizionata in modo da direzionare la protuberanza del bulbo verso la carcassa
del faro per ottenere una migliore resa del fascio.
4- Richiudete il carrello portalampada.
3.2 Posizionamento del proiettore
Il seguipersona DARDO 1200MSR dovrà essere montato su di uno stativo e la sua
distanza da eventuale materiale infiammabile non dovrà essere inferiore a 1m.
3.3 Montaggio su stativo
Fissate il seguipersona DARDO 1200MSR allo stativo, utilizzando il foro situato sulla
staffa di supporto dello stesso stringendo il relativo pomolo di bloccaggio. La forcella di fissaggio è disegnata per permettere al seguipersona il movimento sia orizzontale che verticale nel modo più scorrevole possibile.
4
3.4 Collegamento elettrico
1- Fissate il cavo di alimentazione ad una presa in grado di sopportare un carico di
almeno 16Amps.
2- Collegate alla rete il seguipersona facendo attenzione alla tensione di alimentazione (230V - 50/60Hz).
4.0 USO DEL PROIETTORE
4.1 Funzionamento
Il DARDO 1200MSR è un seguipersona che funziona con lampade a scarica da
1200W tipo MSR ed è consigliato per un impiego a media/lunga distanza e dove
vengono richieste dall’operatore illuminazioni di luce pura e bianca. Uno dei pregi
di questo seguipersona, oltre al peso relativamente ridotto, è senz’altro la compattezza del faro e la sua manovrabilità in quanto il gruppo di alimentazione è incorporato nel proiettore stesso.
4.2 Messa a fuoco
Una volta collegato il proiettore alla rete di alimentazione ed azionato l’interruttore
posto nella parte posteriore si può procedere alla messa a fuoco. Il seguipersona
può essere utilizzato sia a fascio concentrato che a fascio diffuso. Per la regolazione della messa a fuoco utilizzate gli appositi regolatori situati lateralmente rispetto
all’alloggiamento della lente facendoli scorrere lungo le guide. Il regolatore anteriore a guida di scorrimento lunga viene utilizzato per la regolazione del diametro
del fascio di luce, mentre il regolatore posteriore per la successiva messa a fuoco.
4.3 Regolazione assetto lampada
Anche se il seguipersona viene fornito con portalampada già settato per l'utilizzo di
lampada a scarica 1200MSR, è possibile regolare l'altezza della stessa rispetto all'asse della lente condensatrice, per una perfetta centratura del fascio. Il portalampada è fissato al carrello porta lampada da due viti a molla che permettono il movimento verticale della lampada. A carrello chiuso e lampada accesa è quindi possibile, tramite la regolazione delle viti, calibrare l'altezza del portalampada e della
lampada, sino ad ottenere la definizione del fascio desiderata.
4.4 Diaframma ad iride
Il diaframma ad iride, posto nella zona centrale del faro e provvisto di una leva,
viene utilizzato per variare il diametro del fascio di luce pur mantenendone la stessa intensità.
Si consiglia di riaprire il diaframma ad iride dopo lo spegnimento del seguipersona,
per ottenere un raffreddamento uniforme delle lamelle.
4.5 Dimmer
Il dimmer è situato in un punto non focalizzato del sistema ottico. Esso, regolabile
attraverso una leva nella parte superiore del faro, permette una dolce attenuazione della luce dalla massima potenza sino al black-out. Il suo uso può avvenire in
contemporanea con il diaframma ad iride.
4.6 Accessori
Per il seguipersona DARDO 1200MSR sono disponibili i seguenti accessori, non forniti
con l'apparecchio:
• Telaio porta gelatina: permette di colorare il fascio luminoso con l'inserimento di
filtri colore (n.b. si consiglia l'utilizzo di filtri ad alta resistenza termica).
• Portagobo : viene inserito nell'alloggiamento del diaframma ad iride.
• Cambiacolori : permette un rapido cambio del colore (n.5 colori + black-out);
accessorio da installare sulla parte anteriore del faro.
• 4 Ghigliottine sagomatrici che, inserite nella zona centrale, permettono di modificare la sagoma del fascio di luce proiettata.
• Stativo
5
5.0 MANUTENZIONE
Tutti i proiettori richiedono una manutenzione regolare per assicurare la massima
funzionalità e la massima resa luminosa. Seguite pertanto le seguenti istruzioni:
- pulite regolarmente le lenti poiché persino un sottilissimo strato di polvere può
ridurre in modo sostanziale la resa luminosa ed alterare la compattezza del fascio.
- sostituite la lampada se ha subito danni visibili o se si è deformata a causa del
calore;
- controllate i collegamenti elettrici ed in particolare la messa a terra;
- sostituite tutte le parti eventualmente danneggiate
- sostituite le lenti se hanno subito danni visibili quali tagli, crepe e profondi graffi.
6.0 INFORMAZIONI TECNICHE
Dimensioni di ingombro
mm
Peso
Kg
Materiale della carcassa
Tensione nominale
V
DARDO 1200 MSR
970x350x510
34.2
Alluminio / Fe37
230
Frequenza nominale
Hz
50/60
Potenza assorbita
W
1290
Corrente nominale
A
Lampada consigliata
10.8
MSR 1200
attacco G22
Sistema ottico
Temperatura max di esercizio
Temperatura max ambiente
°C
°C
a lenti
110
50
7.0 PARTI DI RICAMBIO
Tutti i componenti del seguipersona DARDO 1200MSR sono disponibili come parti di
ricambio ed il relativo catalogo è disponibile su richiesta.
8.0 NOMENCLATURE E SIMBOLOGIE RIPORTATE SUL PROIETTORE
45°
Inclinazione massima / minima
45°
Lampada
Distanza minima dagli oggetti illuminati
TCMax
6
Ta
Temperatura massima
Temperatura ambiente massima
Français
1.0 EMBALLAGE
Controlez le contenu du carton, et en cas de dommages du produit contacter
Votre transporteur immédiatement.
Le carton contient le materiel suivant:
n° 1 Instructions
n° 1 poursuite DARDO 1200MSR
2.0 SECURITE'
Cet appareil est pourvu d'un microrupteur de sécurité. Il est conseillé de debrancher l'appareil pendant le remplacement de la lampe.
• Ce projecteur a été conçu pour une utilisation interieure. La température ambiante ne doit pas dépasser 50° C.
• Attention: la température de la surface extérieure du projecteur peut atteindre
110°C.
• Attention: Lampe très chaude; avant le remplacement attendre au moins 10
minutes.
3.0 INSTALLATION DU PROJECTEUR
3.1 Montage de la lampe
1- Tournez la vis située au fond de la partie postérieure du poursuite et descendez
lentement le chariot porte-lampe; l'ouverture du chariot débranche automatiquement la lampe de l'alimentation.
2- Nettoyez la lampe avec la serviette détergente; fixez la lampe dans la douille en
faisant attention:
- ne touchez pas la lampe avec les doigts ou avec des chiffons sales;
- ne secouez pas la lampe ou la faire heurter contre le projecteur
3- Fixez solidement la lampe à la douille en vissant le papillon de blocage et fermez
le câble d'alimentation; positionnez la lampe en façon que la protubérance soit
directionée contre le corp du projecteur pour obtenir le rendement du faisceu le
meilleur.
4- Fermez le chariot porte-lampe.
3.2 Position du projecteur
Le poursuite DARDO 1200MSR doit être monté sur un trepied et la distance entre le
projecteur et des matières inflammables doit être au moins 1 mètre.
3.3 Montage sur trépied
Montez le poursuite DARDO 1200MSR sur un trépied, en vissant le papillon de blocage sur la lyre de support. La lyre a étée conçue pour permettre le mouvement
horizontal et vertical du projecteur le plus coulant possible.
3.4 Connection électrique
1 Fixez le câble d'alimentation à une prise capable de supporter un charge de 16
Amps.
2- Branchez le poursuite à une alimentation 230V 50/60Hz.
7
Français
4.0 USAGE DU PROJECTEUR
4.1 Fonctionnement
Le DARDO 1200MSR est un poursuite qui utilise une lampe à decharge MSR 1200 et
il est conseillé pour utilisation à distance moyenne ou pour illuminations avec lumière blanche. Ce poursuite compact et leger est doté de black/out dimmer; l'alimentateur est installé dans le corps du projecteur.
4.2 Mise au point
Branchez le projecteur à l'alimentation et l'allumez en utilisant l'interrupteur situé sur
la partie postérieure. Le poursuite peut être utilisé à faisceau concentré ou diffus.
Pour regler la mise au point utilisez les papillons de reglage situés sur la partie laterale près de la lentille. Le papillon anterieur est utilisé pour regler la dimension du faisceau tandis-que le papillon posterieur est utilisé pour la mise au point.
4.3 Reglage de la position de la lampe
Même si la douille est déjà reglée pour l'utilisation de la lampe à décharge
1200MSR, il est possible d'effectuer le reglage de la hauter de la lampe même pour
obtenir le centrage du faisceau. La douille est fixée au chariot porte-lampe par 2
vis qui permettent le reglage vertical de la lampe. Il est possible donc de regler la
hauteur de la lampe et de la douille simplement en vissant ou devissant les 2 vis à
chariot fermé et lampe allumée pour obtenir un parfait centrage du faisceau.
4.4 Diaphragme à iris
Le diaphragme à iris situé dans la partie centrale du projecteur pourvu d'un levier,
est utilisé pour modifier la dimension du faisceau même si l'intensité de la lumière ne
change pas.
Nous conseillons d'ouvrir le diaphragm à iris après avoir eteint le projecteur pour permettre un refroidissement uniforme des lamelles de l'iris.
4.5 Dimmer
Le dimmer est situé dans un point non-focalisé du système optique. Il est reglable
par un levier situé sur la partie supérieure du projecteur et il permet une attenuation
douce de la lumière jusqu'au black-out. Il est possible de l'utiliser en même temps
que l'iris.
4.6 Accessoires
Les accessoires suivants sont disponibles pour être utilisés avec le poursuite:
• Porte-filtre: à installer dans les guides sur la partie antérieure du projecteur. Nous
conseillons l'utilisation de filtres à haute résistance thérmique.
• Porte-gobo : à installer dans le logement du diaphragme à iris.
• Changeur de couleur: permet un changement rapide de 5 couleurs + blackout.
Il doit être installé sur la parite antérieure du projecteur.
• Trepied.
• 4 Couteaux qour la modification du faisceau
8
Français
5.0 ENTRETIEN
Tous les projecteurs requierent une entretien regulière pour assurer le rendement le
meilleur.
Nous conseillons d'observer les instructions suivantes:
• nettoyez regulièrement les lentille parce-que même une très subtile couche de
poussière peut reduire le rendement lumineux et alterer le faisceaux.
• remplacez la lampe si elle presente des dommages visibles ou si elle est deformée
à cause de la chaleur.
• contrôlez les cablage en particulier la mise à terre.
• remplacez toutes les parties abîmées.
• remplacez les lentilles si elles presentent des dommages visibles
6.0 INFORMATIONS TECHNIQUES
Dimensions
mm
Poid
Kg
Matériau de la carcasse
Tension nominale
V
DARDO 1200 MSR
970x350x510
34.2
Aluminium / Acier
230
Frequence nominale
Hz
50/60
Puissance absorbée
W
1290
Courant nominale
A
Lampe recommandée
10.8
MSR 1200
G22
Système optique
Température maximale d'utilisation
Température maximale ambiante
°C
°C
Lentilles
110
50
7.0 PIECES DETACHEES
Tous les components du poursuite DARDO 1200MSR sont disponibles comme pièces
detachées et le catalogue est disponible sur demande.
8.0 DESCRIPTIONS ET SYMBOLES DU PROJECTEUR
45°
Inclination max / min
45°
Lampe
Distance minimum des objectes illumines
TCMax
Ta
Temperature max
Temperature ambiance max
9
Deutsch
1.0 AUSPACKEN:
Prüfen Sie den Inhalt der Verpackung sorgfältig auf Vollständigkeit. Sollten irgendwelche Schäden an den Produkten auftauchen, benachrichtigen Sie bitte sofort
Ihren Händler. Der Inhalt der Verpackung besteht aus:
n°1 Bedienungsanleitung
n°1 Verfolger DARDO 1200MSR
2.0 SICHERHEIT:
Wir empfehlen im Falle eines Lampenwechsels, das Gerät unbedingt vom Stromkreis
zu trennen, selbst wenn die Lampe mit einem Sicherheitsschalter versehen ist.
Das Gerät ist ausschließlich für die Nutzung in geschlossenen Räumen konzipiert. Um
eine sichere Nutzung zu gewährleisten, sollte die Umgebungstemperatur 50°C nicht
überschreiten.
WICHTIG:
•Die Temperatur des Gerätes kann 110°C erreichen.
•Gehen Sie sicher, daß sich bei einem Lampenwechsel die defekte Lampe abgekühlt hat. Die Zeit dafür beträgt ca. 10 min.
3.0 INSTALLATION:
1- Im hinteren, unteren Teil des Gerätes befindet sich der Sockel für die Lampe. Um
eine Lampe einsetzen oder tauschen zu können, muß die schwarze Griffschraube
so weit gelöst werden, bis sich das Geräteteil mit dem Lampensockel aufklappen
läßt. Sobald die Klappe etwas geöffnet ist, unterbricht ein Sicherungsschalter
allpolig die Stromzufuhr.
2- Die Lampe vor dem Einsetzen mit einem weichen Tuch reinigen und anschließend
einsetzen.
- Das Berühren der Lampe mit den Fingern oder unsauberen Reinigungstüchern
ist zu vermeiden.
- Die Lampe keinen Vibrationen aussetzen.
3- Die Lampe durch in die Fassung stecken und mit den Rändelschrauben festziehen. Anschließend die Lampe mit dem Stromkabel verbinden.
- Um eine maximale Lichtausbeute zu erzielen, sollte die Lampe so eingesetzt werden, daß der Glasansatz der Lampe nach oben zeigt.
4- Die Lampenklappe schließen.
3.1 Position des Verfolgers
Der Verfolger DARDO 1200MSR kann auf einem Verfolgerstativ montiert werden. Der
Abstand zu entflammbaren Gegenständen muß mindestens 1 m betragen.
3.2 Montage auf einem Stativ
Den Verfolger DARDO 1200MSR auf dem Stativ montieren. Die Handschraube hat
die Funktion, Auf- und Abwärtsbewegungen gleichmäßig durchführen zu können.
3.3 Netzanschluß
1. Die Zuleitung sollte mit mindestens 16 A abgesichert sein.
2. Die Netzspannung muß 230V - 50/60 Hz betragen.
10
4.0 BEDIENUNGSANLEITUNG
Deutsch
4.1 Allgemeines
Der Verfolger DARDO 1200MSR ist für Entladungslampen mit 1200W vorgesehen. Das
Gerät ist für mittlere bis weite Entfernungen konzipiert, bei denen vorrangig weißes
Licht und Brillianz bevorzugt werden. Ausgeliefert wird das Gerät komplett mit
Blackout/Dimmer und vier Blendenschiebern.
4.2 Fokus
Schalten Sie das Gerät mit dem Schalter auf der Rückseite ein. Der Verfolger kann
einen Hard-Edge oder einen Soft-Edge projizieren. Die Fokussierung erfolgt durch
die Stellschraube an der Seite des Linsentubus.
4.3 Zentrierung der Lampe
Es besteht die Möglichkeit, daß die Lampe nicht ganz genau zentriert ist. Der
Lampenhalter ist mit dem Lampensockel durch zwei Schrauben fixiert. Durch diese
beiden Schrauben kann die vertikale Ausrichtung korrigiert werden. Die Korrektur
kann bei eingeschaltetem Gerät und geschlossenem Lampenhalter durchgeführt
werden.
4.4 Irisblende
Die Irisblende befindet sich im mittleren Bereich des Gerätes. Mit Hilfe des seitlich
angebrachten Hebels läßt sich der Lichtstrahl reduzieren oder vergrößern, wobei die
Lichtintensität nicht beeinflußt wird. Es wird empfohlen, die Irisblende nach dem
Ausschalten des Gerätes zu öffnen, um eine bessere Abkühlung zu erreichen.
4.5 Dimmer
Der mechanische Dimmer befindet sich im unscharfen Bereich des Strahlengangs
im vorderen Teil des Scheinwerfers.
4.6 Zubehör
Das folgende Zubehör ist optional erhältlich:
• Farbfilterrahmen: Dieser Rahmen kann in den zwei Einschüben auf der Vorderseite
des Gerätes arretiert werden. Es sollten nur hitzebeständige Farbfilter zum Einsatz
kommen.
• Gobohalter: Dieser kann von der dafür vorgesehenen Vorrichtung an der
Irisblende aufgenommen werden.
• Farbwechsler: Ein Farbwechsler kann im vorderen Teil des Gerätes montiert werden. (5 Farben und Blackout)
• Vier Blendenschieben
• Verfolgerstativ
11
Deutsch
5.0 WARTUNG
Der Verfolger benötigt eine regelmäßige Wartung, um eine maximale Leistung
jederzeit zu garantieren. Beachten Sie bitte die folgenden Anweisungen:
• Die Linse und der Reflektor sollten einer regelmäßigen Reinigung unterzogen werden. Schon eine kleine Staubschicht auf diesen Geräteteilen kann eine reduzierte Lichtausbeute bewirken.
• Die Lampe sollte bei einem Defekt oder einer thermischen Deformieren unverzüglich ausgetauscht werden.
• Die elektrischen Verbindungen - insbesondere die Erdung - sollten regelmäßig und
sorgfältig überprüft werden.
• Sollte die Linse sichtbar beschädigt sein, ist diese umgehend auszuwechseln.
(Dieser Punkt gilt für alle beschädigten Bauteile.)
6.0 TECHNISCHE DATEN
Abmessungen
Gewicht
Gehause
Netz spannung
mm
Kg
V
DARDO 1200 MSR
970x350x510
34.2
Aluminium / Schwarz
230
Netz frequenz
Hz
50/60
Leistungsaufnahme
W
1290
Stromaufnahme
Lampe
Optik
Max bedienungstemperatur
Max umgebungstemperatur
A
10.8
MSR 1200
G22
°C
°C
Linsen
110
50
7.0 ERSATZTEILE
Alle Komponenten des Verfolgers DARDO 1200MSR sind als Ersatzteile lieferbar.
Einen entsprechenden Katalog erhalten Sie auf Wunsch von Ihrem Fachhändler.
12
English
1.0 PACKING
Check carefully the content of the box and in case of damage contact immediately your forwarder.
The following items are included in the box:
n° 1 instructions leaflet
n° 1 followspot DARDO 1200MSR
2.0 SAFETY
Even if this lantern is fitted with a safety micro-switch which automatically disconnect power as soon as the lamp cover is opened, we strongly suggest to disconnect
the lantern from mains supply before to replace the lamp.
• This followspot has been designed for use in interor.
• For safety operation, max ambient temperature must not exceed 50°C.
• Caution: the surface temperature of the followspot can reach 110°C
• Caution: hot lamp; ensure that the lamp is cold before to attempt to remove it
(about 10 minutes)
3.0 INSTALLATION
3.1 Fitting lamp
1- A captive screw is fitted on the base of the rear part of the followspot. Unscrew
the knob until it is free and gently pull down the lamp tray. As soon as the lamp
tray is released, the safety switch will automatically disconnect both poles of the
mains supply to the lamp.
2- Clean the lamp with the cleaning towel and fit it carefully in the lampholder.
- avoid to touch the lamp with fingers or dirty towels;
- do not shake the lamp;
3- Fix the lamp to the lampholder tightening the fixing knobs; fix the supply cable.
- to obtain the maximum light output, position the lamp with the glass pip towards
the metal case of the lantern
4- Close the lamp tray.
3.2 Mounting position
The followspot DARDO 1200MSR can be mounted on a tripod stand; distance from
flammable object must be minimum 1 m.
3.3 Mounting on tripod
Mount the followspot DARDO 1200MSR on the tripod, tightening the stirrup by the
locking knob.
The stirrup is designed to give a smooth and positive up/down movement.
3.4 Electrical connection
1- Connect the supply cable to a plug capable to support a load of at least 16
Amps.
2- Connect the lantern to a mains supply of 230V - 50/60Hz.
13
English
4.0 USE OF THE LANTERN
4.1 Operation
The DARDO 1200MSR followspot use a discharge lamp 1200 MSR. It is a
medium/long-throw followspot suitable in situation where brilliant and white light is
required. The advantage of this followspot is the compact size which doesn't require excessive space during operation. It is supplied complete with blackout/dimmer.
4.2 Focus
Switch on the followspot using the switch located on the rear side of the lantern.
Followspots are used either with a sharp or a soft edge. The focus control knobs are
located on the side of the lens tube.
4.3 Centering the lamp position
Even if the lampholder is factory set to use a 1200MSR discharge lamp, it's possible
to obtain the centering of the beam by adjusting the height of the lamp with reference to the condensor lens axis.
The lampholder is fixed to the lamptray by 2 screws which allow the vertical movement of the lamp.
Turn the screws to obtain the beam centering. This operation is possible while the
lamptray is closed and the lamp is on.
4.4 Iris diaphragm
The iris diaphragm is located in the central part of the lantern and is fitted with a
lever which is used to reduce the diameter of the spot whilst maintaining the same
light intensity.
We suggest to re-open the iris as soon as the followspot is switched off to obtain an
even cooling of the iris leaves.
4.5 Dimmer
The mechanical dimmer is located in a non-focused point of the optical path on
the top of the lantern. It provides a smooth dim, from full power to blackout and it
can be used in conjunction with the iris control.
4.6 Accessories
The following accessories are available on request:
• Colour frame: to be fitted in the two guide slots on the front of the followspot. Hightemperature resistant colour filter is recommended.
• Gobo holder: to be fitted in the iris diaphragm gate.
• Colour changer: to be fitted on the front part of the followspot. 5 colours + blackout.
• 4 Shutter blades to modify the beam’ s shape
• Tripod stand
14
5.0 MAINTENANCE
All lanterns require regular maintenance to ensure maximum performance and light
output.
Please follow these instructions:
• clean lens and reflector regularly, as even a thin layer of dust can reduce the light
output and scatter the beam;
• replace the lamp if it has become damaged or it's thermally deformed;
• carefully check the electrical connections, particularly the earth connection;
• replace the lenses if they have become visibly damaged;
• replace all the damaged components
English
6.0 TECHNICAL INFORMATION
Size
mm
Weight
Kg
Body materials
Operating voltage
V
DARDO 1200 MSR
970x350x510
34.2
Aluminium / Steel
230
Operating frequence
Hz
50/60
Power
W
1290
Operating amperage
A
Suggested lamp
10.8
MSR 1200
socket G22
Optical system
Max working temperature
Lenses
°C
Max ambient temperature
110
°C
50
7.0 SPARE PARTS
All components are available for the DARDO 1200MSR and the exploded diagram
and catalogue are available on request.
8.0 SIMBOLS
45°
Min / max TILT position
45°
Lamp
Typical throw distance
TCMax
Ta
Max Temperature
Max ambient temperature
Importanti informazioni per il corretto riciclaggio/
smaltimento di questa apparecchiatura
La direttiva Europea 2002/96/CE sui rifiuti di apparecchiature elettroniche (RAEE), prevede che gli apparecchi illuminanti non debbano essere smaltiti nel normale flusso dei
rifiuti solidi urbani. Gli apparecchi dismessi debbono essere raccolti separatamente per ottimizzare il tasso di recupero e riciclaggio dei materiali che li compongono
ed impedire potenziali danni per la salute e l’ambiente.
Il simbolo del cestino barrato è riportato su tutti i prodotti per ricordare gli obblighi di raccolta separata.
Per ulteriori informazioni sulla corretta dismissione
delle apparecchiature, i detentori potranno rivolgersi al servizio pubblico preposto o ai rivenditori.
Important information for the correct recycle/treatment procedures of this equipment
The European Directive 2002/96/EC on Waste Electrical
and Electronic Equipment (WEEE), requires that old
lighting fixtures must not be disposed of the normal unsorted municipal waste stream. Old appliances must be collected separately in order to optimise the recovery and
recycling of the materials they contain and reduce
the impact on human health and the environment.
The crossed out “wheeled bin” symbol on the product reminds you of your obligation, that when you
dispose of the appliance it the must be separately
collected.
Consumer should contact their local authority or
retailer for information conceming the correct disposal of their old appliance.
15
Via Bulgaria, 16 - 46042 CASTEL GOFFREDO (MN) - Italy
Telefono 0376/779483 - Fax 0376/779682 - 0376/779552
http://www.griven.com/ e-mail [email protected]
http://www.griven.it/ e-mail [email protected]
User’s manual rel. 2.01