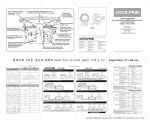
1
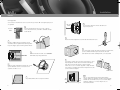
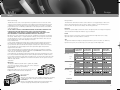
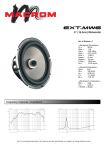
Electro - Acoustic parameters
D
ML 2500
ML 3000
ML 3800
210
253
320
19
19
19
2,6
2,6
2,6
33
32
28
1,71
1,67
1,68
0,85
0,83
0,84
mm
Xmax
mm
Re
ohm
Fs
Hz
Le
mH@1kHz
Le
mH@10kHz
Vas
19
39
130
165
197
233
0,14
0,12
0,13
13
14
13
Qts
0,50
0,51
0,60
Qes
0,52
0,53
0,64
Qms
11,00
10,40
11,65
87
89
91
lit
Mms
gr
Cms
mm/N
BL
T-m
Spl
SUB
dB
ML 2500
ML 3000
ML 3800
MANUALE DI ISTRUZIONI
06.1
OWNER’S MANUAL
62018 Potenza Picena (MC) Italy - T +39 0733 870 870 - F +39 0733 870 880 - www.elettromedia.it
www.hertzaudiovideo.com
Introduction
Italiano
Gentile cliente,
complimenti per aver acquistato un prodotto HERTZ MILLE. La nostra soddisfazione è il primo
requisito cui devono rispondere i nostri prodotti; la stessa soddisfazione di chiunque voglia vivere
l’emozione del car audio.
GLI ALTOPARLANTI HERTZ MILLE SONO IN GRADO DI CREARE SISTEMI AUDIO AD ALTA
POTENZA CHE POSSONO GENERARE ELEVATISSIME PRESSIONI SONORE INDISTORTE.
RICORDATE CHE PROLUNGATE ESPOSIZIONI AD UN LIVELLO ECCESSIVO DI PRESSIONE
ACUSTICA POSSONO PRODURRE DANNI AL VOSTRO UDITO; UTILIZZATE DUNQUE
EQUILIBRIO E BUON SENSO NELL’ASCOLTO.
La sicurezza durante la marcia deve restare sempre al primo posto. In ogni situazione il volume
d’ascolto deve avere un livello tale da non coprire i suoni provenienti dall’esterno; dovreste essere
in condizione di udire anche quelli del Vostro veicolo per affrontare prontamente situazioni di
emergenza.
Per ottenere il massimo delle prestazioni dal Vostro nuovo altoparlante Vi consigliamo di seguire
attentamente le istruzioni del presente manuale. La realizzazione di sistemi hi-fi car di alto livello
richiede una buona conoscenza delle problematiche meccaniche ed elettriche delle autovetture;
qualora riteneste di non possedere gli attrezzi necessari o la conoscenza adeguata, non esitate a
contattare un installatore specializzato. Un’installazione a regola d’arte Vi assicurerà prestazioni
entusiasmanti e coinvolgenti, senza influire sulla sicurezza e l’affidabilità della Vostra autovettura.
Indice
SAFE SOUND
02
Indice
03
Technology
04
Precauzioni Generali
05
Progetti
06
Find your Box
ML 2500
ML 3000
ML 3800
07
08
09
10
Connessioni
11
Esempi pratici di connessione
12
Consigli pratici
14
Installazione
16
Taratura Elettroacustica
18
Taratura Reflex
19
Cablaggio
20
Limiti di garanzia
20
Technical specifications
21
Questo manuale è stato compilato per fornire le indicazioni principali e necessarie all’installazione e
all’uso dell’altoparlante. La varietà delle applicazioni possibili è tuttavia molto ampia; per avere
ulteriori informazioni non esitate a contattare il Vostro rivenditore HERTZ o l’assistenza ufficiale
HERTZ via mail, scrivendo direttamente agli indirizzi:
Per l’Italia - [email protected]
Per l’estero - [email protected]
02
03
Technology
Italiano
Technology
Precauzioni Generali
La linea MILLE ha rivoluzionato il mercato sin dalla sua introduzione nel
1999. Altoparlanti progettati per divenire il nuovo riferimento e soddisfare
le richieste degli appassionati più esigenti con prestazioni eccezionali.
Questi componenti hanno stabilito un nuovo standard nella riproduzione
del suono, riscuotendo un entusiastico apprezzamento dal pubblico e
prestigiosi riconoscimenti dalla stampa specializzata.
L’innovazione e lo sviluppo continuo dei prodotti sono da sempre punti
di riferimento del programma di ricerca Elettromedia per HERTZ.
Oggi il team di Ricerca e Sviluppo è riuscito nell’impresa di
migliorare ciò che sembrava già perfetto.
I nuovi ML Sub segnano un nuovo limite nella riproduzione delle
basse frequenze. Possenti sin dalle primissime ottave dello spettro audio con l’impatto, la dinamica
e il controllo che solo un componente di livello elevatissimo può raggiungere. Questi altoparlanti
rappresentano la massima espressione tecnologica sviluppata su tutte le parti che compongono
il subwoofer. Il profilo V-CONE applicato ad una membrana in Polipropilene irrigidita con polveri
minerali, eliminando qualsiasi fenomeno di break-up, fornisce la massima
prestazione indistorta. Per sopportare le condizioni più estreme le sospensioni
sono state progettate come nelle macchine da competizione, assicurando la
massima simmetria ad elevate escursioni. Il polo centrale e un anello di alluminio
tornito posti all'interno del motore riducono in maniera determinante la distorsione
per asimmetria di campo e abbattono la modulazione dell’induttanza ad alte escursioni, per un
basso più deciso, profondo e scolpito. La bobina mobile avvolta a doppio strato con rame ad alta
temperatura, cuore pulsante del subwoofer, è stretta su un supporto in fibra di carbonio ad
elevatissimo Q per rendere il trasferimento dell’energia al cono particolarmente efficiente.
Il perfezionamento dei flussi dell’aria interni al gruppo motore, realizzati con una speciale geometria
di canali, crea un circuito di ventilazione forzata che riduce drasticamente la compressione
dinamica, innalzando oltre ogni limite la potenza applicabile. Il trasferimento della corrente è
affidato ai terminali che accettano cavi sino a 5 AWG, ergonomicamente disposti per rimanere
all’interno della circonferenza di montaggio.
I subwoofer ML segnano un nuovo riferimento anche nel design. Potenza e armonia in un mix
di linee taglienti e profili descritti da un’ampia curvatura. Il cestello è in lega di alluminio antirisonante
ed ha cinque razze a bassa incidenza impreziosite da un inserto che, generando un contrasto di
materiali e colori, richiama una spina dorsale coperta di muscoli in tensione. Questa struttura
auto-portante concorre allo smorzamento meccanico totale per una trasparenza al suono illimitata.
Essenzialità nel design e attenzione per i dettagli si ritrovano anche nella guarnizione progettata per
avere la doppia possibilità di montaggio sia in posizione tradizionale che rovesciata, quando il sub
è montato con il magnete a vista. Gli inserti, che riprendono le linee delle razze,
proteggono e rifiniscono le viti per il fissaggio del subwoofer.
Gli stessi alloggiamenti sono predisposti per accogliere le basi della griglia
di protezione, che diviene parte integrante dell’altoparlante. La copertura
del gruppo motore completa il design e protegge legando il valore estetico
a quello tecnico del consolidamento globale del sistema.
La passione ci spinge alla ricerca di prodotti estremi, dove l’unico requisito di fondo è la qualità,
senza alcun tipo di compromesso. Al servizio del suono per un’esperienza unica ed emozionante.
• Prima di procedere all’installazione leggete con attenzione
Attenzione
Per chi voglia costruire tali casse,
tutte le indicazioni contenute in questo manuale.
le schede tecniche complete di tu
• Il simbolo a lato indica che è opportuno prestare attenzione
alle indicazioni riportate. La mancata osservanza di tali
istruzioni potrebbe causare lesioni involontarie o danni
all’apparecchio.
• Per facilitare l’installazione schematizzate nel dettaglio la configurazione dei Vostri nuovi
altoparlanti e realizzate un cablaggio ordinato e razionale.
• Indossate sempre occhiali protettivi durante l’utilizzo di attrezzi che possono generare schegge o
residui di lavorazione.
• Riponete, quando è possibile, il prodotto nell’imballo durante l’installazione per evitare danni
accidentali.
• Fissate alla struttura del veicolo in modo solido e affidabile tramite staffe, viti, dadi e bulloni tutte
le strutture supplementari realizzate per installare i vari componenti, per assicurare stabilità e
sicurezza in condizioni di marcia.
• Il distaccamento dal fissaggio durante la marcia dell’autovettura può causare grave danno per le
persone trasportate e per gli altri veicoli. Fissate adeguatamente gli altoparlanti, facendo la
massima attenzione nel caso in cui l'installazione sia all'interno dell'abitacolo.
• Non realizzate alcun tipo di installazione all'interno del vano motore.
• Prima dell’installazione, spegnete la sorgente e tutti gli apparati elettronici del sistema audio per
evitare qualsiasi possibile danno.
• Assicuratevi che il posizionamento prescelto per i componenti non interferisca con il corretto
funzionamento di ogni dispositivo meccanico o elettrico della vettura.
• Evitate di passare i cavi o installare gli altoparlanti in prossimità di centraline elettroniche.
• Prestate estrema attenzione nel praticare fori o tagli sulla lamiera, verificando che sotto o nella
zona interessata non vi sia alcun cavo elettrico o elemento strutturale e vitale per l’autovettura.
• Il cavo di collegamento deve essere provvisto di isolamento meccanicamente resistente ed
autoestinguente alla fiamma. La sezione del cavo deve essere dimensionata come quanto
suggerito nel presente manuale. Nel posizionamento, evitate di schiacciare il cavo contro parti
taglienti o nella vicinanza di organi meccanici in movimento. Assicuratevi che sia adeguatamente
fissato per tutta la sua lunghezza.
• Proteggete il cavo conduttore con un anello in gomma se passa in un foro della lamiera o con
appositi materiali se scorre vicino a parti che generano calore.
• Non fate passare mai i fili all’esterno del veicolo; non avreste protezione sufficiente contro l’usura
o in caso d’incidente.
• Nell'installazione degli altoparlanti e dei cavi che li collegano, accertatevi che non vadano
in contatto, anche in modo saltuario, con parti taglienti del veicolo. In tal caso interverrà la
protezione dell'amplificatore.
• Per evitare problemi usate cavi, connettori e accessori di alta qualità scegliendoli nel catalogo
CONNECTION Audison.
• A fine installazione ricontrollate l’intero cablaggio del sistema e assicuratevi di aver eseguito tutti
i collegamenti in maniera corretta.
04
05
Design
Italiano
Progetti
Find your Box
I parametri elettroacustici dei Subwoofer ML sono ottimizzati per un uso in cassa. In questo manuale
riportiamo quattro proposte differenti per dimensioni e prestazioni, negli allineamenti cassa chiusa e
cassa reflex. Per ogni tipologia sono presenti due progetti diversi che privilegiano le dimensioni,
quindi il minimo ingombro possibile, o le prestazioni assolute, a discapito dello spazio occupato.
TUTTI I PROGETTI SONO STATI REALIZZATI, TESTATI E OTTIMIZZATI SIA IN LABORATORIO
CHE IN ABITACOLO. LE CURVE RIPORTATE NON SONO SIMULAZIONI SOFTWARE MA DATI
REALI RILEVATI MEDIANTE MISURE ELETTRO ACUSTICHE.
I progetti riportati nel manuale non sono esaustivi di tutte le possibilità di configurazione offerte dagli
ML Sub. In qualsiasi momento potrete, con l’ausilio di programmi di simulazione, progettare Voi
stessi il box più adatto alle Vostre esigenze, utilizzando soluzioni o geometrie differenti. Di seguito
troverete alcuni consigli pratici per realizzare i box in maniera corretta.
Tenete presente che:
1_ Nei progetti riportati il volume del box comprende l'ingombro dell'altoparlante montato con il
magnete dentro la cassa;
2_ Se posizionerete il subwoofer con il magnete rivolto verso l’esterno, dovete sottrarre l'ingombro
dell'altoparlante (Total driver displacement) al volume della cassa acustica;
3_ I progetti sono stati ottimizzati tenendo conto dell’inserimento di materiale assorbente come il
FONOFORM di AZ Audiocomp;
4_ I condotti di accordo dichiarati nei Reflex Box sono intesi per un montaggio vicino ad un angolo
della cassa e il loro ingombro è già calcolato nel progetto;
5_ Se volete realizzare una sezione bassi con più di un altoparlante, montate lo stesso modello di
subwoofer utilizzando la stessa tipologia di allineamento. Realizzate una serie di box identici, ognuno
dedicato ad un subwoofer o disegnate una struttura unica suddivisa in singoli box;
La tabella riportata riassume sinteticamente le principali caratteristiche acustiche di ogni progetto
proposto. Scegliete il tipo di suono e di prestazioni che desiderate ottenere dal Vostro sub in base
alle Vostre esigenze e ai gusti personali. Le valutazioni sono state espresse secondo i seguenti
parametri:
Sealed Box o Cassa Chiusa
Dimension:
la cassa è volutamente piccola per ottimizzare al
massimo gli ingombri complessivi; è la soluzione giusta
per chi ha problemi di spazio, ma non vuole rinunciare
ad un basso potente.
Performance:
più grande sia sotto l’aspetto fisico che acustico,
risponde con una gamma bassa piena e corposa e
un’ottima dinamica.
ML 2500 Extension
Bass Reflex o Cassa Accordata
Dimension:
mantiene le dimensioni simili al Sealed Box Performance,
ma offre una maggiore estensione, con un suono
energico e un’ottima articolazione.
Performance:
grande tenuta in potenza, elevati valori di sensibilità e
grande impatto; è il sub di maggiori dimensioni per un
basso possente con ogni genere musicale.
06
Extension
Indica l’estensione in gamma bassa del sistema, vale a dire la profondità percepita delle basse
frequenze.
Punch
Indica lo smorzamento acustico del sistema. Un alto punteggio indica un suono netto e preciso,
d’impatto; viceversa il basso percepito sarà più morbido.
SPL
Questo parametro indica la massima pressione acustica ottenibile dal subwoofer. Per realizzare
impianti ad altissimo valore di SPL consigliamo di scegliere i progetti che ottengono il maggiore
punteggio.
Find your Box
Sealed Box
Dimension
Sealed Box
Performance
Reflex Box
Dimension
Reflex Box
Performance
Punch
SPL
ML 3000 Extension
Punch
SPL
ML 3800 Extension
Punch
SPL
Attenzione
Per chi voglia costruire tali casse, sul sito www.hertzaudiovideo.it sono disponibili in formato pdf
le schede tecniche complete di tutte le tavole con le misure esatte.
07
Design
Italiano
ML 2500
ML 3000
Sealed Box
60
180°
48
108°
12
-108°
0
-180°
60
180°
48
108°
36
36°
24
-36°
12
-108°
0
-180°
234
270
234
48
108°
36
36°
24
-36°
12
-108°
0
-180°
60
180°
48
108°
36
36°
24
-36°
12
-108°
0
-180°
60
180°
48
108°
36
36°
24
-36°
12
-108°
0
-180°
Dimension
310
Fonoassorbente:
FONOFORM
su tutte le pareti
esclusa quella
dell’altoparlante
Performance
250
180°
Fonoassorbente:
FONOFORM
su tutte le pareti
esclusa quella
dell’altoparlante
210
284
350
240
284
Reflex Box
60
180°
48
108°
-108°
0
-180°
36°
24
-36°
12
-108°
0
-180°
77,5
08
280
290
50
L: 2
10
L: 2
284
77,6
234
Fonoassorbente:
FONOFORM
su tutte le pareti
esclusa quella
dell’altoparlante
Tubo Reflex: AR 70
Tubo Reflex: AR 70
Performance
42
330
60
180°
Fonoassorbente:
FONOFORM
su tutte le pareti
esclusa quella
dell’altoparlantei
48
108°
36
36°
24
-36°
12
-108°
Tubo Reflex: AR 70
0
-180°
Performance
350
310
72
90
20
L: 2
284
72
36
42
230
350
108°
77,5
234
42
180°
48
40
L: 2
280
60
42
Reflex Box
42
-36°
12
Fonoassorbente:
FONOFORM
su tutte le pareti
esclusa quella
dell’altoparlante
Fonoassorbente:
FONOFORM
su tutte le pareti
esclusa quella
dell’altoparlante
Dimension
330
24
220
42
36°
280
280
36
Dimension
Fonoassorbente:
FONOFORM
su tutte le pareti
esclusa quella
dell’altoparlante
Performance
350
-36°
Sealed Box
60
310
24
210
270
36°
250
250
36
Dimension
Attenzione
Attenzione
Tutte le quote indicate sono interne ed espresse in millimetri (mm).
Materiali fonoassorbenti e tubi reflex sono scelti dal catalogo AZ audiocomp.
Tutte le quote indicate sono interne ed espresse in millimetri (mm).
Materiali fonoassorbenti e tubi reflex sono scelti dal catalogo AZ audiocomp.
Fonoassorbente:
FONOFORM
su tutte le pareti
esclusa quella
dell’altoparlante
Tubo Reflex: AR 80V
09
Design
Italiano
Connessioni
ML 3800
Sealed Box
60
180°
48
108°
36
36°
24
-36°
12
-108°
0
-180°
60
180°
48
108°
36
36°
24
-36°
12
-108°
Dimension
360
360
351
Fonoassorbente:
1.5 fogli di FONOFORM
Performance
380
300
380
0
200
Solitamente gli amplificatori hanno la capacità di aumentare la potenza di uscita con l’abbassarsi
del carico;
CONSIGLIAMO DI VERIFICARE NEI DATI DICHIARATI DAL COSTRUTTORE L’IMPEDENZA
MINIMA ACCETTATA DALL’AMPLIFICATORE E DI NON SCENDERE MAI SOTTO TALE DATO.
Nel caso dell’utilizzo di due o più altoparlanti nella sezione subwoofer è estremamente importante
utilizzare componenti dello stesso modello montati nello stesso tipo di configurazione.
Nella pagina successiva sono mostrati differenti combinazioni di collegamento serie, parallelo e
misti serie/parallelo che rispondono alla maggior parte delle esigenze sia per l’impedenza di carico
che per la massima pressione sonora ottenibile.
Fate riferimento alla tabella seguente per verificare che la configurazione che avete prescelto sia
supportata dal Vostro amplificatore:
Fonoassorbente:
2.5 fogli di FONOFORM
351
Ω
1 Speaker
-180°
Series
Reflex Box
60
180°
48
108°
-36°
12
-108°
0
-180°
60
180°
48
108°
24
-36°
12
-108°
0
-180°
351
Tubo Reflex: AR 80V
90
Performance
82
105
400
400
50
L: 2
351
82
36°
20
L: 2
400
36
67
Attenzione
Tutte le quote indicate sono interne ed espresse in millimetri (mm).
Materiali fonoassorbenti e tubi reflex sono scelti dal catalogo AZ audiocomp.
10
Fonoassorbente:
2.5 fogli di FONOFORM
67
24
300
380
380
36°
2,50
1
5,00
2
7,50
1
1,25
2
0,83
3
0,63
Attenzione
1
2,50
I valori della tabella fanno riferimento agli
esempi di connessione delle pagine 11 e 12
2
2,50
3
3,75
4
1,67
5
1,25
Dimension
Parallel
36
ML 2500
ML 3000
ML 3800
Free Air DC
Resistance
Fonoassorbente:
3 fogli di FONOFORM
Tubo Reflex: AR 100V
Mixed
Di seguito riportiamo anche le formule che permettono di calcolare l’impedenza per differenti
tipologie di connessione.
Connessioni in serie:
Impedenza totale = Ω Sub1 + Ω Sub 2 + Ω Sub 3…
Connessioni in parallelo:
1
...
Impedenza totale =
1
1
1
...
+
+
Ω Sub1 Ω Sub2 Ω Sub3
dove “Ω Sub” è l’impedenza
del Subwoofer numero 1 etc. …
11
Technology
Italiano
Connessioni serie - parallelo
Misto
Serie
1 Speaker
1
1
2
Parallelo
2
3
1
12
2
3
5
4
13
Installation
Italiano
Consigli pratici
Se avete deciso di realizzare da soli la cassa armonica per il Vostro ML Sub seguite questi piccoli
accorgimenti:
1
19 mm
MIN
6
30 mm
MIN
Lasciate almeno 30 mm tra il fondo del Subwoofer
e la parete posteriore.
Usate un materiale di buon spessore, molto compatto
e meccanicamente inerte, come MDF o multistrato di legno
ad alta densità.
7
Fissate in maniera adeguata la cassa del Sub alla struttura del veicolo.
2
Incollate e sigillate tutte le pareti del box usando
colla vinilica di buona qualità in abbondante quantità.
Dopo l’incollaggio, ripassate tutte le giunzioni interne.
8
Non è importante su quale lato del box metterete il condotto reflex,
poiché i cambiamenti nella risposta del sistema, introdotti
dalla distanza del condotto dall’altoparlante, sono trascurabili.
3
Damping materials
Utilizzate materiali smorzanti come il FONOMAT
di AZ Audiocomp nelle pareti interne.
L
9
4
Utilizzate sempre la guarnizione di tenuta tra cestello
e piano di battuta e serrate con decisione le viti
seguendo un ordine a croce.
Se mettete il condotto di accordo vicino ad un angolo, a causa
del prolungamento virtuale dovuto alla vicinanza delle pareti,
fatelo più corto del 25-30% rispetto a quanto simulato.
Fate la stessa cosa se il condotto progettato è di tipo lamellare.
Se possibile, Vi consigliamo di misurare la frequenza di accordo
con uno strumento adeguato.
L-25/30%
10
5
Se possibile utilizzate almeno una parete inclinata.
75°
90°
Vb1
+
Vtrp
Vb2
+
Vtrp
Vtrp = Volume tablet reflex port
14
Nel caso dei progetti in Reflex, Asymmetric Bandpass
e Doppio Reflex, non aggiungete al volume totale l’ingombro
dei tubi e dei condotti di accordo, ma solo il volume del tipo
di supporto utilizzato; es.: la tavola di legno nel caso
del condotto lamellare.
15
Installation
Italiano
Come fissare il sub
I subwoofer ML hanno una clip che copre il foro di fissaggio e la testa della vite una volta
posizionata al momento del fissaggio.
1
2
3
4
Come girare il gasket
3
4
Il gasket dell’ML Sub è realizzato per poter essere fissato sia in posizione tradizionale
(impostazione standard) che rovesciato, in maniera da rifinire l’installazione quando si monta il
subwoofer con il magnete a vista.
1
2
Griglia
Le griglie GR 2500, 3000 e 3800, disponibili come accessorio, completano l’estetica e la
funzionalità dei subwoofer ML. I punti di fissaggio sono in comune con il cestello dell’altoparlante.
3
4
1
2
16
17
Tuning
Italiano
Taratura Elettroacustica
Taratura Reflex
Una volta realizzato il box e terminata l’installazione in vettura, dedicate alcune attenzioni alla
messa a punto dell’impianto e alla taratura dell’amplificazione specifica. Ricordate che è più facile
danneggiare un altoparlante usando un amplificatore poco potente in piena distorsione.
Viceversa, un amplificatore molto potente in zona di funzionamento lineare non è quasi mai
responsabile di malfunzionamenti del sistema.
Se state realizzando un box reflex, effettuate alcune prove di ascolto in abitacolo prima di chiudere
definitivamente la cassa, solo in questo modo avrete la certezza di ottenere il miglior risultato
acustico secondo i Vostri gusti:
Variate la frequenza di accordo modificando
la lunghezza del condotto o la quantità di materiale
fonoassorbente presente all’interno.
Accorciando il condotto o diminuendo la quantità
di fonoassorbente la frequenza di accordo sale e il basso
avrà un suono più netto e deciso, viceversa sarà più profondo
ma meno incisivo.
Regolate il livello del gain dell’amplificatore in modo
da sfruttare tutta la potenza indistorta dell’amplificatore.
ALERT:
Distortion
In Fase
SUBSONIC 24 dB/Oct.
30
37
22
Utilizzate, se possibile, il filtro subsonico settando
la frequenza di taglio nei dintorni dei 25 Hz.
43
0
20
200
2K
Hz
Effettuate delle prove in entrambi i sensi e
scegliete secondo i vostri gusti.
CROSSOVER
90
Impostate la frequenza di taglio tra i 45 e i 120 Hz
a seconda del tipo di allineamento utilizzato.
70
50÷150
110
130
Controfase
50
150
20
200
2K
20K
Hz
Loudness
Flat
0
18
20
200
Evitate l’utilizzo del loudness o di equalizzazioni in gamma bassa.
2K
Hz
Variate la posizione del subwoofer
all’interno del bagagliaio spostando il
subwoofer box e la direzione di
emissione di condotto di accordo e
altoparlante.
19
Technical
Italiano
Cablaggio
Il cablaggio di potenza riveste un ruolo estremamente importante poiché influenza direttamente il
fattore di smorzamento del sistema; nella tabella allegata potete trovare un’indicazione della
sezione del cavo, consigliata in funzione della lunghezza e della potenza applicata.
Technical
specifications
ML 2500
ML 3000
ML 3800
Component
Subwoofer
Subwoofer
Subwoofer
Size
250 (10”)
300 (12”)
380 (15”)
1200
1500
1800
600
750
900
4
4
4
31-1000
25-900
22-800
dB/SPL
87
89
91
Total driver
displacement
2,1
3,1
3,9
65
65
65
mm (inch)
Power Handling
Potenza applicata
Watt
peak
contin.
program
Diametro del cavo
Impedance
La tabella si riferisce alla potenza continua su
un carico di 4 ohm.
Qualora il carico scenda si dovranno
aumentare proporzionalmente le dimensioni
del cavo.
Lunghezza del collegamento
ohm
Frequency
response
Hz
Nominal sensitivity*
lit
Voice coil
diameter
mm
Double magnet high density
flux ferrite
Magnet
Cone / Dome
Xmech**
20
28
**Xmech massima escursione meccanica: indica il range
di movimento in zona di funzionamento lineare
dell’altoparlante, in entrambi i sensi.
Outer diameter
mm
268
318
391
Mounting hole
diameter
234
284
351
195
207
218,4
mm
166,5
179
190,5
Weight of one
component
12,3
12,8
13,7
mm
Fuori Garanzia:
1. Danni cagionati da incidenti, abuso, funzionamento improprio, acqua, furto.
2. Assistenza tecnica eseguita da chiunque non sia autorizzato dall’Elettromedia.
3. Qualsiasi prodotto su cui il numero di serie sia stato deturpato, alterato o rimosso.
4. Danni cagionati da sovrapilotaggio o amplificazione in zona di funzionamento non lineare con
eccessivo tasso di distorsione.
Elettromedia non risponde in alcun modo di eventuali danni generati dalla non osservanza delle
raccomandazioni contenute in questo manuale.
28
* Il dato di sensibilità dichiarato non è indicativo della
pressione acustica generata in abitacolo e non deve
essere utilizzato per confronti con altri subwoofer.
Limiti di garanzia
Vi preghiamo di leggere con cura i termini della garanzia e di conservare sia il libretto che la scatola
originale, per qualsiasi evenienza.
L’Elettromedia sui prodotti HERTZ offre una garanzia limitata alle seguenti condizioni:
Durata della garanzia: 2 anni.
Questa garanzia è applicabile solamente ai prodotti HERTZ venduti da rivenditori autorizzati
HERTZ.
I prodotti che risulteranno difettosi durante il periodo della garanzia saranno riparati oppure
sostituiti con un prodotto equivalente, a discrezione dell’Elettromedia.
Polypropylene with mineral powder
28
Total depth
mm
Mounting depth
Kg
21
SUB
ML 2500
ML 3000
ML 3800
OWNER’S MANUAL
www.hertzaudiovideo.com
Introduction
English
Dear customer,
Our compliments for purchasing a HERTZ MILLE product. Our engineers’ satisfaction is
the first requirement that our products must meet; the same satisfaction from those who long
for the emotions that car audio can create.
Table of Contents
Safe Sound
24
Table of Contents
25
Technology
26
Warning
27
Enclosure Design
28
Find Your Box
ML 2500
ML 3000
ML 3800
29
30
31
32
Connections
33
HERTZ MILLE SPEAKERS CAN BE PART OF A HIGH POWER AUDIO SYSTEM THAT CAN
GENERATE VERY HIGH UNDISTORTED SOUND PRESSURE LEVELS. PLEASE REMEMBER
THAT LONG EXPOSURE TO AN EXCESSIVELY HIGH SOUND PRESSURE LEVEL MAY
DAMAGE YOUR HEARING; THEREFORE, PLEASE USE COMMON SENSE AND PRACTICE
SAFE SOUND.
Connection Configurations
34
Design Advice
36
Safety must be at the forefront while driving. The listening volume should never obscure the noise
coming from the outside of your vehicle; you should be able to hear the sounds generated by your
vehicle in order to promptly face any emergency situation.
To achieve the best possible performance from your new components, we recommend you follow
the instructions in this manual carefully. In order to design and create top level car hi-fi systems you
need to understand automobile mechanical and electrical issues very well; if you think you lack
the required knowledge or the proper tools, please consult with a specialized installer.
A professional installation will ensure your system delivers all the performance you have paid for,
without affecting the safety and reliability of your vehicle.
This manual has been designed to provide you with the basic instructions required to install and
use this product. However, the range of possible applications is very wide; to obtain further
information, please contact your authorized HERTZ dealer or HERTZ service center.
You can also send an e-mail directly to the following addresses:
Installation
38
Electro-acoustic Tuning
40
Reflex Tuning
41
Connecting Cables
42
Warranty Restrictions
42
Technical Specifications
43
Italy - [email protected]
Worldwide - [email protected]
24
25
Technology
English
Tecnology
Warning
The MILLE line has revolutionized the market since its introduction in 1999;
designed to be the new reference and meet the needs of the most
demanding enthusiasts, providing reference performance.
These components have set a new standard in sound reproduction,
winning people’s appreciation and prestigious awards by the specialized
press. Constant innovation and product development have always
been the foundation of Elettromedia’s research program for HERTZ.
Today the R&D team has succeeded in improving what seemed to be
already perfect.
The new ML Subs set a new benchmark for low frequency
reproduction. The lowest octaves of the audio range are delivered
with the powerful impact, dynamics and control that only a reference component can achieve.
These speakers represent the pinnacle of technology, in all parts of the subwoofer construction.
The V-CONE™ profile is applied to a Polypropylene cone stiffened with mineral
dusts; eliminating any break-up, offering the best undistorted performance.
To stand the most extreme conditions, the surround has been designed like a
racing cars’, ensuring the maximum symmetry at very high excursions.
The center pole piece, with a turned aluminum ring inside the motor significantly
reduces distortion due to field asymmetry and reduces inductance modulation at high excursions;
for a harder, deeper and more accurate bass.
The throbbing heart of the subwoofer; the dual layer, high temperature copper voice coil, is wound
on a very high Q fiberglass former to transfer energy to the cone in a highly efficient manner.
Using special channels, significant improvements have been made to the air flow inside the motor
itself. This proprietary design creates a forced ventilation circuit that significantly reduces dynamic
compression, raising power handling over the top.
The proper current transfer depends on the wire terminals; in this case, accepting cables up to
5 AWG for huge current transfer, ergonomically arranged to add to the speakers lines.
The ML subwoofers set a new landmark in cosmetic design. Power and harmony in a mix of sharp
lines and widely bent outlines. The basket is made from anti-resonant aluminum alloy and features
a five spoke design, adorned with an insert that creates a contrast between materials and colors,
reminding one of a backbone covered in stretched muscles. This self-standing structure
contributes to the overall mechanical damping for incredibly transparent sound.
Basic design and attention to detail can also be found in the gasket, designed to mount
the component in two possible ways: both in the traditional “cone out” position
as well as inverted, where the sub is mounted with the frame/magnet
structure in sight. The trim ring has the same design as the spokes,
protecting and concealing the fasteners used to fix the subwoofer.
The same holes are used to accommodate the fixing of the optional protection
grille, which then becomes an integral part of the speaker.
The structure covering the motor assembly completes the design and protects the same,
combining the aesthetic value and the technical importance of the overall system.
Passion drives us to design the ultimate products; where the only basic requirement is quality
without compromise.
Dedicated to sound: for a unique, exciting experience.
• The symbol on the right shows that it is advisable to carefully
Caution
Those who wish to build this kind
follow the highlighted instructions. Failure to respect these
where some technical files are av
instructions may cause unintentional harm or damage
to the components.
• Before installing the components, please carefully read all of the instructions contained
in this manual.
• In order to simplify the installation, prepare a detailed plan of your installation configuration
and connect the cables safely and neatly.
• Always wear protective eyewear when using tools.
• In order to avoid possible damage, store the product in its package during installation
construction.
• All of the structures built to house the different components must be firmly and reliably attached
to the vehicle chassis using brackets, screws, nuts and bolts, in order to ensure a solid and safe
installation.
• If the component comes loose from the vehicle chassis while driving, this may cause serious
damage to the vehicle and injury to passengers in the car. Attach the components properly, with
the utmost care, especially in the case of installation inside the vehicles interior.
• Do not carry out any installation inside the engine compartment.
• Before you start the installation, turn off the head unit and all the electronic devices of the audio
system in order to avoid any damage and disconnect the negative battery terminal.
• Make sure that the location you chose for the components does not hinder the correct
functioning of any mechanical or electric device in the vehicle.
• Do not put cables or install the components close to electronic or mechanical devices.
• Be very careful when you drill or cut into the vehicle chassis, and make sure that no cables
or structural elements essential to the car are underneath or in the selected area.
• The connecting cable must have an insulation which is mechanically resistant and
self-extinguishing in the case of fire. The cable section must have the size indicated herein.
When you route the cable, do not press the cable against sharp edges or near a moving
mechanical device. Make sure that it is firmly attached and protected for its entire length.
• Protect the conductor with a rubber ring (grommet) if it passes through a hole in the vehicle
chassis or with proper protection materials if it runs close to heat-generating parts.
• Do not pass the wires outside the vehicle; this is not reliable or safe.
• When you install the components and their connecting cables, make sure that they do not touch,
even occasionally, any part of the cars chassis. In this case the amplifier protection triggers.
• In order to avoid any problems, use top quality cables, connectors and accessories choosing
them in the CONNECTION Audison catalogue.
• Once your installation has been completed, check the system wiring again for proper connection
before turning the system on.
26
27
Design
English
Enclosure Design
Find your Box
The ML Subwoofers electro-acoustic parameters are optimized for use in an enclosure. In this
manual we have provided the specifications for two different sealed and reflex (vented) enclosure
configurations for each model, which vary in size and performance. For each type you will find
projects that favor size, for minimum possible bulk, or for absolute performance, to the detriment
of the space taken up.
ALL OF THESES PROJECTS HAVE BEEN DESIGNED, TESTED AND OPTIMIZED IN THE
LABORATORY AND THEN PERFECTED IN THE ACTUAL VEHICLE INTERIOR.
THE REPORTED CURVES ARE NOT SOFTWARE SIMULATIONS; THEY ARE ACTUAL
DATA OBTAINED BY SOUND MEASUREMENTS DEVICES IN THE VEHICLE.
ML subwoofers can be used in many other enclosure configurations other than the ones listed in
this manual. With the help of a computer simulation software, you may design an enclosure that
is better suited for the acoustics of your vehicle and your desired performance. There are some
practical suggestions to follow when designing an enclosure.
Please remember that:
1_ In the designs included in this manual, the box volume includes the displacement volume of
the speaker itself considering it is mounted with the frame/magnet structure inside the box;
2_ If you invert the subwoofer, with the frame/magnet assembly on the outside of the enclosure,
you should subtract the speaker displacement volume (Total driver displacement) from the
suggested enclosure volume;
3_ The suggested designs, both sealed and reflex (vented), have been optimized considering
the use of a sheet damping material like the AZ Audiocomp FONOFORM on all the internal walls
of the enclosure, other than the speaker’s baffle.
4_ The tuning ports specified in the reflex (vented) designs are meant for mounting near one of the
box corners and their material displacement volume is already included in the overall box volume;
5_ If you wish to design an enclosure with several subwoofers, use only the same subwoofer model
using the same enclosure configuration. Each subwoofer should have its own separate enclosure
within the single structure.
The table below summarizes the main acoustic features for each suggested project. Choose the
kind of sound and performance that you wish to obtain according to your needs and personal
taste. The values are expressed according to the following parameters:
Sealed Box
Dimension:
This design is deliberately small in order to optimize the available
space; this is the perfect solution for those who have a small space
but do not want to give up a powerful bass.
Performance:
Bigger, both in dimensions and sound, it responds with a full
bodily bass with excellent extension and dynamics.
Bass Reflex Box
Dimension:
Almost the same dimensions as the Sealed Box Performance, yet offering
a wider extension, with a stronger sound and an excellent articulation.
Performance:
Great power handling, high sensitivity values and great impact; this is
the perfect design for powerful bass with every kind of music.
28
Extension
Indicates the system ability to extend to the lowest of frequencies; that is how deep low frequencies
can be heard and felt. A high value indicates very good extension.
Punch
Means the response speed of the system to musical transients. A high value means a sharp,
impactful sound. Lower values indicate a softer bass.
SPL
This parameter indicates the highest sound pressure that the system can achieve. To obtain very
high SPL level systems, we recommend you choose the projects with a higher value.
Find your Box
Sealed Box
Dimension
Sealed Box
Performance
Reflex Box
Dimension
Reflex Box
Performance
ML 2500 Extension
Punch
SPL
ML 3000 Extension
Punch
SPL
ML 3800 Extension
Punch
SPL
Caution
Those who wish to find more information on building these enclosures can visit the following address:
www.hertzaudiovideo.com, where technical files are available in PDF format containing all the tables
with precise measurements.
29
Design
English
ML 2500
ML 3000
Sealed Box
60
180°
48
108°
12
-108°
0
-180°
60
180°
48
108°
36
36°
24
-36°
12
-108°
0
-180°
234
270
234
48
108°
36
36°
24
-36°
12
-108°
0
-180°
60
180°
48
108°
36
36°
24
-36°
12
-108°
0
-180°
60
180°
48
108°
36
36°
24
-36°
12
-108°
0
-180°
60
180°
48
108°
36
36°
24
-36°
12
-108°
0
-180°
Dimension
310
Damping material:
FONOFORM on all
internal walls except for
the speaker’s baffle
Performance
250
180°
Damping material:
FONOFORM on all
internal walls except for
the speaker’s baffle
210
284
350
240
284
Reflex Box
60
180°
48
108°
180°
48
108°
36
36°
24
-36°
12
-108°
0
-180°
Performance
42
77,5
30
Reflex tube: AR 70
290
280
50
L: 2
234
Damping material:
FONOFORM on all
internal walls except for
the speaker’s baffle
Reflex tube: AR 70
42
77,6
330
10
L: 2
284
Damping material:
FONOFORM on all
internal walls except for
the speaker’s baffle
Reflex tube: AR 70
Performance
72
90
310
350
20
L: 2
284
72
60
77,5
234
230
350
-180°
40
L: 2
Reflex Box
42
0
42
Damping material:
FONOFORM on all
internal walls except for
the speaker’s baffle
Damping material:
FONOFORM on all
internal walls except for
the speaker’s baffle
Dimension
330
-108°
42
-36°
12
280
24
220
42
36°
280
280
36
Dimension
Damping material:
FONOFORM on all
internal walls except for
the speaker’s baffle
Performance
350
-36°
Sealed Box
60
310
24
210
270
36°
250
250
36
Dimension
Damping material:
FONOFORM on all
internal walls except for
the speaker’s baffle
Reflex tube: AR 80V
Caution
Caution
All of the dimensions shown on the illustration are INTERNAL measurements expressed in millimetres (mm).
Damping materials and reflex tubes are chosen from the AZ audiocomp catalog.
All of the dimensions shown on the illustration are INTERNAL measurements expressed in millimetres (mm).
Damping materials and reflex tubes are chosen from the AZ audiocomp catalog.
31
Design
English
Connections
ML 3800
Sealed Box
60
180°
48
108°
36
36°
Dimension
360
12
-108°
0
-180°
60
180°
48
108°
36
36°
24
-36°
12
-108°
0
-180°
351
Damping material:
1.5 sheet
of FONOFORM
Performance
380
300
380
-36°
360
24
200
Usually, a car amplifiers power output increases as load decreases;
WE SUGGEST THAT YOU CHECK THE RECCOMENDATIONS BY THE AMPLIFER
MANUFACTURER AS TO THE MINUMUM IMPEDANCE THAT YOUR AMPLIFIER
CAN ACCEPT, AND NEVER GO BELOW THIS .
When using two or more speakers in your design, it is extremely important to use identical models,
installed in the same type of enclosure.
In the following page there are some different examples of connections in series, in parallel and
mixed (series/parallel) that meet most needs, both in terms of load impedance and of the maximum
sound pressure achievable.
Please, refer to the following table to make sure that the chosen configuration is supported
by your amplifier:
351
Damping material:
2.5 sheets
of FONOFORM
Ω
1 Speaker
Series
Reflex Box
60
180°
48
108°
36
-108°
0
-180°
60
180°
36
300
67
20
L: 2
351
Reflex tube: AR 80V
90
36°
82
-108°
0
-180°
105
50
L: 2
351
Damping material:
3 sheets
of FONOFORM
Reflex tube: AR 100V
82
12
400
400
400
-36°
Caution
All of the dimensions shown on the illustration are INTERNAL measurements expressed in millimetres (mm).
Damping materials and reflex tubes are chosen from the AZ audiocomp catalog.
32
1
5,00
2
7,50
1
1,25
2
0,83
3
0,63
Caution
Mixed
1
2,50
The values in the table refer to the connection
patterns at the pages 34 and 35.
2
2,50
3
3,75
4
1,67
5
1,25
Performance
108°
24
Damping material:
2.5 sheets
of FONOFORM
67
12
48
Parallel
380
380
-36°
2,50
Dimension
36°
24
ML 2500
ML 3000
ML 3800
Free Air DC
Resistance
Use these formulas to calculate the impedance for different types of connections.
Connections in series:
Total impedance = Ω Sub1 + Ω Sub 2 + Ω Sub 3…
Connections in parallel:
1
...
Total impedance =
1
1
1
...
+
+
Ω Sub1 Ω Sub2 Ω Sub3
where "Ω Sub" is the impedance
of Subwoofer number 1 etc. ...
33
Technology
English
Connection Configuration
Mixed
Series
1 Speaker
1
1
2
Parallel
2
3
1
34
2
3
5
4
35
Installation
English
Design Advice
If You have decided to make a box for Your ML Sub on Your own, please remember what follows:
1
19 mm
MIN
6
30 mm
MIN
Leave at least 30 mm between the subwoofer back plate
and the back wall of the enclosure.
Use a thick material as stiff and dense as possible; like MDF
or high density multilayer wood.
7
Make sure the entire enclosure assemble is solidly and safely
mounted to the vehicle’s chassis.
2
Glue and seal all the box walls using good quality
vinyl glue. Use more glue to seal all internal joints.
8
As the distance between the port and the speaker does not
introduce any perceivable change, the enclosure wall you
choose to locate the reflex port makes no difference.
3
Damping materials
Use damping material like AZ Audiocomp
FONOMAT on the internal walls.
L
9
4
Always use the gasket between the basket and
the mounting surface, and use a criss-cross
pattern to firmly secure the fixing screws.
If you place the tuning port next to a corner of the enclosure,
shorten it by 25-30% compared to the simulation. This is
because of the virtual extension of the port being close to the
side walls. Do the same if the port design is lamellar (slot type).
Whenever possible, we recommend you measure the tuning
frequency with a suitable method.
L-25/30%
10
5
If possible, use at least one angled wall in the enclosure design.
75°
90°
Vb1
+
Vtrp
Vb2
+
Vtrp
Vtrp = Volume tablet reflex port
36
In the case of a Reflex (vented), Asymmetric Bandpass
or Double Reflex design, do not add the volume
displacement of tuning port to the total volume. Only add
the volume displacement of the actual material the port
is made from; for example: the volume displaced by the
wooden board in case of a lamellar (slot type) tuning port.
37
Installation
English
Fixing Your Sub
The ML subwoofers are provided with a cosmetic clip that covers the fixing holes and the screw
heads once it has been installed.
1
2
3
4
Turning The Gasket
3
4
The ML Sub gasket is designed to be fixed both in the traditional position (standard setting) and
inverted, so as to finish off the installation when you mount the subwoofer with the frame/magnet
structure exposed.
1
2
Grille
Available as an accessory, the GR 2500, 3000 and 3800 grilles complete the ML subwoofers
beauty and functionality. The fixing points are the same as the speaker basket.
3
4
1
2
38
39
Tuning
English
Electro-acoustic Tuning
Reflex Tuning
After you finish installing the enclosure in your vehicle, it is recommended to spend some time
to tune the system and its amplifiers. Remember that a small power amplifier driven into full
distortion can damage a speaker. On the contrary, a very powerful amplifier with a linear
operation rarely causes system failures.
Before completely finishing your reflex enclosure, we recommend that you test its response
in your vehicle first, as this is the only way to be sure you achieve the best sound according
to your preference:
Vary the tuning frequency by changing the port length
or the quantity of damping material inside the box.
If you shorten the port or reduce the quantity of damping
material, the tuning frequency increases and the bass will be
harder and lean.
A longer port or more damping material will lower the tuning
frequency creating a less defined but deeper bass.
Adjust the amplifier gain control to make use of all
the amplifiers undistorted power.
ALERT:
Distortion
In Phase
SUBSONIC 24 dB/Oct.
30
37
22
If available, use the subsonic filter, setting
the cut-off frequency around 25 Hz.
43
0
20
200
2K
Hz
Test both ways and choose what you prefer.
CROSSOVER
90
Set the cut-off frequency between 45 and 120 Hz
according to the type of configuration used.
70
50
50÷150
110
130
Out of Phase
150
20
200
2K
20K
Loudness
Flat
0
40
20
200
Do not use loudness controls or equalizers at low frequencies.
2K
Hz
Experiment with the positioning
of the enclosure inside your vehicle,
changing the output direction of the
subwoofer box and the tuning port.
Hz
41
Technical
English
Connecting Cables
As they directly affect the system’s damping factor, the cables used to connect the subwoofer
are extremely important; the following table indicates the cable section (gauge) we recommended
according to the length and power applied.
Technical
specifications
ML 2500
ML 3000
ML 3800
Component
Subwoofer
Subwoofer
Subwoofer
Size
250 (10”)
300 (12”)
380 (15”)
1200
1500
1800
600
750
900
4
4
4
31-1000
25-900
22-800
dB/SPL
87
89
91
Total driver
displacement
2,1
3,1
3,9
65
65
65
mm (inch)
Power Handling
Cable diameter
Applied power
Watt
The table refers to continuous power with
4 Ohm load. If load decreases, the cable size
needs to be proportionally increased.
Connection length
peak
contin.
program
Impedance
ohm
Frequency
response
Hz
Sensitivity
lit
Voice coil
diameter
mm
Double magnet high density
flux ferrite
Magnet
Warranty Restrictions
Cone / Dome
Please read the warranty terms carefully and keep both the manual and the original box
for all eventualities.
Elettromedia provides a restricted warranty on the HERTZ products according to
the following terms:
Warranty duration: 2 years.
This warranty is applicable only to HERTZ products sold by HERTZ authorized dealers.
Products found to be defective during the warranty period will be repaired or replaced with
an equivalent product, at Elettromedia’s discretion.
Xmech*
Warranty is void:
1. For damage caused by accidents, abuse, improper operation, water, theft.
2. If after sale service is performed by anyone other than Elettromedia authorized service centers.
3. If serial number has been spoiled, altered or removed from the product.
4. For damages caused by overdriving or amplification excessive distortion due to non-linear
functioning of power supply.
Elettromedia accepts no liabilities for any damage resulting from disregarding the warnings herein.
Warranties for product purchased and used in countries outside Italy are covered by the HERTZ
distributor in that respective country. Warranty length and policies are outlined and enforced
by the distributor.
42
Polypropylene with mineral powder
28
28
28
* The stated sensitivity is not directly connected with
the acoustic pressure generated inside the car interior
and should not be used as the sole comparison to
other subwoofers.
**Xmech maximum mechanic excursion: indicates the
linear motion range of the speaker in both
directions.
Outer diameter
mm
268
318
391
Mounting hole
diameter
234
284
351
195
207
218
mm
166,5
179
190,5
Weight of one
component
12,3
12,8
13,7
mm
Total depth
mm
Mounting depth
Kg
43