1
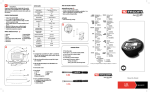
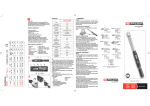
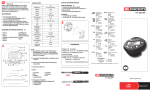
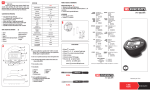
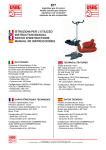
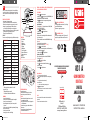
GB
1
2
Thank you for purchasing our digital angle meter. This manual will help you
to use the many features of your new digital angle meter. Before operating
the device, please read this manual completely and keep it nearby for future
reference.
FUNCTIONS OF THE DEVICE
•Measurement of tightening angle value
•Selection of rotation direction: clockwise or counter-clockwise
•LED and buzzer indicators when target pre-set angle is reached
•Memory for pre-settable target angles: allows to memorize
up to 9 values (M1-M9) among the most used angle values.
•Memory slots for tightening angles measured: allows to keep track of
tightening made storing the measurement results.
(50 memory slots available: n001-n050)
WARNING!
To measure correctly, the display must lay parallel with rotation plane.
TECHNICAL DATA
831 A
ACCURACY *1
±2%
RESOLUTION
0,1°
DISPLAY
0 ➞ 999,0°
RANGE
1 ➞ 360,0° (increment 0,1°)
PRESETTING N°
9
DATA MEMORY N°
50
BUTTON
4
5
6
7
8
10
11
9
FUNCTIONS
01) LED indicators
02) Buzzer
03) LCD display
04) MEMORY button
05) UP button
06) DOWN button
07) Start/Setting button
08) Power on/Delete button
09) Battery compartment
10) Magnet
11) RESET button
5
BATTERY*2
2 x AAA
BATTERY LIFE (IN USE)*3
48 hours
BATTERY LIFE (STANDBY)*3
1 year
OPERATING TEMPERATURE
-10°C ➜ 60°C
STORAGE TEMPERATURE
-20°C ➜ 70°C
HUMIDITY
MAX 90%
DROP TEST
1m
AUTO SLEEP
after 2 min idle
Note:
*1.The accuracy of readout is tested from 0° to 360.0°
(test speed: 30°/sec).
*2. Rechargeable batteries compatible.
*3. Test condition: Toshiba carbon-zinc R03UG batteries
WARNINGS
•Do not shake violently or drop
•Do not expose to excessive heat, humidity or direct sunlight
•Do not use in water (not waterproof)
•Wipe the digital meter with a dry towel as soon as possible
if it gets wet
•Do not use organic solvents (alcohol or paint thinner) for cleaning
•Keep away from magnets
•Do not expose to dust or sand
•Do not apply excessive force on LCD display
831A_manuale.indd 1
3
BATTERY INSTALLATION
Remove the battery cover.
Insert 2 AAA batteries matching the -/+ polarities.
Put on the battery cover and fasten the screws.
CAUTION:
•Remove batteries when the angle meter is not used
for an extended period of time.
•Keep spare batteries on hand in case of prolonged use
or in cold environment
•Do not mix battery types or combine used batteries
with new ones.
•Dispose batteries in a designated disposal area.
•Do not throw batteries into a fire.
BEFORE GOING ON READING, PLEASE SEE THE QUICK START
SECTION ON THE BACK OF THE SHEET.
SETUP MENU
Long press
to go into setup menu.
Continuously press
to visit respectively the DIRECTION MENU, the
RECORD MENU and the RECORD CLEAR-ALL MENU.
Press
again to skip out the setup menu and go back to the
current target angle screen.
DIRECTION MENU
- The display shows PoS if the rotation direction is CLOCKWISE, while
nEG if it is COUNTER-CLOCKWISE.
- Press
e
to change direction.
- Continuously press
to skip out the menu.
RECORD MENU
Shows the value of measured angles which have been memorized
(up to 50 memory slots).
If no values have been memorized in the RECORD MENU the display
shows nonE.
- The display shows the memorized value
and the respective slot number (n005 <-----> 20,3°)
- Press
e
to select slot number.
- To delete one of the stored angle values, select the slot number you
want to clear and press
twice.
- Continuously press
to skip out the menu.
RECORD CLEAR-ALL MENU
Allows to delete all angle values stored in the RECORD MENU.
- The display shows ClrA
- Press
to delete the all record data.
- The display shows no?
- Press
a second time to delete all record data, press
to avoid the operation.
- Press twice
to skip out the menu.
ERROR MESSAGES
Er4 > the setting process does not function right.
Press
to repeat the operation. Keep the meter rest during the setting
process.
Er5 > the digital meter does not work normally.
Press the RESET button.
Er - - > the meter rotate too fast during measuring process.
Press
to repeat the operation.
Full > all the 50 memory slots are in use. No more data can be recorded.
Delete some or all record data.
RESET
Press with a pin the RESET button located in the hole on the back of the
digital meter.
You can also remove batteries and re-install them.
M
VOLTAGGIO BATTERIE BASSO
Se il voltaggio delle batterie scende sotto 2,3 V, sul display
appare il simbolo della batteria :
il goniometro si spegne dopo poco tempo.
LOW BATTERY VOLTAGE
If the battery serial voltage is under 2,3 V, the meter will
display a battery symbol and then turn off after a while.
INSTRUCTION MANUALS IN OTHER LANGUAGES
PLEASE VISIT OUR WEB SITE:
www.usag-tools.com
Imported by:
SWK Utensilerie S.r.l.
Via Volta, 3
21020 Monvalle (VA) Italia
Tel. 0332 790111 · Fax 0332 790330
www.usag.it - www.usag-tools.com
831 A
GONIOMETRO
DIGITALE
DIGITAL
ANGLE METER
MANUALE DI ISTRUZIONI
INSTRUCTION MANUAL
14/10/11 10.09
IT
1
2
Grazie per aver preferito il nostro goniometro digitale. Per utilizzare le caratteristiche e le funzioni del prodotto nel modo migliore, leggere attentamente il
presente manuale e conservarlo per eventuali successive consultazioni.
FUNZIONI DEL DISPOSITIVO
•Misura dell’angolo di serraggio
•Verso di serraggio selezionabile: in senso orario o in senso antiorario
•Avviso tramite indicatori LED e buzzer sonoro al raggiungimento
dell’angolo di serraggio impostato
•Memoria angoli di serraggio preimpostati: permette di memorizzare
fino a 9 valori (M1-M9) tra gli angoli più frequentemente utilizzati.
•Memoria angoli di serraggio effettuati: permette di tenere traccia del
serraggio effettuato registrando la misura
(50 slot di memoria disponibili: n001-n050)
ATTENZIONE!
Appoggiare il dispositivo in modo che il display sia parallelo
al piano di rotazione.
DATI TECNICI
831 A
PRECISIONE *1
±2%
RISOLUZIONE
0,1°
DISPLAY
SCALA
0 ➞ 999,0°
1 ➞ 360,0° (incremento 0,1°)
SETTAGGI IMPOSTABILI
9
MEMORIE
50
PULSANTI
5
ALIMENTAZIONE*2
48 ore
AUTONOMIA (STANDBY)*3
1 anno
TEMPERATURA DI UTILIZZO
-10°C ➜ 60°C
TEMPERATURA DI STOCCAGGIO
-20°C ➜ 70°C
TEST CADUTA
SPEGNIMENTO AUTOMATICO
7
8
10
11
9
FUNZIONI
1) Indicatori LED
2) Indicatore sonoro
3) Schermo LCD
4) Pulsante MEMORIA
5) Pulsante SU
6) Pulsante GIU’
7) Pulsante inizio misurazione/menù
8) Pulsante ON/CANC
9) Vano batterie
10) Magnete
11) Pulsante RESET
MAX 90%
1m
dopo 2 min. di inattività
Note:
*1.La precisione di lettura è testata da 0.0° a 360.0°
a velocità di 30°/sec.
*2. Compatibile con batterie ricaricabili.
*3. Condizioni di test: Batterie Toshiba zinco-carbone R03UG
AVVERTENZE
•Non agitare violentemente né far cadere.
•Non esporre ad un calore eccessivo, umidità o luce diretta del sole.
•Non usare nell’acqua, non è impermeabile.
•Asciugare subito con un panno asciutto in caso di contatto con acqua.
•Non utilizzare solventi organici (alcool o diluenti) per la pulizia.
•Non avvicinare a campi magnetici.
•Non esporre a sabbia o polvere.
•Non applicare una forza eccessiva sul display LCD.
831A_manuale.indd 2
4
5
6
2 x batterie AAA
AUTONOMIA (IN USO)*3
UMIDITÀ
3
INSTALLAZIONE BATTERIE
Rimuovere il coperchio del vano batterie
Inserire 2 batterie AAA assicurandosi di rispettare le polarità
indicate.
Chiudere il coperchio del vano batterie.
AVVERTENZE:
•Rimuovere le batterie se si prevede un lungo periodo di
inutilizzo.
•Tenere delle batterie di scorta in caso di utilizzi prolungati o in
ambienti particolarmente freddi.
•Non mischiare batterie di tipo diverso o batterie usate con
batterie nuove
•Smaltire le batterie esaurite secondo le norme vigenti,
non gettarle nel fuoco.
GB
IT
UTILIZZO RAPIDO
QUICK START
IT
Appoggiare il goniometro su una
superficie piana e tenere
premuto il tasto
per
accendere.
Sul display appariranno il senso
di rotazione impostato: PoS
(orario) o nEG (antiorario) e successivamente oooo. Attendere.
Quando il settaggio dell’apparecchio è completo il display
fornirà l’angolo di torsione precedentemente impostato.
GB
Let the digital meter lay on a flat surface and long press
to power on.
First the direction sign PoS (CW) or nEG (CCW) will show. Then
the LCD shows oooo. It indicates the meter is under resetting
process. Please wait.
Finally the current pre-set target angle will be shown.
IT
Premere
per selezionare
uno dei 9 valori di angolo
preimpostato o impostare un
nuovo valore di angolo
con le frecce
e
Il valore di angolo impostato
sarà salvato automaticamente
nella memoria (M1- M9)
corrispondente.
GB
Press
to select one of the 9 pre-set target angles (M1- M9)
or press
e
to modify the current target angle.
Note that the target angle modified will be saved automatically
with the current M number.
IT
Posizionare il goniometro
sull’utensile e premere
velocemente
per iniziare
il serraggio.
GB
Put the meter on the wrench and
press quickly
to start the
angle measurement.
Start rotation.
ATTENZIONE
Se si interrompe il serraggio per alcuni secondi il display
lampeggia e indica l’angolo fin’ora raggiunto.
Per continuare il serraggio premere
, per azzerare la
misurazione premere
WARNING
Note that if the angle meter does not move for a few seconds,
the LCD screen will be flashing and the current angle is holding
on screen.
Press
to calculate angle again from current angle.
Press
to clear the current angle and reset the measurement.
IT
Il primo LED verde ed il segnale
acustico indicano il raggiungimento dell’80% dell’angolo
selezionato.
GB
The first green LED lights and
the buzzer rings when the
current angle reaches the 80%
of target angle.
IT
Il LED rosso segnala infine il
raggiungimento dell’angolo
selezionato.
GB
The red LED indicates the target
angled have been reached.
IT
Per memorizzare l’angolo di
serraggio effettuato in uno dei
50 slot di memoria disponibili
tenere premuto il tasto
Il numero di slot in cui è stato
memorizzato il valore lampeggia
sul display.
(n004 <-----> 200,0°)
GB
Press
to record the measured
angle value in one of the 50 memory slots.
The display shows the data number of slot used.
(n004 <-----> 200,0°)
IT
Per iniziare un nuovo serraggio
premere
Il display si spegnerà
automaticamente dopo 2 min
di inutilizzo.
GB
Press
to start a new
measurement.
The angle meter will auto sleep after 2 minutes idle.
MENU SETUP
Tenere premuto il tasto
per entrare nel menu di configurazione.
Premendo il tasto
più volte si entrerà rispettivamente nel menu
CAMBIO VERSO DI SERRAGGIO, MEMORIE SERRAGGI e infine
RESET MEMORIE SERRAGGI
Premendo ulteriormente il tasto
si uscirà dal menu di configurazione e si tornerà alle memorie preimpostabili.
MENU CAMBIO VERSO DI SERRAGGIO
- Il display mostra PoS se il senso di rotazione impostato è ORARIO,
mentre mostra nEG se è ANTIORARIO.
- Premere i tasti
e
per cambiare il senso di rotazione.
- Uscire dal menu premendo più volte il tasto
MENU MEMORIE SERRAGGI
Fornisce il valore degli angoli di serraggio misurati che si è
deciso di memorizzare (fino a 50 valori memorizzabili).
Se non ci sono valori memorizzati nel menu MEMORIE SERRAGGI il
display mostra nonE.
- Il display mostra per ogni slot l’angolo di serraggio memorizzato
(n005 <-----> 20,3°)
- Premere i tasti
e
per selezionare gli slot di memoria
utilizzati.
- Per cancellare uno dei valori memorizzati posizionarsi sullo slot
corrispondente e premere
due volte.
- Uscire dal menu premendo più volte il tasto
MENU RESET MEMORIE SERRAGGI
Permette di cancellare tutti i valori memorizzati nel menu
MEMORIE SERRAGGI.
- Il display mostra ClrA
- Per cancellare tutti i valori memorizzati premere il tasto .
- Il display mostra no?
- Per cancellare tutte le memorie premere una seconda volta ,
per annullare l’operazione premere
- Uscire dal menu premendo due volte il tasto
MESSAGGI DI ERRORE
Er4 > il settaggio non è riuscito correttamente.
Premere
per ripetere l’ operazione.
Non muovere il goniometro durante il settaggio.
Er5 > il goniometro non funziona correttamente.
Premere il tasto RESET.
Er - - > il goniometro è stato ruotato troppo velocemente
durante una misurazione.
Premere
per ripetere l’ operazione.
Full > i 50 slot di memoria sono tutti in uso. Non è possibile registrare altri dati. Cancellare alcune o tutte le memorizzazioni.
RESET
Se il goniometro non funziona regolarmente,
premere il tasto reset di azzeramento posto su retro del goniometro.
E’ possibile resettare il goniometro anche rimuovendo le batterie.
14/10/11 10.09