1
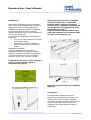
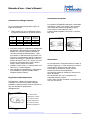
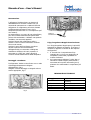
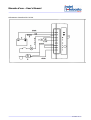
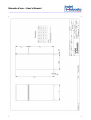
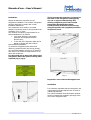
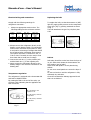
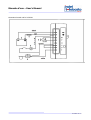
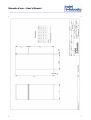
Manuale di Istruzioni
Instruction manual
CR165 CR219 CR271
Ver. 1.0
Manuale d’uso – User’s Manual
CG 030609 Ver 1.0
Manuale d’uso – User’s Manual
I refrigeratori Isotherm sono progettati per
garantire un corretto funzionamento anche in
difficili condizioni ambientali/marine, eccellendo
nelle caratteristiche più importanti per la nautica:
affidabilità e ridotto consumo energetico.
Dotati di sistema di raffreddamento a tenuta
ermetica, garantiscono il minor consumo di
energia possibile ed una manutenzione ridotta.
Tutti i modelli sono estremamente facili da
installare. Possono sopportare uno sbandamento
laterale di 30°.
Per garantire il funzionamento più efficiente
possibile del refrigeratore Isotherm, attenersi alle
seguenti istruzioni:
•
•
•
•
•
Evitare di aprire le porte del refrigeratore se
non necessario.
Assicurare una buona ventilazione del
compressore e condensatore.
Controllare le buone condizioni del sistema
elettrico. Ispezionare batterie e livelli di carica
regolarmente. Avviare sempre il motore con
un gruppo batterie separato. Seguire
attentamente le istruzioni relative al cablaggio
elettrico e vano fusibili.
Mantenere pulito l’interno del frigo/freezer.
Lasciare socchiuse le porte del frigo/freezer
quando l’imbarcazione non è utilizzato per
lunghi periodi.
Istruzioni per la Sicurezza
Quando si è connessi alla rete elettrica della
banchina, assicurarsi che il generatore di corrente
sia predisposto con un salvavita.
Attenzione!
Non lasciare mai cavi scoperti inseriti
nell’alimentazione elettrica.
Attenzione!
Mai collegare direttamente al refrigeratore il
caricabatterie. I recenti carica batterie
contengono, in aggiunta all’acido, un gas
esplosivo.
Attenzione!
Mai coprire le aperture di ventilazione dell’unità
compressore. Non disperdere il refrigerante in
aria.
Sensore Batteria
Per proteggere le batteria dall’esaurimento totale,
un sensore di voltaggio spegnerà
automaticamente il compressore ai seguenti livelli:
VOLTAGGIO
12V
24V
Cut-Out
9.6V
21.3V
Cut-In
10.9V
22.7V
CG 030609 Ver 1.0
Manuale d’uso – User’s Manual
Installazione
Quasi tutte le imbarcazioni hanno uno specifico
spazio destinato all’installazione del frigorifero. Il
refrigeratore Isotherm è stato progettato per
soddisfare le normali dimensioni di installazione.
Il compressore deve rimanere in posizione
verticale ma opererà anche con una oscillazione di
30° e più per periodi brevi.
I requisiti minimi obbligatori per l’installazione a
bordo sono:
• 2 cm di luce sopra il frigorifero (fra il frigo
e la linea del mobilio);
• Lateralmente, le pareti del frigorifero
possono essere messe a contatto con il
mobilio.
Installazione consigliata:
Al fine di massimizzare la performance e
l’efficienza del frigo (funzionamento ottimale e
risparmio energetico), consigliamo di aggiungere
al requisito minimo di 2cm di luce nella parte
superiore, ulteriori 2cm di luce per ogni lato.
Questo perché l’evaporatore è schiumato
nei lati del refrigeratore e applicando
qualsiasi staffa o supporto si rischia di
forare lo stesso causando la fuoriuscita del
gas refrigerante e danneggiando in modo
irreparabile il prodotto.
Fissare il prodotto alla base dello stesso e
nella parte superiore con le apposite staffe
(fornite) come da figure 3 e 4:
Fig.3
E’ importante non forare i lati del frigorifero
dove è presente l’etichetta gialla di
avvertenza (Fig.1,Fig.2).
Fig.4
Fig.1
Importante: non rimuovere mai i piedini di
supporto.
Ventilazione
E’ estremamente importante che l’unità
compressore sia adeguatamente areata e che
l’afflusso d’aria fresca sia sempre garantito.
La naturale areazione dal basso verso l’alto può
essere incrementata con delle aperture di
ventilazione in corrispondenza del retro del
refrigeratore.
Fig.2
CG 030609 Ver 1.0
Manuale d’uso – User’s Manual
Sostituzione Lampadina
Connessioni e cablaggio elettrico
Per la connessione del refrigeratore seguire le
seguenti avvertenze:
•
Usare sempre cavi con un’adeguata sezione,
Di seguito una tabella con le sezioni minime:
Sezione
mm2
Diametro
2.5
4
6
12
10
10
Lunghezza
max cavo
12V mt/ft
2.5/8
4/13
6/19
Per sostituire la lampadina impostare il termostato
in posizione 0 (OFF, luce spenta), fare pressione
sulla levetta del coperchio trasparente (Fig.6)
verso l’esterno come indicato in Fig.7.
L’attacco della lampadina è di tipo E14, 12V/24V,
Max 15W.
Lunghezza
max cavo
24V mt/ft
5/16
8/26
12/39
• Connettere sempre il refrigeratore direttamente
alla batteria o all’interruttore principale della
batteria. Se connesso tramite il pannello di
controllo principale dell’imbarcazione, o altro,
può causare un abbassamento di tensione che
va preso in considerazione quando si calcola la
sezione dei cablaggi. Il sistema deve avere un
fusibile da 15A per 12V o da 7,5A per 24V. Se è
previsto un interruttore deve essere almeno
20A per evitare perdite di tensione.
• Collegare il cavo rosso (+) al polo positivo ed il
cavo nero (-) al polo negativo.
• Non collegare mai direttamente il refrigeratore
al carica batterie. Questo potrebbe essere
collegato al pacco batterie.
Regolazione della temperatura
Il refrigeratore è dotato di un termostato a
manopola con interruttore ON/OFF integrato.
Ruotando la manopola a fine scala si avvertirà un
click che identifica lo spegnimento
dell’apparecchio.
Fig.6
Fig.7
Sbrinamento
Lo scongelamento va eseguito quando lo strato di
ghiaccio raggiunge i 3-4 mm di spessore. Ruotare
il termostato in posizione OFF (fine scala).
Conservare gli alimenti ed i liquidi al fresco
durante il processo di scongelamento.
Non utilizzare spatole di metallo per rimuovere lo
strato di ghiaccio.
Non riaccendere fino a che il frigorifero sia
scongelato asciutto e pulito.
Pulire il tubo di scarico condensa e controllare che
esso non sia ostruito.
0 = Posizione OFF.
L’apparecchio è spento
1 = Posizione acceso,
minima refrigerazione
7 = Posizione acceso,
massima refrigerazione
Fig.5
CG 030609 Ver 1.0
Manuale d’uso – User’s Manual
Manutenzione
I refrigeratori Isotherm hanno un sistema di
raffreddamento a chiusura ermetica che non
necessita di manutenzione o rabbocchi di fluido
refrigerante. Il refrigeratore può essere lasciato
sull’imbarcazione durante l’inverno (se la
temperatura scende sotto lo 0 il compressore può
non avviarsi).
La manutenzione, non meno di una volta all’anno,
può essere ridotta solamente alla pulizia della
polvere dal condensatore. Utilizzare una spazzola
morbida e non strumenti appuntiti.
Lasciare l’interno del refrigeratore pulito e
asciutto. Pulire lo scarico condensa e verificare
che non sia ostruito.
Lasciare le porte del frigo/freezer socchiuse
durante il periodo di non utilizzazione
dell’apparecchio per consentire un’adeguata
ventilazione all’interno dei vani, impostare il
termostato a 0 (OFF) per evitare sprechi di
corrente causati dall’accensione della lampadina.
Drenaggio e Condensa
Il refrigeratore Isotherm viene fornito con un tubo
di drenaggio direttamente collegato
all’apparecchio, Fig.4.
Svolgere il tubo di drenaggio e collegarlo ad uno
scarico appropriato, Fig.5.
Fig.5
Frigo/Congelatore Doppia Porta Isotherm
Per i Frigo/Congelatori doppia porta, la priorità è
stata data al risparmio energetico. Il consumo è
modesto in rapporto al volume ed alla capienza
del frigorifero.
1. E’ normale che il compartimento frigo
impieghi da 6 a 12 ore per raggiungere la
temperatura selezionata, soprattutto se
ricolmo di alimenti.
2. Se la temperatura ambiente è molto alta, si
otterranno risultati migliori posizionando il
termostato ad un punto intermedio (pos.4)
piuttosto che selezionando le temperature più
basse.
INFORMAZIONI TECNICHE
Voltaggio
Consumo 12V
Media Consumo 12V
Compressore
Refrigerante
Fusibile
12/24 Volt
6A (compressore in
funzione)
2,3 – 2,5 A
Danfoss BD50F
R134a, 0,13 Kg
12V – 15A / 24V – 7,5A
Fig.4
CG 030609 Ver 1.0
Manuale d’uso – User’s Manual
Collegamento Centralina DC 12V/24V
CG 030609 Ver 1.0
Manuale d’uso – User’s Manual
Difetto
Il frigorifero non raffredda.
Il compressore non parte.
Possibile Causa
Alimentazione elettrica assente.
Batterie scariche.
Termostato danneggiato.
Fusibile danneggiato.
Centralina elettrica danneggiata.
Azione da intraprendere
Controllare cablaggio elettrico,
cavi e collegamenti.
Verificare alimentazione
compressore.
La luce funziona?
Controllare il sistema di ricarica
batterie.
Controllare termostato, ponte
elettrico T-C, se il compressore si
avvia il termostato è danneggiato.
Se il compressore non si avvia,
sostituire centralina elettrica.
Il compressore funziona solo ad
intervalli di qualche secondo.
Alimentazione elettrica
insufficiente.
Voltaggio troppo basso o perdita
di voltaggio all’avvio.
Batterie esaurite.
Ventola difettosa.
Controllare connessioni e
cablaggio elettrico, possibilità di
ossidazione.
Caricare batterie, avviare il
motore dell’imbarcazione o
ricaricarle tramite allaccio alla
banchina.
Al momento dell’accensione il
voltaggio deve essere >= 11V.
Scollegare la ventola, se il
compressore si avvia la ventola è
difettosa, sostituirla.
Il compressore parte ma il
frigorifero non raffredda.
Mancanza di gas refrigerante.
Possibile perdita dei tubi o
dell’evaporatore.
Tubazioni ostruite.
(Queste operazioni vanno
eseguite da personale tecnico
autorizzato).
Controllare con il “cercafughe”
eventuali perdite di gas
refrigerante.
Riparare la possibile perdita.
Eseguire il vuoto del sistema e
ricaricarlo con l’apposito gas
refrigerante (R134a).
Il compressore funziona per
lunghi periodi ma non raffredda
abbastanza.
Non adeguata ventilazione del
sistema
compressore/condensatore.
Ventola danneggiata.
Accumulo di ghiaccio nel vano
freezer.
Chiusura delle porte non
adeguata.
Condensatore bloccato dalla
polvere.
Aumentare la ventilazione del
sistema
Compressore/Condensatore.
Sostituire la ventola.
Eseguire sbrinatura reparto
freezer.
Controllare la corretta posizione
della guarnizione di tenuta delle
porte.
Rimuovere la polvere dal
condensatore.
CG 030609 Ver 1.0
Manuale d’uso – User’s Manual
CG 030609 Ver 1.0
Manuale d’uso – User’s Manual
Isotherm refrigerators are designed to guarantee
correct function, even in difficult
environmental/marine conditions. They excel in
terms of the most important characteristics for the
marine environment: reliability and low energy
consumption.
Equipped with a hermetic seal cooling system,
they guarantee the least possible energy
consumption and reduced maintenance.
All models are very easy to install. They can
withstand lateral movement of 30°.
To guarantee the most efficient function possible
of the Isotherm refrigerator, comply with the
following instructions:
•
•
•
•
•
Avoid opening the refrigerator doors if not
necessary.
Ensure good compressor and condenser
ventilation.
Check that the electrical system is in good
condition. Inspect batteries and charge levels
regularly. Always start the engine up with a
separate battery unit. Keep to the instructions
concerning the electrical wiring and fuse box,
closely.
Keep the inside of the refrigerator/freezer
clean.
Leave the refrigerator/freezer doors slightly
open when the ship is not in use for long
periods of time.
Safety instructions
When connected up to the quay mains electrics,
ensure that the current generator is set up with a
trip switch.
Warning!
Never leave uncovered wires connected to the
electrical supply.
Warning!
Never connect the battery charger to the
refrigerator directly. New battery charger contain
an explosive gas in addition to the acid.
Warning!
Never cover the ventilation openings of the
compressor unit. Do not dispose of coolant in the
air.
Battery sensor
To protect the battery from running down
completely, a voltage sensor will turn the
compressor off automatically at the following
levels:
VOLTAGE
12V
24V
Cut-Out
9.6V
21.3V
Cut-In
10.9V
22.7V
CG 030609 Ver 1.0
Manuale d’uso – User’s Manual
Installation
Almost all ships have a specific area for
refrigerator installation. The Isotherm refrigerator
has been designed to comply with normal
installation dimensions.
The compressor must remain in a vertical
position, but will also work for short periods at an
oscillation of 30° or more.
The minimum compulsory requirements for on
board installation are as follows:
• 2 cm space above the refrigerator
(between the refrigerator and the
furniture line);
• To the side, the refrigerator walls can be
placed in contact with the furniture.
Recommended installation:
To maximise refrigerator performance and
efficiency (optimal function and energy saving),
we recommend addition a further 2 cm space on
each side, to the minimum requirement of 2 cm
above the refrigerator.
It is important not to pierce the sides of the
refrigerator where the yellow warning label
is placed (Fig.1, Fig.2).
This is because the evaporator is foamed at
the sides of the refrigerator and applying
any rod or support risks piercing this,
causing refrigerant gas to leak out and
irreparably damaging the product.
Fix the product at its base and at the top,
using the specific rods (supplied) as shown
in figures 3 and 4:
Fig. 3
Fig. 1
Fig. 4
Important: never remove the support feet.
Ventilation
It is extremely important that the compressor unit
is appropriate aired and that the flow of fresh air
is always guaranteed.
The natural ventilation from the bottom upwards
can be increased with ventilation openings at the
level of the refrigerator back.
Fig. 2
CG 030609 Ver 1.0
Manuale d’uso – User’s Manual
Electrical wiring and connections
Replacing the bulb
Comply with the following warnings for
refrigerator connection:
To replace the bulb, set the thermostat to 0 (OFF,
light off), apply gentle pressure to the transparent
cover lever (Fig. 6), pushing outwards as shown
in Fig. 7.
The bulb attachment is type E14, 12V/24V, Max
15W.
•
Always use appropriate section wires. The
following table gives the minimum sections:
Section
mm2
Diamete
r
2.5
4
6
12
10
10
Max. wire
length 12V
mt/ft
2.5/8
4/13
6/19
Max. wire
length 24V
mt/ft
5/16
8/26
12/39
• Always connect the refrigerator directly to the
•
•
battery or main battery switch. If connected by
means of the main boat control panel or other,
it may lead to a lowering of voltage that should
be considered when calculating wiring section.
The system must have a 15A fuse for 12V, or
7.5A for 24V. If a switch is to be used, it must
be at least 20A to avoid loss of voltage.
Connect the red wire (+) to the positive pole
and the black wire (-) to the negative pole.
Never connect the refrigerator directly to the
battery charger. This could be connected to the
battery pack.
Temperature regulation
The refrigerator is equipped with a thermostat dial
and built-in ON/OFF switch.
By rotating the dial to the end of the scale, you
will hear a click indicating that the appliance has
been turned off.
Fig.6
Fig.7
Defrost
Defrosting should be carried out when the layer of
ice is 3-4mm thick. Rotate the thermostat to the
OFF position (end of scale).
Store foods and liquids in a cool place during
defrost.
Do not use a metal spatula to remove the layer of
ice.
Do not turn back on until the refrigerator is fully
defrosted, dry and clean.
Clean the condensation drainage pipe and check
that it is not blocked.
0 = OFF position. The
appliance is off
1 = ON position, minimum
refrigeration
7 = ON position, maximum
refrigeration
Fig. 5
CG 030609 Ver 1.0
Manuale d’uso – User’s Manual
Maintenance
Isotherm refrigerators have a hermetic seal
cooling system that requires no maintenance nor
topping up of coolant liquid. The refrigerator can
be left on board the boat all winter (if the
temperature goes below 0, the compressor may
not start).
Maintenance, no less than once a year, may
merely involve cleaning dust from the condenser.
Use a soft brush and no sharp tools.
Leave the inside of the refrigerator clean and dry.
Clean the condensation drain and check that it is
not blocked.
Leave the refrigerator/freezer doors slightly open
when the appliance is not in use, to allow for
appropriate ventilation within the units. Set the
thermostat to 0 (OFF) to avoid any wastage of
current caused by the light being on.
Two-door Isotherm refrigerator/freezer
For two-door refrigerator/freezers, priority has
been given to energy saving. Consumption is very
limited compared to refrigerator volume and
capacity.
3. It is quite normal for the refrigerator
compartment to talk from 6 to 12 hours to
reach the temperature selected, particularly if
filled with food.
4. If room temperature is very high, better
results will be obtained by setting the
thermostat to an interim point (pos. 4) rather
than selecting a lower temperature.
TECHNICAL INFORMATION
Drainage and condensation
The Isotherm refrigerator is supplied with a
drainage pipe directly connected to the appliance,
Fig. 4.
Unwind the drainage pipe and connect to an
appropriate drain, Fig. 5.
Voltage
Consumption 12V
Average
consumption 12V
Compressor
Coolant
Fuse
12/24 Volts
6A (compressor operating)
2.3 – 2.5 A
Danfoss BD50F
R134a, 0.13 Kg
12V – 15A / 24V – 7.5A
Fig. 4
Fig. 5
CG 030609 Ver 1.0
Manuale d’uso – User’s Manual
Connection Control unit DC 12V/24V
CG 030609 Ver 1.0
Manuale d’uso – User’s Manual
Problem
The refrigerator does not cool
down.
The compressor does not start.
Possible cause
No electrical supply.
Batteries flat.
Thermostat damaged.
Fuse damaged.
Electrical control unit damaged.
Action to be taken
Check electrical wiring, wires and
connections.
Check compressor power.
Does the light work?
Check the battery recharge
system.
Check the thermostat, T-C
electrical bridge, if the
compressor start the thermostat
is damaged.
If the compressor does not start,
replace the electrical control unit.
The compressor only works at
intervals of a few seconds.
Insufficient electrical supply.
Voltage too low or loss of voltage
at start-up.
Batteries flat.
Fan faulty.
Check connections and electrical
wiring, possibility of oxidation.
Charge batteries, start up the
boat engine or recharge by means
of quay connection.
Upon start-up the voltage should
be <=11V.
Disconnect the fan, if the
compressor starts up, the fan is
faulty, replace it.
The compressor starts but the
refrigerator does not cool down.
Lack of coolant gas.
Possible leak from pipes or
evaporator.
Pipes blocked.
(These operations must only
be carried out by authorised
technical staff).
Use the ‘leak searcher’ to check
for any leaks of coolant gas.
Repair any possible leaks.
Empty the system and refill with
specific coolant gas (R134a).
The compressor works for long
periods, but does not cool
sufficiently.
Insufficient ventilation of the
compressor/condenser system.
Fan damaged.
Accumulation of ice in the freezer
compartment.
Door closure insufficient.
Condenser blocked by dust.
Increase ventilation of the
compressor/condenser system.
Replace the fan.
Defrost the freezer compartment.
Check correct position of door
seal.
Remove the dust from the
condenser.
CG 030609 Ver 1.0
Manuale d’uso – User’s Manual
CG 030609 Ver 1.0
Manuale d’uso – User’s Manual
GB
This appliance is marked according to the European directive 2002/96/EC on Waste Electrical and Electronic
Equipment (WEEE). By ensuring this product is disposed of correctly, you will help prevent potential negative
consequences for the environment and human health, which could otherwise be caused by inappropriate
waste handling of this product.
The symbol
on the product, or on the documents accompanying the product, indicates that this
appliance may not be treated as household waste. Instead it shall be handed over to the applicable
collection point for the recycling of electrical and electronic equipment. Disposal must be carried out in
accordance with local environmental regulations for waste disposal. For more detailed information about
treatment, recovery and recycling of this product, please contact your local city office, your household waste
disposal service or the shop where you purchased the product.
I
Questo apparecchio è contrassegnato in conformità alla Direttiva Europea 2002/96/EC, Waste Electrical and
Electronic Equipment (WEEE). Assicurandosi che questo prodotto sia smaltito in modo corretto, l'utente
sul
contribuisce a prevenire le potenziali conseguenze negative per l'ambiente e la salute. Il simbolo
prodotto o sulla documentazione di accompagnamento indica che questo prodotto non deve essere trattato
come rifiuto domestico ma deve essere consegnato presso l'idoneo punto di raccolta per il riciclaggio di
apparecchiature elettriche ed elettroniche. Disfarsene seguendo le normative locali per lo smaltimento dei
rifiuti. Per ulteriori informazioni sul trattamento, recupero e riciclaggio di questo prodotto, contattare l'idoneo
ufficio locale, il servizio di raccolta dei rifiuti domestici o il negozio presso il quale il prodotto è stato
acquistato.
D
In Übereinstimmung mit den Anforderungen der Europäischen Richtlinie 2002/96/EG über Elektro- und
lektronik-Altgeräte
(WEEE) ist vorliegendes Gerät mit einer Markierung versehen. Sie leisten einen positiven Beitrag für den
Schutz der Umwelt und die Gesundheit des Menschen, wenn Sie dieses Gerät einer gesonderten
Abfallsammlung zuführen. Im unsortierten Siedlungsmüll könnte ein solches Gerät durch unsachgemäße
Entsorgung negative Konsequenzen nach sich ziehen.
Auf dem Produkt oder der beiliegenden Produktdokumentation ist folgendes Symbol
einer
durchgestrichenen Abfalltonne abgebildet. Es weist darauf hin, dass eine Entsorgung im normalen
Haushaltsabfall nicht zulässig ist Entsorgen Sie dieses Produkt im Recyclinghof mit einer getrennten
Sammlung für Elektro- und Elektronikgeräte. Die Entsorgung muss gemäß den örtlichen Bestimmungen zur
Abfallbeseitigung erfolgen. Bitte wenden Sie sich an die zuständigen Behörden Ihrer Gemeindeverwaltung,
an den lokalen Recyclinghof für Haushaltsmüll oder an den Händler, bei dem Sie dieses Gerät erworben
haben, um weitere Informationen über Behandlung, Verwertung und Wiederverwendung dieses Produkts zu
erhalten.
CG 030609 Ver 1.0
Manuale d’uso – User’s Manual
F
Cet appareil porte le symbole du recyclage conformément à la Directive Européenne 2002/96/CE
concernant les Déchets
d'Équipements Électriques et Électroniques (DEEE ou WEEE). En procédant correctement à la mise au
rebut de cet appareil, vous contribuerez à empêcher toute conséquence nuisible pour l'environnement et la
santé de l'homme.
Le symbole
présent sur l'appareil ou sur la documentation qui l'accompagne indique que ce produit
ne peut en aucun cas être traité comme déchet ménager. Il doit par conséquent être remis à un centre de
collecte des déchets chargé du recyclage des équipements électriques et électroniques. Pour la mise au
rebut, respectez les normes relatives à l'élimination des déchets en vigueur dans le pays d'installation. Pour
obtenir de plus amples détails au sujet du traitement, de la récupération et du recyclage de cet appareil,
veuillez vous adresser au bureau compétent de votre commune, à la société de collecte des déchets ou
directement à votre revendeur.
S
Denna produkt är märkt enligt EG-direktiv 2002/96/EEC beträffande elektriskt och elektroniskt avfall (Waste
Electrical and Electronic Equipment, WEEE). Genom att säkerställa en korrekt kassering av denna produkt
bidrar du till att förhindra potentiella, negativa konsekvenser för vår miljö och vår hälsa, som annars kan bli
följden om produkten inte hanteras på rätt sätt. Symbolen
på produkten, eller i medföljande
dokumentation, indikerar att denna produkt inte får behandlas som vanligt hushållsavfall. Den skall i stället
lämnas in på en lämplig uppsamlingsplats för återvinning av elektrisk och elektronisk
utrustning. Produkten måste kasseras enligt lokala miljöbestämmelser för avfallshantering. För mer
information om hantering, återvinning och återanvändning av denna produkt, var god kontakta de lokala
myndigheterna, ortens sophanteringstjänst eller butiken där produkten inhandlades.
E
Este aparato lleva el marcado CE en conformidad con la Directiva 2002/96/EC del Parlamento Europeo y
del Consejo sobre residuos de aparatos eléctricos y electrónicos (RAEE). La correcta eliminación de este
producto evita consecuencias negativas para el medioambiente y la salud. El símbolo
en el producto
o en los documentos que se incluyen con el producto, indica que no se puede tratar como residuo
doméstico. Es necesario entregarlo en un punto de recogida para reciclar aparatos eléctricos y electrónicos.
Deséchelo con arreglo a las normas medioambientales para eliminación de residuos. Para obtener
información más detallada sobre el tratamiento, recuperación y reciclaje de este producto, póngase en
contacto con el ayuntamiento, con el servicio de eliminación de residuos urbanos o la tienda donde adquirió
el producto.
NL
Dit apparaat is voorzien van het merkteken volgens de Europese richtlijn 2002/96/EG inzake Afgedankte
elektrische en elektronische apparaten (AEEA). Door ervoor te zorgen dat dit product op de juiste manier als
afval wordt verwerkt, helpt u mogelijk negatieve consequenties voor het milieu en de menselijke gezondheid
te voorkomen die anders zouden kunnen worden veroorzaakt door onjuiste verwerking van dit product als
afval. Het symbool
op het product of op de bijbehorende documentatie geeft aan dat dit product niet
als huishoudelijk afval mag worden behandeld. In plaats daarvan moet het orden afgegeven bij een
verzamelpunt voor recycling van elektrische en elektronische apparaten. Afdanking moet worden itgevoerd
in overeenstemming met de plaatselijke milieuvoorschriften voor afvalverwerking. Voor nadere informatie
over de ehandeling, terugwinning en recycling van dit product wordt u verzocht contact op te nemen met het
stadskantoor in uw woonplaats, uw afvalophaaldienst of de winkel waar u het product heeft aangeschaft.
CG 030609 Ver 1.0
Manuale d’uso – User’s Manual
Zona Artigianale
IT – 61019 – Sant’Agata Feltria (PU) – ITALY
Tel. +39 0541 848030 – Fax. +39 0541 848563
E-MAIL: [email protected]
WEB: www.indelwebastomarine.com
3400 Gateway Drive, Unit #107
Pompano Beach, FL – 33069
Phone (954) 984-8448 – Fax (954) 979-2533
E-MAIL: [email protected]
WEB: www.indelwebastomarineusa.com
CG 030609 Ver 1.0


![[ES] Smart Energy Control Manual de Instrucciones y de Uso](http://vs1.manualzilla.com/store/data/006255326_1-bcb3ba9c27cbad56c6ef2fe6103a1f45-150x150.png)