1
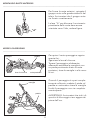
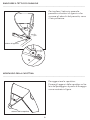
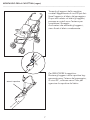
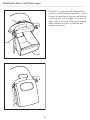
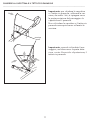
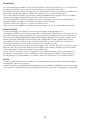
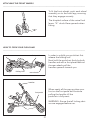
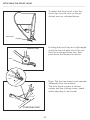
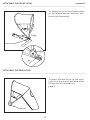
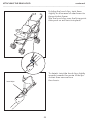
BI&BO
Conforme alla norma EN 1888:2003 – (A1, A2, A3:2005)
Manuale d’uso / Instruction manual
IT
Leggete attentamente queste istruzioni prima dell’uso e conservatele per consultazioni future.
La sicurezza del vostro bambino potrebbe essere compromessa se non seguite queste istruzioni.
GB
Read these instructions carefully before use and keep them for future reference.
Your child’s safety may be affected if you do not follow these instructions.
1
IT
GUIDA DELL’UTENTE
Vi ringraziamo per aver scelto questo prodotto. Dedicate qualche tempo alla lettura dei seguenti importanti avvertimenti di sicurezza. In questo modo, avrete la garanzia di usare il prodotto correttamente e in tutta sicurezza
per un lungo periodo.
SICUREZZA: PRENDETE NOTA
___________________________________________________________________________________________________
AVVERTENZA: SIETE RESPONSABILI DELLA SICUREZZA DEL VOSTRO BAMBINO.
• Il passeggino è stato progettato per il trasporto di due bambini, ognuno del peso massimo di 15 kg.
• AVVERTENZA: Il sedile anteriore non è adatto a bambini con età inferiore ai 6 mesi.
Il sedile posteriore è adatto per bambini dalla nascita fino a 15 kg, utilizzare sempre e solo lo schienale completamente reclinato (orizzontale), per bambini di età inferiore ai 6 mesi.
• I passeggini rappresentano un modo ideale per trasportare il vostro bambino. Tuttavia, è importante ricordare
che durante i primi 3 mesi di vita, i bambini dovrebbero trascorrere la maggior parte della loro giornata in posizione supina, sia per la loro comodità, sia per il loro sviluppo.
• AVVERTENZA: E’ pericoloso lasciare il vostro bambino incustodito.
• AVVERTENZA: Assicurare sempre con la cintura, correttamente agganciata, il vostro bambino.
• AVVERTENZA: Qualsiasi carico appeso alla maniglia pregiudica la stabilità del passeggino.
• AVVERTENZA: Questo prodotto non è idoneo per essere usato da adulti che corrono o pattinano o praticano altre attività sportive similari.
• I bambini devono indossare sempre le cinture di sicurezza e non devono mai essere lasciati incustoditi.
• Il bambino deve essere tenuto lontano dalle parti mobili, mentre si fanno le regolazioni.
• Questo prodotto richiede una manutenzione regolare da parte dell’utente.
• Non utilizzate pezzi di ricambio o accessori non forniti o approvati dal fabbricante, in quanto potrebbero rendere il passeggino poco sicuro.
• Un carico eccessivo, la chiusura incorretta e l’uso di accessori o componenti di ricambio non approvati potrebbero danneggiare o rompere il passeggino e potrebbero rendere il prodotto pericoloso. Leggete le istruzioni.
• Non sovraccaricate il passeggino con altri bambini, merce o accessori. Le borse e altri oggetti non devono
essere appesi alla maniglia.
• Il passeggino è dotato di cestino per il trasporto di 3 kg di merce che deve essere distribuita in modo uniforme.
• Non lasciate mai il parapioggia fissato al passeggino in casa, in un ambiente caldo o vicino ad una fonte di
calore in quanto il bambino potrebbe soffrire di caldo eccessivo.
• Assicuratevi che tutti gli utenti abbiano familiarità con il funzionamento del prodotto. L’apertura e la chiusura avviene
facilmente, non richiede sforzi eccessivi. Se non è così, non forzate il meccanismo – fermatevi e leggete le istruzioni.
• Non utilizzate il passeggino per un uso diverso da quello per il quale è stato progettato.
• Assicuratevi che il vostro bambino indossi sempre le cinture di sicurezza in modo corretto e che le stesse siano
ben regolate. Le cinture sono provviste di anelli a forma “D”, necessarie per il fissaggio di altre cinture, conformi
alle norme BS 6684 o BS EN 13210, per la distribuzioni in mercati esteri, se richieste da un regolamento interno.
• Non permettete al vostro bambino di salire, senza aiuto, nel passeggino, di giocare con il passeggino o
penzolarsi dallo stesso.
• Azionate sempre i freni quando il passeggino è fermo.
• Tenete sempre il passeggino quando state vicino a veicoli o treni in movimento.
Anche con i freni azionati, la corrente d’aria causata dal veicolo in movimento potrebbe spostare il passeggino.
• State attenti quando salite o scendete da un cordolo.
• Togliete i bambini e chiudete il passeggino quando salite o scendete le scale o le scale mobili.
• Assicuratevi che il passeggino chiuso sia tenuto lontano dai bambini in modo che non possa cadere e causare ferite.
• Non utilizzare accessori o complementi non inclusi, come per esempio seggiolini per bambini, borse, ganci,
vassoi, ecc. oltre a quelli approvati dal fabbricante in quanto potrebbero rendere il passeggino poco sicuro.
• Non trasportate mai un terzo bambino sul passeggino.
• Non utilizzare pedane aggiuntive, per il trasporto di un bambino.
• Il montaggio deve essere eseguito da una persona adulta.
2
COMPONENTI
_______________________________________________________________________________________
1
2
1. Passeggino....................... x 1
3
2. Ruote.................................x 2
4
3. Tettuccio parasole.............x 1
4. Capottina...........................x 1
5. Cesto.................................x 1
6. Spallacci imbottiti..............x 4
7. Parapioggia........................x 1
5
6
7
3
MONTAGGIO RUOTE ANTERIORI
_____________________________________________________________________________________
Per fissare le ruote anteriori, spingete il
gruppo ruota sulle gambe anteriori del
telaio. Assicuratevi che il gruppo ruote
sia fissato correttamente.
La leva “A” per bloccare il movimento
piroettante delle ruote deve essere
orientata verso l’alto, vedere figura.
“A”
APRIRE
IL PASSEGGINO
pedale
maniglia
_____________________________________________________________________________________
Per aprire il vostro passeggino seguire
queste fasi:
Sganciare la leva di chiusura.
Tenere il passeggino saldamente,
afferrando entrambe le maniglie e con
un piede posizionato dietro le ruote
posteriori, tirare le maniglie in alto verso
di voi.
pedale
maniglia
leva di chiusura
leva di chiusura
ruote posteriori
ruote posteriori
maniglia
Quando il passeggino è quasi completamente sollevato, mettete il piede sul
pedale e continuate a tirare le maniglie
finché il passeggino non sia completamente aperto.
maniglia
pedale
pedale
AVVERTENZA: Assicuratevi che tutti i dispositivi di bloccaggio siano agganciati
prima dell’uso.
4
MONTAGGIO DEL TETTUCCIO PARASOLE
_____________________________________________________________________________________
Per applicare il tettuccio parasole:
Inserite gli attacchi del parasole nelle
fessure sui braccioli del passeggino
come indicato in figura.
attacchi parasole
Tenendo gli attacchi del parasole
leggermente inclinati, inserite la parte
anteriore di ogni attacco nella fessura
sul bracciolo del passeggino. Premere
verso basso e fate scorrere in avanti il
dispositivo d’aggancio.
Assicuratevi del corretto inserimento.
Attacco
parasole
parte
anteriore
agganciare
Nota: Il tettuccio parasole e la capottina
hanno il dispositivo di regolazione con
superficie interna dentata, è normale
sentire i click durante la regolazione.
Bracciolo del
passeggino
5
RIMUOVERE IL TETTUCCIO PARASOLE
_____________________________________________________________________________________
Per togliere il tettuccio parasole:
premere sui bottoni di sgancio e far
scorrere gli attacchi del parasole, verso
il lato posteriore.
bottone di sgancio
bottone di sgancio
MONTAGGIO DELLA CAPOTTINA
_____________________________________________________________________________________
Per agganciare la capottina:
Fissare gli agganci della capottina sul telaio del passeggino al punto di fissaggio
come mostrato in figura.
attacchi della capottina
attacchi della capottina
6
MONTAGGIO DELLA CAPOTTINA (segue)
_____________________________________________________________________________________
Tenendo gli agganci della capottina,
ruotateli leggermente di circa 90°per facilitare l’aggancio al telaio del passeggino.
Dopo aver calzato sul telaio gli agganci,
premere e ruotarli verso l’esterno per
completare il fissaggio.
Assicuratevi che entrambi gli agganci,
siano fissati al telaio correttamente.
Per RIMUOVERE la capottina:
Ruotare gli agganci della capottina leggermente verso l’interno del passeggino,
di circa 90°, sollevare verso l’alto per
sganciare la capottina dal telaio.
attacchi capottina
7
MONTAGGIO DELLA CAPOTTINA (segue)
_____________________________________________________________________________________
Quando lo schienale del sedile posteriore è completamente reclinato, si può
fissare la capottina al tessuto del sedile,
usando per il suo fissaggio, le strisce di
Velcro che si trovano sulla parte interna
della capottina e sullo schienale del
sedile posteriore.
Velcro
Velcro
8
RECLINARE LO SCHIENALE DEL SEDILE POSTERIORE
_____________________________________________________________________________________
Lo schienale del sedile posteriore è regolabile in 3 posizioni. Per abbassare lo
schienale, alzare le levette su entrambi
i lati del sedile e reclinarlo nella posizione desiderata. Per alzare lo schienale,
basta sollevarlo nella posizione desiderata, non è necessario azionare le
levette di sblocco. Quando lo schienale
si trova nella posizione più reclinata,
abbassata, il tessuto laterale, della seduta, si può fissare al risvolto posteriore
usando le due strisce di Velcro ed i
bottoni automatici,creando così uno
spazio sicuro per il bambino.
Schienale alzato
Nota: Assicuratevi sempre che lo
schienale sia ben fissato, che entrambi
i dispositivi di bloccaggio siano correttamente agganciati, che tutte le regolazione siano state effettuate, prima di
utilizzare il prodotto.
leva
Quando lo schienale è sollevato, o
quando il bambino è più grande, si può
fissare il risvolto posteriore, in modo
che non dia fastidio, ripiegandolo sul
retro dello schienale e fissandolo con le
strisce di Velcro.
Schienale
reclinato
9
APRIRE LA CAPOTTINA E IL TETTUCCIO PARASOLE
_____________________________________________________________________________________
La capottina ed il tettuccio parasole
sono fornite di cerniere “snodi” da
ambo i lati per consentirne l’apertura.
cerniere
“snodi”
Per aprire il tettuccio parasole, premere
verso il basso sulle cerniere come indicato in figura.
10
CHIUDERE LA CAPOTTINA E IL TETTUCCIO PARASOLE
_____________________________________________________________________________________
Importante: per chiudere la capottina
o il tettuccio parasole, sollevare le cerniere, da ambo i lati, e ripiegare verso
la parte posteriore del passeggino la
capottina ed il parasole.
Non richiudere la capottina o il tettuccio
parasole senza prima aver sollevato le
cerniere.
cerniere
“snodi”
Importante: quando richiudete il passeggino, reclinare verso la parte anteriore, contro il bracciolo di protezione, il
tettuccio parasole
11
SGANCIARE IL BRACCIOLO DI PROTEZIONE
_____________________________________________________________________________________
Il bracciolo di protezione, può essere
aperto a cancelletto, per agevolare il
posizionamento del bambino all’interno
del passeggino o per toglierlo con più
facilità.
bracciolo
Per sganciare il bracciolo di protezione, apertura solo sul lato destro, girare
nel senso antiorario la levetta destra,
posta sul lato inferiore del bracciolo,
come indicato in figura e mantenendola
ruotata, tirare il bracciolo aprendolo a
cancelletto.
bracciolo
leva
Per riagganciare il bracciolo, girare la levetta in senso antiorario e mantenendola
ruotata agganciare il bracciolo.
Lasciare la levetta.
Assicurarsi del corretto aggancio.
bracciolo
leva
12
UTILIZZO DEI FRENI E BLOCCAGGIO DEL MOVIMENTO PIROETTANTE DELLE RUOTE ANTERIORI
_____________________________________________________________________________________
Per azionare i freni, premere con il piede sulla leva del freno destra o sinistra,
finché il meccanismo non azioni il
dispositivo frenante.
Verificare che i freni siano azionati,
spingendo dolcemente in avanti il passeggino.
Per sbloccare il dispositivo frenante,
sollevare, con il piede, la leva dei freni
destra o sinistra.
Per sicurezza azionare sempre i freni prima di collocare o rimuovere il bambino
dal passeggino.
leva del freno
ll passeggino è dotato di ruote anteriori
piroettanti, che possono essere bloccate.
Per bloccare il movimento piroettante,
premere entrambe le leve verso il basso
e spingere il passeggino leggermente
in avanti, quando le ruote si troveranno
allineate nel senso longitudinale, avrete
il bloccaggio delle ruote.
Per sbloccare le ruote, sollevare entrambe le leve verso l’alto.
leva di bloccaggio
13
L’USO DELLA CINTURA “IMBRACATURA”
____________________________________________________________________________________
AVVERTENZA
La cintura a 5 punti, deve sempre
essere usata correttamente agganciata,
corpo sparti gambe, cinture girovita,
cinture pettorali.
Per allacciare la cintura:
Spingete le estremità di ogni cintura (A)
nella fibbia (B) fino allo scatto, in questo
modo la cintura girovita e il corpo
sparti gambe saranno correttamente
agganciate e bloccate.
A
Le cinture pettorali devono sempre essere agganciate all’anello, presente sul
corpo di plastica, dell’estremità della
cintura girovita.
B
A
Per slacciare la cintura:
Premete contemporaneamente le estremità di ogni cinghia (A), questo consentirà lo sgancio delle cinture dalla
fibbia (B).
L’imbracatura, sia in dotazione al sedile
anteriore, sia in dotazione al sedile posteriore, è regolabile per adattarsi
perfettamente alla corporatura del
bambino.
B
C
Per regolare le cinture, è sufficiente agire sui regolatori (C) facendoli scorrere
lungo la cintura per ottenere la regolazione idonea alla corporatura del vostro
bambino.
C
Le cinture potrebbero essere dotate di
anelli a “D” da utilizzare per eventuali
cinture in conformità alle norme BS EN
13210, richieste in mercati esteri.
14
UTILIZZO DEL POGGIAPIEDI PER IL SEDILE POSTERIORE
_____________________________________________________________________________________
Il sedile posteriore del vostro passeggino è dotato di poggiapiedi a scomparsa che può essere fissato con strisce di
Velcro e bottoni automatici.
bottoni automatici
Velcro
Man mano che il vostro bambino cresce
e richiede più spazio per le gambe, il
poggiapiedi può essere ripiegato sotto
il sedile posteriore, si fissa con strisce di
Velcro.
FISSARE E TOGLIERE IL CESTO INFERIORE
____________________________________________________________________________________
cinghia
Si fissa e si toglie il cesto inferiore, sotto il
passeggino, tramite i bottoni automatici
posti sulle 4 cinghie del cesto.
cinghia
lato con rete
15
FISSARE E TOGLIERE IL CESTO INFERIORE continua
_____________________________________________________________________________________
Il cesto inferiore può essere fissato in
un senso o nell’altro a condizione che la
parte con la rete sia sempre a lato del
passeggino.
Infilate le cinghie intorno al telaio del
passeggino e agganciate i bottoni
automatici.
rete
rete
FISSARE IL PARAPIOGGIA
_____________________________________________________________________________________
fessura
Per fissare il parapioggia, infilate la
fessura che si trova sulla parte alta del
parapioggia sopra le maniglie del
passeggino.
Fissate i lati del parapioggia utilizzando
le strisce in Velcro in dotazione.
fessura
Velcro
Velcro
Velcro
Velcro
16
Velcro
Velcro
CHIUDERE IL PASSEGGINO
_____________________________________________________________________________________
Prima di procedere con la chiusura del
passeggino, con la capottina o il parasole montati, assicuratevi che gli stessi
siano piegati come mostrato in figura,
la capottina ripiegata indietro ed il
parasole piegato in avanti.
PER CHIUDERE IL PASSEGGINO continua
_____________________________________________________________________________________
Per chiudere il passeggino, tirate verso
alto la maniglia posteriore finché il passeggino non inizia a piegarsi.
Non forzare sul passeggino.
Tirare entrambe le leve di sgancio verso
l’alto e contemporaneamente spingete
le maniglie in avanti e il passeggino si
chiuderà.
leva di
sgancio
maniglia
posteriore
Bloccate il passeggino agganciando la
leva di chiusura.
leva di chiusura
17
ATTENZIONE
• Il vostro passeggino soddisfa i requisiti previsti dalle norme di sicurezza e con un uso corretto e
un’adeguata manutenzione manterrà le sue prestazioni inalterate per diversi anni.
• Il telaio è robusto ma può danneggiarsi se le ruote posteriori continuano ad essere sottoposte a
forti impatti scendendo gradini o cordoli. Gli impatti continui causeranno dei danni.
• Se il vostro bambino indossa scarpe dure, queste potrebbero danneggiare il tessuto morbido.
• Riporre il passeggino bagnato, può causare la formazione di muffa.
• Se il passeggino è esposto all’umidità, o bagnato, asciugatelo con un panno morbido, aprite
completamente il passeggino e lasciatelo asciugare prima di riporlo.
• Tenete il vostro passeggino in un luogo asciutto e sicuro.
• Non lasciate il passeggino al sole per periodi prolungati – alcuni tessuti potrebbero sbiadirsi.
MANUTENZIONE
• Questo passeggino richiede una manutenzione regolare da parte dell’utente.
• Il prodotto richiede un minino di manutenzione. La lubrificazione delle parti in movimento aumenterà la durata del passeggino e renderà più facile le operazioni di apertura e chiusura dello stesso.
• Se alcune parti del passeggino dovessero diventare rigide o difficile da far funzionare, applicate una
piccola quantità di lubrificante in forma di spray, per esempio WD 40. Non utilizzate olio o grasso.
• Il prodotto WD 40 non deve essere usato per lubrificare le ruote estraibili. Se necessario, le
ruote devono essere rimosse e pulite con un panno morbido e asciutto.
• Controllate regolarmente i dispositivi di bloccaggio, i freni, le ruote, le cinghie, le levette, i regolatori dei sedili, le giunture ed i dispositivi di fissaggio, assicurandosi sempre che siano correttamente agganciati e in buone condizioni di funzionamento.
• I freni, le ruote e le gomme sono soggetti ad usura e devono essere sostituiti all’occorrenza.
• Eseguire un controllo accurato, sul corretto funzionamento del passeggino, dopo 18 mesi di
utilizzo, dopo un lungo periodo di non utilizzo e prima di utilizzarlo per un secondo bambino.
PULIZIA
• I sedili, la fodera del frontalino, il tettuccio e la capottina possono essere puliti con acqua tiepida,
un detergente neutro e una spugna.
• Le parti in plastica e in metallo possono essere pulite con acqua tiepida, un detergente neutro e una spugna.
• Non utilizzare mai prodotti per la pulizia abrasivi o a base di ammoniaca, candeggina o acquaragia.
18
GB
USER GUIDE
thank you for choosing our product. Please take a little time to read the important safety notes detailed below. this will ensure
many years of happy, safe use.
_________________________________________________________________________________________________________________
SAFETY: TAKE NOTE
WARNING: A CHILDS SAFETY IS YOUR RESPONSIBILITY
• This pushchair is designed to carry two children, each with a maximum weight of 15kg.
• WARNING: The front seat is not suitable for children under 6 months.
The rear seat is suitable from birth to 15kg, always use the backrest completely lowered for children under the age of 6 months.
• Pushchairs are an ideal way of transporting your baby. It is important to remember, however, that during the first 3 months
babies should be spending most of their day lying flat, for comfort and development.
• WARNING: It may be dangerous to leave your child unattended.
• WARNING: Always use the harness, correctly fastened, to secure your child when in the pushchair.
• WARNING: Any load attached to the handle affects the stability of the pushchair.
• WARNING: This product is not suitable for running or skating.
• Children should be harnessed in at all times and never left unattended.
• The child should be clear of moving parts while making adjustments.
•This vehicle requires regular maintenance by the user.
• Do not use replacement parts or accessories other than those approved by the supplier as they may render the pushchair unsafe.
• Overloading, incorrect folding, and the use of non-approved accessories or spare parts may
damage or break this pushchair and could render the product unsafe. Read the instructions.
• Do not overload this pushchair with additional children, goods or accessories. Bags and other items must not be hung from
the handle. A basket is provided for the carriage of 3kg (6.6lb.) of goods, evenly distributed.
• Never leave rain covers on indoors, in a hot atmosphere or near a heat source as the baby could overheat.
• Ensure all users are familiar with the products operation. It should always open and fold easy. If it does not, do not force the
mechanism - stop and read the instructions.
• Do not use your pushchair in a manner for which it is not designed.
• Ensure your child wears a correctly fitted and adjusted harness at all times. D-rings are provided on the existing harness for
the attachment of a separate safety harness approved to BS 6684 or BS En 13210 should this be required.
• Do not allow your child to climb unassisted into, play with or hang onto your pushchair.
• Always apply the brakes when the pushchair is stationary.
• Hold on to your pushchair when close to moving road vehicles or trains.
Even with the brake on the draught from the vehicle may move the pushchair.
• Exercise caution when mounting or dismounting a kerb.
• Remove your children and fold the pushchair when ascending or descending stairs or escalators.
• Ensure the folded pushchair is stored away from children so that it does not fall and cause injury.
• Do not use replacement parts or accessories, e.g. child seats, bags, hooks, trays, rain covers etc. other than those approved
by the supplier, they may render the pushchair unsafe.
• Never carry a third child on your pushchair.
• Do not use any platforms or attachments that allow transportation of third child.
• The product must be assebled by an adult.
19
LIST OF PARTS
_____________________________________________________________________________________
1
2
1. Pushchair..............................x1
3
2. Wheels.................................x2
4
3. Front Hood..........................x1
4. Rear Hood...........................x1
5. Basket..................................x1
6. Harness Pads.......................x4
7. Rain cover............................x1
5
6
7
20
ATTACHING THE FRONT WHEELS
_____________________________________________________________________________________
To fit the front wheels, push each wheel
assembly on to the front legs, ensuring
that they engage securely.
The dimpled surface of the swivel lock
levers “A“ should face upwards when
fitting.
“A”
HOW TO OPEN YOUR PUSHCHAIR
foot pedal
handles
_____________________________________________________________________________________
In order to unfold your pushchair first
release the folding lock.
Next hold the pushchair firmly by both
handles and with a foot placed behind
the rear wheels pull the
handles upwards towards you.
foot pedal
handles
folding lock
rear wheels
folding lock
rear wheels
handles
handles
foot pedal
When nearly all the way up place your
foot on the foot pedal and continue
pulling the handles till the
pushchair is fully erect.
foot pedal
WARNING: Ensure that all locking devices are engaged before use.
21
ATTACHING THE FRONT HOOD
_____________________________________________________________________________________
To attach the front hood: insert the
hood clips into the slots on the pushchair arms as indicated below.
hood clips
Holding the hood clips at a slight angle
insert the front of each hood clip into
the slot on the pushchair arm, then
push down and forward to secure.
Hood Clip
front
slot
Note: The front and rear hoods operate
differently from one another.
The front hood contains a ratchet
system and the clicking noises, heard
whilst adjusting it, are normal.
Pushchair Arm
22
ATTACHING THE FRONT HOOD
continued
_____________________________________________________________________________________
To detach the front hood: press down
on the release buttons then pull the
hood clips backwards.
release button
release button
ATTACHING THE REAR HOOD
_____________________________________________________________________________________
To attach the rear hood: fix the hood
clips on to the pushchair frame at the
fixing point as indicated on
page 5.
hood clips
hood clips
23
ATTACHING THE REAR HOOD
continued
_____________________________________________________________________________________
Holding the hood clips, twist them
slightly to allow ease of attachment to
the pushchair frame.
Slip the hood clips over the fixing point
then push on and twist into place.
To detach: twist the hood clips slightly
inwards towards the centre of the pushchair then remove from
the chassis.
hood clips
24
ATTACHING THE REAR HOOD
continued
____________________________________________________________________________________
When the back seat is reclined the rear
hood can fasten to the seat fabric by
means of Velcro strips
located on the underside of the hood
and back of the rear seat.
Velcro
Velcro
25
ADJUSTING THE REAR SEAT BACK
_____________________________________________________________________________________
The rear seat has 3 recline positions. To
lower the back rest lift the catches on
both sides of the seat and position as required. To raise simply push the backrest
forwards to the desired position.
Once the back rest is in its reclined position the sides of the pushchair can be
attached to the rear flap using the two
Velcro strips and press studs to create a
secure space for the infant.
Back raised
Note: Always ensure the backrest is
secure and the necessary adjustments
are made prior to use.
catch
When the back seat is raised or when
the infant is older the rear flap can be
secured out of the way by folding back
and securing with the Velcro strips.
Back lowered
26
OPENING THE HOODS
_____________________________________________________________________________________
Both hoods can be opened by hinges
on either side of each hood.
hinges
To open the front hood push down on
the hinges as indicated.
27
CLOSING THE HOODS
_____________________________________________________________________________________
Both hoods can be folded back by
lifting the hinges on either side of
each and pushing the hood frame
backwards.
hinges
If folding the pushchair, push the front
hood forwards against the armrests.
28
UNLOCKING AND LOCKING THE BUMPER BAR
_____________________________________________________________________________________
The front bumper bar can be opened
for ease of placing and removing your
infant from the pushchair.
bumper bar
To open the bumper bar turn the lever
to the right as indicated by the arrow.
Whilst holding the lever in this position
pull on the bumper bar to free it.
bumper bar
lever
To
close the bumper bar again, turn the
lever to the right as indicated by the
arrow and push the bumper bar back
into place.
Letting go of the lever will lock the bar
safely in position.
bumper bar
lever
29
THE BRAKES AND WHEEL LOCKS
_____________________________________________________________________________________
Using your foot, push down on either
brake pedal till the mechanism clicks
into place, engaging the brakes.
Check the brakes are securely engaged
by gently pushing forwards against the
pushchair handles.
To disengage the brakes place your toe
under either brake pedal and ease it
upwards to free the brakes.
For their safety, the brakes must be
engaged before loading or unloading
children.
brake pedals
Your pushchair is equipped with lockable swivel wheels. To lock the front
wheels push down on both
swivel locking pedals.
To unlock: lift both pedals.
pedals
30
USING THE HARNESS
_____________________________________________________________________________________
WARNING Always use the crotch strap in combination with the waist belt.
Fastening the harness:
Push the ends of each strap (A) into
the buckle (B) until they click into place
locking the waist and crotch
straps together.
A
B
Releasing the harness:
Press together the ends of each strap
(A)allowing the straps to be slid out
from the buckle (B).
A
B
All straps on both front and rear harnesses can be fully adjusted to securely fit
your infant.
To adjust the straps simply slide the
adjusters (C) up or down till the required size is found.
‘D’ rings are fitted should you wish to
attach a separate harness complying
with BS EN 13210.
C
C
31
REAR SEAT FOOT-REST
_____________________________________________________________________________________
The rear seat of your pushchair comes
with a fold-away foot-rest which can be attached via strips of Velcro and press studs.
press studs
press studs
Velcro
Velcro
As your infant grows and requires more
leg room the footrest can be detached
and folded back under the rear seat where it attaches to more Velcro strips.
ATTACHING AND DETACHING THE BASKET
_____________________________________________________________________________________
The basket can be attached and detached from underneath the pushchair by
means of the press studs on the basket’s
4 straps.
strap
strap
mesh
mesh
strap
strap
32
ATTACHING AND DETACHING THE BASKET
continued
_____________________________________________________________________________________
The basket can be attached any way
round provided the mesh is at the side of
the pushchair.
mesh
Thread the straps around the pushchair
frame and secure the press studs.
ATTACHING THE RAINCOVER
_____________________________________________________________________________________
Your pushchair comes complete with a
simple and quick attaching raincover.
To attach the cover simply slide the slot
located in the top of the cover over the
pushchair handles.
slot
Secure the sides of the rain cover using
the Velcro straps provided.
Velcro ®
Velcro ®
FOLDING THE PUSHCHAIR
_____________________________________________________________________________________
If folding the pushchair with the hoods attached ensure hoods are folded as shown
with the rear hood folded back and front
hood folded forward.
33
FOLDING THE PUSHCHAIR
continued
_____________________________________________________________________________________
To fold your pushchair pull the rear handle
upwards till the pushchair begins to fold DO NOT FORCE IT.
Whilst pulling up on the release catches
push the handles away from you folding
the pushchair.
release catches
rear handle
Secure the pushchair with the folding
lock.
folding lock
34
CARE
• Your pushchair has been designed to meet safety standards and with correct use
and maintenance will give many years of trouble free performance.
• The chassis is strong but will weaken should the back wheels be bumped down
stairs or kerbs. continual impact will cause damage.
• If your child wears hard shoes these might damage the soft fabric.
• Storing a damp pushchair will encourage mildew to form.
• After exposure to damp conditions, dry off with a soft cloth, open fully and allow to
dry thoroughly before storing.
• Store your pushchair in a dry, safe place.
• Do not leave the pushchair in sunlight for prolonged periods - some fabrics may fade.
MAINTENANCE
• This pushchair requires regular maintenance by the user.
• This product is designed to operate with minimum maintenance, however regular
lubrication of moving parts will extend the life of your pushchair and make opening
and folding easier.
• Should parts of your pushchair become stiff or difficult to operate, apply a light
application of a spray lubricant e.g. WD 40. Do not use oil or grease.
• WD 40 should not be used to lubricate the running of removable wheels. If necessary, these should be removed and cleaned with a soft dry cloth.
• Regularly inspect the locking devices, brakes, wheels, harness assembly, catches,
seat adjusters, joints and fixings to ensure they are secure and in full working order.
• Brakes, wheels and tyres are subject to wear and should be replaced if necessary.
• Your pushchair should be serviced and reconditioned before using it for a second
baby, or within 18 months, whichever is the sooner.
CLEANING
• The seat units, bumper bar cover and hoods may be cleaned by sponging lightly
using warm water and a mild detergent.
• Plastic and metal parts may be sponged clean with warm water and a mild detergent.
• Never clean with abrasive, ammonia based, bleach based or spirit type cleaners.
35
Made in China
R1 BI & BO
Distribuito da:
Foppa Pedretti S.p.A. via Volta, 11
24064 Grumello del Monte, BG - Italy
tel +39 035 830497 fax + 39 035.831283
www.foppapedretti.it
36