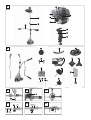
1
BENZIN-SENSE FBS 43 B2
BENZIN-SENSE
DÉBROUSSAILLEUSE THERMIQUE
Originalbetriebsanleitung
Vor dem Gebrauch der Maschine sorgfältig lesen!
Traduction du mode d'emploi d'origine
Lire consciencieusement avant d'utiliser a machine !
DECESPUGLIATORE A MOTORE
BENZINE TRIMMER
Traduzione delle istruzioni d'uso originali
Leggere attentamente prima di utilizzare la macchina!
Vertaling van de originele gebruiksaanwijzing
Voor gebruik van de machine zorgvuldig lezen!
PETROL GRASS TRIMMER
Translation of original operation manual
Read carefully before using machine!
IAN 97786
Klappen Sie vor dem Lesen die beiden Seiten mit den Abbildungen aus und machen Sie sich anschließend
mit allen Funktionen des Gerätes vertraut.
Avant de lire le mode d'emploi, ouvrez les deux pages contenant les illustrations et familiarisez-vous ensuite
avec toutes les fonctions de l'appareil.
Prima di leggere aprire le due pagine con le immagini e prendere confidenza con le diverse funzioni
dell'apparecchio.
Vouw vóór het lezen de beide pagina‘s met de afbeeldingen open en maak u vertrouwd met alle functies
van het apparaat.
Before reading, unfold both pages containing illustrations and familiarise yourself with all functions of the device.
DE / AT / CH
FR / CH
IT / CH
NL
GB
Originalbetriebsanleitung
Traduction du mode d'emploi d'origine
Traduzione delle istruzioni d'uso originali
Vertaling van de originele gebruiksaanwijzing
Translation of original operation manual
Seite
Page
Pagina
Pagina
Page
1
11
21
31
41
1
2
3a
3b
3c
4a
4b
4c
5
5a
6a
6b
6c
6d
6e
6f
6g
7a
7b
8a
8b
8c
8c
8e
8f
8i
8g
8j
7c
8d
8h
8k
9a
9e
11
9b
10a
12a
12d
12e
13a
13b
9c
9d
10b
10c
12b
12c
12f
12g
DE
AT
CH
Inhaltsverzeichnis
Einleitung . . . . . . . . . . . . . . . . . . . . . . . . . . . . . . . . . . . . . . . . . . . . . . . . . . . . . . . . . . . . . . . . . . . . . . . . . . . . . . . . . . . . . . 2
Bestimmungsgemäßer Gebrauch . . . . . . . . . . . . . . . . . . . . . . . . . . . . . . . . . . . . . . . . . . . . . . . . . . . . . . . . . . . . . . . . . . . . . . . . . . . . . . . . . . . 2
Lieferumfang . . . . . . . . . . . . . . . . . . . . . . . . . . . . . . . . . . . . . . . . . . . . . . . . . . . . . . . . . . . . . . . . . . . . . . . . . . . . . . . . . . . . . . . . . . . . . . . . . . . 2
Ausstattung . . . . . . . . . . . . . . . . . . . . . . . . . . . . . . . . . . . . . . . . . . . . . . . . . . . . . . . . . . . . . . . . . . . . . . . . . . . . . . . . . . . . . . . . . . . . . . . . . . . . 2
Technische Daten. . . . . . . . . . . . . . . . . . . . . . . . . . . . . . . . . . . . . . . . . . . . . . . . . . . . . . . . . . . . . . . . . . . . . . . . . . . . . . . . . . . . . . . . . . . . . . . . 3
Sicherheitshinweise. . . . . . . . . . . . . . . . . . . . . . . . . . . . . . . . . . . . . . . . . . . . . . . . . . . . . . . . . . . . . . . . . . . . . . . . . . . . . . 3
Handhabung . . . . . . . . . . . . . . . . . . . . . . . . . . . . . . . . . . . . . . . . . . . . . . . . . . . . . . . . . . . . . . . . . . . . . . . . . . . . . . . . . . . . . . . . . . . . . . . . . . . 3
Sicherheitsvorrichtungen . . . . . . . . . . . . . . . . . . . . . . . . . . . . . . . . . . . . . . . . . . . . . . . . . . . . . . . . . . . . . . . . . . . . . . . . . . . . . . . . . . . . . . . . . . 4
Vor dem Gebrauch . . . . . . . . . . . . . . . . . . . . . . . . . . . . . . . . . . . . . . . . . . . . . . . . . . . . . . . . . . . . . . . . . . . . . . . . . . . . . . . . . . . . . . . . . . . . . . 5
Sicherheitsmaßnahmen beim Umgang mit dem Schnittmesser . . . . . . . . . . . . . . . . . . . . . . . . . . . . . . . . . . . . . . . . . . . . . . . . . . . . . . . . . . . . . . 5
Inbetriebnahme. . . . . . . . . . . . . . . . . . . . . . . . . . . . . . . . . . . . . . . . . . . . . . . . . . . . . . . . . . . . . . . . . . . . . . . . . . . . . . . . . 5
Montage . . . . . . . . . . . . . . . . . . . . . . . . . . . . . . . . . . . . . . . . . . . . . . . . . . . . . . . . . . . . . . . . . . . . . . . . . . . . . . . . . . . . . . . . . . . . . . . . . . . . . . 5
Tragegurt anlegen . . . . . . . . . . . . . . . . . . . . . . . . . . . . . . . . . . . . . . . . . . . . . . . . . . . . . . . . . . . . . . . . . . . . . . . . . . . . . . 6
Bedienung . . . . . . . . . . . . . . . . . . . . . . . . . . . . . . . . . . . . . . . . . . . . . . . . . . . . . . . . . . . . . . . . . . . . . . . . . . . . . . . . . . . . . 6
Wartung und Reinigung . . . . . . . . . . . . . . . . . . . . . . . . . . . . . . . . . . . . . . . . . . . . . . . . . . . . . . . . . . . . . . . . . . . . . . . . . . 7
Ersatzteilbestellung . . . . . . . . . . . . . . . . . . . . . . . . . . . . . . . . . . . . . . . . . . . . . . . . . . . . . . . . . . . . . . . . . . . . . . . . . . . . . . 8
Lagerung und Transport . . . . . . . . . . . . . . . . . . . . . . . . . . . . . . . . . . . . . . . . . . . . . . . . . . . . . . . . . . . . . . . . . . . . . . . . . . 8
Fehlersuchplan. . . . . . . . . . . . . . . . . . . . . . . . . . . . . . . . . . . . . . . . . . . . . . . . . . . . . . . . . . . . . . . . . . . . . . . . . . . . . . . . . . 9
Garantie. . . . . . . . . . . . . . . . . . . . . . . . . . . . . . . . . . . . . . . . . . . . . . . . . . . . . . . . . . . . . . . . . . . . . . . . . . . . . . . . . . . . . . . 9
Service . . . . . . . . . . . . . . . . . . . . . . . . . . . . . . . . . . . . . . . . . . . . . . . . . . . . . . . . . . . . . . . . . . . . . . . . . . . . . . . . . . . . . . . . 9
Importeur. . . . . . . . . . . . . . . . . . . . . . . . . . . . . . . . . . . . . . . . . . . . . . . . . . . . . . . . . . . . . . . . . . . . . . . . . . . . . . . . . . . . . . 9
Entsorgung. . . . . . . . . . . . . . . . . . . . . . . . . . . . . . . . . . . . . . . . . . . . . . . . . . . . . . . . . . . . . . . . . . . . . . . . . . . . . . . . . . . . 10
Original-Konformitätserklärung . . . . . . . . . . . . . . . . . . . . . . . . . . . . . . . . . . . . . . . . . . . . . . . . . . . . . . . . . . . . . . . . . . 10
FBS 43 B2
1
DE
AT
CH
BENZIN-SENSE FBS 43 B2
Einleitung
Herzlichen Glückwunsch zum Kauf Ihres neuen Gerätes. Sie haben sich
damit für ein hochwertiges Produkt entschieden. Die Betriebsanleitung
ist Bestandteil dieses Produkts. Sie enthält wichtige Hinweise für Sicherheit,
Gebrauch und Entsorgung. Machen Sie sich vor der Benutzung des Produkts
mit allen Bedien- und Sicherheitshinweisen vertraut. Benutzen Sie das Produkt
nur wie beschrieben und für die angegebenen Einsatzbereiche. Händigen Sie
alle Unterlagen bei Weitergabe des Produkts an Dritte mit aus.
Ausstattung
Verbindungsstück Führungsholm
Führungsholm
Führungshandgriff
Startseilzug
Choke-Hebel
Benzintank
Kraftstoffpumpe „Primer“
Abdeckung Luftfiltergehäuse
Bestimmungsgemäßer Gebrauch
Ein- / Aus-Schalter
Verwendung mit Schnittmesser: Zum Schneiden von hohem Gras und Gestrüpp
mit dem 4-Zahn-Schnittmesser, für dichtes Gestrüpp und schwache Holzgewächse mit dem 3-Zahn-Schnittmesser.
Gashebel
Verwendung mit Fadenspule: Zum Schneiden von Rasen und leichtem Unkraut.
Schnittfaden-Schutzhaube
Jede andere Verwendung, die in dieser Betriebsanleitung nicht ausdrücklich zugelassen wird, kann zu Schäden am Gerät führen und eine ernsthafte Gefahr für den Benutzer darstellen. Beachten Sie unbedingt die Einschränkungen in den Sicherheitshinweisen. Beachten Sie nationale Vorschriften die
den Einsatz der Maschine beschränken können. Jede andere Verwendung
oder Veränderung der Maschine gilt als nicht bestimmungsgemäß und birgt
erhebliche Unfallgefahren. Nicht zum gewerblichen Gebrauch vorgesehen.
Schnittmesser-Schutzhaube
VERBOTENE ANWENDUNGEN!
Wegen körperlicher Gefährdung des Benutzers darf das Gerät nicht zu
folgenden Arbeiten eingesetzt werden: zum Reinigen von Gehwegen und als
Häcksler zum Zerkleinern von Baum- und Heckenabschnitten. Ferner darf
das Gerät nicht zum Einebnen von Bodenerhebungen, wie z.B. Maulwurfshügeln verwendet werden. Aus Sicherheitsgründen darf das Gerät nicht
als Antriebsaggregat für andere Geräte jeglicher Art verwendet werden.
Für daraus hervorgerufene Schäden oder Verletzungen aller Art haftet der
Benutzer / Bediener und nicht der Hersteller.
Griffschraube M6
Gashebelsperre
Fadenspule mit Schnittfaden
2 x Schraube M6
Tragegurt
4-Zahn-Schnittmesser
3-Zahn-Schnittmesser
Halterung Führungshandgriff
Mitnehmerscheibe
Druckplatte
Abdeckung Druckplatte
Mutter M10 (Linksgewinde)
Öl- / Benzinmischflasche
Zündkerzenschlüssel
Sechskantschlüssel 5 mm
Lieferumfang
1 Benzin-Sense FBS 43 B2
1 Betriebsanleitung
■ Öffnen Sie die Verpackung und nehmen Sie das Gerät vorsichtig aus
der Verpackung.
Sechskantschlüssel 4 mm
Griffschraube M6
Luftfilter
Zündkerzenstecker
■ Entfernen Sie das Verpackungsmaterial sowie Verpackungs-/ und
Transportsicherungen (falls vorhanden).
■ Überprüfen Sie, ob der Lieferumfang vollständig ist.
■ Kontrollieren Sie das Gerät und die Zubehörteile auf Transportschäden.
■ Bewahren Sie die Verpackung nach Möglichkeit bis zum Ablauf der
Garantiezeit auf.
2
Schnittmesser / und Fadenspule werden im Text auch als Schneidwerkzeug (als Oberbegriff) zusammengefasst.
FBS 43 B2
Technische Daten
WARNUNG!
Motortyp:
2-Takt-Motor, luftgekühlt, Chromzylinder
Motorleistung (max.):
1,35 kW / 1,8 PS
Hubraum:
42,7 cm³
Leerlaufdrehzahl Motor:
2700 - 3400 min-1
Max. Drehzahl Motor
mit Schnittmesser:
10500 min-1
mit Fadenspule:
9000 min-1
Max. Schnittgeschwindigkeit mit Schnittmesser:
7850 min-1
mit Fadenspule:
6750 min-1
Zündung:
Elektronisch
Antrieb:
Zentrifugalkupplung
Gewicht (leerer Tank):
8 kg
Schnittkreis-Faden Ø:
43 cm
Schnittkreis-Schnittmesser Ø:
25,5 cm
Fadenlänge:
8,0 m
Faden-Ø:
2,0 mm
Tankinhalt:
0,85 l
Zündkerze:
Champion RCJ7Y
Krafstoffverbrauch bei
max. Motorleistung:
0,6 kg / h
■ Der in diesen Anweisungen angegebene Schwingungspegel ist
entsprechend einem in EN ISO 11806-1 genormten Messverfahren
gemessen worden und kann für den Gerätevergleich verwendet
werden. Der angegebene Schwingungsemissionswert kann auch zu
einer einleitenden Einschätzung der Aussetzung verwendet werden.
Der Schwingungspegel wird sich entsprechend dem Einsatz des
Elektrowerkzeugs verändern und kann in manchen Fällen über dem
in diesen Anweisungen angegebenen Wert liegen. Die Schwingungsbelastung könnte unterschätzt werden, wenn das Elektrowerkzeug
regelmäßig in solcher Weise verwendet wird.
HINWEIS
■ Für eine genaue Abschätzung der Schwingungsbelastung während
eines bestimmten Arbeitszeitraumes sollten auch die Zeiten berücksichtigt werden, in denen das Gerät abgeschaltet ist oder zwar läuft,
aber nicht tatsächlich im Einsatz ist. Dies kann die Schwingungsbelastung über den gesamten Arbeitszeitraum deutlich reduzieren.
Sicherheitshinweise
WARNUNG!
■ Lesen Sie alle Sicherheitshinweise und Anweisungen. Versäumnisse bei
der Einhaltung der Sicherheitshinweise und Anweisungen können elektrischen Schlag, Brand und/oder schwere Verletzungen verursachen.
ACHTUNG!
■ Gerät und Verpackungsmaterial sind kein Kinderspielzeug!
Kinder dürfen nicht mit Kunststoffbeuteln, Folien und Kleinteilen spielen!
Es besteht Erstickungsgefahr!
spezifischer
Bewahren Sie alle Sicherheitshinweise und Anweisungen für
die Zukunft auf.
Kraftstoffverbrauch
bei max. Motorleistung:
446 g / kWh
Geräusch- und Vibrationsinformationen
Messwert für Geräusch ermittelt entsprechend EN ISO 11806-1.
Der A-bewertete Geräuschpegel beträgt typischerweise:
Schalldruckpegel LpA:
96,3 dB(A)
Unsicherheit KpA:
Schallleistungspegel LWA:
2,5 dB
110,3 dB(A)
Unsicherheit KWA:
2,5 dB
ACHTUNG!
■ Tragen Sie einen Gehörschutz!
WARNUNG!
■ Vermindern Sie auch die Schwingungsrisiken z.B. das Risiko einer Weißfingererkrankung durch häufige Arbeitspausen in denen Sie z.B. ihre
Handflächen aneinander reiben!
Betrieb
Schwingungsemissionswert ah = 8,2 m / s2
Unsicherheit K = 1,5 m / s2
FBS 43 B2
Handhabung
■ Tragen Sie anliegende Arbeitskleidung, die Schutz bietet, wie eine lange
Hose, sichere Arbeitsschuhe, strapazierfähige Schutzhandschuhe, einen
Schutzhelm, eine Schutzmaske für das Gesicht oder eine Schutzbrille zum
Schutz der Augen und gute Ohrwatte oder einen anderen Gehörschutz
gegen den Lärm.
■ Nur ausreichend geschulte Personen und Erwachsene dürfen das Gerät
bedienen, einstellen und warten.
■ Sind Sie mit dem Gerät nicht vertraut, üben Sie den Umgang bei nicht
laufendem Motor.
■ Achten Sie darauf, dass Schrauben und Verbindungselemente fest
angezogen sind. Bedienen Sie das Gerät nie, wenn es nicht richtig
eingestellt, nicht vollständig oder sicher zusammengesetzt ist.
■ Öffnen Sie den Benzintank langsam, um eventuellen Druck abzulassen,
der sich im Tankdeckel gebildet hat. Um Brandgefahr vorzubeugen,
entfernen Sie sich mindestens 3 Meter vom Auftankbereich, bevor Sie
das Gerät anlassen.
■ Halten Sie das Gerät stets mit beiden Händen fest. Dabei sollen Daumen
und Finger die Griffe umschließen.
■ Arbeitshaltung: Das Gerät nicht in unbequemer Stellung, nicht bei
fehlendem Gleichgewicht, mit ausgestreckten Armen oder nur mit einer
Hand bedienen.
■ Achten Sie immer auf festen Stand.
■ Benutzen Sie immer den mitgelieferten Tragegurt.
■ Achten Sie darauf, dass die Griffe trocken und sauber sind und keinerlei
Benzingemisch daran haftet.
■ Benutzen Sie das Gerät nicht, wenn Zuschauer oder Tiere sich in unmittelbarer Nähe befinden. Halten Sie während der Mäharbeiten einen Mindestabstand von 15 Metern zwischen Benutzer und anderen Personen oder Tieren.
Halten Sie bei Abmäharbeiten bis zum Boden bitte einen Mindestabstand
3
DE
AT
CH
■
■
■
■
■
■
■
■
■
■
von 30 Metern zwischen Benutzer und anderen Personen oder Tieren.
Überprüfen Sie vor dem Arbeiten das Gelände auf Gegenstände, wie
Metallteile, Flaschen, Steine o.ä. die weggeschleudert werden können und
dadurch Verletzungen beim Benutzer verursachen.
Führen Sie die Fadenspule in der gewünschten Höhe. Vermeiden Sie
es, kleine Gegenstände (z.B. Steine) mit der Fadenspule zu berühren.
Halten Sie die Fadenspule stets auf dem Boden, wenn das Gerät in
Betrieb ist.
Bei Mäharbeiten am Hang stehen Sie bitte stets unterhalb des Schneidwerkzeugs. Schneiden oder trimmen Sie niemals an einem glatten,
rutschigen Hügel oder Abhang.
Bevor Sie den Motor anlassen, vergewissern Sie sich, dass die Fadenspule mit keinem Hindernis in Berührung kommt.
Benutzen Sie das Gerät niemals, wenn es beschädigt ist oder Mängel
aufweist.
Trimmen und schneiden Sie immer im oberen Drehzahlbereich. Lassen
Sie den Motor zu Beginn des Mähens oder während des Trimmens
nicht in niedriger Drehzahl laufen.
Sollten Sie aus Versehen einen festen Gegenstand mit dem Gerät
berühren, schalten Sie den Motor sofort aus und untersuchen Sie das
Gerät auf eventuelle Schäden.
Schalten Sie das Gerät ab, bevor Sie es abstellen.
Stellen Sie den Motor immer vor Arbeiten an dem Schneidwerkzeug
ab.
Erläuterungen der Hinweisschilder auf dem Gerät!
Warnung! Vor Inbetriebnahme Betriebsanleitung lesen!
Gehörschutz tragen!
Schutzbrille tragen!
Festes Schuhwerk tragen!
Schutzhandschuhe tragen!
Kopfschutz tragen!
Gerät vor Regen oder Nässe schützen!
Achten Sie auf weggeschleuderte Teile!
Vor Wartungsarbeiten Gerät abstellen und Zündkerzenstecker
abziehen!
ACHTUNG!
Zusätzliche Sicherheitshinweise
Der Abstand zwischen der Maschine und Dritte muss
mindestens 15 Meter betragen!
■ Den Auspuff nicht berühren.
■ Benutzen Sie das Gerät nur zum vorgesehenen Zweck, wie Rasentrimmen und Mäharbeiten.
Schneidwerkzeug (Schnittmesser / Schnittfaden) läuft nach!
■ Benutzen Sie das Gerät nicht über einen längeren Zeitraum, machen
Sie regelmäßig Pausen.
Achtung, heiße Teile. Abstand halten!
■ Das Gerät nicht unter Alkohol- oder Drogeneinfluss betätigen.
■ Das Gerät nur benutzen, wenn die entsprechende Schutzhaube
installiert und in gutem Zustand ist.
Ergänzen Sie alle 20 Betriebsstunden etwas Fett
(Getriebefließfett)
20 h
■ Jegliche Veränderungen an dem Produkt können die persönliche Sicherheit gefährden und lassen die Herstellergarantie verfallen.
Vorsicht vor Rückstoß!
■ Benutzen Sie das Gerät niemals in der Nähe von leicht entflammbaren
Flüssigkeiten oder Gasen, weder in geschlossenen Räumen noch im
Freien. Explosionen und / oder Brand können die Folge sein.
Vorsicht - Benzin ist extrem leicht entzündlich! Explosionsgefahr! Keinen Kraftstoff verschütten!
■ Verwenden Sie keine anderen Schneidwerkzeuge. Zu Ihrer eigenen
Sicherheit verwenden Sie nur Zubehör und Zusatzgeräte, die in der
Betriebsanleitung angegeben werden. Der Gebrauch anderer als
der in der Betriebsanleitung empfohlenen Schneidwerkzeuge oder
Zubehöre kann eine persönliche Verletzungsgefahr für Sie bedeuten.
Achtung! Erstickungsgefahr!
Vorsicht! Giftige CO-Dämpfe!
Gerät nicht in geschlossenen Räumen verwenden!
Vorsicht! Verletzungsgefahr durch drehendes Schnittmesser! Hände und Füße fernhalten!
Sicherheitsvorrichtungen
Beim Arbeiten mit dem Gerät muss die entsprechende Kunststoffschutzhaube
für Schnittmesser- oder Fadenbetrieb montiert sein, um das Wegschleudern
von Gegenständen zu verhindern.
114
Angabe des Schallleistungspegels LWA in dB.
Angabe des Benzin-Öl Mischungsverhältnisses.
WARNUNG!
■ Mähen Sie niemals, während andere Personen, insbesondere Kinder
oder Tiere, in der Nähe sind.
Feuer, offenes Licht und Rauchen verboten!
■ Halten Sie einen Sicherheitsabstand von 15 m ein. Bei Annäherung
stellen Sie das Gerät unverzüglich ab.
Hinweis! Linksgewinde.
Hinweis! Führungshandgriff montieren.
1
ACHTUNG! VERGIFTUNGSGEFAHR!
■ Abgase, Kraftstoffe, und Schmierstoffe sind giftig. Abgase dürfen
nicht eingeatmet werden.
2
DE
AT
CH
min-1
Max. Umdrehungen pro Minute.
max. 9000
4
FBS 43 B2
■ Tanken Sie nur im Freien und rauchen Sie nicht.
■ Das Schnittmesser läuft aus, wenn der Gashebel losgelassen wurde. Ein
auslaufendes Schnittmesser kann Ihnen oder umherstehenden Personen
Schnittverletzungen zufügen. Bevor Sie am Schnittmesser irgendwelche
Arbeiten vornehmen, stellen Sie den Motor ab und vergewissern Sie
sich, dass das Schnittmesser zum Stillstand gekommen ist.
■ Während der Motor läuft oder bei heißem Gerät darf der Tankverschluss nicht geöffnet oder Benzin nachgefüllt werden.
Inbetriebnahme
WARNUNG!
■ Benzin ist hochgradig entflammbar. Bewahren Sie Benzin nur in den
dafür vorgesehenen Behältern auf.
■ Falls Benzin übergelaufen ist, darf kein Versuch unternommen werden,
den Motor zu starten. Stattdessen ist das Gerät von der benzinverschmutzten Fläche zu entfernen. Jeglicher Zündversuch ist zu vermeiden,
bis sich die Benzindämpfe verflüchtigt haben.
■ Aus Sicherheitsgründen sind Benzintank und Tankverschlüsse bei
Beschädigung auszutauschen.
Vor dem Gebrauch
ACHTUNG!
■ Während des Mähens sind immer rutschfeste Sicherheitsschuhe und
entsprechende Sicherheitskleidung wie Schutzhandschuhe, einen
Schutzhelm, eine Schutzmaske oder eine Schutzbrille sowie einen
Gehörschutz zu tragen.
■ Überprüfen Sie das Gelände, auf dem das Gerät eingesetzt wird und
entfernen Sie Gegenstände, die erfasst und weggeschleudert werden
können.
■ Vor dem Gebrauch und nach dem Fallenlassen oder anderen
Stoßeinwirkungen ist immer durch Sichtkontrolle zu prüfen, ob die
Schneidwerkzeuge, Befestigungsbolzen sowie die gesamte Schneideinheit beschädigt ist. Abgenutzte oder beschädigte Schneidwerkzeuge und Befestigungsbolzen müssen ausgetauscht werden.
■ Vor dem Gebrauch ist immer durch Sichtkontrolle zu prüfen, ob die
Schneidwerkzeuge angenutzt oder beschädigt sind. Zur Vermeidung
einer Umwucht dürfen abgenutzte oder beschädigte Schneidwerkzeuge und Befestigungsbolzen nur satzweise ausgetauscht werden.
Montage
Führungshandgriff montieren (Abb. 3a - 3c)
■ Montieren Sie den Führungshandgriff wie in den Abbildungen 3a - 3c
dargestellt. Der Führungshandgriff sollte wie in Abbildungen 3a - 3c
dargestellt ausgerichtet werden. Ziehen Sie die Griffschraube erst
dann ganz fest, wenn Sie die optimale Arbeitsposition mit dem Tragegurt
eingestellt haben (siehe Kapitel Tragegurt anlegen/Einstellen der
Schnitthöhe).
■ Um den Führungshandgriff in die richtige Entfernung vom Körper einzustellen und somit auch genügend Abstand zwischen Motor und Ihnen
zu gewährleisten, lösen Sie die beiden Schrauben an der Unterseite des
Führungshandgriffes (siehe Abb. 8j).
Führungsholm montieren (4a - 4c)
■ Drücken Sie den Arretierhebel und schieben Sie den Führungsholm
(siehe Abb. 4a) in das Verbindungsstück des Führungsholmes . Achten
Sie dabei darauf, dass die Antriebswellen im Inneren des Führungsholmes
ineinander gleiten, gegebenenfalls leicht an der Fadenspule /dem
Schnittmesser / drehen. Der Haken des Arretierhebels muss in das
Loch einrasten. Ziehen Sie die Griffschraube fest, wie in Abbildung
4c dargestellt.
Schnittmesser-Schutzhaube montieren
WARNUNG!
■ Beim Arbeiten mit dem Schnittmesser muss die Schnittmesser-Schutzhaube
montiert sein. Die Schnittmesser-Schutzhaube wird mit 2 Schrauben an
dem Führungsholm befestigt, wie in Abbildung 5 dargestellt.
Beschränken Sie die Geräuschentwicklung und Vibration
auf ein Minimum!
Schnittmesser montieren/ersetzen
■ Verwenden Sie nur einwandfreie Geräte.
■ Montieren/Ersetzen Sie die Schnittmesser
6a - 6g dargestellt.
■ Warten und reinigen Sie das Gerät regelmäßig.
■ Passen Sie Ihre Arbeitsweise dem Gerät an.
■ Überlasten Sie das Gerät nicht.
■ Lassen Sie das Gerät gegebenenfalls überprüfen.
■ Schalten Sie das Gerät aus, wenn es nicht benutzt wird.
■ Tragen Sie Schutzhandschuhe.
Sicherheitsmaßnahmen beim Umgang mit dem
Schnittmesser
■ Umstehende Personen können Erblindung oder Verletzungen erleiden.
Halten Sie in allen Richtungen einen Abstand von 15 Metern zwischen
sich und anderen Personen oder Tieren ein.
■ Benutzen Sie das Gerät nicht, wenn nicht alle Schnittmesseranbauten
ordnungsgemäß installiert sind.
■ Das Schnittmesser kann ruckartig von Gegenständen weggeschleudert
werden. Dies kann zu Verletzungen an Armen und Beinen führen. Sollte
das Gerät auf Fremdkörper treffen, stoppen Sie den Motor sofort und
warten Sie, bis das Schnittmesser zum Stillstand gekommen ist. Überprüfen Sie das Schnittmesser auf Schäden. Ersetzen Sie das Schnittmesser immer, wenn es verbogen oder gerissen ist.
■ Das Schnittmesser schleudert Gegenstände und auch Erde heftig weg.
Dies kann Erblindung oder Verletzungen verursachen. Tragen Sie
Augen-, Gesichts- und Beinschutz. Entfernen Sie Gegenstände immer aus
dem Arbeitsbereich, bevor Sie das Schnittmesser einsetzen.
FBS 43 B2
■ Schnittmesser
■ Druckplatte
/
/ , wie in den Abbildungen
auf der Mitnehmerscheibe arretieren (siehe Abb. 6c).
über das Gewinde der Zahnwelle stecken (siehe Abb. 6d).
■ Abdeckung Druckplatte
aufstecken (siehe Abb. 6e).
■ Die Bohrung der Mitnehmerscheibe suchen, mit der darunter liegenden
Kerbe überein bringen und mit dem mitgelieferten Sechskantschlüssel
kontern, nun die Mutter mit dem Zündkerzenschlüssel anziehen
(siehe Abb. 6f + 6g).
HINWEIS! Linksgewinde!
■ Die Schnittmesser / sind bei der Auslieferung mit Plastikschutzkappen
versehen. Diese sind vor dem Gebrauch zu entfernen und bei Nichtgebrauch wieder anzubringen.
ACHTUNG! SCHARFE KANTEN, TRAGEN SIE SCHUTZHANDSCHUHE
■ ACHTUNG! Schnittfaden-Schutzhaube
haube montieren.
an der Schnittmesser-Schutz-
■ Beim Arbeiten mit dem Schnittfaden muss zusätzlich die SchnittfadenSchutzhaube montiert werden. Die Montage der SchnittfadenSchutzhaube erfolgt wie in der Abbildung 7a dargestellt.
■ Achten Sie darauf, dass die Schnittfaden-Schutzhaube richtig einrastet.
An der Innenseite der Schnittfaden-Schutzhaube befindet sich ein
Messer (siehe Abb. 7a). Dieses ist mit einer Schutzhülle (siehe
Abb. 7a.) abgedeckt.
■ Entfernen Sie die Schutzhülle vor Arbeitsbeginn und bringen Sie
diesen nach dem Arbeiten wieder an.
5
DE
AT
CH
DE
AT
CH
Empfohlene Treibstoffe:
Fadenspule montieren/ersetzen
■ Montieren/Ersetzen Sie die Fadenspule
dargestellt.
wie in der Abbildung 7c
■ Die Bohrung der Mitnehmerscheibe suchen, mit der darunter liegenden
Kerbe übereinbringen und mit dem mitgelieferten Sechskantschlüssel
arretieren, nun die Fadenspule auf das Gewinde schrauben.
■ Benutzen Sie nur ein Gemisch aus bleifreiem Benzin und speziellem
2-Takt-Motoröl. Mischen Sie das Treibstoffgemisch nach der TreibstoffMischtabelle an.
■ Geben Sie jeweils die richtige Menge Benzin und 2-Takt-Öl in die
beiliegende Mischflasche (siehe Treibstoff-Mischtabelle). Schütteln Sie
anschließend den Behälter gut durch.
HINWEIS! Linksgewinde!
Treibstoff-Mischtabelle
Tragegurt anlegen
Mischverfahren: 40 Teile Benzin auf 1 Teil Öl
HINWEIS
■ Um ein Ermüdungsfreies Arbeiten zu gewährleisten, können Sie an
folgenden Punkten Einstellungen vornehmen. Je nach Körpergröße,
können die Einstellungen variieren.
■ Vor Arbeitsbeginn den Tragegurt und den Handgriff entsprechend
der Körpergröße einstellen.
■ Die Benzin-Sense mit montiertem Schneidewerkzeug so ausbalancieren,
dass das Schneidewerkzeug, ohne dass die Benzin-Sense mit den Händen berührt wird, nur knapp über dem Boden schwebt.
1.) Legen Sie den Tragegurt an und fügen die beiden Tragegurtteile
zusammen bis sie einrasten (siehe Abb. 8a - 8b).
2.) Ziehen Sie wie in Abbildung 8c dargstellt, an dem Tragegurt, um den
Tragegurt mittig am Körper auszurichten und dem Oberkörperumfang
entsprechend anzupassen.
3.) Um nun die beiden Schultergurte zu straffen, ziehen Sie an den beiden
Schultergurten, wie in Abbildung 8d dargestellt.
4.) Um die richtige Position der Benzin-Sense am Tragegurt einzustellen,
ziehen Sie an dem Tragegurt, wie in Abbildung 8e dargestellt.
5.) Hängen Sie den Karabiner ein (siehe Abb. 8f - 8h) und sichern Sie
ihn mit dem roten Gurtstück von dem Schnellöffnungsmechanismus.
6.) Nehmen Sie jetzt die Benzin-Sense und hängen Sie sie, wie in Abbildung 8i dargestellt, mit der Halterung in den Karabiner ein. Die
Halterung kann zusätzlich durch 1 Schraube gelöst und verschoben werden, um die beste Ausrichtung der Benzin-Sense einzustellen.
7.) Der Führungshandgriff kann jetzt noch durch 2 Schrauben
an der Unterseite zur Ausrichtung des Führungshandgriff verstellt
werden.
Schnitthöhe einstellen
■ Tragegurt
wie in Abbildung 8a - 8c dargestellt anlegen.
■ Das Gerät am Tragegurt einhaken (siehe Abb. 8d).
■ Mit den verschiedenen Gurtverstellern am Tragegurt optimale Arbeitsund Schnittposition einstellen (siehe Abb. 8e).
■ Um die optimale Tragegurtlänge festzustellen, machen Sie anschließend
einige Schwingbewegungen ohne den Motor anzulassen (siehe Abb. 9a).
■ Der Tragegurt ist mit einem Schnellöffnungsmechanismus ausgestattet.
Ziehen Sie an dem roten Gurtstück , falls Sie das Gerät schnell ablegen
müssen (siehe Abb. 8k).
ACHTUNG!
■ Benutzen Sie den Tragegurt immer, wenn Sie mit dem Gerät arbeiten.
Bringen Sie den Gurt an, sobald Sie den Motor gestartet haben
und er im Leerlauf läuft. Schalten Sie den Motor aus, bevor Sie den
Tragegurt abnehmen.
Treibstoff und Öl
ACHTUNG!
■ Verwenden Sie kein Treibstoffgemisch, welches mehr als 90 Tage
gelagert wurde.
6
Benzin
2-Takt-Öl
1 Liter
25 ml
5 Liter
125 ml
Bedienung
ACHTUNG!
■ Beachten Sie bitte die gesetzlichen Bestimmungen zur Lärmschutzverordnung.
Prüfen Sie das Gerät vor jeder Inbetriebnahme auf:
■ Dichtheit des Treibstoffsystems.
■ Einwandfreien Zustand und Vollständigkeit der Schutzeinrichtungen und
der Schnittvorrichtung.
■ Festen Sitz sämtlicher Verschraubungen.
■ Leichtgängigkeit aller beweglichen Teile.
Starten bei kaltem Motor
ACHTUNG!
■ Lassen Sie niemals den Startseilzug zurückschleudern. Dies kann zu
Beschädigungen führen.
1.) Füllen Sie den Tank. (Siehe auch Abschnitt “Treibstoff und Öl”).
2.) Kraftstoffpumpe (Primer) 6 x drücken.
3.) Ein- / Aus-Schalter auf „I“ schalten.
4.) Choke-Hebel auf „ “ stellen.
5.) Das Gerät gut festhalten und den Startseilzug bis zum ersten
Widerstand herausziehen. Jetzt den Startseilzug rasch anziehen.
Das Gerät startet.
6.) Sollte der Motor nicht starten, wiederholen Sie die Schritte 4–5.
7.) Sobald der Motor läuft, drücken Sie den Gashebel ,um den AutoChoke zu lösen.
Springt der Motor auch nach mehreren Versuchen nicht an, lesen Sie den
Abschnitt „Fehlersuchplan“.
ACHTUNG!
■ Ziehen Sie den Startseilzug stets gerade heraus. Halten Sie den
Griff des Startseilzugs fest, wenn sich der Startseilzug wieder
einzieht. Lassen Sie den Startseilzug nie zurückschnellen.
HINWEIS
■ Bei sehr hohen Außentemperaturen kann es vorkommen, dass auch
bei kaltem Motor ohne Choke gestartet werden muss!
Starten bei warmem Motor
(Das Gerät stand für weniger als 15–20 Minuten still)
1.) Ein- / Aus-Schalter
2.) Choke-Hebel
auf „I“ schalten.
muss auf „
“ stehen.
3.) Gerät gut festhalten und den Startseilzug bis zum ersten Widerstand herausziehen. Jetzt den Startseilzug rasch anziehen. Das Gerät sollte nach
1–2 Zügen starten. Falls das Gerät nach 6 Zügen immer noch nicht startet,
wiederholen Sie die Schritte 1-7 unter „Starten bei kaltem Motor” starten.
FBS 43 B2
Motor abstellen
Verklemmen
Not-Aus Schrittfolge
Sollte das Schneidwerkzeug blockieren, stellen Sie unverzüglich den Motor ab. Befreien Sie das Gerät von Gras und Gestrüpp, bevor Sie es erneut
in Betrieb nehmen.
Falls es notwendig ist, das Gerät sofort zu stoppen, stellen Sie hierzu den
Ein- / Aus-Schalter auf „0“.
Vermeiden von Rückschlag
Normale Schrittfolge
Arbeitshinweise
Beim Arbeiten mit dem Schnittmesser besteht die Gefahr des Rückschlages,
wenn dieses auf feste Hindernisse (Baumstamm, Ast, Baumstumpf, Stein
oder dergleichen) trifft. Das Gerät wird dabei gegen die Drehrichtung des
Schneidwerkzeugs zurückgeschleudert. Dies kann zum Verlust der Kontrolle
über das Gerät führen. Benutzen Sie das Schnittmesser nicht in der Nähe von
Zäunen, Metallpfosten, Grenzsteinen oder Fundamenten. Zum Schneiden von
schwachem Holzgewächs positionieren Sie das Gerät wie in Abb. 9e dargestellt, um Rückschläge zu vermeiden.
Trainieren Sie vor Einsatz des Gerätes sämtliche Arbeitstechniken (siehe
Abb. 9a - 9c) bei abgestelltem Motor.
Wartung und Reinigung
Schnittfaden verlängern
Reinigung
■ Lassen Sie den Gashebel los und warten Sie bis der Motor in Leerlaufgeschwindigkeit übergegangen ist. Stellen Sie dann den Ein- / AusSchalter auf „0“.
ACHTUNG!
■ Im Leerlauf muss das Schnittmesser stillstehen. Sollte sich das Schnittmesser drehen, ist der Vergaser einzustellen!
Zur Verlängerung des Schnittfadens lassen Sie den Motor auf Vollgas
laufen und tippen Sie die Fadenspule auf den Boden. Der Faden wird
automatisch verlängert. Das Messer an der Schnittfaden-Schutzhaube
kürzt den Faden auf die zulässige Länge (siehe Abb. 9d).
ACHTUNG!
Rasen- / Gras- / Unkrautreste verfangen sich unterhalb der SchnittmesserSchutzhaube .
■ Entfernen Sie die Reste bei abgeschaltetem Motor mit einem Spachtel
oder dergleichen.
Verschiedene Schnittverfahren
Trimmen / Mähen (Schnittmesser ggf. mit Fadenspule)
■ Schwingen Sie das Gerät in sichelartiger Mähbewegung (siehe Abb.
9a).
■ Halten Sie das Schneidwerkzeug parallel zum Boden und legen Sie die
gewünschte Schnitthöhe fest.
Niedriges Trimmen (mit Fadenspule)
■ Halten Sie das Gerät mit einer leichten Neigung über den Boden (siehe
Abb. 9b). Schneiden Sie immer von sich weg. Ziehen Sie das Gerät
nicht zu sich hin.
Abmähen (mit Fadenspule)
■ Beim Abmähen erfassen Sie die gesamte Vegetation bis zum Grund.
Dazu neigen Sie die Fadenspule im 30 Grad Winkel nach rechts. Stellen Sie den Handgriff in die gewünschte Position (siehe Abb. 9c).
Schneiden an Baum / Zaun / Fundament (mit Fadenspule)
HINWEIS
■ Kommt der Faden mit Bäumen, Steinen, Steinmauern oder Fundamenten in Berührung, nutzt er sich ab oder franst aus. Schlägt der Faden
gegen Zaungeflecht, bricht er ab.
ACHTUNG!
■ Entfernen Sie mit dem Gerät keine Gegenstände von Fußwegen
usw.! Die Benzin-Sense ist ein kraftvolles Gerät und kleine Steine
oder andere Gegenstände können 15 Meter und mehr weggeschleudert werden und zu Verletzungen oder Beschädigungen an Autos,
Häusern und Fenstern führen.
FBS 43 B2
HINWEIS
■ Nach jedem Gebrauch sollte das Gerät gründlich gereinigt werden.
■ Schalten Sie das Gerät vor Reinigungsarbeiten immer aus und ziehen
den Zündkerzenstecker ab.
■ Reinigen Sie das Gerät regelmäßig mit einem feuchten Tuch und etwas
Spülmittel. Achten Sie darauf, dass kein Wasser in das Geräteinnere
gelangen kann.
Fadenspule / Schnittfaden ersetzen
1.) Die Fadenspule , ist wie in Abschnitt Fadenspule montieren / ersetzen zu
demontieren. Die Fadenspule zusammendrücken (siehe Abb. 12a) und
eine Gehäusehälfte abnehmen (siehe Abb. 12b).
2.) Spulenteller
12c + 12d).
aus dem Fadenspulen-Gehäuse entnehmen (siehe Abb.
3.) Evtl. noch vorhandenen Schnittfaden entfernen.
4.) Neuen Schnittfaden in der Mitte zusammenlegen und die entstandene
Schlaufe in die Aussparung des Spulentellers einhängen (siehe Abb. 12d).
5.) Faden unter Spannung gegen den Uhrzeigersinn aufwickeln. Der Spulenteller trennt dabei die beiden Hälften des Schnittfadens (siehe Abb. 12e).
6.) Die letzten 15 cm der beiden Fadenenden in die gegenüberliegenden
Fadenhalter des Spulentellers einhaken (siehe Abb. 12f).
7.) Die beiden Fadenenden durch die Metallösen im Fadenspulen-Gehäuse
führen (siehe Abb. 12f).
8.) Spulenteller in das Fadenspulen-Gehäuse drücken (siehe Abb. 12f).
9.) Fügen Sie die Gehäusehälften wieder zusammen.
10.) Kurz und kräftig an beiden Fadenenden ziehen, um diese aus den
Fadenhaltern zu lösen (siehe Abb. 12g).
11.) Überschüssigen Faden auf etwa 13 cm zurückschneiden. Das verringert
die Belastung auf den Motor während des Startens und Aufwärmens.
12.) Fadenspule wieder montieren (siehe Kapitel Fadenspule montieren /
ersetzen). Wird die komplette Fadenspule erneuert, überspringen Sie
die Punkte 3–6.
7
DE
AT
CH
DE
AT
CH
Luftfilter warten
Standgas einstellen
Verschmutzte Luftfilter verringern die Motorleistung durch zu geringe Luftzufuhr zum Vergaser.
Regelmäßige Kontrolle ist daher unerlässlich. Der Luftfilter sollte alle 25
Betriebsstunden kontrolliert werden und bei Bedarf gereinigt werden.
2.) Entnehmen Sie den Luftfilter
3.) Reinigen Sie den Luftfilter
■ Standgas bei warmem Betriebszustand einstellen.
Sollte das Gerät bei nicht betätigtem Gashebel ausgehen und sämtliche
andere Ursachen nach Abschnitt „Fehlerbehebung“ ausgeschlossen sein,
ist ein Nachjustieren des Standgases notwendig. Drehen Sie hierzu die
Standgasschraube (siehe Abb. 5a) im Uhrzeigersinn, bis das Gerät im
Leerlauf rund läuft. Ist das Standgas so hoch, dass sich das Schneidwerkzeug mitdreht, muss dies durch Linksdrehen der Standgasschraube soweit
verringert werden, bis sich das Schneidwerkzeug nicht mehr mitdreht.
Bei sehr staubiger Luft ist der Luftfilter häufiger zu überprüfen.
1.) Entfernen Sie die Abdeckung des Luftfiltergehäuses
ACHTUNG!
(siehe Abb. 10a).
(siehe Abb. 10b + 10c).
durch Ausklopfen oder Ausblasen (mit Druckluft).
4.) Der Zusammenbau erfolgt in umgekehrter Reihenfolge.
Getriebe fetten
ACHTUNG!
■ Ergänzen Sie alle 20 Betriebsstunden etwas Getriebefließfett (ca. 10 g).
Öffnen Sie hierzu die Schraube (siehe Abb. 7c).
■ Luftfilter nie mit Benzin oder brennbaren Lösungsmitteln reinigen.
Zündkerze warten
Ersatzteilbestellung
1.) Ziehen Sie den Zündkerzenstecker
(siehe Abb. 11a) ab.
2.) Lösen Sie die Zündkerze mit dem beiliegenden Zündkerzenschlüssel
.
Ersatzteile bestellen
Bei der Ersatzteilbestellung sollten folgende Angaben gemacht werden:
3.) Der Zusammenbau erfolgt in umgekehrter Reihenfolge.
■ Typ des Gerätes
Elektrodenabstand = 0,6 mm (Abstand zwischen den Elektroden, zwischen
welchen der Zündfunke erzeugt wird). Ziehen Sie die Zündkerze mit 12
bis 15 Nm mit einem Drehmomentschlüssel (erhältlich im Fachhandel)
an. Überprüfen Sie die Zündkerze erstmals nach 10 Betriebsstunden auf Verschmutzung und reinigen Sie diese gegebenenfalls mit einer Kupferdrahtbürste.
■ Artikelnummer des Gerätes
Aktuelle Preise und Infos finden Sie unter
Danach die Zündkerze alle 50 Betriebsstunden warten.
Lagerung und Transport
Schutzhaubenmesser schleifen
Das Schutzhaubenmesser (siehe Abb. 7a) kann mit der Zeit stumpf werden. Sollten Sie dies feststellen, lösen Sie die 2 Schrauben mit denen das
Schutzhaubenmesser an der Schnittfaden-Schutzhaube befestigt ist.
Befestigen Sie das Messer in einem Schraubstock. Schleifen Sie das Messer mit einem Schleifstein und achten Sie darauf, den Winkel der Schnittkante beizubehalten. Schleifen Sie nur in eine Richtung.
■ Ident-Nummer des Gerätes
www.kompernass.com
■ Bewahren Sie das Gerät an einem sicheren Platz auf.
■ Lagern Sie das Gerät und Zubehör sicher und geschützt vor offenen
Flammen und Hitze- /Funkenquellen, wie Gasdurchlauferhitzer, Wäschetrockner, Ölofen oder tragbaren Radiatoren etc.
■ Halten Sie die Schnittmesser-Schutzhaube , die Fadenspule
den Motor bei der Lagerung immer frei von Mährückständen.
und
■ Schalten Sie das Gerät vor Wartungsarbeiten immer aus und ziehen
Sie den Zündkerzenstecker ab.
Vergaser-Einstellungen
Gerät lagern
Zu allen Arbeiten am Vergaser muss zuerst die Abdeckung des Luftfiltergehäuses , wie in Abb. 10a gezeigt, demontiert werden.
Wenn Sie das Gerät länger als 30 Tage lagern, muss es hierfür hergerichtet
werden. Andernfalls verdunstet der im Vergaser befindliche restliche Treibstoff und lässt einen gummiartigen Bodensatz zurück. Dies könnte den Start
erschweren und teure Reparaturarbeiten zur Folge haben.
Gasseilzug einstellen
Sollte die Maximaldrehzahl des Geräts mit der Zeit nicht mehr erreicht werden
und sämtliche andere Ursachen nach Abschnitt „Fehlerbehebung“ ausgeschlossen sein, könnte eine Einstellung des Gasseilzuges erforderlich sein.
1.) Nehmen Sie den Tankdeckel ab, um eventuellen Druck im Benzintank
abzulassen. Entleeren Sie vorsichtig den Benzintank .
HINWEIS
2.) Starten Sie den Motor und lassen Sie ihn laufen, bis dieser stoppt, um
den Treibstoff aus dem Vergaser zu entfernen.
■ Überprüfen Sie hierfür zunächst, ob der Vergaser bei voll durchgedrücktem Gashebel ganz öffnet.
3.) Lassen Sie den Motor für ca. 10 Minuten abkühlen.
Dies ist der Fall, wenn der Vergaserschieber (siehe Abb. 13b) bei voll
betätigtem Gas vollständig geöffnet ist. Abbildung 13a zeigt die korrekte
Einstellung. Sollte der Vergaserschieber nicht vollständig geöffnet sein, ist
eine Nachjustierung notwendig.
Um den Gasseilzug nachzustellen sind folgende Schritte erforderlich:
■ Lösen Sie die Kontermutter (siehe Abb. 13a) einige Umdrehungen.
Drehen Sie die Verstellschraube (siehe Abb. 13a) heraus, bis der
Vergaserschieber bei voll betätigtem Gas, vollständig geöffnet ist (siehe
Abb. 13b).
■ Ziehen Sie die Kontermutter
8
4.) Entfernen Sie die Zündkerze (siehe Kapitel Zündkerze warten).
5.) Geben Sie 1 Teelöffel 2-Takt-Öl in die Verbrennungskammer. Ziehen
Sie mehrere Male an dem Startseilzug , um alle mechanischen Teile
mit Öl zu benetzen. Setzen Sie die Zündkerze wieder ein.
HINWEIS
■ Verstauen Lagern Sie das Gerät an einem trockenen Ort und weit
entfernt von möglichen Entzündungsquellen.
wieder fest.
FBS 43 B2
Erneutes Inbetriebnehmen
Garantie
1.) Entfernen Sie die Zündkerze (siehe Kapitel Zündkerze warten).
2.) Ziehen Sie rasch an dem Startseilzug
Verbrennungskammer zu entfernen.
, um überschüssiges Öl aus der
3.) Reinigen Sie die Zündkerze und achten Sie auf den richtigen Elektrodenabstand an der Zündkerze.
4.) Füllen Sie den Benzintank
. Siehe Abschnitt „Treibstoff und Öl“.
Transportieren
■ Wenn Sie das Gerät transportieren möchten, entleeren Sie den Benzintank
wie im Abschnitt „Lagerung“ erklärt. Demontieren Sie den Führungshandgriff und Führungsholm wie in Abschnitt (Führungshandgriff /
Führungsholm montieren) erklärt.
Fehlersuchplan
# = Störung
+ = Mögliche Ursache
* = Störungsbehebung
#
+
*
+
*
+
Das Gerät springt nicht an.
Fehlerhaftes Vorgehen beim Starten.
Folgen Sie den Anweisungen zum Starten
Verrußte oder feuchte Zündkerze
Zündkerze reinigen oder durch neue ersetzen.
Falsche Vergasereinstellung
Kundendienst kontaktieren
#
+
*
+
*
+
Das Gerät springt an, hat aber nicht die volle Leistung.
Falsche Einstellung des Chokehebels
Chokehebel auf „ “ stellen.
Verschmutzter Luftfilter
Luftfilter reinigen
Falsche Vergasereinstellung
Kundendienst kontaktieren
# Der Motor läuft unregelmäßig.
+ Falscher Elektrodenabstand der Zündkerze
* Zündkerze reinigen und Elektrodenastand einstellen oder neue Zündkerze einsezen.
+ Falsche Vergasereinstellung
Kundendienst kontaktieren
Sie erhalten auf dieses Gerät 3 Jahre Garantie ab Kaufdatum.
Das Gerät wurde sorgfältig produziert und vor Anlieferung gewissenhaft geprüft. Bitte bewahren Sie den Kassenbon als Nachweis
für den Kauf auf. Bitte setzen Sie sich im Garantiefall mit Ihrer
Servicestelle telefonisch in Verbindung. Nur so kann eine kostenlose
Einsendung Ihrer Ware gewährleistet werden.
Die Garantieleistung gilt nur für Material- oder Fabrikationsfehler, nicht
aber für Transportschäden, Verschleißteile oder für Beschädigungen an
zerbrechlichen Teilen, z. B. Schalter oder Akkus. Das Produkt ist lediglich für
den privaten und nicht für den gewerblichen Gebrauch bestimmt.
Bei missbräuchlicher und unsachgemäßer Behandlung, Gewaltanwendung
und bei Eingriffen, die nicht von unserer autorisierten Service-Niederlassung
vorgenommen wurden, erlischt die Garantie. Ihre gesetzlichen Rechte werden
durch diese Garantie nicht eingeschränkt.
Die Garantiezeit wird durch die Gewährleistung nicht verlängert. Dies gilt
auch für ersetzte und reparierte Teile. Eventuell schon beim Kauf vorhandene
Schäden und Mängel müssen sofort nach dem Auspacken gemeldet werden,
spätestens aber zwei Tage nach Kaufdatum. Nach Ablauf der Garantiezeit
anfallende Reparaturen sind kostenpflichtig.
Service
WARNUNG!
■ Lassen Sie Ihr Gerät nur von qualifiziertem Fachpersonal und nur mit
Originalersatzteilen reparieren. Damit wird sichergestellt, dass die
Sicherheit des Gerätes erhalten bleibt.
Service Deutschland
Tel.: 0800 5435 111
E-Mail: [email protected]
IAN 97786
Service Österreich
Tel.: 0820 201 222 (0,15 EUR/Min.)
E-Mail: [email protected]
IAN 97786
Service Schweiz
Tel.: 0842 665566 (0,08 CHF/Min., Mobilfunk max. 0,40 CHF/Min.)
E-Mail: [email protected]
IAN 97786
Erreichbarkeit Hotline:
Montag bis Freitag von 8:00 Uhr – 20:00 Uhr (MEZ)
Importeur
KOMPERNASS HANDELS GMBH
BURGSTRASSE 21
44867 BOCHUM
GERMANY
www.kompernass.com
FBS 43 B2
9
DE
AT
CH
DE
AT
CH
Entsorgung
Die Verpackung besteht aus umweltfreundlichen Materialien, die Sie
über die örtlichen Recyclingstellen entsorgen können.
Das Gerät und dessen Zubehör bestehen aus verschiedenen
Materialien, wie z.B. Metall und Kunststoffe.
Möglichkeiten zur Entsorgung des ausgedienten Gerätes erfahren Sie bei
Ihrer Gemeinde- oder Stadtverwaltung.
Umweltschutz
■ Entleeren Sie den Benzin- und Öltank sorgfältig und geben Sie ihr
Gerät an einer Verwertungsstelle ab. Die verwendeten Kunststoff- und
Metallteile können sortenrein getrennt werden und so einer Wiederverwendung zugeführt werden.
■ Geben Sie Altöl und Benzinreste an einer Entsorgungsstelle ab und
schütten diese nicht in die Kanalisation oder in den Abfluss.
■ Geben Sie verschmutztes Wartungsmaterial und Betriebsstoffe in einer
dafür vorgesehenen Sammelstelle ab.
Original-Konformitätserklärung
Wir, KOMPERNASS HANDELS GMBH, Dokumentenverantwortlicher:
Herr Semi Uguzlu, BURGSTR. 21, 44867 BOCHUM, DEUTSCHLAND,
erklären hiermit, dass dieses Produkt mit den folgenden Normen,
normativen Dokumenten und EG-Richtlinien übereinstimmt:
Maschinenrichtlinie
(2006 / 42 / EC)
Elektromagnetische Verträglichkeit
(2004 / 108 / EC)
Outdoor Richtlinie
(2005 / 88 / EC)
Emissionsrichtlinie
(2004/26/EC)
Angewandte harmonisierte Normen
EN ISO 11806-1: 2011
EN ISO 14982: 2009
Typ / Gerätebezeichnung
Benzin-Sense FBS 43 B2
Herstellungsjahr: 01 - 2014
Seriennummer: IAN 97786
Bochum, 31.10.2013
Semi Uguzlu
- Qualitätsmanager Technische Änderungen im Sinne der Weiterentwicklung sind vorbehalten.
10
FBS 43 B2
Table des matières
FR
CH
Introduction . . . . . . . . . . . . . . . . . . . . . . . . . . . . . . . . . . . . . . . . . . . . . . . . . . . . . . . . . . . . . . . . . . . . . . . . . . . . . . . . . . . 12
Usage conforme . . . . . . . . . . . . . . . . . . . . . . . . . . . . . . . . . . . . . . . . . . . . . . . . . . . . . . . . . . . . . . . . . . . . . . . . . . . . . . . . . . . . . . . . . . . . . . . 12
Matériel livré . . . . . . . . . . . . . . . . . . . . . . . . . . . . . . . . . . . . . . . . . . . . . . . . . . . . . . . . . . . . . . . . . . . . . . . . . . . . . . . . . . . . . . . . . . . . . . . . . . 12
Équipement . . . . . . . . . . . . . . . . . . . . . . . . . . . . . . . . . . . . . . . . . . . . . . . . . . . . . . . . . . . . . . . . . . . . . . . . . . . . . . . . . . . . . . . . . . . . . . . . . . . 12
Caractéristiques techniques . . . . . . . . . . . . . . . . . . . . . . . . . . . . . . . . . . . . . . . . . . . . . . . . . . . . . . . . . . . . . . . . . . . . . . . . . . . . . . . . . . . . . . . 13
Consignes de sécurité . . . . . . . . . . . . . . . . . . . . . . . . . . . . . . . . . . . . . . . . . . . . . . . . . . . . . . . . . . . . . . . . . . . . . . . . . . . 13
Manipulation . . . . . . . . . . . . . . . . . . . . . . . . . . . . . . . . . . . . . . . . . . . . . . . . . . . . . . . . . . . . . . . . . . . . . . . . . . . . . . . . . . . . . . . . . . . . . . . . . . 13
Dispositifs de sécurité . . . . . . . . . . . . . . . . . . . . . . . . . . . . . . . . . . . . . . . . . . . . . . . . . . . . . . . . . . . . . . . . . . . . . . . . . . . . . . . . . . . . . . . . . . . 14
Avant utilisation . . . . . . . . . . . . . . . . . . . . . . . . . . . . . . . . . . . . . . . . . . . . . . . . . . . . . . . . . . . . . . . . . . . . . . . . . . . . . . . . . . . . . . . . . . . . . . . . 15
Mesures de sécurité lors de la manipulation de la lame . . . . . . . . . . . . . . . . . . . . . . . . . . . . . . . . . . . . . . . . . . . . . . . . . . . . . . . . . . . . . . . . . 15
Mise en service . . . . . . . . . . . . . . . . . . . . . . . . . . . . . . . . . . . . . . . . . . . . . . . . . . . . . . . . . . . . . . . . . . . . . . . . . . . . . . . . 15
Montage . . . . . . . . . . . . . . . . . . . . . . . . . . . . . . . . . . . . . . . . . . . . . . . . . . . . . . . . . . . . . . . . . . . . . . . . . . . . . . . . . . . . . . . . . . . . . . . . . . . . . 15
Mettre la ceinture de port. . . . . . . . . . . . . . . . . . . . . . . . . . . . . . . . . . . . . . . . . . . . . . . . . . . . . . . . . . . . . . . . . . . . . . . . 16
Commande. . . . . . . . . . . . . . . . . . . . . . . . . . . . . . . . . . . . . . . . . . . . . . . . . . . . . . . . . . . . . . . . . . . . . . . . . . . . . . . . . . . . 16
Maintenance et nettoyage . . . . . . . . . . . . . . . . . . . . . . . . . . . . . . . . . . . . . . . . . . . . . . . . . . . . . . . . . . . . . . . . . . . . . . . 17
Commande de pièces de rechange . . . . . . . . . . . . . . . . . . . . . . . . . . . . . . . . . . . . . . . . . . . . . . . . . . . . . . . . . . . . . . . . 18
Stockage et transport . . . . . . . . . . . . . . . . . . . . . . . . . . . . . . . . . . . . . . . . . . . . . . . . . . . . . . . . . . . . . . . . . . . . . . . . . . . 18
Elimination des erreurs . . . . . . . . . . . . . . . . . . . . . . . . . . . . . . . . . . . . . . . . . . . . . . . . . . . . . . . . . . . . . . . . . . . . . . . . . . 19
Garantie. . . . . . . . . . . . . . . . . . . . . . . . . . . . . . . . . . . . . . . . . . . . . . . . . . . . . . . . . . . . . . . . . . . . . . . . . . . . . . . . . . . . . . 19
Service après-vente. . . . . . . . . . . . . . . . . . . . . . . . . . . . . . . . . . . . . . . . . . . . . . . . . . . . . . . . . . . . . . . . . . . . . . . . . . . . . 19
Importateur . . . . . . . . . . . . . . . . . . . . . . . . . . . . . . . . . . . . . . . . . . . . . . . . . . . . . . . . . . . . . . . . . . . . . . . . . . . . . . . . . . . 19
Mise au rebut. . . . . . . . . . . . . . . . . . . . . . . . . . . . . . . . . . . . . . . . . . . . . . . . . . . . . . . . . . . . . . . . . . . . . . . . . . . . . . . . . . 20
Traduction de la déclaration de conformité originale . . . . . . . . . . . . . . . . . . . . . . . . . . . . . . . . . . . . . . . . . . . . . . . . . 20
FBS 43 B2
11
DÉBROUSSAILLEUSE THERMIQUE
FBS 43 B2
FR
CH
Introduction
Toutes nos félicitations pour l'achat de votre nouvel appareil. Ainsi, vous
venez d'opter pour un produit de grande qualité. Le mode d'emploi fait
partie de ce produit. Il contient des remarques importantes concernant la
sécurité, l'usage et la mise au rebut. Avant l'usage du produit, veuillez vous
familiariser avec toutes les consignes d'utilisation et de sécurité. N'utilisez le
produit que conformément aux consignes et pour les domaines d'utilisation
prévus. Si vous cédez le produit à un tiers, remettez-lui également tous les
documents.
Équipement
Pièce de raccordement guidon
Guidon
Poignée de guidage
Cordon de démarrage
Levier étrangleur
Réservoir d'essence
Pompe à carburant "Primer"
Recouvrement du boîtier du filtre à air
Interrupteur marche/arrêt
Accélérateur
Usage conforme
Blocage de l'accélérateur
Utilisation avec la lame : Pour couper l'herbe haute et les broussailles avec
la lame à 4 dents, pour les broussailles épaisses et les plantes ligneuses
fragiles avec la lame à 3 dents.
Bobine de fil avec fil de coupe
Utilisation avec la bobine de fil : pour couper l'herbe et les quelques
mauvaises herbes.
Capot de protection du fil de coupe
Capot de protection de la lame
2 x vis M6
Toute autre utilisation non expressément approuvée dans ce manuel peut
endommager l'appareil et présenter un risque sérieux pour l'utilisateur.
Respecter impérativement les restrictions figurant dans les consignes de
sécurité. Veuillez respecter les réglementations nationales qui peuvent
restreindre l'utilisation de la machine. Toute autre utilisation ou modification de la machine est considérée comme non conforme et présente des
risques d'accidents non négligeables. Non prévue pour une utilisation
commerciale.
Ceinture de port
UTILISATIONS INTERDITES !
Recouvrement plaque de protection
Pour éviter les blessures, l'utilisateur ne doit pas utiliser l'appareil pour les
travaux suivants : pour le nettoyage des trottoirs et comme broyeur à végétaux pour le broyage de tronçons d'arbres et de haies. En outre, l'appareil
ne doit pas être utilisé pour niveler les reliefs tels que les taupinières. Pour
des raisons de sécurité, l'appareil ne doit pas servir d'unité d'entraînement
pour d'autres appareils de tous types. L'utilisateur/opérateur est responsable
des dommages ou blessures de toute sorte qui pourraient en résulter, non
le fabricant.
Écrou M10 (filet à gauche)
Matériel livré
Cosse de bougie d'allumage
Lame à 4 dents
Lame à 3 dents
Fixation poignée de guidage
Vis pour poignée M6
Disque entraîneur
Plaque de compression
Flacon d'essence/d'huile
Clé à bougie
Clé mâle à six pans 5 mm
Clé mâle à six pans 4 mm
Vis pour poignée M6
Filtre à air
1 débroussailleuse thermique FBS 43 B2
1 mode d'emploi
■ Ouvrez l'emballage et retirez l'appareil de l'emballage avec précaution.
■ Retirez le matériel d'emballage ainsi que les sécurités d'emballage et
de transport (le cas échéant).
Lame / et bobine de fil
de coupe (terme générique).
sont également appelés dans le texte outil
■ Vérifiez que la livraison est complète.
■ Vérifiez que l'appareil et les accessoires n'ont subi aucun dégât pendant
le transport.
■ Si possible, conservez l'emballage jusqu'à la fin de la période de
garantie.
12
FBS 43 B2
Caractéristiques techniques
Type de moteur :
moteur 2 temps, refroidi par air,
cylindre chromé
Puissance du moteur (maxi.) :
1,35 kW / 1,8 PS
Cylindrée :
42,7 cm³
Vitesse de rotation à vide moteur :
2700 - 3400 min-1
AVERTISSEMENT !
avec lame :
10500 min-1
■ Le niveau de vibrations indiqué dans ces instructions a été mesuré
conformément aux méthodes de mesure décrites dans la norme
EN ISO 11806-1 et peut être utilisé pour la comparaison d'appareils. La valeur d'émission des vibrations mentionnée peut être
également utilisée pour une évaluation préliminaire de l'arrêt. Le
niveau des vibrations varie en fonction de l'usage de l'outil électrique
et peut, dans certains cas, excéder les valeurs indiquées dans ces instructions. La sollicitation due aux vibrations pourrait être sous-estimée
si l'outil électrique est utilisé régulièrement de cette manière.
avec bobine de fil :
9000 min-1
REMARQUE
Vitesse de coupe max. avec lame :
7850 min-1
avec bobine de fil :
6750 min-1
Allumage :
électronique
Entraînement :
accouplement centrifuge
■ Afin d'obtenir une estimation précise de la sollicitation due aux vibrations pendant un certain temps de travail, il convient également de
tenir compte des périodes pendant lesquelles l'appareil est éteint ou
allumé, mais n'est pas effectivement utilisé. Ceci peut considérablement réduire la sollicitation due aux vibrations pendant toute la durée
du travail.
Poids (réservoir vide) :
8 kg
Ø cercle de coupe du fil :
43 cm
Ø cercle de coupe de la lame :
25,5 cm
Longueur du fil :
8,0 m
Ø fil :
2,0 mm
Contenance du réservoir :
0,85 l
Bougie d'allumage :
Champion RCJ7Y
Vitesse moteur maxi
Consommation de carburant
à puissance max. du moteur :
0,6 kg / h
Consommation spécifique
de carburant
à puissance max. du moteur :
446 g / kWh
Consignes de sécurité
AVERTISSEMENT !
■ Lire toutes les consignes de sécurité et instructions. Tout manquement
aux consignes de sécurité et instructions peut causer une électrocution,
un incendie et/ou de graves blessures.
ATTENTION !
■ L'appareil et le matériel d'emballage ne sont pas des jouets !
Il est interdit de laisser des enfants jouer avec des sacs en matière
plastique, des films et avec des pièces de petite taille ! Il y a risque
d'étouffement !
Conserver toutes les consignes de sécurité et instructions
pour pouvoir vous y reporter ultérieurement.
Informations relatives aux bruits et aux vibrations
Manipulation
Valeur de mesure du bruit déterminée conf. à la norme EN ISO 11806-1.
■ Portez des vêtements de travail protecteurs comme un pantalon long,
des chaussures de sécurité sûres, des gants de travail résistants, un
casque de protection, un masque de protection pour le visage ou des
lunettes de protection pour les yeux et de bons bouchons pour les
oreilles ou toute protection auditive contre le bruit.
■ Seules les personnes adultes suffisamment formées sont autorisées à
utiliser l'appareil, le régler et en faire la maintenance.
■ Si l'appareil ne vous est pas familier, entraînez-vous à l'utiliser lorsque
le moteur est éteint.
■ Veillez à ce que les vis et les éléments de raccordement soient bien
serrés. N'utilisez jamais l'appareil lorsqu'il n'est pas bien réglé, incomplet ou pas monté sûrement.
■ Ouvrez lentement le réservoir d'essence pour laisser s'échapper la
pression s'étant éventuellement formée dans le couvercle du réservoir.
Pour éviter tout risque risque d'incendie, éloignez-vous d'au moins
3 m du lieu de remplissage avant de démarrer l'appareil.
■ Tenez toujours l'appareil à deux mains. Ce faisant, les pouces et les
doigts doivent entourer les poignées.
■ Posture de travail : ne pas utiliser l'appareil dans une position inconfortable, en déséquilibre, les bras tendus ou d'une seule main.
■ Veillez toujours à ce qu'il soit stable.
■ Utilisez toujours la ceinture de port fournie.
■ Veillez à ce que les poignées soient sèches et propres et qu'il n'y ait
pas de mélange d'essence dessus.
■ N'utilisez pas l'appareil si des spectateurs ou des animaux se trouvent
dans le voisinage immédiat. Lors des travaux de tonte, maintenez une
distance minimale de 15 mètres entre l'utilisateur et d'autres personnes ou
animaux. Lors de travaux de tonte à ras, veuillez maintenir une distance
minimale de 30 mètres entre l'utilisateur et d'autres personnes ou animaux.
Le niveau de bruit A pondéré typique de :
Niveau de pression acoustique LpA :
Imprécision KpA :
96,3 dB(A)
2,5 dB
Niveau de puissance acoustique LWA :110,3 dB(A)
Imprécision KWA :
2,5 dB
ATTENTION !
■ Porter une protection auditive !
AVERTISSEMENT !
■ Réduisez également les risques de vibrations tels que le risque d'une
maladie des doigts morts grâce à des pauses de travail fréquentes
dans lesquelles vous frottez par ex. les paumes des mains l'une
contre l'autre !
Fonctionnement
Valeur d'émission de vibration ah = 8,2 m/s2
Incertitude K = 1,5 m/s2
FBS 43 B2
13
FR
CH
Explication des plaques signalétiques sur l'appareil !
Avertissement ! Lire le mode d'emploi avant la mise en
service.
Porter une protection auditive !
Porter des lunettes de protection !
Porter des chaussures rigides !
Porter des gants de travail !
Porter une protection pour la tête !
Protéger l'appareil de la pluie ou de l'humidité !
ATTENTION !
Faites attention aux pièces projetées !
Remarques supplémentaires
■ Ne pas toucher l'échappement.
Avant les travaux de maintenance, mettez l'appareil
hors circuit et retirez la cosse de bougie d'allumage !
■ Utilisez l'appareil uniquement pour l'application prévue comme la
taille du gazon et les travaux de tonte.
La distance entre la machine et les personnes environnantes doit être d'au moins 15 m !
L'outil de coupe (lame/fil de coupe) continue de tourner une fois l'appareil éteint !
■ N'utilisez pas l'appareil pendant une longue période, faites régulièrement des pauses.
■ N'actionnez pas l'appareil sous l'influence de l'alcool ou de la
drogue.
Attention, pièces brûlantes. Gardez vos distances !
■ N'utilisez l'appareil que lorsque le capot de protection correspondant est installé et est en bon état.
■ Toute modification sur l'appareil peut mettre en danger la propre
sécurité de l'utilisateur et rend caduque la garantie du fabricant.
Remettez un peu de graisse toutes les 20 heures
(graisse liquide pour engrenage) !
20 h
■ N'utilisez jamais l'appareil à proximité de liquides ou de gaz facilement inflammables que ce soit dans des pièces fermées ou à l'air
libre. Il peut en résulter des explosions ou des incendies.
Risque de recul !
Prudence - L'essence est extrêmement inflammable !
Risque d'explosion ! Ne pas renverser de carburant !
■ N'utilisez pas d'autres outils de coupe. Pour votre propre sécurité,
utilisez uniquement des accessoires et appareils auxiliaires indiqués
dans le mode d'emploi. L'usage de tout autre outil ou accessoire que
ceux recommandés dans le mode d'emploi peut signifier pour vous
un risque de blessure corporelle.
Attention ! Risque d'étouffement !
Prudence ! Émanations de CO toxiques !
Dispositifs de sécurité
Ne pas utiliser l'appareil dans des pièces fermées !
Pendant que vous travaillez avec l'appareil, le capot de protection en
plastique correspondant pour fonctionnement avec lame ou fil doit être
monté pour éviter que des objets soient projetés.
Prudence ! Risque de blessure par lame rotative !
Tenir les mains et les pieds éloignés !
114
AVERTISSEMENT !
Indication du niveau de puissance acoustique LWA en dB.
■ Ne tondez jamais pendant que d'autres personnes, en particulier des
enfants [...] ou des animaux, sont à proximité.
Indication du rapport de mélange essence-huile.
■ Respectez une distance de sécurité de 15 m. Arrêtez immédiatement
l'appareil dès que quelqu'un s'approche.
Feu, flamme nue et fumée interdits !
ATTENTION ! RISQUE D'EMPOISONNEMENT !
Remarque ! Filet à gauche.
Remarque ! Monter la poignée de guidage.
1
■ Les gaz d'échappement, les carburants et les lubrifiants sont toxiques.
Il ne faut pas inhaler les gaz d'échappement.
2
FR
CH
■ Avant le travail, contrôlez le terrain, des objets tels que des pièces
métalliques, des bouteilles, des pierres ou autre peuvent être projetés et
entraîner de graves blessures de l’utilisateur.
■ Déplacez la bobine de fil à la hauteur souhaitée. Évitez de toucher les
petits objets (par ex. les pierres) avec la bobine de fil.
■ Maintenez la bobine de fil toujours au dessus du sol lorsque l'appareil
est en fonctionnement.
■ Lors de travaux de tonte sur une pente, veuillez toujours vous placer
en dessous de l'outil de coupe. Ne coupez ou ne taillez jamais sur une
butte ou une pente glissante.
■ Avant de démarrer le moteur, assurez-vous que la bobine de fil ne
rencontre pas d'obstacle.
■ N'utilisez jamais l'appareil s'il est endommagé ou présente des défauts.
■ Taillez ou coupez toujours à un palier de vitesse de rotation élevé. Ne
laissez pas tourner le moteur à faible vitesse au début de la tonte ou
pendant la taille.
■ Si vous touchez accidentellement un objet solide avec l'appareil, coupez
le moteur immédiatement et contrôlez les dommages éventuels sur
l'appareil.
■ Éteignez l'appareil avant de le déposer.
■ Éteignez toujours le moteur avant de travailler sur l'outil de coupe.
min-1
Tours par minute max.
max. 9000
14
FBS 43 B2
AVERTISSEMENT !
■ L'essence est hautement inflammable. Conservez l'essence uniquement dans les récipients prévus à cet effet.
■ Faites le plein uniquement à l'air libre et ne fumez pas.
■ Pendant que le moteur est en marche ou que l'appareil est chaud,
ne pas ouvrir le bouchon du réservoir d'essence et ne pas remplir
d'essence.
■ Si de l'essence a débordé, il ne faut pas essayer de démarrer le
moteur. Au lieu de cela, il faut éloigner l'appareil de l'endroit où
l'essence s'est répandue. Il faut éviter toute tentative d'allumage
tant que les vapeurs d'essence ne se sont pas évaporées.
■ Pour des raisons de sécurité, il faut remplacer le réservoir d'essence
et les bouchons du réservoir lorsqu'ils sont endommagés.
Avant utilisation
ATTENTION !
■ Pendant la tonte, portez toujours des chaussures de sécurité antidérapantes et des vêtements de travail protecteurs correspondants
comme des gants de travail, un casque de protection, un masque de
protection ou des lunettes de protection et une protection auditive.
■ Contrôlez le terrain sur lequel l'appareil est utilisé et éloignez les
objets qui peuvent être happés et projetés.
■ Avant utilisation et après une chute ou d'autres impacts, il faut toujours
procéder à une inspection visuelle pour déterminer si l'outil de coupe,
les boulons de fixation ainsi que l'ensemble de l'unité de coupe sont
endommagés. Les outils de coupe et les boulons de fixation usés ou
endommagés doivent être remplacés.
■ Avant l'utilisation il faut toujours contrôler visuellement si les outils de
coupe sont usés ou endommagés. Pour éviter tout balourd, les outils
de coupe et les boulons de fixation endommagés ou usés doivent
être uniquement remplacés par jeu.
■ La lame s'arrête de tourner lorsque l'on relâche l'accélérateur. Une
lame continuant de tourner peut causer des blessures par coupure sur
vous-même ou les personnes environnantes. Avant de procéder à des
travaux quelconques sur la lame, éteignez le moteur et assurez-vous
que la lame s'est arrêtée.
Mise en service
Montage
Montage de la poignée de guidage (fig. 3a-3c)
■ Montez la poignée de guidage comme illustré sur les figures 3a-3c.
La poignée de guidage devrait être orientée comme illustré sur les
figures 3a-3c. Ne serrez la vis pour poignée qu'après avoir réglé la
position de travail optimale avec la ceinture de port (voir chapitre
Mettre la ceinture de port/Réglage de la hauteur de coupe).
■ Afin de régler la poignée de guidage à la bonne distance du
corps et garantir ainsi également un écart suffisant entre le moteur et
vous-même, desserrez les deux vis situées à la base de la poignée de
guidage (voir fig. 8j).
Montage du guidon (4a-4c)
■ Appuyez sur le levier de blocage et insérez le guidon (voir fig. 4a)
dans la pièce de raccordement du guidon . Faites attention ce faisant
à ce que les arbres d'entraînement à l'intérieur du guidon glissent
l'un dans l'autre, et tournent le cas échéant facilement sur la bobine de
fil / la lame / . Le nez du levier de blocage doit s'encranter
dans le trou . Serrez à présent la vis pour poignée comme dans
la figure 4c.
Montage du capot de protection de la lame
AVERTISSEMENT !
■ Lorsque l'on travaille avec la lame, il faut que le capot de protection
de la lame soit monté. Le capot de protection de la lame est
fixé avec 2 vis au guidon comme illustré figure 5.
Limitez le niveau sonore et les vibrations au minimum !
Montage/ remplacement de la lame
■ Utilisez exclusivement des appareils en excellent état.
■ Montez/remplacez la lame
6a - 6g.
■ Entretenez et nettoyez l'appareil régulièrement.
■ Adaptez votre façon de travailler à l'appareil.
■ Ne surchargez pas l'appareil.
■ Bloquer la lame
/
/ , comme illustré dans les figures
sur le disque entraineur (voir fig. 6c).
■ Enficher la plaque de compression
(voir fig. 6d).
sur le filetage de l'arbre cannelé
■ Faites contrôler l'appareil le cas échéant.
■ Monter le recouvrement de la plaque de protection
■ Mettez l'appareil hors circuit lorsque vous ne l'utilisez pas.
■ Cherchez le trou du disque entraîneur, faites-le correspondre à l'encoche
qui se trouve dessous et bloquez-le à l'aide de la clé mâle à six pans
fournie pour ensuite serrer l'écrou à l'aide de la clé à bougie
(voir fig. 6f + 6g).
■ Portez des gants.
Mesures de sécurité lors de la manipulation de la
lame
■ Les personnes présentes peuvent souffrir de cécité ou de blessures.
Maintenez une distance de 15 m au moins dans toutes les directions
entre vous et les autres personnes ou les animaux.
■ N'utilisez pas l'appareil si toutes les pièces additionnelles de la lame
ne sont pas montées dans les règles de l'art.
■ La lame peut être projetée brutalement par des objets. Cela peut entraîner
des blessures aux bras ou aux jambes. Si l'appareil heurte des corps
étrangers, arrêtez le moteur immédiatement et attendez que la lame
s'immobilise. Vérifiez si la lame est endommagée. Remplacez toujours
la lame lorsqu'elle est tordue ou déchirée.
■ La lame projette des objets et même de la terre violemment. Cela peut
causer la cécité ou des blessures Portez une protection oculaire, du
visage et des jambes. Retirez toujours les objets de la zone de travail
avant d'utiliser la lame.
FBS 43 B2
(voir fig. 6e).
ATTENTION ! Filet à gauche !
■ Les lames / sont livrées avec des protections en plastique.
Les enlever avant l'utilisation puis les remettre ensuite.
ATTENTION ! BORDS TRANCHANTS, PORTEZ DES GANTS
DE PROTECTION
■ ATTENTION ! Monter le capot de protection du fil de coupe
le capot de protection de la lame .
sur
■ Lorsque l'on travaille avec le fil de coupe, le capot de protection du fil
de coupe doit être monté. Le montage du capot de protection du fil
de coupe se fait comme représenté dans l'illustration 7a.
■ Veillez à ce que le capot de protection du fil de coupe s'enclenche
vraiment. Une lame (voir fig. 7a) se trouve sur le côté inférieur du
capot de protection du fil de coupe . Celle-ci est recouverte d'une
protection (voir fig. 7a.).
■ Retirez cette protection avant de travailler et remettez-la après avoir
travaillé.
15
FR
CH
FR
CH
Montage/remplacement de la bobine de fil
Carburants recommandés :
■ Monter/remplacer la bobine de fil
tion 7c.
■ Utilisez uniquement un mélange à base d'essence sans plomb et d'une
huile spéciale moteur 2 temps. Mélangez le carburant en respectant le
tableau des mélanges de carburants.
■ Versez respectivement la bonne quantité d'essence et d'huile moteur
2 temps dans le flacon de mélange joint à la livraison (voir tableau
des mélanges de carburant). Secouez ensuite bien le récipient.
comme représenté dans l'illustra-
■ Cherchez le trou du disque entraîneur , faites-le correspondre à
l'encoche qui se trouve dessous et bloquez-le avec la clé mâle à six
pans fournie pour ensuite visser la bobine de fil sur le filetage.
ATTENTION ! Filet à gauche !
Tableau des mélanges des carburants
Mettre la ceinture de port
Procédure de mélange : 40 parts d'essence pour 1 part d'huile
REMARQUE
■ Pour assurer un travail sans fatigue, vous pouvez effectuer les réglages
sur les points suivants. Selon la taille du l'utilisateur, les réglages
peuvent varier.
■ Avant de commencer à travailler, régler la ceinture de port et la
poignée en fonction de la taille de l'utilisateur.
■ Équilibrer la débroussailleuse thermique avec l'outil de coupe monté
de telle sorte que l'outil de coupe soit en suspens juste au-dessus du
sol sans que la débroussailleuse thermique n'entre en contact avec
les mains.
1.) Enfilez la ceinture de port et assemblez les deux parties de la ceinture
de port jusqu'à ce qu'elles s'enclenchent (voir fig. 8a - 8b).
2.) Comme le montre la figure 8c, tirez sur la ceinture de port pour l'aligner
au centre du corps et ajuster le tour de taille en conséquence.
3.) Pour tendre à présent les deux sangles d'épaule, tirez sur les deux
sangles, comme représenté sur la figure 8d.
4.) Pour régler la bonne position de la débroussailleuse thermique sur la
ceinture de port, tirez sur la ceinture, comme représenté sur la figure 8e.
5.) Accrochez le mousqueton (voir fig. 8f - 8h) et fixez-le avec le morceau
de ceinture rouge du mécanisme d'ouverture rapide.
6.) Prenez maintenant la débroussailleuse thermique et accrochez-la comme
illustré en figure 8i, avec la fixation dans le mousqueton . La fixation peut également être enlevée et déplacée au moyen d'1 vis
pour ajuster le meilleur alignement de la débroussailleuse thermique.
7.) La poignée de guidage peut maintenant être encore ajustée par 2
vis situées à la base de l'alignement de la poignée de guidage .
Réglage de la hauteur de coupe
■ Positionnez la ceinture de port
comme illustré sur les figures 8a-8c.
■ Accrochez l'appareil à la ceinture de port (fig. 8d).
■ Réglez la position de travail et la position de coupe optimales à l'aide
des différents réglages de la ceinture de port (voir fig. 8e).
■ Afin de déterminer la longueur optimale de ceinture de port, faites ensuite
quelques mouvements de balancier sans allumer le moteur (voir fig. 9a).
■ La ceinture de port est dotée d'un mécanisme d'ouverture rapide. Si
vous devez déposer rapidement l'appareil , tirez sur le morceau de
ceinture rouge (fig. 8k).
ATTENTION !
■ Utilisez toujours la ceinture de port lorsque vous travaillez avec
l'appareil. Mettez la ceinture dès que vous avez démarré le moteur
et qu'il tourne à vide. Éteignez le moteur avant d'enlever la ceinture
de port.
Carburant et huile
ATTENTION !
■ N'utilisez pas de mélange de carburant qui a été stocké plus longtemps que 90 jours.
16
Essence
Huile 2 temps
1 litre
25 ml
5 litres
125 ml
Commande
ATTENTION !
■ Veuillez respecter les directives légales relatives à l'ordonnance de la
protection contre le bruit.
Vérifiez l'appareil avant chaque mise en service.
■ Étanchéité du système de carburant.
■ État impeccable et dispositifs de protection et de coupe au complet.
■ Bonne fixation de toutes les vis.
■ Souplesse de toutes les pièces mobiles.
Démarrage à froid
ATTENTION !
■ Ne laissez jamais la contrainte de câble de démarrage effectuer un
brusque retour en arrière. Ceci peut entraîner des dommages.
1.) Remplissez le réservoir (voir également la section "Carburant et huile").
2.) Appuyez 6 x sur la pompe à carburant (Primer).
3.) Positionnez l'interrupteur marche/arrêt sur "I".
4.) Mettez le levier étrangleur sur " ".
5.) Tenez fermement l'appareil et tirez la poignée de démarrage jusqu'à
la première résistance. Maintenant, tirez sur le cordon de démarrage
d'un coup sec. L'appareil démarre.
6.) Si le moteur ne démarre pas, répétez les étapes 4-5.
7.) Dès que le moteur tourne, appuyez sur le levier des gaz pour desserrer le starter automatique.
Si le moteur ne démarre toujours pas au bout de plusieurs essais, veuillez
lire le paragraphe "Élimination des erreurs".
ATTENTION !
■ Tirez toujours sur le cordon de démarrage de façon rectiligne.
Maintenez la poignée du cordon de démarrage lorsque le
cordon de démarrage retourne à sa place. Ne laissez jamais le
cordon de démarrage revenir rapidement de son état tiré.
REMARQUE
■ En cas de températures extérieures très élevées, il peut arriver que
l'on puisse démarrer à froid sans starter !
Démarrage à chaud
(L'appareil a été arrêté pendant moins de 15-20 min)
1.) Positionnez l'interrupteur marche/arrêt
2.) Le levier du starter
doit être sur "
sur "I".
".
FBS 43 B2
3.) Tenez bien l'appareil et tirez le cordon de démarrage jusqu'à la
première résistance. Maintenant, tirez fortement sur le cordon de
démarrage . L'appareil doit démarrer au bout de 1 à 2 essais.
Si la machine ne démarre toujours pas au bout de 6 essais, répétez les
étapes 1 à 7 avec un démarrage à froid.
ATTENTION !
■ Ne retirez pas d'objets du trottoir avec l'appareil ! La débroussailleuse
à essence est un outil puissant et les petites pierres ou autres objets
peuvent être projetés à 15 mètres et plus et provoquer des blessures
ou des détériorations sur les voitures, les maisons et les fenêtres.
Mettre le moteur hors circuit
Blocage
Procédure arrêt d'urgence
Si l'outil de coupe se bloque, mettez immédiatement le moteur hors circuit.
Enlevez l'herbe et la broussaille de l'appareil avant de le remettre en service.
Si c'est nécessaire, arrêtez immédiatement l'appareil, placez pour cela
l'interrupteur marche/arrêt sur "0".
Procédure normale
■ Lâchez l'accélérateur et attendez que le moteur soit passé à la vitesse
de rotation à vide. Mettez ensuite l'interrupteur marche/arrêt sur "0".
ATTENTION !
■ Au point mort, la lame doit être arrêtée. Si la lame devait tourner,
régler le carburateur !
Éviter un recul
Lorsque la lame rencontre des obstacles (tronc d'arbre, nœud, souche, pierre
ou autres) pendant le travail, cela entraîne un risque d'effet de recul.
L'appareil recule ce faisant brusquement dans le sens contraire du sens de
rotation de l'outil. Cela peut faire perdre le contrôle de l'appareil. N'utilisez
pas la lame à proximité de clôtures, de poteaux métalliques, de bornes
ou de fondations. Pour la coupe de petits arbustes, positionnez l'appareil
comme illustré sur la figure 9e afin d'éviter des reculs.
Consignes de travail
Entraînez-vous à toutes les techniques de travail le moteur éteint avant
d'utiliser l'appareil (voir fig. 9a - 9c).
Maintenance et nettoyage
Nettoyage
Allongement du fil de coupe
REMARQUE
Pour allonger le fil de coupe, laissez tourner le moteur à plein régime et
tapoter la bobine de fil sur le sol. Le fil est automatiquement rallongé.
La lame du capot de protection de fil de coupe raccourcit le fil à la
longueur adéquate (voir fig. 9d).
■ Après chaque utilisation, l'appareil devrait être nettoyé soigneusement.
ATTENTION !
■ Mettez toujours l'appareil hors circuit avant tout travail d'entretien et
retirez la cosse de la bougie d'allumage.
■ Nettoyez l'appareil régulièrement à l'aide d'un chiffon humide et d'un
peu de détergent. Veillez à ce que l'eau ne pénètre pas à l'intérieur de
l'appareil.
Les résidus de gazon, d'herbe, de mauvaises herbes se coincent sous le
capot protecteur .
Remplacement de la bobine de fil/du fil de coupe
■ Retirez les résidus une fois le moteur éteint à l'aide d'une spatule ou
quelque chose de semblable.
1.) La bobine de fil doit être démontée, comme décrit dans le paragraphe
Montage/remplacement de la bobine de fil. Comprimez la bobine de
fil (voir fig. 12a) et enlevez la moitié du boîtier (voir fig. 12b).
Différents types de coupe
Couper/Tondre (lame si néc. avec une bobine de fil)
2.) Retirez le porte-bobine
+ 12 d).
■ Déplacez l'appareil en faisant des mouvements oscillants d'un côté à
l'autre (voir fig. 9a).
3.) Retirez les éventuels fils de coupe encore présents.
■ Positionnez toujours l'outil de coupe parallèle au sol et déterminez la
hauteur de coupe souhaitée
Couper à basse hauteur (avec bobine de fil)
■ Positionnez l'appareil en le penchant légèrement au-dessus du sol (voir
fig. 9b). Coupez toujours en vous éloignant de là où vous vous tenez.
Ne tirez jamais l'appareil vers vous.
Tondre à ras (avec bobine de fil)
du boitier de la bobine de fil (voir fig. 12c
4.) Regroupez le nouveau fil de coupe au milieu et accrochez la boucle
qui s'est formée à l'encoche du porte-bobine (fig. 12d).
5.) Enroulez le fil sous tension dans le sens inverse des aiguilles d'une
montre. Le porte-bobine sépare ce faisant les deux moitiés du fil de
coupe (voir fig. 12e).
6.) Accrochez les derniers 15 cm des deux extrémités des fils dans les
supports de fil opposés du porte-bobine (fig. 12f).
■ Quand vous tondez à ras, il s'agit de tondre toute la végétation jusqu'au
sol. Pour cela, penchez la bobine de fil de 30 degrés vers la droite.
Placez la poignée dans la position souhaitée (voir fig. 9c).
7.) Introduisez les deux extrémités de fils par les œillets métalliques dans
le boîtier de bobine de fil (voir fig. 12f).
Couper l'herbe autour d'arbres/grillages/fondations
(avec bobine de fil)
9.) Assemblez à nouveau les deux moitiés du boitier.
8.) Enfoncez le porte-bobine dans le boîtier de la bobine de fil (fig. 12f).
REMARQUE
10.) Tirez brièvement et vigoureusement sur les extrémités des fils afin de
les détacher du support de fil (fig. 12g).
■ Si le fil entre en contact avec des arbres, des pierres, des murs en
pierre ou des fondations, il s'use ou s'effiloche. Si le fil tape contre
le grillage d'une clôture, il se casse.
11.) Recoupez les fils qui dépassent sur environ 13 cm. Cela réduit la
sollicitation du moteur lors du démarrage et de la chauffe.
12.) Remontez la bobine de fil (voir chapitre Montage/remplacement de
la bobine de fil). Si toute la bobine de fil est remplacée, ne considérez
pas les points 3-6.
FBS 43 B2
17
FR
CH
FR
CH
Maintenance du filtre à air
Afin de régler le tirant de câble, les étapes suivantes sont nécessaires :
Les filtres à air encrassés réduisent la puissance motrice en raison d'une
amenée d'air au carburateur trop réduite.
■ Desserrez le contre écrou (voir fig. 13a) de quelques tours. Dévissez
la vis de réglage (voir fig. 13a) jusqu'à ce que le coulisseau du
carburateur soit complètement ouvert alors que l'accélérateur est à
fond (voir fig. 13b).
Des contrôles réguliers sont par conséquent indispensables. ll faut contrôler
le filtre à air toutes les 25 heures de service et le nettoyer si nécessaire.
Si l'air est fortement chargé de poussière, contrôlez plus souvent le filtre à air.
1.) Retirez le recouvrement du boîtier du filtre
2.) Retirez le filtre à air
3.) Nettoyez le filtre à air
comprimé).
(voir fig.10a).
Réglage du ralenti
■ Régler le ralenti en état de fonctionnement chaud.
en le tapotant ou en le soufflant (à l'air
4.) Le montage s'effectue dans l'ordre inverse des étapes.
ATTENTION !
■ Ne nettoyez jamais le filtre avec de l'essence ni avec des solvants
inflammables.
Maintenance de la bougie d'allumage
(voir fig. 11a) ab.
2.) Retirez la bougie d'allumage à l'aide de la clé à bougie
.
ATTENTION !
(voir fig.10b + 10c).
1.) Retirez la cosse de bougie d'allumage
■ Resserrez le contre écrou
fournie.
3.) Le montage s'effectue dans l'ordre inverse des étapes.
Écart entre les électrodes = 0,6 mm (écart entre les électrodes entre
lesquelles l'étincelle d'allumage a lieu). Serrez la bougie d'allumage avec
12 à 15 Nm à l'aide d'une clé dynamométrique (disponible en magasin
spécialisé). Contrôlez l'encrassement de la bougie d'allumage pour la
première fois au bout de 10 heures de service et nettoyez celle-ci le cas
échéant à l'aide d'une brosse à fils de cuivre.
Effectuez ensuite une maintenance de la bougie d'allumage toutes les
50 heures de service.
Affûtage de la lame du capot
La lame du capot de protection (voir fig. 7a) peut s'émousser avec le
temps. Si vous vous en rendez compte, desserrez les 2 vis avec lesquelles
la lame du capot est fixée au capot de protection du fil de coupe .
Bloquez la lame dans un étau. Affûtez la lame avec une lime plate et veillez
à garder l'angle de l'arête de coupe. Limez dans une seule direction.
Réglages du carburateur
Pour tous travaux sur le carburateur, il faut d'abord démonter le recouvrement du boîtier du filtre à air comme indiqué sur les figure 10a.
Réglage du câble de transmission du carburateur
Si, avec le temps, la vitesse maximale de l'appareil ne peut plus être atteinte
et que toutes les autres causes possibles selon le paragraphe "Élimination
des erreurs" sont exclues, il pourrait être nécessaire de régler le câble de
transmission du carburateur.
REMARQUE
■ Vérifiez pour ce faire tout d'abord si le carburateur s'ouvre complètement lorsque la poignée de l'accélérateur est enfoncé jusqu'au bout.
C'est le cas lorsque le coulisseau du carburateur (voir fig. 13b) est ouvert
lorsque l'on appuie à fond sur l'accélérateur. La figure 13a montre le
réglage correct. Si le coulisseau du carburateur n'est pas complètement
ouvert, il est nécessaire de faire un ajustement.
Si l'appareil s'éteint sans que le levier de l'accélérateur ait été activé et que
toutes les autres causes de défauts selon le paragraphe "Élimination des
erreurs" sont exclues, il faut procéder à un nouveau réglage du ralenti.
Pour cela, tournez la vis du ralenti (voir fig. 5a) dans le sens des aiguilles
d'une montre jusqu'à ce que l'appareil tourne à vide de manière stable.
Si le ralenti est si élevé qu'il entraîne l'outil de coupe, il faut tourner la vis
du ralenti vers la gauche de manière à diminuer ce mouvement jusqu'à ce
que l'outil de coupe ne soit plus entraîné.
Graissage de l'engrenage
■ Rajoutez toutes les 20 heures de fonctionnement un peu de graisse
liquide pour engrenage (env. 10 g). Desserrez pour cela la vis
(voir fig. 7c).
Commande de pièces de rechange
Commander des pièces de rechange
Veuillez indiquer ce qui suit pour toute commande de pièces de rechange :
■ Type de l'appareil
■ Référence de l'appareil
■ Numéro d'identification de l'appareil
Vous trouverez les prix et informations actuels à l'adresse
www.kompernass.com
Stockage et transport
■ Rangez l'appareil dans un endroit sûr.
■ Rangez l'appareil et ses accessoires en sécurité et protégés des flammes
ouvertes et des sources de chaleur/d'ignition telles que les chauffe-eau
à gaz, sèche-linges, poêles à mazout ou radiateurs portatifs etc.
■ Gardez le capot de protection de la lame , la bobine de fil
moteur toujours exempts de résidus de tonte lors du stockage.
et le
■ Avant les travaux d'entretien, éteignez l'appareil et retirez la cosse de
bougie d'allumage .
Rangement de l'appareil
Si vous rangez l'appareil pendant une durée qui dépasse 30 jours, il faut
le préparer pour cela. Sinon, le reste du carburant se trouvant dans le
carburateur s'évapore et laisse un fond ressemblant à du caoutchouc. Cela
pourrait rendre le démarrage difficile et entraîner des coûts de réparation
importants.
1.) Retirez le bouchon du réservoir réservoir d'essence afin de laisser
s'échapper la pression contenue éventuellement dans le réservoir
Videz le réservoir avec précaution.
.
2.) Démarrez le moteur et laissez le tourner jusqu'à ce qu'il s'arrête, afin
d'éliminer le carburant du carburateur.
3.) Laissez refroidir le moteur pendant env. 10 minutes.
18
FBS 43 B2
4.) Enlevez la bougie d'allumage (voir chapitre Maintenance de la bougie
d'allumage)
5.) Versez une cuillère à café d'huile moteur à 2 temps dans la chambre
de combustion. Tirez plusieurs fois de suite lentement sur le cordon de
démarrage afin de recouvrir tous les composants internes d'huile.
Réintroduisez la bougie d'allumage.
REMARQUE
■ Rangez l'appareil à un endroit sec et éloigné de sources d'inflammation éventuelles.
Remise en service
1.) Enlevez la bougie d'allumage (voir chapitre Maintenance de la bougie
d'allumage)
2.) Tirez brusquement sur le cordon de démarrage
en trop de la chambre de combustion.
, afin d'enlever l'huile
3.) Nettoyez la bougie d'allumage et veillez à ce que les électrodes aient
un écart correct sur la bougie d'allumage.
4.) Remplissez le réservoir d'essence
. Voir le chapitre "Carburant et huile".
Transport
■ Si vous voulez transporter l'appareil, videz le réservoir d'essence
comme expliqué dans le paragraphe "Stockage". Démontez la poignée
de guidage et le guidon comme expliqué dans le paragraphe
(Montage de la poignée de guidage/du guidon).
Garantie
Cet appareil bénéficie d'une garantie de 3 ans à compter de la date
d'achat. L'appareil a été fabriqué avec soin et consciencieusement
contrôlé avant sa livraison. Veuillez conserver le ticket de caisse
en guise de preuve d'achat. Dans le cas où la garantie s'applique,
veuillez appeler le service après-vente compétent. Cette condition
doit être respectée pour assurer l'expédition gratuite de votre
marchandise.
La prestation de garantie s'applique uniquement aux vices de matériau ou
de fabrication, et non aux dégâts de transport, aux pièces d'usure ou aux
dégâts subis par des pièces fragiles telles que les commutateurs ou les
batteries. Le produit est destiné uniquement à un usage privé et ne répond
pas à un usage professionnel.
La garantie est annulée en cas de manipulation incorrecte et inappropriée,
d'usage de la force et en cas d'intervention non réalisée par notre centre
de service après-vente agréé. Vos droits légaux ne sont pas restreints par
la présente garantie.
L'exercice de la garantie ne prolonge pas la période de garantie. Cette
disposition s'applique également aux pièces remplacées ou réparées.
Signalez sans attendre toute anomalie éventuelle sur le matériel au moment
de l'achat, au plus tard deux jours après la date d'achat. Toute réparation
fera l'objet d'une facturation après expiration de la période de garantie.
Service après-vente
Elimination des erreurs
# = Panne
+ = Cause possible
* = Dépannage
#
+
*
+
*
+
L'appareil ne démarre pas.
Procédure défectueuse au démarrage.
Suivez les instructions pour démarrer
Bougie encrassée ou humide
Nettoyer la bougie d'allumage ou la remplacer par une nouvelle.
Mauvais réglage du carburateur
Contacter le service-client
#
+
*
+
*
+
L'appareil démarre mais n'a pas la pleine puissance.
Mauvais réglage du levier de starter
Régler le levier de starter sur " ".
Filtre à air encrassé
Nettoyer le filtre à air
Mauvais réglage du carburateur
Contacter le service-client
# Le moteur tourne de façon irrégulière.
+ Mauvaise distance entre les électrodes de la bougie d'allumage
* Nettoyer la bougie d'allumage et régler la distance entre les électrodes ou installer une nouvelle bougie
+ Mauvais réglage du carburateur
AVERTISSEMENT !
■ Faites réparer votre appareil exclusivement par des spécialistes
qualifiés et uniquement avec des pièces de rechange d'origine.
Vous garantissez ainsi la sécurité de l'appareil.
Service France
Tel.: 0800 919270
E-Mail: [email protected]
IAN 97786
Service Suisse
Tel.: 0842 665566 (0,08 CHF/Min., mobile max. 0,40 CHF/Min.)
E-Mail: [email protected]
IAN 97786
Heures de service de notre hotline :
du lundi au vendredi de 8 h à 20 h (HEC)
Importateur
KOMPERNASS HANDELS GMBH
BURGSTRASSE 21
44867 BOCHUM
GERMANY
www.kompernass.com
Contacter le service-client
FBS 43 B2
19
FR
CH
Mise au rebut
FR
CH
L'emballage se compose de matières recyclables que vous
pouvez mettre au rebut dans un centre de recyclage local.
L'appareil est ses accessoires se composent de différents matériaux, tels
que le métal et le plastique.
Se renseigner auprès de votre mairie ou des services de votre commune
pour connaître les possibilités de mise au rebut de votre appareil usagé.
Protection de l'environnement
■ Videz le réservoir d'essence ou d'huile avec soin et déposez votre
appareil à un point d'élimination. Les pièces en plastique et en métal
utilisées peuvent être triées et être ainsi réutilisées.
■ Déposez les huiles usagées et les résidus d'essence à un site de stockage
et ne les déversez pas dans les canalisations ou dans les égouts.
■ Déposez le matériel d'entretien pollué et les carburants dans un point
de collecte agréé.
Traduction de la déclaration de
conformité originale
Nous soussignés, KOMPERNASS HANDELS GMBH, responsables du
document : M. Semi Uguzlu, BURGSTR. 21, 44867 BOCHUM, GERMANY,
déclarons par la présente que ce produit est en conformité avec les
normes, documents normatifs et directives CE suivants :
Directive Machines
(2006 / 42 / EC)
Compatibilité électromagnétique
(2004 / 108 / EC)
Directive extérieure
(2005 / 88 / EC)
Directive sur les émissions
(2004/26/EC)
Normes harmonisées appliquées
EN ISO 11806-1: 2011
EN ISO 14982: 2009
Type / Désignation de l'appareil
Débroussailleuse thermique FBS 43 B2
Année de construction : 01 - 2014
Numéro de série : IAN 97786
Bochum, 31/10/2013
Semi Uguzlu
- Responsable qualité Sous réserve de modifications techniques à des fins d'amélioration.
20
FBS 43 B2
Indice
Introduzione . . . . . . . . . . . . . . . . . . . . . . . . . . . . . . . . . . . . . . . . . . . . . . . . . . . . . . . . . . . . . . . . . . . . . . . . . . . . . . . . . . 22
IT
CH
Uso conforme . . . . . . . . . . . . . . . . . . . . . . . . . . . . . . . . . . . . . . . . . . . . . . . . . . . . . . . . . . . . . . . . . . . . . . . . . . . . . . . . . . . . . . . . . . . . . . . . . 22
Volume della fornitura . . . . . . . . . . . . . . . . . . . . . . . . . . . . . . . . . . . . . . . . . . . . . . . . . . . . . . . . . . . . . . . . . . . . . . . . . . . . . . . . . . . . . . . . . . . 22
Dotazione . . . . . . . . . . . . . . . . . . . . . . . . . . . . . . . . . . . . . . . . . . . . . . . . . . . . . . . . . . . . . . . . . . . . . . . . . . . . . . . . . . . . . . . . . . . . . . . . . . . . 22
Dati tecnici. . . . . . . . . . . . . . . . . . . . . . . . . . . . . . . . . . . . . . . . . . . . . . . . . . . . . . . . . . . . . . . . . . . . . . . . . . . . . . . . . . . . . . . . . . . . . . . . . . . . 23
Indicazioni relative alla sicurezza . . . . . . . . . . . . . . . . . . . . . . . . . . . . . . . . . . . . . . . . . . . . . . . . . . . . . . . . . . . . . . . . . 23
Manipolazione . . . . . . . . . . . . . . . . . . . . . . . . . . . . . . . . . . . . . . . . . . . . . . . . . . . . . . . . . . . . . . . . . . . . . . . . . . . . . . . . . . . . . . . . . . . . . . . . 23
Dispositivi di sicurezza . . . . . . . . . . . . . . . . . . . . . . . . . . . . . . . . . . . . . . . . . . . . . . . . . . . . . . . . . . . . . . . . . . . . . . . . . . . . . . . . . . . . . . . . . . 24
Prima dell'uso . . . . . . . . . . . . . . . . . . . . . . . . . . . . . . . . . . . . . . . . . . . . . . . . . . . . . . . . . . . . . . . . . . . . . . . . . . . . . . . . . . . . . . . . . . . . . . . . . 25
Misure di sicurezza per maneggiare la lama da taglio . . . . . . . . . . . . . . . . . . . . . . . . . . . . . . . . . . . . . . . . . . . . . . . . . . . . . . . . . . . . . . . . . 25
Messa in funzione . . . . . . . . . . . . . . . . . . . . . . . . . . . . . . . . . . . . . . . . . . . . . . . . . . . . . . . . . . . . . . . . . . . . . . . . . . . . . . 25
Montaggio . . . . . . . . . . . . . . . . . . . . . . . . . . . . . . . . . . . . . . . . . . . . . . . . . . . . . . . . . . . . . . . . . . . . . . . . . . . . . . . . . . . . . . . . . . . . . . . . . . . 25
Indossare la tracolla . . . . . . . . . . . . . . . . . . . . . . . . . . . . . . . . . . . . . . . . . . . . . . . . . . . . . . . . . . . . . . . . . . . . . . . . . . . . 26
Funzionamento . . . . . . . . . . . . . . . . . . . . . . . . . . . . . . . . . . . . . . . . . . . . . . . . . . . . . . . . . . . . . . . . . . . . . . . . . . . . . . . . 26
Manutenzione e pulizia . . . . . . . . . . . . . . . . . . . . . . . . . . . . . . . . . . . . . . . . . . . . . . . . . . . . . . . . . . . . . . . . . . . . . . . . . 27
Ordinazione dei pezzi di ricambio. . . . . . . . . . . . . . . . . . . . . . . . . . . . . . . . . . . . . . . . . . . . . . . . . . . . . . . . . . . . . . . . . 28
Stoccaggio e trasporto . . . . . . . . . . . . . . . . . . . . . . . . . . . . . . . . . . . . . . . . . . . . . . . . . . . . . . . . . . . . . . . . . . . . . . . . . . 28
Tabella di ricerca degli errori . . . . . . . . . . . . . . . . . . . . . . . . . . . . . . . . . . . . . . . . . . . . . . . . . . . . . . . . . . . . . . . . . . . . . 29
Garanzia . . . . . . . . . . . . . . . . . . . . . . . . . . . . . . . . . . . . . . . . . . . . . . . . . . . . . . . . . . . . . . . . . . . . . . . . . . . . . . . . . . . . . 30
Assistenza . . . . . . . . . . . . . . . . . . . . . . . . . . . . . . . . . . . . . . . . . . . . . . . . . . . . . . . . . . . . . . . . . . . . . . . . . . . . . . . . . . . . 30
Importatore . . . . . . . . . . . . . . . . . . . . . . . . . . . . . . . . . . . . . . . . . . . . . . . . . . . . . . . . . . . . . . . . . . . . . . . . . . . . . . . . . . . 30
Smaltimento. . . . . . . . . . . . . . . . . . . . . . . . . . . . . . . . . . . . . . . . . . . . . . . . . . . . . . . . . . . . . . . . . . . . . . . . . . . . . . . . . . . 30
Traduzione della dichiarazione di conformità originale . . . . . . . . . . . . . . . . . . . . . . . . . . . . . . . . . . . . . . . . . . . . . . . 30
FBS 43 B2
21
DECESPUGLIATORE A MOTORE
FBS 43 B2
Introduzione
IT
CH
Congratulazioni per l'acquisto del Suo nuovo apparecchio. È stato acquistato un prodotto di alta qualità. Il manuale di istruzioni è parte integrante
di questo prodotto. Esso contiene importanti indicazioni per la sicurezza,
l'uso e lo smaltimento. Prima di utilizzare il prodotto, familiarizzarsi con
tutte le indicazioni relative ai comandi e alla sicurezza. Utilizzare l'apparecchio solo come descritto e per i campi d'impiego indicati. In caso di
cessione del prodotto a terze persone, consegnare anche tutta la relativa
documentazione.
Dotazione
Raccordo di collegamento al manico di guida
Manico di guida
Impugnatura di guida
Corda di avvio
Leva starter
Serbatoio benzina
Pompa carburante "Primer"
Coperchio alloggiamento filtro dell'aria
Interruttore ON/OFF
Leva del gas
Uso conforme
Blocco della leva del gas
Utilizzo con lama da taglio: per tagliare l'erba alta e le sterpaglie utilizzare
una lama da taglio a 4 denti, mentre per sterpaglie fitte e getti legnosi
deboli utilizzare la lama da taglio a 3 denti.
Bobina con filo da taglio
Utilizzo con bobina: per tagliare prati ed erbacce non folte.
Qualsiasi altro utilizzo non esplicitamente autorizzato nel presente manuale
di istruzioni può causare danni all'apparecchio e rappresentare un vero
pericolo per l'operatore. Rispettare sempre le limitazioni indicate nelle
istruzioni di sicurezza. Rispettare le prescrizioni nazionali che possono
prevedere limitazioni all'utilizzo della macchina. Qualunque altro impiego
o modifica della macchina è da considerarsi non conforme alla destinazione
d'uso prevista e può comportare gravi rischi di infortunio. Non previsto per
un uso professionale.
Calotta di protezione del filo da taglio
Calotta di protezione della lama da taglio
2 x vite M6
Tracolla
Lama da taglio a 4 denti
Lama da taglio a 3 denti
Supporto dell'impugnatura di guida
Vite con manopola M6
Disco di trascinamento
USI NON CONSENTITI
A causa del pericolo fisico che l'operatore corre, non utilizzare l'apparecchio
per eseguire i seguenti lavori: pulizia di sentieri o come trinciapaglia per
triturare rami di alberi e siepi. Inoltre, non utilizzare l'apparecchio per
appianare rialzamenti del terreno come per es. i cumuli di terra sollevati
dalle talpe. Per motivi di sicurezza, non utilizzare l'apparecchio come
gruppo propulsore per altri apparecchi di qualsiasi tipo. La responsabilità di
eventuali danni o lesioni conseguenti a tale comportamento è dell'operatore / utente e non del produttore.
Piastra di pressione
Volume della fornitura
Filtro dell'aria
1 decespugliatore a motore FBS 43 B2
Spina per della candela di accensione
Coperchio della piastra di pressione
Dado M10 (filettatura sinistrorsa)
Bottiglia per miscelare olio/benzina
Chiave per candele
Chiave a testa esagonale 5 mm
Chiave a testa esagonale 4 mm
Vite con manopola M6
1 manuale di istruzioni
■ Aprire la confezione ed estrarre l'apparecchio con cautela.
■ Eliminare il materiale d'imballo e i dispositivi di blocco dell'imballo
e di trasporto (se presenti).
La lama da taglio / e la bobina vengono definite per brevità nel
testo anche strumenti da taglio (come macroconcetto).
■ Verificare se la fornitura è completa.
■ Accertarsi che l'apparecchio e i relativi accessori non abbiano subito
danni nel trasporto.
■ Conservare la confezione fino alla scadenza del periodo di garanzia,
se possibile.
22
FBS 43 B2
Dati tecnici
AVVISO!
Tipo di motore:
motore a 2 tempi, raffreddamento
ad aria, cilindri cromati
Potenza motore (max):
1,35 kW / 1,8 PS
Cilindrata:
42,7 cm³
Numero di giri a vuoto del motore:
2700 - 3400 min-1
con lama da taglio:
10500 min-1
■ Il livello di vibrazioni indicato nelle presenti istruzioni è stato misurato
secondo un procedimento di misurazione conforme alla norma
EN ISO 11806-1 e può venire usato per un confronto tra vari apparecchi. Il coefficiente di emissione delle vibrazioni può anche venire
usato per una stima introduttiva dell'esposizione. Il livello di vibrazioni
cambia in base all'uso dell'elettroutensile e in alcuni casi può essere
superiore al valore indicato nelle presenti istruzioni. La sollecitazione
da vibrazioni potrebbe risultare sottostimata se l'elettroutensile viene
utilizzato regolarmente in tal modo.
con bobina:
9000 min-1
AVVERTENZA
Velocità max. di taglio con lama
da taglio:
7850 min-1
con bobina:
6750 min-1
Accensione:
elettrica
Funzionamento:
frizione centrifuga
Peso (serbatoio vuoto):
8 kg
Ø filo della circonferenza di taglio:
43 cm
Numero giri max. del motore
Ø lama da taglio della circonferenza
di taglio:
25,5 cm
Lunghezza filo:
8,0 m
Ø filo:
2,0 mm
Capacità del serbatoio:
0,85 l
Candela di accensione:
Champion RCJ7Y
Consumo di carburante
con max potenza motore:
Incertezza KWA:
96,3 dB(A)
2,5 dB
110,3 dB(A)
2,5 dB
ATTENZIONE!
■ Indossare un paraorecchi!
AVVISO!
■ Ridurre anche i rischi dovuti alle vibrazioni, per es. il rischio di vasocostrizione, interrompendo di frequente il lavoro con pause per
strofinare la superficie delle mani!
Funzionamento
Valore di emissione delle vibrazioni ah = 8,2 m / s2
Incertezza K = 1,5 m / s2
FBS 43 B2
■ L'apparecchio e il materiale d'imballo non devono venire usati da
bambini per giocare! Non permettere che i bambini giochino con
i sacchetti di plastica, le pellicole e le parti piccole! Pericolo di
soffocamento!
Manipolazione
Valori tipici del livello di rumore classificato A:
Livello di potenza acustica LWA:
ATTENZIONE!
446 g / kWh
Valore di misurazione dei rumori determinato secondo EN ISO 11806-1.
Incertezza KpA:
AVVISO!
■ Leggere tutte le indicazioni di sicurezza e le istruzioni. L'errata applicazione delle indicazioni di sicurezza può causare scosse elettriche,
incendi e / o gravi lesioni.
Conservare le indicazioni di sicurezza e le istruzioni per il
futuro.
Informazioni sul rumore e sulle vibrazioni
Livello di pressione acustica LpA:
Indicazioni relative alla sicurezza
0,6 kg / h
Consumo specifico di carburante
con max potenza motore:
■ Per una stima precisa del carico di vibrazione durante un dato
periodo di lavoro, si dovrebbe tenere conto anche dei tempi nei
quali l'apparecchio viene spento o gira, ma non è effettivamente in
funzione. Questo può ridurre chiaramente il carico di vibrazioni per
tutto il periodo di lavoro.
■ Per proteggersi indossare l'abbigliamento da lavoro in dotazione, come
pantaloni lunghi, scarpe antinfortunistiche, guanti protettivi resistenti,
un casco protettivo, una maschera per proteggere il viso o occhiali per
proteggere gli occhi e tappi per le orecchie o un'altra protezione per
l'udito contro il rumore.
■ Solo le persone debitamente addestrate e gli adulti possono utilizzare
l'apparecchio ed eseguire le regolazioni e la manutenzione.
■ Se non si ha ancora dimestichezza con l'apparecchio, esercitarsi a
motore spento.
■ Assicurarsi che le viti e gli elementi di fissaggio siano ben stretti. Non
utilizzare mai l'apparecchio se non è regolato a dovere o assemblato
completamente e in modo sicuro.
■ Aprire lentamente il serbatoio della benzina per scaricare l'eventuale
pressione formatasi sotto il coperchio del serbatoio. Per evitare il pericolo d'incendio, allontanarsi di almeno 3 metri dall'area di rifornimento
carburante prima di avviare l'apparecchio.
■ Tenere l'apparecchio sempre con due mani, stringendo le impugnature
tra il pollice e le dita.
■ Postura di lavoro: non utilizzare mai l'apparecchio in posizione scomoda,
in mancanza di equilibrio, con le braccia tese o con una sola mano.
■ Assicurarsi sempre di essere in posizione stabile.
■ Utilizzare sempre la tracolla in dotazione.
■ Assicurarsi che le impugnature siano asciutte e pulite e che non vi siano
rimasti residui di benzina.
■ Non utilizzare l'apparecchio in presenza di persone o animali nelle
immediate vicinanze. Mantenere una distanza di almeno 15 metri tra
l'operatore ed eventuali altre persone o animali durante i lavori di falciatura. Mantenere una distanza di almeno 30 metri tra l'operatore ed eventuali altre persone o animali durante i lavori di falciatura fino al suolo.
23
IT
CH
Spiegazioni delle targhette di avviso sull'apparecchio!
Attenzione! Prima della messa in funzione, leggere il
manuale di istruzioni!
Indossare i paraorecchi!
Indossare occhiali di protezione!
Indossare calzature robuste!
Indossare guanti di protezione!
Indossare una protezione per il capo!
Proteggere l'apparecchio dalla pioggia o dall'umido!
ATTENZIONE!
Prestare attenzione a eventuali oggetti proiettati in aria!
Indicazioni aggiuntive di sicurezza
Prima di effettuare interventi di manutenzione, spegnere
l'apparecchio e staccare la spina della candela di
accensione!
La distanza tra la macchina ed eventuali terze persone
deve essere di almeno 15 metri!
Lo strumento da taglio (lama da taglio / filo da taglio)
è ancora in funzione!
■ Non toccare lo scarico.
■ Utilizzare l'apparecchio solo per lo scopo previsto, cioè per tagliare
l'erba ed effettuare lavori di falciatura.
■ Non utilizzare l'apparecchio ininterrottamente per un periodo
prolungato, bensì rispettare pause regolari.
■ Non azionare l'apparecchio sotto l'effetto di alcol o droga.
■ Utilizzare l'apparecchio solo se è in buono stato e se è installata
l'apposita calotta di protezione.
■ Qualunque modifica del prodotto potrebbe mettere in pericolo la
sicurezza personale e invalidare la garanzia del produttore.
Attenzione: parti surriscaldate. Mantenere la distanza!
Aggiungere il grasso ogni 20 ore di esercizio (grasso
fluido per ingranaggi)
20 h
■ Non utilizzare mai l'apparecchio nelle vicinanze di liquidi o gas
infiammabili, in spazi chiusi o all'aperto. Così facendo si potrebbero
provocare esplosioni e/o incendi.
Attenzione a eventuali rinculi!
■ Non utilizzare altri strumenti da taglio. Per la propria sicurezza
personale, utilizzare solo gli accessori e gli apparecchi addizionali
indicati nelle istruzioni per l'uso. L'uso di strumenti da taglio o accessori diversi da quelli consigliati nel presente manuale di istruzioni
potrebbe causare lesioni all'operatore.
Attenzione: la benzina è facilmente infiammabile!
Pericolo di esplosione! Non rovesciare il carburante!
Attenzione! Pericolo di soffocamento!
Dispositivi di sicurezza
Attenzione! Vapori tossici di biossido di carbonio!
Non utilizzare l'apparecchio in ambienti chiusi!
Per lavorare con l'apparecchio, occorre montare l'apposita calotta protettiva di plastica per il funzionamento con lama da taglio o filo per evitare
che eventuali oggetti vengano proiettati nell'aria.
Attenzione! Pericolo di lesioni causate dalla lama da
taglio! Tenere a distanza mani e piedi!
AVVISO!
114
■ Non effettuare mai lavori di falciatura se nelle vicinanze sono presenti
altre persone, in particolare bambini e animali.
■ Mantenere una distanza di sicurezza di almeno 15 m. Se la distanza
si riduce, spegnere immediatamente l'apparecchio.
Indicazione sul livello di potenza acustica LWA in dB.
Indicazione del rapporto di miscela benzina-olio.
Divieto di fuochi, fiamme libere e fumo!
ATTENZIONE! PERICOLO DI AVVELENAMENTO!
■ Gas di scarico, carburanti e lubrificanti sono tossici. Non inalare i
gas di scarico.
Avvertenza! Filettatura sinistrorsa.
1
Avvertenza! Montare l'impugnatura di guida.
2
IT
CH
■ Prima del lavoro verificare che sul terreno non siano presenti oggetti
come parti di metallo, bottiglie, pietre o simili che potrebbero venire
proiettati nell'aria causando lesioni all'operatore.
■ Portare la bobina all'altezza desiderata. Evitare il contatto della bobina
con piccoli oggetti (per es. pietre).
■ Quando l'apparecchio è in funzione, tenere sempre la bobina sul
terreno.
■ Quando si esegue la falciatura in pendenza, rimanere sempre al di
sotto dello strumento da taglio. Non tagliare o potare mai su una
collina o un pendio con fondo liscio e scivoloso.
■ Prima di accendere il motore, accertarsi che la bobina non sia a
contatto con ostacoli di alcun tipo.
■ Non utilizzare mai l'apparecchio se risulta danneggiato o difettoso.
■ Potare o tagliare sempre nel campo di velocità superiore. All'inizio
della falciatura o della potatura non far girare il motore a un basso
numero di giri.
■ Se per errore l'apparecchio dovesse entrare in contatto con un oggetto
solido, spegnere immediatamente il motore e verificare che l'apparecchio
non abbia subito danni.
■ Spegnere l'apparecchio prima di riporlo.
■ Prima del lavoro, spegnere sempre il motore dello strumento da taglio.
min-1
Numero di giri max. al minuto.
max. 9000
24
FBS 43 B2
■ Fare il rifornimento di benzina solo all'aperto e non fumare.
■ Rilasciando la leva del gas, la lama da taglio si arresta gradualmente.
Una lama in fase di arresto graduale potrebbe causare lesioni da taglio
a voi o alle persone nei dintorni. Prima di intraprendere qualsiasi lavoro
con la lama da taglio, spegnere il motore e accertarsi che la lama si sia
fermata.
■ Non aprire il tappo del serbatoio o aggiungere benzina quando
il motore è in funzione o se l'apparecchio è bollente.
Messa in funzione
AVVISO!
■ La benzina è altamente infiammabile. Conservare la benzina solo
negli appositi contenitori.
■ Se si verifica una fuoriuscita di benzina, non cercare di avviare il
motore, bensì allontanare l'apparecchio dalla superficie sporca di
benzina. Evitare ogni tentativo di accensione fino alla completa
evaporazione dei vapori della benzina.
■ Per motivi di sicurezza, sostituire il serbatoio della benzina e il tappo
del serbatoio nel caso siano danneggiati.
Prima dell'uso
ATTENZIONE!
■ Durante i lavori di falciatura, indossare sempre scarpe antinfortunistiche antiscivolo e l'apposito abbigliamento protettivo come guanti
protettivi, casco, maschera oppure occhiali protettivi e una protezione
per l'udito.
■ Verificare il terreno sul quale viene utilizzato l'apparecchio e rimuovere
eventuali oggetti che potrebbero venire travolti e proiettati in aria.
■ Prima dell'uso e dopo un'eventuale caduta o colpo effettuare sempre
un controllo visivo per verificare se gli strumenti da taglio, i bulloni di
fissaggio o l'intera unità di taglio sono eventualmente danneggiati.
Strumenti da taglio e bulloni di fissaggio usurati o danneggiati
devono venire sostituiti.
■ Prima dell'uso, effettuare sempre un controllo visivo per verificare
se gli strumenti da taglio sono usurati o danneggiati. Per evitare un
eventuale sbilanciamento, sostituire gli strumenti da taglio e i bulloni
di fissaggio ogni volta che presentano segni di usura o danni.
Limitare al minimo la produzione di rumori e vibrazioni!
Montaggio dell'impugnatura di guida (Figg. 3a - 3c)
■ Montare l'impugnatura di guida come indicato nelle Figg. 3a - 3c.
L'impugnatura di guida deve essere allineata come indicato nelle
Figg. 3a - 3c. Serrare la vite con manopola solo dopo aver regolato
la tracolla nella posizione ottimale di lavoro (vedere il capitolo
Mettere la tracolla / impostazione dell'altezza di taglio).
■ Per regolare l'impugnatura di guida alla distanza corretta dal corpo
e garantire così anche una distanza sufficiente tra il motore e l'operatore,
rilasciare le due viti sul lato inferiore dell'impugnatura di guida
(vedere Fig. 8j).
Montaggio del manico di guida (4a - 4c)
■ Premere la leva di arresto e spingere il manico di guida (vedere
Fig. 4a) nel raccordo di collegamento della leva di arresto .
Fare attenzione che gli alberi motore all'interno del manico di guida
scorrano l'uno nell'altro e, se necessario, ruotare leggermente la
bobina / la lama da taglio / . Il gancio della leva di arresto
deve scattare in posizione nel foro . Stringere forte la vite con
manopola , come indicato nella Figura 4c.
Montare la calotta di protezione della lama da taglio
AVVISO!
■ Per lavorare con la lama da taglio, montare prima la calotta di
protezione della lama da taglio . Fissare la calotta di protezione
della lama da taglio con 2 viti sul manico di guida , come
indicato nella Figura 5.
■ Utilizzare solo apparecchi in perfetto stato.
Montaggio/sostituzione della lama da taglio
■ Effettuare periodicamente la manutenzione e la pulizia dell'apparecchio.
■ Montare/sostituire la lama da taglio
6a - 6g.
■ Adeguare il proprio modo di lavorare all'apparecchio.
■ Non sovraccaricare l'apparecchio.
■ All'occorrenza far verificare l'apparecchio.
■ Spegnere l'apparecchio quando non lo si utilizza.
■ Indossare guanti protettivi.
■ Bloccare la lama da taglio
Fig. 6c).
/
■ Inserire la piastra di pressione
(vedere Fig. 6d).
/ , come indicato nelle figure
sul disco di trascinamento (vedere
oltre la filettatura dell'albero dentato
■ Inserire il coperchio della piastra di pressione
Misure di sicurezza per maneggiare la lama da
taglio
■ Le persone che si trovano nei dintorni possono restare accecate o subire
lesioni. Mantenere una distanza di almeno 15 metri in tutte le direzioni
tra sé ed eventuali altre persone o animali.
■ Non utilizzare l'apparecchio se non sono correttamente installati tutti
i componenti della lama da taglio.
■ In presenza di oggetti la lama da taglio potrebbe venire bruscamente
proiettata in aria. Questo potrebbe comportare lesioni a braccia e
gambe. Se l'apparecchio urta oggetti esterni, arrestare immediatamente
il motore e aspettare che la lama da taglio si fermi completamente.
Verificare l'eventuale presenza di danni sulla lama da taglio. Sostituire
sempre la lama da taglio se presenta deformazioni o crepe.
■ La lama da taglio può proiettare in aria con forza eventuali oggetti
e anche la terra. Questo potrebbe causare accecamento o lesioni.
Indossare protezioni per occhi, viso e gambe. Prima di inserire la lama
da taglio, rimuovere eventuali oggetti dall'area di lavoro.
FBS 43 B2
IT
CH
Montaggio
(vedere Fig. 6e).
■ Cercare il foro del disco di trascinamento, farlo coincidere con la tacca
sottostante e ribattere con la chiave a testa esagonale , infine serrare il
dado con la chiave per candele (vedere Fig. 6f + 6g).
AVVERTENZA! Filettatura sinistrorsa!
■ La fornitura comprende lame da taglio / con rispettivi cappucci
di plastica. Rimuovere questi cappucci prima dell'utilizzo e applicarli
di nuovo nel caso di non utilizzo.
ATTENZIONE! SPIGOLI AFFILATI, INDOSSARE GUANTI
PROTETTIVI
■ Attenzione! Montare la calotta di protezione della bobina
calotta di protezione della lama da taglio .
sulla
■ Per lavorare con il filo da taglio si deve montare anche la calotta di
protezione del filo da taglio . Per il montaggio della calotta protettiva
del filo da taglio seguire le indicazioni della Figura 7a.
■ Assicurarsi che la calotta di protezione del filo da taglio scatti correttamente in posizione . Il lato interno della calotta di protezione del filo
da taglio presenta una lama (vedere Fig. 7a). La lama è coperta
da una pellicola protettiva (vedere Fig. 7a.).
■ Prima di iniziare il lavoro rimuovere la pellicola protettiva e applicarla
di nuovo alla fine del lavoro.
25
Montaggio/sostituzione della bobina
■ Montare/sostituire la bobina
come indicato nella Figura 7c.
■ Cercare il foro del disco di trascinamento, farlo coincidere con la tacca
incavatura sottostante e bloccare con la chiave a testa esagonale ,
infine avvitare la bobina sulla filettatura .
AVVERTENZA! Filettatura sinistrorsa!
IT
CH
Indossare la tracolla
AVVERTENZA
■ Per garantire un lavoro senza fatica, si possono eseguire le regolazioni nei seguenti punti. Le regolazioni possono variare a seconda
della statura.
■ Prima di iniziare il lavoro, regolare la tracolla e l'impugnatura in base
alla propria statura.
■ Bilanciare il decespugliatore a benzina con lo strumento da taglio
montato, in modo che decespugliatore a benzina non sia a contatto
con le mani e lo strumento sia sollevato solo di poco dal suolo.
1.) Indossare la tracolla e unire congiuntamente le due parti della tracolla
fino a sentire uno scatto (vedere le Figg. 8a - 8b).
2.) Tirare la tracolla come indicato nella Figura 8c per centrare la tracolla
sul corpo e adattarla opportunamente al torace.
3.) Per tendere le due tracolle, tirarle entrambe come indicato nella Fig. 8d.
4.) Per regolare la posizione corretta del decespugliatore a benzina sulla
tracolla, tirare la tracolla come indicato nella Fig. 8e.
5.) Agganciare il moschettone (vedere le Figg. 8f - 8h) e fissarlo con
l'elemento rosso del meccanismo ad apertura rapida.
6.) A questo punto prendere il decespugliatore a benzina e agganciarlo
come indicato nella Figura 8i, con il supporto nel moschettone .
Il supporto può anche venire rilasciato e spostato con una vite
per regolare il centraggio ottimale del decespugliatore a benzina.
7.) L'impugnatura di guida può venire regolata anche per mezzo di
2 viti sul lato inferiore che permettono di centrare l'impugnatura di
guida .
Regolazione dell'altezza di taglio
■ Indossare la tracolla
come indicato nelle Figure 8a - 8c.
■ Agganciare l'apparecchio alla tracolla (vedere Fig. 8d).
■ Impostare la posizione di lavoro e di taglio ottimale con le varie
regolazioni della tracolla (vedere Fig. 8e).
■ Per definire la lunghezza ottimale della tracolla, muoversi oscillando
un paio di volte di seguito senza avviare il motore (vedere Fig. 9a).
■ La tracolla è dotata di un meccanismo ad apertura rapida. Per liberarsi
velocemente dall'apparecchio, tirare l'elemento rosso della tracolla
(vedere Fig. 8k).
ATTENZIONE!
■ Quando si lavora con l'apparecchio utilizzare sempre la tracolla.
Indossare la tracolla subito dopo aver acceso il motore e mentre gira
ancora a vuoto. Spegnere il motore prima di togliere la tracolla.
Carburante e olio
ATTENZIONE!
■ Non utilizzare miscela di carburante che è stata stoccata per più di
90 giorni.
Carburanti consigliati:
■ Utilizzare solo una miscela di benzina senza piombo e olio speciale
per motore a 2 tempi. Preparare la miscela di carburante secondo la
tabella di miscelazione del carburante.
■ Versare poi la giusta quantità di benzina e di olio per motore a 2 tempi
nella bottiglia di miscelazione in dotazione (vedere la tabella di miscelazione del carburante). Agitare bene il contenitore.
Tabella di miscelazione del carburante
Procedimento di miscelazione: 40 parti di benzina e 1 parte
di olio
Benzina
Olio per motore a 2 tempi
1 litro
25 ml
5 litri
125 ml
Funzionamento
ATTENZIONE!
■ Rispettare le prescrizioni di legge relative all'ordinamento sulla
protezione antirumore.
Prima di mettere in funzione l'apparecchio, eseguire sempre i seguenti
controlli:
■ Tenuta ermetica del sistema di alimentazione del combustibile.
■ Perfetto stato e integrità dei dispositivi di protezione e dell'apparecchiatura di taglio.
■ Stabilità di tutti i collegamenti a vite.
■ Facilità di manovra di tutte le parti mobili.
Avvio a motore caldo
ATTENZIONE!
■ Non far mai rimbalzare indietro la corda d’avvio. Questo può
causare danni.
1.) Riempire il serbatoio. (Vedere anche il paragrafo "Carburante e olio").
2.) Premere 6 volte la pompa del carburante (Primer).
3.) Impostare l'interruttore ON/OFF su "I".
4.) Posizionare la leva starter su " ".
5.) Tenere ben fermo l'apparecchio ed estrarre la corda di avvio solo
fino al primo segno di resistenza. Infine tirare velocemente la corda di
avvio . Avviare l'apparecchio.
6.) Se il motore non si avvia, ripetere i passaggi 4–5.
7.) Non appena il motore è in funzione, premere la leva del gas , per
far scattare lo starter automatico.
Se dopo vari tentativi il motore non si avvia, leggere il paragrafo "Tabella
di ricerca errori".
ATTENZIONE!
■ Tirare la corda di avvio sempre tenendola diritta verso l'esterno.
Stringere saldamente la presa della corda di avvio se questa
si ritira di nuovo. Non lasciare mai che la corda di avvio torni
indietro troppo velocemente.
AVVERTENZA
■ In presenza di temperature esterne elevate può accadere che si
debba avviare senza starter anche a motore freddo!
26
FBS 43 B2
Avvio a motore caldo
Taglio vicino ad alberi / recinti / basamenti (con bobina)
(L'apparecchio è rimasto fermo per meno di 15-20 minuti)
1.) Impostare l'interruttore ON/OFF
2.) Posizionare la leva starter
su "
su "I".
".
3.) Tenere ben fermo l'apparecchio ed estrarre la corda di avvio solo
fino al primo segno di resistenza. Infine tirare velocemente la corda di
avvio . L'apparecchio dovrebbe avviarsi dopo 1-2 strappi. Se l'apparecchio non si avvia dopo 6 strappi, ripetere i passaggi 1-7 e ripartire
da "Avvio a motore freddo".
Arresto del motore
Sequenza dell'arresto di emergenza
Se occorre arrestare immediatamente l'apparecchio, portare l'interruttore
ON/OFF su "0".
Sequenza normale
■ Rilasciare la leva del gas e attendere fino a quando il motore non
gira alla velocità di funzionamento a vuoto. Poi impostare l'interruttore
ON/OFF su "0".
ATTENZIONE!
■ Durante il funzionamento a vuoto la lama da taglio deve rimanere
ferma. Se la lama da taglio dovesse girare, regolare il carburatore!
Istruzioni operative
Prima che l'apparecchio venga usato, istruire tutti i tecnici a motore spento
(vedere Figg. 9a - 9c).
Allungamento del filo da taglio
Per allungare il filo da taglio, far girare il motore a tutto gas e toccare
appena il suolo con la bobina . Il filo si allungherà automaticamente.
La lama sulla calotta di protezione del filo da taglio accorcia il filo alla
lunghezza ammessa (vedere Fig. 9d).
ATTENZIONE!
I residui di prato, erba o sterpaglie si impigliano sotto la calotta di protezione della lama da taglio .
■ Eliminare i residui a motore spento con una spatola o un attrezzo
simile.
Vari procedimenti di taglio
AVVERTENZA
■ Se il filo entra in contatto con alberi, pietre, muretti di pietra o
basamenti, si usura o si sfrangia. Se il filo batte contro la rete di un
recinto, si spezza.
ATTENZIONE!
■ Non utilizzare l'apparecchio per rimuovere eventuali oggetti presenti
sul sentiero! Il decespugliatore a benzina è un apparecchio potente,
pietrisco o altri oggetti di piccole dimensioni potrebbero quindi
venire proiettati in aria per più di 15 metri e causare lesioni o danni
ad auto, case e finestre.
Inceppamento
Se lo strumento da taglio si blocca, spegnere immediatamente il motore.
Liberare l'apparecchio dall'erba e dalle sterpaglie prima di rimetterlo in
funzione.
Evitare contraccolpi
Mentre si lavora con la lama da taglio, sussiste il rischio di contraccolpi se
la lama incontra ostacoli fissi (fusti d'albero, rami, ceppi d'albero, pietre o
simili). L'apparecchio viene sbalzato nella direzione contraria al senso di
rotazione dello strumento da taglio. La conseguenza può essere la perdita
di controllo dell'apparecchio. Non utilizzare la lama da taglio in prossimità
di recinti, pali metallici, pietre di confine o fondazioni. Per tagliare deboli
getti di legno, posizionare l'apparecchio come indicato nella Fig. 9e al
fine di evitare contraccolpi.
Manutenzione e pulizia
Pulizia
AVVERTENZA
■ Dopo l'uso pulire sempre a fondo l'apparecchio.
■ Prima di effettuare gli interventi di manutenzione, spegnere sempre
l'apparecchio e staccare la spina della candela di accensione.
■ Pulire a fondo l'apparecchio con un panno umido e un po' di detersivo.
Assicurarsi che le parti interne dell'apparecchio non vadano a contatto
con acqua.
Sostituzione della bobina / del filo da taglio
Potatura / falciatura (lama da taglio se necessario con
bobina)
1.) La bobina deve venire smontata come indicato nel paragrafo Sostituzione della bobina / del filo. Comprimere la bobina (vedere la
Fig. 12a) e togliere uno dei due gusci della sede (vedere Fig. 12b).
■ Far oscillare l'apparecchio muovendolo come fosse una falce (vedere
Fig. 9a).
2.) Rimuovere il piatto porta-bobina
Figg. 12c + 12d).
■ Tenere lo strumento di taglio parallelo al terreno e definire l'altezza di
taglio desiderata.
3.) Rimuovere l'eventuale filo da taglio ancora presente.
Potatura bassa (con bobina)
4.) Ripiegare al centro il nuovo filo da taglio e agganciare il passante
così creato nella cavità del piatto portabobina (vedere Fig. 12d).
■ Tenere l'apparecchio sopra il terreno con una leggera inclinazione
(vedere Fig. 9b). Tagliare sempre lontano da sé. Non tirare a sé
l'apparecchio.
Falciatura (con bobina):
■ Durante la falciatura si strappa tutta la vegetazione fino al suolo.
A tale scopo inclinare la bobina di 30 gradi verso destra. Posizionare
l'impugnatura nella posizione desiderata (vedere Fig. 9c).
dalla sede della bobina (vedere
5.) Avvolgere il filo ben teso in senso antiorario. Il piatto portabobina
separa le due metà del filo da taglio (vedere Fig. 12e).
6.) Agganciare gli ultimi 15 cm delle due estremità del filo nel portafilo
del piatto portabobina (vedere Fig. 12f).
7.) Guidare le due estremità del filo attraverso le asole metalliche nella
sede della bobina (vedere Fig. 12f).
8.) Premere il piatto portabobina nella sede della bobina (vedere Fig. 12f).
9.) Ricongiungere nuovamente i due gusci della sede.
FBS 43 B2
27
IT
CH
10.) Tirare velocemente e con forza le due estremità del filo per liberarle
dal portafilo (vedere Fig. 12g).
Regolazione del cavo acceleratore
11.) Tagliare il filo residuo a circa 13 cm. Questa operazione riduce il
carico sul motore durante l'avvio e nella fase di riscaldamento.
IT
CH
12.) Rimontare la bobina (vedere il capitolo Montaggio/sostituzione della
bobina). Se la bobina viene cambiata completamente, saltare i Punti
da 3 a 6.
Manutenzione del filtro dell'aria
Per questo motivo è indispensabile eseguire controlli periodici. Il filtro
dell'aria deve venire controllato e all'occorrenza pulito ogni 25 ore di
esercizio.
3.) Pulire il filtro dell'aria
compressa).
(vedere Fig. 10a).
(vedere Figg. 10b + 10c).
■ Allentare di alcuni giri il controdado (vedere Fig. 13a). Svitare la
vite di centraggio (vedere Fig. 13a) fino a quando il cursore del
carburatore non è totalmente aperto, tenendo l'acceleratore completamente premuto (vedere Fig. 13b).
■ Stringere di nuovo il controdado
battendolo o soffiandoci sopra (con aria
.
Regolazione del minimo
ATTENZIONE!
4.) Per l'assemblaggio procedere in senso inverso.
■ Regolazione del minimo nello stato di funzionamento a caldo.
ATTENZIONE!
■ Non pulire mai il filtro dell'aria con benzina o solventi infiammabili.
Manutenzione delle candele
1.) Estrarre la spina della candela di accensione
■ Verificare dapprima se il carburatore è completamente aperto tenendo
la leva del gas premuta.
Per regolare il cavo acceleratore sono necessarie le seguenti operazioni:
Se l'aria è molto carica di polvere, verificare più spesso il filtro dell'aria.
2.) Estrarre il filtro dell'aria
AVVERTENZA
È il caso in cui il cursore del carburatore (vedere Fig. 13b) è completamente aperto con l'acceleratore completamente azionato. La Figura 13a
mostra la corretta regolazione. Se il cursore del carburatore non è aperto
completamente, occorre un'ulteriore regolazione.
I filtri dell'aria sporchi riducono la potenza del motore a causa del ridotto
apporto di aria al carburatore.
1.) Rimuovere il coperchio della sede del filtro dell'aria
Se dopo un certo tempo non si raggiunge il numero di giri massimo
dell'apparecchio e si escludono tutte le altre cause riportate nel paragrafo
"Eliminazione dei guasti", potrebbe rendersi necessaria una regolazione
del cavo acceleratore.
(vedere Fig. 11a).
2.) Svitare la candela di accensione con l'apposita chiave in dotazione
3.) Per l'assemblaggio procedere in senso inverso.
Distanza degli elettrodi = 0,6 mm (distanza tra gli elettrodi tra i quali si
genera la scintilla). Serrare la candela di accensione a 12 - 15 Nm con
la chiave dinamometrica (in vendita nei negozi specializzati). Eseguire la
prima verifica delle candele dopo 10 ore di funzionamento e all'occorrenza
pulirle con una spazzola con fili di rame.
Eseguire la manutenzione successiva dopo 50 ore di funzionamento.
Affilatura della lama nella calotta di protezione
Con il tempo, la lama presente nella calotta di protezione potrebbe
smussarsi (vedere Fig. 7a). In questo caso, svitare le 2 viti che fissano la
lama della calotta di protezione alla calotta di protezione del filo da
taglio . Serrare la lama in una morsa. Affilare la lama con una mola
abrasiva e assicurarsi di mantenere l'angolatura del bordo di taglio.
Affilare in una sola direzione.
Regolazioni del carburatore
Per tutti i lavori sul carburatore occorre innanzitutto smontare la copertura
della sede del filtro dell'aria , come mostrato in Fig. 10a.
.
Se l'apparecchio con la leva del gas non azionata si spegne e si escludono tutte le altre cause riportate nel paragrafo "Eliminazione dei guasti",
occorre un'ulteriore regolazione del minimo. A tal fine ruotare la vite del
minimo (vedere Fig. 5a) in senso orario fino a quando l'apparecchio
non gira al minimo. Se il minimo è talmente alto da far girare anche lo
strumento da taglio, va ridotto con una rotazione a sinistra della vite del
minimo, in modo che lo strumento da taglio non giri più.
Lubrificazione degli ingranaggi
■ Rabboccare il grasso fluido per ingranaggi ogni 20 ore di esercizio
(circa 10 g). Aprire a tal fine la vite (vedere Fig. 7c).
Ordinazione dei pezzi di ricambio
Ordinazione dei pezzi di ricambio
Per ordinare i pezzi di ricambio si devono fornire i seguenti dati:
■ tipo di apparecchio
■ codice dell'apparecchio
■ numero ID dell'apparecchio
Per i prezzi aggiornati e maggiori informazioni consultare:
www.kompernass.com
Stoccaggio e trasporto
■ Stoccare l'apparecchio in un luogo sicuro.
■ Stoccare l'apparecchio e gli accessori in un luogo sicuro e protetto
da fiamme libere e da fonti di calore/accensione come riscaldatori a
ricircolo di gas, asciugabiancheria, forni a olio o radiatori portatili, ecc.
■ Per lo stoccaggio non lasciare residui di erba sulla calotta di protezione
della lama da taglio , sulla bobina o sul motore.
■ Prima di eseguire gli interventi di manutenzione, spegnere sempre
l'apparecchio e staccare la spina della candela di accensione .
28
FBS 43 B2
Stoccaggio dell'apparecchio
Tabella di ricerca degli errori
Qualora l'apparecchio venga stoccato per più di 30 giorni deve essere
disposto in posizione verticale. In caso contrario il carburante residuo nel
carburatore evapora e lascia un fondo gommoso. Questo potrebbe rendere
difficile l'avvio e comportare costosi lavori di riparazione.
1.) Rimuovere il coperchio del serbatoio per far fuoriuscire l'eventuale pressione nel serbatoio della benzina . Svuotare con cautela il serbatoio
della benzina .
2.) Avviare il motore e lasciarlo girare fino a quando non si ferma per
rimuovere il carburante dal carburatore.
3.) Lasciar raffreddare il motore per circa 10 minuti.
# = Guasto
+ = Possibile causa
* = Eliminazione dei guasti
#
+
*
+
*
+
L'apparecchio non si accende
Procedura di avvio errata
Seguire le istruzioni per l'avvio
Candela di accensione arrugginita o umida
Pulire la candela di accensione o sostituirla con una nuova
Regolazione errata del carburatore
4.) Rimuovere la candela di accensione (vedere capitolo Manutenzione
delle candele).
Contattare il servizio clienti
5.) Aggiungere nella camera di combustione 1 cucchiaino di olio per motore
a 2 tempi. Tirare più volte la corda di avvio per ungere di olio tutte
le parti meccaniche. Applicare di nuovo la candela di accensione.
# L'apparecchio si accende, ma non funziona al 100%
della sua potenza
+ Regolazione errata della leva starter
* Impostare la leva starter su " "
+ Filtro aria sporco
* Pulire il filtro dell'aria
+ Regolazione errata del carburatore
AVVERTENZA
■ Stoccare l'apparecchio in un luogo asciutto e lontano da possibili
fonti di accensione.
Nuova messa in funzione
1.) Rimuovere la candela di accensione (vedere capitolo Manutenzione
delle candele).
2.) Per rimuovere eventuale olio in eccesso dalla camera di combustione,
tirare rapidamente la corda di avvio .
3.) Pulire la candela di accensione e verificare che gli elettrodi sulla candela siano alla distanza giusta.
4.) Riempire il serbatoio della benzina
"Carburante e olio".
. Vedere anche il paragrafo
IT
CH
Contattare il servizio clienti
# Il motore gira in modo irregolare
+ Distanza errata degli elettrodi della candela di accensione
* Pulire la candela di accensione e regolare la distanza degli elettrodi
o montare una nuova candela
+ Regolazione errata del carburatore
Contattare il servizio clienti
Trasporto
■ Se si desidera trasportare l'apparecchio, svuotare il serbatoio della
benzina come descritto nel paragrafo "Conservazione". Smontare
l'impugnatura di guida e il manico di guida come spiegato nel
paragrafo (Montaggio dell'impugnatura di guida / manico di guida).
FBS 43 B2
29
IT
CH
Garanzia
Smaltimento
Questo apparecchio è garantito per tre anni a partire dalla data
di acquisto. L'apparecchio è stato prodotto con cura e debitamente
collaudato prima della consegna. Conservare lo scontrino come
prova di acquisto. Nei casi contemplati dalla garanzia, mettersi
in comunicazione telefonicamente con il centro di assistenza più
vicino. Solo in tal modo è possibile garantire una spedizione
gratuita della merce.
L'imballaggio è composto di materiali ecocompatibili, che
possono essere smaltiti tramite gli appositi centri di raccolta
e riciclaggio.
L'apparecchio e i suoi accessori sono in diversi materiali, come ad esempio
metallo e plastiche.
La prestazione della garanzia vale solo per difetti del materiale o di
fabbricazione, ma non per i danni da trasporto, danni alle parti soggette
a usura o alle parti fragili, come per es. interruttori o accumulatori.
Il prodotto è destinato esclusivamente all'uso domestico e non a quello
commerciale.
Tutela dell'ambiente
La garanzia decade in caso di impiego improprio o manomissione, uso
della forza e interventi non eseguiti dalla nostra filiale di assistenza
autorizzata. Questa garanzia non costituisce alcun limite ai diritti legali
del consumatore.
■ Portare l'olio esausto e i residui di benzina in un centro di smaltimento
e non svuotarli nella canalizzazione o nella rete di scarico.
Il periodo di garanzia non viene prolungato da interventi in garanzia. Ciò
vale anche per le parti sostituite e riparate. I danni e difetti eventualmente
presenti già all'atto dell'acquisto devono venire comunicati immediatamente
dopo il disimballo, e comunque entro e non oltre due giorni dalla data di
acquisto. Le riparazioni eseguite dopo la scadenza del periodo di garanzia
sono a pagamento.
Traduzione della dichiarazione di
conformità originale
Assistenza
AVVISO!
■ Fare riparare l'apparecchio solo da personale qualificato specializzato e solo con pezzi di ricambio originali. In tal modo si garantisce
la sicurezza dell'apparecchio.
Assistenza Italia
Tel.: 02 36003201
E-Mail: [email protected]
IAN 97786
Service Suisse
Tel.: 0842 665566 (0,08 CHF/Min., mobile max. 0,40 CHF/Min.)
E-Mail: [email protected]
IAN 97786
Disponibilità della hotline telefonica:
dal lunedì al venerdì dalle 8.00 alle 20.00 (CET)
Per lo smaltimento dell'apparecchio usato, informarsi presso l'amministrazione comunale o municipale.
■ Svuotare con cautela il serbatoio della benzina e dell'olio e portare
l'apparecchio in un centro di raccolta. I componenti di plastica e
metallo usati possono essere smaltiti separatamente e quindi essere
riutilizzati.
■ Portare il materiale sporco per la manutenzione e i mezzi di esercizio
in un apposito centro di raccolta.
La KOMPERNASS HANDELS GMBH, responsabile della documentazione:
Sig. Semi Uguzlu, BURGSTR. 21, 44867 BOCHUM, GERMANY, dichiara
con la presente che questo prodotto è conforme alle seguenti norme,
ai documenti normativi e alle direttive CE:
Direttiva macchine
(2006/42/EC)
Compatibilità elettromagnetica
(2004/108/EC)
Direttiva Outdoor
(2005/88/EC)
Direttiva sulle emissioni
(2004/26/EC)
Norme armonizzate utilizzate
EN ISO 11806-1: 2011
EN ISO 14982: 2009
Tipo / contrassegno apparecchio
Decespugliatore a motore FBS 43 B2
Anno di produzione: 01 - 2014
Numero di serie: IAN 97786
Importatore
KOMPERNASS HANDELS GMBH
BURGSTRASSE 21
Bochum, 31/10/2013
44867 BOCHUM
GERMANY
Semi Uguzlu
www.kompernass.com
- Direttore qualità Con riserva di modifiche tecniche volte al miglioramento del prodotto.
30
FBS 43 B2
Inhoud
Inleiding . . . . . . . . . . . . . . . . . . . . . . . . . . . . . . . . . . . . . . . . . . . . . . . . . . . . . . . . . . . . . . . . . . . . . . . . . . . . . . . . . . . . . . 32
Gebruik in overeenstemming met bestemming . . . . . . . . . . . . . . . . . . . . . . . . . . . . . . . . . . . . . . . . . . . . . . . . . . . . . . . . . . . . . . . . . . . . . . . . 32
Inhoud van het pakket . . . . . . . . . . . . . . . . . . . . . . . . . . . . . . . . . . . . . . . . . . . . . . . . . . . . . . . . . . . . . . . . . . . . . . . . . . . . . . . . . . . . . . . . . . . 32
NL
Uitrusting . . . . . . . . . . . . . . . . . . . . . . . . . . . . . . . . . . . . . . . . . . . . . . . . . . . . . . . . . . . . . . . . . . . . . . . . . . . . . . . . . . . . . . . . . . . . . . . . . . . . . 32
Technische gegevens . . . . . . . . . . . . . . . . . . . . . . . . . . . . . . . . . . . . . . . . . . . . . . . . . . . . . . . . . . . . . . . . . . . . . . . . . . . . . . . . . . . . . . . . . . . . 33
Veiligheidsvoorschriften . . . . . . . . . . . . . . . . . . . . . . . . . . . . . . . . . . . . . . . . . . . . . . . . . . . . . . . . . . . . . . . . . . . . . . . . . 33
Omgang . . . . . . . . . . . . . . . . . . . . . . . . . . . . . . . . . . . . . . . . . . . . . . . . . . . . . . . . . . . . . . . . . . . . . . . . . . . . . . . . . . . . . . . . . . . . . . . . . . . . . 33
Veiligheidsvoorzieningen . . . . . . . . . . . . . . . . . . . . . . . . . . . . . . . . . . . . . . . . . . . . . . . . . . . . . . . . . . . . . . . . . . . . . . . . . . . . . . . . . . . . . . . . 34
Voorafgaand aan gebruik. . . . . . . . . . . . . . . . . . . . . . . . . . . . . . . . . . . . . . . . . . . . . . . . . . . . . . . . . . . . . . . . . . . . . . . . . . . . . . . . . . . . . . . . 35
Veiligheidsmaatregelen bij de omgang met het snijmes . . . . . . . . . . . . . . . . . . . . . . . . . . . . . . . . . . . . . . . . . . . . . . . . . . . . . . . . . . . . . . . . . 35
Ingebruikname . . . . . . . . . . . . . . . . . . . . . . . . . . . . . . . . . . . . . . . . . . . . . . . . . . . . . . . . . . . . . . . . . . . . . . . . . . . . . . . . 35
Montage . . . . . . . . . . . . . . . . . . . . . . . . . . . . . . . . . . . . . . . . . . . . . . . . . . . . . . . . . . . . . . . . . . . . . . . . . . . . . . . . . . . . . . . . . . . . . . . . . . . . . 35
Harnas omdoen. . . . . . . . . . . . . . . . . . . . . . . . . . . . . . . . . . . . . . . . . . . . . . . . . . . . . . . . . . . . . . . . . . . . . . . . . . . . . . . . 36
Bediening . . . . . . . . . . . . . . . . . . . . . . . . . . . . . . . . . . . . . . . . . . . . . . . . . . . . . . . . . . . . . . . . . . . . . . . . . . . . . . . . . . . . . 36
Onderhoud en reiniging . . . . . . . . . . . . . . . . . . . . . . . . . . . . . . . . . . . . . . . . . . . . . . . . . . . . . . . . . . . . . . . . . . . . . . . . . 37
Bestelling van vervangingsonderdelen . . . . . . . . . . . . . . . . . . . . . . . . . . . . . . . . . . . . . . . . . . . . . . . . . . . . . . . . . . . . 38
Opslag en transport . . . . . . . . . . . . . . . . . . . . . . . . . . . . . . . . . . . . . . . . . . . . . . . . . . . . . . . . . . . . . . . . . . . . . . . . . . . . 38
Schema voor hulp bij storingen . . . . . . . . . . . . . . . . . . . . . . . . . . . . . . . . . . . . . . . . . . . . . . . . . . . . . . . . . . . . . . . . . . . 39
Garantie. . . . . . . . . . . . . . . . . . . . . . . . . . . . . . . . . . . . . . . . . . . . . . . . . . . . . . . . . . . . . . . . . . . . . . . . . . . . . . . . . . . . . . 39
Service . . . . . . . . . . . . . . . . . . . . . . . . . . . . . . . . . . . . . . . . . . . . . . . . . . . . . . . . . . . . . . . . . . . . . . . . . . . . . . . . . . . . . . . 40
Importeur. . . . . . . . . . . . . . . . . . . . . . . . . . . . . . . . . . . . . . . . . . . . . . . . . . . . . . . . . . . . . . . . . . . . . . . . . . . . . . . . . . . . . 40
Afvoeren . . . . . . . . . . . . . . . . . . . . . . . . . . . . . . . . . . . . . . . . . . . . . . . . . . . . . . . . . . . . . . . . . . . . . . . . . . . . . . . . . . . . . 40
Vertaling van de oorspronkelijke conformiteitsverklaring. . . . . . . . . . . . . . . . . . . . . . . . . . . . . . . . . . . . . . . . . . . . . 40
FBS 43 B2
31
BENZINE TRIMMER FBS 43 B2
Inleiding
NL
Uitrusting
Verbindingsstuk maaischacht
Maaischacht
Hartelijk gefeliciteerd met de aankoop van uw nieuwe apparaat. U hebt
hiermee gekozen voor een hoogwaardig product. De gebruiksaanwijzing
maakt deel uit van dit product. Deze bevat belangrijke aanwijzingen voor
veiligheid, gebruik en afvoeren. Maak u vertrouwd met alle bedienings- en
veiligheidsaanwijzingen voordat u het product in gebruik neemt. Gebruik
het product uitsluitend op de voorgeschreven wijze en voor de aangegeven
doeleinden. Geef alle documenten mee als u het product doorgeeft aan
een derde.
Stuurbeugel
Gebruik in overeenstemming met bestemming
Gashendel
Gebruik met snijmes: voor het maaien van hoog gras en struikgewas met
het 4-tandssnijmes, voor dicht struikgewas en zacht houtgewas met het
3-tandssnijmes.
Gashendelvergrendeling
Gebruik met draadspoel: voor het maaien van gazons en licht onkruid.
Elk ander gebruik dat in deze gebruiksaanwijzing niet uitdrukkelijk wordt
toegestaan, kan schade aan het apparaat veroorzaken en een ernstig
gevaar voor de gebruiker vormen. Neem beslist de beperkingen in de
veiligheidsinstructies in acht. Neem nationale voorschriften die het gebruik
van de machine kunnen beperken in acht. Elk ander gebruik of modificatie
van de machine geldt als niet in overeenstemming zijnde met de bestemming
en brengt aanzienlijk gevaar voor ongelukken met zich mee. Niet voor
bedrijfsmatig gebruik bestemd.
VERBODEN TOEPASSINGEN!
Vanwege lichamelijke risico's voor de gebruiker mag het apparaat niet
worden gebruikt voor de volgende werkzaamheden: voor het reinigen
van looppaden en als hakselaar voor het verkleinen van snoeisel van
bomen en hagen. Daarnaast mag het apparaat niet worden gebruikt
voor het egaliseren van oneffenheden in de grond, zoals molshopen. Om
veiligheidsredenen mag het apparaat niet worden gebruikt als aandrijfaggregaat voor andere apparaten van welk type dan ook. Voor hieruit
voortvloeiende schade of letsel van welke aard dan ook is de gebruiker/
bediener aansprakelijk, niet de fabrikant.
Startkoord
Chokehendel
Benzinetank
Brandstofpomp “Primer”
Kap luchtfilterbehuizing
Aan-/uitknop
Draadspoel met snijdraad
Beschermkap snijdraad
Beschermkap snijmes
2 x schroef M6
Harnas
4-tandssnijmes
3-tandssnijmes
Houder stuurbeugel
Gripschroef M6
Meeneemschijf
Drukplaat
Afdekking drukplaat
Moer M10 (linkse schroefdraad)
Mengfles olie/benzine
Bougiesleutel
Inbussleutel 5 mm
Inbussleutel 4 mm
Gripschroef M6
Inhoud van het pakket
Luchtfilter
1 benzine trimmer FBS 43 B2
Bougiestekker
1 gebruiksaanwijzing
■ Open de verpakking en haal het apparaat voorzichtig uit de verpakking.
■ Verwijder het verpakkingsmateriaal en verpakkings-/ en transportbeveiligingen (indien aanwezig).
Snijmes / en draadspoel worden samen in de tekst ook als
“snijgereedschap” (als overkoepelend begrip) aangeduid.
■ Controleer of de inhoud van het pakket compleet is.
■ Controleer het apparaat en de accessoires op transportschade.
■ Bewaar de verpakking zo mogelijk tot aan het einde van de garantieperiode.
32
FBS 43 B2
Technische gegevens
WAARSCHUWING!
Motortype:
2-taktmotor, luchtgekoeld, chroomcilinder
Motorvermogen (max.):
1,35 kW / 1,8 PS
Cilinderinhoud:
42,7 cm³
Stationair toerental motor:
2700 - 3400 min-1
Max. toerental motor
met snijmes:
10500 min-1
met draadspoel:
9000 min-1
Max. snijsnelheid met snijmes: 7850 min-1
met draadspoel:
6750 min-1
Ontsteking:
Elektronisch
Aandrijving:
Centrifugaalkoppeling
Gewicht (lege tank):
8 kg
Maaicirkel draad Ø:
43 cm
Maaicirkel snijmes Ø:
25,5 cm
Draadlengte:
8,0 m
Draad-Ø:
2,0 mm
Tankinhoud:
0,85 l
Bougie:
Champion RCJ7Y
0,6 kg / h
Specifiek brandstofverbruik
bij max. motorvermogen:
446 g / kWh
Geluids- en trillingsgegevens
Gemeten waarden voor geluid vastgesteld conform EN ISO 11806-1.
Het A-gewogen geluidsniveau bedraagt gemiddeld:
Geluidsdrukniveau LpA:
Onzekerheid KpA:
96,3 dB(A)
2,5 dB
Geluidsvermogensniveau LWA: 110,3 dB(A)
Onzekerheid KWA:
2,5 dB
LET OP!
■ Draag gehoorbescherming!
WAARSCHUWING!
■ Verminder ook de trillingsrisico's, bijv. het risico van “dode vingers”,
door vaak werkpauzes te nemen waarin u bijv. uw handen tegen
elkaar aan wrijft!
Gebruik
Trillingsemissiewaarde ah = 8,2 m / s2
Onzekerheid K = 1,5 m / s2
FBS 43 B2
OPMERKING
■ Voor een nauwkeurige beoordeling van de trillingsbelasting tijdens een
bepaalde werkperiode moeten ook de tijden worden meegerekend
waarin het apparaat is uitgeschakeld, of wel loopt, maar niet wordt
gebruikt. Dit kan de trillingsbelasting over de totale werkperiode
duidelijk verminderen.
Veiligheidsvoorschriften
WAARSCHUWING!
■ Lees alle veiligheidsinstructies en aanwijzingen. Het niet naleven van
de veiligheidsinstructies en aanwijzingen kan elektrische schokken,
brand en/of ernstig letsel veroorzaken.
LET OP!
Brandstofverbruik bij
max. motorvermogen:
■ Het in deze gebruiksaanwijzing aangegeven trillingsniveau is gemeten
conform een in EN ISO 11806-1 genormeerde meetprocedure en
kan worden gebruikt voor apparaatvergelijking. De aangegeven
trillingsemissie-waarde kan ook gebruikt worden voor een voorlopige beoordeling van de blootstelling. Het trillingsemissieniveau is
afhankelijk van het gebruik van het elektrische gereedschap en kan
in bepaalde gevallen hoger zijn dan de in deze gebruiksaanwijzing
aangegeven waarde. De trillingsbelasting kan worden onderschat
wanneer het elektrische gereedschap regelmatig op een dergelijke
manier wordt gebruikt.
■ Het apparaat en het verpakkingsmateriaal zijn geen kinderspeelgoed! Kinderen mogen niet met kunststofzakken, folie en kleine
onderdelen spelen! Er bestaat verstikkingsgevaar!
Bewaar alle veiligheidsinstructies en aanwijzingen voor
toekomstig gebruik.
Omgang
■ Draag nauwsluitende werkkleding die bescherming biedt, zoals een
lange broek, veiligheidswerkschoenen, stevige veiligheidshandschoenen, een veiligheidshelm, een beschermmasker voor het gezicht of een
veiligheidsbril ter bescherming van de ogen en goede oordopjes of
andere gehoorbescherming tegen het lawaai.
■ Alleen afdoende geschoolde personen en volwassenen mogen het
apparaat bedienen, instellen en onderhouden.
■ Oefen hoe u het apparaat moet hanteren bij uitgeschakelde motor als
u niet vertrouw bent met het apparaat.
■ Zorg ervoor dat schroeven en verbindingselementen stevig zijn vastgedraaid. Werk nooit met het apparaat wanneer het niet correct is ingesteld of niet volledig of veilig is gemonteerd.
■ Open de benzinetank langzaam, om eventuele druk die zich onder
de tankdop heeft gevormd te laten ontsnappen. Start het apparaat
op minstens drie meter afstand van de plaats waar u hebt getankt om
brand te voorkomen.
■ Houd het apparaat altijd met beide handen vast. Daarbij moeten de
duimen en vingers de handgrepen omsluiten.
■ Werkhouding: bedien het apparaat niet in een ongemakkelijke stand,
niet bij ontbrekend evenwicht, niet met uitgestrekte armen of met slechts
één hand.
■ Zorg er altijd voor dat u stevig staat.
■ Gebruik altijd het meegeleverde harnas.
■ Zorg ervoor dat de handgrepen droog en schoon zijn en dat er geen
benzinemengsel op komt.
■ Gebruik het apparaat niet wanneer toeschouwers of dieren zich in in
de onmiddellijke omgeving bevinden. Houd tijdens het maaien een
minimale afstand van 15 meter tussen de gebruiker en andere personen
of dieren aan.
33
NL
■
■
■
■
■
■
■
■
■
■
Betekenis van de aanwijzingsplaatjes op het apparaat!
Waarschuwing! Lees voorafgaand aan ingebruikname
de gebruiksaanwijzing!
Draag gehoorbescherming!
Draag een veiligheidsbril!
Draag stevige schoenen!
Draag veiligheidshandschoenen!
Draag hoofdbescherming!
Bescherm het apparaat tegen regen en vocht!
Let op weggeslingerde delen!
Schakel het apparaat uit en trek de bougiestekker
los voordat u onderhoudswerkzaamheden verricht!
LET OP!
Aanvullende veiligheidsinstructies
De afstand tussen de machine en derden moet minstens
15 meter bedragen!
■ Raak de uitlaat niet aan.
■ Gebruik het apparaat uitsluitend voor het beoogde doel, bijv. gras
trimmen en maaiwerkzaamheden.
Snijgereedschap (snijmes / snijdraad) loopt na!
■ Gebruik het apparaat niet langdurig achtereen, las regelmatig
pauzes in.
■ Gebruik het apparaat niet als u onder invloed van alcohol, drugs of
medicijnen bent.
Let op, hete onderdelen. Afstand houden!
Vul om de 20 bedrijfsuren een beetje vet bij
(aandrijfvet)
20 h
■ Gebruik het apparaat uitsluitend wanneer de bijbehorende beschermkap bevestigd en in goede toestand is.
Pas op terugslag!
■ Elke modificatie van het product kan de persoonlijke veiligheid in gevaar brengen en resulteert in het vervallen van de fabrieksgarantie.
Voorzichtig - benzine is extreem licht ontvlambaar!
Explosiegevaar! Mors geen brandstof!
■ Gebruik het apparaat nooit in de buurt van licht ontvlambare vloeistoffen of gassen, noch in gesloten ruimtes, noch in de openlucht.
Dit kan explosies en/of brand tot gevolg hebben.
Let op! Verstikkingsgevaar!
■ Gebruik geen andere snijgereedschappen. Gebruik voor uw eigen
veiligheid uitsluitend accessoires en extra apparatuur die in de
gebruiksaanwijzing worden beschreven. Het gebruik van andere dan
in de gebruiksaanwijzing aanbevolen snijgereedschappen of accessoires kan persoonlijk letselgevaar voor u betekenen.
Voorzichtig! Giftige koolmonoxidedampen!
Gebruik het apparaat niet in gesloten ruimtes!
Voorzichtig! Letselgevaar door draaiend snijmes!
Houd handen en voeten op afstand!
Veiligheidsvoorzieningen
114
Bij werkzaamheden met het apparaat moet de bijbehorende kunststofbeschermkap voor gebruik met het snijmes resp. de draadspoel zijn gemonteerd, om het wegslingeren van voorwerpen te voorkomen.
Indicatie van het geluidsvermogensniveau LWA in dB.
Indicatie van de mengverhouding benzine-olie.
WAARSCHUWING!
■ Maai nooit terwijl andere personen, met name kinderen of dieren, in
de buurt zijn.
Vuur, open licht en roken verboden!
■ Houd een veilige afstand van 15 m aan. Schakel het apparaat bij
nadering van mens of dier onmiddellijk uit.
Opmerking! Linkse schroefdraad.
Opmerking! Stuurbeugel monteren.
1
LET OP! VERGIFTIGINGSGEVAAR!
■ Uitlaatgassen, brandstoffen en smeerstoffen zijn giftig. Uitlaatgassen
mogen niet worden ingeademd.
2
NL
Houd tijdens maaiwerkzaamheden tot op de grond een minimale afstand van 30 meter tussen de gebruiker en andere personen of dieren
aan.
Controleer voorafgaand aan het maaien het terrein op voorwerpen,
zoals metaaldelen, flessen, stenen e.d. die kunnen worden weggeslingerd en daardoor letsel bij de gebruiker kunnen veroorzaken.
Houd de draadspoel op de gewenste hoogte. Voorkom dat u kleine
voorwerpen (bijv. stenen) met de draadspoel aanraakt.
Houd de draadspoel altijd op de grond wanneer het apparaat in
werking is.
Blijf bij maaiwerkzaamheden op schuinlopend terrein altijd onder het
snijgereedschap. Maai of trim nooit op een gladde heuvel of helling
waar u kunt uitglijden.
Zorg ervoor dat de draadspoel met geen enkel obstakel in aanraking
komt als u de motor start.
Gebruik het apparaat nooit als het beschadigd is of gebreken vertoont.
Trim en maai altijd in het hoogste toerentalbereik. Laat de motor bij het
begin van het maaien of bij het trimmen niet op een laag toerental lopen.
Mocht u per ongeluk een vast voorwerp met het apparaat aanraken,
schakel de motor dan meteen uit en inspecteer het apparaat op eventuele schade.
Schakel het apparaat uit voordat u het neerlegt.
Schakel de motor altijd uit voorafgaand aan werkzaamheden aan het
snijgereedschap.
min-1
Max. toerental per minuut.
max. 9000
34
FBS 43 B2
■ Tank alleen in de openlucht en rook niet.
■ Het snijmes draait nog door nadat u de gashendel loslaat. Het nog
draaiende snijmes kan snijwonden bij u of omstanders veroorzaken.
Schakel de motor uit en vergewis u ervan dat het snijmes tot stilstand is
gekomen voordat u werkzaamheden van welke aard dan ook uitvoert
aan het snijmes.
■ Bij draaiende motor of als het apparaat heet is, mag de tanksluiting
niet worden geopend en mag er geen benzine worden bijgevuld.
Ingebruikname
WAARSCHUWING!
■ Benzine is uiterst ontvlambaar. Bewaar benzine uitsluitend in de
daarvoor bestemde jerrycans/vaten.
■ Als er benzine gemorst is, mag geen poging worden gedaan om
de motor te starten. In plaats daarvan moet het apparaat uit de met
benzine vervuilde zone worden verwijderd Elke ontstekingspoging
moet worden vermeden tot de benzinedampen zijn vervluchtigd.
■ Om veiligheidsredenen moeten de benzinetank en de tanksluiting bij
beschadiging worden vervangen.
Voorafgaand aan gebruik
LET OP!
■ Draag tijdens het maaien altijd antislip-veiligheidsschoenen en
passende veiligheidskleding zoals veiligheidshandschoenen, een
veiligheidshelm, een beschermingsmasker of een veiligheidsbril, en
gehoorbescherming.
■ Controleer het terrein waarop het apparaat wordt gebruikt en verwijder voorwerpen die gegrepen en weggeslingerd kunnen worden.
■ Voorafgaand aan het gebruik en na het laten vallen of andere
inwerkingen van slagen of stoten moet altijd door visuele inspectie
worden gecontroleerd of de snijgereedschappen, bevestigingsbouten
alsmede de complete snij-unit beschadigd zijn. Versleten of beschadigde snijgereedschappen en bevestigingsbouten moeten worden
vervangen.
■ Voorafgaand aan het gebruik moet altijd door visuele inspectie
worden gecontroleerd of de snijgereedschappen zijn versleten
of beschadigd. Ter voorkoming van onbalans mogen versleten of
beschadigde snijgereedschappen en bevestigingsbouten alleen
paarsgewijs worden vervangen.
Montage
Stuurbeugel monteren (afb. 3a - 3c)
■ Monteer de stuurbeugel zoals weergegeven op de afbeeldingen
3a - 3c. De stuurbeugel moet worden uitgericht zoals weergegeven
op de afbeeldingen 3a - 3c. Draai de gripschroef pas helemaal vast
wanneer u de optimale werkpositie met het harnas hebt ingesteld
(zie het hoofdstuk Harnas omdoen/maaihoogte instellen).
■ Om de stuurbeugel op de juiste afstand van het lichaam in te stellen
en zo ook te zorgen voor voldoende afstand tussen u en de motor,
maakt u de beide schroeven aan de onderkant van de stuurbeugel
los (zie afb. 8j).
Maaischacht monteren (4a - 4c)
■ Druk de vergrendelingshendel in en schuif de maaischacht (zie
afb. 4a) in het verbindingsstuk van de maaischacht .
Let er daarbij op dat de aandrijfassen binnen in de maaischacht in
elkaar glijden, draai eventueel licht aan de draadspoel /het snijmes
/ . De haak van de vergrendelingshendel moet in het gat
vallen. Draai de gripschroef vast zoals weergegeven op afbeelding
4c.
Snijmes-beschermkap monteren
WAARSCHUWING!
■ Bij werkzaamheden met het snijmes moet de snijmes-beschermkap
gemonteerd zijn. De snijmes-beschermkap wordt met 2 schroeven
op de maaischacht bevestigd, zoals weergegeven in afbeelding 5.
Snijmessen monteren/vervangen
Beperk de geluidsontwikkeling en trillingen tot een
minimum!
■ Monteer/vervang de snijmessen
afbeeldingen 6a - 6g.
■ Gebruik uitsluitend apparaten die in onberispelijke toestand zijn.
■ Zet het snijmes
■ Onderhoud en reinig het apparaat regelmatig.
■ Steek de drukplaat
■ Pas uw werkwijze aan het apparaat aan.
■ Plaats de afdelling van de drukplaat
■ Voorkom overbelasting van het apparaat.
■ Zoek het boorgat van de meeneemschijf, breng die op één lijn met de
daaronder liggende groef en zet hem vast met de meegeleverde inbussleutel , draai daarna de moer vast met de bougiesleutel (zie
afb. 6f + 6g).
■ Laat het apparaat eventueel nakijken.
■ Schakel het apparaat uit wanneer het niet wordt gebruikt.
■ Draag veiligheidshandschoenen.
Veiligheidsmaatregelen bij de omgang met het
snijmes
■ Voor omstanders bestaat er gevaar voor verblinding of letsel. Houd
in alle richtingen een minimale afstand van 15 meter tussen uzelf en
andere personen of dieren aan.
■ Gebruik het apparaat niet wanneer niet alle onderdelen van snijmes
correct zijn geïnstalleerd.
■ Het snijmes kan met een ruk door voorwerpen worden weggeslingerd.
Dit kan letsel aan armen en benen tot gevolg hebben. Stop onmiddellijk
de motor en wacht tot het snijmes tot stilstand is gekomen als het apparaat met oneigenlijke voorwerpen in aanraking komt. Controleer het
snijmes op schade. Vervang het snijmes altijd wanneer het verbogen
of gescheurd is.
■ Het snijmes slingert voorwerpen en ook aarde heftig weg. Dit kan
verblinding of letsel veroorzaken. Draag oog-, gezichts- en beenbescherming. Verwijder voorwerpen altijd uit de werkzone voordat u het
snijmes gebruikt.
FBS 43 B2
/
/
zoals weergegeven op de
vast op de meeneemschijf (zie afb. 6c).
op de schroefdraad van de tandas (zie afb. 6d).
(zie afb. 6e).
OPMERKING! Linkse schroefdraad!
■ De snijmessen / zijn bij levering voorzien van plastic beschermkappen. Deze moeten voor het gebruik worden verwijderd en bij nietgebruik weer worden aangebracht.
LET OP! SCHERPE KANTEN, DRAAG VEILIGHEIDSHANDSCHOENEN
■ LET OP! Monteer de snijdraad-beschermkap
beschermkap .
op de snijmes-
■ Bij werkzaamheden met de snijdraad moet ook de snijdraad-beschermkap worden gemonteerd. Monteer de snijdraad-beschermkap
zoals weergegeven in afbeelding 7a.
■ Let erop dat de snijdraad-beschermkap goed vastklikt. Aan de binnenkant van de snijdraad-beschermkap bevindt zich een mes (zie
afb. 7a). Dit mes is afgedekt met een beschermhuls (zie afb. 7a.).
■ Verwijder de beschermhuls voorafgaand aan de werkzaamheden
en breng deze na afloop weer aan.
35
NL
Draadspoel monteren/vervangen
■ Monteer/vervang de draadspoel
7c.
zoals weergegeven in afbeelding
■ Zoek het boorgat van de meeneemschijf , breng het op één lijn met
de daaronder liggende groef en zet vast met de meegeleverde inbussleutel , schroef daarna de draadspoel op de schroefdraad.
OPMERKING! Linkse schroefdraad!
Harnas omdoen
NL
Brandstof en olie
LET OP!
■ Gebruik geen brandstofmengsel dat meer dan 90 dagen is opgeslagen.
Aanbevolen brandstoffen:
■ Gebruik uitsluitend een mengsel van loodvrije benzine en speciale
2-takt-motorolie. Stel het brandstofmengsel samen op basis van de
brandstofmengtabel.
■ Doe de juiste hoeveelheid benzine en 2-taktolie in de meegeleverde
mengfles (zie Brandstofmengtabel). Schud de fles daarna goed.
OPMERKING
Brandstofmengtabel
■ Om zonder vermoeidheid te kunnen werken kunt u op de volgende
punten instellingen uitvoeren. Al naar gelang de lichaamsgrootte
kunnen de instellingen variëren.
Mengprocedure: 40 delen benzine op 1 deel olie
■ Stel voor aanvang van de werkzaamheden het harnas en de stuurbeugel in overeenkomstig de lichaamsgrootte.
■ Balanceer de benzinemotormaaier met gemonteerd snijgereedschap
zodanig uit, dat het snijgereedschap, zonder dat de bosmaaier met
de handen wordt aangeraakt, net boven de grond zweeft.
Benzine
2-taktolie
1 liter
25 ml
5 liter
125 ml
Bediening
LET OP!
1.) Doe het harnas om en voeg de beide delen van het harnas samen
tot ze vastklikken (zie afb. 8a - 8b).
2.) Trek, zoals weergegeven in afbeelding 8c, aan het harnas om dit
op het midden van het lichaam te plaatsen en aan te passen aan de
omvang van het bovenlichaam.
3.) Trek de beide schouderriemen strak zoals weergegeven in afbeelding
8d.
4.) Trek aan het harnas, zoals weergegeven in afbeelding 8e om de juiste
positie van de benzinemotormaaier aan het harnas in te stellen.
5.) Hang de musketonhaak in (zie afb. 8f - 8h) en borg deze met het
rode riemstuk van het snelopeningsmechanisme.
6.) Neem nu de benzinemotormaaier en hang deze, zoals weergegeven
op afbeelding 8i, met de houder in de musketonhaak .
De houder kan bovendien met 1 schroef worden losgemaakt en
verschoven om de beste uitrichting van de benzinemotormaaier in te
stellen.
7.) De stuurbeugel kan worden versteld met 2 schroeven voor
uitrichting van de stuurbeugel aan de onderkant.
Maaihoogte instellen
■ Doe het harnas
om zoals weergegeven in afbeelding 8a - 8c.
■ Haak het apparaat in het harnas (zie afb. 8d).
■ Stel met de verschillende riemverstellers op het harnas de optimale
werk- en maaipositie in (zie afb. 8e).
■ Maak vervolgens een paar heen en weer gaande bewegingen zonder
de motor te starten om de optimale lengte van het harnas in te stellen
(zie afb. 9a).
■ Het harnas is voorzien van een snelopeningsmechanisme. Trek aan het
rode riemstuk wanneer u het apparaat snel moet afdoen (zie afb. 8k).
LET OP!
■ Gebruik altijd het harnas wanneer u met het apparaat werkt. Bevestig de maaier aan het harnas zodra u de motor hebt gestart en deze
stationair loopt. Schakel de motor uit voordat u het harnas afneemt.
36
■ Neem de wettelijke bepalingen voor bescherming tegen geluidsoverlast in acht.
Controleer het apparaat voor elke ingebruikname op:
■ Dichtheid van het brandstofsysteem.
■ Onberispelijke toestand en volledigheid van de beveiligingsvoorzieningen
en de maai-inrichting.
■ Vastzitten van alle schroefverbindingen.
■ Soepele beweegbaarheid van alle bewegende onderdelen.
Starten bij koude motor
LET OP!
■ Laat nooit de startkabel terugslingeren. Dit kan schade veroorzaken.
1.) Vul de tank. (Zie ook sectie “Brandstof en olie”).
2.) Druk 6x op de brandstofpomp (Primer).
3.) Zet de aan-/uitknop op “I”.
4.) Zet de chokehendel op “ ”.
5.) Houd het apparaat goed vast en trek het startkoord aan tot u weerstand voelt. Trek vervolgens het startkoord snel aan. Het apparaat
start.
6.) Herhaal de stappen 4–5 als de motor niet start.
7.) Zodra de motor loopt, drukt u op de gashendel om de auto-choke
te activeren.
Lees de sectie “Schema voor hulp bij storingen” als de motor ook na meerdere pogingen niet aanslaat.
LET OP!
■ Trek het startkoord altijd rechtuit. Houd de greep van het startkoord
vast wanneer het startkoord weer wordt ingetrokken. Laat het
startkoord nooit los zodat het terugschiet.
OPMERKING
■ Bij zeer hoge buitentemperaturen kan het voorkomen dat ook bij een
koude motor zonder choke moet worden gestart!
FBS 43 B2
Starten bij warme motor
(Het apparaat heeft minder dan 15–20 minuten stilgestaan)
2.) De chokehendel
OPMERKING
op “I”.
1.) Zet de aan-/uitknop
moet op “
Maaien bij een boom / hekwerk / fundering (met draadspoel)
” staan.
3.) Houd het apparaat goed vast en trekhet startkoord aan tot u weerstand voelt. Trek vervolgens het stratkoord snel aan. Het apparaat
moet na 1–2 keer trekken starten. Als het apparaat na 6 keer trekken
nog niet start, herhaalt u stap 1-7 onder “Starten bij koude motor”.
Motor uitschakelen
Volgorde bij noodstop
Als het apparaat onmiddellijk moet worden gestopt, zet u de aan-/uitknop op “0”.
Normale volgorde
■ Laat de gashendel los en wacht tot de motor is stationair draait.
Zet de aan-/uitknop op “0”.
LET OP!
■ Bij stationair draaien moet het snijmes stilstaan. Als het snijmes draait,
moet de carburateur worden afgesteld!
Werkinstructies
Oefen voordat u het apparaat gaat gebruiken alle werktechnieken (zie
afb. 9a - 9c) bij uitgeschakelde motor.
Snijdraad langer maken
Om de snijdraad langer te maken, laat u de motor met vol gas lopen en
tikt u de draadspoel op de grond. De draad wordt automatisch langer.
Het mes op de snijdraad-beschermkap verkort de draad tot de toegestane lengte (zie afb. 9d).
LET OP!
■ Als de draad in aanraking komt met bomen, stenen, stenen muren
of funderingen, slijt de draad af of gaat deze rafelen. Als de draad
tegen hekwerk slaat, breekt de draad af.
LET OP!
■ Verwijder met het apparaat geen voorwerpen van looppaden e.d.!
De benzinemotormaaier is een krachtig apparaat en kleine stenen
of andere voorwerpen kunnen 15 meter en meer worden weggeslingerd en resulteren in letsel of beschadigingen aan auto's, huizen en
ramen.
Klemzitten
Schakel onmiddellijk de motor uit als het snijgereedschap blokkeert. Verwijder
gras en struikgewas uit het apparaat voordat u het weer in gebruik neemt.
Terugslag voorkomen
Bij het werken met het snijmes bestaat er gevaar voor een terugslag wanneer
het snijmes in contact komt met vaste obstakels (boomstam, tak, boomstronk, steen e.d.). Het apparaat wordt daarbij tegen de draairichting van
het snijgereedschap in teruggeslingerd. Dit kan ertoe leiden dat u de controle over het apparaat verliest. Gebruik het apparaat niet in de nabijheid
van hekken, metalen kozijnen, afperkingsstenen of funderingen. Voor het
maaien van zacht houtgewas plaatst u het apparaat zoals weergegeven
op afb. 9e om terugslag te voorkomen.
Onderhoud en reiniging
Reinigen
OPMERKING
■ Na elk gebruik moet het apparaat grondig worden gereinigd.
Gazon-/gras-/onkruidresten hopen zich op onder de snijmes-beschermkap .
■ Schakel het apparaat uit en maak de bougiestekker los voordat u
reinigingswerkzaamheden uitvoert.
■ Verwijder de resten bij uitgeschakelde motor met een plamuurmes
of iets dergelijks.
■ Reinig het apparaat regelmatig met een vochtige doek en een beetje
afwasmiddel. Let daarbij op dat er geen water in het apparaat binnendringt!
Verschillende maaimethoden
Draadspoel / snijdraad vervangen
Trimmen / maaien (snijmes evt. met draadspoel)
■ Beweeg het apparaat in een sikkelvormige maaibeweging heen en
weer (zie afb. 9a).
■ Houd het snijgereedschap parallel aan de grond en stel de gewenste
maaihoogte vast.
Laag trimmen (met draadspoel)
■ Houd het apparaat iets schuin boven de grond (zie afb. 9b).
Maai altijd van u af. Beweeg het apparaat niet naar u toe.
Afmaaien (met draadspoel)
■ Bij afmaaien maait u alle vegetatie tot aan de grond weg. Daartoe
draait u de draadspoel in een hoek van 30 graden naar rechts. Zet de
handgreep in de gewenste positie (zie afb. 9c).
1.) De draadspoel moet worden gedemonteerd zoals beschreven onder “Draadspoel monteren/vervangen”. Druk de draadspoel samen
(zie afb. 12a) en neem een helft van de behuizing af (zie afb. 12b).
2.) Neem het spoelplateau
+ 12d).
uit de draadspoelbehuizing (zie afb. 12c
3.) Verwijder een eventueel nog aanwezig restant van de snijdraad.
4.) Leg een nieuwe snijdraad in het midden neer en laat de zo ontstane lus
uit de uitsparing van het spoelplateau hangen (zie afb. 12d).
5.) Wikkel de draad onder spanning op, tegen de wijzers van de klok in.
Het spoelplateau scheidt daarbij de beide helften van de snijdraad
(zie afb. 12e).
6.) Haak de laatste 15 cm van beide draaduiteinden in de tegenoverliggende draadhouder van het spoelplateau (zie afb. 12f).
7.) Leid de beide draaduiteinden door de metalen oogjes in de draadspoelbehuizing (zie afb. 12f).
8.) Druk het spoelplateau in draadspoelbehuizing (zie afb. 12f).
9.) Voeg de behuizinghelften weer samen.
FBS 43 B2
37
NL
10.) Trek kort en krachtig aan beide draaduiteinden om deze uit de draadhouders los te maken (zie afb. 12g).
11.) Kort overtollige draad tot 13 cm in. Dit vermindert de belasting van de
motor tijdens het starten en opwarmen.
12.) Monteer draadspoel weer (zie het hoofdstuk Draadspoel monteren/
vervangen). Sla punt 3–6 over als de complete draadspoel wordt
vervangen.
Luchtfilter onderhouden
NL
Vervuilde luchtfilters zorgen voor een afname van het motorvermogen
door te geringe luchttoevoer naar de carburateur.
Regelmatige controle is daarom noodzakelijk. Het luchtfilter moet om
de 25 bedrijfsuren worden gecontroleerd en zo nodig worden gereinigd.
Bij zeer stoffige lucht moet het luchtfilter vaker worden gecontroleerd.
1.) Verwijder de kap van de luchtfilterbehuizing
(zie afb. 10a).
2.) Neem het luchtfilter
uit (zie afb. 10b + 10c).
3.) Reinig het luchtfilter
schoon te blazen.
door het uit te kloppen of (met perslucht)
Als het maximale toerental van het apparaat mettertijd niet meer wordt
bereikt en alle andere oorzaken zoals beschreven in de sectie “Schema
voor hulp bij storingen” zijn uitgesloten, kan het nodig zijn de gaskabel af
te stellen.
OPMERKING
■ Controleer voor eerst of de carburateur bij volledig ingedrukte gashendel volledig opengaat.
Dit is het geval wanneer de carburateurschuif (zie afb. 13b) bij vol gas
volledig geopend is. Afbeelding 13a toont de correcte instelling. Als de
carburateurschuif niet volledig geopend is, moet de gaskabel worden
afgesteld.
Voor het afstellen van de gaskabel zijn de volgende stappen nodig:
■ Draai de contramoer (zie afb. 13a) een paar slagen los. Draai de
stelschroef (zie afb. 13a) uit, tot de carburateurschuif bij vol gas
volledig geopend is (zie afb. 13b).
■ Draai de contramoer
weer vast.
Stationair toerental instellen
4.) De montage vindt in omgekeerde volgorde plaats.
LET OP!
■ Stel het stationair toerental in bij warme motor.
LET OP!
■ Reinig het luchtfilter nooit met benzine of brandbare oplosmiddelen.
Bougie onderhouden
1.) Trek de bougiestekker
Gaskabel instellen
(zie afb. 11a) los.
2.) Maak de bougie los met de meegeleverde bougiesleutel
.
3.) De montage vindt in omgekeerde volgorde plaats.
Elektrodenafstand = 0,6 mm (afstand tussen de elektroden waartussen de
ontstekingsvonk wordt opgewekt). Draai de bougie met een momentsleutel
(verkrijgbaar in de vakhandel) aan met 12 tot 15 Nm. Controleer de bougie voor het eerst na 10 bedrijfsuren op vervuiling en reinig deze zo nodig
met een koperdraadborstel.
Als het apparaat uitgaat wanneer de gashendel niet wordt bediend en
alle andere oorzaken zoals beschreven in de sectie “Schema voor hulp bij
storingen” zijn uitgesloten, moet het stationair toerental worden bijgesteld.
Draai hiertoe de stelschroef voor stationair toerental (zie afb. 5a) met
de wijzers van de klok mee, tot het apparaat bij stationair toerental rustig
loopt. Als het stationair toerental zo hoog is dat het snijgereedschap
meedraait, moet dit door de stelschroef voor stationair toerental naar
links te draaien zo ver worden verlaagd tot het snijgereedschap niet meer
meedraait.
Aandrijving smeren
Pleeg daarna om de 50 uur onderhoud aan de bougie.
■ Vul om de 20 bedrijfsuren een beetje aandrijfvet bij (ca. 10 g). Open
hiertoe de schroef (zie afb. 7c).
Beschermkapmes slijpen
Bestelling van vervangingsonderdelen
Het beschermkapmes (zie afb. 7a) kan mettertijd bot worden. Mocht u
dit vaststellen, maak dan de 2 schroeven los waarmee het beschermkapmes op de snijdraad-beschermkap is bevestigd. Zet het mes vast in
een bankschroef. Slijp het mes met een slijpsteen en let erop dat u de hoek
van de snijkant handhaaft. Slijp in één richting.
Vervangingsonderdelen bestellen
Bij het bestellen van vervangingsonderdelen moeten de volgende gegevens worden opgegeven:
Carburateurinstellingen
■ Identificatienummer van het apparaat
Bij alle werkzaamheden aan de carburateur moet eerst de kap van de
luchtfilterbehuizing , zoals weergegeven op afb. 10a, worden gedemonteerd.
Actuele prijzen en informatie vindt u op
■ Type apparaat
■ Artikelnummer van het apparaat
www.kompernass.com
Opslag en transport
■ Berg het apparaat op een veilige plaats op.
■ Berg het apparaat en de accessoires veilig op, beschermd tegen open
vuur en hitte-/ontstekingsbronnen, zoals gasgeisers, wasdrogers, oliekachels of draagbare radiatoren, enz.
■ Houd de snijmes-beschermkap , de draadspoel
opslag altijd vrij van maairesten.
■ Schakel het apparaat uit en maak de bougiestekker
onderhoudswerkzaamheden uitvoert.
38
en de motor bij
los voordat u
FBS 43 B2
Apparaat opslaan
Wanneer u het apparaat langer dan 30 dagen opslaat, moet het hierop
worden voorbereid. Anders verdampt de resterende brandstof in de carburateur met achterlating van een rubberachtig bodembezinksel. Dit kan het
starten bemoeilijken en dure reparatiewerkzaamheden tot gevolg hebben.
1.) Draai de tankdop los om eventuele druk in de benzinetank
nemen. Giet de benzinetank voorzichtig leeg.
weg te
2.) Start de motor en laat deze draaien tot hij stopt, om de brandstof uit
de carburateur te verwijderen.
3.) Laat de motor ca. 10 minuten afkoelen.
4.) Verwijder de bougie (zie het hoofdstuk Bougie onderhouden).
5.) Giet 1 theelepel 2-taktolie in de verbrandingskamer. Trek meerdere
keren aan het startkoord om alle mechanische delen met olie te
smeren. Plaats de bougie terug.
OPMERKING
■ Berg het apparaat droog en zo ver mogelijk uit de buurt van mogelijke ontstekingsbronnen op.
Opnieuw in gebruik nemen
1.) Verwijder de bougie (zie het hoofdstuk Bougie onderhouden).
2.) Trek snel aan het startkoord
kamer te verwijderen.
om overtollige olie uit de verbrandings-
3.) Reinig de bougie en let op de juiste afstand tussen de elektroden op
de bougie.
4.) Vul de benzinetank
. Zie de sectie “Brandstof en olie”.
Vervoeren
■ Wanneer u het apparaat wilt vervoeren, maakt u de benzinetank
leeg, zoals beschreven in de sectie “Opslag en transport”. Demonteer
de stuurbeugel en de maaischacht zoals beschreven in de sectie
Stuurbeugel/maaischacht monteren.
Schema voor hulp bij storingen
# = Storing
+ = Mogelijke oorzaak
* = Oplossing van de storing
#
+
*
+
*
+
Het apparaat gaat niet aan.
Foutieve procedure bij het starten.
Volg de aanwijzingen voor het starten
Beroete of vochtige bougie
Reinig de bougie of vervang hem.
Verkeerde instelling van de carburateur
# Het apparaat gaat aan, maar heeft niet het volledige
vermogen.
+ Verkeerde instelling van de chokehendel
* Zet de chokehendel op “ ”.
+ Verontreinigd luchtfilter
* Reinig het luchtfilter
+ Verkeerde instelling van de carburateur
Neem contact op met de klantendienst
# De motor loopt onregelmatig.
+ Verkeerde elektrodenafstand van de bougie
* Reinig de bougie en stel de afstand van de elektroden in of vervang
de bougie.
+ Verkeerde instelling van de carburateur
Neem contact op met de klantendienst
Garantie
U hebt op dit apparaat 3 jaar garantie vanaf de aankoopdatum.
Het apparaat is met de grootst mogelijke zorg vervaardigd en
voorafgaand aan de levering nauwkeurig gecontroleerd. Bewaar
a.u.b. de kassabon als aankoopbewijs. Neem telefonisch contact
op met uw servicepunt, mocht u aanspraak willen maken op de
garantie. Alleen op die manier is een kosteloze verzending van
uw product gegarandeerd.
De garantie geldt uitsluitend voor materiaal- of fabricagefouten, echter niet
voor transportschade, aan slijtage onderhevige delen of voor beschadigingen
van breekbare delen, bijv. schakelaars of accu's. Het product is uitsluitend
bestemd voor privégebruik en niet voor bedrijfsmatige doeleinden.
Bij verkeerd gebruik en ondeskundige behandeling, bij gebruik van geweld
en bij reparaties die niet door ons geautoriseerd servicefiliaal zijn uitgevoerd, vervalt de garantie. Uw wettelijke rechten worden door deze
garantie niet beperkt.
De garantieperiode wordt door deze waarborg niet verlengd. Dat geldt
ook voor vervangen en gerepareerde onderdelen. Eventueel al bij aankoop aanwezige schade en gebreken moeten meteen na het uitpakken
worden gemeld, echter uiterlijk twee dagen na de aankoopdatum. Voor
reparaties na afloop van de garantieperiode worden kosten in rekening
gebracht.
Neem contact op met de klantendienst
FBS 43 B2
39
NL
Service
WAARSCHUWING!
■ Laat uw apparaat uitsluitend door gekwalificeerd deskundig personeel en alleen met originele vervangingsonderdelen repareren.
Op die manier blijft de veiligheid van het apparaat gewaarborgd.
Service Nederland
Tel.: 0900 0400223 (0,10 EUR/Min.)
E-Mail: [email protected]
IAN 97786
NL
Bereikbaarheid hotline:
maandag t/m vrijdag van 8:00 uur – 20:00 uur (MET)
Importeur
KOMPERNASS HANDELS GMBH
BURGSTRASSE 21
44867 BOCHUM
GERMANY
www.kompernass.com
Afvoeren
De verpakking bestaat uit milieuvriendelijke materialen, die u via
de plaatselijke recyclepunten kunt afvoeren.
Het apparaat en de accessoires bestaan uit verschillende materialen, zoals
metaal en kunststoffen.
Informatie over mogelijkheden voor het afvoeren van het afgedankte apparaat krijgt u bij uw gemeentereinigingsdienst.
Milieubescherming
■ Leeg de benzine- en olietank zorgvuldig en lever uw apparaat in bij
een recyclepunt. De gebruikte kunststof- en metaalonderdelen kunnen
worden gescheiden voor hergebruik.
■ Lever oude olie en benzineresten in bij een afvalverwerkingspunt en
giet deze niet in de riolering of in de afvoer.
■ Lever verontreinigd onderhoudsmateriaal en grondstoffen in bij een
daarvoor bestemd inzamelpunt.
Vertaling van de oorspronkelijke
conformiteitsverklaring
Wij, KOMPERNASS HANDELS GMBH, documentverantwoordelijke
persoon: de heer Semi Uguzlu, BURGSTR. 21, 44867 BOCHUM,
DUITSLAND, verklaren hierbij dat dit product voldoet aan de volgende
normen, normatieve documenten en EU-richtlijnen:
Machinerichtlijn
(2006 / 42 / EC)
Elektromagnetische compatibiliteit
(2004 / 108 / EC)
Outdoor-richtlijn
(2005 / 88 / EC)
Emissies richtlijn
(2004/26/EC)
Toegepaste geharmoniseerde normen
EN ISO 11806-1: 2011
EN ISO 14982: 2009
Type / apparaatbeschrijving:
Benzine trimmer FBS 43 B2
Productiejaar: 01 - 2014
Serienummer: IAN 97786
Bochum, 31-10-2013
Semi Uguzlu
- Kwaliteitsmanager Technische wijzigingen vanwege verdere ontwikkeling voorbehouden.
40
FBS 43 B2
Contents
Introduction . . . . . . . . . . . . . . . . . . . . . . . . . . . . . . . . . . . . . . . . . . . . . . . . . . . . . . . . . . . . . . . . . . . . . . . . . . . . . . . . . . . 42
Proper use . . . . . . . . . . . . . . . . . . . . . . . . . . . . . . . . . . . . . . . . . . . . . . . . . . . . . . . . . . . . . . . . . . . . . . . . . . . . . . . . . . . . . . . . . . . . . . . . . . . . 42
Package contents. . . . . . . . . . . . . . . . . . . . . . . . . . . . . . . . . . . . . . . . . . . . . . . . . . . . . . . . . . . . . . . . . . . . . . . . . . . . . . . . . . . . . . . . . . . . . . . 42
Features . . . . . . . . . . . . . . . . . . . . . . . . . . . . . . . . . . . . . . . . . . . . . . . . . . . . . . . . . . . . . . . . . . . . . . . . . . . . . . . . . . . . . . . . . . . . . . . . . . . . . . 42
Technical details . . . . . . . . . . . . . . . . . . . . . . . . . . . . . . . . . . . . . . . . . . . . . . . . . . . . . . . . . . . . . . . . . . . . . . . . . . . . . . . . . . . . . . . . . . . . . . . 43
GB
Safety instructions. . . . . . . . . . . . . . . . . . . . . . . . . . . . . . . . . . . . . . . . . . . . . . . . . . . . . . . . . . . . . . . . . . . . . . . . . . . . . . 43
Handling . . . . . . . . . . . . . . . . . . . . . . . . . . . . . . . . . . . . . . . . . . . . . . . . . . . . . . . . . . . . . . . . . . . . . . . . . . . . . . . . . . . . . . . . . . . . . . . . . . . . . 43
Safety equipment . . . . . . . . . . . . . . . . . . . . . . . . . . . . . . . . . . . . . . . . . . . . . . . . . . . . . . . . . . . . . . . . . . . . . . . . . . . . . . . . . . . . . . . . . . . . . . 44
Before use . . . . . . . . . . . . . . . . . . . . . . . . . . . . . . . . . . . . . . . . . . . . . . . . . . . . . . . . . . . . . . . . . . . . . . . . . . . . . . . . . . . . . . . . . . . . . . . . . . . . 45
Safety measures when handling the cutting blade . . . . . . . . . . . . . . . . . . . . . . . . . . . . . . . . . . . . . . . . . . . . . . . . . . . . . . . . . . . . . . . . . . . . . 45
Initial operation. . . . . . . . . . . . . . . . . . . . . . . . . . . . . . . . . . . . . . . . . . . . . . . . . . . . . . . . . . . . . . . . . . . . . . . . . . . . . . . . 45
Assembly . . . . . . . . . . . . . . . . . . . . . . . . . . . . . . . . . . . . . . . . . . . . . . . . . . . . . . . . . . . . . . . . . . . . . . . . . . . . . . . . . . . . . . . . . . . . . . . . . . . . . 45
Putting on the shoulder strap. . . . . . . . . . . . . . . . . . . . . . . . . . . . . . . . . . . . . . . . . . . . . . . . . . . . . . . . . . . . . . . . . . . . . 46
Operation. . . . . . . . . . . . . . . . . . . . . . . . . . . . . . . . . . . . . . . . . . . . . . . . . . . . . . . . . . . . . . . . . . . . . . . . . . . . . . . . . . . . . 46
Maintenance and Cleaning. . . . . . . . . . . . . . . . . . . . . . . . . . . . . . . . . . . . . . . . . . . . . . . . . . . . . . . . . . . . . . . . . . . . . . . 47
Spare part orders . . . . . . . . . . . . . . . . . . . . . . . . . . . . . . . . . . . . . . . . . . . . . . . . . . . . . . . . . . . . . . . . . . . . . . . . . . . . . . 48
Storage and transportation . . . . . . . . . . . . . . . . . . . . . . . . . . . . . . . . . . . . . . . . . . . . . . . . . . . . . . . . . . . . . . . . . . . . . . 48
Troubleshooting guide . . . . . . . . . . . . . . . . . . . . . . . . . . . . . . . . . . . . . . . . . . . . . . . . . . . . . . . . . . . . . . . . . . . . . . . . . . 49
Warranty . . . . . . . . . . . . . . . . . . . . . . . . . . . . . . . . . . . . . . . . . . . . . . . . . . . . . . . . . . . . . . . . . . . . . . . . . . . . . . . . . . . . . 49
Service . . . . . . . . . . . . . . . . . . . . . . . . . . . . . . . . . . . . . . . . . . . . . . . . . . . . . . . . . . . . . . . . . . . . . . . . . . . . . . . . . . . . . . . 49
Importer . . . . . . . . . . . . . . . . . . . . . . . . . . . . . . . . . . . . . . . . . . . . . . . . . . . . . . . . . . . . . . . . . . . . . . . . . . . . . . . . . . . . . . 49
Disposal . . . . . . . . . . . . . . . . . . . . . . . . . . . . . . . . . . . . . . . . . . . . . . . . . . . . . . . . . . . . . . . . . . . . . . . . . . . . . . . . . . . . . . 50
Translation of the original Conformity Declaration . . . . . . . . . . . . . . . . . . . . . . . . . . . . . . . . . . . . . . . . . . . . . . . . . . . 50
FBS 43 B2
41
PETROL GRASS TRIMMER FBS 43 B2
Introduction
Congratulations on the purchase of your new device. You have selected
a high-quality product. The operating instructions are an integral part of
this product. They contain important information about safety, use and
disposal. Before using the product, familiarise yourself with all operating
and safety instructions. Use this product only as described and only for the
specified areas of application. Please also pass these operating instructions
on to any future owner(s).
GB
Features
Guide rail connecting piece
Guide rail
Guide handle
Starter pull cord
Choke lever
Fuel tank
Fuel pump (primer)
Air filter housing cover
Proper use
On/Off switch
Use with cutting blade: for cutting high grass and undergrowth with the
4-section cutting blade, or dense undergrowth and small woody plants
with the 3-section cutting blade.
Throttle control
Use with line spool: for cutting grass and small weeds.
Cutting line protective hood
Any other use which is not expressly permitted in these operating instructions
may damage the device and represents a serious risk for the user. Please
make sure that you pay attention to the restrictions in the safety instructions
Pay attention to the national regulations which may restrict the use of the
machine. Any other uses of or modifications to the device are deemed to
be improper usage and may result in serious physical injury. Not intended
for commercial use.
Cutting blade protective hood
PROHIBITED APPLICATIONS!
M6 handle screw
Due to the physical risk posed to the user, the device may not be used to
perform the following activities: cleaning footpaths and as a shredder for
shredding tree and hedge sections. Furthermore, the device may not be
used to level elevations such as molehills. For reasons of safety, the device
may not be used as a drive unit for any other devices. The user, not the
manufacturer, is liable for any resulting damage or injuries of any kind.
Drive plate
Package contents
Spark plug spanner
1 petrol grass trimmer FBS 43 B2
5 mm hexagonal key
1 operating instructions
4 mm hexagonal key
■ Open the packaging and carefully remove the device.
M6 handle screw
■ Remove the packaging material and packaging and transport locks
(if present).
Air filter
■ Check to ensure that the package content is complete.
Throttle control lock
Line spool with cutting line
2 x M6 screws
Shoulder strap
4-tooth cutting blade
3-tooth cutting blade
Handle bracket
Pressure plate
Pressure plate cover
M10 nut (left-hand thread)
Oil/petrol mixing canister
Spark plug connector
■ Inspect the device and accessories for transport damage.
■ If possible, store the packaging until the end of the warranty period.
The cutting blade / and line spool
as the cutting tool in the text.
42
are also referred to together
FBS 43 B2
Technical details
WARNING!
Engine type:
2-stroke engine, air-cooled,
chrome cylinder
Engine output (max.):
1.35 kW / 1.8 hp
Cylinder capacity:
42.7 cm³
Engine idle speed:
2700 - 3400 rpm
Max. engine speed
with cutting blade:
10500 rpm
with line spool:
9000 rpm
Max. cutting speed with
cutting blade:
7850 rpm
with line spool:
6750 rpm
Ignition:
Electronic
Drive:
Centrifugal clutch
Weight (tank empty):
8 kg
Line cutting diameter Ø:
43 cm
Cutting blade cutting
diameter Ø:
25.5 cm
Line length:
8.0 m
Line Ø:
2.0 mm
Tank size:
0.85 l
Spark plug:
Champion RCJ7Y
Fuel consumption at
max. engine performance:
0.6 kg / h
Specific fuel consumption
at max. engine performance:
Noise measurement determined in accordance with EN ISO 11806-1.
The A-rated noise level is typically:
Uncertainty KpA:
Sound power level LWA:
Uncertainty KWA:
96.3 dB(A)
2.5 dB
110.3 dB(A)
2.5 dB
IMPORTANT!
■ Wear hearing protection!
WARNING!
■ Also reduce the risk due to vibrations, e.g. the risk of Raynaud's
phenomenon, by taking frequent breaks and rubbing your hands
together!
Operation
Vibration emission value ah = 8.2 m/s2
Uncertainty K = 1.5 m/s2
FBS 43 B2
NOTE
■ For an accurate estimate of the vibration load during a certain working
period, the times during which the device is switched off or is running
but not actually being used must also be taken into consideration.
This can significantly reduce the vibration load over the total working
period.
Safety instructions
WARNING!
■ Please read all of the safety instructions. Failure to follow the safety
instructions listed below can result in electric shock, fire and/or serious
injuries.
IMPORTANT!
■ The device and packaging material are not toys! Children must not
be allowed to play with the plastic bags, foil and small parts!
Risk of suffocation!
Keep all safety instructions and other instructions for
future use.
Handling
446 g / kWh
Noise and vibration data:
Sound pressure level LpA:
■ The vibration level specified in these instructions has been measured
in accordance with the standardised measuring procedure specified
in EN ISO 11806-1 and can be used to make equipment comparisons. The specified vibration emission value can also be used to
make an initial exposure estimate. The vibration level varies in accordance with the use of the tool and may be higher than the value
specified in these instructions in some cases. It is easy to underestimate the vibration load if the electrical power tool is used regularly
in this manner.
■ Wear close-fitting work clothes that offer protection, such as long trousers,
safe work shoes, durable work gloves, a protective helmet, a protective
face mask or protective glasses to protect your eyes and high-quality
ear plugs or other hearing protection against the noise.
■ Only appropriately trained individuals and adults may operate, adjust
and maintain the device.
■ If you are not familiar with the device, practice handling the device
while the engine is off.
■ Ensure that screws and connecting elements are firmly tightened. Never
operate the device if it is not correctly adjusted, incomplete or if it is not
properly assembled.
■ Open the fuel tank slowly in order to allow any pressure which may have
built up in the tank to dissipate. To prevent the risk of fire, move at least
3 metres away from the refuelling area before starting the device.
■ Always hold the device with both hands. Your thumbs and fingers
should encircle the handles.
■ Work posture: Do not operate the device in an uncomfortable position,
when you are unbalanced, with arms fully stretched or with only one
hand.
■ Always ensure that you have a solid and firm stance.
■ Always use the enclosed shoulder strap.
■ Always ensure that the handles are dry and clean and that no petrol
mixture is present.
■ Do not use the device if spectators or animals are in the direct vicinity.
Maintain a minimum distance of 15 metres between the operator and
other persons or animals when trimming. Maintain a minimum distance
of 30 metres between the operator and other persons or animals when
mowing down to the ground.
■ Check the area prior to starting work for objects such as metal parts,
bottles, rocks, etc. which can be flung away and injure the user.
43
GB
Explanation of the symbols on the device!
Warning! Read the operating instruction before use!
Wear hearing protection!
Wear protective glasses!
Wear safe work boots!
Wear work gloves!
IMPORTANT!
Additional information
■ Do not touch the exhaust.
Wear head protection!
■ Only use the device for the intended purpose, such as lawn trimming
and mowing activities.
Protect the device against rain or moisture!
■ Do not use the device for long periods, take regular breaks.
■ Do not operate the device under the influence of alcohol or drugs.
Beware of flung objects!
■ Only use the device if the appropriate protective hood has been
installed and is in good condition.
Turn the device off and remove the spark plug before
performing any maintenance work!
■ Any changes to the product may risk personal safety and void the
manufacturer's warranty.
A distance of 15 metres must be maintained between
the machine and third parties!
The cutting tool continues running after it is turned off
(cutting blade/cutting line)!
■ Never use the device near highly flammable liquids or gases, either
in closed rooms or in the open. This may result in explosions and/or
fire.
■ Do not use any other cutting tools. For your safety, only use accessories
and additional devices that are indicated in the operating instructions.
The use of parts other than those recommended in the operating
instructions, or other accessories, can put you at risk of injury.
Important, hot parts. Keep a safe distance away!
Add a little grease after every 20 hours of operation
(gear grease)
20 h
Safety equipment
Beware of recoil!
The relevant plastic protective hood to operate the cutting blade or line
must be installed when working with the device in order to prevent objects
from being slung away.
Attention - petrol is highly flammable! Risk of explosion!
Do not spill fuel!
WARNING!
Attention! Risk of suffocation!
■ Never mow/trim while other individuals, especially children or animals,
are in the vicinity.
Caution! Toxic CO vapours!
■ Maintain a safety distance of 15 m. Immediately turn off the device
if this distance is not maintained.
Do not use the device in closed rooms!
Caution! Risk of injury from rotating cutting blade!
Keep hands and feet away!
IMPORTANT! RISK OF POISONING!
■ Exhaust gases, fuel and lubricants are toxic. Exhaust gases must
never be inhaled.
114
Sound power level LWA data in dB.
Petrol/oil mix ratio information.
Fire, naked flames and smoking are prohibited!
Note! Left-hand thread.
1
Note! Assemble guide handle.
2
GB
■ Adjust the line coil to the desired length. Avoid contacting small objects
(e.g. rocks) with the line coil.
■ Always hold the line coil on the floor when the device is in operation.
■ When trimming on a slope, always stand at a lower level than the cutting
tool. Never cut or trim on an icy, slippery hill or slope.
■ Before starting the engine, make sure that the line coil is not in contact
with any obstacles.
■ Do not use the device if it is damaged or defects are visible.
■ Always trim and cut using the high speed range. Do not let the engine
run at a low speed when starting mowing or trimming.
■ If the device accidentally comes into contact with a solid object, immediately turn off the engine and inspect the device for damage.
■ Switch the device off before you put it down.
■ Always turn the engine off before working on the cutting tool.
min-1
Max. rotation per minute.
max. 9000
44
FBS 43 B2
■ Only refuel out in the open and do not smoke.
■ The cutting blade continues to run down once the throttle lever has
been released. A cutting blade that is running down to a stop may
cause cutting injuries to you or bystanders. Turn the engine off and
make sure that the cutting blade has come to a complete stop before
performing any work on the cutting blade.
■ The filler cap must not be opened and refuelling must not take
place while the engine is running or when the device is hot.
Initial operation
WARNING!
■ Petrol is highly flammable. Only store petrol in the containers
provided.
■ Do not attempt to start the engine if the petrol has overflowed.
Instead, remove the device from the area polluted by petrol. Do not
attempt to restart the device until the petrol fumes have dissipated.
Assembly
■ For reasons of safety, the petrol tank and filler cap must be replaced
if they are damaged.
■ Assemble the guide handle as shown in figures 3a - 3c. The guide
handle must be installed as displayed in figures 3a - 3c. Only tighten
the handle screw once you have adjusted the shoulder strap to the
optimal operating position (see "Putting on the shoulder strap/adjusting
the cutting height" chapter).
Before use
IMPORTANT!
■ When mowing/trimming, always wear non-slip safety boots and
proper safety clothing, such as work gloves, a protective helmet,
a protective mask or protective glasses and hearing protection.
■ Check the area in which the device is to be used and remove any
objects that may be caught and slung away.
■ Before use and after dropping or other impacts, always visually
inspect the device to check whether the cutting tool, mounting bolts
and the entire cutting unit is damaged. Worn or damaged cutting
tools and mounting bolts must be replaced.
■ Always perform a visual inspection prior to use to check whether
the cutting tool is worn or damaged. To prevent imbalance, worn or
damaged cutting tools and mounting bolts may only be replaced in
sets.
Limit the noise development and vibrations to a minimum!
■ Only use devices that are in good condition.
■ Maintain and clean the device on a regular basis.
■ Adapt your working method to the device.
■ Do not overload the device.
■ Have the device inspected if necessary.
■ Switch the device off when not in use.
■ Wear gloves.
Safety measures when handling the cutting blade
■ The device may cause blindness and injuries to bystanders. Maintain a
minimum distance of 15 metres in all directions between the device and
other persons or animals.
■ Do not use the device if any of the cutting blade accessories have not
been properly installed.
■ The cutting blade can be catapulted away from objects with force.
This can lead to arm or leg injuries. If the device comes into contact
with a foreign body, immediately shut down the engine and wait until
the cutting blade has come to a complete stop. Check the cutting blade
for damage. Always replace the cutting blade if it is bent or torn.
■ The cutting blade forcefully slings away objects as well as soil. This may
cause blindness or injuries. Wear eye, face and leg protection. Always
remove objects from the work area before using the cutting blade.
FBS 43 B2
Assembling the guide handle (Fig. 3a - 3c)
■ To adjust the guide handle the correct distance from the body and to
ensure that there is sufficient distance between the engine and yourself,
loosen the two screws on the underside of the guide handle (see
fig. 8j).
Assembling the guide rail (4a - 4c)
■ Press the locking lever and slide the guide rail (see fig. 4a) into
the guide rail connecting piece . Make sure that the drive shafts inside
the guide rail slide into each other, lightly turn the line spool /the
cutting blade / if necessary. The locking lever hook must engage
with the slot . Tighten the handle screw as displayed in figure 4c.
Assembling the cutting blade protective hood
WARNING!
■ The cutting blade protective hood must be assembled when working
with the cutting blade. The cutting blade protective hood is attached
to the guide rail using 2 screws as displayed in figure 5.
Installing/replacing the cutting blade
■ Install/replace the cutting blade
■ Lock the cutting blade
/
■ Insert the pressure plate
/
as displayed in figures 6a - 6g.
to the drive plate (see fig. 6c).
via the splined shaft thread (see fig. 6d).
■ Attach the pressure plate cover
(see fig. 6e).
■ Locate the drive plate drill hole, align with the underlying groove and
lock with the enclosed hexagonal key , now tighten the nut with
the spark plug spanner (see fig. 6f + 6g).
NOTE! Left-hand thread!
■ The cutting blades / are delivered with plastic protective caps.
These must be removed prior to use and reattached when not in use.
IMPORTANT! SHARP EDGES, WEAR PROTECTIVE GLOVES
■ ATTENTION! Assemble the cutting line protective hood
cutting blade protective hood .
on the
■ The cutting line protective hood must be assembled when working
with the cutting line. The cutting line protective hood is assembled as
displayed in figure 7a.
■ Ensure that the cutting line protective hood is correctly engaged.
A blade is located on the inner side of the cutting line protective
hood (see fig. 7a). This is covered with a protective sleeve (see
fig. 7a).
■ Remove the protective sleeve before starting work and reattach after
completing your activities.
45
GB
Installing/replacing the line spool
Recommended fuels:
■ Install/replace the line spool
■ Only use a mixture of unleaded petrol and special 2-stroke engine oil.
Mix the fuel mixture in accordance with the fuel mix table.
■ Pour the correct amount of petrol and 2-stroke oil into the enclosed
mixing canister (see fuel mix table). Then shake the canister well.
as displayed in figure 7c.
■ Locate the drive shaft drill hole , align it with the underlying groove
and lock it in place with the hexagonal key included, now screw the
line spool onto the thread.
Fuel mix table
NOTE! Left-hand thread!
Mixing process: 40 parts petrol to 1 part oil
Putting on the shoulder strap
GB
Petrol
2-stroke oil
NOTE
1 litre
25 ml
■ The following adjustments can be made to make sure that you can
work without becoming fatigued. The settings may vary depending
on your body size.
5 litre
125 ml
■ Before starting work, adjust the shoulder strap and the handle to your
body size.
■ Balance the petrol-driven scythe with the installed cutting tool so that
the cutting tool hovers just above the ground without touching the
petrol-driven scythe with your hands.
1.) Put on the shoulder strap and connect the two shoulder strap parts until
they lock (see fig. 8a - 8b).
2.) Pull on the shoulder strap, as displayed in 8c, to move the shoulder
strap to the centre of your body and adjust the upper body girth accordingly.
3.) Now pull on the two shoulder straps, as displayed in figure 8d, to
tighten them.
4.) To set the correct position of the petrol-driven scythe on the shoulder
strap, pull on the belt as displayed in figure 8e.
5.) Hook in the carabiner (see fig. 8f - 8h) and secure it with the red
strap on the quick release mechanism.
6.) Now pick up the petrol-driven scythe and hang it in carabiner using
holder as shown in figure 8i. The bracket can also be released
and shifted using a screw in order to set the best possible position of
the petrol-driven scythe.
7.) The guide handle can now be adjusted using 2 screws on the
underside to set the perfect position of the guide handle .
Setting the cutting height
■ Put on the shoulder strap
as displayed in figure 8a - 8c.
■ Hook the device into the shoulder strap (see fig. 8d).
■ Set the ideal working and cutting position using the various strap adjusters on the shoulder strap (see fig. 8e).
■ Perform a few circular movements without starting the engine in order to
find the ideal shoulder strap length (see fig. 9a).
■ The shoulder strap is equipped with a quick release mechanism. Pull on
the red strap if you have to release the device quickly (see fig. 8k).
IMPORTANT!
■ Always use the shoulder strap when working with the device.
Put the strap on as soon as you have started the engine and it is
idling. Turn off the engine before removing the shoulder strap.
Fuel and oil
IMPORTANT!
■ Do not use a fuel mix that has been stored for over 90 days.
46
Operation
IMPORTANT!
■ Please pay attention to the statutory provisions in the noise protection
regulations.
Before starting the device, check for:
■ Tightness of the fuel system.
■ Flawless condition and completeness of the protective equipment and
cutting equipment.
■ Firm position of all screw connections.
■ Smooth running of all moving parts.
Starting when the engine is cold
IMPORTANT!
■ Never allow the starter line to snap back. This may result in damage.
1. Fill the tank. (see also "Fuel and oil" section).
2.) Press the fuel pump (primer) 6 times.
3.) Turn the on/off switch to "I".
4.) Set the choke lever to " ".
5.) Hold the device firmly and pull out the starter pull cord to the point
of first resistance. Now quickly pull the starter pull cord . The device
starts.
6.) If the engine does not start, repeat steps 4-5.
7.) Once the engine has started, press the throttle control to release the
auto choke.
If the engine does not start after several attempts, read the "Troubleshooting
guide" section.
IMPORTANT!
■ Always pull the starter pull cord out straight. Hold the starter pull
cord handle firmly when the starter pull cord retracts.
Never allow the starter pull cord to spring back.
NOTE
■ At very high ambient temperatures it is possible that even a cold
engine has to be started without using the choke!
Starting when the engine is hot
(The device has been turned off for less than 15-20 minutes)
1.) Turn the on/off switch
2.) Set the choke lever
to "I".
to "
".
3.) Hold the device firmly and pull out the starter pull cord to the point
of first resistance. Now quickly pull the starter pull cord . The device
should start after 1-2 pulls. If the device has not started after 6 pulls,
repeat steps 1-7 under "Starting when the engine is cold".
FBS 43 B2
Turning the engine off
Seizing
Emergency stop sequence
Immediately turn off the engine if the cutting tool becomes blocked.
Remove all grass and scrub from the device before restarting the device.
If the device needs to be stopped immediately, turn the on/off switch
"0".
to
Normal sequence
■ Release the throttle lever and wait until the engine has switched to its
idling speed. Then turn the on/off switch to "0".
IMPORTANT!
■ The cutting blade must be stationary when the engine is idling.
If the cutting blade is rotating adjust the carburettor!
Prevent kickback
When working with the cutting blade there is a risk of kickback if it strikes
against solid obstacles (tree trunk, branch, tree stump, rock or the like). This
will result in the cutting tool being catapulted back against the direction of
rotation. This may lead to the loss of control of the device. Do not use the
cutting blade near fences, metal posts, boundary stones or foundations. To
cut small woody plants, position the device as displayed in fig. 9e in order
to prevent any kickback.
Optimal working procedures
Before using the device, practice all the operating techniques (see fig. 9a 9c) while the engine is switched off.
Cleaning
Extending the cutting line
NOTE
To extend the cutting line, run the engine at full speed and tap the line
spool on the floor. The line extends automatically. The blade on the
cutting line protective hood shortens the line to the permitted length
(see fig. 9d).
■ Clean the device thoroughly after every use.
IMPORTANT!
Lawn/grass/undergrowth remains get caught under the cutting blade
protective hood .
■ Remove the remains using a scraper or similar item when the engine
is switched off.
Various cutting methods
Trimming/mowing (cutting blade or line spool)
■ Swing the device in a sickle-like mowing movement (see fig. 9a).
GB
Maintenance and Cleaning
■ Always turn the device off before performing any cleaning work and
remove the spark plug connector.
■ Clean the device regularly with a moistened cloth and a mild detergent.
Make sure that no water can penetrate into the device interior.
Replacing the line spool/cutting line
1.) The line spool must be removed as described in the "Installing/
replacing the line spool" section. Compress the line spool (see fig.
12a) and remove one half of the housing (see fig. 12b).
2.) Remove the spool disc
12d).
from the line spool housing (see fig. 12c +
3.) Remove any remaining cutting line.
■ Hold the cutting tool parallel to the floor and adjust the desired cutting
height.
4.) Fold the new cutting line in the centre and insert the resulting loop into
the spool disc recess (see fig. 12d).
Low trimming (with line spool)
5.) Tightly wind the line in a counter-clockwise direction. The spool disc
separates the two halves of the cutting line (see fig. 12e).
■ Hold the device over the ground at a slight angle (see fig. 9b). Always
cut away from the body. Never pull the device towards you.
Short mowing (with line spool)
6.) Hook the last 15 cm of the two line ends into the opposite spool disc
line holder (see fig. 12f).
■ Short mowing removes all the vegetation down to the ground. Angle
the line spool 30 degrees to the right. Adjust the handle to the desired
position (see fig. 9c).
7.) Feed the two line ends through the metal eyelets in the line spool housing
(see fig. 12f).
Cutting against trees/fences/foundations (with line spool)
9.) Re-connect the two halves of the housing.
NOTE
■ The line will quickly wear or fray if it comes into contact with trees,
rocks, walls or foundations. The line will break off if it strikes fence
mesh.
IMPORTANT!
■ Do not use the device to remove any objects from footpaths, etc.!
The petrol-driven scythe is a powerful device and small rocks or other
objects can be catapulted 15 metres or more and cause injuries or
damage to cars, houses and windows.
8.) Push the spool disc into the line spool housing (see fig. 12f).
10.) Give the two line ends a quick and vigorous tug to remove these from
the line holders (see fig. 12g).
11.) Cut any excess line back to about 13 cm. This reduces the load on
the engine when starting and warming up.
12.) Re-install the line spool (see "Installing/replacing the line spool"
chapter). Skip points 3-6 if you are replacing the entire line spool.
Air filter maintenance
Contaminated air filters reduce the engine output due to low air supply to
the carburettor.
Regular inspection is essential. The air filter must be inspected after
every 25 hours of operation and cleaned if necessary.
FBS 43 B2
47
The air filter must be checked more frequently if the air is dusty.
1.) Remove the air filter housing cover
2.) Remove the air filter
3.) Clean the air filter
Adjusting the idling rate
(see fig. 10a).
IMPORTANT!
(see fig. 10b + 10c).
■ Adjust the idling rate once the device has warmed up.
by tapping or blowing it out (with compressed air).
4.) Assembly takes place in reverse order.
IMPORTANT!
■ Never clean the air filter with petrol or flammable solvents.
Spark plug maintenance
1.) Remove the spark plug connector
(see fig. 11a).
2.) Remove the spark plug using the enclosed spark plug spanner
GB
.
3.) Assembly takes place in reverse order.
Electrode gap = 0.6 mm (distance between the electrodes between which
the ignition spark is generated). Tighten the spark plug with 12 to 15 Nm
of torque using a torque wrench (available from specialist retailers).
Initially check the spark plug for contamination after 10 hours of operation
and clean this with a copper wire brush if required.
Then service the spark plug after every 50 hours of operation.
If the device does not come to a stop when the throttle is not engaged
and all other causes in accordance with the "Troubleshooting" section
have been excluded, it may mean that a readjustment of the idling rate is
required. Rotate the idling screw (see fig. 5a) in a clockwise direction
until the device idles smoothly. If the idling rate is so high that the cutting
tool rotates, this must be reduced by turning the idling screw to the left until
the cutting tool no longer rotates.
Lubricating the gears
■ Add gear grease after every 20 hours of operation (approx. 10 g).
To do so, open the screw (see fig. 7c).
Spare part orders
Ordering spare parts
The following information must be provided when ordering spare parts:
■ Type of device
■ Item number of the device
Grinding the protective hood blade
■ Device ID number
The protective hood blade (see fig. 7a) may become blunt over time.
If you notice that this is the case, loosen the 2 screws used to fasten the
protective hood blade to the cutting line protective hood . Clamp
the blade in a vice. Grind the blade with a grindstone and ensure that the
correct angle of the blade edge is maintained. Only grind in one direction.
Current price and information is available at
Adjusting the carburettor
The air filter housing cover must first be removed, as displayed in fig.
10a, before performing any work on the carburettor.
Adjusting the throttle cable
If the device's maximum speed is no longer reached over time and all other
causes in accordance with the "Troubleshooting" section have been ruled
out, this may mean that the throttle cable needs to be adjusted.
NOTE
■ First check whether the carburettor opens completely when the throttle
lever is fully engaged.
This is the case if the carburettor slide (see fig. 13b) is completely open at
full throttle. Figure 13a shows the correct setting. An adjustment is necessary
if the carburettor slide is not fully open.
The following steps must be taken to adjust the throttle cable:
■ Loosen the locking nut (see fig. 13a) a few turns. Unscrew the adjusting screw (see fig. 13a) until the carburettor slide is completely
open at full throttle (see fig. 13b).
■ Retighten the locking nut
.
www.kompernass.com
Storage and transportation
■ Store the device in a safe location.
■ Store the device and accessories in a safe location that is protected
against naked flames and sources of heat/sparks, such as gas-powered
water heaters, dryers, oil stoves or mobile heaters, etc.
■ Always keep the cutting blade protective hood , the line spool
and the engine free of mowing residue during storage.
■ Always turn the device off before performing any maintenance work
and remove the spark plug connector .
Storing the device
The device must be prepared for storage if it is to be stored for longer than
30 days. Otherwise the residual fuel in the carburettor will evaporate and
leave a rubbery sediment. This may make starting the device more difficult
and result in expensive repair work.
1.) Remove the filler cap in order to relieve any pressure in the fuel tank
Carefully empty the fuel tank .
.
2.) Start the engine and leave it to run until it stops in order to remove all
fuel from the carburettor.
3.) Allow the engine to cool for about 10 minutes.
4.) Remove the spark plug (see "Spark plug maintenance" chapter).
5.) Add 1 teaspoon of 2-stroke oil to the combustion chamber. Pull the
starter pull cord several times in order to wet all mechanical parts
with oil. Re-insert the spark plug.
NOTE
■ Store the device in a dry place and away from possible ignition
sources.
48
FBS 43 B2
Start-up after storage
1.) Remove the spark plug (see "Spark plug maintenance" chapter).
2.) Pull the starter pull cord quickly in order to remove any excess oil
from the combustion chamber.
3.) Clean the spark plug and observe the correct electrode gap on the
spark plug.
4.) Fill the fuel tank
. See "Fuel and oil" section.
Transporting
■ If you are planning to transport the device, empty the fuel tank as
explained in the "Storage" section. Remove the guide handle and
guide rail as described in the "Assembling the guide handle/guide
rail" section.
Troubleshooting guide
# = Malfunction
+ = Possible cause
* = Troubleshooting
#
+
*
+
*
+
The device is not starting.
Incorrect process during start-up.
Follow the start-up instructions
Sooted or wet spark plug
Clean or replace the spark plug.
Incorrect carburettor setting
Contact customer service
#
+
*
+
*
+
The device starts but does not run at full power.
Incorrect choke lever setting
Set choke lever to " ".
Contaminated air filter
Clean air filter
Incorrect carburettor setting
Contact customer service
Warranty
The warranty provided for this device is 3 years from the date
of purchase. This device has been manufactured with care and
inspected meticulously prior to delivery. Please retain your receipt
as proof of purchase. In the event of a warranty claim, please
contact your Customer Service by telephone. This is the only way
to guarantee free return of your goods.
The warranty only covers claims for material and manufacturing defects,
not for transport damage, wearing parts or for damage to fragile components such as switches or batteries. This device is intended solely for
private use and not for commercial purposes.
The warranty is deemed void if this product has been subjected to improper or inappropriate handling, abuse or modifications which were not
carried out by one of our authorised service centres. Your statutory rights
are not restricted in any way by this warranty.
The warranty period is not prolonged by repairs made under the warranty.
This also applies to replaced and repaired parts. Damage and defects present at the time of purchase must be reported immediately after unpacking,
or no later than two days after the date of purchase. Repairs made after
expiry of the warranty period are chargeable.
Service
WARNING!
■ Only allow your device to be repaired by qualified specialists and
only with original spare parts. Thus, you can be certain that the
safety of your device is assured.
Service Great Britain
Tel.: 0871 5000 720 (£ 0.10/Min.)
E-Mail: [email protected]
IAN 97786
Hotline availability:
Monday to Friday from 8:00 to 20:00 (CET)
Importer
# The motor does not run smoothly.
+ Incorrect spark plug electrode gap
* Clean the spark plug and adjust the electrode gap or use a new spark
plug.
+ Incorrect carburettor setting
Contact customer service
FBS 43 B2
KOMPERNASS HANDELS GMBH
BURGSTRASSE 21
44867 BOCHUM
GERMANY
www.kompernass.com
49
GB
Disposal
The packaging is made from environmentally-friendly material
and can be disposed off at your local recycling plant.
The device and its accessories are made from various materials,
such as metal and plastic.
Your local community or municipal authorities can provide information on
how to dispose of the worn-out device.
Environmental protection
■ Carefully empty the petrol and oil tank and dispose of your device at a
recycling plant. The plastic and metal parts used can be separated and
recycled.
GB
■ Dispose of waste oil and petrol at a waste collection centre, do not
dump these into the sewerage or drainage system.
■ Dispose of contaminated maintenance material and working materials
at a collection point provided for this purpose.
Translation of the original Conformity
Declaration
We, KOMPERNASS HANDELS GMBH, Custodian of Documents:
Mr. Semi Uguzlu, BURGSTR. 21, 44867 BOCHUM, GERMANY, hereby
declare that this product complies with the following standards, normative
documents and the EC directives:
Machinery Directive
(2006 / 42 / EC)
EMC (Electromagnetic Compatibility)
(2004 / 108 / EC)
Outdoor Directive
(2005 / 88 / EC)
Emissions Directive
(2004/26/EC)
Related harmonised standards
EN ISO 11806-1: 2011
EN ISO 14982: 2009
Type / Device designation
Petrol grass trimmer FBS 43 B2
Year of manufacture: 01 - 2014
Serial number: IAN 97786
Bochum, 31/10/2013
Semi Uguzlu
- Quality Manager Subject to technical changes in the course of further developments.
50
FBS 43 B2
KOMPERNASS HANDELS GMBH
BURGSTRASSE 21
44867 BOCHUM
DEUTSCHLAND / GERMANY
www.kompernass.com
Stand der Informationen · Version des informations
Versione delle informazioni · Stand van de informatie
Last Information Update: 01 / 2014 · Ident.-No.: FBS43B2-122013-4
IAN 97786
1