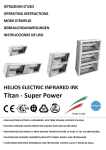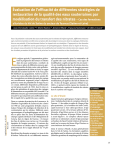
1
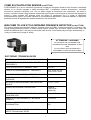
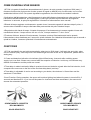
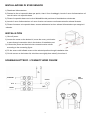
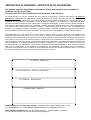
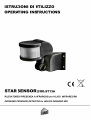
Informazione importante per lo smaltimento ambientalmente compatibile
IN ALCUNI PAESI DELL'UNIONE EUROPEA QUESTO PRODOTTO NON RICADE NEL CAMPO DI APPLICAZIONE
DELLA LEGGE NAZIONALE DI RECEPIMENTO DELLA DIRETTIVA RAEE E QUINDI NON È IN ESSI VIGENTE
ALCUN OBBLIGO DI RACCOLTA DIFFERENZIATA A FINE VITA.
Questo prodotto è conforme alla Direttiva EU2002/96/EC. Il simbolo del bidone barrato riportato sull’apparecchio indica
che il prodotto, alla fine della propria vita utile, dovendo essere trattato separatamente dai rifiuti domestici, deve essere
conferito in un centro di raccolta differenziata per apparecchiature elettriche ed elettroniche oppure riconsegnato al
rivenditore al momento dell’acquisto di una nuova apparecchiatura equivalente. L’utente è responsabile del conferimento
dell’apparecchio a fine vita alle appropriate strutture di raccolta, pena le sanzioni previste dalla vigente legislazione sui
rifiuti. L’adeguata raccolta differenziata per l’avvio successivo dell’apparecchio dismesso al riciclaggio, al trattamento e allo
smaltimento ambientalmente compatibile contribuisce ad evitare possibili effetti negativi sull’ambiente e sulla salute e
favorisce il riciclo dei materiali di cui è composto il prodotto. Per informazioni più dettagliate inerenti i sistemi di raccolta
disponibili, rivolgersi al servizio locale di smaltimento rifiuti o al negozio in cui è stato effettuato l’acquisto. I produttori e gli
importatori ottemperano alla loro responsabilità per il riciclaggio, il trattamento e lo smaltimento ambientalmente
compatibile sia direttamente sia partecipando ad un sistema collettivo.
Important information for environmentally friendly disposal
IN SOME EU COUNTRIES THIS PRODUCT DOES NOT FALL INTO THE SCOPE OF APPLICATION OF THE ITALIAN
DOMESTIC LAW ACKNOWLEDGING THE RAEE DIRECTIVE AND THEREFORE THERE IS NO OBLIGATION IN
FORCE TO SEPARATE MATERIALS AT THE END OF THEIR USEFUL LIFE.
This product complies with Directive ED2002/96/EC. The symbol of a dustbin with a cross, which is shown on the
appliance, indicates that the product, because it must be treated separately from household waste, must be taken, at the
end of its useful life, to a collection centre for electrical and electronic equipment or redelivered to the retailer on purchase
of a new equivalent appliance. The user is responsible for delivering the appliance to the appropriate collection structure at
the end of its life, on penalty of the measures provided for by current legislation on waste. The proper separate collection
for subsequent transfer of the appliance for recycling, treatment and environmentally friendly disposal contributes to
avoiding any possible harmful effects on the environment and health and promotes recycling of the materials that make up
the product. For more detailed information on the available collection systems, contact the local refuse disposal service or
the shop where the purchase was made. The producers and importers meet their responsibilities for recycling, treatment
and environmentally friendly disposal either directly or through participating in a collective system.
2
COME SI UTILIZZA STAR SENSOR (cod.ST13A)
STAR SENSOR è un nuovo rilevatore di presenza a risparmio energetico dotato di due rilevatori a sensibilità
elevata, di un circuito integrato e della tecnologia SMT. Il dispositivo riunisce automazione, comodità,
sicurezza e risparmio energetico, ecc. Con un ampio raggio di rilevamento che comprende i lati destro e
sinistro, il sensore utilizza i raggi infrarossi emessi dal corpo umano come sorgente di controllo del segnale per
avviare il carico quando una persona entra nel campo di rilevamento ed è in grado di identificare
automaticamente il giorno e la notte. Utilizzato in numerosissime applicazioni e facile da installare, il dispositivo
possiede funzioni di segnalazione dell'alimentazione e del rilevamento.
WELCOME TO USE ST13A INFRARED PRESENCE DETECTOR (code ST13A)
This product adopts high sensitivity detector, integrate circuit and SMD; It gathers automatic, convenient, safe,
energy-saving,practical functions; It utilizes human motion infrared rays as control signal sources, when one
enters the detection field, it will start the controlled load at once; It can identify day and night automatically; It
is easy to install and its usage is widely.
ATTENZIONE / WARNING
ST13A NON E’ DA UTILIZZARSI CON
APPARECCHIATURE SUPERIORI AI 3000
Watt
ST13A SHOULD NOT BE USED WITH
EQUIPMENTS OVER 3000 Watt POWER
DATI TECNICI /TECHNICAL DATAS
FONTE DI ALIMENTAZIONE / POWER SOURCE
220-240V/AC
FREQUENZA DI ALIMENTAZIONE / POWER
FREQUENCY
50Hz
LUCE DI CONTROLLO / AMBIENT LIGHT
<3 Lux ~
TEMPO DI FUNZIONAMENTO / TIME-DELAY
min 10 sec ± 3 sec
max 7 min ± 2 min
RAGGIO DI RILEVAMENTO / DETECTION RANGE
220°
DISTANZA DI RILEVAMENTO / DETECTION
DISTANCE
12 m max (<24°C)
ALTEZZA DI INSTALLAZIONE / INSTALLATION
HEIGHT
1,5 m – 2,5 m
CARICO DI POTENZA / RATED LOAD
3000 W
(220 V/CA ~
240V/CA)
TEMPERATURA DI FUNZIONAMENTO / WORKING
TEMPERATURE
-20 ~ 40°C
UMIDITA' DI FUNZIONAMENTO / WORKING
HUMIDITY
< 93% UR
CONSUMO ENERGETICO / POWER
CONSUMPTION
0,45 W (statico 0,1
W)
VELOCITA' DI RILEVAMENTO MOVIMENTO /
DETECTION MOVING SPEED
0,6 ~ 1,5 m/s
3
COME FUNZIONA STAR SENSOR
1.ST13A è in grado di identificare automaticamente il giorno e la notte: quando si regola su SUN (max), il
rilevatore funziona sia di giorno che di notte, quando si regola su MOON (min), funziona solo con una luce
ambientale inferiore a 3lux. Per quanto riguarda la regolazione, fare riferimento al metodo di collaudo.
2.Indicazione dell'alimentazione e del rilevamento: la spia dell'indicatore lampeggia una volta ogni 4 sec. dopo
l'attivazione dell'alimentazione, può lampeggiare 2 volte ogni secondo dopo la ricezione dei segnali di
induzione. In tal modo, la spia può segnalare se il rilevatore e l'alimentazione sono normali.
3.Ritardo di tempo aggiunto continuamente: quando riceve il secondo segnale di induzione dopo il primo, il
sensore deve ricalcolare il tempo sulla base della parte residua del primo ritardo di tempo.
4.Regolazione del ritardo di tempo: il ritardo di tempo per il funzionamento può essere regolato in base alle
necessità del cliente. Il tempo minimo è 8 sec ± 3 sec, il tempo massimo è 7 min ± 2 min.
5.Funzione di blocco: durante il funzionamento, il sensore continua l'illuminazione del carico quando
l'alimentazione viene disattivata per 2 secondi e quindi riattivata. Se si disattiva l'alimentazione per 4 secondi e
quindi la si riattiva, il sensore riprenderà il funzionamento automatizzato.
FUNCTIONS
1.ST13A can identify day and night automatically: when turn to SUN (max), it will work day and night, when
turn it to MOON (min), it will only work in the ambient light less than 3LUX. As for adjustment, please refer to
testing way.
2. Power and detection indication: the indicator light will flash every 4 seconds after switching power
supply, but it can flash 2 times every second after the reception of induction. In this way, the indicator may
indicate if the detector and the power are normal.
3.Time-delay is added continually: When it receives the second induction signals after the first induction, it will
compute time once more on the rest of the first time-delay basis (set time).
4.Time-delay is adjustable: It can be set according to your desire, the minimum is 10sec±3sec and the
maximum is 7min±2min.
5.Lock Function: During operation, the sensor will continue lighting load when the power is turned off for 2
seconds and then back on. If you turn off the power for 4 seconds and then reactivates it, the sensor will
resume the automated operation.
ORIENTAMENTO CORRETTO
DEL MOVIMENTO
ORIENTAMENTO ERRATO
DEL MOVIMENTO
GOOD SENSITIVITY
POOR SENSITIVITY
4
INSTALLAZIONE DI STAR SENSOR
1) Disattivare l'alimentazione.
2) Ruotare la vite sul coperchio-base per aprirlo, tirare il foro di cablaggio, inserire il cavo di alimentazione e il
cavo di carico nel coperchio-base.
3) Fissare il coperchio-base con la vite di dilatabilità nella posizione di installazione selezionata.
4) Inserire il cavo di alimentazione e il cavo di carico nel sensore conformemente allo schema illustrato.
5) Fissare il sensore sul coperchio-base, serrare saldamente la vite e attivare l'alimentazione per eseguire il
collaudo.
INSTALLATION
1) Shut off power.
2) Loosen the screw on the bottom lid, move the cover, put the wire
to pass through connection hole in the bottom of installation part.
3) Connect the power and load wire into connection-wire column
according to the connecting figure.
4) Fix the sensor with inflated screw on the selected position through installation hole.
5) Put the sensor on the bottom lid, twist the screw tightly then electrify it and test it.
SCHEMA ELETTRICO / CONNECT-WIRE FIGURE
MARRONE
CARICO
BLU
ROSSO
5
SPIA
PILOTA
COLLAUDO
1) Ruotare la manopola di comando della luce in senso antiorario sul valore più alto, quindi ruotare la
manopola del tempo in senso orario sul valore più basso.
2) Attivare l'alimentazione. Il carico controllato non deve funzionare e la spia dell'indicatore lampeggia una
volta ogni 4 sec. Il carico funziona entro 10-15 sec e la spia dell'indicatore lampeggia due volte ogni secondo.
Se non vi sono segnali di induzione, il carico interrompe il funzionamento entro 5-30 sec e la spia
dell'indicatore deve riprendere a lampeggiare 1 volta ogni 4 sec.
3) Eseguire un nuovo rilevamento 5-10 sec dopo lo spegnimento del carico. Il carico deve funzionare e la spia
dell'indicatore lampeggiare 2 volte ogni secondo. Il carico interrompe il funzionamento entro 5-15 sec.
4) Ruotare la manopola LUX sul valore più basso in senso antiorario. Se il collaudo viene effettuato con una
luce ambientale superiore a 3 Lux, eseguire un rilevamento e il carico non dovrebbe attivarsi dopo
l'interruzione del funzionamento. Se si copre la lente di rilevamento con un oggetto opaco (asciugamano,
ecc.), il carico deve funzionare. In condizioni di assenza dei segnali di rilevamento, è normale che il carico
interrompa il funzionamento entro 5-15 sec.
5) Attenzione: è necessario che vi sia un intervallo di 5 sec tra il secondo rilevamento e il primo rilevamento
quando il carico interrompe il funzionamento, ma non è necessario un intervallo quando l'induzione è continua
e il carico non interrompe il funzionamento.
N.B.: quando si effettuano prove di giorno, ruotare la manopola sulla posizione Sole (sun), altrimenti la
lampada sensore potrebbe non funzionare.
NOTE:
- Il sensore deve essere installato da un elettricista o un operatore esperto.
- Non è possibile utilizzare oggetti instabili come base per l'installazione.
- Assicurarsi che non vi siano ostacoli od oggetti instabili che influiscono sul rilevamento davanti alla finestra
di rilevamento.
- Evitare di installare il sensore vicino a fonti di calore.
- Per motivi di sicurezza, non aprire l'alloggiamento se si rilevano inconvenienti dopo l'installazione.
TEST:
1) Turn the TIME knob clockwise on the minimum, turn the LUX knob anti-clockwise on the maximum (sun).
2) When you switch on the power, the controlled load and pilot lamp are both not working. Preheat 30 seconds
later, the load and the pilot lamp are turned on synchronization, in the absence of no inductor signals, the load
should be stopped working within 5-30sec, the pilot lamp is turned off.
3) After the first is out, make it sense again after 5~10sec. The load should work. When there is no inductor
signals in the pilot lamp, the load should be stopped working within 5-15sec.
4) Turn LUX knob clockwise on the minimum. The inductor load should not work after load stop working. If you
cover the detection window with the opaque objects (towel etc), the load work .under no induction signal
condition, the load should stop working within 5-15sec.
Note: when testing in daylight, please turn LUX knob to (SUN) position, otherwise the sensor lamp could not
work!
NOTE:
-Should be installed by electrician or experienced person.
-Avoid installing it on the unrest object.
-There should be no hindrance and moving objects in front of the detection windows to effect detection.
-Avoid installing it near air temperature alteration zones such as air condition, central heating, etc.
-Considering your safety, please do not open the cover when you find the hitch after installation.
-If there is difference between instruction and the function the product has, please give priority to product and
sorry not to inform you additionally.
6
COME RIMEDIARE AD EVENTUALI INCONVENIENTI
1) Il rilevatore non si accende:
a.
Controllare che le connessioni di alimentazione e il carico siano corretti
b.
Controllare che la spia dell'indicatore lampeggi 1 volta ogni 4 sec.
c.
Controllare che il carico sia ottimale.
d.
Controllare che la luce di funzionamento impostata corrisponda alla luce ambientale.
2) La sensibilità è insufficiente:
a.
Controllare che non vi siano ostacoli davanti alla finestra di rilevamento che possano influire
sulla ricezione dei segnali.
b.
Controllare la temperatura ambientale sia nella range min. e max di funzionamento
c.
Controllare se la sorgente dei segnali rientra nei campi di rilevamento.
d.
Controllare che l'altezza di installazione sia nella range consigliata.
e.
Controlla che l'orientamento del movimento sia corretto.
3) Il sensore non spegne automaticamente il carico:
a.
Verificare che ci sia un segnale continuo nel campo di rilevamento.
b.
Verificare che il tempo di spegnimento sia impostato sul valore più alto.
–
Verificare che l'alimentazione corrisponda alle specifiche tecniche.
–
Verificare che la temperatura vicino al sensore non subisca variazioni (climatizzatore,
riscaldamento centrale, ecc.).
SOME PROBLEM AND SOLVED WAY:
1) The load do not work:
a. Please check if the connection-wiring of power and load is correct.
b. Please check if the load is good.
c. Please check if the working light sets correspond to ambient light.
The sensitivity is poor:
a. Please check if there has hindered in front of the detection window to effect to receive the signal.
b. Please check if the ambient temperature is too high.
c. Please check if the induction signal source is in the detection fields.
d. Please check if the installation height corresponds to the height showed in the instruction.
e. Please check if the moving orientation is correct.
The sensor can not shut off the load automatically:
a. Please check if there is continual signal in the detection field.
b. Please check if the time delay is the longest.
c. Please check if the power corresponds to the instruction.
d. Please check if the temperature near the sensor changes obviously, such as air condition or
central heating etc.
7
CERTIFICATO DI GARANZIA / CERTIFICATE OF GUARANTEE
Per rendere operante la garanzia, l’utilizzatore all’atto dell’acquisto deve compilare il
certificato in tutte le sue parti.
The user must fill in the certificate for the guarantee to be effective.
Ci complimentiamo con Lei per l’acquisto dei nostri sensori di movimento a infrarossi Star Sensor. La durata di
garanzia è di 1 anno e decorre dalla data di acquisto del rilevatore, cessa dopo il periodo prescritto. La ricevuta fiscale
o altro documento valido fiscalmente comprova la decorrenza della garanzia. Si garantiscono tutte le sostituzioni o le
riparazioni che si rendessero necessarie a causa di difetti di materiale o di costruzione. La garanzia non viene
riconosciuta qualora il rilevatore venga manomesso o qualora sia danneggiato a causa di incuria, durante il trasporto,
manutenzione operata da personale non autorizzato, mancata osservanza delle istruzioni d’uso, errata installazione o
non conforme alle norme vigenti nel paese di utilizzo. La garanzia non prevede in alcun caso la sostituzione del
rilevatore. Le riparazioni eventuali riconosciute in garanzia saranno effettuate gratuitamente per merce resa franco
STAR PROGETTI presso il distributore autorizzato. Sono quindi a carico dell’utilizzatore le sole spese di trasporto.
We congratulate you on the purchase of our Star Sensor. Validity 1 year from date of purchase of the appliance: the
guarantee expires after this period. The invoice, receipt or hire purchase agreement shall prove the duration of the
guarantee period. Replacements and repairs caused by faulty materials or manufacture are guaranteed. Replacements
and repairs to those parts of the appliance subject to normal wear are excluded form this guarantee. The guarantee
shall immediately cease and become void should the appliance be dismantled or repaired by unauthorized people, or in
case of negligence, or accidental damage during transport or elsewhere, or in case of misuse, failure to comply with
the instructions for use, maintenance carried out by unauthorized people, faulty installation not in conformity with the
laws in force. Replacement of the appliance is excluded from this guarantee. The eventual repairs recognized in
guarantee will be carried out free of charge for those appliances returned free STAR PROGETTI’s factory or to one of
the authorized distributor. All transport costs are to be paid by the customer.
N. SERIE – SERIAL NO.
DATA ACQUISTO - DATE OF PURCHASE
FATTURA N. - INVOICE NO.
RIVENDITORE - DEALER
STAR PROGETTI Tecnologie Applicate SpA - Via Pasubio 4/D - 20067 TRIBIANO (MI) - ITALY
Tel +39/02/90639261 Fax +39/02/90639259 www.starprogetti.com [email protected]
STAR PROGETTI FRANCE Sarl - 345, Rue du Bois Bernoux – 71290 CUISERY - FRANCE
Tel +33 3 85 401 262 Fax +33 3 85 400 691 www.starprogetti.com
8
ED.02_13
SEDE CENTRALE/PRODUZIONE – HEADQUARTER / PRODUCTION:
STAR PROGETTI Tecnologie Applicat e SpA - Via Pasubio 4/D - 20067 TRIBIANO (MI) - ITALY
Tel +39/02/90639261 Fax +39/02/90639259 www.starprogetti.com [email protected]
STAR PROGETTI FRANCE Sarl - 345, Rue du Bois Bernoux – 71290 CUISERY - FRANCE
Tel +33 3 85 401 262 Fax +33 3 85 400 691 www.starprogetti.com