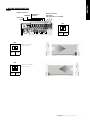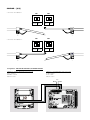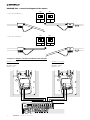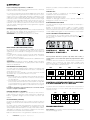
1
INSTALLATION AND USER’S MANUAL
CU - 110V - HP
Control unit
comunello.com
ISTRUZIONI D’USO E DI INSTALLAZIONE
INSTALLATIONS-UND GEBRAUCHSANLEITUNG
INSTRUCIONS D’UTILISATION ET D’INSTALLATION
INSTRUCCIONES DE USO Y DE INSTALACION
ИНСТРУКЦИЯ ПО МОНТАЖУ
Cod. 91300194
Rev. 01 - 25.03.15
MENÙ LIST
MAIN MENÙ
ID
L1
L2
L3
L4
L5
L6
L7
LEV
LED
STEP BY STEP
CODE TX
CONDO
MOTOR TIME
PAUSE TIME
DELAY
AUTO PROGRAM
MENÙ LEVEL
ID
L1
L2
L3
LED
PERSON PRESENT
PEDESTRIAN /
SINGLE LEAF PUSHBUTTON
PEDESTRIAN PUSHBUTTON / DS3
L4
L5
L6
L7
LEV
FOTOTEST
DS2 STP IN CLOSING
DS1 PARTIAL REVERSAL
NC AS 8K2
MENU LEVEL
ID
L1
L2
L3
L4
L5
L6
L7
LEV
LED
BRAKE
DECELERATION
ALWAYS CLOSE
FOLLOW ME
PEDESTRIAN TIME
2°CH MONOSTABLE
REMOTE PRG
MENÙ LEVEL
ID
L1
L2
L3
L4
L5
L6
L7
LEV
LED
SOFT STOP
SOFT START
RELEASE STROKE
SLAM LOCK
ELS / PED CMD
PAUSE FLASHING
PREFLASH / COURTESY LIGHT
MENU LEVEL
Step-by-Step
Code entered
ON
Programmed time
With automatic closing
ON
ON
Automatic
No code
OFF
30 sec.
Without automatic closing
OFF
OFF
ON
EXTENDED MENÙ 1
ON
SINGLE LEAF
OFF
PEDESTRIAN
PUSHBUTTON
PEDESTRIAN
PUSHBUTTON
OFF
OFF
OFF
OFF
DS3
ON
ON
ON
ON
1 FLASH
EXTENDED MENÙ 2
ON
OFF
ON
ON
PROGRAMMED TIME
ON
ON
2 FLASHES
OFF
ON
OFF
OFF
10 Sec
OFF
OFF
EXTENDED MENÙ 3
2
COMUNELLO ®Copyright 2014 - All right reserved
ON
ON
ON
ON
ON
ON
ON
OFF
OFF
OFF
OFF
OFF
OFF
OFF
3 FLASHES
ITALIANO
FIG. 4
TABELLA CONNESSIONI CAVI AG01 - WIRES CONNECTION TABLE AG01
HP 110V – (CU 110V HP)
ID
Description
1
Cable type
Lenght (1m to 20m)
Lenght (20m to 50m)
Main power supply
3Gx1,5mm2
3Gx2,5mm2
6A
Motor power supply
4Gx1,5mm2
4Gx2,5mm2
2
Flashing light
2x0,5mm2
2x1,0mm2
4A , 5A
Photocell TX
2x0,5mm2
2x1,0mm2
4B , 5B
Photocell RX
4x0,5mm2
4x1,0mm2
7
Key selector
3x0,5mm2
3x1,0mm2
6B
Limit switch
3x0,5mm2
6C
Encoder
3x0,5mm2
3
Antenna
FROR CEI 20-22
CEI EN 50267-2-1
RG58
3x1,0mm2
3x1,0mm2
max 20m
COMUNELLO ®Copyright 2014 - All right reserved
3
MOTORE n1
MOTOR n1
230V 50HZ
MOTORE n2
MOTORE n2
230V 50HZ
LAMPEGGIANTE
FLASHING
230V 500W
FINECORSA CHIUSURA (N.C.) MOTORE n2
END CLOSE (N.C.) MOTOR n2
ENCODER
MOTORE n2
MOTOR n2
LINEA
POWER SUPPLY
2P+T 230V 50Hz
FINECORSA APERTURA (N.C.) MOTORE n2
END OPEN (N.C.) MOTOR n2
ENCODER
MOTORE n1
MOTOR n1
FINECORSA CHIUSURA (N.C.) MOTORE n1
END CLOSE (N.C.) MOTOR n1
FINECORSA APERTURA (N.C.) MOTORE n1
END OPEN (N.C.) MOTOR n1
CN3
CN2
FC2
FA2
GND
E2
E2+
FC1
FA1
GND
E1
E1+
CL2
CM2
OP2
CM1
CL1
230V
OP1
230V
CN1
L
N
CANALE RADIO AUX
RADIO CHANNEL AUX
(N.O.) 30V 1A
2nCH
2nCH
ALIMENTAZIONE FOTOCELLULE
PHOTOCELL POWER
24V 5W
LAMPEGGIANTE
FLASHING LIGHT
24V 4W
FOT+
FOTOCELLULA
PHOTOCELL
DS 2 (N.C.)
L24V
DS2
GND
DS1
S8K2
FOTOCELLULA
PHOTOCELL
DS 1 (N.C.)
GND
PPED
PP
ELS+
ELS24V
INGRESSO 8K2
IMPUT 8K2
GND
+LED
ANTANT+
CN5
CN4
PULSANTE PEDONALE (N.O.)
PEDESTRI AN PUSH BUTTON (N.O)
PULSANTE APRI-CHIUDI (N.O.)
PUSCH BUTTON (N.O)
11.8V
25V
TRASFORMATORE
TRANSFORMER
230 / 25V - 0,8A, 11,8V - 3,5A
ANTENNA
ELETTROSERRATURA 12VDC 15W
ELECTRIC LOCK 12V 15W
ALIMENTAZIONE SERVIZI
SUPPLY SERVICES
24V 5W
LUCE SPIA
LIGHT
24V 4W
ITALIANO
1 MOTOR CONFIGURATION
FORT
MOTOR 1 OUTPUT:
CL2
CM1
CL1
230V
OP1
230V
CN1
L
N
BLACK ON
OPEN
CM2
MOTOR 2 OUTPUT:
NOT USED
(NO-ELECTRICITY SUPPLIED)
BROWN ON
CLOSED
OP2
COMMON
SW1
ON
1
2
1
M2 NOT
MOTOR CONSID.
SW2
FORT opens to LEFT
Innner side view
ON
1
2
INV
MOT 1
M2 NOT
CONSID.
SW2
FORT opens to RIGHT
Innner side view
ON
1
INV
MOT 1
2
M2 NOT
CONSID.
COMUNELLO ®Copyright 2014 - All right reserved
5
SALIENT
MOTOR 1 OUTPUT:
OP2
CM1
CL1
230V
OP1
230V
CN1
L
N
BROWN ON
OPEN
CL2
MOTOR 2 OUTPUT:
NOT USED
(NO-ELECTRICITY SUPPLIED)
BLACK ON
CLOSED
CM2
COMMON
SW1
ON
1
2
1
M2 NOT
MOTOR CONSID.
SALIENT: DO NOT CHANGE the configuration!
Opens to left, closes to right (left profile view, as in the image).
ITALIANO
2 MOTORS CONFIGURATION
ABACUS - connection diagram of the motors
SW2
SW1
• DELAY OF THE MOTOR n.2
ON
ON
1
2
1
DELAY
2
MOTORS MOT.2
2
INV
OFF
INV
OFF
1
2
SW2
SW1
• DELAY OF THE MOTOR n.1
ON
ON
1
1
2
2
MOTORS
DELAY
MOT.1
2
INV
OFF
INV
OFF
1
2
Configuration:
CL2
CM2
OP2
CM1
CL1
230V
OP1
CN1
230V
OPEN with OP2
COMMON with CM2
CLOSED with CL2
L
N
OPEN with OP1
COMMON with CM1
CLOSED with CL1
COMUNELLO ®Copyright 2014 - All right reserved
7
RAM - connection diagram of the motors
SW2
SW1
• DELAY OF THE MOTOR n.2
ON
ON
1
2
1
2
INV
OFF
2
DELAY
MOTORS MOT.2
INV
OFF
1
2
SW2
SW1
• DELAY OF THE MOTOR n.1
ON
ON
1
2
MOTORS
1
2
2
INV
OFF
DELAY
MOT.1
INV
OFF
1
2
Configuration:
CL2
CM2
OP2
CM1
CL1
230V
OP1
CN1
230V
OPEN with OP2
COMMON with CM2
CLOSED with CL2
L
N
OPEN with OP1
COMMON with CM1
CLOSED with CL1
ITALIANO
CONDOR - connection diagram of the motors [1/2]
SW1
• DELAY OF THE MOTOR n.2
SW2
ON
ON
1
2
1
2
DELAY
MOTORS MOT.2
INV
OFF
2
INV
MOT.2
1
2
SW2
SW1
• DELAY OF THE MOTOR n.1
ON
ON
1
2
MOTORS
2
1
DELAY
MOT.1
1
INV
OFF
2
INV
MOT.2
2
Configuration - MASTER ON THE LEFT, SLAVE ON THE RIGHT
MOTOR n.1 WITH CONTROL UNIT (on the left)
[ALREADY CONNECTED]
BLACK with OP1
BLUE on CM1
Blue
BROWN on CL1
MOTOR n.2 WITHOUT CONTROL UNIT (on the right)
OPEN with OP2
COMMON with CM2
CLOSED on CL2
Brown
FC2
FA2
GND
E2
E2+
FC1
FA1
GND
E1
E1+
CL2
CM2
OP2
230V
CM1
CL1
OP1
L
N
230V
Black
2nCH
2nCH
FOT+
L24V
DS2
GND
DS1
S8K2
GND
PPED
PP
ELS+
ELS24V
GND
+LED
ANTANT+
COMUNELLO ®Copyright 2014 - All right reserved
9
CONDOR - [2/2]
• DELAY OF THE MOTOR n.1
SW2
SW1
ON
ON
1
2
2
DELAY
MOTORS MOT.1
1
2
INV
MOT.1
INV
OFF
2
1
SW2
SW1
• DELAY OF THE MOTOR n.2
ON
ON
1
2
DELAY
2
MOTORS MOT.2
1
INV
MOT.1
2
INV
OFF
2
1
Configuration - MASTER ON THE RIGHT, SLAVE ON THE LEFT
MOTOR n.1 WITH CONTROL UNIT (on the right)
BLACK with OP1
BLUE on CM1
BROWN on CL1
Blue
FC2
FA2
GND
E2
E2+
FC1
FA1
GND
E1
E1+
CL2
CM2
230V
CM1
CL1
OP1
L
N
OP2
Brown
Black
230V
MOTOR n.2 WITHOUT CONTROL UNIT (on the left)
OPEN with OP2
COMMON on CM2
CLOSED on CL2
2nCH
2nCH
FOT+
L24V
DS2
GND
DS1
S8K2
GND
PPED
PP
ELS+
ELS24V
GND
+LED
ANTANT+
ITALIANO
EAGLE - connection diagram of the motors
SW2
SW1
• DELAY OF THE MOTOR n.2
ON
ON
1
2
2
MOTORS
1
INV
OFF
DELAY
MOT.2
2
INV
MOT.2
1
2
SW1
• DELAY OF THE MOTOR n.1
SW2
ON
ON
1
1
2
2
MOTORS
INV
OFF
DELAY
MOT.1
2
INV
MOT.2
1
2
Configuration - MOTOR n.1 ON THE LEFT, MOTOR n.2 ON THE RIGHT
Black
Blue
Brown
OP2
CM2
CL2
Brown
CM1
CL1
230V
OP1
230V
L
N
CN1
Blue
MOTOR n.2 (on the right)
BLACK with OP2
BLUE on CM2
BROWN on CL2
Black
MOTOR n.1 (on the left)
BLACK with OP1
BLUE on CM1
BROWN on CL1
COMUNELLO ®Copyright 2014 - All right reserved
11
CONDOR 500 - connection diagram of the motors
SW1
• DELAY OF THE MOTOR n.2
SW2
ON
ON
1
2
1
2
DELAY
MOTORS MOT.2
2
INV
MOT.2
INV
OFF
1
2
SW2
SW1
• DELAY OF THE MOTOR n.1
ON
ON
1
2
1
2
DELAY
MOTORS MOT.1
2
INV
MOT.2
INV
OFF
1
2
Configuration - MOTOR n.1 ON THE LEFT, MOTOR n.2 ON THE RIGHT
12
COMUNELLO ®Copyright 2014 - All right reserved
CL2
CM2
OP2
CM1
CL1
OP1
230V
CN1
230V
MOTOR n.2 (on the right)
OPEN with OP2
COMMON on CM2
CLOSED on CL2
L
N
MOTOR n.1 (on the left)
OPEN with OP1
COMMON on CM1
CLOSED on CL1
ITALIANO
ISTRUZIONI D’USO E DI INSTALLAZIONE
CU - 110V - HP
DICHIARAZIONE DI CONFORMITÁ CE
Il sottoscritto, sig. COMUNELLO LUCA rappresentante il seguente costruttore
F.lli COMUNELLO spa
Via Cassola 64, 36027 Rosà (VI) Italy
DICHIARA che l’apparecchiatura descritta in appresso:
Quadro elettronico di comando
CU 110V HP
Descrizione Modello è conforme alle disposizioni legislative che traspongono le seguenti direttive:
• direttiva 2004/108 CE (Direttiva EMC)
• direttiva 2006/95/CE
e che sono state applicate tutte le norme e/o specifiche tecniche di seguito indicate
EN61000-6-2 + EN61000-6-3
EN62233 :2008
EN301489-1 + EN301489-3 + EN300220-2
EN60335-1 :2002
ed emendamenti successivi
Ultime due cifre dell’anno in cui è affissa la marcatura CE 14
Rosà (VI) – Italia
01-09-2014
Inoltre dichiara che non è consentito mettere in servizio il macchinario fino a che la macchina in cui sarà incorporata o di cui diverrà
componente sia stata identificata e ne sia stata dichiarata la conformità alle condizioni della Direttiva 2006/42/CE e alla legislazione
nazionale che la traspone.
Dr. LUCA COMUNELLO
Legale rappresentante della FRATELLI COMUNELLO s.p.a.
Fratelli Comunello S.p.A.
Azienda con Sistema Gestione Qualità certificato
UNI EN ISO 9001:2008.
(Certificato n° 50 100 11235 Rev. 01)
COMUNELLO ®Copyright 2014 - All right reserved
13
AVVERTENZE
•La centrale non presenta nessun tipo di
dispositivo di sezionamento della linea elettrica
110~, sarà quindi cura dell’in stallatore prevedere
nell’impianto un dispositivo di sezionamento. È
necessario installare un interruttore omnipolare
con categoria III di sovratensione. Esso deve
essere posizionato in modo da essere protetto
contro le richiusure accidentali secondo quanto
previsto al punto 5.2.9 della EN 12453. Il
cablaggio dei vari componenti elettrici esterni
alla centralina deve essere effettuato secondo
quanto prescritto dalla normativa EN 60204-1
e dalle modifiche a questa apportata dal punto
5.2.7 della EN 12453.
I cavi di alimentazione possono avere un
diametro massimo di 14 mm; il fissaggio dei cavi
di alimentazione e di collegamento, deve essere
garantito tramite l’assemblaggio di pressacavi
fornibili “optional”.
• Utilizzare in fase di installazione esclusivamente
cavi in doppio isolamento (cavi con guaina)
sia per i collegamenti a tensione di rete (110V)
che per i collegamenti in bassissima tensione
di sicurezza SELV. Utilizzare esclusivamente
canalette in plastica, distinte per i cablaggi
in bassa tensione (110V) e per i cablaggi in
bassissima tensione di sicurezza (SELV).
•I conduttori a bassissima tensione di sicurezza
devono essere fisicamente separati (almeno 4
mm in aria) dai conduttori a tensione di rete,
oppure devono essere adeguatamente isolati
con isolamento supplementare avente spessore
di almeno 1 mm.
•Prevedere a monte della rete di alimentazione
dell’automazione un dispositivo che assicuri
la disconnessione completa omnipolare della
rete, con una distanza di apertura dei contatti
in ciascun polo di almeno 3mm. Tali dispositivi
di disconnessione devono essere previsti nella
rete di alimentazione conformemente alle regole
di installazione e devono essere direttamente
collegati ai morsetti di alimentazione.
•Per i cavi di alimentazione si raccomanda di
utilizzare cavi flessibili sotto guaina isolante in
policloroprene di tipo armonizzato (H05RN-F)
con sezione minima dei conduttori pari a 1mm2.
• Fare attenzione, in fase di foratura dell’ involucro
esterno per far passare i cavi di alimentazione
e di collegamento, e di assemblaggio dei
pressacavi, ad installare il tutto in modo
da mantenere il più possibile inalterate le
caratteristiche di grado IP della scatola. Prestare
inoltre attenzione a fissare i cavi in modo che
siano ancorati in modo stabile.
•L’involucro nella parte posteriore è provvisto di
opportune predisposizioni per fissaggio a muro
(predisposizione per fori per fissaggio mediante
tasselli o fori per fissaggio mediante viti).
Prevedere e implementare tutti gli accorgimenti
14
COMUNELLO ®Copyright 2014 - All right reserved
per una installazione che non alteri il grado IP.
•
L’eventuale montaggio di una pulsantiera
per il comando manuale deve essere fatto
posizionando la pulsantiera in modo che l’utente
non venga a trovarsi in posizione pericolosa.
•Il motoriduttore usato per muovere il cancello
deve essere conforme a quanto prescritto al
punto 5.2.7 della EN 12453.
• L’uscita FOTO+ è necessariamente dedicata
all’alimentazione delle fotocellule, non è
consentito l’utilizzo per altre applicazioni.
•La centrale ad ogni ciclo di manovra può
effettuare il test di funzionamento delle
fotocellule, garantendo una protezione al
guasto dei dispositivi antischiacciamento di
Categoria 2 secondo quanto prescritto al punto
5.1.1.6. della EN 12453. Quindi se i dispositivi
di sicurezza non vengono connessi e/o non
sono funzionanti la centrale non è abilitata al
funzionamento.
•L’apparecchio può essere utilizzato da bambini
di età non inferiore a 8 anni e da persone con
ridotte capacità fisiche, sensoriali o mentali,
o prive di esperienza o della necessaria
conoscenza, purché sotto sorveglianza oppure
dopo che le stesse abbiano ricevuto istruzioni
relative all’uso sicuro dell’apparecchio e alla
comprensione dei pericoli ad esso inerenti. I
bambini non devono giocare con l’apparecchio.
La pulizia e la manutenzione destinata ad essere
effettuata dall’utilizzatore non deve essere
effettuata da bambini senza sorveglianza.
Per un corretto funzionamento della parte radio
ricevente, in caso di utilizzo di due o più centrali, si
consiglia l’installazione ad una distanza di almeno
3 metri l’una dall’altra.
Tutte le operazioni che richiedono l’apertura
dell’involucro (collegamento cavi, programmazione,
ecc.) devono essere eseguite in fase di installazione
da personale esperto.
IMPORTANTE PER L’UTENTE
•Il dispositivo non deve essere utilizzato da
bambini o da persone con ridotte capacità psicofisiche, almeno che non siano supervisionati o
istruiti sul funzionamento e le modalità di utilizzo.
•Non consentire ai bambini di giocare con il
dispositivo e tenere lontano dalla loro portata i
radiocomandi.
• ATTENZIONE! conservare questo manuale
d’istruzioni e rispettare le importanti prescrizioni
di sicurezza in esso contenute. Il non rispetto
delle prescrizioni potrebbe provocare danni e
gravi incidenti.
Esaminare frequentemente l’impianto per rilevare
eventuali segni di danneggiamento. Non utilizzare
il dispositivo se è necessario un intervento di
riparazione.
Alimentazione:
Uscita lampeggiante 1:
Uscita lampeggiante 2:
Uscite motori:
Uscita elettro-serratura:
Alimentazione fotocellule:
Uscita alimentazione servizi:
Uscita lampada spia:
Sicurezze e comandi in BT:
Temperatura d’esercizio:
Ricevitore radio:
Trasmettitori op.:
Codici TX max. in memoria:
Dimensioni scheda:
2: Ingresso Avvolgimento Primario Trasformatore 110 V~
CN4 (2st):
1: Uscita SEC 1 Trasformatore 11,8V 3,5A.
2: Uscita SEC 1 Trasformatore 11,8V 3,5A.
3: Uscita SEC 2 Trasformatore 25V 0,8A.
4: Uscita SEC 2 Trasformatore 25V 0,8A
110 V~ 50-60Hz 1600W max.
110 V~ 500 W max.
24 V~ 4 W max.
110 V~ 2 x 500 W max.
12 V 15 W max.
24 V~ 5 W max.
24 V~ 5 W max.
24 V 4 W max.
24 V
-20 ÷ 55 °C
433 Mhz
18 Bit o Rolling Code
120 (CODE o CODE PED/2°CH)
160x107 mm.
CARATTERISTICHE FUNZIONALI
VERIFICHE PRELIMINARI
• Verificare che il prodotto all’interno dell’imballo sia integro ed in buone
condizioni.
• Verificare che il luogo di installazione sia idoneo e rispetti le dimensioni
minime riportate in FIG. 1.
INSTALLAZIONE
• Dopo aver forato la scatola ai quattro angoli fissare la centrale alla parete
(FIG. 2).
• Per il passaggio dei cavi forare la parte inferiore della scatola. (FIG. 3).
È consigliabile l’utilizzo di pressacavi.
COLLEGAMENTI ELETTRICI
CN1:
L:
Ingresso linea 110 V~ (Fase)
N:
Ingresso linea 110 V~ (Neutro)
LAMP 110~:
Uscita Lampeggiante 1 (110 V~ Neutro)
LAMP 110~:
Uscita Lampeggiante 1 (110 V~ Fase)
MOT1 OPEN:
Uscita Motore 1 apertura
MOT1 COM:
Uscita Motore 1 comune
MOT1 CLOSE:
Uscita Motore 1 chiusura
MOT2 OPEN2:
Uscita Motore 2 apertura
MOT2 COM2:
Uscita Motore 2 comune
MOT2 CLOSE2: Uscita Motore 2 chiusura
CN2:
2nd CH:
Uscita canale Radio Aux (Free Contact max load 30V
2nd CH:
Uscita canale Radio Aux (Free Contact max load 30V
FOTO+:
Controllo e Alimentazione Fotocellule (24V~ 5W)
LAMP 24V 4W:
Uscita Lampeggiante 2 (24V~ 4W)
GND:
Ingresso GND comune
DS2:
Ingresso Dispositivo Sicurezza 2 (NC)
DS1:
Ingresso Dispositivo Sicurezza 1 (NC)
STOP 8K2: Ingresso Blocco (NC)
GND:
Ingresso GND comune
P PED:
Ingresso Pulsante Pedonale/Anta Singola/apre (NA)
PP:
Ingresso Pulsante comando apre-chiude/ chiude (NA)
ELS+:
Uscita Elettroserratura 12 V
15 W (+12V)
ELS-:
Uscita Elettroserratura 12 V 15 W (GND)
24V 5W:
Uscita servizi (24V~ 5W)
GND:
Ingresso GND comune
SPIA +24V LED:
Uscita Lampada spia (+24 V
4 W)
ANT-:
Ingresso Massa Antenna.
ANT+:
Ingresso Polo caldo Antenna
CN3:
ENC1 +:
Ingresso Alimentazione Encoder Motore 1
ENC1 E:
Ingresso Segnale Encoder Motore 1
ENC1 GND: Ingresso GND Comune
MOT1 FCA: Ingresso Finecorsa Apertura Motore 1 (NC)
MOT1 FCC: Ingresso Finecorsa Chiusura Motore 1 (NC)
ENC2 +:
Ingresso Alimentazione Encoder Motore 2
ENC2 E:
Ingresso Segnale Encoder Motore 2
ENC2 GND: Ingresso GND comune.
MOT2 FCA: Ingresso Finecorsa Apertura Motore 2 (NC)
MOT2 FCC: Ingresso Finecorsa Chiusura Motore 2 (NC)
COLLEGAMENTI AL TRASFORMATORE
CN5 (1st):
1: Ingresso Avvolgimento Primario Trasformatore 110 V~
ITALIANO
CARATTERISTICHE TECNICHE
1A)
1A)
FUNZIONAMENTO AUTOMATICO
Utilizzando sia il radiocomando che la pulsantiera in bassa tensione per
l’azionamento del serramento, si otterrà il seguente funzionamento:
il primo impulso comanda l’apertura fino allo scadere del tempo motore
al raggiungimento del fine corsa d’apertura, il secondo impulso comanda
la chiusura del serramento; se si invia un impulso prima dello scadere del
tempo motore o del raggiungimento di uno dei due finecorsa, la centrale
effettua l’inversione del moto sia nella fase d’apertura sia in quella di
chiusura.
FUNZIONAMENTO PASSO-PASSO:
Utilizzando sia il radiocomando che i pulsanti in bassa tensione per
l’azionamento del serramento, si otterrà il seguente funzionamento:
il primo impulso comanda l’apertura fino allo scadere del tempo motore o
al raggiungimento del fine corsa d’apertura, il secondo impulso comanda
la chiusura del serramento; se si invia un impulso prima dello scadere del
tempo motore o del raggiungimento del finecorsa apertura, la centrale
effettua l’arresto del moto ( se precedentemente programmato il tempo
di pausa, la centrale allo scadere effettua la richiusura automatica ). Un
ulteriore comando determina la ripresa del moto in senso opposto; se si
invia un impulso prima dello scadere del tempo motore o del raggiungimento
del finecorsa chiusura, la centrale effettua sempre l’arresto del moto. Un
ulteriore comando determina la ripresa del moto in senso opposto.
Funzionamento Passo-Passo 1:
Utilizzando sia il radiocomando che i pulsanti in bassa tensione per
l’azionamento del serramento, si otterrà il seguente funzionamento:
il primo impulso comanda l’apertura fino allo scadere del tempo motore o
al raggiungimento del fine corsa d’apertura, il secondo impulso comanda
la chiusura del serramento; se si invia un impulso prima dello scadere del
tempo motore o del raggiungimento di uno dei due finecorsa, la centrale
effettua sempre l’arresto del moto sia nella fase di apertura sia in quella di
chiusura ( anche se precedentemente programmato il tempo di pausa )
. Un ulteriore comando determina la ripresa del moto in senso opposto.
CHIUSURA AUTOMATICA:
La centrale permette di richiudere il serramento in modo automatico senza
l’invio di comandi supplementari.
La scelta di questo funzionamento è descritta nel modo di programmazione
del Tempo di pausa.
PASSAGGIO PEDONALE:
La centrale permette, utilizzando sia il radiocomando che il pulsante
Pedonale, l’azionamento del solo Motore 1, per un tempo programmabile.
ANTA SINGOLA:
La centrale, pur utilizzata nella configurazione per l’automazione a 2 motori,
permette tramite il pulsante Pedonale / Anta Singola (vedi Menù 1 Esteso
per l’opportuna configurazione del pulsante), l’azionamento del solo Motore
1, seguendo le tempistiche programmate in fase di programmazione dei
tempi motore.
INGRESSO BLOCCO:
La centrale permette il collegamento di pulsante di blocco (NC). L’intervento
in qualsiasi fase di funzionamento della centrale provoca l’arresto immediato
del moto. Un ulteriore comando di moto sarà valido sempre che sia stato
disattivato l’ingresso di blocco, ed in ogni caso la centrale effettuerà la fase
di apertura dell’automatismo con prelampeggio di 5 secondi.
ATTENZIONE: Ponticellare questo ingresso se non utilizzato
FOTOCELLULE:
La centrale permette l’alimentazione ed il collegamento di fotocellule in
accordo alla direttiva EN 12453.
Ingresso DS1 (NC)
L’intervento delle fotocellule nella fase di apertura non viene considerato,
nella fase di chiusura provoca l’inversione del moto.
Ingresso DS2 (NC)
L’intervento nella fase di apertura provoca l’arresto momentaneo del
serramento, una volta liberato la centrale riprende la fase di apertura.
L’intervento in fase di chiusura provoca l’inversione del moto.
COMUNELLO ®Copyright 2014 - All right reserved
15
Ingresso DS3 (NC) programmabile, vedi Menù 2
L’intervento nella fase di apertura provoca l’inversione del moto. L’intervento
in fase di chiusura non viene considerato.
Per consentire un funzionamento rispondente alla Categoria 2 di EN 138491 viene eseguito prima di ogni manovra un test delle fotocellule. Per poter
eseguire questo test è indispensabile alimentare la trasmittente di ogni
coppia di fotocellule mediante l’apposita uscita “Controllo e Alimentazione
Fotocellule” (uscite 3 e 5 della morsettiera CN2), mentre la ricevente di ogni
coppia deve essere alimentata mediante l’uscita “Uscita servizi” (uscite 14
e 15 della morsettiera CN2). Solo se viene superato il test la centrale avvia
la manovra: in caso contrario la centrale non consente nessun movimento
e ad ogni comando il lampeggio di tutti i led di programmazione segnala la
situazione di allarme.
FINECORSA APERTURA E CHIUSURA:
La centrale permette il collegamento di due Finecorsa Apertura e Chiusura
(NC). L’intervento nelle rispettive fasi di funzionamento provoca l’arresto
immediato del moto per entrambe le uscite Motore 1 e 2.
ATTENZIONE: Non ponticellare questi ingressi se non utilizzati
+
-
+
-
+
-
REGOLAZIONE FORZA DEI MOTORI (FORCE):
La centrale elettronica è dotata di un trimmer “FORCE” per la regolazione
della Forza dei motori, completamente gestite dal microprocessore. La
regolazione può essere effettuata con un range da 50% al 100% della Forza
massima.
Per ogni movimento è previsto comunque uno spunto iniziale, alimentando
il motore per 2 secondi alla massima potenza anche se è inserita la
regolazione della forza del motore.
Nota: lo spunto iniziale è disabilitato automaticamente se abilitata la funzione
di Soft Start.
ATTENZIONE: Una variazione del trimmer “FORCE” richiede la ripetizione
della procedura di apprendimento, in quanto potranno variare i tempi di
manovra e di rallentamento.
RILEVAMENTO OSTACOLO (SENS):
La centrale elettronica è dotata di un trimmer “SENS” per la regolazione della
Forza di contrasto necessaria alla rilevazione dell’ostacolo, completamente
gestite dal microprocessore.
La regolazione può essere effettuata con un tempo d’intervento che varia
da un minimo di 0,1 secondi ad un massimo di 7 secondi.
ATTENZIONE:
• In presenza di finecorsa collegati alla centrale il rilevamento dell’ostacolo
provoca sempre l’inversione del moto in chiusura e l’inversione per 2
secondi in apertura.
• In assenza di finecorsa collegati alla centrale il rilevamento dell’ostacolo
provoca sempre l’inversione del moto in chiusura (tranne che negli ultimi
5 secondi di manovra in cui esegue lo Stop) e l’inversione per 2 secondi
in apertura (tranne che negli ultimi 5 secondi di manovra in cui esegue lo
Stop).
La funzione rilevamento ostacolo funziona solo con motori dotati di
encoder e collegati correttamente
ENCODER MOTORE 1 E MOTORE 2:
La centrale permette il collegamento di un Encoder per ciascun motore.
L’utilizzo degli Encoder agevola la centrale nella funzione di Rilevamento
Ostacolo e garantisce maggiore precisione durante l’esecuzione delle
manovre.
RALLENTAMENTO (SLOWING):
La funzione di rallentamento dei motori è usata nei cancelli per evitare la
battuta a forte velocità delle ante mobili al termine della fase di apertura e
chiusura.
La centrale consente durante la programmazione del Tempo Motore (vedi
menù Principale) anche la programmazione del rallentamento nei punti
desiderati (prima della totale apertura e chiusura), inoltre tramite il trimmer
“SLOWING” è possibile fare una regolazione suddivisa in tre livelli di fine
intensità della velocità durante la fase di rallentamento.
Qualora si utilizzi la funzione di “Programmazione automatica” (vedi menù
16
COMUNELLO ®Copyright 2014 - All right reserved
principale) è possibile comunque disabilitare la fase di rallentamento (vedi
menù Esteso 2).
LAMPADA SPIA:
La centrale permette il collegamento di una lampada 24
per la
visualizzazione dello stato dell’automazione.
Lampada spenta: automazione chiusa
Lampada accesa: automazione aperta
Lampada che lampeggia lentamente: moto in apertura, Lampada che
lampeggia velocemente: moto in chiusura.
FUNZIONAMENTO CON TIMER:
La centrale permette di collegare al posto del pulsante di comando apre –
chiude un timer.
Esempio: ore 08.00 il timer chiude il contatto e la centrale comanda
l’apertura, ore 18.00 il timer apre il contatto e la centrale comanda la
chiusura. Durante l’intervallo 08.00–18.00 al termine della fase di apertura la
centrale disabilita il lampeggiante, la chiusura automatica e i radiocomandi.
USCITA COMANDO ELETTROSERRATURA:
La centrale dispone di un uscita per pilotare elettroserrature 12 15W
max. Il comando viene attivato ad ogni movimento iniziale di apertura per
la durata di 2 sec.
CONTROLLO SENSO DI
MOTORE 1 E MOTORE 2
MARCIA
DEL
Nota Importante: Attenzione spostare i Dip Switch SW1 e SW2, a
centrale spenta e successivamente ripetere la programmazione della
centrale.
La centrale elettronica è dotata di un Dip Switch SW2 che permette di
cambiare il senso di marcia di ogni singolo motore collegato senza
intervenire fisicamente
1 di SW2 è riferito SW2
al
SW2 su i collegamenti
SW2 elettrici: il dip SW2
motore 1; il dip 2 di SW2 è riferito al motore 2
ON
ON
SW2
ON
SW2
ON
ON
1
ON
SW2
SW2
ON
2
1
ON
2
1
2
1
1
INV
2OFF
INV
OFF1
INV
MOT
1
2
INV
OFF1
INV
OFF
2
INV
MOT 12
INV
MOT
1
2
INV
OFF
INV
OFF
INV
MOT 1
INV
OFF
INV
OFF
INV
MOT 2
INV
MOT 1
INV
MOT 2
CONTROLLO RITARDO MOTORE 1 O MOTORE
2 E ABILITAZIONE DI 1 O 2 MOTORI
La centrale elettronica è dotata di un Dip Switch SW1 che permette di
selezionare la funzione 1 o 2 motori e definire quale dei due parte per primo
e quale per secondo.
SW1
ON
SW1
SW1
ON
SW1
ON
SW1
ON
1
1
SW1
ON
2
ON
1
2
1
2
NOT
2
RITARDO
2
RITARDO
1
MOTORE
CONSID.
MOTORI
MOT.12 MOTORI
MOT. 1
2
1
2
2
NOT
2
RITARDO
2
RITARDO
1
MOTORE CONSID. MOTORI MOT. 2 MOTORI MOT. 1
PROGRAMMAZIONE:
Tasto SELECT: seleziona il tipo di funzione da memorizzare, la selezione è
indicata dal lampeggio del Led.
2
INV
MOT 2
MENÙ PRINCIPALE
La centrale è fornita dal costruttore con la possibilità di selezionare alcune
funzioni importanti.
L1
L2
L3
L4
L5
L6
L7
LEV
STEP BY STEP
CODE TX
CONDO
MOTOR TIME
PAUSE TIME
DELAY
PRG AUTOM
MENÙ
Passo – Passo
Codice inserito
ON
Tempo programmato
Con chiusura automatica
ON
ON
Automatico
Nessun codice
OFF
30 sec.
Senza chiusura automatica
OFF
OFF
ON
1. STEP BY STEP:
La centrale nella configurazione di default presenta la logica di funzionamento
“ Automatico ” abilitato (LED NR 1 spento);
se si desidera abilitare la logica di funzionamento P/P “ Passo – Passo “,
procedere nel seguente modo: posizionarsi con il tasto SEL sul lampeggio
del LED NR 1. e poi premere il tasto SET:
il LED NR 1 si accenderà permanentemente e la programmazione sarà
conclusa. Se si desidera abilitare la logica di funzionamento P/P1 “ Passo
– Passo 1, ripetere l’operazione sopra descritta, premendo il tasto SEL
due volte (ottenendo il lampeggio veloce del LED NR 1) anziché una volta.
Ripetere l’operazione se si desidera ripristinare la configurazione iniziale.
2. CODE TX: (Codice del radiocomando):
La centrale permette di memorizzare fino a 120 radiocomandi aventi codice
diverso fra loro di tipo fisso o rolling code.
Programmazione:
La programmazione del codice di trasmissione è eseguita nel seguente
modo: posizionarsi con il tasto SELECT sul lampeggio del LED L2.
Premere 1 volta SET, il led modificherà il proprio lampeggio (1 0 1 0 più
lungo) indicando che si sta memorizzando il primo livello. Inviando il codice
prescelto con il radiocomando desiderato, il LED CODE resterà acceso
permanentemente indicando che la programmazione sarà completata.
Per memorizzare il codice per l’apertura pedonale / anta singola procedere
come di seguito: posizionarsi con il tasto SELECT sul lampeggio del LED
L2 CODE. Premere 2 volte consecutive SET, il led modificherà il proprio
lampeggio (1 1 0 1 1 0) indicando che si sta memorizzando il codice
pedonale. Inviando il codice prescelto con il radiocomando desiderato,
il LED L2 CODE resterà acceso permanentemente indicando che la
programmazione sarà completata.
Per memorizzare il codice per il 2° canale AUX procedere come di seguito:
posizionarsi con il tasto SEL sul lampeggio del LED L2. Premere 3 volte
consecutive SET, il led modificherà il proprio lampeggio (1 1 1 0 1 1 1 0)
indicando che si sta memorizzando il codice 2° canale AUX. Inviando il
codice prescelto con il radiocomando desiderato, il LED L2 resterà acceso
permanentemente indicando che la programmazione sarà completata.
Nel caso che tutti i 120 codici siano stati memorizzati, ripetendo l’operazione
di programmazione, tutti i LED di programmazione inizieranno a lampeggiare
segnalando che non sono possibili ulteriori memorizzazioni.
Cancellazione:
Posizionarsi con SEL sul LED L2; attivare il lampeggio del codice da
cancellare (CODE, PEDONALE o 2° canale AUX identificati dal rispettivo
lampeggio); premere e tener premuto SET per tempo > 5 s. Alla fine il led
si spegnerà per 2 sec e la procedura è completata. Se si eliminano tutti i
codici sia CODE che PEDONALI, il led rimarrà spento.
Se rimarranno memorizzati solo codici PEDONALI o 2° CH, il led lampeggerà
in modo diverso (1 1 1 1 0 1 1 1 1 0)
Regola del primo Radiocomando memorizzato:
Nella programmazione dei radiocomandi vige la seguente regola: se il
primo radiocomando ad essere memorizzato è un radiocomando di tipo
rolling code il ricevitore accetterà poi solo radiocomandi rolling code,
garantendo così una maggiore sicurezza antintrusione; se invece il primo
radiocomando ad essere memorizzato è un radiocomando a codice fisso il
ricevitore accetterà poi sia radiocomandi a codice fisso che radiocomandi
rolling code.
3. CONDO:
Il funzionamento Condominiale prevede che la centrale durante la fase
apertura o durante la pausa non senta i comandi provenienti dai Pulsanti e
dai radiocomandi. Nella fase di chiusura invece un comando proveniente
dai pulsanti o dai radiocomandi provoca l’inversione del moto. Questa
modalità di funzionamento è particolarmente utilizzata quando l’automazione
è comprensiva di un loop detector.
La centrale nella configurazione di default, presenta la funzione condominiale
disabilitata, se occorre abilitarla, procedere nel seguente modo: posizionarsi
con il tasto SELECT sul lampeggio del LED L3 e poi premere il tasto SET:
il LED L3 si accenderà permanentemente e la programmazione sarà
conclusa. Ripetere l’operazione se si desidera ripristinare la configurazione
precedente.
4. MOTOR TIME (Program. tempo di lavoro dei motori 4 minuti
max.):
La centrale è fornita dal costruttore con un tempo di lavoro dei motori
predefinito pari a 30 sec. e senza rallentamento.
Se occorre modificare il tempo di lavoro dei Motori 1 e 2, la programmazione
deve essere effettuata a serramento chiuso nel seguente modo:
posizionarsi con il tasto SEL sul lampeggio del LED L4 e poi premere per un
istante il tasto SET, il Motore 1 inizierà ciclo di Apertura; in corrispondenza
del punto iniziale desiderato di rallentamento premere nuovamente il tasto
SET: il LED L4 inizierà a lampeggiare più lentamente e il Motore 1 effettuerà
il rallentamento; al raggiungimento della posizione desiderata premere
il tasto SET per concludere il ciclo di Apertura. A questo punto il LED
L4 tornerà a lampeggiare regolarmente e il Motore 2 partirà in Apertura:
ripetere l’operazione di programmazione del tempo di lavoro per il Motore
2. Conclusa la programmazione dei tempi motore in Apertura, il Motore 2
riparte subito in Chiusura: ripetere le operazioni viste sopra, per la fase di
Chiusura del Motore 2 e successivamente del Motore 1.
Se non si desidera che la centrale effettui il rallentamento, durante la
programmazione, al completamento dei cicli di apertura e chiusura,
premere il tasto SET due volte consecutivamente anziché una sola.
Se la centrale è utilizzata nella configurazione ad 1 Motore (dip 1 di SW1
OFF), la programmazione del tempo di lavoro del Motore 2 non viene
eseguita.
Durante la programmazione è possibile usare al posto del tasto SET, posto
sulla centrale, il tasto del radiocomando solamente se precedentemente
memorizzato.
5. PAUSE TIME (Programmazione tempo chiusura aut. 4 min. max.):
La centrale è fornita dal costruttore senza chiusura automatica. Se si
desidera abilitare la chiusura automatica, procedere nel seguente modo:
posizionarsi con il tasto SEL sul lampeggio del LED L5 e premere per un
istante il tasto SET, attendere poi per un tempo uguale a quello desiderato;
premere nuovamente per un istante il tasto SET, nello stesso momento si
determinerà la memorizzazione del tempo di chiusura automatica e il LED
L5 sarà acceso fisso. Se si desidera ripristinare la condizione iniziale (senza
chiusura automatica), posizionarsi sul lampeggio del LED L5 poi premere
consecutivamente per 2 volte il tasto SET in un intervallo di tempo di 2
secondi. Il Led si spegnerà e l’operazione sarà conclusa.
Durante la programmazione è possibile usare al posto del tasto SET, posto
sulla centrale, il tasto del radiocomando solamente se precedentemente
memorizzato
6. DELAY (Programmazione ritardo anta 15 sec. max.):
La centrale è fornita dal costruttore con ritardo ante di apertura e chiusura
(4 sec). Nel caso di utilizzo nella configurazione per l’automazione a 2
motori, potrebbe essere necessario inserire un tempo di ritardo delle ante
diverso; la programmazione deve essere effettuata a serramento chiuso nel
seguente modo: posizionarsi con il tasto SELECT sul lampeggio del LED
L6 premere per un istante il tasto SET, poi attendere per un tempo uguale
a quello desiderato, premere nuovamente per un istante il tasto SET, nello
stesso momento si determinerà la memorizzazione del tempo di ritardo ante
di apertura fisso a 4 secondi, del tempo di ritardo ante di chiusura per il
tempo programmato ed il LED L6 sarà acceso fisso.
Se si desidera disattivare questa funzione (senza ritardo ante), posizionarsi
sul lampeggio del LED L6 poi premere consecutivamente per 2 volte il
tasto SET in un intervallo di tempo di 2 secondi, nello stesso tempo il Led
si spegnerà e l’operazione sarà conclusa.
7. PROGRAMMAZIONE AUTOMATICA (PRG AUTOM):
La centrale permette di effettuare una Programmazione Automatica
COMUNELLO ®Copyright 2014 - All right reserved
17
ITALIANO
Premendo più volte il tasto, è possibile posizionarsi sulla funzione desiderata.
La selezione resta attiva per 10 secondi, visualizzata dal Led lampeggiante,
se trascorsi, la centrale ritorna allo stato originario.
Tasto SET: effettua la programmazione dell’informazione secondo il tipo di
funzione prescelta con il tasto SEL.
IMPORTANTE: la funzione del tasto SET può anche essere sostituita dal
radiocomando se precedentemente programmato (led CODE acceso).
ATTENZIONE: Programmazione abilitata solo a sicurezze non attive
(SEMPLIFICATA).
Posizionarsi con il tasto SEL sul lampeggio del LED L7 e poi premere
in modo continuo il tasto SET, il Motore 2 effettuerà la chiusura fino al
raggiungimento del finecorsa o battuta, successivamente sarà ripetuta la
manovra dal Motore 1. Nel caso in cui i Motori si muovano in modo contrario
a come descritto lasciare il tasto SET, togliere alimentazione alla centrale
e modificare Dip Switch SW2 per cambiare il senso di marcia al motore
desiderato senza intervenire fisicamente su i collegamenti elettrici. Se
invece la sequenza dei Motori è corretta, la centrale completa la fase di Auto
programmazione eseguendo un’apertura e chiusura completa (mantenere
sempre premuto il tasto SET fino al termine dell’ Auto Programmazione).
Nello stesso viene Automaticamente impostato il ciclo di Rallentamento pari
a circa il 15% del ciclo completo.
Durante la Programmazione Automatica è possibile usare al posto del
tasto SET, posto sulla centrale, il tasto del radiocomando solamente se
precedentemente memorizzato.
Attenzione non è possibile effettuare la Programmazione Automatica
in assenza dei finecorsa.
MENÙ ESTESO 1
La centrale è fornita dal costruttore con la possibilità di selezione diretta
solamente delle funzioni del menù principale. Se si desidera abilitare
le funzioni descritte nel Menù Esteso 1, procedere nel seguente modo:
posizionarsi sul lampeggio del led LEV e premere 1 volta SET. Il led inizierà
a lampeggiare. In questo modo si avranno 30 secondi di tempo per
selezionare le funzioni del Menù Esteso 1 mediante l’uso dei tasti SELECT
e SET; trascorsi ulteriori 30 secondi la centrale ritorna al menù principale.
L1
L2
L3
L4
L5
L6
L7
LEV
UOMO PRESENTE
PULSANTE PEDONALE /
ANTA SINGOLA
PULSANTE PEDONALE / DS3
FOTOTEST
DS2 STP IN CHIUDE
DS1 INVERSIONE PARZIALE
BLOCCO / 8K2
MENÙ
ON
ANTA SINGOLA
DS3
ON
ON
ON
ON
OFF
PULSANTE PEDONALE
PULSANTE PEDONALE
OFF
OFF
OFF
OFF
1 LAMPEGGIO
1. UOMO PRESENTE:
La centrale permette di impostare il funzionamento “Uomo presente”. Se
si desidera tale modalità di funzionamento procedere nel seguente modo:
assicurarsi di aver abilitato il Menù Esteso 1 (lampeggio alternato 1 0 1 0
1 0 del LED LEV). posizionarsi con il tasto SEL sul lampeggio del LED L1
e poi premere il tasto SET: il LED L1 si accenderà permanentemente e
l’operazione sarà conclusa. In questo modo, utilizzando sia i radiocomandi
che i Pulsanti per l’azionamento del serramento, si otterrà il seguente
funzionamento: occorrerà mantenere costantemente attivato il comando
desiderato per ottenere il moto del serramento. Il rilascio del comando
provocherà l’arresto immediato del moto. Ripetere l’operazione se si
desidera ripristinare la configurazione precedente.
2. ANTA SINGOLA O PULS. PED.= APRI, PULS P/P = CHIUDI:
La centrale permette il collegamento di un Pulsante NA (ingresso n°10
di CN2) per l’azionamento in modalità Passaggio Pedonale. È possibile
tuttavia utilizzare tale ingresso per il collegamento di un pulsante NA che
operi con una diversa modalità. Se si desidera abilitare la funzione “Anta
Singola”, procedere nel seguente modo: assicurarsi di aver abilitato il Menù
Esteso 1 (lampeggio alternato 1 0 1 0 1 0 del LED LEV, posizionarsi con
il tasto SEL sul lampeggio del LED L2 e poi premere il tasto SET: il LED
L2 si accenderà permanentemente e la programmazione sarà conclusa.
In questo modo il Pulsante potrà essere utilizzato per l’azionamento del
solo Motore 1. (vedi par. “Anta Singola”). Se si desidera abilitare invece la
modalità “APRE-CHIUDI” per utilizzare il Pulsante Ped. per azionare la sola
apertura del serramento e il Pulsante P/P (ingresso n°11 di CN2) per la sola
chiusura, ripetere l’operazione sopra descritta, premendo il tasto SEL due
volte (ottenendo il lampeggio veloce del LED L2 anziché una volta. Ripetere
l’operazione se si desidera ripristinare la configurazione iniziale.
3. PULSANTE PEDONALE / DS3:
La centrale permette il collegamento di un Pulsante NA (ingresso n°10
di CN2) per l’azionamento in modalità Passaggio Pedonale. È possibile
tuttavia utilizzare tale ingresso per il collegamento di una fotocellula DS3
(NC): assicurarsi di essere nel Menù Esteso 1 (lampeggio alternato 1 0 1
0 1 0 del LED LEV), posizionarsi con il tasto SEL sul lampeggio del LED
18
COMUNELLO ®Copyright 2014 - All right reserved
L3 e poi premere il tasto SET: il LED L3 si accenderà permanentemente
e la programmazione sarà conclusa. Ripetere l’operazione se si desidera
ripristinare la configurazione precedente.
4. FOTOTEST (Test fotocellule):
La centrale è fornita dal costruttore con il test delle fotocellule disabilitato.
Se si desidera abilitare tale test procedere nel seguente modo: assicurarsi
di aver abilitato il Menù Esteso 1 (evidenziato dal lampeggio 1 0 1 0 1
del LED LEV, posizionarsi con il tasto SEL sul lampeggio del led L4,
poi premere il tasto SET, il LED L4 si accenderà permanentemente e la
programmazione sarà conclusa. Ripetere l’operazione se si desidera
ripristinare la configurazione precedente.
5. DS2 STOP IN CHIUDE:
La centrale consente di modificare il funzionamento dell’ingresso DS2. Se
si desidera che DS2 intervenga anche in chiusura (arresto del serramento).
Se in funzionamento Automatico una volta liberato si avrà la ripresa del moto
del serramento in chiusura), procedere nel seguente modo: assicurarsi di
essere nel Menù Esteso 1 (lampeggio alternato 1 0 1 0 1 0 del LED LEV
posizionarsi con il tasto SEL sul lampeggio del LED L5 e poi premere il tasto
SET: il LED L5 accenderà permanentemente e la programmazione sarà
conclusa. Ripetere l’operazione se si desidera ripristinare la configurazione
iniziale.
6. DS1 INVERSIONE PARZIALE:
La centrale consente di modificare il funzionamento dell’ingresso DS1.
Se si desidera che DS1 provochi in chiusura un’inversione parziale (breve
inversione) anziché totale, procedere nel seguente modo assicurarsi di
essere nel Menù Esteso 1 (lampeggio alternato 1 0 1 0 1 0 del LED LEV,
posizionarsi con il tasto SEL sul lampeggio del LED L6 e poi premere il tasto
SET: il LED L6 si accenderà permanentemente e la programmazione sarà
conclusa. Ripetere l’operazione se si desidera ripristinare la configurazione
iniziale
7. BLOCCO / 8K2:
La centrale permette il collegamento di un Pulsante di Blocco NC (ingresso
Stop 8K2). È possibile tuttavia commutare tale ingresso in un ingresso
resistivo 8,2k ohm: assicurarsi di essere nel Menù Esteso 1 (lampeggio
alternato 1 0 1 0 1 0 del LED LEV, posizionarsi con il tasto SEL sul
lampeggio del LED L7 e poi premere il tasto SET: il LED L7 si accenderà
permanentemente e la programmazione sarà conclusa. Una variazione del
valore letto in ingresso provoca il blocco della centrale in qualsiasi fase
del moto. Un ulteriore comando di moto sarà valido sempre che sia stato
ripristinato il corretto valore in ingresso, ed in ogni caso la centrale effettuerà
la fase di apertura dell’automatismo Ripetere l’operazione se si desidera
ripristinare la configurazione iniziale
MENÙ ESTESO 2
La centrale è fornita dal costruttore con la possibilità di selezione diretta
solamente delle funzioni del menù principale.
Se si desidera abilitare le funzioni descritte nel Menù esteso 2, procedere
nel seguente modo: posizionarsi sul lampeggio del LED LEV e premere
2 volte SET. Il led inizierà a lampeggiare in modo alternato 1 1 0 1 1 0. In
questo modo si avranno 30 secondi di tempo per selezionare le funzioni
del Menù Esteso 2 mediante l’uso dei tasti SEL e SET; trascorsi ulteriori 30
secondi la centrale ritorna al menù principale
L1
L2
L3
L4
L5
L6
L7
LEV
FRENO
RALLENTAMENTO
CHIUDI SEMPRE
FOLLOW ME
TEMPO PEDONALE
2°CH MONOSTABILE
PROG. A DISTANZA
MENÙ
ON
OFF
ON
ON
TEMPO PRGRAMMATO
ON
ON
2 LAMPEGGI
OFF
ON
OFF
OFF
10 Sec
OFF
OFF
1. FRENO:
La centrale è fornita dal costruttore con la funzione di freno elettronico
disabilitata. Se si desidera abilitare la funzione, procedere nel seguente
modo: assicurarsi di essere nel Menù Esteso 2 (lampeggio alternato 1 1 0
1 1 0 1 1 0 del LED LEV, posizionarsi con il tasto SEL sul lampeggio del LED
L1 e poi premere il tasto SET: il LED L1 si accenderà permanentemente e
la programmazione sarà conclusa.
In questo modo la centrale riduce l’avanzamento del cancello dovuto
all’inerzia, in corrispondenza di un arresto o di un comando d’inversione.
Ripetere l’operazione se si desidera ripristinare la configurazione precedente.
3. CHIUDI SEMPRE:
La centrale permette di impostare il funzionamento “Chiudi Sempre”: tale
funzione, programmabile solo se è già stato programmato un Tempo di
Pausa, interviene dopo una mancanza di alimentazione; se viene rilevato
che il cancello è aperto si avvia automaticamente una manovra di chiusura
preceduta da 5s. di prelampeggio. Se si desidera tale modalità di
funzionamento procedere nel seguente modo: assicurarsi di aver abilitato
il Menù Esteso 2 (evidenziato dal lampeggio 1 1 0 1 1 0 del LED LEV,
posizionarsi con il tasto SEL sul lampeggio del LED L3 e poi premere il
tasto SET: il LED L3 si accenderà permanentemente e l’operazione sarà
conclusa. Ripetere l’operazione se si desidera ripristinare la configurazione
precedente.
4. FOLLOW ME:
La centrale permette di impostare il funzionamento “Follow me”: tale
funzione, programmabile solo se è già stato programmato un Tempo di
Pausa, prevede di ridurre il tempo di Pausa a 5 sec. dopo il disimpegno della
fotocellula DS1, ossia il serramento si richiude 5 sec. dopo che l’utilizzatore
è transitato. Per attivare tale funzione procedere nel seguente modo:
assicurarsi di aver abilitato il Menù Esteso 2 (evidenziato dal lampeggio 1 1
0 1 1 0 del LED LEV, posizionarsi con il tasto SEL sul lampeggio del LED
L4 e poi premere il tasto SET: il LED L4 si accenderà permanentemente
e la programmazione sarà conclusa. Ripetere l’operazione se si desidera
ripristinare la configurazione precedente.
5. TEMPO PEDONALE: (Program. tempo di lavoro pedonale 4
minuti max.)
La centrale è fornita dal costruttore con un tempo di lavoro del Motore
(Pedonale) predefinito pari a 10 secondi e senza rallentamento.
Se occorre modificare il tempo di lavoro pedonale, la programmazione deve
essere effettuata a serramento chiuso nel seguente modo: assicurarsi di
aver abilitato il Menù Esteso 2 (evidenziato dal lampeggio 1 1 0 1 1 0
del LED LEV, posizionarsi con il tasto SEL sul lampeggio del LED L5 poi
premere per un istante il tasto SET, il Motore inizierà ciclo di Apertura; in
corrispondenza del punto iniziale desiderato di rallentamento premere
nuovamente il tasto SET: il LED L5 inizierà a lampeggiare più lentamente
e il Motore effettuerà il rallentamento; al raggiungimento della posizione
desiderata premere il tasto SET per concludere il ciclo di Apertura. A questo
punto il LED L5 tornerà a lampeggiare regolarmente e il Motore ripartirà in
Chiusura; ripetere le operazioni viste sopra, per la fase di Chiusura.
Se non si desidera che la centrale effettui il rallentamento, durante la
programmazione, al completamento del ciclo di apertura e chiusura,
premere il tasto SET due volte consecutivamente anziché una sola.
Durante la programmazione è possibile usare al posto del tasto SET, posto
sulla centrale, il tasto del radiocomando solamente se precedentemente
memorizzato.
6. LOGICA DI FUNZIONAMENTO CANALE RADIO AUSILIARIO:
(2° CH monostabile)
La centrale permette di selezionare la logica di funzionamento del Canale
Radio Ausiliario.
Nella configurazione di fabbrica il Canale Radio Ausiliario presenta un
funzionamento “Monostabile”. Se si desidera abilitare il funzionamento
“Bistabile” procedere nel seguente modo: assicurarsi di aver abilitato il Menù
Esteso 2 (evidenziato dal lampeggio 1 1 0 1 1 0 del LED LEV, posizionarsi
con il tasto SEL sul lampeggio del LED L6 e poi premere il tasto SET:
il LED L6 si accenderà permanentemente e l’operazione sarà conclusa.
Se si desidera abilitare la funzionamento “Temporizzato 3 minuti”, ripetere
l’operazione sopra descritta, premendo il tasto SEL due volte (ottenendo il
lampeggio veloce del LED L6 anziché una volta. Ripetere l’operazione se si
desidera ripristinare la configurazione iniziale.
7. PROGRAMMAZIONE RADIOCOMANDO A DISTANZA:
La centrale consente la programmazione del codice di trasmissione,
senza intervenire direttamente sul tasto SEL della centrale, ma eseguendo
l’operazione a distanza.
La programmazione del Radiocomando a distanza, si esegue nel seguente
modo: inviare in modo continuo per un tempo maggiore a 10 secondi il
codice di un radiocomando in precedenza memorizzato, allo stesso tempo
la centrale entra in modo programmazione come sopra descritto per
il LED L2 nel menù principale. Se ad essere inviato in modo continuo è
un codice pedonale precedentemente memorizzato la centrale entrerà in
programmazione di un nuovo codice pedonale e il LED L2 lampeggerà
come fosse attivata l’acquisizione del codice pedonale (1 1 0 1 1 0 1 1
0); se è il codice relativo al 2° CH/AUX lampeggerà come fosse attivata
l’acquisizione del codice 2° CH (1 1 1 0 1 1 1 0 1 1 1 0). Per abilitare
la funzione di programmazione a distanza procedere nel seguente modo:
assicurarsi di aver abilitato il Menù Esteso 2 (evidenziato dal lampeggio 1 1
0 1 1 0 del LED LEV, posizionarsi con il tasto SEL sul lampeggio del LED
L7 e poi premere il tasto SET: il LED L7 si accenderà permanentemente
e la programmazione sarà conclusa. Ripetere l’operazione se si desidera
ripristinare la configurazione iniziale.
MENÙ ESTESO 3
La centrale è fornita dal costruttore con la possibilità di selezione diretta
solamente delle funzioni del menù principale.
Se si desidera abilitare le funzioni descritte nel Menù esteso 3, procedere
nel seguente modo: posizionarsi sul lampeggio del LED LEV e premere 3
volte SET. Il led inizierà a lampeggiare in modo alternato 1 1 1 0 1 1 1 0. In
questo modo si avranno 30 secondi di tempo per selezionare le funzioni
del Menù Esteso 3 mediante l’uso dei tasti SEL e SET; trascorsi ulteriori 30
secondi la centrale ritorna al menù principale
L1
L2
L3
L4
L5
L6
L7
LEV
SOFT STOP
SOFT START
COLPO ARIETE
COLPO CHIUDE
ELS / CMD PED
LAMP / LUCE CORTESIA
PRELAMP / LAMP IN PAUSA
LIVELLO MENÙ
ON
ON
ON
ON
ON
ON
ON
OFF
OFF
OFF
OFF
OFF
OFF
OFF
3 LAMPEGGI
1. SOFT STOP:
La centrale è fornita dal costruttore con la funzione Soft Stop disabilitata. Se
si desidera abilitare la funzione, procedere nel seguente modo: assicurarsi
di aver abilitato il Menù Esteso 3 (evidenziato dal lampeggio 1 1 1 0 1 1
1 0 del LED LEV posizionarsi con il tasto SEL sul lampeggio del LED L1
e poi premere il tasto SET, nello stesso istante il LED L1 si accenderà
permanentemente e la programmazione sarà conclusa. In questo modo, la
centrale alla fine del moto, porterà la forza a zero in modo graduale entro 2
secondi. Ripetere l’operazione se si desidera ripristinare la configurazione
precedente.
2. SOFT START:
La centrale è fornita dal costruttore con la funzione Soft Start disabilitata. Se
si desidera abilitare la funzione, procedere nel seguente modo: assicurarsi
di aver abilitato il Menù Esteso 3 (evidenziato dal lampeggio 1 1 1 0 1 1
1 0 del LED LEV posizionarsi con il tasto SEL sul lampeggio del LED L2
e poi premere il tasto SET, nello stesso istante il LED L2 si accenderà
permanentemente e la programmazione sarà conclusa. In questo modo, la
centrale ad ogni inizio di moto, controllerà la partenza del motore, portando
la forza in modo graduale, dal minimo al valore impostato dal trimmer
“FORCE” nei primi 2 secondi di funzionamento. Ripetere l’operazione se si
desidera ripristinare la configurazione precedente.
Nota: quando abilitata la funzione Soft Start la centrale disabilita
automaticamente lo Spunto Iniziale e viceversa.
3. COLPO D’ARIETE:
La centrale è fornita dal costruttore con la funzione di Colpo d’Ariete
disabilitata. Tale funzione consiste nell’inviare un comando di chiusura per
circa 2 sec. all’inizio di una fase di apertura: in questo modo viene facilitato
COMUNELLO ®Copyright 2014 - All right reserved
19
ITALIANO
2. RALLENTAMENTO:
Come detto precedentemente la centrale permette la programmazione
di una fase di rallentamento in apertura e chiusura, mentre con la
funzione Programmazione Automatica il rallentamento viene inserito
automaticamente. Qualora però non si desideri avere alcun rallentamento,
è possibile escluderlo: in questo modo se si utilizza la Programmazione
Automatica non verrà più inserita la fase di Rallentamento, mentre se si usa la
funzione di Programmazione dei Tempi Motore, durante la programmazione
stessa non verrà più data la possibilità di programmare il rallentamento
durante le fasi di apertura e chiusura. Se prima di escludere il rallentamento
esso era stato programmato mediante la funzione di Programmazione
dei Tempi Motore sarà necessario ripetere la programmazione da capo.
Se si desidera escludere il rallentamento procedere nel seguente modo:
assicurarsi di aver abilitato il Menù Esteso 2 (evidenziato dal lampeggio 1 1
0 1 1 0 del LED LEV, posizionarsi con il tasto SEL sul lampeggio del LED
L2 e poi premere il tasto SET: il LED L2 si accenderà permanentemente
e la programmazione sarà conclusa. Ripetere l’operazione se si desidera
ripristinare la configurazione precedente.
lo sblocco della serratura per permettere la corretta esecuzione della fase di
apertura. Se si desidera abilitare la funzione di Colpo d’Ariete alla massima
potenza, procedere nel seguente modo: assicurarsi di aver abilitato il
Menù Esteso 3 (evidenziato dal lampeggio 1 1 1 0 1 1 1 0 del LED LEV),
posizionarsi con il tasto SEL sul lampeggio del LED L3 e poi premere il tasto
SET: il LED L3 si accenderà permanentemente e la programmazione sarà
conclusa. Se si desidera abilitare la funzione di Colpo d’Ariete alla potenza
impostata tramite il Trimmer FORCE, ripetere l’operazione sopra descritta,
premendo il tasto SEL due volte (ottenendo il lampeggio veloce del LED
L3 anziché una volta. Ripetere l’operazione se si desidera ripristinare la
configurazione iniziale.
4. COLPO CHIUDE:
La centrale è fornita dal costruttore con la funzione di Colpo in Chiusura
disabilitata. Tale funzione consiste nell’aggiungere, nel caso sia presente
una fase di rallentamento in chiusura, un tempo di 1 secondo, alla potenza
massima oppure alla potenza selezionata mediante trimmer VR1, in modo
da sormontare un’eventuale serratura installata. Se si desidera abilitare
la funzione di Colpo in Chiusura alla massima potenza, procedere nel
seguente modo: assicurarsi di aver abilitato il Menù Esteso 3 (evidenziato
dal lampeggio 1 1 1 0 1 1 1 0 del LED LEV, posizionarsi con il tasto SEL sul
lampeggio del LED L4. e poi premere il tasto SET: il LED L4 si accenderà
permanentemente e la programmazione sarà conclusa. Se si desidera
abilitare la funzione di Colpo in Chiusura alla potenza impostata tramite il
Trimmer FORCE, ripetere l’operazione sopra descritta, premendo il tasto
SEL due volte (ottenendo il lampeggio veloce del LED L4 anziché una volta.
Ripetere l’operazione se si desidera ripristinare la configurazione iniziale.
5. ATTIVAZIONE ELETTROSERRATURA CMD PED. (ELS/CMD PED):
La centrale è fornita dal costruttore con la funzione di attivazione
dell’elettroserratura tramite comando Pedonale disabilitata. La funzione di
attivazione dell’elettroserratura tramite comando Pedonale è usata quando
si dispone ad esempio di un cancello scorrevole con accanto una porta
per il passaggio Pedonale. In questo modo possiamo ottenere sia l’apertura
del cancello tramite i comandi da Pulsante P-P e da radiocomandi, che
della porta Pedonale tramite l’azionamento dell’elettroserratura con i
comandi PED. Per abilitare questa funzione procedere nel seguente modo:
assicurarsi di aver abilitato il Menù Esteso 3 (evidenziato dal lampeggio 1 1
1 0 1 1 1 0 del LED LEV, posizionarsi con il tasto SEL sul lampeggio del LED
L5. e poi premere il tasto SET: il LED L5. si accenderà permanentemente
e la programmazione sarà conclusa. Ripetere l’operazione se si desidera
ripristinare la configurazione precedente.
6. FUNZIONAMENTO LAMPEGGIANTE/LUCE DI CORTESIA:
La centrale è fornita dal costruttore con il funzionamento del Lampeggiante
durante il Tempo di Pausa disabilitato. Se si desidera abilitare il
funzionamento, procedere nel seguente modo: assicurarsi di aver abilitato
il Menù Esteso 3 (evidenziato dal lampeggio 1 1 1 0 1 1 1 0 del LED LEV,
posizionarsi con il tasto SEL sul lampeggio del LED L6 e poi premere il tasto
SET: il LED L6 si accenderà permanentemente e la programmazione sarà
conclusa. Ripetere l’operazione se si desidera ripristinare la configurazione
precedente.
4W
Funzionamento Luce di Cortesia: L’uscita Lampeggiatore 24
max. si attiverà per la durata di 3 minuti, ogni qualvolta che sarà impartito
un comando di apertura.
7. PRELAMPEGGIO/LAMPEGGIANTE IN PAUSA:
La centrale è fornita dal costruttore con la funzioni Prelampeggio e
Lampeggiante in Pausa disabilitate. Se si desidera abilitare la funzione
Prelampeggio, procedere nel seguente modo: assicurarsi di aver abilitato
il Menù Esteso 3 (evidenziato dal lampeggio 1 1 1 0 1 1 1 0 del LED LEV,
posizionarsi con il tasto SEL sul lampeggio del LED L7. e poi premere il tasto
SET: il LED L7. si accenderà permanentemente e la programmazione sarà
conclusa. Se si desidera abilitare la funzione di Luce di Cortesia, ripetere
l’operazione sopra descritta, premendo il tasto SET due volte (ottenendo il
lampeggio veloce del LED L7 anziché una volta. Ripetere l’operazione se si
desidera ripristinare la configurazione iniziale.
Funzionamento Prelampeggio: L’uscita lampeggiatore 24V si attiverà
sempre 3 secondi prima della manovra di chiusura.
Funzionamento Lampeggiante in Pausa: L’uscita Lampeggiatore 110 ~
e 24V rimarrà attiva se precedentemente programmato il Tempo di Pausa.
RESET
Nel caso sia opportuno ripristinare la centrale alla configurazione di fabbrica,
premere il tasto SELECT e SET in contemporanea, allo stesso tempo si
20
COMUNELLO ®Copyright 2014 - All right reserved
otterrà l’accensione contemporanea di tutti i led ROSSI di segnalazione e
subito dopo lo spegnimento.
DIAGNOSTICA
Test Fotocellula:
La centrale è predisposta per la connessione di dispositivi di sicurezza
che rispettano il punto 5.1.1.6 della normativa EN 12453. Ad ogni ciclo di
manovra viene effettuato il test di funzionamento della fotocellula collegata.
Nel caso di mancato collegamento e/o non funzionamento, la centrale non
abilita il movimento del serramento ed evidenzia visivamente il fallimento del
test effettuando il lampeggio contemporaneo di tutti i Led di segnalazione.
Una volta ripristinato il corretto funzionamento della fotocellula, la centrale è
pronta per il normale utilizzo. Ciò garantisce un monitoraggio contro i guasti
conforme alla Categoria 2 della EN 954-1.
Test input comandi:
In corrispondenza ad ogni ingresso di comando in bassa tensione,
la centrale dispone di un LED di segnalazione, in modo tale da poter
controllare rapidamente lo stato.
Logica di funzionamento: LED acceso ingresso chiuso, LED spento
ingresso aperto.
GARANZIA
Fratelli Comunello SpA garantisce, a condizione del rispetto delle speciche
prestazionali indicate nei manuali di istruzione dei prodotti, il corretto funzionamento
degli attuatori per 24 mesi dalla data di fabbricazione. Fratelli Comunello S.p.a.
garantisce in via esclusiva, e quindi con esclusione di domande risarcitorie
formulate per equivalente, la riparazione o sostituzione gratuita delle parti
difettose che verranno riconosciute tali, secondo l’insindacabile giudizio tecnico
del personale di Fratelli Comunello SpA. Il materiale in garanzia inviato alla sede
della Fratelli Comunello SpA, dovrà essere spedito in porto franco e verrà quindi
rispedito in porto assegnato. Il materiale ritenuto difettoso ed inviato a Fratelli
Comunello S.p.a. rimarrà di proprietà di quest’ultima società.
- Il costo di manodopera necessario per le riparazioni e sostituzioni eseguite rimane
a carico dell’acquirente. Non viene riconosciuto alcun indennizzo per il periodo
d’inoperatività dell’impianto. L’intervento non prolunga la durata della garanzia.
A pena di decadenza, l’acquirente deve denunciare gli eventuali vizi e difetti dei
prodotti, entro il termine di 8 (otto) giorni da calcolarsi rispettivamente dalla data di
scoperta dei vizi o dalla data di consegna della merce. La denuncia dovrà essere
fatta esclusivamente per iscritto. La garanzia non comprende: Avarie o danni
causati dal trasporto; avarie o danni causati da vizi dell’impianto elettrico presente
presso l’acquirente il prodotto e/o da trascuratezza, negligenza, inadeguatezza,
uso anomalo di tale impianto; avarie o danni dovuti a manomissioni poste in
essere da parte di personale non autorizzato o conseguenti allo scorretto uso/
installazione (a questo proposito, si consiglia una manutenzione del sistema
almeno ogni sei mesi) o all’impiego di pezzi di ricambio non originali; difetti causati
da agenti chimici e/o fenomeni atmosferici.
La garanzia non comprende il costo per materiale di consumo né quello per vizi
presunti o veriche di comodo.
Caratteristiche dei prodotti
I prodotti realizzati da Fratelli Comunello SpA sono soggetti a continue innovazioni
e miglioramenti; pertanto, le caratteristiche costruttive e l’immagine degli stessi,
potranno subire variazioni anche senza preavviso.
Foro competente
Poiché il contratto viene perfezionato mediante Conferma d’Ordine compilata
in Rosà, in caso di controversia legale di qualsiasi natura è applicabile il diritto
italiano ed è competente il Foro di Vicenza (VI).
INSTALLATION AND USER’S MANUAL
CU - 110V - HP
EC DECLARATION OF COMFORMITY:
ENGLISH
The undersigned Mr. Luca Comunello, representing the following manufacturer,
Fratelli COMUNELLO Spa
Via Cassola 64, 36027 Rosà (VI) – Italy
DECLARES that the equipment described below:
Description: Model: Electronic control unit
CU 110V HP
Is in compliance with the provisions set down in the following directives:
• 2004/108 EC Directive (EMC Directive)
• 2006/95/CE Directive
and that all the rules and/or technical specifications shown below have been applied:
EN61000-6-2 + EN61000-6-3
EN62233 :2008
EN301489-1 + EN301489-3 + EN300220-2
EN60335-1 :2002
and the following amendments.
Last two digits of the year in which the EC marking has been affixed
14
Rosà (VI) – Italia
01-09-2014
and he also declares that it is not allowed to commission the device until the machinery where it will be incorporated or whose it will
become a component will have been identified and will have been declared in compliance with the conditions of the 2006/42 EC Directive
and with the national legislation that transpose it.
Mr. Luca Comunello
Fratelli Comunello Legal Representative
Fratelli Comunello S.p.A.
Company with certified Quality Management System
UNI EN ISO 9001:2008.
(Certificate n° 50 100 11235 Rev. 01)
COMUNELLO ®Copyright 2014 - All right reserved
21
PRESCRIPTIONS
•The control unit is not equipped with a
device for disconnection of the 110 ~ power
supply line. It is therefore the responsibility
of the installer to fit a disconnection device
in the electrical system. The disconnection
device must be composed of a category
III overvoltage all-pole circuit breaker. This
device must be positioned in consideration
of the need to be protected against
inadvertent reconnection in compliance with
the requirements of EN 12453 point 5.2.9.
Wiring of the external electrical devices to the
control unit must be carried out in compliance
with the prescriptions of EN 60204-1 as
amended by EN 12453 point 5.2.7. The
maximum diameter of power feeding cables
is 14 mm; fixing of power feeding and
connection cables must be assured by fitting
cable glands, which can be supplied as
optionals.
•
The power input cables must be of
the
standardized
flexible
type
with
polychloroprene sheath (H05RN-F) having
minimum conductor size of 1 mm2.
•During the installation operations, take care
to use cable with double insulation only
(sheathed cables) for both of mains voltage
connections (110V) and extra-low voltage
connections (SELV). Use exclusively plastic
cable trays, separated for mains voltage
wiring (110V) and extra-low voltage wiring
(SELV).
•The extra low voltage conductors must be
physically separated (at least 4 mm in air)
from the mains voltage wires, or shall be
adequately insulated with extra insulation
with a thickness of at least 1 mm.
•Upstream of main supply, install a device
that ensures the complete omnipolar
disconnection (cut-off switch) of the power
supply, with a contact opening gap of at least
3mm in each pole. These disconnecting
devices shall be places in the power supply
wiring in compliance with the installation
standards and must be directly connected to
the supply terminals.
• When drilling the outer case to insert the power
and connection cables and when fitting the
cable glands, take care to install all the parts
in a manner that maintains the IP protection
characteristics of the box unchanged as far
as possible. Ensure the cables are fixed in a
stable and secure manner.
• The rear of the box is equipped with knockouts
for wall fixing (knockouts for fixing holes using
anchor bolts or holes for fixing with screws).
Take all the measures required to ensure the
installation procedures do not affect the IP
rating.
22
COMUNELLO ®Copyright 2014 - All right reserved
•If required, a pushbutton panel for manual
control of the gate must be installed in a
position such as to ensure the user is not
placed in danger.
•The operator utilized to move the gate must
be in compliance with the prescriptions of
EN 12453, point 5.2.7.
•Power Supply output D.S. must be used for
photocells. Alternative uses of this output are
not permitted.
•At each operating cycle, the control unit
can test the photocells operation to ensure
protection against failure of anti-crushing
protective devices according to Category 2
in compliance with the prescriptions of EN
12453 point 5.1.1.6. It follows that if the
safety devices are not connected or are
faulty, operation of the control unit will be
inhibited.
• The device can be used by children no older
than 8 years old and people with reduced
physical, sensory or mental capabilities, or
lack of experience or without the required
knowledge, but only under surveillance or
after having received instructions about
the safe use of the device and the hazards
inherent in it. Children should not play with
the device. Cleaning and maintenance
should not be carried out by children without
supervision.
For correct operation of the radio receiver
section, when using two or more control units
it is good practice to install them at a minimum
distance of 3 metres from one another.
All operations that require the control unit
box to be opened (connection of cables,
programming, etc.) must be carried out by
expert personnel at the time of installation.
IMPORTANT INFORMATION FOR USERS
•The device must not be used by minors or
psychologically-physically differently-abled
persons unless they are supervised or duly
instructed on the operation and methods of
use.
•Do not let children play with the device and
keep the remotes out of their reach.
• IMPORTANT: keep this instruction manual
and comply with the safety prescriptions
set down herein. Failure to comply with
the prescriptions may cause damage and
serious accidents.
Frequently examine the system to identify any
signs of damage. Do not use the device if the
enclosure is in need of repair (re-programming,
repair or modification of the installation); contact
technical service.
TECHNICAL SPECIFICATIONS
PRELIMINARY CHECKS
• Check that the product in the pack is intact and in good condition.
• Check that the place of installation is suitable and in compliance
with the minimum dimensions shown in FIG. 1.
INSTALLATION
• Drill the box in the four corners and then fix the control unit to the
wall (FIG. 2).
• Drill a hole in the underside of the box for the cable inlet (FIG. 3).
The use of cable glands is recommended.
CONNECTIONS
CN1:
L:
110 V~ line input (phase).
N:
110 V~ line input (neutral).
LAMP 110V~:
Flashing Light Output 1 (110 V~ Neutral).
LAMP 110V~:
Flashing Light Output 1 (110 V~ Phase).
MOT1 OPEN:
Operator 1 opening output.
MOT1 COM:
Operator 1 output common.
MOT1 CLOSE: Operator 1 closing output.
MOT2 OPEN2: Operator 2 opening output.
MOT2 COM2:
Operator 2 output common.
MOT2 CLOSE2: Operator 2 closing output.
CN2:
2nd CH:
Aux Radio CH Output (Free Contact max load 30V 1A).
2nd CH:
Aux Radio CH Output (Free Contact max load 30V 1A).
FOTO+:
Photocells Control and Power Supply (24V~ 5W).
LAMP 24V 4W: Flashing Light Output 2 (24V~ 4W).
GND:
Common GND input
DS2:
Safety Device 2 Input (NC).
DS1:
Safety Device 1 Input (NC).
STOP 8K2: Emergency Stop Input (NC).
GND:
Common GND input.
P PED:
Pedestrian Pushbutton/Single Leaf/open input (NO).
PP:
Open-close / close command Pushbutton input (NO).
ELS+:
Electric Lock Output 12 V 15 W (+12V).
ELS-:
Electric Lock Output 12 V 15 W (GND).
24V 5W:
Users output (24V~ 5W)
GND:
Common GND input.
SPIA +24V LED: Indicator light output (+24 V 4 W).
ANT-:
Antenna Ground Input.
ANT+:
Antenna Hot pole input.
CN3:
ENC1 +:
Operator 1 Encoder Power Input
ENC1 E:
Operator 1 Encoder Signal Input
ENC1 GND: Common GND input
MOT1 FCA: Operator 1 Opening Limit Switch Input (NC).
MOT1 FCC: Operator 1 Closing Limit Switch Input (NC).
ENC2 +:
Operator 2 Encoder Power Input
ENC2 E:
Operator 2 Encoder Signal Input
ENC2 GND: Common GND input.
MOT2 FCA: Operator 2 Opening Limit Switch Input (NC).
MOT2 FCC: Operator 2 Closing Limit Switch Input (NC).
TRANSFORMER CONNECTIONS
CN5 (1st):
1: 110 V~ Transformer Primary Winding Input.
FUNCTIONAL CHARACTERISTICS
AUTOMATIC OPERATION
When either the remote or the low voltage pushbutton panel is used to
control the gate, operation is as follows:
the first command opens the gate until motor time elapses or until the
gate reaches its opening limit position; the second command closes
the gate; if another command is transmitted before motor time has
elapsed or before one of the two limiters has been reached, the control
unit reverses the movement direction during both opening and closing.
STEP-BY-STEP OPERATION:
When either the remote or the low voltage control pushbuttons are
used to control the gate, operation is as follows:
the first command opens the gate until motor time or until the
gate reaches its opening limit position; the second command closes
the gate; if another command is transmitted before motor time has
elapsed or before one of the limit stops has been reached, the control
unit stops the movement. Another command causes the gate to start
moving again in the opposite direction.
Step-by-step 1 operations:
When either the remote or the low voltage control pushbuttons are
used to control the gate, operation is as follows:
the first command opens the gate until motor time or until the
gate reaches its opening limit position; the second command closes
the gate; if another command is transmitted before motor time has
elapsed or before one of the limit stops has been reached, the control
unit stops the movement during both opening and closing. Another
command causes the gate to start moving again in the opposite
direction.
AUTOMATIC CLOSING:
The control unit can be set up to close the gate automatically without
sending any additional commands.
The selection of this type of operation is described in Pause time
programming mode.
PEDESTRIAN OPENING:
The control unit allows activation of exclusively Operator 1 for a
programmable time via either the remote or the Pedestrian pushbutton.
SINGLE LEAF:
Despite being utilized in the configuration for a 2-operator gate opener,
the control unit allows the Pedestrian/Single Leaf pushbutton (refer
to Extended Menu 1 for the correct pushbutton configuration) to start
exclusively Operator 1, in accordance with the times programmed at
the time of motor times programming.
EMERGENCY STOP INPUT:
The control unit allows the connection of an emergency stop
pushbutton (NC). Pressing this pushbutton irrespective of the current
operating mode of the control unit will cause immediate stopping of the
gate movement. An additional gate movement command will be valid
provided the emergency stop input is deactivated and, in any case,
the control unit will execute the gate opening cycle with 5 seconds
preflashing.
IMPORTANT: Jumper this input if it is not to be used.
PHOTOCELLS:
Photocells can be powered by and connected to the control unit in
accordance with directive EN 12453.
Input DS1 (NC)
Tripping of the photocells during opening is disregarded, while during
closing it causes reversal of the direction of movement.
Input DS2 (NC)
Tripping during opening causes momentary stopping of the gate; once
the passage is free, the control unit resumes the opening movement.
Tripping during closing causes reversal of the direction of movement.
COMUNELLO ®Copyright 2014 - All right reserved
23
ENGLISH
Power supply:
110 V~ 50-60Hz 1600W max.
Flashing light output 1:
110 V~ 500 W max.
Flashing light output 2:
24 V~ 4 W max.
Operator outputs:
110 V~ 2 x 500 W max.
Electric lock output:
12 V 15 W max.
Photocells power supply:
24 V~ 5 W max.
Users power supply output:
24 V~ 5 W max.
Indicator light output:
24 V 4 W max.
LV safeties and controls:
24 V
Working temperature:
-20 ÷ 55 °C
Radio receiver:
433 Mhz
Transmitters:
18 Bit or Rolling Code
Max TX codes stored in memory:
120 (CODE or PED/2nd CH
CODE)
Dimensioni scheda:
160x107 mm.
2: 110 V~ Transformer Primary Winding Input.
CN4 (2st):
1: Transformer SEC 1 output 11.8V 3.5A.
2: Transformer SEC 1 output 11.8V 3.5A.
3: Transformer SEC 2 output 25V 0.8A.
4: Transformer SEC 2 output 25V 0.8A
Programmable input DS3 (NC), see Menu 2
Tripping during opening causes reversal of the direction of movement.
Tripping during closing is disregarded.
To allow operation in compliance with EN 13849-1 Category 2 a
photocell test is performed before each movement. In order to perform
this test it is essential to power the transmitter of each pair of photocells
on the specific “Photocells Power and Control” output (outputs 3 and 5
of terminal strip CN2), while the receiver of each pair must be powered
via the “Users Output” (outputs 14 and 15 of terminal strip CN2). The
control unit enables the movement only if the test is passed; if it is
not, the control unit inhibits all movements and an alarm condition is
signalled by blinking of all the programming LEDs on transmission of
each command.
OPENING AND CLOSING LIMIT SENSORS:
The control unit allows for the connection of two Opening and Closing
limit sensors (NC). Tripping in the associated operating stages causes
immediate stopping of movement for both Operator 1 and 2 outputs.
IMPORTANT: Do not jumper these inputs if they are not used.
+
-
+
-
+
-
OPERATOR FORCE ADJUSTMENT (FORCE):
The electronic control unit is equipped with a “FORCE” trimmer for
adjustment of the force delivered by the operators, completely
managed by the microprocessor. Adjustment can be performed in a
range of between 50% and 100% of maximum force.
Initial starting torque can be set for each movement by feeding the
operator at full power for 2 seconds, even if operator force control is
enabled. Note: initial starting torque is disabled automatically if the Soft
Start function is enabled.
IMPORTANT: If the “FORCE” trimmer is adjusted, the self-learning
procedure must be repeated because the movement and deceleration
times may change.
OBSTACLE DETECTION (SENS):
The electronic control unit is equipped with a “SENS” trimmer,
completely managed by the microprocessor, for adjustment of the
opposing Force required to detect the presence of an obstacle.
The adjustment can be made with a trip time from a minimum of 0.1
seconds to a maximum of 7 seconds
IMPORTANT:
• If limit sensors are connected to the control unit, detection of an
obstacle will always result in movement reversal during closing and
reversal for 2 seconds during opening.
• If there are no limit sensors connected to the control unit, detection
of an obstacle will always result in movement reversal during closing
(except in the final 5 seconds of the movement, when it will cause a
Stop) and reversal for 2 seconds during opening (except in the final
5 seconds of the movement, when it will cause a Stop).
Obstacle detection system works only with automations
provided with encoder and correctly connected.
OPERATOR 1 AND OPERATOR 2 ENCODER:
The control unit allows connection of an Encoder for each operator.
The use of Encoders facilitates the work of the control unit in the
Obstacles Detection function and ensures enhanced precision during
execution of the gate movements.
DECELERATION (SLOWING):
The operators deceleration function is used on gates to prevent the
moving leaves from slamming at speed into the limit stops at the end
of the opening and closing strokes.
During Motor Time programming (see Main menu) the control unit
allows programming of deceleration in the required points (immediately
before full opening and full closing); in addition, using the “SLOWING”
trimmer the force intensity can be adjusted during the deceleration
phase in three fine adjustment level settings.
If the “Automatic Programming” function is used (see main menu) it
is anyway possible to disable the deceleration stage (see Extended
24
COMUNELLO ®Copyright 2014 - All right reserved
menu 2).
INDICATOR LIGHT:
The control unit allows a 24
indicator light to be connected to
display the status of the gate opener.
Indicator light off: gate closed
Indicator light on: gate open
Indicator light slow blinking: opening movement; rapid blinking: closing
movement.
Changing as Flashing light output.
OPERATION WITH TIMER:
The control unit allows a timer to be connected in place of the open –
close pushbutton.
E.g.: at 08.00 am the timer closes the contact and the control unit
commands an opening movement; at 06.00 pm the timer opens the
contact and the control unit commands a closing movement. From
08.00 am – 06.00 pm at the end of the opening cycle, the control unit
disables the flashing light, automatic closing and the remotes.
ELECTRIC LOCK CONTROL OUTPUT:
The control unit features an output to control a 12 15W max electric
lock. The command is switched on at each initial opening movement
for a period of 2 seconds.
MOTOR 1 AND MOTOR 2 DIRECTION OF
RUN CONTROL
Important Note: Warning: change the settings of dip-switches
SW1 and SW2 with the control unit off and only subsequently
repeat the control unit programming procedure.
The electronic control unit is equipped with dip-switches that can be
used to change the direction of run of each connected motor without
SW2
SW2
SW2 1 controls SW2
rewiring
the electrical connections:
dip-switch
operator 1
while
dip-switch 2 ON
controls operator ON
2.
ON
ON
SW2
ON
1
INV
OFF
1
SW2
2
1
SW2
2
INV
OFF
INV
MOT 1
INV
OFF
INV
MOT 1
2
INV
OFF
ON
1
ON
1
SW2
2
ON
1
2
INV
OFF
INV
OFF
INV
MOT 2
INV
MOT 1
INV
MOT 2
INV
OFF
INV
OFF
INV
MOT 2
INV
MOT 1
INV
MOT 2
2
1
2
1
2
M1 OR M2 DELAY CONTROL AND ENABLING
OF 1 OR 2 MOTORS
The electronic control unit is equipped with a dip-switch SW1 that is
used to select operation with 1 or 2 motors and to define which of the
two starts first and which starts second.
SW1
ON
SW1
ON
SW1
ON
SW1
ON
1
2
SW1
ON
1
SW1
2
ON
1
2
NOT
2
MOTOR
2
MOTOR
1
MOTOR CONSID. MOTORS 2 DELAY MOTORS 1 DELAY
1
2
1
2
1
2
NOT
2
RITARDO
2
RITARDO
1
MOTORE CONSID. MOTORI MOT. 2 MOTORI MOT. 1
PROGRAMMING:
SELECT Key: selects the type of function to store; the selection is
indicated by blinking of the LED.
Press the key twice to go to the required function. The selection
remains active for 10 seconds shown by blinking of the LED; when
this interval elapses, the control unit returns to the original state.
SET Key: programs the information in accordance with the function
type preselected with the SEL key.
IMPORTANT: The SET key function can be replaced by the remote if
programmed beforehand (CODE LED on).
Programming enabled only when safety devices are not active
MAIN MENÙ
The control unit is factory set to allow the selection of several important
functions.
STEP BY STEP
CODE TX
CONDO
MOTOR TIME
PAUSE TIME
DELAY
AUTOM PRG
MENU
Step-by-Step
Code entered
ON
Programmed time
With automatic closing
ON
ON
Automatic
No code
OFF
30 sec.
Without automatic closing
OFF
OFF
ON
1. STEP BY STEP:
In the default configuration the control unit is set with “Automatic”
operating logic enabled (LED n1 off); if the “Step-by-Step” operating
logic is required (LED n1 on), proceed as follows; use the SELECT
key to select blinking LED n1 and then press the SET key: LED n1
becomes steady on and programming will be completed.
If the “Step-by-Step 1” operating logic is required, repeat the operation
above described, by pressing the SEL key twice instead only one (to
obtain the quick blinking of LED. Repeat the procedure if you wish to
restore the previous configuration.
2. TX CODE: (Remote control code):
Up to 120 remotes with different codes of either the fixed or rolling
code type can be saved on the control unit.
Programming:
Programming of the transmission code is performed as follows: use
the SELECT key to select blinking LED L2. Press SET once; the LED
will change its blinking mode (longer 1 0 1 0) to show that the
first level is being saved. On sending the selected code with the
required remote, the CODE LED will remain steady on to indicate that
programming will be completed.
To save the code for pedestrian opening / single leaf, proceed as
follows: use the SELECT key to select blinking CODE LED L2. Press
SET twice consecutively; the LED will change its blinking mode (1 1 0
1 1 0) to show that
the pedestrian code is being saved. On sending the selected code
with the required remote, the CODE LED L2 will remain steady on to
indicate that programming will be completed.
To save the code for the 2nd AUX channel proceed as follows:
use the SELECT key to select blinking LED L2. Press SET 3 times
consecutively; the LED will change its blink mode (1 1 1 0 1 1 1 0) to
show that the 2nd AUX channel code is being saved. On sending the
selected code with the required remote, LED L2 will remain steady on
to indicate that programming will be completed.
If all 120 codes have been saved, repeating the programming operation
will cause all the programming LEDs to start blinking to signal that no
further codes can be saved.
Deletion:
Use SELECT to go to LED L2; activate blinking of the code to be
deleted (CODE or PEDESTRIAN or 2nd AUX channel as identified
by the associated blinking mode); press and hold down SET for >
5 s. After this interval, the LED will switch off for 2 seconds and the
procedure is completed. If all CODE and PEDESTRIAN codes are
deleted, the LED will remain off.
If only PEDESTRIAN or 2nd CH codes remain stored, the LED blinking
mode will change (1 1 1 1 0 1 1 1 1 0)
Rule of the first saved Remote control:
When programming remotes the following rule is applied: if the first
remote to be saved is a rolling code type, the receiver will subsequently
accept only rolling code remotes, thus providing enhanced antiintrusion security; if the first remote to be saved is a fixed code type,
the receiver will subsequently accept both fixed code remotes and
rolling code remotes.
4. MOTOR TIME (Operator run time programming, max 4
minutes):
The control unit is factory set with Operator run time of 30 seconds
without deceleration.
If the run time of Operators 1 and 2 must be changed, programming
must be carried out with the gate closed as follows: use the SEL key
to select blinking LED L4 and then press the SET key momentarily;
Operator 1 will start the opening cycle; when the required deceleration
starting point is reached, press the SET key again; LED L4 will start
blinking more slowly and Operator 1 will decelerate. On reaching the
required position, press SET to terminate the Opening cycle. At this
point LED L4 will revert to the normal blinking rate and Operator 2 will
start the opening cycle: repeat the run time programming operation for
Operator 2. When motor times programming for the opening cycle is
finished, Operator 2 restarts immediately in the closing cycle: repeat
the operations described above for the Closing cycle of Operator 2
followed by Operator 1.
If you do not require the control unit to perform the deceleration,
during programming, when the opening and closing cycles have been
completed press the SET key twice consecutively rather than just
once.
If the control unit is used in the single Operator configuration (dip switch
SW1 OFF), programming of the run time of Operator 2 is not executed.
During programming, instead of the SET key on the control unit you
can use the button on the remote, provided the remote has been
saved beforehand.
5. PAUSE TIME (Automatic closing time programming 4 min.
max.):
The control unit is factory set with automatic closing disabled. If you
wish to enable automatic closing proceed as follows: use the SEL key
to select blinking LED L5 and press the SET key momentarily; now
wait for a time equivalent to the required time; press the SET key again
momentarily and at the same time the automatic closing time will be
saved and LED L5 will remain steady on. If you wish to restore the initial
condition (no automatic closing) select blinking LED L5 and then press
the SET key twice consecutively in an interval of 2 seconds. The LED
will switch off and the operation will be completed.
During programming, instead of the SET key on the control unit you
can use the button on the remote, providing the remote has been
saved beforehand.
6. LEAVES DELAY (15 sec. max leaf delay programming):
The control unit is factory set with leaves opening and closing delay
disabled (4 sec.). If the control unit is used in the configuration for an
automation with 2 operators, it may be necessary to set a different
leaves delay time; programming must be performed with the gate
closed as follows: press the SELECT key to select blinking LED L6 then
press the SET key momentarily; now wait for a time equivalent to the
desired time interval and then press the SET key again momentarily, at
the same time the fixed 4 second leaves opening delay and the closing
delay for the programmed time will be saved and LED L6 will remain
steady on.
If you want to deactivate this function (without leaves delay), select
blinking LED L6 and then press the SET key twice consecutively in a
time interval of 2 seconds, at the same time the LED will switch off and
the operation will be terminated.
7. AUTOMATIC PROGRAMMING (PRG AUTOM):
The control unit allows Automatic Programming (SIMPLIFIED).
Press the SEL key to select blinking LED L7 and then press the SET
key and hold it down; Operator 2 will perform closing until reaching
the limit switch or end stop, thereafter the Operator 1 movement will
COMUNELLO ®Copyright 2014 - All right reserved
25
ENGLISH
L1
L2
L3
L4
L5
L6
L7
LEV
3. CONDO:
The Condominium function means that during the opening movement
or during the pause time the control unit will not respond to commands
sent by Pushbuttons or remotes. In contrast, during the closing
movement a command sent by the Pushbuttons or the remotes will
reverse the direction of movement. This operating mode is invaluable
when the automation includes a loop detector.
In the default configuration the control unit is set with the Condominium
function disabled; if the Condominium function is required, proceed as
follows: use the SELECT key to select blinking LED L3 and then press
the SET key: LED L3 becomes steady on and programming will be
completed. Repeat the procedure if you wish to restore the previous
configuration.
be repeated. If the Operators move in the opposite direction to the
described direction, release the SET key, disconnect the control unit
from the power supply and change the setting of Dip Switch SW2 to
change the direction of run of the required operator without having
to rewire the connections. If the Operators sequence is correct, the
control unit completes the Auto programming stage by performing
a complete opening and closing cycle (keep the SET key pressed
until the end of the Auto Programming procedure). During the Auto
Programming procedure, the Deceleration cycle is set automatically at
approximately 15% of the complete cycle.
During Automatic Programming, instead of the SET key on the control
unit you can use the button on the remote, providing the remote has
been saved beforehand.
Warning: Automatic Programming is not available without limit
switches.
EXTENDED MENU 1
The control unit is factory set to allow direct selection exclusively of the
main menu functions. If you wish to enable the functions described in
Extended Menu 1, proceed as follows: select blinking LEV LED and
press SET once. The LED will start blinking. This means there will be
30 seconds to select the functions of Extended Menu 1 using the
SELECT and SET keys; once an additional 30 seconds have elapsed,
the control unit reverts to the main menu.
L1
L2
L3
L4
L5
L6
L7
LEV
PERSON PRESENT
PEDESTRIAN /
SINGLE LEAF PUSHBUTTON
PEDESTRIAN PUSHBUTTON /
DS3
FOTOTEST
DS2 STP IN CLOSING
DS1 PARTIAL REVERSAL
NC AS 8K2
MENU LEVEL
ON
SINGLE LEAF
OFF
PEDESTRIAN
PUSHBUTTON
PEDESTRIAN
PUSHBUTTON
OFF
OFF
OFF
OFF
DS3
ON
ON
ON
ON
1 FLASH
1. HOLD-TO-RUN:
The control unit provides the opportunity to set the “Hold-to-run”
function. If you wish to enable this function, proceed as follows: ensure
you have enabled Extended Menu 1 (alternate blinking 1 0 1 0 1 0 of
menu LED LEV) and then use the SEL key to select blinking LED L1
and press the SET key; LED L1 becomes steady on and the operation
will be completed. With hold-to-run enabled, using either the remotes
or the Pushbuttons to operate the gate, the following operation will be
obtained: the command must be maintained constantly to move the
gate. When the command is released, movement will stop immediately.
Repeat the procedure if you wish to restore the previous configuration.
2. SINGLE LEAF OR PED. BUTTON = OPEN, PED. BUTTON =
CLOSE:
The control unit allows a NO Pushbutton to be connected (CN2 input
no. 10) to activate the gate in Pedestrian Opening mode. It is however
possible to use this input to connect a NO pushbutton operating in
a different manner. If you wish to enable the “Single Leaf” function,
proceed as follows: ensure you have enabled Extended Menu 1
(alternate blinking 1 0 1 0 1 0 of menu LED LEV) and then use the SEL
key to select blinking LED L2 and press the SET key; LED L2 becomes
steady on and the operation will be completed. With this function
enabled, the Pushbutton can be used to activate exclusively Operator
1 (refer to the heading “Single Leaf”). In contrast, if you wish to enable
“OPEN-CLOSE” mode in order to use the Pedestrian Pushbutton to
activate exclusively opening of the gate and the P/P Pushbutton to
(CN2 input no. 11) to activate exclusively closing of the gate, repeat
the operation described above, pressing the SEL key twice (LED L2
will blink rapidly) instead of just once. Repeat the procedure if you wish
to restore the initial configuration.
3. PEDESTRIAN PUSHBUTTON / DS3:
The control unit allows a NO Pushbutton to be connected (CN2 input
no. 10) to activate the gate in Pedestrian Opening mode. However,
this input can be used to connect a DS3 photocell (NC): make sure
you have enabled Extended Menu 1 (alternate blinking 1 0 1 0 1 0 of
menu LED LEV) and then use the SEL key to select blinking LED L3
and press the SET key; LED L3 becomes steady on and the operation
26
COMUNELLO ®Copyright 2014 - All right reserved
will be completed. Repeat the procedure if you wish to restore the
previous configuration.
4. FOTOTEST (Photocells test):
The control unit is factory set with the photocells test disabled. If you
wish to enable the photocells test proceed as follows: ensure you have
enabled Extended Menu 1 (blinking 1 0 1 0 1 of LED LEV) and then use
the SEL key to select blinking LED L4 and press the SET key; LED L4
becomes steady on and the operation will be completed. Repeat the
procedure if you wish to restore the previous configuration.
5. DS2 CLOSING STOP:
The control unit allows the operation of input DS2 to be modified. If
you want DS2 to trip also during closing (stopping of the gate leaf). If
in Automatic operating mode and once the passage is free, the gate
resumes the closing manoeuvre, proceed as follows: ensure you have
enabled Extended Menu 1 (alternate blinking 1 0 1 0 1 0 of menu
LED LEV) and then use the SEL key to select blinking LED L5 and
press the SET key; LED L5 becomes steady on and the operation will
be completed. Repeat the procedure if you wish to restore the initial
configuration.
6. DS1 PARTIAL REVERSAL:
The control unit allows the operation of input DS1 to be modified. If,
during a closing manoeuvre, you want DS1 to perform a partial reversal
(short reversal) of the gate leaf instead of a total reversal, proceed as
follows: ensure you have enabled Extended Menu 1 (alternate blinking
1 0 1 0 1 0 of menu LED LEV) and then use the SEL key to select
blinking LED L6 and press the SET key; LED L6 becomes steady on
and the operation will be completed. Repeat the procedure if you wish
to restore the initial configuration.
7. EMERGENCY STOP / 8K2:
The control unit allows the connection of an NC Emergency Stop
pushbutton (CN2 input LED LEV). However, this input can be switched
to an 8.2 KOhm resistive input: ensure you have enabled Extended
Menu 1 (alternate blinking 1 0 1 0 1 0 of menu LED LEV) and then
use the SEL key to select blinking LED L7 and press the SET key;
LED L7 becomes steady on and programming will be completed. A
change of the value read on the input will cause the control unit to
shut down irrespective of the gate movement currently in progress. An
additional gate movement command will be valid provided the correct
input value is restored and irrespective of the prior status the control
unit will execute the gate opening cycle. Repeat the procedure if you
wish to restore the initial configuration.
EXTENDED MENU 2
The control unit is factory set to allow direct selection exclusively of the
main menu functions.
If you wish to enable the functions described in Extended Menu 2,
proceed as follows: select blinking LED LEV and press SET twice. The
LED will start blinking alternately 1 1 0 1 1 0. This means there will
be 30 seconds to select the functions of Extended Menu 2 using the
SEL and SET keys; once an additional 30 seconds have elapsed, the
control unit reverts to the main menu.
L1
L2
L3
L4
L5
L6
L7
LEV
BRAKE
DECELERATION
ALWAYS CLOSE
FOLLOW ME
PEDESTRIAN TIME
2nd CH MONOSTABLE
REMOTE PRG
MENU LEVEL
ON
OFF
ON
ON
PGM TIME
ON
ON
OFF
ON
OFF
OFF
10 Sec
OFF
OFF
2 FLASHIES
1. BRAKE:
The control unit is factory set with the electronic brake function
disabled. If you wish to enable the function, proceed as follows: ensure
you have enabled Extended Menu 2 (alternate blinking 1 1 0 1 1 0 1
1 0 of menu LED LEV) and then use the SEL key to select blinking
LED L1 and press the SET key; LED L1 becomes steady on and the
operation will be completed.
With the brake enabled the control unit reduces coasting of the gate
due to inertia at the time of a stop or direction reversal command.
Repeat the procedure if you wish to restore the previous configuration.
3. ALWAYS CLOSE:
The control unit allows to set “Always Close” operation: this function,
which is programmable only if a Pause Time has already been
programmed, is activated after a power loss; if the gate open condition
is confirmed a closing movement is started automatically, preceded
by 5 seconds of preflashing. If you wish to exclude the deceleration
stage proceed as follows: ensure you have enabled Extended Menu 2
(blinking 1 1 0 1 1 0 of LED LEV) and then use the SEL key to select
blinking LED L3 and press the SET key; LED L3 becomes steady on
and the operation will be completed. Repeat the procedure if you wish
to restore the previous configuration.
4. FOLLOW ME:
The control unit allows the “Follow me” function to be configured;
programmable only if a Pause Time has already been set, this function
reduces the Pause Time to 5 seconds after freeing the DS1 photocell,
meaning the gate re-closes 5 seconds after transit of the user. To
activate this function, proceed as follows: ensure you have enabled
Extended Menu 2 (blinking 1 1 0 1 1 0 of LED LEV) and then use the
SEL key to select blinking LED L4 and press the SET key; LED L4
becomes steady on and the operation will be completed. Repeat the
procedure if you wish to restore the previous configuration.
5. PED. MOT. T: (Programming of pedestrian opening motor
time of max 4 minutes)
The control unit is factory set with Motor time (Pedestrian opening) of
10 seconds without deceleration.
If the pedestrian run time must be changed, programming must be
carried out with the gate closed as follows: ensure you have enabled
Extended Menu 2 (blinking 1 1 0 1 1 0 of LED LEV) use the SEL key
to select blinking LED L5 and then press the SET key momentarily;
the Operator will start the opening movement; when the required
deceleration starting point is reached, press the SET key again; LED
L5 will start blinking more slowly and the Operator will decelerate; on
reaching the required poisition press SET to terminate the Opening
cycle. At this point LED L5 returns to the normal blinking speed and
the Operator restarts in the Closing movement; repeat the operations
described above for the Closing movement.
If you do not require the control unit to perform the deceleration,
during programming, when the opening and closing cycle has been
completed press the SET key twice consecutively rather than just
once.
During programming, instead of the SET key on the control unit you
can use the button on the remote, providing the remote has been
saved beforehand.
6. AUXILIARY RADIO CHANNEL OPERATING LOGIC:
(2nd CH monostable)
The control unit allows the operating logic of the Auxiliary Radio
Channel to be selected.
The control unit is factory set with “Monostable” operation of the
Auxiliary Radio Channel. If you wish to enable “Bistable” operation
proceed as follows: ensure you have enabled Extended Menu 2
(blinking 1 1 0 1 1 0 of LED LEV) and then use the SEL key to select
blinking LED L6 and press the SET key; LED L6 becomes steady on
7. REMOTE RADIO CONTROL PROGRAMMING:
The control unit allows the transmission code to be programmed
remotely without acting directly on the control unit SEL key.
Remote programming of a Radio remote control is performed as
follows: send, continuously for a time in excess of 10 seconds, the
code of a previously saved remote control; at the same time the
control unit switches to programming mode as described above for
the LED L2 in the main menu. If a previously saved pedestrian code is
transmitted continuously the control unit will enter programming mode
of a new pedestrian code and LED L2 will blink as though acquisition
of the pedestrian code were active (1 1 0 1 1 0 1 1 0); if the code
is associated with the 2nd CH/AUX input the LED will blink as though
acquisition of the 2nd CH code were active (1 1 1 0 1 1 1 0 1 1 1 0). To
enable the remote programming function, proceed as follows:
ensure you have enabled Extended Menu 2 (blinking 1 1 0 1 1 0 of
LED LEV) and then use the SEL key to select blinking LED L7 and
press the SET key; LED L7 becomes steady on and the operation will
be completed. Repeat the procedure if you wish to restore the initial
configuration.
EXTENDED MENU 3
The control unit is factory set to allow direct selection exclusively of the
main menu functions.
If you wish to enable the functions described in Extended Menu 3,
proceed as follows: select blinking LED LEV and press SET 3 times.
The LED will start blinking alternately 1 1 1 0 1 1 1 0. This means there
will be 30 seconds to select the functions of Extended Menu 3 using
the SEL and SET keys; once an additional 30 seconds have elapsed
the control unit reverts to the main menu.
L1
L2
L3
L4
L5
L6
L7
LEV
SOFT STOP
SOFT START
RELEASE STROKE
SLAM LOCK
ELS / PED CMD
FLASHING/COURTESY LIGHT
PREFLASH/PAUSE FLASHING
MENU LEVEL
ON
ON
ON
ON
ON
ON
ON
OFF
OFF
OFF
OFF
OFF
OFF
OFF
3 FLASHIES
1. SOFT STOP:
The control unit is factory set with the Soft Stop function disabled. If
you wish to enable this function, proceed as follows: ensure you have
enabled Extended Menu 3 (blinking 1 1 1 0 1 1 1 0 of LED LEV) and
then use the SEL key to select blinking LED L1 and press the SET key;
at the same time LED L1 becomes steady on and programming will
be completed. With the Soft Stop function enabled, at the end of the
movement the control unit will reduce operator force to zero gradually
in a 2 second interval. Repeat the procedure if you wish to restore the
previous configuration.
2. SOFT START:
The control unit is factory set with the Soft Start function disabled. If
you wish to enable this function, proceed as follows: ensure you have
enabled Extended Menu 3 (blinking 1 1 1 0 1 1 1 0 of LED LEV) and
then use the SEL key to select blinking LED L2 and press the SET
key; LED L2 becomes steady on and programming will be completed.
With the Soft Start function enabled, at the start of each movement the
control unit will control start-up of the operator, gradually increasing
the force from the minimum to the value set by the “FORCE” trimmer
during the first 2 seconds of operation. Repeat the procedure if you
wish to restore the previous configuration.
Note: when the Soft Start function is enabled, the control unit
automatically disables the Starting Torque function, while if Soft Start is
disabled then Starting Torque is automatically enabled.
3. RELEASE STROKE:
The control unit is factory set with the release stroke function disabled.
This function comprises sending a closing command for 2 seconds
at the start of an opening cycle: this facilitates release of the lock to
allow correct execution of the opening cycle. If you wish to enable the
COMUNELLO ®Copyright 2014 - All right reserved
27
ENGLISH
2. DECELERATION:
As indicated above, the control unit allows a deceleration stage to
be programmed during opening and closing, while with the Automatic
Programming function the deceleration stage is included automatically.
However, if no deceleration stage is required it can be excluded. In
this manner, when using Automatic Programming the Deceleration
stage will no longer be included, while if the Motor Times Programming
function is used the option of programming a deceleration stage during
opening and closing will no longer be available. If, before excluding the
deceleration stage it had already been programmed using the Motor
Times Programming function, programming must be repeated from the
beginning. If you wish to exclude the deceleration stage proceed as
follows: ensure you have enabled Extended Menu 2 (blinking 1 1 0 1
1 0 of LED LEV) and then use the SEL key to select blinking LED L2
and press the SET key; LED L1 becomes steady on and the operation
will be completed. Repeat the procedure if you wish to restore the
previous configuration.
and the operation will be completed. If you wish to enable “3 Minutes
Timed” operation, repeat the operation described above; pressing the
SEL key twice (LED L6 will blink rapidly) rather than once. Repeat the
procedure if you wish to restore the initial configuration.
Release Stroke function at the maximum power, proceed as follows:
ensure you have enabled Extended Menu 3 (blinking 1 1 1 0 1 1 1 0
of LED LEV) and then use the SEL key to select blinking LED L3 and
press the SET key; LED L3 becomes steady on and programming will
be completed. If you wish to enable the Release Stroke function at the
power set via the “FORCE” Trimmer, repeat the operation described
by pressing the SELECT key twice (LED L3 will blink rapidly) rather
than once. Repeat the procedure if you wish to restore the initial
configuration.
4. SLAM LOCK:
The control unit is factory set with the Slam Lock function disabled.
This function consists in adding, in the case of a deceleration stage
during closing, 1 extra second at the maximum power or at the
power selected with trimmer VR1, in such a way as to ensure positive
engagement of the gate lock, if installed. If you wish to enable the Slam
Lock function at the maximum power, proceed as follows: ensure you
have enabled Extended Menu 3 (blinking 1 1 1 0 1 1 1 0 of LED LEV)
and then use the SEL key to select blinking LED L4 and press the SET
key; LED L4 becomes steady on and programming will be completed.
If you wish to enable the Slam Lock function at the power set via the
“FORCE” Trimmer, repeat the operation described above, pressing the
SEL key twice (LED L4 will blink rapidly) rather than once. Repeat the
procedure if you wish to restore the initial configuration.
5. PED CMD ELECTRIC LOCK ACTIVATION. (ELS/CMD PED):
The control unit is factory set with the function for electric lock activation
via the Pedestrian command disabled. The function for electric lock
activation with the Pedestrian command is used when, for example, the
application consists of a sliding gate with a pedestrian gate alongside.
With this function enabled the sliding gate can be opened both using
commands from the P/P Pushbutton and the remotes, and via the PED
commands from the pedestrian gate by activating the electric lock.
To enable this function proceed as follows: ensure you have enabled
Extended Menu 3 (blinking 1 1 1 0 1 1 1 0 of LED LEV) and then use
the SEL key to select blinking LED L5 then press the SET key; LED L5
becomes steady on and programming will be completed. Repeat the
procedure if you wish to restore the previous configuration.
6. FLASHING LIGHT OPERATION/COURTESY LIGHT:
The control unit is factory set with Flashing Light during Pause Time
disabled. If you wish to enable this function proceed as follows: ensure
you have enabled Extended Menu 3 (blinking 1 1 1 0 1 1 1 0 of LED
LEV) and then use the SEL key to select blinking LED L6 and press
the SET key; LED L6 becomes steady on and programming will be
completed. Repeat the procedure if you wish to restore the previous
configuration.
Courtesy Light Operation: The 24 ~ 4W max. Courtesy Light
output will switch on for 3 minutes whenever an opening command
is transmitted
7. PREFLASHING/PAUSE FLASHING:
The control unit is factory set with the Preflashing and Pause Flashing
functions disabled. If you wish to enable the Preflashing function,
proceed as follows: ensure you have enabled Extended Menu 3
(blinking 1 1 1 0 1 1 1 0 of LED LEV) and then use the SEL key
to select blinking LED L7 and press the SET key LED L7 becomes
steady on and programming will be completed. If you wish to enable
the Pause Flashing function repeat the operation described above,
pressing the SET key twice (LED L7 will blink rapidly) rather than once.
Repeat the procedure if you wish to restore the initial configuration.
Preflashing Operation: The 110 ~ and 24V flashing light output
will always switch on 3 seconds before the gate starts the closing
operation..
Pause Flashing Operation: The 110 ~ and 24V Flashing Light output
will switch on if previously programmed The Pause Time.
RESET
If it becomes necessary to reset the control unit to restore the factory
settings, press the SEL and SET keys together; this will cause all the
RED indicator LEDs to light simultaneously followed immediately by the
control unit switching off.
28
COMUNELLO ®Copyright 2014 - All right reserved
DIAGNOSTICS
Photocell Test:
The control unit is prearranged for connection of safety devices in
compliance with standard EN 12453 point 5.1.1.6. At each operating
cycle a functional test of the connected photocell is performed. In
the case of an open circuit and/or malfunctioning of the photocell,
the control unit does not enable movement of the gate and visually
signals the test failed condition by causing all the indicator LEDs to
blink simultaneously. As soon as correct operation of the photocell is
restored the control unit is ready for normal use. This operating mode
guarantees failure monitoring in compliance with EN 954-1 Category
2.
Commands input test:
In correspondence with each low voltage command input the control
unit is equipped with a signalling LED so that the status of the input can
be checked at a glance.
Operating logic: LED on input closed, LED off input open.
WARRANTY
Fratelli Comunello SpA provides a warranty for 24 months for the correct
functioning of the actuators from the date of manufacture, provided
that the performance specications indicated in the product instruction
manuals are respected. Free of charge repair and replacement of
components that are found to be faulty according to the indisputable
judgment of the company’s technical staff shall be guaranteed at the
sole discretion of Fratelli Comunello Spa, and so excluding any claim
for damages made by others. Warranty material shall be returned to
Fratelli Comunello S.p.a. headquarters carriage paid and will then be
shipped to the customer carriage unpaid. The material found to be
faulty and returned to Fratelli Comunello S.p.a. shall remain property
of the Seller. Any cost resulting from any work needed to repair the
defect or to replace the material shall be charged to the Buyer. No
compensation shall be allowed for the period of device inactivity. Work
under warranty does not prolong the warranty period. The defect of
the product shall be reported by the Buyer within 8 (eight) days from
its discovery or from the date of delivery of the goods, under penalty
of invalidation of the warranty. Such claim shall be notied in writing.
Warranty does not cover:
Any product defect or damage that may have been incurred during
transport; any defect or damage arising from any fault and/or from
neglect, inadequacy and misuse of the electrical wiring in the Buyer’s
property; any defect or damage caused by any repairs carried out
by non authorised personnel or by incorrect use/installation (with
reference to this, system maintenance is recommended every 6
months) or if not original spare parts are used; any defect caused by
chemicals or atmospheric conditions. The warranty does not cover
any cost neither for consumable materials nor for alleged defects or
convenient surveys.
Product Features Fratelli Comunello SpA products are subjected to
continue changes and improvements; their technical features and
image may therefore change without previous notice.
Competent court
Since the contract of sale is conrmed by an Order Conrmation drawn
up in Rosà, any such dispute shall be settled by the laws of Italy and
by the court of Vicenza (VI).
INSTALLATIONS-UND GEBRAUCHSANLEITUNG
CU - 110V - HP
CE-KONFORMITÄTSERKLÄRUNG
Der Unterzeichner, Herr COMUNELLO LUCA, der den folgenden Hersteller vertritt:
F.lli COMUNELLO spa
Via Cassola 64, 36027 Rosà (VI) Italy
RKLÄRT, dass die anbei beschriebene Ausrüstung:
Elektronische Steuerung
CU 110V HP
Beschreibung Modell DEUTSCH
den Gesetzesbestimmungen entspricht, die folgende Richtlinien umsetzen:
• Richtlinie 2004/108/EG (EMV-Richtlinie)
• Richtlinie 2006/95/CE
und dass alle folgenden Normen und/oder technischen Spezifikationen angewendet wurden:
EN61000-6-2 + EN61000-6-3
EN62233 :2008
EN301489-1 + EN301489-3 + EN300220-2
EN60335-1 :2002
sowie ihre nachträglichen Änderungen.
Letzte zwei Ziffern des Jahres, in dem das CE-Zeichen angebracht wurde 14
Rosà (VI) – Italien
01-09-2014
Außerdem wird erklärt, dass es nicht erlaubt ist, die Automatisierung in Betrieb zu setzen, solange die Anlage, in die sie eingebaut wird
oder mit der sie zusammengebaut wird, identifiziert wurde und deren Konformität mit den Erfordernissen der Richtlinie 2006/42/EG und
der entsprechenden nationalen Gesetzgebung erklärt wurde.
Dr. LUCA COMUNELLO
Rechtsvertreter der Firma FRATELLI COMUNELLO s.p.a.
Fratelli Comunello S.p.A.
Unternehmen mit UNI EN ISO 9001:2008
zertifizierten Qualitätssystem
(Bescheinigung n° 50 100 11235 Rev. 01)
COMUNELLO ®Copyright 2014 - All right reserved
29
HINWEISE
•Die Steuerung besitzt keinerlei Trennvorrichtung
für die 110 Volt Stromleitung; deshalb muss der
Installateur eine Trennvorrichtung in die Anlage
einplanen. Es ist notwendig, einen HauptNetzschalter der Überspannungskategorie III zu
installieren. Er ist an einer Stelle anzubringen, an
der er vor ungewünschten Wiedereinschaltungen
geschützt ist, gemäß Punkt 5.2.9 der Richtlinie
EN 12453. Die Verkabelung der verschiedenen
steuerungsexternen elektrischen Bestandteile ist
nach EN 60204-1 und deren Änderungen laut
Punkt 5.2.7 der Richtlinie EN 12453 zu fertigen.
Die Stromkabel dürfen einen Höchstdurchmesser
von 14 mm aufweisen; die Befestigung der
Speise- und Anschlusskabel muss durch die
Anwendung als „Option“ lieferbarer Kabelklemmen
gewährleistet sein
•Als Speisekabel sind unbedingt harmonisierte
biegsame Kabel mit Isolierhülle aus Polychloropren
(H05RN-F) mit Leiter-Mindestquerschnitt von 1
mm2 zu verwenden
• Bei der Installation ausschließlich doppelt isolierte
Kabel (mit Schutzmantel) verwenden, sowohl für
Anschlüsse mit Netzspannung (110V) als auch für
Anschlüsse mit Sicherheitskleinspannung SELV.
Ausschließlich
Kunststoff-Führungsschienen
verwenden und getrennt für Verkabelungen
mit
Niederspannung
(110V)
und
mit
Sicherheitskleinspannung (SELV).
•Die Leiter für Sicherheitskleinspannung müssen
materiell von den Netzspannungsleitern getrennt
sein (mind. 4 mm in der Luft), oder sie müssen
durch eine zusätzliche, mindestens 1 mm dicke
Isolierung angemessen isoliert sein.
•Am Stromversorgungsnetz des Torantriebs ist
eingangsseitig eine Vorrichtung zu installieren, die
eine komplette allpolige Ausschaltung des Netzes
mit einer Kontaktköffnung von mind. 3 mm an jedem
Pol gewährleistet. Solche Trennvorrichtungen
müssen
gemäß
Installationsregeln
am
Stromversorgungsnetz vorhanden und direkt an
den Stromversorgungsklemmen angeschlossen
sein.
•
Beim Durchbohren des Gehäuses zur
Durchführung der Strom- und Anschlusskabel
und bei der Montage der Kabelklemmen ist
darauf zu achten, dass beim Zusammenbau
aller Teile die Eigenschaften des IP-Schutzgrades
des Gehäuses so gut wie möglich unverändert
bleiben.
Außerdem ist bei der Kabelbefestigung darauf zu
achten, dass sie stabil verankert werden.
•Das Gehäuse ist an der Rückseite für die
Wandbefestigung vorbereitet (Vorbereitung für
die Durchbohrungen zur Befestigung mit Dübeln
oder zur Befestigung mit Schrauben). Es sind
alle Vorkehrungen für eine Installation ohne
Veränderung des IP-Schulzgrades vorzusehen
und zu implementieren.
•Falls eine Druckknopftafel für die manuelle
30
COMUNELLO ®Copyright 2014 - All right reserved
Bedienung montiert wird, ist diese so zu
positionieren, dass sich der Benutzer nicht an
einer gefährlichen Position befindet.
•Der Getriebemotor für die Torbewegung muss
den Vorschriften laut 5.2.7 der Richtlinie EN
12453 entsprechen.
• Der Ausgang FOTO+ ist notwendigerweise der
Fotozellenspeisung gewidmet und darf nicht für
andere Anwendungen eingesetzt werden.
• Die Steuerung kann bei jedem Bewegungszyklus
die Funktionsfähigkeit der Fotozellen testen und
garantiert damit den Quetschschutzvorrichtungen
der Kategorie 2 einen Schutz vor Defekten gemäß
Punkt 5.1.1.6. der Richtlinie EN 12453. Wenn die
Sicherheitsvorrichtungen nicht angeschlossen
werden und/oder nicht funktionieren, ist die
Steuerung daher nicht betriebsfähig.
•Das Gerät kann von Kindern ab mindestens 8
Jahren und von Personen mit herabgesetzten
körperlichen, gefühlsmäßigen und geistigen
Fähigkeiten bzw. von Personen ohne Erfahrung
oder ohne die notwendigen Kenntnisse benutzt
werden, vorausgesetzt sie werden dabei
beaufsichtigt bzw. man erteilt ihnen vorab
Anweisungen für den sicheren Gebrauch
des Geräts und das Verständnis der damit
verbundenen Gefahren.
Kinder dürfen nicht mit dem Gerät spielen. Die
Reinigung und Wartung, die dem Benutzer
obliegen, dürfen nicht von Kindern ohne Aufsicht
durchgeführt werden.
Für einen korrekten Betrieb des Funkempfängers
wird im Falle einer Verwendung von zwei oder
mehreren Steuerungen empfohlen, sie in einem
Abstand von mindestens 3 m voneinander zu
installieren.
Alle Arbeitsgänge, die das Öffnen des Gehäuses
verlangen (Anschluss der Kabel, Programmierung,
usw.) sind in der Installationsphase von fachkundigem
Personal durchzuführen.
WICHTIGE HINWEISE FÜR DEN BENUTZER
•Die Vorrichtung darf nicht von Kindern oder
Personen mit unzureichenden psychischphysischen Fähigkeiten verwendet werden, es
sei denn, sie werden überwacht oder über den
Betrieb und die Benutzungsmethoden belehrt.
•Kindern darf nicht erlaubt werden, mit der
Vorrichtung zu spielen; außerdem sind die
Funksteuerungen vor Kindern fern zu halten.
• ACHTUNG: Dieses Anleitungshandbuch ist
aufzubewahren und die darin enthaltenen
wichtigen Sicherheitsvorschriften zu beachten.
Das Nichtbeachten der Vorschriften könnte
Schäden und schwere Unfälle verursachen.
Die Anlage häufig untersuchen, um eventuelle
Zeichen von Beschädigungen festzustellen.
Die Vorrichtung nicht verwenden, wenn sie
reparaturbedürftig ist.
TECHNISCHE EIGENSCHAFTEN
Stromversorgung:
110 V~ 50-60Hz 1600W max.
Ausgang Blinkleuchte 1:
110 V~ 500 W max.
Ausgang Blinkleuchte 2:
24 V~ 4 W max.
Ausgänge Motoren:
110 V~ 2 x 500 W max.
Ausgang Elektroschloss:
12 V 15 W max.
Stromversorgung Fotozellen:
24 V~ 5 W max.
Ausgang Service-Stromversorgung:24 V~ 5 W max.
Ausgang Kontrolllampe:
24 V 4 W max.
Sicherungen und Betätigungenmit Niederspannung: 24 V
Betriebstemperatur:
-20 ÷ 55 °C
Funkempfänger:
433 Mhz
Sender:
18 Bit oder Rolling Code
Max. gespeicherte TX Codes:
120 (CODE o CODE PED/2°CH)
Abmessungen der Platine:
160x107 mm.
VORBEREITENDE ÜBERPRÜFUNGEN
• Prüfen, dass das in der Verpackung enthaltene Produkt einwandfrei und
in gutem Zustand ist.
• Prüfen, dass der Installationsort geeignet ist und die Mindestabmessungen
laut ABB. 1 einhält.
INSTALLATION
ANSCHLÜSSE
CN1:
L:
Eingang Außenleiter 110 V~ (Phase).
N:
Eingang Außenleiter 110 V~ (Neutralleiter).
LAMP 110~:
Ausgang Blinkleuchte 1 (110 V~ Neutralleiter).
LAMP 110~:
Ausgang Blinkleuchte 1 (110 V~ Phase).
MOT1 OPEN:
Ausgang Motor 1 Öffnung.
MOT1 COM:
Ausgang Motor 1 common.
MOT1 CLOSE:
Ausgang Motor 1 Schließung.
MOT2 OPEN2:
Ausgang Motor 2 Öffnung.
MOT2 COM2:
Ausgang Motor 2 common.
MOT2 CLOSE2: Ausgang Motor 2 Schließung.
CN2:
2nd CH:
Ausgang Aux-Funkkanal (Freier Kontakt Höchstlast 30V
1A).
2nd CH:
Ausgang Aux-Funkkanal (Freier Kontakt Höchstlast 30V
1A).
FOTO+:
Kontrolle und Speisung der Fotozellen (24V~ 5W).
LAMP 24V 4W:
Ausgang Blinkleuchte 2 (24V~ 4W).
GND:
Eingang GND common
DS2:
Eingang Sicherheitsvorrichtung 2 (NC-Kontakt).
DS1:
Eingang Sicherheitsvorrichtung 1 (NC-Kontakt).
STOP 8K2: Eingang Sperre (NC-Kontakt).
GND:
Eingang GND common.
P PED:
Eingang Taster Fußgänger/Einzelflügel/Auf (NO).
PP:
Eingang Taster Auf/Zu-Betätigung / Schließen (NO).
ELS+:
Ausgang Elektroschloss 12 V 15 W (+12V).
ELS-:
Ausgang Elektroschloss 12 V 15 W (GND).
24V 5W:
Service-Ausgang (24V~ 5W)
GND:
Eingang GND common.
SPIA +24V LED:Ausgang Kontrolllampe (+24 V
4 W).
ANT-:
Eingang Massenanschluss Antenne.
ANT+:
Eingang heißer Pol Antenne.
CN3:
ENC1 +:
Eingang Encoder-Speisung Motor 1
ENC1 E:
Eingang Encoder-Signal Motor 1
ENC1 GND: Eingang GND common
MOT1 FCA: Eingang Öffnungs-Endschalter Motor 1 (NC-Kontakt).
MOT1 FCC: Eingang Schließ-Endschalter Motor 1 (NC-Kontakt).
ENC2 +:
Eingang Encoder-Speisung Motor 2
ENC2 E:
Eingang Encoder-Signal Motor 2
ENC2 GND: Eingang GND common.
MOT2 FCA: Eingang Öffnungs-Endschalter Motor 2 (NC-Kontakt).
MOT2 FCC: Eingang Schließ-Endschalter Motor 2 (NC-Kontakt).
CN5 (1st):
1: Eingang Transformator-Primärwicklung 110 V~.
2: Eingang Transformator-Primärwicklung 110 V~.
CN4 (2st):
1: Ausgang SEC (Sekundärwicklung) 1 Transformator 11,8V 3,5A.
2: Ausgang SEC (Sekundärwicklung) 1 Transformator 11,8V 3,5A.
3: Ausgang SEC (Sekundärwicklung) 2 Transformator 25V 0,8A.
4: Ausgang SEC (Sekundärwicklung) 2 Transformator 25V 0,8A
BETRIEBSEIGENSCHAFTEN
AUTOMATIKBETRIEB
Wenn sowohl die Funksteuerung wie auch die NiederspannungsDruckknopftafel zur Bedienung des Tors verwendet werden, erfolgt der
Betrieb in folgender Weise:
Der erste Impuls steuert das Öffnen bis zum Ablauf der Motorzeit bzw.
zum Erreichen des Öffnungs-Endanschlags, der zweite Impuls steuert das
Schließen des Tors. Wenn vor Ablauf der Motorzeit bzw. dem Erreichen
eines der beiden Endanschläge ein Impuls gesendet wird, schaltet die
Steuerung sowohl beim Öffnen als auch beim Schließen die Umkehr der
Bewegung.
IMPULSBETRIEB:
Bei Verwendung der Funksteuerung oder der Niederspannungstasten zur
Betätigung des Schließsystems wird folgender Betrieb erzeugt: Der erste
Impuls steuert die Öffnung bis zum Ablauf der Motorzeit oder zum Erreichen
des Öffnungs-Endanschlages; der zweite Impuls steuert die Schließung
des Schließsystems; falls vor Ablauf der Motorzeit oder vor Erreichen des
Öffnungs-Endanschlages ein Impuls gesendet wird, stoppt die Steuerung
die Bewegung (falls zuvor eine Pausezeit programmiert wurde, steuert sie
bei Ablauf das erneute automatische Schließen). Eine weitere Schaltung
bewirkt die Wiederaufnahme der Bewegung in die entgegengesetzte
Richtung; falls vor Ablauf der Motorzeit oder vor Erreichen des SchließEndanschlages ein Impuls gesendet wird, stoppt die Steuerung die
Bewegung ebenfalls. Eine weitere Schaltung bewirkt den Neustart der
Bewegung in die entgegengesetzte Richtung.
Impulsbetrieb 1:
Bei Verwendung der Funksteuerung oder der Niederspannungstaster zur
Betätigung des Schließsystems wird folgender Betrieb erzeugt: Der erste
Impuls steuert die Öffnung bis zum Ablauf der Motorzeit oder zum Erreichen
des Öffnungs-Endanschlages; der zweite Impuls steuert die Schließung
des Schließsystems; falls vor Ablauf der Motorzeit oder vor Erreichen eines
der beiden Endanschläge ein Impuls gesendet wird, stoppt die Steuerung
ebenfalls die Bewegung, sowohl in der Öffnungs- wie auch Schließphase
(auch wenn zuvor eine Pausezeit programmiert wurde). Eine weitere
Schaltung bewirkt den Neustart der Bewegung in die entgegengesetzte
Richtung.
SCHLIESSAUTOMATIK:
Die Steuerung erlaubt ein automatisches Schließen des Tors ohne
zusätzliche Betätigungen.
Die Wahl dieser Betriebsmethode ist im Abschnitt der Programmierung der
Pausezeit beschrieben.
FUSSGÄNGERFUNKTION:
Mit der Steuerung kann unter Verwendung der Funksteuerung oder des
Fußgänger-Öffnungstasters nur der Motor 1 mit einer programmierbaren
Zeit betätigt werden.
EINZELFLÜGEL:
Trotz Verwendung in der Konfiguration für den Antrieb mit 2 Motoren erlaubt
die Steuerung mit dem Taster Fußgängeröffnung/Einzelflügel (s. Menü 2
für die entsprechende Taster-Konfiguration) das alleinige Betätigen des
Motors 1, unter Befolgung der in der Motorzeiten-Programmierungsphase
programmierten Zeiten.
EINGANG SPERRE:
Die Steuerung erlaubt den Anschluss eines Sperr-Tasters (NC).
Das Ansprechen in egal welcher Betriebsphase der Steuerung
führt zum sofortigen Stoppen der Bewegung. Es wird eine weitere
Bewegungsbetätigung möglich sein, sofern der Sperreingang deaktiviert
wurde; in jedem Fall leistet die Steuerung die Öffnungsphase des Antriebs
mit einem 5 Sekunden langen Vorblinken.
ACHTUNG: Diesen Eingang überbrücken, wenn er nicht benutzt wird
COMUNELLO ®Copyright 2014 - All right reserved
31
DEUTSCH
• An den vier Ecken des Gehäuses Bohrungen fertigen und die Steuerung
an der Wand befestigen (ABB. 2).
•Zur Durchführung der Kabel, das Gehäuse an der Unterseite
durchbohren. (ABB.3). Es wird zur Verwendung von Kabelklemmen
empfohlen.
ANSCHLÜSSE AN DEN TRANFORMATOR
FOTOZELLEN:
Die Steuerung erlaubt die Speisung und den Anschluss von Fotozellen
nach der Richtlinie EN 12453.
Eingang DS1 (NC)
Das Ansprechen der Fotozellen wird in der Öffnungsphase nicht
berücksichtigt, in der Schließphase bewirkt es die Umkehr der Bewegung.
Eingang DS2 (NC)
Das Ansprechen in der Öffnungsphase bewirkt das vorübergehende
Anhalten des Tors; nach der Freisetzung nimmt die Steuerung die
Öffnungsphase wieder auf. Das Ansprechen in der Schließphase bewirkt
die Umkehr der Bewegung.
Programmierbarer Eingang DS3 (NC), siehe Menü 2
Das Ansprechen in der Öffnungsphase bewirkt die Umkehr der Bewegung.
Das Ansprechen in der Schließphase wird nicht berücksichtigt.
Für einen Betrieb gemäß Kat. 2 der Richtlinie EN 13849-1 findet vor jedem
Manöver ein Fotozellentest statt. Um diesen Test durchführen zu können
ist unbedingt der Sender jedes Fotozellenpaars über den entsprechenden
Ausgang „Kontrolle und Speisung der Fotozellen” (Ausgänge 3 und 5 der
Klemmenleiste CN2) zu speisen, während der Empfänger jedes Paars über
den Ausgang „Service-Ausgang”(Ausgänge 14 und 15 der Klemmenleiste
CN2) gespeist werden muss. Das Manöver startet erst nach positivem
Testergebnis: andernfalls erlaubt die Steuerung keine Bewegung und
bei jeder Schaltung weist das Blinken aller Programmier-Leds auf den
Alarmzustand hin.
ENDSCHALTER ÖFFNUNG UND SCHLIESSUNG:
Die Steuerung erlaubt den Anschluss von zwei Endschaltern für die Öffnung
und Schließung (NC). Wenn diese in den jeweiligen Betriebsphasen
ansprechen, wird ein sofortiges Stoppen der Bewegung für beide
Ausgänge Motor 1 und 2 erzeugt.
ACHTUNG: Diese Eingänge nicht überbrücken, wenn sie nicht benutzt
werden.
+
-
+
-
+
-
Die Verwendung der Encoder unterstützt die Steuerung bei der
Hinderniserkennung und garantiert eine höhere Genauigkeit bei der
Ausführung der Manöver.
VERLANGSAMUNG:
Die Verlangsamungsfunktion der Motoren wird für Tore verwendet, um das
Anschlagen mit hoher Geschwindigkeit der beweglichen Flügel am Ende
der Öffnungs- und Schließphase zu vermeiden.
Die Steuerung erlaubt während der Programmierung der Motorzeit
(siehe Hauptmenü) auch die Programmierung der Verlangsamung an
den gewünschten Stellen (vor der kompletten Öffnung und Schließung);
außerdem ist mit dem Trimmer „SLOWING“ eine dreistufige Feineinstellung
der Intensität der Kraft während der Verlangsamungsphase möglich.
Bei Nutzung der Funktion „Automatische Programmierung“ (siehe
Hauptmenü) kann in jedem Fall die Verlangsamungsphase ausgeschaltet
werden (s. Erweitertes Menü 2).
KONTROLLLAMPE:
Die Steuerung erlaubt den Anschluss einer Kontrolllampe 24
für die
Zustandsanzeige des Antriebs.
Kontrolllampe ausgeschaltet: Antrieb geschlossen
Kontrolllampe eingeschaltet: Antrieb geöffnet
Lamgsam blinkende Kontrolllampe: Öffnungsbewegung, Schnell blinkende
Kontrolllampe: Schließbewegung.
Auf Blinkleuchtenausgang umwandelbar.
BETRIEB MIT TIMER:
Die Steuerung erlaubt den Anschluss eines Timers anstelle des Auf-ZuTasters.
Beispiel: 8.00 Uhr: Der Timer schließt den Kontakt und die Steuerung steuert
die Öffnung; 18.00 Uhr: Der Timer öffnet den Kontakt und die Steuerung
steuert die Schließung. Während des Intervalls von 08.00 bis 18.00 Uhr
am Ende der Öffnungsphase schaltet die Steuerung die Blinkleuchte, die
Schließautomatik und die Funksteuerungen aus.
AUSGANG ELEKTROSCHLOSS-BETÄTIGUNG:
Die Steuerung besitzt einen Ausgang zur Steuerung von Elektroschlössern
12
15W max. Die Schaltung erfolgt bei jeder Anfangsbewegung der
Öffnung 2 Sek. lang.
SW2
SW2
ON
EINSTELLUNG DER MOTORKRAFT (FORCE):
Die elektronische Steuerung ist mit einem Trimmer „FORCE“ für die
Einstellung der Kraft der Motoren ausgestattet, die vollkommen vom
Mikroprozessor betrieben wird. Die Einstellung kann in einem Bereich von
50% bis 100% der max. Kraft erfolgen.
Für jede Bewegung ist in jedem Fall ein Anlauf vorgesehen, bei dem der
Motor 2 Sekunden lang mit der Höchstleistung gespeist wird, auch wenn
die Einstellung der Motorkraft eingeschaltet ist. Anmerkung: Der Anlassstoß
wird automatisch ausgeschaltet, wenn die Soft-Start-Funktion eingestellt
ist.
ACHTUNG: Eine Änderung des Trimmers „FORCE“ verlangt
die Wiederholung der Lernprozedur, da sich die Manöver- und
Verlangsamungszeiten verändern können.
HINDERNISERKENNUNG (SENS):
Die elektronische Steuerung ist mit einem Trimmer „SENS“ für die Einstellung
der zur Hinderniserkennung notwendigen Gegenkraft ausgestattet, der
ganz vom Mikroprozessor betrieben wird.
Die Einstellung kann mit einer Ansprechzeit zwischen mindestens 0,1 Sek.
und maximal 7 Sek. erfolgen.
ACHTUNG:
• Wenn Endschalter an der Steuerung angeschlossen sind, bewirkt die
Hinderniserkennung immer die Umkehr der Bewegung beim Schließen
und die 2 Sekunden lange Umkehr beim Öffnen.
• Wenn keine Endschalter an der Steuerung angeschlossen sind,
bewirkt die Hinderniserkennung immer die Umkehr der Bewegung
beim Schließen (ausgenommen in den letzten 5 Sekunden, in denen
das Stopp-Manöver erfolgt) und eine 2 Sekunden lange Umkehr beim
Öffnen (ausgenommen in den letzten 5 Sekunden, in denen das StoppManöver erfolgt).
Die Hinderniserfassung funktioniert nur bei automatischen
Antrieben mit Encoder und richtig verbunden.
ENCODER MOTOR 1 UND MOTOR 2:
Die Steuerung erlaubt den Anschluss eines Encoders pro Motor.
32
COMUNELLO ®Copyright 2014 - All right reserved
SW2
ON
1
2
REV
OFF
REV
OFF
SW2
ON
1
2
REV
MOT 1
REV
OFF
KONTROLLE DER
MOTOREN 1 UND 2
ON
1
2
REV
OFF
REV
MOT 2
1
REV
MOT 1
LAUFRICHTUNG
2
REV
MOT 2
DER
Wichtige Anmerkung: Achtung! Die Dip-Switches SW1 und SW2 bei
ausgeschalteter Steuerung verschieben und dann die Programmierung
der Steuerung wiederholen.
Die elektronische Steuerung ist mit einem Dip-Switch SW2 ausgestattet,
mit dem die Laufrichtung eines jeden angeschlossenen Motors geändert
werden kann, ohne an den elektrischen Anschlüssen Eingriffe vornehmen
zu müssen: Dip 1 von SW2 bezieht sich auf den Motor 1; Dip 2 von SW2
auf den Motor 2
SW1
ON
SW1
SW1
ON
1
2
ON
1
2
1
2
NICHT
2
1
VERZ.
2
VERZ.
MOTOR BERÜCK MOTOREN MOT. 2 MOTOREN MOT. 1
VERZÖGERUNGSKONTROLLE MOT 2 ODER
M 2 UND FREIGABE 1 ODER 2 MOT.
Die elektronische Steuerung ist mit einem Dip-Switch SW1 ausgestattet,
mit dem die Funktion 1 oder 2 Motoren gewählt und bestimmt werden
kann, welcher der Motoren zuerst und welcher danach starten soll.
SW1
ON
SW1
SW1
ON
1
2
ON
1
2
1
2
NICHT
2
1
VERZ.
2
VERZ.
MOTOR BERÜCK MOTOREN MOT. 2 MOTOREN MOT. 1
PROGRAMMIERUNG:
TASTE SELECT: Wählt die Art der zu speichernden Funktion; die Wahl
wird von der blinkenden Led angezeigt.
Durch mehrmaliges Drücken der Taste stellt man auf die gewünschte
Funktion. Die Wahl bleibt 10 Sekunden lang aktiv, wird von der blinkenden
Led angezeigt und nach Ablauf schaltet die Steuerung wieder auf den
ursprünglichen Zustand.
Taste SET: Dient zur Programmierung der Information je nach der mit der
Taste SEL gewählten Funktion.
WICHTIG: Die Funktion der Taste SET kann auch von der Funksteuerung
ersetzt werden, sofern sie vorher programmiert wurde (Led CODE
eingeschaltet).
Die Programmierung erfolgt nur wenn die Sicherheitskontakte nicht aktiv
sind
MENÜ HAUPTMENÜ
L1
L2
L3
L4
L5
L6
L7
LEV
STEP BY STEP
CODE TX
CONDO
MOTOR TIME
PAUSE TIME
DELAY
PRG. AUTOM
MENU
Impulsbetrieb
Code eingegeben
ON
Programmierte Zeit
Mit Schließautomatik
ON
ON
Automatikbetrieb
Kein Code
OFF
30 Sek.
Ohne Schließautomatik
OFF
OFF
ON
1. STEP BY STEP:
n der Default-Konfiguration ist der „Automatikbetrieb“ eingestellt (LED
Nr.1 ausgeschaltet); falls die Betriebslogik „Impulsbetrieb“ eingestellt
werden soll: mit der Taste SEL auf das Blinken der LED Nr. 1 stellen und
auf die Taste SET drücken. Die LED Nr. 1 schaltet permanent ein und die
Programmierung wird beendet.
Falls die Betriebslogik „Impulsbetrieb 1“ eingestellt werden soll, den oben
beschriebenen Vorgang wiederholen und zweimal anstatt einmal auf die
Taste SEL drücken (die LED Nr.1 beginnt schnell zu blinken).
Zur Rückstellung auf die vorherige Konfiguration den Vorgang wiederholen
2. CODE TX: (Code der Funksteuerung):
Mit der Steuerung können bis zu 120 Funksteuerungen mit untereinander
unterschiedlichen Codes (Festcode oder Rolling Code) gespeichert
werden.
Programmierung:
Zur Programmierung des Übertragungscodes: Mit der Taste SELECT auf
das Blinken der LED L2 stellen. 1 Mal auf SET drücken, die Led ändert das
Blinken (1 0 1 0 länger), um auf die aktive Speicherung des ersten Niveaus
hinzuweisen.
Durch Senden des gewählten Codes mit der gewünschten Funksteuerung
bleibt die LED CODE permanent eingeschaltet, um darauf hinzuweisen,
dass die Programmierung komplettiert wird.
Zur Speicherung des Codes für Fußgängeröffnung / Einzelflügel: Mit
der Taste SELECT auf das Blinken der LED L2 CODE stellen. 2 Mal
hintereinander auf SET drücken, die Led ändert das Blinken (1 1 0 1 1 0),
um auf die aktive Speicherung des Fußgängercodes hinzuweisen.
Durch Senden des gewählten Codes mit der gewünschten Funksteuerung
bleibt die LED CODE L2 permanent eingeschaltet, um darauf hinzuweisen,
dass die Programmierung komplettiert wird.
Zur Speicherung des Codes für den 2.Aux-Kanal: Mit der Taste SEL auf
das Blinken der LED L2 stellen. 3 Mal hintereinander auf SET drücken,
die Led ändert das Blinken (1 1 1 0 1 1 1 0) und weist so auf die aktive
Code-Speicherung des 2. AUX-Kanals hin. Durch Senden des gewählten
3. CONDO (WOHNGEBÄUDE):
Bei der Wohngebäude-Funktion erfasst die Steuerung in der
Öffnungsphase oder während der Pausezeit keine von den Tastern und
von den Funksteuerungen eingehenden Betätigungen. Dagegen bewirkt
in der Schließphase eine von den Tastern oder von den Funksteuerungen
eingehende Betätigung die Umkehr der Bewegung. Dieser Betriebsmodus
wird besonders dann verwendet, wenn der Torantrieb einen Loop Detector
umfasst.
In der Default-Konfiguration der Steuerung ist die Wohngebäude-Funktion
ausgeschaltet; zur Einschaltung: Mit der Taste SELECT auf das Blinken
der LED L3 stellen und auf die Taste SET drücken: Die LED L3 schaltet
permanent ein und die Programmierung wird beendet. Zur Rückstellung auf
die vorherige Konfiguration den Vorgang wiederholen.
4. MOTOR TIME (Programm. Betriebszeit der Motoren max. 4
Minuten):
Der Hersteller liefert die Steuerung mit einer vorbestimmten Motorbetriebszeit
von 30 Sek. und ohne Verlangsamung.
Zur Änderung der Betriebszeit der Motoren 1 und 2, die Programmierung bei
geschlossenem Tor wie folgt durchführen: Mit der Taste SEL auf das Blinken
der Led L4 stellen und einen Augenblick auf die Taste SET drücken und der
Motor 1 beginnt den Öffnungszyklus; an der gewünschten Anfangsstelle
der Verlangsamung erneut auf die Taste SET drücken: Die LED L4 beginnt
langsamer zu blinken und der Motor 1 erzeugt die Verlangsamung; bei
Erreichen der gewünschten Position durch Drücken der Taste SET den
Öffnungszyklus beenden. Nun blinkt die LED L4 wieder regelmäßig und
der Motor 2 startet die Öffnungsphase: Den Programmierungsvorgang der
Betriebszeit des Motors 2 wiederholen. Nach vollendeter Programmierung
der Motorzeiten der Öffnung startet der Motor 2 sofort wieder den
Schließvorgang: Die obigen Arbeitsschritte für die Schließphase des Motors
2 und daraufhin des Motors 1 wiederholen.
Falls die Steuerung die Verlangsamung nicht durchführen soll, ist bei
der Programmierung nach Vollendung der Öffnungs- und Schließzyklen
zweimal hintereinander anstatt nur einmal auf die Taste SET zu drücken.
Wenn die Steuerung in der Konfiguration mit 1 Motor verwendet wird (Dip
1 von SW1 OFF), wird für den Motor 2 keine Betriebszeit programmiert.
Während der Programmierung kann anstelle der auf der Steuerung
vorhandenen Taste SET die Taste der Funksteuerung verwendet werden,
sofern sie vorher gespeichert wurde.
5. PAUSE TIME (Programmierung der autom. Schließzeit von max.
4 Min.):
Der Hersteller liefert die Steuerung ohne Schließautomatik. Zur Freigabe
der Schließautomatik: Mit der Taste SEL auf das Blinken der LED L5
stellen und einen Augenblick auf die Taste SET drücken und dann
eine der gewünschten Pausezeit gleichlange Zeit warten; erneut einen
Augenblick auf SET drücken und gleichzeitig erfolgt die Speicherung der
automatischen Schließzeit und die LED L5 schaltet mit Festlicht ein. Um
den Ausgangszustand wieder herzustellen (ohne Schließautomatik), auf
das Blinken der LED L5 stellen und in einer Zeit von 2 Sekunden zweimal
hintereinander auf die Taste SET drücken. Die Led schaltet aus und der
Vorgang wird beendet.
Während der Programmierung kann anstelle der auf der Steuerung
COMUNELLO ®Copyright 2014 - All right reserved
33
DEUTSCH
Der Hersteller liefert die Steuerung mit der möglichen Wahl einiger wichtiger
Funktionen.
Codes mit der gewünschten Funksteuerung bleibt die LED L2 permanent
eingeschaltet, um darauf hinzuweisen, dass die Programmierung
komplettiert wird.
Falls alle 120 Codes gespeichert wurden und der Programmierungsvorgang
wiederholt wird, beginnen alle Programmier-Leds zu blinken, um darauf
hinzuweisen, dass keine weiteren Speicherungen möglich sind.
Löschen:
Mit SEL auf LED L2 stellen; das Blinken des zu löschenden Codes
aktivieren (CODE, FUSSGÄNGER oder 2. AUX-Kanal, vom jeweiligen
Blinken angezeigt); auf SET drücken und > 5 Sek. lang gedrückt halten.
Abschließend schaltet die Led 2 Sek. aus und die Prozedur ist komplettiert.
Falls alle Codes (CODE und FUSSGÄNGER) gelöscht werden, bleibt die
Led ausgeschaltet.
Falls nur FUSSGÄNGER- oder 2. KANAL-Codes gespeichert bleiben, blinkt
die Led anders (1 1 1 1 0 1 1 1 1 0)
Regel der erstgespeicherten Funksteuerung:
Bei der Programmierung der Funksteuerungen gilt folgende Regel: Falls
die erstgespeicherte Funksteuerung eine Rolling Code Funksteuerung
ist, nimmt der Empfänger dann nur Rolling Code Funksteuerungen
entgegen, um einen höheren Intrusionsschutz zu gewährleisten; ist die
erstgespeicherte Funksteuerung dagegen eine mit Festcode, nimmt der
Empfänger sowohl Festcode wie auch Rolling Code Funksteuerungen
entgegen.
vorhandenen Taste SET die Taste der Funksteuerung verwendet werden,
sofern sie vorher gespeichert wurde.
6. VERZ. FLÜGEL (Programm. Flügelverzögerung max. 15 Sek.):
Der Hersteller liefert die Steuerung mit Verzögerung beim Öffnen und
Schließen der Flügel (4 Sek). Im Falle der Verwendung der Konfiguration
für die Automatisierung mit 2 Motoren könnte es notwendig sein, eine
andere Verzögerungszeit der Flügel einzustellen; diese Programmierung
bei geschlossenem Tor wie folgt durchführen: Sicherstellen, dass das
Erweiterte Menü 1 freigegeben wurde, mit der Taste SELECT auf das
Blinken der LED L6 stellen und einen Augenblick auf die Taste SET
drücken; dann eine der gewünschten Verzögerungszeit gleichlange Zeit
warten; erneut einen Augenblick auf SET drücken und gleichzeitig erfolgt
die Speicherung der festen Flügelöffnungsverzögerung von 4 Sekunden
und der programmierten Flügelschließverzögerung und die LED L6 schaltet
fest ein.
Zur Abschaltung dieser Funktion (ohne Flügelverzögerung), auf das
Blinken der LED L6 stellen und dann innerhalb von 2 Sekunden zweimal
hintereinander auf die Taste SET drücken; im selben Moment schaltet die
Led aus und der Vorgang wird beendet.
7. AUTOMATISCHE PROGRAMMIERUNG (PRG AUTOM):
Die Steuerung ermöglicht eine Automatische Programmierung
(VEREINFACHT).
Mit der Taste SEL auf das Blinken der LED L7 stellen und dann andauernd
auf die Taste SET drücken; der Motor 2 führt den Schließvorgang bis zum
Endschalter bzw. Anschlag aus und daraufhin wiederholt der Motor 1 das
Manöver. Falls sich die Motoren anders bewegen als beschrieben, die Taste
SET freisetzen, die Steuerung spannungsfrei setzen und den Dip-Switch
SW2 ändern, um am gewünschten Motor die Laufrichtung zu wechseln,
ohne die elektrischen Anschlüsse materiell zu verändern. Ist die Schaltfolge
der Motoren dagegen korrekt, komplettiert die Steuerung die automatische
Programmierung und führt eine komplette Öffnung und Schließung aus
(dabei ist die Taste SET bis zum Ende der automatischen Programmierung
gedrückt zu halten). Hierbei wird automatisch der Verlangsamungszyklus
auf ca. 15% des Komplettzyklus eingestellt.
Während der Automatischen Programmierung kann anstelle der auf der
Steuerung vorhandenen Taste SET die Taste der Funksteuerung verwendet
werden, sofern sie vorher gespeichert wurde.
Achtung! Eine Automatische Programmierung ist bei fehlenden
Endschaltern nicht möglich.
ERWEITERTES MENÜ 1
Der Hersteller liefert die Steuerung mit der Möglichkeit, nur die Funktionen
aus dem Hauptmenü direkt zu wählen. Zur Freigabe der im Erweiterten
Menü 1 beschriebenen Funktionen: Auf das Blinken der Led LEV stellen
und einmal auf SET drücken. Die Led beginnt zu blinken. Nun stehen 30
Sekunden für die Wahl der Funktionen aus dem Erweiterten Menü 1 mit
den Tasten SELECT und SET zur Verfügung; nach weiteren 30 Sekunden
stellt die Steuerung wieder auf das Hauptmenü zurück.
L1
L2
L3
L4
L5
L6
L7
LEV
TOTMANNBETRIEB
TASTER FUSSGÄNGER /
EINZELFLÜGEL
FUSSGÄNGER-TASTER / DS3
FOTOTEST
DS2 STP SCHLIESSUNG
DS1 TEILW. UMKEHR
NC WIE 8K2
MENÜSTUFE
ON
EINZELFLÜGEL
DS3
ON
ON
ON
ON
OFF
FUSSGÄNGER-TASTER
FUSSGÄNGER-TASTER
OFF
OFF
OFF
OFF
1 BLINKEN
1. TOTMANNBETRIEB:
Auf der Steuerung kann der „Totmannbetrieb“ eingestellt werden. Falls
diese Betriebsweise gewünscht ist: Sicherstellen, dass das Erweiterte
Menü 1 freigegeben wurde (abwechselndes Blinken 1 0 1 0 1 0 der
Menüstufe 8). Mit der Taste SEL auf das Blinken der LED L1 stellen und
auf die Taste SET drücken: Die LED 1 schaltet permanent ein und der
Vorgang wird beendet. In dieser Weise wird unter Verwendung sowohl der
Funksteuerungen wie auch der Tor-Bedientaster folgender Betrieb erzeugt:
Damit sich das Tor bewegt, ist die gewünschte Betätigung ständig aktiv zu
halten. Das Freisetzen des Schaltelements bewirkt eine sofortige Stoppung
der Bewegung. Zur Rückstellung auf die vorherige Konfiguration den
Vorgang wiederholen.
34
COMUNELLO ®Copyright 2014 - All right reserved
2. EINZELFLÜGEL ODER FUSSGÄNGER-TASTER=AUF,
P/P-TASTER (IMPUSBETRIEB) =ZU
Die Steuerung ermöglicht den Anschluss eines NO-Taster (Eingang Nr.
10 von CN2) für die Betätigung im Fußgängerdurchgangsmodus. Dieser
Eingang kann jedoch auch für den Anschluss eines NO-Tasters verwendet
werden, der in anderer Weise funktioniert. Wenn die Funktion „Einzelflügel“
gewünscht ist: Sicherstellen, dass das Erweiterte Menü 1 freigegeben ist
(abwechselndes Blinken 1 0 1 0 1 0 der LED LEV), mit der Taste SEL auf
das Blinken der LED L2 stellen und auf die Taste SET drücken: Die LED L2
schaltet permanent ein und die Programmierung wird beendet. In dieser
Weise kann der Taster für die alleinige Betätigung des Motors 1 verwendet
werden (s. Abs. „Einzelflügel“).Wenn dagegen der Betriebsmodus „AUFZU“ gewünscht ist, um den Fußgänger-Taster nur für die Toröffnung
und den P/P-Taster (Eingang Nr. 11 von CN2) nur für die Schließung zu
benutzen, ist der oben beschriebene Vorgang zu wiederholen, indem
zweimal anstatt nur einmal auf die Taste SEL zu drücken ist (die LED L2
wird schnell blinken). Zur Rückstellung auf die ursprüngliche Konfiguration
den Vorgang wiederholen.
3. FUSSGÄNGER-TASTER / DS3:
Die Steuerung ermöglicht den Anschluss eines NO-Taster (Eingang Nr. 10
von CN2) für die Betätigung im Fußgängerdurchgangsmodus. Es ist jedoch
möglich, diesen Eingang auch für den Anschluss einer Fotozelle DS3 (NC)
zu verwenden: Sicherstellen, dass das Erweiterte Menü 1 freigegeben ist
(abwechselndes Blinken 1 0 1 0 1 0 der LED LEV), mit der Taste SEL
auf das Blinken der LED L3 stellen und auf die Taste SET drücken: Die
LED L3 schaltet permanent ein und die Programmierung wird beendet. Zur
Rückstellung auf die vorherige Konfiguration den Vorgang wiederholen.
4. FOTOTEST (Fotozellentest):
Der Hersteller liefert die Steuerung mit ausgeschaltetem Fotozellentest. Zur
Freigabe des Fotozellentests: Sicherstellen, dass das Erweiterte Menü 1
freigegeben wurde (wird durch das Blinken 1 0 1 0 1 der LED LEV angezeigt),
mit der Taste SEL auf das Blinken der Led 4 stellen und auf die Taste SET
drücken; die LED L4 schaltet permanent ein und die Programmierung wird
beendet. Zur Rückstellung auf die vorherige Konfiguration den Vorgang
wiederholen.
5. DS2 STOPP BEIM SCHLIESSEN:
Die Steuerung erlaubt das Ändern des Eingangs DS2, wenn DS2 auch
beim Schließen ansprechen soll (Stoppen des Tors; Bei Automatikbetrieb
nimmt nach dem Freisetzen die Schließbewegung des Tors wieder auf),
dazu: Sicherstellen, dass das Erweiterte Menü 1 freigegeben wurde
(abwechselndes Blinken 1 0 1 0 1 0 der LED LEV), mit der Taste SEL
auf das Blinken der LED L5 stellen und auf die Taste SET drücken: Die
LED L5 schaltet permanent ein und die Programmierung wird beendet. Zur
Rückstellung auf die ursprüngliche Konfiguration den Vorgang wiederholen.
6. DS1 TEILWEISE UMKEHR:
Die Steuerung erlaubt die Funktionsänderung des Eingangs DS1. Wenn
DS1 beim Schließen eine teilweise anstatt komplette Umkehr (kurze Umkehr)
erzeugen soll: Sicherstellen, dass das Erweiterte Menü 1 freigegeben ist
(abwechselndes Blinken 1 0 1 0 1 0 der LED LEV, mit der Taste SEL auf
das Blinken der LED L6 stellen und auf die Taste SET drücken: Die LED
L6 schaltet permanent ein und die Programmierung wird beendet. Zur
Rückstellung auf die ursprüngliche Konfiguration den Vorgang wiederholen.
7. SPERRE / 8K2:
Die Steuerung erlaubt den Anschluss eines Sperrtasters NC (Eingang Nr.
8 von CN2). Es ist jedoch möglich, diesen Eingang in einen 8,2k Ohm
Widerstandseingang zu schalten: Sicherstellen, dass das Erweiterte Menü
1 freigegeben ist (abwechselndes Blinken 1 0 1 0 1 0 der Stufe LEV),
mit der Taste SEL auf das Blinken der LED L7 stellen und auf die Taste
SET drücken: Die LED L7 schaltet permanent ein und die Programmierung
wird beendet. Eine Veränderung des erfassten Eingangswertes erzeugt
in jeder Phase der Bewegung das Sperren der Steuerung. Eine erneute
Bewegungsbetätigung ist möglich, sofern der korrekte Eingangswert wieder
hergestellt wurde; in jedem Fall leistet die Steuerung die Öffnungsphase
des Antriebs. Zur Rückstellung auf die ursprüngliche Konfiguration den
Vorgang wiederholen.
ERWEITERTES MENÜ 2
Der Hersteller liefert die Steuerung mit der Möglichkeit, nur die Funktionen
aus dem Hauptmenü direkt zu wählen.
Zur Freigabe der im Erweiterten Menü 2 beschriebenen Funktionen: Auf das
Blinken der LED LEV stellen und 2 Mal auf SET drücken. Die Led beginnt
abwechselnd zu blinken 1 1 0 1 1 0. Nun bestehen 30 Sekunden Zeit,
um mit den Tasten SEL und SET die Funktionen des Erweiterten Menüs 2
zu wählen, dann stellt die Steuerung nach weiteren 30 Sekunden auf das
Hauptmenü zurück.
L1
L2
L3
L4
L5
L6
L7
LEV
BREMSE
VERLANGSAMUNG
IMMER SCHLIESSEN
FOLLOW ME
ZEIT FUSSGÄNGER
2. MONOSTABILER KANAL
FERNPROGRAMMIERUNG
MENÜSTUFE
ON
OFF
ON
ON
ON
ON
ON
OFF
ON
OFF
OFF
OFF
OFF
OFF
2 BLINKEN
1. BREMSE:
Der Hersteller liefert die Steuerung mit ausgeschalteter Funktion Elektronische
Bremse. Zur Freigabe der Funktion: Sicherstellen, dass das Erweiterte Menü 2
freigegeben ist (abwechselndes Blinken 1 1 0 1 1 0 1 1 0 der LED LEV), mit der
Taste SEL auf das Blinken der LED L1 stellen und auf die Taste SET drücken:
Die LED L1 schaltet permanent ein und die Programmierung wird beendet.
Dadurch reduziert die Steuerung an einem Anschlag oder einer
Reversierschaltung den Torvorschub durch seine Schwerkraft. Zur Rückstellung
auf die vorherige Konfiguration den Vorgang wiederholen.
3. IMMER SCHLIESSEN:
Die Steuerung erlaubt die Betriebseinstellung „Immer Schließen“. Diese Funktion
ist nur programmierbar, wenn bereits eine Pausezeit programmiert wurde und
wird nach einem Versorgungsmangel aktiviert; wenn erfasst wird, dass das Tor
geöffnet ist, beginnt automatisch ein Schließmanöver mit einem vorherigen 5
Sek. langen Vorblinken. Falls diese Betriebsweise gewünscht ist: Sicherstellen,
dass das Erweiterte Menü 2 freigegeben wurde (durch das Blinken 1 1 0 1 1 0
der LED LEV angezeigt), mit der Taste SEL auf das Blinken der LED L3 stellen
und auf die Taste SET drücken: Die LED L3 schaltet permanent ein und der
Vorgang wird beendet. Zur Rückstellung auf die vorherige Konfiguration den
Vorgang wiederholen.
4. FOLLOW ME:
Die Steuerung erlaubt die Betriebseinstellung „Follow me“. Diese Funktion ist
nur programmierbar, wenn bereits eine Pausezeit programmiert wurde; nach
Freisetzung der Fotozelle DS1 kürzt sie die Pausezeit auf 5 Sek., d.h. das Tor
schließt 5 Sek. nach dem Durchgehen des Benutzers wieder. Zur Aktivierung
dieser Funktion: Sicherstellen, dass das Erweiterte Menü 2 freigegeben
wurde (durch das Blinken 1 1 0 1 1 0 der LED LEV angezeigt), mit der Taste
SEL auf das Blinken der LED L4 stellen und auf die Taste SET drücken: Die
LED L4 schaltet permanent ein und die Programmierung wird beendet. Zur
Rückstellung auf die vorherige Konfiguration den Vorgang wiederholen
5. MOT.ZEIT FUSSG.: (Programm. Fußgänger-Betriebszeit max. 4
Minuten)
Der Hersteller liefert die Steuerung mit einer vorbestimmten Motorbetriebszeit
(Fußgänger) von 10 Sek. und ohne Verlangsamung.
Zur Änderung der Fußgänger-Motorbetriebszeit die Programmierung bei
geschlossenem Tor wie folgt durchführen: Sicherstellen, dass das Erweiterte
Menü 2 freigegeben wurde (durch Blinken 1 1 0 1 1 0 der LED LEV angezeigt),
mit der Taste SEL auf das Blinken der Led L5 stellen und einen Augenblick
auf die Taste SET drücken und der Motor beginnt den Öffnungszyklus; an
der gewünschten Anfangsstelle der Verlangsamung erneut auf die Taste SET
6. BETRIEBSLOGIK HILFS-FUNKKANAL:
Die Steuerung ermöglicht die Wahl der Betriebslogik des Hilfs-Funkkanals.
In der werkseitigen Konfiguration ist für den Hilfs-Funkkanal der „monostabile“
Betrieb eingestellt. Falls ein „bistabiler“ Betrieb gewünscht ist: Sicherstellen,
dass das Erweiterte Menü 2 freigegeben wurde (durch das Blinken 1 1 0 1 1 0
der LED LEV angezeigt), mit der Taste SEL auf das Blinken der LED L6 stellen
und auf die Taste SET drücken: Die LED L6 schaltet permanent ein und der
Vorgang wird beendet. Zur Freigabe der Funktion „Zeitsteuerung 3 Minuten“
den oben beschriebenen Vorgang durch zweimaliges anstatt einmaliges
Drücken der Taste SEL wiederholen (die LED L6 wird schnell blinken). Zur
Rückstellung auf die ursprüngliche Konfiguration den Vorgang wiederholen.
7. PROGRAMMIERUNG DER FERNFUNKSTEUERUNG:
Die Steuerung erlaubt die Programmierung des Übertragungscodes
ohne direkte Betätigung der Taste SEL auf der Steuerung, sondern durch
Fernbetätigung.
Zur Programmierung der Funkfernsteuerung: Den Code einer zuvor
gespeicherten Funksteuerung über eine längere Zeit als 10 Sekunden
andauernd senden; im selben Moment schaltet die Steuerung auf die oben
für die LED L2 im Hauptmenü beschriebene Programmierungsfunktion. Wenn
es sich bei dem andauernd gesendeten Code um einen zuvor gespeicherten
Fußgänger-Code handelt, schaltet die Steuerung auf die Programmierung
eines neuen Fußgänger-Codes und die LED L2 blinkt wie wenn die Erfassung
des Fußgängercodes aktiviert wäre (1 1 0 1 1 0 1 1 0); falls es sich um den
Code des 2. HILFSKANALS handelt, blinkt die Led wie wenn die Erfassung
des Codes des 2. Kanals aktiviert wäre (1 1 1 0 1 1 1 0 1 1 1 0); . Zur
Aktivierung der Fernprogrammierungsfunktion:
Sicherstellen, dass das Erweiterte Menü 2 freigegeben wurde (durch das
Blinken 1 1 0 1 1 0 der LED LEV angezeigt), mit der Taste SEL auf das Blinken
der LED L7 stellen und auf die Taste SET drücken: Die LED L7 schaltet
permanent ein und die Programmierung wird beendet. Zur Rückstellung auf
die ursprüngliche Konfiguration den Vorgang wiederholen.
ERWEITERTES MENÜ 3
Der Hersteller liefert die Steuerung mit der Möglichkeit, nur die Funktionen aus
dem Hauptmenü direkt zu wählen.
Zur Freigabe der im Erweiterten Menü 3 beschriebenen Funktionen: Auf das
Blinken der LED LEV stellen und 3 Mal auf SET drücken. Die Led beginnt
abwechselnd zu blinken 1 1 1 0 1 1 1 0. Nun bestehen 30 Sekunden Zeit,
um mit den Tasten SEL und SET die Funktionen des Erweiterten Menüs 3
zu wählen, dann stellt die Steuerung nach weiteren 30 Sekunden auf das
Hauptmenü zurück.
L1
L2
L3
L4
L5
L6
L7
LEV
SOFT STOP
SOFT START
DRUCKSTOSS
SCHLIESSSTOSS
ELEKTROSCHLOSS / FUSSGÄNGER
BLINKLEUCHTE / UMFELDLEUCHTE
VORBLINKEN / BLINKLEUCHTENPAUSE
MENÜSTUFE
ON
ON
ON
ON
ON
ON
ON
OFF
OFF
OFF
OFF
OFF
OFF
OFF
3 BLINKEN
1. SOFT STOP:
Der Hersteller liefert die Steuerung mit ausgeschalteter Soft-Stop-Funktion. Zur
Freigabe der Funktion: Sicherstellen, dass das Erweiterte Menü 3 freigegeben
wurde (wird durch das Blinken 1 1 1 0 1 1 1 0 der LED LEV angezeigt), mit
der Taste SEL auf das Blinken der LED L1 stellen und auf die Taste SET
drücken; im selben Moment schaltet die LED L1 permanent ein und die
Programmierung wird beendet. In dieser Weise stellt die Steuerung in den
Endlagen der Bewegung die Kraft innerhalb von 2 Sekunden langsam auf Null.
Zur Rückstellung auf die vorherige Konfiguration den Vorgang wiederholen.
COMUNELLO ®Copyright 2014 - All right reserved
35
DEUTSCH
2. VERLANGSAMUNG:
Wie zuvor erwähnt, erlaubt die Steuerung das Programmieren einer
Verlangsamungsphase beim Öffnen und Schließen, während mit der Funktion
Automatische Programmierung die Verlangsamung automatisch eingeschaltet
wird. Wenn jedoch keine Verlangsamung gewünscht ist, kann sie ausgeschaltet
werden: Dadurch wird bei Nutzung der Automatischen Programmierung
die Verlangsamungsphase nicht mehr eingeschaltet, während bei Nutzung
Motorzeiten-Programmierungsfunktion bei der Programmierung keine
Möglichkeit mehr eingeräumt wird, die Verlangsamung während der Öffnungsund Schließphasen zu programmieren. Wenn die Verlangsamung vor der
Ausschaltung mit der Motorzeiten-Programmierungsfunktion programmiert
war, ist die Programmierung von vorne zu wiederholen. Zur Ausschaltung
der Verlangsamung: Sicherstellen, dass das Erweiterte Menü 2 freigegeben
wurde (durch das Blinken 1 1 0 1 1 0 der LED LEV angezeigt), mit der Taste
SEL auf das Blinken der LED L2 stellen und auf die Taste SET drücken: Die
LED L2 schaltet permanent ein und die Programmierung wird beendet. Zur
Rückstellung auf die vorherige Konfiguration den Vorgang wiederholen.
drücken: Die LED L5 beginnt langsamer zu blinken und der Motor erzeugt
die Verlangsamung; bei Erreichen der gewünschten Position durch Drücken
der Taste SET den Öffnungszyklus beenden. Nun blinkt die LED L5 wieder
regelmäßig und der Motor nimmt den Schließvorgang wieder auf; die obigen
Vorgänge für die Schließphase wiederholen.
Falls die Steuerung die Verlangsamung nicht durchführen soll, ist bei der
Programmierung nach Vollendung des Öffnungs- und Schließzyklus zweimal
hintereinander anstatt nur einmal auf die Taste SET zu drücken.
Während der Programmierung kann anstelle der auf der Steuerung
vorhandenen Taste SET die Taste der Funksteuerung verwendet werden,
sofern sie vorher gespeichert wurde.
2. SOFT START:
Der Hersteller liefert die Steuerung mit ausgeschalteter Soft-Start-Funktion.
Zur Freigabe der Funktion: Sicherstellen, dass das Erweiterte Menü 3
freigegeben wurde (wird durch das Blinken 1 1 1 0 1 1 1 0 der LED LEV
angezeigt), mit der Taste SEL auf das Blinken der LED L2 stellen und auf die
Taste SET drücken; im selben Moment schaltet die LED L2 permanent ein und
die Programmierung wird beendet. In dieser Weise kontrolliert die Steuerung
bei jedem Bewegungsanfang den Motorstart und stellt die Kraft langsam in
den ersten 2 Sekunden Betrieb vom Mindestwert auf den mit dem Trimmer
„FORCE“ eingestellten Wert. Zur Rückstellung auf die vorherige Konfiguration
den Vorgang wiederholen.
Anmerkung: Bei eingeschalteter Soft-Start-Funktion schaltet die Steuerung
automatisch den Anlassstoß aus und umgekehrt.
3. DRUCKSTOSS:
Der Hersteller liefert die Steuerung mit ausgeschalteter Druckstoß-Funktion.
Diese Funktion sendet eine ca. 2 Sek. lange Schließschaltung am Anfang
einer Öffnungsphase. Dadurch wird das Entriegeln des Schlosses erleichtert
und eine korrekte Ausführung der Öffnungsphase ermöglicht. Zur Freigabe der
Druckstoß-Funktion mit der Höchstleistung: Sicherstellen, dass das Erweiterte
Menü 3 freigegeben wurde (durch das Blinken 1 1 1 0 1 1 1 0 der LED LEV
angezeigt), mit der Taste SEL auf das Blinken der LED L3 stellen und auf die
Taste SET drücken: Die LED L3 schaltet permanent ein und die Programmierung
wird beendet. Zur Freigabe der Druckstoß-Funktion mit der mit dem Trimmer
„FORCE“ eingestellten Leistung den oben beschriebenen Vorgang durch
zweimaliges anstatt einmaliges Drücken der Taste SEL wiederholen (die LED
L3 wird schnell blinken). Zur Rückstellung auf die ursprüngliche Konfiguration
den Vorgang wiederholen.
4. SCHLIESSSTOSS:
Der Hersteller liefert die Steuerung mit ausgeschalteter Schließstoß-Funktion.
Falls beim Schließen eine Verlangsamungsphase programmiert ist, wird mit
dieser Funktion eine Zeit von 1 Sekunde mit der Höchstleistung oder mit der
mit dem Trimmer VR1 gewählten Leistung hinzugefügt, um in ein eventuell
installiertes Schloss einzurasten. Zur Freigabe der Schließstoß-Funktion mit
der Höchstleistung: Sicherstellen, dass das Erweiterte Menü 3 freigegeben
wurde (durch das Blinken 1 1 1 0 1 1 1 0 der LED LEV angezeigt), mit der
Taste SEL auf das Blinken der LED L4 stellen und auf die Taste SET drücken:
Die LED L4 schaltet permanent ein und die Programmierung wird beendet.
Zur Freigabe der Druckstoß-Funktion mit der mit dem Trimmer „FORCE“
eingestellten Leistung den oben beschriebenen Vorgang durch zweimaliges
anstatt einmaliges Drücken der Taste SEL wiederholen (die LED L4 wird schnell
blinken). Zur Rückstellung auf die ursprüngliche Konfiguration den Vorgang
wiederholen.
5. Elektroschloss-Aktivierung mittels FUSSÄNGER-SCHALTUNG
(ELS/CMD PED):
Der Hersteller liefert die Steuerung mit ausgeschalteter Funktion der
Elektroschloss-Aktivierung mittels Fußgänger-Schaltung. Die Funktion der
Elektroschloss-Aktivierung mittels Fußgängerschalter wird benutzt, wenn
man z.B. über ein Schiebetor verfügt, das angrenzend ein Durchgangstor für
Fußgänger besitzt. Dadurch kann sowohl die Toröffnung durch Betätigung
des P/P-Tasters (Impulsbetrieb)und über Funksteuerung erzielt werden, wie
auch die Fußgängertoröffnung durch Betätigung des Elektroschlosses mit
den Fußgängerschaltern. Zur Aktivierung dieser Funktion: Sicherstellen, dass
das Erweiterte Menü 3 freigegeben wurde (durch Blinken 1 1 1 0 1 1 1 0
der LED LEV angezeigt), mit der Taste SEL auf das Blinken der LED 5 stellen
und auf die Taste SET drücken: Die LED L5 schaltet permanent ein und die
Programmierung wird beendet. Zur Rückstellung auf die vorherige Konfiguration
den Vorgang wiederholen.
6. BETRIEB DER BLINKLEUCHTE/ UMFELDLEUCHTE:
Der Hersteller liefert die Steuerung mit während der Pausezeit ausgeschaltetem
Betrieb der Blinkleuchte. Zur Freigabe des Betriebs: Sicherstellen, dass das
Erweiterte Menü 3 freigegeben wurde (durch das Blinken 1 1 1 0 1 1 1 0 der
LED LEV angezeigt), mit der Taste SEL auf das Blinken der LED L6 stellen
und auf die Taste SET drücken: Die LED L6 schaltet permanent ein und die
Programmierung wird abgeschlossen. Zur Rückstellung auf die vorherige
Konfiguration den Vorgang wiederholen.
Funktion Umfeldleuchte: Der Ausgang Umfeldleuchte 110 ~ und 24V max.
wird jedes Mal 3 Minuten lang aktiviert, wenn eine Öffnung betätigt wird.
7. VORBLINKEN/BLINKLEUCHTEN-PAUSE:
Der Hersteller liefert die Steuerung mit den ausgeschalteten Funktionen
Vorblinken und Blinkleuchten-Pause. Zur Freigabe der Vorblinkfunktion:
Sicherstellen, dass das Erweiterte Menü 3 freigegeben wurde (durch das
36
COMUNELLO ®Copyright 2014 - All right reserved
Blinken 1 1 1 0 1 1 1 0 der LED Nr. 8 angezeigt), mit der Taste SEL auf das
Blinken der LED Nr.7 stellen und auf die Taste SET drücken: Die LED Nr.7
schaltet permanent ein und die Programmierung wird beendet. Zur Freigabe
der Funktion Blinkleuchten-Pause den oben beschriebenen Vorgang durch
zweimaliges anstatt einmaliges Drücken der Taste SET wiederholen (die LED
Nr.7 wird schnell blinken). Zur Rückstellung auf die ursprüngliche Konfiguration
den Vorgang wiederholen.
Vorblinkfunktion: Der Ausgang Blinkleuchte 110 ~ und Blinkleuchte 24V wird
immer 3 Sekunden vor Beginn jeder Bewegung des Torantriebs aktiviert.
Betrieb Blinkleuchten-Pause: Der Ausgang Blinkleuchte 110 ~ und 24V
bleibt aktiv, wenn zuvor die Pausezeit programmiert wurde.
RESET
Falls eine Rückstellung der Steuerung auf die werkseitige Konfiguration ratsam
ist, gleichzeitig auf die Tasten SEL und SET drücken: Alle ROTEN Signal-Leds
schalten gleichzeitig ein und sofort wieder aus.
DIAGNOSTIK
Fotozellentest:
Die Steuerung ist für den Anschluss von Sicherheitsvorrichtungen gemäß Punkt
5.1.1.6 der Richtlinie EN 12453 vorbereitet. Bei jedem Bewegungszyklus
wird die angeschlossene Fotozelle auf ihre Funktionsfähigkeit getestet. Bei
fehlendem Anschluss und/oder Betriebsunfähigkeit erlaubt die Steuerung
keine Torbewegung und zeigt durch das gleichzeitige Blinken aller SignalLeds an, dass der Test gescheitert ist. Nach Rückstellung des korrekten
Fotozellenbetriebs ist die Steuerung für eine normale Verwendung einsatzbereit.
Dies garantiert eine Defektüberwachung gemäß Kategorie 2 der Richtlinie EN
954-1.
Test Input Steuerungen:
An jedem Eingang für die Betätigung mit Niederspannung verfügt die Steuerung
über eine Signal-LED für eine rasche Zustandskontrolle.
Betriebslogik: LED eingeschaltet Eingang geschlossen, LED ausgeschaltet
Eingang geöffnet.
GARANTIE
Fratelli Comunello SpA gewährleistet den korrekte Betrieb der Antriebe für einen
Zeitraum von 24 Monaten ab Herstellungsdatum, unter der Bedingung, dass
die auf der Gebrauchsanweisungen Leistungsspezikationen beachtet werden.
Fratelli Comunello S.p.A. ausbessert oder ersetzt kostenfrei die fehlerhaften
Teile, die als fehlerhafte Teile laut dem unanfechtbarem Urteil des Fachpersonal
von Fratelli Comunello S.p.A. anerkannt werden. Die Ausbesserung
bzw. Ersetzung ist die einzige Entschädigung möglich, die alle weitere
Schadenersatzforderungen vernichtet. Die Ware unter Garantie soll frachtfrei
an den Sitz von Fratelli Comunello S.p.A. gesendet werden und wird zu Lasten
des Empfängers zurückgesendet. Das umgetauschte Material bleibt Eigentum
von Fratelli Comunello S.p.A. Die Arbeitskosten, die wegen der Ausbesserung
bzw. Ersetzung entstehen gehen auf jeden Fall zu Lasten des Käufers. Für
den Zeitraum des Ausfalls der Anlage wird keine Entschädigung gewährt.
Der Eingriff beinhaltet keine Verlängerung der Garantiedauer. Der Käufer soll
eventuelle Produkt -Mangel und -Fehler innerhalb dem Frist von 8 (acht) Tagen
melden, die entweder vom Datum der Fehler- Entdeckung oder vom Datum
der Wareannahme zu rechnen sind. Die Meldung soll unbedingt schriftlich
erteilt werden. Von der Garantie sind ausgeschlossen: Durch Transport
verursachte Beschädigungen oder Schäden; auf Fehler der elektrischen
Anlage vom Käufer und/oder Nachlässigkeit, Unangemessenheit, auf durch
unsachgemässe Benutzung der Anlage zurückzuführende Beschädigungen
oder Schäden; durch unzulässige Eingriffe seitens nicht autorisiertem Personal
oder folgend uneigentlicher Verwendung/Installation (in dieser Hinsicht
empfehlt man eine Anlagewartung zumindest aller sechs Monaten) oder durch
Verwendung von Nichtoriginalersatzteilen verursachte Beschädigungen oder
Schäden; durch chemischen Substanzen oder atmosphärischen Einüsse
verursachte Defekte. Die Garantie enthält keinen Verbrauchsmaterialkost sowie
vermuteten Fehlerkost oder Gefälligskeitsüberprüfungen.
Produkteigenschaften Die Produkte der Fratelli Comunello S.p.A. unterliegen
ständigen Innovationen und Verbesserungen; Konstruktionseigenschaften und
Aussehen können ohne
Vorankündigung geändert werden.
Gerichtsstand
Da der Vertrag durch die in Rosà ausgestellte Auftragsbestätigung
abgeschlossen wird, kommt im Fall von rechtlichen Streitigkeiten irgendwelcher
Art die italienische Rechtsprechung zur Anwendung, wobei Vicenza (VI)
Gerichtsstand ist.
INSTRUCIONS D’UTILISATION ET D’INSTALLATION
CU - 110V - HP
DÉCLARATION DE CONFORMITÉ CE
Le soussigné, M. COMUNELLO LUCA, représentant le suivant constructeur
F.lli COMUNELLO spa
Via Cassola 64, 36027 Rosà (VI) Italie
Déclare que l’appareil décrit ci-dessous:
Description
Panneau de commande électronique
Modèle CU 110V HP
Est conforme aux dispositiones légales transposant les directives suivantes:
• Directive 2004/108 CE (Directive EMC)
• Directive 2006/95/CE
Et qui ont été soumis toutes les norms et /ou spécifications techniques ci-après indiquées:
Les deux derniers chiffres de l’année dans laquelle il a été apposé le marquage CE
FRANÇAIS
EN61000-6-2 + EN61000-6-3
EN62233 :2008
EN301489-1 + EN301489-3 + EN300220-2
EN60335-1 :2002
Et amendements ultérieurs
14
Rosà (VI) – Italie
01-09-2014
Nous déclarons en outre que la machine ne pourra pas être mise en service avant identification et déclaration de conformité aux
conditions de la Directive 2006/42 CE et à la législation nationale la transposant de la machine à laquelle elle sera intégrée ou dont elle
deviendra partie intégrante.
Luca Comunello
Représentant légal de la société Fratelli Comunello
Fratelli Comunello S.p.A.
Enterprise avec Système de Management de la Qualité certifié
UNI EN ISO 9001:2008
(Certificat n° 50 100 11235 Rev. 01)
COMUNELLO ®Copyright 2014 - All right reserved
37
AVERTISSEMENT
•La logique de commande est dépourvue de
tout dispositif de sectionnement de la ligne
électrique à 110 Vca, et la mise en place de ce
dernier devra donc être prévue par l’installateur.
Installer un interrupteur omnipolaire catégorie III
de surtension. Positionner ce dernier afin de le
protéger contre les fermetures accidentelles,
comme prévu par le point 5.2.9 de l’EN
12453. Le câblage des différents composants
électriques à l’extérieur de la logique de
commande doit être effectué conformément
à la norme EN 60204-1 et modifications
apportées à cette dernière par le point 5.2.7
de l’EN 12453. Les câbles d’alimentation
doivent présenter un diamètre max. de 14
mm; la fixation des câbles d’alimentation et
de connexion doit s’effectuer au moyen des
presse-étoupes fournis en option.
•Pour l’alimentation, il est conseillé d’utiliser
des câbles flexibles sous gaine isolante en
polychloroprène de type harmonisé (H05RN-F)
avec une section min. des conducteurs d’1
mm2
•Pendant les operations d’installation, prêter
attention à utiliser seulement des câbles à
double isolation(câbles gainés) et pour les
connexions de réseau à 110 V et pour les
connexions en très basse tension de securité
SELV. Utiliser exclusivement des conduits en
plastique, distinguées par des câblages en
basse tension (110 V) et pour des câblages en
trension de securité (SELV).
•Les conducteurs à très basse tension de
securité doivent être physiquement séparés
(au moins 4mm dans l’air) des conducteurs
à la tension du réseau, ou ils doivent être
adéquatement isolés à travers une isolation
supplémentaire avec un épaisseur d’au moins
1 mm.
•Il faut préparer en amont de le réseau
d’alimentation de l’automation un dispositif
que peut assûrer la déconnexion omnipolaire
complète de le réseau, avec une distance
d’overture des contacts pour chaque pole d’au
moins 3mm. Ces dispositifs de déconnexion
doivent être préparés dans le réseau
d’alimentation conformément aux règles
d’installation et ils doivent être connectés
directement aux bornes d’alimentation.
•Durant le perçage du boîtier externe pour le
passage des câbles d’alimentation et de
connexion et l’assemblage des presseétoupes, adopter toutes les précautions
nécessaires à garantir l’indice IP du coffret.
Fixer solidement les câbles.
•Le boîtier arrière est prévu pour une fixation
murale (orifices de fixation pour chevilles ou vis).
Adopter toutes les précautions nécessaires en
vue d’une installation conforme à l’indice IP
38
COMUNELLO ®Copyright 2014 - All right reserved
prévu.
• En cas de montage d’un clavier manuel, éviter
toute situation dangereuse pour l’utilisateur.
•L’opérateur utilisé pour l’actionnement du
portail doit être conforme aux prescriptions du
point 5.2.7 de l’EN 12453.
• La sortie FOTO+ est réservée à l’alimentation
des photocellules et ne peut être utilisée pour
d’autres applications.
•À chaque cycle de manœuvre, la logique
de commande peut accompli un test de
fonctionnement des photocellules et garantit
la protection Catégorie 2 des dispositifs antiécrasement, comme prescrit au point 5.1.1.6.
de l’EN 12453. La logique de commande ne
peut fonctionner si les dispositifs de sécurité
ne sont pas connectés ou ne fonctionnent
pas.
•Le dispositif peut être utilisé par des enfants
d’un âge supérieur à 8 ans et par des personnes
avec des capacités physiques, sensorielles et
mentales limitées ou sans la connaissance et
l’expérience necessaires, à condition qu’ils
soient sous surveillance ou seulement après
qu’ils ont reçù des instructions sûr l’utilisation
sûre de l’appareil et sûr les risques associés.
Les enfants ne doivent pas jouer avec le
dispositif. Le nettoyage et l’entretien qui
devraient être faits par l’utilisateur, ne doivent
pas être accomplis par des enfants sans
surveillance.
En cas d’utilisation de deux centrales ou
davantage, il est conseillé d’installer ces dernières
à une distance min. de 3 m l’une de l’autre afin
de garantir une réception radio correcte.
Toutes les opérations exigeant l’ouverture du
boîtier (branchement câbles, programmation,
etc.), doivent être effectuées durant la phase
d’installation par un personnel expert.
IMPORTANT POUR L’UTILISATEUR
•Le dispositif ne doit pas être utilisé par les
enfants ou par des personnes disposant de
capacités psycho-physiques réduites, sauf
si ces dernières l’utilisent sous surveillance
ou ont reçu des instructions concernant son
fonctionnement et ses modes d’utilisation.
• Ne pas laisser les enfants jouer avec le dispositif
et ne pas laisser les radiocommandes à leur
portée.
• ATTENTION:
conserver
ce
manuel
d’instructions et respecter les prescriptions
importantes concernant la sécurité contenues.
Le non-respect de ces prescriptions peut
entraîner des dommages et accidents graves.
Examiner fréquemment l’installation à la recherche
de tout signe d’endommagement. Ne pas utiliser
le dispositif si une intervention de réparation est
nécessaire.
CARACTÉRISTIQUES TECHNIQUES
Alimentation:
Sortie clignotant 1:
Sortie clignotant 2:
Sortie moteurs:
Sortie électroserrure:
Alimentation photocellule:
Sortie alimentation auxiliaires:
Sortie voyant:
Sécurités et commandes en BT:
Température de service:
Récepteur radio:
Émetteurs:
Codes TX max. en mémoire:
Dimensions carte:
110 V~ 50-60Hz 1600W max.
110 V~ 500 W max.
24 V~ 4 W max.
110 V~ 2 x 500 W max.
15 W max.
12 V
24 V~ 5 W max.
24 V~ 5 W max.
24 V
4 W max.
24 V
-20 ÷ 55 °C
433 Mhz
18 bits ou code variable
120 (CODE ou CODE PED/2°CH)
160x107 mm.
CONTRÔLES PRÉLIMINAIRES
• Vérifier que le contenu de l’emballage est en parfait état.
• Vérifier que le lieu d’installation est adapté et conforme aux dimensions
minimum indiquées à la FIG. 1.
INSTALLATION
• Après avoir percé le boîtier aux quatre angles, fixer la logique de
commande au mur (FIG. 2).
• Pour le passage des câbles, percer la partie inférieure du coffret. (FIG.
3). Il est conseillé d’utiliser des presse-étoupes.
BRANCHEMENTS
BRANCHEMENTS AU TRANSFORMATEUR
CN5 (1st):
1: Entrée enroulement primaire transformateur 110 V~.
CARACTÉRISTIQUES FONCTIONNELLES
FONCTIONNEMENT AUTOMATIQUE
En utilisant la radiocommande ou le clavier de commande basse tension
pour l’actionnement du portail, le fonctionnement est le suivant:
la première impulsion commande l’ouverture jusqu’à la fin du temps
moteur ou à l’atteinte du fin de course d’ouverture, la seconde commande
la fermeture du portail; en cas d’envoi d’une impulsion avant la fin du
temps moteur ou de l’atteinte de l’un des deux fins de course, la logique
de commande inverse le mouvement, en phase d’ouverture comme de
fermeture.
FONCTIONNEMENT PAS À PAS:
En utilisant la radiocommande ou les claviers de commande en basse
tension pour l’actionnement du portail, le fonctionnement est le suivant: la
première impulsion commande l’ouverture jusqu’à la fin du temps moteur ou
à l’atteinte du fin de course d’ouverture, la seconde commande la fermeture
du portail; en cas d’envoi d’une impulsion avant la fin du temps moteur ou
de l’atteinte de l’un des deux fins de course, la logique de commande arrête
le mouvement (si le temps de pause avait été précédemment programmé,
la centrale à l’éxpiration réalise la refermeture automatique). Une nouvelle
commande déclenche la reprise du mouvement en sens inverse. En cas
d’envoi d’une impulsion avant la fin du temps moteur ou de l’atteinte du
fin de course de fermeture, la logique de commande arrête toujours le
mouvement. Une nouvelle commande déclenche la reprise du mouvement
en sens inverse.
Fonctionnement du Pas à Pas 1: En utilisant et le radiocommande
et les claviers de commande en basse tension pour l’actionnement du
portail, le fonctionnement est le suivant: la prèmiere impulsion commande
l’ouverture jusqu’à la fin du temps moteur ou à l’atteinte du fin de course
d’ouverture, la seconde commande la fermeture du portail; en cas d’envoi
d’une impulsion avant la fin du temps moteur ou de l’atteinte de l’un des
deux fins de course, la centrale arrête le mouvement et pendant la phase
d’ouverture et pendant la phase de fermeture (même avec le temps de
pause précédemment programmé). Une nouvelle commande déclenche la
reprise du mouvement en sens inverse.
FERMETURE AUTOMATIQUE:
La logique de commande permet de refermer le portail en mode
automatique sans devoir envoyer une nouvelle commande.
Le choix de ce fonctionnement est décrit dans le mode de programmation
du Temps de pause.
PASSAGE PIÉTONS:
La logique de commande permet, avec la radiocommande ou le bouton
Piétons, d’actionner le Moteur 1 seul pour une durée programmable.
UN SEUL VANTAIL:
La logique de commande utilisée pour la configuration de l’automatisme à 2
moteurs, permet, au moyen du bouton Piétons/1 seul vantail (voir menu 2
pour la configuration du bouton), l’actionnement du Moteur 1 seul selon les
délais définis lors de la programmation des temps moteur.
ENTRÉE BLOCAGE:
La logique de commande permet la connexion du bouton de blocage (NF).
L’intervention provoque l’arrêt immédiat du mouvement, quelle que soit
la phase de fonctionnement de la logique de commande. Une nouvelle
commande de mouvement sera valide à condition que l’entrée de blocage
ait été désactivée, la logique de commande effectuant toutefois la phase
d’ouverture de l’automatisme avec un préclignotement de 5 secondes.
ATTENTION: Ponter cette entrée si non utilisée
PHOTOCELLULES:
La logique de commande permet l’alimentation et la connexion de
photocellules conformément à la directive EN 12453.
Entrée DS1 (NF)
L’intervention des photocellules durant la phase d’ouverture n’est pas prise
en compte, tandis qu’elle provoque l’inversion du mouvement en phase
de fermeture.
Entrée DS2 (NF)
COMUNELLO ®Copyright 2014 - All right reserved
39
FRANÇAIS
CN1:
L:
Entrée ligne 110 V~ (phase)
N:
Entrée ligne 110 V~ (neutre).
LAMP 110~:
Sortie clignotant 1 (110 V~ neutre).
LAMP 110~:
Sortie clignotant 1 (110 V~ phase).
MOT1 OPEN:
Sortie moteur 1 ouverture.
MOT1 COM:
Sortie moteur 1 commune.
MOT1 CLOSE:
Sortie moteur 1 fermeture.
MOT2 OPEN2:
Sortie moteur 2 ouverture.
MOT2 COM2:
Sortie moteur 2 commune.
MOT2 CLOSE2: Sortie moteur 2 fermeture.
CN2:
2nd CH:
Sortie CH radio aux. (Free Contact charge max. 30 V
1 A).
2nd CH:
Sortie CH radio aux. (Free Contact charge max. 30 V
1 A).
FOTO+:
Contrôle et alimentation photocellules (24 V~ 5 W).
LAMP 24V 4W:
Sortie clignotant 2 (24 V~ 4 W).
GND:
Entrée GND commune
DS2:
Entrée dispositif sécurité 2 (NF).
DS1:
Entrée dispositif sécurité 1 (NF).
STOP 8K2: Entrée bloc (NF)
GND:
Entrée GND commune.
P PED:
Entrée bouton piétons/1 seul vantail/ouverture (NO).
PP:
Entrée bouton commande ouverture/fermeture/fermeture
(NO).
ELS+:
Sortie électroserrure 12 V 15 W (+12 V).
ELS-:
Sortie électroserrure 12 V 15 W (GND).
24V 5W:
Sortie auxiliaires (24 V~ 5 W)
GND:
Entrée GND commune.
SPIA +24V LED:
Sortie voyant (+24 V 4 W).
ANT-:
Entrée masse antenne.
ANT+:
Entrée pôle chaud antenne
CN3:
ENC1 +:
Entrée alimentation codeur moteur 1
ENC1 E:
Entrée signal codeur moteur 1
ENC1 GND: Entrée GND commune
MOT1 FCA: Entrée fin de course ouverture moteur 1 (NF).
MOT1 FCC: Entrée fin de course fermeture moteur 1 (NF).
ENC2 +:
Entrée alimentation codeur moteur 2
ENC2 E:
Entrée signal codeur moteur 2
ENC2 GND: Entrée GND commune.
MOT2 FCA: Entrée fin de course ouverture moteur 2 (NF).
MOT2 FCC: Entrée fin de course fermeture moteur 2 (NF).
2: Entrée enroulement primaire transformateur 110 V~.
CN4 (2st):
1: Sortie SEC 1 Transformateur 11,8 V 3,5 A.
2: Sortie SEC 1 Transformateur 11,8 V 3,5 A.
3: Sortie SEC 2 Transformateur 25 V 0,8A.
4: Sortie SEC 2 Transformateur 25 V 0,8A.
L’intervention des photocellules durant la phase d’ouverture provoque
l’arrêt momentané du portail, la logique de commande reprenant la phase
d’ouverture une fois le faisceau dégagé. L’intervention des photocellules
durant la phase de fermeture invertit le mouvement.
Entrée DS3 (NF) programmable, voir menu 2
L’intervention durant la phase d’ouverture provoque l’inversion du
mouvement. L’intervention des photocellules durant la phase de fermeture
n’est pas prise en compte.
En vue d’un fonctionnement conforme à la Catégorie 2 de l’EN 13849-1, un
test des photocellules est effectué avant chaque manœuvre. Pour pouvoir
effectuer ce test, il est indispensable d’alimenter l’émetteur de chaque paire
de photocellules via la sortie Contrôle et alimentation photocellules (sorties
3 et 5 du bornier CN2), tandis que le récepteur de chaque paire doit être
alimenté via la sortie Sortie auxiliaires (sorties 14 et 15 du bornier CN2).
La logique de commande déclenche uniquement la manœuvre si le test
est positif et, dans le cas contraire, bloque tout mouvement et signale la
situation d’alarme à chaque commande via clignotement de toutes les Led
de programmation.
FINS DE COURSE OUVERTURE ET FERMETURE:
La logique de commande permet la connexion de deux fins de course
ouverture et fermeture (NF). L’intervention des phases de fonctionnement
respectives provoque l’arrêt immédiat du mouvement pour les deux sorties
moteur 1 et 2.
ATTENTION: Ne pas ponter ces entrées si non utilisées
+
-
+
-
+
-
RÉGLAGE PUISSANCE DU MOTEUR (FORCE):
La logique de commande électronique est équipée d’un trimmer FORCE
entièrement géré par microprocesseur pour régler la puissance du moteur.
Le réglage peut être effectué dans une plage comprise entre 50 % et 100
% de la puissance maximum.
Un démarrage initial est prévu pour chaque mouvement, le moteur étant
alimenté à sa puissance maximum durant 2 secondes, y compris si le
réglage de la puissance du moteur est activé. Remarque: le démarrage
initial est automatiquement désactivé si la fonction Soft Start est activée.
ATTENTION: Toute variation du trimmer FORCE exige de répéter la
procédure d’apprentissage du fait de la variation possible des temps de
manœuvre et de ralentissement.
DÉTECTION DES OBSTACLES (SENS):
La logique de commande électronique est équipée d’un trimmer SENS
entièrement géré par microprocesseur et permettant de réguler la force
contraire nécessaire à la détection de l’obstacle.
Le temps d’intervention peut être réglé d’un minimum de 0,1 seconde à un
maximum de 7 secondes.
ATTENTION:
• En cas de fins de course connectés à la logique de commande, la
détection de l’obstacle entraîne toujours l’inversion du mouvement en
fermeture et l’inversion durant 2 secondes en ouverture.
• En l’absence de fins de course connectée à la logique de commande,
la détection de l’obstacle entraîne toujours l’inversion du mouvement
en fermeture (sauf durant les 5 dernières secondes de la manœuvre,
correspondant au déclenchement du Stop) et l’inversion durant 2
secondes en ouverture (sauf durant les 5 dernières secondes de la
manœuvre, correspondant au déclenchement du Stop).
La détenction d’obstacle fonctionne seulement avec automations
équipées de encodeur et connectent correctement.
CODEURS MOTEUR 1 ET MOTEUR 2:
La logique de commande permet la connexion d’un codeur pour
chaque moteur. L’utilisation des codeurs facilite la fonction de détection
des obstacles de la logique et garantit une précision majeure durant les
manœuvres.
RALENTISSEMENT (SLOWING):
La fonction de ralentissement des moteurs permet d’éviter tout arrêt brutal
des vantaux à la fin de la phase d’ouverture ou de fermeture.
Durant la programmation du temps moteur (voir menu principal), la logique
40
COMUNELLO ®Copyright 2014 - All right reserved
de commande permet également de programmer le ralentissement
aux points désirés (avant l’ouverture et la fermeture totale), et le trimmer
SLOWING permet également un réglage subdivisé en trois niveaux
d’intensité de puissance durant la phase de ralentissement.
En cas d’utilisation de la fonction Programmation automatique (voir menu
principal), la phase de ralentissement peut être désactivée (voir menu
complet 2).
VOYANT:
La logique de commande permet la connexion d’un voyant 24 Vcc pour
affichage de l’état de l’automatisme.
Voyant éteint: automatisme fermé
Voyant allumé: automatisme ouvert
Voyant clignotant lentement: mouvement en ouverture, Voyant clignotant
rapidement: mouvement en fermeture.
Convertible comme sortie du clignotant
FONCTIONNEMENT AVEC TIMER:
La logique de commande permet de connecter un timer au lieu du bouton
de commande ouverture - fermeture.
Ex.: 8 h, le timer ferme le contact et la logique de commande l’ouverture,
18 h, le timer ouvre le contact et la logique commande la fermeture. Durant
l’intervalle 8 h – 18 h, à la fin de la phase d’ouverture, la logique désactive le
clignotant, la fermeture automatique et les radiocommandes.
SORTIE COMMANDE ÉLECTROSERRURE:
La logique de commande dispose d’une sortie pour le pilotage de
l’électroserrure de 12 Vcc 15 W max. La commande est activée à chaque
mouvement initial d’ouverture durant 2 sec.
CONTROLE SENS DE LA MARCHE
MOTEUR 1 ET DU MOTEUR 2
DU
Remarque importante: Attention, déplacer les dip-switch SW1 et SW2
avec la logique de commande éteinte, puis répéter la programmation
de cette dernière.
La logique électronique est équipée d’un dip-switch SW2 qui permet de
modifier le sens de la marche de chaque moteur connecté sans intervenir
SW2
sur les SW2
branchements électriques:
le dip 1 deSW2
SW2 se réfère auSW2
moteur 1;
leONdip 2 de SW2 se ON
réfère au moteur 2ON
ON
SW2
ON
1
INV
OFF
INV
OFF
1
SW2
2
ON
INV
OFF
SW2
2
INV
MOT 1
2
INV
OFF
1
1
INV
OFF
ON
INV
OFF
SW2
2
INV
OFF
2
INV
MOT 1
1
INV
MOT 2
1
2
INV
OFF
INV
MOT 2
ON
1
INV
MOT 1
1
INV
MOT 1
2
INV
MOT 2
2
INV
MOT 2
CONTROLE RETARD MOT 1 OU M 2 ET
ACTIVATION 1 OU 2 MOT.
La logique électronique est équipée d’un dip-switch SW1 qui permet de
sélectionner la fonction 1 ou 2 moteurs et de définir l’ordre de démarrage
de ces derniers.
SW1
ON
SW1
ON
SW1
ON
SW1
ON
1
2
SW1
ON
1
SW1
2
ON
1
2
1
NON PRIS
2
RETARD
2
RETARD
MOTEUR EN COMPTE MOTEURS MOT. 2 MOTEURS MOT. 1
1
2
1
2
1
2
NOT
2
RITARDO
2
RITARDO
1
MOTORE CONSID. MOTORI MOT. 2 MOTORI MOT. 1
PROGRAMMATION:
Touche SELECT: sélectionne le type de fonction à mémoriser, la sélection
est indiquée par le clignotement de la Led.
Appuyer sur la touche à plusieurs reprises pour se positionner sur la fonction
désirée. La sélection reste active durant 10 secondes et est signalée par la
Led clignotante, la logique de commande retourne ensuite à son état initial
après ce délai.
Touche SET: effectue la programmation de l’information selon le type de
fonction sélectionnée avec la touche SEL.
IMPORTANT: La fonction de la touche SET peut également être remplacée
par la radiocommande si cette dernière a été programmée au préalable
(Led CODE allumée).
ATTENTION: Programmation disponible que pour les dispositifs de
sécurité pas actifs
MENU PRINCIPAL
La logique de commande est configurée en usine avec la possibilité de
sélectionner plusieurs fonctions importantes.
L1
L2
L3
L4
L5
L6
L7
LEV
STEP BY STEP
CODE TX
CONDO (IMMEUBLE)
MOTOR TIME
(TEMPS MOTEUR)
PAUSE TIME
DELAY
PRG AUTOM
MENU
Pas à pas
Code inséré
ON
Temps programmé
Automatique
Aucun code
OFF
30 sec.
Avec fermeture automatique
ON
ON
Sans fermeture automatique
OFF
OFF
ON
2. CODE TX: (Code de la radiocommande):
La logique de commande permet de mémoriser un max. de 120
radiocommandes comportant des codes différents de type fixe ou variable.
Programmation:
La programmation du code de transmission s’effectue comme suit: au
moyen de la touche SELECT, se positionner sur le clignotement de la LED
L2. Appuyer une fois sur SET, la Led modifie son clignotement (1 0 1 0 plus
long) pour indiquer que la
mémorisation du premier niveau est en cours. Après envoi du code
sélectionné avec la radiocommande désirée, la LED CODE reste allumée
fixe et indique que la programmation est terminée.
Pour mémoriser le code d’ouverture piétons / 1 seul vantail procéder comme
suit: au moyen de la touche SELECT se positionner sur le clignotement de
la LED L2 CODE. Appuyer deux fois de suite sur SET, la Led modifie son
clignotement (1 1 0 1 1 0) pour indiquer que la
mémorisation du code piétons est en cours. Après envoi du code
sélectionné avec la radiocommande désirée, la LED L2 CODE reste
allumée fixe et indique que la programmation est terminée.
Pour mémoriser le code pour le 2e canal AUX, procéder comme suit: au
moyen de la touche SEL se positionner sur le clignotement de la LED L2.
Appuyer trois fois de suite sur SET, la Led modifie son clignotement (1 1 1
0 1 1 1 0) pour indiquer que la mémorisation du 2e canal AUX est en cours.
Après envoi du code sélectionné avec la radiocommande désirée, la LED
L2 reste allumée fixe et indique que la programmation est terminée.
En cas de mémorisation des 120 codes, la répétition de l’opération de
programmation entraîne le clignotement de tous les LED de programmation
pour indiquer qu’aucune nouvelle mémorisation n’est possible
Effacement:
Au moyen de la touche SEL se positionner sur la LED L2; activer le
clignotement du code à effacer (CODE, PIÉTONS ou 2e canal AUX
identifiés par le clignotement correspondant); maintenir SET enfoncé durant
un temps > 5 s. La Led s’éteint ensuite durant 2 sec. et la procédure est
3. CONDO (Immeuble):
La fonction Immeuble prévoit que la logique de commande ne relève pas
les commandes provenant des boutons ou des radiocommandes durant la
phase d’ouverture ou la pause. Durant la phase de fermeture, en revanche,
une commande provenant des boutons ou des radiocommandes
provoque l’inversion du mouvement. Ce mode de fonctionnement est
particulièrement utilisé si l’automatisme comprend un détecteur de boucle.
Dans la configuration par défaut de la logique de commande, la fonction
Immeuble est désactivée, procéder comme suit pour l’activer: avec la
touche SELECT, se positionner sur le clignotement de la LED L3 puis
appuyer sur la touche SET: la LED L3 s’allume fixe et la programmation
est terminée. Répéter l’opération pour rétablir la configuration précédente.
4. MOTOR TIME
(Program. temps de fonctionnement des moteurs 4 min. max.):
La logique de commande est configurée en usine avec un temps de
fonctionnement des moteurs de 30 sec. et sans ralentissement.
Pour modifier le temps de fonctionnement des moteurs 1 et 2, la
programmation doit s’effectuer avec le portail fermé et de la façon suivante:
avec la touche SEL, se positionner sur le clignotement de la LED L4 puis
appuyer une seconde sur la touche SET, le moteur 1 démarre le cycle
d’ouverture; à hauteur du point de ralentissement initial requis, appuyer à
nouveau sur la touche SET: la LED L4 clignote plus lentement et le moteur 1
procède au ralentissement; une fois la position requise atteinte, appuyer sur
la touche SET pour terminer le cycle d’ouverture. La LED L4 recommence
alors à clignoter normalement et le moteur 2 démarre l’ouverture: répéter
l’opération de programmation du temps de fonctionnement pour le moteur
2. Une fois la programmation des temps moteur en ouverture terminée,
le moteur 2 démarre immédiatement la fermeture: répéter les opérations
ci-dessus pour la phase de fermeture du moteur 2 puis pour le moteur 1.
Pour annuler le ralentissement de la logique de commande, durant la
programmation, à la fin des cycles d’ouverture et fermeture, appuyer deux
fois de suite sur la touche SET au lieu d’une seule fois.
Si la logique de commande est utilisée dans la configuration à 1 moteur (dip
1 de SW1 OFF), la programmation du temps de fonctionnement du moteur
2 n’est pas effectuée.
Durant la programmation, au lieu de la touche SET placée sur la logique
de commande, il est possible d’utiliser la touche de la radiocommande - à
condition que cette dernière ait été mémorisée.
5. PAUSE TIME
(Programmation temps de fermeture aut. 4 min. max.):
La logique de commande est configurée en usine sans fermeture
automatique. Pour activer la fermeture automatique, procéder comme suit:
au moyen de la touche SEL, se positionner sur le clignotement de la LED
L5 et appuyer rapidement sur la touche SET, patienter ensuite durant un
temps correspondant à celui requis; appuyer à nouveau rapidement sur
la touche SET, la mémorisation du temps de fermeture automatique sera
effectuée et la LED L5 sera allumée fixe. Pour rétablir la condition initiale
(sans fermeture automatique), se positionner sur le clignotement de la LED
L5 puis appuyer deux fois de suite sur la touche SET durant 2 secondes.
La Led s’éteint et l’opération est terminée.
Durant la programmation, au lieu de la touche SET placée sur la logique
de commande, il est possible d’utiliser la touche de la radiocommande - à
condition que cette dernière ait été mémorisée.
6. RET. VANTAIL (Programmation retard vantail 15 sec. max.) DELAY:
La logique de commande est configurée en usine avec retard des vantaux
d’ouverture et fermeture (4 sec). En cas d’utilisation en configuration pour
automatisme à 2 moteurs, il peut être nécessaire de prévoir un temps de
retard différent des vantaux; la programmation devra être effectuée avec le
portail fermé et comme suit: au moyen de la touche SELECT, se positionner
sur le clignotement de la LED L6 et appuyer rapidement sur la touche SET,
patienter ensuite durant un temps correspondant à celui requis; appuyer à
COMUNELLO ®Copyright 2014 - All right reserved
41
FRANÇAIS
1. STEP BY STEP:
La configuration par défaut de la logique de commande prévoit la logique
de fonctionnement Automatique activée (LED L1 éteinte); pour activer la
logique de fonctionnement Pas à pas (LED L1 allumée), procéder comme
suit: avec la touche SEL, se positionner sur le clignotement de la LED L1
puis appuyer sur la touche SET: la LED L1 s’allume fixe, indiquant que la
programmation est effectué.
Si on veut activer le fonctionnement P/P1 «Pas à Pas 1», répéter l’opération
décrite ci-dessous, en pressant le bouton SEL pour deux fois (en obtenant
le clignotement rapide du LED NR 1) au lieu de une fois. Répéter l’opération
pour rétablir la configuration précédente.
terminée. Si tous les codes CODE et PIÉTONS sont éliminés, la Led reste
éteinte.
Si seuls les codes PIÉTONS ou 2e CH sont mémorisés, la Led émet un
clignotement différent (1 1 1 1 0 1 1 1 1 0)
Règle de la première radiocommande mémorisée:
La programmation des radiocommandes suit la règle suivante: si la première
radiocommande mémorisée est de type rolling code (code variable), le
récepteur acceptera ensuite uniquement des radiocommandes de type
rolling code (code variable), garantissant ainsi une sécurité anti-intrusion
majeure; si la première radiocommande mémorisée est en revanche à
code fixe, le récepteur acceptera ensuite tant des radiocommandes de
type rolling code (code variable) que fixe.
nouveau rapidement sur la touche SET, la logique mémorise simultanément
le temps de retard du vantail en ouverture de 4 sec. et un temps de retard
du vantail en fermeture de la durée programmée, la LED L6 étant allumée
fixe.
Pour désactiver cette fonction (sans retard vantaux), se positionner sur le
clignotement de la LED L6 puis appuyer deux fois de suite sur la touche
SET durant 2 secondes, la Led s’éteint et l’opération est terminée.
7. PROGRAMMATION AUTOMATIQUE (PRG AUTOM):
La logique de commande permet d’effectuer une programmation
automatique (SIMPLIFIÉE).
Au moyen de la touche SEL, se positionner sur le clignotement de la
LED L7 et appuyer de façon continue sur la touche SET, le moteur 2
commande la fermeture jusqu’à l’atteinte du fin de course ou de la butée,
et la manœuvre sera ensuite répétée par le moteur 1. Dans le cas où les
moteurs effectueraient une manœuvre inverse de celle décrite, relâcher la
touche SET, sectionner l’alimentation de la logique et modifier le dip-switch
SW2 pour changer le sens de la marche du moteur sans intervenir sur
les branchements électriques. Si la séquence des moteurs est correcte,
la logique termine la phase de programmation automatique en effectuant
une ouverture et une fermeture complètes (toujours maintenir enfoncée
la touche SET à la fin de la programmation automatique). Le cycle de
ralentissement est configuré à environ 15 % du cycle complet.
Durant la programmation, au lieu de la touche SET placée sur la logique
de commande, il est possible d’utiliser la touche de la radiocommande - à
condition que cette dernière ait été mémorisée.
Attention, la programmation automatique exige la présence des fins
de course.
MENU COMPLET 1
La logique de commande est configurée en usine avec la possibilité de
sélectionner directement les fonctions du menu principal. Pour activer
les fonctions décrites dans le menu complet 1, procéder comme suit:
se positionner sur le clignotement de la LED LEV et appuyer 1 fois sur
SET. La Led commence à clignoter. De cette façon, on dispose de 30
secondes pour sélectionner les fonctions du menu complet 1 au moyen
des touches SELECT et SET; après un nouveau délai de 30 secondes, la
logique retourne au menu principal.
L1
L2
L3
L4
L5
L6
L7
LEV
ACTION MAINTENUE
BOUTON PIÉTONS / 1 SEUL
VANTAIL
BOUTON PIÉTONS / DS3
PHOTOTEST
DS2 STP EN FERMETURE
DS1 INVERSION PARTIELLE
NF COMME 8K2
NIVEAU MENU
ON
UN SEUL VANTAIL
DS3
ON
ON
ON
ON
OFF
BOUTON PIÉTONS
BOUTON PIÉTONS
OFF
OFF
OFF
OFF
1 CLIGNOTEMENT
1. ACTION MAINTENUE:
La logique de commande permet de configurer le fonctionnement À action
maintenue. Pour sélectionner ce mode de fonctionnement, procéder
comme suit: vérifier que le menu complet 1 est activé (clignotement
alternatif 1 0 1 0 1 0 du niveau menu 8). Avec la touche SELECT, se
positionner sur le clignotement de la LED L1 puis appuyer sur la touche
SET: la LED L1 s’allume fixe et la programmation est effectuée. De cette
façon, en utilisant les radiocommandes ou les boutons d’actionnement
du portail, le fonctionnement est le suivant: la commande requise pour le
mouvement du portail doit être constamment activée. Le relâchement de la
commande provoque l’arrêt immédiat du mouvement. Répéter l’opération
pour rétablir la configuration précédente.
2. UN SEUL VANTAIL OU BOUTON PIÉT.= OUVERTURE, BOUT P/P
= FERMETURE:
La logique de commande permet la connexion d’un bouton NO (entrée
n°10 de CN2) pour l’actionnement en mode passage piétons. Il est
toutefois possible d’utiliser cette entrée pour la connexion d’un bouton NO
fonctionnant différemment. Pour activer la fonction Un seul vantail, procéder
comme suit: vérifier que le menu complet 1 est activé (clignotement alternatif
1 0 1 0 1 0 du niveau menu L8), au moyen e la touche SEL, se positionner
sur le clignotement de la LED L2 puis appuyer sur la touche SET: la LED L2
s’allume fixe et la programmation est terminée. De cette façon, le bouton
pourra être utilisé pour l’actionnement du moteur 1 seul (voir par. Un seul
vantail). Pour activer en revanche le mode OUVERTURE-FERMETURE et
42
COMUNELLO ®Copyright 2014 - All right reserved
utiliser le bouton Piét. pour actionner uniquement l’ouverture du portail et le
bouton P/P (entrée n°11 de CN2) pour la fermeture uniquement, répéter
l’opération décrite plus haut en appuyant deux fois sur la touche SEL (la
LED L2 clignote rapidement au lieu d’une seule fois). Répéter l’opération
pour rétablir la configuration initiale.
3. BOUTON PIÉTONS / DS3:
La logique de commande permet la connexion d’un bouton NO (entrée
n°10 de CN2) pour l’actionnement en mode passage piétons. Cette entrée
peut toutefois être utilisée pour la connexion d’une photocellule DS3 (NF):
vérifier que le menu complet 1 est activé (clignotement alternatif 1 0 1
0 1 0 du niveau 8), au moyen de la touche SEL, se positionner sur le
clignotement de la LED L3 puis appuyer sur la touche SET: la LED L3
s’allume fixe et la programmation est effectuée. Répéter l’opération pour
rétablir la configuration précédente.
4. FOTOTEST (Test photocellules):
La centrale est configurée en usine avec le test photocellules désactivé.
Pour activer le test, procéder comme suit: vérifier que le menu complet 1
est activé (clignotement alternatif 1 0 1 0 1 de la LED LEV), au moyen de la
touche SEL, se positionner sur le clignotement de la LED L4 puis appuyer
sur la touche SET: la LED L4 s’allume fixe et la programmation est terminée.
Répéter l’opération pour rétablir la configuration précédente.
5. DS2 STOP EN FERMETURE:
La logique de commande permet de modifier le fonctionnement de l’entrée
DS2. Pour que la DS2 intervienne également en fermeture (arrêt du portail.
*** Si en fonctionnement automatique, une fois relâché, le mouvement du
portail en fermeture reprend), procéder comme suit: vérifier que le menu
complet 1 est activé (clignotement alternatif 1 0 1 0 1 0 du niveau menu
LED LEV), au moyen de la touche SEL, se positionner sur le clignotement
de la LED L5 puis appuyer sur la touche SET: la LED L5 s’allume fixe
et la programmation est terminée. Répéter l’opération pour rétablir la
configuration initiale.
6. DS1 INVERSION PARTIELLE:
La logique de commande permet de modifier le fonctionnement de l’entrée
DS1. Pour que DS1 provoque en fermeture une inversion partielle (inversion
rapide) et non totale, procéder comme suit: vérifier que le menu complet 1
est activé (clignotement alternatif 1 0 1 0 1 0 du niveau menu LED LEV), au
moyen de la touche SEL, se positionner sur le clignotement de la LED L6
puis appuyer sur la touche SET: la LED L6 s’allume fixe et la programmation
est terminée. Répéter l’opération pour rétablir la configuration initiale
7. BLOCAGE / 8K2:
La logique de commande permet la connexion du bouton de blocage NF
(entrée n°8 de CN2). Cette entrée peut toutefois être commutée en entrée
résistive 8,2k ohms: vérifier que le menu complet 1 est activé (clignotement
alternatif 1 0 1 0 1 0 du niveau LED LEV), au moyen de la touche SEL, se
positionner sur le clignotement de la LED L7 puis appuyer sur la touche SET:
la LED L7 s’allume fixe et la programmation est terminée. Toute variation de
la valeur lue en entrée entraîne le blocage de la logique de commande
à toute phase du mouvement. Une nouvelle commande de mouvement
sera valide à condition que la valeur correcte en entrée ait été rétablie, la
logique effectuant toutefois la phase d’ouverture de l’automatisme. Répéter
l’opération pour rétablir la configuration initiale.
MENU COMPLET 2
La logique de commande est configurée en usine avec la possibilité de
sélectionner directement les fonctions du menu principal.
Pour activer les fonctions décrites dans le menu complet 2, procéder
comme suit: se positionner sur le clignotement de la LED LEV et appuyer 2
fois sur SET. La Led commence à clignoter en mode alternatif 1 1 0 1 1 0.
De cette façon, on dispose de 30 secondes pour sélectionner les fonctions
du menu complet 2 au moyen des touches SEL et SET; après un nouveau
délai de 30 secondes, la logique retourne au menu principal.
L1
L2
L3
L4
L5
L6
FREIN
RALENTISSEMENT
FERMETURE SYSTÉMATIQUE
FOLLOW ME
TEMPS PIÉTONS
2°CH MONOSTABLE
ON
OFF
ON
ON
ON
ON
OFF
ON
OFF
OFF
OFF
OFF
de commande, il est possible d’utiliser la touche de la radiocommande - à
condition que cette dernière ait été mémorisée.
L7
LEV
PROG. À DISTANCE
NIVEAU MENU
ON
OFF
2 CLIGNOTEMENT
1. FREIN:
La logique de commande est configurée en usine avec la fonction frein
électronique désactivée. Pour activer la fonction, procéder comme suit:
vérifier que le menu complet 2 est activé (clignotement alternatif 1 1 0 1 1
0 1 1 0 du niveau LED LEV), au moyen de la touche SEL, se positionner
sur le clignotement de la LED L1 puis appuyer sur la touche SET: la LED L1
s’allume fixe et la programmation est terminée.
La logique de commande réduit ainsi l’avancée du portail due à l’inertie
à hauteur d’un arrêt ou d’une commande d’inversion. Répéter l’opération
pour rétablir la configuration précédente.
2. RALENTISSEMENT:
Ainsi qu’on l’a vu précédemment, la logique de commande permet la
programmation d’une phase de ralentissement en ouverture et en fermeture,
tandis que le ralentissement est automatiquement activé avec la fonction
Programmation automatique. Si aucun ralentissement n’est requis, il est
possible de le suspendre: de cette façon, la programmation automatique
ne comprendra plus la phase de ralentissement tandis que, si la fonction
Programmation des temps moteur est activée, la possibilité de programmer
le ralentissement durant les phases d’ouverture et fermeture ne sera plus
offerte durant la programmation. Si, avant de suspendre le ralentissement,
ce dernier était programmé via la fonction de programmation des temps
moteur, répéter toute la procédure de programmation. Pour suspendre le
ralentissement, procéder comme suit: vérifier que le menu complet 2 est
activé (clignotement alternatif 1 1 0 1 1 0 de la LED LEV), au moyen de
la touche SEL, se positionner sur le clignotement de L2 puis appuyer sur
la touche SET: la LED L2 s’allume fixe et la programmation est terminée.
Répéter l’opération pour rétablir la configuration précédente.
4. FOLLOW ME:
La logique de commande permet de configurer le fonctionnement Follow
me: cette fonction, uniquement programmable si un temps de pause a été
prévu, réduit ce dernier à 5 sec. après la mise au repos de la photocellule
DS1, et le portail se referme donc 5 sec. après le passage de l’utilisateur.
Pour activer cette fonction, procéder comme suit: vérifier que le menu
complet 2 est activé (clignotement alternatif 1 1 0 1 1 0 de la LED LEV), au
moyen de la touche SEL, se positionner sur le clignotement de la LED L4
puis appuyer sur la touche SET: la LED L4 s’allume fixe et la programmation
est effectuée. Répéter l’opération pour rétablir la configuration précédente.
5. T. MOT. PIÉT: (Program. temps de fonctionnement piétons 4 min.
max.)
La logique de commande est configurée en usine avec un temps
de fonctionnement du moteur (piétons) prédéfini à 10 sec. et sans
ralentissement.
Pour modifier le temps de fonctionnement piétons, la programmation doit
s’effectuer avec le portail fermé et de la façon suivante: vérifier que le menu
complet 2 est activé (clignotement alternatif 1 1 0 1 1 0 de la LED LEV), au
moyen de la touche SEL, se positionner sur le clignotement de la LED L5
puis appuyer une seconde sur la touche SET, le moteur démarre le cycle
d’ouverture; à hauteur du point de ralentissement initial requis, appuyer à
nouveau sur la touche SET: la LED L5 clignote plus lentement et le moteur
procède au ralentissement; une fois la position requise atteinte, appuyer sur
la touche SET pour terminer le cycle d’ouverture. La LED L5 recommence
alors à clignoter normalement et le moteur relance la fermeture; répéter les
opérations ci-dessus pour la phase de fermeture.
Pour annuler le ralentissement de la logique de commande, durant la
programmation, à la fin des cycles d’ouverture et fermeture, appuyer deux
fois de suite sur la touche SET au lieu d’une seule fois.
Durant la programmation, au lieu de la touche SET placée sur la logique
7. PROGRAMMATION RADIOCOMMANDE À DISTANCE:
La logique de commande permet de programmer le code de transmission
à distance, sans utiliser la touche SEL de la logique.
La programmation de la radiocommande à distance s’effectue en envoyant
en continu et durant plus de 10 sec. le code d’une radiocommande
précédemment mémorisée, la logique entrant ainsi en mode programmation
comme décrit pour la LED L2 du menu principal. Si le code envoyé en
continu est un code piétons précédemment mémorisé, la logique lance la
programmation d’un nouveau code piétons et la LED L2 clignote comme
pour activer l’acquisition du code piétons (1 1 0 1 1 0 1 1 0); si le code
correspond au 2° CH/AUX, elle clignote comme pour activer l’acquisition
du code 2° CH (1 1 1 0 1 1 1 0 1 1 1 0). Pour activer la fonction de
programmation à distance, procéder comme suit:
vérifier que le menu complet 2 est activé (clignotement alternatif 1 1 0 1
1 0 de la LED LEV), au moyen de la touche SEL, se positionner sur le
clignotement de la LED L7 puis appuyer sur la touche SET: la LED L7
s’allume fixe et la programmation est terminée. Répéter l’opération pour
rétablir la configuration initiale.
MENU COMPLET 3
La logique de commande est configurée en usine avec la possibilité de
sélectionner directement les fonctions du menu principal.
Pour activer les fonctions décrites dans le menu complet 3, procéder
comme suit: se positionner sur le clignotement de la LED LEV et appuyer
3 fois sur SET. La Led commence à clignoter en mode alternatif 1 1 1 0 1
1 1 0. De cette façon, on dispose de 30 secondes pour sélectionner les
fonctions du menu complet 3 au moyen des touches SEL et SET; après
un nouveau délai de 30 secondes, la logique retourne au menu principal.
L1
L2
L3
L4
L5
L6
L7
LEV
SOFT STOP
SOFT START
COUP DE BÉLIER
COUP FERMETURE
ELS / CMD PED
CLIGNOT. / LUM. DE COURT.
PRÉCLIGN. / CL. EN PAUSE
NIVEAU MENU
ON
ON
ON
ON
ON
ON
ON
OFF
OFF
OFF
OFF
OFF
OFF
OFF
3 CLIGNOTEMENT
1. SOFT STOP:
La logique de commande est configurée en usine avec la fonction Soft
Stop désactivée. Pour activer cette fonction, procéder comme suit: vérifier
que le menu complet 3 est activé (clignotement alternatif 1 1 1 0 1 1 1 0 de
la LED LEV), au moyen de la touche SEL, se positionner sur le clignotement
de la LED L1 puis appuyer sur la touche SET: la LED L1 s’allume fixe et
la programmation est terminée. De cette façon, à la fin du mouvement,
la logique diminuera graduellement la puissance à zéro dans un délai de
2 secondes. Répéter l’opération pour rétablir la configuration précédente.
2. SOFT START:
La logique de commande est configurée en usine avec la fonction Soft
Start désactivée. Pour activer cette fonction, procéder comme suit: vérifier
que le menu complet 3 est activé (clignotement alternatif 1 1 1 0 1 1 1 0 de
la LED LEV), au moyen de la touche SEL, se positionner sur le clignotement
de la LED L2 puis appuyer sur la touche SET: la LED L2 s’allume fixe et la
programmation est terminée. À chaque début de mouvement, la logique
contrôlera ainsi le démarrage du moteur en augmentant graduellement la
puissance de la valeur min. jusqu’à celle configurée par le trimmer FORCE
durant les 2 premières secondes de fonctionnement. Répéter l’opération
COMUNELLO ®Copyright 2014 - All right reserved
43
FRANÇAIS
3. FERMETURE SYSTÉMATIQUE:
La logique de commande permet de configurer le fonctionnement
Fermeture systématique: cette fonction, uniquement programmable si un
temps de pause a été prévu, intervient après une panne d’alimentation; si le
système détecte que le portail est ouvert, la fermeture est automatiquement
déclenchée après 5 sec. de clignotement. Pour activer ce mode de
fonctionnement, procéder comme suit: vérifier que le menu complet 2 est
activé (clignotement 1 1 0 1 1 0 de la LED LEV), au moyen de la touche
SEL, se positionner sur le clignotement de la LED L3 puis appuyer sur
la touche SET: la LED L3 s’allume fixe et la programmation est terminée.
Répéter l’opération pour rétablir la configuration précédente.
6. LOGIQUE DE FONCTIONNEMENT CANAL RADIO AUXILIAIRE:
La logique de commande permet de sélectionner la logique de
fonctionnement du canal radio auxiliaire.
Dans sa configuration d’usine, le canal radio auxiliaire est placé en
fonctionnement monostable. Pour activer le fonctionnement bistable,
procéder comme suit: vérifier que le menu complet 2 est activé (clignotement
1 1 0 1 1 0 de la LED LEV), au moyen de la touche SEL, se positionner sur
le clignotement de la LED L6 puis appuyer sur la touche SET: la LED L6
s’allume fixe et la programmation est terminée. Pour activer en revanche le
mode Temporisé 3 min., répéter l’opération décrite plus haut en appuyant
deux fois sur la touche SEL (la LED L6 clignote rapidement au lieu d’une
seule fois). Répéter l’opération pour rétablir la configuration initiale.
pour rétablir la configuration précédente.
Remarque: si la fonction Soft Start est activée, la logique désactive
automatiquement le démarrage initial, et vice-versa.
3. COUP DE BÉLIER:
La logique de commande est configurée en usine avec la fonction Coup
de bélier désactivée. Cette fonction envoie une commande de fermeture
durant env. 2 sec. au début d’une phase d’ouverture: le déblocage de la
serrure est ainsi facilité et permet une phase d’ouverture correcte. Pour
activer la fonction Coup de bélier à la puissance maximum, procéder
comme suit: vérifier que le menu complet 3 est activé (clignotement
alternatif 1 1 1 0 1 1 1 0 de la LED LEV), au moyen de la touche SEL, se
positionner sur le clignotement de la LED L3 puis appuyer sur la touche
SET: la LED L3 s’allume fixe et la programmation est effectuée. Pour activer
en revanche la fonction Coup de bélier à la puissance configurée avec le
trimmer FORCE, répéter l’opération décrite plus haut en appuyant deux fois
sur la touche SEL (la LED L3 clignote rapidement au lieu d’une seule fois).
Répéter l’opération pour rétablir la configuration initiale.
4. COUP EN FERMETURE:
La logique de commande est configurée en usine avec la fonction Coup en
fermeture désactivée. Cette fonction consiste à ajouter, en cas de phase de
ralentissement en fermeture prévue, un temps d’1 seconde à la puissance
max. ou à la puissance sélectionnée au moyen du trimmer VR1 de façon
à vaincre la serrure éventuellement installée. Pour activer la fonction Coup
en fermeture à la puissance maximum, procéder comme suit: vérifier que
le menu complet 3 est activé (clignotement alternatif 1 1 1 0 1 1 1 0 de la
LED LEV), au moyen de la touche SEL, se positionner sur le clignotement
de la LED L4 puis appuyer sur la touche SET: la LED L4 s’allume fixe et la
programmation est terminée. Pour activer en revanche la fonction Coup
en fermeture à la puissance configurée avec le trimmer FORCE, répéter
l’opération décrite plus haut en appuyant deux fois sur la touche SEL (la
LED L4 clignote rapidement au lieu d’une seule fois). Répéter l’opération
pour rétablir la configuration initiale.
5. ACTIVATION ÉLECTROSERRURE CMD PIÉT.:
La logique de commande est configurée en usine avec la fonction
d’activation électroserrure via commande piétons désactivée. La fonction
d’activation de l’électroserrure via commande piétons est utile en cas
par ex. de portail coulissant équipé d’une porte piétons adjacente. Il est
ainsi possible d’obtenir l’ouverture du portail avec les commandes du
bouton P-P et de la radiocommande ainsi que celle de la porte piétons via
actionnement de l’électroserrure avec les commandes PED. Pour activer
cette fonction, procéder comme suit: vérifier que le menu complet 3 est
activé (clignotement alternatif 1 1 1 0 1 1 1 0 de la LED LEV), au moyen
de la touche SEL, se positionner sur le clignotement de la LED L5 puis
appuyer sur la touche SET: la LED L5 s’allume fixe et la programmation
est terminée. Répéter l’opération pour rétablir la configuration précédente.
6. FONCTIONNEMENT CLIGNOTANT/ LUMIÈRE DE COURTOISIE:
La logique de commande est configurée en usine avec le fonctionnement
du clignotant durant la pause désactivé. Pour activer le fonctionnement,
procéder comme suit: vérifier que le menu complet 3 est activé (clignotement
1 1 1 0 1 1 1 0 de la LED LEV), au moyen de la touche SEL, se positionner
sur le clignotement de la LED L6 puis appuyer sur la touche SET: la LED
L6 s’allume fixe et la programmation est terminée. Répéter l’opération pour
rétablir la configuration précédente.
Fonctionnement Lumière de courtoisie: La sortie Clignotement 24 Vca
4 W max. s’active durant 3 minutes avant chaque commande d’ouverture.
7. PRÉCLIGNOTEMENT/CLIGNOTANT EN PAUSE:
La logique de commande est configurée en usine avec les fonctions
Préclignotement et Clignotant en pause désactivées. Pour activer la
fonction Préclignotement, procéder comme suit: vérifier que le menu
complet 3 est activé (clignotement 1 1 1 0 1 1 1 0 de la LED LEV), au
moyen de la touche SEL, se positionner sur le clignotement de la LED L7
puis appuyer sur la touche SET: la LED L7 s’allume fixe et la programmation
est terminée. Pour activer en revanche la fonction Lumière de courtoisie,
répéter l’opération décrite plus haut en appuyant deux fois sur la touche
SET au lieu d’une seule fois (la LED L7 clignote rapidement). Répéter
l’opération pour rétablir la configuration initiale.
Fonctionnement Préclignotement: La sortie Clignotement 110 Vca et
clignotement 24 V s’active toujours 3 secondes avant la manœuvre de
fermeture.
Fonctionnement du clignotant en pause: la sortie Clignotant 110
Volt et 24 V restera active si le temps de pause avait été précédemment
programmé.
44
COMUNELLO ®Copyright 2014 - All right reserved
RÉINITIALISATION
S’il est nécessaire de rétablir la configuration d’usine de la logique de
commande, appuyer simultanément sur les touches SEL et SET, toutes
les Led ROUGES de signalisation s’allument et s’éteignent immédiatement.
DIAGNOSTIC
TEST Photocellules:
La logique de commande est prévue pour la connexion de dispositifs
de sécurité conformes au point 5.1.1.6 de la norme EN 12453. Chaque
cycle de manœuvre s’accompagne du test de fonctionnement de la
photocellule connectée. En cas d’absence de fonctionnement et/ou de
connexion, la logique de commande n’active pas le mouvement du portail
et indique l’échec du test via clignotement simultané de toutes les Led de
signalisation. Une fois le fonctionnement correct de la photocellule rétabli,
la logique est prête à l’utilisation. Cette précaution permet une prévention
des pannes conforme à la catégorie 2 de l’EN 954-1.
Test entrée commandes:
Une Led de signalisation correspond à chaque entrée de commande à
basse tension et permet d’effectuer un contrôle rapide du système.
Logique de fonctionnement: LED allumée entrée fermée, LED allumée
entrée ouverte.
GARANTIE
Fratelli Comunello S.p.A. garantie, sous réserve de conformité avec les
performances mentionnées dans les manuels d’instructions des produits,
le bon fonctionnement des actionneurs pendant 24 mois à compter de la
date de fabrication. Fratelli Comunello S.p.A. garantie exclusivement (elle
exclue donc le remboursement du montant équivalent au dommage) la
réparation ou le remplacement gratuit des pièces défectueuses qui seront
reconnues comme telles, selon la discrétion des techniciens Comunello.
Le matériel sous garantie envoyé au siège de Fratelli Comunello S.p.A.
devra être envoyé franco de port et devra être retourné port dû. Le matériel
défectueux envoie à l’entreprise Fratelli Comunello S.p.A. restera de
propriété de Fratelli Comunello S.p.A.
Le cout de la main-d’oeuvre nécessaire pour les réparations et
remplacements reste à la charge de l’acheteur. Aucune indemnisation n’est
reconnue pour toute la durée d’inutilisation de l’installation. Les temps de
réparation ne prolongent pas la durée de la garantie.
Sous peine de déchéance, l’acheteur doit signaler les vices et les défauts
des produits dans les 8 (huit) jours à compter de la date de découverte des
vices ou de la date de livraison de la marchandise. La plainte doit être faite
uniquement par écrit.
La garantie ne comprend pas :
Des pannes ou des dommages causes par le transport ; des pannes ou
des dommages causés par des défauts de l’installation électrique chez
l’acheteur et/ou par des omissions, des négligences, des inadéquations,
l’utilisation inappropriée de cette installation ; des pannes ou des dommages
dus à des effractions de la part de personnel non autorisé ou causées par
l’utilisation/installation incorrectes (à ce propos, on suggère un entretien
su system tous les six mois au moins) ou à l’emploi de pièces rechange
non originales ; des défauts causes par des agents chimiques ou par des
phénomènes atmosphériques.
Cette garantie ne comprend pas le coût du matériel de consommation, ni
de vices présumés ou de vérications.
Caractéristiques des produits
Les caractéristiques des produits Fratelli Comunello S.p.A. sont susceptibles
d’être modiées et améliores à tout moment; donc, les caractéristiques de
construction et l’image du matériel peuvent souffrir des modications sans
préavis.
Tribunal compétent Étant donné que le contrat est perfectionné à travers
Conrmation de Commande remplie à Rosà, pour tout contentieux
INSTRUCCIONES DE USO Y DE INSTALACION
CU - 110V - HP
DECLARACIÓN DE CONFORMIDAD CE
El abajo firmante, Señ. COMUNELLO LUCA, representante el siguiente fabbricante
F.lli COMUNELLO spa
Via Cassola 64, 36027 Rosà (VI) Italia
Declara que el automatismo en lo sucesivo descrito:
Descripción
Panel de control electrónico
Modelo
CU 110V HP
Es conforme a las disposiciones legales que transponen las seguientes directivas:
• Directiva 2004/108 CE (Directiva EMC)
•Directiva 2006/95/CE
Y que han sido aplicadas todas las normas y /o especificaciones técnicas en lo sucesivo indicadas
EN61000-6-2 + EN61000-6-3
EN62233 :2008
EN301489-1 + EN301489-3 + EN300220-2
EN60335-1 :2002
y enmiendas posteriores
Últimas dos cifras del año donse se fija el marcado CE
14
Rosà (VI) – Italia
01-09-2014
Asimismo declara que no está permitido poner en servicio la maquinaria hasta que la máquina donde esté incorporada o de la que
forme parte haya sido identificada y declarada de conformidad a las disposiciones de la Directiva 2006/42 CE y a la legislación nacional
que la transpone.
ESPAÑOL
Luca Comunello
Representante Legal de Fratelli Comunello
Fratelli Comunello S.p.A.
Empresa con sistema de Gestión de Calidad certificado
UNI EN ISO 9001:2008
(Certificado n° 50 100 11235 Rev. 01)
COMUNELLO ®Copyright 2013 - All right reserved
45
ADVERTENCIAS
•El cuadro de control no incorpora ningún
dispositivo de corte de la línea eléctrica de
110 Vca, por lo tanto, el instalador deberá
montar en el sistema un dispositivo de corte.
Es necesario instalar un interruptor omnipolar
de categoría III de sobretensión. Dicho
interruptor debe colocarse de manera que
quede protegido contra los cortes accidentales,
según las indicaciones del apartado 5.2.9 de la
Norma EN 12453. El cableado de los distintos
componentes eléctricos fuera del cuadro de
control debe realizarse según las indicaciones
de la Norma EN 60204-1 y las modificaciones
hechas por el apartado 5.2.7 de la Norma EN
12453. Los cables de alimentación pueden
tener un diámetro máximo de 14 mm; la fijación
de los cables de alimentación y de conexión
debe estar garantizada con el ensamblaje
de prensaestopas suministrados como
“opcionales”
• Para los cables de alimentación se recomienda
utilizar cables flexibles protegidos por
revestimiento aislante de policloropreno tipo
armonizado (H05RN-F) con una sección mínima
de 1 mm2
• Al instalar, se recomienda utilizar exclusivamente
cables revestidos de de una funda de
aislamiento doble tanto para la conexión de
red (110V)como para conexiones de muy baja
tensión de seguridad (SELV), Utilizar tan solo
tubos de plástico , divididos por cableados en
baja tensión (110V) y porcableados en muy
baja tensión de seguridad.
• El conductor de muy baja tensión de seguridad
deben estar fisicamente separados (por lo menos
4 mm en aire) de los conductores a tensión
de red, o bien deben estar convenientemente
aislados con revestimiento suplementario con
espesor mínimo de 1 mm.
• Antes de la red de alimentación de la automación
hay que predisponer un dispositivo que asegure
la desconexión completa omnipolar de la red,
con una distancia de apertura de los contactos
de cada polo mínimo 3 mm. Estos dispositivos
de desconexión deben estar previstos en la red
de alimentación conformemente a las reglas
de instalación y deben estar directamente
conectados a los bornes de Alimentación.
•Durante el taladrado de la cubierta exterior
para hacer pasar los cables de alimentación
y de conexión y durante el ensamblaje de los
prensaestopas, instale todo de manera de no
alterar las características de grado IP de la caja.
También tenga cuidado cuando fije los cables
de manera que queden bien fijados
•La cubierta de la parte trasera está preparada
para la fijación a la pared (predisposición para la
fijación con tacos u orificios para la fijación con
tornillos). Prevea y tome todas las medidas de
46
COMUNELLO ®Copyright 2013 - All right reserved
precaución para realizar una instalación que no
modifique el grado de protección IP.
•Si fuera necesario montar una botonera para
el accionamiento manual, colóquela en una
posición en que el usuario no se encuentre en
una posición peligrosa.
•El motorreductor utilizado para mover la puerta
debe ser conforme a las prescripciones del
apartado 5.2.7 de la Norma EN 12453.
• La salida D.S. Power Supply está dedicada
obligatoriamente a la alimentación de las
fotocélulas, no está permitido utilizarla para
otras aplicaciones.
•En cada movimiento el cuadro de control
puede realizar el test de funcionamiento de las
fotocélulas, garantizando una protección contra
el fallo de los dispositivos antiaplastamiento
de Categoría 2 según las prescripciones del
apartado 5.1.1.6. de la Norma EN 12453. Por
consiguiente, si los dispositivos de seguridad
no se conectaran o no funcionaran, el
cuadro de control no estará habilitado para el
funcionamiento.
•El dispositivo puede ser utilizado por niños
mayores de 8 años, por persona con
discapacidades psicofísicas y sensoriales,
sin experiencia o con falta de conocimiento,
siempre bajo vigilancia o bien después que
los mismos hayan recebido instrucciones de
la utilización en seguridad y que hayan bien
comprendidos los riesgos relacionados al mal
empleo. No permita que los niños jueguen con
el dispositivo. La limpieza y el mantenimiento
destinadas a ser efectuadas por el usuario no
debe ser efectuadas por menores sin vijilancia.
Para un funcionamiento correcto del receptor, si
se utilizaran dos o más cuadros de control, se
recomienda instalarlos a al menos 3 metros de
distancia entre sí.
Todas las operaciones que requieren la apertura de
la cubierta (conexión de los cables, programación,
etc.) deben ser realizadas por personal experto.
IMPORTANTE PARA EL USUARIO
• El dispositivo no debe ser utilizado por los niños o
por personas con discapacidades psicofísicas,
salvo que estén controladas o sean instruidas
sobre el funcionamiento y el modo de uso.
•No permita que los niños jueguen con el
dispositivo y conserve los radiomandos lejos de
su alcance.
• ATENCIÓN conserve este manual de
instrucciones y respete las prescripciones
de seguridad importantes que contiene. El
incumplimiento de las prescripciones podría
provocar daños y accidentes graves.
Controle periódicamente el sistema para detectar
cualquier señal de daño. No utilice el dispositivo si
fuera necesario realizar una reparación.
CARACTERÍSTICAS TÉCNICAS
Alimentación:
Salida luz intermitente 1:
Salida luz intermitente 2:
Salida motores:
Salida electrocerradura:
Alimentación fotocélulas:
Salida alimentación servicios:
Salida luz testigo:
Disp. seguridad y mandos de BT:
Temperatura de servicio:
Receptor:
Transmisores:
Códigos TX máx. en la memoria:
Dimensiones de la tarjeta:
2: Entrada Bobinado Primario Transformador 110 V~
CN4 (2st):
1: Salida SEC 1 Transformador 11,8 V 3,5 A
2: Salida SEC 1 Transformador 11,8 V 3,5 A
3: Salida SEC 2 Transformador 25 V 0,8 A
4: Salida SEC 2 Transformador 25 V 0,8 A
110 V~ 50-60Hz 1600W máx.
110 V~ 500 W máx.
24 V~ 4 W max.
110 V~ 2 x 500 W máx.
15 W máx.
12 V
24 V~ 5 W máx.
24 V~ 5 W máx.
24 V
4 W máx.
24 V
-20 ÷ 55 °C
433 Mhz
18 Bit o Rolling Code
120 (CODE o CODE PED/2°CH)
160x107 mm.
CARACTERÍSTICAS FUNCIONALES
FUNCIONAMIENTO AUTOMÁTICO
Utilizando el radiomando o la botonera de baja tensión para el accionamiento
del cerramiento, se obtendrá el siguiente funcionamiento:
el primer impulso acciona la apertura hasta que finaliza el tiempo motor o hasta
que el cerramiento llega al final de carrera de apertura, el segundo impulso
acciona el cierre del cerramiento; si se envía un impulso antes de que finalice
el tiempo motor o que el cerramiento llegue a uno de los dos finales de carrera,
el cuadro de control invierte el movimiento de apertura o de cierre.
CONTROLES PRELIMINARES
• Compruebe que el producto embalado esté íntegro y en buenas
condiciones.
• Compruebe que el lugar de instalación sea adecuado y respete las
dimensiones mínimas indicadas en la FIG. 1.
INSTALACIÓN
• Tras haber taladrado la caja en las cuatro esquinas, fije el cuadro de control
a la pared (FIG. 2).
• Para pasar los cables, taladre la parte inferior de la caja. (FIG. 3).
Se aconseja utilizar prensaestopas.
CONEXIONES
CONEXIONES AL TRANSFORMADOR
CN5 (1st):
1: Entrada Bobinado Primario Transformador 110 V~
1A)
1A)
Funcionamento paso a paso 1:
Utilizando el radiomando o los pulsadores de baja tensión para el accionamiento
del cerramiento, se obtendrá el siguiente funcionamiento: el primer impulso
acciona la apertura hasta que finaliza el tiempo motor o hasta que el
cerramiento llega al final de carrera de apertura, el segundo impulso acciona
el cierre acciona el cierre del cerramiento; si se envía un impulso antes de que
finalice el tiempo motor o que el cerramiento llegue a uno de los dos finales
de carrera, el cuadro de control el cerramiento llegue a uno de los dos finales
de carrera, el cuadro de control detiene el movimento de apertura y cierre
(también si estuviese precedentemente programado el tiempo de pausa). Otro
mando determina la reanudación del movimiento en el sentido contrario.
CIERRE AUTOMÁTICO:
El cuadro de control permite cerrar nuevamente el cerramiento de manera
automática sin enviar otros mandos.
La selección de este funcionamiento se describe en el modo de programación
del Tiempo de pausa.
PASO DE PEATONES:
El cuadro permite, utilizando el radiomando y el pulsador Peatonal, accionar el
Motor 1 solo durante un tiempo programable.
HOJA INDIVIDUAL:
El cuadro de control, aunque se utilice en la configuración para el automatismo
de 2 motores, permite, mediante el pulsador Peatonal/Hoja Individual (véase
Menú 2 para la configuración adecuada del pulsador), el accionamiento del
Motor 1 solo, siguiendo los tiempos programados durante la programación de
los tiempos motor.
ENTRADA BLOQUEO:
El cuadro de control permite la conexión del pulsador de bloqueo (NC). La
activación en cualquier fase de funcionamiento del cuadro provoca la parada
inmediata del movimiento. Otro mando de movimiento será válido siempre que
se haya desactivado la entrada de bloqueo y cada vez que el cuadro efectúe la
fase de apertura del automatismo con destello previo de 5 segundos.
ATENCIÓN: puentee esta entrada si no la utilizara.
FOTOCÉLULAS:
El cuadro de control permite la alimentación y la conexión de Fotocélulas de
conformidad con la Norma EN 12453.
Entrada DS1 (NC)
La activación de las fotocélulas durante el movimiento de apertura no es tenida
en cuenta; durante el cierre provoca la inversión del movimiento.
Entrada DS2 (NC)
COMUNELLO ®Copyright 2013 - All right reserved
47
ESPAÑOL
CN1:
L:
Entrada línea 110 V~ (Fase)
N:
Entrada línea 110 V~ (Neutro)
LAMP 110~:
Salida Luz Intermitente 1 (110 V~ Neutro)
LAMP 110~:
Salida Luz Intermitente 1 (110 V~ Fase)
MOT1 OPEN:
Salida Motor 1 apertura
MOT1 COM:
Salida Motor 1 común
MOT1 CLOSE:
Salida Motor 1 cierre
MOT2 OPEN2:
Salida Motor 2 apertura
MOT2 COM2:
Salida Motor 2 común
MOT2 CLOSE2: Salida Motor 2 cierre
CN2:
2nd CH:
Salida CH Radio Aux (Contacto sin tensión carga máx. 30 V
2nd CH:
Salida CH Radio Aux (Contacto sin tensión carga máx. 30 V
FOTO+:
Control y Alimentación Fotocélulas (24 V~ 5 W)
LAMP 24V 4W:Salida Luz intermitente 2 (24 V~ 4W)
GND:
Entrada GND común
DS2:
Entrada Dispositivo de Seguridad 2 (NC)
DS1:
Entrada Dispositivo de Seguridad 1 (NC)
STOP 8K2: Entrada Bloqueo (NC)
GND:
IEntrada GND común
P PED:
Entrada Pulsador Peatonal/Hoja Individual/abrir (NA)
PP:
Entrada Pulsador mando abrir-cerrar/ cerrar (NA)
ELS+:
Salida Electrocerradura 12 V
15 W (+12V)
ELS-:
Salida Electrocerradura 12 V
15 W (GND)
24V 5W:
Salida servicios (24 V~ 5W)
GND:
Entrada GND común
SPIA +24V LED:
Salida Luz testigo (+24 V
4 W)
ANT-:
Entrada Masa Antena
ANT+:
Entrada Polo central Antena
CN3:
ENC1 +:
Entrada Alimentación Encoder Motor 1
ENC1 E:
Entrada Señal Encoder Motor 1
ENC1 GND: Entrada GND común
MOT1 FCA: Entrada Final de carrera Apertura Motor 1 (NC)
MOT1 FCC: Entrada Final de carrera Cierre Motor 1 (NC)
ENC2 +:
Entrada Alimentación Encoder Motor 2
ENC2 E:
Entrada Señal Encoder Motor 2
ENC2 GND: Entrada GND común
MOT2 FCA: Entrada Final de carrera Apertura Motor 2 (NC)
MOT2 FCC: Entrada Final de carrera Cierre Motor 2 (NC)
FUNCIONAMIENTO PASO A PASO:
Utilizando el radiomando o los pulsadores de baja tensión para el
accionamiento del cerramiento, se obtendrá el siguiente funcionamiento: el
primer impulso acciona la apertura hasta que finaliza el tiempo motor o hasta
que el cerramiento llega al final de carrera de apertura, el segundo impulso
acciona el cierre del cerramiento; si se envía un impulso antes de que finalice
el tiempo motor o que el cerramiento llegue a uno de los dos finales de carrera,
el cuadro de control detiene el movimento de apertura y cierre (si estuviese
precedentemente programado el tiempo de pausa, en cuanto expire efectua
el cierre automático). Otro mando determina la reanudación del movimiento en
el sentido contrario. Si se envia antes de que expire el tiempo programado o
del alcanzar al final de carrera, el cuadro de control siempre efectua el cierre.
Un mando adicional determina la reanudación del movimiento en el sentido
contrario.
La activación durante la apertura provoca la parada momentánea del
cerramiento, cuando queda libre, el cuadro de control reanuda el movimiento
de apertura. La activación durante el cierre provoca la inversión del movimiento.
Entrada DS3 (NC) programable, véase Menú 2
La activación durante la fase de apertura provoca la inversión del movimiento.
La activación en la fase de cierre no es tenida en cuenta.
Para permitir un funcionamiento de conformidad con la Categoría 2 de
la Norma EN 13849-1, antes de cada movimiento se realiza un test de
las fotocélulas. Para poder realizar este test es indispensable alimentar la
fotocélula transmisora de cada par de fotocélulas mediante la salida “Control
y Alimentación Fotocélulas” (salidas 3 y 5 de la bornera CN2), mientras que la
fotocélula receptora de cada par debe alimentarse mediante la salida “Salida
servicios” (salidas 14 y 15 de la bornera CN2). Únicamente si se superara el
test el cuadro de control inicia el movimiento: en caso contrario, el cuadro
de control no permite ningún movimiento y a cada mando todos los LED de
programación destellarán para señalar la situación de alarma.
FINAL DE CARRERA APERTURA Y CIERRE:
El cuadro de control permite conectar dos Finales de Carrera de Apertura y
Cierre (NC). La activación en las respectivas fases de funcionamiento provoca
la parada inmediata del movimiento para ambas salidas Motor 1 y Motor 2.
ATENCIÓN: no puentee estas entradas si no las utilizara.
+
-
+
-
+
-
REGULACIÓN DE LA FUERZA DEL MOTOR (FORCE):
El cuadro de control electrónico incorpora un trimmer “FORCE” para regular la
Fuerza de los motores, gestionada completamente por el microprocesador.
La regulación se puede hacer con un rango del 50% al 100% de la Fuerza
máxima.
Para cada movimiento hay prevista una corriente inicial de arranque,
alimentando el motor durante 2 segundos con la potencia máxima, aunque
esté activa la regulación de la fuerza del motor. Nota: la corriente inicial de
arranque se inhabilita automáticamente si estuviera habilitada la función Soft
Start (Arranque Suave).
Atención: si se modificara el trimmer “FORCE”, habrá que repetir el
procedimiento de aprendizaje porque podrían variar los tiempos de movimiento
y de ralentización.
DETECCIÓN OBSTÁCULO (SENS):
El cuadro de control electrónico incorpora un trimmer “SENS” para regular la
Fuerza de contraste necesaria para la detección del obstáculo, gestionada
completamente por el microprocesador.
La regulación se puede realizar con un tiempo de activación que varíe desde
un mínimo de 0,1 segundos hasta un máximo de 7 segundos.
ATENCIÓN:
• Con los finales de carrera conectados a la central, la detección del
obstáculo siempre provoca la inversión del movimiento durante el cierre y la
inversión durante 2 segundos en la apertura.
• Si los finales de carrera no están conectados a la central, la detección del
obstáculo provoca la inversión del movimiento durante el cierre (salvo en los
últimos 5 segundos de movimiento que se realiza la Parada) y la inversión
durante 2 segundos en la apertura (salvo en los últimos 5 segundos de
movimiento que se realiza la Parada).
La detección de obstáculos funciona solamente con automatismos
dotados de codificador y conectados correctamente.
ENCODER MOTOR 1 Y MOTOR 2:
El cuadro de control permite la conexión de un Encoder para cada motor. El
uso de los Encoders ayuda al cuadro de control en la función de Detección
Obstáculo y garantiza una mayor precisión durante la realización de los
movimientos.
RALENTIZACIÓN (SLOWING):
La función de ralentización de los motores se utiliza en las puertas para evitar
que las hojas móviles golpeen a velocidad rápida al final de la fase de apertura
y cierre.
Durante la programación del Tiempo Motor (véase menú Principal) el cuadro
de control también permite programar la ralentización en los puntos deseados
(antes de la apertura y cierre totales); además, mediante el trimmer “SLOWING”
48
COMUNELLO ®Copyright 2013 - All right reserved
es posible hacer una regulación subdividida en tres niveles de intensidad
precisa de la fuerza durante la fase de ralentización.
Si se utilizara la función de “Programación automática” (véase el menú principal)
es posible inhabilitar la fase de ralentización (véase el menú Ampliado 2).
LUZ TESTIGO:
El cuadro de control permite la conexión de una lámpara de 24 Vcc para la
visualización del estado del automatismo.
Luz apagada: automatismo cerrado
Luz encendida: automatismo abierto
Luz con destello lento: movimiento de apertura, Luz con destello rápido:
movimiento de cierre.
Concvertible en unidad periféreca de salida Luz intermitente.
FUNCIONAMIENTO CON TEMPORIZADOR:
El cuadro de control permite conectar un temporizador en lugar del pulsador
de mando abrir – cerrar.
Ejemplo: a las 08:00 horas el temporizador cierra el contacto y el cuadro de
control acciona la apertura, a las 18:00 horas el temporizador abre el contacto
y el cuadro de control acciona el cierre. Durante el intervalo 08:00 – 18:00 al
final de la fase de apertura, el cuadro de control inhabilita la luz intermitente, el
cierre automático y los radiomandos.
SALIDA MANDO ELECTROCERRADURA:
El cuadro incorpora una salida para gobernar electrocerraduras de 12 Vcc 15
W máx. El mando se activa durante 2 segundos en cada movimiento inicial
de apertura.
CONTROL DEL SENTIDO DE MARCHA DEL
MOTOR 1 Y DEL MOTOR 2
Nota importante: Atención, desplace los Dip Switches SW1 y SW2 con
el cuadro de control apagado y posteriormente repita la programación
del cuadro.
El cuadro de control electrónico incorpora un Dip Switch SW2 que permite
cambiar el sentido de marcha de cada motor conectado sin intervenir
físicamente
eléctricas: el dipSW2
1 de SW2 se refiereSW2
al motor 1;
SW2en las conexiones
SW2
el dip 2 de SW2 se refiere al motor 2.
ON
ON
SW2
ON
ON
ON
SW2
ON
1
SW2
2
ON
1
SW2
2
ON
1
2
1
2
INV
OFF1
2
INV
OFF
INV
MOT11
2
INV
OFF
INV
OFF1
INV
MOT
2
2
INV
MOT 11
INV
MOT
2
2
INV
OFF
INV
OFF
INV
MOT 1
INV
OFF
INV
OFF
INV
MOT 2
INV
MOT 1
INV
MOT 2
CONTROL DEL RETARDO DE MOT 1 O M 2 Y
HABILITACIÓN 1 O 2 MOT.
El cuadro de control electrónico incorpora un Dip Switch SW1 que permite
seleccionar la función 1 o 2 motores y definir el motor que arranca primero y el
motor que arranca después.
SW1
ON
SW1
ON
ON
SW1
ON
SW1
1
2
SW1
ON
1
SW1
2
ON
1
2
NO
2
2
1
RETARDO
RETARDO
MOTOR
CONSID.
MOTORES
MOT.
2 MOTORES
MOT.
1
1
2
1
2
1
2
NOT
2
RITARDO
2
RITARDO
1
MOTORE CONSID. MOTORI MOT. 2 MOTORI MOT. 1
PROGRAMACIÓN:
Pulsador SELECT: selecciona el tipo de función que se debe memorizar, la
selección está indicada por el destello del LED.
Presionando varias veces el pulsador es posible colocarse sobre la función
deseada. La selección se mantiene activa durante 10 segundos, indicada
por el LED intermitente, posteriormente el cuadro de control vuelve al estado
original.
Pulsador SET: sirve para programar la información según el tipo de función
seleccionada con el pulsador SEL.
IMPORTANTE: la función del pulsador SET también puede sustituirse por el
radiomando si hubiera sido programado anteriormente (LED CODE encendido).
ATENCIÓN: Programación habilitada solo con dispositivos de seguridad no
activados.
MENÚ PRINCIPAL
El cuadro de control se suministra de fábrica con la posibilidad de seleccionar
algunas funciones importantes.
L1
L2
L3
L4
L5
L6
L7
LEV
STEP BY STEP
CODE TX
CONDO
MOTOR TIME
PAUSE TIME
DELAY
PRG AUTOM
MENU
Paso a Paso
Código introducido
ON
Tiempo programado
Con cierre automático
ON
ON
Automático
Ningún código
OFF
30 s
Sin cierre automático
OFF
OFF
ON
1. STEP BY STEP (PASO A PASO):
El cuadro de control, en su configuración por defecto, tiene habilitada la lógica
de funcionamiento “Automático” (LED NR 1 apagado); si fuera necesario
habilitar la lógica de funcionamiento “Paso a Paso” (LED L1 encendido),
proceda de la siguiente manera: colóquese con el pulsador SELECT sobre el
LED NR 1 y luego presione el pulsador SET; el LED NR 1 se encenderá con
luz fija y se completará la programación.
Si se desea habilitar la lógica de funcionamiento “Paso a Paso 1”, repeter
la sobredicha operación presionando dos veces repetidas el pulsador SEL
(se habrá el destello rápido del LED NR 1). Repita la operación si se desea
restablecer la configuración anterior.
3. CONDO (COMUNITARIO):
El funcionamiento Comunitario prevé que el cuadro de control durante la
fase de apertura o de pausa no acepte los mandos que provienen de los
Pulsadores ni de los Radiomandos. Durante la fase de cierre un mando que
provenga de los pulsadores o de los radiomandos provoca la inversión del
movimiento. Este modo de funcionamiento se utiliza por lo general cuando el
automatismo incorpora un detector de bucle.
El cuadro de control, en su configuración por defecto, tiene inhabilitada la
función comunitaria; si fuera necesario habilitarla, proceda de la siguiente
manera: colóquese con el pulsador SELECT sobre el LED L3 intermitente
y luego presione el pulsador SET: el LED L3 se encenderá con luz fija y se
completará la programación. Repita la operación si se desea restablecer la
configuración anterior.
4. MOTOR TIME (Programación del tiempo de funcionamiento de los
motores 4 minutos máx.):
El cuadro de control se suministra de fábrica con un tiempo de funcionamiento
del motor configurado en 30 segundos y sin ralentización.
Si fuera necesario modificar el tiempo de funcionamiento de los Motores 1 y
2, la programación debe hacerse de la siguiente manera con el cerramiento
cerrado: colóquese con el pulsador SEL sobre el LED L4 intermitente y luego
presione el pulsador SET; el Motor 1 comenzará el ciclo de Apertura; presione
de nuevo el pulsador SET en correspondencia del punto inicial deseado de
ralentización; el LED L4 comenzará a destellar más lento y el Motor 1 realizará
la ralentización; al alcanzar la posición deseada, presione el pulsador SET
para concluir el ciclo de Apertura. Entonces, el LED L4 volverá a destellar
regularmente y el Motor 2 iniciará el movimiento de Apertura; repita la operación
de programación del tiempo de funcionamiento para el Motor 2. Concluida
la programación de los tiempos motor de Apertura, el Motor 2 arrancará de
inmediato en el modo Cierre; repita las operaciones antedichas para la fase de
Cierre del Motor 2 y posteriormente del Motor 1.
Si no se deseara que el cuadro de control realice la ralentización, durante la
programación y al finalizar los ciclos de apertura y cierre, presione el pulsador
SET dos veces consecutivas en lugar de una sola vez.
Si el cuadro de control se utiliza en la configuración con 1 Motor (dip 1 de
SW1 OFF), la programación del tiempo de funcionamiento del Motor 2 no se
ejecuta.
Durante la programación, en lugar del pulsador SET situado en el cuadro de
control, es posible utilizar el pulsador del radiomando únicamente si estuviera
memorizado
5. PAUSE TIME (Programación del tiempo de cierre aut. 4 min. máx.):
El cuadro de control se suministra de fábrica con el cierre automático
inhabilitado. Si se deseara habilitar el cierre automático, proceda de la
siguiente manera: colóquese con el pulsador SEL sobre el LED L5 intermitente
y presione durante un instante el pulsador SET, espere el tiempo equivalente
al deseado; presione de nuevo durante un instante el pulsador SET; en ese
momento se memorizará el tiempo de cierre automático y el LED L5 quedará
encendido con luz fija. Si se deseara restablecer la condición inicial (sin cierre
automático), colóquese sobre el LED L5 intermitente y luego presione 2 veces
consecutivas el pulsador SET en un intervalo de 2 segundos. El LED se
apagará y la operación terminará.
Durante la programación es posible utilizar en lugar del pulsador SET, situado
en el cuadro de control, el pulsador del radiomando únicamente si estuviera
memorizado.
6. RET. HOJAS (Programación del retardo de la hoja 15 s máx.) DELAY:
El cuadro de control se suministra de fábrica con el retardo de apertura y cierre
de las hojas (4 sec.). Si la configuración fuera para un automatismo con 2
motores, podría ser necesario introducir un tiempo de retardo de las hojas
diferente; la programación deberá realizarse de la siguiente manera con el
cerramiento cerrado: colóquese con el pulsador SELECT sobre el LED L6
intermitente, presione el pulsador SET y luego espere un tiempo equivalente
al deseado, presione de nuevo el pulsador SET; en dicho instante se
determinará la memorización del tiempo de retardo de apertura fijo de las hojas
de 4 segundos, el tiempo de retardo de cierre de las hojas durante el tiempo
programado y el LED L6 quedará encendido con luz fija.
Si se deseara desactivar esta función (sin retardo de las hojas), colóquese
COMUNELLO ®Copyright 2013 - All right reserved
49
ESPAÑOL
2. CODE TX: (Código del radiomando):
El cuadro de control permite memorizar hasta 120 radiomandos con códigos
diferentes entre sí, tipo fijo o rolling code.
Programación:
El código de transmisión se programa de la siguiente manera: colóquese
con el pulsador SELECT sobre el LED L2 intermitente. Pulse 1 vez SET, el
LED modificará su destello (1 0 1 0 más prolongado) indicando que se está
memorizando el primer nivel.
Enviando el código predeterminado con el radiomando deseado, el LED
CODE quedará encendido con luz fija indicando que se ha completado la
programación.
Para memorizar el código para la apertura de peatones / una hoja, proceda
de la siguiente manera: colóquese con el pulsador SELECT sobre el LED L2
CODE intermitente. Pulse 2 veces consecutivas SET, el LED modificará su
destello (1 1 0 1 1 0) indicando que se está memorizando el código peatonal.
Enviando el código predeterminado con el radiomando deseado, el LED
L2 CODE quedará encendido con luz fija indicando que se completará la
programación.
Para memorizar el código para el 2° canal AUX, proceda de la siguiente
manera: colóquese con el pulsador SEL sobre el LED L2 intermitente. Pulse
3 veces consecutivas SET, el LED modificará su destello (1 1 1 0 1 1 1 0)
indicando que se está memorizando el código 2° canal AUX. Enviando el
código predeterminado con el radiomando deseado, el LED L2 quedará
encendido con luz fija indicando que se completará la programación.
Si se han memorizado los 120 códigos, repitiendo la operación de
programación, todos los LED de programación comenzarán a destellar
señalando que no es posible memorizar más nada.
Cancelación:
Colóquese con SEL sobre el LED L2; active el destello del código que se
debe cancelar (CODE, PEATONAL o 2° canal AUX identificados por el destello
respectivo); pulse y mantenga pulsado SET durante más de 5 s. Al final el LED
se apagará durante 2 s y el procedimiento se completará. Si se eliminan todos
los códigos CODE y PEATONALES, el LED quedará apagado.
Si permanecieran memorizados solo los códigos PEATONALES o 2° CH, el
LED destellará de otra manera (1 1 1 1 0 1 1 1 1 0).
Regla del primer Radiomando memorizado:
Para la programación de los radiomandos es válida la siguiente regla: si el
primer radiomando que se debe memorizar es un radiomando tipo rolling code,
el receptor aceptará después solo radiomandos rolling code, garantizando
así una mayor seguridad contra las intrusiones; por el contrario, si el primer
radiomando memorizado es uno con código fijo, el receptor aceptará después
radiomandos con código fijo y con rolling code.
sobre el LED L6 intermitente y luego presione simultáneamente 2 veces el
pulsador SET en un intervalo de tiempo de 2 segundos; en dicho instante el
LED se apagará y se concluirá la operación.
7. PROGRAMACIÓN AUTOMÁTICA (PRG AUTOM):
El cuadro de control permite realizar una Programación Automática
(SIMPLIFICADA).
Colóquese con el pulsador SEL sobre el LED L7 intermitente y luego presione
de manera continua el pulsador SET; el Motor 2 realizará el cierre hasta llegar
al final de carrera o tope; posteriormente se repetirá el movimiento del Motor 1.
Si los Motores se movieran de manera contraria al descrito, suelte el pulsador
SET, corte la alimentación del cuadro de control y modifique el Dip Switch SW2
para cambiar el sentido de marcha del motor deseado sin intervenir físicamente
en las conexiones eléctricas. Por el contrario, si la secuencia de los Motores es
correcta, el cuadro completará la fase de Programación Automática realizando
un movimiento completo de apertura y cierre (mantenga siempre presionado el
pulsador SET hasta que finalice la Programación Automática). En el mismo se
configura automáticamente el ciclo de Ralentización equivalente al 15% aprox.
del ciclo completo.
Durante la Programación Automática, en lugar del pulsador SET situado en el
cuadro de control, es posible utilizar el pulsador del radiomando únicamente si
estuviera memorizado.
Atención: no es posible realizar la Programación Automática sin los
finales de carrera.
MENÙ ESTESO 1
El cuadro de control se suministra de fábrica con la posibilidad de seleccionar
directamente solo las funciones del menú principal. Si se desearan habilitar
las funciones descritas en el Menú Ampliado 1, proceda de la siguiente
manera: colóquese sobre el LED NIV intermitente y presione 1 vez SET. El
LED comenzará a destellar. De esta manera tendrá 30 segundos de tiempo
para seleccionar las funciones del Menú Ampliado 1 utilizando los pulsadores
SELECT y SET; transcurridos otros 30 segundos, el cuadro de control volverá
al menú principal.
L1
L2
L3
L4
L5
L6
L7
LEV
HOMBRE PRESENTE
PULSADOR PEATONAL /
HOJA INDIVIDUAL
PULSADOR PEATONAL / DS3
FOTOTEST
DS2 STOP EN EL CIERRE
DS1 INVERSIÓN PARCIAL
NC COMO 8K2
NIVEL MENÚ
ON
HOJA INDIVIDUAL
DS3
ON
ON
ON
ON
OFF
PULSADOR PEATONAL
PULSADOR PEATONAL
OFF
OFF
OFF
OFF
1 DESTELLO
1. HOMBRE PRESENTE:
El cuadro permite configurar el funcionamiento “Hombre presente”. Si se desea
dicho modo de funcionamiento, proceda de la siguiente manera: asegúrese
de haber habilitado el Menú Ampliado 1 (destello alternado 1 0 1 0 1 0 del
nivel menú 8). Colóquese con el pulsador SEL sobre el LED L1 intermitente
y luego presione el pulsador SET; el LED L1 se encenderá con luz fija y se
completará la programación. De esta manera, utilizando los radiomandos o
los Pulsadores para el accionamiento del cerramiento se obtendrá el siguiente
funcionamiento: es necesario mantener constantemente activo el mando
deseado para obtener el movimiento del cerramiento. Al soltar el mando
se detendrá de inmediato el movimiento. Repita la operación si se desea
restablecer la configuración anterior.
2. HOJA INDIVIDUAL O PULS. PEAT. = ABRIR, PULS P/P = CERRAR
El cuadro de control permite la conexión de un Pulsador NA (entrada n.° 10 de
CN2) para el accionamiento en modo Paso Peatonal. Sin embrago, es posible
utilizar dicha entrada para la conexión de un pulsador NA que funcione con un
modo diferente. Si se desea habilitar la función “Hoja Individual”, proceda de la
siguiente manera: asegúrese de haber habilitado el Menú Ampliado 1 (destello
alternado 1 0 1 0 1 0 del nivel L8). Colóquese con el pulsador SEL sobre el
LED 2 intermitente y luego presione el pulsador SET; el LED L2 se encenderá
con luz fija y se completará la programación. En este modo el Pulsador se
puede utilizar para el accionamiento del Motor 1 solo (véase aptdo. “Hoja
Individual”). Por el contrario, si se deseara habilitar el modo “ABRIR-CERRAR”
para utilizar el Pulsador Peat. para accionar la apertura sola del cerramiento y
el Pulsador P/P (entrada n.° 11 de CN2) solo para el cierre, repita la operación
antes descrita presionando el pulsador SEL dos veces (obteniendo el destello
rápido del LED L2 en lugar de una). Repita la operación si se desea restablecer
la configuración original.
50
COMUNELLO ®Copyright 2013 - All right reserved
3. PULSADOR PEATONAL / DS3:
El cuadro de control permite la conexión de un Pulsador NA (entrada n.° 10
de CN2) para el accionamiento en modo Paso Peatonal. Sin embargo es
posible utilizar dicha entrada para la conexión de una fotocélula DS3 (NC);
asegúrese de estar en el Menú Ampliado 1 (destello alternado 1 0 1 0 1 0 del
LED LEV). Colóquese con el pulsador SEL sobre el LED L3 intermitente y luego
presione el pulsador SET; el LED L3 se encenderá con luz fija y se completará
la programación. Repita la operación si se desea restablecer la configuración
anterior.
4. FOTOTEST (Test Fotocélulas):
El cuadro de control se suministra de fábrica con el test de las fotocélulas
inhabilitado. Si se desea habilitar dicho test, proceda de la siguiente manera:
asegúrese de haber habilitado el Menú Ampliado 1 (evidenciado por el destello
1 0 1 0 1 del LED LEV), colóquese con el pulsador SEL sobre el LED L4
intermitente y luego presione el pulsador SET; el LED L4 se encenderá con
luz fija y se completará la programación. Repita la operación si se desea
restablecer la configuración anterior.
5. DS2 PARADA EN EL CIERRE:
El cuadro de control permite modificar el funcionamiento de la entrada DS2.
Si se deseara que DS2 se active también en el cierre (parada del cerramiento.
Si se encuentra en funcionamiento Automático, tras haber sido liberado, el
cerramiento reanudará el movimiento de cierre), proceda de la siguiente
manera: asegúrese de estar en el Menú Ampliado 1 (destello alternado 1 0 1 0
1 0 del LED LEV). Colóquese con el pulsador SEL sobre el LED L5 intermitente
y luego presione el pulsador SET; el LED L5 se encenderá con luz fija y se
completará la programación. Repita la operación si se desea restablecer la
configuración original.
6. DS1 INVERSIÓN PARCIAL:
El cuadro de control permite modificar el funcionamiento de la entrada DS1.
Si se deseara que DS1 provoque en el cierre una inversión parcial (inversión
breve) en vez de total, proceda de la siguiente manera: asegúrese de estar en
el Menú Ampliado 1 (destello alternado 1 0 1 0 1 0 del LED LEV). Colóquese
con el pulsador SEL sobre el LED L6 intermitente y luego presione el pulsador
SET; el LED L6 se encenderá con luz fija y se completará la programación.
Repita la operación si se desea restablecer la configuración original.
7. BLOQUEO / 8K2:
El cuadro de control permite la conexión de un Pulsador de Bloqueo NC
(entrada n.° 8 de CN2). Sin embargo, es posible conmutar dicha entrada en
una entrada resistiva 8,2k ohm: asegúrese de estar en el Menú Ampliado 1
(destello alternado 1 0 1 0 1 0 del LED LEV). Colóquese con el pulsador SEL
sobre el LED L7 intermitente y luego presione el pulsador SET; el LED L7 se
encenderá con luz fija y se completará la programación. Una variación del valor
leído en la entrada provoca el bloqueo del cuadro de control en cualquier fase
del movimiento. Otro mando de movimiento será válido siempre y cuando
se haya restablecido el valor correcto en la entrada, el cuadro de control
realizará la fase de apertura del automatismo. Repita la operación si se desea
restablecer la configuración original.
MENÚ AMPLIADO 2
El cuadro de control se suministra de fábrica con la posibilidad de seleccionar
directamente solo las funciones del menú principal.
Si se desearan habilitar las funciones descritas en el Menú Ampliado 2,
proceda de la siguiente manera: colóquese sobre el LED nro. 8 intermitente
y presione 2 veces el pulsador SET. El LED comenzará a destellar de manera
alternada 1 1 0 1 1 0. De esta manera, usted tendrá 30 segundos de tiempo
para seleccionar las funciones del Menú Ampliado 2 mediante el uso de los
pulsadores SEL y SET; transcurridos otros 30 segundos, el cuadro de control
volverá al menú principal.
L1
L2
L3
L4
L5
L6
L7
LEV
FRENO
RALENTIZACIÓN
CERRAR SIEMPRE
FOLLOW ME
TIEMPO PEATONAL
2°CH MONOESTABLE
PROG. A DISTANCIA
NIVEL MENÚ
ON
OFF
ON
ON
ON
ON
ON
OFF
ON
OFF
OFF
OFF
OFF
OFF
2 DESTELLO
1. FRENO:
El cuadro de control se suministra de fábrica con la función Freno Electrónico
inhabilitada. Si se desea habilitar la función, proceda de la siguiente manera:
asegúrese de estar en el Menú Ampliado 2 (destello alternado 1 1 0 1 1 0 1 1
0 del LED LEV). Colóquese con el pulsador SEL sobre el LED L1 intermitente
y luego presione el pulsador SET; el LED L1 se encenderá con luz fija y se
completará la programación.
De esta manera el cuadro de control reduce el avance de la puerta debido a la
inercia en correspondencia de un mando de parada o de inversión. Repita la
operación si se desea restablecer la configuración anterior.
2. RALENTIZACIÓN:
Como antedicho, el cuadro de control permite la programación de una fase
de ralentización durante la apertura y el cierre, mientras que con la función
Programación Automática la ralentización se activa automáticamente. Es
posible inhabilitar la ralentización si no fuera necesaria: de esta manera, si
se utiliza la Programación Automática no se activará la fase de Ralentización,
mientras que si se utiliza la función de Programación de los Tiempos Motor,
durante la misma programación no se podrá programar la ralentización durante
las fases de apertura y cierre. Si la ralentización había sido programada
mediante la función de Programación de los Tiempos Motor, para inhabilitarla
habrá que repetir la programación desde el inicio. Si se desea desactivar la
ralentización, proceda de la siguiente manera: asegúrese de haber habilitado el
Menú Ampliado 2 (destello alternado 1 1 0 1 1 0 del LED LEV). Colóquese con
el pulsador SEL sobre el LED L2 intermitente y luego presione el pulsador SET;
el LED L2 se encenderá con luz fija y se completará la programación. Repita la
operación si se desea restablecer la configuración anterior.
3. CERRAR SIEMPRE:
El cuadro de control permite configurar el funcionamiento “Cerrar Siempre”:
dicha función, que se puede programar solo si se ha programado un Tiempo
de Pausa, se activa después de un corte de alimentación; si se detectara
que la puerta está abierta, se activará automáticamente un movimiento de
cierre antecedido por 5 segundos de destello previo. Si se desea dicho modo
de funcionamiento, proceda de la siguiente manera: asegúrese de haber
habilitado el Menú Ampliado 2 (destello 1 1 0 1 1 0 del LED LEV). Colóquese
con el pulsador SEL sobre el LED L3 intermitente y luego presione el pulsador
SET; el LED L3 se encenderá con luz fija y se completará la programación.
Repita la operación si se desea restablecer la configuración anterior.
6. LÓGICA DE FUNCIONAMIENTO CANAL RADIO AUXILIAR:
La central permite seleccionar la lógica de funcionamiento del Canal Radio
Auxiliar.
En la configuración de fábrica, el Canal Radio Auxiliar presenta un funcionamiento
7. PROGRAMACIÓN RADIOMANDO A DISTANCIA:
El cuadro permite programar el código de transmisión sin tener que utilizar
directamente el pulsador SEL del cuadro sino realizando la operación a
distancia.
El Radiomando se programa a distancia de la siguiente manera: envíe de
manera continua durante más de 10 segundos el código de un radiomando
memorizado anteriormente, en ese instante el cuadro de control entrará en
modo programación como antedicho para el LED L2 en el menú principal. Si
el código que se envía es un código peatonal antes memorizado, el cuadro
de control programará un nuevo código peatonal y el LED L2 destellará como
si se activara la adquisición del código peatonal (1 1 0 1 1 0 1 1 0); si fuera
el código relativo al 2° CH/AUX, el LED destellará como si estuviera activa la
adquisición del código 2° CH (1 1 1 0 1 1 1 0 1 1 1 0). Para habilitar la función
de programación a distancia, proceda de la siguiente manera:
asegúrese de haber habilitado el Menú Ampliado 2 (destello 1 1 0 1 1 0 del
LED LEV). Colóquese con el pulsador SEL sobre el LED L7 intermitente y luego
presione el pulsador SET; el LED L7 se encenderá con luz fija y se completará
la programación. Repita la operación si se desea restablecer la configuración
original.
MENÚ AMPLIADO 3
El cuadro de control se suministra de fábrica con la posibilidad de seleccionar
directamente solo las funciones del menú principal.
Si se desearan habilitar las funciones descritas en el Menú Ampliado 3,
proceda de la siguiente manera: colóquese sobre el LED nro. 8 intermitente
y presione 3 veces el pulsador SET. El LED comenzará a destellar de manera
alternada 1 1 1 0 1 1 1 0. De esta manera, usted tendrá 30 segundos de
tiempo para seleccionar las funciones del Menú Ampliado 3 mediante el uso
de los pulsadores SEL y SET; transcurridos otros 30 segundos, el cuadro de
control volverá al menú principal.
L1
L2
L3
L4
L5
L6
L7
LEV
SOFT STOP
SOFT START
GOLPE DE ARIETE
GOLPE CIERRE
ELS / CMD PED
LUZ INTERMITENTE/LUZ CORTES
DESTELLO PREVIO / LUZ INT.
EN PAUSA
LIVELLO MENÙ
ON
ON
ON
ON
ON
ON
ON
OFF
OFF
OFF
OFF
OFF
OFF
OFF
3 DESTELLO
1. SOFT STOP (PARADA SUAVE):
El cuadro de control se suministra de fábrica con la función Soft Stop
inhabilitada. Si se desea habilitar la función, proceda de la siguiente manera:
asegúrese de haber habilitado el Menú Ampliado 3 (destello 1 1 1 0 1 1 1 0
del LED LEV), colóquese con el pulsador SEL sobre el LED L1 intermitente
y luego presione el pulsador SET; en ese instante el LED L1 se encenderá
con luz fija y se completará la programación. De esta manera, al final del
movimiento, el cuadro de control colocará la fuerza en cero de manera gradual
en 2 segundos. Repita la operación si se desea restablecer la configuración
anterior.
2. SOFT START (ARRANQUE SUAVE):
El cuadro de control se suministra de fábrica con la función Soft Start
inhabilitada. Si se desea habilitar la función, proceda de la siguiente manera:
asegúrese de haber habilitado el Menú Ampliado 3 (destello 1 1 1 0 1 1 1 0
del LED LEV), colóquese con el pulsador SEL sobre el LED L2 intermitente y
luego presione el pulsador SET; en ese instante el LED L2 se encenderá con
luz fija y se completará la programación. De esta manera, el cuadro controlará
el arranque del motor cada vez que comienza un movimiento, aumentando
gradualmente la fuerza desde el mínimo hasta el valor configurado en el
trimmer “FUERZA” en los primeros 2 segundos de funcionamiento. Repita la
operación si se desea restablecer la configuración anterior.
Nota: cuando la función Soft Start está habilitada, el cuadro de control inhabilita
automáticamente la Corriente Inicial de arranque y viceversa.
COMUNELLO ®Copyright 2013 - All right reserved
51
ESPAÑOL
4. FOLLOW ME:
El cuadro de control permite configurar el funcionamiento “Follow me”: esta
función, que se puede programar solo si se ha programado un Tiempo de
Pausa, prevé reducir el tiempo de Pausa en 5 segundos después de que la
fotocélula DS1 queda libre, es decir que el cerramiento se cierra 5 segundos
después de que el usuario ha pasado. Para activar dicha función, proceda
de la siguiente manera: asegúrese de haber habilitado el Menú Ampliado 2
(destello 1 1 0 1 1 0 del LED LEV). Colóquese con el pulsador SEL sobre el
LED L4 intermitente y luego presione el pulsador SET; el LED L4 se encenderá
con luz fija y se completará la programación. Repita la operación si se desea
restablecer la configuración anterior.
5. T. MOT. PEAT: (Programación del tiempo de funcionamiento paso
peatonal 4 minutos máx.)
El cuadro de control se suministra de fábrica con un tiempo de funcionamiento
del Motor (Peatonal) configurado en 10 segundos y sin ralentización.
Si fuera necesario modificar el tiempo de funcionamiento peatonal, la
programación debe hacerse de la siguiente manera con el cerramiento
cerrado: asegúrese de haber habilitado el Menú Ampliado 2 (destello 1
1 0 1 1 0 del LED LEV). Colóquese con el pulsador SEL sobre el LED L5
intermitente y luego presione el pulsador SET; el Motor comenzará el ciclo de
Apertura; presione de nuevo el pulsador SET en correspondencia del punto
inicial deseado de ralentización; el LED L5 comenzará a destellar más lento y
el Motor realizará la ralentización; al alcanzar la posición deseada, presione el
pulsador SET para concluir el ciclo de Apertura. Entonces el LED L5 volverá a
destellar regularmente y el Motor reanudará el movimiento de Cierre; repita las
operaciones antedichas para la fase de Cierre.
Si no se deseara que el cuadro de control realice la ralentización, durante la
programación y al finalizar el ciclo de apertura y cierre, presione el pulsador SET
dos veces consecutivas en lugar de una sola vez.
Durante la programación, en lugar del pulsador SET situado en el cuadro de
control, es posible utilizar el pulsador del radiomando únicamente si estuviera
memorizado.
“Monoestable”. Si se desea habilitar el funcionamiento “Biestable”, proceda
de la siguiente manera: asegúrese de haber habilitado el Menú Ampliado 2
(destello 1 1 0 1 1 0 del LED LEV). Colóquese con el pulsador SEL sobre el
LED L6 intermitente y luego presione el pulsador SET; el LED L6 se encenderá
con luz fija y se completará la programación. Si se desea habilitar la función
“Temporizado 3 minutos”, repita la operación antedicha, presionando dos
veces el pulsador SEL (obteniendo el destello rápido del LED L6) en lugar de
una vez. Repita la operación si se desea restablecer la configuración original.
3. GOLPE DE ARIETE:
El cuadro de control se suministra de fábrica con la función Golpe de Ariete
inhabilitada. Dicha función consiste en enviar un mando de cierre durante 2
segundos aprox. al inicio de una fase de apertura; de esta manera se facilita el
desbloqueo de la cerradura y se ejecuta correctamente la fase de apertura. Si
se desea habilitar la función Golpe de Ariete, proceda de la siguiente manera:
asegúrese de haber habilitado el Menú Ampliado 3 (destello 1 1 1 0 1 1 1 0 del
LED LEV). Colóquese con el pulsador SEL sobre el LED L3 intermitente y luego
presione el pulsador SET; el LED L3 se encenderá con luz fija y se completará
la programación. Si se desea habilitar la función Golpe de Ariete en la potencia
configurada mediante el Trimmer FUERZA, repita la operación antedicha,
presionando dos veces el pulsador SEL (obteniendo el destello rápido del
LED L3) en lugar de una vez. Repita la operación si se desea restablecer la
configuración original.
4. GOLPE EN EL CIERRE:
El cuadro de control se suministra de fábrica con la función Golpe en el
Cierre inhabilitada. Dicha función consiste en añadir, en caso de que exista
una fase de ralentización durante el cierre, un tiempo de 1 segundo en la
potencia máxima o en la potencia seleccionada mediante el trimmer VR1, con
la finalidad de asegurar una posible cerradura instalada. Si se desea habilitar
la función Golpe en el Cierre en la potencia máxima, proceda de la siguiente
manera: asegúrese de haber habilitado el Menú Ampliado 3 (destello 1 1 1
0 1 1 1 0 del LED LEV). Colóquese con el pulsador SEL sobre el LED L4
intermitente y luego presione el pulsador SET; el LED L4 se encenderá con
luz fija y se completará la programación. Si se desea habilitar la función Golpe
en el Cierre en la potencia configurada mediante el Trimmer FUERZA, repita
la operación antedicha, presionando dos veces el pulsador SEL (obteniendo
el destello rápido del LED L4) en lugar de una vez. Repita la operación si se
desea restablecer la configuración original.
5. Activación Electrocerradura CMD PED:
El cuadro de control se suministra de fábrica con la función de activación de
la electrocerradura inhabilitada mediante el mando Peatonal. La función de
activación de la electrocerradura mediante el mando Peatonal se utiliza cuando
se dispone, por ejemplo, de una puerta corredera con al lado una puerta para
el paso de Peatones. De esta manera se puede obtener tanto la apertura de
la puerta mediante los mandos del Pulsador P-P y de los radiomandos como
de la puerta Peatonal mediante el accionamiento de la electrocerradura con
los mandos PED. Para habilitar esta función, proceda de la siguiente manera:
asegúrese de haber habilitado el Menú Ampliado 3 (destello 1 1 1 0 1 1 1 0 del
LED L8). Colóquese con el pulsador SEL sobre el LED L5 intermitente y luego
presione el pulsador SET; el LED L5 se encenderá con luz fija y se completará
la programación. Repita la operación si se desea restablecer la configuración
anterior.
6. FUNCIONAMIENTO LUZ INTERMITENTE/LUZ DE CORTESÍA:
El cuadro de control se suministra de fábrica con el funcionamiento de la Luz
Intermitente durante el Tiempo de Pausa inhabilitado. Si se desea habilitar la
función, proceda de la siguiente manera: asegúrese de haber habilitado el
Menú Ampliado 3 (destello 1 1 1 0 1 1 1 0 del LED LEV). Colóquese con el
pulsador SEL sobre el LED L6 intermitente y luego presione el pulsador SET;
el LED L6 se encenderá con luz fija y se completará la programación. Repita la
operación si se desea restablecer la configuración anterior.
Funcionamiento Luz de Cortesía: la salida Luz de cortesía 110 Vca 24V
se activará durante 3 minutos cada vez que se active un mando de apertura.
7. DESTELLO PREVIO/LUZ INTERMITENTE EN PAUSA:
El cuadro de control se suministra de fábrica con las funciones Destello Previo y
Luz Intermitente en Pausa inhabilitadas. Si se desea habilitar la función Destello
Previo, proceda de la siguiente manera: asegúrese de haber habilitado el Menú
Ampliado 3 (destello 1 1 1 0 1 1 1 0 del LED LEV). Colóquese con el pulsador
SEL sobre el LED L7 intermitente y luego presione el pulsador SET; el LED L7
se encenderá con luz fija y se completará la programación. Si se desea habilitar
la función Luz de Cortesía, repita la operación antedicha, presionando dos
veces el pulsador SET (obteniendo el destello rápido del LED L7) en lugar de
una vez. Repita la operación si se desea restablecer la configuración original.
Funcionamiento Destello Previo: la salida Luz Intermitente 110 Vca y luz
intermitente 24V siempre se activará 3 segundos antes de la maniobra de
cierre.
Funcionamiento Luz Intermitente en Pausa: la salida Luz de cortesía 110
Vca 24V se activará Durante 3 minutos cada vez que se active un mando de
apertura.
52
COMUNELLO ®Copyright 2013 - All right reserved
REAJUSTE
Si fuera necesario restablecer el cuadro de control con la configuración de
fábrica, presione simultáneamente los pulsadores SEL y SET; se encenderán
todos juntos los LED ROJOS de señalización y se apagarán inmediatamente.
DIAGNÓSTICO
Test Fotocélula:
El cuadro de control está preparado para la conexión de dispositivos de
seguridad que respetan el apartado 5.1.1.6 de la Norma EN 12453. En cada
movimiento se realiza el test de funcionamiento de la fotocélula conectada.
Si no hubiera conexión y/o no funcionara, el cuadro de control no habilita el
movimiento del cerramiento y muestra el fallo del test, haciendo que todos
los LED de señalización destellen simultáneamente. Tras haber restablecido
el funcionamiento correcto de la fotocélula, el cuadro de control estará listo
para el uso normal, lo cual garantiza una monitorización contra los fallos, de
conformidad con la Categoría 2 de la Norma EN 954-1.
Test entrada mandos:
En correspondencia de cada entrada de mando de baja tensión, el cuadro de
control incorpora un LED de señalización para poder controlar rápidamente el
estado.
Lógica de funcionamiento: LED encendido entrada cerrada, LED apagado
entrada abierta.
GARANTÍA
Fratelli Comunello SPA garantiza, con sujeción al cumplimiento de las
especicaciones de rendimiento que guran en los manuales de instrucciones
de los productos, el buen funcionamiento de los actuadores durante 24
meses desde la fecha de fabricacion. Fratelli Comunello SPA garantiza en
exclusiva, y por lo tanto la exclusion de las reclamaciones por daños y perjuicios
equivalente, a la reparación o reemplazo de piezas defectuosas que serán
reconocidas como tales, de acuerdo a la discreción del personal técnico de
Comunello Fratelli SpA. El material en garantia deben enviarse a la sede de
Fratelli Comunello SPA en porte pagado y sera devuelto a portes debido. El
material considerado defectuoso y enviado a Fratelli Comunello SPA seguirá
siendo propiedad de dicha empresa
El costo de la mano de obra necesaria para las reparaciones y sustituciones
realizadas es sólo del comprador. No tiene derecho a ninguna compensación
por el período de tiempo de inactividad de la instalacion. La intervención no
extende el plazo de duración de la garantía.
Bajo pena de caducidad, el comprador debe informar de cualquier fallo o
defecto de los productos, dentro de los 8 (ocho) días para ser calculados,
respectivamente, desde la fecha del descubrimiento de los defectos o la fecha
de entrega del material. El informe deberá realizarse únicamente por escrito La
garantia no incluye:
Avérias o daños causados por el transporte; avérias o daños causados por
vicios de la instalacion eléctrico presente en el comprador y / o descuido,
negligencia, uso inadecuado, anormal de esta installacion; avéria o daño debido
a la manipulación por parte de personal no autorizado o que resulten del uso
/ instalación inadecuados (en este sentido, se recomienda un mantenimiento
del sistema por lo menos cada seis meses) o al empleo de piezas de repuesto
no originales; los defectos causados por agentes químicos o fenómenos
atmosféricos. La garantia no cubre el costo del material de consumo ni por
supuestos defectos o las vericaciones a su comodidad.
Caracteristicas de los productos Los productos fabricados por Fratelli SpA
Comunello están sujetos a continuas mejoras e innovaciones, por lo que
las características constructivas y la imagen de los mismos, pueden sufrir
variaciones incluso sin aviso previo Tribunal competente Ya que el contrato es
perfeccionado mediante
Conrmación de Pedido
cumplimentada en Rosà, por cualquier tipo de controversia legal se aplicarà el
derecho italiano y sera competente el Tribunal de Vicenza (VI).
ИНСТРУКЦИЯ ПО МОНТАЖУ
CU - 110V - HP
ДЕКЛАРАЦИЯ О СООТВЕТСТВИИ CE
Нижеподписавшийся г. COMUNELLO LUCA, представитель производителя
F.lli COMUNELLO spa
Via Cassola 64, 36027 Rosà (VI) Italy
ЗАЯВЛЯЕТ, что описанное здесь оборудование:
Описание
Модель
Электронная панель управления
CU 110V HP
соответствует законодательным положениям, передающим содержание следующих директив:
• Директива 2004/108/CE (Директива по ЭМС)
• Директива 2006/95/CE
и что были применены все нормы и/или технические спецификации, перечисленные далее
EN61000-6-2 + EN61000-6-3
EN62233 :2008
EN301489-1 + EN301489-3 + EN300220-2
EN60335-1 :2002
и последующие дополнения
Последние две цифры года, когда была присвоена маркировка CE 14
г. Rosà (Vicenza) – Италия
01-09-2014
Также заявляет, что пуск в эксплуатацию машинного оборудования не разрешается до тех пор, пока машинное
оборудование, в которое оно встраивается или частью которого оно является, не будет идентифицировано или не
будет объявлено соответствующим положениям Директивы 2006/42 CE и национальному законодательству страны,
принявшей директиву.
Доктор LUCA COMUNELLO
Официальный представитель фирмы FRATELLI COMUNELLO s.p.a.
Fratelli Comunello S.p.A.
Компания с сертифицированной системой менеджмента качества
РУССКИЙ
UNI EN ISO 9001:2008
(цертифицат n° 50 100 11235 Rev. 01)
COMUNELLO ®Copyright 2014 - All right reserved
53
ПРЕДУПРЕЖДЕНИЯ
• Центральная станция не имеет какого-либо
устройства для разъединения электрической
линии 110 В пер. тока, поэтому монтажник
должен подготовить в установке устройство для
разъединения. Нужно установить всеполюсный
выключатель с категорией перенапряжения III.
Он должен быть расположен так, чтобы быть
защищенным от случайного закрытия, согласно
тому, что указано в пункте 5.2.9 стандарта EN 12453.
Проводка различных наружных электрических
компонентов за пределами центральной станции
должна производиться в соответствии со
стандартом EN 60204-1 и модификациями в пункте
5.2.7 EN 12453. Кабели питания могут иметь
максимальный диаметр 14 мм; крепление кабелей
питания и соединительных кабелей должно
гарантироваться при помощи сальников кабелей,
поставляемых в качестве опции
• Для
соединений
питания
рекомендуется
использовать гибкие полихлоропреновые кабели в
чехле стандартного типа (H05RN-F) с минимальным
сечением проводников 1 мм2
• На этапе монтажа необходимо использовать
исключительно кабели с двойной изоляцией (кабели
с чехлом) как для соединения с напряжением
сети (110V), так идля соединений очень низкого
напряжения безопасности SELV. Используйте
исключительно пластиковые каналы, разные
каналы для проводки низкого напряжения (110V) и
проводки очень низкого напряжения безопасности
(SELV).
• Проводники
очень
низкого
напряжения
безопасности должны быть физически отделены
(минимум на 4 мм в воздухе) от проводников
напряжения сети, или же они должны быть как
следует изолированы при помощи дополнительной
изоляции с минимальной толщиной 1 мм.
• Перед сетью питания автоматической системы
необходимо
предусмотреть
устройство,
гарантирующее полное всеполюсное разъединение
сети, с минимальным расстоянием между
разомкнутыми контактами каждого полюса 3 мм.
Такие устройства разъединения должны быть
предусмотрены в сети питания в соответствии
с правилами монтажа и должны быть напрямую
соединены с клеммами питания.
• Следует соблюдать осторожность на этапе
сверления наружного корпуса для прокладки
кабелей питания и соединительных кабелей, а
также при сборке сальников кабелей, поскольку
необходимо монтировать все части так, чтобы не
нарушить, по возможности характеристики защиты
IP корпуса.
Обратите также внимание на крепление кабелей,
чтобы они были надежно прикреплены.
• В задней части корпуса имеются соответствующие
средства для крепления к стене (подготовка к
сверлению отверстий для крепления при помощи
вкладышей или отверстий для крепления винтами).
54
COMUNELLO ®Copyright 2014 - All right reserved
Предусмотрите и примите все необходимые меры
для того, чтобы установка не нарушила степень
защиты IP.
• Монтаж клавиатуры для ручного управления
должен быть сделан так, чтобы положение
клавиатуры не привело к возникновению опасности
для пользователя.
• Мотор-редуктор, используемый для передвижения
ворот, должен соответствовать предписаниям в
пункте 5.2.7 EN 12453.
• Выход D.S. Установка питания специально
предназначенадляподачипитаниякфотоэлементам,
не разрешается его использование в других целях
• При каждом цикле маневрирования центральный
блокпроводиттестированиеработыфотоэлементов,
гарантируя отсутствие неисправности устройств
защиты от раздавливания Категории 2, согласно
предписаниям в пункте 5.1.1.6. стандарта EN
12453. То есть, если устройства безопасности не
соединены и/или не работают, центральная станция
не может работать.
• Оборудование может использоваться детьми
старше 8 лет или людьми с ограниченными
физическими, сенсорными или умственными
способностями, или людьми, не обладающими
достаточным опытом или знаниями, за исключением
тех случаев, когда они контролируются другими
лицами или после проведения инструктажа по
безопасному пользованию оборудованием и
ознакомления со связанными с этим опасностями.
Для правильной работы части радиоприемника,
в случае применения двух или более станций,
рекомендуется устанавливать их на минимальном
расстоянии 3 метра друг от друга.
Операции, требующие открытия оболочки (соединение
кабелей, программирование и т. д.), должны
выполняться на этапе монтажа специализированным
техническим персоналом.
ВАЖНАЯ ИНФОРМАЦИЯ ДЛЯ ПОЛЬЗОВАТЕЛЯ
• Устройство не должно использоваться детьми
или людьми с ограниченными психическими и
физическими способностями, за исключением
случаев, когда они находятся под руководством
или обучены работе и способам использования.
• Не разрешайте детям играть с устройством и
храните в недоступном для них месте пульты
радиоуправления.
• ВНИМАНИЕ: храните эти инструкции и выполняйте
предписания по безопасности, приведенные в этом
руководстве. Несоблюдение инструкций может
привести к причинению ущерба и серьезным
несчастным случаям.
Регулярно проверяйте установку для определения
признаков повреждений. Не используйте устройство,
если нужно отремонтировать оболочку (провести
повторное
программирование,
ремонт
или
модификации при монтаже), нужно обращаться в
службу техсервиса.
ТЕХНИЧЕСКИЕ ХАРАКТЕРИСТИКИ
Питание:
110 V~ 50-60 Гц 1600 Вт макс.
Выход мигающей лампы 1:
110 V~ 500 Вт макс.
Выход мигающей лампы 2:
24 V~ 4 Вт макс.
Выход двигателей:
110 V~ 500 Вт макс.
Выход электрического замка:
12 V--- 15 Вт макс.
Питание фотоэлементов:
24 V~ 5 Вт макс.
Выход питания служебных устройств: 24 V~ 5 Вт макс.
Выход индикаторной лампы:
24 V--- 4 Вт макс.
Устройства безопасности и органы управления низкого напряжения:
24 V--Рабочая температура:
-20 ÷ 55 °C
Радиоприемник:
433 Mhz
Передатчики:
18 бит или непрерывно
изменяющийся код
Макс. количество кодов TX в памяти: 120 (CODE или
CODE PED/2°CH)
Размеры платы:
160x107 мм.
ПРЕДВАРИТЕЛЬНЫЕ ПРОВЕРКИ
• Необходимо проверить целостность и хорошее состояние
изделия внутри упаковки.
• Проверьте соответствие места установки и соблюдение
минимальных размеров, указанных на FIG. 1.
МОНТАЖ
• После того, как вы просверлили коробку по четырем углам,
прикрепите центральную станцию к стене (Рис. 2).
• Для прокладки кабелей нужно просверлить нижнюю часть
коробки. (Рис. 3). Рекомендуется использование сальников
кабелей.
СОЕДИНЕНИЯ
CN1:
L:
Входная линия 110 V~ переменного тока (фаза)
N:
Входная линия 110 V~ переменного тока (нейтраль)
LAMP 110 В пер. тока:
Выход мигающей лампы 1 (110 V~
нейтраль)
LAMP 110В пер. тока:Выход мигающей лампы 1 (110 V~ фаза)
MOT1 OPEN: Выход двигателя 1 открытие
MOT1 COM:
Выход двигателя 1 общий
MOT1 CLOSE: Выход двигателя 1 закрытие
MOT2 OPEN2: Выход двигателя 2 открытие
MOT2 COM2: Выход двигателя 2 общий
MOT2 CLOSE2: Выход двигателя 2 закрытие
CN2:
2nd CH:
Выход вспом. радиоканал (свободный контакт
макс. нагрузка 30V--- 1A)
2nd CH:
Выход вспом. радиоканал (свободный контакт
макс. нагрузка 30V--- 1A)
FOTO+:
Управление и питание фотоэлементов (24V~ 5 Вт)
LAMP 24V 4W: Выход мигающей лампы 2 (24V~ 4 Вт)
GND:
Общий вход заземления GND
DS2:
Вход устройства безопасности 2 (NC)
DS1:
Вход устройства безопасности 1 (NC)
STOP 8K2: Вход блокировки (NC)
GND:
Общий вход заземления GND
P PED:
Вход пешеходной кнопки/отдельной
створки/открытия (NA)
PP:
Вход кнопки управления открытием-закрытием/
закрывает (NA)
ELS+:
Выход электрозамка 12 V---15 Вт (+12V)
ELS-:
Выход электрозамка 12 V--- 15 Вт (GND)
24V 5W:
Выход служебных устройств (24V~ 5 Вт)
GND:
Общий вход заземления GND
SPIA +24V LED: Выход индикаторной лампы (+24 V--- 4 Вт)
ANT-:
Вход массы антенны
ANT+:
Вход горячего полюса антенны
СОЕДИНЕНИЯ С ТРАНСФОРМАТОРОМ
CN5 (1st):
1: Вход первичной обмотки трансформатора 110 V~
2: Вход первичной обмотки трансформатора 110 V~
CN4 (2st):
1: Выход SEC 1 трансформатора 11,8V 3,5A
2: Выход SEC 1 трансформатора 11,8V 3,5A
3: Выход SEC 2 трансформатора 25V 0,8A
4: Выход SEC 2 трансформатора 25V 0,8A
ФУНКЦИОНАЛЬНЫЕ ХАРАКТЕРИСТИКИ
АВТОМАТИЧЕСКИЙ РЕЖИМ:
Используя как пульт радиоуправления, так и клавиатуру низкого
напряжения для приведения в действие ворот, будет происходить
следующее:
первый импульс подает команду открытия, до истечения времени
двигателя или до достижения конца хода открытия, второй импульс
подает команду закрытия ворот; если импульс будет направлен
до истечения времени двигателя или достижения одного из
двух концевых выключателей, центральная станция произведет
изменение направления движения, как во время фазы открытия,
так и закрытия.
ПОШАГОВЫЙ РЕЖИМ:
Используя как пульт радиоуправления, так и клавиатуру низкого
напряжения для включения замка, будет получена следующая
работа: при первом импульсе подается команда открытия, до
истечения времени двигателя или до достижения конца хода
открытия, второй импульс подает команду закрытия замка; если
импульс будет направлен до истечения времени двигателя или
достижения концевого выключателя открытия, центральный блок в
любом случае произведет остановку движения, как во время фазы
открытия, так и закрытия (даже если ранее было запрограммировано
время паузы). После истечения времени центральный блок
произведет автоматическое закрытие. Следующая команда
приводит к возобновлению движения в противоположном
направлении; если импульс будет направлен до истечения времени
двигателя или достижения концевого выключателя закрытия,
центральный блок в любом случае произведет остановку движения.
Дополнительная команда приведет к возобновлению движения в
противоположном направлении.
Пошаговый режим 1:
Используя как пульт радиоуправления, так и клавиатуру низкого
напряжения для включения замка, будет получена следующая
работа: при первом импульсе подается команда открытия, до
истечения времени двигателя или до достижения конца хода
открытия, второй импульс подает команду закрытия замка; если
импульс будет направлен до истечения времени двигателя или
достижения одного из двух концевых выключателей, центральный
блок в любом случае произведет остановку движения, как во
время фазы открытия, так и закрытия (даже если ранее было
запрограммировано время паузы). Следующая команда приводит
к возобновлению движения.
АВТОМАТИЧЕСКОЕ ЗАКРЫТИЕ:
Центральная станция позволяет закрывать ворота в автоматическом
режиме, не направляя дополнительных команд.
Выбор данного режима работы описан в способе программирования
Времени паузы.
ПЕШЕХОДНЫЙ ПРОХОД:
Станция позволяет, используя как пульт радиоуправления, так
и кнопку пешеходной работы, включение только двигателя 1, в
течение программируемого времени.
Вход питания кодера двигателя 1
Вход сигнала кодера двигателя 1
Общий вход заземления GND
Вход концевого выключателя открытия двигателя 1
(NC).
Вход концевого выключателя закрытия двигателя 1
ОТДЕЛЬНАЯ СТВОРКА:
Станция, даже если используется в конфигурации для
автоматизации 2 двигателей, позволяет при помощи кнопки
Пешеходной работы/ Отдельной створки (см. меню 2 для
возможности
конфигурации
кнопки),
включение
только
двигателя 1, соблюдая время, запрограммированное на этапе
программирования времени работы двигателя.
Вход питания кодера двигателя 2
Вход сигнала кодера двигателя 2
ВХОД БЛОКИРОВКИ:
Станция позволяет соединение с кнопкой блокировки (NC).
COMUNELLO ®Copyright 2014 - All right reserved
55
РУССКИЙ
CN3:
ENC1 +:
ENC1 E:
ENC1 GND:
MOT1 FCA:
MOT1 FCC:
(NC)
ENC2 +:
ENC2 E:
ENC2 GND: Общий вход заземления GND.
MOT2 FCA: Вход концевого выключателя открытия двигателя 2
(NC)
MOT2 FCC: Вход концевого выключателя закрытия двигателя 2
(NC)
Срабатывание во время различных фаз работы станции приводит
к немедленной остановке движения. Дополнительная команда
движения будет действенной в случае отключения входа
блокировки, и в этом случае станция выполнит фазу открытия
автоматизации с предварительным миганием в течение 5 секунд.
ВНИМАНИЕ: Установите перемычки на этот вход, если он не
используются.
ФОТОЭЛЕМЕНТЫ:
Центральная станция позволяет питание и соединение
фотоэлементов в соответствии с директивой EN 12453.
Вход DS1(NC)
Срабатывание фотоэлементов на этапе открытия не учитывается,
при закрытии приводит к изменению направления движения.
Вход DS2(NC)
Срабатывание на фазе открытия приводит к мгновенной остановке
ворот, после освобождения станция возобновляет движение.
Срабатывание при закрытии приводит к изменению направления
движения.
Программируемый вход DS3 (NC), см. Меню 2
Срабатывание при открытии приводит к изменению направления
движения. Срабатывание во время фазы закрытия не учитывается.
Для того чтобы работа соответствовала Категории 2 EN 138491, перед каждым маневром выполняется предварительное
тестирование фотоэлементов. Для выполнения тестирования
необходимо подать питание к передатчику каждой пары
фотоэлементов при помощи специального выхода “Контроль и
питание фотоэлементов” (выходы 3 и 5 клеммника CN2), а приемник
каждой пары должен получать питание при помощи выхода “Выход
служебных устройств” (выходы 14 и 15 клеммника CN2). Только
если это тестирование проходит успешно, центральная станция
разрешает начало проведения маневра: в противном случае
станция не разрешит совершать маневры, и при направлении
любой команды все светодиоды будут мигать, сигнализируя
аварийную ситуацию.
КОНЦЕВЫЕ ВЫКЛЮЧАТЕЛИ ОТКРЫТИЯ И ЗАКРЫТИЯ:
Станция позволяет подключить два концевых выключателя
открытия и закрытия (NC). Срабатывание в соответствующие фазы
функционирования приводит к немедленной остановке движения
обоих выходов двигателя 1 и 2.
ВНИМАНИЕ: Не устанавливайте перемычки на эти входы, если они
не используются
+
-
+
-
+
КОДЕР ДВИГАТЕЛЯ 1 И ДВИГАТЕЛЯ 2:
Станция позволяет соединение кодера с каждым двигателем.
Использование кодеров облегчает для станции функцию
обнаружения препятствия и обеспечивает повышенную точность
при выполнении маневров.
ЗАМЕДЛЕНИЕ:
Функция замедления двигателей используется у ворот, чтобы
избежать удара на высокой скорости подвижных створок, в конце
фазы открытия и закрытия.
Центральная станция позволяет во время программирования
времени двигателя (см. Главное меню) выполнять также
программирование замедления в нужных точках (перед полным
открытием и закрытием). При помощи триммера “SLOWING” можно
проводить тонкую настройку интенсивности силы во время фазы
замедления.
Если вы используете функцию “Автоматическое программирование”
(см. главное меню) можно в любом случае выключить фазу
замедления (см. расширенное меню 2).
ИНДИКАТОРНАЯ ЛАМПА:
Станция позволяет соединение с лампой 24 В пост. тока для
визуализации состояния автоматизации.
Лампа не горит: автоматизация закрыта
Лампа горит: автоматизация открыта
Лампа медленно мигает: движение открытия. Лампа быстро мигает:
движение закрытия.
Преобразуется в качестве выхода мигающей лампы
РАБОТА С ТАЙМЕРОМ:
Центральная станция позволяет соединить вместо кнопки таймер
для управления открытием-закрытием.
Пример: в 08.00 таймер замыкает контакт, и станция дает команду
открытия, в 18.00 таймер открывает контакт и станция посылает
команду закрытия. Во время интервала 08.00 – 18.00 в конце фазы
открытия станция отключает мигающую лампу, автоматическое
закрытие и пульты управления.
ВЫХОД КОМАНДЫ ЭЛЕКТРОЗАМКА:
Станция располагает выходом для пилотирования электрозамков
12 В пост. тока 15 Вт макс. Команда включается при каждом
начальном движении открытия в течение 2 сек.
-
РЕГУЛИРОВАНИЕ СИЛЫ ДВИГАТЕЛЯ (FORCE):
Электронная станция оборудована триммером “FORCE” для
регулирования силы двигателей, которая полностью управляется
микропроцессором. Регулирование выполняется в диапазоне от
50% до 100% максимальной силы.
Каждое движение происходит с начальным толчком, подавая
питание к двигателю в течение 2 секунд на максимальной мощности,
даже если было включено регулирование силы двигателя.
Примечание: начальный толчок автоматически отключается, если
была включена функция плавного пуска
ВНИМАНИЕ: Изменение триммера “FORCE” требует повторения
процедуры обучения, поскольку могут изменяться время
выполнения маневра и замедления.
ОБНАРУЖЕНИЕ ПРЕПЯТСТВИЙ (SENS):
Электронная станция оборудована триммером “SENS” для
регулирования силы сопротивления, необходимой для обнаружения
препятствия, которая полностью управляется микропроцессором.
Регулируется время срабатывания, которое может быть от минимум
0,1 секунды до максимум 7 секунд.
ВНИМАНИЕ:
• При наличии концевых выключателей, соединенных со
станцией, обнаружение препятствия всегда приводит к
изменению направления движения при закрытии, и к изменению
направления на 2 секунды при открытии.
• В отсутствии концевого выключателя, соединенного со
станцией, обнаружение препятствия всегда приводит
к изменению направления движения при закрытии (за
исключением последних 5 секунд маневра, выполняющего
останов) и к изменению направления на 2 секунды при открытии
56
(за исключением последних 5 секунд маневра, выполняющего
останов).
Обнаружение препятствий работает только с кодера
автоматической системы
COMUNELLO ®Copyright 2014 - All right reserved
КОНТРОЛЬ НАПРАВЛЕНИЯ ДВИЖЕНИЯ
ДВИГАТЕЛЯ 1 И ДВИГАТЕЛЯ 2
Важное примечание: Внимание, передвиньте переключатели
Dip Switch SW1 и SW2, при выключенной станции, и затем
повторите программирование станции.
Электронная станция оборудована выключателем Dip Switch
SW2, позволяющим изменять направление движения каждого
отдельного двигателя, соединенного со станцией, без физического
изменения электрических соединений: выключатель dip 1 SW2
относится к двигателю 1; выключатель dip 2 SW2 относится к
двигателю 2.
SW2
SW2
ON
SW2
ON
1
INV
OFF
2
INV
OFF
ON
1
INV
MOT 1
2
INV
OFF
SW2
ON
1
INV
OFF
2
INV
MOT 2
1
INV
MOT 1
2
INV
MOT 2
КОНТРОЛЬ ОПОЗДАНИЯ MOT 1 ИЛИ M 2 И
ВКЛЮЧЕНИЕ 1 ИЛИ 2 ДВ.
Электронная станция оборудована выключателем Dip Switch SW1,
позволяющим выбирать функции 1 или 2 двигателей и определить, какой
двигатель включается первым и какой вторым.
SW1
SW1
ON
SW1
ON
1
1
ДВИГАТЕЛЬ
2
НЕ
УЧИТ.
ON
1
2
1
2
2
ОПОЗДАНИЕ
2
ОПОЗДАНИЕ
ДВИГАТЕЛЯ
ДВ. 2
ДВИГАТЕЛЯ
ДВ. 1
ПРОГРАММИРОВАНИЕ
Кнопка SELECT: Выберите тип функции для запоминания, ваш выбор
будет подтвержден миганием светодиода.
Нажмите несколько раз на кнопку, чтобы перейти к требуемой вам функции.
Выбор остается активным в течение 10 секунд, на что указывает мигающий
светодиод, по истечении которых центральная станция возвращается к
первоначальному состоянию
Кнопка SET: выполняет программирование информации, в зависимости от
типа выбранной при помощи кнопки SEL функции.
ВАЖНО: Функция кнопки SET может также быть заменена пультом
радиоуправления, если он был ранее запрограммирован (горит светодиод
CODE)
ВНИМАНИЕ: Программирование включена только для неактивных
устройств безопасности
МЕНЮ ГЛАВНОЕ
Станция поставляется производителем с возможностью выбора нескольких
важных функций.
L1
STEP BY
STEP
L2
L3
L4
CODE TX
L5
PAUSE TIME
L6
L7
LEV
DELAY
CONDO
MOTOR TIME
PRG AUTOM
MENU
Пошаговый
Автоматический режим
Код введен
Нет кода
Запрограммированное
время
30 сек.
ВКЛ.
ВЫКЛ.
С автоматическим
закрытием
Без автоматического
закрытия
ВКЛ.
ВКЛ.
ВЫКЛ.
ВКЛ.
ВЫКЛ.
1. ШАГ ЗА ШАГОМ (STEP BY STEP):
Центральная станция по умолчанию представляет логическую схему
“Автоматической” работы (светодиод LED L1 не горит); если нужно
включить логическую схему “Шаг за шагом” (LED L1 горит), действовать
следующим образом: установите кнопку SELECT на мигание светодиода
LED L1 и затем нажмите на SET: LED L1 загорается и горит постоянно,
программирование завершено. Повторите операцию, если вы хотите
восстановить первоначальную конфигурацию.
Удаление:
Поместите SEL на LED L2; включите мигание стираемого кода (CODE,
PEDONALE (ПЕШЕХОДНЫЕ) или 2-ой код вспомогательного канала
идентифицируются соответствующим миганием); нажать и держать
нажатым SET более > 5 с. В конце светодиод погаснет на 2 сек. и
процедура будет завершена. Если будут удалены все коды, как CODE, так и
ПЕШЕХОДНЫЕ, светодиод не будет гореть.
Если в памяти останутся только ПЕШЕХОДНЫЕ коды или коды 2-го канала,
светодиод будет мигать по-другому (1 1 1 1 0 1 1 1 1 0)
Правило первого внесенного в память пульта радиоуправления:
При программировании пультов радиоуправления действует данное
правило: если первый пульт радиоуправления имеет код непрерывно
изменяющегося типа, то приемник примет затем только пульты с
непрерывно изменяющимся кодом, гарантируя повышенную защиту от
проникновения. Если первый пульт радиоуправления, внесенный в память,
имеет постоянный код, то приемник будет принимать в последствии
как пульты радиоуправления с постоянным кодом, так и с непрерывно
изменяющимся кодом, контролируя у последних только постоянную часть
(что ведет к утрате безопасности системы непрерывно изменяющихся
кодов).
3. CONDO:
Работа в режиме «Многоквартирный дом» предусматривает, что станция
управления во время фазы открытия или во время паузы не воспринимает
команды, поступающие от кнопок и от пультов. Во время фазы закрытия
команда, поступающая от кнопок или пультов, приводит к изменению
направления движения. Этот режим работы особенно часто используется в
тех случаях, когда система автоматизации включает шлейфовый детектор.
Центральная станция по умолчанию имеет функцию «Многоквартирный
дом» отключенной; если нужно включить эту функцию, действовать
следующим образом: установите кнопку SELECT на мигание светодиода
LED L3 и затем нажмите на SET: LED L3 загорается и горит постоянно,
программирование завершено. Повторите операцию, если вы хотите
восстановить первоначальную конфигурацию.
4. ВР. ДВИГ. (Программирование времени работы двигателей макс.
4 минуты.) MOTOR TIME:
Станция, поставляемая производителем, настроена на время работы
двигателя, заданное на 30 сек. и без замедления.
Если нужно изменить время работы двигателей 1 и 2, нужно вести
программирование при закрытых воротах следующим образом: поместите
кнопку SEL на мигание светодиода LED L4, затем нажмите на секунду
на кнопку SET, двигатель 1 начнет цикл открытия, после достижения
начальной точки, где требуется замедление, вновь нажмите на кнопку
SET, светодиод L4 начнет мигать и одновременно с этим двигатель 1
произведет замедление. После достижения требуемого положения,
нажмите кнопку SET для завершения цикла открытия. Теперь LED L4
начнет мигать регулярно и двигатель 2 начнет работать при открытии;
повторите операции программирования времени работы для двигателя 2.
После завершения программирования времени двигателя при открытии,
двигатель 2 немедленно начнет работать при закрытии: повторить
действия, выполненные ранее, для фазы закрытия двигателя 2 и затем для
двигателя 1.
Если вы не хотите, чтобы станция выполняла замедление, во время
программирования после завершения циклов закрытия и открытия,
нажмите на кнопку SET два раза подряд, а не один раз.
Если станция использует конфигурацию 1 двигателя (dip 1 SW1 ВЫКЛ.),
программирование времени работы двигателя 2 не выполняется.
Во время программирования можно использовать вместо кнопки SET,
находящейся на станции управления, кнопку пульта радиоуправления,
только если он был предварительно внесен в память.
5. ВР. ПАУЗА (Программирование времени авт. закрытия 4 мин.
макс.) PAUSE TIME:
без автоматического закрытия. Если вы хотите включить автоматическое
закрытие, действуйте следующим образом: установите кнопку SELECT
на мигание светодиода LED L5 и нажмите на секунду на SET, подождите
в течение времени, равного требуемому вам времени; вновь нажмите
на секунду кнопку SET, в то же время произойдет запоминание времени
автоматического закрытия и LED L5 будет гореть постоянно. Если вы
хотите восстановить начальные условия (без автоматического закрытия),
поместите на мигание светодиода LED L5, затем нажмите подряд 2 раза
кнопку SET с интервалом 2 секунды. Светодиод погаснет, и операция будет
COMUNELLO ®Copyright 2014 - All right reserved
57
РУССКИЙ
2. CODE TX: (Код радиоуправления):
Станция позволяет запомнить до 120 пультов радиоуправления, имеющих
разные коды между собой, фиксированного или постоянно меняющегося
типа.
Программирование:
Программирование кода передачи выполняется следующим способом:
поместите кнопку SELECT на мигание LED L2. Нажмите 1 раз SET, светодиод
изменит собственное мигание (1 0 1 0 плюс долгое мигание), указывая на
то, что он запоминает первый уровень. Направив выбранный при помощи
нужно пульта радиоуправления код, LED CODE будет гореть непрерывно,
указывая на завершение программирования.
Для запоминания кода для пешеходного открытия / одинарной створки,
действуйте, как указано далее: поместите кнопку SELECT на мигание LED
L2 CODE. Нажмите 2 раза подряд SET, светодиод изменит собственное
мигание (1 1 0 1 1 0), указывая на то, что он запоминает пешеходный
код. Направив выбранный при помощи нужно пульта радиоуправления
код, LED L2 CODE будет гореть непрерывно, указывая на завершение
программирования.
Для запоминания кода 2-го вспомогательного канала действуйте, как
указано далее: поместите кнопку SEL на мигание LED L2. Нажмите 3
раза подряд SET, светодиод изменит собственное мигание (1 1 1 0 1 1 1
0), указывая на то, что он запоминает 2-ой код вспомогательного канала.
Направив выбранный при помощи нужно пульта радиоуправления код, LED
L2 будет гореть непрерывно, указывая на завершение программирования.
В том случае, если все 120 были внесены в память, повторив операцию
программирования, все СВЕТОДИОДЫ программирования начнут мигать,
сигнализируя то, что дополнительные внесения в память невозможны.
завершена.
Во время программирования можно использовать вместо кнопки SET,
находящейся на станции управления, кнопку пульта радиоуправления,
только если он был предварительно внесен в память.
нужно поддерживать постоянно включенной нужную команду для того,
чтобы ворота двигались. Отпускание команды приводит к немедленной
остановке движения. Повторите операцию, если вы хотите восстановить
первоначальную конфигурацию.
6. ОПОЗДАНИЕ СТВОРКИ (Программирование опоздания створки
на макс. 15 сек.) DELAY:
Станция поставляется производителем с отключенной функцией опоздания
створки при открытии и закрытии 4 cek. В случае использования в
конфигурации автоматизации 2 двигателей, может быть необходимо задать
разный время опоздания створок; программирование должно выполняться
при закрытых воротах следующим образом: убедитесь, что Расширенное
меню 1 включено, установите кнопку SELECT на мигание светодиода LED
L6 и нажмите на секунду на SET, подождите в течение времени, равного
требуемому вам времени; вновь нажмите на секунду кнопку SET, в то же
время произойдет запоминание времени автоматического закрытия, и LED
L6 будет гореть постоянно.
Если вы хотите отключить эту функцию(без опоздания створок), поместите
кнопку на мигающий светодиод LED L6 затем 2 раза подряд нажмите
на кнопку SET в течение 2 секунд, одновременно светодиод погаснет и
операция будет завершена.
2. ОТДЕЛЬНАЯ СТВОРКА ИЛИ ПЕШ. КН. = ОТКРЫТЬ, КН. P/P =
ЗАКРЫТЬ:
Станция позволяет соединение кнопки NA (вход № 10 CN2) для включения
режима пешеходного прохода. Можно использовать этот вход для
соединения кнопки NA, работающей иначе. Для включения функции
«Отдельная створка» сделайте следующее: убедитесь, что Расширенное
меню 1 включено (обозначено миганием 1 0 1 0 1 0 уровня меню 8),
поместите кнопку SEL на мигание светодиода L2, затем нажмите кнопку
SET, LED L2 включится и будет гореть постоянно, программирование
завершено. Таким образом, кнопка может использоваться только для
включения двигателя 1 (см. пар. «Отдельная створка»). Если вы хотите
включить режим “ОТКРЫТЬ-ЗАКРЫТЬ” для использования кнопки пешех.
реж. для включения только открытия ворот и кнопки P/P (вход №11 CN2)
только для закрытия, повторите операцию, описанную выше, нажав на
кнопку SEL два раза (светодиод LED L2 замигает быстро), а не один раз.
Повторите операцию, если вы хотите восстановить первоначальную
конфигурацию.
7. АВТОМАТИЧЕСКОЕ ПРОГРАММИРОВАНИЕ (PRG AUTOM):
Станция позволяет выполнять автоматическое программирование
(УПРОЩЕННОЕ).
Установите кнопку SEL на мигание светодиода LED L7 и затем длительно
нажмите на кнопку SET, двигатель 2 произведет закрытие до достижения
концевого выключателя или упора, затем будет повторен маневр двигателя
1. Если двигатели движутся в противоположном направлении, по сравнению
с указанным, отпустите кнопку SET, отключите питание от станции и
измените выключатель Dip Switch SW2 для изменения направления
движения выбранного двигателя, не изменяя физически электрические
соединения. Если последовательность двигателей правильная, станция
завершит фазу автоматического программирования, выполнив полное
открытие и закрытие (держите нажатой кнопку SET до завершения
автоматического программирования). Одновременно с этим автоматически
задается цикл замедления, равный примерно 15% от полного цикла.
Во время автоматического программирования можно использовать
вместо кнопки SET, находящейся на станции управления, кнопку пульта
радиоуправления, только если он был предварительно внесен в память.
Внимание,
невозможно
выполнить
автоматическое
программирование в отсутствии концевого выключателя.
РАСШИРЕННОЕ МЕНЮ 1
Станция поставляется производителем с возможностью прямого
выбора только функций главного меню. Если вы хотите включить
функции, описанные в расширенном меню 1, действуйте, как указано
далее: установите на мигание светодиода УР., нажмите один раз на SET.
Светодиод замигает. В этом случае у вас будет около 30 секунд для выбора
функций из расширенного меню 1, используя кнопки SEL и SET, спустя
дополнительные 30 секунд центральная станция вернется к главному меню.
L1
L2
L3
ПРИСУТСТВУЕТ
ЧЕЛОВЕК
ПЕШЕХОДНАЯ
КНОПКА /
ОТДЕЛЬНАЯ
СТВОРКА
ПЕШЕХОДНАЯ
КНОПКА / DS3
ВКЛ.
ВЫКЛ.
ОТДЕЛЬНАЯ
СТВОРКА
ПЕШЕХОДНАЯ
КНОПКА
DS3
ПЕШЕХОДНАЯ
КНОПКА
L4
L5
ФОТОТЕСТ
ВКЛ.
L6
DS1 ЧАСТИЧНОЕ
ИЗМЕНЕНИЕ
НАПРАВЛЕНИЯ
ВКЛ.
L7
LEV
DS2 STP ПРИ
ЗАКРЫТИИ
БЛОКИРОВКА 8K2
УРОВЕНЬ МЕНЮ
ВЫКЛ.
ВКЛ.
ВКЛ.
ВЫКЛ.
ВЫКЛ.
1 МИГАНИЕ
ВЫКЛ.
1. ПРИСУТСТВУЕТ ЧЕЛОВЕК
Станция позволяет настроить работу «Присутствует человек». Для
включения этой функции сделайте следующее: убедитесь, что Расширенное
меню 1 включено (обозначено миганием 1 0 1 0 1 0 уровня меню 8),
поместите кнопку SEL на мигание светодиода L1, затем нажмите кнопку
SET, LED L1 включится и будет гореть постоянно, программирование
завершено. Таким образом, используя как пульты радиоуправления, так
и кнопки для включения ворот вы получите следующий режим работы:
58
COMUNELLO ®Copyright 2014 - All right reserved
3. ПЕШЕХОДНАЯ КНОПКА / DS3:
Станция позволяет соединение кнопки NA (вход № 10 CN2) для включения
режима пешеходного прохода. Можно использовать этот вход для
соединения фотоэлемента DS3 (NC): убедитесь, что Расширенное меню
1 включено (обозначено миганием 1 0 1 0 1 0 уровня меню 8), поместите
кнопку SEL на мигание светодиода L3, затем нажмите кнопку SET, LED
L3 включится и будет гореть постоянно, программирование завершено.
Повторите операцию, если вы хотите восстановить первоначальную
конфигурацию.
4. FOTOTEST (испытания фотоэлементов):
Станция поставляется производителем с возможностью выбора нескольких
важных функций. Для включения этой функции сделайте следующее:
убедитесь, что Расширенное меню 1 включено (обозначено миганием 1 0
1 0 1 светодиода LED LEV), поместите кнопку SEL на мигание светодиода
L4, затем нажмите кнопку SET, LED L4 включится и будет гореть постоянно,
программирование завершено. Повторите операцию, если вы хотите
восстановить первоначальную конфигурацию.
5. DS2 ОСТАНОВКА ПРИ ЗАКРЫТИИ:
Станция позволяет изменить работу входа DS2, если вы хотите, чтобы
DS2 срабатывал также при закрытии (останов ворот). Если работа
автоматическая, после освобождения фотоэлемента произойдет
возобновление движения двигателя при закрытии; сделайте следующее:
убедитесь, что Расширенное меню 1 включено (обозначено миганием 1 0
1 0 1 0 уровня меню 8), поместите кнопку SEL на мигание светодиода L5,
затем нажмите кнопку SET, LED L5 включится и будет гореть постоянно,
программирование завершено. Повторите операцию, если вы хотите
восстановить первоначальную конфигурацию.
6. DS1 ЧАСТИЧНОЕ ИЗМЕНЕНИЕ НАПРАВЛЕНИЯ:
Станция позволяет изменить работу входа DS1. Если вы хотите, чтобы
DS1 производило при закрытие частичное изменение направления
движения (краткое изменение), вместо полного, сделайте следующее:
убедитесь, что Расширенное меню 1 включено (обозначено миганием 1 0
1 0 1 0 уровня меню 8), поместите кнопку SEL на мигание светодиода L6,
затем нажмите кнопку SET, LED L6 включится и будет гореть постоянно,
программирование завершено. Повторите операцию, если вы хотите
восстановить первоначальную конфигурацию.
7. БЛОКИРОВКА = 8K2:
Станция позволяет соединение с кнопкой блокировки NC (вход № 8 CN2).
Можно переключать этот вход на резистивный вход 8,2к Ом: убедитесь, что
Расширенное меню 1 включено (обозначено миганием 1 0 1 0 1 0 уровня
меню 8), поместите кнопку SEL на мигание светодиода L7, затем нажмите
кнопку SET, LED L7 включится и будет гореть постоянно, программирование
завершено. Изменение значения, прочитанного на входе, приводит к
блокировке станции в любой фазе движения. Дополнительная команда
движения будет действенной в случае восстановления правильного
значения на входе, и в любом случае станция выполнит фазу открытия
автоматизации. Повторите операцию, если вы хотите восстановить
первоначальную конфигурацию.
РАСШИРЕННОЕ МЕНЮ 2
Станция поставляется производителем с возможностью прямого выбора
только функций главного меню. Если вы хотите включить функции,
описанные в расширенном меню 2, нужно действовать, как указано
далее: поместитесь на мигание светодиода № 8 и нажмите 2 раза на SET.
Светодиод начнет мигать, чередуясь, 1 1 0 1 1 0 1 1 0. Таким образом, у вас
будет 30 секунд для выбора функций Расширенного Меню 2 при помощи
кнопок SELECT и SET, затем еще через 30 секунд станция вернется к
главному меню.
L1
L2
L3
L4
L5
ТОРМОЗ
L6
2-ОЙ
МОНОСТАБИЛЬНЫЙ
КАНАЛ
L7
LEV
ЗАМЕДЛЕНИЕ
ЗАКРЫВАЙ ВСЕГДА
СЛЕДУЙ ЗА МНОЙ
ВРЕМЯ ДЛЯ
ПРОХОДА ПЕШКОМ
ПРОГ. НА
РАССТОЯНИИ
УРОВЕНЬ МЕНЮ
ВКЛ.
ВЫКЛ.
ВКЛ.
ВЫКЛ.
ВКЛ.
1ВЫКЛ.
ВКЛ.
ВЫКЛ.
ВКЛ.
ВЫКЛ.
ВЫКЛ.
ВКЛ.
ВКЛ.
ВЫКЛ.
2 МИГАНИЕ
1. ТОРМОЗ:
Станция поставляется производителем с отключенной функцией
электронного тормоза. Для включения этой функции сделайте следующее:
убедитесь, что Расширенное меню 2 включено (обозначено миганием 1 1 0
1 1 0 1 1 0 уровня меню 8), поместите кнопку SEL на мигание светодиода
L1, затем нажмите кнопку SET, LED L2 включится и будет гореть постоянно,
программирование завершено.
Таким образом, станция сократит движение вперед ворот, как следствие
инерции, при останове или при получении команды изменения направления.
Повторите операцию, если вы хотите восстановить первоначальную
конфигурацию.
2. ЗАМЕДЛЕНИЕ:
Как было сказано ранее, станция позволяет вести программирование
фазы замедления при открытии и закрытии, а с функцией автоматического
программирования замедление вводится автоматически. Если вы не хотите
замедления, его можно исключить: таким образом, если вы используете
автоматическое программирование, фаза замедления не будет введена, а
если вы используете функцию программирования времени двигателя, во
время самого программирования не будет предоставлена возможность
программирования замедления во время фазы открытия и закрытия. Если
перед тем, как исключать замедление, оно было запрограммировано
при помощи функции программирования времени двигателя, нужно
будет повторить все программирование с самого начала. Если вы хотите
исключить замедление, сделайте следующее: убедитесь, что Расширенное
меню 2 включено (обозначено миганием 1 1 0 1 1 0 светодиода LEV),
поместите кнопку SEL на мигание светодиода L2, затем нажмите кнопку
SET, LED L2 включится и будет гореть постоянно, программирование
завершено. Повторите операцию, если вы хотите восстановить
первоначальную конфигурацию.
3. ЗАКРЫВАЙ ВСЕГДА:
Станция позволяет настроить работу “Закрывай всегда”: эта функция,
программируемая только в том случае, если уже было запрограммировано
время паузы, срабатывает после отключения питания; если будет
обнаружено, что ворота открыты, то автоматически включается маневр
закрытия, с предварительным миганием за 5 секунд. Если вы хотите
включить этот режим работы, действуйте следующим образом: убедитесь,
что Расширенное меню 2 включено (обозначено миганием 1 1 0 1 1 0 уровня
меню 8), поместите кнопку SELECT на мигание светодиода LED L3, затем
нажмите кнопку SET, одновременно LED L3 включится и будет гореть
постоянно, программирование завершено. Повторите операцию, если вы
хотите восстановить первоначальную конфигурацию.
5. ПЕШ. ВР. ДВ (Программирование времени работы в пешеходном
режиме макс. 4 минуты.):
Станция поставляется производителем с временем работы двигателя
(пешеходный режим), заданным на 10 секунд и без замедления.
Если нужно изменить время работы в пешеходном режиме, нужно вести
6. ЛОГИКА РАБОТЫ ВСПОМОГАТЕЛЬНОГО РАДИОКАНАЛА
Станция позволяет выбирать логическую схему работу вспомогательного
радиоканала.
В заводской конфигурации вспомогательный радиоканал работает как
“моностабильный”. Для включения функции «Бистабильный» сделайте
следующее: убедитесь, что Расширенное меню 2 включено (обозначено
миганием 1 1 0 1 1 0 уровня меню 8), поместите кнопку SEL на мигание
светодиода L6, затем нажмите кнопку SET, LED L6 включится и будет
гореть постоянно, программирование завершено. Если вы хотите включить
функцию «Синхронизация 3 минуты», повторите операцию, описанную
выше, нажав два раза на кнопку SEL (после чего будет видно быстрое
мигание светодиода L6, а не одно мигание). Повторите операцию, если вы
хотите восстановить первоначальную конфигурацию.
7. ПРОГРАММИРОВАНИЕ ПУЛЬТА РАДИОУПРАВЛЕНИЯ НА
РАССТОЯНИИ:
Станция позволяет программирование кода передачи, без прямого
использования кнопки SEL станции, выполняя дистанционное управление.
Программирование пульта радиоуправления на расстоянии выполняется
следующим образом: направляйте непрерывно в течение времени,
превышающего 10 секунд, код пульта радиоуправления, внесенного в
память ранее. Станция одновременно перейдет в режим программирования,
как описано выше для светодиода LED L2 в главном меню. Если
непрерывно направляется пешеходный код, занесенный ранее в память, то
станция перейдет в режим программирования нового пешеходного кода
и светодиод L2 начнет мигать, как если бы было включено приобретение
пешеходного кода (1 1 0 1 1 0 1 1 0); если это код, относящийся ко 2-му
вспомогательному каналу, он будет мигать, как если бы было включено
получение кода 2-го канала (1 1 1 0 1 1 1 0 1 1 1 0). Для включения функции
программирования на расстоянии действуйте следующим образом:
убедитесь, что Расширенное меню 2 включено (обозначено миганием 1 1 0
1 1 0 светодиода LED LEV), поместите кнопку SEL на мигание светодиода
L7, затем нажмите кнопку SET, LED L7 включится и будет гореть постоянно,
программирование завершено. Повторите операцию, если вы хотите
восстановить первоначальную конфигурацию.
РАСШИРЕННОЕ МЕНЮ 3
Станция поставляется производителем с возможностью прямого выбора
только функций главного меню.
Если вы хотите включить функции, описанные в расширенном меню 3,
нужно действовать, как указано далее: поместитесь на мигание светодиода
№ 8 и нажмите 3 раза на SET. Светодиод начнет поочередно показывать 1 1
0 1 1 0. В этом случае у вас будет около 30 секунд для выбора функций из
расширенного меню 3, используя кнопки SEL и SET, спустя дополнительные
30 секунд центральная станция вернется к главному меню.
L1
L2
L3
ПЛАВНЫЙ ОСТАНОВ
ВКЛ.
ВЫКЛ.
ГИДРАВЛИЧЕСКИЙ
УДАР
ВКЛ.
ВЫКЛ.
L4
L5
L6
УДАР ЗАКРЫТИЯ
ВКЛ.
ВЫКЛ.
ПРОБЛЕСКОВЫЙ
ОГОНЬ /
ОСВЕЩЕНИЕ ПРИ
ОТКР
ВКЛ.
ВЫКЛ.
L7
ПРЕД. МИГАНИЕ./
ПАУЗА ЛАМПЫ
LEV
ПЛАВНЫЙ ПУСК
ELS / CMD PED
УРОВЕНЬ МЕНЮ
ВКЛ.
ВЫКЛ.
ВКЛ.
ВЫКЛ.
ВКЛ.
ВЫКЛ.
3 МИГАНИЕ
1. ПЛАВНЫЙ ОСТАНОВ (SOFT STOP):
Станция поставляется производителем с отключенной функцией плавного
COMUNELLO ®Copyright 2014 - All right reserved
59
РУССКИЙ
4. СЛЕДУЙ ЗА МНОЙ (FOLLOW ME):
Станция позволяет задать работу в режиме “Следуй за мной”: эта
функция, программируемая только в том случае, если уже было
запрограммировано время паузы, позволяет сократить время паузы до 5
сек. после освобождения фотоэлемента DS1, то есть ворота закрываются
5 сек. спустя после того, как проехал пользователь. Если вы хотите
включить эту функцию, нужно действовать, как указано далее: проверьте,
что вы включили Расширенное меню 2 (обозначено миганием 1 1 0 1 1 0
светодиода LED LEV), поместите кнопку SEL на мигание светодиода LED
L4, затем нажмите кнопку SET: Светодиод LED L4 загорится постоянным
светом, программирование будет завершено. Повторите операцию, если
вы хотите восстановить первоначальную конфигурацию.
программирование при закрытых воротах следующим образом: убедитесь,
что Расширенное меню 2 включено (обозначено миганием 1 1 0 1 1 0
светодиода LED LEV), поместите кнопку SELECT на мигание светодиода
LED L5, затем нажмите на секунду на кнопку SET, двигатель начнет цикл
открытия, после достижения начальной точки, где требуется замедление,
вновь нажмите на кнопку SET, светодиод L5 начнет мигать и одновременно
с этим двигатель произведет замедление. После достижения требуемого
положения, нажмите кнопку SET для завершения цикла открытия. Теперь
LED L5 начнет мигать регулярно, и двигатель начнет работать при закрытии;
повторите операции, указанные выше, для фазы закрытия.
Если вы не хотите, чтобы станция выполняла замедление, во время
программирования после завершения цикла закрытия и открытия, нажмите
на кнопку SET два раза подряд, а не один раз.
Во время программирования можно использовать вместо кнопки SET,
находящейся на станции управления, кнопку пульта радиоуправления,
только если он был предварительно внесен в память.
останова. Для включения этой функции сделайте следующее: убедитесь,
что Расширенное меню 3 включено (обозначено миганием 1 1 1 0 1 1 1
0 светодиода LED LEV), поместите кнопку SEL на мигание светодиода L1,
затем нажмите кнопку SET, LED L1 включится и будет гореть постоянно,
программирование завершено. Таким образом, станция в конце движения
приведет силу к нулю, постепенно в течение 2 секунд. Повторите операцию,
если вы хотите восстановить первоначальную конфигурацию.
2. ПЛАВНЫЙ ПУСК (SOFT START):
Станция поставляется производителем с отключенной функцией плавного
пуска. Для включения этой функции сделайте следующее: убедитесь,
что Расширенное меню 3 включено (обозначено миганием 1 1 1 0 1 1 1
0 светодиода LED LEV), поместите кнопку SEL на мигание светодиода L2,
затем нажмите кнопку SET, LED L2 включится и будет гореть постоянно,
программирование завершено. Таким образом, станция в начале каждого
движения будет управлять пуском двигателя, постепенно увеличивая
силу, от минимального значения до заданного значения на триммере
“FORCE” в первые 2 секунды работы. Повторите операцию, если вы хотите
восстановить первоначальную конфигурацию.
Примечание: при включении функции плавного пуска станция
автоматически отключает начальный толчок и наоборот.
3. ГИДРАВЛИЧЕСКИЙ УДАР:
Станция поставляется производителем с отключенной функцией
гидравлического удара. Эта функция заключается в направлении
команды закрытия в течение примерно 2 секунд в начале фазы открытия:
таким образом, будет облегчена разблокировка ворот, чтобы позволить
правильное выполнение фазы открытия. Для включения этой функции
удара на максимальной мощности сделайте следующее: убедитесь,
что Расширенное меню 3 включено (обозначено миганием 1 1 1 0 1 1 1
0 светодиода LED LEV), поместите кнопку SEL на мигание светодиода L3,
затем нажмите кнопку SET, LED L3 включится и будет гореть постоянно,
программирование завершено. Если вы хотите включить функцию удара
при закрытии на мощности, заданной при помощи триммера “FORCE”,
повторите операцию, описанную выше, нажав два раза на кнопку SEL (после
чего будет видно быстрое мигание светодиода LED L3, а не одно мигание).
Повторите операцию, если вы хотите восстановить первоначальную
конфигурацию.
4. УДАР ПРИ ЗАКРЫТИИ:
Станция поставляется производителем с отключенной функцией удара
при закрытии. Эта функция заключается в добавлении, если есть фаза
замедления при закрытии, 1 секунды, на максимальной мощности
или на мощности, выбранной при помощи триммера “VR1”, так, чтобы
наверняка закрыть ворота. Для включения этой функции удара при
закрытии на максимальной мощности сделайте следующее: убедитесь,
что Расширенное меню 3 включено (обозначено миганием 1 1 1 0 1 1 1
0 светодиода LED LEV), поместите кнопку SEL на мигание светодиода L4,
затем нажмите кнопку SET, LED L4 включится и будет гореть постоянно,
программирование завершено. Если вы хотите включить функцию удара
при закрытии на мощности, заданной при помощи триммера “FORCE”,
повторите операцию, описанную выше, нажав два раза на кнопку SEL (после
чего будет видно быстрое мигание светодиода LED L4, а не одно мигание).
Повторите операцию, если вы хотите восстановить первоначальную
конфигурацию.
5. ВКЛЮЧЕНИЕ ЭЛЕКТРОЗАМКА CMD PED.:
Станция поставляется производителем с отключенной функцией включения
электрозамка при помощи пешеходной команды. Функция активации
электрозамка при помощи пешеходной команды используется, когда у вас
имеются раздвижные ворота с расположенной рядом дверью для прохода
пешеходов. Таким образом, можно открыть ворота при помощи команд от
кнопок P-P и пультов радиоуправления, а также открыть дверь при помощи
включения электрозамка командами PED. Для включения этой функции
сделайте следующее: убедитесь, что Расширенное меню 3 включено
(обозначено миганием 1 1 1 0 1 1 1 0 светодиода LED LEV), поместите
кнопку SEL на мигание светодиода L5, затем нажмите кнопку SET, LED
L5 включится и будет гореть постоянно, программирование завершено.
Повторите операцию, если вы хотите восстановить первоначальную
конфигурацию.
6. ПРОБЛЕСКОВЫЙ ОГОНЬ/ОСВЕЩЕНИЕ ПРИ ОТКРЫТИИ:
Станция поставляется производителем с отключенной функцией мигающей
лампы в течение времени паузы. Для включения этой функции сделайте
следующее: убедитесь, что Расширенное меню 3 включено (обозначено
миганием 1 1 1 0 1 1 1 0 светодиода LED LEV), поместите кнопку SEL на
мигание светодиода L6, затем нажмите кнопку SET, LED L6 включится и
будет гореть постоянно, программирование будет завершено. Повторите
операцию, если вы хотите восстановить первоначальную конфигурацию.
Работа освещения при открытии: Выход освещения при открытии 110
В пер. тока и 24В включается на 3 минуты всякий раз, когда посылается
команда открытия.
60
COMUNELLO ®Copyright 2014 - All right reserved
7. ПРЕДВАРИТЕЛЬНОЕ МИГАНИЕ/МИГАНИЕ В СОСТОЯНИИ ПАУЗЫ:
Блок поставляется производителем с отключенной функцией
предварительного мигания и мигающей лампы во время паузы Для
включения функции предварительного мигания сделайте следующее:
убедитесь, что Расширенное меню 3 включено (обозначено миганием
1 1 1 0 1 1 1 0 светодиода LED LEV), поместите кнопку SEL на мигание
светодиода L 7, затем нажмите кнопку SET, LED L7 включится и будет
гореть постоянно, программирование завершено. Если вы хотите включить
функцию освещения при открытии, повторите операцию, описанную выше,
нажав два раза на кнопку SET (после чего будет видно быстрое мигание
светодиода L 7, а не одно мигание). Повторите операцию, если вы хотите
восстановить первоначальную конфигурацию.
Работа предварительного мигания: Выход мигающей лампы 24 В пер.
тока 4 Вт макс. мигает на 3 секунды перед закрытием.
Работа при предварительном мигании в состоянии паузы: Выход
мигающей лампы 110 В пер. тока и 24V останется активирован, если ранее
было запрограммировано время паузы.
СБРОС:
В том случае, если необходимо восстановить заводские настройки
центральной станции, нажмите на кнопки SEL и SET вместе, чтобы добиться
одновременного включения всех КРАСНЫХ сигнальных светодиодов и
последующего их выключения.
ДИАГНОСТИКА:
Испытания фотоэлемента:
Станция подготовлена к соединению устройств безопасности,
соответствующих пункту 5.1.1.6 стандарта EN 12453. Перед каждым
циклом маневрирования проводится тестирование работы соединенного
фотоэлемента. Если фотоэлемент не соединен или плохо работает, станция
не разрешает движение ворот, и показывает на то, что тестирование
не прошло, одновременно включая все мигающие светодиоды. После
восстановления нормального функционирования фотоэлемента, станция
опять будет готова к нормальной работе. Это гарантирует контроль за
неисправностями, в соответствии с Категорией 2 нормы EN 954-1.
Испытания ввода команд:
Рядом с каждым входом команды низкого напряжения находится
светодиод, который позволяет быстро проверить и сигнализировать его
состояние.
Логическая схема работы: СВЕТОДИОД горит, вход закрыт; СВЕТОДИОД
не горит, вход открыт.
ГАРАНТИЯ
Гарантия на правильное функционирование приводов компании
Fratelli Comunello S.p.a составляет 24 месяцев с даты изготовления,
при соблюдении инструкций по монтажу и эксплуатации указанных в
данном руководстве. Fratelli Comunello S.p.a. гарантирует ремонт или
замену дефектных деталей (эквивалентные размеры компенсации не
обеспечиваются), после анализа специалистов компании Fratelli Comunello
SpA и только при их подтверждении дефекта изготовления. Расходы
на транспорт товара (с покупателя до компании Фрателли Комунелло
и с Фрателии Комунелло до покупателя) возлагаются на покупателя.
Дефектный товар возвращен Fratelli Comunello SpA принадлежает компании
Комунелло. Стоимость выполнения ремонта и замены дефектных товаров
возлагается на покупателя. Не выплачивается компенсация за период, в
течение которого привод не работает. Ремонт или замена дефектных
товаров не отложит срок гарантии.
Покупатель должен сообщить поставщику, на сновании письменного
заявления, дефектность товаров не позднее, чем через 8 дней с даты
обнаружения дефекта или доставки товаров. Гарантия не действует в
следующих случаях: гарантия не покрывает любые повреждения изделий,
произошедшие при транспортировке или вследствие неисправности
электроустановки у покупателя, человеческой халатности и небрежности,
нарушения правила эксплуатации электроутсановки, несанкционированной
разборки, ремонта или
модификации, неправильного использования (мы советуем проводить
техническое обслуживание 1 раз в 6 месяцев), использования
неоригинальных запчастей; воздействия атмосферных агентов или
химических агентов.
Гарантия не покрывает стоимость потребительских материалов,
предполагаемых дефектов или необъективных проверок.
Хатактеристики изделия
Fratelli Comunello SpA постоянно улучшает свои изделия, поэтому
технические характеристики и внешний вид изделий могут быть изменены
производителем, даже без предупреждения.
Арбитраж
Все споры, которые могут возникнуть, считаютя в компетенции суда Vicenza
(VI) и будут урегулированы на основе итальянского законодательства.
NOTES
COMUNELLO ®Copyright 2014 - All right reserved
61
NOTES
NOTES
COMUNELLO ®Copyright 2014 - All right reserved
63
FRATELLI COMUNELLO S.P.A.
AUTOMATION GATE DIVISION
Via Cassola, 64 - C.P. 79
36027 Rosà, Vicenza, Italy
Tel. +39 0424 585111 Fax +39 0424 533417
[email protected] www.comunello.com