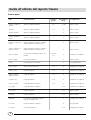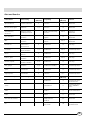
1
Combinato frigo/freezer
Installazione e uso
Fridge/freezer combined
Installation and use
Kühl/Gefrier-Kombination
Installation und Gebrauch
Combinado frigorífico-congelador
Instalação e uso
BCZ 35 A VE
I
Combinato frigo/freezer
1
Istruzioni per l'installazione e l'uso
GB Fridge/freezer combined
13
Instructions for installation and use
D Kühl/Gefrier-Kombination
25
Installation- und Gebrauchshinweise
P
Combinado frigorífico-congelador
38
Instruções para a instalação e o uso
Per garantire l’efficienza e la sicurezza di questo elettrodomestico:
- rivolgetevi esclusivamente a centri di assistenza tecnica autorizzati
- richiedete sempre l’utilizzo di parti di ricambio originali
To maintain the EFFICIENCY and SAFETY of this appliance, we recommend:
- call only the Service Centers authorized by the manufacturer
- always use original Spare Parts
Um die Leistungsfähigkeit und Sicherheit dieses Gerätes zu gewährleisten,
bitte folgendes beachten:
- wenden Sie sich ausschließlich an unsere autorisierten Service-Stellen
- verlangen Sie, daß nur Original-Ersatzteile verwendet werden
Para garantir a eficiência e a segurança deste electrodoméstico:
- dirija-se exclusivamente a centros de assistência técnica autorizados
- solicite sempre a utilização de peças originais
La sicurezza, una buona abitudine
ATTENZIONE
Leggete attentamente le avvertenze contenute nel presente
libretto in quanto forniscono importanti indicazioni riguardanti
la sicurezza di installazione, d’uso e di manutenzione.
7. Non fate né pulizia né manutenzione senza aver prima
staccato la spina; per eliminare ogni contatto elettrico non
basta, infatti, posizionare la manopola ON/OFF prodotto in
OFF.
8. Prima di farvi ritirare il vecchio frigorifero, mettete fuori
uso l’eventuale serratura per evitare che i bambini, giocando, possano rimanere chiusi dentro l’apparecchio.
9. In caso di guasto, prima di chiamare il servizio-assistenza,
controllate al capitolo “C’è qualche problema?” per verificare se è possibile eliminare l’eventuale inconveniente. Non
tentate di riparare il guasto, cercando di accedere alle parti
interne.
10. In caso di sostituzione del cavo di alimentazione rivolgersi ai nostri Centri di Assistenza. In alcuni casi le connessioni sono eseguite con terminali speciali, in altri è richiesto
l’uso di un utensile speciale per accedere ai collegamenti.
11. Non usate apparecchi elettrici all'interno dello scomparto conservatore di cibi, se questi non sono del tipo raccomandato dal costruttore.
12. Al termine della vita funzionale dell'apparecchio, contenente gas ciclopentano nella schiuma isolante ed eventualmente gas R600a (isobutano) nel circuito refrigerante,
lo stesso dovrà essere messo in sicurezza prima dell'invio in
discarica. Per questa operazione rivolgetevi al vostro negoziante o all'Ente Locale preposto.
Questa apparecchiatura è conforme alle seguenti Direttive Comunitarie:
- 73/23/CEE del 19/02/73 (Basse Tensioni) e successive
modificazioni;
- 89/336/CEE del 03/05/89 (Compatibilità Elettromagnetica) e successive modificazioni.
1. Questo apparecchio non va installato all’aperto, nemmeno se lo spazio è riparato da una tettoia; è molto pericoloso
lasciarlo esposto alla pioggia e ai temporali.
2. Deve essere usato soltanto da adulti ed esclusivamente
per conservare e congelare i cibi, seguendo le istruzioni d’uso
scritte in questo manuale.
3. Non toccate né manovrate mai l’apparecchio a piedi nudi
o con le mani o i piedi bagnati.
4. Sconsigliamo di ricorrere a prolunghe e prese multiple.
Se il frigorifero è installato tra i mobili, controllate che il
cavo non subisca piegature o compressioni pericolose.
5. Non tirate mai il cavo né il frigorifero per staccare la spina
dalla presa a muro: è molto pericoloso.
6. Non toccate le parti interne raffreddanti soprattutto con
le mani bagnate poiché potreste ustionarvi o ferirvi. Né mettete in bocca cubetti di ghiaccio appena estratti dal freezer
poiché rischiate di ustionarvi.
Installazione
basso a sinistra accanto alla verduriera, corrisponda a quello del vostro impianto di casa, e che la presa sia dotata di
una regolare messa a terra, come prescrive la legge sulla
sicurezza degli impianti 46/90. Se manca la messa a terra,
la Casa Costruttrice declina ogni responsabilità. Non usate
prese multiple o adattatori.
Posizionare l’apparecchio in modo che la presa, a cui
è collegato, sia accessibile.
Per garantire un buon funzionamento e un consumo
contenuto di elettricità è importante che l’installazione sia eseguita correttamente.
L’aerazione
Il compressore ed il condensatore emettono calore e richiedono perciò una buona aerazione. Sono poco adatti ambienti con una non perfetta ventilazione. L’apparecchio va
quindi installato in un ambiente servito da un’apertura (finestra o portafinestra) che assicuri il necessario ricambio
dell’aria e che non sia troppo umido.
Fare attenzione, durante l'installazione, a non coprire od
ostruire le griglie che permettono la buona ventilazione dell'apparecchio.
La potenza è insufficiente?
La presa elettrica deve essere in grado di sopportare il carico
massimo di potenza dell’apparecchio, indicato sulla targhetta
caratteristiche posta in basso a sinistra accanto alla verduriera.
Prima di collegarlo elettricamente
Lontano dal calore
Dopo il trasporto posizionare l’apparecchio verticalmente
ed attendere almeno 3 ore prima di collegarlo alla presa
per consentire un corretto funzionamento.
Evitare di posizionare l'apparecchio in un luogo direttamente esposto alla luce solare, accanto alla cucina elettrica o
similari.
Collegamento elettrico e messa a terra
Prima di procedere al collegamento elettrico, controllare che
il voltaggio indicato sulla targhetta caratteristiche, posta in
1
I
Visto da vicino
A
Balconcino estraibile con coperchio, con
L
Ripiani estraibili e regolabili in altezza
M
"A.I.R. System"
portauova e scatola burro
B
Balconcino estraibile portaoggetti
C
Balconcino richiudibile
D
Vano per bottiglia da 2 litri
E
Balconcino bottiglie
F
Vani per la conservazione
G
Bacinelle per la produzione di
(Ariston Integrated Refrigeration)
M
A
L
B
L
B
ghiaccio
H
Vano utilizzabile per il congelamento e la conservazione
C
I
Quadro comandi
J
Cassetti per frutta e verdura
K
Scatola scorrevole per carni e
formaggi
K
D
J
E
I
ECO
H
G
F
G
F
I
2
Il Display
A
E
C
A
G
H
I
J
G
Manopola frigo
Gestisce l’accensione e lo spegnimento dello scomparto frigorifero e permette di impostare le relative
temperature di funzionamento.
B
H
Manopola freezer e ON/OFF prodotto
I
Pulsante MODE
Funzione SUPER COOL
Funzione SUPER FREEZE
Funzione HOLIDAY
Visualizza lo stato (disattivato, selezionato o attivato)
della funzione HOLIDAY (temperature ottimali con minimi consumi in caso di lunghe assenze).
J
Pulsante SELECT
Funzione ICE PARTY
Visualizza lo stato (disattivato, selezionato o attivato
) della funzione ICE PARTY (la massima rapidità nel
freddare una bottiglia calda e servirla in tavola con
l’apposito secchiello adatto a mantenerne la temperatura raggiunta).
Consente la selezione/deselezione delle varie funzioni e lo spegnimento degli allarmi sonori.
E
D
Visualizza lo stato (disattivato, selezionato o attivato)
della funzione SUPER FREEZE (congelamento rapido).
Consente lo spostamento all'interno del display per
arrivare alle varie impostazioni/funzioni e lo spegnimento degli allarmi sonori.
D
B
Visualizza lo stato (disattivato, selezionato o attivato)
della funzione SUPER COOL (raffreddamento rapido
del vano frigo).
Gestisce l’accensione e lo spegnimento dell’intero prodotto e permette di impostare le temperature di funzionamento nello scomparto freezer.
C
F
Impostazione scomparto frigorifero
Visualizza la temperatura impostata nel vano frigo e
lo stato di OFF del comparto frigorifero (scritta OFF
attiva).
F
Impostazione scomparto congelatore
Visualizza la temperatura impostata nel vano freezer
e lo stato di OFF del prodotto (scritta OFF attiva).
3
I
Come avviare il combinato
ATTENZIONE
Dopo il trasporto, posizionare l’apparecchio verticalmente ed attendere circa 3 ore prima di collegarlo alla
presa di corrente per favorire un buon funzionamento.
Prima di mettere gli alimenti nel frigorifero pulite bene l’interno con acqua tiepida e bicarbonato.
Scomparto congelatore
All’accensione del prodotto (ruotare la manopola ON/OFF
prodotto "B" fino ad impostare la temperatura di funzionamento voluta nel vano freezer) si consiglia di inserire la funzione SUPER FREEZE per accelerare il raffreddamento del
vano; quando quest’ultimo avrà raggiunto la sua temperatura ottimale, la funzione si disattiverà e potrete introdurre
nel congelatore i surgelati.
Tempo protezione motore.
Questo modello è provvisto di un controllo
salvamotore, pertanto dopo uno spegnimento impostato dall'utente non preoccupatevi se il compressore
non parte immediatamente, perché si attiverà automaticamente dopo circa 8 minuti.
Dopo aver collegato la spina alla presa di corrente accertatevi che il display sia acceso.
Scomparto frigorifero
All’accensione dello scomparto frigo (ruotare la manopola
"A" fino ad impostare la temperatura di funzionamento voluta nel vano frigorifero) si consiglia di inserire la funzione
SUPER COOL per accelerare il raffreddamento del vano:
dopo qualche ora potrete mettere i cibi nel frigorifero.
Come muoversi nel display
Impostazione delle temperature
Se il vano interessato è spento, sul relativo spazio di segnalazione sul display (E per il frigorifero e F per il congelatore)
apparirà la scritta OFF. Se il vano è acceso appariranno invece le temperature impostate in quel momento. Per modificarle agire direttamente sulla manopola relativa al vano interessato (A per il frigorifero e B per il congelatore).
Le temperature impostabili per il comparto frigorifero vanno da +2°C a +8°C, mentre quelle per il comparto congelatore vanno da –18°C a –26°C. Gli incrementi o decrementi
possibili sono comunque sempre di 1°C.
Quando è attiva la funzione HOLIDAY non sono possibili
regolazioni di temperatura, ma il prodotto si posiziona automaticamente alla regolazione ottimale per la situazione:
+12°C per il comparto frigorifero (se attivo) e –18°C per il
comparto congelatore.
Gestione delle funzioni:
Simbolo della funzione nel normale funzionamento.
Funzione selezionata (contorno lampeggiante).
Funzione attivata (contorno acceso)
Attivazione/disattivazione delle funzioni
Premere il pulsante MODE "C" tante volte quante sono
necessarie a far lampeggiare il simbolo della funzione su cui
si vuole agire: ciò indica che la funzione è selezionata e pronta
I
4
ad essere attivata o disattivata. A questo punto si può gestire la funzione tramite il pulsante SELECT "D" per attivarla
o disattivarla.
NOTA: se non si dà conferma premendo il pulsante SELECT
entro cinque secondi dall’ultima azione sul display, quest’ultimo tornerà a visualizzare la funzione come precedentemente
impostata ad indicare che nessuna modifica è stata impostata.
La funzione SUPER COOL è legata al comparto frigorifero
e quando questo è spento non sarà consentita alcuna azione su tale funzione; altre prevedono un funzionamento che
può creare dei conflitti (ad esempio quando vengono attivate contemporaneamente le funzioni HOLIDAY e SUPER
FREEZE), in questo caso si tiene conto di una priorità già
stabilita in modo da aiutarvi nella gestione del prodotto.
La funzione SUPER FREEZE prevede due modalità di attivazione (vedere il paragrafo relativo alla gestione del reparto
congelatore).
Attivazione/disattivazione della modalità DEMO:
Per fare una dimostrazione del funzionamento del display
mantenendo il prodotto spento, si può attivare la modalità
DEMO.
Attivazione:
- posizionare la manopola della temperatura del freezer su 0;
- tenere premuti i due pulsanti “Select” e “Mode” per
circa 5 secondi, fino a che si sente un suono e lampeggiano
le due scritte “OFF” e “OFF” nel display; queste scritte
lampeggiano per tutto il tempo che la funzione DEMO è
attiva.
Disattivazione:
- posizionare la manopola della temperatura del freezer su 0;
- tenere premuti i due pulsanti “Select” e “Mode” per
circa 5 secondi, fino a che si sente un suono e le due scritte
“OFF” e “OFF” nel display smettono di lampeggiare.
Come utilizzare al meglio il reparto frigorifero
La temperatura all’interno del frigorifero si regola automaticamente in base all’impostazione della manopola frigo "A".
Si consiglia una posizione intermedia (ad esempio +5°C).
Il reparto frigorifero del suo apparecchio è dotato di un dispositivo di "A.I.R. System" (Ariston Integrated Refrigeration)
che consente un'ottima conservazione degli alimenti ed un
utilizzo semplificato dell'apparecchio grazie a:
- un ripristino veloce della temperatura: dopo l'apertura della
porta le temperature raggiungono valori ottimali velocemente, per una migliore conservazione.
- una distribuzione omogenea della temperatura che consente di riporre alimenti in qualsiasi ripiano.
B
Inserite soltanto alimenti a temperatura ambiente, evitando
di inserire quelli caldi: alzerebbero subito la temperatura interna costringendo il compressore ad un super lavoro con
consumo eccessivo di energia elettrica.
Non inserite i liquidi in recipienti scoperti perché provocherebbero l’aumento di umidità all’interno del frigorifero e di
conseguenza la formazione di brina.
B
B
A
A
A - Aria soffiata che si raffredda a contatto della parete
fredda
B - Aria più calda aspirata
Quando il vano frigo viene riempito dopo una grossa spesa,
utilizzate la funzione SUPER COOL "G" (vedi paragrafo
"Come muoversi nel display") in modo da raggiungere rapidamente un'ottima condizione di funzionamento. Una volta trascorso il tempo necessario la funzione si disattiva automaticamente.
Seguite attentamente i nostri consigli sulla durata massima
della conservazione: qualsiasi cibo, anche il più fresco, non
rimane intatto molto a lungo.
Contrariamente a quanto si crede, i cibi cotti non si mantengono più a lungo di quelli crudi.
Lo scomparto frigorifero è dotato di pratici ripiani estraibili
e regolabili in altezza grazie alle apposite guide (Fig. 1). Per
questo è possibile inserire anche grandi contenitori e cibi di
notevoli dimensioni. La forma innovativa dei ripiani consente la regolazione in altezza senza estrarre completamente il
ripiano.
1
2
Fig. 1
5
I
Come utilizzare al meglio il reparto congelatore
Non aprite la porta del freezer in caso di mancanza di corrente o di un guasto, ritarderete così l’aumento della temperatura al suo interno. In questo modo i surgelati e i congelati si conserveranno senza alterazioni per circa 9-14 ore.
Non mettete nel congelatore bottiglie piene: potrebbero
rompersi poiché, gelandosi, tutti i liquidi aumentano di volume.
Per la preparazione dei cibi da congelare consultare
un manuale specializzato.
Un alimento scongelato, anche solo parzialmente, non deve
mai essere ricongelato: lo dovete cuocere per consumarlo
(entro 24 ore) oppure per ricongelarlo.
Gli alimenti freschi da congelare non devono essere posti a
contatto con quelli già congelati o surgelati ma vanno messi nel vano superiore "I" dove la temperatura scende sotto
i -18°C ed è l'ideale per congelar bene i cibi. Non bisogna
infatti dimenticare che la buona conservazione degli alimenti
congelati dipende dalla velocità di congelazione.
La quantità massima giornaliera da congelare è indicata sulla
targhetta caratteristiche posta all'interno dello scomparto
frigorifero.
La prima volta, o dopo che il congelatore è stato inattivo,
potete congelare i cibi solo dopo aver fatto funzionare al
massimo l’apparecchio.
Quando l'apparecchio è già in funzione la congelazione può
essere fatta in due modi:
1. Per piccole quantità, inferiori alla capacità massima indicata sulla targhetta caratteristiche (posta in basso a sinistra,
accanto alla verduriera), attivate dal display la funzione
SUPER FREEZE nella sua modalità “24 ore” e introducete i
cibi da congelare. Per attivare la funzione premere il pulsante MODE "C" tante volte quante sono necessarie a far lampeggiare il simbolo del SUPER FREEZE e, quindi, premere il
pulsante SELECT "B" per rendere attiva la funzione
Per raffreddare rapidamente le bevande.
Grazie all’apposita funzione ICE PARTY non avrete più il
problema di trovare rotte le bottiglie messe a freddare nel
vano freezer (tutti i liquidi, gelandosi, aumentano infatti di
volume). Attivando questa funzione sarà il prodotto stesso
ad avvisarvi con un segnale acustico che è giunto il momento d estrarre la bottiglia dal vano freezer. Per tacitare l’allarme sonoro è sufficiente premere il pulsante SELECT "D".
Non dimenticatevi di usare l’ergonomico secchiello in dotazione per posizionare la bottiglia all’interno del vano freezer;
oltre ad accelerare il raffreddamento della stessa potrete,
giunto il momento di servire la bevanda, trasportarla facilmente grazie alle apposite maniglie e mantenerla fredda
per lungo tempo anche in tavola.
ATTENZIONE: tenete sempre il secchiello in dotazione per la
bottiglia all’interno del vano freezer (anche quando non avete bottiglie da freddare); solo così sarà garantita la bassa
temperatura del liquido in tempo breve.
.
Dopo 24 ore, o una volta raggiunte le temperature ottimali,
la funzione di congelamento rapido si disinserisce automaticamente.
2. Per grossi quantitativi di cibi da congelare (fino al carico
massimo indicato nella targhetta delle caratteristiche posta
in basso a sinistra, accanto alla verduriera) attivate dal display
la funzione SUPER FREEZE nella sua modalità “48 ore”.
Per attivare la funzione premere il pulsante MODE "C" tante volte quante sono necessarie a far lampeggiare il simbolo del SUPER FREEZE e, quindi, mantenere premuto per
più di tre secondi il pulsante SELECT "B" per rendere attiva
la funzione (il simbolo
inizia a lampeggiare lentamen-
te). Dopo 24 ore il simbolo della funzione smetterà di lampeggiare e tornerà fisso; a questo punto potete introdurre i
cibi da congelare. Dopo altre 24 ore la funzione si disinserirà
automaticamente.
Durante il congelamento evitate di aprire la porta del freezer.
Per ottenere una conservazione e un successivo
scongelamento ottimali è consigliabile dividere i cibi in piccole porzioni così da poterli congelare rapidamente e in
modo omogeneo. Sulle confezioni riportate le indicazioni
sul contenuto e sulla data di congelamento.
Al fine di ottenere un spazio maggiore nel reparto freezer
potete togliere il cassetto centrale, sistemando gli alimenti
direttamente sulla piastra evaporante. Verificare, dopo l'introduzione del carico, che la porta chiuda correttamente.
I
6
Bacinelle ghiaccio
Questo nuovo concetto di bacinelle ghiaccio è un brevetto
esclusivo. Il fatto di essere poste sulla parte superiore dei
cassetti riposti nel vano freezer assicura una maggiore
ergonomia, pulizia e più spazio nei cassetti: il ghiaccio non
viene più a contatto con i cibi riposti nel vano freezer; inoltre si evita lo sgocciolamento dell’acqua nella fase di
caricamento (in dotazione anche il coperchio per chiudere
il foro dopo l’operazione di carico dell’acqua).
MAX
WATER LEVEL
WATER LEVEL
MAX
Modalità d’uso (Fig. 2)
Riempite la bacinella con acqua attraverso l’apposito foro
fino al livello indicato (MAX WATER LEVEL), prestando attenzione a non superarlo: l’inserimento dell’acqua in quantità superiore a quella necessaria, comporterà una tale formazione di ghiaccio che potrebbe ostacolare la fuoriuscita
dei ghiaccioli.
Nel caso in cui abbiate utilizzato una quantità eccessiva di
liquido, bisognerà attendere che il ghiaccio si sciolga, svuotare la bacinella, e ripetere l’operazione di carico.
Una volta effettuata l’operazione di carico attraverso il foro
indicato, ruotate la bacinella di 90 °. Per il principio dei vasi
comunicanti l’acqua va a riempire le apposite forme,
dopodichè si potrà chiudere il foro con il tappo ed allocare
la bacinella nell'apposita sede del cassetto.
Dopo che il ghiaccio si sarà formato, basterà battere la bacinella su una superficie dura affinché i ghiaccioli si stacchino dalle loro sedi e siano fatti uscire dallo stesso foro da cui
è stata introdotta l’acqua. Per migliorare l’uscita dei ghiaccioli bagnare con acqua l’esterno della bacinella.
ATTENZIONE: ogni volta che si effettua il caricamento con
acqua, verificare che la bacinella sia completamente vuota
e non siano presenti residui di ghiaccio.
Il tempo minimo necessario per una ottimale formazione di
ghiaccio è circa 8 ore.
Fig. 2
7
I
Guida all'utilizzo del reparto freezer
Carni e pesci
Frollatura
(giorni)
Conservazione
(mesi)
Avvolto in foglio di alluminio
2/3
9 / 10
Non necessario
Agnello
Avvolto in foglio di alluminio
1/2
6
Non necessario
Arrosto di maiale
Avvolto in foglio di alluminio
1
6
Non necessario
Arrosto e bollito di
vitello
Avvolto in foglio di alluminio
1
8
Non necessario
Bistecche e braciole di
maiale
Ogni fetta avvolta in politene e quindi in
foglio di alluminio in numero di 4-5
6
Non necessario
Fettine e cotolette di
agnello o manzo
Ogni fetta avvolta in politene e quindi in
foglio di alluminio in numero di 4-5
6
Non necessario
Carne macinata
In contenitori di alluminio ricoperti con
politene
2
Lentamente in frigorifero
Cuore e fegato
In sacchetti di politene
3
Non necessario
Salsicce
In fogli di politene o alluminio
2
A seconda dell’uso
Polli e tacchini
Avvolti in fogli di alluminio
1/3
9
Lentamente in frigorifero
Anatre e oche
In fogli di alluminio
1/4
6
Lentamente in frigorifero
Anatre selvatiche,
fagiani e pernici
In fogli di alluminio
1/3
9
Lentamente in frigorifero
Conigli e lepri
In fogli di alluminio
3/4
6
Lentamente in frigorifero
Cervo e capriolo
In fogli di alluminio o politene
5/6
9
Lentamente in frigorifero
Pesci grossi
In fogli di alluminio o politene
4/6
Lentamente in frigorifero
Pesci piccoli
In buste di politene
2/3
Non necessario
Crostacei
In buste di politene
3/6
Non necessario
Molluschi
In contenitori di alluminio o plastica
ricoperti con acqua e sale
3
Lentamente in frigorifero
Pesci cotti
In fogli di alluminio o politene
12
In acqua calda
Pesci fritti
In sacchetti di politene
Tipo
Confezionamento
Arrosto e bollito di
manzo
I
Freschissima
4/6
8
Scongelamento
Direttamente in padella
Frutta e verdura
Tipo
Preparazione
Mele e pere
Sbucciare e tagliare a
pezzetti
Albicocche, pesche,
Snocciolare e pelare
ciliege e prugne
Scottatura
Confezionamento
(min)
Conservazione
Scongelamento
(mesi)
2’
In contenitori ricoperti di
sciroppo
12
Lentamente in frigorifero
1’ / 2’
In contenitori ricoperti di
sciroppo
12
Lentamente in frigorifero
10 / 12
Lentamente in frigorifero
12
Lentamente in frigorifero
Lentamente in frigorifero
Fragole, more e
mirtilli
Pulire, lavare e lasciare
asciugare
In contenitori ricoperti di
zucchero
Frutta cotta
Tagliare, cuocere e
passare
In contenitori,
aggiungere 10% di
zucchero
Succhi di frutta
Lavare, tagliare e
schiacciare
In contenitori, zucchero
a piacere
10 / 12
Cavolfiori
Spezzettare e scottare
in acqua e succo di
limone
2’
In sacchetti di politene
12
Cavolo e cavolini
Pulire e lavare
(spezzettare)
1’ / 2’
In sacchetti di politene
10 / 12
Piselli
Sbucciare e lavare
2’
In sacchetti di politene
12
Non necessario
Fagiolini
Lavare e tagliare a
pezzetti
2
In sacchetti di politene
10 / 12
Non necessario
Carote, peperoni e Tagliare a fette,
rape
pelare, lavare
3’ / 4’
In sacchetti di politene
12
Non necessario
Funghi e asparagi
Lavare e tagliare
3’ / 4’
In sacchetti o contenitori
6
A temperatura ambiente
Spinaci
Lavare e tagliuzzare
2’
In sacchetti di politene
12
A temperatura ambiente
Verdure varie per
minestra
Lavare e tagliare a
pezzetti
3’
In sacchetti in piccole
porzioni
6/7
A temperatura ambiente
Cibi vari
Preparazione
Scottatura Confezionamento
Non necessario
A temperatura ambiente
Conservazione
Scongelamento
(mesi)
Pane
In sacchetti di politene
4
A temperatura ambiente o
nel frigorifero
Torte
In fogli di politene
6
A temperatura ambiente e
cuocere a 100/200°C
Panna
In contenitori di plastica
6
A temperatura ambiente o
nel frigorifero
Burro
Nel suo incarto originale
avvolto in alluminio
6
In frigorifero
Cibi cotti,
minestrone
Suddiviso in contenitori
di plastica o vetro
3/6
A temperatura ambiente e
in acqua calda
Uova
Congelare senza guscio
in piccoli contenitori
10
A temperatura ambiente o
nel frigorifero
9
I
Consigli per risparmiare
- Installatelo bene
E cioè lontano da fonti di calore, dalla luce diretta del sole,
in locale ben aerato e con le distanze indicate nel paragrafo
"Installazione/L'aerazione".
IL CONSUMO DI ENERGIA EFFETTIVO DIPENDE DAL
MODO IN CUI L’APPARECCHIO VIENE UTILIZZATO E DAL
POSTO IN CUI VIENE SITUATO.
Le prove di consumo sono state eseguite in colonne di profondità 560mm, condizione più comune di installazione
- Il freddo giusto
L'impostazione per temperature interne troppo basse fa
aumentare i consumi.
- Non riempitelo troppo
Per conservare bene i cibi il freddo deve circolare liberamente
all’interno del frigorifero. Riempirlo troppo significa impedire questa circolazione facendo lavorare di continuo il compressore.
- A porte chiuse
Aprite il vostro frigorifero il meno possibile perché ogni volta che lo fate va via gran parte dell’aria fredda. Per ristabilire
la temperatura il motore deve lavorare a lungo consumando molta energia.
- Occhio alle guarnizioni
Mantenetele efficienti e pulite in modo che aderiscano bene
alle porte; solo così non lasceranno uscire nemmeno un po’
di freddo.
- Niente cibi caldi
Una pentola calda messa nel frigorifero alza immediatamente la temperatura di diversi gradi, lasciatela raffreddare a
temperatura ambiente prima di introdurla nel frigorifero.
- Brina nel freezer
Controllate lo spessore della brina sulle pareti del freezer ed
effettuate subito lo sbrinamento se lo strato è diventato
troppo spesso (Vedi più avanti “Come tenerlo in forma”).
Allarmi sonori e visivi
Allarme per porta aperta
Nel caso in cui la porta del frigorifero rimane aperta per un
tempo superiore ai due minuti la lampada di illuminazione
interna inizia a lampeggiare; dopo alcuni secondi è emesso
un segnale acustico che è possibile tacitare chiudendo la
porta o premendo il pulsante SELECT "D". Se la porta rimane aperta per più di 4 minuti la lampada inizia a lampeggiare più velocemente.
Allarme per riscaldamento anomalo del
freezer
1. Per segnalare un eccessivo riscaldamento del freezer (es.
momentaneo black out) viene emesso un segnale acustico
e compare un messaggio sul display (A1) a segnalare un
pericoloso riscaldamento. Per non far ricongelare il cibo, il
freezer si manterrà ad una temperatura intorno a 0°C, permettendovi di consumare gli alimenti entro le 24 ore o di
ricongelarli previa cottura. Si può spegnere il segnale acustico premendo semplicemente il pulsante SELECT "D".
Per tornare al normale funzionamento e cancellare il messaggio sul display si dovrà spegnere e riaccendere il prodotto, agendo sulla manopola ON/OFF prodotto "B".
I
10
2. Se la temperatura continua a salire verso valori eccessivamente alti viene emesso nuovamente il segnale acustico
e compare un altro messaggio sul display (A2) a segnalare l’eccessivo riscaldamento. Si consiglia di verificare lo
stato del cibo, potrebbe essere necessario gettarlo. In ogni
caso il cibo non va ricongelato se non dopo cottura. Per
non far ricongelare il cibo, il freezer verrà mantenuto ad
una temperatura intorno a 0°C. Si può spegnere il segnale acustico premendo semplicemente il pulsante
SELECT "D".
Per tornare al normale funzionamento e cancellare il messaggio sul display si dovrà spegnere e riaccendere il prodotto, agendo sulla manopola ON/OFF prodotto "B".
Come tenerlo in forma
Prima di procedere a qualsiasi operazione di pulizia o
sbrinamento staccare l'apparecchio dalla rete di alimentazione (ruotare la manopola ON/OFF prodotto "B" nella
posizione OFF e poi disinserire la spina). Nel caso in cui
tale procedura non sia eseguita, si potrebbe verificare
una condizione di allarme. ATTENZIONE: tale allarme non
è sintomo di anomalia. Per ripristinare il corretto funzionamento spegnere e riaccendere il prodotto agendo direttamente sulla manopola ON/OFF prodotto "B".
Sbrinamento
ATTENZIONE: non danneggiare il circuito refrigerante.
Fare attenzione a non usare dispositivi meccanici o altri
utensili per accelerare il processo di sbrinamento, oltre
a quelli raccomandati dal costruttore.
Come sbrinare il reparto frigorifero.
Questo apparecchio ha lo sbrinamento automatico e l’acqua
viene convogliata verso la parte posteriore da un apposito scarico (fig. 3) dove il calore prodotto dal compressore la fa evaporare. L’unico intervento che dovete fare periodicamente consiste
nel controllare che l'acqua di scarico passi regolarmente. Pulire
il foro di scarico con l'apposito "scovolino".
Come sbrinare lo scomparto congelatore
- Eliminate ogni tanto la brina con l’apposito raschietto in
dotazione (niente coltelli od oggetti metallici).
- Se la brina ha superato i 5 mm bisogna fare un vero e proprio sbrinamento. Procedete così: un giorno prima attivare la
funzione SUPER FREEZE nella sua modalità 24 ore;
serve a dare agli alimenti un salutare “colpo di freddo” in
più. Dopo 24 ore la funzione di congelamento si disinserisce
automaticamente ma potete disinserirla voi. Spegnete il prodotto agendo sulla manopola ON/OFF prodotto "B". ATTENZIONE: questa operazione spegne tutto l'apparecchio (reparto frigorifero compreso).
Avvolgete tutti i surgelati e i congelati in carta da giornale mettendoli o in un altro frigorifero o in un luogo fresco. Lasciate
aperta la porta in modo che la brina si sciolga del tutto, aiutandola con dei contenitori pieni di acqua tiepida.
Pulire ed asciugare con cura prima di riavviare l'apparecchio.
Ricordatevi che il motore può non partire immediatamente ma dopo circa 8 minuti.
FUNZIONE VACANZE. Quello delle muffe e cattivi odori che si formano all'interno del frigorifero spento
quando si parte per le vacanze, non è più un problema: basta attivare la funzione Holiday. In questo modo,
con un basso consumo, si mantiene la
temperatura nel vano frigo a circa 12°C
(potete conservare ad esempio trucchi
e cosmetici) e si lascia funzionare il
congelatore al minimo, indispensabile per la conservazione dei cibi.
Pulizia e manutenzioni particolari
Prima di pulire il frigorifero ruotare la manopola ON/
OFF prodotto "B" nella posizioe OFF, fintanto che non
è visualizzato lo stato di OFF in entrambi i comparti
frigo e freezer, e successivamente disinserire la spina.
- I materiali con i quali è stato fabbricato il vostro apparecchio sono igienici e non trasmettono odori ma per mantenere queste qualità è necessario che i cibi vengano sempre
protetti e ben chiusi, per evitare macchie difficilmente rimovibili o la creazione di cattivi odori.
- Solo acqua e bicarbonato. Per pulire sia l’interno che l’esterno usate una spugnetta con acqua tiepida e bicarbonato di
sodio che, tra l’altro, è anche un buon disinfettante. Se non
l’avete in casa potete impiegare del sapone neutro (quello
di Marsiglia ad esempio).
- Cosa non usare. Mai abrasivi, mai candeggina, mai ammoniaca. Proibitissimi i solventi e altri prodotti simili.
- Tutto ciò che si può togliere, mettetelo a bagno in acqua
calda con sapone o detersivo per i piatti. E prima di rimetterlo a posto, risciacquatelo e asciugatelo bene.
- Quando sta fermo a lungo. Se decidete di fermare il frigorifero durante il periodo estivo, bisogna pulire l’interno e lasciare
le porte aperte.
- Come sostituire la lampadina interna.
Per sostituire la lampada di illuminazione dello scomparto
frigorifero staccate l'apparecchio dalla rete di alimentazione e cambiate la lampada avariata con un'altra di potenza
non superiore a 15 W.
Per accedere alla lampada "A", svitare la vite di fissaggio
centrale "B" posizionata nella parte posteriore del
coprilampada, come indicato in Fig. 4.
A
Fig. 3
B
Fig. 4
11
I
C'è qualche problema?
Il display è completamente spento
Avete controllato se:
· l’interruttore generale dell’appartamento è disinserito;
· la spina non è correttamente inserita nella presa di corrente;
· la presa non è efficiente; provate a collegare la spina ad
un'altra presa del locale.
Se, nonostante tutti i controlli, l’apparecchio non funziona
e l’inconveniente da voi rilevato continua ad esserci, chiamate il Centro di Assistenza più vicino, comunicando queste informazioni: il tipo di guasto, la sigla del modello (Mod.)
e i relativi numeri (S/N) scritti sulla targhetta delle caratteristiche posta in basso a sinistra, accanto alla verduriera (vedi
esempio nella figura seguente).
Il motore non parte
Avete controllato se:
· sono trascorsi 8 minuti dopo l’accensione?
Questo modello, infatti, è dotato di un controllo salvamotore
che lo fa avviare solo dopo circa 8 minuti dall’accensione;
· è stata attivata la modalità DEMO? (Vedi a pag. 4).
Il frigorifero e il congelatore raffreddano poco
Avete controllato se:
· le porte non chiudono bene o le guarnizioni sono rovinate;
· le porte vengono aperte molto spesso;
· le manopole di regolazione della temperatura non sono
in posizione corretta;
· il frigorifero o il congelatore sono stati riempiti eccessivamente.
Nel frigorifero gli alimenti si gelano troppo
Avete controllato se:
· la regolazione della temperatura impostata è troppo bassa (o non ottimale);
· gli alimenti sono a contatto con la parte posteriore, la più
fredda.
Il motore funziona di continuo
Avete controllato se:
· sono attive le funzioni SUPER COOL e/o SUPER FREEZE
e/o ICE PARTY;
· le porte sono state aperte di continuo;
· la temperatura esterna è molto alta .
L’apparecchio emette troppo rumore.
Avete controllato se:
· Il frigorifero non è posto ben in piano:
· è stato installato tra mobili o oggetti che vibrano ed emettono rumori;
· il gas refrigerante interno produce un leggero rumore anche quando il compressore è fermo (non è un difetto).
Sul fondo del frigorifero c'è dell'acqua
Avete controllato se:
· Il foro dello scarico dell'acqua di sbrinamento è otturato
I
12
Mod. RG 2330
220 - 240 V-
TI
50 Hz
Cod.
150 W
75
Total 340
Net
Gross
Gross
Util
Bruto
Bruto
Utile
Brut
Brut
Compr. R 134 a
Test Pressure
HIGH-235
Syst.
P.S-I. LOW 140
Kompr. kg 0,090
Made in Italy 13918
93139180000
W Fuse
S/N 704211801
A
Gross
Bruto
Brut
Max 15 w
Capac
Class
Poder de Cong
Clase
Freez.
kg/24 h
4,0
N
Classe
Non ricorrete mai a tecnici non autorizzati e rifiutate
sempre l’installazione di pezzi di ricambio non originali.
Safety - a good habit to get into.
ATTENTION
Read your manual carefully since it contains instructions
which will ensure safe installation, use and maintenance of
your appliance.
Your Refrigerator is built to International safety standards
(EN60) and has been awarded the European approval mark
(IMQ) for compliance with UK electrical safety requirements.
It also meets the EC standards on the prevention and elimination of radio interference (EC directive 87/308 - 02.06.89).
1. This appliance must not be installed outdoors - not even in
an area protected by a roof. It is extremely dangerous to leave
it exposed to rain or storms.
2. It must only be used by adults and exclusively to refrigerate
and freeze foodstuffs, following the instructions for use contained in this manual.
3. Do not ever touch or handle the appliance with bare feet or
with wet hands or feet.
4. It is highly recommended that you do not use extension cords
or multiple socket adapters. If the refrigerator is installed between cabinets, make sure that the cord is not bent or dangerously pinched or compressed.
5. Never pull on the cord or the refrigerator to remove the plug
from the wall socket - this is very dangerous.
6. Never touch the cooling components within the appliance,
especially with wet hands because this could result in injury.
Never put ice cubes just removed from the freezer into your
mouth because they could stick to your mouth and cause burns.
7. Never perform any cleaning or maintenance operations
without first unplugging the appliance; in fact, setting the
appliance ON/OFF knob to OFF is not enough to cut off all
electrical contacts.
8. Before having your old refrigerator picked up for disposal,
remove or make inoperable any locking devices to prevent children who might play in or around the appliance from being
locked inside.
9. Before calling for service/assistance in the case of malfunction, consult the chapter entitled “Is There a Problem? to determine whether it is possible to eliminate the problem. do not try
to repair the problem by trying to access the internal components of the appliance.
10. If damaged, the power supply cord on this appliance
must necessarily be replaced by our service centre because
special tools are required for replacement.
11. Do not use electric appliances inside the compartment for
food storage, if these are not those recommended by the
manufacturer.
12. At the end of the functional life of your appliance –
containing cyclopentane gas in the insulation foam and perhaps
gas R600a (isobutane) in the refrigeration circuit – the latter
should made safe before being sent to the dump.
For this operation, please contact your dealer or the Local
Organisation in charge of waste disposal.
Installation
To ensure that the appliance operates properly and to
reduce energy consumption, it is important that the
appliance is installed correctly.
Ventilation
The compressor and condenser generate heat and, therefore, need to be ventilated properly. Rooms with less than
perfect ventilation are not very suited for installation of the
appliance. Therefore, it should be installed in a room with
an opening (window or French window) that provide the
appropriate amount of air re-circulation. It is also important
that the room not be too humid.
Away from Heat
This appliance should not be positioned in a place where it
is directly exposed to sunlight or directly next to an iven/
hob.
standards for 46/90 systems. If the socket is not fitted with
an earthing wire, the manufacturer will not be held liability
for any damages and or injuries arising out of the use of the
appliance. Do not use multiple sockets or adapters.
Position the appliance in such a way that you can access
the socket where it is plugged in.
Insufficient power?
The electrical socket must be able to handle the maximum
power load of the appliance, which is indicated on the rating plate located at the bottom left next to the vegetable
crisper.
Before making the electrical connection ...
After the appliance has been delivered, place it in the vertical upright position and wait at least 3 hours before inserting the plug into the socket in order to ensure that it functions properly.
Electrical Connection and Earthing
Before proceeding with the electrical connection, make sure
that the voltage indicated on the rating plate, located at the
bottom left near the vegetable crisper, corresponds to the
mains voltage in your home and that the socket is fitted
with a standard earthing wire in accordance with safety
13
GB
Close-up view
A
Removable door shelves with lid, with egg tray
L
Removable/Adjustable Shelves
M
"A.I.R. System"
and lidded butter dish
B
Removable miscellaneous shelf
C
Hinged shelf
D
Compartment for a 2 litre bottle
E
Removable door shelf for
(Ariston Integrated Refrigeration)
bottles
F
Compartment for storing
frozen foods
G
Ice tray
H
Compartment for freezing
fresh foods and storing frozen
foods
I
M
A
L
B
L
B
C
Display
J
Fruit and Vegetable Crispers
K
Meat/cheese storage box
K
D
J
E
I
ECO
H
G
F
G
F
GB
14
The Display
A
E
C
A
G
H
I
J
G
Fridge knob
Freezer and appliance ON/OFF knob
H
This knob turns the whole appliance on or off and
enables you to set the freezer compartment operating
temperatures.
C
I
MODE button
SELECT button
J
SUPER FREEZE function
HOLIDAY function
ICE PARTY function
Displays the status (disabled, selected or enabled) of
the ICE PARTY function (maximum speed in cooling a
warm bottle and serving it at the table in the special
bucket designed to maintain the temperature reached
by the bottle).
Fridge compartment setting
Displays the temperature set in the fridge
compartment and when the fridge compartment is
turned OFF (word OFF indicated).
F
SUPER COOL function
Displays the status (disabled, selected or enabled) of the
HOLIDAY FUNCTION (optimal temperatures with the
minimum consumption in the event of prolonged
absence).
This button selects/deselects the different functions
and turns off the alarm buzzers.
E
D
Displays the status (disabled, selected or enabled) of
the SUPER FREEZE function (rapid freezing).
This button allows you to navigate the display to have
access to the various settings/functions and to turn
off the alarm buzzers.
D
B
Displays the status (disabled, selected or enabled) of
the SUPER COOL function (rapid cooling of the
refrigerator compartment).
This knob turns the refrigerator compartment on or
off and enables you to set the relative operating
temperatures.
B
F
Freezer compartment setting
Displays the temperature set in the freezer
compartment and when the appliance is turned OFF
(word OFF indicated).
15
GB
How to Start the Appliance
NOTICE
After the appliance has been delivered, stand it in the
upright position and wait approximately 3 hours before connecting it to the electrical outlet to guarantee
that it operates properly.
Before placing foodstuffs in the refrigerator or freezer, clean
the interior well with warm water and baking soda.
Motor protection time.
This model is provided with a motor protection system.
Therefore, if the compressor does not start immediately
after the user has turned it off, do not worry as it will
start automatically after approximately 8 minutes.
Once you have plugged the appliance into the mains socket,
make sure the display is on.
Freezer compartment
When you turn the appliance on (by turning the appliance ON/
OFF knob "B" to the required freezer compartment operating
temperature), we recommend you enable the SUPER FREEZE
function to speed up the cooling process inside the compartment;
when the latter has reached the optimal temperature, the
function will be disabled and you may place the frozen foods
inside the freezer.
Refrigerator compartment
When you turn the refrigerator compartment on (by turning
knob "A" to the required refrigerator compartment operating
temperature), we recommend you enable the SUPER COOL
function to speed up the cooling process inside the
compartment: after a few hours, you may place food inside the
refrigerator.
How to use the display
Temperature settings
If the compartment concerned is switched off, the word OFF
will appear on the relative indication space on the display (E
for the refrigerator and F for the freezer). If the compartment
is switched on, then the temperatures set at that time will
appear. To change them, turn the relative knob directly (A
for the refrigerator and B for the freezer).
The refrigerator compartment can be set to between +2°C
and +8°C, while the freezer compartment can be set to a temperature of between -18°C and -26°C. The temperature in
both cases can be increased or decreased by 1°C at a time.
When the HOLIDAY function is enabled, temperature
regulations cannot be made, but the appliance automatically
sets itself to the best setting for the situation: +12°C for the
refrigerator compartment (if enabled) and -18°C for the
freezer compartment.
Enabling/disabling the DEMO mode:
To run a demonstration of the display operation while
keeping the appliance turned off, just enable the DEMO
mode.
How to use the functions:
Function symbol during normal operation.
Enabling:
- set the freezer temperature knob to 0;
- keep the two buttons “Select” and “Mode” pressed for
approximately 5 seconds, until you hear the buzzer and the
two words “OFF” and “OFF” flash on the display; these
words will flash for the entire duration the DEMO mode is
enabled.
Function selected (outline flashing).
Function enabled (outline on)
Enabling/disabling the functions
Press the MODE button "C" as many times as necessary for
the red outline of the function you wish to act on to light
up: this indicates that the function has been selected and is
ready to be enabled or disabled. Now you can enable or
GB
disable the selected function using the SELECT button "D".
NOTE: if you do not confirm your selection by pressing the
SELECT button within five seconds of the last action
performed on the display, the latter shall go back to displaying
the function previously set and indicate that no new
modification has been made.
The SUPER COOL function is linked to the refrigerator
compartment and when the latter is switched off, no action
whatsoever will be possible on the former, other functions
foresee an operation that can create conflicts (for example,
when the HOLIDAY and SUPER FREEZE functions are
enabled simultaneously), in this case a pre-set priority is taken
into consideration in order to help you operate the appliance.
The SUPER FREEZE function features a double mode of
operation (see paragraph on operating the freezer
compartment).
16
Disabling:
- set the freezer temperature knob to 0;
- keep the two buttons “Select” and “Mode” pressed for
approximately 5 seconds, until you hear the buzzer and the
two words “OFF” and “OFF” on the display stop flashing.
How to use the refrigerator compartment...
The temperature inside the refrigerator is automatically adjusted according to the setting made on the display.We recommend, however, a medium position (+5°C).
The refrigerator compartment of your appliance is equipped with
"A.I.R. System" which makes it possible to achieve optimal
food storage while simplifying the use of the refrigerator thanks
to the following features:
- Fast temperature reset: after the doors heve been opened,
the internal temperatures return to optimal values faster,
improving food storage.
- More uniform temperature distribution: this makes it
possible to place any type of food on any shelf.
- Higher humidity level: this allows you to store food longer.
B
Remember to cool hot food before storing otherwise the
temperature inside the appliance will increase, causing the
compressor to work harder and use more energy.
Do not store liquids in unsealed containers since this will
increase the humidity and lead to the formation of frost in
the refrigerator.
B
B
A
A
A - Blown air which is cooled when it comes into contact
with the refrigeration panel
B - Hotter air is drawn in
When the fridge compartment is filled up after a heavy
shopping spree, use the SUPER COOL "J" function (see the
paragraph on "How to use the display") in order to reach
optimum operating conditions quickly. Once the necessary
time has elapsed, the function is disabled automatically.
Remember to follow our instructions on the storage life of
foods: If not stored correctly, even the freshest food will
deteriorate quite quickly.
Contrary to popular belief, cooked foods do not keep longer
than fresh food.
The refrigerator compartment of your appliance is fitted with
practical removable shelves (Fig. 1) whose height can be
adjusted to allow storage of large containers. This allows
you to place even large containers and foodstuffs in the refrigerator.
1
2
Fig. 1
17
GB
How to use the freezer compartment...
For the preparation of food to be frozen, please consult a specialized manual.
Food that has be thawed, even partially, must not be refrozen: you must cook it in order to consume it (within 24
hours) or to freeze it once again.
When freezing fresh foods, remember that they should not
touch other previously frozen or deep frozen foods. Place
the food that you wish to freeze in the top compartment
"I" where the temperature will fall below -18°C, which is
ideal for freezing food properly. Remember that proper conservation depends on the speed of freezing.
The maximum amount of food you can freeze per day is
indicated on the data plate situated inside the refrigerator
compartment.
The first time, or after the freezer has been inactive, you can
only freeze food after having let the appliance function at
maximum. When the appliance is already on, freezing can
be done in two ways:
1. For small quantities, less than the maximum capacity
indicated on the data plate (situated on the lower left, next
to the salad crisper), enable the SUPER FREEZE function on
the display in the "24 hour" mode and insert the food to be
frozen. To enable the function, press the MODE button "C"
as many times as necessary for the SUPER FREEZE symbol
to start flashing and then press the SELECT "B" button to
enable the
function. After 24 hours, or once the optimal
temperatures have been reached, the rapid freezing function
is automatically disabled.
2. For large quantities of food to be frozen (up until the
maximum load indicated on the data plate situated on the
lower left, next to the salad crisper), enable the SUPER
FREEZE function on the display in the "48 hours" mode: To
enable the function, press the MODE button "C" as many
times as necessary for the SUPER FREEZE symbol to start
flashing and then press the SELECT "B" button for more
than three seconds to ensure the function is enabled (symbol
starts to flash slowly).
During the freezing process, avoid opening the door of the
freezer.
In order to freeze and then thaw foods optimally, it is recommended that you divide food into small portions so that they
freeze quickly and uniformly. The packages should be clearly
marked with the content and the date they were frozen.
In order to obtain a larger amount of space in the freezer
compartment, you can remove the central drawer, and place
the food directly onto the evaporator plate. Make sure that,
after having inserted the load, the door closes correctly.
Do not open the freezer door in the event of a power failure
or malfunction. This precaution will slow the rise in temperature within the compartment. If the door is not opened,
frozen and fast-frozen foods will remain in their current state
for approximately 9-14 hours.
Do not place full bottles in the freezer: they could easily
burst because all liquids increase in volume when they freeze.
GB
18
To cool drinks down quickly.
Thanks to the special ICE PARTY function, you will no longer
have to deal with the problem of finding broken bottles
placed to cool inside the freezer compartment (all liquids,
upon freezing, expand and increase in volume). Once you
have enabled this function, the appliance itself will inform
you in the form of an alarm buzzer that the time has come
to remove the bottle from the freezer compartment. To
silence the alarm buzzer, just press the SELECT button "D".
Do not forget to use the ergonomic bucket provided to store
the bottle inside the freezer compartment; as well as
accelerating the cooling process of the same, once it is time
to serve it at the table, you can take it there easily thanks to
the special handles and keep it cool at length at the table.
WARNING: always keep the bucket provided for the bottle
inside the freezer compartment (even when you don't have
bottles to cool); only this way can the low temperature of
the liquid be guaranteed in a short amount of time.
Ice trays
This new concept of ice trays is an exclusive patent. The fact
that they are situated on the top part of the freezer drawers
ensures greater ergonomics and cleanliness and leaves more
room free inside the drawers : the ice no longer comes into
contact with the food placed inside the freezer
compartment; furthermore, the dripping of the water during
filling is avoided (a lid to cover up the hole after filling with
water is also provided).
WATER LEVEL
WATER LEVEL
MAX
Instructions for use (Fig. 2)
Fill up the tray with water via the special hole up to the level
indicated (MAX WATER LEVEL), taking care not to exceed it:
inserting more water than is necessary will lead to the
formation of ice which could obstruct the exit of the ice
cubes.
If you have used an excessive amount of water, you will
have to wait until the ice has melted, empty out the tray
and re-fill it with water.
Once you have filled the ice tray up with water through the
hole indicated, turn it by 90 °. Thanks to the connected
compartments, the water fills up the special shapes, after
which you can cover the hole up with the special cap and
place the ice tray in the inner door of the freezer
compartment.
Once the ice has formed, all you need to do is to knock the
tray against a hard surface so that the ice cubes come away
from their housing and come out of the same hole used to
fill the tray with water. To make it easier for the ice cubes to
come out, wet the outside of the tray.
WARNING: every time you fill up the ice tray with water ,
make sure that the same is completely empty and that there
are no traces of ice left inside it.
The minimum time required for ice to form well is
approximately 8 hours.
MAX
Fig. 2
19
GB
Guide to Using the Freezer
Meat and Fish
Tenderising
(days)
Storage
(months)
Tinfoil
2/3
9 / 10
Not required.
Lamb
Tinfoil
1/2
6
Not required.
Pork Roast
Tinfoil
1
6
Not required.
Veal Roast
Tinfoil
1
8
Not required.
Veal/Pork Chops
Each piece wrapped in cling wrap and
then in tinfoil (4 to 6 slices)
6
Not required.
Veal/Lamb Cutlets
Each piece wrapped in cling wrap and
then in tinfoil (4 to 6 slices)
6
Not required.
Minced Meat
In aluminium containers covered with cling
wrap.
2
Slowly in refrigerator.
Heart and Liver
Plastic Baggies
3
Not required.
Sausages
Cling Wrap or Tinfoil
2
As necessary.
Chicken and Turkey
Tinfoil
1/3
9
Very slowly in refrigerator.
Duck and Goose
Tinfoil
1/4
6
Very slowly in refrigerator.
Pheasant, Partrige and
Wild Duck
Tinfoil
1/3
9
Very slowly in refrigerator.
Hare and Rabbit
Tinfoil
3/4
6
Very slowly in refrigerator.
Venison
Tinfoil or Cling Wrap
5/6
9
Very slowly in refrigerator.
Large Fish
Tinfoil or Cling Wrap
4/6
Very slowly in refrigerator.
Small Fish
Plastic Baggies
2/3
Not required.
Crustaceans
Plastic Baggies
3/6
Not required.
Shellfish
Store in salted water in aluminium
containers or plastic containers.
3
Very slowly in refrigerator.
Boiled Fish
Tinfoil or Cling Wrap
12
In hot water.
Fried Fish
Plastic Baggies
Food
Wrapping
Beef Roast
GB
Freshly
minced
4/6
20
Thawing Time
Directly in pan.
Fruits and Vegetables
Food
Preparation
Apples and Pears
Peel and cut into slices.
Apricots, Peaches,
Cherries and Plums
Peel and pit.
Strawberries
Blackberries and
Raspberries
Blanching
Time
Wrapping
Storage
(months)
Thawing Time
2’
In Containers (cover
with syrup)
12
In refrigerator very
slowly.
1’ / 2’
In Containers (cover
with syrup)
12
In refrigerator very
slowly.
Rinse and fry.
In Containers (cover
with sugar)
10 / 12
In refrigerator very
slowly.
Cooked Fruit
Cut, cook and strain.
In Containers (add
10% sugar)
12
In refrigerator very
slowly.
Fruit Juice
Wash, cut and crush.
In Containers (sugar
to taste)
10 / 12
In refrigerator very
slowly.
Cauliflower
Remove leaves, cut head
into small pieces and blanch
in water and a little lemon
juice.
Cabbage and
Brussel Sprouts
Wash and cut into small
pieces.
Peas
2’
Plastic Baggies
12
1’ / 2’
Plastic Baggies
10 / 12
Shell and wash.
2’
Plastic Baggies
12
Not required.
French Beans
Wash and slice if required.
2
Plastic Baggies
10 / 12
Not required.
Carrots, Peppers
and Turnips
Peel, wash and slice if
necessary.
3’ / 4’
Plastic Baggies
12
Not required.
Mushrooms and
Asparagus
Wash, peel and cut up.
3’ / 4’
Plastic Baggies or
Containers
6
At room temperature.
Spinach
Wash and mince.
2’
Plastic Baggies
12
At room temperature.
Vegetable for Soups
Wash and cut up in small
pieces.
3’
Plastic Baggies or
Containers
Various Foods
Preparation
Blanching
Time
Wrapping
6 /7
Storage
(months)
Not required.
At room temperature.
Not required.
Thawing time
Bread
Plastic Baggies
4
At room temperature
and in the oven.
Cakes
Plastic Baggies
6
About 10 minutes at
room temperature,
cook at 100/200°C.
Cream
Plastic Containers
6
At room temperature or
in refrigerator.
Butter
In original wrapping
or tinfoil
6
In refrigerator.
Boiled Food or
Vegetable Soup
Plastic or Glass
Containers
Eggs
Freeze without shells
in small containers
21
3 /6
At room temperature or
in hot water.
10
At room temperature or
in refrigerator.
GB
Tips on Saving Energy
- Install the Appliance Correctly
This means that the appliance should be installed away from
heat sources or direct sunlight in a well ventilated room.
THE ACTUAL ENERGY CONSUMPTION OF THE
APPLIANCE DEPENDS ON THE WAY THE SAME IS USED
AND ON ITS LOCATION.
The consumption tests were performed in 560mm deep
column units, the most common installation setting for this
appliance.
- Just the right cold
Setting internal temperatures that are too low will increase
consumption levels.
- Do not Overfill
To conserve food properly, the cold air must circulate freely
within the refrigerator. If it is overfilled, this will prevent proper
air circulation, forcing the compressor to work continuously.
- Close the Doors
Open your refrigerator as little as possible because each time
you do so you loose much of the cold air. To raise the temperature to the proper level again, the motor must work for
a long time, consuming energy.
- Keep an Eye on the Seals
Keep the seals clean and make sure that they adhere well to
the door. This alone will ensure that no cold air escapes.
- No Hot Foods
A hot pot or pan placed in the refrigerator immediately raises
the temperature several degrees. Let hot cookware and food
cool to ambient temperature before placing them in the refrigerator.
- Defrost the Freezer
Check the thickness of the frost on the walls of the freezer
and immediately defrost it if the layer of frost is too thick.
(see the section entitled, “Keeping your Appliance in Shape”).
Alarm buzzers and visual warnings
Door open alarm
Should the refrigerator door be left open for more than two
minutes, the lamp inside the compartment will begin to flash;
after a few seconds, an alarm buzzer is sounded. To silence
this buzzer, just shut the door or press the SELECT button
"D". Should the door remain open for more than 4 minutes,
the lamp will flash more rapidly.
Abnormal freezer heating alarm
1. To signal an excessive heating on the part of the freezer
(e.g. momentary power failure), a buzzer will sound and
a message comes up on the display (A1) to signal the
dangerous heating of the compartment. To prevent food
from refreezing, the freezer will try to maintain a temperature of 0°C, thus allowing you to use up the food within
24 hours or to cook them and then refreeze them. You
can turn the buzzer off simply by pressing the SELECT
button "D".
To return to normal operation and cancel the message
from the display, you need to turn the appliance off and
on again, turning the appliance ON/OFF knob "B".
GB
22
2. If the temperature inside the freezer continues to rise to
excessively high values, the buzzer will sound yet again
and another message (A2) will come up on the display to
signal the dangerous state of overheating. We recommend
you check the conditions of the food, as it may be
necessary to throw it away. In all cases, food should not
be refrozen unless you cook it first. To prevent food from
refreezing, the freezer will try to maintain a temperature
of 0°C. The buzzer can be turned off by simply pressing
the SELECT button "D". To return to normal operation
and cancel the message from the display, you need to
turn the appliance off and on again, turning the appliance
ON/OFF knob "B".
Keeping Your Appliance in Shape
Before proceeding with any cleaning or defrosting
operations, disconnect the appliance from the
electricity mains (by setting the appliance ON/OFF knob
“B” to the OFF position and then unplugging it). Should
you fail to do this, the appliance may go into alarm
mode. WARNING: this alarm is not a sign of any
anomaly. To return to normal operating mode, turn
the appliance off and back on again by turning the
appliance ON/OFF knob “B”.
Defrosting
WARNING: do not damage the refrigeration circuit.
Do not use mechanical devices or other tools to speed
up the defrosting process, unless they have been recommended by the manufacturer.
How to Defrost the Refrigerator
This appliance defrosts automatically, and the water is ducted
to the back of the appliance by a special outlet (fig. 3) where
the heat produced by the compressor makes it evaporate.
The only operation to be performed on a regular basis is to
control that the outlet water flows freely. Clean the outlet
hole with the special cleaning brush.
How to defrost the freezer compartment
- Remove the frost from time to time with the aid of the
special scraper provided (do not use knives or metal objects).
- If the frost is more than 5 mm thick, then you must defrost
the freezer completely. Proceed as follows: one day before
enabling the SUPER FREEZE function in the 24-hour mode;
it helps give the food a healthy extra "cold shock". After 24
hours, the freezing function is automatically disabled but you
can disable it yourself. Turn the appliance off by turning the
appliance ON/OFF knob "B". WARNING: this operation
switches off the whole appliance (including the fridge
compartment).
Wrap all frozen foods in newspaper and place them either in
another refrigerator or in a cool place. Leave the door open,
so as to allow all the frost to melt completely, helping it along
with containers filled with lukewarm water.
Clean and dry thoroughly before restarting the appliance.
Remember that the motor will not start immediately,
but rather after approximately 8 minutes.
HOLIDAY FUNCTION. Mould and bad odours forming
inside your unused fridge when you go on holiday need
no longer be a problem: just enable the Holiday
function (from the display). This way, with limited
energy consumption, the temperature of the
refrigerator compartment is kept at around 12°C (you
can store your make-up and beauty
products in it, for example) and the
freezer is operated at its minimum
setting, which is essential for food
preservation.
Cleaning and maintenance of the parts
Before you clean the refrigerator, turn the appliance
ON/OFF knob “B” to the OFF setting; only unplug the
appliance once the word OFF is displayed in both the
fridge and freezer compartments.
- Your appliance is manufactured with hygienic odourless
materials. To preserve these characteristics, always use sealed
containers for strong smelling foods to avoid the formation
of odours that are difficult to remove.
- Use only a water and bicarbonate solution: Clean the internal
and exterior of your appliance with a sponge soaked with a
warm water and sodium bicarbonate solution, which is also
a good disinfectant. If you do not have any sodium
bicarbonate at home, use neutral detergent.
- What not to use: Do not use abrasive detergents, bleach or
detergents containing ammonia. Never use solvent based
products.
- All the removable parts can be cleaned by soaking in hot
soapy water or detergent. Remember to dry thoroughly before
replacing them.
- When the appliance is left unused for an extended amount of
time. If you decide to switch your appliance off during the summer
months, clean it on the inside and leave the doors open.
- Replacing the light bulb.
When replacing the light of the refrigerator compartment
unplug the unit from the power supply and chang the used
lamp with another one of not more than 15 W.
For access ti lamp "A", remove the centre screw "B" at the
back of the lamp cover, as indicated in fig. 4.
A
B
Fig. 3
Fig. 4
23
GB
Is There a Problem?
The display is completely switched off
Have you checked whether:
• The main switch for the electricity to the apartment or
home has been turned off;
• The plug is properly inserted in the outlet;
• The outlet is adequate; try inserting the plug into another
outlet in the room.
If after all the checks, the appliance still does not operate or
the problem persists, call the nearest Service Centre and
inform them of: the type of problem, the abbreviation of
the model name (Mod.) and the relative numbers (S/N) written on the rating plate located at the bottom left next to
the vegetable crisper (see example in the figure below).
The motor does not start
Have you checked whether:
· 8 minutes have passed since you switched the
appliance on?
This model is in fact provided with a motor protection
control system which means that it will only start
approximately 8 minutes after being switched on.
• the DEMO mode has been enabled? (see page 16)
The refrigerator and the freezer do not cool
properly.
Have you checked whether:
• The doors do not close well or the seals are faulty;
• The doors are left open too long;
• The thermostat knob is not on the proper setting;
• The refrigerator or freezer is overfilled.
The food inside the refrigerator is freezing
too much
Have you checked whether:
· the temperature setting is too low (or not the best);
• The food is in contact with the back wall - which is the
coldest part.
The motor runs constantly
Have you checked whether:
· the SUPER COOL and/or SUPER FREEZE and/or ICE PARTY functions are enabled;
· the doors have been open continuously;
• The ambient temperature is too high;
The appliance makes too much noise.
The gas refrigerant produces a slight noise even when the
compressor is not running (this is not a defect).
Have you checked whether:
• The refrigerator is level.
• The appliance was installed between cabinets or objects
that vibrate and make noise.
There is water on the bottom of the refrigerator.
Have you checked whether:
• The hole for draining the water from the frost is clogged.
GB
24
Mod. RG 2330
220 - 240 V-
TI
50 Hz
Cod.
150 W
75
Total 340
Net
Gross
Gross
Util
Bruto
Bruto
Utile
Brut
Brut
Compr. R 134 a
Test Pressure
HIGH-235
Syst.
P.S-I. LOW 140
Kompr. kg 0,090
Made in Italy 13918
93139180000
W Fuse
S/N 704211801
A
Gross
Bruto
Brut
Max 15 w
Capac
Class
Poder de Cong
Clase
Freez.
kg/24 h
4,0
N
Classe
Never call on unauthorized technicians and always
refuse spare parts which are not originals.
Die Sicherheit - Eine gute Gewohnheit und unsere Verpflichtung
ACHTUNG
Lesen Sie bitte vor Inbetriebnahme aufmerksam die
nachstehenden Sicherheitshinweise dieser Anleitung. Sie
enthalten wichtige Angaben über die Sicherheit bei der
Installation, Benutzung und Instandhaltung des Gerätes.
Dieses Gerät wurde gemäß der internationalen
Sicherheitsregelung zum Schutz des Verbrauchers
konstruiert. Das Gerät weist das IMQ Qualitätszeichen auf,
ausgegeben vom Istituto Italiano di Qualità (Ital. Institut zur
Qualitätsüberprüfung). Dieses Zeichen wird nur den Geräten
zuteil, die den Normen des CEI, Comitato Elettrotecnico
Italiano (Elektrotechn. Komitat Italiens ) entsprechen.
Dieses Gerät eignet sich zum Kühlen und Gefrieren von
Lebensmitteln und zur Eisbereitung.
Es ist für die Verwendung im privaten Haushalt bestimmt.
Bei Einsatz im gewerblichen Bereich sind die für das Gewerbe
gültigen Bestimmungen zu beachten.
1. Sollte das Gerät wider Erwarten auf dem Transport zu
Ihnen beschädigt worden sein, nehmen Sie es nicht in Betrieb
ohne zuvor Rücksprache mit Ihrem Lieferanten gehalten zu
haben.
2. Es darf nur von Erwachsenen benutzt werden und
ausschließlich zur Konservierung und zum Einfrieren von
Speisen unter Beachtung der hier aufgeführten Anleitung.
3. Berühren oder bedienen Sie niemals das Gerät mit nassen
Händen oder barfuß, wenn Sie auf feuchtem oder nassem
Bodenbelag stehen.
4. Wir raten vom Einsatz von Mehrfachsteckern,
Adaptersteckern oder Verlängerungen ab.
5. Trennen Sie das Gerät bei Störungen, Wartung und
Reinigung vom Stromnetz, oder schalten Sie die
entsprechende Sicherung aus. Ziehen Sie bitte bei Entfernen
des Netzkabels nie am Kabel, sondern bitte immer am
Netzstecker.
6. Vor der Reinigung und Wartung des Gerätes muss immer
der Stecker aus der Steckdose gezogen werden. Es genügt
nicht, den ON/OFF-Schalterknopf des Gerätes auf OFF
einzustellen, um jeglichen elektrischen Kontakt
auszuschließen.
7. Berühren Sie nicht die inneren Kühlteile, besonders nicht
mit nassen Händen; Sie könnten sich verbrennen oder
verletzen. Nehmen Sie niemals frisch entnommene Eiswürfel
oder gefrorenes Speiseeis in den Mund, Sie könnten sich
durch die sehr starken Temperaturunterschiede verbrennen.
8. Vor der Entsorgung Ihres alten Kühlschranks entfernen
Sie das Schloß, soweit vorhanden, um zu verhindern, daß
spielende Kinder eingesperrt werden könnten.
9. Reparaturen an Elektrogeräten dürfen nur von Fachkräften
ausgeführt werden. Durch unsachgemäße Reparaturen
können erhebliche Gefahren für den Benutzer entstehen.
10. Lagern Sie hochprozentigen Alkohol nur dicht
verschlossen und stehend, durch austretende Alkoholdämpfe
kann Explosionsgefahr bestehen.
11. Vermeiden Sie Beschädigungen an Teilen des
Kältemittelkreislaufes, zum Beispiel durch Aufstechen von
Kältemittelkanälen mit scharfen Gegenständen usw.
12. Lagern Sie keine Flüssigkeiten in Flaschen oder Dosen,
insbesondere mit kohlensäurehaltigen Flüssigkeiten, im
Gefrierteil des Gerätes. Ihr Gerät könnte durch platzende
Gebinde beschädigt werden.
13. Sollte Ihr Gerät nicht funktionieren oder einen Defekt
aufweisen, lesen Sie zuerst das Kapitel “Gibt's ein Problem?”,
bevor Sie den technischen Service anrufen; eventuell kann
der Fehler so behoben werden. Versuchen Sie nicht, in das
Innere der Kombination zu gelangen, um den Defekt zu
reparieren.
14. Im Falle einer Beschädigung des Gerätespeisekabels muß
dieses zwangsläufig durch unseren Kundendienst
ausgewechselt werden, da hierzu Spezialwerkzeuge benötigt
werden.
15. Bitte verwenden Sie im Innern des Lagerfachs für Speisen
keine Elektrogeräte, die nicht ausdrücklichst von der
Herstellerfirma empfohlen wurden.
16. Vor der Entsorgung eines Altgerätes - das ZyklopentaneGas im Isolierschaum, und eventuell R600a - Gas (Isobutan)
im Kühlkreis enthält - muss dieses sichergestellt werden,
bevor es der Entsorgung zugeführt wird.
Wenden Sie sich hierzu an Ihren Händler oder an die
zuständige kommunale Entsorgungsstelle.
Entsorgung Ihres Altgerätes sowie der Verpackung des
Neugerätes.
Ältere Kühl- und Gefriergeräte enthalten im Kältekreis und
in der Isolation Fluorchlorkohlenwasserstoffe (FCKW). Dieses
FCKW kann, wenn es freigesetzt wird, die Ozonschicht der
Atmosphäre schädigen.
Nehmen Sie deshalb zum Entsorgen des Altgerätes Ihre
zuständige kommunale Entsorgungsstelle in Anspruch.
Achten Sie bitte darauf, daß die Rohrleitungen Ihres
Kältegerätes bis zum Abtransport zu einer sachgerechten
und umweltfreundlichen Entsorgung nicht beschädigt
werden.
In der Bundesrepublik Deutschland können Sie die
Verpackung Ihres Neugerätes zur weiteren stofflichen
Verwendung Ihrem Händler zurückgeben.
25
D
Installationshinweise
Um eine optimale und langfristige Funktion sowie
einen möglichst geringen Stromverbrauch zu erzielen,
ist es wichtig, das Gerät korrekt zu installieren.
Die Be- und Entlüftung
Der Kompressor sowie der Kondensator strahlen Wärme aus,
weshalb sich eine gute Lüftung als notwendig erweist. Das
Gerät muß deshalb in einem trockenen Raum aufgestellt werden, in dem eine Öffnung (Fenster oder Balkontür) für den
nötigen Luftaustausch sorgt. Achten Sie bitte bei der Installation darauf, die Luftgitter, die eine gute Belüftung des Gerätes ermöglichen, zu verdecken oder zu verstopfen.
Von Hitzequellen fernhalten
Installieren Sie das Gerät in einem Abstand von mind. 60 cm
zu Öfen, Boilern, Wärmespendern, Backherden und
Kaminen, sowie auch anderen Kühlgeräten und mind. 3cm
zur nächsten Wand.
Eben aufstellen
Der Boden muß eben sein; wenn das nicht der Fall ist, können
Sie die Lage des Gerätes mit den verstellbaren Vorderfüßen
eben regulieren. Sollten Sie sich nicht sicher sein, daß das
Gerät gerade steht, oder sollte das Gerät mit einer starken
Lärmentwicklung arbeiten, kontrollieren Sie den Stand mit
einer Wasserwaage.
D
26
Die Erdung
Vor dem Stromanschluß kontrollieren Sie bitte, ob die
Voltangaben auf dem Schild links neben dem Gemüsefach
den Stromdaten Ihrer Wohnung entsprechen, und ob die
Steckdose eine reguläre Erdung aufweist. Fehlt diese Erdung,
lehnt der Hersteller jegliche Verantwortung und
Gewährleistung ab.
Benutzen Sie keine Mehrfachstecker, Adapterstecker oder
Verlängerungen.
Ist die Stromleistung ausreichend?
Die Steckdose muß die Höchststromleistung des Gerätes
aufnehmen können, die auf dem Schild unten links neben
dem Gemüsefach angegeben ist, bzw. auch entsprechend
abgesichert sein.
Vor dem Stromanschluß
Warten Sie mind. 3 Stunden, bevor Sie das Gerät an den
Stromkreis anschließen; so garantieren Sie ein einwandfreies
Funktionieren.
Aus der Nähe betrachtet
A
Ausziehbares Abstellbord mit Decl, Eierablage
K
Behälter für Fleisch und Käse
L
Herausnehmbare, hõhenverstellbare
Butterfach
B
Abnehmbare Kippkonsolen
C
Abstellbord mit Klappdeckel
Ablageroste
M
"A.I.R. System"
(Ariston Integrated Refrigeration)
D
Fach für eine 2-Liter-Flasche
E
Abnehmbare Konsole für
Flaschen
F
Schubfach für die Lagerung
tiefgekühlter Speisen
G
Eiswürfelbehälter
H
Fach für das Einfrieren von
Frisch-Speisen und die
Lagerung von tiefgekühlten
Speisen
I
J
M
A
L
B
L
B
C
Display
Obst- und Gemüsefach
K
D
J
E
I
ECO
H
G
F
G
F
27
D
Das Display
A
E
C
A
G
H
I
J
F
Kühlzonen-Schalter
Mittels dieser Taste wird die Kühlzone ein- bzw.
ausgeschaltet, und ermöglicht außerdem die
Einstellung der entsprechenden
Betriebstemperaturen.
B
G
Gefrierzonen- und Geräte-EIN/AUS-Schalter
MODE-Taste
Über diese erhalten Sie Zugriff auf die einzelnen
Einstellungen/Funktionen innerhalb des Displays, und
ermöglicht außerdem das Ausschalten der
Alarmsignale.
D
H
Gefrierzonen-Einstellung
I
28
Funktion SUPER FREEZE
Funktion HOLIDAY
Auf diesem Display ist ersichtlich, ob die Funktion
HOLIDAY (optimale Temperatur bei Mindestverbrauch
im Falle einer längeren Abwesenheit) ausgeschaltet,
gewählt oder aktiviert wurde.
J
Kühlzonen-Einstellung
Funktion SUPER COOL
Auf diesem Display ist ersichtlich, ob die Funktion
SUPER FREEZE (Schockfrieren) ausgeschaltet, gewählt
oder aktiviert wurde.
SELECT-Taste
Anzeige der eingestellten Kühlzonen-Temperatur,
sowie OFF-Anzeige (Schrift OFF eingeblendet), bei
ausgeschalteter Kühlzone.
D
D
Auf diesem Display ist ersichtlich, ob die Funktion
SUPER COOL (rasches Kühlen der Kühlzone)
ausgeschaltet, gewählt oder aktiviert wurde.
Über diese können Sie die einzelnen Funktionen
Wählen/Löschen sowie Alarmsignale ausschalten.
E
B
Anzeige der eingestellten Gefrierzonen-Temperatur,
sowie OFF-Anzeige (Schrift OFF eingeblendet), bei
ausgeschalteter Gefrierzone.
Mittels dieser Taste wird das gesamte Gerät (die Kühlund die Gefrierzone) ein- bzw. ausgeschaltet, und
ermöglicht außerdem die Einstellung der
Gefrierzonentemperatur.
C
F
Funktion ICE PARTY
Auf diesem Display ist ersichtlich, ob die Funktion ICE
PARTY (äußerst rasches Kühlen einer warmen Flasche,
die zur Erhaltung der Kühltemperatur in dem
entsprechenden Kübel auch auf den Tisch gebracht
werden kann) ausgeschaltet, gewählt oder aktiviert
wurde.
Die erste Inbetriebnahme des Gerätes
ACHTUNG
Bitte warten Sie nach dem Aufstellen, bzw. nach einem Transport ca. 3 Stunden, bevor Sie das Gerät anschließen, um eine optimale Funktionsweise zu gewährleisten.
Motorschutzzeit
Dieses Modell ist mit einem Motorschutzkontrollsystem
ausgestattet. Sollte nach einer Off-Einstellung Ihrerseits
anschließend der Kompressor nicht wieder sofort
anlaufen, so ist das kein Grund zur Besorgnis, denn er
startet nach ungefähr 8 Minuten automatisch.
Vergewissern Sie sich nach Einstecken des Steckers in die
Steckdose , dass das Display eingeschaltet ist.
Gefrierzone
Bei Einschalten des Gerätes (durch Drehen des Geräte-ON/
OFF-Schalters "B" bis auf die für die Gefrierzone gewünschte
Betriebstemperatur), empfiehlt es sich, sofort auch die
Funktion SUPER FREEZE einzuschalten, um das Abkühlen
des Fachs zu beschleunigen. Nach Erreichen der optimalen
Temperatur schaltet sich die Funktion automatisch ab. Das
Gefriergut kann nun eingeräumt werden.
Kühlzone
Bei Einschalten der Kühlzone ( durch Drehen des Schalters "A"
bis auf die für die Kühlzone gewünschte Temperatur) empfiehlt
es sich, sofort auch die Funktion SUPER COOL einzuschalten,
um das Abkühlen des Fachs zu beschleunigen. Nach Ablauf
einiger Stunden können die Speisen in den Kühlschrank
eingeräumt werden.
So bediene ich das Display
Einstellung der Temperaturen
Ist das Fach, dessen Temperatur eingestellt werden soll, ausgeschaltet, wird auf dem entsprechenden Display (E für die Kühlzone und F für die Gefrierzone) die Anzeige OFF eingeblendet. Ist das Fach jedoch eingeschaltet, erscheint die soeben
eingestellte Temperatur. Um diese zu ändern, drehen Sie den
Schalterknopf der entsprechenden Zone (A für die Kühlzone
und B für die Gefrierzone) auf die gewünschte Temperatur.
Die für die Kühlzone einstellbaren Temperaturen reichen von
+2°C bis +8°C, die für die Gefrierzone einstellbaren Temperaturen von -18°C a -26°C. Das Herauf- bzw. Herabsetzen einer Temperatur ist jeweils um nur 1°C möglich.
Wurde die Funktion HOLIDAY aktiviert, sind Temperatureinstellungen nicht möglich. Das Gerät schaltet automatisch auf
die der jeweiligen Situation entsprechende, optimale Einstellung. +12°C für die Kühlzone (wenn aktiviert) und -18°C für
die Gefrierzone.
Erläuterungen zu den Funktionen:
Funktionssymbol für normale Betriebsweise.
Gewählte Funktion (Umrandung
eingeschaltet).
Gewählte Funktion (Umrandung
eingeschaltet).
Einschalten/Ausschalten der Funktionen
Drücken Sie die Taste Mode "C" so oft, bis in dem entsprechenden Feld das Symbol der entsprechenden Funktion blinkt.
Dies bedeutet, dass die Funktion gewählt wurde und demnach eingeschaltet bzw. ausgeschaltet werden kann. Schal-
ten Sie diese nun über die Taste SELECT "D" ein oder aus.
ANMERKUNG: Wird die Einstellung nicht innerhalb fünf
Sekunden nach der letzten Displayeingabe mittels der Taste
SELECT bestätigt, schaltet das Display auf die vorher eingestellte Funktion zurück, als Zeichen dafür, dass keine neue
Funktion eingestellt wurde.
Die Funktion SUPER COOL hängt von der Kühlzone ab. Ist
diese ausgeschaltet, sind Einstellungen bzw. Änderungen an
dieser Funktion nicht möglich. Andere Funktionen sehen eine
Betriebsweise vor, die Konflikte hervorrufen könnte (zum
Beispiel wenn zur gleichen Zeit die Funktionen HOLIDAY
und SUPER FREEZE aktiviert werden), in diesem Falle hilft
Ihnen die bereits vorbestimmte Priorität bei der Handhabung
des Geräts.
Die Funktion SUPER FREEZE sieht zwei Aktivierungsmodalitäten vor (siehe Abschnitt Gefrierzone).
Aktivierung/Deaktivierung der DEMO-Modalität:
Soll bei ausgeschaltetem Gerät die Display-Funktionsweise
nachgewiesen werden, kann dies durch Aktivierung der
Modalität DEMO erfolgen.
Aktivierung:
- Stellen Sie den Gefrierfach-Temperaturschalter auf 0;
- halten Sie die beiden Tasten "Select“ und "Mode“ für ca.
5 Sekunden gedrückt, bis Sie ein Tonsignal vernehmen und
die beiden Display-Schriftanzeigen "OFF“ und "OFF“
blinken; diese Schriftanzeigen blinken für die gesamte Zeit
der DEMO-Aktivierung.
Deaktivierung:
- Stellen Sie den Gefrierfach-Temperaturschalter auf 0;
- halten Sie die beiden Tasten "Select“ und "Mode“ für ca.
5 Sekunden gedrückt, bis Sie ein Tonsignal vernehmen und
die beiden Display-Blinkanzeigen "OFF“ und "OFF“
erlöschen.
29
D
So friere ich richtig ein
Die Temperatur des Kühlraums wird je nach der Einstellung des
Temperaturreglerknopfes "A" automatisch reguliert bzw. gehalten.
Es empfiehlt sich jedoch, einen mittleren Wert einzustellen (+5°C).
Das Kühlschrank-Fach Ihres Gerätes ist mit einer "A.I.R.
System"(Ariston Integrated Refrigeration)- Vorrichtung ausgerüstet, die ein optimales Aufbewahren der Lebensmittel
und eine Vereinfachung im Gebrauch des Gerätes gewährleistet, und dies dank:
- einer raschen Wiederherstellung der Kühltemperatur: nach Öffnen der Tür werden die optimalen Kühlwerte schneller erreicht,
was eine längere Erhaltung der Lebensmittel gewährleistet;
- einer gleichmäßigen Verteilung der Kälte, wodurch die Lebensmittel auf jeder beliebigen Ablage aufbewahrt werden können;
- Eines höheren Feuchtigkeitsgrades, und demnach können
die Lebensmittel länger aufbewahrt werden.
B
Befolgen Sie unbedingt unsere Ratschläge für die maximalen Aufbewahrungszeiten, denn alle Nahrungsmittel, auch
die frischesten, sind nur begrenzt haltbar.
Beachten Sie auch bitte, daß es ein Irrtum ist, anzunehmen,
daß sich gekochte Speisen länger halten, als rohe.
Die praktischen ausziehbaren Abstellflächen (Abb. 1) können mittels der entsprechenden Gleitführungen höhenverstellt werden,
um auch hohe Behälter und große Gebinde leicht unterbringen zu
können, und dies, ohne sie ganz herausziehen zu müssen, dank
der innovativen Form dieser Abstellflächen.
1
2
B
B
A
A
Abb. 1
A - Abluft, die bei Kontakt mit der Kühlzelle abkühlt
B - Angesaugte wärmere Luft
Wird die Kühlzone aufgrund eines Großeinkaufs sehr gefüllt,
ist es ratsam, auf die Funktion SUPER COOL "G" (siehe
Abschnitt "So bediene ich das Display") umzuschalten, damit
die optimalen Betriebsbedingungen kurzfristig erreicht
werden. Nach Ablauf der erforderlichen Zeit schaltet sich
die Funktion automatisch ab.
Warme Speisen sollten abgekühlt sein, bevor sie in den
Kühlschrank gestellt werden, um einen höheren
Stromverbrauch zu vermeiden.
Stellen Sie Flüssigkeiten niemals in offenen Behältern in den
Kühlschrank, um zu verhindern, daß sich zuviel Feuchtigkeit
und demzufolge übermäßig viel Reif bildet.
So friere ich richtig ein
- Für das Verpacken von einzufrierenden Nahrungsmitteln sollte ein spezielles Handbuch zu Rate gezogen
werden.
- Eine einmal, auch nur teilweise aufgetaute Speise darf auf
keinen Fall noch einmal eingefroren werden: Sie muß (innerhalb 24 Stunden) verbraucht, d.h. gekocht werden. Das
gekochte Gericht kann dann wieder eingefroren werden.
- Wenn Sie frische Nahrungsmittel einfrieren möchten, achten
Sie bitte darauf, daß diese nicht mit bereits eingefrorenen oder
tiefgefrorenen Speisen in Kontakt kommen. Lagern Sie frische
Nahrungsmittel daher zunächst in das obere Fach ein, in welchem eine Gefrier-Temperatur bis unter -18°C herrscht; die ideale Temperatur für richtiges Einfrieren. Vergessen Sie nicht, daß
die Haltbarkeit der Tiefkühlkost davon abhängt, wie schnell sie
eingefroren wurde.
Die täglich einfrierbare, maximale Lademenge ist auf dem Typenschild (befindlich im Kühlraum) aufgeführt.
D
30
Bei erstmaligem Gebrauch, oder nach längerem Stillstand der
Gefrierzone ist das Gerät auf seine maximale Einstellstufe in Betrieb zu setzen, und zwar solange erst dann können frische Lebensmittel eingefroren werden.
Befindet sich das Gerät bereits in Betrieb, kann auf zwei
Arten eingefroren werden:
1. Für kleine Mengen, die unter der auf dem Typenschild
(unten links neben der Gemüseschale) angegebenen, maximalen Kapazität liegen, aktivieren Sie über das Display die
Funktion SUPER FREEZE in der Betriebsart "24 Stunden",
und räumen die einzufrierenden Nahrungsmittel ein. Um
diese Funktion einzuschalten drücken Sie die Taste MODE
"C" so oft, bis das Symbol SUPER FREEZE blinkt, zur Aktivierung der Funktion
drücken Sie dann die Taste SELECT
"B". Nach Ablauf von 24 Stunden bzw. nach Erreichen der
optimalen Temperatur schaltet sich die Superfrost-Funktion
automatisch ab.
2. Sollen große Mengen eingefroren werden (Mengen bis
zu der auf dem Typenschild - links unten neben der Gemüseschale - angegebenen, maximalen Lademenge), aktivieren
Sie über das Display die Funktion SUPER FREEZE in der Betriebsart "48 Stunden". Um diese Funktion einzuschalten
drücken Sie die Taste MODE "C" so oft, bis das Symbol
SUPER FREEZE blinkt, halten Sie daraufhin die Taste SELECT
"B" für mehr als drei Sekunden gedrückt, um die Funktion
zu aktivieren (das Symbol
blinkt dann langsam).
Nach Ablauf von 24 Stunden schaltet das Symbol dieser Funktion von Blinkanzeige wieder auf Festanzeige zurück. Nun
können die einzufrierenden Nahrungsmittel eingeräumt
werden. Nach weiteren 24 Stunden schaltet sich die Funktion automatisch ab. Während des Einfrierens vermeiden Sie
ein Öffnen des Gefrierteils.
Um eine optimale Konservierung und nachträglich ein optimales Auftauen zu gewährleisten, empfehlen wir, die Speisen in kleine Portionen abzufüllen; auf diese Weise tauen
sie schnell und gleichmäßig auf. Beschriften Sie die Behälter
mit Angaben wie Inhalt und Einfrier-Datum.
Zur Erhöhung der Nutzfläche im Gefrierraum kann die mittlere
Schale herausgenommen werden, um die Lebensmittel direkt auf
die Verdampferplatte zu legen. Abschließend ist sicherzustellen,
dass die Gefrierraum-Tür korrekt geschlossen wurde.
Bitte öffnen Sie bei einem Stromausfall oder Defekt nicht
die Tür des Gefrierteils; so zögern Sie einen Temperaturanstieg im Innern hinaus. Die eingefrorenen bzw. tiefgekühlten Speisen halten sich so unverändert ca. 9 - 14 Stunden.
Stellen Sie keine vollen Glasflaschen ins Gefrierfach, da gefrierende Flüssigkeiten das Glas zum Explodieren bringen.
Zum raschen Kühlen von Getränken
Dank der Funktion ICE PARTY gibt es nun keine zerplatzten
Flaschen mehr, die zum Kühlen ins Tiefkühlfach gelegt wurden (sämtliche Flüssigkeiten erhöhen durch das Einfrieren
ihr Volumen). Aktivieren Sie diese Funktion, macht das Gerät Sie durch ein akustisches Signal darauf aufmerksam, wenn
der optimale Moment zur Entnahme der Flasche erreicht
wurde. Um das akustische Signal abzustellen, drücken Sie
ganz einfach die Taste SELECT "D". Vergessen Sie nicht,
den mitgelieferten, ergonomischen Flaschenkübel zu verwenden, um die Flasche in die Gefrierzone zu legen; die Flasche
wird nicht nur schneller gekühlt, sondern kann darin auch
auf den Tisch gebracht werden, wenn das Getränk serviert
werden soll. Die praktischen Griffe erleichtern das Handling
und die Flasche bleibt außerdem viel länger kalt.
ACHTUNG: Bewahren Sie den Flaschenkübel auch wenn
keine Flasche gekühlt werden soll in der Gefrierzone auf.
Eiswürfelbehälter
Bei diesem neuen Eiswürfelkonzept handelt es sich um ein
Exklusivpatent. Dank der Positionierung dieses Behälters
oberhalb der Gefrierzonenschalen ist größere Ergonomie und
Sauberkeit, und vor allem mehr Platz in den Schalen gewährleistet.: Die Berührung mit dem gelagerten Gefriergut
wird vermieden, wie auch ein Verschütten von Wasser beim
Füllen des Behälters (ein entsprechender Verschluss, mit dem
die Öffnung nach Füllen verschlossen werden kann, wird
mitgeliefert).
Gebrauchsanweisung (Abb. 2)
Füllen Sie den Behälter durch die entsprechende Öffnung
bis zu dem angegebenen Stand (MAX WATER LEVEL) mit
Wasser. Durch Einfüllen von zuviel Wasser, d.h. über diese
Anzeige hinaus, würde eine derartige Menge an Eis gebildet,
die das Herausnehmen der Eiswürfel erschweren könnte.
Sollten Sie doch zuviel Wasser eingefüllt haben, dann warten
Sie, bis das Eis geschmolzen ist, entleeren den Behälter und
füllen ihn dann erneut.
Nach dem Füllen ist der Behälter um 90° zu drehen.
Aufgrund der kommunizierenden Röhren werden die
entsprechenden Formen mit Wasser gefüllt. Schließen Sie
die Öffnung durch den Stöpsel und bringen Sie den Behälter
daraufhin vorschriftsmäßig an der Innentür unter.
Durch leichtes Aufschlagen des Behälters auf ein harte
Oberfläche fallen die geformten Eiswürfel aus ihren Sitzen
heraus und können so durch die Öffnung, durch die das
Wasser eingefüllt wurde, herausgenommen werden. Die
Eiswürfel fallen leichter heraus, wenn der Behälter vorher
kurz unter fließendes Wasser gehalten wird.
ACHTUNG: Stellen Sie vor jedem erneuten Füllen des
Behälters sicher, dass sich keine Eisreste mehr darin befinden.
Die zur optimalen Eisbildung erforderliche Mindestzeit
beträgt ungefähr 6 Stunden.
MAX
WATER LEVEL
WATER LEVEL
MAX
Abb. 2
31
D
Anleitung zum Gebrauch des Gefriergerätes
Fleisch und Fisch
Abhängen
Lagerdauer
(Monate)
Auftauen
Aluminiumfolie
2/3
9 / 10
Nicht nötig
Hammelfleisch
Aluminiumfolie
1/2
6
Nicht nötig
Schweinefleisch
Aluminiumfolie
1
6
Nicht nötig
Kalbfleisch
Aluminiumfolie
1
8
Nicht nötig
Kalb-oder
Schweinekotelett
Plastikfolie zwischen den einzelnen
Scheiben anschließend 4-6 Stück in
Alufolie
6
Nicht nötig
Hammelkotelett
Plastikfolie zwischen den einzelnen
Scheiben anschließend 4-6 Stück in
Alufolie
6
Nicht nötig
Hackfleisch
Alubehälter und Plastikfolie
2
Langsam im Kühlschrank
Leber
Plastikbeutel
3
Nicht nötig
Wurst
Plastik- oder Alufolie
2
Je nach Gebrauch
Geflügel
Alufolie
1/3
9
Langsam im Kühlschrank
Gans - Ente
Alufolie
1/4
6
Langsam im Kühlschrank
Wild
Alufolie
1/3
9
Langsam im Kühlschrank
Hasen - Kanichen
Alufolie
3/4
6
Langsam im Kühlschrank
Hirsch
Alufolie oder Plastikfolie
5/6
9
Langsam im Kühlschrank
Große Fische
Alufolie oder Plastikfolie
4/6
Langsam im Kühlschrank
Kleine Fische
Plastikbeutel
2/3
Nicht nötig
Schalentiere
Plastikbeutel
3/6
Nicht nötig
Muscheln
Alu- oder Plastikbehälter mit Salzwasser
3
Langsam im Kühlschrank
Gekochter Fisch
Alufolie oder Plastikfolie
12
In warmem Wasser
Bratfisch
Plastikbeutel
Lebensmittel
Verpackung
Rindfleisch
D
Frisch
4/6
32
Direkt in der Bratpfanne
Obst und Gemüse
Lebensmittel
Vorbereitung
Äpfel und Birnen
Waschen,schälen und
in Stücke schneiden
Aprikosen, Pfirsiche,
Kirschen, Zwetschgen
Waschen und
entkernen
Erdbeeren, Heidelbeeren,
Johannisbeeren,
Himbeeren
Blanchierzeit
Verpackung
(Minuten)
Lagerdauer
(Monate)
Auftauen
2'
Behälter mit Zuckersirup
bedecken
12
Langsam im
Kühlschrank
1' / 2'
Behälter mit Zuckersirup
bedecken
12
Langsam im
Kühlschrank
Waschen, verlesen,
gut abtropfen lassen
Behälter mit Zuckersirup
bedecken
10 / 12
Langsam im
Kühlschrank
Gekochtes Obst
Waschen, In Stücke
schneiden
Behälter 10% Zucker
zugeben
12
Langsam im
Kühlschrank
Obst
Waschen, In Stücke
schneiden
Behälter nach Belieben
zuckern
10 / 12
Langsam im
Kühlschrank
Blumenkohl
Putzen, verlesen,
blanchieren in
Zitronenwasser
Nicht nötig
Rosenkohl
Putzen, waschen, in
Stücke schneiden
Erbsen
2'
Plastikbeutel
12
1' / 2'
Plastikbeutel
10 / 12
Waschen und
auslesen
2'
Plastikbeutel
12
Nicht nötig
Bohnen, grüne
Waschen, inStücke
schneiden
3'
Plastikbeutel
10 / 12
Nicht nötig
Karotten, Paprika
Waschen schülen,
scheiben schneiden
3' / 4'
Plastikbeutel
12
Nicht nötig
Pilze, Spargel
Waschen und
schneiden
3' / 4'
Plastikbeutel - Behälter
6
Bei Raumtemperatur
Spinat
Waschen und
zerschneiden
2'
Plastikbeutel
12
Bei Raumtemperatur
Suppengemüse
Waschen und
zerschneiden
3'
Verpackt in kleinen
Portionen
6/7
Bei Raumtemperatur
Verschiedene Speisen
Vorbereitung
Blanchierzeit Verpackung
Lagerdauer
(Monate)
Bei Raumtemperatur
Auftauen
Brot
Plastikbeutel
4
Bei Raumtemperatur
oder im Backofen
Torten
In Plastikfolien
6
Bei Raumtemperatur
und bei 100/200°C
backen
Sahne
Behälter
6
Bei Raumtemperatur
oder im Kühlschrank
Butter
Originalverpackung
Alufolie
6
Kühlschrank
Gekochte Lebensmittel
Aufgeteilt in
entsprechenden
Behältern
3/6
Kühlschrank
Eier
In kleinen Behältern
ohne Schale
33
10
Raumtemperatur
oder Kühlschrank
D
Tips zum Sparen
- Die richtige Installation
Das heißt fern von Hitzequellen, von direkter Sonneneinwirkung, in einem gut belüfteten Raum und unter Beachtung der im Abschnitt “Installationshinweise/Be- und Entlüftung” angegebenen Abstände.
DER TATSÄCHLICHE ENERGIEVERBRAUCH HÄNGT
DAVON AB, WIE DAS GERÄT EINGESETZT WIRD UND
WO ES AUFGESTELLT WIRD.
Die wurden in einem 560 mm tiefen Säulenschrank, die
üblichsten Installationsverhältnisse für ein derartiges Gerät,
vorgenommen.
- Halten Sie die Türen Ihres Kombigerätes geschlossen
Öffnen Sie die Türen Ihres Kombigerätes nur wenn es unbedingt nötig ist, denn bei jedem Öffnen geht Kälte verloren.
Um die richtige Temperatur erneut zu erreichen, kühlt der
Kompressor nach, was ebenfalls zu erhöhtem Stromverbrauch führt.
- Kontrollieren Sie die Dichtungen
Halten Sie diese elastisch und sauber, kontrollieren Sie, daß
sie gut an den Türen anliegen, nur so lassen sie keine Kälte
entweichen.
- Die richtige Kälte
Die Einstellung zu niedriger Innentemperaturen hat nur
höheren Energieverbrauch zur Folge.
- Niemals warme Speisen
Ein Topf mit warmen Speisen erhöht sofort die Temperatur
um einige Grade; lassen Sie sie erst auf Raumtemperatur
abkühlen, bevor Sie sie in den Kühlschrank stellen.
- Lagern Sie niemals zuviel ein
Um eine einwandfreie Aufbewahrung der Speisen zu gewährleisten, muß die Kälte frei im Innern des Kühlraums
zirkulieren können. Bei unsachgemäßer Befüllung ist dies
nicht möglich und der Kompressor kühlt ständig nach.
- Eisschicht
Kontrollieren Sie die Eisschicht an den Wänden des Gefrierfachs. Tauen Sie Ihr Gerät sofort ab, wenn die Schicht zu
dick geworden ist (siehe auch den nächsten Abschnitt “So
halte ich das Gerät in Topform”).
Akustische und schriftliche Alarmanzeige
Alarm wegen offenstehender Tür
Bleibt die Tür des Kühlschranks länger als 2 Minuten
offenstehen, blinkt die Lampe der Innenbeleuchtung; nach
einigen Sekunden ertönt ein akustisches Signal, das durch
Schließen der Tür oder durch Drücken der Taste SELECT
"D" abgestellt werden kann. Bleibt die Tür länger als 4
Minuten offenstehen, blinkt die Lampe sehr schnell.
Alarm wegen unnormalen Temperaturanstiegs in der Gefrierzone
1. Um auf einen unnormalen Temperaturanstieg im Innern
der Gefrierzone aufmerksam zu machen (ein vorübergehender Stromausfall), ertönt ein akustisches Alarmsignal
und auf dem Display erscheint eine Meldung (A1), die
auf diesen gefährlichen Temperaturanstieg hinweist. Um
zu vermeiden, dass das Gefriergut erneut eingefroren
wird, wird in der Gefrierzone eine Temperatur von ungefähr 0°C gehalten. Somit wird Ihnen die Möglichkeit gegeben, diese Lebensmittel innerhalb 24 Stunden zu verwenden bzw. nach dem Kochen als Fertiggericht erneut
einzufrieren. Der Signalton kann durch Druck auf die
Taste SELECT "D" abgestellt werden.
Um zur normalen Funktion zurückzukehren, und die auf
dem Display eingeblendete, schriftliche Nachricht zu löschen, muss das Gerät über den ON/OFF-Geräteschalter
"B" zuerst ausgeschaltet und dann wieder eingeschaltet
werden.
D
34
2. Sollte die Temperatur auf zu hohe Werte ansteigen, ertönt erneut ein akustisches Signal, es erscheint ebenfalls
eine neue Alarmmeldung auf dem Display (A2), die Sie
auf diesen zu hohen Temperaturanstieg aufmerksam
macht. Es empfiehlt sich, das Gefriergut zu überprüfen,
gegebenenfalls ist es nicht mehr zu verwenden. Auf keinen Fall darf es neu eingefroren werden, es sei denn, es
wird gekocht. Um zu vermeiden, dass das Gefriergut erneut eingefroren wird, wird in der Gefrierzone eine Temperatur von ungefähr 0°C gehalten. Das akustische Signal kann durch Druck auf die Taste SELECT "D" abgestellt werden.
Um zur normalen Funktion zurückzukehren, und die auf
dem Display eingeblendete, schriftliche Nachricht zu löschen, muss das Gerät über den ON/OFF-Geräteschalter
"B" zuerst ausgeschaltet und dann wieder eingeschaltet
werden.
So halte ich das Gerät in Topform
Bevor Sie Ihr Gerät reinigen oder abtauen muss es vom
Stromnetz getrennt werden. (Drehen Sie hierzu den
ON/OFF-Geräteschalter "B" auf OFF und ziehen Sie
daraufhin den Stecker aus der Steckdose. Das
Unterlassen dieser Vorsichtsmaßnahme könnte ein
Alarmsignal seitens Ihres Gerätes auslösen. ACHTUNG:
Dieser Alarm ist kein Zeichen für eine eventuelle
Störung. Um den korrekten Betrieb wieder
herzustellen, muss das Gerät über den ON/OFFGeräteschalter "B" zuerst ausgeschaltet und dann
wieder eingeschaltet werden.
Wickeln Sie das gesamte Tiefkühl- und Gefriergut in mehrere Lagen Zeitungspapier ein und bewahren Sie dieses während der zum Abtauen erforderlichen Zeit entweder im Kühlraum oder an einem frischen Ort auf. Lassen Sie die Tür der
Gefrierzone offen stehen, um den Abtauvorgang zu beschleunigen, der durch Einstellen von mit warmem Wasser
gefüllten Behältern noch unterstützt werden kann. Bevor
Sie das Gerät wieder in Betrieb setzen, sind sämtliche Teile
gründlich zu reinigen und abzutrocknen.
Beachten Sie, dass der Motor nicht umgehend anläuft,
sondern erst nach ungefähr 8 Minuten.
Abtauen
ACHTUNG: Der Kältekreis darf nicht beschädigt
werden. Vermeiden Sie den Gebrauch mechanischer
Vorrichtungen oder anderer Gegenstände, außer den
vom Hersteller empfohlenen, um den Abtauvorgang
zu beschleunigen.
So wird die Kühlzone abgetaut.
Bei diesem Gerät erfolgt das Abtauen automatisch; das Abtauwasser wird über einen entsprechenden Ablauf (Abb. 3)
zur Rückseite hin abgeleitet, wo es durch die vom Kompressoren erzeugte Hitze verdampft. Das Einzige, was Ihrerseits dazu beizutragen ist,
ist eine regelmäßige Kontrolle, dass der Ablauf nicht verstopft ist und das Wasser
ordnungsgemäß ablaufen
kann. Reinigen Sie hierzu
das Ablaufloch mit dem entsprechenden Reinigungsbürstchen.
FUNKTION HOLYDAY Bildung von Schimmel und
schlechten Gerüchen im abgeschalteten Kühlschrank
während der Ferienzeit? Dieses Problem existiert nicht
mehr: Schalten Sie ganz einfach (über das Display) die
Funktion Holyday ein. Auf diese Weise wird im Kühlschrank, bei niedrigstem Stromverbrauch, eine Temperatur von ungefähr 12°C gehalten
(praktisch auch zur Aufbewahrung Ihrer Kosmetik und Schminksachen), die
Gefrierzone läuft auf der zur Konservierung des Gefrierguts erforderlichen
Minimumeinstellung weiter.
Abb. 3
Wie taut man das Gefrierfach ab
- Entfernen Sie ab und zu die Reifschicht mit Hilfe des beiliegenden Plastik-Kratzers (absolut nicht mit Messern oder
Metallgegenständen).
- Hat sich in der Gefrierzone eine Reifschicht von mehr als 5
mm gebildet, muss komplett abgetaut werden. Gehen Sie
hierzu wie folgt vor: Aktivieren Sie einen Tag vorher die
Funktion SUPER FREEZE in der Betriebsweise 24 Stunden.
Auf diese Weise geben Sie dem Gefriergut einen gesunden,
zusätzlichen "Kälteschub". Nach Ablauf dieser 24 Std.
schaltet sich die Funktion automatisch ab, jedoch können Sie
diese auch von Hand ausschalten. Schalten Sie das Gerät über
den ON/OFF-Geräteschalter "B" aus. ACHTUNG: Hierdurch
wird das gesamte Gerät (die Kühl- und die Gefrierzone)
ausgeschaltet.
35
D
Reinigung und Pflege
Bevor Sie Ihren Kühlschrank reinigen drehen Sie bitte
den ON/OFF-Geräteschalter „B“ auf OFF, bis die Anzeige
OFF für beide Zonen, d.h. Kühl- und Gefrierzone,
eingeblendet wird. Ziehen Sie daraufhin den Stecker
aus der Steckdose.
- Das Material aus dem Ihr Gerät hergestellt wurde, ist hygienisch einwandfrei und überträgt keine Geruchsstoffe. Um
diese Vorzüge beizubehalten, ist es notwendig, daß die Nahrungsmittel immer gut geschützt und verschlossen gelagert
werden, um nur schwer entfernbare Flecken und unangenehme Geruchsbildung zu vermeiden.
- Nur Wasser und Bicarbonat: Zur Reinigung der Innen- und
Außenteile verwenden Sie bitte nur einen weichen
Schwamm, getränkt mit lauwarmem Wasser und Natriumbicarbonat, welches außerdem auch ein ausgezeichnetes
Desinfektionsmittel ist. Wenn Sie keines zur Hand haben,
nehmen Sie eine neutrale Seife (z.B. Marseille- oder Kernseife).
- Niemals zu benutzen sind: Scheuermittel, Weißmacher,
Ammoniak, Benzin oder sonstige Lösungsmittel.
- Alle herausnehmbaren Teile können in einer warmen Spülmittellauge eingeweicht werden, diese dann mit klarem
Wasser nachspülen und vor Wiedereinsetzen sorgfältig trocknen.
- Um auf der Rückseite eine Staubansammlung, die die
Funktionsweise nachträglich beeinflussen könnte, zu vermeiden, muß auch diese regelmäßig und mit besonderer Vorsicht gereinigt werden. Verwenden Sie hierzu einen Staubsauger.
- Sollte das Gerät für längere Zeit abgeschaltet werden, z.B.
während der Sommerferien, ist es ratsam, es innen sorgfältig zu reinigen und die Tür vorstehen zu lassen, um Schimmelbildung oder die Bildung schlechter Gerüche zu vermeiden.
- Wie tauscht man die Innenlampe aus? Am hinteren Teil
des Thermostatengehäuses befindet sich die Birne für die
Innenbeleuchtung. Bevor Sie diese austauschen, ziehen Sie
den Stecker aus der Steckdose; schrauben Sie hierauf die
defekte Birne heraus und ersetzen Sie diese durch eine neue,
die nicht stärker als 15 Watt sein darf. (Siehe Abb. 8).
A
B
Fig. 8
D
36
Gibt’s ein Problem?
Das Display ist vollkommen dunkel
Bitte kontrollieren Sie, ob:
• die Hauptsicherung eingeschaltet ist;
• der Stecker richtig in der Steckdose steckt;
• die Steckdose in Ordnung ist defekt ist; kontrollieren Sie dies;
indem Sie den Stecker in eine andere Steckdose stecken;
· der Gefrierzonen-Reglerknopf auf "OFF" steht.
Sollte trotz aller Kontrollen das Gerät nicht funktionieren
und der von Ihnen festgestellte Fehler weiter bestehen bleiben, dann fordern Sie bitte den nächstgelegenen technischen Kundendienst an und teilen Sie dort zusammen mit
Ihrer Fehlerbeschreibung folgende Daten mit: die Modellbezeichnung (Mod.), die entsprechenden Nummern (S/N),
die auf dem Schild unten links neben dem Gemüsefach angegeben sind (siehe untenstehende Beispiele).
Der Motor startet nicht
Haben Sie sichergestellt, dass:
• 8 Minuten nach dem Einschalten vergangen sind?
Denn dieses Modell verfügt über ein Motorschutzkontrollsystem, aufgrund dessen er erst 8 Minuten nach
Einschalten des Gerätes startet.
• die Betriebsart DEMO eingestellt wurde (siehe S. 41).
Mod. RG 2330
220 - 240 V-
Cod.
150 W
75
Total 340
Net
Gross
Gross
Util
Bruto
Bruto
Utile
Brut
Brut
Compr. R 134 a
Test Pressure
HIGH-235
Syst.
P.S-I. LOW 140
Kompr. kg 0,090
Made in Italy 13918
Kühlraum und Gefrierfach kühlen
unzureichend
Bitte kontrollieren Sie, ob:
• die Türen richtig schließen oder die Dichtungen beschädigt sind;
• die Türen vielleicht zu lange offenstehen;
• der Temperaturregler richtig eingestellt ist;
• der Kühlraum oder das Gefrierfach nicht überladen wurde.
TI
50 Hz
93139180000
W Fuse
S/N 704211801
A
Capac
Class
Poder de Cong
Clase
Freez.
Gross
Bruto
Brut
Max 15 w
kg/24 h
4,0
N
Classe
Beauftragen Sie auf keinen Fall einen nicht befugten
Kundendienst und lassen Sie ausschließlich OriginalErsatzteile einbauen.
Der Kühlschrank kühlt zu stark
Bitte kontrollieren Sie, ob:
· eine zu niedrige (bzw. nicht optimale) Temperatur
eingestellt wurde;
• die Nahrungsmittel an die Rückwand (Kühlzelle) anstoßen.
Der Motor läuft ununterbrochen
Bitte kontrollieren Sie, ob:
· vielleicht die Funktionen SUPER COOL und/oder SUPER
FREEZE und/oder ICE PARTY aktiviert wurden;
• die Außentemperatur sehr hoch ist;
• der Temperaturregler richtig eingestellt ist.
Das Gerät macht zu viel Lärm
Das im Innern des Geräts befindliche Kühlgas erzeugt ein
leichtes Geräusch, auch bei Stillstand des Kompressors (das
ist kein Defekt).
Bitte kontrollieren Sie, ob:
• Ihr Gerät gerade steht:
• es zwischen Möbelteilen oder Gegenständen steht, die
vibrieren und daher Lärm verursachen.
Auf dem Kühlraumboden sammelt sich
Wasser an
Kontrollieren Sie, ob:
• der Tauwasserablauf nicht verstopft ist.
37
D
A segurança, um bom hábito
ATENÇÃO
Ler atentamente as advertências mencionadas neste livro de
instruções dado que fornecem importantes indicações relativas à segurança da instalação, à utilização e à manutenção.
Este aparelho foi concebido segundo as normas internacionais de segurança criadas fundamentalmente para a protecção do consumidor.
Na realidade, este aparelho obteve o certificado de homologação IMQ passado pelos técnicos do Instituto Italiano de
Qualidade, certificado que só é atribuido aos aparelhos que
cumpram as normas do CEI, Comitato Elettrotecnico Italiano.
1. Este aparelho não deve ser instalado ao ar livre, mesmo se a
área estiver protegida por uma cobertura; é muito perigoso
deixá-lo exposto à chuva e às intempéries.
2. Deve ser utilizado somente por adultos e exclusivamente
para conservar e congelar alimentos, de acordo com as
instruções de utilização contidas neste manual.
3. Nunca tocar nem manusear este aparelho com os pés descalços ou com as mãos ou os pés molhados.
4. Não é aconselhável a utilização de extensões e fichas múltiplas. Se o frigorífico for instalado entre móveis, controlar que o
cabo de alimentação não se dobre nem seja pressionado de
maneira perigosa.
5. Nunca puxar o cabo de alimentação nem o frigorífico para
soltar a ficha da tomada de parede : é muito perigoso.
6. Não tocar as partes internas de refrigeração, sobretudo com
as mãos molhadas, porque poderá sofrer queimaduras ou fe-
rir-se. Também não colocar na boca cubos de gelo recém retirados do congelador porque podem provocar queimaduras.
7. Não limpe nem realize operações de manutenção sem
antes ter desligado a ficha eléctrica; para eliminar todos os
contactos eléctricos não é suficiente basta apenas colocar o
selector ON/OFF do aparelho em OFF.
8. Antes de desfazer-se do seu velho frigorífico, desmontar o
seu fecho para evitar que crianças a brincar possam ficar
trancadas dentro do aparelho.
9. No caso de avaria, antes de chamar o serviço de assistência
técnica, controlar no capítulo “Há um problema” para verificar
se é possível resolver a eventual anomalia. Não tente proceder
à reparação, mexendo nas partes internas do aparelho.
10. No caso de dano, o cavo de alimentação eléctrica deste
aparelho deve ser trocado obrigatoriamente pelo nosso Serviço
de Assistência Técnica, porque é necessário utilizar ferramentas
especiais.
11. não use aparelhos eléctricos no interior do compartimento
para guardar alimentos, excepto os de tipo recomendado pelo
fabricante.
12, No final da vida útil do aparelho – que contém gás
ciclopentano na espuma de isolamento e eventualmente gás
R600a (isobutano) no circuito de refrigeração – é necessário
colocar o mesmo em segurança, antes de mandar eliminá-lo.
Para esta operação, entre em contacto com o seu revendedor
ou com o organismo local encarregado.
Instalação
Para garantir um bom funcionamento e um consumo
reduzido de electricidade é importante que a instalação seja efectuada correctamente.
A ventilação
O compressor e o condensador emitem calor e portanto precisam de uma boa ventilação. São pouco adequados os ambientes com ventilação imperfeita. Portanto o aparelho deve ser
instalado num ambiente dotado de uma abertura (janela ou
porta externa) para assegurar a necessária renovação de ar. O
ambiente também não deve ser demasiado húmido.
Ter cuidado, durante a instalação, para não cobrir ou obstruir
as grelhas que permitem a boa ventilação do aparelho.
Afastado do calor
Evitar de posicionar o aparelho num ligar directamente exposto à luz solar, ao lado do fogão eléctrico ou similar.
Ligação eléctrica e ligação à terra
Antes de proceder à ligação eléctrica, controlar se a tensão
indicada na placa de características, colocada embaixo à
esquerda, junto ao recipiente para verduras, corresponde a
P
38
tensão da instalação eléctrica da casa e se a tomada está
equipada com uma ligação à terra regular, na maneira
indicada pelas leis relativas à segurança das instalações N°.
46/90. Se não houver uma ligação à terra, o Fabricador declina toda e qualquer responsabilidade. Não utilizar fichas
múltiplas ou adaptadores.
Posicione o aparelho de modo que haja acesso à
tomada em que estiver ligada.
A potência é insuficiente ?
A tomada eléctrica deve ser capaz de suportar a máxima
carga de potência do aparelho, indicada na placa de características, colocada embaixo à esquerda, junto ao recipiente
para verduras.
Antes da ligação eléctrica
Depois do transporte, colocar o aparelho verticalmente e
aguardar pelo menos 3 horas antes de ligá-lo na tomada,
para permitir o seu funcionamento correcto.
Descrição do aparelho
A
Prateleira extraível com tampa, com porta-ovas
L
Prateleiras extraíveis e de altura regulável
M
"A.I.R. System"
e manteigueira
B
Prateleira extraível para objectos
C
Prateleira suspensa e inclinável
D
Vão ara garrafa de 2 litros
E
Prateleira para garrafas
F
Compartimentos para a
conservação
G
Contenitores para a produção
(Ariston Integrated Refrigeration)
M
A
L
B
L
B
de gelo
H
Compartimento que se
utilizam para congelar e a
conservação.
C
I
O Ecrã
K
J
Gavetas para frutas e verduras
J
D
E
I
K
Caixa para carne/queijo
ECO
H
G
F
G
F
39
P
O Ecrã
A
E
C
A
G
H
I
J
G
Selector frigorífico
Para ligar e desligar e desligar o compartimento
frigorífero e possibilita definir as respectivas
temperaturas de funcionamento.
B
Para ligar e desligar e desligar o inteiro aparelho e
possibilita definir as temperaturas de funcionamento
do compartimento freezer.
C
Para deslocar-se no âmbito do ecrã, para passar para
as várias definições/funções e desligar os alarmes
sonoros.
D
Para seleccionar/anular a selecção das várias funções
e desligar os alarmes sonoros.
E
Regulação do compartimento frigorífero
Visualiza a temperatura definida para o vão frigorífico
e o estado de desligado do comparto frigorífero
(escrita OFF activa).
F
Regulação do compartimento congelador
Visualiza a temperatura definida para o vão freezer e
o estado de desligado do aparelho (escrita OFF activa).
P
40
Função SUPER COOL
Função SUPER FREEZE
Função HOLIDAY
Visualiza o estado (desactivada, seleccionada ou
activada) da função HOLIDAY (temperaturas ideias com
consumos mínimos, no caso de longas ausências).
J
Botão SELECT
D
Visualiza o estado (desactivada, seleccionada ou
activada) da função SUPER FREEZE (congelar rapidamente).
I
Botão MODE
B
Visualiza o estado (desactivada, seleccionada ou
activada) da função SUPER COOL (refrigeração rápida
do compartimento frigorífero).
H
Selector freezer e ON/OFF aparelho
F
Função ICE PARTY
Visualiza o estado (desactivada, seleccionada ou
activada) da função ICE PARTY (a máxima rapidez no
esfriar uma garrafa quente e servi-a à mesa com o
apropriado balde adequado para manter a temperatura obtida).
Como pôr em funcionamento o aparelho
ATENÇÃO
Depois do transporte, colocar o aparelho verticalmente
e aguardar cerca de 3 horas antes de ligá-lo na tomada
eléctrica, para assegurar o seu bom funcionamento.
Antes de guardar alimentos no frigorífico ou no congelador,
limpar bem o seu interior com água morna e bicarbonato de
sódio.
Tempo de protecção do motor
Este modelo é equipado de controlo para protecção
do motor, portanto se depois de desligado pelo
utilizador, o compressor não partir imediatamente, não
se preocupe, porque se activará automaticamente
depois de aproximadamente 8 minutos.
Depois de ter ligado a ficha na tomada eléctrica, assegurese que o ecrã esteja aceso.
Compartimento congelador.
Quando ligar a aparelhagem (rodando o selector "B" até
definir a temperatura de funcionamento que desejar para o
compartimento congelador), é aconselhável activar a função
SUPER FREEZE para acelerar a refrigeração do compartimento; quando o mesmo tiver chegado à temperatura ideal,
esta função se desactivará e será possível guardar congelados
no congelador.
Compartimento frigorífero.
Quando ligar o compartimento frigorífico (rodando o botão
"A" até definir a temperatura de funcionamento que desejar
no vão frigorífero), é aconselhável activar a função SUPER
COOL para acelerar a refrigeração do vão: depois de algumas
horas será possível guardar alimentos no frigorífico.
Como deslocar-se no ecrã
Definição das temperaturas:
Se o compartimento em questão estiver desligado, no espaço
do ecrã correspondente à sinalização (F para o frigorífico e F
para o congelador) aparecerá a escrita OFF. Por outro lado,
se o compartimento estiver ligado, aparecerão as
temperaturas definidas actualmente. Para mudá-la, rode
directamente o selector correspondente ao vão em questão
(A para o frigorífero e B para o congelador).
As temperaturas que podem ser definidas para o compartimento frigorífero vão desde +2°C até +8°C, enquanto que
as do comparto congelador vão desde -18°C até -26°C. Em
todos os casos é sempre possível aumentá-las ou diminui-las
em passos de 1°C.
Quando estiver activa a função HOLIDAY não serão possíveis
regulações de temperatura, mas a aparelhagem passará
automaticamente para a regulação ideal para a situação:
+12°C para o compartimento frigorífero (se estiver ligado) e
-18°C para o compartimento congelador.
para ser activada ou desactivada. Neste ponto será possível
a gestão da função mediante o botão SELECT "D" para
activá-la ou desactivá-la.
OBSERVAÇÃO: se não confirmar, carregando no botão
SELECT dentro de cinco segundos após a última acção no
ecrã, o mesmo voltará a visualizar a função da maneira anteriormente definida para indicar que nenhuma modificação
foi definida.
A função SUPER COOL corresponde ao compartimento
frigorífero e quando o mesmo estiver desligado, nenhuma
acção será permitida para esta função; para outras pode
haver funcionamento que poderá criar conflitos (por
exemplo, quando forem activadas contemporaneamente as
funções HOLIDAY e SUPER FREEZE), neste caso será
considerada uma prioridade já estabelecida para ajudar na
gestão do aparelho.
Na função SUPER FREEZE há duas maneira para activar (veja
o parágrafo relativo à gestão do compartimento congelador).
Gestão das funções:
Activação/desactivação do modo DEMO:
Para ver uma demonstração do funcionamento do ecrã com
o aparelho desligado, é possível activar o modo DEMO.
Símbolo da função no normal funcionamento.
Função seleccionada (contorno a piscar).
Função activada (contorno aceso)
Activação/desactivação das funções
Carregue no botão MODE "C" tantas vezes quando for
necessário, até piscar o símbolo da função que desejar mudar:
isto indicará que a função foi seleccionada e está pronta
Activação:
- coloque o selector de temperatura do congelador no 0;
- mantenha 5 segundos pressionados os dois botões “Select”
e “Mode”, até ouvir um ruído e começarem a piscar as
duas escritas “OFF” e “OFF” no ecrã; estas escritas piscarão
durante todo o tempo que a função DEMO estiver activada.
Desactivação:
- coloque o selector de temperatura do congelador no 0;
- mantenha 5 segundos pressionados os dois botões “Select”
e “Mode”, até ouvir um ruído e no ecrã pararem de piscar
as duas escritas “OFF” e “ ”.
41
P
Como utilizar melhor o repartição frigorífica
A temperatura do interior do frigorífico regula-se automaticamente em função da definição realizada mediante acção
no ecrã.
Entretanto é aconselhável uma posição intermediária (es
+5°C).
A repartição frigorífica do seu aparelho está equipada com
um dispositivo "A.I.R. System" (Ariston Integrated
Refrigeration) que permite uma ótima conservação dos
alimentos e um emprege simplificado do aparelho graças a:
- Ao restabelecinento rápido da temperatura: após a abertura
das portas as temperaturas alcançam antes os valores ideais
e os alimentos se conservam malhor.
- Uma distribuição homogénea da temperatura que permite
colocar as alimentos em qualquer prateleira.
- Um grau de umidade mais alto para poder conservar os
alimentos por mais tempo.
O compartimento frigorífico está dotado de grelhas amovíveis
e reguláveis em altura, graças ao e inclinabili seu sistema de
guias (Fig. 1). Assim é possível arrumar no sea interior reservatórios grandes e garrafas de grandes dimenções assim
como alimentos de grande volume.
1
2
Fig. 1
B
B
B
A
Só guarde no frigorífico alimentimentos frios ou, no máximo, alimentos tépidos; nunca coloque os alimentos enquanto
estiverem quentes: o aumento súbito da temperatura interna obrigará fortemente o consumo de energia eléctrica.
Não guarde os líquidos em recipientes abertos porque provocará o aumento da humidade no interior do frigorífico e
consequentemente a formação de gelo.
A
A - Ar soprado que se enfria em contacto com a parede
esfriante
B - Ar mais quente aspirada
Quando for encher o compartimento frigorífero depois de
ter feito muitas compras, utilize a função SUPER COOl "J"
(veja o parágrafo "Como deslocar-se no ecrã") para chegar
rapidamente à condição ideal de funcionamento. Depois que
passar o tempo necessário, esta função se desactivará automaticamente.
Leia atentamente os nossos conselhos relativos ao tempo
máximo de conservação: qualquer alimento, mesmo que
muito fresco, não deve ficar muito tempo no frigorífico.
Contrariamente ao que se possa pensar, os alimentos cozinhados não se mantêm em bom estado de conservação mais
tempo que os alimentos crus.
P
42
Como utilizar melhor o compartimento congelador
Para confeccionar alimentos a serem congelados, consulte um manual especializado.
Um alimento descongelado, ainda que só parcialmente, não
deve voltar a ser congelado: deverá cozinhá-lo para o consumir (dentro de 24 horas) ou para o congelar.
Os alimentos frescos a serem congelados não devem ser
colocados em contacto com os que já estão congelados mas
sim no compartimento superior "H" onde a temperatura
desce abaixo dos -18°C, temperatura ideal para congelar
bem os alimentos. Não deve esquecer que a boa conservação dos alimentos congelados depende da rapidez com que
se processa a congelação.
A quantidade máxima quotidiana a ser congelada é indicada
na placa das características situada no interior do compartimento frigorífero.
A primeira vez que o ligar, ou depois que o congelador tiver
estado inactivo, é possível congelar alimentos somente depois de ter deixado o aparelho a funcionar no máximo.
Quando o aparelho já estiver a funcionar, é possível congelar de dois modos:
1. Para pequenas quantidades, inferiores à capacidade
máxima indicada na placa das características (situada
embaixo, à esquerda, ao lado da gaveta da verdura), active
no ecrã a função SUPER FREEZE no seu modo de "24 horas"
e guarde dentro os alimentos a serem congelados. Para
activar a função carregue no botão MODE "C" tantas vezes
quanto for necessário para piscar o símbolo do SUPER
FREEZE e, em seguida, carregue no botão SELECT "B" para
tornar activa a funçã
Não abrir a porta do congelador em caso de falta de energia
eléctrica ou de avaria, assim adiará o aumento da temperatura no seu interior. Deste modo, os alimentos comprados
congelados e os congelados por si conservar-se-ão sem alterações durante cerca de 9 - 14 horas.
Não colocar no congelado garrafas cheias : poderão partirse, dado que ao congelarem-se todos os líquidos aumentam de volume.
Para rapidamente esfriar bebidas
Graças à específica função ICE PARTY não há mais o problema de partirem-se garrafas colocadas a esfriar no compartimento do congelador (todos os líquidos, ao congelaremse, praticamente aumentam o volume). Se activar esta
função, será o próprio aparelho que avisará, com um sinal
sonoro, quando chegar o momento de tirar a garrafa do
compartimento do congelador. Para desligar o alarme sonoro é suficiente carregue no botão SELECT "D". Não se
esqueça de utilizar o ergonómico balde fornecido para
colocar a garrafa dentro do compartimento congelador; que
além de acelerar a refrigeração da mesma, quando chegar
o momento de servir a bebida, poderá facilmente transportála, graças às apropriadas pegas, e também manterá a garrafa
fria muito tempo, mesmo na mesa.
ATENÇÃO: guarde sempre dentro do compartimento
congelador o balde para garrafa fornecido (mesmo quando
não estiver a esfriar garrafas); somente assim será garantida
uma baixa temperatura do líquido em pouco tempo.
. Depois de 24 horas, ou depois de
ter chegado às temperatura ideais, a função de automaticamente congelar rapidamente desactiva-se.
2. Para grandes quantidades de alimentos a serem
congelados (até a carga máxima indicada na placa das
características situada embaixo, à esquerda, ao lado da
gaveta da verdura) active no ecrã a função SUPER FREEZE
no seu modo de "48 horas". Para activar a função carregue
no botão MODE "C" tantas vezes quanto for necessário
para piscar o símbolo do SUPER FREEZE e, em seguida,
carregue no botão SELECT "B" para tornar activa a função
(o símbolo
começará a piscar lentamente).
Depois de mais 24 horas a função automaticamente
desactiva-se.
Durante a congelação, evitar abrir a porta do congelador.
Para obter uma congelação e uma sucessiva descongelação
ideal é aconselhável separar os alimentos em pequenas porções porque assim congelam-se rapidamente e de maneira
homogénea. Nas confecções indicar o conteúdo e a data de
congelação.
43
P
Recipientes para gelo
Este novo conceito de recipientes para gelo, é uma patente
exclusiva. Por estarem situados sobre a parte superior das
gavetas colocadas no vão do freezer, assegura-se uma maior
ergonomia, limpeza e mais espaço nas gavetas: o gelo já
não entra mais em contacto com os alimentos guardados
no compartimento congelador; evita-se também que a água
respingue-se na altura em que carregar (também é fornecida
a tampa para fechar a entrada, depois de ter deitado a água
dentro).
44
WATER LEVEL
P
WATER LEVEL
Fig. 2
MAX
Modalidade de emprego (Fig. 2)
Encha o recipiente de água através do furo de entrada, até
o nível marcado (MAX WATER LEVEL - NÍVEL MÁXIMO
D'ÁGUA), tome cuidado para não ultrapassá-lo: se for deitada
uma quantidade de água superior à necessária, haverá um
formação de gelo que poderá impedir que os cubos de gelo
sejam tirados.
Se tiver sido deitada água demais, será necessário aguardar
o gelo derreter-se, esvaziar o recipiente e deitar água
novamente.
Depois de ter deitado água através do furo indicado, rode
90° o recipiente. Pelo princípio dos vasos comunicantes, a
água irá encher as apropriadas formas, em seguida pode-se
fechar o furo com a apropriada tampa e guardar o recipiente
na parte interior da porta.
Depois que gelo tiver se formado, será suficiente bater o
recipiente numa superfície dura, para que os cubos de gelo
soltem-se das formas e possam sair através do mesmo furo
por onde a água foi deitada. Para facilitar a saída dos cubos
de gelo, molhe com água a parte de fora do recipiente.
ATENÇÃO: todas as vezes que for deitar água no recipiente,
assegure-se antes que o mesmo esteja inteiramente vazio e
não haja dentro restos de gelo.
O prazo mínimo necessário para a melhor formação de gelo
é de aproximadamente 8 horas.
MAX
Guia para utilização do compartimento de congelação
Parne e peixe
Maturação
(dias)
Conservação
(meses)
Envolta em folha de aluminio
2/3
9 / 10
Não necessária
Carneiro
Envolto em folha de aluminio
1/2
6
Não necessária
Porco assado
Envolto em folha de aluminio
1
6
Não necessária
Vitela assada ou cozida
Envolta em folha de aluminio
1
8
Não necessária
Bifes ou costeletas de
porco ou vitela
Cada peça envolta em película de
polietileno e em seguida em folha de
aluminio, em conjuntos de 4 e 6
6
Não necessária
Fatias ou costeletas de
carneiro ou vaca
Cada peça envolta em pelicula de
polietileno e em seguida em folha de
aluminio, em conjuntos de 4 e 6
6
Não necessária
Carne picada
Em sacos de aluminio, coberto com
pelicula de polietileno
2
Lentamente no frigorífico
Coração e figado
Em saquetas de polietileno
3
Não necessária
Salsichas
Envolto em folha de aluminio ou pelicula
de polietileno
2
Em função do uso
Frango e perú
Envolto em folha de aluminio
1/3
9
Lentamente no frigorífico
Pato e ganso
Envolto em folha de aluminio
1/4
6
Lentamente no frigorífico
Pato bravo, faisão,
perdiz, (caça)
Envolto em folha de aluminio
1/3
9
Lentamente no frigorífico
Coelho e lebre
Envolto em folha de aluminio
3/4
6
Lentamente no frigorífico
Veado, cabrito
Envolto em folha de aluminio ou pelicula
de polietileno
5/6
9
Lentamente no frigorífico
Peixe grande (grosso)
Envolto em folha de aluminio ou pelicula
de polietileno
4/6
Lentamente no frigorífico
Peixe miúdo
Em sacos de polietileno
2/3
Não necessária
Crustáceos
En sacos de polietileno
3/6
Não necessária
Molúscos
Em embalagens de aluminio ou plástico,
cobertos com água salgada
3
Lentamente no frigorífico
Peixes cozidos
Envolto em folha de aluminio ou pelicula
de polietileno
12
Em água quente
Peixes fritos
Em saquetas de polietileno
Tipo de alimentos
Acondicionamento
Vaca assada e cozida
Fresquíssima
4/6
45
Descongelação
Directamente na frigideira
P
Fruta e verdura
Tipo
Preparação
Maçãs e peras
Descascar e cortar em
pedaços
Alperces, pêssegos,
cerejas e ameixas
Tirar os caroços e a
pele
Morangos, amoras e
mirtilo
Fervura
Acondicionamento
Conservação
(meses)
Descongelação
2'
Em recipientes, cobertas
de calda de açúcar
12
Lentamente no
frigorífico
1' / 2'
Em recipientes, cobertas
de calda de açúcar
12
Lentamente no
frigorífico
Tirar o pé, lavar e
deixar secar
Em recipientes, cobertas
de calda de açúcar
10 / 12
Lentamente no
frigorífico
Fruta cozida
Cortar, cozer e coar a
água
Em recipientes, adicionar
10% de açúcar
12
Lentamente no
frigorífico
Sumos de frutos
Lavar, cortar e
espremer os frutos
Em recipientes, juntar
açúcar a gosto
10 / 12
Lentamente no
frigorífico
Couve flor
Cortar em pedaços e
escaldar em água e
sumo de liimão
Não necessária
Couves e grelos
Arranjar e lavar
Ervilhas
2'
Em sacos de polietileno
12
1' / 2'
Em sacos de polietileno
10 / 12
Descascar e lavar
2'
Em sacos de polietileno
12
Não necessária
Feijão verde
Lavar e cortar em
pedaços
2
Em sacos de polietileno
10 / 12
Não necessária
Cenouras, pimentos
e nabos
Cortar em tiras,
descascar e lavar
3' / 4'
Em sacos de polietileno
12
Não necessária
Cogumelos e
espargos
Lavar e cortar
3' / 4'
Em sacos ou recipientes
6
À temperatura ambiente
Espinafres
Lavar e cortar em
pedaços
2'
Em sacos de polietileno
12
À temperatura ambiente
Legumes diversos
para sopa
Lavar e cortar em
pedaços
3'
Em sacos com
pequenas porções
6/7
À temperatura ambiente
Outros alimentos
Preparação
Fervura
Acondicionamento
Conservação
(meses)
À temperatura ambiente
Descongelação
Pão
Em sacos de polietileno
4
À temperatura ambiente
e no forno
Bolos
Em pelicula de
polietileno
6
À temperatura ambiente
e cozer a 100/200°C
Natas
Em recipientes de
plástico
6
À temperatura ambiente
ou no frigorífico
Manteiga
Na embalagem envolto
em aluminio
6
No frigorífico
Alimentos cozidos,
sopa
Repartido por recipientes
de plastico ou vidro
Ovos
Congelar sem casca
P
46
3/6
À temperatura ambiente
ou em água quente
10
À temperatura ambiente
ou no frigorífico
Conselhos para poupar energia
- Instalar bem o aparelho
Isto é, longe das fontes de calor, da luz directa do sol e em
local bem arejado.
O GASTO EFECTIVO DE ENERGIA DEPENDE DA FORMA
NA QUAL O APARELHO É UTILIZADO E DO LUGAR NO
QUAL É LOCALIZADO.
Os ensaios de gasto foram efectuados em colunas de
profundidade de 560mm, condição mais comum de
montagem.
- O frio justo.
Uma programação de temperaturas interiores baixas demais
causará um aumento dos consumos.
- Não o encher demasiado
Para conservar bem os alimentos, o ar frio deve circular livremente no interior do frigorífico. Enchê-lo muito significa
impedir esta circulação o que obriga o compressor a trabalhar continuamente.
- A porta fechada
Abra o seu aparelho o menor número de vezes possível,
porque cada vez que o faça sai para o exterior grande parte
do ar frio. Para restabelecer a temperatura o compressor
terá que trabalhar durante muito tempo, consumindo muita energia.
- Cuidado com as guarnições
(borrachas de vedação das portas). Mantenha-as elásticas e
limpas de modo a que adiram bem às portas; só assim vedaro
completamente no deixando sair o ar frio.
- Não guarde alimentos quentes
Um recipiente com alimentos quentes metido no frigorífico
faz subir imediatamente a temperatura de diversos graus;
deixe arrefecer os alimentos à temperatura ambiente antes
de os introduzir no frigorífico.
- Gelo no congelador
Controlar a espessura do gelo nas paredes do congelador e
efectuar logo a descongelação se a camada estiver demasiado espessa (Ver a seguir : “Como mantê-lo em forma” ).
Alarmes sonoros e visuais
Alarme da porta aberta
Se a porta do frigorífico ficar aberta mais de dois minutos, a
lâmpada de iluminação interna começa a piscar; depois de
alguns segundos, toca um sinal sonoro, que pode ser
desligado, se fechar a porta ou carregar no botão SELECT
"D". Se a porta ficar aberta mais de quatro minutos, a
lâmpada começa a piscar mais depressa.
Alarme de aquecimento anómalo do
congelador
1. Para avisar que há aquecimento excessivo do congelador
(por ex.: por causa de uma momentânea interrupção da
energia) é dado um sinal sonoro e aparece uma mensagem
no ecrã (A1) para assinalar um perigoso aquecimento.
Para não congelar novamente os alimentos, o congelador
mantém-se a uma temperatura ao redor de 0°C, para
possibilitar-lhe os alimentos dentro de 24 horas ou para
cozê-los e congelá-los. É possível desligar o aviso sonoro,
se simplesmente carregar no botão SELECET "D".
Para voltar ao normal funcionamento e apagar a
mensagem do ecrã, será necessário desligar e ligar
novamente o aparelho mediante o selector ON/OFF "B"
do aparelho.
2. Se a temperatura continuar a subir para valores
excessivamente altos, o sinal tocará novamente e
aparecerá outra mensagem no ecrã (A2) para assinalar o
excessivo aquecimento. É aconselhável verificar o estado
dos alimentos, pode ser necessário jogá-los fora. Em todo
o caso, os alimentos não devem ser novamente
congelados, se ainda não estiverem cozidos. Para não
deixar congelar novamente os alimentos, o congelador
será mantido a uma temperatura ao redor de 0°C. É
possível desligar o aviso sonoro, se simplesmente carregar
no botão SELECET "D".
Para voltar ao normal funcionamento e apagar a
mensagem do ecrã, será necessário desligar e ligar
novamente o aparelho mediante o selector ON/OFF "B"
do aparelho.
47
P
Como conservar o aparelho
Antes de realizar quaisquer operações de limpeza ou
de degelo, desligue o aparelho da rede de eléctrico
(coloque o botão ON*OFF do aparelho “B” na posição
de OFF e, em seguida, tire a ficha da tomada). Se este
processo não for realizado, poderá haver uma condição
de alarme. ATENÇÃO: este alarme não é sintoma de
anomalia. Para restabelecer um funcionamento
correcto, desligue e ligue novamente o aparelho,
directamente no botão ON/OFF do aparelho “B”.
Descongelamento
ATENÇÃO: não estrague o circuito de refrigeração.
Ter cuidado para não utilizar dispositivos mecânicos ou
outros instrumentos para tornar mais veloz o processo de
descongelação, além dos recomendados pelo fabricador.
Como descongelar o compartimento frigorífico
Este aparelho degela-se automaticamente e a água é
conduzida até a parte traseira mediante uma descarga para
este fim (fig. 3), na qual o calor produzido pelo compressor
fá-la evaporar. A única intervenção que deverão periodicamente realizar consiste em verificar que a água descarregada
passa regularmente. Limpe o furo de descarga com a
respectiva “escovinha”.
Como descongelar o compartimento congelador
No congelador não é necessario que seja realizada a operação
de descongelamento pois o sistema de resfriamento com
“ar frio ventilado” não deixa formar gelo sobre as paredes.
Fig. 3
FUNÇÃO FÉRIAS. O mofo e os maus cheiros formados
dentro do frigorífico desligado quando se parte de
férias, já não são mais problemas: é suficiente activar a
função Holiday (no ecrã). Desta maneira, com um baixo
consumo, mantém-se no compartimento frigorífero uma
temperatura de cerca de 12°C (pode-se guardar dentro,
por exemplo, produtos de maquillage
e cosméticos) e para deixar o
congelador funcionar no mínimo
indispensável para a conservação dos
alimentos.
Limpeza e manutenção especial
Antes de limpar o frigorífico, coloque o botão ON/OFF
aparelho “B” na posição de OFF, até ser visualizado o
estado de OFF de ambos os compartimentos frigorífero
e o freezer e, em seguida desligue a ficha.
- Os materiais com que foi fabricado o seu aparelho são
higiênicos e não transmitem odores. No entanto, para manter
esta qualidade, é necessário que os alimentos estejam sempre
protegidos e bem fechados em recipientes, de modo a que os
odores não se transmitam e não se criem incrustações e manchas dificilmente removíveis ou a criação de maus odores.
- Para limpar, quer o interior, quer o exterior do aparelho,
utilize uma esponja macia embebida em água tépida e bicarbonato de sódio que, é também um bom desinfectante. Também poderá utilizar um sabão neutro.
- O que não deve utilizar: Nunca utilize produtos abrasivos,
lixívia ou amoníaco . É proibido utilizar solventes ou productos
similares.
- As peças que podem ser removidas devem ser lavadas com
água quente e sabão ou detergente para louça. Antes de
colocar as peças no aparelho, enxugue-as muito bem.
- Quando está desligado durante muito tempo- Durante as
férias, se decidir desligar o aparelho é preciso limpar o seu
interior e deixar as portas abertas para evitar a formação de
maus odores e bolor.
- Como substituir a lâmpada interna: Desligue o aparelho da
rede de alimentação eléctrica para substituir a lâmpada fundida por outra da mesma potência, nunca superior a 15 Watt.
Desenrosque o parafuso de fixação centrale "B", colocado na
parte posterior do cobre-lâmpada e desenrosque a lâmpada
"A" (fig. 4).
A
B
Fig. 4
P
48
O que fazer se ocorrer alguma anomalia?
O ecrã está inteiramente apagado
Deve verificar se:
· O interruptor geral do apartamento está desligado
· A ficha está correctamente inserida na tomada de corrente
· A tomada de corrente não está eficiente: experimente ligar a ficha a uma outra tomada de corrente
Se, apesar de todos os controlos, o aparelho não funcionar
e a anomalia que notou continuar a verificar-se, chamar o
Centro de Assistência Técnica mais próximo, comunicando
as seguintes informações : o tipo de avaria, a sigla do modelo (Mod.) e os respectivos números (S/N) escritos na placa de
características colocada embaixo à esquerda, junto ao recipiente para verduras. (ver os exemplo na figura seguinte).
O motor não parte
Controlou se:
· passaram 8 minutos desde que o ligou?
De facto, este modelo é dotado de um controlo de protecção
de motor que deixa-o iniciar somente aproximadamente
depois de 8 minutos depois de ligado.
· foi activada a modalidade DEMO? (veja-se pag. 40)
Mod. RG 2330
220 - 240 V-
Cod.
150 W
75
Total 340
Net
Gross
Gross
Util
Bruto
Bruto
Utile
Brut
Brut
Compr. R 134 a
Test Pressure
HIGH-235
Syst.
P.S-I. LOW 140
Kompr. kg 0,090
Made in Italy 13918
O frigorífico e o congelador arrefecem pouco
Deve verificar se:
· As portas fecam bem e se as guarnições (borrachas de
vadação) estão em bom estado
· As portas sã abertas com muita frequência
· Os manípulos de regulação da temperatura estão na
posicão correcta
· O frigorífico ou congelador não estão excessivamente carregados (cheios)
TI
50 Hz
93139180000
W Fuse
S/N 704211801
A
Gross
Bruto
Brut
Max 15 w
Capac
Class
Poder de Cong
Clase
Freez.
kg/24 h
4,0
N
Classe
Nunca recorrer a técnicos não autorizados e recusar
sempre a instalação de peças sobresselentes não originais.
No frigorífico os alimentos gelam-se demais
Controlou se:
· a regulação da temperatura definida é baixa demais (ou
não ideal);
· Os alimentos estão em contacto com a parede posterior.
O motor está a funcionar continuamente.
Controlou se:
· estão activas as funções SUPER COOL e/ou SUPER FREEZE
e/ou ICE PARTY;
· as portas foram abertas continuamente;
· A temperatura exterior é muito elevada
O aparelho emite muito ruído
Deve verificar se:
· O aparelho está bem nivelado
· Está instalado entre móveis ou objectos que vibram e
emitem ruídos
· O gás refrigerante que circula no interior do circuíto de
refrigeração pode provocar um ligeiro ruído (gorgojar) ,
mesmo quando o compressor não está em funcionamento.
Não se preocupe, não é um defeito, trata-se de uma situação normal.
Existência de água no fundo do frigorífico
Deve verificar se:
· O furo de saida da agua do descongelamento não é obstruido.
49
P
02/2005 - 195044858.01 - Xerox Business Services DocuTech
Viale Aristide Merloni, 47
60044 Fabriano (AN) Italy
Tel. +39 0732 6611
www.aristonchannel.com