1
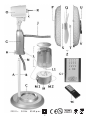
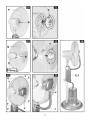
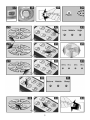
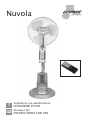
Nuvola
I
GB
Ventilatore con nebulizzatore
ISTRUZIONI D’USO
Atomiser fan
INSTRUCTIONS FOR USE
220 V~
50 Hz
85 W p.m.
2
3
4
5
6
I
AVVERTENZE GENERALI
Conservate con cura il presente
manuale e leggetene attentamente le avvertenze; esse forniscono importanti indicazioni riguardanti la
sicurezza, l’uso immediato e futuro dell’apparecchio.
Questo apparecchio, adatto per il solo uso
domestico, dovrà essere destinato solo alla
funzione per il quale è stato espressamente
concepito.
Ogni altro uso è da considerarsi improprio
e pericoloso.
Il costruttore non può essere considerato
responsabile per eventuali danni derivanti
da usi impropri, errati ed irragionevoli.
L’installazione dovrà essere effettuata secondo le prescrizioni del costruttore.
Una errata installazione può causare danni
a persone, animali, cose, il costruttore non
può esserne ritenuto responsabile.
La sicurezza delle apparecchiature elettriche è garantita solo se queste sono collegate ad un impianto elettrico provvisto di
idonea messa a terra secondo quanto stabilito dagli attuali standard vigenti in materia di sicurezza elettrica.
Gli elementi dell’imballaggio (sacchetti in
plastica, chiodi, polistirolo espanso, ecc.)
non devono essere lasciati alla portata di
bambini o incapaci in quanto rappresentano potenziali fonti di pericolo.
Prima di collegare l’apparecchio accertarsi
che i dati di targa siano rispondenti a quelli
della rete di distribuzione elettrica.
In caso di incompatibilità tra la presa e la
spina rivolgersi a personale qualificato per
le necessarie operazioni di adeguamento.
Non utilizzare adattatori, prese multiple
e/o prolunghe.
Qualora il loro uso si rendesse indispensabile utilizzare esclusivamente materiale
conforme alle vigenti norme di sicurezza ed
aventi requisiti di compatibilità con appa-
7
recchio e rete di distribuzione elettrica.
Utilizzando l’apparecchio per la prima
volta, assicurarsi di aver tolto ogni etichetta
o foglio di protezione.
Se l’apparecchio è dotato di prese d’aria,
assicurarsi che non vengano mai occluse
nemmeno parzialmente.
L’uso di qualsiasi apparecchio elettrico
comporta l’osservanza di alcune regole
fondamentali ed in particolare:
Non immergere o bagnare l’apparecchio;
non usarlo vicino ad acqua, in vasca, nel lavello o in prossimità di altro recipiente con
liquidi. Nel caso l’apparecchio dovesse cadere accidentalmente in acqua NON cercare
di recuperarlo ma innanzitutto togliere immediatamente la spina dalla presa di corrente.
Successivamente portarlo in un centro assistenza qualificato per i necessari controlli.
Durante l’uso, l’apparecchio deve essere
lontano da qualsiasi oggetto o sostanza infiammabile od esplosiva.
Non toccare l’apparecchio con mani bagnate o umide.
Non usare l’apparecchio a piedi nudi.
Non tirare l’apparecchio o il cavo per staccare la spina dalla presa.
Non lasciare l’apparecchio esposto ad
agenti atmosferici (pioggia, sole).
Si raccomanda di tenere l’apparecchio fuori
dalla portata di bambini od incapaci e di
non permetterne loro l’utilizzo.
Scollegare la spina dalla presa di corrente
quando l’apparecchio non viene utilizzato
e prima di effettuare qualsiasi operazione
di pulizia o manutenzione.
Il cavo di alimentazione deve essere srotolato per tutta la sua lunghezza al fine di
evitarne il surriscaldamento.
Il cavo di alimentazione non deve essere
avvicinato a fonti di calore e/o superfici taglienti.
In caso di cavo di alimentazione danneggiato, provvedere alla sostituzione che deve
essere effettuata da personale qualificato.
In caso di guasto e/o cattivo funzionamento spegnere l’apparecchio e rivolgersi
a personale qualificato.
Eventuali manomissioni o interventi effettuati da personale non qualificato fanno
decadere i diritti di garanzia.
Per pulire l’apparecchio usare solo un
panno morbido e non abrasivo.
Quando l’apparecchio, risulta inutilizzabile
e si desidera eliminarlo, asportarne i cavi e
smaltirlo presso un ente qualificato al fine
di non contaminare l’ambiente.
Il simbolo
sul prodotto o sulla confezione indica che il prodotto non deve essere considerato come un normale rifiuto
domestico, ma deve essere portato nel
punto di raccolta appropriato per il riciclaggio di apparecchiature elettriche ed
elettroniche.
Provvedendo a smaltire questo prodotto in
modo appropriato, si contribuisce a evitare
potenziali conseguenze negative per l’ambiente e per la salute, che potrebbero derivare da uno smaltimento inadeguato del
prodotto.
• Se nel prodotto vi sono parti in vetro, Per informazioni più dettagliate sul riciclaggio di questo prodotto, contattare l’ufqueste non sono coperte da garanzia.
ficio comunale, il servizio locale di
smaltimento rifiuti o il negozio in cui è
ATTENZIONE:
Le parti in plastica del prodotto non sono stato acquistato il prodotto.
coperte da garanzia.
ATTENZIONE:
I danni del cavo di alimentazione, derivanti
dall’usura non sono coperti da garanzia;
l’eventuale riparazione sarà pertanto a carico del proprietario
ATTENZIONE:
Se si rendesse necessario portare o spedire
l’apparecchio al centro assistenza autorizzato, si raccomanda di pulirlo accuratamente in tutte le sue parti.
Se l’apparecchio risultasse anche minimamente sporco o incrostato o presentasse
depositi di cibo, depositi calcarei, depositi
di polvere o altro; esternamente o internamente: per motivi igenico-sanitari, il centro
assistenza respingerà l’apparecchio stesso
senza visionarlo.
8
A, B.
C.
D.
E.
F.
G.
G1.
H.
L.
L1.
M.
M2.
M1.
N.
O.
P.
Q.
R.
K.
S.
T.
U.
Z.
V.
Y.
J.
Montaggio dell'apparecchio
1. Inserire i tubi A e B nei fori del copri-basamento C e aggiungere la piastrina D ).
2-3. Posizionare il basamento E nel copribasamento C.
Mettere in posizione le 2 rondelle F e bloccare il tutto per mezzo delle 2 viti con
testa esagonale ).
4. Capovolgere l'insieme.
5. Inserire il corpo centrale G sui tubi A-B.
6. Bloccare per mezzo delle 2 viti con testa
in plastica H.
7-8. Unire il (serbatoio con L il suo coperchio) sulla pompa M.
9. Collocare la pompa M.con il serbatoio L
nell'alloggiamento del copri-basamento C
e inserire il tubo corrugato N nel foro superiore del coperchio del serbatoio L.
10. Posizionare sul corpo motore O la griglia posteriore di protezione P del ventilatore
11. Bloccare per mezzo della ghiera S.
12. Collocare le pale Q sul perno R, facendo
inserire il piolino K del perno R nella scanalatura della pale Q.
13. Bloccare per mezzo del tappo filettato
T (per avvitare ruotare in senso antiorario).
14. Aggiungere la griglia anteriore U posizionandola in modo che.il foro dell'erogatore V sia rivolto verso il basso.
Bloccarla con la vite + dado Z nella parte
inferiore e chiudendo i 5 bloccaggi Y sulla
sua circonferenza.
15. Inserire il tubo corrugato J sul terminale dell'erogatore V.
Componenti
Tubi di sostegno
Copri-basamento
Piastrina
Basamento
Rondelle con viti a testa esagonale
Corpo centrale
Pannello del corpo centrale
Viti con testa in plastica
Serbatoio con coperchio
Tappo con valvola
Pompa
Interruttore pompa
Regolatore di flusso
Tubo corrugato
Corpo motore
Griglia posteriore di protezione
Pale
Perno
Piolino del perno R
Ghiera
Tappo filettato
Griglia anteriore
Vite + dado
Erogatore
Bloccaggi ghiere
Tubo corrugato
Pannello G1
Indicatori luminosi:
1/2Hrs, 1Hrs, 2Hrs, 4Hrs
Swing, Low, Middle, High
Mist, Nature, Natural, Sleep
POWER
Tasti:
SWING. MIST
OFF
ON/SPEED, TIMER
Telecomando TC
Tasti:
MODE,MIST,
OFF, TIMER,
SWING, SPEED/ON
9
Istruzioni per l'utilizzo della sola
ventilazione
17. Interruttore M2 spento,
18. Regolatore di flusso M1 ruotato completamente in senso antiorario
19. Inserire la spina in una presa di corrente idonea a riceverla.
20. L'indicatore luminoso POWER del pannello G1 si illuminerà in rosso.
21-22. Premere il tasto SPEED/ON direttamente sul pannello G1 oppure sul telecomando TC per attivare la ventilazione.
23. Regolare la velocità (LOW, MIDDLE,
HIGH) evidenziata dall'accendersi del corrispondente indicatore luminoso, con successive pressioni del tasto.
24-25-26. Desiderando l'oscillazione alternata del ventilatore premere il tasto
SWING.
27-28-29. Per impostare in automatico lo
spegnimento dell'apparecchio utilizzare i
tasti TIMER. Ad ogni pressione successiva
corrisponderà un incremento di 30 minuti:
… ½h, 1h, 1h e 30 minuti, 2h ecc... sino
ad un massimo di 7 ore e 30 minuti. Con
una ulteriore pressione si esclude la programmazione auto-stop.
30-31. Il tasto MODE del telecomando TC
permette di variare la ventilazione tra NATURE, NORMAL, SLEEP.
32-33. A fine utilizzazione, premere il
tasto OFF, con la spina ancora inserita l'indicatore POWER permarrà illuminato ad
indicare che l'apparecchio è ancora sotto
tensione.
34. Occorre quindi estrarre la spina dalla
presa di corrente.
Istruzioni per l'utilizzo di ventilazione
con nebulizzazione
35-36-37. Con spina non inserita nella
presa, l'interruttore M2 spento, il regolatore di flusso M1 ruotato completamente
in senso antiorario.
38. Estrarre il tubo N dal serbatoio L.
39. Assicurarsi che non ci sia residuo
d'acqua nel serbatoio L e asportarlo dalla
pompa M.
40. Capovolgere il serbatoio L, ruotare il
tappo con valvola L1 (il bloccaggio è a baionetta) liberando l'accesso
41. Effettuare il rifornimento d'acqua.
42. Riempito il serbatoio L, rimettere in
posizione il tappo L1 e bloccarlo saldamente.
43. Capovolgere il serbatoio L e riposizionarlo nell'alloggiamento della pompa M.
44. Con mani asciutte, inserire la spina in
una presa di corrente idonea a riceverla.
L'indicatore luminoso POWER del pannello
G1 si illuminerà.
Mettere in funzione la ventilazione secondo quanto sopra indicato da Fig.*** ed
effettuare le relative regolazioni.
45. Portare l'interruttore MI della pompa M
su I, si accenderà in verde l'indicatore luminoso POWER.
46. Ruotare in senso orario al massimo il
regolatore di flusso M1.
47-48-49. Per attivare la nebulizzazione
premere il tasto MIST e successivamente
regolare l'intensità del flusso ruotando in
senso antiorario la manopola regolatore
M1.
A fine utilizzazione, per spegnere
l'apparecchio
50-51. Premere il tasto OFF (con la spina
ancora inserita l'indicatore POWER permarrà illuminato ad indicare che l'apparecchio è ancora sotto tensione).
Occorre quindi (con mani perfettamente
asciutte) estrarre la spina dalla presa di
corrente.
Se non è prevista una imminente utilizzazione dell'apparecchio provvedere allo
svuotamento del serbatoio L e della
pompa M.
Per fare questo asportare il serbatoio L da
M e dopo aver tolto il tappo con valvola L1,
capovolgerlo sopra ad un contenitore sino
al completo svuotamento.
Togliere dal suo alloggiamento nel copribasamento C la pompa M e capovogendola sopra un contenitore, svuotarla dal
residuo d'acqua.
10
GB
GENERAL SAFETY REQUIREMENTS
Carefully read the requirements
in this manual and keep in a safe
place. It contains important instructions on the safety, use and future of
your appliance.
This appliance is only for domestic use
and must only to be used for the purpose
it was specifically designed.
Any other use is considered improper and
dangerous.
The manufacturer cannot be held responsible for any damages caused by improper, incorrect and negligent use. The
installation must be carried out according
to the manufacturer’s instructions. The
manufacturer shall not be held responsible
for any damages to people, animals or objects caused by incorrect installation. The
safety of the electrical equipment is only
guaranteed if it is connected to an electrical installation equipped with a suitable
earthing system in compliance with the
current standards on electrical safety.
Do not leave parts of packaging (plastic
bags, foam polystyrene, nails, etc) within
reach of children or incapacitated people
since they are potential sources of danger.
Before connecting the appliance, check
that the technical data on the rating label
corresponds to those of the main electricity network.
In case of incompatibility between the outlet and the plug, contact a qualified electrician for the necessary adjustments.
Do not use adaptors, multiple plugs and
extension leads.
However, if absolutely necessary only use
materials that conform to the current safety standards and that are compatible
with the appliance and the main electricity
network.
On using the appliance for the first time,
remove any labels or protective sheets.
If the appliance is equipped with air inlets,
make sure they are never blocked not even
partially.
The use of any electrical appliance involves the observance of some fundamental
rules. In particular:
Do not immerge the appliance in water
and do not wet; do not use it near water,
in the tub, washbasin or near other recipients with liquids. If the appliance
should accidentally fall in water, DO NOT
try to touch it but immediately disconnect
the plug from the mains power.
Then bring it to an authorised service
centre for the necessary controls.
During use, the appliance must be kept
away from any inflammable objects or
substances or explosives.
Do not touch the appliance with wet
hands or feet.
Do not use the appliance with bare feet.
Do not pull on the power cord or on the
appliance itself to disconnect the plug
from the power outlet.
Do not leave the appliance exposed to atmospheric agents (sun, rain…)
Keep the appliance out of reach of children or incapacitated people and do not
let them use it.
Disconnect the plug from the power outlet when the appliance is not being used
and before carrying out any cleaning or
maintenance.
The power cord must be completely unwound to prevent it from overheating.
The power cord must be kept away from
heat sources and/or sharp edges.
If power cord is damaged, have it replaced by qualified personnel.
Switch off and contact a qualified technician if the appliance should breakdown
and/or not function properly.
Any tampering or interventions executed
by unqualified people will cancel the guarantee.
11
Use a soft and non-abrasive cloth to
clean the appliance.
When the appliance is unserviceable and
must be eliminated, remove its cords and
dispose of it at an authorised disposal
centre in order to protect the environment.
• Warranty does not cover any glass parts
of the product.
ATTENTION:
The damages of the power supply cord,
originate by the wear aren’t covered by
guarantee; the repair will be in charge to
the owner.
ATTENTION:
Warranty does not cover any plastic parts
of the product
ATTENTION:
If the need should arise to take or send the
appliance to an authorised service centre,
make sure to clean all its parts thoroughly.
For hygienic purposes, the service centre
shall reject appliances that are not perfectly clean on the outside or inside without
making any controls or repairs.
The symbol
on the product or on its
packaging indicates that this product may
not be treated as household waste. Instead
it shall be handed over to the applicable
collection point for the recycling of electrical and electronic equipment.
By ensuring this product is disposed of
correctly, you will help prevent potential
negative consequences for the environment and human health, which could
otherwise be caused by inappropriate
waste handling of this product.
For more detailed information about recycling of this product, please contact your
local city office, your household waste disposal service or the shop where you purchased the product.
12
A, B.
C.
D.
E.
F.
G.
G1.
H.
L.
L1.
M.
M2.
M1.
N.
O.
P.
Q.
R.
K.
S.
T.
U.
Z.
V.
Y.
J.
Components
Support tubes
Base-cover
Small plate
Base
Washers with hex head screws
Central unit
Central unit panel
Screws with plastic head
Container with lid
Plug with valve
Pump
Pump switch
Flow regulator
Corrugated tube
Motor unit
Rear grid guard
Blades
Pin
R pin rod
Ring nut
Threaded plug
Front grid
Screw + nut
Dispenser
Ring nut locks
Corrugated tube
Panel G1
Indicator lights:
1/2Hrs, 1Hrs, 2Hrs, 4Hrs
Swing, Low, Middle, High
Mist, Nature, Natural, Sleep
POWER
Keys:
SWING. MIST
OFF
ON/SPEED, TIMER
TC Remote Control
Keys:
MODE,MIST,
OFF, TIMER,
SWING, SPEED/ON
Appliance assembly
1. Insert tubes A and B in the base-cover
C and add small plate D.
2-3. Position base E in base-cover C.
Place the 2 washers F in position and block
all using the two hex head screws.
4. Turn the unit upside down.
5. Insert the central unit C on tubes A-B.
6. Block using the 2 plastic head screws H.
7-8. Join the container with lid L on
pump M.
9. Place pump M. with container L in the
base-cover C compartment and insert the
corrugated tube N in the upper hole of the
lid on container L.
10. Position the rear grid guard P of the
fan on motor unit O.
11. Block using the ring nut S.
12. Position blades Q on pin R, inserting
rod K of pin R in the grooves of blades Q.
13. Block using threaded plug T (to screw
in turn anti-clockwise).
14. Add the front grid U by positioning it
so that dispenser V is turned downwards.
Block with the screw + nut Z on the lower
part and close the 5 locks Y on its circumference.
15. Insert the corrugated tube J on the end
of dispenser V.
Instructions for use of the fan alone
17. Switch M2 off.
18. Flow regulator M1 turned completely
anti-clockwise.
19. Put the plug in a suitable power socket.
20. The POWER indicator light on panel G1
turns red.
21-22. Press the SPEED/ON key directly
on panel G1 or on remote control TC to
activate the fan.
23. Adjust the speed (LOW, MIDDLE, HIGH)
which is highlighted by the corresponding
indicator light switching on, after the key
is pressed.
24-25-26. If you want alternated oscillation of the fan, press the SWING key.
13
27-28-29. To set automatic switch off of
the appliance use the TIMER keys.
Each subsequent press corresponds to an
increase of 30 minutes: … ½h, 1h, 1h and
30 minutes, 2h etc... up to a maximum of
7 hours 30 minutes.
An additional press switches off the autostop program.
30-31. The MODE key on remote control
TC allows you to vary ventilation between
NATURE, NORMAL and SLEEP.
32-33. When you are finished using it,
press the OFF key.
If the plug is still inserted, the POWER indicator will stay on to indicate the appliance is still powered.
34. You must take the plug out of the socket.
47-48-49. To activate misting, press the
MIST key and then adjust flow intensity by
turning the regulator knob M1 in an anticlockwise direction.
When you have finished using it,
switch off the appliance
50-51. Press the OFF key (with the plug
still inserted, the POWER indicator will
stay on to indicate the appliance is still
powered).
You must take the plug out (your hands
must be perfectly dry) of the socket.
If you will not use the appliance again
soon, empty container L and pump M.
To do this, remove tank L from M and having removed the plug with valve L1, turn
it upside down into a container until it is
completely empty.
Remove pump M from its compartment in
Instructions for use of fan with mithe base-cover and turn it upside down
sting function
35-36-37. With the plug not yet inserted over a container, emptying it of any water
in the socket, switch M2 off, the flow re- residue.
gulator M1 turned completely in an anticlockwise direction.
38. Remove tube N from container L.
39. Ensure there is no water residue in
container L and remove it from pump M.
40. Turn tank L upside down, turn the
plug with valve L1 (bayonet locking) to
free access.
41. Refill with water.
42. Fill tank L, put the plug L1 in position
and block firmly.
43. Turn the tank L and reposition it in the
compartment of pump M.
44. With dry hands, put the plug in a suitable power socket.
The POWER indicator light on panel G1
turns on.
Operate the fan according to the instructions in Fig. *** and adjust as desired.
45. Bring switch M1 of pump M to I, the
POWER indicator light turns green.
46. Turn the flow regulator M1 to the fully
clockwise direction.
14
GARANZIA
La durata della garanzia decorre dalla data di acquisto dell’apparecchio, comprovata dal timbro del rivenditore e cessa dopo il periodo
prescritto anche se l’apparecchio non é stato usato. Rientrano nella garanzia tutte le sostituzioni o riparazioni che si rendessero necessarie per difetti di materiale o di fabbricazione. La garanzia decade qualora l’apparecchio venga manomesso o quando il difetto
sia dovuto ad uso improprio. Le sostituzioni o le riparazioni contemplate nella garanzia vengono effettuate gratuitamente per merce
resa franco nostri centri assistenza. Sono a carico dell’utente le sole spese di trasporto. Le parti o gli apparecchi sostituiti diventano
di nostra proprietà.
GUARANTEE
The validity of the guarantee starts from the purchasing date certified by the seller’s stamp and expires at the end of the indicated
period, even when the device has not been used. The guarantee covers all substitutions or repairs due to material or manufacturing
defects. The guarantee has no validity in case of device tampering or when the defect is due to incorrect or improper use of the
same. Substitutions and repair covered by the guarantee are made free of any charge for goods delivered free our service company
representative. Only the freight will be at buyer’s expense. All replaced parts or devices will become our property.
GARANTIE
La validité de la garantie commence à partir de la date d’achat de l’appareil, attestée par la timbre du revendeur et termine après la
période prescrit, même si l’appareil n’a pas été utilisé. Rentrent dans la garantie: toutes les substitutions ou réparations qui seraient
nécessaires par défauts de matériel ou de fabrication. La garantie n’est pas valable si l’appareil a été manumis ou si le défaut est dû
à usage impropre. Les substitutions ou les réparations couvertes par la garantie sont faites gratuitement pour marchandise rendue
franco nos centres d’assistance. Sont à la charge de l’acheteur simplement les frais de transport. Les pièces et les appareils substitués
deviennent de notre propriété.
GARANTIE
Die Garantiedauer läuft vom Einkaufsdatum der Gerätes an das durch den Stempel des Verkäufres nachgewiesen ist, und verfällt
nach der vorgeschriebenen Zeit, auch wenn das Gerät nicht gebraucht worden ist. Die Garantie schliesst alle Ersetzungen oder Reparaturen ein, die wegen schadhaften Materials oder fehlerhafter Herstellung erfordert würden. Die Garantie verfällt, wenn das Gerät
zerbrochen wird oder der Fehler auf ungeeigneten Gebrauch zurückzuführen ist. Die von der Garantie vorgesehenen Ersetzungen
oder Reparaturen werden für ab unserren Kundenzentren gelieferte Ware kostenlos ausgeführt. Nur die Frachtkosten gehen zu Lasten
des Verbrauchers. Die Ersetzen Teile oder Geräte werden unser Eigentum.
GARANTIA
El período de garantia inicia en la fecha de compra del aparato comprobada por el sello del vendedor y termina después del período
prescrito aunque el aparato no sea usado. Entran en la garantia todas las sustituciones o reparaciones que sean necesarias por defectos de materiales o de fabricación. La garantia se pierde cuando el aparato sea reparado en un centro de asistencia no autorizado
o cuando el defecto es causado por un uso inapropiado. Las sustituciones o las reparaciones contempladas en la garantia vienen
efectuadas gratuitamente. Solamente son a cargo del usuario los gastos de transporte. Las partes o los aparatos sustituidos permanecen en nuestro poder.
GARANTIA
A validade da garantia começa a partir da data da compra do aparelho, comprovada pelo carimbo do vendedor e termina após o periodo indicado, mesmo se o aparelho não tiver sido utilizado. A garantia cobre todas as substituições ou reparações que sejam necessárias, devido a defeitos do material ou de fabrico. A garantia perde a validade se o aparelho fôr indevidamente utilizado ou se
o defeito fôr devido a utilizaçao imprópria do mesmo. As substituições ou reparações cobertas pela garantia sâo efectuadas gratuitamente, sendo a mercadoria entregue sem despesas nos nossos centros de assistència. Apenas fiçarao a cargo do comprador as
despesas de transporte. As peças ou os aparelhos substituidos serâo de nossa propriedade.
ΕΓΓΥΗΣΗ
Η διάρκεια της εγγύησης τίθεται σε ισχύ από την ημερομηνία αγοράς της συσκευής, με βάση την σφραγίδα του καταστηματάρχη
και έως ότου παρέλθει η προβλεπόμενη περίοδος ακόμα και στην περίπτωση που η συσκευή δεν έχει χρησιμοποιηθεί. Η εγγύηση
καλύπτει όλες τις αντικαταστάσεις ή/και επισκευές που αποδεικνύονται αναγκαίες για ελαττώματα υλικών ή κατασκευής. Η
εγγύηση παύει να ισχύει εάν στην συσκευή γίνουν αυθαίρετες παρεμβάσεις ή όταν η δυσλειτουργία προκληθεί από ακατάλληλη
χρήση. Οι προβλεπόμενες από την εγγύηση αντικαταστάσεις και οι επισκευές γίνονται δωρεάν για προϊόντα που στέλνονται
ελεύθερης παράδοσης στα κέντρα εξυπηρέτησης πελατών μας. Ο χρήστης αναλαμβάνει μόνο τα έξοδα μεταφοράς. Τα εξαρτήματα ή οι συσκευές που αντικαθιστώνται παραμένουν στην δική μας ιδιοκτησία.
ГАРАНТІЯ
Гарантія має дію з дати придбання електропобутового приладу, підтверджена штампом продавця та закінчується після встановленого строку, навіть якщо прилад не вживався. Гарантії підлягає необхідна заміна та ремонт деталей признаних як дефект
матеріалу чи заводський брак. Гарантія признається дійсною в тому випадку, коли виріб застосовувався згідно з настановами
цього посібника та не був пошкоджений в результаті невірного користування. Заміна та ремонт, передбачені в гарантії, виконуються безкоштовно, при умові відправлення виробу у сервісний центр виробника. Покупець несе кошти за транспортні
витрати. Деталі або пошкоджені побутові прилади, поверненню не підлягають.
2
GARANZIA GUARANTEE GARANTIE GARANTIE GARANTIA GARANTIA ΕΓΓΥΗΣΗ ГАРАНТІЯ
ANNI YEARS ANS JAHR
internet: www.johnson.it
MOD. Nuvola
Compilare all’atto dell’acquisto
Check before purchasing
DATA ACQUISTO
PURCHASE DATE
Allegare scontrino fiscale con timbro del rivenditore
Seller’s stamp
La presente garanzia non é valida se incompleta
This certificate of guarantee has to be dulyfilled
in to be valid
e-mail: [email protected]
MOD. Nuvola
DATA ACQUISTO
PURCHASE DATE
DATA RIPARAZIONE
REPARE DATE
TIMBRO CENTRO ASSISTENZA
AFTER SALES SERVICE CENTER STAMP