1
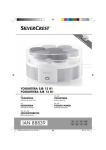
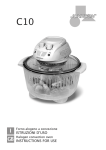
Yogurt
Yogurtiera elettrica
ISTRUZIONI D’USO
Electric yogurt maker
INSTRUCTIONS FOR USE
220-240V
˜ 50/60Hz 15W
7 vasetti/cups (170ml/cup)
2
AVVERTENZE GENERALI
Conservate con cura il presente manuale e
leggetene attentamente le avvertenze; esse
forniscono importanti indicazioni riguardanti la sicurezza, l’uso immediato e futuro dell’apparecchio.
Questo apparecchio, adatto per il solo uso domestico, dovrà essere destinato solo alla funzione per
il quale è stato espressamente concepito.
Ogni altro uso è da considerarsi improprio e pericoloso.
Il costruttore non può essere considerato responsabile per eventuali danni derivanti da usi impropri,
errati ed irragionevoli. L’installazione dovrà essere
effettuata secondo le prescrizioni del costruttore.
Una errata installazione può causare danni a persone, animali, cose, il costruttore non può esserne
ritenuto responsabile.
La sicurezza delle apparecchiature elettriche è garantita solo se queste sono collegate ad un impianto
elettrico provvisto di idonea messa a terra secondo
quanto stabilito dagli attuali standard vigenti in materia di sicurezza elettrica.
Gli elementi dell’imballaggio (sacchetti in plastica,
chiodi, polistirolo espanso, ecc.) non devono essere
lasciati alla portata di bambini o incapaci in quanto
rappresentano potenziali fonti di pericolo.
Prima di collegare l’apparecchio accertarsi che i dati
di targa siano rispondenti a quelli della rete di distribuzione elettrica.
In caso di incompatibilità tra la presa e la spina rivolgersi a personale qualificato per le necessarie
operazioni di adeguamento.
Non utilizzare adattatori, prese multiple e/o prolunghe.
3
Qualora il loro uso si rendesse indispensabile utilizzare esclusivamente materiale conforme alle vigenti norme di sicurezza ed aventi requisiti di
compatibilità con apparecchio e rete di distribuzione
elettrica.
Utilizzando l’apparecchio per la prima volta, assicurarsi di aver tolto ogni etichetta o foglio di protezione.
Se l’apparecchio è dotato di prese d’aria, assicurarsi che non vengano mai occluse nemmeno parzialmente.
L’uso di qualsiasi apparecchio elettrico comporta
l’osservanza di alcune regole fondamentali ed in
particolare:
Non immergere o bagnare l’apparecchio; non usarlo
vicino ad acqua, in vasca, nel lavello o in prossimità
di altro recipiente con liquidi. Nel caso l’apparecchio
dovesse cadere accidentalmente in acqua NON cercare di recuperarlo ma innanzitutto togliere immediatamente la spina dalla presa di corrente.
Successivamente portarlo in un centro assistenza
qualificato per i necessari controlli.
Durante l’uso, l’apparecchio deve essere lontano da
qualsiasi oggetto o sostanza infiammabile od esplosiva.
Non toccare l’apparecchio con mani bagnate o umide.
Non usare l’apparecchio a piedi nudi.
Non tirare l’apparecchio o il cavo per staccare la
spina dalla presa.
Non lasciare l’apparecchio esposto ad agenti atmosferici (pioggia, sole).
Si raccomanda di tenere l’apparecchio fuori dalla
portata di bambini od incapaci e di non permetterne
loro l’utilizzo.
4
Scollegare la spina dalla presa di corrente quando
l’apparecchio non viene utilizzato e prima di effettuare qualsiasi operazione di pulizia o manutenzione.
Il cavo di alimentazione deve essere srotolato per
tutta la sua lunghezza al fine di evitarne il surriscaldamento.
Il cavo di alimentazione non deve essere avvicinato
a fonti di calore e/o superfici taglienti.
In caso di cavo di alimentazione danneggiato, provvedere alla sostituzione che deve essere effettuata
da personale qualificato.
In caso di guasto e/o cattivo funzionamento spegnere
l’apparecchio e rivolgersi a personale qualificato.
Eventuali manomissioni o interventi effettuati da
personale non qualificato fanno decadere i diritti di
garanzia.
Per pulire l’apparecchio usare solo un panno morbido e non abrasivo.
Quando l’apparecchio, risulta inutilizzabile e si desidera eliminarlo, asportarne i cavi e smaltirlo presso
un ente qualificato al fine di non contaminare l’ambiente.
- Questo apparecchio può essere utilizzato da bambini dagli 8 anni in su e da persone con ridotte capacità fisiche, sensoriali o mentali o con mancanza
di conoscenza se a loro è stata assiscurata un'adeguata sorveglianza oppure se hanno ricevuto istruzioni circa l'uso in sicurezza dell'apparecchio e
hanno compreso i pericoli correlati.
- I bambini non devono giocare con l’apparecchio.
- Le operazioni di pulizia e di manutenzione non
devono essere effettuate da bambini a meno che
non abbiano più di 8 anni e siano sorvegliati.
5
- Non permettere che i bambini utilizzino l'apparecchio senza sorveglianza.
- Utilizzare l'apparecchio solo con gli accessori forniti in dotazione, per non compremettere la sicurezza di impiego.
Verificare periodicamente il buono stato dell'apparecchio e dei componenti; in caso di dubbio rivolgersi ad un centro assistenza autorizzato.
- Non tirare il cavo di alimentazione per spostare
l'apparecchio.
- L'utilizzatore non deve lasciare l'apparecchio
senza sorveglianza quando è collegato alla alimentazione.
- Non utilizzare l'apparecchio se non funziona regolarmente o se appare danneggiato; in caso di
dubbio rivolgersi a personale qualificato.
- E' assolutamente vietato smontare o riparare l’apparecchio per pericolo di shock elettrico; se necessario rivolgersi al rivenditore o centro assistenza.
- L’apparecchio non deve essere fatto funzionare
con dei temporizzatori esterni o altri dispositivi separati di controllo remoto.
- La spina del cavo di alimentazione, in quanto utilizzata come dispositivo di disconnessione, deve essere sempre facilmente raggiungibile.
6
• Se nel prodotto vi sono parti in vetro, queste non sono coperte da garanzia.
ATTENZIONE:
Le parti in plastica del prodotto non sono coperte da garanzia.
ATTENZIONE:
I danni del cavo di alimentazione, derivanti dall’usura non sono coperti da garanzia;
l’eventuale riparazione sarà pertanto a carico del proprietario
ATTENZIONE:
Se si rendesse necessario portare o spedire l’apparecchio al centro assistenza autorizzato, si raccomanda di pulirlo accuratamente in tutte le sue parti.
Se l’apparecchio risultasse anche minimamente sporco o incrostato o presentasse
depositi di cibo, depositi calcarei, depositi di polvere o altro; esternamente o internamente: per motivi igenico-sanitari, il centro assistenza respingerà l’apparecchio
stesso senza visionarlo.
Il simbolo
sul prodotto o sulla confezione indica che il prodotto non deve essere
considerato come un normale rifiuto domestico, ma deve essere portato nel punto
di raccolta appropriato per il riciclaggio di apparecchiature elettriche ed elettroniche.
Provvedendo a smaltire questo prodotto in modo appropriato, si contribuisce a evitare potenziali conseguenze negative per l’ambiente e per la salute, che potrebbero
derivare da uno smaltimento inadeguato del prodotto.
Per informazioni più dettagliate sul riciclaggio di questo prodotto, contattare l’ufficio
comunale, il servizio locale di smaltimento rifiuti o il negozio in cui è stato acquistato
il prodotto.
7
SCELTA DELLO STARTER
Per avviare la trasformazione del latte in
yogurt occorre aggiungere un cosiddetto
starter che può consistere in:
yogurt bianco commerciale (preferibilmente di latte intero) con una data di scadenza il più lontana possibile.
yogurt precedentemente già ottenuto in
Per ottenere lo yogurt, occorre disporre di casa.
un litro di latte e di una cultura starter o
NB. Da non utilizzare per più di dieci volte.
yogurt già esistente.
Coltura congelata o essiccata (acquistata in
farmacia o in negozi di erboristeria).
SCELTA DEL LATTE
Latte intero o magro ma sterilizzato a tem- In questo caso, aggiungere due ore al tempo
necessario per il primo lotto di yogurt.
peratura ultraelevata (UHT).
Questo tipo di latte non deve essere bollito
ISTRUZIONI D’USO
prima dell'uso.
Non usare latte scremato UHT. I migliori ri- Al primo utilizzo della yogurtiera, lavare i
vasi, i loro coperchi e il coperchio traspasultati si ottengono con latte intero UHT.
rente in acqua calda e detersivo per piatti.
Latte pastorizzato
Questo tipo di latte non è sterile. Esso con- Risciacquare accuratamente e asciugare. Il
tiene ancora batteri che resistono al calore corpo dell’apparecchio deve essere pulito
e che la pastorizzazione non ha distrutto. solo con un morbido panno inumidito e
Se si utilizza questo latte senza prima bol- tiepido quindi asciugato. Questa compolirlo, si sviluppa una flora batterica diversa nente della yogurtiera non deve mai essere
da quella dello yogurt. Non è pericoloso, ma immersa in acqua.
provoca un cambiamento della consistenza
e del gusto dello yogurt. Perciò bollirlo, la- Preparazione dello yogurt
sciarlo raffreddare e eliminare lo strato so- 1. Mescolare accuratamente un litro di latte
lido superficiale. A questo punto può essere con lo starter, in modo che la cultura si
utilizzato per creare uno yogurt cremoso, fonda completamente con il latte. Per una
con una sottile pellicina superficiale creata miscelazione ottimale, sbatterla in modo
che diventi una pastella molto liscia e
dalla crema risalita in superficie.
quindi aggiungerla al latte continuando a
Latte crudo di fattoria
deve essere prima tassativamente bollito a sbattere il composto.
lungo. (Usarlo senza prima bollirlo è peri- 2. Versare il composto in vasetti.
coloso per la salute). Poi, come per il latte 3. Posizionare i vasetti senza i coperchi
pastorizzato, lasciarlo raffreddare prima di nella yogurtiera.
4. Mettere il coperchio trasparente e inseimmetterlo nella yogurtiera.
rire la spina in una presa elettrica.
Latte in polvere
lo yogurt fatto con latte in polvere è molto 5. Premere il pulsante " O/I ".
liscio. Esso si utilizza rapidamente e facil- 6. La yogurtiera si riscalda e il latte inizia
ad addensarsi.
mente.
7. Per ottenere un buon yogurt, a secondo
NB. Il latte intero è più liscio e più aroma- del tipo di latte utilizzato, occorrono da
tico. Per rendere più denso lo yogurt, ag- otto a quindici ore.
giungere al litro di latte, due o tre cucchiai 8. A operazione conclusa, estrarre la spina
di latte in polvere e mescolare lentamente. dalla presa di corrente.
a.
b.
c.
d.
e.
COMPONENTI
Base con riscaldatore
Interruttore con indicatore luminoso
Coperchio trasparente
Cavo di alimentazione
7 Barattoli in vetro con coperchietti
in plastica
8
NB. - Quando la yogurtiera si raffredda (da
otto a dieci ore dopo averlo accesa), assicurarsi che gli yogurt siano pronti. In caso
contrario significa che la cultura starter non
ha avuto abbastanza tempo per lavorare:
ripetere quindi dal punto 5 sopra indicato.
- Non spostare la yogurtiera quando è
accesa.
- Evitare luoghi che potrebbero essere soggetti a vibrazioni o esposti a correnti d'aria.
- Se preventivamente si scalda leggermente il latte (37°C a 40°C), la preparazione richiederà meno tempo.
Pulizia
Operazioni da effettuare sempre con spina
scollegata dalla presa elettrica.
Il corpo della yogurtiera non deve mai essere immerso in acqua, ma pulita con un
panno morbido, tiepido, inumidito e asciugato accuratamente.
I vasetti e i loro coperchietti sono lavabili in
lavastoviglie.
Avvertenza: Questo apparecchio non deve
essere smaltito con i rifiuti domestici. Un
sistema di riciclaggio è stato istituito con i
Comuni per questo tipo di prodotto.
Contattare il municipio per scoprire ulteriori informazioni sul centro di riciclaggio
Possibili difetti:
più vicino.
• Grumi:
Gli apparecchi elettrici ed elettronici con- Il latte era troppo caldo.
- Gli ingredienti non sono stati mescolati tengono sostanze pericolose che hanno un
effetto dannoso per l'ambiente e la salute
sufficientemente.
umana e devono pertanto essere riciclati.
- Il latte è inacidito.
• Liquido sulla superficie.
- Lo yogurt è rimasto troppo a lungo nel- Questo apparecchio è destinato ad essere
utilizzato a livello domestico e applicazioni
l'apparecchio.
- I vasetti, per raffreddarli, sono stati spo- simili come:
- Aree cucina personale in negozi , uffici e
stati troppo presto.
altri ambienti di lavoro.
- Insufficiente riscaldamento.
- Zone cucina personale in negozi, uffici e
• Yogurt troppo liquido.
- La cultura yogurt e il latte utilizzato ave- altri ambienti di lavoro.
vano diverso contenuto di grassi con ec- - Case coloniche.
- Per i clienti in alberghi, motel e altri amcessivo tempo di maturazione.
- La cultura starter non era abbastanza bienti di tipo residenziale.
- Ambienti Pernottamento e prima colafresca.
zione tipo. Se il cavo di alimentazione è
danneggiato, deve essere sostituito dal
Conservazione dello yogurt in frigorifero
Togliere il coperchio della yogurtiera e as- produttore, dal suo servizio assistenza o da
sicurarsi che la condensa non coli nei va- personale qualificato al fine di evitare un
setti. Mettere i coperchietti. Collocare in pericolo.
frigorifero i vasetti di yogurt. Attendere almeno due ore prima d’iniziare la consuma- Servizio post-vendita
L' apparecchio non è riparabile dall'utente.
zione.
Se non funziona correttamente, controllare
NB. La durata dello yogurt conservato in che:
frigorifero oscilla tra gli otto e i dieci giorni -Hai seguito correttamente le istruzioni;
- Il principale dell'interruttore fusibile di
al massimo.
La data di scadenza è dunque D + 8-10 alimentazione / circuito non sia saltato /
scattato. Se ancora non funziona, rivolgersi
giorni (D è la data di fabbricazione).
al rivenditore.
Non collocare la yogurtiera in frigorifero.
9
Garanzia
Difetti che alterano la funzionalità dell'apparecchio, che si manifesta entro un anno
dal suo acquisto sarà corretto mediante riparazione o sostituzione, a condizione che
sia stato utilizzato e mantenuto in conformità con le istruzioni e non è stato abusato
o abusato in alcun modo gratuito.
ALCUNE RICETTE
Yogurt con frutta
NOTA: certa frutta contiene sostanze acide,
che uccidendo i batteri impediscono il formarsi dello yogurt. In tal caso, aggiungere
la frutta fresca nello yogurt quando è già
preparato oppure dopo averla cotta.
Yogurt alla fragola
1 litro di latte freddo,
1 yogurt o coltura starter,
10 fragole,
4 cucchiai di sciroppo di fragola.
Tagliare le fragole a pezzetti.
Sbattere lo yogurt in una ciotola con una
frusta e aggiungere lentamente il latte e lo
sciroppo, versare nei vasetti.
Distribuire i pezzetti di fragola nei vasetti.
Si può aggiungere una mezza scorza di limone grattugiata alla miscela latte-yogurt.
nel latte freddo e continuare a sbattere il
composto con una frusta finchè si fondono.
Versare il composto nei vasetti e metterli
nella yogurtiera.
Yogurt al cioccolato, caffè, caramello, vaniglia
1 litro di latte freddo,
1 yogurt o la coltura starter,
3 cucchiai di polvere di: cioccolato, caffè,
cicoria o chip caramello, estratto di vaniglia.
Mettere la polvere in una ciotola, aggiungere lentamente una tazza di latte tiepido
e continuando a sbattere aggiungere lo yogurt o la coltura starter. Mescolare bene.
Versare il resto del latte freddo continuando a sbattere. Versare nei vasetti.
NB. Con ingredienti in polvere, si consiglia
di mescolare lo yogurt con un cucchiaio
prima di consumarlo.
Yogurt aromatizzato
1 litro di latte freddo,
1 yogurt o cultura starter,
1 scorza di limone o di arancia grattugiata.
Almeno un'ora prima (o meglio il giorno
prima) di preparare lo yogurt, grattugiare
finemente la scorza e mescolarla nel latte.
Quando si prepara lo yogurt, versare lo yogurt bianco in una ciotola, mescolare,
quindi aggiungere lentamente il latte aroYogurt con altri frutti
Nello stesso modo si possono preparare matizzato dalla scorza.
yogurt con pezzi di ananas, lamponi, cle- Aggiungere zucchero a piacere. Versare nei
vasetti.
mentine, arance.
Yogurt con sciroppi
1 litro di latte freddo,
1 yogurt o coltura starter,
5 cucchiai di:
sciroppo di frutta (granatina, arancia, ribes
nero, limone, mandarino, fragola, ribes
rosso, orzata, lampone, fragola, banana,
mirtillo, ciliegia ...)
4 cucchiai di: sciroppo di fiori (rosa, violetta, gelsomino, sandalo).
4 cucchiai di: sciroppo di menta.
Versare lo yogurt o la coltura starter in una
ciotola. Aggiungere lo sciroppo prescelto
Yogurt alla marmellata
1 litro di latte freddo,
1 yogurt o cultura starter,
4 cucchiai di marmellata non troppo densa
con piccoli frutti di bosco o pezzi di frutta:
mirtilli, rabarbaro, zenzero, fragole, di
arance.
Mescolare la marmellata con una piccola
quantità di latte. Aggiungere lo yogurt o
coltura starter. Mescolare bene, poi versare
il resto del latte e versare questo composto
nei vasetti.
10
GENERAL SAFETY REQUIREMENTS
Carefully read the requirements in this manual
and keep in a safe place. It contains important
instructions on the safety, use and future of your appliance.
This appliance is only for domestic use and must only
to be used for the purpose it was specifically designed.
Any other use is considered improper and dangerous.
The manufacturer cannot be held responsible for any
damages caused by improper, incorrect and negligent use.
The installation must be carried out according to the
manufacturer’s instructions.
The manufacturer shall not be held responsible for
any damages to people, animals or objects caused by
incorrect installation.
The safety of the electrical equipment is only guaranteed if it is connected to an electrical installation equipped with a suitable earthing system in
compliance with the current standards on electrical
safety.
Do not leave parts of packaging (plastic bags, foam
polystyrene, nails, etc) within reach of children or incapacitated people since they are potential sources
of danger.
Before connecting the appliance, check that the technical data on the rating label corresponds to those
of the main electricity network.
In case of incompatibility between the outlet and the
plug, contact a qualified electrician for the necessary
adjustments.
Do not use adaptors, multiple plugs and extension
leads.
11
However, if absolutely necessary only use materials
that conform to the current safety standards and that
are compatible with the appliance and the main electricity network.
On using the appliance for the first time, remove any
labels or protective sheets.
If the appliance is equipped with air inlets, make sure
they are never blocked not even partially.
The use of any electrical appliance involves the observance of some fundamental rules. In particular:
Do not immerge the appliance in water and do not
wet; do not use it near water, in the tub, washbasin
or near other recipients with liquids. If the appliance
should accidentally fall in water, DO NOT try to touch
it but immediately disconnect the plug from the
mains power.
Then bring it to an authorised service centre for the
necessary controls.
During use, the appliance must be kept away from
any inflammable objects or substances or explosives.
Do not touch the appliance with wet hands or feet.
Do not use the appliance with bare feet.
Do not pull on the power cord or on the appliance itself to disconnect the plug from the power outlet.
Do not leave the appliance exposed to atmospheric
agents (sun, rain…)
Keep the appliance out of reach of children or incapacitated people and do not let them use it.
Disconnect the plug from the power outlet when the
appliance is not being used and before carrying out
any cleaning or maintenance.
The power cord must be completely unwound to prevent it from overheating.
12
The power cord must be kept away from heat sources
and/or sharp edges.
If power cord is damaged, have it replaced by qualified personnel.
Switch off and contact a qualified technician if the
appliance should breakdown and/or not function
properly.
Any tampering or interventions executed by unqualified people will cancel the guarantee.
Use a soft and non-abrasive cloth to clean the appliance.
When the appliance is unserviceable and must be eliminated, remove its cords and dispose of it at an authorised disposal centre in order to protect the
environment.
- The device can be used by children 8 years of age
or up and people whose physical, sensorial or mental capacity is reduced or those lacking in experience and know-how, if they have the benefit of a
mediator responsible for their safety, supervision or
instructions on use of the device in a safe manner
and if they have understood the dangers involved.
- Children must not play with the appliance.
- Cleaning and maintenance must not be carried
out by children without the supervision of an adult.
- Do not allow children to use the appliance without supervision.
- Use the unit only with the supplied accessories,
not compromise the safety of use.
Periodically check the good condition apparatus
and components; If in doubt, contact an authorized
service center.
13
- Do not pull the power cord to move the unit.
- The user should not leave the appliance unattended when it is connected to the power.
- Do not use the appliance if it does not operate
normally, or if it is damaged; If in doubt, contact
qualified personnel.
- It is strictly forbidden to disassemble or repair
the unit for danger of electric shock; if necessary
contact your dealer or service center.
- The appliance must not be operated with timers
or other external devices separate remote control.
- The plug on the power cord, as it is used as a disconnection device, shall remain readily accessible.
• Warranty does not cover any glass parts of the product.
ATTENTION:
The damages of the power supply cord, originate by the wear aren’t covered by guarantee; the repair will be in charge to the owner.
ATTENTION:
Warranty does not cover any plastic parts of the product.
ATTENTION:
If the need should arise to take or send the appliance to an authorised service centre,
make sure to clean all its parts thoroughly.
For hygienic purposes, the service centre shall reject appliances that are not perfectly
clean on the outside or inside without making any controls or repairs.
The symbol
on the product or on its packaging indicates that this product may
not be treated as household waste. Instead it shall be handed over to the applicable
collection point for the recycling of electrical and electronic equipment.
By ensuring this product is disposed of correctly, you will help prevent potential negative consequences for the environment and human health, which could otherwise
be caused by inappropriate waste handling of this product.
For more detailed information about recycling of this product, please contact your
local city office, your household waste disposal service or the shop where you purchased the product.
14
PARTS
a. Base with heater
b. Switch with light indicator
c. Transparent lid
d. Power supply cable
e. 7 glass jars with plastic lids
far off as possible.
yogurt previously homemade.
NB. Do not use more than ten times.
Frozen or dry culture (purchased in a pharmacy or in herbalist’s shops).
In this case, add two hours to the time neTo make the yogurt, you need one litre of cessary for the first batch of yogurt.
milk and a starter culture or ready-made
yogurt.
INSTRUCTIONS FOR USE
When you first use the yogurt maker, wash
CHOOSING THE MILK
the jars, the lids and the transparent lid in
Full fat or skimmed milk, sterilised at an hot water and washing up liquid. Carefully
ultra-high temperature (UHT).
rinse and dry. The appliance casing must
This type of milk must not be boiled before only be cleaned with a soft, damp and luuse.
kewarm cloth and then dried. This part of
Do not use skimmed UHT milk. The best the yogurt maker must never be emerged
results are obtained with full UHT milk.
in water.
Pasteurised milk
This type of milk is not sterile. It still con- Yogurt preparation
tains bacteria that resists heat and which 1. Accurately mix one litre of water with the
pasteurisation has not destroyed.
starter, to ensure the culture completely
If you use this milk without boiling it first, blends fully with the milk. To obtain an exa bacterial flora develops different from cellent mix, beat it so it becomes a smooth
that of the yogurt. It is not dangerous, but batter and then add it to the milk, contichanges the consistency and taste of the nuing to beat the mix.
yogurt. Therefore, boil it, leave it to cool 2. Pour the mix in the jars.
and remove the solid surface layer. At this
point, it can be used to create creamy yo- 3. Position the jars without the lids in the
gurt, with a light surface film created by the yogurt maker.
cream that rose to the surface.
4. Put the transparent lid on and connect
Raw farm milk
the plug in an electricity socket.
must firstly be boiled for a long time. (Use 5. Press the " O/-- " button.
without boiling first is dangerous for your 6. The yogurt maker heats up and the milk
health). And, as for pasteurised milk, leave starts to thicken.
it to cool before putting it in the yogurt.
7. To obtain good yogurt, according to the
Powered milk
type of milk used, you need eight to fifteen
Yogurt made with powdered milk is very hours.
smooth. It is quick and easy to use.
8. You must take the plug out of the socket
NB. Full milk is smoother and more aroma- when the operation has concluded.
tic. To make yogurt thicker, add one litre of
milk, two or three tablespoons of powdered NB. - Quando la yogurtiera si raffredda (da
milk and mix slowly.
otto a dieci ore dopo averlo accesa), assicurarsi che gli yogurt siano pronti.
CHOOSING THE STARTER
In caso contrario significa che la cultura
To start transforming the milk into yogurt, starter non ha avuto abbastanza tempo per
you need to add the aforementioned starter lavorare: ripetere quindi dal punto 5 sopra
which can be:
indicato.
white yogurt on the market (preferably - Do not move the yogurt maker when on.
made with full milk) with an expiry date as - Avoid locations which could be subject to
15
vibrations or exposed to air currents.
- If the milk is heated slightly in advance
(37°C to 40°C), less preparation time is
needed.
Possible defects:
• Lumps:
- The milk was too hot.
- The ingredients were not sufficiently
mixed.
- The mix was sour.
• Liquid on the surface.
- The yogurt was too long in the appliance.
- The jars, to cool them, were moved too
soon.
- Insufficient heating.
• Yogurt too liquid.
- The yogurt culture and the milk used had
different fat contents with excess maturation time.
- The starter culture was not fresh enough.
Storing the yogurt in the fridge
Remove the lid of the yogurt maker and
ensure the condensate does not fall into
the jars. Put the small lids on. Place the jars
of yogurt in the fridge. Wait at least two
hours before eating.
NB. Yogurt stored in the fridge lasts eight
to ten days at most.
The expiry date is therefore D + 8-10 days
(D is the date of manufacture).
Do not place the yogurt maker in the fridge.
Cleaning
Operations to always carry out with the
plug disconnected from the electricity
socket.
The casing of the yogurt maker must
never be placed in water, but cleaned with
a soft, lukewarm and damp cloth, then carefully dried.
The jars and their lids are dishwasher machine washable.
Warning: This appliance must not be disposed of with domestic waste. A recycling
system was established with the Municipalities for this type of product.
Contact your municipality for further information on the recycling centre nearest
to you.
Electrical and electronic appliances contain
dangerous substances which have a dangerous effect on the environment and
human health and must therefore be recycled.
This appliance is destined for use at domestic level and similar applications, such as:
- Staff kitchen areas in shops, offices and
other work environments.
- Staff kitchen zones in shops, offices and
other work environments.
- Farmsteads.
- For customers in hotels and other residential type environments.
- Bed & Breakfasts. If the power supply
cable is damaged, it must be replaced by
the manufacturer, by the support service or
qualified staff to avoid danger.
After-sales service
The appliance cannot be repaired by the
user. If it is not working properly, check:
- you have followed the instructions correctly;
- the power supply fuse switch/circuit has
not blown/tripped. If it still doesn’t work,
contact the retailer.
Warranty
Defects that alter the functionality of the
appliance, which appear within the first
year of its purchase will be resolved by repairing or replacement, on condition the
appliance was used and maintained in
compliance with the instructions and was
not tampered with, free of charge.
SOME RECIPES
Fruit yogurt
NOTE: certain fruit contains acidic substances, which kill the bacteria and prevent the
yogurt from forming. In this case, add fresh
fruit to the yogurt when it has already been
prepared or after cooking it.
16
Strawberry yogurt
1 litre of cold milk,
1 yogurt or starter culture,
10 strawberries,
4 tablespoons of strawberry syrup.
Cut the strawberries into pieces.
Beat the yogurt in a bowl with a whisk and
slowly add the milk and syrup, then pour
into the jars.
Distribute the strawberry pieces in the
jars. You can add half a rind of grated
lemon to the milk-yogurt mix.
Yogurt with other fruit
In the same way, you can prepare yogurt
with pieces of pineapple, raspberries,
mandarin or orange.
Yogurt with syrup
1 litre of cold milk,
1 yogurt or starter culture,
5 tablespoons of:
fruit syrup (grenadine, orange, blackcurrants, lemon, mandarin, strawberry, redcurrants, barley, raspberries, banana,
blueberries, cherries...)
4 tablespoons of: flower syrup (rose, violet,
jasmine, sandalwood).
4 tablespoons of: mint syrup.
Pour the yogurt and the starter culture in a
bowl. Add the pre-selected syrup to the
cold milk and continue to beat the mixture
with a whisk until fully blended. Pour the
mixture into the jars and place on the yogurt maker.
Chocolate, coffee, caramel, vanilla yogurt
1 litre of cold milk,
1 yogurt or starter culture,
3 tablespoons of powdered: chocolate,
coffee, chicory or caramel chips, vanilla
extract.
Place the powder in a bowl, slowly add a
cup of warm milk and as you continue to
beat add the yogurt or starter culture. Mix
well. Pour the rest of the cold milk in, continuing to whisk. Pour into the jars.
NB. With powder ingredients, you are advised to mix the yogurt with a spoon before eating.
Aromatised yogurt
1 litre of cold milk,
1 yogurt or starter culture,
1 grated lemon or orange rind.
At least an hour before (better still the day
before) prepare the yogurt, finely grate the
rind and mix with the milk. when you prepare the yogurt, pour the white yogurt in a
bowl, mix and then slowly add the milk
aromatised with the rind.
Add sugar as you wish. Pour into the jars.
Jam yogurt
1 litre of cold milk,
1 yogurt or starter culture,
4 tablespoons of jam, not too thick, with
small pieces of forest fruits or fruit pieces:
blueberries, rhubarb, ginger, strawberries
or orange.
Mix the jam with a small quantity of milk.
Add the yogurt or starter culture. Mix well,
then pour the rest of the milk in and pour
this mixture into jars.
17
18
19
GARANZIA
La durata della garanzia decorre dalla data di acquisto dell’apparecchio, comprovata dal timbro del rivenditore e cessa dopo il periodo
prescritto anche se l’apparecchio non é stato usato. Rientrano nella garanzia tutte le sostituzioni o riparazioni che si rendessero necessarie per difetti di materiale o di fabbricazione. La garanzia decade qualora l’apparecchio venga manomesso o quando il difetto
sia dovuto ad uso improprio. Le sostituzioni o le riparazioni contemplate nella garanzia vengono effettuate gratuitamente per merce
resa franco nostri centri assistenza. Sono a carico dell’utente le sole spese di trasporto. Le parti o gli apparecchi sostituiti diventano
di nostra proprietà.
GUARANTEE
The validity of the guarantee starts from the purchasing date certified by the seller’s stamp and expires at the end of the indicated
period, even when the device has not been used. The guarantee covers all substitutions or repairs due to material or manufacturing
defects. The guarantee has no validity in case of device tampering or when the defect is due to incorrect or improper use of the
same. Substitutions and repair covered by the guarantee are made free of any charge for goods delivered free our service company
representative. Only the freight will be at buyer’s expense. All replaced parts or devices will become our property.
3
GARANZIA GUARANTEE GARANZIA GUARANTEE GARANZIA GUARANTEE GARANZIA GUARANTEE
ANNI YEARS
Designed by: JOHNSON ® S.p.A
V.le Kennedy, 596 - 21050 Marnate (VA) Lombardy - internet: www.johnson.it - e-mail: [email protected]
MOD. Yogurt
Compilare all’atto dell’acquisto
Check before purchasing
MOD. Yogurt
DATA ACQUISTO
PURCHASE DATE
DATA ACQUISTO
PURCHASE DATE
DATA RIPARAZIONE
REPARE DATE
Allegare scontrino fiscale con timbro del rivenditore
Seller’s stamp
TIMBRO CENTRO ASSISTENZA
AFTER SALES SERVICE CENTER STAMP
La presente garanzia non é valida se incompleta
This certificate of guarantee has to be dulyfilled
in to be valid