1
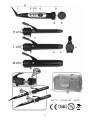
Boucles
Arriccia capelli digitale a terminali intercambiabili
con rivestimento ceramico
ISTRUZIONI D’USO
Digital hair curling iron with ceramic-coated
interchangeable barrels
INSTRUCTIONS FOR USE
230 V~
2
50/60 Hz
50 W
AVVERTENZE GENERALI
Conservate con cura il presente manuale e leggetene attentamente le avvertenze; esse forniscono importanti indicazioni riguardanti la sicurezza,
l’uso immediato e futuro dell’apparecchio.
Questo apparecchio dovrà essere destinato solo alla
funzione per il quale è stato espressamente concepito.
Ogni altro uso è da considerarsi improprio e pericoloso.
In caso di un uso professionale il periodo di garanzia
dell’apparecchio sarà di 6 mesi dalla data di acquisto.
Questo apparecchio non è destinato ad essere utilizzato da persone, compresi i bambini, con ridotte capacità fisiche, sensoriali o mentali, o con ridotta
esperienza e conoscenza. A meno che non siano stati
istruiti appositamente all’utilizzo dell'apparecchio e
siano controllati da una persona responsabile della
loro sicurezza.
Il costruttore non può essere considerato responsabile
per eventuali danni derivanti da usi impropri, errati ed
irragionevoli. L’installazione dovrà essere effettuata
secondo le prescrizioni del costruttore. Una errata installazione può causare danni a persone, animali,
cose, il costruttore non può esserne ritenuto responsabile. La sicurezza delle apparecchiature elettriche è
garantita solo se queste sono collegate ad un impianto
elettrico provvisto di idonea messa a terra secondo
quanto stabilito dagli attuali standard vigenti in materia di sicurezza elettrica.
Gli elementi dell’imballaggio (sacchetti in plastica,
chiodi, polistirolo espanso, ecc.) non devono essere
lasciati alla portata di bambini o incapaci in quanto
rappresentano potenziali fonti di pericolo.
3
Prima di collegare l’apparecchio accertarsi che i dati di
targa siano rispondenti a quelli della rete di distribuzione elettrica.
In caso di incompatibilità tra la presa e la spina rivolgersi a personale qualificato per le necessarie operazioni di adeguamento.
Non utilizzare adattatori, prese multiple e/o prolunghe.
Qualora il loro uso si rendesse indispensabile utilizzare esclusivamente materiale conforme alle vigenti
norme di sicurezza ed aventi requisiti di compatibilità
con apparecchio e rete di distribuzione elettrica.
Utilizzando l’apparecchio per la prima volta, assicurarsi di aver tolto ogni etichetta o foglio di protezione.
Se l’apparecchio è dotato di prese d’aria, assicurarsi
che non vengano mai occluse nemmeno parzialmente.
L’uso di qualsiasi apparecchio elettrico comporta
l’osservanza di alcune regole fondamentali ed in
particolare:
Non immergere o bagnare l’apparecchio; non usarlo
vicino ad acqua, in vasca, nel lavello o in prossimità di
altro recipiente con liquidi. Nel caso l’apparecchio dovesse cadere accidentalmente in acqua NON cercare
di recuperarlo ma innanzitutto togliere immediatamente la spina dalla presa di corrente.
Successivamente portarlo in un centro assistenza qualificato per i necessari controlli.
Durante l’uso, l’apparecchio deve essere lontano da
qualsiasi oggetto o sostanza infiammabile od esplosiva.
Non toccare l’apparecchio con mani bagnate o umide.
Non usare l’apparecchio a piedi nudi.
Non tirare l’apparecchio o il cavo per staccare la spina
dalla presa.
4
Non lasciare l’apparecchio esposto ad agenti atmosferici (pioggia, sole).
Il presente apparecchio può essere utilizzato dai bambini a partire da otto anni di età e da persone dalle ridotte capacità fisiche sensoriali o mentali oppure con
mancanza di esperienza e di conoscenza se si trovano
sotto adeguata sorveglianza oppure se sono stati
istruiti circa l’uso dell’apparecchio in modo sicuro e se
si rendono conto dei pericoli correlati.
I bambini non devono giocare con l’apparecchio.
Le operazioni di pulizia e manutenzione non devono
essere effettuate da bambini senza sorveglianza.
Scollegare la spina dalla presa di corrente quando l’apparecchio non viene utilizzato e prima di effettuare
qualsiasi operazione di pulizia o manutenzione.
Il cavo di alimentazione deve essere srotolato per tutta
la sua lunghezza al fine di evitarne il surriscaldamento.
Il cavo di alimentazione non deve essere avvicinato a
fonti di calore e/o superfici taglienti.
In caso di cavo di alimentazione danneggiato, provvedere alla sostituzione che deve essere effettuata da
personale qualificato.
In caso di guasto e/o cattivo funzionamento spegnere
l’apparecchio e rivolgersi a personale qualificato.
Eventuali manomissioni o interventi effettuati da personale non qualificato fanno decadere i diritti di garanzia.
Per pulire l’apparecchio usare solo un panno morbido
e non abrasivo.
Quando l’apparecchio, risulta inutilizzabile e si desidera eliminarlo, asportarne i cavi e smaltirlo presso un
ente qualificato al fine di non contaminare l’ambiente.
5
Quando si utilizza l’apparecchio in un bagno, bisogna
staccare la spina dopo l’uso poiché la prossimità con
l’acqua costituisce un rischio anche se l’apparecchio è
spento.
Per una maggior protezione, si consiglia l’installazione
di un dispositivo a corrente differenziale nel circuito
elettrico che alimenta il bagno che abbia una corrente
differenziale di funzionamento nominale non superiore a 30 mA.
È opportuno chiedere consigli all’installatore.
ATTENZIONE:
Le parti in plastica del prodotto non sono coperte da
garanzia.
ATTENZIONE:
I danni del cavo di alimentazione, derivanti dall’usura
non sono coperti da garanzia; l’eventuale riparazione
sarà pertanto a carico del proprietario.
ATTENZIONE:
Se si rendesse necessario portare o spedire l’apparecchio al centro assistenza autorizzato, si raccomanda
di pulirlo accuratamente in tutte le sue parti.
Se l’apparecchio risultasse anche minimamente sporco
o incrostato o presentasse depositi calcarei, depositi
di polvere o altro; esternamente o internamente: per
motivi igenico-sanitari, il centro assistenza respingerà
l’apparecchio stesso senza visionarlo.
Il simbolo
sul prodotto o sulla confezione indica
che il prodotto non deve essere considerato come un
normale rifiuto domestico, ma deve essere portato nel
6
punto di raccolta appropriato per il riciclaggio di apparecchiature elettriche ed elettroniche.
Provvedendo a smaltire questo prodotto in modo appropriato, si contribuisce a evitare potenziali conseguenze negative per l’ambiente e per la salute, che
potrebbero derivare da uno smaltimento inadeguato
del prodotto. Per informazioni più dettagliate sul riciclaggio di questo prodotto, contattare l’ufficio comunale, il servizio locale di smaltimento rifiuti o il
negozio in cui è stato acquistato il prodotto.
Il simbolo
sul prodotto o sulla confezione indica:
Non utilizzare questo apparecchio in prossimità di vasche
da bagno e lavelli.
7
COMPONENTI
A. Elemento con impugnatura, display (B), comandi (C, D, E) e cavo di alimentazione
pivoettante (F)
B. Display
C. Tasto incremento temperatura +
D. Tasto decremento temperatura E. Tasto ON/OFF
F. Terminale cavo di alimentazione pivoettante
G. Innesto a T rovescia
S. Ghiera blocca terminali
H19, L26, M33.
Elementi con barra cilindrica con rivestimento ceramico (N), pinze (O) e puntali
termoisolati (P).
N. Barra con rivestimento ceramico
O. Pinza
P. Puntale di sicurezza termoisolato
Q. Sede per innesto a T rovescia
R. Borsa per la conservazione delle componenti del prodotto
ASSEMBLAGGIO
Scegliere l’elemento (H19 o L 26 o M33) del diametro più adatto al trattamento previsto.
Per collegare l’elemento all’impugnatura: ruotare la ghiera (S) facendo coincidere il suo
simbolo del triangolo vuoto con quello pieno posto sull’impugnatura.
Tenere la pinza e i comandi rivolti verso l’alto in modo da permettere all’innesto (G) di
inserirsi fino in fondo nella sede (Q) sul terminale.
Innestato l’elemento scelto premenlo contro l’impugnatura e bloccarlo ruotando la
ghiera (S) fino a far coincidere i 2 triangoli pieni.
ACCENSIONE E REGOLAZIONE
Accendere l’apparecchio premendo l’interruttore (E) ON/OFF.
L’apparecchio é predisposto per raggiungere automaticamente la temperatura di
180°C.
All’accensione, il display si illumina in color verde e indica l’aumento progressivo della
temperatura fino al raggiungimento di 180° alla quale si fermerà mantenendola costante.
La gamma di temperatura di utilizzo possibile varia però da 50°C a 200°C.
E’ pertanto possibile impostare la temperatura di utilizzo a piacere.
Premendo il pulsante (C) si incrementa l’impostazione della temperatura di 10°C alla
volta. Durante questa operazione, il display si colora in rosso.
Premendo il pulsante (D) si decrementerà l’impostazione della temperatura di 10°C
alla volta.
Durante questa operazione, il display si colora in blu.
Terminata l’operazione di impostazione, il display torna di color verde indicando il variare della temperatura sino a raggiungimento di quella impostata.
8
UTILIZZO
Collocare l’apparecchio su di una superficie resistente alle alte temperature ed inserire
la spina in una presa di corrente idonea a riceverla.
Per una acconciatura perfetta non utilizzare lacca o gel prima o durante lo styling, ma
utilizzarli solo successivamente.
Effettuare lo styling operando su ciocche di capelli asciutti, non più larghe di 5 cm.
Spazzolarle preventivamente per renderle soffici.
Operando su di una ciocca alla volta metterne la punta sulla barra B con pinza D aperta,
richiudere l’apparecchio assicurandosi che la punta dei capelli sporga leggermente dalla
barra stessa.
Impugnare il puntale di sicurezza A e con l’altra mano ruotare l’apparecchio per arrotolare i capelli.
Tenere ben tesa la ciocca di capelli mentre la si avvolge.
Avvolgere il ricciolo verso il cuoio capelluto facendo attenzione a non procurarsi scottature con la barra calda.
Volendo ricci folti o se i capelli sono difficili da arricciare, mantenere in posizione per
circa 20 secondi, con capelli più facili diminuire il tempo.
Quando si rilascia il ricciolo fargli compiere un mezzo giro (con capelli lunghi srotolarli
un po’ di più) e agire sulla leva della pinza per aprirla.
Ritirare la barra dal centro del ricciolo. Lasciare raffreddare quest’ultimo ed evitare di
toccarlo mentre si procede nella stesso modo per il resto della capigliatura.
Al termine dell’operazione con i riccioli raffreddati, pettinare o spazzolare i capelli completando l’acconciatura.
Durante i primi minuti di funzionamento si potrebbe notare la fuoriuscita di fumo o
odore: è normale e scomparirà dopo qualche minuto.
Terminato l’uso, prima di scollegare le due parti, spegnere l’apparecchio premendo il
pulsante (E) estrarre la spina dalla presa, collocarlo su di una superficie resistente al
calore lasciandolo raffreddare.
Durante questa fase non lasciare incustodito l’apparecchio ed evitare che, il cavo di alimentazione in particolare, o altri oggetti, vengano a contatto con le parti calde che si
mantengono ad alta temperatura ancora per diversi minuti.
Attendere che si siano completamente raffreddate poi premendo i tastini (S) allontanare
gli elementi estraendo delicatamente gli spinotti.
Conservare il tutto nella borsa in dotazione
PULIZIA
L’arricciacapelli deve essere pulito solo quando è freddo e con spina estratta dalla presa
utilizzando un panno morbido.
9
GENERAL SAFETY REQUIREMENTS
Carefully read the requirements in this manual
and keep in a safe place. It contains important
instructions on the safety, use and future of your appliance.
This appliance must only to be used for the purpose
it was specifically designed.
Any other use is considered improper and dangerous.
This appliance is not intended for use by person including children with reduced physical, sensory or
mental capabilities, or lake of expeience & knowledge, unless it have been given supervision or instruction conceming use the appliance by person
responsible for their safty.
In case of professional use, the warranty period of the
appliance shall be 6 months
from the date of purchase.
The manufacturer cannot be held responsible for any
damages caused by improper, incorrect and negligent use.
The installation must be carried out according to the
manufacturer’s instructions. The manufacturer shall
not be held responsible for any damages to people,
animals or objects caused by incorrect installation.
The safety of the electrical equipment is only guaranteed if it is connected to an electrical installation
equipped with a suitable earthing system in compliance with the current standards on electrical safety.
Do not leave parts of packaging (plastic bags, foam
polystyrene, nails, etc) within reach of children or incapacitated people since they are potential sources
of danger.
10
Before connecting the appliance, check that the technical data on the rating label corresponds to those
of the main electricity network.
In case of incompatibility between the outlet and the
plug, contact a qualified electrician for the necessary
adjustments.
Do not use adaptors, multiple plugs and extension
leads.
However, if absolutely necessary only use materials
that conform to the current safety standards and that
are compatible with the appliance and the main electricity network.
On using the appliance for the first time, remove any
labels or protective sheets.
If the appliance is equipped with air inlets, make sure
they are never blocked not even partially.
The use of any electrical appliance involves the observance of some fundamental rules. In particular:
Do not immerge the appliance in water and do not
wet; do not use it near water, in the tub, washbasin
or near other recipients with liquids. If the appliance
should accidentally fall in water, DO NOT try to touch
it but immediately disconnect the plug from the
mains power.
Then bring it to an authorised service centre for the
necessary controls.
During use, the appliance must be kept away from
any inflammable objects or substances or explosives.
Do not touch the appliance with wet hands or feet.
Do not use the appliance with bare feet.
Do not pull on the power cord or on the appliance itself to disconnect the plug from the power outlet.
11
Do not leave the appliance exposed to atmospheric
agents (sun, rain…)
This appliance can be used by children eight years
of age upwards and by people with reduced physical, sensorial or mental abilities or lacking in experience and know-how if adequately supervised or if
they have been trained in the safe use of the appliance and they are aware of the dangers involved.
Children must not play with the appliance.
Cleaning and maintenance operations must not be
carried out by children without supervision.
Disconnect the plug from the power outlet when the
appliance is not being used and before carrying out
any cleaning or maintenance.
The power cord must be completely unwound to prevent it from overheating.
The power cord must be kept away from heat sources
and/or sharp edges.
If power cord is damaged, have it replaced by qualified personnel.
Switch off and contact a qualified technician if the
appliance should breakdown and/or not function
properly.
Any tampering or interventions executed by unqualified people will cancel the guarantee.
Use a soft and non-abrasive cloth to clean the appliance.
When the appliance is unserviceable and must be
eliminated, remove its cords and dispose of it at an
authorised disposal centre in order to protect the
environment.
When using appliance in the bathroom, disconnect
the plug after use because nearby water poses a risk
even with the appliance off.
12
For greater safety, you are advised to install a differential current device on the electrical circuit powering the bathroom with a differential, nominal
operating current not over 30 mA.
You should ask you installation technician for advice.
ATTENTION:
The damages of the power supply cord, originate by
the wear aren’t covered by guarantee; the repair will
be in charge to the owner.
ATTENTION:
Warranty does not cover any plastic parts of the product.
ATTENTION:
If the need should arise to take or send the appliance
to an authorised service centre, make sure to clean
all its parts thoroughly.
If the appliance is only slightly dirty or encrusted or
should present food deposits, scale deposits, dust or
the like, externally or internally: for health reasons,
the service centre shall reject the appliance without
making any controls or repairs.
The symbol
on the product or on its packaging
indicates that this product may not be treated as
household waste. Instead it shall be handed over to
the applicable collection point for the recycling of
electrical and electronic equipment. By ensuring this
product is disposed of correctly, you will help prevent
potential negative consequences for the environment
and human health, which could otherwise be caused
13
by inappropriate waste handling of this product. For
more detailed information about recycling of this
product, please contact your local city office, your
household waste disposal service or the shop where
you purchased the product.
The symbol
on the product or on the packaging
indicates: Do not use this appliance near baths or
sinks.
PARTS
A. Handle with display (B), controls (C, D, E) and pivoting power cord (F)
B. Display
C. Temperature increase key
D. Temperature decrease key
E. ON/OFF key
F. Pivoting power cord end
G. Reverse T connector
S. Terminal locknut
H19, L26, M33.
Elements with ceramic-coated cylindrical rod (N), tongs (O) and thermo-insulating
tips (P).
N. Ceramic-coated rod
O. Tongs
P. Heat-insulated safety tip
Q. Seat for Reverse T connector
R. Bag for storing the parts of the curling iron
ASSEMBLY
Select the element (H19 or L26 or M33) with the most suitable diameter for the treatment.
To connect the element to the handle: turn the locknut (S) so that the “empty triangle”
symbol coincides with the “full triangle” symbol located on the handle.
Keep the tongs and commands turned upwards in order to allow the connector (G) to
insert right down into the seat (Q) of the terminal.
Once the selected element has been connected, press it against the handle and lock it
into position by turning the locknut (S) until the two “full triangles” coincide.
STARTING AND SETTING
Turn on the appliance by pressing the ON/OFF switch (E).
The appliance is preset to automatically reach a temperature of 180°C.
On start-up, the display turns green indicating that the temperature is increasing progressively.
When the temperature reaches 180°C, the curling iron stops heating and maintains
this temperature.
Operating temperatures can vary between 50°C and 200°C.
14
However, the operating temperature can be set to your liking. Press the key (C) to increase the set temperature by intervals of 10°C. The display is red during this operation.
Press the key (D) to decrease the set temperature by intervals of 10°C.
The display is blue during this operation. On completion of this operation, the display
becomes green again indicating that the temperature is changing. It will turn off once
the set temperature has been reached.
USE
Place the appliance on a heat resistant surface and insert the plug into a compatible
power outlet.
For a perfect hairstyle, do not use hair spray or gel before or during styling.
You may apply it afterwards.
Curl your hair by working on dry hair sections that are not wider than 5cm.
Brush beforehand to make it soft.
Take one section of hair at a time and place the end on the rod (B) with the tongs (D)
open.
Close the appliance making sure the ends of the hair protrude slightly from the rod.
Hold the safety tip (A) with one hand and turn the appliance with the other hand to
wind the hair.
Keep the hair section well taut while winding.
Wind the curl towards the scalp as desired, making sure it does not touch the hot rod.
Hold the curl for around 20 seconds if you want tight curls or if your hair is difficult to
curl.
Reduce the time for softer curls.
Make a half-turn when releasing the curl (unwind a bit more for long hair) and use the
lever to open the tongs.
Now remove the rod from the centre of the curl.
Let the curl cool and try not to touch while proceeding in the same manner for the rest
of the head.
At the end of the operation, allow the curls to cool.
Then comb or brush the hair to complete the styling process.
During the first minutes of operation, some smoke and an odour may be noticed: this
is normal and will disappear after a few minutes.
After use and before disconnecting the two parts, turn off the appliance by pressing
the switch (E) and removing the plug from the power outlet.
Rest on a heat resistant surface and leave it to cool.
During this phase, do not leave the appliance unattended and make sure the power
cord or other objects do not come into contact with the hot parts.
Wait for the iron to completely cool then press the keys (S) to separate the elements by
delicately extracting the pins.
Place all the parts in the bag supplied.
CLEANING
The curling iron must be cleaned only when cold and with the plug disconnected from
the power outlet.
Use a soft cloth.
15
GARANZIA
La durata della garanzia decorre dalla data di acquisto dell’apparecchio, comprovata dal timbro del rivenditore
e cessa dopo il periodo prescritto anche se l’apparecchio non é stato usato. Rientrano nella garanzia tutte le
sostituzioni o riparazioni che si rendessero necessarie per difetti di materiale o di fabbricazione. La garanzia
decade qualora l’apparecchio venga manomesso o quando il difetto sia dovuto ad uso improprio. Le sostituzioni
o le riparazioni contemplate nella garanzia vengono effettuate gratuitamente per merce resa franco nostri centri
assistenza. Sono a carico dell’utente le sole spese di trasporto. Le parti o gli apparecchi sostituiti diventano di
nostra proprietà.
WARRANTY
The validity of the guarantee starts from the purchasing date certified by the seller’s stamp and expires at the
end of the indicated period, even when the device has not been used. The guarantee covers all substitutions or
repairs due to material or manufacturing defects. The guarantee has no validity in case of device tampering or
when the defect is due to incorrect or improper use of the same. Substitutions and repair covered by the guarantee are made free of any charge for goods delivered free our service company representative. Only the freight
will be at buyer’s expense. All replaced parts or devices will become our property.
3
GARANZIA
WARRANTY
ANNI YEARS
internet: www.johnson.it
MOD. Boucles
Compilare all’atto dell’acquisto
Check before purchasing
DATA ACQUISTO
PURCHASE DATE
Allegare scontrino fiscale con timbro del rivenditore
Seller’s stamp
La presente garanzia non é valida se incompleta
This certificate of guarantee has to be dulyfilled
in to be valid
e-mail: [email protected]
MOD. Boucles
DATA ACQUISTO
PURCHASE DATE
DATA RIPARAZIONE
REPARE DATE
TIMBRO CENTRO ASSISTENZA
AFTER SALES SERVICE CENTER STAMP