1
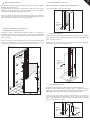
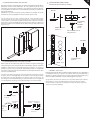
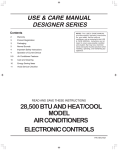
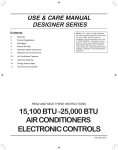
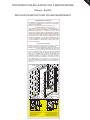
1
ISTRUZIONI DI INSTALLAZIONE USO E MANUTENZIONE
Italiano - English
INSTALLATION INSTRUCTIONS USE AND MAINTENANCE
MONTAGGIO CASSAMATTA
Per effettuare il montaggio della cassamatta, come prima
cosa, bisogna controllare che lo spazio per il montaggio
della stessa sia sufficiente.
Esempio: cassamatta per porta (luce netta) 90 x 210
vano muro grezzo (luce lorda) 103 x 217
Aprire tutte le zanche, avvicinare la cassamatta al muro e
segnare i punti di incasso per effettuare la cementificazione.
Attenzione: Posizionare la cassamatta sul Piano Finito
(pavimento). Smontare i tiranti a cementificazione effettuata (dopo 24 ore). Non buttare le staffe cavallotto zincate che
serviranno per l’ancoraggio del telaio. Nota: la cassamatta
ha 7 zanche per lato che sono più che sufficienti. Se, per
qualche impedimento, non è possibile cementificare tutte
le zanche è sufficiente cementificare solamente 4 zanche
per lato. Attenzione: la prima zanca in basso deve essere
sempre cementificata.
MOUNT THE DOOR FRAME
In order to mount the door frame, it is first necessary to measure
and be sure that there is enough space for the frame to fit.
Example: in order to fit a door frame whose dimensions are 90 x 120,
the bare wall must have dimensions 103 x 217.
All clamps must be opened, then the door frame can be moved
closer to the wall. The points of insertion must then be marked
before the cementing can begin. Attention: Position the door
frame on the finished floor (pavement). Disassemble the
cementing rods (after 24 hours). Do not throw away the
galvanized U-brackets, they will serve to anchor the frame.
Note: the door frame has 7 U-brackets on each side, these are
more than enough. If, for some reason, it is not possible to
cement all U-brackets it is acceptable to cement only 4 per side.
Attention: the first U-bracket on the bottom must always be
cemented.
P.F. = Piano Finito
Finished Floor
1030
2170
P.F.
P.F.
LATO INTERNO
INTERNAL SIDE
CASSAMATTA - DOOR FRAME “B”
25
10 Minimo
Minimum
LATO INTERNO INTERNAL SIDE
Posa filo interno,rifinitura
Posa centro muro,rifinitura
muro ad intonaco
muro stipite in marmo
internal placement,
placement in wall center,
plaster wall
wall with marble pillars
MOVIMENTAZIONE - HANDLING
Per garantire l’incolumità dell’operatore e delle persone esposte, utilizzare
adeguati sistemi di trasporto.
Successivamente alla consegna lo spostamento della porta deve essere
effettuata minimo da due persone, facendo attenzione che in posizione
verticale la freccia sull’imballo sia rivolta verso l’alto.
2
2 REGISTRO SCROCCO - SPRING LATCH
Allentare al massimo il registro scrocco verso l'interno.
Loosen the spring latch as much as possible inwards.
2
In order to guarantee the safety of the operator and the people exposed, use an adequate
mode of transportation. Upon delivery the door must be handled by at least two people,
making sure that the vertical arrow on the packaging is facing up.
Chiave
esagonale
da 5
INSTALLAZIONE PORTA - DOOR INSTALLATION
1 ANCORAGGIO - ANCHORING THE DOOR
Smontare i tiranti a cementazione avvenuta, ripulire la cassamatta da
eventuali residui di intonaco, inserire il telaio e ancorarlo con le 8 viti TSPEI
8x20 in dotazione accostando al massimo il telaio al muro. Infine mettere la
porta nei cardini.
Remove the rods after the cementing has finished, re-clean the door-frame of any plaster
residue, insert the frame and secure it with the 8 screws TSPEI 8x20 that are given. Screw
the frame as closely as possible to the wall. Lastly, put the door on the hinges.
1
Hex key of 5
3 PLANARITA' - UNIFORMITY
Per far combaciare uniformemente il battente della porta al telaio bisogna
agire sui registri dell'ancoraggio. Preferibilmente iniziare la registrazione dai
due in basso lato cerniera.
In order to door close properly it is necessary to regulate the anchoring. Begin regulating
preferably from the two honges towards the botton.
3
Chiave
esagonale
da 5
Hex key of 5
Chiave
esagonale
da 5
Hex key of 5
4 REGISTRO CERNIERE - HINGES
Le cerniere sono registrabili sia verticalmente che orizzontalmente.
Un volta centrata la porta dentro il telaio e messa a squadro rispetto al
pavimento, si lascia nel punto trovato senza bisogno di stringere altre viti.
Infine registrare lo scrocco (punto 2) per evitare che la porta si muova.
The hinges can be adjusted either vertically or horizontally. Once the door has been
centered in the frame and placed at an angle with respect to the pavement, it is left at the
point it is found without need of tightening other screws. Lastly, fasten the spring latch
(point 2) so that the door does not move.
4
Chiave
esagonale
da 5
Chiave
esagonale
da 8
hex key of 5
hex key of 8
5 REGISTRO PARASPIFFERO - DRAFT EXCLUDER
3
SPIEGAZIONE MONTAGGIO CILINDRO
Una volta regolata la porta blindata, si registra il paraspiffero autolivellante.
Avvitando in senso orario diminuisce la corsa quindi scende di meno,
svitando in senso antiorario aumenta la corsa quindi scende di più. Regolare il paraspiffero in modo che scenda all'ultimo momento per evitare che
strisci sul pavimento.
Attenzione: se la posa viene fatta su un pavimento in parquet ancora da
verniciare, lasciare il paraspiffero in alto per evitare che si incolli.
EXPLANATION FOR MOUNTING THE CYLINDER
CILINDRO - CYLINDER
TCEI 6x40
Once the armored door has been regulated, install the self-leveling draft excluder.
Screwing clockwise decreases, that is, it is lowered down less. Screwing counterclockwise
increases, that is, it is lowered more. Regulate the draft excluder so that it is lowered at the
last moment so as to avoid it dragging along the floor.Attention: if the door is placed on a
parquet floor that has not been stained, leave the draft excluder up off the ground so that
it does not stick.
5
CAVALLOTTO
BLOCCA
CILINDRO
CYLINDER
BLOCKER
RONDELLONE 46x2
WASHER 46 X 2
VITE FISSAGGIO TSP 5x14
SCREW FOR FIXATION
DEFENDER
DISTANZIALE 42x2
SPACER 42X2
6 MONTAGGIO ACCESSORI - MOUNTING ACCESSORIES
PORTA - DOOR
Nella scatola di corredo trovate tutto l'occorrente. Eseguire il montaggio
come da disegno. I fori sono già fatti. Raccomandazioni: quando si monta la
maniglia accostarla bene al pannello facendo pressione e poi serrare la
brucola. La stessa cosa per il pomolo dell'apertura parziale, è consigliabile
che sia ben serrato in modo che il movimento sia rallentato ed evitare che si
inserisca accidentalmente.
In the box set you will find everything you will need. Perform the mounting as it is done in
the picture. The holes are already made. Recommendations: when mounting the handle
lay it down well on the panel applying pressure and then tighten the the hex key. The
same thing for the knob for partial opening, it is advised to make sure it is well tightened
in such a way that the movement is slowed and avoid that it is inserted accidentally.
6
Chiave esagonale da 3
Hex key of 3
Cacciavite
croce 2
Chiave
esagonale
da 3
Hex key of 3
Philip’s head
screwdriver 2
Cacciavite Philip’s head
screwdriver 2
croce 2
Chiave esagonale da 3
Hex key of 3
ISTRUZIONI - INSTRUCTIONS
E’ importante prima di sfilare il cilindro, togliere il defender con i distanziali e
il rondellone interno, per evitare che cadano dentro la porta. Quando si
introduce il cilindro assicurarsi che sia nella posizione di lavoro prima che si
serri il pacchetto, altrimenti si rischia di danneggiare la serratura.
It is important to first remove the cylinder, remove the defender with the spacers and the
internal washer, in order to avoid that they fall inside the door. When the cylinder is
introduced, make sure that it is in the working position before the packet is tightened,
otherwise the lock can be damaged.
4
SPIEGAZIONE SISTEMA KA P - EXPLANATION KA P SYSTEM
È una elaborazione su un cilindro Corbin Eurostar, per far si che una unica
chiave da cantiere apra tutte le porte.
It is an elaboration on a cylinder Corbin Eurostar, so that only one pass-key for use on
building sites can open all the doors.
ISTRUZIONI PER UTILIZZARE LA CHIAVE DA CANTIERE
INSTRUCTIONS ON USING THE MASTER KEY
CHIAVE DA CANTIERE
PASS-KEY FOR BUILDING SITE
ISTRUZIONI PER ESTRARRE L’INSERTO e introdurre la chiave padronale
INSTRUCTIONS FOR EXTRACTING THE INSERT and introducing the master key
NO
NO
POSIZIONE INSERTO
POSIZIONE INSERTO
INSERT POSITION
INSERT POSITION
SI - YES
POSIZIONE INSERTO
INSERT POSITION
INSERTO
INSERT
- La chiave da cantiere deve essere introdotta completamente nel cilindro
nella posizione in cui combini l’inserto (altrimenti se si forza si può spezzare).
- Attenzione: il sistema prevede mezza chiave (l’inserto) sempre all’interno
del cilindro.
Questo comporta che prima di bloccarsi il cilindro fa mezzo giro. Quindi per
la sicurezza è obbligatorio chiudere tutte le mandate o lasciare il cilindro in
posizione di blocco (in posizione verticale).
- Per essere estratto l’inserto deve essere posizionato in orizzontale sempre
sul lato destro.
- Prendere la pinzetta a punta ed estrarre l’inserto. Attenzione, se l’inserto
non è posizionato bene non si estrarrà.
- Inserire la chiave padronale e ruotare di 360° per annullare la combinazione
dell’inserto sia esternamente che internamente (se per errore viene introdotta un’altra chiave padronale non succede niente).
Attenzione: non introdurre mai la chiave padronale senza aver prima estratto l’inserto, altrimenti il cilindro va in blocco.
-The pass-key must be inserted completely in the cylinder in the position that matches the
insert (otherwise, if forced, the key might break).
-Attention: the system requires half of the key always inside of the cylinder. In this way the
cylinder turns halfway before locking.
For safety reasons it is obligatory to close all of the locks or leave the cylinder in the locked
position (vertical position).
-In order to extract the insert, it must be positioned horizontally on the right side.
-Take the pointed tweezers and extract the insert.
Attention: if the insert is not positioned properly it will not be possible to extract it.
-Insert the master key and rotate 360° to cancel the combination of the insert, inside and
out (if by mistake a another master key is introduced nothing will happen).
Attention: never introduce the master key without first having extracted the insert,
otherwise the cylinder will be blocked.
PROBLEMI E SOLUZIONI - PROBLEMS AND SOLUTIONS
La chiave da cantiere stenta ad entrare:
- controllare che la chiave da cantiere sia introdotta in modo che combini l’inserto;
- controllare che non ci siano bave sulla punta della chiave da cantiere;
- aiutare l’introduzione muovendo leggermente la punta;
- mettere una goccia di lubricante sulla punta della chiave da cantiere.
The pass-key has trouble entering:
-check that the pass-key has been inserted properly;
-check to see that there are no rough projections on the end of the pass-key;
-help the introduction of the key by slightly moving the point;
-put a drop of lubricant on the point of the pass-key.
PROBLEMI E SOLUZIONI - PROBLEMS AND SOLUTIONST
L’inserto non si estrae:
- controllare che la posizione di estrazione sia corretta;
- mentre si tira per estrarre l’inserto ruotare di poco la punta per trovare il
punto di estrazione.
La chiave padronale non ruota:
- provare con un’altra chiave in dotazione;
- provare con un altro gruppo di chiavi della stessa serie di porte.
He insert cannot be removed:
-make sure that the removal position is correct;
-while pulling in order to extract the insert, rotate slightly the point in order to find the
point of extraction.
The master key does not rotate:
-try using another key that was given;
-try using another set of keys of the same door series.
ISTRUZIONI D‘USO - INSTRUCTIONS FOR USE
PROPRIETA’ AGGIUNTIVE - ADDITIONAL PROPERTIES
L’inserto può avere la funzione di una pre-chiave padronale rendendo
inaccessibile uno o più appartamenti.
Esempio: in una palazzina di 20 appartamenti, su due sono finiti tutti i lavori,
il capo cantiere può estrarre gli inserti, rendendoli inaccessibili a tutte le
chiavi da cantiere che ha distribuito.
Attenzione: per riaprire le porte bisogna inserire ad ogni cilindro il proprio inserto.
The insert can have the function of a pre-master key rendering inaccessible one or more
apartments.Example: in a building with 20 apartments, 2 apartments are completely
finished, the head of construction can extract the inserts, rendering inaccessible all
pass-keys he has distributed.
Attention: when reopening the door, it is necessary to place in every cylinder its own insert.
L’uso corretto del prodotto garantisce una durata maggiore, quindi
l’apertura e la chiusura della porta blindata deve essere sempre fatta
utilizzando le mani e accompagnata sempre fino al punto di chiusura (non
deve essere mai sbattuta). Per ottenere il massimo della siurezza, si consiglia
di chiudere sempre la porta blindata con tutte le mandate ed estrarre la
chiave.
The correct use of the product guarantees that it will last longer. The opening and closing
of the armored door must always be done using the hands while guiding it always to the
point of closure (the door must never be slammed). In order to obtain maximum security,
it is advised to always close the armored door with all the locks and remove the key
PRECAUZIONI D’USO - PRECAUTIONSN
Non lasciare mai la porta aperta specialmente in una posizione dove c’è
molto vento.
Ever leave the door open, especially when there is lots of wind.
PULIZIA ORDINARIA - REGULAR CLEANING
Sulla porta blindata occorre effettuare periodicamente le operazioni di
pulizia. La frequenza con cui va effettuata la pulizia è in relazione
all’aggressività dell’atmosfera del luogo dove viene installata. La pulizia
deve essere eseguita con acqua e detergente neutro non abrasivo, asciugare
con un panno. Evitare l’uso di sostanze aggressive come alcool ed ammoniaca.
The armored door should be cleaned periodically. How often the door should be cleaned
depends on the harshness of the environment where it was installed. The door should be
cleaned with water and detergent that is neutral and non-abrasive, then dry with a towel.
Avoid the use of harsh substances such as alcohol and ammonium.
GARANZIE - GUARANTEE
5
GARANZIA LEGALE - LEGAL GUARANTEE
La porta blindata è garantita 2 anni dalla data della fattura in tutte le sue
parti, sia quelle strutturali che quelle meccaniche.
Restano fuori dalla garanzia i naturali deterioramenti causati dall’uso.
The armored door is guaranteed for 2 years from the date it was completely manufactured,
whether it be the structural or mechanical parts. Natural deteriorations caused by use are
not guaranteed.
GARANZIA COMMERCIALE - COMMERCIAL GUARANTEE
Alcuni componenti della porta blindata come pannelli e maniglieria hanno
una garanzia superiore ai 2 anni, (se dichiarata) sempre che venga rispettata
la tipologia di esposizione consigliata nel catalogo generale.
The door such as the panels and the handles have a guarantee longer than 2 years, (if
declared) as long as the door is placed in a location as stated in the general catalog.
MANUTENZIONE ORDINARIA - REGULAR MAINTENANCE
Una volta l’anno, con prodotti specifici non a base oleosa, lubrificare:
- il cilindro dove si introduce la chiave;
- le cerniere al centro dove si inserisce il perno nella femmina verso il basso;
- lo scrocco, solo la parte smussata.
Once a year, with specific non-oil based products, lubricate:
-the cylinder where the key is inserted;
-the hinges in the center where the pivot is inserted in the socket towards the bottom;
-the latch, only the curved part.
RINFRESCO - REFINISHING
Pulizia del pannello esterno massello o in essenza lignea da polvere o altre
impurità; applicazione con un panno in cotone di olio paglierino o altro
prodotto specifico per 2 volte in maniera uniforme. Questo trattamento
deve essere eseguito due volte l’anno.
Clean the solid external panel of dust or other impurities. Apply oil finish with a cotton
cloth twice. Apply in a uniform manner. This treatment must be done twice a year.
RITOCCO - RETOUCH
In caso di piccoli graffi sul pannello esterno, effettuare il ritocco con pennarelli per il legno della stessa mordenzatura, agendo con un movimento
puntinato, non strisciato, pulendo subito le eventuali sbavature con un
panno.
In case of small scratches on the external panel, use wood markers for retouching of the
same etching. Apply with a dotted motion. Clean immediately any drops with a cloth.
VERNICIATURA - STAINING
Per la verniciatura di pannelli esterni massello o in essenza lignea esposti alle
intemperie procedere nel seguente modo:
- pulizia della superfice;
- eventuale carteggiatura, sempre lungo vena, con grana prima da 180
e poi da 220;
- riverniciatura con vernice all’acqua.
E’ consigliabile far effettuare questa operazione da personale specializzato.
To stain the solid external panels, effectively the wood exposed to weather, proceed in the
following manner:
-clean the surface
-sand the surface with grains of 180 then 220;
-re-staining with water based stain.
It is recommended to have the painting done by professionals.