1
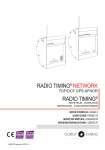
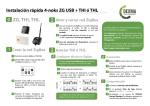
PRO SMART - Istruzioni d’uso - Instruction manual - Bedienungsanleitung - Mode d’emploi Fig. 2 Cod. Descrizione / Description PRO-SMART Pro-Smart per Elios4you Pro Descrizione generale Fig. 1 IT Centralina wireless per il comando di attuatori radio ZigBee Home Automation che permettono di aumentare l’autoconsumo. Requisiti di compatibilità Pro Smart va abbinato al dispositivo E4U-PRO-IT. Per l'installazione di Elios4you Pro, fare riferimento alla sua guida. Installazione / Messa in servizio Montare su barra DIN Montare e avvitare antenna Collegare dispositivo come in Fig. 1 Configurazione PRO-SMART (RED-CAP) Collegarsi ad Elios4you tramite APP Accedere al menù ( ) > RedCap > Attiva RedCap > Confermare Associazione SMART PLUG / SWITCH Alimentare il PLUG/SWITCH in prossimità del Pro Smart Dal menù APP( ) > RedCap > Aggiungi Smart Plug Seguire attentamente la procedura guidata proposta dalla APP Tornare alla home dell’APP > premere > appariranno sulla pagina dei consumi le icone relative ai PLUG/SWITCH Per modificare le impostazioni dei singoli PLUG/SWITCH, premere sull’icona del corrispondente attuatore NOTA: ripetere questa procedura per installare ulteriori SMART PLUG/SWITCH ATTENZIONE: PLUG/SWITCH comunicano in wireless direttamente con Pro Smart, in maniera totalmente indipendente dalla rete WiFi domestica. I PLUG/SWITCH funzionano anche come ripetitori radio, in caso di comunicazione scadente (disconnessioni frequenti di uno o più PLUG/SWITCH) può essere utile posizionare almeno uno dei PLUG/SWITCH in prossimità della centralina Pro Smart. Solo dopo 1 minuto circa dalla procedura di associazione sarà possibile vedere il PLUG/SWITCH all’interno della schermata di configurazione e stato. Comportamento dei LED All’avvio del dispositivo tutti i led vengono accesi fissi per 2 secondi, in seguito tutti i led lampeggiano velocemente per altri due secondi. Al termine del lampeggio il dispositivo passa al funzionamento normale. LED Significato Acceso fisso → Pro Smart non configurato (nessuna rete attiva) Lampeggio lento (1Hz) → Pro Smart configurato (nessuna rete attiva) Lampeggio veloce (4Hz) → Pro Smart configurato e in modalità associazione Spento → nessun dispositivo (PLUG/SWITCH) con buon collegamento radio 1 lampeggio → Un PLUG/SWITCH con buon collegamento radio 2 lampeggi → Due PLUG/SWITCH con buon collegamento radio 3 lampeggi → Tre o più PLUG/SWITCH buon collegamento radio Lampeggio Led con trasmissione o ricezione verso Smart Plug/Switch Lampeggio Led con trasmissione o ricezione con Elios4you Pro 485 Fig. 3 General description EN Allgemeine Beschreibung Wireless control unit to control radio actuators Home Automation ZigBee to increase self-consumption. Compatibility requirements Pro Smart works with the device E4U-PRO-EN. To install E4U-PRO referred to its instruction. Unité de commande sans fil pour contrôler actionneurs radio ZigBee Home Automation pour augmenter l'auto-consommation. Kompatibilitäts-Voraussetzungen Exigences en matière de compatibilité Installation/ Inbetriebnahme Auf die DIN Schiene installieren Installieren und Antenne anschrauben Gerät wie in Fig.1 anschließen Install on DIN rail Install and screw antenna Connect device as shown in the Fig.1 Konfiguration PRO-SMART (RED-CAP) Verbinden Sie sich mithilfe der App mit dem Elios4you PRO-SMART (RED-CAP) configuration Connect APP to Elios4you Drücken Sie in der App Menü ( ) > anschließend „Red Cap“> aktivieren Sie den RedCap > und anschließend bestätigen Sie die Eingabe ) > RedCap > Activate RedCap > Confirm SMART PLUG / SWITCH paring Supply the PLUG / SWITCH close to Pro Smart Funksteckdosen einrichten Die Funksteckdose müssen Sie nahe dem Pro Smart platzieren APP menu ( ) > RedCap > Add Smart Plug Follow the APP wizard Im Menü ( ) > Red-Cap > Funksteckdose /Stecker hinzufügen Folgen Sie dem App- Installationsassistenten Return to APP home > press > the PLUG / SWITCH icons will appear on the consumption page To edit the PLUG / SWITCH settings, press the corresponding APP icon NOTE: Repeat this procedure to install additional SMART PLUG / SWITCH WARNING: PLUG / SWITCH directly communicate wireless with Pro Smart, independently from home WiFi network. PLUGs and SWITCHes work also as radio repeaters when necessary (to avoid disconnections. It may be helpful to place at least one PLUG near the control Pro Smart. Only after about 1 minute from the pairing will be able to see the PLUG / SWITCH in the setup and status. LED behavior When the device starts, all the LEDs are ON for 2 seconds, after all LEDs flash quickly for 2 seconds. At the end of flashing the device switches to normal operation. FR Smart PRO fonctionne avec le dispositif E4U-PRO-FR. Pour installer le E4U-PRO, voir son manuel d’ instruction. Installation / Mise en service Installation sur rail DIN Installez et vissez l'antenne Raccorder l'appareil comme indiqué dans la Fig.1 Configuration du PRO-SMART (RED-CAP) Connectez l’ APP à Elios4you App Menu ( ) > RedCap > Activer RedCap > Confirmer Configuration SMART PLUG / SWITCH Branchez les PLUG / Switch près du Red Cap Menu APP ( ) > RedCap > Ajouter Smart Plug Suivez l'assistant APP Retour à APP Accueil > cliquez > sur les icônes PLUG / Switch qui apparaissent sur la page de consommation Pour modifier les paramètres PLUG / Switch, appuyez sur l'icône correspondante APP Remarque: Répétez cette procédure pour installer d'autres Smart Plug / SWITCH Um zum APP Home-Bildschirm zurückzukehren > drücken Sie ein SteckerSymbol wird auf der Seite erscheinen, auf der der Verbrauch abgebildet ist Um die Stecker - Einstellungen zu bearbeiten bedienen Sie bitte das entsprechende APP Symbol ANMERKUNG: Diesen Vorgang müssen Sie wiederholen um zusätzliche Stecker zu installieren. BITTE BEACHTEN: PLUG/SWITCH kommunizieren drahtlos direkt mit Pro Smart, also vollkommen unabhängig vom heimischen WLAN. Die PLUG/SWITCH funktionieren auch als Funkverstärker, im Falle einer schlechten Kommunikation (häufiges Trennen der Verbindung eines oder mehrerer PLUG/SWITCH) kann es von Nutzen sein, mindestens einen der PLUG/SWITCH in der Nähe der Zentrale Pro Smart aufzustellen. Nur etwa 1 Minute nach der Zuweisungsprozedur ist der PLUG/SWITCH auf den Konfigurations- und Statusbildschirm zu sehen. AVERTISSEMENT: les PLUG / SWITCH sans fil communiquent directement avec le Pro SMART, de manière totalement indépendant du réseau WiFi. Les PLUG / SWITCH fonctionnent également comme répéteurs radio, en cas de mauvaise communication (déconnexions fréquentes d'un ou plusieurs PLUG/ SWITCH) il peut être utile de placer au moins un/une des PLUG / SWITCH près du Pro SMART. Après environ 1 minute de procédure d' appariement vous serez en mesure de voir les PLUG / SWITCH à l'écran principal. LED Verhaltensverlauf Comportement des LED Wenn das Gerät startet, leuchten alle LEDs für 2 Sekunden, danach blinken die LEDs 2 Sekunden lang. Nach dem Blinken schaltet das Gerät in den normalen Modus. Lors du démarrage de l'appareil, tous les voyants sont allumés pendant 2 secondes. Ensuite tous les voyants clignotent rapidement pendant 2 secondes. À la fin, L'appareil passe en mode normal. LED LED Description générale Kabellose Regelungseinheit, die über Funk mithilfe von ZigBee mit den Geräten zu Hause kommuniziert, um den Eigenverbrauch von selbst produziertem Strom zu steigern. Der Pro Smart arbeitet in Verbindung mit dem Gerät E4U-PRO. Um den E4U-PRO zu installieren nutzen sie bitte dessen Anleitung. Installation / Commissioning App Menu ( DE Bedeutung LED Signification Meaning On steady → Pro Smart not on the Net (no network working) Slow flashing (1Hz) → Pro Smart on Net (no network working) Rapid flashing (4 Hz) → Pro Smart on Net, Network open (pairing mode) Off → No devices (PLUG / SWITCH) with good connection nearby 1 flash → One PLUG / SWITCH with good connection nearby 2 flashes → Two PLUG / SWITCH with good connection nearby 3 flashes → Tree or more PLUG / SWITCH with good connection nearby Dauerlicht → Pro Smart nicht konfiguriert (kein Netz aktiv) Langsames Blinken (1Hz) → Pro Smart konfiguriert (kein Netz aktiv) Schnelles Blinken (4Hz) → Pro Smart konfiguriert und in Zuweisungsmodus ON fixe → Pro Smart non configurato (nessuna rete attiva) Lampeggio lento (1Hz) → Pro Smart configurato (nessuna rete attiva) Lampeggio veloce (4Hz) → Pro Smart configurato e in modalità associazione Aus → kein Gerät (PLUG/SWITCH) mit guter Funkverbindung 1 Mal Blinken → Ein PLUG/SWITCH mit guter Funkverbindung 2 Mal Blinken → Zwei PLUG/SWITCH mit guter Funkverbindung 3 Mal Blinken → Drei oder mehr PLUG/SWITCH mit guter Funkverbindung Off → aucun dispositif (PLUG / SWITCH) avec une bonne liaison radio 1 clignotement → 1 PLUG / SWITCH avec bonne liaison radio 2 clignote → Deux PLUG / SWITCH avec bonne liaison radio 3 clignote → Trois ou plus PLUG / SWITCH avec bonne liaison radio LED blinkt während der Übertragung von Daten mit der Funksteckdose La Led clignote lors de la transmission ou la réception des PLUG // Switch LED blinkt während der Übertragung von Daten mit dem Elios4you Pro La Led clignote lors de la transmission ou la réception du Elios4you Pro 485 Led flashes during transmission or reception to Smart Plug / Switch Led flashes during transmission or reception to Elios4you Pro 485 4-noks s.r.l. • Via per Sacile, 158 • 31018 Francenigo di Gaiarine (TV) ITALY • P.I./C.F. IT03899650265 Tel +39 0434 768462 • [email protected] • www.4-noks.com 1 4-noks si riserva il diritto di modificare le caratteristiche dei prodotti senza preavviso. 4-noks reserves its rights to make changes or variations to its own products without any prior notice. +05N002010R1.1_Pro-Smart_Istruzioni-uso_Instruction-manual.pub - 31/10/2015 NOTA: per un corretto funzionamento spostare uno o più dei PLUG/SWITCH in maniera da avere almeno un lampeggio. NOTE: in order to have the system working properly, move one or more PLUG/ SWITCH till to have the LED flashing one time. IT ATTENZIONE: Se il PRO-SMART (RED-CAP) non appare nell’APP, potrebbe essere necessario aggiornare l’APP. Fare riferimento al manuale dell’E4U. HINWEIS: Für einen einwandfreien Betrieb einen oder mehrere der PLUG/SWITCH so positionieren, dass die Anzeige wenigstens einmal blinkt. BITTE BEACHTEN: Wenn der PRO-SMART (RED-CAP) nicht in der APP erscheint, ist möglicherweise ein Update der APP erforderlich. Siehe Handbuch des E4U. EN WARNING: If PRO-SMART (RED-CAP) does not appear in the APP, probably an APP update is necessary (See Elios4you User Manual). DE Reset button Il pulsante, se premuto per più di 6 secondi continuativi, riporta il dispositivo alle condizioni di fabbrica. Keep press the button for more than 6 seconds, the device get back to the factory original settings. Um die Standard Einstellungen wiederherzustellen müssen Sie den Reset-Knopf für mindestens 6 Sekunden gedrückt halten. Caratteristiche elettriche Electrical characteristics Elektronische Kenndaten 90÷250Vac; 50÷60Hz Power supply 90 ÷ 250Vac; 50 to 60Hz Stromversorgung 90 - 250 V (Wechselstrom); 50 bis 60 Hz Assorbimento <1W Power consumption <1W Leistungsbedarf <1 Watt Caratteristiche radio 2405 MHz ÷ 2480 MHz; +10 mW; Antenna Esterna con connettore SMA; IEEE 802.15.4 compliant Radio features 2405 MHz ÷ 2480 MHz; +10 MW; External antenna with SMA connector; IEEE 802.15.4 compliant Funkübertragung 2405 -2480 MHz; +10 MW; Externe Antenne mit SMA-Anschluss, IEEE 802.15.4 kompatibel Profilo ZigBee Home Automation Profile (HA1.2) ZigBee profile Home Automation Profile (HA1.2) ZigBee Profil Home Automation Profil (HA1.2) Operating Contidions 0 ÷ +50°C; <80% U.R. N.C.; Immagazzinamento : -20 ÷ +70°C; <80% U.R. N.C. Operating Contidions 0 to + 50 ° C; <80% R.H. N.C.; Storage: -20 to + 70 ° C; <80% R.H. N.C. Betriebsbedingungen 0 bis 50°C; <80 % Luftfeuchtigkeit; Speicher: -20 - +70°C; <80 % Luftfeuchtigkeit Classe isolamento IP20 Insulation class IP20 Isolierungsklasse IP20 GRIGIO Indica lo stato OFF (relé aperto, quindi carico del PLUG / SWITCH non alimentato). GIALLO Indica lo stato ON (relé chiuso, quindi carico alimentato). GRAY Displays the status OFF (relay open, the load on PLUG / SWITCH is not supplied). ROSSO Indica lo stato “OFFLINE RADIO” (il PLUG/SWITCH non comunica con Pro Smart) YELLOW Displays the ON (relay closed, the load is supplied). Bedeutung der APP Verbindungssymbole für die Funksteckdose(n) GRAU Zeigt den Status AUS (Relaise offen, Funkstecker nicht angeschlossen) RED Displays the status "OFFLINE RADIO" (the PLUG / SWITCH does not communicate with the Pro Smart) ATTENZIONE • NON COLLEGARE A PLUG/SWITCH: apparecchiature medicali: la disattivazione involontaria può causare situazioni con pericolo di morte utilizzatori che possano provocare danni, lesioni o incendi in caso di attivazione involontaria (ad es. ferri da stiro) carichi che possono essere danneggiati da attivazione/spegnimenti frequenti utilizzatori/carichi che non possono essere interrotti utilizzatori che richiedono una continua alimentazione di corrente. ATTENZIONE: informarsi presso il produttore del dispositivo collegato se questo è idoneo al controllo tramite presa temporizzata. ATTENZIONE: configurare il Plug/Switch in modo tale che il dispositivo collegato non venga attivato o disattivato più frequentemente di quanto indicato dal produttore del dispositivo. ATTENTION • DO NOT CONNECT THE SMART PLUG/SWITCH TO: medical equipment: the involountary deactivation can cause life-threatening situations devices that can cause damage, injury or fire in case of accidental activation (eg. irons) appliances that can be damaged by turning on / off frequently appliances that cannot be interrupted appliances that require a continuous current supply. ATTENTION: always seek advice from the manufacturer or user manual of the appliance if it is suitable to control via radio plug or timer. ATTENTION: be sure to configure the Smart Plug/Switch correctly, as per the instructions from specific appliance manufacturers. ATTENZIONE: Le presenti istruzioni sono indirizzate esclusivamente a personale tecnico specializzato. Il cliente (costruttore, progettista o installatore) si assume ogni responsabilità e rischio in relazione alla fase di configurazione del prodotto per il raggiungimento dei risultati previsti in relazione alla specifica installazione. Eventuali mancanze nelle fasi di studio richiamate in queste istruzioni possono generare malfunzionamenti e/o danni nei prodotti finali di cui 4-NOKS non può essere ritenuta responsabile. La responsabilità di 4-NOKS in relazione al proprio prodotto è regolata dalle condizioni generali di contratto 4-NOKS. Tutti i collegamenti e le impostazioni hardware devono essere effettuati da personale qualificato ed in assenza di alimentazione in ingresso. Tutti i modelli sono conformi alle direttive 2004/108 CE - 2006/95 CE - direttiva 99/5 CEE. L’apparecchiatura (o il prodotto) deve essere oggetto di raccolta separata in conformità alle vigenti normative locali in materia di smaltimento. Con la presente 4-NOKS dichiara che questi prodotti sono conformi ai requisiti essenziali ed alle altre disposizioni pertinenti stabilite dalla direttiva 1999/5/CE. La dichiarazione di conformità può essere consultata sul sito: www.4-noks.com/download. GELB Zeigt den Status AN (Relais geschlossen, Funkstecker angeschlossen) Restez appuyez sur la touche pendant plus de 6 secondes, l'appareil va revenir aux réglages d'usine. Caractéristiques électriques Alimentazione Plug/Switch APP connection icons meaning FR Bouton Réinitialiser Reset-Knopf Pulsante Reset Significato delle icone di connessione su App di Plug/Switch NOTE: Pour un fonctionnement correct, déplacez un ou plusieurs PLUG/ SWITCHr de manière à avoir au moins un flash. ATTENTION: Si la PRO-SMART ne figure pas dans l'APP, vous pouvez avoir besoin de mettre à jour l'APP. Reportez-vous au manuel du E4U. ROT Zeigt den Status „Funkverbindung gestört“ (Stecker kommuniziert nicht mit Pro Smart) Source de courant 90 ÷ 250Vac; 50 to 60Hz Consommation d'énergie <1W Fonctionnalités de la radio 2405 MHz ÷ 2,480 MHz; 10 MW; Antenne externe avec connecteur SMA; Conforme IEEE 802.15.4 profil ZigBee Home Automation Profile (de HA1.2) Contidions d'exploitation 0 à + 50 ° C; <80% d'humidité relative N.C .; Stockage: -20 à + 70 ° Classe d'isolement IP20 Signification des icons de l’ APP pour les Plug/Switch GRIS Montre le statut OFF (relais ouvert, la charge sur le PLUG / SWITCH n’est pas alimenté). JAUNE Montre le statut ON (relais fermé, la charge sur le PLUG / SWITCH est alimenté). ROUGE Montre le statut "OFFLINE RADIO" (le PLUG / SWITCH ne communiqué pas avec le E4U PRO Smart) ACHTUNG: Verbinden Sie die Smart Funksteckdosen nicht mit: Medizinischen Geräten: Durch eine unbeabsichtigte Deaktivierung können lebensbedrohliche Situationen entstehen Geräten, die im Falle eines Unfalls Schaden verursachen, Verletzungen hervorrufen oder Feuer auslösen könnten (Bsp. Bügeleisen) Geräten, die bei ständigem Ab-und Anschalten beschädigt werden können Apparaten, die in ihrer Funktionsweise unterbrochen werden könnten Geräten, die eine ständige Stromversorgung benötigen ACHTUNG: Benutzen Sie immer die Anleitung des Herstellers für das entsprechende Geräte und vergewissern Sie sich, dass das Gerät für eine Funkverbindung via Funksteckdose geeignet ist. ACHTUNG: Gehen Sie sicher, dass Sie die Funksteckdose richtig konfiguriert haben, folgen Sie dabei der Anleitung des Herstellers. Geräten, die bei ständigem Ab-und Anschalten beschädigt werden können ATTENTION • NE PAS CONNECTER A UNE PLUG/SWITCH: Matériel médical: une panne involontaire peut provoquer danger de mort Les appareils qui peuvent causer des dommages, des blessures ou des incendies en cas d’activation accidentelle (Ex Fer à repasser) Les appareils qui peuvent être endommagés par allumages / extinctions fréquents Appareils / charges qui ne doivent pas être interrompus Les appareils qui nécessitent un processus continu de source de courant ATTENTION: demander au fabricant de l’appareil, de la charge, s’il est approprié pour le contrôle via une prise radio ou minuterie. ATTENTION: Configurer plugs et switch de telle sorte que l ’appareil lié ne soit pas activé ou désactivé, plus fréquemment que ne l’indiquent les fabricants des appareils. ATTENTION: Installation must be completed by qualified personnel only. The customer (builder, developer or installer ) accepts all liability and risk relating to the configuration of the product to achieve the expected results in relation to the specific installation. Any deficiencies in the acknowledgment of the instructions may lead to malfunctions and / or damage to the devices, to which 4NOKS cannot be held responsible. The responsibility of 4-NOKS in relation to the devices manufactured is regulated by the general terms & conditions. Be careful to ensure all works being carried out are completed by qualified personnel, during which, no power is being supplied to the devices. ACHTUNG: Die Installation darf nur durch Fachpersonal durchgeführt werde. Der Kunde übernimmt alle Haftungsgeltungen, sobald die Konfiguration der Installation vorgenommen wurde, mit der die erwarteten Ergebnisse erzielt werden sollen. Mögliche Unkenntnis über die Funktionsweise der verwendeten Geräte können zu Fehlverhalten/oder Schaden an den Geräten führen. 4-Noks wird in diesen Fällen keine Haftung übernehmen. Die Verantwortung von 4-Noks bewegt sich in dem üblichen. Rahmen für Hersteller von produzierten Geräten. Solange wie die Geräte noch nicht an das Versorgungsnetz angeschlossen wurden, muss sichergestellt werden, dass alle Vorkehrungen von Fachpersonal durchgeführt worden sind. Rahmen für Hersteller von produzierten Geräten. Solange wie die Geräte noch nicht an das Versorgungsnetz angeschlossen wurden, muss sichergestellt werden, dass alle Vorkehrungen von Fachpersonal durchgeführt worden sind. ATTENTION: ce document est dédié à un personnel qualifié. Le client (concepteur, installateur) assume l’entière responsabilité et le risque relatif à la configuration du produit afin d’obtenir les résultats escomptés de l’installation spécifique. Des manques dans les étapes mentionnées dans les instructions peuvent entrainer des dysfonctionnements et/ou dommages sur le produit final et 4-Noks ne pourra être tenu pour responsable. La responsabilité de 4-Noks par rapport à ses produits est régie par les conditions générales. Tous les raccordements et les réglages de matériel doivent être effectués par un personnel qualifié et en l’absence de puissance d’entrée All models are compliant to directive 2004/108 CE - 2006/95 CE - directive 99/5 CEE The appliance (or the product) must be disposed of separately in accordance with the local regulations regarding disposal. 4-NOKS hereby declares that these products conform to the essential requirements and to all relevant specifications established by Directive 1999/5/CE. The declaration of conformity may be consulted on the website: www.4-noks.com/download. Alle Modelle erfüllen die Richtlinien 2004/108 CE – 2006/95 CE – die Richtlinie 99/5 CEE. Das Gerät und alle damit verbundenen Produkte müssen getrennt entsorgt werden und dabei die regional herrschenden Richtlinien für Entsorgung erfüllen. 4-Noks erklärt hiermit, dass alle Produkte die Mindestforderungen der Richtlinie 1999/5/CE erfüllen. Für die Erklärung, dass alle Produkte diese Richtlinien erfüllen können Sie unsere Webseite mit einbeziehen: www.4-noks.com/download Tous les modèles sont conformes à la directive 2004/108 CE - 2006/95 CE - directive 99/5 CEE. L'appareil (ou le produit) doit être jeté séparément, en conformité avec les réglementations locales en matière d'élimination. 4-NOKS déclare que ces produits sont conformes aux exigences essentielles et toutes les spécifications pertinentes établies par la directive 1999/5 / CE. La déclaration de conformité peut être consultée sur le site Internet: www.4-noks.com/download. Sicurezza. Smaltimento e garanzia. Apparecchiatura elettrica ed elettronica oggetto di raccolta separata, in conformità alle vigenti normative locali in materia di smaltimento. 4-noks s.r.l. • Via per Sacile, 158 • 31018 Francenigo di Gaiarine (TV) ITALY • P.I./C.F. IT03899650265 Tel +39 0434 768462 • [email protected] • www.4-noks.com Safety. Disposal and warranty. Electrical and electronic equipment: subject to separate recycling, according to local rules about e-waste disposal. Sicherheit, Entsorgung und Garantie: Elektrische und elektronische Bauteile: Alle Bauteile müssen separat entsorgt werden und dabei die regionalen Richtlinien für Entsorgung für elektrischen Müll und elektronischen Müll erfüllen. 2 Sécurité. Élimination et garantie. Les Équipements électriques et électroniques: font l’objet d'un recyclage séparé, selon les règles locales sur les déchets électroniques. 4-noks si riserva il diritto di modificare le caratteristiche dei prodotti senza preavviso. 4-noks reserves its rights to make changes or variations to its own products without any prior notice. +05N002010R1.1_Pro-Smart_Istruzioni-uso_Instruction-manual.pub - 31/10/2015