1
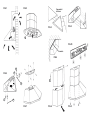
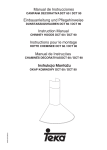
INSTRUCTIONS FOR USE
INSTRUCTIONS POUR L'EMPLOI
GEBRAUCHSANWEISUNG
ISTRUZIONI PER L'USO
04305564 - K ANGOLO
English
WARNING
-------------------------------------------------------The distance between the hob and the lower
part of the hood must be at least 65cm.
The air collected must not be conveyed into
a duct used to blow off smokes from
appliances fed with an energy other than
electricity (central heating systems,
thermosiphons, water-heaters, etc.).
Comply with the official instructions provided
by the competent authorities in merit when
installing the disposal duct.
The room must be well aerated in case a
hood and some other heat equipment fed
with an energy other than electricity (gas, oil,
coal heaters, etc) operate at the same time.
In fact the intake hood, disposing of air, could
create a vacuum in the room. The vacuum
should not exceed 0,04mbar. This prevents
the gas exhausted by the heat source from
being intaken again. It is therefore advisable
to ensure the room contains air taps able to
ensure a steady flow of fresh air.
ATTENTION: This appliance must be
grounded.
The following warning is valid in the United
Kingdom only:
As the colours of the wires in the mains lead
of this appliance may not correspond with
the coloured markings identifying the
terminals in your plug, proceed as follows:
- the wire which is coloured green and yellow
must be connected to the terminal in the plug
which is marked with the letter E or by the
earth symbol [ ], or coloured green or green
and yellow;
- the wire which is coloured blue must be
connected to the terminal which is marked
with the letter N or coloured black;
- the wire which is coloured brown must be
connected to the terminal which is marked
with the letter L or coloured red.
When making the electrical connections,
check that the current socket has a ground
connection and that the voltage values
correspond to those indicated on the data
plate inside the appliance itself.
In case your appliance is not furnished
with a non separating flexible cable and
has no plug, or has not got any other
device ensuring omnipolar disconnection
from the electricity main, with a contact
opening distance of at least 3mm, such
separating device ensuring disconnection
from the main must be included in the
fixed installation.
INSTALLATION
--------------------------------------------------------
Always switch off the electricity supply
before carrying out any cleaning or
servicing operations on the appliance.
Remove the metal filters as described below
(Fig. 2) before proceeding with the assembly
operations. This will make the appliance easier
to handle.
USE
-------------------------------------------------------Avoid using materials which could cause
spurts of flame (flambées) near the appliance.
When frying, take particular care to prevent
oil and grease from catching fire. Already
used oil is especially dangerous in this
respect. Do not use uncovered electric
grates.
To avoid possible risks of fire always comply
with the indicated instructions when cleaning
anti-grease filters and when removing grease
deposits from the appliance.
MAINTENANCE
-------------------------------------------------------Thorough servicing guarantees correct
and long-lasting operation.
Particular care must be paid to the grease
filtering panels which must be periodically
cleaned in relation to use (at least once
every two months). Remove the grease
filters and wash them either by hand or in
the dishwasher using neutral detergent.
Use lukewarm water and neutral detergent
to clean painted appliances. Never use
products containing abrasives.
Take great care to prevent the use of
corrosive or abrasive products when
cleaning steel, copper or brass appliances.
It is advisable to use specialized products
according to the manufacturer’s
instructions.
This appliance is designed for angle installation.
This appliance is designed for application as
a suction unit i.e. that the air is evacuated
outside (Fig.1).
It consists of a hood and a telescopic bearing
structure which must be applied to the upper part
of the hood in order to cover the draft tube.
This appliance is equipped with a provided
"closing support" (Fig.3). This part is not
necessary when you are in a situation as
indicated in Fig.4, where, for example, there is
an angle panel.
If you would use the "closing support" before
fixing the hood to the wall, assemble it as
indicated in Fig.3. Then fix it to the bach part
of the hood as indicated in Fig.5.
Wall fixing with brackets
Using the relative boring template, make the
right holes to fix to the ceiling. Mind that the
distance between the lower edge of the hood
and the hob must be at least 650 mm.
Apply the supplied brackets to the wall using
the relative screws and screw anchors
(Fig.6D). Before installing the hood, check
that the bracket fixing screws (Fig.6A) have
been sufficiently slackened to allow the hood
itself to be fitted in place.
Now fit on the hood using the relative
rectangular slots situated at the rear of the
appliance. The appliance can be regulated in
height by means of the relative bracket
adjuster screws (Fig.6B). Once having
regulated the equipment, fix everything in place
by tightening screws A (Fig.6) and inserting
screws C (Fig.6).
In case you do not use the "closing support",
the bach of the hood is equipped with 2
provided holes for a possible safety fixing.
Fixing the decorative pipe
The following operations are essential for
assembly:
– Fit the wiring system within the decorative
pipe.
–
Prepare the air disposal hole.
1. Using the supplied screws and screw
anchors, fix the upper pipe bearing bracket
to the ceiling (or to the wall too if you are
in a position as in Fig.4), aligning it with
the hood (Fig.7).
2. Connect the hood flange to the disposal
hole on the ceiling, using a suitable tube.
3. Make the electrical connections.
4. Insert the upper decorative pipe (Fig.8A),
fixing it to the bracket by means of the
two side fixing screws.
5. Now mount the lower pipe, inserting it
from the front part of the hood and
expanding it lightly (Fig.8). Fix the parts
using the relative screws, which must be
inserted from the inside of the casing
(Fig.9).
OPERATION
------------------------------------------------------Switch A - LIGHT (Fig.10):
Position 0: light off
Position 1: light on
Cursor B - MOTOR SPEED:
Used to regulate the operative speed of
the motor.
Switch C - MOTOR:
Position 0: motor off
Position 1: motor on
Warning light D:
Indicates motor operation.
Remove the metal filters for access to the internal parts of the appliance. This is carried
out by pushing the relative catch inwards and
turning it downwards until it disengages from
the supports. Proceed with these instructions
in reverse when refitting the filters (Fig. 2).
If the light bulbs need changing, slacken the
ring nut in an anticlockwise direction and remove the bulb itself (Fig. 2). Replace with a bulb
of the same type.
Français
ATTENTION
-------------------------------------------------------La distance entre la surface de la table de
cuisson et la base de la hotte doit être d'au
moins 65cm.
L'air aspiré ne doit pas être canalisé dans un
conduit qui est utilisé pour évacuer les
fumées produites par des appareils alimentés
par des sources d'énergies autres que
l'énergie électrique (installations de
chauffage central, radiateurs, chauffe-eau,
etc.).
Pour évacuer l'air qui doit être éliminé
respectez les prescriptions des autorités
compétentes.
Prévoyez une aération de la pièce adéquate
quand une hotte et des appareils alimentés
par une énergie autre que l'énergie électrique
(poêle à gaz, à huile, à charbon etc.) sont
utilisés en même temps.
En effet, en évacuant l'air, la hotte pourrait
créer une dépression dans la pièce.
La pression négative de la pièce ne doit pas
dépasser 0,04mbar, évitant ainsi que la
source de chaleur provoque un appel des
gaz qui doivent être évacués. Il est donc
nécessaire d'équiper la pièce de prises d'air
alimentant un flux d'air frais constant.
ATTENTION: cet appareil doit être relié à
la terre.
Lors du raccordement électrique assurezvous que la prise de courant est munie de
connexion de mise à terre; vérifiez aussi que
les valeurs de tension correspondent à celles
qui sont indiquées sur la plaque des
caractéristiques de l’appareil, qui se trouve
à l'intérieur de celui-ci.
Si votre appareil n'a pas de cable flexible qui
ne peut pas être séparé et de prise, ou bien
d'autre dispositif qui garantisse le
débranchement de tous les pôles du réseau,
avec une distance d'ouverture entre les
contacts d'au moins 3mm, ces dispositifs de
séparation du réseau doivent alors être
prévus dans l'installation fixe.
Avant de procéder à une opération d’entretien ou de nettoyage quelconque, débranchez l’appareil.
UTILISATION
-------------------------------------------------------Evitez d'utiliser des matériaux qui causent
des flambées à proximité de l'appareil.
Dans le cas de fritures, faites tout particulièrement attention au danger d’incendie que
représentent les huiles et les corps gras. A
cause de son inflammabilité l’huile usagée
est particulièrement dangereuse.
N'utilisez pas de grilles électriques
découvertes.
Pour éviter des risques d'incendie possibles
suivez les instructions données concernant
le nettoyage des filtres antigraisses et sur la
façon d'enlever des dépots éventuels de
graisse sur l'appareil.
ENTRETIEN
-------------------------------------------------------Un entretien soigné est une garantie de bon
fonctionnement et de bon rendement de
votre appareil dans le temps.
Faites très attention surtout aux panneaux
filtrants anti-graisse et nettoyez-les périodiquement (au moins tous les deux mois).
Retirez les filtres anti-graisse et lavez-les
avec un détersif neutre à la main ou dans
le lave-vaisselle.
Pour nettoyer les appareils peints, utilisez
de l’eau tiède et du détersif neutre: évitez
les produits abrasifs. Pour nettoyer les
appareils en acier, cuivre et laiton, faites
très attention: il ne faut absolument pas
utiliser de produits abrasifs ou corrosifs.
Nous conseillons d’employer des produits
spécifiques et de suivre leurs modes
d'emploi.
INSTALLATION
------------------------------------------------------Cet appareil est prévu pour une installation
angulaire.
Cet appareil a été conçu pour fonctionner en
version aspirante, c’est-à-dire pour évacuer
l’air vers l’extérieur (Fig.1). Il est composé
d’une hotte et d’un conduit télescopique
décoratif qui doit être appliqué sur la partie
supérieure de la hotte, en tant que revêtement
du tuyau d’évacuation.
Avant de monter l'appareil, pour le manoeuvrer
plus aisément, enlevez les filtres métalliques
en suivant les instructions ci-dessous (Fig.
2).
Pour cette hotte nous vous fournissons en
dotation un "support de fermeture" (Fig.3). Ce
dernier n'est pas nécessaire si vous vous
trouvez dans une situation comme dans la
Fig.4, où, par ex., peut être présent un panneau
dans l'angle.
Si vous utiliserez le "support de fermeture"
avant de fixer la hotte au mur assemblezle come indiqué à la Fig.3.
Fixez-le sur la partie postérieure de la hotte
come indiqué à la Fig.5.
Fixation murale avec étriers
A l'aide du gabarit de perçage faites les trous
nécessaires au montage de votre modèle dans
le mur en tenant compte du fait que la distance
entre l'arête inférieure de la hotte et votre
table de cuisson doit mesurer au moins 650
mm.
Fixez les étriers au mur au moyen des vis et
des chevilles en dotation (Fig.6D). Avant
d’accrocher la hotte assurez-vous que les vis
de fixation des étriers (Fig.6A) sont dévissés
de manière à ce qu'il soit possible d'accrocher
la hotte. Ensuite fixez la hotte au moyen des
fentes rectangulaires qui se trouvent à l’arrière
de l’appareil.
Le réglage de l’appareil en hauteur se fait au
moyen des vis des étriers (Fig.6B). Après ce
réglage, fixez le tout en serrant les vis 6A et
en introduisant les vis 6C.
Si vous n'utilisez pas le "support de fermeture",
il est prévu sur la partie postérieure de la
hotte, 2 trous (Fig.6E) pour une éventuelle
fixation au mur.
Fixation de la cheminée décorative
Pour l'assemblage il est nécessaire de:
– Prévoir l’alimentation électrique à l'intérieur
du conduit décoratif.
–
Prévoir le trou d’évacuation de l’air.
1. Au moyen des chevilles et des vis en
dotation, fixez l’étrier supérieur de support
du conduit décoratif au plafond (ou aussi
à la paroi si votre situation est comme
dans la Fig.4), de manière à ce qu’il soit
aligné avec votre hotte (Fig.7).
2. Reliez la bride de la hotte au trou
d’évacuation qui se trouve dans le mur/
plafond, au moyen d’un tuyau approprié.
3. Effectuez le raccordement électrique.
4. Introduisez le conduit décoratif supérieur
en le fixant à l’étrier au moyen des deux
vis de fixation latérales (Fig.8A).
5. Ensuite montez le conduit inférieur, en
l’enfilant par le devant de la hotte en
l'elargissant légerement (Fig.8) et fixez-le au
moyen des vis qui doivent être introduites
par l’intérieur de la structure (Fig.9).
FONCTIONNEMENT
-------------------------------------------------------Interrupteur A - ECLAIRAGE (Fig.10):
Position 0: lumière éteinte
Position 1: lumière allumée
Curseur B - VITESSE DU MOTEUR:
Permet le réglage de la vitesse de fonctionnement du moteur.
Interrupteur C - MOTEUR:
Position 0: moteur arrêté
Position 1: moteur en marche
Voyant D: Témoin de fonctionnement du moteur.
Pour accéder à la partie interne de l’appareil
vous devez enlever les filtres métalliques. Pour
cela, débloquez le dispositif d’arrêt et poussez
les filtres vers l’intérieur en les tournant vers
le bas jusqu’à les dégager des supports. Pour
remonter les filtres, effectuez ces mêmes opérations dans le sens inverse (Fig.2).
Pour le remplacement des lampes halogènes,
dévissez la bague dans le sens contraire aux
aiguilles d'une montre et ôtez l'ampoule
(Fig.2). Montez une ampoule de même type.
Deutsch
MONTAGE UND
GEBRAUCHSANWEISUNG
-------------------------------------------------------Das Gerät ist so zu montieren, daß der
Abstand zwischen den Kochplatten
und
dem
unteren
Rand
der
Dunstabzugshaube mindestens 65 cm
beträgt.
Ein Anschluß der Abluftleitungen an
Verbrennungs-Abgaskamine
(z.B.
Zentral-heizung usw.) ist nicht zulässig.
In jedem Fall sind bei der Ableitung
der
Abluft
die
behördlichen
Vorschriften zu beachten.
Achtung! Bei gleichzeitigem Betrieb einer
Abluft-Dunstabzugshaube und einer raumluftabhängigen Feuerstätte (wie z.B. gas, öl- oder kohlebetriebene Heizgeräte,
Durch-lauferhitzer, Warmwasserbereiter)
ist Vorsicht geboten, da beim Absaugen
der Luft durch die Dunstabzugshaube dem
Aufstellraum die Luft entnommen wird, die
die Feuerstätte zur Verbrennung benötigt.
Ein gefahrloser Betrieb ist möglich, wenn
bei gleichzeitigem Betrieb von Haube und
raumluftabhängiger Feuerstätte im Aufstellraum der Feuerstätte ein Unterdruck von
höchstens 0,04 mbar erreicht wird und
damit
ein
Rücksaugen
der
Feuerstättenabgase vermieden wird.
Dies kann erreicht werden, wenn durch
nicht verschließbare Öffnungen, (z.B. in
Türen,
Fenstern,
Zuluft-/
Abluftmauerkasten,
oder
andere
technische Maßnahmen, wie gegenseitige
Verriegelung o.ä.), die Ver-brennungsluft
nachströmen kann.
Anmerkung: Bei der Beurteilung muß
immer der gesamte Lüftungsverbund der
Wohnung beachtet werden. Bei Betrieb von
Kochgeräten, z.B. Kochmulde und
Gasherd, wird diese Regel nicht
angewendet. Im Zweifelsfalle muß der
zuständige Schorn-steinfegermeister zu
Rate gezogen werden.
Beim elektrischen Anschluß müssen
die Spannungswerte des Stromnetzes
mit den Werten des im Inneren des
Geräts angebrachten Typenschildes
übereinstimmen.
Vor jeder Reinigungs- oder Wartungsarbeit muß das Gerät vom Stromnetz
getrennt werden. Falls das Gerät nicht
an einer immer gut zugänglichen Steckdose angeschlossen wird, ist in der
Installation eine allpolige Trennvorrichtung von Netz, mit einer Kontaktöffnungsweite von mindestens 3 mm
pro Pol vorzusehen.
GEBRAUCH
-------------------------------------------------------Offenes Feuer, bzw. der Gebrauch von
Elektrogrills unter dem Gerät ist zu vermeiden. Beim Fritieren, besonders mit
mehrmals benutztem Öl, besteht Brandgefahr. Auch bei Nichtbeachtung der
Reinigungsanweisungen besteht die
Gefahr eines Brandes.
WARTUNG
-------------------------------------------------------Nur eine sorgfältige Pflege garantiert
auf Dauer eine gute Leistung und
Funktion des Geräts.
Besonders wichtig ist die Reinigung
der Fettfilter. Hierzu sind die Metallfettfilter abzunehmen. Die Reinigung
wird von Hand, mit biologisch abbaubarem Reinigungsmittel, oder in der
Spülmaschine empfohlen. Die Reinigungshäufigkeit hängt ab von der Benutzungsdauer und der Art der
abzusaugenden Wrasen.
Das Gerät selbst ist mit lauwarmem
Wasser und mildem Reinigungsmittel,
ohne Scheuerzusatz, zu reinigen. In
keinem Fall sind kratzende, ätzende
oder agres-sive Reinigungsmittel und
Hilfsmittel zu verwenden. Verwenden
Sie für Edelstahlgeräte Spezialprodukte
zur Edelstahlpflege. die jeweilige
Gebrauchsanweisung des verwendeten
MONTAGE DES GERÄTS
-------------------------------------------------------Dies Gerät ist für eine Eckanwendung
vorgesehen.
Zur Montage des Geräts sind die Metallfilter
herauszunehmen (Abb.2). Diese werden
hierzu am entsprechenden Griff leicht nach
hinten gedrückt und nach unten aus der
Federhalterung gezogen. Eingesetzt werden
die Fettfilter im umgekehrten Handlungsablauf.
Für diese Haube wird einen Schlusshaken
geliefert (Abb.3). Dieser ist night notwending,
wenn sie sich in einer Situation laut Abb.4
befinden, wo zum Beispiel es ein Eckepaneel
gibt.
Wenn Sie den Schlusshaken verwenden, vor
der Wandbefestigung:
Schlusschirm zusammenfassen (Abb.3).
Dann Schirm an der Rückseite des Geräts
befestigen (Abb.5).
Wandmontage des Geräts:
Die beiden mitgelieferten Haken unter Verwendung der Borschablone, mit, für die jewelige
Wandkonstruktion geeigneten Dübeln und
Schrauben an der Wand befestigen (Abb.6D).
Bevor nun das Gerät mit den rechteckigen
Öffnungen in der Geräterückwand in die
Haken eingehängt wird, ist darauf zu achten,
daß die Feststellschrauben (Abb.6A) an den
Haken so weit gelöst sind, daß die
Geräterückwand pro-blemlos in die
Halterungen eingehängt werden kann.
Die Höhenregulierung des Geräts erfolgt durch
Verstellen der Regulierschrauben an den
Aufhängehaken (Abb.6B).
Nach genauer Einstellung der endgültigen
Position werden die Feststellschrauben
(Abb.6A) fest angezogen. Zusätzlich wird das
Gerät durch die Sicherungslöcher fest mit der
Wand ver-schraubt (Abb.6C).
Wenn Sie den Schlusshaken nicht verwenden,
sind 2 Löcher zur Sicherheitsbefestigung auf
der Hinterseite der Haube vorgesehen
(Abb.6E).
Montage des Kamins:
Es wird empfohlen, den elektrischen Anschluß
für das Gerät im Bereich hinter der
Kaminverkleidung vorzusehen.
Zunächst wird die Position des Kaminbefesti-
gungsteiles festgelegt. Dieses kann sowohl
an der Decke, als auch an der Wand (wenn
sie die situation Abb.4 haben) festgeschraubt
werden (Abb.7).
Nachdem der Abluftschlauch am Gerät
angeschlossen ist und das Gerät mit dem
Stromanschluß verbunden wurde, wird
zunächst das Kaminoberteil von vorne über
das Kaminbe-festigungsteil geschoben und
seitlich festgeschraubt (Abb.8A). Bei dieser
Operaktion den Kamin ein wenig ausweitern.
Das Kaminunterteil wird von vorne
eingeschoben (Abb.8) und vom Geräteinneren
her mit dem Gehäuse verschraubt (Abb.9).
SCHALTUNG DES GERÄTS
-------------------------------------------------------Schalter A: Beleuchtung (Abb.10)
Position 0: Beleuchtung ist ausgeschaltet
Position 1: Beleuchtung ist eingeschaltet
Schalter B: Motorgeschwindigkeit
Schalter C: Motorhausptschalter - setzt das
Ge-rät beim Einschalten in der zuletzt
einge-sellten Betriebsstufe in Betrieb.
Position 0: Motor ist ausgeschaltet
Position 1: Motor ist eingeschaltet
D: Kontrolleuchte für Motorbetrieb.
Wechsel der Halogenlampen:
Hierzu ist der Sicherungsring der zu
wechselnden Halogenlampe abzunehmen,
indem er ge-gen den Uhrzeigersinn gedreht
wird (Abb.2). Nun kann die Halogenlampe
gewechselt wer-den. Im Austauschfall sind
unbedingt Halogenlampen des selben Typs
zu verwenden. Nach dem Lampenwechsel ist
der Sicherungsring wieder einzusetzen und
im Uhrzeigersinn festzudrehen.
Italiano
AVVERTENZE
-------------------------------------------------------La distanza minima tra la superficie del
piano di cottura e la parte inferiore della
cappa deve essere 65 cm.
L'aria raccolta non deve essere convogliata in un condotto usato per lo scarico
di fumi di apparecchi alimentati con energia diversa da quella elettrica (impianti di
riscaldamento centralizzati, termosifoni,
scaldabagni ecc.).
Per lo scarico dell'aria da evacuare rispettare le prescrizioni delle autorità competenti.
Prevedere un'adeguata areazione del locale quando una cappa e apparecchi alimentati con energia diversa da quella elettrica (stufe a gas, ad olio, a carbone ecc),
vengono usati contemporaneamente.
Infatti la cappa aspirante evacuando l'aria
potrebbe creare una pressione negativa
nella stanza.
La pressione negativa del locale non deve
superare i 0,04 mbar, evitando così il risucchio dei gas di scarico della fonte di
calore.
Pertanto attrezzare il locale con delle prese d’aria che alimentino un flusso costante di aria fresca.
ATTENZIONE: Questo apparecchio
deve essere collegato a terra.
Nell’operazione di collegamento elettrico
assicurarsi che la presa di corrente sia
munita di collegamento di terra e verificare
che i valori di tensione corrispondano con
quelli indicati nella targhetta inserita all’interno dell’apparecchio.
Se il Vostro apparecchio non è provvisto
di cavo flessibile non separabile e di spina, o di altro dispositivo che assicuri la
onnipolare disinserzione dalla rete, con una
distanza di apertura dei contatti di almeno
3 mm, allora tali dispositivi di separazione
dalla rete devono essere previsti nell'installazione fissa.
Prima di procedere a qualsiasi operazione
di pulizia o manutenzione è necessario
togliere tensione.
USO
-------------------------------------------------------Evitare l’uso di materiali che causano
fiammate (flambè) nelle immediate vicinanze dell’apparecchio.
Nel caso di fritture fare particolarmente
attenzione al pericolo di incendio che costituiscono olio e grassi. Particolarmente
pericoloso per la sua infiammabilità è l’olio
già usato. Non usare griglie elettriche scoperte.
Per evitare un possibile rischio di incendio
attenersi alle istruzioni indicate per la pulizia dei filtri antigrasso e la rimozione di
eventuali depositi di grasso sull’apparecchio.
MANUTENZIONE
-------------------------------------------------------Un'accurata manutenzione garantisce un
buon funzionamento ed un buon rendimento nel tempo.
Una cura particolare va rivolta ai pannelli
filtranti antigrasso, che devono essere puliti periodicamente in rapporto all'uso (almeno ogni due mesi). Disinserite i filtri
antigrasso e lavateli con detersivo neutro
a mano o in lavastoviglie.
Per la pulizia di apparecchi verniciati adoperare acqua tiepida e detersivo neutro;
evitare l'uso di prodotti contenenti abrasivi.
Per la pulizia di apparecchi in acciaio, rame
od ottone fate estrema attenzione ad evitare l'uso di prodotti contenenti abrasivi o
corrosivi. È consigliato l'uso di prodotti specializzati, seguendo le istruzioni indicate
sul prodotto.
INSTALLAZIONE
------------------------------------------------------Il presente apparecchio è progettato per l'installazione ad angolo.
Il presente apparecchio è progettato per impiego aspirante, cioè per evacuazione aria
verso l’esterno (Fig.1) ed è composto da una
cappa e da un camino decorativo telescopico
che deve essere applicato sulla parte superiore della cappa quale rivestimento del tubo
di scarico.
–
Predisporre l’alimentazione elettrica entro
l’ingombro del tubo decorativo
–
Predisporre il foro evacuazione aria.
1. Mediante i tasselli e le viti in dotazione,
fissare al soffitto (o anche alla parete se
la vs. situazione è come in Fig.4) la staffa
superiore di supporto del tubo decorativo,
facendo in modo che sia in asse con la
vostra cappa (Fig.7).
2. Collegare la flangia della cappa al foro di
evacuazione sul soffitto, tramite un tubo
adatto.
Prima di procedere alle operazioni di montaggio, per una più facile manovrabilità dell’apparecchio disinserire i filtri metallici come descritto di seguito (Fig. 2).
3. Effettuare il collegamento elettrico.
Per questa cappa viene fornito in dotazione
un "supporto di chiusura" (Fig.3). Quest'ultimo
non è necessario se vi trovate in una situazione come in Fig.4 dove ad es. può essere
presente un pannello nell'angolo.
Se utilizzerete il "supporto di chiusura" prima
di fissare la cappa al muro assemblatelo
come indicato in Fig.3. Fissatelo ora alla parte
posteriore della cappa come indicato in Fig.5.
5. A questo punto montare il camino inferiore, infilandolo dalla parte anteriore della
cappa e allargandolo leggermente (Fig.8);
fissarlo tramite le viti apposite che devono
essere inserite dall’interno della carcassa
(Fig.9).
Fissaggio a muro con staffe
Usando l'apposita maschera di foratura praticate sulla parete i fori necessari all'installazione del
vostro modello tenendo conto che la distanza
dello spigolo inferiore della cappa dal piano di
cottura deve essere minimo di 650 mm.
Applicate alla parete le staffe fornite a corredo
tramite le viti e i tasselli in dotazione (Fig. 6D).
Prima di agganciare la cappa assicurarsi che
le viti di fissaggio delle staffe (Fig. 6A) siano
svitate in modo tale da consentire l’aggancio
della cappa. Agganciate quindi la cappa tramite le asole rettangolari apposite, situate nella
parte posteriore dell’apparecchio. La
regolazione in altezza dell’apparecchio avviene operando sulle apposite viti di regolazione
delle staffe (Fig. 6B). A regolazione avvenuta,
procedere al fissaggio stringendo le viti A (Fig.
6) ed inserendo le viti (Fig. 6C).
Se non utilizzate il "supporto di chiusura",
sono previsti sul retro della cappa 2 fori (Fig.6E)
per un eventuale fissaggio di sicurezza.
Fissaggio del camino decorativo
Requisiti essenziali per il montaggio:
4. Inserire il tubo decorativo superiore fissandolo alla staffa tramite le due viti di fissaggio
laterali (Fig.8A).
FUNZIONAMENTO
-------------------------------------------------------Interruttore A - LUCE (Fig.10):
Posizione 0: luce spenta
Posizione 1: luce accesa
Cursore B - VELOCITÀ MOTORE:
Permette la regolazione delle velocità di
esercizio del motore.
Interruttore C - MOTORE:
Posizione 0: motore spento
Posizione 1: motore acceso
Gemma spia D:
Spia di funzionamento del motore.
Per accedere alla parte interna dell'apparecchio rimuovere i filtri metallici. La rimozione dei
filtri metallici, avviene operando sull'apposito
fermo, spingendoli verso l'interno e ruotandoli
verso il basso fino a disinserirli dai supporti.
Per il reinserimento dei filtri procedere nell'operazione inversa (Fig.2).
Per sostituire le lampade alogene svitare la
ghiera in senso antiorario e togliere la lampadina (Fig.2). Sostituire con lampade dello stesso tipo.
FIG.1
FIG.2
Supporto di
chiusura
FIG.5
FIG.3
FIG.10
Pannello
FIG.4
A
E
FIG.6
A
D
C
B
FIG.7
FIG.8
FIG.9