1
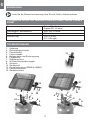
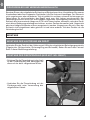
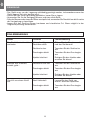
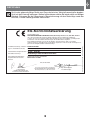
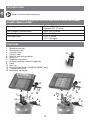
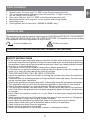
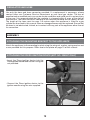
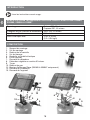
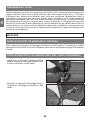
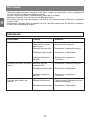
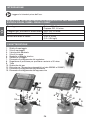
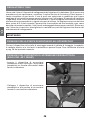
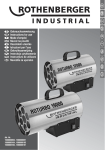
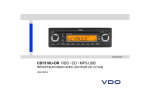
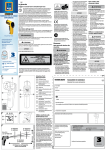
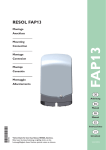
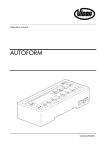
INDUSTRIAL
D
GB
F
I
Gebrauchsanweisung
Instructions for use
Mode d’emploi
Istruzioni per l’uso
0359
Version AT – DE – CH:
Gas G30 / G31
KAT. I3B/P (50)
50 mbar
G 1/4”
Art.-Nr. 035984,85,86,87
www.rothenbergerindustrial.com
D
EINFÜHRUNG
Lesen Sie die Gebrauchsanweisung, bevor Sie das Gerät in Betrieb nehmen.
TECHNISCHE DATEN FÜR GASHEIZSTRAHLER 035984, 035985, 035986 &
035987
Gasart
Butan G30, 50 mbar
Propan G31, 50 mbar
I3B/P (50), 50 mbar
0,9 mm
2,50– 4,20 kW
(0,2– 0,34 kg/h)
Gaskategorie, Betriebsdruck
Brennerdüse:
Nennleistung
TEILEBEZEICHNUNG
1.
2.
3.
4.
5.
6.
7.
8.
9.
10.
11.
12.
13.
Halterung
Befestigungsschraube
Flaschenventil
Fixierschraube
Beilagscheibe und Sicherungsring
Flügelmutter
Regleranschluss
50 mbar Konstantdruckregler
Schlauch
Geräteventil
Piezozündung (nur 035985 & 035987)
Flaschenanschluss
Geräteanschluss
11
10
10
9
9
1
12
5
3
6
2
4
13
6
8
9
5
1
13
3
12 2
8
9
7
7
2
D
LIEFERUMFANG
1.
2.
3.
4.
5.
6.
Gasheizstrahler, 50 mbar mit G 1/4” Schlauchverbindung mit Linksgewinde
Gasdruckregler (50 mbar Niedrigdruck, Leistung 1,5 kg/h),
Art. Nr. 035921 (CH: 035921Z)
Gasschlauch 400 mm, mit G 1/4” Linksgewinde x G 1/4” Linksgewinde
Halterung mit Flügelmutter, Schraube, Beilagscheibe und Sicherungsring
Befestigungsschraube
Piezozündung mit Mutter und Kabel (nur 035985 & 035987)
VERWENDUNGSZWECK
Dieses Gerät darf nur als Heizstrahler verwendet werden. DIESES GERÄT IST NICHT FÜR
DIE VERWENDUNG IN WOHNRÄUMEN GEEIGNET. DIESES GERÄT DARF NUR IM FREIEN
VERWENDET WERDEN. Das Gerät muss gemäß den geltenden Gesetzen installiert werden.
Achtung, heiße Teile
Nur für den Gebrauch im
Freien
BESTIMMUNGSLÄNDER ÖSTERREICH, DEUTSCHLAND, SCHWEIZ
SICHERHEITSHINWEISE
• Im Fall eines Lecks (Gasgeruch), schließen Sie das Flaschenventil und halten Sie das Gerät
fern von Zündquellen. Suchen Sie und beheben Sie das Leck, bevor Sie das Gerät in
Betrieb nehmen. Suchen Sie nie ein Leck mit eine Flamme sondern benutzen Sie hierzu
Seifenlauge.
• Das Gerät darf nur an einem gut belüfteten Ort verwendet werden.
• Das Gerät darf nicht in Kellern oder unter Erdgleiche verwendet werden.
• Falls das Gerät über längerer Zeit nicht benützt wird ist das Gerät von der Gasflasche
zu trennen und an einem kühlen, trocken Ort, außerhalb der Reichweite von Kindern zu
lagern.
• DIESES GERÄT DARF NUR IM FREIEN VERWENDET WERDEN.
• Bei Nichtgebrauch ist das Gerät durch schließen des Flaschenventils von der Gasflasche
zu trennen.
• Um Beschädigungen zu vermeiden dürfen Schläuche nicht verdreht werden. Der
Verbindungsschlauch darf nicht verdreht am Gerät angeschlossen werden.
• Das Gerät darf nur fern von Wänden, entflammbaren Materialen und Zündquellen aufgestellt
werden.
• Das Gerät darf nur mit einem Schlauch und Regler, wie in dieser Gebrauchsanleitung
beschrieben, betrieben werden.
• Überprüfen Sie den Schlauch regelmäßig auf Beschädigungen. Ersetzen Sie beschädigte
Schläuche.
• Während des Betriebes wird dieses Gerät sehr heiß. Berühren Sie keine heißen Geräteteile.
Lassen Sie das Gerät vollständig auskühlen, bevor Sie es transportieren, abmontieren
oder lagern.
• Während des Gebrauchs darf das Gerät nicht bewegt werden. Lassen Sie das Gerät
vollständig abkühlen, bevor Sie es transportieren.
• Versuchen Sie nie ein Gerät, das an einer Gasflasche angeschlossen ist, durch Teile des
Gerätes selbst zu heben oder zu transportieren. Verwenden Sie hierzu nur den Handgriff
der Gasflasche.
• Versuchen Sie nie, das Gerät im Bereich des Injektors anzuzünden.
• Entfernen Sie nie das Sicherheitsgitter und zerlegen oder modifizieren Sie das Gerät nicht.
• Kinder vom Gerät fernhalten.
• Lassen Sie das Gerät nie unbeaufsichtigt. Gerät bei gebrochener oder beschädigter
Keramik nicht in Betrieb nehmen.
3
D
DRUCKREGLER UND VERBINDUNGSSCHLAUCH
Benutzen Sie nur den mitgelieferten Schlauch und Schlauchanschluss. Kontaktieren Sie unseren
Kundendienst oder Ihren regionalen Gashändler, falls Sie Austausch benötigen. Der Gebrauch
nicht-zugelassener oder veränderter Teile ist gefährlich und kann schwere Verletzungen zur
Folge haben. Es wird empfohlen, den Regler nach max. fünf Jahren auszutauschen. Der
Verbindungsschlauch muss der einschlägigen regionalen Gesetzgebung entsprechen. Der
Schlauch darf eine maximale Länge von 0,5 m nicht überschreiten, aufweisen, wenn das Gerät,
wie in dieser Bedienungsanleitung beschrieben, an einer Gasflasche montiert wird. Abgenutzte
oder beschädigte Schläuche müssen ausgetauscht werden. Vergewissern Sie sich, dass der
Schlauch nicht eingeklemmt oder geknickt ist und keine anderen Teile des Gerätes als die
Verbindung berührt.
MONTAGE
MONTAGE DER HALTERUNG AM GERÄT
Verbinden Sie das Gerät mit der Halterung mit Hilfe des mitgelieferten Befestigungsmaterials
(Flügelmutter, Beilagscheibe, Sicherungsring und Schraube). Sehen Sie auch das Foto auf
Seite 2 dieser Bedienungsanleitung.
MONTAGE DER PIEZOZÜNDUNG (NUR ART. NR. 035987)
- Schieben Sie die Piezozündung in das Loch
an der Piezohalterung und befestigen Sie
diese mit der dafür vorgesehene Mutter.
- Verbinden Sie die Piezozündung mit der
Zündungsnadel unter Verwendung des
mitgelieferten Kabels.
4
D
MONTIEREN DES GERÄTES UND ANSCHLUSS AN EINER GASFLASCHE
Das Gerät darf nur an 5 kg und 11 kg-Gasflaschen angeschlossen werden.
- Schieben Sie die Halterung über den Flaschenhals.
- Fixieren Sie das Gerät samt Halterung am Flaschenhals, indem Sie die Befestigungsschraube
fest zudrehen, damit diese am Flaschenhals anschlägt.
- Vergewissern Sie sich, dass das Flaschenventil und das Geräteventil geschlossen sind.
- Überprüfen Sie den Zustand des Schlauches und des Reglers jedes Mal vor Gebrauch des
Gerätes. Verwenden Sie keinen Schlauch oder Regler, der Beschädigungen oder
Abnützungserscheinungen aufweist.
- Verbinden Sie den Druckregler mit der Gasflasche.
- Verbinden Sie den Gasschlauch mit dem Druckregler und mit dem Gerät. Vergewissern Sie
sich, dass der Schlauch nicht verdreht oder angespannt ist und keine Teile der Gerät
berührt, die heiß werden können.
- Öffnen Sie das Flaschenventil. Vergewissern Sie sich, dass alle Verbindungen dicht sind.
Falls notwendig, verwenden Sie hierzu ein Lecksuchspray oder eine Seifenlauge. Eventuell
sind die Verbindungen nachzuziehen. Verwenden Sie das Gerät nicht, wenn Sie vermuten,
dass das System undicht ist.
VERWENDUNG
Gehen Sie wie folgt vor, um das Gerät anzuzünden und die Flamme einzustellen:
- Stellen Sie das Gerät und die Gasflasche im Freien auf eine feste, ebene Fläche, fern von
entflammbaren Materialien auf.
- Öffnen Sie die Flaschenventil, indem Sie den Hahn gegen den Uhrzeigersinn drehen.
- Halten Sie den Ventilknopf gedrückt und drehen Sie diesen auf die höchste Stufe.
- Modelle 035985 & 035987: Drücken Sie die Piezozündung.
- Modelle 035985 & 035987: Zünden Sie das Gerät an, indem Sie eine Flamme zum Keramik,
möglichst weit vom Bereich des Injektors entfernt, halten.
- Halten Sie den Ventilknopf ca. 20 Sekunden gedrückt. Falls die Flamme ausgeht, wiederholen
Sie die oben beschriebene Schritte.
- Sobald die Flamme sich stabilisiert, kann sie durch Drehen des Knopfes wie gewünscht
reguliert werden.
- Um das Gerät auszuschalten, stellen Sie die Flamme ab indem Sie zunächst das
Flaschenventil und anschließend das Geräteventil schließen.
WARTUNG UND REINIGUNG
AUSWECHSELN DER GASFLASCHE
- Die Gasflasche darf nur im Freien und fern von allen Zündquellen und anderen Personen
gewechselt werden.
- Schließen Sie das Flaschenventil und das Geräteventil.
- Falls das Gerät in Betrieb war, lassen Sie es vollständig abkühlen.
- Schrauben Sie den Gasregler ab und entfernen Sie diesen.
- Schrauben Sie die Befestigungsschraube ab und entfernen Sie die Halterung und das Gerät
vom Flaschenhals.
- Gehen Sie wie im Abschnitt ‘Montieren des Gerätes und Anschluss an einer Gasflasche’
vor.
5
D
REINIGUNG
- Das Gerät muss vor der Lagerung vollständig gereinigt werden, insbesondere wenn das
Gerät längere Zeit nicht benützt wird.
- Lassen Sie das Gerät vollständig auskühlen, bevor Sie es lagern.
- Verwenden Sie für die Reinigung Wasser und eine milde Seife.
- Falls der Brenner oder eines der Rohre verstopft sind, verwenden Sie Druckluft um die Ursache
der Verstopfung zu beseitigen.
- Lagern Sie das Gerät an einem trockenen und staubfreien Ort. Wenn möglich in der
Originalverpackung aufbewahren.
FEHLERBEHEBUNG
Fehler
Ursache
Fehlerbehebung
Das Gerät lässt sich nicht
anzünden
Nicht alle nötigen
Gashähne offen
Öffnen Sie das Flaschenventil
und das Geräteventil
Gasflasche leer
Tauschen Sie die Gasflasche
aus
Druckregler defekt
Tauschen Sie den Druckregler
aus
Injektor blockiert
Reinigen Sie den Injektor oder
ersetzen Sie diesen
Gasflasche fast leer
Tauschen Sie die Gasflasche
aus
Druckregler defekt
Tauschen Sie den Druckregler
aus
Injektor blockiert
Reinigen Sie den Injektor oder
ersetzen Sie diesen
Ventil fehlerhaft
Lassen Sie das Gerät von
einem Fachmann reparieren
Druckregler defekt
Tauschen Sie den Druckregler
aus
Flamme sehr schwach,
instabil, gelb...
Gas tritt aus einem Ventil
aus
6
D
RECYCLING
Nicht mehr gebrauchsfähige Geräte zum Recyceln bei einer Wertstoffsammelstelle abgeben.
Nicht mit dem Hausmüll entsorgen. Weitere Informationen erhalten Sie bei der dafür zuständigen
Behörde. Entsorgen Sie die Verpackung in Übereinstimmung mit dem Materialtyp sowie den
örtlichen, in Ihrem Gebiet geltenden Vorschriften.
EG-Konformitätserklärung
Produktbezeichnung / Funktion: Gasheizstrahler
Typen- / Modellbezeichnung:
035984, 85, 86, 87
Seriennummer/Chargennummer: 90-388 – 2010-08
Handelsbezeichnung:
Rothenberger Industrial Gasheizstrahler
Einschlägige EG-Richtlinien:
Angewandte harmonisierte
Normen:
Gasgeräterichtlinie 90/396/EEC
EN461:1999 +A1:2004
Anif, 01-08-2010
Oliver Hahn
Leiter-Einkauf
und Bevollmächtigter der
Technischen Dokumentation
Technische Dokumentation verfügbar bei:
WALTER WERKZEUGE SALZBURG GmbH,
Gewerbeparkstrasse 9, 5081 Anif, Austria
7
Mag. Bart Duquène
Produktmanager
Dies ist die Originalversion der EG-Konformitätserklärung.
Hiermit erklären wir,
WALTER WERKZEUGE SALZBURG GmbH, Gewerbeparkstrasse 9, 5081 Anif, Austria
dass das nachfolgend bezeichnete Gerät aufgrund seiner Konzipierung und Bauart
sowie in der von uns in Verkehr gebrachten Ausführung, den einschlägigen, grundlegenden
Sicherheits- und Gesundheitsanforderungen der EG-Richtlinien entspricht.
Diese Erklärung bezieht sich nur auf das Gerät in dem Zustand, in dem es in Verkehr
gebracht wurde. Vom Endbenutzer nachträglich angebrachte Teile und/oder nachträglich vorgenommene Eingriffe bleiben unberücksichtigt.
8
INDUSTRIAL
D
GB
F
I
Gebrauchsanweisung
Instructions for use
Mode d’emploi
Istruzioni per l'uso
0359
Version AT – DE – CH:
Gas G30 / G31
CAT. I3B/P (50)
50 mbar
G 1/4"
Art.-Nr. 035984,85,86,87
www.rothenbergerindustrial.com
GB
INTRODUCTION
Read the instructions before use.
TECHNICAL SPECIFICATIONS FOR THE GAS SPACE HEATERS 035984,
035985, 035986 & 035987
Type of gas
Butane G30, 50 mbar
Propane G31, 50 mbar
I3B/P (50), 50 mbar
0.9 mm
2.50– 4.20 kW
(0.2– 0.34 kg/h)
Gas category, feed pressare
Injector
Total heat input
FEATURES
1.
2.
3.
4.
5.
6.
7.
8.
9.
10.
11.
12.
13.
Mounting bracket
Mounting screw
Cylinder valve
Fixing screw
Washer and spring washer
Wing nut
Regulator connector
50 mbar constant pressure regulator
Hose
Gas tap
Piezo ignition button (035985 & 035987 only)
Cylinder connector
Appliance connector
11
10
10
9
9
1
12
5
3
6
2
4
13
6
8
9
5
1
13
3
12 2
8
9
7
7
10
1.
2.
3.
4.
5.
6.
Space heater, 50 mbar with 1/4" BSP screw thread connection (left)
Gas pressure regulator, (50 mbar pressure reduction, 1.5 kg/h capacity),
art. no. 035921 (CH: 035921Z)
Gas hose, 400 mm, with 1/4" BSP screw thread connectors (left)
Mounting bracket with wing nut, screw, washer and spring washer
Mounting screw
Piezo ignition with nut and wire (035985 & 035987 only)
SCOPE OF USE
This appliance may only be used for space heating. THIS APPLIANCE IS NOT FOR DOMESTIC
USE. THIS APPLIANCE MUST ONLY BE USED OUTDOORS. This appliance must be installed
in accordance with such regulations as are in force.
Caution, hot parts
Only for outdoor use
COUNTRIES OF DESTINATION: AUSTRIA, GERMANY, SWITZERLAND
SAFETY INSTRUCTIONS
• In the event of a gas leak (smell of gas) close the cylinder valve and keep the appliance
well away from sources of ignition. Locate the source and repair the leak before operating
the appliance. Never use a flame to locate the source of a leak; use a soapy solution instead.
• Use only in a well ventilated area.
• The appliance shall not be used in basements or below ground level.
• If the appliance is not to be used for a period of time disconnect it from the cylinder and
store it in a cool, dry place out of the reach of children.
• THIS APPLIANCE MAY ONLY BE USED OUTDOORS.
• Isolate the appliance from the cylinder by closing the cylinder valve when the appliance
is not in use.
• To prevent the risk of damage avoid twisting the flexible tubes and hoses. The hose may
not be twisted when connected.
• Position the appliance well away from walls, inflammable materials and sources of ignition.
• This appliance must be used with a hose and regulator as described in this manual.
• Check the hose regularly for signs of damage. Replace damaged hoses.
• The appliance becomes very hot when in use. Do not touch any part of the appliance
that is hot. Allow the appliance to cool down completely before transport, disassembly
or storage.
• Never move the appliance when it is in use. Allow it to cool down completely before
transport.
• Never attempt the move or lift the appliance and gas cylinder assembly by lifting parts
of the appliance. Always use the gas cylinder’s handle.
• Never ignite the appliance by applying a flame to an area close to the injector.
• Never remove the safety grill or dismantle and/or modify the appliance.
• Keep children well away from the appliance.
• Never leave the appliance unattended.
• Never use the appliance if the ceramic element is damaged or broken.
11
GB
PACK CONTENTS
GB
REGULATOR AND HOSE
Use only the hose and hose connector provided. If a replacement is necessary, please
contact either our Customer Service Department or your local gas dealer. The use of
unauthorised or modified parts can create unsafe conditions and could result in serious injury
to the user. It is recommended that the regulator is changed within 5 years of the date of
manufacture. The hose used must conform to the relevant standard for the country of use.
The length of the hose must be max. 0.5 metres when the appliance is fitted to a gas
cylinder as described in this manual. Worn or damaged hoses must be replaced. Ensure that
the hose is not obstructed, kinked, or in contact with any part of the appliance other than at
its connection.
ASSEMBLY
ATTACHING THE MOUNTING BRACKET TO THE APPLIANCE
Attach the appliance to the mounting bracket using the wing nut, washer, spring washer and
screw provided for this purpose. Refer also to the photo on page 10 of this manual.
ATTACHING THE PIEZO IGNITION DEVICE (ART. NO. 035987 ONLY)
- Insert the Piezo ignition device into the
Piezo ignition bracket and secure it using the
nut provided.
- Connect the Piezo ignition device to the
ignition needle using the wire supplied.
12
The appliance may only be fitted to 5kg and 11kg gas cylinders.
- Place the mounting bracket on to the collar of the gas cylinder.
- Tighten the mounting screw so that so that it engages with the collar of the gas cylinder
and so that the appliance and the mounting bracket are securely fixed on the gas cylinder.
- Make sure that the gas cylinder valve and the appliance valve are closed.
- Check the condition of the hose and the pressure regulator each time you use the appliance.
Do not use a hose or regulator that show any sign of damage or deterioration.
- Connect the pressure regulator to the gas cylinder.
- Connect the gas hose to the pressure regulator and to the appliance connector. Make sure
that the hose is routed in such a way so that it is not twisted or subject to strain and so
that it can not come into contact with any parts of the appliance that may become hot.
- Open the gas cylinder valve. Check that all connections are air-tight. If necessary use a leak
detector spray or a soapy solution. If necessary, tighten the connections. Do not use the
appliance if you suspect that the system may be leaky.
USING THE APPLIANCE
Proceed as follows to light the appliance and adjust the flame:
- Place the appliance and gas cylinder assembly outdoors on a level and stable surface, well
away from any inflammable materials.
- Open the gas cylinder valve by turning the knob anti-clockwise.
- Push and hold the appliance’s knob and turn it to the highest setting.
- Models 035985 & 035987: Push the Piezo ignition button.
- Models 035984 & 035986: Light the appliance by applying a gas lighter to the section of
the ceramic grille furthest away from the valve.
- Hold the appliance’s knob depressed for approximately 20 seconds. If the flow of gas stops,
repeat the steps above.
- Once the flame is established the flame can be adjusted as required by turning the valve.
- To switch off the appliance extinguish the flame by closing the cylinder valve and subsequently
close the appliance valve.
MAINTENANCE AND CLEANING
CHANGING THE GAS CYLINDER
- The gas cylinder may only be changed outdoors, well away from sources of ignition and
other persons.
- Close the gas cylinder valve and the gas appliance valve.
- If the appliance has been in operation allow it to cool down completely.
- Unscrew and remove the gas regulator.
- Unscrew the mounting screw and remove the mounting bracket and the appliance from
the gas cylinder’s collar.
- Proceed as described in the ‘Fitting and connecting the appliance to a gas cylinder’
section.
13
GB
FITTING AND CONNECTING THE APPLIANCE TO A GAS CYLINDER
GB
CLEANING
- The appliance must be thoroughly cleaned before it is put away, especially if the appliance
is not to be used for a longer period.
- Allow the appliance to cool down completely before cleaning.
- Clean the appliance with water and a mild detergent.
- If the burner or any of the tubes are clogged, use compressed air to remove the cause of
obstruction.
- Store the appliance in a dry place and away from dust. If possible put it back in its original
packaging.
TROUBLESHOOTING
PROBLEM
CAUSE
CORRECTIVE ACTION
The appliance does not
ignite
Not all necessary
valves are open
Open the gas cylinder valve
and the appliance valve
Gas cylinder empty
Replace the gas cylinder
Pressure regulator
defective
Replace the pressure regulator
Injector blocked or
clogged
Clean or replace the injector
Flame very weak, unsteady, Gas cylinder almost
empty
yellow...
Gas leaks from a valve
Replace the gas cylinder
Pressure regulator
defective
Replace the pressure regulator
Injector blocked or
clogged
Clean or replace the injector
Faulty valve
Have the appliance repaired by
a competent person
Pressure regulator
defective
Replace the pressure regulator
14
Worn out appliances must be recycled at a suitable recycling facility. Do not dispose of with
the household waste. Contact your local authority for more information. Dispose of packaging
according to type and in accordance with local regulations.
EC-Declaration of Conformity
Product description / function:
Gas space heaters
Type / model identifier:
035984, 85, 86, 87
Serial number / Lot number:
90-388 – 2010-08
Trade name:
Rothenberger Industrial Gas space heaters
Appropriate EC directives:
Applicable harmonised
standards:
Gas Appliances Directive 90/396/EEC
EN461:1999 +A1:2004
Anif, 01-08-2010
Oliver Hahn
Purchasing Manager
and person responsible for
technical documentation
Technical documentation is available from:
WALTER WERKZEUGE SALZBURG GmbH
Gewerbeparkstrasse 9, 5081 Anif-Austria
15
Mag. Bart Duquène
Product Manager
This is a translation of the CE declaration of conformity.
We,
WALTER WERKZEUGE SALZBURG GmbH, Gewerbeparkstrasse 9, 5081 Anif, Austria
declare that the design and construction of the following appliance, in the form supplied by
us, comply with the basic health and safety requirements of the appropriate EC directives.
This declaration covers the appliance only in the condition in which it was supplied by us.
It does not cover parts subsequently fitted by the user or modifications made after purchase.
GB
RECYCLING
16
INDUSTRIAL
D
GB
F
I
Gebrauchsanweisung
Instructions for use
Mode d’emploi
Istruzioni per l’uso
0359
Version AT – DE – CH :
Gaz G30 / G31
CAT. I3B/P (50)
50 mbars
G 1/4”
Réf. 035984,85,86,87
www.rothenbergerindustrial.com
INTRODUCTION
F
Lisez les instructions avant usage.
SPÉCIFICATIONS TECHNIQUES POUR LES CHAUFFAGES À GAZ 035984,
035985, 035986 & 035987
Type de gaz
Catégorie de gaz, pression d’alimentation
Injecteur
Débit calorifique total
Butane G30, 50 mbars
Propane G31, 50 mbars
I3B/P (50), 50 mbars
0,9 mm
2,50– 4,20 kW
(0,2– 0,34 kg/h)
COMPOSITION
1.
2.
3.
4.
5.
6.
7.
8.
9.
10.
11.
12.
13.
Support de montage
Vis de montage
Robinet de la bouteille
Vis de blocage
Rondelle et rondelle élastique
Ecrou papillon
Raccord du détendeur
Détendeur réglable en continu 50 mbars
Tuyau
Robinet de gaz
Bouton d’allumage Piezo (035985 & 035987 uniquement)
Raccord de la bouteille
Raccord de l’appareil
11
10
10
9
9
1
12
5
3
6
2
4
13
6
8
9
5
1
13
3
12 2
8
9
7
7
18
1.
2.
3.
4.
5.
6.
Chauffage, 50 mbars avec raccordement par vis filetée (à gauche) 1/4” BSP
Détendeur-régulateur de gaz, (réduction de la pression à 50 mbars, capacité 1,5
kg/h), réf. 035921 (CH: 035921Z)
Tuyau de gaz, 400 mm, avec raccords à vis filetée (à gauche) 1/4” BSP
Support de montage avec écrou papillon, vis, rondelle et rondelle élastique
Vis de montage
Allumage Piezo avec écrou et câble (035985 & 035987 uniquement)
ETENDUE D’UTILISATION
Cet appareil doit être utilisé pour le chauffage uniquement. CET APPAREIL N’EST PAS DESTINÉ
À UN USAGE DOMESTIQUE. CET APPAREIL NE DOIT ÊTRE UTILISÉ QU’EN PLEIN AIR.
Cet appareil doit être installé conformément aux règlementations en vigueur.
Attention, parties chaudes
Pour usage en plein air
uniquement
PAYS AUXQUELS CET APPAREIL EST DESTINE : AUTRICHE, ALLEMAGNE, SUISSE
CONSIGNES DE SÉCURITÉ
• En cas de fuite de gaz (odeur), fermez le robinet de la bouteille et tenez l’appareil éloigné
de toute source d’inflammation. Repérez la source de la fuite et éliminez la fuite avant d’utiliser
l’appareil. Ne recherchez jamais une fuite avec une flamme ; utilisez plutôt une solution
savonneuse.
• Utilisez cet appareil uniquement dans un endroit bien aéré.
• Cet appareil ne doit pas être utilisé en sous-sol ou sous le niveau du sol.
• Si vous n’utilisez pas cet appareil pendant une période prolongée, séparez-le de la
bouteille et rangez-le dans un endroit frais et sec hors de portée des enfants.
• CET APPAREIL NE DOIT ÊTRE UTILISÉ QU’EN PLEIN AIR.
• Quand vous n’utilisez pas l’appareil, isolez-le de la bouteille en fermant le robinet de la
bouteille.
• Afin d’éviter tout risque d’endommagement, ne tordez pas les tubes souples et les tuyaux.
Le tuyau ne doit pas être tordu quand il est raccordé.
• N’installez pas l’appareil à proximité d’un mur, de matières inflammables ou de sources
d’inflammation.
• Cet appareil doit être utilisé avec un tuyau et un détendeur conformes à ceux décrits dans
ce manuel.
• Contrôlez le tuyau régulièrement pour pouvoir détecter tout signe de détérioration.
Remplacez les tuyaux détériorés.
• Cet appareil devient très chaud au cours de l’utilisation. Ne touchez pas les parties de
l’appareil qui sont chaudes. Laissez l’appareil refroidir complètement avant de le transporter,
de le démonter ou de l’entreposer.
• Ne déplacez jamais l’appareil pendant qu’il fonctionne. Laissez-le refroidir complètement
avant de le transporter.
• N’essayez jamais de déplacer ou de soulever l’ensemble appareil/bouteille de gaz en
soulevant un des composants de l’appareil. Utilisez toujours la poignée de la bouteille de
gaz.
• N’allumez jamais l’appareil en appliquant une flamme dans une zone proche de l’injecteur.
• Ne retirez jamais la grille de protection et ne démontez et/ou ne modifiez jamais l’appareil.
• Tenez les enfants éloignés de l’appareil.
• Ne laissez jamais l’appareil sans surveillance.
• N’utilisez jamais l’appareil si l’élément en céramique est détérioré ou cassé.
19
F
CONTENU DE LA LIVRAISON
F
DÉTENDEUR ET TUYAU
Utilisez uniquement le tuyau et le raccord de tuyau fournis. Si un remplacement est nécessaire,
veuillez contacter notre service après-vente ou votre fournisseur de gaz local. L’utilisation
d’éléments non autorisés ou modifiés peut créer des conditions dangereuses dont la
conséquence peut être des blessures graves pour l’utilisateur. Il est recommandé de
remplacer le détendeur tous les 5 ans à partir de la date de fabrication. Le tuyau utilisé doit
être conforme aux normes en vigueur dans le pays d’utilisation. La longueur du tuyau doit
être de 0,5 mètre max. quand l’appareil est fixé à la bouteille de gaz comme décrit dans le
présent manuel. Les tuyaux usés ou détériorés doivent être remplacés. Assurez-vous que
le tuyau n’est pas obstrué, tordu ou en contact avec un élément de l’appareil autre que celui
servant au raccordement.
MONTAGE
FIXER LE SUPPORT DE MONTAGE À L’APPAREIL.
Fixez l’appareil au support de montage en utilisant l’écrou papillon, la rondelle, la rondelle
élastique et la vis fournis à cet effet. Reportez-vous aussi à la photo de la page 18 du présent
manuel.
FIXER LE DISPOSITIF D’ALLUMAGE PIEZO (RÉF. 035987 UNIQUEMENT)
- Introduisez le dispositif d’allumage Piezo
dans le support de l’allumage Piezo et fixezle bien en utilisant l’écrou fourni.
- Branchez le dispositif d’allumage Piezo à
l’aiguille de l’allumage en utilisant le câble
fourni.
20
MONTAGE ET RACCORDEMENT DE L’APPAREIL SUR LA BOUTEILLE
- Positionnez le support de montage sur la collerette de la bouteille de gaz.
- Serrez la vis de montage de telle sorte qu’elle bute sur la collerette de la bouteille de gaz
et que l’appareil et le support de montage soient fermement fixés sur la bouteille.
- Assurez-vous que le robinet de la bouteille de gaz et le robinet de l’appareil sont fermés.
- Vérifiez l’état du tuyau et du détendeur à chaque fois que vous utilisez l’appareil. N’utilisez
pas un tuyau ou un détendeur qui présente un signe d’endommagement ou de détérioration.
- Raccordez le détendeur à la bouteille de gaz.
- Raccordez le tuyau de gaz au détendeur et au raccord de l’appareil. Assurez-vous que le
tuyau est installé de telle manière qu’on ne puisse pas le tordre ou le tendre et de telle sorte
qu’il ne puisse pas être en contact avec un élément de l’appareil pouvant devenir chaud.
- Ouvrez le robinet de la bouteille de gaz. Vérifiez l’étanchéité de tous les raccordements. Si
nécessaire, utilisez un spray détecteur de fuite ou une solution savonneuse. Si besoin est,
resserrez les raccords. N’utilisez pas l’appareil si vous suspectez la présence d’une fuite
dans l’équipement.
UTILISATION DE L’APPAREIL
Pour allumer l’appareil et régler la flamme, procédez comme suit :
- Placez l’ensemble appareil/bouteille de gaz à l’extérieur sur une surface plane et stable,
loin de toute matière inflammable.
- Ouvrez le robinet de la bouteille de gaz en tournant la poignée dans le sens inverse des
aiguilles d’une montre.
- Maintenez la poignée de l’appareil enfoncée et tournez-la au point le plus élevé.
- Modèles 035985 & 035987 : Appuyez sur le bouton d’allumage Piezo.
- Modèles 035984 & 035986 : Allumez l’appareil en appliquant un briquet à gaz vers la partie
de la grille céramique le plus éloignée du robinet.
- Maintenez le bouton de l’appareil enfoncé pendant environ 20 secondes. Si le gaz arrête
de circuler, répétez les opérations précédentes.
- Une fois qu’une flamme est présente, il vous est possible de l’ajuster à votre guise en tournant
le robinet.
- Pour éteindre l’appareil, éteignez la flamme en fermant d’abord le robinet de la bouteille
puis le robinet de l’appareil.
MAINTENANCE ET NETTOYAGE
CHANGEMENT DE LA BOUTEILLE DE GAZ
- Ne changez la bouteille de gaz qu’à l’extérieur, à l’écart de toute source d’inflammation et
des personnes.
- Fermez le robinet de la bouteille de gaz et de l’appareil.
- Si l’appareil vient d’être utilisé, laissez-le refroidir complètement.
- Dévissez et retirez le détendeur.
- Dévissez la vis de montage et retirez le support de montage et l’appareil de la collerette
de la bouteille de gaz.
- Procédez comme décrit dans la section « Montage et raccordement de l’appareil sur la
bouteille ».
21
F
L’appareil n’est adapté que pour des bouteilles de gaz de 5 kg et 11 kg.
F
NETTOYAGE
- Nettoyez soigneusement l’appareil avant de le ranger, en particulier si vous prévoyez de
ne pas l’utiliser pendant une longue période.
- Laissez l’appareil refroidir complètement avant de le nettoyer.
- Nettoyez l’appareil avec de l’eau et un détergent doux.
- Si le brûleur ou un tuyau est bouché, utilisez de l’air comprimé pour éliminer la cause de
l’obstruction.
- Entreposez l’appareil dans un endroit sec et à l’abri de la poussière. Si possible, remettezle dans son emballage d’origine.
DEPANNAGE
PROBLEME
CAUSE
REMEDE
L’appareil ne s’allume pas
Tous les robinets
nécessaires ne sont
pas ouverts
Bouteille de gaz vide
Ouvrez le robinet de la bouteille
de gaz et de l’appareil
Détendeur défectueux
Remplacez le détendeur
Injecteur bloqué ou
bouché
Nettoyez ou remplacez
l’injecteur
Flamme très faible, instable, Bouteille de gaz
jaune...
presque vide
Fuite de gaz à partir du
robinet
Remplacez la bouteille de gaz
Remplacez la bouteille de gaz
Détendeur défectueux
Remplacez le détendeur
Injecteur bloqué ou
bouché
Nettoyez ou remplacez
l’injecteur
Robinet défectueux
Faites réparer l’appareil par une
personne qualifiée
Détendeur défectueux
Remplacez le détendeur
22
RECYCLAGE
F
Les appareils usés doivent être recyclés par un centre de recyclage approprié. Ne jetez pas
l’appareil avec les déchets ménagers. Consultez votre municipalité pour plus de détails.
Débarrassez-vous des emballages selon leur type et conformément aux règlementations
locales.
Nous,
WALTER WERKZEUGE SALZBURG GmbH, Gewerbeparkstrasse 9, 5081 Anif, Austria
certifions sur notre honneur que l'appareil ci-après mentionné, dans la version mise par nos
soins sur le marché, répondent de par leur conception et leur forme de construction, aux directives de la réglementation CE en vigueur.
Cette déclaration ne concerne qu'un appareil se trouvant dans le même état que lors de sa
mise en service. L’ajout ultérieur d’accessoires et/ou les interventions effectuées ne sont pas
pris en compte.
Désignation du produit / fonction : Chauffages à gaz
Désignation du type / modèle :
035984, 85, 86, 87
N° de série / n° de lot :
90-388 – 2010-08
Désignation commerciale :
Rothenberger Industrial Chauffages à gaz
Réglementations CE en vigueur : Directive 90/396/CEE Appareils à gaz
Normes harmonisées
EN461:1999 +A1:2004
appliquées :
Anif, 01-08-2010
Oliver Hahn
Directeur des achats
Mandataire de la
documentation technique
Documentation technique disponible auprès de / chez :
WALTER WERKZEUGE SALZBURG GmbH,
Gewerbeparkstrasse 9, 5081 Anif, Austria
23
Mag. Bart Duquène
Chef de produit
Ceci est la traduction de la version originale de l'attestation de conformité CE.
Attestation de conformité CE
24
INDUSTRIAL
D
GB
F
I
Gebrauchsanweisung
Instructions for use
Mode d’emploi
Istruzioni per l’uso
0359
Versione AT – DE – CH:
Gas G30 / G31
CAT. I3B/P (50)
50 mbar
G 1/4”
Cod. art. 035984,85,86,87
www.rothenbergerindustrial.com
INTRODUZIONE
Leggere le istruzioni prima dell’uso.
SPECIFICHE TECNICHE RELATIVE AI RISCALDATORI PER AMBIENTI
ESTERNI 035984, 035985, 035986 E 035987
I
Tipo di gas
Butano G30, 50 mbar
Propano G31, 50 mbar
Categoria gas, pressione di alimentazione I3B/P (50), 50 mbar
Iniettore
0,9 mm
Immissione totale di calore
2,50– 4,20 kW
(0,2– 0,34 kg/h)
CARATTERISTICHE
1.
2.
3.
4.
5.
6.
7.
8.
9.
10.
11.
12.
13.
Staffa di montaggio
Vite di montaggio
Valvola della bombola
11
Vite di fissaggio
Rondella e rondella elastica
Galletto di fissaggio
Elemento di collegamento del regolatore
Regolatore di pressione per pressione costante a 50 mbar
Tubo
Rubinetto del gas
Pulsante per l’accensione piezoelettrica (solo 035985 e 035987)
Elemento di collegamento della bombola
Elemento di collegamento dell’apparecchio
10
10
9
9
1
12
5
3
6
2
4
13
6
8
9
5
1
13
3
12 2
8
9
7
7
26
CONTENUTO DELLA CONFEZIONE
1.
2.
3.
4.
5.
6.
Riscaldatore per ambienti esterni, 50 mbar con collegamento a filettatura BSP 1/4”
(a sinistra)
Regolatore della pressione del gas, (riduzione della pressione 50 mbar, capacità 1,5 kg/h),
cod. art. 035921 (CH: 035921Z)
Tubo del gas, 400 mm, con collegamenti a filettatura BSP 1/4” (a sinistra)
Staffa di montaggio con galletto di fissaggio, vite, rondella e rondella elastica
Vite di montaggio
Accensione piezoelettrica con dado e cavo (solo 035985 e 035987)
I
DESTINAZIONE D’USO
Questo apparecchio può essere usato solo per il riscaldamento di ambienti esterni. QUESTO
APPARECCHIO NON È DESTINATO AD UN USO DOMESTICO. QUESTO APPARECCHIO
DEVE ESSERE USATO SOLO ALL’ESTERNO. Questo apparecchio deve essere installato in
base alle norme di legge in vigore.
Attenzione, parti roventi
Solo per uso in ambienti
esterni
PAESI DI DESTINAZIONE: AUSTRIA, GERMANIA, SVIZZERA
ISTRUZIONI PER LA SICUREZZA
• In caso di perdita di gas (odore di gas) chiudere la valvola della bombola e conservare
l’apparecchio a debita distanza da fonti di accensione. Individuare il punto di fuoriuscita del
gas e riparare la perdita prima di mettere in funzione l’apparecchio. Non usare mai una fiamma
per individuare il punto di fuoriuscita del gas; usare invece una soluzione contenente sapone.
• Usare solo in una zona ben areata.
• L’apparecchio non deve essere usato in seminterrati o sotto il livello del suolo.
• Se non verrà usato per qualche tempo, scollegare l’apparecchio dalla bombola e conservarlo
in un luogo fresco e asciutto, fuori dalla portata dei bambini.
• QUESTO APPARECCHIO PUÒ ESSERE USATO SOLO ALL’ESTERNO.
• Isolare l’apparecchio dalla bombola chiudendo la valvola della bombola quando l’apparecchio
non viene utilizzato.
• Per prevenire danni evitare di attorcigliare i tubi flessibili. Il tubo non deve essere attorcigliato
quando collegato.
• Posizionare l’apparecchio a debita distanza da muri, materiali infiammabili e fonti di accensione.
• Questo apparecchio deve essere usato con un tubo e un regolatore, così come indicato nel
presente manuale.
• Controllare regolarmente il tubo alla ricerca di eventuali segni di danni. Sostituire i tubi
danneggiati.
• L’apparecchio si scalda molto durante l’uso. Non toccare alcuna parte rovente dell’apparecchio.
Attendere che l’apparecchio si raffreddi completamente prima di procedere al suo trasporto,
smontaggio o immagazzinamento.
• Non muovere mai l’apparecchio durante l’uso. Attendere che si raffreddi completamente
prima di procedere al suo trasporto.
• Non cercare mai di muovere o sollevare l’apparecchio e la bombola a gas ricorrendo a parti
dell’apparecchio stesso. Usare sempre la maniglia della bombola a gas.
• Non accendere mai l’apparecchio avvicinando una fiamma all’area circostante l’iniettore.
• Non rimuovere mai la griglia di sicurezza o smontare e/o modificare l’apparecchio.
• Tenere i bambini a debita distanza dall’apparecchio.
• Non lasciare mai l’apparecchio incustodito.
• Non usare mai l’apparecchio se l’elemento in ceramica è danneggiato o rotto.
27
REGOLATORE E TUBO
I
Usare solo il tubo e l’elemento di collegamento del tubo forniti in dotazione. Se è necessario
procedere ad una sostituzione, contattare il nostro Servizio di Assistenza Clienti oppure il
vostro rivenditore di gas locale. L’uso di parti non autorizzate o modificate può creare
condizioni di insicurezza e provocare gravi infortuni per l’utilizzatore. Si consiglia di sostituire
il regolatore entro 5 anni dalla data di produzione. Il tubo impiegato deve essere conforme
alla normativa corrispondente in vigore nel paese di utilizzo. La lunghezza massima del tubo
deve essere di 0,5 metri quando l’apparecchio è assemblato ad una bombola a gas come
descritto nel presente manuale. I tubi usurati o danneggiati devono essere sostituiti. Assicurarsi
che il tubo non sia ostruito, attorcigliato o in contatto con parti dell’apparecchio diverse dal
suo elemento di collegamento.
MONTAGGIO
FISSAGGIO DELLA STAFFA DI MONTAGGIO ALL’APPARECCHIO
Fissare il dispositivo sulla staffa di montaggio usando il galletto di fissaggio, la rondella,
la rondella elastica e la vite forniti in dotazione a questo scopo. Fare riferimento alla foto
a pag. 26 del presente manuale.
FISSAGGIO DEL DISPOSITIVO DI ACCENSIONE PIEZOELETTRICA
(SOLO COD. ART. 035987)
- Inserire il dispositivo di accensione
piezoelettrica nella staffa per l’accensione
piezoelettrica e fissarlo utilizzando il dado
fornito in dotazione.
- Collegare il dispositivo di accensione
piezoelettrica alla puntina di accensione
usando il cavo fornito in dotazione.
28
ASSEMBLAGGIO E COLLEGAMENTO DELL’APPARECCHIO AD UNA
BOMBOLA A GAS
- Posizionare la staffa di montaggio sul collo della bombola a gas.
- Serrare la vite di montaggio in modo che si innesti sul collo della bombola a gas e che
l’apparecchio e la staffa di montaggio siano fissati saldamente alla bombola a gas.
- Assicurarsi che la valvola della bombola a gas e quella dell’apparecchio siano chiuse.
- Controllare la condizione del tubo e del regolatore di pressione tutte le volte che si utilizza
l’apparecchio. Non usare tubi o regolatori di pressione che mostrino qualsiasi segno di danno
o deterioramento.
- Collegare il regolatore di pressione alla bombola a gas.
- Collegare il tubo del gas al regolatore di pressione e all’elemento di collegamento
dell’apparecchio. Assicurarsi che il tubo sia disposto in maniera tale da evitare attorcigliamenti
o tensioni e che non possa quindi venire in contatto con qualsiasi parte dell’apparecchio
rovente.
- Aprire la valvola della bombola a gas. Controllare che tutti i collegamenti siano stagni. Se
necessario usare uno spray per il rilevamento delle perdite o una soluzione contenente sapone.
Se necessario, serrare i collegamenti. Non usare l’apparecchio in caso di sospette perdite
del sistema.
USO DELL’APPARECCHIO
Per accendere l’apparecchio e regolare la fiamma procedere come segue:
- Posizionare l’apparecchio e la bombola a gas all’esterno su una superficie piana e stabile,
a debita distanza da qualsiasi materiale infiammabile.
- Aprire la valvola della bombola a gas ruotando la manopola in senso antiorario.
- Mantenere premuta la manopola dell’apparecchio e posizionarla sul punto di regolazione
massimo.
- Modelli 035985 e 035987: Premere il pulsante di accensione piezoelettrica.
- Modelli 035984 e 035986: Accendere l’apparecchio avvicinando un accendino a gas alla
sezione della griglia in ceramica il più lontano possibile dalla valvola.
- Tenere premuta la manopola dell’apparecchio per circa 20 secondi. Se il flusso di gas si
interrompe, ripetere le fasi sopra descritte.
- Una volta stabilizzata, la fiamma può essere regolata a piacere ruotando la valvola.
- Per spegnere l’apparecchio estinguere la fiamma chiudendo la valvola della bombola e
successivamente la valvola dell’apparecchio.
MANUTENZIONE E PULIZIA
SOSTITUZIONE DELLA BOMBOLA A GAS
- La bombola a gas può essere sostituita solo all’esterno, a debita distanza da fonti di
accensione e altre persone.
- Chiudere la valvola della bombola a gas e la valvola dell’apparecchio a gas.
- Se l’apparecchio era in funzione, lasciarlo raffreddare completamente.
- Svitare e rimuovere il regolatore del gas.
- Svitare la vite di montaggio e rimuovere la staffa di montaggio e l’apparecchio dal collo della
bombola a gas.
- Procedere come descritto alla sezione ‘Assemblaggio e collegamento dell’apparecchio ad
una bombola a gas’.
29
I
L’apparecchio può essere assemblato solo a bombole a gas da 5 e 11 kg.
PULIZIA
I
- Prima di riporlo, l’apparecchio deve essere accuratamente pulito, in particolare se non verrà
utilizzato per un lungo periodo.
- Atttendere che l’apparecchio si raffreddi completamente prima di procedere alla sua
pulizia.
- Pulire l’apparecchio con acqua e un detergente non aggressivo.
- Se il bruciatore o uno dei tubi sono ostruiti, usare aria compressa per rimuovere la causa
dell’ ostruzione.
- Conservare l’apparecchio in un luogo asciutto e al riparo dalla polvere. Se possibile riporlo
nel suo imballaggio originale.
INDIVIDUAZIONE ED ELIMINAZIONE GUASTI
PROBLEMA
CAUSA
RIMEDIO
L’apparecchio non si
accende
Non tutte le valvole
necessarie sono
aperte
Bombola a gas vuota
Aprire la valvola della bombola
a gas e la valvola
dell’apparecchio
Sostituire la bombola a gas
Regolatore di
pressione difettoso
Sostituire il regolatore di
pressione
Iniettore bloccato od
ostruito
Pulire o sostituire l’iniettore
Bombola a gas
praticamente vuota
Sostituire la bombola a gas
Regolatore di
pressione difettoso
Sostituire il regolatore di
pressione
Iniettore bloccato od
ostruito
Pulire o sostituire l’iniettore
Valvola difettosa
Fare riparare l’apparecchio ad
una persona competente
Regolatore di
pressione difettoso
Sostituire il regolatore di
pressione
Fiamma molto debole,
instabile, gialla...
Perdite di gas da una
valvola
30
RICICLAGGIO
Gli apparecchi non più utilizzabili devono essere riciclati presso un impianto idoneo al loro
riciclaggio. Non smaltire insieme ai rifiuti domestici. Per maggiori informazioni contattare le autorità
locali. Smaltire l’imballaggio in base alla sua tipologia e in conformità con le normative locali.
Denominazione del prodotto /
funzione:
Riscaldatori a gas per ambienti esterni
Denominazione del tipo/modello: 035984, 85, 86, 87
Numero di serie / numero di charge: 90-388 – 2010-08
Nome commerciale:
Rothenberger Industrial Riscaldatori a gas per ambienti esterni
Direttive CE pertinenti:
Norme armonizzate applicate:
Direttiva 90/396/CEE sugli apparecchi a gas
EN461:1999 +A1:2004
Anif, 01-08-2010
Oliver Hahn
Direttore Acquisti
Incaricato della
documentazione tecnica
Documentazione tecnica disponibile /
acquistabile presso:
WALTER WERKZEUGE SALZBURG GmbH,
Gewerbeparkstrasse 9, 5081 Anif, Austria
31
Alexander Reischl
Responsabile del Prodotto
Questa è una traduzione della versione originale della dichiarazione di conformità CE.
Con la presente, noi,
WALTER WERKZEUGE SALZBURG GmbH, Gewerbeparkstrasse 9, 5081 Anif, Austria
dichiariamo che l'apparecchio di seguito indicato è conforme, per concezione e struttura
costruttiva nonché nella versione messa in circolazione, alle norme pertinenti stabilite nelle
direttive CE.
Questa dichiarazione si riferisce solo alle condizioni dell'apparecchio alle quali viene messa
in circolazione. I componenti applicati successivamente e/o interventi effettuati
successivamente dall’utente finale, non sono contemplati.
I
Dichiarazione di conformità CE
INDUSTRIAL
SERVICE:
ROTHENBERGER Industrial GmbH
Sodener Str. 47
D-65779 Kelkheim-Fischbach
Tel.: +49 (0)6195 9981 - 0
Email: [email protected]
www.rothenbergerindustrial.com
© Copyright
Nachdruck oder Vervielfältigung – auch auszugsweise – nur mit Genehmigung der
WALTER WERKZEUGE SALZBURG GMBH
Gewerbeparkstrasse 9
5081 Anif / Austria
Diese Druckschrift einschließlich aller ihrer Teile ist urheberrechtlich geschützt.
Jede Verwertung außerhalb der engen Grenzen des Urheberrechtsgesetzes ist ohne Zustimmung
der WALTER WERKZEUGE SALZBURG GMBH unzulässig und strafbar.
Das gilt insbesondere für Vervielfältigungen, Übersetzungen, Mikroverfilmungen und die
Einspeisung und Verarbeitung in elektronischen Systemen.
32