1
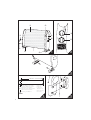
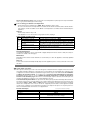
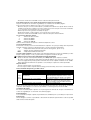
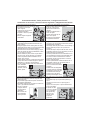
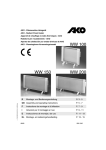
AKO - Design-Wärmewelle
AKO - Design Comfortwave Heater
Panneau Rayonnant - AKO
Onda Calda - AKO
Placa-Radial de AKO
AKO - Warmtegolfstraalkachel
WW 120 K
130602-Ww120k- ibw
D
Montage- und Bedienungsanleitung
S. 3 - 4
GB Assembly and operating instructions
P. 4 - 6
F
Instructions de montage et d’utilisation
P. 6 - 8
I
Istruzioni per il montaggio e l’uso
P. 8 - 10
E
Instrucciones de montaje y de uso
P. 10 - 11
NL
Montage- en bedieningshandleiding
P. 12 - 13
06/2002
223 241/1
Á
À
MAX
2
1
0
Â
Â
Æ
Ã
f
MAX
Ã
Ã
Å
Ä
1
Ä
2
3
500 mm
3.
95 mm
Mindestabstand zum Boden
520 Minimum distance to ground
Distance au sol minimum
mm Distanza minima dal pavimento
Distancia mínima al suelo
Minimum grondafstand
1.
Bohrer 6 mm
Drill 6 mm
Foret 6 mm
Trapano 6 mm
Broca de 6 mm
Boor 6 mm
4
2
2.
3.
2.
1.
5
Liebe Kundin, lieber Kunde, vielen Dank für das Vertrauen, das Sie uns mit dem Kauf dieses Geräts entgegengebracht haben. Sie haben ein Qualitätsprodukt erworben, welches nach anerkannten sicherheitstechnischen Regeln CE-konform hergestellt wurde. Weil wir wollen, daß Sie lange Freude an dem Gerät
haben und ausreichend für Ihre Sicherheit gesorgt ist, lesen Sie bitte die Anleitung vor Inbetriebnahme
sorgfältig durch. Beachten Sie unbedingt die Sicherheitshinweise auf den letzten Seiten. Bewahren
Sie die Anleitung griffbereit auf und geben Sie das Gerät nie ohne Anleitung an andere Personen weiter.
Ihr AKO - Wärmewellen-Heizgerät gibt Wärme über Wärmestrahlung direkt an Gegenstände und Personen ab, die sich, auch in einiger Entfernung, vor dem Gerät befinden. Sie können zwischen den Funktionen
AUS - 400W - 600W - 1000W Heizleistung wählen. Der Thermostat ermöglicht die stufenlose Einstellung
der Temperatur von ca. +5°C bis ca. +35°C. Das Gerät kann als Standgerät verwendet oder mit den Wandhaltern auch fest montiert werden. Das Gerät dient ausschließlich dem Beheizen oder der Temperierung
von Räumen und ist für den normalen Hausgebrauch vorgesehen.
Technische Daten
Typ
Netzspannung
Leistung
Schaltstufen
Geräteart
Schutzklasse
Schutzart
Abmessungen ca. B x H x T
Gewicht ca.
Technische Änderungen vorbehalten
WW 120 K
- siehe Typschild 1000 W
AUS / 400W / 600W / 1000 W
Thermostat mit Frostschutzfunktion
Standgerät /Wandgerät
I
IP 20
Standgerät:
71 cm x 43 cm x 18,2 cm
Wandmontage:
71 cm x 41 cm x 17 cm
4 ,15 kg
Aufbau und Bedienteile (vgl. Abbildungen auf Seite 2)
햲 Wärmeaustrittsgitter
햶 2 Standfüße mit 2 Befestigungsschrauben
햳 Kontrolleuchte
햷 Netzkabel
햴 Drehschalter
햸 Netzstecker
햵 Thermostat
Das Auspacken des Geräts
- Überprüfen Sie das Gerät auf sichtbare Beschädigungen. Falls Sie Beschädigungen am Gerät feststellen, dürfen Sie es nicht benutzen. Wenden Sie sich dann bitte an Ihren Fachhändler.
- Vergessen Sie nicht die beiden Standfüße auszupacken. Sie befinden sich in den seitlichen Polstern der
Verpackung.
- Wir bitten Sie, das Verpackungsmaterial umweltgerecht zu entsorgen.
Die Montage als Standgerät
Montieren Sie die beiden Standfüße an der Unterseite des Geräts (vgl. Abb. 3 auf Seite 2).
- Stecken Sie die Standfüße auf die 3 Bolzen an der Unterseite des Geräts.
- Sichern Sie die Standfüße mit den beiden mitgelieferten Schrauben.
- Stecken Sie den Netzstecker ein. Das Gerät ist jetzt betriebsbereit.
Die Wandmontage (vgl. Abb. 4, 5 auf Seite 2)
Beachten Sie die Sicherheitshinweise auf den letzten Seiten.
Zur Wandmontage werden die Standfüße als Wandhalter verwendet.
- Montieren Sie die Standfüße mit 4 Dübeln Ø 6 x 30 mm und 4 Schrauben Ø 5 x 30 mm unter Beachtung
der Mindestabstände an die Wand. Die Maße der benötigten Bohrungen entnehmen Sie der Abb. 4. Stellen Sie sicher, daß sich im Bereich der Bohrlöcher keine anderen Installationen (z.B. Strom, Wasser) befinden.
- Drücken Sie die beiden Haken jedes Standfußes heraus.
- Hängen Sie das Gerät gemäß Abb. 5 in die Haken der Standfüße ein.
- Stecken Sie den Netzstecker ein. Das Gerät ist nun betriebsbereit.
Die Positionen des Drehschalters
0
- Heizung ist ausgeschaltet
1
- Heizstufe 400 W
3
2
- Heizstufe 600 W
MAX
- Heizstufe 1000 W
Die Kontrolleuchte leuchtet, wenn das Gerät eingeschaltet ist.
Die Funktion des Thermostats
Der Thermostat schaltet das Gerät selbsttätig ein und aus. Wird die eingestellte Temperatur unterschritten,
beginnt das Gerät zu heizen bis die Temperatur wieder erreicht ist.
- tiefste Temperatur des Thermostats (Frostschutzstufe)
ooo
- stufenloser Einstellbereich des Thermostats
MAX
- höchste Temperatur des Thermostats
Die Frostschutzposition können Sie einstellen, wenn die Raumtemperatur in (ungenutzten) Räumen nicht
unter ca. +5°C abfallen darf, um z.B. das Gefrieren von Wasserleitungen zu verhindern.
T I P zur Einstellung Ihrer gewünschten Raumtemperatur
- Stellen Sie den Thermostat auf die höchste Temperatur (Pos. MAX). Das Gerät beginnt zu heizen.
- Sobald die gewünschte Raumtemperatur erreicht ist, drehen Sie den Thermostat entgegen dem Uhrzeigersinn soweit zurück, bis der Thermostat das Gerät mit einem hörbaren „Klicken“ ausschaltet. Die
somit eingestellte Raumtemperatur wird vom Gerät nahezu beibehalten.
Nach dem Gebrauch
- Bringen Sie den Drehknopf in Position 0.
- Falls Sie das Gerät längere Zeit nicht verwenden, ziehen Sie den Netzstecker.
Eventuelle Störungen am Gerät und mögliche Ursachen
Störung Ursache
Abhilfe
Das
Gerät
heizt
nicht.
Der Drehschalter befindet sich in Position 0.
Der Thermostat ist zu niedrig eingestellt.
Der Überhitzungsschutz hat angesprochen.
Die Haushaltssicherung hat angesprochen.
Der Netzstecker ist nicht eingesteckt.
Bringen Sie den Drehschalter in die gewünschte
Position.
Drehen Sie den Thermostat höher.
Sorgen Sie dafür, daß die Luft ungehindert um das
Gerät zirkulieren kann. Das Gerät schaltet sich
selbst wieder ein, wenn es abgekühlt ist.
Überprüfen Sie die Haushaltssicherung und achten
Sie darauf, daß keine weiteren leistungsstarken
Geräte diesselbe Haushaltssicherung belasten.
Stecken Sie den Netzstecker ein.
Falls Sie alle oben aufgeführten Ursachen überprüft haben und das Gerät trotzdem nicht funktioniert, wenden Sie sich bitte an den Fachhändler oder die AKO-Servicestelle.
Die Reinigung des Geräts
Bei Bedarf reinigen Sie das Gerät mit einem leicht angefeuchteten Tuch. Beachten Sie dabei die Sicherheitshinweise auf den letzten Seiten.
Die Wartung
Wir empfehlen, je nach Staubanfall und Verschmutzung des Geräts eine Reinigung durch den Fachmann.
Die Entsorgung
Über die Möglichkeit der Entsorgung Ihres Geräts informieren Sie sich bei Ihrem Fachhändler oder direkt
beim Hersteller.
Thank you for purchasing this appliance. You have acquired a quality product which has been manufactured
in accordance with recognized CE technical safety norms. Please read the operating instructions carefully before using the appliance for the first time to ensure your safety and complete satisfaction for a
long time. Please observe strictly the safety instructions as stated on the last pages. Please keep the
operating instructions at hand and do not pass the appliance on to other persons without the operating instructions.
Your AKO - Design Comfortwave Heater radiates heat and directly warms persons or objects - even those
who have a certain distance to the appliance. You can choose between the functions OFF - 400W - 600W
- 1000W. The thermostat enables continuous temperature setting from approx. +5°C to +35°C. The appli4
ance can be used as footed appliance. It can be also used as wall appliance by means of a wall bracket.
The appliance is to be used solely for heating rooms or moderating their temperature. The appliance is designed for normal domestic use.
Technical specifications
Type
Nominal voltage
Power
Switch levels
Type of appliance
Protection class
Protection type
Approx. dimensions (W x H X D)
Approx. weight
Technical modifications reserved
WW 120 K
- see type label 1000 W
OFF / 400 W / 600W / 1000 W
Thermostat with frost protection function
Wall appliance / footed appliance
I
IP 20
Footed appliance:
71 cm x 43 cm x 18.2 cm
Wall appliance:
71 cm x 41 cm x 17 cm
4.15 kg
Construction and operating parts (see illustrations on page 2)
햲 Heat radiation grid
햶 2 feet with 2 fixing screws
햳 Pilot lamp
햷 Power cable
햴 Rotary switch
햸 Mains plug
햵 Thermostat
Unpacking the appliance
- Check the appliance for visible damages. If you notice any damage do not use the appliance. Please contact your dealer immediately.
- Do not forget to unpack the support feet. You will find them on the side of the packaging.
- Please dispose of the packaging in an environmentally-friendly manner.
Use the appliance as footed appliance
Mount both support feet beneath the underside of the appliance (see fig. 3 on page 2).
- Place the support feet on the 3 bolts below the appliance.
- Fasten the feet onto the convector with the 2 screws provided.
- Plug it in. The convector is now ready for operation.
Use the appliance as wall appliance (see figures 4, 5 on page 2)
Please observe strictly the safety instructions as stated on the last pages.
For wall-mounting, the support feet are used as wall mounting brackets.
- Mount the support feet on the wall with 4 pins Ø 6 x 30 mm and 4 screws Ø 5 x 30 mm. Please observe
the correct distances. The dimensions of the required holes are shown in figure 4. Make sure that no
other installations (e.g. electricity or water) are located in the immediate vicinity of the drill-holes.
- Push out the hooks on the support feet.
- Hang the appliance on the support feet as shown in fig. 4.
- Connect the plug to the mains socket. The convector is now ready for operation.
Rotary switch positions (see fig. 2)
0
- Heating is turned off
1
- Heating, 400 W
2
- Heating, 600W
MAX
- Heating, 1000W
While appliance is switched on, the pilot lamp lights up.
Thermostat function
The thermostat turns the appliance on and off automatically. If the room temperature remains below the
temperature set, the appliance will start to heat until the required temperature is reached again.
- lowest thermostat setting (frost protection position, approx. +5°C)
ooo
- continuous setting range
MAX
- highest thermostat setting
5
The frost protection position can be set when the room temperature in (unused) rooms may not fall below
+5°C, e.g. to prevent water pipes from freezing.
T I P for setting your desired room temperature
- Set the thermostat to maximum (Pos. MAX). The appliance starts to heat.
- As soon as the desired room temperature is reached, turn the thermostat anticlockwise until the thermostat switches off with an audible “click”. The room temperature set will be almost maintained by the
appliance.
After use
- Set the rotary switch to the pos. 0.
- If the appliance is not to be used for a longer period of time, unplug it.
Faults and their possible causes
Fault Cause
Rotary switch is set to 0.
The
appli- Thermostat is set too low.
ance The overheating protection is
does activated.
not
Household fuse reacted.
warm
up.
The appliance is not plugged in.
Remedy
Set rotary switch to position 1, 2 or MAX.
Turn up the thermostat.
Make sure that air can circulate around the appliance. The appliance switches on again automatically when it has cooled down.
Examine household fuse and check that no other appliances are
overloading the same household fuse.
Plug the appliance in.
If you have tried all the above and the app. still does not work, please refer to your dealer or a service centre.
Cleaning the appliance
If required, the appliance can be cleaned with a slightly damp cloth. Please observe strictly the safety instructions as stated on the last pages.
Maintenance
Depending on the amount of dust and dirt, we recommend you to have the appliance cleaned by qualified
personnel.
Disposal
For the safe and environmentally-friendly disposal of this appliance please contact your dealer or the manufacturer.
Chère cliente, cher client,
Merci pour la confiance que vous nous avez témoignée en faisant l'achat de cet appareil. Vous avez choisi
un produit de qualité, fabriqué en conformité avec les prescriptions de sécurité CE. Nous souhaitons que
cet appareil vous donne satisfaction pendant de longues années et que vous l'utilisiez dans les meilleures
conditions de sécurité possibles. A cet égard, nous vous invitons à lire attentivement ce mode d'emploi avant la première mise en service. Veuillez absolument respecter les consignes de sécurité se
trouvant sur les dernières pages. Conservez ce mode d'emploi à portée de main et n'omettez pas de le
remettre aux utilisateurs suivants si vous cédez l'appareil à des tiers.
Votre Panneau Rayonnant AKO vous procure de la chaleur par rayonnement thermique directement sur
des objets et personnes se trouvant même à une certaine distance de l’appareil. Vous pouvez choisir entre
les fonctions ARRET - 400W - 600 W - 1000W puissance de chauffage. Le thermostat autorise un réglage
linéaire de la température entre +5°C et +35°C env. L’appareil peut être utilisé comme appareil sur pieds
ou fixé au mur. L’appareil sert exclusivement à chauffer ou à tempérer des pièces. Il est prévu pour fonctionner normalement dans une maison ou un appartement.
Données techniques
Type
Tension secteur
Puissance
Positions
Type d’appareil
6
Sous réserve de modifications techniques
WW 120 K
- cf. plaquette 1000 W
ARRET / 400 W / 600 W / 1000 W
thermostat avec fonction antigel
sur pieds / mural
Catégorie de protection
Type de protection
Dimensions env. (LxHxP)
Appareil sur pieds:
Appareil mural:
I
IP 20
71 cm x 43 cm x 18,2 cm
71cm x 41 cm x 17 cm
4,15 kg
Poids env.
Structure et pièces de commande (cf. figures page 2)
햲 Grille d’échange de chaleur
햶 2 pieds avec 2 vis de fixation
햳 Voyant lumineux de contrôle
햷 Câble de distribution
햴 Commutateur rotatif
햸 Fiche de contact
햵 Thermostat
Le déballage de l’appareil
- Vérifiez si l’appareil présente des traces visibles d’endommagement. Il est interdit de s’en servir si c’est
le cas. Veuillez alors consulter votre revendeur.
- N’omettez pas de déballer les deux pieds qui se trouvent dans les blocs latéraux de protection antichoc
de l’emballage.
- Ayez l’amabilité de vous débarrasser de l’emballage conformément aux règles de protection de l’environnement.
Pour l’emploi comme appareil sur pieds
Montez les deux pieds sous l’appareil (voir fig. 3, p. 2).
- Engagez chaque pied dans les trois goujons prévus à cet effet sous l’appareil.
- Fixez les pieds avec les deux vis fournies.
- Branchez la fiche dans la prise de courant. Votre convecteur est prêt à l’emploi.
Le montage mural de l’appareil (cf. fig. 4, 5 page 2)
Veuillez absolument respecter les consignes de sécurité se trouvant sur les dernières pages.
L’appareil peut s’installer en applique sur un mur en utilisant les pieds comme accessoires de montage.
- Fixez les pieds au mur à l’aide de 4 chevilles Ø 6 x 30 mm et 4 vis Ø 5 x 30 mm. Référez-vous aux distances indiquées figure 4 pour percer les trous dans le mur. Assurez-vous qu’il n’y a pas d’autres installations au niveau des trous (électricité, eau par ex.).
- Faites sortir vers l’extérieur les deux crochets de chaque pied.
- Suspendez l’appareil par les crochets des pieds comme indiqué figure 5.
- Branchez la fiche secteur. L’appareil est prêt à l’emploi.
Les positions du commutateur rotatif
0
- le chauffage est arrêté
1
- position de chauffage 400W
2
- position de chauffage 600 W
MAX
- position de chauffage 1000W
La lampe de contrôle luit, lorsque l’appareil est enclenché.
La fonction du thermostat
Le thermostat active et désactive automatiquement l’appareil. Si la température réglée n’est plus atteinte,
l’appareil commence à chauffer jusqu’à ce que la température soit revenue.
- température minimum du thermostat (position de protection contre le gel env. +5°C)
ooo
- plage de réglage linéaire du thermostat
MAX
- température maximum du thermostat
La position de protection contre le gel peut être réglée si la température ne peut pas descendre en dessous d’environ +5°C dans des pièces (non utilisées), pour par exemple, éviter que des conduites d’eau gèlent.
C o n s e i l s pour régler la température ambiante souhaitée
- Ajustez le thermostat sur la température la plus élevée (pos. MAX). L’appareil commence à chauffer.
- Dès que la température ambiante souhaitée est atteinte, tournez le thermostat dans le sens contraire des
aiguilles de l’horloge, jusqu’à ce que le thermostat émet un déclic audible caractéristique qui indique que
l’appareil s’est éteint. La température ambiante ainsi ajustée est ensuite presque maintenue.
Après l’utilisation
- Mettez le commutateur rotatif sur 0.
7
-Débrancher la fiche secteur si vous n’avez pas besoin de l’appareil pendant une période prolongée.
Pannes et causes possibles
Panne Cause
Le commutateur rotatif se trouve sur 0.
Le thermostat est réglé trop bas.
L’appa- Le disjoncteur a répondu.
reil ne
chauffe
Le fusible ménager a répondu.
pas.
La fiche secteur n’est pas branchée.
Remède
Mettez le commutateur rotatif sur la position 1, 2 ou MAX.
Mettez le thermostat sur une température supérieure.
Veillez à ce que l’air puisse circuler librement autour de
l’appareil. L’appareil se réenclenche automatiquement
lorsqu’il est refroidi.
Vérifiez le fusible ménager et veillez à ce qu’aucun autre
puissant appareil agisse sur ce fusible.
Branchez la fiche secteur.
Veuillez vous adresser à votre revendeur ou à un Point de Dépannage si l’appareil ne fonctionne toujours
pas, même après vérification de toutes les causes mentionnées.
Le nettoyage de l’appareil
Passez, si nécessaire, un chiffon humide légèrement passé à l’eau sur l’appareil. Veuillez absolument respecter les consignes de sécurité se trouvant sur les dernières pages.
Entretien
Si l’appareil est très encrassé, nous vous conseillons de le faire nettoyer par un professionnel.
La mise au rebut
Informez-vous auprès de votre revendeur ou directement chez le fabricant pour ce qui est des possibilités
de mise au rebut.
Cari clienti,
Vi ringraziamo per la fiducia che ci avete dimostrato acquistando il nostro prodotto. Avete acquistato un prodotto di qualità che è stato prodotto in conformità alle normative CE e alle regole tecniche di sicurezza riconosciute. Poiché desideriamo che possiate godere a lungo e in completa sicurezza del vostro
apparecchio, leggete attentamente le istruzioni d’uso prima di proseguire con la messa in funzione.
Faccia attenzione a le norme di sicurezza che si trovano nelle pagine posteriori. Conservate le istruzioni per l’uso a portata di mano e non affidate mai l’apparecchio ad altre persone senza dare loro anche le
istruzioni per l’uso.
Il vostro Onda Calda AKO proporziona calore diretto a oggetti o persone, anche a quelli che si trovano a
certa distanza. Lei può scegliere fra le funzioni SPENTO - 400 W - 600 W - 1000 W. Il termostato permette
una regolazione lineare della temperatura partendo da circa +5°C fino a circa +35°C. L’app. può essere
usato messo in piede o come app. fisso appeso alla parete. Il radiatore a ventola serve esclusivamente al
riscaldamento e per temperare ambienti chiusi. L’apparecchio è ideato per il normale uso casalingo.
Dati tecnici
Tipo
Tensione di rete
Potenza
Stadio
Tipo dell’apparecchio
Classe di protezione
Tipo di protezione
Dimensioni circa (l x a x p)
Peso circa
Con riserva di apportare modifiche tecniche
WW 120 K
- vedere la targhetta del modello 1000 W
SPEGNIMENTO / 400 W / 600 W / 1000 W
Termostato con funzione anticongelamento
Apparecchio in posizione verticale / apparecchio a parete
I
IP 20
Apparecchio in posizione verticale: 71 cm x 43 cm x 18,2 cm
Apparecchio a parete:
71 cm x 41cm x 17 cm
4,15 kg
Esecuzione costruttiva ed elementi di comando (confrontare le figure a pagina 2)
햲 Griglia di scambio di calore
햶 2 piedi di sostegno con 2 viti di fissaggio
햳 Spia di controllo
햷 Cavo elettrico
햴 Pomello girevole
햸 Spina elettrica
햵 Termostato
8
Disimballaggio dell’apparecchio
- Verificate che l’apparecchio non sia danneggiato. Se notate dei danni all’apparecchio non dovete utilizzarlo. In tal caso rivolgetevi prima al vostro rivenditore specializzato.
- Non dimenticate di disimballare anche i due piedi. Essi si trovano nella zona laterale dell’imballo.
- Vi preghiamo di smaltire il materiale d’imballaggio in pieno rispetto dell’ambiente.
Per l’uso mobile dell’apparecchio
Montate i due piedi sulla parte inferiore dell’apparecchio (vedi ill. 3 a pag. 2).
- Inserite i due piedi sui 3 perni sul fondo dell’apparecchio.
- Fissate bene i piedi con l’ausilio delle viti fornite insieme ad essi.
- Inserite la spina elettrica nella presa di corrente. Il termoconvettore è pronto ad essere messo in funzione.
Montaggio a parete dell’apparecchio (confrontare fig. 4, 5 a pagina 2)
Faccia attenzione a le norme di sicurezza che si trovano nelle pagine posteriori.
Per il montaggio a parete vengono impiegati i piedi come supporti da parete.
- Montate alla parete i piedi con 4 tasselli Ø 6 x 30 mm e 4 viti Ø 5 x 30 mm rispettando le distanze minime
previste per il montaggio. Le misure per i fori da eseguire sono deducibili dall’illustrazione 4. Assicuratevi
che nella zona dei fori non ci siano altri impianti (es. corrente, acqua).
- Premete all’infuori i due ganci di ogni piede.
- Inserite la spina elettrica. L’apparecchio è pronto a essere messo in funzione.
Le posizioni del pomello girevole
0
- il riscaldamento è spento
1
- riscaldamento 400W
2
- riscaldamento 600W
MAX
- riscaldamento 1000W
La lampadina di controllo si illumina quando l’apparecchio è innesto.
Funzione del termostato
Il termostato accende e spegne l’apparecchio automaticamente. Se ci si trova sotto la temperatura regolata,
l’apparecchio inizia a riscaldare fino a che la temperatura viene di nuovo raggiunta.
- temperatura minima del termostato (posizione anticongelamento; circa +5°C)
ooo
- campo di regolazione lineare del termostato
MAX
- temperatura maxima del termostato
Potete selezionare la posizione anticongelamento quando la temperatura ambiente nelle stanze (non utilizzate) non deve andare sotto i +5°C ca., ad esempio per impedire il congelamento dei tubi dell’acqua.
CONSIGLIO per l’impostazione della temperatura ambiente desiderata
- Mettere il termostato alla massima temperatura (pos. MAX). L’apparecchio inizia a scaldare.
- Non appena viene raggiunta la temperatura ambiente desiderata, rotare il termostato all’indietro in senso
antiorario fino a che il termostato spegne l’apparecchio unitamente a un sonoro “click”. Ora verrà mantenuta all’incirca la temperatura ambiente precedentemente regolata.
Dopo l’uso
- Portare il pomello girevole in posizione 0.
- Se non utilizzerete l’apparecchio per un lungo periodo di tempo, staccate la spina elettrica.
Eventuali guasti dell’apparecchio e possibili cause
Guasto Causa
Rimedio
Il pomello girevole si trova nella pos.0. Mettere il pomello girevole nella posizione 1, 2 o MAX.
L’appa- Il termostato è regolato troppo basso. Mettere il termostato ad un valore più alto.
recchio La protezione termica è scattata.
Sinceratevi che l’aria possa affluire e defluire liberanon
mente intorno all’apparecchio. L’apparecchio si riacriscalda.
cende automaticamente quando si è raffreddato.
È scattato l’interruttore di sicurezza
Controllare l’interruttore di sicurezza domestico e fare
domestico.
attenzione che nessun altro potente apparecchio sia a
carico dello stesso interruttore di sicurezza.
La spina elettrica non è inserita.
Inserire la spina elettrica.
9
Se avete analizzato tutte le possibili cause sopra descritte e tuttavia l’apparecchio ancora non funziona, vi
preghiamo di rivolgervi al vostro rivenditore specializzato o presso un punto di assistenza AKO.
Pulizia dell’apparecchio
All’occorrenza pulire l’apparecchio con un panno leggermente umido con acqua. Faccia attenzione a le norme di sicurezza che si trovano nelle pagine posteriori.
Manutenzione
A seconda del grado di imbrattamento e di impolverazione dell’apparecchio consigliamo di lasciare eseguire la pulizia da personale qualificato.
Smaltimento
Riguardo alle possibilità di smaltimento del vostro apparecchio, informatevi presso il vostro distributore o
direttamente dal produttore.
Estimado/a cliente:
Le agradecemos la confianza que nos ha dispensado mediante la compra de este aparato. Usted ha adquirido un producto de calidad que ha sido fabricado según las reglas técnicas de seguridad reconocidas
y conforme a las normas de la CE. Porque queremos que disfrute durante mucho tiempo del aparato y que
disponga de la suficiente seguridad, sírvase leer atentamente estas instrucciones antes de la puesta
en funcionamiento. Respete estrictamente las normas de seguridad que se encuentran en las últimas páginas. Guarde dichas instrucciones en un lugar accesible y no entregue el aparato a otras personas
sin las instrucciones.
Su Placa-Radial de AKO radia calor por ondas térmicas y calienta directamente personas y objetos - incluso desde cierta distancia. Se puede seleccionar los niveles DESCONECTADO - 400 W - 600 W 1000 W. El termostato permite el ajuste gradual de la temperatura desde aprox. +5° C hasta aprox. +35° C.
El aparato puede ser utilizado como aparato sobre pies o como aparato mural (instalado de manera fija por
medio de un soporte mural). El aparato sirve exclusivamente para el calentamiento o la regulación de la
temperatura de habitaciones. El aparato está previsto para el uso doméstico normal.
Datos técnicos
Tipo
Tensión de red
Potencia
Niveles de conexión
Tipo de aparato
Clase de protección
Modo de protección
Dimensiones aprox.
(An. x Al. x Fo.)
Peso aprox.
Reservadas todas las modificaciones técnicas
WW 120 K
- véase placa de características 1000 W
DESCONECTADO / 400 W / 650 W / 1000 W
Termostato con función anticongelante
Aparato sobre pies / aparato mural
I
IP 20
Aparato sobre pies:
71 cm x 43 cm x 18,2 cm
Aparato mural
71 cm x 41 cm x 17 cm
4,15 kg
Estructura y elementos de mando (véase las figuras en página 2)
햲 Parrilla de radiación térmica
햶 2 pies con 2 tornillos de fijación
햳 Lámpara de control
햷 Cable de conexión
햴 Botón giratorio
햸 Clavija de conexión
햵 Termostato
Después del desembalaje
- Verifique si el aparato presenta desperfectos visibles. El aparato no debe ser utilizado si se constata la
presencia de desperfectos. En este caso, diríjase a su comercio especializado.
- No olvide desembalar los dos pies de apoyo. Se encuentran en los acolchados laterales del embalaje.
- Le rogamos que deseche correctamente el material de embalaje.
Para utilizar el aparato como aparato sobre pies
Montar los dos pies en la parte inferior del aparato (compárese fig. 3 en la página 2).
- Calar los dos pies sobre los 3 pernos en la cara inferior del aparato.
- Asegurar las patas de apoyo con los dos tornillos adjuntados.
10
- Conectar el enchufe de la red. El convector está ahora listo para funcionar.
Para utilizar el aperato como aparato mural (véase las figuras 4, 5 en página 2)
Respete estrictamente las normas de seguridad que se encuentran en las últimas páginas.
Para el montaje mural se utilizan los dos pies como soportes murales.
- Montar los dos pies con 4 tacos Ø 6 x 30 mm y 4 tornillos Ø 5 x 30 mm en la pared. Sírvase tomar las
medidas necesarias de los taladros necesarios de la fig. 4. Cerciórese de que en la zona de los taladros
no se encuentren otras instalaciones (p.ej. eléctrica, agua).
- Extraer a presión los dos ganchos de cada pie de apoyo.
- Enganchar el aparato, según la figura 5, en los ganchos de los pies de apoyo.
- Conectar el enchufe de la red. El convector está ahora listo para el funcionamiento.
Las posiciones del botón giratorio
0
- Calefacción desconectada
1
- Calefacción 400 W
2
- Calefacción 600 W
MAX
- Calefacción 1000 W
Durante el funcionamiento del aparato se ilumina la lámpara de control.
La función del termostato
El termostato conecta y desconecta automáticamente el aparato. Si se pasa por debajo de la temperatura
ajustada, el aparato comienza a calentar hasta que se vuelva a alcanzar la temperatura.
- Temperatura mínima del termostato (función anticongelante, aprox. +5° C).
ooo
- Margen de ajuste gradual del termostato
MAX
- Temperatura maxima del termostato
La función anticongelante se puede ajustar si la temperatura ambiente en locales (no utilizados) no debe
bajar por debajo de aprox. +5° C, p.ej. para evitar la congelación de tuberías de agua.
C O N S E J O para el ajuste de la temperatura deseada del ambiente.
- Ajuste el termostato a la temperatura máxima (Pos. MAX). El aparato empieza a calentar.
- En cuanto se haya alcanzado la temperatura deseada del ambiente, gire el termostato en sentido contrario a las agujas del reloj hasta que dicho termostato desconecte el aparato mediante un “clic” audible.
La temperatura del ambiente así ajustada es conservada por el aparato de forma aproximada.
Después del uso
- Coloque el botón giratorio en la posición 0.
- En caso de que no utilice el aparato durante un largo período de tiempo, desconecte el enchufe de la red.
Fallos eventuales del aparato y posibles causas
Fallo
Causa
El botón giratorio se encuentra en posición 0.
El termostato está ajustado demasiado bajo.
Ha reaccionado la protección contra sobreEl apa- calentamiento.
rato no
calienta. El fusible doméstico se ha activado.
La clavija de red no está conectada.
Remedio
Coloque el botón giratorio en la pos. 1, 2, Max.
Gire el termostato a una posición más alta.
Cuide que el aire pueda circular libremente alrededor del aparato. El aparato vuelve a conectarse automáticamente cuando esté enfriado.
Compruebe el fusible y cerciórese de que no
existan otros aparatos de gran potencia que
estén conectados al mismo fusible doméstico.
Conecte la clavija de red.
En caso de que haya verificado todas las causas anteriormente descritas y que, a pesar de ello, no funcione
el aparato, sírvase dirigirse a su comercio especializado o a una delegación postventa de AKO.
La limpieza del aparato
En caso de necesidad, limpie el aparato con un paño ligeramente humedecido. Respete estrictamente las
normas de seguridad que se encuentran en las últimas páginas.
El mantenimiento
Les recomendamos limpias el aparato, dependiendo de la cantidad de polvo y suciedad, por un profesional.
El desechado
Sírvase dirigirse al comercio especializado o directamente al fabricante para informarse sobre las posibilidades del desechado del aparato.
11
Geachte klant,
Hartelijk dank voor het vertrouwen, dat u met de aankoop van dit toestel in onze onderneming stelt. U heeft
een kwaliteitsproduct aangeschaft, dat werd vervaardigd conform de erkende technische CE-veiligheidsvoorschriften. Omdat wij graag willen, dat u lange tijd plezier van uw toestel zult hebben en er voldoende
voor uw veiligheid wordt gezorgd, raden wij u aan voordat u het toestel in gebruik gaat nemen de bedieningshandleiding aandachtig door te lezen. Let in elk geval op de veiligheidswenken op de laatste pagina’s. Bewaar de bedieningshandleiding binnen handbereik en geef het toestel nooit zonder de
bedieningshandleiding door aan derden.
Uw AKO - Warmtegolfstraalkachel zend warmte over warmteuitstraling direct aan onderwerpen en personen uit, welke zich, ook in enige afstand, voor het toestel bevinden. U kunt kiezen tussen de functies AUS
- 400 W - 600 W - 1000 W verwarmingsvermogen. Met de thermostaat kunt u traploos de temperatuur instellen vanaf ca. +5°C tot ca. +35°C. Het toestel kan als staand toestel worden gebruikt of met een wandhouder vast worden gemonteerd. Het toestel mag uitsluitend worden gebruikt voor het verwarmen of het op
temperatuur brengen van woonruimten. Het toestel is bestemd voor normaal huishoudelijk gebruik.
Technische gegevens
Type
Netspanning
Vermogen
Schakelaarstanden
Soort toestel
Veiligheidsklasse
Beschermingsklasse
Afmetingen ca. ( B x H x D )
Gewicht ca.
Technische wijzigingen voorbehouden
staand toestel:
wandtoestel:
WW 120 K
- zie gegevensplaatje 1000 W
AUS / 400 W / 600W / 1000 W
Thermostaat met vorstbeveiliging
staand toestel / wandtoestel
I
IP 20
71 cm x 43 cm x 18,2 cm
71 cm x 41 cm x 17 cm
4,15 kg
Montage en bedieningselementen (zie afbeeldingen op pagina 2)
햲 Warmteuittredingstralies
햶 2 standvoeten met 2 bevestigingsschroeven
햳 Controlelampje
햷 Netkabel
햴 Draaiknop
햸 Netstekker
햵 Thermostaat
Uitpakken van het toestel
- Controleer het toestel op zichtbare defecten. Indien u beschadigingen aan het toestel vaststelt, mag u
het niet gebruiken. Neem dan a.u.b. contact op met uw vakhandelaar.
- Vergeet niet de twee steunvoetjes uit de verpakking te halen. Ze zitten in de laterale kussentjes van de
verpakking.
- Wij vragen u vriendelijk, u op een milieuvriendelijke wijze van de verpakking te ontdoen.
Voor gebruik als staandtoestel
Bevestig de twee steunvoetjes aan de onderzijde van het toestel (zie figuur 3 op pagina 2).
- Plaats de twee steunvoetjes op de 3 bouten aan de onderzijde van het toestel.
- Span de twee steunvoetjes aan met de twee bijgevoegde schroeven.
- Stop de stekker in het stopcontact. De convector is nu bedrijfsklaar.
Wandmontage van het toestel (zie afb. 4, 5 op pagina 2)
Let in elk geval op de veiligheidswenken op de laatste pagina’s.
Bij bevestiging aan de muur worden de steunvoetjes als muurhaken gebruikt.
- Monteer de steunvoetjes met 4 pluggen Ø 6 x 30 mm en 4 schroeven Ø 5 x 30 mm aan de wand. Let in
elk geval op de veiligheidswenken op de laatste pagina’s. In figuur 4 worden de afstanden voor de boorgaten geïllustreerd. Overtuig u ervan, dat er zich in het bereik van de boorgaten geen andere installaties
(bijv. stroom, water) bevinden.
- Druk uit beide steunvoetjes de twee haken.
- Hang het teostel zoals aangegeven in figuur 5 in de haken van de steunvoetjes.
- Stop de stekker in het stopcontact. Het toestel is nu bedrijfsklaar.
12
De standen van de draaiknop
0
-Verwarming is uitgeschakelt
1
-Verwarming 400 W
2
-Verwarming 600 W
MAX
-Verwarming 1000 W
Controlelampje schijnt, wanneer het toestel is ingeschakeld .
Functie van de thermostaat
De thermostaat schakelt het toestel automatisch aan en uit. Wanneer de temperatuur onder een vooraf ingestelde waarde daalt, begint het toestel met het verwarmen totdat de temperatuur weer is bereikt.
- laagste temperatuur van de thermostaat (vorstbeveiliging, ca. +5° C)
ooo
- traploze instelling van de thermostaat
MAX
- hoogste temperatuur van de thermostaat
De stand voor de vorstbeveiliging kunt u instellen, wanneer de kamertemperatuur in (ongebruikte) ruimten niet onder ca. +5° C mag komen, om bijv. het bevriezen van waterleidingen te verhinderen.
T I P voor het instellen van uw gewenste kamertemperatuur
- Zet de thermostaat op de hoogste temperatuur (pos. MAX). Het toestel begint te verwarmen.
- Zodra de gewenste kamertemperatuur bereikt is, draait u de thermostaat tegen de wijzers van de klok
zover terug, tot de thermostaat door een duidelijk waarneembare “klik” het toestel uitschakelt. De op
die manier ingestelde kamertemperatuur wordt door het toestel nagenoeg op hetzelfde peil gehandhaafd.
Na het gebruik
- Zet de draaiknop in stand 0.
- Wanneer u het toestel langere tijd niet nodig heeft, haalt u de stekker uit het stopcontact.
Eventuele storingen aan het toestel en mogelijke oorzaken
Storing
Oorzaak
Verhelpen
De draaiknop bevindt zich in pos. 0.
Zet de draaiknop in positie 1, 2 of MAX.
De thermostaat is te laag ingesteld.
Draai de thermostaat hoger.
De overhittingsbescherming heeft aange- Zorg dat de lucht ongehinderd om het toestel
kan circuleren. Het toestel zal zich zelf weer
Het toestel sproken.
inschakelen, wanneer het afgekoeld is.
verwarmt
niet.
De huishoudelijke zekering is geactiveerd. Controleer de huishoudelijke zekering en let er
op, dat er geen andere krachtige apparaten
dezelfde huishoudelijke zekering belasten.
De netstekker zit niet in het stopcontact.
Steek de netstekker in het stopcontact.
Indien u alle hierboven vermelde oorzaken heeft gecontroleerd en het toestel werkt nog steeds niet, neem
dan a.u.b. contact op met uw vakhandelaar of een servicekantoor AKO.
Schoonmaken van het toestel
Indien nodig maakt u het toestel met een licht bevochtigde doek schoon. Let in elk geval op de veiligheidswenken op de laatste pagina’s.
Onderhoud
Wanneer het toestel onder het stof zit of ernstig is bevuild, is het aangewezen het te laten schoonmaken
door een vakman.
Verwijderen
Voor het definitief verwijderen van uw toestel kunt u voor informatie terecht bij uw vakhandelaar of rechtstreeks bij de fabrikant.
13
Sicherheitshinweise / Safety instructions / Consignes de sécurité /
Avvertenze de sicurezza / Instrucciones de seguridad / Veiligheidsvoorschriften
Sicherheitsabstände beachten - Es muß sichergestellt sein, daß Personen in der Badewanne, unter der Dusche oder im
Schwimmbecken das Gerät nicht berühren können.
m Strictly observe the safety distances - It must be ensured that the appliance is out of reach of persons in the bath, the
shower or the swimming pool.
F Observer les distances de sécurité - Il faut être certain, que des personnes se trouvant dans la baignoire, sous la douche
ou dans le bassin de natation ne touchent pas l'appareil.
I Rispettare le distanze di sicurezza - ci si deve accertare che le persone usando
la vasche da bagno, docce o lavandini non possano raggiungere l'apparecchio.
E Respetar las distancias mínimas de seguridad. Se debe asegurar que personas
que se encuentren en la bañera, en la ducha
o lavabo, no tienen contacto con el aparato.
q Veiligheidsafstanden in acht nemen - Het
30 cm
3m
moet gegarandeerd zijn dat personen in een
badkuip, onder de douche of in een
30 cm
zwembassin het apparaat niet kunnen
50 cm
30 cm
3m
aanraken.
225 cm
D
Netzspannung beachten (siehe Typschild).
Observe the stated supply voltage (see type label).
F Observer la tension de réseau (voir plaque signalétique).
I Controllate che la tensione di rete indicata sulla targhetta
del modello dell'apparecchio corrisponda a quella nella
vostra installazione.
E Tomar en consideración la tensión de la corriente eléctrica
(véase la placa de caracteristicas).
q Op de netspanning letten (zie typeplaatje).
D
m
WW 120 K
Gerät nicht abdecken.
The appliance may not be covered.
F Ne pas recouvrir l'appareil.
I L'apparecchio non deve venire
coperto.
E No cubra nunca el aparato.
q Het apparaat niet toedekken.
D
m
14
Das Gerät darf nicht unmittelbar unter einer
Wandsteckdose aufgestellt werden. Der Netzstecker muß
jederzeit frei zugänglich sein.
m The appliance may not be mounted directly below a wall
socket. Make sure that the plug is freely accessible at all
times.
F L'appareil ne peut pas être monté directement sous une
prise de courant murale. La fiche secteur doit toujours
être abordable.
I Fare attenzione che l'apparecchio non venga collocato dir
ettamente sotto una presa di corrente a parete. La spina
di presa di corrente deve essere facilmente accessibile.
E El aparato no debe ser colocado bajo un enchufe de
corriente. La clavija de conexión debe siempre estar en un
lugar de fácil acceso.
q Het apparaat mag niet
direct onder een
stopcontact worden
neergezet. De
netstekker moet te
allen tijde vrij
toegankelijk zijn.
D
Wärmeaustrittsgitter wird heiß, nicht berühren.
The heat radiation grid can become hot during operation.
Do not touch it.
F Grille d’échange de chaleur
chauffe, ne pas toucher.
I La griglia di scambio di calore
diventa molto calda, non
toccarla.
E No tocar la parrilla de radiación
térmica, está muy caliente.
q Het warmteuittredingstralies
wordt heet, niet aanraken.
D
m
Sicherheitshinweise / Safety instructions / Consignes de sécurité /
Avvertenze de sicurezza / Instrucciones de seguridad / Veiligheidsvoorschriften
Kinder dürfen das Gerät nicht bedienen.
The appliance may not be operated by children.
F Les enfants ne peuvent pas
utiliser l'appareil.
I L'apparecchio non deve essere
comandato da bambini.
E El aparato no debe ser operado
por niños.
q Kinderen mogen het apparaat
niet bedienen.
Es dürfen keine Flüsssigkeiten ins Gerät gelangen.
Make sure that no fluids enter the appliance.
F Il faut être certain qu'aucun
liquide puisse s'infiltrer dans
l'appareil.
I Evitate che nell'apparecchio vi
entrino dei liquidi.
E No debe entrar ningún tipo de
líquido en el aparato.
q Er mogen geen vloeistoffen in
het apparaat terechtkomen.
Vor der Reinigung Netzstecker ziehen - Keine
entflammbaren Reinigungsmittel verwenden wie z.B.
Benzin ,Spiritus ...
m Unplug the appliance before cleaning. Never use easily
inflammable cleaning agents, such as petrol ethyl alcohol,
methylated spirit etc. for cleaning the appliance.
F Débrancher la fiche secteur avant le nettoyage - Ne pas
utiliser des produits de nettoyage inflammables, comme
p.ex. de l'essence, de l'alcool.
I Prima di effettuare la pulizia, staccare la spina della di
presa di corrente, facendo attenzione a non utilizzare
sostanze di pulizia facilmente infiammabili come la
benzina, spirito eccetera.
E Antes de limpiar el aparato, se debe desconectar siempre
la clavija de enchufe. No utilizar detergentes o líquidos
inflamables, p.ej. gasolina o alcohol industrial.
q Voor het reinigen de stekker uit het stopcontact trekken.
Geen ontvlambare
reinigingsmiddelen
gebruiken, zoals bijv.
benzine, spiritus ...
2.
D
Nicht in Räumen mit leicht entzündlichen Gasen betreiben.
Never use the appliance in locations along with easily
inflammable gases.
F Ne pas utiliser l'appareil dans des pièces contenant des
gaz légèrement inflammables.
I Non utilizzare l'apparecchio in posti dove si formano dei
vapori o gas facilmente infiammabili.
E No colocar el aparato
en lugares donde se
encuentren gases
inflamables.
q Niet in ruimten met
licht ontbrandbare
gassen gebruiken.
Das Gerät darf nur vom Fachmann geöffnet oder repariert
werden.
m The appliance may only be opened and repaired by an
expert.
F L'appareil ne peut être ouvert ou réparé que par un
spécialiste.
I L'appar. deve essere aperto o riparato solamente da un
tecnico specializzato.
E El aparato solo debe
ser abierto o reparado
por un especialista.
q Het apparaat mag
alleen door een
vakman worden
geopend of
gerepareerd.
D
m
D
1.
D
m
D
m
Gelegentlich Netzkabel kontrollieren. Wenn es beschädigt
wird, darf es nur vom Fachmann ersetzt werden, da dazu
Spezialwerkzeug notwendig ist.
m Occasionally check the power cable. In case of damage, it
must be replaced by an expert, as a special tool is
necessary.
F Contrôler de temps en temps le câble de réseau. Si il est
endommagé, adressez vous à un spécialiste, qui seul a le
matériel nécessaire au remplacement.
I Controllate periodicamente il cavo di alimentazione. Se il
cavo di alimentazione dovesse essere danneggiato esso
deve essere sostituito esclusivamente da un tecnico
specializzato, poiché per tale operazione è necessario
disporre di speciali utensili.
E Controlar periódicamente el estado del cable de red. Si
está dañado el cable de red, únicamente puede ser
sustituido por un profesional ya
que son necesarias herramientas
especiales.
q Incidenteel het netvoedingskabel
controleren. Wanneer de netkabel
beschadigd is, mag hij enkel door
een elektromonteur vervangen
worden: hiervoor zijn immers
speciale gereedschappen vereist.
D
15
GARANTIE
Wir übernehmen für dieses Gerät eine Garantie von 24 Monaten ab Kaufdatum. Die Garantieleistung setzt voraus, daß die Rechnung vorgelegt wird und der Garantieanspruch innerhalb der Garantiefrist erhoben wird. Der Garantieanspruch verfällt, wenn das Gerät beschädigt, nicht
sachgemäß benutzt oder unbefugte Eingriffe vorgenommen wurden. Die Garantie erstreckt sich
nicht auf leicht zerbrechliche Teile wie z.B. Glas.
GUARANTEE
We give a 24 months guarantee on this appliance from the date of purchase. For claims under
guarantee the sales receipt must be produced and the claims must be forwarded within the guarantee period. The right to claim under guarantee expires in case that the device has been damaged, used in an inappropriate way or that unauthorized manipulations have been carried out. The
guarantee does not cover fragile parts, like for example parts of glass.
GARANTIE
L’appareil est couvert par une garantie de 24 mois à compter de la date d’achat. Les appels en
garantie doivent être obligatoirement accompagnés de la preuve d’achat et être introduits avant
l’expiration de la période de garantie. La garantie n’est pas valable en cas de dommages causés
à l’appareil, d’usage impropre ou d’interventions non autorisées. La garantie ne couvre pas les
composants fragiles, tels que les éléments en verre, par exemple.
GARANZIA
Per questo apparecchio assumiamo una garanzia di 24 mesi a partire dalla data di acquisto. La
prestazione di garanzia presuppone che venga presentata la fattura e che il diritto di garanzia scade nel caso che l’apparecchio fosse stato danneggiato o non usato nel modo dovuto o che vi fossero stati eseguiti degli interventi non autorizzati. La garanzia non copre i pezzi fragili, come p.e. il
vetro.
GARANTIA
Por el presenta aparato asumimos un período de garantía de 24 meses a partir de la fecha de compra. La prestación de garantía requiere la presentación de la factura y que el derecho de garantía
sea reivindicado dentro del período de garantía. El derecho de garantía vence cuando el aparato
resulte dañado, no se utilice correctamente o sea manipulado de forma no autorizada. La garantía
no incluye las piezas frágiles, como, p. ej. cristal.
GARANTIE
Voor het toestel geldt een garantie van 24 maanden vanaf de datum van aankoop. Om aanspraak
op de garantie te kunnen maken, moet de aankoopfactuur kunnen worden voorgelegd en mag de
garantietermijn niet zijn verlopen. De garantie geldt niet wanneer het toestel is beschadigd, wanneer het onoordeelkundig werd gebezigd of door onbevoegde personen werd geopend. De garantie dekt geen gemakkelijk breekbare onderdelen zoals bijvoorbeeld glas.
Service Stellen:
Deutschland:
Glen Dimplex Deutschland GmbH
Zentralkundendienst
Regbergstraße 2
D-96365 Nordhalben
Tel.: 09267/914-578
Schweiz
Österreich
K. Mösch AG
Gerhard Sturz
Maschinenhandel
Merangasse 17
A-8010 Graz
Tel.: 0316/323 041
Fax: 0316/382 963
Hintermättlistr. 11
CH-5506 Mägenwil
Tel.: 062/896 03 83
Fax: 062/896 03 88
Service-kantoren
Niederlande
Handelmaatschappij Vermolen B.V.
Industrieweg Oost 6
NL-6662 NE Elst
Tel.: 0481/36 33 55
Fax: 0481/36 33 99
Glen Dimplex Deutschland GmbH
Marketing / Vertrieb / Entwicklung
Flachslander Straße 8
D-90431 Nürnberg
Telefon:0911 / 657 19-0
Telefax: 0911 / 657 19-37