1
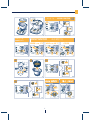
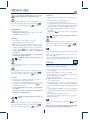
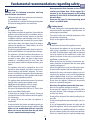
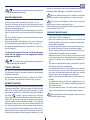
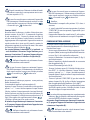
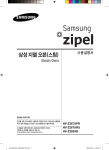
아기를 위한 영양식
BABY MEAL
사용설명서
Instruction manual
Libretto di istruzioni
치코 드롱기 베이비 쿠커
COOkINg fOOD pROCeSSOR
ROBOT DA CUCINA CON COTTURA
it
MANUAL FUNCTION
메뉴얼 기능
1
2
1
메뉴얼 기능
3
2
PRESET FUNCTION
MANUAL FUNCTION
1
조리세팅기능
MILK= ca. 80°C
1
WARM = ca. 37°C
1
3
CREAM
1
2
2
3
4
3
2
5
6
4
3
2
7
1
2
3
(300ml)
8
9
10
1
MAX
2
2
1
3
12
11
2
13
구성품 및 제어판
Description - Descrizione
it
A
D
C
B
E
L
I
M
N
F
2
3
4
9
H
1
5
6
7
8
G
3
안전에 관한 기본 권장사항
kr
제품소개
기기 부호 범례
치코 드롱기 & 미 이유식 조리기를 구매해 주셔서 감사합니다. 이
기기는 이유식을 시작하는 아기들을 위해 디자인 되었습니다. 이 기기는
반드시 어른에 의해 조작 및 작동 되어야 합니다.
기기를 사용하면서 발생할 수 있는 어떤 위험과 상해로부터 보호받을 수
있도록 잠시 설명서를 읽는데 시간을 할애해 주십시오.
중요사항에 대해서는 아래와 같이 그림으로 보여질 것입니다.
아래내용 숙지하시기 바랍니다.
IMQ에 의해 승인되어지고 자격이 주어진 기기임.
이 기기는 CE Directives의 기본적인 요구사항과 일치합니다.
CE 인증 적합성 선언
Danger!
De Longhi S.p.A. 는 베이비 밀, 치코 드롱기 모델 KCP815로 불리는 이
기기는 안전에 기본적인 요구사항과 2004/108CE (전자파 적합성) 및
2006/95/CE (전기안전)의 기타 관련 조항들을 충족시키고 있음을
선언합니다.
CE 인증 적합성 선언에 관한 원문 사본은 De’Longhi Appliances via Seitz,
47-3100–Treviso–Italy로 요청 하시기 바랍니다.
고장 및 전기 감전과 같은 치명적인 위험을 야기 시킬 수 있습니다.
Attention!
기기의 고장을 야기 시킬 수 있습니다.
Attention! Hot surface
기술명세
주의 ! 뜨거운 표면 : 고장 및 표면이 매우 뜨거울 때 데이거나 화상을
야기 시킬 수 있습니다.
모델 : KCP815.BL EX : A4
전압 : 220V
주파수: 60Hz
모터 전원 : 150W
흡수 전원 : 800W
모터 전원 + 저항 : 850W
주의 ! 뜨거운 수증기 : 요리하는 동안 뜨거운 열기가 발생됩니다.
수증기로 인한 화상의 위험을 피하기 위해 뚜껑을 열 때 주의하시기
바랍니다.
ATTENTION! Hot steam
원산지 : 중국
제품소개 메뉴얼을 읽어주십시오.
이 기기는 구매일로부터 2년 혹은 구매한 국가의 법이 허용하는 기간 동
안 제조상의 하자로 부터 보증됩니다.
상기의 보증은 일반적인 마모현상에 대해서는 보장되지 않습니다.
De Longhi S.p.A의 위 조항들은 어느 때나 사전 통보 없이 변경될 수
있습니다. ARTSANA S.p.A. 혹은 DeLOnghi S.p.A의 사전동의 없이 이 기기의
어떠한 부분, 형태라 할지라도 재생산, 사용설명서의 다른 언어로의 표
기, 번역은 엄격히 금지되어 있습니다.
이 사용설명서의 내용 해석에 대한 의문은 ARTSANAN S.p.A. 또는DeLonghi
S.p.A의 한국 거래처에 연락하시기 바랍니다.
Attention! Hot surface
주의 ! 뜨거운 표면 : 매우 뜨거운 표면으로 인해 기기의 고장 또는
화상의 위험이 있습니다.
일반쓰레기를 버리는 곳에 이 기기를 버리지 마십시오. 법적
으로 규정되어 있는 쓰레기 분리 배출 규정에 따라 처리해주시기 바랍니다.
Nota Bene:
이 표시는 사용자에게 숙지해야 할 중요한 정보를 강조합니다.
Instructions for use:
이 표시는 사용설명서에 대한 내용입니다.
네모상자 아이콘의 의미
COOK 기능
STEAM 기능
BOIL 기능
4
안전에 관한 기본 권장사항
kr
Danger!
아래 지시사항을 자세히 읽고 사용시 적용하십시오.
기기의 아래 부분을 물에 담그지 마십시오.
전원 케이블 혹은 플러그가 손상 되었을 경우 기기를 작동시키지
마십시오. 전기 쇼크를 유발할 수 있습니다.
전원 케이블이 손상되었을 경우, 위험을 예방하기 위해 제조사나
A/S 서비스, 혹은 비슷한 자격을 지닌 곳에서 교체해야 합니다.
기기의 청소나 유지보수 전에 전기코드를 뺐는지 꼭 확인해 주십
시오.
기기를 사용 가능한 전기콘센트에 꽂아 사용하시기 바랍니다.
젖거나 땀이 많은 손으로 기기를 만지지 마십시오.
기기를 사용하지 않을 때에는 콘센트에서 분리해 주십시오.
기기의 본체에서 물이 샐 경우 사용을 중지하십시오. 이 경우, 빨리
스위치를 끄고, 콘센트에서 분리해 주십시오.
사용하지 않을 때에는 스위치를 뽑아주십시오. 위험할 수 있습니다.
사람의 관리 없이 기기를 작동시키지 마십시오.
맨발이나 젖은 발로 기기를 사용하지 마십시오.
사고로 기기를 물에 빠뜨렸을 경우 만지지 마십시오. 우선 코드를
뽑고, 고객만족센터에 접수 후 A/S 센터로 보내주십시오.
파워케이블을 잡아 당기는 방식으로 전기플러그에서 분리하지 마
십시오.
비, 햇빛, 얼음에 기기를 노출 시키지 마시기 바랍니다.
기기의 코드와 집안 콘센트의 호환이 어려울 경우, 기술자를 통해
기기의 코드를 교체하십시오.
아답터나 파워스트랩(멀티탭), 연결선을 사용하는 것은 권장사항이
아닙니다.
사용을 해야만 한다면, 아답터와 연장선의 파워 사용제한을 넘지
않게 고려한 현재의 안전기준에 부합하는 단순, 멀티플 아답터와
연장선을 사용하시기 바랍니다.
기기를 뜨거운 표면, 가스 쿠커, 뜨거운 접시, 연약한 표면 근처 및
위에 두지 마십시오.
접지가 장착된 모델은 전기안전기준법에 의해 충족되는 전기접지
유니트에 연결되어야 합니다.
기기사용법의 지시사항을 따르지 않을 경우 상해와 기기의 손상을 야기
시킬 수 있습니다. 기기사용법의 사용자 지시사항을 따르지 않아 발생
하는 상해에 대해서는 제조자가 책임질 법적 의무가 없습니다.
Attention!
이 기기는 장난감이 아닙니다.
기기로부터 아이를 멀리 떨어뜨려 주시기 바랍니다.
부적절한 사용으로 발생할 수 있는 위험 상황을 감지할 수 있는
성인의 감독하에 기기를 사용해야 합니다. 정신적, 신체적, 정서적
비정상 상태의 사람 이나 충분한 경험과 지식이 없는 사람의
사용을 금지합니다.
아이들이 이 기기를 가지고 놀지 못하게 하십시오.
이 기기를 담고 있는 플라스틱 백을 아이가 닫지 않는 곳에 놓거나
폐기하십시오. 위험의 소지가 있습니다.
이 기기는 국내사용으로만 가능합니다.
다음 사항에 대해서는 사용을 자제해 주시기 바랍니다 :
개인적인 가게, 사무실, 다른 작업환경, 농장, 호텔, 모텔, 다른 리셉
션 장소, 게스트하우스 등
이 기기는 사용목적에 의해 사용되어야 합니다. 그 외의 다른
사용은 부적절하며 위험합니다.
제조사는 이 기기의 부적절한 사용, 잘못된 사용, 책임감 없는 사용,
자격이 주어지지 않는 사람에 의한 수리로 발생될 수 있는 어떠한
경우에 대해서도 책임지지 않습니다.
이 기기는 타이머나 별개의 리모콘 사용에 의해 사용되지 않아야
합니다.
내용물이 없을 시에는 사용하지 마십시오.
물이 끓고 있는 동안에는 뚜껑을 열지 마십시오.
용기의 용량이 1.5 리터를 넘으면 끓는 물이 넘칠 수 있습니다.
상해나 위험을 방지하기 위해서, 기기가 작동하는 동안에는 손이나
가정용 도구를 용기 안에 넣지 마십시오.
기기가 작동을 멈추었을 때에만 주걱(N)을 사용해야 합니다.
기기를 사용하기 전 손, 머리카락, 옷, 조리기구가 용기 밖에 있는지
확인하십시오.
칼날이 부러질 수 있습니다.
조심스럽게 다루어야 하며, 특히 용기를 비우거나 청소를 위해
용기에서 칼날을 분리할 때 더욱 조심해야 합니다.
스토퍼(A)가 제거되거나 뚜껑 (B)이 제위치 (C)에 놓여있지 않을
때에는 PULSE기능의 사용을 금합니다. 또한 칼날회전 속도를 3단계
보다 높게 하면 안됩니다. 뜨거운 물이 화상을 야기 시킬 수 있기
때문입니다.
작동속도가 3단계 이상의 설정상태이거나, PULSE 모드와 함께 믹싱
주걱(M)을 함께 사용하지 마십시오.
물에 기기를 담그지 마십시오, 용기, 뚜껑, 액세서리 등은 식
기세척기로 닦을 수 있습니다.
음식과 접촉하게 되는 재료와 항목은 European Regulation 1935/2004
요구사항에 충족되어야 합니다.
European Directive 2002/96/CE 에 따른 기기의 올바른 폐기
처분이 요구됩니다.
기기는 수명이 다 되었을 때 도시 폐기물로 처리되지 않도록 해야
합니다.
각 지역의 공인된 분리수거 센터로 보내지거나 혹은 이를 다루는 중간
거래상으로 보내져야 합니다.
기기의 폐기처분은 환경과 건강을 위협할 가능성이 있는 어떠한 요소도
가지고 있지 않아야 할 것이며, 아울러 에너지와 자원재활용으로의 의미
있는 전환은 허용됩니다.
이 기기는 가전기기 폐기의 분리 규정을 상기시키기 위해서 가전제품
임의 폐기 금지 마크를 표시하고 있습니다.
Scalding hazard!
화상위험 !
뜨거운 요리로 인한 화상을 피하기 위해서 음식물을 섭취하기 전
음식의 온도를 확인해 주십시오.
특히 아이들에게 먹일 경우 더욱 주의를 요합니다.
기기가 작동할 경우에 기기의 외부 표면은 매우 뜨겁습니다.
항상 기기의 뚜껑이 닫힌 상태에서 작동시켜야 합니다.
5
제품설명 및 사용법
kr
구성품 및 제어판
사용상 주의사항
A 스토퍼
B 뚜껑
C 로딩 오프닝
D 뚜껑 핸들
E 찜기
F 본체 용기
G 본체
H 메인 스위치
I 다기능 칼날
L 믹싱 주걱
M 칼날 보호집
N 주걱
1. 디스플레이
2. COOK 버튼
3. STEAM 버튼
4. BOIL 버튼
5. 시간 증가 (+) 버튼
6. 시간 감소 (-) 버튼
7. 모드 버튼 ( 조리 모드 선택 : S, SS, SSS, - 데우기, 우유, 크림)
8. “시작 / 종료” 버튼
9. 칼날 속도 조절 다이얼
사용하던 기능에서 다른 기능으로 이동하실 때는 해당 버튼을
눌러주십시오.
블렌딩 기능으로 전환할 때는 현재 활성화된 기능 버튼을 다시
한번 누르고 “시작/종료” (8) 버튼을 누르십시오.
기기가 작동하고 있을 때, “시작/종료” (8) 버튼을 다시 한번
누르면, 기기가 멈춥니다. (PAUSE) : 버튼을 다시 누르면, 다시
작동합니다.
2초 동안 “시작/종료” (8)버튼을 누르고 있으면 현재의 기능
이 취소됩니다.
기기가 작동하는 동안 뚜껑이 열려 있다면, 기기는 대기 상태
로 되며, 디스플레이창에
의 메시지가 뜹니다.
기기를 다시 작동하기 위해 뚜껑을 닫아 주십시오.
COOK 기능
설정 가능한 속도는 1, 2, 3 이며 다른 속도는 사용할 수 없습니다.
파워를 조절하여 가열하는 일반적인 방식으로의 조리를 가능하게 하며,
이 기기만의 독특한 특징인 “WARM”, “MILK”, “CREAM”의 기능은 음식이나
우유를 데우고 크림을 만들 수 있습니다.
조리방법에 따라, 다기능 칼날(갈거나 요리를 뒤썩을 때)(I) 또는 믹싱
주걱 (L)을 사용하십시오.
조리를 원하는 재료를 용기(F) 안에 넣고, 용기를 기기(G)의 제 위치에
일치 시킨 다음 뚜껑을 닫고 (그림1)처럼 시계반대방향으로 딸깍하는
소리가 날 때까지 돌려주십시오.
I / O 메인스위치 (H)를 누르십시오.
메뉴얼 조리방법
그림 3과 같이 COOK 버튼을 눌러주십시오.
기계의 초기값은 “0 : 00”이며, 파워는 SS 입니다.
다른 파워값을 설정하려면 “MODE (7)” (그림 3)을 눌러 원하는 값
을 설정하십시오.
조리시간을 설정하려면 “+, -“ 버튼으로 조정하면 됩니다.
조리시간을 설정하지 않으면 시작 작동 후 디스플레이창의 시간
이 증가되면서 최대가능시간까지 작동 후 멈춥니다. (최대시간 60분)
조리를 시작 (그림4)하려면 “시작/종료” (8)버튼을 눌러주십시오,
세팅이 완료되면 카운트다운이 디스플레이창에 나타납니다.
칼날 속도조절 다이얼(9)을 (그림4)와 같이 저속믹싱기능에 놓아
주십시오.
“MODE” 버튼을 누르는 것으로 어느 때나 파워를 조정할 수 있습
니다. 장시간의 요리일 경우, 15분 간격으로 믹싱주걱 (L)이 음식을
섞는 작업을 시작할 것입니다.
디스플레이창에
의 표시와 종료 신호음으로 요리가 끝났음
을 알려줍니다.
사용 전 준비 사항
기기를 사용하기 전에 모든 액세서리를 세척하십시오. 칼날 부분은
특별한 주의를 요합니다.(날카로움)
기기의 바닥을 물에 적신 천으로 닦아주십시오.
마르고 평평한 표면 위에 기기를 놓아 주십시오. 액세서리가 적절
하게 조립되기 전까지는 기기를 파워플러그에 연결시키지 마십시오.
기기 표면에 나타나 있는 안내문과 파워 콘센트를 확인하신 후
콘센트에 꽂아주십시오.
기기를 닫을 때 뚜껑을 돌리기 어렵다면 뚜껑을 약간의 물로 적셔
주십시오.
기기를 켰을 때
각각의 기능의 마지막에 용기(F)를 기기에서 분리하기 위하여 알맞은
버튼을 누르고, 뚜껑을 열고(B) 스위치를 끄시기 바랍니다.
플러그를 파워콘센트에 꼽기 전에, 메인 스위치(H)가 기기의 옆면
에 있는지 확인해 주십시오. 단계는 ‘0’ 이어야 합니다.
메인스위치의 I / 0 을 누르십시오.
기기가 작동 중에는, 세가지 기능의 스위치 불이 켜집니다.
스위치가 꺼졌을 때 디스플레이창에는 “- - - -“표시가 나타납니다.
뚜껑을 열 때나 용기를 기기로부터 분리 시 화상에 주의
하십시오.
6
제품설명 및 사용법
kr
이 기기는 튀김용으로는 적당하지 않습니다. 50g이 넘는 기름
을 사용하는 요리를 위해 본 기기를 사용하지 마십시오.
“ CREAM ” 기능
카스타드, 화이트소스 등 걸죽한 퓨레타입의 조리를 위한 기능입
니다.
믹싱주걱(L)과 함께 사용하는 것을 권장합니다.
+, - 버튼을 작동하여 조리시간을 설정하십시오.
조리시간을 설정하지 않으면 “시작” 작동 후 디스플레이창의 시간
이 증가되면서 최대가능시간까지 작동 후 멈춥니다. (최대시간 60분)
기기사용을 시작할 때 “시작/종료” (8)버튼을 눌러주십시오.
칼날속도조절다이얼(9)을 저속믹싱기능(1-3)에 놓아주십시오.
(그림 4 참조)
디스플레이창에
표시와 종료음으로 조리가 끝났음을 알려
줍니다.
물이 없는 상태로 기기를 사용하거나 물이 다 증발되었을 경우, 기기는
작동이 중단되며 삼중의 소리를 냅니다. 디스플레이창에는
의
글씨가 보이며 주의를 알리는 빨간색 경고등
이 표시됩니다.
프리셋 조리세팅 기능
COOK버튼 (2)을 한번 눌러주십시오.
“WARM”, “MILK”또는 “CREAM” (그림. 5-7)의 원하는 기능이 나올 때
까지 “MODE (7)” 버튼을 눌러주십시오.
뚜껑을 열 때나 용기를 기기로부터 분리 시 화상에 주의
하십시오.
“WARM” 기능
37도의 지속되는 온도로 음식을 데우는 기능입니다.
믹싱주걱(L)을 함께 사용하는 것을 권장합니다.
WARM 기능을 위해 “시작/종료” (8)버튼을 눌러주십시오. 믹싱주
걱(L)이 음식을 뒤섞는 작업을 시작합니다. 기기가 37도에 맞추어
졌을 때, 30초 간격으로 소리를 낸 후 30분 동안 온도를 유지합니
표시가 디스플레이창에 나타납니다.
다. 30분이 지나면,
이 기능은 칼날속도조절다이얼 (9) 그리고 +, - 버튼과 함께 사용
할 수 없습니다.
조리가 끝난 후 용기를 기기에서 분리하기 위해 버튼을 눌러
스위치를 끄고 뚜껑 (B)을 열어줍니다.
물이 없는 상태로 기기를 사용하거나 물이 다 증발되었을 경우, 기기는
작동이 중단되며 삼중의 소리를 냅니다. 디스플레이창에는
의
글씨가 보이며 주의를 경각시키는 빨간색 경고등
이 표시됩니다.
“0”의 위치에 칼날속도조절다이얼을 위치시키면 칼날작동이 멈춥
니다.
설정 후 2분 안에 “시작/종료”(8)버튼을 누르지 마십시오, 기기가
준비 모드로 변환됩니다.
기기는 (C) 로딩 오프닝(loading opening) 상태로 제작되어 뚜껑을
열지 않고 양념을 넣어 조리할 수 있도록 합니다.
뚜껑을 열 때나 용기를 기기로부터 분리 시 화상에 주의
하십시오.
STEAM 기능
아이를 위한 음식을 조리할 때는 음식이 너무 뜨겁지 않도록 주의해
주십시오. (37도 이상)
STEAM기능은 음식에 함유된 단백질과 비타민의 영양을 보존하면서
조리할 수 있습니다. 다음과 같이 진행하십시오.
용기(F) 안에 스팀 그림이 있는 눈금까지 물을 붓고 본체에 장착
합니다. (그림8 참조)
찜기(E)에 조리할 재료들을 넣어주십시오. (그림9 참조)
용기의 뚜껑을 닫고 “딸깍” 소리가 날 때까지 시계반대방향으로
돌려 뚜껑을 닫아주십시오. (그림1 참조)
메인 스위치 (H)를 눌러주십시오.
STEAM기능 버튼 3을 눌러주십시오. 디스플레이 창에 초기 설정 된
시간이 “0:00”로 나타납니다.
조리시간을 설정하려면 + 버튼 또는 –버튼을 눌러 주십시오.
조리시간을 설정하지 않으면 “시작” 버튼 작동 후 디스플레이창의
시간이 증가되면서 최대가능시간까지 작동 후 멈춥니다. (최대시간
30분)
“시작/종료”(8)버튼을 눌러 STEAM기능을 작동시킵니다. (그림10 참조)
디스플레이 창에 표시된 숫자는 끓는 점에 (약100℃) 닿을 때 까지
깜빡 거립니다.
100℃에 도달하면 3번의 연속 신호음이 납니다.
설정값 혹은 시간을 설정하지 않았을 때 증가되는 시간은 디스
플레이 창에 표시됩니다.
물이 없는 상태로 기기를 사용하거나 물이 다 증발되었을 경우, 기기는
작동이 중단되며 삼중의 소리를 냅니다. 디스플레이창에는
의
글씨가 보이며 주의를 알리는 빨간색 경고등
이 표시됩니다.
“ MILK ” 기능
80도 정도의 온도로 우유를 지속적으로 데워주는 기능입니다.
믹싱주걱(L)을 함께 사용하는것을 권장합니다.
음식의 온도가 80도에 이르렀을 때, 30초 간격으로 소리가 나며 이
표시가
온도를 30분 동안 유지해 줍니다. 30분이 경과하면
디스플레이창에 나타납니다.
이 기능은 칼날속도조절다이얼 (9) 그리고 +, - 버튼과 함께 사용
할 수 없습니다.
조리가 끝난 후 용기를 기기에서 분리하기 위해 버튼을 눌러
스위치를 끄고 뚜껑 (B)을 열어줍니다.
뚜껑을 열 때나 용기를 기기로부터 분리 시 화상에 주의
하십시오.
조리 과정이 완료되면 신호음과 함께 디스플레이 창에
표기 됩니다.
물이 없는 상태로 기기를 사용하거나 물이 다 증발되었을 경우, 기기는
작동이 중단되며 삼중의 소리를 냅니다. 디스플레이창에는
의
글씨가 보이며 주의를 알리는 빨간색 경고등
이 표시됩니다.
메시지가
조리가 끝난 후 용기 (F)를 기기에서 분리하기 위해 버튼을 눌러
스위치를 끄고 뚜껑 (B)을 시계방향으로 돌려 열어줍니다.
7
제품설명 및 사용법
kr
뚜껑을 열 때나 용기를 기기로부터 분리 시 화상에 주의
하십시오.
뚜껑을 열 때나 용기를 기기로부터 분리 시 화상에 주의
하십시오.
물이 없는 상태로 기기를 사용하거나 물이 다 증발되었을 경우, 기기는
작동이 중단되며 삼중의 소리를 냅니다. 디스플레이창에는
의
글씨가 보이며 주의를 알리는 빨간색 경고등
이 표시됩니다.
재료
물이 없는 상태로 기기를 사용하거나 물이 다 증발되었을 경우, 기기는
작동이 중단되며 삼중의 소리를 냅니다. 디스플레이창에는
의
글씨가 보이며 주의를 알리는 빨간색 경고등
이 표시됩니다.
조리시간
블렌딩 기능
과일
사과 / 배
15분
스토퍼 (A)를 제거했거나 뚜껑(B)이 제 위치에 장착되어있지 않을 시
PULSE기능을 사용하거나 칼날회전속도를 3단계 이상 설정하지 마십시
오. 음식물이 튀거나 뜨거운 음식물에 의해 화상을 입을 수 있습니다.
육류
닭고기 / 칠면조 / 토끼
송아지 / 소고기
25분
30분
블렌딩 기능은 익히지 않은 재료나 삶은 재료를 갈거나 잘게 자르는
기능입니다. 다음과 같이 진행하십시오.
어류
대구살
서대 / 참치
칼날을 장착 후에 재료를 용기 안에 넣고 용기를 본체에 놓은 후
뚜껑(B)를 시계반대방향으로 “딸깍”소리가 날 때까지 돌려줍니다.
메인버튼 (H)를 눌러주십시오.
“시작/종료” 버튼 (8)을 눌러주십시오 (그림 12 참조)
+ 버튼 또는 –버튼을 이용하여 (5번, 6번 버튼) 디스플레이 창에
원하는 작동 시간(최대 2분)을 조절해 주십시오.
원하는 음식을 조리하기 위해 칼날속도다이얼 (9)을 조정해주십
시오. (최대시간 4분. 최대스피드 8)
설정된 시간이 종료되면 칼날이 멈추고, 신호음과 함께 디스플레
이 창에
메시지가 표시 됩니다.
블렌딩 시간을 설정하지 않으면 “시작” 작동 후 디스플레이창의 시
간이 증가되면서 최대가능시간까지 작동 후 멈춥니다. (최대시간 2분)
블렌딩 작동 중에도 언제든지 칼날속도조절다이얼을 “0”으로 돌려
작동을 멈출 수 있습니다.
기기를 준비단계로 놓기 위하여 “시작/종료” 버튼 (8)을 2초간 누르
면 초기화 됩니다.
25~30분
완숙달걀
달걀 1개
달걀 4개
15분
20분
채소류
시금치 / 근대 / 토마토
호박류(쥬키니)
미나리 / 완두콩류
감자 / 당근 / 껍질콩 / 단호박
브로콜리
15분
20분
25분
30분
BOIL 기능
BOIL 기능은 재료를 물에 끓이는 기능입니다. 재료의 살균으로 이유식
준비단계를 위한 이상적인 기능입니다.
경고! 본 기기로 특히 냉동 식품과 같은 딱딱한 재료를 분쇄할
경우 칼날이 파손될 수 있습니다.
용기 (F)에 물을 넣은 후 삶을 재료를 넣고, 용기를 본체 (G)에 장착한
후 뚜껑 (B)를 시계반대방향으로 “딸깍”소리가 날 때까지 돌려줍니
다. (그림 1번 참조)
메인스위치 (H)를 눌러주십시오.
BOIL 기능 버튼 4 (그림 11번 참조)를 눌러주십시오.
디스플레이 창에 초기 값은 “0:00”입니다. 조리시간을 설정하려면 +
버튼 또는 –버튼을 눌러 주십시오. (5번, 6번 버튼) (그림 11번 참조)
조리시간을 설정하지 않으면 “시작” 작동 후 디스플레이창의 시간
이 증가되면서 최대가능시간까지 작동 후 멈춥니다. (최대시간 30분)
“시작/종료” 버튼 (8)을 눌러 BOIL 기능을 작동시킵니다. (그림 11참조)
디스플레이 창에 표시된 숫자는 끓는 점에(약100℃) 도달할 때 까지
깜빡 거립니다.
100℃에 도달하면 3번의 연속 신호음이 납니다.
설정값 혹은 시간을 설정하지 않을 때 증가되는 시간은 디스플레이
창에 표시됩니다.
신호음과 함께 디스플레이 창에
메시지가 표시될 때 까지
경과 시간이 표시됩니다.
이유식을 잘 섞는 방법은 관련된 페이지를 참고하십시오.
조리가 끝난 후 용기 (F)를 기기에서 분리하기 위해 버튼을 눌러
스위치를 끄고 뚜껑 (B)을 시계방향으로 돌려 열어줍니다.
뚜껑을 열 때나 용기를 기기로부터 분리 시 화상에 주의
하십시오.
이유식 균질 조리법
과일, 채소, 육류, 생선류, 곡류 등 일반적으로 이유식에 사용되는 모든
재료를 균질화하여 이유식을 만들 수 있습니다.
기기에 포함된 칼날은 이유식 조리 중 기포의 양을 줄이도록 특별히 고
안된 칼날로 아기의 배앓이를 방지합니다.
적절한 계량컵을 이용하여 물과 재료를 용기에 넣은 다음 본체 (G)에
장착해 주십시오. 뚜껑 (B)를 시계반대방향으로 “딸깍”소리가 날 때까지
돌려줍니다. (그림 1 참조)
BOIL기능(17페이지 참조)을 사용 후 블렌딩 기능에 따라 약 20초간
블렌딩 해줍니다.
제공된 주걱(N)을 이용하여 용기 (F)에서 음식을 덜어내십시오.
조리가 끝난 후 용기 (F)를 기기에서 분리하기 위해 버튼을 눌러
스위치를 끄고 뚜껑 (B)을 시계방향으로 돌려 열어줍니다.
조리가 끝난 후 용기 (F)를 기기에서 분리하기 위해 버튼을 눌러
스위치를 끄고 뚜껑 (B)을 열어줍니다.
뚜껑을 열 때나 용기를 기기로부터 분리 시 화상에 주의
하십시오.
8
제품설명 및 사용법
kr
순간 작동(PULSE) 기능
뚜껑의 고무파킹의 파손을 방지하기 위해 뚜껑의 돌출된 부위의 바깥
쪽과 고무파킹 사이에 주걱을 집어 넣어 안쪽으로 밀어 고무파킹을
분리하여 세척하여 줍니다. (옆의 그림참조)
순간작동기능은 단시간에 작동하는 것입니다.
이 기능은 매뉴얼에 있는 조리방법이나 블렌딩 기능 범위 내에서 작동
할 수 있습니다.
이 기능은 칼날속도조절다이얼(9)이 “PULSE” 위치에 있는 동안에만
작동합니다. (그림 13 참조)
본 기능은 기 설정된 속도로 작동 합니다.
경고! 뚜껑의 고무패킹을 다시 뚜껑에 장착할 때에 뚜껑의 돌출된
부위까지 깊숙하게 고무 파킹을 맞추어 장착해 주십시오.
해동 기능
해동 기능은 미리 준비된 이유식을 데우거나 해동하는 기능입니다.
다기능 칼날 (I)이나 믹싱 주걱 (L)을 용기 (F)에서 제거해 줍니다. 물을
용기안에 “스팀기호” 까지 부어줍니다.
뚜껑과 음식물이 담겨있는 용기에 부착된 라벨들을 제거해주고 해동 /
데움을 해줍니다.
(주의 : 용기의 재질은 반드시 유리로 되어있거나 음식물을 100℃까지
데우기 위한 적절한 내열 플라스틱 재질, 용기의 최대 크기가 지름
60mm, 높이 90mm 를 초과 하지 말아야 합니다.)
본체 용기 (F)의 바닥에 음식물이 든 용기를 놓고 설명서에 있는 “끓이기
기능”을 참조하여 세팅해 줍니다.
해동/데움을 위한 이유식 양이 약 80g 이라면 시간을 15분/20분으로 설
정하고 이유식양이 약 200~260g 이라면 시간을 약25~30분으로 설정
합니다.
경고! 해동/데움 사이클이 종료되면, 음식물을 담은 용기가 매우 뜨거울
수 있으므로 오븐 장갑을 이용해 주의하여 꺼내주십시오.
경고! 위생을 위해 절대로 이유식을 한번 이상 또는 1시간 이상 열을
가하지 마십시오.
아기에게 열을 가한 이유식을 주기 전에는 항상 너무 뜨겁지 않은지
확인해 주십시오. (37 ℃ 이상)
기구 세척
메인 버튼을 “0”로 놓아 전원을 끄고 코드를 본체로부터 분리해
줍니다.
용기를 닦기 전에 뚜껑을 열어 제거하고 용기와 스토퍼를 분리해
줍니다. 미지근한 미눗물로 세척 후 완벽하게 헹구고 건조해
주십시오.
제공된 주걱(N)을 이용하여 남아있는 재료를 제거해줍니다.
연마제를 사용하지 마십시오.
편리하게 세척하기 위해서는 항상 칼날을 분리합니다. 모든 용기
를 세척하고 완벽하게 건조 후에 다시 조립하여 사용하십시오.
칼날이 매우 날카로우니 주의하십시오. 본체 기기 안에 칼날을 끼
우지 않을 때에는 보호케이스를 끼워서 아이들의 손이 닿지 않는
안전한 장소에 보관하십시오.
산화(녹스는 현상)로부터 칼날을 보호하기 위해서는 사용 할 때
마다 항상 깨끗이 세척하고 완벽하게 건조하여 주십시오.
칼날을 식기 세척기에 넣어 세척하지 마십시오. 염분이 뭍은 칼날
이 식기세척기의 습한 환경에서 산화될 수 있습니다.
본체와 전원 케이블은 젖은 천이나 스폰지로 닦은 후 부드러운
천으로 완벽하게 말려 주십시오.
전원케이블을 본체 아래에 주의하여 감싸 보관하십시오.
뚜껑의 세척을 손쉽게 하려면, 뚜껑에 있는 고무 패킹을 약하게
잡아 당기거나 끝이 뭉툭한 도구(제공된 주걱(N))를 이용하여 분리
해 주십시오.
9
제품설명 및 사용법
kr
권장사항
용기 내부에 표시된 용량을 초과하지 마십시오.
레시피 북에서 권장하는 시간을 숙지하십시오.
경고! 용기세척 후 물기가 손잡이 프레임 틈 사이로 들어갈 수 있습니다.
이로 인한 곰팡이 생성을 방지하기 위해 깨끗이 세척 후 완벽하게 건조
시켜 주십시오.
절대 본체 기기를 물에 담그지 마십시오.
칼날을 제외한 본체 용기, 뚜껑과 기타 부속품들은 식기세척기에 세척할
수 있습니다.
문제 발생 시 해결방법
문제
원인 / 해결방법
작동이 전혀 되지 않는 경우
본체 뚜껑이 올바로 닫혀 있는지 확인 하십시오.
플러그가 메인 소켓에 정확히 꽂혀 있는 지 확인 하십시오.
7회 연속 신호음과 함께 디스플레이 창에
이 나타날 경우
고객만족 센터로 문의해주십시오.
6회 연속 신호음과 함께 디스플레이 창에
가 나타날 경우
용기가 너무 뜨겁거나/ 너무 많은 오일을 사용한 경우의 오류.
본체의 전원을 끄고 용기의 열을 식혀 주십시오.
5회 연속 신호음과 함께 디스플레이 창에
가 나타날 경우
칼날이 뻑뻑할 경우의 오류.
본체의 전원을 끄고 하단 부위의 열을 식혀 주십시오.(칼날 제거)
4회 연속 신호음과 함께 디스플레이 창에
이 나타날 경우
고객만족 센터로 문의해주십시오.
디스플레이 창에
와
표시가 나타날 경우
물이 없는 경우.
BOIL 기능 이나 STEAM 기능에 오일을 잘 못 사용한 경우.
COOK 기능에서만 오일을 사용하십시오.
전원을 끈 후 다시 처음부터 올바르게 사용하여 주십시오.
디스플레이 창에
표시가 나타날 경우
용기가 본체에 장착되지 않거나 잘 못 놓여있을 경우.
뚜껑이 올바르게 닫혀 있지 않을 경우.
10
Fundamental recommendations regarding safety
INTRODUCTION
Thank you for having chosen the Chicco De’Longhi & Me!
the food processor. This appliance has been designed for the
preparation of baby food, from weaning onwards. The appliance must be used exclusively by adults only. Take a few minutes
to read these instructions. This way you will avoid danger and
damage to the machine.
en
APPLIANCE SYMBOLS LEGEND
The important recommendations have these symbols. These
recommendations must be followed.
Appliance certified and approved by IMQ
Appliance compliant with the essential requirements of
applicable CE Directives
CE declaration of conformity:
De Longhi S.p.A. hereby declares that this appliance called
Baby Meal™, Chicco™ De Longhi™ brand mod. KCP815 is
compliant with the essential requirements and other relevant
provisions of Directives 2004/108/CE (electromagnetic compatibility) and 2006/95/CE (electrical safety). A full copy of the CE
declaration may be requested from De’ Longhi Appliances
via Seitz, 47 - 31100 - Treviso - Italy.
Danger!
Failure to comply can be or is the cause of injury due to lifethreatening electric shocks.
Attention!
Failure to comply can be or is cause of injury or damage to the
appliance.
Attention! Hot surface
Hot surfaces: failure to comply can be or is cause of scalding or
burns as the surfaces are very hot.
TECHNICAL SPECIFICATIONS
Model: KCP815
Voltage: 220-240 Vac
Frequency: 50/60 Hz
Motor Power: 150 W
Absorbed power: 800 W
Motor Power + Resistance: 850 W
ATTENTION! Hot steam
High temperature steam is produced during cooking. Be careful when opening the lid to avoid danger of burns due to the
steam puff.
Made in China
Read the instructions manual
This appliance is warranted against manufacturing defects for two years from the date of purchase (date indicated on the receipt or other proof of purchase date) or
for any other period allowed by the applicable law in the
country of purchase.
The warranty does not cover parts subject to normal
wear.
De Longhi S.p.A. reserves the right to change what is
described in this instructions manual at any time and
without notice.
The reproduction, transcription and translation of this
manual into another language, even in part and in any
form, is strictly prohibited without prior written consent
from ARTSANA S.p.A. or De Longhi S.p.A.
If in doubt about the interpretation of the contents of this
manual contact the dealer or ARTSANA S.p.A. or De Longhi
S.p.A.
Attention! Hot surface
Hot surfaces: failure to comply can be or is cause of scalding or
burns as the surfaces are very hot.
Do not dispose of this product as normal household
waste. Make use of separate waste collection as required by the laws in force
Nota Bene:
This symbol highlights recommendations and important information for the user.
Instructions for use:
This symbol indicates the instructions manual.
Letters and numbers in brackets
Letters in brackets correspond to the legend in the description
of the unit (page 14).
11
Cooking Function
Steam Cooking Function
Boil Function
Fundamental recommendations regarding safety en
•
Nota Bene:
Carefully read the following instructions and keep
them for further consultation.
- Failure to comply with these instructions can lead to injury and damage to the machine.
The manufacturer is not liable for damage deriving from
the failure to comply with the user instructions.
•
•
•
•
•
•
•
•
•
•
•
•
•
Attention!
This product is not a toy.
Keep children away from the appliance. Do not allow the
appliance to be used by persons (even children) with reduced psycho-physical-sensorial capacities or that have
insufficient experience and knowledge, unless they are
carefully monitored and instructed by a person responsible for their safety, who informs them of the dangers
connected to improper use. Watch children, do not let
them play with the appliance.
The plastic bag containing the product should not be left within the reach of children as it is a potential source of danger.
This appliance is intended exclusively for domestic use.
It is not intended for use in: rooms used as kitchens for
personnel in shops, offices and other wo http://www.
nada.kth.se/~asa/bilder/penta.gif rk areas, farm holidays, hotels, motels and other reception structures, guest
houses.
This appliance must only be employed for the use for
which it has been designed. Any other use must be considered improper and therefore dangerous. The manufacturer is not liable for damage deriving from improper,
wrong or irresponsible use of the appliance and/or repairs carried out by unqualified personnel.
The appliance must not function by means of an external
timer or with a separate remote control system.
DO NOT operate the appliance when it is empty.
DO NOT remove the lid whilst water is boiling.
If the pot is filled beyond the MAX level (1.5 litres) there
may be an overflow of boiling water.
To avoid injury or damage to the machine, do not put
your hands or utensils in the container while the appliance is functioning.
The spatula (N) can be used when the appliance is
switched off.
Ensure that hands, hair, clothes and cooking utensils are
out of the container before operating the appliance. The
blades can cut: handle them with care, especially
when one extracts the blade from the pot, when
the pot is emptied and during cleaning.
•
•
•
•
•
•
•
•
•
•
•
•
•
•
•
•
•
12
Never operate the Pulse function or select a blade
rotation speed higher than 3 if the stopper (A) is
removed or not inserted properly in the loading
opening (C) of the lid (B) as food could spill and if
hot cause burns.
Do not use the stirrer (L) with an operating speed
above 3 or in PULSE mode
Scalding hazard!
To avoid scalding after heating/cooking foods check the
temperature before consumption, especially before administering them to children.
The external surface can reach high temperatures when
the appliance is functioning.
Always use the appliance with the lid on.
Danger!
Do not immerse the base of the appliance in water.
Do not operate the appliance in case the power supply
cable or plug is damaged as it might be cause of electric shocks. Should the power supply cable be damaged,
it must be replaced by the manufacturer or after-sales
technical assistance service or by a person with similar
qualification, to avoid any risk.
Before carrying out any cleaning or maintenance operation, disconnect the appliance from the mains power
supply by unplugging it.
Connect the appliance to an easily accessible power socket.
Do not touch the appliance with wet or damp hands.
Unplug from the power socket when the appliance is not used.
Stop using the appliance in the event of liquid leakage
from the appliance body. In this case, switch off the appliance immediately and unplug from the power mains.
Do not leave the appliance switched on unnecessarily
because it is potentially dangerous.
Never leave the appliance unattended when in use.
Never use the appliance with bare or wet feet.
Do not touch the appliance if it has accidentally fallen
into water. Remove it after unplugging it and take it to
an After-Sales Centre.
Do not pull the plug out of the socket by pulling the power cable.
Do not leave the appliance exposed to weather (rain, sun,
ice, etc.).
In case of incompatibility between the socket and the
plug of the appliance, have the plug replaced with another suitable one by a qualified technician. It is unadvisable to use adapters, power strips and/or extension leads.
If their use is required, only use simple or multiple adap-
Appliance description en
•
•
4. BOIL BUTTON
5. Time increase + BUTTON
6. Time decrease - BUTTON
7. MODE BUTTON (selects the cooking mode:
, ,
, - WARM, MILK, CREAM)
8. “START/STOP” BUTTON
9. Blade speed selection KNOB
ters and extension leads that comply with current safety
standards, taking care not to exceed the power limit indicated on the adapter and/or extension lead.
Do not place the appliance near or above hot surfaces,
gas cookers, hot plates, delicate surfaces.
The models equipped with earthing must be connected
to an efficient earthing unit as required by the electrical
safety standards in force.
Before use
NEVER IMMERSE the base of the appliance in water. The container, lid and accessories can be washed in the dishwasher.
•
The materials and items intended for contact with food
comply with the requirements of European Regulation
1935/2004.
•
Before using the appliance for the first time, thoroughly
wash all the accessories, paying attention to the blades
(they are sharp), wipe a damp cloth over the base of the
appliance.
Place the appliance on a dry and level surface. Do not
connect the appliance to a power socket until the accessories have been properly installed.
Check the mains voltage corresponds to the indication on
the appliance plate then plug into the power socket.
Should it be particularly hard to turn the cover when closing it, dampen the seal with some water
Should it be particularly hard to turn the cover when closing it, dampen the seal with some water.
Recommendations for the correct disposal of the
product in compliance with European Directive
2002/96/CE.
The product must not be disposed of as urban waste at
the end of its working life. It must be taken to appropriate local
authority separate waste collection centres or to dealers providing
this service. Disposing of a household appliance separately avoids
possible negative consequences for the environment and health
deriving from unsuitable disposal and allows to recover the materials of which it is made in order to make significant savings of
energy and resources. The product has the crossed-out wheeled
bin mark as a reminder of the obligation to dispose of household
appliances separately. The illegal disposal of the product by the
user entails the application of administrative sanctions envisioned by the Standard in force.
Appliance description and controls panel
Instructions for use
A Stopper
B Lid
C Loading opening
D Lid handle
E Steam cooking basket
F Container
G Appliance base
H Main switch
I Multi-function blade (for mincing/blending)
L Mixing paddle
M Blade protection
N Spatula
1. DISPLAY
2. TRADITIONAL COOKING BUTTON
3. STEAM COOKING BUTTON
Nota Bene:
• To move from one function to another, simply press the
button relative to the desired function.
• To switch to the blender function, press the button relative
to the currently active function again, then press the START
/ STOP (8) button.
• With any function active, by pressing the START/STOP (8)
button once, the appliance stops (PAUSE); by pressing the
button again, the appliance resumes operation.
By pressing and holding the START/STOP (8) for about 2 seconds, the appliance cancels the currently active function.
• If the lid is opened whilst a function is active the appliance
goes into STAND-BY and the message appears.
To resume operation close the lid again.
•
•
Switching on the appliance
•
•
•
13
Nota Bene :
Before inserting the plug into the power socket, ensure that
the main switch (H), placed on the side of appliance, is on 0.
Press the I/0 main switch.
Upon activation, the three function switches light up and
then switch off and the display shows fixed “-- --“ dashes.
Use en
Pre-set cooking
• Press the cooking button (2) once.
Press the “MODE” (7) button until the desired function is
displayed: “WARM”, “MILK “ or “CREAM” (fig. 5-7).
Traditional Cooking Function
The setting speeds are 1,2 and 3, as per graphics. The
others are inhibited.
This feature allows you to cook in the traditional manner by
modulating the power and mixing evenly, in addition the three exclusive “WARM”, “MILK” and “CREAM” functions enable to
heat food and milk and prepare creams.
Depending on the kind of food to be cooked, apply the multifunction blade (I) (for mincing and blending food) or the mixing
paddle (L) (for mixing).
• After having put the food one wishes to cook in the container (F), position it in its place properly on the base of the
appliance (G), then put on the lid (B) and close it by turning
it clockwise until it clicks into place (fig. 1).
• Press the I/0 main switch (H) (fig. 2).
“WARM” function
This function is for heating food at a constant temperature of
approximately 37°C.
It is recommended to apply the mixing paddle (L).
Press the start/stop (8) button to start heating; the paddle will
start mixing. When the appliance reaches the temperature, it
emits an acoustic signal which is repeated every 30 seconds
and holds this temperature for a maximum of 30 minutes.
When 30 minutes have elapsed,
will appear on the
display.
With this function the knob (9) and the + and - button
are disabled.
To remove the container (F) at the end of each function
switch off the appliance via the appropriate button and
remove the lid (B).
Manual cooking
• Press the cooking button (2) (fig. 3) once.
By default the display shows “0:00“ and the power .
If one wishes to select a different power, press the “MODE” (7)
(fig. 3) button until the desired function is selected.
• If one wishes to set the cooking time press the “+ and -”
buttons. If one does not wish to set the cooking time the display shows the incremental time (maximum 60 minutes).
• Press the “START/STOP” button (8) to start cooking (4). The
countdown begins on the display if it is set.
• Place the speed selection knob (9) on the slow mixing position (1-3) (fig. 4).
One can adjust the power at any time by pressing the
“MODE” button. In the event of long cooking, the paddle
will start mixing intermittently after 15 minutes.
The end of cooking is signalled via the
message on the
display and by an acoustic signal.
To remove the container (F) at the end of each function
switch off the appliance via the appropriate button
and remove the lid (B).
Be careful not to get burnt when opening the lid
and/or removing the container!!
Before administering heated food to a baby, always
check that it is not too hot (above 37°C).
In the event there is no water or it runs out, the appliance MAY stop working and emit three acoustic signals.
In this case
appears on the screen and the red light
switches on.
“MILK” function
This function is for heating milk at a constant temperature of
approximately 80°C.
It is recommended to apply the mixing paddle (L).
Press the start/stop (8) button to start heating; the paddle will
start mixing.
When the appliance reaches the temperature, it emits an
acoustic signal which is repeated every 30 seconds and holds
this temperature for a maximum of 30 minutes. When 30 minutes have elapsed,
will appear on the display.
With this function the knob (9) and the + and - button
are disabled.
To remove the container (F) at the end of each function
switch off the appliance via the appropriate button and
remove the lid (B).
Be careful not to get burnt when opening the lid
and/or removing the container!!
This appliance is not suitable for frying; thus do
not use amounts of oil in excess of 50 g.
In the event there is no water or it runs out, the appliance MAY stop working and emit three acoustic signals.
In this case
appears on the screen and the red light
switches on.
14
en
Be careful not to get burnt when opening the lid
and/or removing the container!!
Steam Cooking Function
The steam cooking function allows to cook food, preserving
the proteins and vitamins contained.
Proceed as follows:
• Pour water into the container (F) until reaching the steam
(300ml) level marked inside the same container (fig. 8) and
insert it in its place.
• Insert the steam cooking basket (E) (fig. 9) into the container with the food to be cooked.
• Put on the lid and close it by turning it clockwise until it
clicks into place (fig. 1).
• Press the I/0 main switch (H).
• Press the steam button (3). By default the display shows 0:00.
If one wishes to set the cooking time press the “+ and -” buttons.
If one does not wish to set the cooking time the display shows
the incremental time (maximum 30 minutes).
• Press the “START/STOP” (8) button to start steam cooking
(fig. 10).
The numbers on the display flash until boiling point is
reached (approximately 100°C). A triple acoustic signal is
emitted when it reaches 100°C.
The countdown time or incremental time starts on the display.
In the event there is no water or it runs out, the appliance MAY stop working and emit three acoustic signals.
In this case
appears on the screen and the red light
switches on.
“CREAM” function
This function is for preparing: custard, pudding, white sauce,
etc. It is recommended to apply the mixing paddle (L).
Set the cooking time according to the recipe by operating the
“+ and -” buttons.
If one does not wish to set the cooking time the display shows
the incremental time (maximum 30 minutes).
Press the start/stop (8) button to start the function. Place the
knob (9) in the slow mixing position (1-3) (fig.4).
The end of cooking is signalled via the
message on the
display and by an acoustic signal.
To remove the container (F) at the end of each function
switch off the appliance via the appropriate button
and remove the lid (B).
Be careful not to get burnt when opening the lid
and/or removing the container!!
The elapsed set time is signalled by the
message
on the display and by an acoustic signal. The steam cooking
process is complete.
In the event there is no water or it runs out, the appliance MAY stop working and emit three acoustic signals.
In this case
appears on the screen and the red light
switches on.
To remove the container (F) at the end of each function
switch off the appliance via the appropriate button
and remove the lid (B).
Nota Bene
• By placing the knob on position “0”, the blades stop.
• If the “START/STOP” (8) button is not pressed within 2 minutes from the setting, the appliance goes into stand-by.
• The appliance is equipped with a loading opening (C), useful for pouring seasoning without opening the lid.
Be careful not to get burnt when opening the lid
and/or removing the container!!
In the event there is no water or it runs out, the appliance MAY stop working and emit three acoustic signals. In this
case
appears on the screen and the red light
switches on.
15
en
INGREDIENTS
FRUIT (150gr)
apples/pears
MEAT (150/200gr)
chicken/turkey/rabbit
veal/beef
To remove the container (F) at the end of each function
switch off the appliance via the appropriate button
and remove the lid (B).
COOKING TIME
15min
Be careful not to get burnt when opening the lid
and/or removing the container!!
25min
30min
In the event there is no water or it runs out, the appliance MAY stop working and emit three acoustic signals.
In this case
appears on the screen and the red light
switches on.
FISH (150gr)
hake/cod/
sole/tuna
25/30min
Blender function
HARD-BOILED EGGS
1 egg
4 egg
15min
20min
Never operate the Pulse function or select a blade
rotation speed higher than 3 if the stopper (A) is removed or not inserted properly in the loading opening (C)
of the lid (B) as food could spill and if hot cause burns.
15min
20min
The blender function allows to mince and chop up both raw
and boiled food.
Proceed as follows:
• After having inserted the blades and food one wishes to
blend in the container, position it in its place on the base of
the appliance then put on the lid (B) and close it by turning
it until it clicks into place.
• Press the I/0 main switch (H).
• Press the “START/STOP” button (8) (fig. 12).
If you wish to set the operation time (max. 2 min.), turn the
knob to the “0” position and use the +/- buttons (5-6) until
the desired time appears on the display. To start processing
food simply rotate the knob (9) until selecting the desired
speed (4 min. speeds - 8 max. speeds).
Once the set time has elapsed the blades stop, the message appears on the display and the appliance emits
an acoustic signal. If one does not wish to set the blending
time the display shows the incremental time (maximum 2
minutes). One can however interrupt operation at any time
by turning the knob onto 0. The appliance stays in stand-by,
press and hold the START/STOP button for 2 seconds to reset
the function.
VEGETABLES (100 g)
spinach/chard/tomato
courgettes
fennels/peas
potatoes/carrots/green
beans/pumpkin
cauliflower
25min 30min
Boil function
The boil function allows to boil food.
This function is ideal for preparing homogenised foods.
• After having put water and the food one wishes to boil in the
container (F), position it in its place on the base of the appliance (G), then put on the lid (B) and close it by turning it clockwise until it clicks into place (fig. 1).
• Press the I/0 main switch (H).
• Press the boil button (4) (fig.11). By default the display shows
0:00. To set the desired time press the +/- buttons (5-6) (fig.
11). If one does not wish to set the boiling time the display
shows the incremental time. Maximum 30 minutes.
• Press the “START/STOP” (8) (fig. 11) button to start boiling.
The numbers on the display flash until boiling point is reached
(approximately 100°C).
A triple acoustic signal is emitted when it reaches 100°C. The
countdown time or incremental time starts on the display.
The elapsed set time is signalled by the
message on the
display and by an acoustic signal. When cooking is complete, if
you wish to homogenise the food see the relative chapter.
It is not recommended to use this appliance to mince
particularly hard food such as frozen food as the blades may
get damaged irreparably.
To remove the container (F) at the end of each function
switch off the appliance via the appropriate button
and remove the lid (B).
16
en
time on 15/20 minutes, in the event of complete homogenised
baby food (about 200-260 g) set at about 25-30 minutes.
Be careful not to get burnt when opening the lid
and/or removing the container!!
Once the defrost/heating cycle is complete, extract the
jar with oven gloves taking great care as it may be very hot.
How to homogenise
The appliance allows to homogenise all the foods normally
used for weaning: fruit, vegetables, meat, fish, rice, etc.
Thanks to the special design of its blades, Baby Meal reduces
the amount of air bubbles, which cause colic in babies, in the
homogenised food it prepares.
Put water and the food one wishes to homogenise in the container (F), then insert it in its place on the base of the appliance
(G).
Put on the lid (B) and close it by turning it clockwise until it
clicks into place (fig. 1).
After having used the “boil function” (see page 17) proceed as
per “blender function” for roughly 20 seconds (see page 17).
To remove the baby food from the container (F), use the spatula (N) supplied.
for hygienic and biological reasons never heat foods
more than once or for a more than an hour.
Before administering heated food to a baby, always check that
it is not too hot (above 37°C).
Cleaning the appliance
• Ensure that the plug is disconnected from the power mains
and that the switch is in position 0.
• Open and remove the lid, then remove the container and
the stopper before washing them in tepid and soapy water.
Rinse and dry thoroughly.
• If needed remove the remains of the ingredients by using
the spatula (N) supplied. Do not use abrasive products.
• To ease cleaning, always dismantle the blades. Wash everything and dry thoroughly, then reassemble.
Attention the blades are very sharp, so when they are not
inserted in the appliance, protect them with the protective
casing and store them in a safe place out of children’s reach.
• To prevent the blades from rusting, straight after each use
always clean and dry them thoroughly.
It is recommended not to wash the blades in the dishwasher because the presence of salt and moisture may cause
rust. Wipe the motor body and power cable with a damp
cloth or sponge. Dry thoroughly with a soft cloth.
• Wrap the power cable carefully around the base of the motor body.
• To simplify the cleaning of the cover, slightly pull or use a
thin blunt tool (e.g. the spatula provided) to remove the
seal from its housing.
To prevent damages to the seal, insert the tool in the outer
edge in correspondence of the support hook (see figure).
To remove the container (F) at the end of each function
switch off the appliance via the appropriate button
and remove the lid (B).
Be careful not to get burnt when opening the lid
and/or removing the container!!
“PULSE” function
The “PULSE” function enables better control in short processes.
This function can only be activated within the manual cooking
and blender functions.
The appliance works until the knob (9) is kept in the “PULSE”
(fig. 13) position. The appliance work at the pre-set speed.
Defrost function
The defrost function allows to defrost and heat the previously prepared baby food. If present, remove the multi-function
blade (I) or the mixing paddle (L) from the container (F); pour
water into the container (F) until reaching the level marked by
the steam
symbol, if present remove the lid and any
labels from the jar with the food to be defrosted/heated (Attention: the jar must be made of glass or heat resistant plastic
material suitable for heating food up to 100°C, the maximum
dimensions of the jar must not exceed: 60 mm diameter, 90
mm height). Position the jar on the bottom of the container
(F) and set the Boil function according to the instructions indicated in the relative section of this instructions manual. To
defrost/heat homogenised food weighing about 80 g set the
When putting the seal back into place, make sure that it
fits in all the support hooks
17
en
Recommendations
• Never exceed the amounts indicated inside the container..
• Observe the time recommended in the recipe book.
After cleaning, water may get caught in the
handles. See to clean and dry them to prevent mould from
forming.
NEVER immerse the base of the appliance in water..
The container, lid and accessories can be washed in the
dishwasher.
If something does not work...
PROBLEM
CAUSE/SOLUTION
The appliance does not work
•
•
The lid is not closed properly.
The plug is not correctly inserted in the socket.
The display reads
followed by the emission of an
acoustic signal repeated 7 times
•
Take to an After-Sales Centre.
The display reads
followed by the emission of an
acoustic signal repeated 6 times
•
Pot too hot/too much oil used..
Switch off the appliance and let the pot cool down.
The display reads
followed by the emission of an
acoustic signal repeated 5 times
•
Blades jammed.
Switch off the appliance and let the base cool down
(remove the blades).
The display reads
followed by the emission of an
acoustic signal repeated 4 times
•
Take to an After-Sales Centre.
The display shows
• No water.
• Wrong use of oil in Boil function and Steam function.
• Use of oil only in coking function.
Switch off the appliance and use it properly.
and
The display shows
•
18
The container is not in its place or is badly positioned.
The lid is not closed properly.
Avvertenze importanti per la sicurezza it
Introduzione
Grazie per aver scelto il robot da cucina Chicco De’Longhi & Me!
Questo elettrodomestico è stato sviluppato per la preparazione
dei cibi per bambino, dallo svezzamento in poi.
L’apparecchio deve essere utilizzato solo ed esclusivamente
da persone adulte. Prendetevi un paio di minuti per leggere
le presenti istruzioni per l’uso. Eviterete così di incorrere in pericoli o di danneggiare l’apparecchio.
LEGENDA SIMBOLI SULL’APPARECCHIO
Le avvertenze importanti recano questi simboli. È assolutamente necessario osservare queste avvertenze.
Dichiarazione CE di conformità:
Con la presente De Longhi S.p.A. dichiara che questo apparecchio denominato Baby Meal™, marca Chicco™ De Longhi™
mod. KCP815 è conforme ai requisiti essenziali ed alle altre
disposizioni pertinenti stabilite dalle direttive 2004/108/CE
(compatibilità elettromagnetica) e 2006/95/CE (sicurezza
elettrica). Copia integrale della dichiarazione CE può essere
richiesta a De’ Longhi Appliances via Seitz, 47 - 31100
- Treviso - Italia.
Pericolo!
La mancata osservanza può essere o è causa di lesioni da scossa elettrica con pericolo per la vita.
Apparecchio certificato e approvato da IMQ
Apparecchio conforme ai requisiti essenziali delle direttive CE applicabili
Attenzione!
La mancata osservanza può essere o è causa di lesioni o di danni all’apparecchio.
Attenzione! Superficie calda
Superfici calde: la mancata osservanza può essere o è causa di
scottature o di ustioni in quanto le superfici sono molto calde.
CARATTERISTICHE TECNICHE
Modello: KCP815
Tensione: 220-240 Vac
Frequenza: 50/60 Hz
Potenza Motore: 150 W
Potenza Resistenza: 800 W
Potenza Motore + Resistenza: 850 W
ATTENZIONE! Vapore bollente
Durante la cottura si produce vapore ad alta temperatura. Prestare attenzione durante l’apertura del coperchio per evitare
pericoli di ustione a causa dello sbuffo di vapore.
Made in China
Leggere il manuale di istruzioni per l’uso
Attenzione! Superficie calda
Superfici calde: la mancata osservanza può essere o è causa di
scottature o di ustioni in quanto le superfici sono molto calde.
Questo apparecchio è garantito da difetti di fabbricazione per due anni dalla data di acquisto (data indicata sullo
scontrino fiscale o altro documento comprovante la data
di acquisto) o comunque per la diversa durata prevista
dalla normativa applicabile nel paese di acquisto.
La garanzia non copre i componenti soggetti a normale
usura.
De Longhi S.p.A. si riserva il diritto di modificare in qualsiasi momento e senza preavviso quanto descritto nel
presente manuale di istruzioni.
La riproduzione, la trascrizione nonché la traduzione in
altra lingua anche parziale in qualsiasi forma di questo
manuale, sono assolutamente vietate senza la previa
autorizzazione scritta da parte di ARTSANA S.p.A. o De
Longhi S.p.A.
In caso di dubbi circa l’interpretazione del contenuto del
presente libretto di istruzioni contattare i rivenditore o
ARTSANA S.p.A. o De Longhi S.p.A.
Non smaltire questo prodotto come normale rifiuto
urbano. Operare la raccolta differenziata come richiesto dalle vigenti leggi
Nota Bene:
Questo simbolo evidenzia consigli ed informazioni importanti
per l’utente.
Istruzioni per l’uso:
Questo simbolo indica il manuale di istruzioni per l’uso
Lettere e numeri tra parentesi
Le lettere tra parentesi corrispondono alla legenda riportata
nella descrizione dell’apparecchio (pag. 6).
19
Funzione Cottura
Funzione Cottura a Vapore
Funzione Bollitura
Avvertenze importanti per la sicurezza it
Nota Bene:
Leggere con attenzione le seguenti istruzioni e conservarle per ogni ulteriore consultazione.
- Il mancato rispetto di queste istruzioni può esse fonte di
lesioni e di danni all’apparecchio.
Il costruttore non risponde per danni derivanti dal mancato rispetto di queste istruzioni per l’uso.
•
•
•
•
•
•
•
•
•
•
•
•
•
•
Attenzione!
Questo prodotto non è un giocattolo.
Tenere i bambini lontano dall’apparecchio. Non consentire l’uso dell’apparecchio a persone (anche bambini) con
ridotte capacità psico-fisico-sensoriali, o con esperienza
e conoscenze insufficienti, a meno che non siano attentamente sorvegliate e istruite da un responsabile della loro
incolumità che le renda coscienti dei pericoli connessi ad
un uso non appropriato. Sorvegliare i bambini, assicurandosi che non giochino con l’apparecchio.
Il sacchetto di plastica contenente il prodotto non deve
essere lasciato alla portata dei bambini in quanto potenziale fonte di pericolo.
Questo apparecchio è destinato esclusivamente all’uso domestico. Non è previsto l’uso in: ambienti adibiti a cucina per
il personale di negozi, uffici e altre aree di lavoro, agriturismi, hotel, motel e altre strutture ricettive, affitta camere.
L’apparecchio dovrà essere destinato esclusivamente all’uso
per il quale è stato espressamente concepito. Ogni altro uso
è da considerarsi improprio e quindi pericoloso. Il costruttore non potrà essere ritenuto responsabile di eventuali
danni derivanti da uso improprio, erroneo e irresponsabile
e/o da riparazioni effettuate da personale non qualificato.
L’apparecchio non deve essere fatto funzionare per mezzo
di un timer esterno o con un sistema di comando a distanza separato.
NON azionare l’apparecchio quando è vuoto.
NON rimuovere il coperchio mentre l’acqua sta bollendo.
Se la coppa viene riempita oltre il livello MAX (1,5 Lt.) può
esserci tracimazione di acqua bollente.
Per evitare la possibilità di ferirsi o di danneggiare l’apparecchio, non inserite le mani o utensili nel contenitore
mentre l’apparecchio è in funzione.
É possibile utilizzare la spatola (N) quando l ’apparecchio
è spento.
Accertarsi che mani, capelli, abiti e utensili da cucina
siano fuori dal contenitore prima di mettere in funzione
l’apparecchio. Le lame possono tagliare: maneggiatele con cura, in particolare quando si estrae la
•
•
•
•
•
•
•
•
•
•
•
•
•
•
20
lama dalla coppa, quando la coppa viene svuotata
e durante la pulizia.
Non azionare mai la funzione Pulse o selezionare
una velocità di rotazione della lame superiore a 3
se il tappo (A) viene rimosso o non è correttamente inserito nel vano di carico (C) del coperchio (B) in
quanto gli alimenti potrebbero fuoriuscire e se caldi
causare ustioni.
Non utilizzare mai la pala mescolatrice (L) con velocità di funzionamento superiore a 3 e in funzione
PULSE.
Pericolo Scottature!
Per evitare scottature dopo il riscaldamento/cottura di cibi
controllare la temperatura prima della consumazione, in
modo particolare prima di somministrarli ai bambini.
Quando l’apparecchio è in funzione, la superficie esterna
potrebbe raggiungere temperature elevate.
Utilizzare l’apparecchio con il coperchio sempre inserito.
Pericolo!
Non immergere la base dell’apparecchio in acqua.
Non mettere in funzione l’apparecchio nel caso in cui il
cavo di alimentazione o la spina siano danneggiati in
quanto potrebbe essere causa di scosse elettriche. Se il
cavo di alimentazione è danneggiato, esso deve essere
sostituito dal costruttore o dal suo servizio di assistenza
tecnica o comunque da una persona con qualifica similare, in modo da evitare ogni rischio.
Prima di effettuare qualsiasi operazione di pulizia o di
manutenzione, scollegare l’apparecchio dalla rete di alimentazione elettrica staccando la spina.
Collegare l’apparecchio ad una presa di corrente facilmente accessibile.
Non toccare l’apparecchio con le mani bagnate o umide.
Disinserire la spina dalla presa di corrente quando l’apparecchio non viene utilizzato.
Non utilizzare più l’apparecchio in caso di perdita di liquido dal corpo dell’apparecchio. In questo caso, spegnere
immediatamente l’apparecchio e rimuovere la spina dalla
presa di corrente.
Non lasciare l’apparecchio inutilmente acceso perché potenziale fonte di pericolo.
Non lasciare mai l’apparecchio incustodito mentre
è in funzione.
Non usare l’apparecchio a piedi nudi o bagnati.
Non toccare l’apparecchio se questo cade accidentalmente in acqua. Rimuoverlo dopo aver tolto la spina e portar-
Descrizione dell’apparecchio it
•
•
•
•
•
Descrizione dell’ apparecchio e pannello
comandi
lo ad un Centro Assistenza.
Non sfilare la spina dalla presa tirando il cavo di alimentazione.
Non lasciare l’apparecchio esposto agli agenti atmosferici
(pioggia, sole, gelo, ecc.).
In caso di incompatibilità tra la presa e la spina dell’apparecchio, fare sostituire la presa con altra di tipo adeguato
da personale qualificato. É sconsigliabile l’uso di adattatori, prese multiple, e/o prolunghe. Qualora il loro uso si
rendesse necessario, utilizzare esclusivamente adattatori
semplici o multipli e prolunghe conformi alle vigenti
norme di sicurezza, facendo attenzione a non superare il
limite di potenza marcato sull’adattatore e/o prolunga.
Non posizionare l’apparecchio vicino o sopra a superfici
calde, cucine a gas, piastre elettriche, superfici delicate.
I modelli provvisti di messa a terra devono essere collegati ad un efficace impianto di messa a terra come previsto
dalle vigenti norme di sicurezza elettrica.
A Tappo
B Coperchio
C Vano di carico
D Maniglia coperchio
E Cesto cottura a vapore
F Contenitore
G Base apparecchio
H Interruttore generale
I Lama multifunzione (trita/omogeneizza )
L Pala mescolatrice
M Protezione lame
N Spatola
1. DISPLAY
2. PULSANTE COTTURA TRADIZIONALE
3. PULSANTE COTTURA A VAPORE
4. PULSANTE BOLLITURA
5. PULSANTE + incremento tempo
6. PULSANTE - decremento tempo
7. PULSANTE MODE (seleziona modalità di cottura:
, ,
, - WARM, MILK, CREAM)
8. PULSANTE “START/STOP”
9. MANOPOLA selezione velocità lame
NON IMMERGERE MAI la base dell’apparecchio in acqua.
Il contenitore, il coperchio e gli accessori possono essere
lavati in lavastoviglie.
I materiali e gli oggetti destinati al contatto con prodotti alimentari sono conformi alle prescrizioni del
regolamento Europeo 1935/2004.
Prima dell’uso
• Prima di utilizzare l’apparecchio per la prima volta, lavare
accuratamente tutti gli accessori, facendo attenzione alle
lame (sono taglienti); passare con un panno umido la
base dell’apparecchio.
• Posizionare l’apparecchio su una superficie asciutta e dritta.
Non collegare l’apparecchio ad una presa di corrente finché non sono stati correttamente montati gli accessori.
• Verificare che la tensione di rete corrisponda a quella indicata sulla targhetta dell’apparecchio quindi inserire la
spina nella presa di corrente.
• Se durante la chiusura del coperchio la rotazione dovesse
risultare troppo dura, si consiglia di bagnare la guarnizione con un po’ d’acqua.
Avvertenze per il corretto smaltimento del prodotto ai sensi della Direttiva Europea 2002/96/EC.
Alla fine della sua vita utile il prodotto non deve essere
smaltito insieme ai rifiuti urbani. Può essere consegnato presso gli
appositi centri di raccolta differenziata predisposti dalle amministrazioni comunali, oppure presso i rivenditori che forniscono questo servizio. Smaltire separatamente un elettrodomestico consente di evitare possibili conseguenze negative per l’ambiente e per
la salute derivanti da un suo smaltimento inadeguato e permette
di recuperare i materiali di cui è composto al fine di ottenere un
importante risparmio di energia e di risorse. Per rimarcare l’obbligo di smaltire separatamente gli elettrodomestici, sul prodotto è
riportato il marchio del contenitore di spazzatura mobile barrato.
Lo smaltimento abusivo del prodotto da parte dell’utente comporta l’applicazione delle sanzioni amministrative previste dalla
normativa vigente.
Accensione dell’apparecchio
•
•
21
Nota Bene :
Prima di inserire la spina nella presa di corrente, accertarsi
che l’interruttore generale (H), posto a lato dell’apparecchio, sia in pos. 0.
Premere l’interruttore generale I/0.
Utilizzo it
•
All’accensione, i tre tasti funzione si illuminano per poi rispegnersi ed il display visualizza dei trattini “-- --“ fissi .
cottura (fig. 4). Sul display ha inizio il conto alla rovescia se
impostato.
• Posizionare la manopola selezione velocità (9) sulla posizione mescolatura lenta (1-3) (fig. 4).
In qualsiasi momento è possibile regolare la potenza premendo il tasto “MODE”. In caso di cotture lunghe, dopo 15
minuti la pala inizierà a mescolare ad intermittenza.
Il fine cottura viene segnalato tramite la dicitura
sul
display e dall’emissione di un segnale acustico.
Al termine di ogni funzione per rimuovere il contenitore (F) spegnere l’apparecchio mediante l’apposito tasto
e rimuovere il coperchio (B).
Modalità d’uso
Nota Bene:
• Per spostarsi da una funzione all’altra è sufficiente premere
il pulsante relativo alla funzione desiderata.
• Per passare alla funzione frullatore, ripremere il pulsante
relativo alla funzione attiva al momento , quindi premere il
pulsante START/STOP (8).
• Con qualsiasi funzione attiva, premendo 1 volta il pulsante
START/STOP (8), l’apparecchio si arresta (PAUSA); ripremendo il pulsante, l’apparecchio riprende a funzionare.
Mantenendo premuto il pulsante START/STOP (8) per ca 2 secondi, l’apparecchio cancella la funzione attiva al momento.
• Se si apre il coperchio durante una funzione la macchina va
in STAND-BY e appare la scritta .
Per riavviare richiudere il coperchio.
Nell’aprire il coperchio e/o nel rimuovere il contenitore fate attenzione a non scottarvi!!
Questo apparecchio non è adatto alla frittura; non
utilizzare quindi quantità d’olio superiori a 50 gr.
In caso di assenza di acqua o esaurimento, l’apparecchio
PUO’ interrompere il funzionamento ed emettere un triplo
segnale acustico. In questo caso il display visualizza
e si accende la spia
di colore rosso.
Funzione Cottura Tradizionale
Le velocità impostabili sono 1,2 e 3, come da grafica. Le
rimanenti sono inibite.
La funzione permette di cuocere in maniera tradizionale modulando la potenza e mescolando uniformemente, inoltre le tre
esclusive funzioni “WARM”, “MILK “ e “CREAM” permettono di
riscaldare il cibo, il latte e preparare creme.
A seconda del tipo di cibo da cuocere, applicare la lama multifunzione (I) (indicata per tritare e omogeneizzare gli alimenti)
o la pala mescolatrice (L) (indicata per mescolare).
• Dopo aver messo il cibo che si desidera cuocere nel contenitore (F), posizionarlo correttamente nella sede prevista
nella base dell’apparecchio (G), quindi posizionare il coperchio (B) e chiuderlo ruotandolo in senso orario fino ad
agganciarlo (fig.1).
• Premere l’interruttore generale I/0 (H) (fig. 2).
Cotture preimpostate
• Premere 1 volta il pulsante cottura (2).
Premere il pulsante “MODE” (7) fino a visualizzare la funzione desiderata: “WARM”, “MILK “ o “CREAM” (fig. 5-7).
Funzione “WARM”
Questa funzione è indicata per riscaldare i cibi ad una temperatura costante di circa 37°C. Si raccomanda di applicare la pala mescolatrice (L).
Premere il pulsante start/stop (8) per dare avvio al riscaldamento; la pala inizierà a mescolare.
Al raggiungimento della temperatura l’apparecchio emette un
segnale acustico che si ripete ogni 30 secondi e mantiene la
temperatura raggiunta per massimo 30 minuti. Allo scadere
dei 30 minuti apparirà sul display
.
Con questa funzione la manopola (9) e i pulsanti + e sono disabilitati.
Al termine di ogni funzione per rimuovere il contenitore (F) spegnere l’apparecchio mediante l’apposito tasto
e rimuovere il coperchio (B).
Cottura manuale
• Premere 1 volta il pulsante cottura (2) (fig. 3).
Di default il display visualizza “0:00“ e la potenza .
Se si desidera selezionare una potenza diversa, premere il tasto
“MODE” (7) (fig. 3) fino a selezionare la funzione desiderata.
• Se si desidera impostare il tempo di cottura premere i
pulsanti “+ e -” . Se non si desidera impostare il tempo di
cottura il display visualizza il tempo incrementale (massimo
60 minuti).
• Premere il pulsante “START/STOP” (8) per dare avvio alla
Nell’aprire il coperchio e/o nel rimuovere il contenitore fate attenzione a non scottarvi!!
22
it
Prima di somministrare l’alimento riscaldato al bambino, verificare sempre che la sua temperatura non sia eccessiva (non superiore a 37°C).
In caso di assenza di acqua o esaurimento, l’apparecchio PUO’ interrompere il funzionamento ed emettere un
triplo segnale acustico. In questo caso il display visualizza
e si accende la spia
di colore rosso.
In caso di assenza di acqua o esaurimento, l’apparecchio
PUO’ interrompere il funzionamento ed emettere un triplo
segnale acustico. In questo caso il display visualizza
e si accende la spia
di colore rosso.
Nota Bene
• Posizionando la manopola sulla posizione “0”, le lame si
arrestano.
• Se entro 2 minuti dall’ avvenuta impostazione, il pulsante
“START/STOP” (8) non viene premuto, l’apparecchio si posiziona in stand-by.
• L’apparecchio è dotato di un vano di carico (C), utile qualora
si voglia versare dei condimenti senza aprire il coperchio.
Funzione “MILK”
Questa funzione è indicata per riscaldare il latte ad una temperatura costante di circa 80°C. Si raccomanda di applicare
la pala mescolatrice (L). Premere il pulsante start/stop (8)
per dare avvio alla funzione; la pala inizierà a mescolare. Al
raggiungimento della temperatura l’apparecchio emette un
segnale acustico che si ripete ogni 30 secondi e mantiene la
temperatura raggiunta per massimo 30 minuti. Allo scadere
dei 30 minuti apparirà sul display
.
Con questa funzione la manopola (9) e i pulsanti + e
- sono disabilitati. Al termine di ogni funzione per rimuovere il contenitore (F) spegnere l’apparecchio mediante l’apposito tasto e rimuovere il coperchio (B).
Funzione Cottura a Vapore
La funzione cottura a vapore permette di cuocere i cibi, conservando l’apporto proteico e vitaminico degli alimenti.
Procedere come segue:
• Versare acqua nel contenitore (F) fino a raggiungere il livello vapore (300ml) contrassegnato all’interno del contenitore stesso (fig. 8) ed inserirlo nella sede prevista.
• Inserire nel contenitore il cesto cottura a vapore (E) (fig. 9)
con il cibo da cuocere.
• Mettere il coperchio e chiuderlo ruotandolo in senso orario
fino ad agganciarlo (fig. 1). • Premere l’interruttore generale I/0 (H).
• Premere il pulsante vapore (3). Di default il display visualizza 0:00. Se si desidera impostare il tempo di cottura
premere i pulsanti “+ e -” . Se non si desidera impostare il
tempo di cottura il display visualizza il tempo incrementale
(massimo 30 minuti).
• Premere il pulsante “START/STOP” (8) per dare inizio alla
cottura al vapore (fig. 10). Le cifre sul display lampeggiano
fino al raggiungimento dell’ebollizione (circa 100°C).
Il raggiungimento dei 100°C viene segnalato dall’emissione
di un triplo segnale acustico. Sul display ha inizio il conto
alla rovescia oppure il tempo incrementale.
Nell’aprire il coperchio e/o nel rimuovere il contenitore fate attenzione a non scottarvi!!
In caso di assenza di acqua o esaurimento, l’apparecchio PUO’ interrompere il funzionamento ed emettere un
triplo segnale acustico. In questo caso il display visualizza
e si accende la spia
di colore rosso.
Funzione “CREAM”
Questa funzione è indicata per preparare: crema pasticcera,
budino, besciamella etc.
Si raccomanda di applicare la pala mescolatrice (L).
Impostare il tempo di cottura a seconda della ricetta agendo sui
pulsanti “+ e -” . Se non si desidera impostare il tempo di cottura
il display visualizza il tempo incrementale (massimo 30 minuti).
Premere il pulsante start/stop (8) per dare avvio alla funzione. Posizionare la manopola (9) nella posizione mescolatura lenta (1-3)
(fig.4). Il fine cottura viene segnalato tramite la dicitura
sul display e dall’emissione di un segnale acustico.
Al termine di ogni funzione per rimuovere il contenitore (F) spegnere l’apparecchio mediante l’apposito tasto
e rimuovere il coperchio (B).
Lo scadere del tempo impostato viene segnalato tramite
la dicitura
sul display e dall’emissione di un segnale
acustico. Il processo di cottura a vapore è completo.
Al termine di ogni funzione per rimuovere il contenitore (F) spegnere l’apparecchio mediante l’apposito tasto
e rimuovere il coperchio (B).
Nell’aprire il coperchio e/o nel rimuovere il contenitore fate attenzione a non scottarvi!!
Nell’aprire il coperchio e/o nel rimuovere il contenitore fate attenzione a non scottarvi!!
23
it
Il raggiungimento dei 100°C viene segnalato dall’emissione
di un triplo segnale acustico. Sul display ha inizio il conto
alla rovescia oppure il tempo incrementale.
Lo scadere del tempo impostato viene segnalato tramite la
dicitura
sul display e dall’emissione di un segnale
acustico. A cottura ultimata, se desiderate omogeneizzare
gli alimenti vedere il capitolo relativo.
Al termine di ogni funzione per rimuovere il contenitore (F) spegnere l’apparecchio mediante l’apposito tasto
e rimuovere il coperchio (B).
In caso di assenza di acqua o esaurimento, l’apparecchio PUO’ interrompere il funzionamento ed emettere un
triplo segnale acustico. In questo caso il display visualizza
e si accende la spia
di colore rosso.
INGREDIENTI
FRUTTA (150gr)
mele/pere
CARNE (150/200gr)
pollo/tacchino/coniglio
vitello/manzo
TEMPO DI COTTURA
15min
Nell’aprire il coperchio e/o nel rimuovere il contenitore fate attenzione a non scottarvi!!
25min
30min
In caso di assenza di acqua o esaurimento, l’apparecchio
PUO’ interrompere il funzionamento ed emettere un triplo
segnale acustico. In questo caso il display visualizza
e si accende la spia
di colore rosso.
PESCE (150gr)
nasello/merluzzo/
sogliola/tonno
UOVA SODE
1 uova
4 uova
VERDURA (100 gr)
spinaci/bietole/pomodoro
zucchine
finocchi/piselli patate/carote/fagiolini/
zucca/cavolfiori
25/30min
Funzione Frullatore
15min
20min
Non azionare mai la funzione Pulse o selezionare
una velocità di rotazione della lame superiore a 3
se il tappo (A) viene rimosso o non è correttamente inserito nel vano di carico (C) del coperchio (B)
in quanto gli alimenti potrebbero fuoriuscire e se
caldi causare ustioni.
15min
20min
25min La funzione frullatore permette di tritare, sminuzzare gli alimenti sia crudi che bolliti.
Procedere come segue:
• Dopo aver inserito le lame ed il cibo che si desidera frullare nel contenitore, inserirlo nella sede prevista alla base
dell’apparecchio quindi posizionare il coperchio (B) e chiudere ruotandolo fino ad agganciarlo.
• Premere l’interruttore generale I/0 (H).
• Premere il pulsante “START/STOP” (8) (fig. 12). Se si desidera impostare il tempo di funzionamento (max.
2 min.), PORTARE LA MANOPOLA NELLA POSIZIONE “0” ED
agire sui pulsanti +/- (5-6) fino a visualizzare sul display il
tempo desiderato. Per iniziare la lavorazione dei cibi è sufficiente ruotare la manopola (9) fino a selezionare la velocità
desiderata (4 velocità min. - 8 velocità max.).
Trascorso il tempo impostato le lame si arrestano, sul
display appare la dicitura
e l’apparecchio emette un
segnale acustico.
30min
Funzione Bollitura
La funzione bollitura permette di bollire i cibi. Questa funzione
è ideale per la preparazione di omogeneizzati.
• Dopo aver inserito l’acqua ed il cibo che si desidera bollire nel
contenitore (F) inserirlo nella sede prevista nella base dell’apparecchio (G) , quindi posizionare il coperchio (B) e chiuderlo
ruotandolo in senso orario fino ad agganciarlo (fig. 1).
• Premere l’interruttore generale I/0 (H).
• Premere il pulsante bollitura (4) (fig.11). Di default il display visualizza 0:00. Per impostare il tempo desiderato
premere i pulsanti +/- (5-6) (fig. 11).
Se non si desidera impostare il tempo di bollitura il display
visualizza il tempo incrementale. Massimo 30 minuti.
• Premere il pulsante START/STOP (8) (fig. 11) per dare inizio
alla bollitura.
Le cifre sul display lampeggiano fino al raggiungimento
dell’ebollizione (circa 100°C).
24
it
funzioni cottura manuale e frullatore.
L’apparecchio funziona finchè la manopola (9) è mantenuta
sulla posizione “PULSE” (fig. 13) .
L’apparecchio funziona alla velocità predeterminata.
Se non si desidera impostare il tempo di frullatura il display
visualizza il tempo incrementale (massimo 2 minuti). é
possibile comunque interrompere il funzionamento in
qualsiasi momento riportando la manopola su 0. La macchina resta in stand-by; mantenere premuto il tasto START/
STOP per 2 secondi per resettare la funzione.
Funzione Scongelamento
La funzione scongelamento permette di scongelare e riscaldare le pappe preparate in precedenza. Se presente, rimuovere
dal contenitore (F) la lama multifunzionale (I) o la pala mescolatrice (L); versare l’acqua nel contenitore (F) fino a raggiungere il livello contrassegnato dal simbolo vapore
, se
presenti togliere il coperchio ed eventuali etichette al vasetto
con l’alimento da scongelare/riscaldare (Attenzione il vasetto
deve essere in vetro o in plastica termoresistente o altro materiale adatto a scaldare alimenti fino a 100°C, le dimensioni
massime del vasetto non devono essere superiori a: diametro
60mm, altezza 90mm).
Si sconsiglia di utilizzare questo apparecchio per tritare
alimenti particolarmente duri come cibi ancora surgelati in
quanto le lame potrebbero danneggiarsi in modo irreparabile.
Al termine di ogni funzione per rimuovere il contenitore (F) spegnere l’apparecchio mediante l’apposito tasto
e rimuovere il coperchio (B).
Nell’aprire il coperchio e/o nel rimuovere il contenitore fate attenzione a non scottarvi!!
Posizionare il vasetto sul fondo del contenitore (F) ed impostare la funzione Bollitura secondo le istruzioni indicate in tale
paragrafo su questo manuale di istruzioni. Per scongelare/riscaldare un omogeneizzato di circa 80 gr impostare il tempo a
15/20 minuti, nel caso di una pappa completa omogeneizzata
(circa 200-260 gr) impostare 25-30 minuti circa.
Come si omogeneizza
L’ apparecchio permette di omogeneizzare tutti gli alimenti solitamente utilizzati per lo svezzamento: frutta, verdura, carne,
pesce, riso, ecc.
Grazie allo speciale design delle sue lame, negli omogeneizzati
che prepara il Baby Meal si riduce la quantità di bollicine d’aria
che sono causa di coliche per i bimbi.
Versare l’acqua e il cibo che si desidera omogeneizzare nel
contenitore (F), quindi, inserirlo nella sede prevista nella base
dell’apparecchio (G).
Posizionare il coperchio (B) e chiuderlo ruotando in senso orario fino ad agganciarlo (fig. 1).
Dopo aver eseguito la “funzione bollitura” (vedi pag. 9) procedere come da “funzione frullatore” per circa 20 secondi (vedi
pag. 9).
Per rimuovere la pappa dal contenitore (F), utilizzare la spatola
(N), in dotazione.
Terminato il ciclo di scongelamento/riscaldamento,
estrarre il vasetto con guanti o presine da forno prestando la
massima attenzione in quanto potrebbe essere molto caldo.
per motivi di ordine igienico e biologico non riscaldare
mai gli alimenti più di una volta volta o per un periodo di tempo superiore ad un’ora.
Prima di somministrare l’alimento riscaldato al bambino, verificare sempre che la sua temperatura non sia eccessiva (non
superiore a 37°C).
Pulizia dell’apparecchio
• Accertarsi che la spina sia disinserita dalla presa di corrente e
l’interruttore sia in posizione 0.
• Aprire e rimuovere il coperchio, quindi togliere il contenitore e il tappo prima di lavarli in acqua tiepida e saponata.
Risciacquare e asciugare bene.
• Se necessario rimuovere i resti degli ingredienti utilizzando
la spatola (N), in dotazione. Non utilizzare prodotti abrasivi.
• Per facilitare le operazioni di pulizia, smontare sempre le
lame. Lavare il tutto e asciugare accuratamente, quindi procedere al rimonataggio.
Attenzione le lame sono molto taglienti, quando non inse-
Al termine di ogni funzione per rimuovere il contenitore (F) spegnere l’apparecchio mediante l’apposito tasto
e rimuovere il coperchio (B).
Nell’aprire il coperchio e/o nel rimuovere il contenitore fate attenzione a non scottarvi!!
Funzione “PULSE”
La funzione “PULSE” permette un miglior controllo sulle lavorazioni brevi. Questa funzione è attivabile solo all’interno delle
25
•
•
•
it
rite nell’apparecchio, proteggerle con gli appositi cappucci
di protezione e riporle in un luogo sicuro fuori dalla portata
dei bambini.
Per evitare l’eventuale ossidazione delle lame, subito dopo
ogni utilizzo procedere sempre alla loro pulizia a fondo ed
asciugarle accuratamente.
Si consiglia di non lavare le lame in lavastoviglie perchè la
presenza di sali e umidità può provocare fenomeni ossidanti. Passare il corpo motore e il cavo di alimentazione con un
panno umido o con una spugnetta. Asciugare completamente con un panno morbido.
Avvolgere con cura il cavo di alimentazione alla base del
corpo motore.
Per facilitare la pulizia del coperchio rimuovere la guarnizione tirandola leggermente oppure utilizzando un utensile
sottile non appuntito (es. spatola in dotazione) per estrarla
dalla sua sede.
Per evitare di danneggiare la guarnizione, procedere inserendo l’utensile nel bordo esterno in corrispondenza del
gancio di supporto (vedi figura).
Dopo le operazioni di pulizia, si potrebbe depositare acqua in corrispondenza dei manici. Provvedere alla
relativa pulizia ed asciugatura per evitare l’insorgere di
muffe.
NON IMMERGERE MAI la base dell’apparecchio in acqua.
Il contenitore, il coperchio e gli accessori possono essere lavati in lavastoviglie.
Consigli
• Non superare mai le quantità riportate all’interno del contenitore.
• Rispettare i tempi consigliati nel ricettario.
Nel riposizionare la guarnizione, accertarsi che sia accuratamente inserita in tutti i ganci di supporto.
Se qualcosa non funziona...
PROBLEMA
CAUSA/RIMEDIO
L’apparecchio non funziona
•
•
Il coperchio non è correttamente chiuso.
La spina non è ben inserita nella presa.
Il display visualizza
seguito dall’emissione di un
segnale acustico ripetuto 7 volte
•
Portare in un Centro Assistenza.
Il display visualizza
seguito dall’emissione di un
segnale acustico ripetuto 6 volte
•
Pentola troppo calda/utilizzo di troppo olio.
Spegnere l’apparecchio e lasciare raffreddare la pentola.
Il display visualizza
seguito dall’emissione di un
segnale acusticoa ripetuto 5 volte
•
Lame bloccate.
Spegnere l’apparecchio e lasciare raffreddare la base
(togliere le lame).
Il display visualizza
seguito dall’emissione di un
segnale acustico ripetuto 4 volte
•
Portare in un Centro Assistenza.
Il display visualizza
•
•
Mancanza d’acqua. Errato utilizzo di olio in funzione Bollitura e funzione
Vapore.
Utilizzo di solo olio in funzione cottura.
Spegnere l’apparecchio e utilizzarlo correttamente.
e l’icona
•
Il display visualizza
•
•
26
Il contenitore non è in sede o è mal posizionato.
Il coperchio non è chiuso correttamente.
한국치코주식회사
서울시 영등포구 문래동3가 55-20
에이스하이테크시티 2동 1801호
1599.5510
www.chicco.co.kr
5720610071/08.12