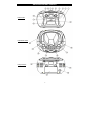
1
CDMP-327U
Radioregistratore CD/MP3 con presa USB e radio AM/FM
CD/MP3 Radio Recorder with USB socket & AM/FM radio
Radiograbador CD/MP3 con toma USB y radio AM/FM
Manuale istruzioni
User’s manual
Manual de uso
AVVERTENZE IMPORTANTI
Leggere attentamente questo manuale prima di iniziare ad utilizzare l’apparecchio e
conservarlo per eventuali consultazioni future.
PERICOLO
PERICOLO
RISCHIO DI FOLGORAZIONE
NON APRIRE IL MOBILE
IMPORTANTE: NELL'APPARECCHIO SONO PRESENTI ALTE TENSIONI. NON CERCARE DI APRIRE IL
MOBILE. NELL'EVENTUALE CASO DI GUASTI RIVOLGERSI ESCLUSIVAMENTE AD UN CENTRO DI
ASSISTENZA TECNICA AUTORIZZATO.
Il triangolo che racchiude un fulmine indica che nell’apparecchio sono
presenti alte tensioni, che possono mettere in grave pericolo l’incolumità di
chi apre il mobile.
Il triangolo che racchiude un punto esclamativo indica che prima di iniziare ad
utilizzare l’apparecchio è necessario essere a conoscenza di tutte le
avvertenze riportate in questo manuale di istruzioni.
ATTENZIONE - L'esposizione diretta dell’apparecchio alla pioggia o ad una eccessiva
umidità ambientale può provocare cortocircuiti o principi d'incendio.
PRODOTTO LASER CLASSE 1 - Questo prodotto incorpora un generatore laser a bassa
potenza. In caso di apertura del vano CD e contemporanea disattivazione dei dispositivi di
sicurezza, potrebbe verificarsi una pericolosa esposizione alle radiazioni laser invisibili
emesse dal dispositivo di lettura.
-1-
PRECAUZIONI PER L’USO
Per mantenere elevate e costanti nel tempo le prestazioni di questo prodotto, osservare le
seguenti precauzioni.
Formazione di condensa
• Portando repentinamente l’apparecchio
da un ambiente freddo ad uno più caldo
si può verificare una formazione di
condensa al suo interno. In questo caso
si consiglia di scollegare l’apparecchio
dalla presa di corrente e di lasciarlo
spento per almeno un paio d’ore prima di
iniziare ad utilizzarlo, in modo da
permettere che l’eventuale condensa
asciughi perfettamente.
Posizionamento
• Evitare di riporre o utilizzare
l’apparecchio in ambienti
eccessivamente caldi, freddi, umidi o
polverosi.
• Posizionare l’apparecchio su una
superficie orizzontale, stabile e piatta.
• Evitare di ostruire le aperture di
ventilazione. Non appoggiare
l’apparecchio su un letto o un tappeto.
Alimentazione
• Prima di collegare l’apparecchio ad una
presa di corrente, controllare che la
tensione di rete corrisponda a quella
indicata nella targhetta sul retro del
mobile.
Ventilazione
• Collocare l’apparecchio in una posizione
in cui non ne sia preclusa la ventilazione.
Acqua e umidità
• All’interno dell’apparecchio non devono
penetrare acqua o liquidi di qualsiasi tipo.
Questo apparecchio non deve essere
utilizzato in prossimità di contenitori
d’acqua, e non vi si deve sovrapporre
alcun contenitore di liquidi.
Sicurezza dell’utente
• Per sfilare il cavo di alimentazione dalla
presa di corrente afferrarne la spina,
evitando di tirare il cavo stesso.
• Scollegare l’apparecchio
dall’alimentazione di rete durante I
temporali o in previsione di un lungo
periodo di inutilizzo.
• Quando il cavo di alimentazione è
collegato ad una presa di corrente,
l’apparecchio è sempre sotto tensione,
anche mentre è spento. Per scollegarlo
completamente, sfilare la spina del cavo
dalla presa.
• Questo prodotto deve essere utilizzato
solo in posizione orizzontale.
Elevati livelli sonori
• Questo apparecchio ha un basso rumore
di fondo ed un’elevata gamma dinamica;
per questi motivi, può succedere che il
volume venga inavvertitamente regolato
ad un livello talmente alto da
danneggiare gli altoparlanti o una cuffia
eventualmente collegata all’apposita
uscita. Si raccomanda pertanto di
regolare il volume con particolare
attenzione.
-2-
AVVERTENZE IMPORTANTI
• L’apparecchio non deve essere posizionato in prossimità di fonti di calore quali stufe, caloriferi o
altre apparecchiature in grado di generare calore (ad esempio amplificatori).
• Non utilizzare l’apparecchio in prossimità di contenitori d’acqua, vasche, lavabi, lavandini, su
superfici bagnate o accanto ad una piscina. L’apparecchio non deve essere raggiunto da spruzzi o
getti d’acqua.
• Non appoggiare sopra o accanto all’apparecchio candele o altre fiamme libere.
• Se all’interno del mobile dovessero penetrare dell’acqua o altri liquidi, scollegare immediatamente
l’apparecchio dalla presa di corrente e interpellare un tecnico qualificato.
• Evitare di toccare la spina del cavo di alimentazione mentre si hanno le mani bagnate. Evitare
inoltre di toccare qualsiasi parte o componente all’interno del mobile.
• Per sfilare il cavo di alimentazione dalla presa di corrente afferrarne la spina, evitando di tirare il
cavo stesso.
• Evitare di far cadere l’apparecchio, o di far penetrare al suo interno liquidi o oggetti di qualsiasi tipo.
• L’apparecchio è progettato in modo da poter essere lasciato in stand-by quando non viene utilizzato.
Dato che quando si trova in stand-by è comunque collegato all’impianto di rete e alimentato, per
scollegarlo completamente si deve sfilare la spina del cavo di alimentazione dalla presa di corrente.
• Nell’eventuale caso di danni al cavo di alimentazione, interpellare un centro di assistenza tecnica.
• Evitare di piegare in maniera troppo accentuata o di strappare il cavo di alimentazione.
• Non manomettere il cavo di alimentazione.
• Evitare che all’interno dell’apparecchio possano penetrare oggetti metallici.
• In previsione di forti temporali è prudente scollegare il cavo di alimentazione dalla presa di corrente.
POSIZIONAMENTO DELL’APPARECCHIO
• Al fine di non ostacolarne la ventilazione, l’apparecchio deve essere posizionato a non meno di 15
cm dalle superfici o dagli oggetti circostanti.
• Evitare di ostruire le fessure di ventilazione ricavate sul mobile dell’apparecchio e di posizionarlo su
superfici morbide o in luoghi in cui ne sia precluso il corretto raffreddamento.
• L’apparecchio deve essere posizionato su una superficie stabile e orizzontale.
• Evitare di utilizzare l’apparecchio in luoghi eccessivamente caldi, umidi o polverosi.
• Portando repentinamente l’apparecchio da un ambiente freddo ad uno più caldo si può verificare
l’eventuale formazione di condensa al suo interno. In questo caso si consiglia di lasciare
l’apparecchio spento per almeno un paio d’ore prima di iniziare ad utilizzarlo, in modo da permettere
che l’eventuale condensa asciughi perfettamente.
• Evitare che l’apparecchio venga sottoposto a urti o a vibrazioni di forte intensità.
• Non posizionare l’apparecchio in prossimità di campi magnetici di notevole intensità. Evitare inoltre
di avvicinare agli altoparlanti dell’apparecchio cassette audio registrate, dato che il campo
magnetico indotto potrebbe provocare la cancellazione delle registrazioni.
• Non avvicinare l’apparecchio allo schermo di un televisore, poiché il campo magnetico prodotto
dagli altoparlanti potrebbe provocare distorsioni delle immagini.
• Chiudere sempre lo sportellino del vano CD, per impedire che la polvere possa depositarsi sulla
lente del dispositivo di lettura.
DISPOSITIVO DI SICUREZZA
• L’ apparecchio è dotato di un dispositivo di sicurezza che disattiva l’emissione del raggio laser
quando si apre il coperchietto del vano CD. Questo dispositivo non deve essere manomesso: in
caso contrario, l’eventuale esposizione al raggio laser può provocare gravi danni alla vista.
-3-
DESCRIZIONE DELL’APPARECCHIO
Vista frontale
Vista dall’alto
Vista posteriore
-4-
DESCRIZIONE DELL’APPARECCHIO
sintonizzare l’emittente desiderata.
Lato frontale e lato superiore
1. Altoparlanti
2. Vano cassetta
3. Pulsante BACK – Per selezionare il
brano precedente del CD.
4. Pulsante NEXT – Per selezionare il
brano successivo del CD.
5. Display – Visualizza le funzioni del
lettore CD.
6. Finestrella di sintonia – Permette di
osservare l’indicatore di sintonia.
7. Scala di sintonia – Visualizza la
frequenza AM o FM sintonizzata.
8. Indicazione FM stereo – Evidenzia
che è in corso la ricezione stereo in
banda FM.
9. Pulsante PLAY/PAUSE – Per
avviare o sospendere
temporaneamente la lettura di un
CD.
10. Pulsante STOP – Permette di
interrompere la riproduzione di un
CD o di cancellare la
programmazione dell’ordine di lettura
dei brani.
11. Pulsante MODE – Permette di
ripetere la lettura di un singolo brano,
di un intero CD, di una cartella o di
attivare la funzione di riproduzione
casuale.
12. Pulsante PROGRAM – Permette di
programmare l’ordine desiderato di
lettura di una sequenza di brani.
13. Porta USB
14. Selettore AM/FM/FM ST – Permette
di selezionare la ricezione in banda
AM, FM mono o FM stereo.
16. Pulsantiera del registratore –
PAUSE: Interrompe momentaneamente
la registrazione o la riproduzione in corso
STOP/EJECT: Interrompe definitivamente
la registrazione o la riproduzione in corso.
Premendolo una seconda volta si apre lo
sportellino del vano cassetta.
FWD/REW: Per attivare rispettivamente
la ricerca veloce in avanti o all’indietro.
PLAY: Per dare inizio alla riproduzione.
RECORD: Per dare inizio alla
registrazione.
17. Coperchietto vano CD – Sollevarlo per
accedere al vano CD.
18. Manopola volume – Per regolare il
volume d’ascolto.
19. Selettore di funzione – Permette di
selezionare la sorgente audio
(CD/MP3/USB, RADIO oppure TAPE) e
di accendere/spegnere l’apparecchio.
20. Maniglia di trasporto
Lato posteriore
21. Ingresso alimentazione – Permette il
collegamento del cavo di alimentazione
da rete.
22. Uscita stereo per collegamento
cuffia – Presa da 3,5 mm.
23. Coperchietto vano batterie – Permette
di accedere al vano delle batterie.
24. Antenna telescopica – Estendendola
completamente permette una migliore
ricezione in banda FM.
15. Manopola di sintonia – Per
-5-
ALIMENTAZIONE
Quando è possibile, utilizzare l’alimentazione da rete per preservare la carica delle batterie.
Prima di inserire le batterie, assicurarsi di aver scollegato l’apparecchio dalla presa di corrente.
Batterie (non fornite in dotazione)
Aprire il vano batterie e inserire, rispettando la corretta polarità indicata dai segni “+” e “–”
all’interno del vano stesso, 6 batterie formato R-14/UM2/C.
LE BATTERIE CONTENGONO SOSTANZE CHIMICHE POTENZIALMENTE DANNOSE
E DEVONO ESSERE SMALTITE CORRETTAMENTE.
Un utilizzo improprio delle batterie potrebbe causare una perdita di liquido elettrolita e
conseguentemente corrodere il vano o far esplodere le batterie stesse.
Si raccomanda quindi di:
• Non mischiare batterie di tipo diverso (ad esempio alcaline e zinco-carbone).
• Utilizzare solamente batterie dello stesso tipo.
• Non utilizzare simultaneamente batterie nuove con altre usate.
• Rimuovere le batterie in caso di inutilizzo prolungato dell’apparecchio.
Alimentazione da rete
1 Controllare che il voltaggio indicato sulla targhetta applicata sul retro del mobile
corrisponda alla tensione di rete locale. In caso contrario rivolgersi al rivenditore o ad
un Centro di Assistenza Tecnica.
2 Collegare il cavo di alimentazione alla presa di alimentazione sul retro del mobile e ad
una presa a muro. L’apparecchio è ora alimentato e pronto all’uso.
3 Per scollegare completamente l’apparecchio dall’alimentazione, sfilare la presa del
cavo di alimentazione dalla presa a muro.
4 In caso di violento temporale o di prolungato inutilizzo, scollegare prudenzialmente il
cavo di alimentazione dalla presa a muro.
-6-
ISTRUZIONI PER L’USO
FUNZIONAMENTO GENERALE
1 Per accendere l’apparecchio e selezionare la sorgente audio desiderata, portare il
selettore di funzione nella posizione corrispondente (CD/MP3/USB, TAPE oppure
RADIO).
2 Regolare il volume sino a raggiungere il livello desiderato.
3 Per spegnere l’apparecchio, portare il selettore di funzione in posizione OFF.
ANTENNE FM E AM
• Per migliorare la ricezione in banda FM, estendere completamente l’antenna telescopica e
orientarla finché il segnale ricevuto non è ottimale. Ridurre la lunghezza se il segnale è
troppo forte (ad esempio nelle vicinanze di un trasmettitore).
• Per migliorare la ricezione in banda AM, orientare opportunamente l’apparecchio, che è
dotato di un’antenna AM incorporata.
RICEZIONE RADIO
1 Portare il selettore di funzione in posizione RADIO.
2 Selezionare, per mezzo del commutatore BAND, la banda desiderata (AM, FM mono o
FM stereo).
3 Ruotare la manopola della sintonia in modo da sintonizzare l’emittente desiderata.
Attenzione: Se si è selezionata la banda FM STEREO, quando si sintonizza
un’emittente che trasmette in banda FM in stereofonia, si accende la relativa
indicazione luminosa.
4 Terminato l’ascolto, portare il selettore di funzione in posizione OFF per spegnere
l’apparecchio.
RIPRODUZIONE DI UNA CASSETTA
1 Portare il selettore di funzione in posizione TAPE.
2 Premere il pulsante STOP/EJECT per aprire lo sportellino del vano cassetta.
3 Inserire una cassetta registrata e chiudere lo sportellino.
4 Premere il pulsante PLAY per dare inizio alla riproduzione.
5 Per interrompere la riproduzione, premere il pulsante PAUSE. Premerlo nuovamente
per riprendere la riproduzione.
6 Premendo i pulsanti FWD/REW, si attiva l’avvolgimento del nastro in avanti o all’indietro.
7 Per interrompere la funzione in corso, premere il tasto STOP/EJECT.
USO DI UNA CUFFIA
Inserire lo spinotto di collegamento della cuffia (o di una coppia di auricolari) nella presa
PHONES che si trova sul lato superiore dell’apparecchio. Gli altoparlanti vengono
disattivati automaticamente. Prima di indossare la cuffia o gli auricolari, accertarsi che il
volume non sia eccessivamente elevato.
-7-
REGISTRAZIONE DI UNA CASSETTA
INFORMAZIONI GENERALI SULLA REGISTRAZIONE
• La registrazione di materiale audio coperto da diritto d’autore deve essere effettuata in
osservanza alle vigenti leggi.
• Questo apparecchio non è adatto alla registrazione su nastri di tipo Chrome (IEC II) o
Metal (IEC IV). Per la registrazione, utilizzare solamente cassette con nastri di tipo
Normal (IEC I), le cui linguette non siano state asportate.
• Il livello di registrazione ottimale è impostato automaticamente. La regolazione del
volume d’ascolto non ha alcun effetto sulla registrazione in corso.
• All’inizio e alla fine della cassetta si trovano due tratti di nastro sui quali non è possibile
registrare. Per far sì che i primi secondi della registrazione non vengano persi, si
consiglia di avvolgere manualmente il nastro sino alla conclusione del tratto non
registrabile.
• Per impedire che una registrazione possa essere
cancellata accidentalmente, rimuovere l’apposita
linguetta di protezione che si trova sul dorso della
cassetta (osservando frontalmente la cassetta,
con il tratto di nastro esposto rivolto verso il basso,
la linguetta relativa al lato che si ha di fronte è
quella che si trova nella parte sinistra del dorso).
In questo modo non è più possibile registrare sul
nastro. Per poter nuovamente registrare sul nastro,
coprire con del nastro adesivo l’apertura che si è
creata asportando la linguetta.
REGISTRAZIONE DALLA RADIO
1 Sintonizzare l’emittente desiderata
(vedere il paragrafo “Ricezione radio”).
2 Premere il pulsante STOP/EJECT per
aprire lo sportellino del vano cassetta.
3 Inserire una cassetta adatta e chiudere
lo sportellino.
4 Premere il pulsante RECORD per dare
inizio alla registrazione.
5 Per interrompere momentaneamente la
registrazione, premere il pulsante
PAUSE. Per riprenderla, premerlo
nuovamente.
6 Per concludere la registrazione
premere il pulsante STOP/EJECT.
REGISTRAZIONE DA UN CD
1 Portare il selettore di funzione in
posizione CD.
2 Inserire il CD da registrare.
3 Inserire una cassetta adatta e chiudere
lo sportellino.
4 Premere il pulsante RECORD per dare
inizio alla registrazione. Il pulsante
PLAY viene azionato automaticamente.
5 Dare inizio alla lettura del CD
premendo il pulsante PLAY/PAUSE.
6 Per concludere la registrazione
premere il pulsante STOP/EJECT.
-8-
REGISTRAZIONE DI UNA CASSETTA
PULIZIA DELLE TESTINE E DEI MECCANISMI DI TRASCINAMENTO DEL NASTRO
Per assicurare una registrazione e una
riproduzione di qualità, pulire le parti (A), (B) e
(C), evidenziate nella figura, all’incirca ogni 50
ore di utilizzo oppure una volta al mese,
utilizzando un bastoncino ovattato leggermente
imbevuto d’alcool o di uno speciale liquido per la
pulizia delle testine.
1 Aprire lo sportellino del vano cassetta
premendo il pulsante STOP/EJECT.
2 Premere il pulsante PLAY e pulire il rullino
pressore (C).
3 Premere il pulsante PAUSE e pulire la testina
magnetica (A) e l’alberino (B).
4 Completata la pulizia, premere il pulsante
STOP/EJECT.
NOTA: La pulizia periodica delle testine può
essere effettuata anche per mezzo di una
apposita cassetta puliscitestine.
-9-
LETTURA DI UN CD/MP3 O DEL SUPPORTO DI MEMORIA USB
LETTURA DEI FILE PRESENTI SU UN CD/MP3 O SU UN SUPPORTO DI MEMORIA USB
Questo apparecchio può riprodurre file audio presenti su CD Audio, CD registrabili (CD-R),
CD riscrivibili (CD-RW), CD con file MP3 (CD/MP3) o su un supporto di memoria collegato
alla porta USB. Non tentare di riprodurre dischi di altro tipo (CD-ROM, CDi, VCD, DVD o
CD dati).
NOTA: La possibilità di riproduzione di CD-R e CD-RW dipende dal tipo di masterizzatore,
dal software utilizzato per la masterizzazione, dalla velocità di masterizzazione, dal tipo di
disco e dalla sua qualità.
1
2
3
4
5
6
Portare il selettore di funzione in posizione CD/MP3/USB. Nel display viene
visualizzata l’indicazione “– – –”.
Per aprire il coperchietto del vano CD, sollevarne l’estremità con l’indicazione
“OPEN/CLOSE”.
Inserire un CD, un CD-R, un CD-RW o un CD/MP3 con l’etichetta rivolta verso l’alto,
quindi premere con cautela lo sportellino per chiuderlo.
Premere il pulsante PLAY/PAUSE per dare inizio alla riproduzione.
• Per passare dalla modalità CD/MP3 alla modalità USB, o viceversa, tenere
premuto per circa due secondi il pulsante PLAY/PAUSE.
Per interrompere temporaneamente la riproduzione, premere il pulsante PLAY/PAUSE;
per riprenderla, premerlo nuovamente.
Per interrompere definitivamente la riproduzione, premere il pulsante STOP.
NOTA: la riproduzione del CD viene interrotta anche quando:
- si apre il coperchietto del vano CD.
- si porta il selettore di funzione in posizione RADIO.
- il CD raggiunge la fine.
RICERCA DEI BRANI
Durante la riproduzione è possibile, utilizzando i pulsanti NEXT o BACK, selezionare un
particolare brano.
• Se si seleziona un brano mentre l’apparecchio si trova in pausa o in stop, per avviare la
riproduzione premere il pulsante PLAY/PAUSE.
• Premere il pulsante di ricerca NEXT per passare al brano successivo, oppure premerlo
ripetutamente finché il numero del brano desiderato non viene visualizzato sul display.
• Premere il pulsante di ricerca BACK per tornare all’inizio del brano corrente.
• Premere il pulsante di ricerca BACK più di una volta per selezionare un brano
precedente.
RICERCA VELOCE
1 Tenere premuto il pulsante di ricerca NEXT o BACK. Il CD viene riprodotto ad alta
velocità e volume ridotto.
2 Quando si è raggiunto il punto desiderato, rilasciare il pulsante, in modo da riprendere
la normale riproduzione.
- 10 -
LETTURA DI UN CD/MP3 O DEL SUPPORTO DI MEMORIA USB
MODE
Repeat 1 – Riproduzione continua del brano corrente.
Repeat all – Riproduzione continua dell’intero CD/USB.
Repeat Album – Riproduzione continua della cartella selezionata
Random – Riproduzione casuale.
PROGRAMMAZIONE DELL’ORDINE DI LETTURA DEI BRANI
Questa funzione permette di programmare l’ordine desiderato di lettura dei brani del CD,
fino ad un massimo di 20. È possibile programmare lo stesso brano anche più di una volta.
1 Mentre l’apparecchio si trova in stop, selezionare il brano desiderato utilizzando i
pulsanti di ricerca NEXT o BACK.
2 Quando il numero corrispondente al brano desiderato viene visualizzato nel display,
premere il pulsante PROG per memorizzare la selezione.
3 Ripetere i passaggi 1 e 2 per memorizzare gli altri brani.
4 Per dare inizio alla lettura dei brani nell’ordine programmato, premere il pulsante
PLAY/PAUSE.
CONTROLLO DELL’ORDINE DI PROGRAMMAZIONE
Mentre l’apparecchio si trova in lettura, premendo i pulsanti NEXT o BACK verranno
visualizzati in sequenza nel display i numeri dei brani programmati.
CANCELLAZIONE DELL’ORDINE DI PROGRAMMAZIONE
È possibile cancellare dalla memoria l’ordine di programmazione:
- aprendo il coperchietto del vano CD.
- portando il selettore di funzione in posizione RADIO.
- premendo due volte il pulsante STOP.
- 11 -
LETTURA DI UN CD/MP3 O DEL SUPPORTO DI MEMORIA USB
LETTURA DEI FILE PRESENTI SU UN SUPPORTO DI MEMORIA USB
Pulsante PLAY/PAUSE
Porta USB
1
2
3
Portare il selettore di funzione in posizione CD/MP3/USB.
Collegare il supporto di memoria (ad esempio una chiavetta) alla porta USB.
Per passare dalla modalità CD/MP3 alla modalità USB, o viceversa, premere per circa due
secondi il pulsante PLAY/PAUSE. Nel display viene visualizzata questa indicazione:
(Modalità USB)
4
5
Premere il pulsante PLAY/PAUSE per dare inizio alla riproduzione dei file presenti sul
supporto di memoria USB.
Per interrompere la riproduzione, premere il pulsante STOP.
Per tornare alla modalità CD/MP3, premere per circa due secondi il pulsante
PLAY/PAUSE. Nel display viene visualizzata questa indicazione:
(Modalità CD)
(Modalità MP3)
NOTA: Prima di scollegare il supporto di memoria dalla porta USB, premere il pulsante
STOP e tenere premuto per circa 2 secondi il pulsante PLAY/PAUSE, in modo da tornare
in modalità CD/MP3.
- 12 -
MANUTENZIONE
AVVERTENZE DI CARATTERE GENERALE
• Posizionare l’apparecchio su una superficie solida, piatta e orizzontale.
• Non esporre l’apparecchio, le batterie o i CD a umidità, pioggia, sabbia o alte
temperature generate da fonti di calore o dalla luce solare.
• Non coprire l’apparecchio. Un adeguata ventilazione, garantita da una distanza minima
di 15 cm tra le fessure di ventilazione dell’apparecchio ed eventuali superfici circostanti,
è necessaria per evitarne il surriscaldamento.
• Le parti meccaniche dell’apparecchio contengono cuscinetti
autolubrificanti e non necessitano di manutenzione periodica.
• Per pulire l’apparecchio, utilizzare un panno morbido e asciutto.
Non usare detergenti che contengano alcool, ammoniaca,
benzene o agenti abrasivi, che potrebbero danneggiare la
finitura del mobile.
AVVERTENZE RELATIVE ALLA PULIZIA DEI CD
• Per rimuovere impronte digitali o tracce di sporco particolarmente ostinate, utilizzare un
panno morbido leggermente inumidito.
• Pulire i CD, se necessario, detergendoli in senso radiale (dal centro verso il bordo esterno)
e non circolare. Non utilizzare detergenti che potrebbero danneggiarne la superficie.
• Per pulire i disch, evitare di utilizzare alcool, benzina, trielina, solventi di qualsiasi tipo o
detergenti antistatici per dischi in vinile.
• Al termine dell’uso, riporre i CD nelle rispettive custodie.
• Evitare di esporre i dischi alla luce solare diretta o all’azione di una sorgente di calore.
Evitare inoltre di lasciarli all’interno di una vettura parcheggiata al sole.
• Non scrivere o applicare adesivi sulla superficie dei CD.
AVVERTENZE RELATIVE ALLA PULIZIA DEL DISPOSITIVO DI LETTURA
• Per asportare la polvere eventualmente depositata sulla lente del dispositivo di lettura,
utilizzare un pennellino molto morbido con soffietto (reperibile in un negozio di materiale
fotografico) o un bastoncino ovattato leggermente inumidito.
• Prima di pulire la lente del dispositivo di lettura, scollegare l’apparecchio dalla presa di
corrente.
• Al termine dell’uso, chiudere sempre lo sportellino del vano CD per impedire l’accumulo
di polvere al suo interno.
- 13 -
IN CASO DI EVENTUALI PROBLEMI
Se si riscontra un difetto o un malfunzionamento dell’apparecchio, consultare la seguente
tabella. Non aprire il mobile, per evitare il rischio di folgorazione. Se non è possibile
rimediare ai problemi seguendo questi consigli, contattare il rivenditore o un Centro di
Assistenza Tecnica autorizzato.
ATTENZIONE: In nessuna circostanza si deve provare a riparare personalmente
l’apparecchio, in quanto ciò invaliderebbe la garanzia.
Problema
Possibile causa
Rimedio
Assenza di suono
o di alimentazione
- Livello del volume inadeguato.
- Cavo di alimentazione non
inserito correttamente.
- Batterie scariche o inserite
erroneamente.
• Regolare il livello utilizzando il
comando Volume.
• Inserire a fondo i connettori del cavo di
alimentazione.
• Inserire delle batterie nuove rispettando
la corretta polarità.
Il display non
funziona o non vi è
risposta ai
comandi
- Scarica elettrostatica o campi
elettromagnetici.
• Spegnere e scollegare dalla rete
l’apparecchio. Ricollegare dopo
qualche secondo
La qualità sonora
delle registrazioni
è scadente
- Le testine del registratore
sono sporche.
- Il tipo di nastro non è adatto.
• Pulirle secondo le istruzioni riportate
nel relativo paragrafo.
• Questo apparecchio può utilizzare solo
nastri tipo “Normal” (IEC I).
Non si riesce a
registrare una
cassetta
- La linguetta di protezione
contro le cancellazioni
accidentali è stata asportata.
• Coprire l’apertura creatasi sul dorso
della cassetta con un pezzetto di nastro
adesivo.
Nel display viene
visualizzata
l’indicazione “No
disc”
- Nell’apparecchio non è stato
inserito alcun CD.
- Il CD è sporco o rigato.
- La lente del dispositivo di
lettura laser è appannata.
- Nell’apparecchio si è inserito
un CD-R vuoto o non
correttamente finalizzato.
• Inserire un CD, CD-R o CD-RW.
• Pulire o sostituire il CD (vedere il
paragrafo relativo alla manutenzione).
• Attendere sinché la lente non abbia
raggiunto l’equilibrio termico con la
temperatura ambientale.
• Inserire un CD-R non vuoto e
correttamente finalizzato.
Non è possibile
leggere un CD
- Il CD è sporco o rigato.
- La lente del dispositivo di
lettura laser è appannata
• Pulire o sostituire il CD (vedere il
paragrafo relativo alla manutenzione).
• Attendere sinché la lente non abbia
raggiunto l’equilibrio termico con la
temperatura ambientale.
Il CD “salta”
- Il CD è danneggiato o sporco.
- Si è attivata la
programmazione dell’ordine di
lettura dei brani.
• Pulire o sostituire il CD (vedere il
paragrafo relativo alla manutenzione).
• Disattivare la programmazione
dell’ordine di lettura dei brani.
- 14 -
CARATTERISTICHE TECNICHE
DATI GENERALI
Alimentazione:
Uscita cuffia:
AC 230 V, 50 Hz
DC 9 V (6 batterie formato C/UM2/R14 da 1,5 V, non fornite in dotazione)
225 x 160 x 260 mm
2,11 kg
AM 520 – 1.606,5 kHz
FM 87,5 – 108 MHz
Presa stereo da 3,5 mm, impedenza 8-32 Ohm
SEZIONE AUDIO
Potenza in uscita (RMS):
Impedenza altoparlanti:
Uscita cuffia/auricolari:
2 x 1,2 W
8 Ohm
Presa mini-jack da 3,5 mm di diametro
Dimensioni (L x A x P):
Peso:
Gamme di frequenze:
INFORMAZIONI IMPORTANTI PER L'UTENTE AI SENSI DELLA DIRETTIVA
"RAEE" 2002/96/CE E SUCCESSIVA MODIFICA 2003/108/CE SULLO
SMALTIMENTO DI APPARECCHIATURE ELETTRICHE ED ELETTRONICHE.
Ai sensi della Direttiva "RAEE" 2002/96/CE e successiva modifica 2003/108/CE,
questa apparecchiatura viene contrassegnata con il simbolo del contenitore di rifiuti
barrato. Per un futuro smaltimento di questo prodotto, si prega di tenere presente
quanto segue.
- E' vietato smaltire questa apparecchiatura come un comune rifiuto urbano: è necessario rivolgersi ad uno dei
Centri di Raccolta RAEE (Rifiuti di Apparecchiature Elettriche ed Elettroniche) Autorizzato e predisposto
dalla Pubblica Amministrazione. E' possibile consegnare ad un negoziante questa apparecchiatura per il suo
smaltimento all'atto dell'acquisto di una nuova apparecchiatura dello stesso tipo.
- La normativa sopra citata, alla quale rimandiamo per ulteriori dettagli o approfondimenti, prevede sanzioni
in caso di smaltimento abusivo dei RAEE (Rifiuti di Apparecchiature Elettriche ed Elettroniche).
Questo apparecchio è conforme alla Direttiva
CEE/89/336 e successive modifiche
CEE/92/31 - CEE/93/68, relativa al rispetto
dei requisiti essenziali di compatibilità
elettromagnetica (E.M.C.).
Questo apparecchio è conforme al D.M. 28
Agosto 1995 N. 548, pubblicato sulla G.U. N.
301 del 28/12/95 (rispetto delle frequenze
utilizzabili in Italia dai ricevitori di
radiodiffusione sonora e televisiva).
Questo apparecchio è conforme alla Direttiva
CEE/73/23 e successiva modifica CEE/93/68,
che riguarda le prescrizioni relative alla
sicurezza degli apparecchi elettronici e loro
accessori collegati alla rete, per uso
domestico o analogo uso generale (L.V.).
A causa della continua evoluzione dei prodotti,
le caratteristiche ed il disegno di questo
modello possono variare senza preavviso.
L'Azienda declina ogni responsabilità per
l'utilizzo improprio del prodotto.
- 15 -
GARANZIA
GARANZIA CONVENZIONALE
La Società MELCHIONI S.p.A.,
distributrice sul territorio italiano del
marchio IRRADIO, vi ringrazia per la scelta
e vi garantisce che i propri apparecchi
sono frutto delle ultime tecnologie e
ricerche.
L’ apparecchio è coperto dalla garanzia
convenzionale per il periodo di UN ANNO
dalla data di acquisto da parte del primo
utente. La presente garanzia lascia
impregiudicata la validità della normativa in
vigore riguardante i beni di consumo (art
1519 bis - nonies del Codice Civile).
I componenti o le parti che risulteranno
difettosi per accertate cause di
fabbricazione saranno riparati o sostituiti
gratuitamente presso la nostra rete
d’assistenza autorizzata, durante il
periodo di garanzia di cui sopra.
La MELCHIONI SPA si riserva il diritto di
effettuare la sostituzione integrale
dell’apparecchio, qualora la riparabilità
risultasse impossibile o troppo onerosa,
con un altro apparecchio uguale (o simile)
nel corso del periodo di garanzia. In questo
caso la decorrenza della garanzia rimane
quella del primo acquisto: la prestazione
eseguita in garanzia non prolunga il
periodo della garanzia stessa.
Questo apparecchio non verrà mai
considerato difettoso per materiali o
fabbricazione qualora dovesse essere
adattato, cambiato o regolato, per
conformarsi a norme di sicurezza e/o
tecniche nazionali o locali, in vigore in un
Paese diverso da quello per il quale è stato
originariamente progettato e fabbricato.
Questo apparecchio è stato progettato e
costruito per un impiego esclusivamente
domestico: qualunque altro utilizzo fa
decadere la garanzia.
La garanzia non copre:
• le parti soggette ad usura o logorio, né
quelle parti che necessitano di una
sostituzione e/o manutenzione
periodica;
• l’uso professionale del prodotto;
• i mal funzionamenti o qualsiasi difetto
dovuti ad errata installazione,
configurazione, aggiornamento di
software / BIOS / firmware non eseguita
da personale autorizzato MELCHIONI
SPA;
• riparazioni o interventi eseguiti da
persone non autorizzate da MELCHIONI
SPA;
• manipolazioni di componenti
dell'assemblaggio o, ove applicabile, del
software;
• difetti provocati da caduta o trasporto,
fulmine, sbalzi di tensione, infiltrazioni di
liquidi, apertura dell'apparecchio,
intemperie, fuoco, disordini pubblici,
aerazione inadeguata o errata
alimentazione;
• eventuali accessori, ad esempio: scatole,
borse, batterie, ecc. usate con questo
prodotto;
• interventi a domicilio per controlli di
comodo o presunti difetti.
- 16 -
GARANZIA
Il riconoscimento della garanzia da parte di
MELCHIONI SPA, o dei suoi centri di
assistenza autorizzati, è subordinata alla
presentazione di un documento fiscale che
comprovi l’effettiva data d’acquisto. Lo
stesso non deve presentare manomissioni
o cancellature: in presenza di questi
MELCHIONI SPA si riserva il diritto di
rifiutare l’intervento in garanzia.
La garanzia non sarà riconosciuta qualora
la matricola o il modello dell’apparecchio
risultassero inesistenti, abrasi o modificati.
La presente garanzia non comprende
alcun diritto di risarcimento per danni diretti
o indiretti, di qualsiasi natura, verso
persone o cose, causati da un’eventuale
inefficienza dell’apparecchio.
Eventuali estensioni, promesse o
prestazioni assicurate dal rivenditore
saranno a carico di quest’ultimo.
Sig. ........................................................................................................................................
Via ................................................................................................................. n° ..............
CAP ........................ Città ......................................................................... Prov. ............
Modello
CDMP-327U .............. Matricola .........................................................................
Rivenditore .................................................................. Data acquisto ..............................
IL PRESENTE CERTIFICATO DEBITAMENTE COMPILATO IN OGNI SUA PARTE, DEVE
SEMPRE ACCOMPAGNARE L’APPARECCHIO IN CASO DI RIPARAZIONE ED E’ VALIDO
SOLO SE ACCOMPAGNATO DA UN DOCUMENTO FISCALE (scontrino o fattura).
Per eventuali informazioni sui Centri di Assistenza autorizzati sul territorio italiano potete
contattare il numero telefonico 02-57941, oppure consultate il nostro sito www.melchioni.it
Timbro e firma del rivenditore per convalida certificato di garanzia
- 17 -
SAFETY PRECAUTIONS
Read this instruction and safety manual carefully before use. Keep this manual in a safe place for
further reference.
WARNINGS
To reduce the risk of fire or electric shock, do not expose this
product to rain or moisture.
EXPLANATION OF GRAPHIC SYMOBOLS.
The lightning symbol inside an equilateral triangle
warns the user of the presence inside the product of
uninsulated hazardous electric voltages powerful
enough to represent an electrocution risk.
HARZARD WARNING
RISK OF ELECTRIC SHOCK
DO NOT OPEN
PORTABLE CD/MP3/USB RADIO CASSETTE RECORDER
The exclamation mark symbol inside an equilateral
triangle warns the user that important operating and
servicing (troubleshooting) instructions are contained
in the documentation accompanying the product.
CAUTION: TO MINIMISE THE RISK OF ELECTRIC
SHOCK, NEVER REMOVE THE COVER. THIS PRODUCT
CONTAINS NO USER-SERVICEABLE PARTS. ONLY
QUALIFIED REPAIR TECHNICIANS SHOULD WORK ON
THIS EQUIPMENTS.
HAZARD WARNING: TO REDUCE THE RISK OF FIRE OR ELECTRIC SHOCK, DO NOT EXPOSE THIS
PRODUCT TO RAIN OR MOISTURE.
CLASS 1 LASER PRODUCT
CDMP-327U
CAUTIONS
CLASS 1 LASER PRODUCT
APPAREIL À LASER DE CLASSE1
PRODUIT LASER DE CLASSE1
I N V I S I B L E L A S E R R A D I AT I O N
WHEN OPEN AND INTERLOCKS
DEFEATED. AVOID EXPOSURE
TO BEAM.
This product contains a low-power emitter.
PRECAUTIONS FOR USE
To ensure safe use of this product, please follow the
advice below:
Positioning
• Do not use the product in extremely hot, cold,
dusty or damp condition.
• Place the product on a smooth, flat surface.
• Do not obstruct the flow of air through the
product. Place it on a well-ventilated position; do
not cover with fabric or stand on a rug or carpet.
Power supply
• Before using this product, check that its rated
voltage matches your mains power supply
voltage.
Safety instructions
• Never pull on the power cord when plugging in or
un-plugging the product: always use the plug
pulling the cord could damage it and create a risk
of electric shock.
• Unplug the product from the mains socket if you do
not intend to use it for an extended period.
• The On/Off button does not isolate the product
from the power supply. To disconnect the product
from the mains power supply, you must unplug
the power cord.
Condensation
• Water droplets or condensation may from inside it
is moved into a very warm, humid atmosphere.
• Condensation can cause the product to
malfunction.
• Leave the set in a warm room for 1 to 2 hours to
allow the condensation to evaporate.
In the event of a problem, unplug the power cord
and contact a qualified repair technician.
Ventilation precautions
Never obstruct the product’s ventilation holes.
Warning concerning liquids
Do not allow liquids to splash or spill onto the
product, and never stand a liquid-filled container
(vase, jar, etc.)on the top of it.
Warning concerning excessive sound levels
• Owing to this product’s extremely low noise output
and extended dynamic range, the user may be
tempted to turn up the volume louder than
necessary. The sound output may be excessively
high, to the point of damaging the product’s
headphones or loudspeaker. Always keep the
volume within reasonable limits.
• This product should only be used in a horizontal
position.
INSTRUCTION MANUAL
Owner’s record
For your convenience, record the model number and serial number for future reference.
Model :_____________________________Serial number :_____________________________
ENG-1
FUNCTIONS AND CONTROLS
SAFETY PRECAUTIONS
Front panel
IMPORTANT INFORMATION
9
8
7
6
5
4
3
2
1
• This product is designed for use in a temperate environment. This apparatus must not be exposed
to direct sunlight or extremely high temperatures and must not be installed near a radiator, kitchen
range or any other device that produces heat.
• Do not place this apparatus in a location with high humidity (such as a bathroom or near a
swimming pool). Do not use it in a location where it may be exposed to humidity, or dripping
/spraying water.
10
• Do not place an open flame, such as burning candles, on the apparatus.
• If water enters the apparatus, immediately unplug the power cord and consult your retailer.
11
• Do not handle the power cable with wet hands. To avoid all risk of electrocution, NEVER touch the
internal components of the apparatus. All servicing or repair must be performed by a qualified
technician.
12
13
• When plugging in or unplugging the apparatus, do so while holding the plug and not the cable. The
cable may be damaged if it is pulled to unplug the apparatus.
• Be careful not to drop the apparatus, allow liquids to spill inside or drop objects inside.
• Power is supplied to the apparatus even when it is in sleep mode. When the apparatus is not to be
used for an extended period of time, it is recommended that it be disconnected as a safety
precaution and to save electricity.
Upper panel
• If the power supply cable is damaged, cut or has an electrical contact fault, consult your retailer or
nearest after-sales service facility.
• Do not fold, pull or twist the cable.
• Do not modify the power cable in any way.
• Do not insert metallic objects inside the apparatus.
• If the apparatus should catch fire, immediately disconnect the power supply cable.
INSTALLATION
• Keep a minimum gap of 15 cm around the unit for sufficient ventilation and air flow.
20
• Keep sufficient space around the unit to prevent any internal overheating. The ventilation should
not be impeded by covering the ventilation openings with items such as newspapers, tablecloths,
curtains and similar items. Never place the unit on a rug or in an insufficiently ventilated location.
14
19
• Place the unit on a flat and uniform surface.
• Do not use the unit in an excessively hot, cold, dusty or humid environment.
15
• Condensation may form inside the CD player if the apparatus is installed in a hot and humid
location or if it is brought directly from a cold location to a warm place. In this case, avoid using the
unit for 1 to 2 hours or progressively increase the ambient temperature to dry the unit before
resuming operation.
• Do not place the unit in a location where it may be subject to vibrations.
18
17
16
Rear panel
• Do not place it in a location where it may be subjected to magnetic radiation from a magnet or
speaker. As this apparatus contains magnets, do not insert cassettes: data may be erased.
• If this apparatus is placed next to a television, the image may experience interference. In this
case, simply move the unit. If this is ineffective, unplug the unit when the television is on.
• Keep the CD compartment door closed so that the lens does not become dusty. Never touch the
lens.
24
21
SAFETY MECHANISM
The apparatus features a safety locking mechanism which automatically deactivates the laser beam
when the CD compartment is open.
22
23
ENG-2
ENG-3
POWER SUPPLY
FUNCTIONS AND CONTROLS
If you would like, the electrical power supply can be used to save the batteries. Make sure that the
unit is unplugged from the wall outlet before inserting the batteries.
FRONT AND UPPER PANEL
1. SPEAKER
18. VOLUME CONTROL
- sound level control.
2. CASSETTE COMPARTMENT
19. FUNCTION SELECTOR
- source selection CD /MP3/USB, RADIO or TAPE
and power off.
3. BACK
CD: skips tracks backward.
20. HANDLE
4. NEXT
CD: skips tracks forward.
5. DISPLAY
REAR PANEL
- display of CD functions.
21. AC POWER SUPPLY
- power supply cord connection.
6. DIAL POINTER WINDOW
- shows AM/FM frequency.
22. STEREO HEADPHONE JACK
USING THE DC POWER SUPPLY
Batteries (not included)
Open the battery compartment and insert 6 UM-2/R14 batteries with respect to the "+" and "-"
polarity indications in the compartment.
Important:
When replacing the batteries, make sure you dispose of the old batteries in accordance with
applicable regulations. They should be disposed of in a location specifically designated for that
purpose so they can be recycled safely and without posing any risk for the environment. Do not burn
or bury them.
Incorrect use of the batteries may result in electrolyte leakage having a corrosive effect in the
compartment.
- connect for the 3.5mm stereo headphone.
7. RADIO DAIL SCALE
23. BATTERY COMPARTMENT COVER
- opening of the battery compartment.
8. FM STEREO INDICATOR
24. TELESCOPIC ANTENNA
- display of FM stereo indications.
- improvement of FM reception.
9. PLAY/PAUSE
CD: start or pauses CD playback.
• Do not mix different types of batteries: do not use alkaline batteries with saline batteries, for
example.
• Only use batteries of the type recommended by the manufacturer.
• Do not mix old and new batteries when inserting new ones.
• If the unit is not to be used for an extended period of time, remove the batteries from the unit.
USING THE AC POWER SUPPLY
1. Make sure that the voltage indicated on the manufacturer's nameplate in the battery compartment
corresponds to the voltage supplied by your electrical installation. If this is not the case, consult
your dealer or service center.
2. Connect the electrical power cable the unit then plug it into the wall outlet. The wall outlet must be
located near the product and be easily accessible.
3. To turn power to the apparatus off, unplug the power supply cable from the wall outlet.
4. To protect the unit during violent thunderstorms, unplug the power supply cable from the wall
outlet.
10. STOP
CD: stops CD playback or delete a program.
11. MODE
- repeat 1/repeat all/repeat album/random.
12. PROGRAM
CD: programming and control of programmed
track number.
13.USB JACK
14.BAND SELECTOR (AM•FM•FM ST.)
- frequency band selection: AM, FM or FM ST.
15. TUNING KNOB
- AM/FM/FM ST. stations selector
16. CASSETTE RECORDER KEYS
PAUSE - interrupts recording or playback.
STOP/EJECT - stops the tape;
- opens the cassette compartment.
FWD/REW - forwards/rewinds the tape.
PLAY - starts playback.
RECORD - start recording .
17. CD DOOR
- CD compartment door open/close mark
(OPEN/CLOSE).
ENG-4
ENG-5
RECORDING
GENERAL OPERATION
GENERAL OPERATION
1. Select the source by setting the FUNCTION SELECTOR to CD/MP3/USB, TAPE, OFF or RADIO.
2. Set the desired volume level using the VOLUME KNOB.
3. To turn off the unit, set the FUNCTION SELECTOR to OFF.
RADIO
• To listen to the FM radio, extend the telescopic antenna and orient it for optimum reception.
Reduce the length of the antenna if the signal is too strong (if you are very near the transmitter, for
example).
• As the unit is equipped with a built-in antenna, the telescopic antenna does not have to be used to
listen to AM stations. Move the entire unit to orient the built-in antenna.
RADIO RECEPTION
1. Set the FUNCTION SELECTOR on RADIO.
2. Position the BAND SELECTOR on the desired band: AM, FM or FM ST.
3. Turn the TUNING KNOB to search for the desired station.
NOTE: The FM stereo indicator comes on if the BAND SELECTOR is set on FM stereo and you have
tuned the radio to an FM stereo station.
4.When you have finished listening to the radio, position the FUNCTION SELECTOR to OFF to turn
the unit off.
PLAYING A CASSETTE
1. Set the FUNCTION SELECTOR on TAPE.
2. Press STOP/EJECT to open the cassette door.
3. Insert a recorded cassette and close the cassette door.
4. Press PLAY to start playback.
5. To interrupt playback, press PAUSE. To resume, press the key again.
6. By pressing the FWD or REW button, fast winding of the tape is possible in both directions.
7. To stop the tape, press STOP/EJECT button.
STEREO HEADPHONE JACK
Plug stereo headphones (not included), equipped with a 3.5mm mini-plug, into the PHONES jack
(on top of the unit, left-hand side) for private listening, without disturbing those around you.
Reduce the VOLUME to a low level before putting on the headphones. You can then adjust the
VOLUME progressively to a comfortable level.
GENERAL INFORMATION ON RECORDING
• Recording is permissible in so far as copyright of other
rights of third parties are infringed.
• This deck is not suitable for recording on CHROME (IEC II)
or METAL (IEC IV) type cassettes. For recording, use
NORMAL type cassettes (IEC I) on which the tabs have not
been broken.
• The best recording level is set automatically. Altering the
VOLUME control will not affect the recording in progress.
• At the very beginning and end of the tape, no recording will
take place during 7 seconds, when the leader tape passes
the recorder heads.
• To protect a tape from accidental erasure, have the tape in
front of you and break out the left tab.
Recording on this side is no longer possible. To record over
this side again, cover the tabs with a piece of adhesive tape.
RECORDING FROM RADIO
RECORDING FROM THE CD
1. Tune to the desired radio station.
2. Press STOP/EJECT to open the cassette
door.
3. Insert a suitable cassette into the cassette
deck and close the cassette door.
4. Press RECORD to start recording.
5. For brief interruptions, press PAUSE. To
resume recording, press PAUSE again.
6. To stop recording, press STOP/PAUSE.
1. Slide the FUNCTION selector to CD.
2. Insert the CD you want to record.
3. Insert a suitable cassette into the cassette
deck and close the cassette door.
4. Press RECORD to start recording. The PLAY
and RECORD buttons are depressed together.
5. Press CD PLAY/PAUSE button. The recording
level is set automatically.
6. To stop recording, press the cassette
STOP/PAUSE.
MAINTENANCE
Tape deck maintenance.
To ensure quality recording and playback of the
tape deck,
clean part A, B and C shown in the diagram
below after approx. 50 hours of operation, or on
average once a month. Use a cotton bud slightly
moistened with alcohol or a special head
cleaning fluid to clean the deck.
1. Open the cassette door by pressing
STOP/EJECT.
2. Press PLAY and clean the rubber pressure
rollers C.
3. Press PAUSE and clean the magnetic heads
A and also the Capstan B.
4. After cleaning, press STOP/EJECT.
Note: Cleaning of the heads can also be done
by playing a cleaning cassette through once.
ENG-6
ENG-7
C
B
A
A
CD/MP3/USB PLAYER OPERATION
CD/MP3 FILE/USB FILE PLAYBACK
The CD player supports audio discs, CD-R, CD-RW, MP3 files and USB files. Do not attempt to read
CD-ROM, CDi, VCDs, DVDs or data CDs.
Note: Even if this portable radio-CD player is able to read CD-R and CD-RW discs, in addition to
conventional compact discs, it is not possible to offer a 100% guarantee that all CD-R/RW discs can
be read; playback depends on the quality and condition of the blank discs that you use, among other
things. A playback failure does not necessarily indicate that the unit is malfunctioning.
1. Position the FUNCTION SELECTOR on CD/MP3/USB (the display unit briefly displays - - -).
2. To open the CD player door, raise it by the corner marked OPEN/CLOSE.
3. Insert a CD, CD-R, CD-RW or MP3 disc, printed surface facing upwards and gently press the CD
player door to close it.
4.Start playback by pressing PLAY/PAUSE.
• Press PLAY/PAUSE for 2 seconds to switch from CD/MP3 to USB mode. Press
PLAY/PAUSEagain for 2 seconds to return to CD/MP3 mode.
5. Press PLAY/PAUSE to interrupt or resume playback.
6. To stop CD playback, press STOP.
NOTE: CD playback stops automatically when:
• the CD compartment is opened;
• the radio function is selected;
• the CD/MP3/USB is finished.
CD/MP3/USB PLAYER OPERATION
MODE
Repeat 1: playback of the current track continuously.
Repeat All: playback of the entire CD/USB continuously.
Repeat Album: playback of the selected folder continuously.
Random: playback in random order.
PROGRAMMING OF TRACK NUMBERS
Up to 20 tracks can be programmed in any order. If desired, a given track can be programmed more
than once.
1. In STOP mode, press BACK or NEXT to select a track.
2. When the desired track number appears, press the PROG button once to record the track (the
display unit displays "prog", briefly followed by the track number selected).
3. Repeat steps 1 and 2 to select and program the desired tracks.
4. To start playback of your programmed tracks, press PLAY/PAUSE.
PROGRAM CHECK
In STOP mode, press the PROG. button. (the display unit displays the track numbers in the order
programmed).
DELETING A PROGRAM
Perform the following operations to delete the memory:
• Open the CD door;
• Select the RADIO source;
• Press STOP twice.
SELECTING A DIFFERENT TRACK
During playback, press NEXT or BACK on the unit or remote control unit to select a track.
• If you have selected a track number in Stop or Pause mode, press PLAY/PAUSE to resume
playback.
• Briefly press NEXT to pass to the next track or press NEXT several times until the desired track
number appears in the display.
• Briefly press BACK to return to the start of the current track.
• Press BACK several times to find a previous track.
SELECTING A DIFFERENT FOLDER
• Press FOLDER UP for 2 seconds. When the display unit flashes, press NEXT or BACK to select
the desired folder.
• To select the previous files, press FOLDER DOWN.
(Comment: the FOLDER UP/DOWN function can only be activated if the disc contains at least 2
files)
SEARCHING FOR A PASSAGE ON A TRACK
1. Press and hold BACK or NEXT to read the track in fast forward mode at reduced volume.
2. When you have found the desired passage, release the BACK or NEXT button(normal playback
resumes automatically).
ENG-8
ENG-9
CD/MP3/USB PLAYER OPERATION
CD/MP3 FILE/USB FILE PLAYBACK
The CD player supports audio discs, CD-R, CD-RW, MP3 files and USB files. Do not attempt to read
CD-ROM, CDi, VCDs, DVDs or data CDs.
Note: Even if this portable radio-CD player is able to read CD-R and CD-RW discs, in addition to
conventional compact discs, it is not possible to offer a 100% guarantee that all CD-R/RW discs can
be read; playback depends on the quality and condition of the blank discs that you use, among other
things. A playback failure does not necessarily indicate that the unit is malfunctioning.
1. Position the FUNCTION SELECTOR on CD/MP3/USB (the display unit briefly displays - - -).
2. To open the CD player door, raise it by the corner marked OPEN/CLOSE.
3. Insert a CD, CD-R, CD-RW or MP3 disc, printed surface facing upwards and gently press the CD
player door to close it.
4.Start playback by pressing PLAY/PAUSE.
• Press PLAY/PAUSE for 2 seconds to switch from CD/MP3 to USB mode. Press
PLAY/PAUSEagain for 2 seconds to return to CD/MP3 mode.
5. Press PLAY/PAUSE to interrupt or resume playback.
6. To stop CD playback, press STOP.
NOTE: CD playback stops automatically when:
• the CD compartment is opened;
• the radio function is selected;
• the CD/MP3/USB is finished.
CD/MP3/USB PLAYER OPERATION
MODE
Repeat 1: playback of the current track continuously.
Repeat All: playback of the entire CD/USB continuously.
Repeat Album: playback of the selected folder continuously.
Random: playback in random order.
PROGRAMMING OF TRACK NUMBERS
Up to 20 tracks can be programmed in any order. If desired, a given track can be programmed more
than once.
1. In STOP mode, press BACK or NEXT to select a track.
2. When the desired track number appears, press the PROG button once to record the track (the
display unit displays "prog", briefly followed by the track number selected).
3. Repeat steps 1 and 2 to select and program the desired tracks.
4. To start playback of your programmed tracks, press PLAY/PAUSE.
PROGRAM CHECK
In STOP mode, press the PROG. button. (the display unit displays the track numbers in the order
programmed).
DELETING A PROGRAM
Perform the following operations to delete the memory:
• Open the CD door;
• Select the RADIO source;
• Press STOP twice.
SELECTING A DIFFERENT TRACK
During playback, press NEXT or BACK on the unit or remote control unit to select a track.
• If you have selected a track number in Stop or Pause mode, press PLAY/PAUSE to resume
playback.
• Briefly press NEXT to pass to the next track or press NEXT several times until the desired track
number appears in the display.
• Briefly press BACK to return to the start of the current track.
• Press BACK several times to find a previous track.
SELECTING A DIFFERENT FOLDER
• Press FOLDER UP for 2 seconds. When the display unit flashes, press NEXT or BACK to select
the desired folder.
• To select the previous files, press FOLDER DOWN.
(Comment: the FOLDER UP/DOWN function can only be activated if the disc contains at least 2
files)
SEARCHING FOR A PASSAGE ON A TRACK
1. Press and hold BACK or NEXT to read the track in fast forward mode at reduced volume.
2. When you have found the desired passage, release the BACK or NEXT button(normal playback
resumes automatically).
ENG-8
ENG-9
USE WITH A USB KEY
MAINTENANCE & SAFETY
O P E R AT I N G P R E C A U T I O N S A N D G E N E R A L
MAINTENANCE
• Place the unit on a hard and plane surface to ensure that
it does not tip over.
• Do not expose the unit, batteries or the CDs to humidity,
rain, sand or an excessive source of heat from a heater or
direct sunlight.
• No not open the apparatus. A gap of at least 15 cm must
be kept between the ventilation openings and the
surrounding surfaces in order to ensure sufficient
ventilation and avoid all accumulation of heat.
• The unit's mechanism features self-lubricating bearings
and thus do not require grease or lubrication.
• Use a soft and dry cloth to clean the unit. Never use
cleaning agents containing alcohol, ammonia, benzene or
abrasives, which may damage the cabinet.
4
PLAY/PAUSE BUTTON
CLEANING CDs
• Use a soft and clean cloth to wipe away fingerprints or dust from the surface of the disc.
• Wipe in a straight motion from the center to the edge. Very small dust particles and slight smudges
have absolutely no effect on the sound quality.
• Never use chemical products such as sprays for conventional (vinyl) records, anti-static aerosols,
benzene or thinners to clean your CDs.
• To reduce the risk of scratches, always store CDs in their case when not used.
• Do not expose CDs to direct sunlight, high humidity or excessively high temperatures for long
periods of time.
• Never write or affix labels to the CD's surfaces.
USB JACK
1.
2.
3.
Slide the FUNCTION SELECTOR to CD/MP3/USB.
Insert your USB key into the USB jack.
Press and hold PLAY/PAUSE for 2 seconds to switch from CD/MP3 mode to USB mode.
The display unit shows:
USB
MP3
CLEANING THE LENS
If the lens is dirty, the sound may skip and the CD may not be read correctly. Open the CD door and
clean the lens as follows:
• Unplug the power cord.
• D ust or dry particles:
Blow on the lens several times using a camera lens brush, then wipe it gently with the brush to
remove the dust. Then blow again on the lens.
• Fingerprints:
If you are unable to clean the lens with the camera lens brush, use a dry cotton swab to clean the
surface, from the center to the outside.
(USB MODE)
4.
Start playback by pressing PLAY/PAUSE.
5.
To stop playback, press STOP.
Press PLAY/PAUSE again for 2 seconds to return to CD/MP3 mode.
The display unit shows:
MP3
(MP3 MODE)
(CD MODE)
NOTE: Before removing your USB key, press STOP then press and hold PLAY/PAUSE for 2
seconds to return to CD/MP3 mode.
ENG-10
ENG-11
TROUBLESHOOTING
TROUBLESHOOTING
If a problem occurs, check the points below before taking the apparatus in for repair.
Do not open the apparatus to prevent all risk of electrocution.
If you are unable to solve a problem using the indications provided below, contact your dealer or
after-sales service center.
WARNING: Under no circumstances should you attempt to repair the apparatus yourself; doing so
will void the guarantee.
- Problem
• Solution
NO INFORMATION DISPLAYED ABOUT THE
DISC
- No CD in the player.
• Insert a CD, CD-R or CD-RW in the player.
NO SOUND/ELECTRICAL POWER
- The volume is not properly set.
• Adjust the volume
-- The electrical power cord is not plugged in
correctly.
• Check the power cord connections.
- The CD is scratched or very dirty.
• Replace/clean CD. Refer to the section entitled
“Maintenance”.
- The batteries are dead/not inserted correctly.
• Check the installation and charge of the
batteries.
THE DISPLAY UNIT DOES NOT FUNCTION
CORRECTLY / THE BUTTONS DO NOT
FUNCTION
- Electrostatic discharge.
• Turn the unit off and disconnect it. Plug it back
in a few seconds later.
POOR CASSETTE SOUND QUALITY
- Dust and dirt on the heads, etc.
•Clean deck parts etc., See Maintenance
SPECIFICATIONS
GENERAL
Power supply
: AC 230V ~ 50Hz
: DC 9V
6 x UM-2/R14 batteries (not included)
Dimensions of unit
: 260(L) x 225(W) x 160(H) mm
Weight
: 2.11Kgs
Frequency range
: AM 520 to 1606,5KHz
: FM 87,5 to 108MHz
AUDIO SECTION
Output power (RMS)
: 2 x 1.2W RMS
Speaker
: 8 Ohms
Headphone
: ø 3.5mm
(The technical characteristics are liable to change without notice)
- The laser lens is covered with condensation.
• Wait until condensation disappears from the
lens.
- The CD-R is blank or the disc is not finalized.
• Use a finalized CD-R.
THE CD IS NOT READ
- The CD is scratched or very dirty.
• Replace/clean the CD. Refer to the
“Maintenance” selection.
- The laser lens is covered with condensation.
• Wait until condensation disappears from the
lens.
- Use of incompatible cassette types
(METAL or CHROME)
• Only use NORMAL (IEC I) for recording
RECORDING DOES NOT WORK
- Cassette tab(s) may be broken
• Apply a piece of adhesive tape over the missing
tab space.
THE CD SKIPS TRACKS
- The CD is dirty or scratched.
• Replace/clean the CD. Refer to the
“Maintenance” selection.
- A program sequence is activated.
• Exit the programming mode(s).
ENG-12
ENG-13
TROUBLESHOOTING
TROUBLESHOOTING
If a problem occurs, check the points below before taking the apparatus in for repair.
Do not open the apparatus to prevent all risk of electrocution.
If you are unable to solve a problem using the indications provided below, contact your dealer or
after-sales service center.
WARNING: Under no circumstances should you attempt to repair the apparatus yourself; doing so
will void the guarantee.
- Problem
• Solution
SPECIFICATIONS
GENERAL
Power supply
: AC 230V ~ 50Hz
: DC 9V
6 x UM-2/R14 batteries (not included)
Dimensions of unit
: 260(L) x 225(W) x 160(H) mm
Weight
: 2.11Kgs
Frequency range
: AM 520 to 1606,5KHz
: FM 87,5 to 108MHz
AUDIO SECTION
Output power (RMS)
: 2 x 1.2W RMS
Speaker
: 8 Ohms
Headphone
: ø 3.5mm
(The technical characteristics are liable to change without notice)
IMPORTANT NOTICE FOR THE END USER – WEEE DIRECTIVE
2002/96/CE
CONCERNING
and
THE
SUBSEQUENT
WASTE
OF
MODIFICATION
ELECTRICAL
&
2003/108/CE
ELECTRONIC
EQUIPMENTS.
According to “WEEE” Directive 2002/96/CE and subsequent modification
2003/108/CE this equipment has been marked with the above crossed waste bin symbol.
For a future disposal for this equipment, please following instructions:
•
It is forbidden to dispose of this equipment as a normal urban waste: it is necessary
to contact one of the WEEE (Waste of Electric and Electronic Equipments)
Authorised Centres licensed by the Public Administration. It will be possible to
deliver this waste equipment to the dealer for its disposal if you will purchase a new
equivalent equipment.
•
Above directive, for which we recommend to study the whole norms, states that
economic sanctions will be charged for unauthorised disposal of WEEE (Waste of
Electric and Electronic Equipments).
ENG-12
ENG-13
ADVERTENCIAS IMPORTANTES
Lea atentamente este manual antes de empezar a utilizar el aparato y consérvelo para
poder consultarlo en el futuro.
PELIGRO
PELIGRO
PELIGRO DE
ELECTROCUCIÓN
NO ABRA LA CARCASA
IMPORTANTE: EN EL APARATO HAY PRESENTES ALTAS TENSIONES. NO INTENTE ABRIR LA CARCASA. EN
CASO DE AVERÍA, DIRÍJASE EXCLUSIVAMENTE A UN CENTRO DE ASISTENCIA TÉCNICA AUTORIZADO.
El triángulo que contiene la imagen de un rayo indica la presencia de altas
tensiones en el aparato, capaces de poner en grave peligro la incolumidad
de quien intente abrir la carcasa.
El triángulo que contiene un signo exclamativo indica que antes de utilizar el
aparato es necesario conocer detalladamente todas las indicaciones que se
proporcionan en el manual de instrucciones.
ATENCIÓN - La exposición directa del aparato a la lluvia o a un exceso de humedad
puede dar lugar a cortocircuitos o provocar un inicio de incendio.
PRODUCTO LÁSER CLASE 1 – Este producto lleva incorporado un generador láser de
baja potencia. La abertura del compartimento de CD con los dispositivos de seguridad
desactivados puede producir una peligrosa exposición a las radiaciones láser invisibles
que emite el dispositivo de lectura.
-1-
PRECAUCIONES PARA EL USO
Para lograr siempre las máximas prestaciones de este producto, tome las siguientes
precauciones:
Colocación
• No coloque ni utilice el aparato en
ambientes excesivamente cálidos, fríos,
húmedos o polvorientos.
• Coloque el aparato sobre una superficie
horizontal, estable y plana.
• No obstruya las ranuras de ventilación.
No apoye el aparato sobre superficies
mullidas, como la cama o una alfombra.
Formación de vapor de condensación
• Al desplazar rápidamente el aparato de
un ambiente frío a otro más cálido,
puede formarse vapor de condensación
en su interior. En este caso es
aconsejable desconectar el aparato de
la toma de corriente y dejarlo apagado
durante un mínimo de dos horas antes
de empezar a utilizarlo para permitir que
el vapor de condensación pueda
secarse completamente.
Alimentación
• Antes de conectar el aparato a una
toma de corriente, controle que la
tensión de la red corresponda con la
indicada en la placa que se encuentra
en la parte trasera de la carcasa.
Ventilación
• Colóquelo en una posición que no
obstaculice su ventilación.
Agua y humedad
• En el interior del aparato no debe
penetrar agua ni ningún otro tipo de
líquido. No lo utilice cerca de recipientes
que contengan agua ni coloque objetos
que contengan líquidos sobre él.
Seguridad del usuario
• No tire directamente del cable para
desconectar el aparato de la red de
alimentación; hágalo sujetando el
enchufe.
• Desconecte el aparato de la
alimentación de red durante las
tormentas o cuando no vaya a utilizarlo
durante algún tiempo.
• Mientras el cable de alimentación está
conectado a una toma de corriente, el
aparato se encuentra constantemente
bajo tensión, incluso cuando está
apagado. Para desconectarlo
completamente, saque el enchufe del
cable de la toma de corriente.
• Este aparato debe utilizarse siempre en
posición horizontal.
Elevados niveles sonoros
• Este aparato produce un ruido de fondo
bajo y una alta gama dinámica, por lo
que el volumen puede pasar
inadvertidamente a un nivel elevado y
provocar desperfectos en los altavoces
o en el casco estéreo que se
encuentren conectados a él a través de
sus correspondientes salidas. Preste la
máxima atención al ajuste del volumen.
-2-
ADVERTENCIAS IMPORTANTES
• No coloque este aparato cerca de fuentes de calor como estufas, radiadores u otros equipos
capaces de generar calor (por ejemplo amplificadores).
• No lo utilice cerca de recipientes que contengan agua, de bañeras, lavabos, fregaderos o
superficies mojadas ni cerca de una piscina. Evite que pueda recibir salpicaduras o chorros de
agua.
• No apoye velas u otras llamas libres sobre el aparato o cerca de él.
• En caso de que penetre agua u otro líquido en el interior de la carcasa, desconecte
inmediatamente el aparato de la toma de corriente y diríjase a un técnico cualificado.
• No toque el enchufe del cable de alimentación con las manos mojadas. No toque ninguna de las
partes o de los componentes presentes en el interior de la carcasa.
• No tire directamente del cable para desconectar el aparato de la red de alimentación; hágalo
sujetando el enchufe.
• Proteja el aparato contra posibles caídas. Evite que puedan penetrar líquidos u objetos de
cualquier tipo en su interior.
• El aparato ha sido proyectado de manera que cuando no se está utilizando permanece en estado
de espera. Dado que mientras se encuentra en modo de espera sigue conectado a la red de
alimentación, para desconectarlo completamente es necesario extraer el enchufe del cable de la
alimentación de la toma de corriente.
• Si se deteriora el cable de alimentación, póngase en contacto con un centro de asistencia técnica.
• No doble excesivamente el cable de alimentación. No tire de él bruscamente.
• No modifique ilícitamente el cable de alimentación.
• Evite que puedan penetrar objetos metálicos dentro del aparato.
• Desconecte el cable de alimentación de la toma de corriente durante las tormentas.
EMPLAZAMIENTO DEL APARATO
• Para no obstaculizar su ventilación, el aparato debe colocarse a una distancia mínima de 15 cm de
las superficies o de los objetos circunstantes.
• No obstruya las ranuras de ventilación que se encuentran en la carcasa del aparato ni lo coloque
sobre superficies blandas o en lugares que impidan su enfriamiento.
• El aparato debe colocarse sobre una superficie estable y horizontal.
• No utilice el aparato en lugares excesivamente cálidos, húmedos o polvorientos.
• Al desplazar rápidamente el aparato de un ambiente frío a otro más cálido, puede formarse vapor
de condensación en su interior. En este caso es aconsejable dejarlo apagado durante un mínimo
de dos horas antes de empezar a utilizarlo para permitir que el vapor de condensación pueda
secarse completamente.
• El aparato no debe sufrir golpes ni quedar sometido a fuertes vibraciones.
• No lo coloque cerca de campos magnéticos intensos. No acerque casetes de audio grabadas a los
altavoces del aparato, ya que el campo magnético inducido podría borrar las grabaciones.
• No acerque el aparato a la pantalla de un televisor: el campo magnético producido por los
altavoces puede distorsionar las imágenes.
• Cierre siempre la tapa del compartimento de CD para impedir que el polvo se deposite en la lente
del dispositivo de lectura.
DISPOSITIVO DE SEGURIDAD
• El aparato está dotado de un dispositivo de seguridad que desactiva la emisión de radiación láser
cuando se abre la tapa del compartimento de CD. Este dispositivo no debe ser modificado: en
caso contrario existe el peligro de quedar expuesto a una radiación láser capaz de provocar
lesiones graves en la vista.
-3-
DESCRIPCIÓN DEL APARATO
Vista frontal
Vista desde arriba
Vista posterior
-4-
DESCRIPCIÓN DEL APARATO
Lado delantero y lado superior
1. Altavoces
2. Compartimento casete
16. Botonera de la grabadora –
PAUSE: Interrumpe momentáneamente
la grabación o la reproducción que se
está efectuando
STOP/EJECT: Interrumpe
definitivamente la grabación o la
reproducción que se está efectuando.
Pulsándolo por segunda vez se abre la
tapa del compartimento para casetes.
FWD/REW: Para efectuar la búsqueda
rápida hacia adelante o hacia atrás.
PLAY: Para iniciar la reproducción.
RECORD: Para iniciar la grabación.
3. Botón BACK – Para seleccionar la
pista anterior del CD.
4. Botón NEXT – Para seleccionar la
pista siguiente del CD.
5. Display – Muestra las funciones del
lector CD.
6. Ventana de sintonía – Permite
observar el indicador de sintonía.
7. Escala de sintonía – Muestra la
frecuencia AM o FM sintonizada.
8. Indicación FM estéreo – Señala
que se está ejecutando la recepción
estéreo en banda FM.
9. Botón PLAY/PAUSE – Para poner
en marcha o suspender
momentáneamente la lectura de un
CD.
10. Botón STOP – Permite interrumpir
la reproducción de un CD o borrar la
programación del orden de lectura
de las pistas.
11. Botón MODE – Permite repetir la
lectura de una sola pista, de todo un
CD, Folder o reproducción aleatoria.
12. Botón PROGRAM – Permite
programar el orden deseado de
lectura de una secuencia de pistas.
13. Puerto USB
14. Selector AM/FM/FM ST – Permite
seleccionar la recepción en banda
AM, FM mono o FM estéreo.
17. Tapa compartimento CD – Levántela
para acceder al compartimento de CD.
18. Mando volumen – Para regular el nivel
del volumen.
19. Selector de función – Permite
seleccionar la fuente de audio
(CD/MP3/USB, RADIO o TAPE) y
encender/apagar el aparato.
20. Manilla de transporte
Lado trasero
21. Entrada alimentación – Permite
conectar el cable de alimentación de red.
22. Salida para conexión de casco estéreo
– Toma de 3,5 mm.
23. Tapa compartimento pilas – Permite
acceder al compartimento de las pilas.
24. Antena telescópica – Extendiéndola
completamente ofrece una mejor
recepción en banda FM.
15. Mando de sintonía – Para
sintonizar la emisora deseada.
-5-
ALIMENTACIÓN
Siempre que sea posible, utilice la alimentación de red para preservar la carga de las pilas.
Antes de introducir las pilas asegúrese de haber desconectado el aparato de la toma de
corriente.
Pilas (no incluidas)
Abra el compartimento de las pilas e introduzca 6 pilas de formato R-14/UM2/C
respetando la polaridad indicada con los signos “+” y “–”.
LAS PILAS CONTIENEN SUSTANCIAS QUÍMICAS POTENCIALMENTE DAÑINAS Y
DEBEN SER ELIMINADAS CORRECTAMENTE.
El uso impropio de las pilas puede causar pérdidas de líquido electrolito capaces de
corroer el compartimento e incluso de hacer explotar las pilas mismas.
Por lo tanto es aconsejable:
• No mezclar pilas de distintos tipos (por ejemplo pilas alcalinas y de zinc-carbón).
• Utilizar solamente pilas del mismo tipo.
• No emplear pilas nuevas y usadas simultáneamente.
• Sacar las pilas del aparato cuando no se va a utilizar durante algún tiempo.
Alimentación de red
1 Compruebe que el voltaje indicado en la placa que se encuentra en la parte trasera de
la carcasa corresponda con la tensión de red local. En caso contrario diríjase al
vendedor o a un centro de asistencia técnica.
2 Conecte el cable de alimentación a la toma que se encuentra en la parte trasera de la
carcasa y a una toma de corriente mural. Una vez conectado, el aparato está listo
para el uso.
3 Para desconectar completamente el aparato de la alimentación, saque el enchufe del
cable de alimentación de la toma mural.
4 En caso de tormenta o cuando no va a utilizarse el aparato durante algún tiempo, es
prudente desconectar el cable de alimentación de la toma mural.
-6-
INSTRUCCIONES PARA EL USO
FUNCIONAMIENTO GENERAL
1 Para encender el aparato y seleccionar la fuente de audio deseada, ponga el selector
de función en la posición correspondiente (CD/MP3/USB, TAPE o RADIO).
2 Regule el volumen al nivel deseado.
3 Para apagar el aparato, ponga el selector de función en la posición OFF.
ANTENAS FM Y AM
• Para mejorar la recepción en banda FM, extienda completamente la antena telescópica y
oriéntela hasta recibir una señal de buena calidad. Reduzca la longitud si la señal es
demasiado fuerte (por ejemplo cerca de un transmisor).
• Para mejorar la recepción en banda AM basta orientar adecuadamente el aparato,
dado que lleva incorporada una antena AM.
RECEPCIÓN RADIO
1 Ponga el selector de función en la posición RADIO.
2 Seleccione la banda deseada (AM, FM mono o FM estéreo) por medio del conmutador
BAND.
3 Haga girar el mando de la sintonía hasta captar la emisora deseada.
Atención: Si ha seleccionado la banda FM STEREO, al sintonizar una emisora que
transmite en banda FM en estereofonía la indicación luminosa correspondiente se
enciende.
4 Una vez terminada la audición, ponga el selector de función en la posición OFF para
apagar el aparato.
REPRODUCCIÓN DE UNA CASETE
1 Ponga el selector de función en la posición TAPE.
2 Pulse el botón STOP/EJECT para abrir la tapa del compartimento para casetes.
3 Introduzca una casete grabada y cierre la tapa.
4 Pulse el botón PLAY para dar inicio a la reproducción.
5 Para interrumpir la reproducción, pulse el botón PAUSE. Púlselo de nuevo para
reanudar la reproducción.
6 Pulsando los botones FWD/REW se activa el rebobinado de la cinta hacia adelante o
hacia atrás.
7 Para interrumpir la función en curso, pulse el botón STOP/EJECT.
USO DE CASCO ESTÉREO
Conecte la clavija del casco (o de un par de auriculares) a la toma PHONES que se
encuentra en el lado superior del aparato. Los altavoces quedan desactivados
automáticamente. Antes de ponerse el casco o los auriculares, asegúrese de que el
volumen no sea demasiado alto.
-7-
GRABACIÓN DE UNA CASETE
INFORMACIÓN GENERAL SOBRE LA GRABACIÓN
• La grabación de material audio protegido por derechos de autor debe efectuarse
respetando las leyes vigentes.
• Este aparato no es adecuado para la grabación de cintas de tipo Chrome (IEC II) o
Metal (IEC IV). Utilice solamente casetes con cintas de tipo Normal (IEC I) en las que
no hayan sido eliminadas las lengüetas de protección.
• El ajuste del volumen al nivel más adecuado para la grabación tiene lugar
automáticamente. La regulación del volumen de audición no tiene ningún efecto en la
grabación que se está efectuando.
• Al principio y al final de la casete hay dos tramos de cinta en los que no se puede
grabar. Para no perder los primeros segundos de la grabación, es aconsejable bobinar
manualmente la cinta hasta superar el primer tramo.
• Para impedir que la grabación pueda borrase
involuntariamente, quite la lengüeta de
protección que se encuentra en el dorso de la
casete (mirando la casete de frente, con el
tramo de cinta expuesto hacia abajo, la lengüeta
que corresponde al lado que se tiene delante es
la que se encuentra en la parte izquierda del
dorso). De este modo resulta imposible grabar de
nuevo en la cinta. Para poder grabar en ella de
nuevo, cubra con cinta adhesiva la abertura que
se ha creado al quitar la lengüeta.
GRABACIÓN DE LA RADIO
1 Sintonice la emisora deseada (vea el
párrafo “Recepción radio”).
2 Pulse el botón STOP/EJECT para abrir
la tapa del compartimento para
casetes.
3 Introduzca una casete adecuada y
cierre la tapa.
4 Pulse el botón RECORD para dar
inicio a la grabación.
5 Para interrumpir momentáneamente la
grabación, pulse el botón PAUSE.
Pulse de nuevo el mismo botón para
reanudar la grabación.
6 Para terminar la grabación, pulse el
botón STOP/EJECT.
GRABACIÓN DE UN CD
1 Ponga el selector de función en la
posición CD.
2 Introduzca el CD que desea grabar en
la casete.
3 Introduzca una casete adecuada y
cierre la tapa.
4 Pulse el botón RECORD para iniciar la
grabación. El botón PLAY se acciona
automáticamente.
5 Pulse el botón PLAY/PAUSE para
iniciar la lectura del CD.
6 Para terminar la grabación, pulse el
botón STOP/EJECT.
-8-
GRABACIÓN DE UNA CASETE
LIMPIEZA DE LOS CABEZALES Y DE LOS MECANISMOS DE ARRASTRE DE LA CINTA
Para garantizar una buena calidad de grabación
y reproducción, limpie las partes (A), (B) y (C)
indicadas en la figura cada 50 horas de uso
aproximadamente, o una vez al mes, utilizando
un bastoncillo de algodón ligeramente
impregnado en alcohol o en un líquido especial
para la limpieza de cabezales.
1 Abra la tapa del compartimento para casetes
pulsando el botón STOP/EJECT.
2 Pulse el botón PLAY y limpie el rodillo
compresor (C).
3 Pulse el botón PAUSE y limpie el cabezal
magnético (A) y el eje (B).
4 Cuando haya terminado, pulse el botón
STOP/EJECT.
NOTA: La limpieza periódica de los cabezales
puede efectuarse también con una cinta
limpiadora de cabezales.
-9-
LECTURA DE UN CD/MP3 O DEL SOPORTE DE MEMORIA USB
LECTURA DE LOS ARCHIVOS PRESENTES EN UN CD/MP3 O EN UN SOPORTE DE
MEMORIA USB
Este aparato puede reproducir los archivos de audio presentes en CD de audio, CD
grabables (CD-R), CD reescribibles (CD-RW), CD con archivos MP3 (CD/MP3) o en un
soporte de memoria conectado al puerto USB. No intente reproducir discos de otros tipos
(CD-ROM, CDi, VCD, DVD o CD de datos).
NOTA: La posibilidad de reproducir CD-R y CD-RW depende del tipo de grabadora y de
software que se ha empleado para su grabación, de la velocidad de esta última y del tipo
y la calidad del disco.
1
2
3
4
5
6
Ponga el selector de función en la posición CD/MP3/USB. En la pantalla aparecerá la
indicación “– – –”.
Para abrir la tapa del compartimento de CD, levante el extremo que lleva la indicación
“OPEN/CLOSE”.
Introduzca un CD, un CD-R, un CD-RW o un CD/MP3 con la etiqueta hacia arriba y
presione delicadamente la tapa para cerrarla.
Pulse el botón PLAY/PAUSE para iniciar la reproducción.
• Para pasar del modo CD/MP3 al modo USB, o viceversa, mantenga presionado
durante unos dos segundos el botón PLAY/PAUSE.
Para interrumpir momentáneamente la reproducción, pulse el botón PLAY/PAUSE;
púlselo de nuevo para reanudarla.
Para interrumpir definitivamente la reproducción, pulse el botón STOP.
NOTA: la reproducción del CD se interrumpe también cuando:
- se abre la tapa del compartimento de CD.
- se pone el selector de función en la posición RADIO.
- el CD llega al final.
BÚSQUEDA DE LAS PISTAS
Pulsando los botones NEXT o BACK durante la reproducción, se puede seleccionar una
pista particular.
• Si selecciona una pista mientras el aparato se encuentra en estado de pausa o de
parada, para poner en marcha la reproducción es necesario pulsar el botón
PLAY/PAUSE.
• Pulse el botón de búsqueda NEXT para pasar a la pista siguiente o púlselo
repetidamente hasta que el número de la pista deseada aparezca en la pantalla.
• Pulse el botón de búsqueda BACK para regresar al inicio de la pista actual.
• Pulse el botón de búsqueda BACK varias veces para seleccionar una pista
anterior.
BÚSQUEDA RÁPIDA
1 Mantenga presionado el botón de búsqueda NEXT o BACK. El CD se reproducirá a
alta velocidad y bajo volumen.
2 Al llegar al punto deseado, suelte el botón para reanudar la reproducción normal.
- 10 -
LECTURA DE UN CD/MP3 O DEL SOPORTE DE MEMORIA USB
REPETICIÓN CONTINUA DE LA LECTURA
Repeat 1 – Reproducción continua de la pista actual.
Repeat all – Reproducción continua de todo el CD.
Repeat Album - Reproducción continua de toda la carpeta.
Random - Reproducción aleatoria.
PROGRAMACIÓN DEL ORDEN DE LECTURA DE LAS PISTAS
Esta función permite programar el orden deseado para la lectura de las pistas del CD
(hasta un máximo de 20). Es posible programar la misma pista más de una vez.
1 Mientras el aparato se encuentra en modo de parada, seleccione la pista deseada
utilizando los botones de búsqueda NEXT o BACK.
2 Cuando la pantalla muestre el número correspondiente a la pista deseada, pulse el
botón PROG para memorizar esta selección.
3 Repita los pasos 1 y 2 para memorizar las otras pistas.
4 Para dar inicio a la lectura de las pistas en el orden programado, pulse el botón
PLAY/PAUSE.
CONTROL DEL ORDEN DE PROGRAMACIÓN
Durante la reproducción, pulsando los botones NEXT o BACK la pantalla muestra los
números de las pistas programadas en secuencia.
BORRADO DEL ORDEN DE PROGRAMACIÓN
Si desea borrar de la memoria el orden de programación:
- abra la tapa del compartimento de CD.
- ponga el selector de función en la posición RADIO.
- pulse dos veces el botón STOP.
- 11 -
LECTURA DE UN CD/MP3 O DEL SOPORTE DE MEMORIA USB
LECTURA DE LOS ARCHIVOS PRESENTES EN UN SOPORTE DE MEMORIA USB
Botón PLAY/PAUSE
Puerto USB
1
2
3
Ponga el selector de función en la posición CD/MP3/USB.
Conecte el soporte de memoria (por ejemplo una llave) al puerto USB.
Para pasar del modo CD/MP3 al modo USB, o viceversa, mantenga presionado durante
unos dos segundos el botón PLAY/PAUSE. En la pantalla aparecerá la indicación:
(Modo USB)
4
5
Pulse el botón PLAY/PAUSE para iniciar la reproducción de los archivos presentes en
el soporte de memoria USB.
Para interrumpir la reproducción, pulse el botón STOP.
Para regresar al modo CD/MP3, pulse durante unos dos segundos el botón
PLAY/PAUSE. En la pantalla aparecerá la indicación:
(Modo CD)
(Modo MP3)
NOTA: Antes de desconectar el soporte de memoria del puerto USB, pulse el botón STOP
y mantenga presionado durante unos 2 segundos el botón PLAY/PAUSE para regresar al
modo CD/MP3.
- 12 -
MANTENIMIENTO
ADVERTENCIAS GENERALES
• Coloque el aparato sobre una superficie sólida, plana y horizontal.
• No exponga el aparato, las pilas o los CD a la humedad, la lluvia, la arena o a altas
temperaturas generadas por fuentes de calor o por la luz solar.
• No cubra el aparato. Para evitar posibles sobrecalentamientos, es necesario garantizar
una ventilación adecuada del mismo dejando una distancia mínima de 15 cm entre las
ranuras de ventilación y las superficies circunstantes.
• Las partes mecánicas del aparato contienen cojinetes
autolubricantes y no necesitan ninguna operación de
mantenimiento periódico.
• Para limpiar el aparato, use un paño suave y seco. No utilice
detergentes que contengan alcohol, amoníaco, benceno o
agentes abrasivos que puedan dañar el acabado de la
carcasa.
ADVERTENCIAS PARA LA LIMPIEZA DE LOS CD
• Para eliminar las huellas digitales o los restos de suciedad particularmente resistentes,
utilice un paño húmedo ligeramente humedecido.
• Cuando sea necesario limpiar los CD, hágalo en sentido radial (desde el centro hacia el
borde exterior, no con movimientos circulares). No utilice detergentes que puedan dañar
su superficie.
• No utilice alcohol, bencina, bencina quitamanchas, solventes de ningún tipo o
detergentes antiestáticos para discos de vinilo para limpiar los discos.
• Coloque los CD en sus fundas después del uso.
• No exponga los discos a la luz directa del sol o a la acción de fuentes de calor. No deje
los discos dentro del vehículo si se encuentra aparcado al sol.
• No escriba en la superficie de los CD ni coloque etiquetas adhesivas sobre ellos.
ADVERTENCIAS PARA LA LIMPIEZA DEL DISPOSITIVO DE LECTURA
• Para eliminar el polvo que se deposita en el lente del dispositivo de lectura, utilice un
pincel muy suave con soplador (como los que se encuentran en las tiendas de material
fotográfico) o un bastoncillo de algodón ligeramente humedecido.
• Antes de limpiar la lente del dispositivo de lectura, desconecte el aparato de la toma de
corriente.
• Después de utilizarlo, cierre siempre la tapa del compartimento de CD para impedir la
acumulación de polvo en su interior.
- 13 -
RESOLUCIÓN DE POSIBLES PROBLEMAS
Si observa un defecto o un funcionamiento anómalo del aparato, consulte la tabla que
aparece a continuación. No abra la carcasa: quedaría expuesto al riesgo de
electrocución. Si no logra solucionar el problema póngase en contacto con el vendedor
local o con un centro de asistencia autorizado.
ATENCIÓN: No intente reparar personalmente el aparato por ningún motivo puesto que
de este modo anularía la garantía.
Problema
Posible causa
Solución
Ausencia de
sonido o de
alimentación.
- Nivel del volumen
inadecuado.
- Cable de alimentación
conectado incorrectamente.
- Pilas descargadas o
introducidas incorrectamente.
• Regule el nivel utilizando el mando
Volume.
• Introduzca a fondo los conectores del
cable de alimentación.
• Introduzca pilas nuevas respetando las
polaridades indicadas.
La pantalla no
funciona o los
mandos no
producen ninguna
respuesta.
- Descarga electroestática o
campos electromagnéticos.
• Apague el aparato y desconéctelo de
la red de alimentación. Vuelva a
conectarlo al cabo de algunos
segundos.
Mala calidad
sonora de las
grabaciones.
- Los cabezales de la
grabadora están sucios.
- El tipo de cinta no es
adecuado.
• Límpielos siguiendo las instrucciones
que se proporcionan en el párrafo
correspondiente.
• Este aparato solo permite utilizar cintas
de tipo “Normal” (IEC I).
No se consigue
grabar una casete.
- Se ha quitado la lengüeta de
protección contra el borrado
involuntario.
• Cubra la abertura que se ha creado en
el dorso de la casete con un trozo de
cinta adhesiva.
En la pantalla
aparece la
indicación "No
disc".
- No se ha introducido ningún
CD en el aparato.
- El CD está sucio o rayado.
- La lente del dispositivo de
lectura láser está empañada.
- En el aparato se ha introducido
un CD-R vacío o que no ha sido
correctamente finalizado.
• Introduzca un CD, CD-R o CD-RW.
• Limpie o cambie el CD (ver el párrafo
correspondiente al mantenimiento).
• Espere hasta que la lente alcance un
equilibrio térmico con respecto a la
temperatura ambiental.
• Introduzca un CD-R que no esté vacío y
que haya sido finalizado correctamente.
No se consigue
leer un CD.
- El CD está sucio o rayado.
- La lente del dispositivo de
lectura láser está empañada.
• Limpie o cambie el CD (ver el párrafo
correspondiente al mantenimiento).
• Espere hasta que la lente alcance un
equilibrio térmico con respecto a la
temperatura ambiental.
El CD “salta”.
- El CD esta deteriorado o sucio.
- Se ha activado la
programación del orden de
lectura de las pistas.
• Limpie o cambie el CD (ver el párrafo
correspondiente al mantenimiento).
• Desactive de la programación del
orden de lectura de las pistas.
- 14 -
CARACTERÍSTICAS TÉCNICAS
DATOS GENERALES
Alimentación:
Medidas (A x H x P):
Peso:
Bandas de frecuencias:
Salida casco estéreo:
AC 230 V, 50 Hz
DC 9 V (6 pilas de formato C/UM2/R14 de 1,5 V, no incluidas)
225 x 160 x 260 mm
2,11 kg
AM 520 – 1.606,5 kHz
FM 87,5 – 108 MHz
Toma estéreo de 3,5 mm, impedancia 8-32 ohmios
SECCIÓN AUDIO
Potencia en salida (RMS):
2 x 1,2 W
Impedancia altavoces:
8 ohmios
Salida casco estéreo/auriculares: Toma mini jack de 3,5 mm de diámetro
INFORMACIÓN IMPORTANTE PARA EL USUARIO SEGÚN LO DISPUESTO EN
LA DIRECTIVA "RAEE" 2002/96/CE Y POSTERIOR MODIFICACIÓN
2003/108/CE SOBRE LA ELIMINACIÓN DE EQUIPOS ELÉCTRICOS Y
ELECTRÓNICOS.
Según lo dispuesto en la directiva "RAEE" 2002/96/CE y en su posterior
modificación 2003/108/CE, este equipo está marcado con el símbolo de un
contenedor de desperdicios tachado con una cruz. Para la futura eliminación de
este producto, se ruega tener presente lo siguiente:
- Está prohibido eliminar este equipo como si se tratara de un deshecho urbano común: es necesario
dirigirse a un centro de recogida RAEE (desechos de aparatos eléctricos y electrónicos) equipado y
autorizado por la administración pública. Al comprar un nuevo equipo del mismo tipo, puede entregar el
aparato al vendedor para que sea él mismo quien se encargue de su eliminación.
- La normativa mencionada anteriormente, a la cual le remitimos para obtener información más detallada,
prevé sanciones en caso de eliminación abusiva de los RAEE (desechos de aparatos eléctricos y
electrónicos).
- 15 -
Melchioni S.p.A.
Via Friuli 18/a
20135 MILANO – Italy
Tel. +39 02 5794397 – Fax +39.02.57941
www.melchioni.it