1
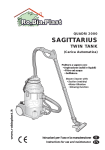
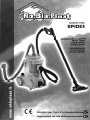
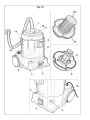
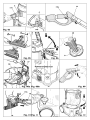
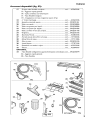
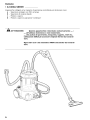
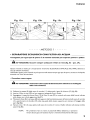
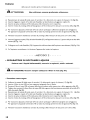
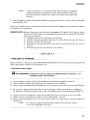
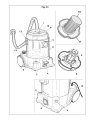
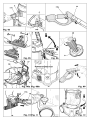
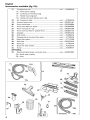
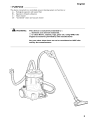
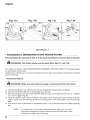
QUADRì2000
SPIDER
CE:
Istruzioni per l'uso e la manutenzione
Instructions for use and maintenance
Fig. O I
7
4
8
Caro Cliente,
La ringraziamo vivamente per l'acquisto del nostro Separatore a vapore.
Siamo certi che da questo apparecchio otterrà la massima soddisfazione nello svolgimento di qualsiasi tipo
di pulizia.
Questo Separatore a vapore aspira allo stesso tempo e senza problemi sia lo sporco liquido che lo sporco
secco/solido.
Con una semplice operazione, libera l'ambiente da pollini, acari, polveri e tutte quelle sostanze nocive che
scatenano le allergie per regalare un fresco profumo gradevole di benessere.
È davvero un sistema ecologico di pulizia efficace ed economico che offre benefici alla salute, risparmio di
tempo e di denaro.
A
ATTENZIONE
A
Prima di utilizzare l'apparecchio, leggere attentamente il presente libretto d'istruzioni,
con particolare riguardo al capitolo Norme d'uso.
Il
SUO
apparecchio è così composto (fig. OI):
- Attacco tubo flessibile collegamento aspirazione centralizzata
2
- Interruttore generale con simbolo tensione elettrica
3
- Interruttore caldaia con spia "vapore pronto"
4
- Presa combinata corrente/vapore con coperchio
@
CD
5
- Bocchettone ad innesto rapido per attacco tubo flessibile
6
- Base
7
- Ruote girevoli
8
- Testata
9
- Galleggiante
IO
- Coperchio ferma filtro
II
- Vasca di raccolta
12
- Ganci di chiusura vasca
13
- Tappo di riempimento serbatoio ricarica caldaia
14
- Manopola di regolazione flusso vapore sull'impugnatura (fig. 4)
15
- Spia "mancanza acqua" con simbolo
16
- Tasto sgancio tubo aspirazione centralizzata
@
Italiano
Accessori disponibili (fig. 02):
17
- Gruppo tubo flessibile completo ...................................................... cod ......... AC0650 I06
17a - Aggancio rapido girevole
17b - Spina combinata corrente/vapore
17c - Tubo flessibile integrato
17d - Impugnatura con leva erogazione vapore (17g)
18 - n° 2 tubi di prolunga ............................................................................ cod ......... AC0630 I06
19 - Spazzola universale vapore ................................................................. cod ...... GRQDOI461
20 -Telaio con setole ................................................................................... cod ...... GRQD00806
21
- Telaio con gomma per liquidi. ............................................................ cod ...... GRQD00906
22 - Telaio con pattini per tappeti ............................................................. cod ...... GRQDOI 006
23 -Telaio con feltri in lana per parquet .................................................. cod ...... GRQDOII06
24 - Tergivetro ................................................................................................ cod ...... GRQD031 06
26 - Bocchetta Piccola ................................................................................. cod ......... AC0820 I06
27 - Forcella tenuta sifone filtro ad acqua ............................................... cod .......... ST7300 I06
28 - Sifone filtro ad acqua ........................................................................... cod .......... ST7315206
29 - Filtro in rete........................................................................................... cod ...... GRQD04106
30 - Lancia Vapore ......................................................................................... cod .......... ST7875I 06
31
- Spazzolino con setole in nylon .......................................................... cod ......... AC0320 I06
32 - Imbuto ..................................................................................................... cod ......... AC0690 I07
OPTIONAL
33 - Tubo flessibile collegamento apparecchio/impianto centralizzato.cod ...... GRQD02044
33a - Aggancio rapido girevole
33b - Tubo flessibile
18
17
20
31
~
33
5
Italiano
• A COSA SERVE
Lapparecchio collegato ad un impianto di aspirazione centralizzata può funzionare come:
a
Separatore ecologico con filtro ad acqua
b
Separatore di sostanze liquide
c
Pulitore a vapore
d
Pulitore a vapore e aspirazione "combinata"
A ATTENZIONE:.... all'utilizzo
Questo apparecchio destinato esclusivamente .... :
domestico e non industriale .
è
.... alla pulizia di pavimenti, moquette, tappeti, vetri etc.
utilizzando SOLO gli accessori originali forniti dal costruttore.
Ogni altro uso è da intendersi NON consentito dal costruttore.
6
Italiano
• NO RME D'USO
Leggere attentamente il libretto delle istruzioni e conservarlo con cura in luogo asciutto e protetto; tenerlo
in prossimità dell'apparecchio in modo da poterlo consultare all'occorrenza.
O Non lasciare il materiale utilizzato per l'imballo (scatola, sacchetto, graffe, etc.) alla portata dei bambini.
È consigliabile conservare l'imballo per un futuro riutilizzo; in caso contrario smaltire i materiali secondo
le norme vigenti in materia del proprio comune.
O Ad ogni utilizzo, svolgere completamente il cavo e prestare attenzione a non srotolarlo su superfici calde
o spigoli taglienti.
O Prima di inserire la spina elettrica alla presa di corrente, verificare che la tensione di rete corrisponda a
quella indicata sulla targhetta identificativa del prodotto. Eseguire questo controllo ogni volta che si collega
la spina elettrica dell'apparecchio in un edificio diverso da quello dove abitualmente viene utilizzato.
O Non schiacciare il cavo o appoggiare oggetti pesanti sullo stesso.
O Non utilizzare adattatori per collegare l'apparecchio alla presa di corrente.
O Non staccare la spina dalla presa di corrente con mani umide o bagnate.
O Non tirare il cavo d'alimentazione o l'apparecchio per staccare la spina dalla presa di corrente.
O Non lasciare in funzione l'apparecchio incustodito e tenere fuori dalla portata dei bambini e delle persone
inabili o incapaci.
O Non avvicinare la bocchetta di aspirazione o l'estremità del tubo a parti delicate del corpo quali occhi,
orecchie, capelli.
O Non utilizzare l'apparecchio per l'aspirazione di oggetti in fiamme, liquidi bollenti, acidi, solventi o sostanze infiammabili, tossiche, corrosive o esplosive.
O Non utilizzare l'apparecchio in ambienti esplosivi (presenza di gas nell'aria).
Llih .
O
O
Non dirigere il getto di vapore verso persone o animali. Pericolo di scottature
Il vapore non deve essere diretto verso apparecchiature contenenti componenti elettrici, come l'interno
del forno.
O
Non toccare mai con le mani da vicino il getto di vapore. Pericolo di scottature
O
O
O
O
O
O
Non toccare le superfici calde durante l'uso. Pericolo di scottature
Non toccare l'apparecchio con le mani o piedi bagnati quando la spina è inserita.
Prima di utilizzare il vapore assicurarsi che la superficie da pulire sia adatta alle alte temperature.
Non salire o sedersi sull'apparecchio.
Utilizzare SOLO accessori originali.
Riporre l'apparecchio in luoghi non soggetti ad agenti atmosferici (sole, pioggia, etc.) e tenerlo lontano da
fonti di calore.
Non immergere assolutamente l'apparecchio nell'acqua.
Non pulire l'apparecchio con getti d'acqua.
Scollegare l'apparecchio dalla rete elettrica dopo l'uso.
Eseguire tutte le operazioni di caricamento acqua, pulizia o manutenzione con l'apparecchio spento e la
spina elettrica scollegata dalla presa di corrente.
Se l'apparecchio è caduto e presenta difetti visibili o anomalie di funzionamento, si raccomanda di non
utilizzarlo e di non tentare di smontarlo o di manometterlo, occorre rivolgersi direttamente alla casa
costruttrice o al rivenditore per la riparazione.
Se il cavo di alimentazione è danneggiato, esso deve essere sostituito dal costruttore o dal suo servizio di
assistenza tecnica o, comunque, da una persona con qualifica similare, in modo da prevenire ogni rischio.
Nel momento in cui l'apparecchio è fuori uso, occorre renderlo inutilizzabile tagliando la spina di alimentazione del cavo.
La spina di alimentazione deve essere inserita in una presa 16A 250V (2P+ T) con efficiente polo di terra, in
accordo alla Norma CEI 64-8.
Nel basamento (verso il pavimento) è presente il foro di sfogo della sovrappressione: esso non deve essere
mai ostruito.
O
O
O
O
O
O
O
O
O
O
O
Llih .
Llih .
Llih
Il simbolo
indica che l'apparecchio produce un getto di vapore. ATTENZIONE: Pericolo di scottature.
In caso di utilizzo non appropriato, non conforme alle istruzioni d'uso o di manomissione, l'azienda non può
essere considerata responsabile per eventuali danni causati dall'apparecchio a persone, animali o cose.
7
Italiano
• MONTAGGIO ED UTILITÀ DEGLI ACCESSORI
TUBO FLESSIBILE COMPLETO (17) (tìg.03) -Inserire l'aggancio rapido girevole (17a) del tubo flessibile
(17) nel bocchettone di aspirazione (5).
Inserire la spina combinata (17b) nella presa e bloccarla con il coperchio.
IMPUGNATURA (tìg.04) - Premendo la leva (17g) si avvia l'erogazione del vapore (se la caldaia è accesa
ed è in temperatura).
TUBI DI PROLUNGA (tìg.02 - pos.18) - Utilizzare a scelta I o 2 tubi di prolunga per praticità e comodità
d'uso dell'apparecchio. Tutti gli accessori si possono montare sia sui tubi di prolunga che
direttamente sull'impugnatura.
SPAZZOLA UNIVERSALE VAPORE (tìg.05) -Adatta per aspirare sia lo sporco solido che liquido su
ogni tipo di supertìcie, cambiando semplicemente l'appropriato Telaio.
Per cambiare Telaio, sbloccare i due cursori scorrevoli sulla spazzola.
TELAIO CON SETOLE (tìg.02 - pos.20) - Utilizzare questo accessorio con la Spazzola Universale, per
aspirare supertìci piane come pavimenti in marmo, ceramiche, etc.
TELAIO CON GOMMA PER LIQUIDI (tìg.02 - pos.21) - Utilizzare questo accessorio con la Spazzola
Universale, per aspirare liquidi su supertìci piane.
TELAIO CON PATTINI PER TAPPETI (tìg.02 - pos.22) - Utilizzare questo accessorio con la Spazzola
Universale, per pulire passatoie, zerbini, tappeti.
TELAIO CON FELTRI IN LANA PER PARQUET (tìg.02 - pos.23) - Utilizzare questo accessorio
con la Spazzola Universale, per aspirare su superfici piane e delicate quali parquet.
TERGIVETRO (tìg.02 - pos.24) - Adatto per pulire le supertìci in vetro (specchi, tìnestre, etc.).
BOCCHETTA PICCOLA (tìg. 02 - pos.26) - Utilizzare questo accessorio con il portaccessori universale
per la pulizia di materassi, divani, cuscini, etc.
FORCELLA TENUTA SIFONE FILTRO AD ACQUA (tìg.02 - pos.27) - La forcella serve a bloccare
nella propria sede il sifone tìltro ad acqua.
SIFONE FILTRO AD ACQUA (tìg.02 - pos.28) - Grazie al foro nella parte inferiore, miscela lo sporco
aspirato con l'acqua presente nella vasca di raccolta, facendo da tìltro naturale (effetto Venturi).
FILTRO IN RETE (tìg.02 - pos.29) - Lutilizzo di questo tìltro è indispensabile per aspirare sia sporco
liquido che sporco secco/solido (unitamente al sifone tìltro acqua e con l'aggiunta di 2 I.
d'acqua nella vasca).
SPAZZOLINO CON SETOLE IN NYLON (tìg. 02 - poso 31) - Utilizzare questo accessorio con la
lancia vapore per avere una maggior forza abrasiva nella pulizia (es. per pulire le fughe delle
piastrelle, fornelli).
LANCIA VAPORE (tìg.02 - poso 30) - Ideale per raggiungere i punti più difficili come angoli, caloriferi.
IMBUTO
(tìg.02 - poso 32) - Questo accessorio serve per il rabbocco dell'acqua nel serbatoio ricarico
acqua (tìg. I I)
TUBO FLESSIBILE COLLEGAMENTO APPARECCHIO/IMPIANTO CENTRALIZZATO (OPTIONAL)
(tìg. 02 - poso 30) - Inserire uno dei due agganci rapidi girevoli (33a) nell'apposito attacco
(I) posto sulla parte alta dell'apparecchio (tìg. 13a).
Inserire l'altro aggancio rapido girevole (33a) nella presa a muro (34)(Fig. 13b).
Per sganciare l'aggancio rapido (33a) dal rispettivo attacco premere il tasto di sgancio (16
o 34a) (Fig. 13c e 13d).
8
Italiano
Fig. 13a
Fig. 13b
Fig. 13e
Fig. 13d
34
- - - - - - - METODO l - - - - - - • 5 E PARATO RE ECOLOGICO CON FILTRO AD ACQUA
Consigliato per ogni tipo di sporco. È il metodo naturale per aspirare polveri e pollini.
A
ATTENZIONE: Occorre sempre utilizzare il filtro in rete (fig. 02 - poso 29).
Questo metodo è ideale per un'aspirazione veramente ECOLOGICA. EFFICACE, SALUTARE, destinata a
tutti gli ambienti domestici.
Utilizzando questo primo metodo si può aspirare nello stesso tempo ogni tipo di sporco, sia secco che liquido,
evitando così l'uso del sacchetto.
- Procedere come segue:
A
o
O
O
O
O
ATTENZIONE: Assicurarsi che la spina di alimentazione elettrica sia scollegata
dalla rete elettrica.
Sollevare la testata (8) dalla vasca di raccolta (II) sbloccando i ganci di chiusura (12) (fig. 06).
Inserire il filtro in rete (29) nel suo supporto spingendo fino in fondo.
Appoggiare il coperchio ferma filtro (IO) al filtro di rete (29) e ruotarlo nel senso della freccia indicata
sullo stesso sino a farlo agganciare (fig. 07).
Montare il sifone filtro ad acqua (28) sul supporto del bocchettone posto all'interno della vasca di raccolta
(II), quindi inserire la forcella (27) nelle due guide dello stesso supporto per ottenere il fissaggio delle
parti (fig.08a).
Versare circa 2 litri di acqua pulita nella vasca di raccolta (I I) sino allivello indicato sulla stessa (ondine
azzurre fig. 8b).
NOTA:
Per profumare l'aria e creare un piacevole effetto balsamico, si potranno
versare alcune gocce di essenze di pino o mentolo direttamente nell'acqua
9
Italiano
della vasca di raccolta prima di iniziare ad aspirare.
A
o
ATTENZIONE:
Non utilizzare essenze profumate schiumose.
Riposizionare la testata (8) sulla vasca di raccolta (I I) e bloccarlo con i ganci di chiusura (12) (fig. 06).
Inserire l'aggancio rapido (17a) del tubo flessibile nel bocchettone ad aggancio rapido (5).
Inserire la spina combinata (17b) nella presa (4) e bloccarla con il coperchio.
Inserire il tubo di prolunga (18) sull'impugnatura (17d) e bloccare le due parti con la leva (18a) (fig. 09).
O
O
O
O
Per montare la Spazzola Universale (19) sul tubo di prolunga è sufficiente spingerla sino all'aggancio.
Per sganciare la Spazzola Universale (19) sul tubo di prolunga premere la leva di sgancio( 19a) (fig. IO).
O
Montare l'accessorio desiderato sul tubo di prolunga (18) e bloccare le due parti con la leva (18a).
O
Inserire l'aggancio rapido (33a), del tubo flessibile (33), nell'apposito attacco (I) posto sulla parte alta della
testata (8) (Fig. 13a).
O
Collegare, con il tubo flessibile (33), l'apparecchio alla bocchetta dell'impianto centralizzato (34)(Fig. 13b).
O
Se l'impianto centralizzato è in funzione l'apparecchio inizierà ad aspirare.
- - - - - - - METODO 2
• SEPARATORE DI SOSTANZE LIQUIDE
Escluso tutti i liquidi infiammabili, corrosivi o esplosivi, acidi e solventi.
A
ATTENZIONE: Occorre sempre utilizzare il filtro in rete (fig. 07).
- Procedere come segue:
O Sollevare la testata (8) dalla vasca di raccolta (II) sbloccando i ganci di chiusura (12) (fig. 06).
O Inserire il filtro in rete (29) nel suo supporto spingendo fino in fondo.
O Ruotare il filtro di rete (29) nel senso della freccia indicata sullo stesso sino a farlo agganciare (fig.07).
O Togliere (se montato) il sifone filtro ad acqua (28) dal supporto del bocchettone estraendo la forcella (27)
dalle due guide (fig.08).
O Riposizionare la testata (8) sulla vasca di raccolta (I I) e bloccarlo con i ganci di chiusura (12) (fig. 06).
O Inserire l'aggancio rapido (17a) del tubo flessibile nel bocchettone ad aggancio rapido (5).
O Inserire la spina combinata (17b) nella presa (4) e bloccarla con il coperchio (fig. 03).
O Inserire il tubo di prolunga (18) sull'impugnatura (17d) e bloccare le due parti con la leva (18a) (fig. 09).
O
Per montare la Spazzola Universale (19) sul tubo di prolunga è sufficiente spingerla sino all'aggancio.
Per sganciare la Spazzola Universale (19) sul tubo di prolunga premere la leva di sgancio( 19a) (fig. IO).
O
Montare l'accessorio desiderato sul tubo di prolunga (18) e bloccare le due parti con la leva (18a).
IO
Italiano
NOTA:
D
In alcune situazioni per l'aspirazione dello sporco liquido, è consigliato
l'utilizzo dell'accessorio Spazzola Universale (19) unitamente al Telaio con
gomma per liquidi (21 )(esempio: per aspirare eventuali perdite d'acqua dalla
lavatrice).
Inserire l'aggancio rapido (33a),del tubo flessibile (33), nell'apposito attacco (I) posto sulla parte alta della
testata (8) (Fig. 13a).
Dove non è possibile aspirare con la spazzola, utilizzare direttamente l'impugnatura, per esempio per liberare
un lavandino da un intasamento.
IMPORTANTE: Quando l'aspirazione viene bloccata dal galleggiante (9), significa che il livello di liquido
aspirato è arrivato al massimo e quindi bisogna svuotare la vasca di raccolta. Per fare questa
operazione è necessario:
D Scollegare l'apparecchio dall'impianto centralizzato.
D Sollevare il gruppo aspirazione dalla vasca di raccolta sbloccando i ganci di chiusura.
D Svuotare la vasca di raccolta acqua.
D Riposizionare il gruppo aspirazione sulla vasca di raccolta e bloccarlo con i ganci di
chiusura.
D Avviare l'apparecchio come descritto in precedenza.
- - - - - - - METODO 3 - - - - - - • PULIZIA A VAPORE
Questo metodo è il sistema di pulizia TOTALMENTE ECOLOGICO che sfrutta la potenza sgrassante del
vapore, igienizzando l'ambiente ed umidificando l'aria.
- Procedere come segue:
A
ATTENZIONE: Assicurarsi che la spina di alimentazione elettrica
scollegata dalla rete elettrica.
sia
D
D
D
Inserire l'aggancio rapido (17a) del tubo flessibile nel bocchettone ad aggancio rapido (5).
Inserire la spina combinata (17b) nella presa (4) e bloccarla con il coperchio.
Inserire il tubo di prolunga (18) sull'impugnatura (17d) e bloccare le due parti con la leva (18a) (fig. 09).
D
Per montare la Spazzola Universale (19) sul tubo di prolunga è sufficiente spingerla sino all'aggancio.
Per sganciare la Spazzola Universale (19) sul tubo di prolunga premere la leva di sgancio( 19a) (fig. IO).
D
D
D
Montare l'accessorio desiderato sul tubo di prolunga (18) e bloccare le due parti con la leva (l8a).
Togliere il tappo di riempimento serbatoio ricarica caldaia (fig. OI - poso 13).
Versare acqua nel serbatoio (circa I litro per il primo utilizzo e circa 0,5 litri per i successivi rabbocchi)
(13) (fig.II).
NOTA:
Se si nota che l'acqua scende lentamente, significa che il serbatoio è pieno
e non si deve aggiungere altra acqua.
Il
Italiano
A
ATTENZIONE: Utilizzare acqua del rubinetto.
o
Rimettere il tappo di riempimento serbatoio ricarica caldaia (fig. OI - poso 13).
o
Inserire la spina di alimentazione elettrica nella presa di corrente.
A
o
ATTENZIONE: Assicurarsi che la tensione di rete corrisponda con quanto
indicato sulla targhetta dati dell'apparecchio.
Premere l'interruttore generale con simbolo tensione elettrica
Cl)
Premere l'interruttore caldaia con spia "vapore pronto" ~
Attendere circa 5 minuti affìnchè la caldaia raggiunga la temperatura adeguata (la "spia vapore pronto" si
spegne) (fig. OI - poso 3).
Premere la leva (17g) per erogare vapore (fig. 4).
O
O
O
NOTA:
A
Se la caldaia non ha raggiunto la temperatura adeguata, dall'accessorio
potrebbe fuoriuscire acqua.
ATTENZIONE:
- Prima di erogare il vapore assicurarsi che la superficie
da pulire resista alle alte temperature.
- Non erogare vapore su specchi o vetri esposti a basse
temperature.
- Potrebbero rompersi a causa dell'improvviso cambiamento
di temperatura.
- Non erogare vapore verso persone o animali.
- Pericolo di scottature
NOTA:
Jlh.
- L.:accensione e spegnimento della spia VAPORE PRONTO (15) durante
l'utilizzo dell'apparecchio è normale: ciò indica che la resistenza elettrica
entra in funzione per mantenere la temperatura e la pressione costante.
- Se durante l'utilizzo si accende la spia MANCANZA ACQUA (15) occorre
procedere al rabbocco d'acqua secondo procedura.
Rabbocco dell'acqua nel serbatoio ricarica caldaia.
O Togliere il tappo di riempimento serbatoio ricarica caldaia (fig. OI - poso 13).
O Versare acqua nel serbatoio (circa 0,5 litri) (13) (fig. I I).
NOTA:
A
O
12
Se si nota che l'acqua scende lentamente, significa che il serbatoio è pieno
e non si deve aggiungere altra acqua.
ATTENZIONE:
Utilizzare acqua del rubinetto.
Rimettere il tappo di riempimento serbatoio ricarica caldaia (fig. OI - poso 13).
Italiano
NOTA:
Per il rabbocco dell'acqua nel serbatoio non occorre spegnere l'apparecchio.
- - - - - - - METODO 4 - - - - - - • PULIZIA A VAPORE e ASPIRAZIONE "COMBINATA"
A
ATTENZIONE: Occorre sempre utilizzare il filtro in rete (fig. 02 - poso 29).
Questo metodo è il sistema di pulizia combinato VAPORE-ASPIRAZIONE, totalmente ECOLOGICO, che
sfrutta la potenza sgrassante del vapore eliminando acari e batteri.
Pulisce ed aspira igienizzando l'ambiente ed umidificando l'aria.
- Procedere come segue:
A
ATTENZIONE: Operare come descritto nei "METODI I" e "3" ed attivare
entrambe le funzioni contemporaneamente.
• DOPO L'UTILIZZO
Scollegare SEMPRE l'apparecchio dall'impianto centralizzato, estrarre la spina di alimentazione elettrica dalla
presa di corrente ed avvolgere il cavo intorno all'apparecchio.
CONSIGLI E PRECAUZIONI
Verificare periodicamente tutti i filtri utilizzati ed assicurarsi che siano posizionati correttamente.
Se l'apparecchio fa un rumore strano o aspira meno bene del solito, verificare che i tubi flessibili, i tubi di
prolunga o gli accessori non siano intasati.
In quel caso spegnere l'apparecchio scollegandolo dall'impianto centralizzato, staccare la spina dalla presa
elettrica e rimediare rimuovendone la causa.
• MANUTENZIONE E PULIZIA
Prima di ogni tipo di manutenzione o pulizia dell'apparecchio. scollegare l'apparecchio dalla rete elettrica e
dall'impianto centralizzato.
Per pulire l'apparecchio utilizzare un panno umido su tutta la superficie, sui tubi di prolunga e sugli accessori,
quindi asciugare.
A
ATTENZIONE: - Non utilizzare detersivi aggressivi e abrasivi.
- Non utilizzare getti d'acqua diretti sull'apparecchio.
13
Italiano
- Pulizia del filtro in rete (29)
O Rimuovere il filtro in rete dal suo supporto.
O Togliere e lavare la spugna sotto il getto d'acqua.
O Riposizionare la spugna nel filtro.
- Pulizia della vasca di raccolta (II)
Per una migliore pulizia della vasca di raccolta (II):
O Togliere la testata (8).
O Sganciare la vasca di raccolta (I I) girandola in senso orario (fig. 12).
O Per riposizionare la vasca di raccolta (I I) sulla base, inserire i perni (a) nelle forcelle (b) e ruotarla in
senso antiorario fino ad agganciarla (fig. 12).
SOLUZIONE DEI PROBLEMI
PROBLEMA
CAUSA
RIMEDI
L'apparecchio non funziona.
Impianto centralizzato spento.
Avviare l'impianto centralizzato.
Riduzione della potenza
d'aspirazione.
Filtro in rete intasato.
Tubi flessibili, prolunghe o accessori intasati.
Pulire o sostituire il filtro in rete.
Controllare i tubi flessibili, le prolunghe e gli
accessori.
Vasca di raccolta troppo piena.
Svuotare la vasca di raccolta.
Funzionamento dell'impianto centralizzato
non ottimale.
Verificare l'impianto centralizzato.
Non esce vapore dagli ace es·
Non c'è più acqua nel serbatoio ricarica
Ripristinare il livello di acqua.
sori
caldaia.
Non è stato premuto l'interruttore caldaia
Premere l'interruttore caldaia con spia "vapore
con spia "vapore pronto"
(pos.3 - fig. I)
La caldaia non funziona.
Elettrovalvola o leva comando vapore sull'im-
pronto"
(pos. 3 - fig. I)
Rivolgersi al Rivenditore.
pugnatura difettosi
14
GJ
Rivolgersi al Rivenditore.
Italiano
DATI TECNICI
Alimentazione elettrica ............................................................................................ 230V- 50Hz
Potenza max caldaia........................................................................... ................................ 1250 W
Capacità caldaia acciaio INOX ............................................................................................... 1,5 I
Capacità serbatoio ricarica caldaia ................................................. .. ..................................... 1,5 I
Pressione max lavoro......................................................................... .. ................ 370 kPa (4 bar)
Grado di protezione all'acqua ......................................................... .. ..................................... IP24
Lunghezza cavo alimentazione elettrica......................................... .. ...................................... 5 m
Capacità vasca d i raccolta................................................................. .. ........................................ 8 I
Comandi vapore in bassa tensione................................................. .. ..................................... 24V
Regolatore flusso vapore.................................................................. .. ........................... Manopola
Indicatore "mancanza acqua" ........................................................... .. .................... Spia luminosa
Peso apparecchio a vuoto................................................................. .. ..................................... 7 kg
SICUREZZE
Valvola di sicurezza
Termostato di lavoro + termostato di sicurezza
Pressostato di sovrapressione
Questo apparecchio è conforme ai REQUISITI ESSENZIALI DI SICUREZZA prescritti dalle
DIRETTIVE EUROPEE:
- CEE 73/23 BT
- CEE 89/336 EMC
Le prove sono state eseguite in accordo alle vigenti norme europee armonizzate.
Lazienda costruttrice si riserva il diritto di cambiare e/o modificare le caratteristiche tecniche e/o
estetiche senza preavviso ai propri prodotti al fine di migliorare le prestazioni.
IS
INFORMAZIONE AGLI UTENTI
Ai sensi dell'art. 13 del Decreto Legislativo 25lnglio 2005, n. 151 "Attnazione delleDirettive 2002/95/CE, 2002/96/CE e 2003/108/CE, relative alla
riduzione dell'uso disostanze pericolose nelle apparecchiature elettriche ed
elettroniche,nonché allo smaltimento dei rifiuti"
Il simbolo del cassonetto barrato riportato sull'apparecchiatura indica che il prodotto alla finedella propria vita utile deve essere raccolto separatamente dagli altri
rifiuti.L'utente dovrà, pertanto, conferire l'apparecchiatura giunta a fine vita agli
idonei centri di raccolta differenziata dei rifiuti elettronici ed elettrotecnici, oppure
riconsegnarla al rivenditore al momento dell'acquisto di una nuova apparecchiatura di tipo equivalente ,in ragione di uno a uno.L'adeguata raccolta differenziata per
l'avvio successivo dell'apparecchiatura dimessaal ricic1aggio, al trattamento e allo
smaltimento ambientalmente compatibile contribuisce adevitare possibili effetti negativi sull'ambiente e sulla salute e favorisce il ricic10 dei materialidi cui è composta
l'apparecchiatura.Lo smaltimento abusivo del prodotto da parte dell'utente comporta
l'applicazione delle sanzio-ni amministrative di cui al D.Lgs. n. 22/1997 (articolo 50
e seguenti del D.Lgs. n. 22/1997).
USER INFORMATION
In accordance with art. 13 of Legislative Decree on 25 July 2005, no. 151 "Implementation of Directive 2002/95/CE, 2002/96/CE and 2003/108/CE, concerning the reduction of use of dangerous substances in electrical and electronic
appliances, as well as the disposal of waste.
"The crossed out garbage bin symbol indicated on the appliance indicates that the
product, atthe time of di sposaI , must be disposed of separately to other wasteThe
user must, therefore, hand the appliance in to an authorized electronic andelectrotechnical differentiated waste collection center or to the point of sale upon acquisitionof a new, equivalent appliance. This operation may also be performed as a
trade-in. Acorrect differentiated di sposaI of the appliance wiU avoid possible damage
to the environment and to one's health. Furthermore, materials used to make the
appliance wiU also be recyc1ed.Illegal disposal of the product is punishable by law.
- - - - - GARANZIA - - - - Il presente prodotto è garantito per un periodo di 24 mesi dalla data di acquisto.
- La garanzia è valida se debitamente compilata e riportante la data di acquisto
e lo scontrino fiscale o fattura vendita.
- La garanzia deve essere conservata ed esibita in caso di riparazione del
prodotto
- La garanzia comprende la riparazione o sostituzione gratuita delle parti
componenti l'apparecchio qualora stesse risultino, a giudizio insindacabile
della casa costruttrice, difettose all'origine della fabbricazione
- La garanzia non ha validità se il guasto è dovuto ad utilizzo improprio
dell'apparecchio non conforme alle istruzioni d'uso o per danni causati da
fuoco, acqua, cadute, ecc.
- La garanzia decade immediatamente in caso di manomissione dell'apparecchio
o di riparazioni effettuate personale non autorizzato.
- Lo smontaggio e apertura dell'apparecchio è consentita solo a personale
tecnico specializzato autorizzato. La mancata osservanza di ciò comporta la
decadenza immediata della garanzia.
-----GUARANTEE----The present product is guaranteed for a period of 24 months from the date of
purchase.
- The guarantee is valid if correctly filled in with the date of purchase and the
receipt or invoice of sale.
- The guarantee must be kept and shown in the case the product requires repairs
- The guarantee covers the repair or free replacement of the parts of the appliance
that should be considered, by unquestionable decision of the manufacturer, to be
production faults.
- The guarantee is not valid if the fault is due to the incorrect use of the appliance
and any use not in compliance with the instructions for use ordue to damages
caused by fire, water, or by being dropped etc.
- The guarantee expires immediately in the case of tampering with the appliance or
repairs carri ed out by unauthorised personnel.
- The disassembly and opening of the appliance is only permitted by specialised
technical personnel authorised.lf these regulations are not observed the guarantee
shall be considered no longer val id.
Ro.Bia.Plast S.r.l.
Via S. Maria, 2
20014 Nerviano - Milano (Italy)
e-mail: [email protected]
.
www.robiaplast.it
Fig. O I
IO
Dear Customer,
Thank you for purchasing our steam separator.
We are conftdent that this unit will get your maximum satisfaction in performing any type of deaning.
This Steam separator sucks up at the some time, and without problems, both Iiquid stains and dry/solid dirt.
With a simple operation, the environment is free from pollens, mites, dust and 011 the harmful substances that trigger
allergies and is given instead a fresh and pleasant scent enhancing well-being.
It really is an eco-friendly and cost-effective deaning system that offers health beneftts, as well as both time and
money saving.
AWARNINGA
Sefore operating the devi ce, please read this manual careful/y,
paying special attention to the chapter on Rules of Use.
Il Suo apparecchio è così composto (fig. OI):
- Centralized vacuum system hose coupling
~'k
2
- Main switch with electric voltage symbol
3
- Switch with boiler and "steam ready" warning light
4
- Combined current/steam socket with lid
5
- Quick coupling nozzle for hose connection
6
- Base
7
- Swivel casters
8
- Head
9
- Float
IO
- Stop fìlter cover
I I
- Collection tank
12
- Tank latches
13
- Boiler refìll tank filler cap
14
- Steam flow control knob on the handle (fig. 4)
15
- "Water lack" warning light with symbol
16
- Centrai vacuum hose release button
@
Cf)
English
Accessories available (fig. 02):
17
- Complete hose unit ............................................................................cod ......... AC0650 I 06
17a - Swivel quick-coupling
17b - Combined currentlsteam plug
17c - Flexible hose integrated
17d - Handle with steam delivery lever (17g)
18
- No.2 extension tubes ........................................................................cod ......... AC0630 I 06
19
- Universal steam brush ........................................................................cod ...... GRQDOI46 I
20 - Frame with bristles .............................................................................cod ...... GRQD00806
21
- Frame with rubber for liquids .......................................................... cod ...... GRQD00906
22 - Frame with pads for rugs .................................................................. cod ...... G RQDO I 006
23 - Frame with wool felts for parquet floors ...................................... cod ...... G RQDO I 106
24 - Squeegee ...............................................................................................cod ...... G RQD031 06
26 - Small nozzle ..........................................................................................cod ......... AC0820 I 06
27 - Clamping clip of the water fìlter siphon ........................................ cod .......... ST7300 I 06
28 - Water fìlter syphon .............................................................................cod .......... ST73 15206
29 - Mesh fìlter .............................................................................................cod ...... GRQD04106
30 - Steam gun ..............................................................................................cod .......... ST7875106
3I
- Brush with nylon bristles ................................................................... cod ......... AC0320 I 06
32 - Funnel ....................................................................................................cod ......... AC0690 I 07
OPTIONAL
33
- Device/centralized system connection hose .................................. cod ...... G RQD02044
33a - Swivel quick-coupling
33b - Hose
18
17
20
~21
24
~
W)
27
4
~
~
~22
23~Q~Q
29
e
31
28
33
English
• PURPOSE
The device connected to a centralized vacuum cleaning system can function as:
a - Ecological separator with water fìlter
b - Separator of liquid substances
Steam cleaner
c
d - "Combined" steam and vacuum cleaner
AWARNING:
This device is exclusively intended to :
.... domestic use and not industriai .
.... to clean floors, carpets, rugs, glass etc. using ONLY the
originai accessories provided by the manufacturer.
Any use other than those are to be considered as NOT allowed by the manufacturer.
5
English
• RULES OF USE
Carefully read the instruction manual carefully and keep it in a dry and protected piace; keep it near the device
so that you can consult it when needed.
D Do not leave the packaging material (box, bag clips etc.) to the reach of children.
You should keep the packaging for future use, otherwise dispose of materials in accordance with the
rules in force in your municipality.
D Every time you use the the steam function fully extend the cable and pay attention not to unroll it on
hot surfaces or sharp edges.
D Before inserting the plug into the power outlet ascertain that the mains voltage corresponds to that
indicated on the identification plate of the product. Perform this check every time you connect the plug
of the device in a building other than that in which it is usually used.
D Do not pinch the cable or piace heavy objects on it.
D Do not use an adapter to connect the unit to the power outlet.
D Do not remove the plug from the socket with wet or damp hands.
D Do not pull the power cord or the device to disconnect the plug from the socket
D Do not leave the running device unattended and keep out of reach of children and incapacitated or
incompetent.
D Do not put the suction nozzle or the end of the hose to delicate parts of the body such as eyes, ears,
hair.
D Do not use the device to vacuum burning objects, hot liquids, acids, solvents or flammable, toxic, corrosive
or explosive substances.
D Do not use the device in explosive environments (presence of gas in the air).
D Do not direct the steam jet towards people or animals. Danger of burning
D The steam should not be directed towards equipment containing electrical components, such as the inside
of the oven.
D Never touch the steam jet very close to the delivery nozzle with hands Danger of burning
D Do not touch hot surfaces during use Danger of burning
D Do not touch the device with wet hands or feet when the plug is inserted.
D Before using the steam ensure that the surface to be cleaned is suitable to withstand high temperatures
D Do not stand or sit on the device.
D Use ONLY originai accessori es.
D Sto re the device in a piace not subject to weathering (sun rain, etc .. ) and keep it away from heat sources.
D Do not immerse the device in water.
D Do not clean the device with jets of water.
D Unplug the device from the mains after use.
D Perform ali water filling, cleaning or maintenance operations when the device is switched off and the plug
disconnected from the power outlet.
D If the device is dropped and visible defects or malfunctions are observed, it is recommended not to use
it and not to try to disassemble or tamper with it. Directly apply to the manufacturer or to the dealer
for repair.
D If the power cord is damaged it must be replaced by the manufacturer or his servicing department or in
any case by a qualified person in order to avoid any risk.
D When the device is out of order make it unusable by cutting the plug of the power cord.
D The power plug must be inserted into a socket 16A 250V (2P+E) with efficient ground connection, in
accordance with standard IEC 64-8.
D In the base (towards the floor) there is the overpressure vent hole: it must never be obstructed.
D The symbol
indicates that the device produces a jet of steam. WARNING: Danger of burning
D In case of improper use or use not in accordance with the instructions herein given, or again in case of
tampering with the manufacturer can not be held liable for any damage caused by the device to persons,
animals or properties
Jh
Jh
Jh
6
Jh
English
• MOUNTING AND PURPOSE OF ACCESSORIES
COMPLETE HOSE (17) (fig. 03) - Insert the swivel quick- coupling (17a) of the hose
(17) into the suction nozzle (5).
Insert the combined plug (17b) into the socket and lock it with its lid.
HANDLE
(Fig. 04) - Press the lever (17g) to start delivering steam (if the boiler is turned on and at
the right temperature).
EXTENSION TUBES (Fig. 02 - poso 18) - Use either I or 2 extension tubes for convenience and ease
of use of the device. Ali the accessories can be mounted on both the extension tu bes and
directly on the handle.
UNIVERSAL STEAM BRUSH (Fig. 05) - Suitable to vacuum both solid dirt or liquid stains on any
surface, simply by changing the appropriate Frame.
To change the Frame, release the two sliders on the brush.
FRAME WITH BRISTLES (Fig. 02 - pos.20) - Use this accessory with the Universal Brush, to vacuum
flat surfaces such as marble floors, ceramics, etc..
FRAME WITH RUBBER FOR LlQUIDS (Fig. 02 - poso 21) - Use this accessory with the Universal
Brush, to vacuum liquids on flat surfaces.
FRAME WITH PADS FOR RUGS (Fig. 02 - poso 22) - Use this accessory with the Universal
Brush to clean runners, doormats, rugs.
FRAME WITH WOOL FELTS FOR PARQUET FLOORS (Fig. 02 - poso 23) - Use this accessory
with the Universal Brush to vacuum flat and delicate surfaces such as parquet floors.
SQUEEGEE (Fig. 02 - poso 24) - Suitable for cleaning glass surfaces (mirrors, windows, etc..) ..
SMALL NOZZLE (Fig. 02 - poso 26) - Use this accessory with the universal accessory coupling for cleaning
mattresses, sofas, pillows, etc ..
CLAMPING CLIP OF THE WATER FILTER SIPHON
in its seat the siphon of the water filter.
(fig. 02 - pos.27) - The clip is used to lock
WATER FILTER SIPHON (fig. 02 - pos.28) - Thanks to the hole at the bottom, it mixes the dirt vacuumed
with the water present in the collection tank, making a natural filter (Venturi effect).
MESH FILTER (fig. 02 - pos.29) - The use of this filter is indispensable to vacuum both liquid stains and
dry/solid dirt (with the water filter siphon and the addition of 2 I. of water in the tank).
BRUSH WITH NYLON BRISTLES (fig. 02 - poso 31) - Use this accessory with the steam gun to exert
a greater abrasive cleaning (e.g. to clean the spaces between tiles, stove).
STEAM GUN (fig. 02 - poso 30) - Ideai to reach difficult spots such as corners, radiators ..
FUNNEL
(fig. 02 - poso 32) - This accessory is used to top up the water in the water tank (Fig.
I I)
CONNECTION HOSE DEVICE/CENTRALlZED SYSTEM (OPTIONAL) (fig. 02 - poso 30) - Insert one
of the two swivel quick couplings (33a) into the socket (I) at the top of the device (Fig. 13a).
nsert the other swivel quick coupling (33a) into the wall outlet (34) (Fig. 13b).
To release the quick coupling (33a) just press the release button (16 or 34a) (Fig. 13c and
13d).
7
English
Fig. 13a
Fig. 13b
Fig. 13e
Fig. 13d
- - - - - - - METHOD l - - - - - - • ECOLOGICAL SEPARATOR WITH WATER FILTER
Recommended for any kind of dirt. It is the natural method to remove dust and pollen
AWARNING: You should always use the mesh filter (fig. 02 - poso 29).
This method is ideai for really ENVIRONMENTALLY-FRIENDLY, EFFICIENT, HEALTHY cleaning, intended
for ali domestic environments.
Using this first method you can vacuum at the same time every type of dirt, both dry and liquid, thus avoiding
the use of the bag.
- Proceed as follows:
AWARNING: Make sure that the power plug is disconnected from the mains.
o
O
O
O
Lift the head (8) from the collection tank (II) by releasing the locking hooks (12) (fig. 06).
Insert the mesh filter (29) into its seat pushing up to the end.
Piace the stop filter cover (IO) to the mesh filter (29) and rotate it in the direction ofthe arrow indicated
on it until it engages (Fig. 07).
Mount the siphon of the water filter (28) on the support of the nozzle positioned inside the collection
tank (II), then insert the clamping clip (27) into the two guides of the same support to fix the parts (fig.
08A).
O
Pour about 2 litres of clean water in the collection tank (II) up to the level shown on it (blue ripples fig.
8b).
NOTA:
8
To perfume the air and create a pleasant balsamic effect, you can pour a
few drops of essenti al oil of pine or menthol directly into the water of the
collection tank before start vacuuming.
English
AWARNING:
Do not use foaming perfumed essences.
o
Reposition the head (8) on the collection tank (II) by releasing the latches (12) (fig. 06). (fig. 06).
O Insert the quick coupling (17a) of the hose into the quick coupling nozzle (5).
O Insert the combined plug (17b) into the socket (4) and lock it with the cover.
O Insert the extension tube (18) on the handle (17d), and tighten the two parts with the lever (18a) (fig. 09).
O To mount the Universal Brush (19) on the extension tube just push it up to the "click".
To release the Universal Brush (19) from the extension tube press the release lever (19a) (fig. IO).
O Mount the desired accessory on the extension tube (18) and lock the two parts with the lever (18a).
O Insert the quick coupling (33a), the hose (33), into the suitable seat (I) located at the top of the head (8)
(Fig. 13a).
O Connect, with the hose (33), the device to the nozzle of the centralized system (34) (Fig. 13b) ..
O If the centralized system is running the device will start vacuuming.
- - - - - - - METHOD 2 • SEPARATOR OF LlQUID SUBSTANCES
Excluded ali flammable, corrosive or explosive liquids, acids and solvents.
AWARNING: You should always use the mesh filter (Fig. 07).
- Proceed as follows:
O
O
O
O
Lift the head (8) from the collection tank (II) by releasing the locking hooks (12) (fig. 06).
Insert the mesh filter (29) into its seat pushing up to the end.
Rotate the mesh filter (29) in the direction of the arrow indicated on it up to coupling (Fig. 07).
Remove (if fitted) the siphon of the water filter (28) from the nozzle by removing the clamping clip (27)
from the two guides (fig. 08).
O
O
O
O
Reposition the head (8) on the collection tank (II) and lock it with the latches (12) (fig. 06).
Insert the quick coupling (17a) of the hose into the quick coupling nozzle (5).
Insert the combined plug (17b) into the socket (4) and lock it with the cover (Fig. 03).
Insert the extension tube (18) on the handle (17d), and tighten the two parts with the lever (18a) (fig. 09).
O To mount the Universal Brush (19) on the extension tube just push it up to the "click".
To release the Universal Brush (19) from the extension tube press the release lever (19a) (fig. IO).
O Mount the desired accessory on the extension tube (18) and lock the two parts with the lever (18a).
9
English
NOTE:
o
In some situations for vacuuming the liquid dirt, it is recommended to use
the Universal Brush (19) together with the Frame with rubber for liquids
(21) (example: to vacuum any water leaks from the washing machine).
Insert the quick coupling (33a), the hose (33), into the suitable seat (I) located at the top of the head (8)
(Fig. 13a).
Where it is not possible to vacuum with the brush,directly use the handle, for example to clear a clogged sink.
IMPORTANTE: When the vacuuming action is prevented by the float (9), it means that the level of liquid
sucked has arrived at the maximum, and then the collection tank must be emptied.To carry
out such an operation you must:
O Disconnect the device from the centralized system.
O Lift the vacuum system from the collection tank by releasing the latches.
O Empty the water collection tank.
O Lift the vacuum system from the collection tank and lock it with the latches.
O Start the device as described above.
- - - - - - - METODO 3 - - - - - - • STEAM CLEANING
This method is the cleaning system TOTALLY ENVIRONMENTALLY FRIENDLY that harnesses the degreasing
power of the steam, sanitizing the environment and humidifying the air.
- Proceed as follows:
ÀWARNING: Make sure that the power plug is disconnected from the mains.
O
O
O
Insert the quick coupling (17a) of the hose into the quick coupling nozzle (5).
Insert the combined plug (17b) into the socket (4) and lock it with the cover.
Insert the extension tube (18) on the handle (17d), and tighten the two parts with the lever (18a) (fig. 09).
O To mount the Universal Brush (19) on the extension tube just push it up to the "click".
To release the Universal Brush (19) from the extension tube press the release lever (19a) (fig. IO).
O
O
O
IO
Mount the desired accessory on the extension tube (18) and lock the two parts with the lever (18a).
Remove the filler cap of the oiler tank (fig. OI - poso 13).
Pour water in the tank (about I litre for the first use and about 0.5 litres for subsequent refills) (13) (fig.
I I).
NOTE:
If you notice that the water flows down slowly, it means that the tank is
full and you should not add more water.
English
AWARNING: Use tap water.
D
Reposition the filler cap of the boiler tank (fig. OI - poso 13).
D
Insert the power plug into the power outlet.
Make sure that the mains voltage corresponds with that
indicated on the identification plate.
AWARNING:
D
Press the mai n switch with the symbol of the voltage
Cf)
@
D Press the boiler switch with the "steam ready" warning light
D Wait about 5 minutes for the boiler to reach the proper temperature (the "steam ready" warning light
turns of!) (fig. OI - poso 3).
D Press the lever (17g) to delivery the steam (Fig. 4).
Se la caldaia non ha raggiunto la temperatura adeguata, dall'accessorio
potrebbe fuoriuscire acqua.
NOTE:
AWARNING:
- Before delivering the steam ensure that the surface to
be cleaned is suitable to withstand high temperatures .
- Do not direct steam on mirrors or glass exposed to low
temperatures.
- They may break due to the sudden change in temperature.
- Do not direct steam towards people or animals.
- Danger of burning
NOTE:
&.
- The switching on and off of the STEAM READY warning light (15) during
use of the device is normal, it indicates that the electrical resistance comes
into operation to maintain constant both the temperature and the pressure.
- If while using the LACK OF WATER (15) warning light turns on it is
necessary to top up with water according to the relevant procedure.
Filling with water the boiler tank.
D
D
Remove the filler cap of the oiler tank (fig. OI - poso 13).
Pour water in the tank (about 0.5 litres) (13) (fig. I I).
NOTE:
AWARNING:
D
If you notice that the water flows down slowly, it means that the tank is
full and you should not add more water.
Use tap water.
Reposition the filler cap of the boiler tank (fig. OI - poso 13).
Il
English
NOTE:
To top up the water in the tank is not necessary to turn off the device.
- - - - - - - METHOD 4 - - - - - - • "COMBINEO" STEAM ANO VACUUM CLEANING
AWARNING: You should always use the mesh filter (Fig. 02 - poso 29).
This method is the combined STEAM-VACUUM cleaning system, totally ENVIRONMENTALLY FRIENFLY,
which harnesses the degreasing power of steam, removing mites and bacteria.
It cleans and vacuums sanitizing the environment and humidifying the air.
- Proceed as follows:
AWARNING:
Proceed as described in "METHODS I" and "3" and activate both functions simultaneously.
• AFTER USE
ALWAYS disconnect the device from the centralized system, remove the power plug from the power outlet
and wrap the cord around the device.
TIPS ANO PRECAUTIONS
Periodically check ali the filters used and make sure they are positioned correctly.
If the device makes an unusual noise or sucks less well than usual, check the hoses, the extension tubes or
accessories are not clogged.
In that case, turn off the power by disconnecting it from the centralized system, unplug it from the electrical
outlet and remedy the problem.
• CLEANING ANO MAINTENANCE
Before carrying out any maintenance or cleaning operations on the unit. disconnect the device from the mains
and from the centralized system.
To clean the device pass a damp cloth over the entire surface, on the extension tubes and on the accessories,
then dry
AWARNING:
12
- Do not use aggressive detergents and abrasives.
- Do not use direct water jets on the device.
English
- Cleaning the mesh filter (29)
O Remove the mesh filter from its holder.
O TRemove and rinse the sponge under running water.
O Reposition the sponge in the filter.
- Cleaning the collection tank (II)
For a better cleaning of the collection tank (I I):
O Remove the head (8).
O Remove the collection tank (II) by turning it clockwise (fig. 12).
O To reposition the collection tank (II) on the base, insert the pins (a) in the clamping clips (b) and turn it
counter-clockwise until it clicks (fig. 12).
PROBLEM SOLVING
PROBLEM
CAUSE
- The device does not work.
Centralized system 011.
- Reduction in vacuum power.
Hoses, extension tubes or accessories clogged
Mesh filter clogged.
Too lull collecting tank.
Operation 01 the centralized system is not
optimal.
The accessories do not del iver steam
There is no more water in the boiler tank.
The button with the "steam ready" warning
0J (pos. 3 - fig. I)
- The boiler does not work.
Solenoid valve or steam lever on the handle
delective
RIMEDI
Start the centralized system.
Clean or replace the mesh filter.
Check the hoses, the extension tu bes and
accessories.
Empty the collection tank.
- Check the centralized system.
Restore the water level.
Press the button with the ''steam ready"
warning light 01 the boiler
Consult the Dealer.
- Consult the Dealer.
(pos. 3 - fig. I)
13
English
TECHNICAL DATA
Electrical power supply .................................................................... ....................... 230V- 50Hz
Max boiler power .............................................................................. ................................ 1250 W
STAINLESS STEEL boiler capacity ................................................. ....................................... 1,5 I
Boiler tank capacity ........................................................................... .. ..................................... 1,5 I
Max working pressure ...................................................................... .. ................ 370 kPa (4 bar)
Degree of protection against water .............................................. .. ..................................... IP24
Length of the power cord ............................................................... .. ...................................... 5 m
Collection tank capacity .................................................................. .. ........................................ 8 I
Steam controls in low voltage ........................................................ .. ..................................... 24V
Steam flow regulator ......................................................................... .. ........................... Manopola
"LACK OFWATER" indicator ............................................................................. Warning light
Weight of the empty device ............................................................ .. ..................................... 7 kg
SAFETY DEVICES
Safety valve
Working thermostat + safety thermostat
Overpressure switch
This device complies with the ESSENTIAL SAFETY REQUIREMENTS prescribed by
EUROPEAN DIRECTIVES:
- EEC 73/23 BT
- EEC 89/336 EMC
The tests were carried out in accordance with the applicable harmonized European standards ..
The manufacturer reserves the right to change and/or modify the specifìcations and/or any design
features without noti ce to its products in order to improve performance.
14
INFORMATION TO USERS
Pursuaut to art. 13 of Legislative Decree dated 25 July 2005, uo. 151 "Implemeutatiou of Directives 2002/95/EC, 2002/96/EC aud 2003/108/EC, on reduction
of hazardous substances in electrical and electronic devices, and the disposal of
waste"
The symbol of the crossed-out dustbin indicates that the product, at the end of its service life, must be collected separately. The user must therefore dispose of the device,
at the end of its useful life, at suitable collection centres for electric and electronic
devices, or return it to the dealer when purchasing a new device of the same type, on a
one-to-one basis. Suitable separated collection for subsequent forwarding to centres,
specifically authorized for eco-friendly treatment and recyc1e, helps to avoid possible
negative effects
on the environment and health and promotes recyc1ing of materials the device is made
of. Improper di sposai of the product by the user entails the application of administrative sanctions to be referred to in Legislative Decree no. 22/1997 (Artic1e 50 and
following to Legislative Decree no. 22/1997).
USER INFORMATION
In accordance with art. 13 of Legislative Decree on 25 July 2005, no. 151 "Implementation ofDirective 2002/95/CE, 2002/96/CE and 2003/108/CE, concerning
the reduction of use of dangerous substances in electrical and electronic appliances, as well as the disposal of waste.
"The crossed out garbage bin symbol indicated on the appliance indicates that the
product, atthe ti me of disposal, must be disposed of separately to other wasteThe user
must, therefore, hand the appliance in to an authorized electronic andelectro-technical
differentiated waste collection center or to the point of sale upon acquisitionof a new,
equivalent appliance. This operation may also be performed as a trade-in. Acorrect
differentiated di sposai of the appliance will avoid possible damage to the environment
and to one's health. Furthermore, materials used to make the appliance will also be
recyc1ed.Illegal di sposai of the product is punishable by law.
- - - - - GARANZIA - - - - Il presente prodotto è garantito per un periodo di 24 mesi dalla data di acquisto.
- La garanzia è valida se debitamente compilata e riportante la data di acquisto
e lo scontrino fiscale o fattura vendita.
- La garanzia deve essere conservata ed esibita in caso di riparazione del
prodotto
- La garanzia comprende la riparazione o sostituzione gratuita delle parti
componenti l'apparecchio qualora stesse risultino, a giudizio insindacabile
della casa costruttrice, difettose all'origine della fabbricazione
- La garanzia non ha validità se il guasto è dovuto ad utilizzo improprio
dell'apparecchio non conforme alle istruzioni d'uso o per danni causati da
fuoco, acqua, cadute, ecc.
- La garanzia decade immediatamente in caso di manomissione dell'apparecchio
o di riparazioni effettuate personale non autorizzato.
- Lo smontaggio e apertura dell'apparecchio è consentita solo a personale
tecnico specializzato autorizzato. La mancata osservanza di ciò comporta la
decadenza immediata della garanzia.
-----GUARANTEE----The present product is guaranteed for a period of 24 months from the date of
purchase.
- The guarantee is valid if correctly filled in with the date of purchase and the
receipt or invoice of sale.
- The guarantee must be kept and shown in the case the product requires repairs
- The guarantee covers the repair or free replacement of the parts of the appliance
that should be considered, by unquestionable decision of the manufacturer, to be
production faults.
- The guarantee is not valid if the fault is due to the incorrect use of the appliance
and any use not in compliance with the instructions for use ordue to damages
caused by fire, water, or by being dropped etc.
- The guarantee expires immediately in the case of tampering with the appliance or
repairs carried out by unauthorised personnel.
- The disassembly and opening of the appliance is only permitted by specialised
technical personnel authorised.lf these regulations are not observed the guarantee
shall be considered no longer valid.
Ro.Bia.Plast S.r.l.
Via S. Maria, 2
20014 Nerviano - Milano (ltaly)
e-mail: [email protected]
.
www.robiaplast.it


![トランスポンダ・DME・TCAS テストセット[IFR6000]](http://vs1.manualzilla.com/store/data/006599612_2-c4ec107de8b6a39cb45b0848b0c6f4b7-150x150.png)