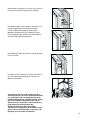
1
Kühl - Gefrierschrank / Frigorifero - congelatore
fridge - freezer
GEBRAUCHSANWEISUNGEN
ISTRUZIONI PER L’USO
INSTRUCTION BOOK
ERN 29801
D
I
2223 366-16
GB
WARNUNGEN UND WICHTIGE HINWEISE
Es ist sehr wichtig, daß diese Bedienungsanleitung mit dem betreffenden Gerät aufbewahrt wird. Sollte
dieses Gerät verkauft bzw. einer anderen Person gegeben werden, so ist es nötig, die Anleitung
beizufügen, damit der neue Besitzer über den Betrieb des Gerätes bzw. die entsprechenden Warnungen.
Sollte dieses Gerät mit Magnet-Türverschluß als Ersatz für ein altes Gerät dienen, das noch mit einem
Schnappschloß ausgerüstet ist, so machen Sie bitte dieses Schloß unbrauchbar, bevor Sie das Gerät
beiseite stellen oder zum Müll geben. Sie verhindern damit, daß spielende Kinder sich selbst einsperren
und damit in Lebensgefahr kommen.
Diese Warnungen wurden zu Ihrem bzw. dem Schutz anderer erarbeitet. Wir bitten Sie daher, diese
aufmerksam zu lesen, bevor das Gerät in Betrieb genommen wird.
Sicherheit
Störungen - Kundendienst
•
Das Gerät darf von Kindern und Personen, deren
physische, sensorische oder geistige Fähigkeiten
sowie Mangel an Erfahrung und Kenntnissen
einen sicheren Gebrauch des Gerätes
ausschließen, nur unter Aufsicht oder nach
entsprechender Einweisung durch eine Person
benutzt werden, die sicherstellt, dass sie sich
den Gefahren des Gebrauchs bewusst sind.
Kinder sind zu beaufsichtigen, sodass sie nicht
am Gerät spielen können.
•
Sollte die Installation des Gerätes eine Änderung
der elektrischen Hausinstallation verlangen, so
darf diese nur von Elektro-Fachkräften
durchgeführt werden.
•
Eventuelle Reparaturen dürfen nur von einem
Kundendienst oder sonstigen autorisierten
Stellen durchgeführt werden.
•
Es ist wichtig, daß nur Original-Ersatzteile
verwendet werden.
•
Es ist gefährlich, die Eigenschaften dieses
Gerätes zu ändern.
•
•
Vor der inneren bzw. äußeren Reinigung des
Gerätes sowie beim Auswechseln der Glühlampe
(bei damit ausgestatteten Geräten) das Gerät
spannungslos machen.
Dieses Gerät enthält im Kältekreislauf
Kohlenwasserstoff. Aus diesem Grund darf die
Wartung und das Nachfiillen ausschließlich von
autorisiertem Fachpersonal durchgeführt werden.
•
Eis aus dem Gefrier- bzw. Frosterfach nicht
sofort essen, es könnte Kälte-Brandwunden
verursachen.
Benutzen Sie nie Metallgegenstände um das
Gerät zu reinigen, da es beschädigt werden
könnte.
•
Tritt eine Störung oder ein Defekt ein, versuchen
Sie nicht, das Gerät selbst zu reparieren.
Elektrogeräte dürfen nur von Elektro-Fachkräften
repariert werden, da durch unsachgemäße
Reparaturen erhebliche Folgeschäden entstehen
können. Wenden Sie sich bitte an die nächste
Kundendienststelle.
•
•
Dieses Gerät ist schwer. Beim Versetzen bitte
darauf achten!
•
Beachten Sie, dan während der Bewegung
des Gerätes der Kältemittelkreislauf nicht
beschädigt wird.
•
Das Gerät darf nicht in unmittelbarer Nähe
von Heizkörpern oder Gasherden aufgestellt
werden.
•
Ein Standort mit direkter Sonneneinstrahlung
sollte vermieden werden.
•
Eine ausreichende Luftzirkulation an der
Geräterückseite muß gewährleistet sein.
Jegliche Beschädigung des Kühlkreislaufes
ist zu vermeiden.
•
NUR FÜR GEFRIERSCHRÄNKE
(Einbaugeräte ausgenommen): ein optimaler
Aufstellungsort ist der Keller.
•
Keine Elektrogeräte (z.B. Eismaschinen) in
das Gerät stellen.
2
Aufstellung
•
Sich vergewissern, daß das Gerät nach der
Installation nicht auf dem Netzkabel steht.
Wichtig: Wenn die Netzanschlussleitung dieses
Gerätes beschädigt wird, muss sie durch den
Hersteller oder seinen Kundendienst oder eine
ähnlich qualifizierte Person ersetzt werden, um
Gefährdungen zu vermeiden.
•
Während das Gerät in Betrieb ist, werden der
Verflüssiger und der Kompressor, die sich auf der
Rückseite des Gerätes befinden, heiß. Es ist
darauf zuachten, dass die Luft um das Gerät frei
zirkulieren kann, damit die Wärme abgeführt
werden kann. Eine ungenügende Luftzirkulation
kann einen unregelmässigen Betrieb bzw.
Schäden am Gerät verursachen. Achten Sie auf
die Installationsanweisungen.
•
•
Teile, die heiß werden (z.B. Kompressorgehäuse,
Verflüssiger und zugehörige Rohre), sollen nicht
frei zugänglich sein. Wo es auch immer möglich
ist, soll das Gerät mit der Rückseite gegen eine
Wand gestellt werden.
Während des Transports kann es vorkommen, daß
das im Motorkompressor enthaltene Öl in den
Kältekreislauf abläuft. Man sollte mindestens 2
Std. warten, bevor das Gerät in Betrieb
genommen wird, damit das Öl in den Kompressor
zurückströmen
Gebrauch
•
•
Die Haushaltskühl- und Gefriergeräte sind nur
zur Einlagerung bzw. zum Einfrieren von
Nahrungsmitteln bestimmt.
Die beste Leistung erzielt man bei
Raumtemperaturen von +18°C bis +43°C (Klasse
T); +18°C bis +38°C (Klasse ST); +16°C bis
+32°C (Klasse N); +10°C bis +32°C (Klasse SN);
die Geräteklasse ist auf dem Typschild
angegeben.
Zu beachten: Wird dieses Gerätes bei anderen
Umgebungstemperaturen betrieben als den in
der entsprechenden Klimaklasse angegebenen
Werten, sind folgende Hinweise zu beachten:
sinkt die Umgebungstemperatur unter den
angegebenen Mindestwert ab, könnte die
Lagertemperatur im Gefrierabteil nicht mehr
garantiert sein; es wird daher empfohlen, die
eingelagerten Lebensmittel so rasch als möglich
zu verbrauchen.
•
Einaufgetautes Produkt darf nicht wieder
eingefroren werden.
•
Für das Aufbewahren bzw. das Einfrieren der
Lebensmittel sind die Anweisungen des
Herstellers zu befolgen.
•
In allen Kühl- und Gefriergeräten bedecken sich
im Laufe der Zeit alle kälteführenden Teile mit
einer Reif bzw. Eissicht. Diese Schicht wird je
nach Modell automatisch oder mit der Hand
abgetaut.
•
Die Reifsicht niemals mit Metallgegenständen
abkratzen, das Gerät könnte beschädigt werden.
Dazu nur den mitgelieferten Plastikschaber
verwenden.
•
Zum Lösen der festgefrorenen Eisschalen keine
scharfkantigen oder spitzn Gegenstände
benutzen.
•
Es sollten keine kohlensäurehaltigen Getränke in
das Gefrier- bzw. Frosterfach eingestellt werden,
sie könnten platzen.
Umweltnormen
Dieses Gerät enthält im Kühlkreislauf und in der
Isolierung kein ozonschädigendes Gas. Das
Gerät darf nicht mit dem Hausmüll entsorgt
werden. Eine Beschädigung des
Kältemittelkreislaufs, insbesondere des
Wärmetauschers auf der Rückseite des Gerätes,
muß verhindert werden. Auskunft über
Abholtermine oder Sammelplätze gibt die
örtliche Gemeindeverwaltung an. Die in diesem
Gerät verwendeten und mit dem Symbol
gekennzeichneten Materialien,sind
recyclingfähig.
Entsorgung von Altgeräten
Das Symbol
auf dem Produkt oder seiner
Verpackung weist darauf hin, dass dieses Produkt
nicht als normaler Haushaltsabfall zu behandeln ist,
sondern an einem Sammelpunkt für das Recycling
von elektrischen und elektronischen Geräten
abgegeben werden muss. Durch Ihren Beitrag zum
korrekten Entsorgen dieses Produkts schützen Sie
die Umwelt und die Gesundheit Ihrer Mitmenschen.
Umwelt und Gesundheit werden durch falsches
Entsorgen gefährdet. Weitere Informationen über
das Recycling dieses Produkts erhalten Sie von
Ihrem Rathaus, Ihrer Müllabfuhr oder dem Geschäft,
in dem Sie das Produkt gekauft haben.
3
HINWEISE ZUR VERPACKUNGSENTSORGUNG
Verpackungen und Packhilfsmittel unserer ElektroGroßgeräte sind mit Ausnahme von Holzwerkstoffen
recyclingfähig und sollen grundsätzlich der
Wiederverwertung zugeführt werden.
Wir empfehlen Ihnen:
•
Papier-, Pappe- und Wellpappeverpackungen
sollten in die entsprechenden Sammelbehälter
gegeben werden.
•
Kunststoffverpackungsteile sollten ebenfalls in
die dafür vorgesehenen Sammelbehälter
gegeben werden. Solange solche in Ihrem
Wohngebiet noch nicht vorhanden sind, können
Sie diese Materialien zum Hausmüll geben.
Als Packhilfsmittel sind bei uns nur recyclingfähige
Kunststoffe zugelassen, z.B.:
In den Beispielen steht
02**
05
06
PE
PP
PS
PE für Polyäthylen** 02 = ^ PE-HD; 04 = ^ PE-LD
PP für Polypropylen
PS für Polystyrol
BESTANDTEILE AUS PLASTIK
Zur einfacheren Entsorgung und/oder Recycling ist
ein Großteil der Materialien dieses Gerätes
gekennzeichnet, um ihre Identifizierung zu
ermöglichen.
INHALT
Warnungen und wichtige Hinweise . . . . . . . . . . . . . . . . . . . . . . . . . . . . . . . . . . . . . . . . . . . . . . . . . . . . . . 2
Hinweise zur Verpackungsentsorgung . . . . . . . . . . . . . . . . . . . . . . . . . . . . . . . . . . . . . . . . . . . . . . . . . . . 4
Gebrauch - Reinigung der Innenteile Bedienungsblende - Display . . . . . . . . . . . . . . . . . . . . . . . . . . . . . . . 5
Gebrauch - Betrieb - Temperaturanzeige - Aktivierung der Funktionen - Gerät abschalten . . . . . . . . . . . . .
Gebrauch des Kühlschrankes - Temperaturregelung - . . . . . . . . . . . . . . . . . . . . . . . . . . . . . . . . . . . . . . . . . 6
Gebrauch - Hinweise zum richtigen Kühlen von Lebensmittel und Getränken - Funktion Shopping . . . . . .
Feuchteregulierung . . . . . . . . . . . . . . . . . . . . . . . . . . . . . . . . . . . . . . . . . . . . . . . . . . . . . . . . . . . . . . . . . . . . 7
Gebrauch - Gebrauch des Gefrierschrankes - Temperaturregelung - Einfrieren von frischen . . . . . . . . . . .
Lebensmitteln - Aufbewahrung der Tiefkühlkost . . . . . . . . . . . . . . . . . . . . . . . . . . . . . . . . . . . . . . . . . . . . . . 8
Gebrauch - Funktion night mode - Auftauen - Alarm Übertemperatur - Eiswürfelbereitung - Kälteakkus . . 9
Gebrauch - Höhenverstellbare Abstellregale - Höhenverstellung der Innentürablagen- Luftaustausch . . . . 10
Tips - Tips für das Kühlen - Tips für das Einfrieren - Tips für Tiefkühlkost . . . . . . . . . . . . . . . . . . . . . . . . . . . . . . . 11
Wartung - Regelmäßige Reinigung - Stillstandzeiten - Innenbeleuchtung - Abtauen. . . . . . . . . . . . . . . . . . 12
Störungen - Technischen Daten - Installation - Aufstellung . . . . . . . . . . . . . . . . . . . . . . . . . . . . . . . . . . . 14
Störungen - Transportsicherungen - Elektrischer Anschluß. . . . . . . . . . . . . . . . . . . . . . . . . . . . . . . . . . . . . 15
Installation - Türanschlagwechsel - Montageanleitungen für den integrierten Einbau . . . . . . . . . . . . . . . . . 16
4
GEBRAUCH
Reinigung der Innenteile
Bitte keine Reinigungs- bzw. Scheuermittel
verwenden, die das Gerät beschädigen
könnten.
Bevor Sie das Gerät in Betrieb nehmen, beseitigen
Sie den typischen «Neugeruch» am besten durch
Auswaschen der Innenteile mit lauwarmem Wasser
und einem neutralen Reinigungsmittel Sorgfältig
nachtrocknen.
Bedienungsblende
MODE
ABCD-
E - Taste Aktivierung der Funktionen /
Alarmrücksetzung
F - Temperaturregler Kühlabteil
Taste zum Ein-/Ausschalten des Gerätes
Temperaturregler Gefrierabteil
Taste Sichtanzeige der Temperaturen
Display Sichtanzeige Temperaturen und
Funktionen
DISPLAY
12 3
1.
2.
3.
4.
Falls eingeschaltet, ist die angezeigte Temperatur,
die Temp. des Kühlschrankraumes;
durch Blinken wird angezeigt, dass der Alarm sich
auf dieses Fach bezieht
Falls eingeschaltet, ist die angezeigte Temperatur,
die Temp. des Gefrierschrankfaches;
durch Blinken wird angezeigt, dass der Alarm sich
auf dieses Fach bezieht
Positive oder negative Temperaturanzeige
Temperaturanzeige
56 78
4
5.
6.
7.
8.
Falls eingeschaltet, wird die aktive
Schnellgefrierung angezeigt
Falls eingeschaltet, wird die aktive Funktion
Performance Optimization angezeigt
Falls eingeschaltet, wird angezeigt, dass die
Funktion Minidac aktiv ist
.Falls eingeschaltet, wird angezeigt, dass die
Funktion Shopping aktiv ist
5
Betrieb
Aktivierung der Funktionen
Falls nach dem Inserieren des Steckers in die
Stromsteckdose das Display nicht beleuchtet ist, die
Taste (A) zum Einschalten des Gerätes drücken.
Sofort nach Einschalten des Gerätes sind folgende
Zeichen auf der Bedientafel zu sehen:
• Das Symbol (3) ist positiv, um anzuzeigen, dass
die Temperatur positiv ist.
Bei jedem Drücken der Taste E aktivieren sich im
Uhrzeigersinn folgende Funktionen:
•
die Temperatur blinkt, der Hintergrund des Displays
ist rot und ein Ton hörbar (Summton). Die Taste (E)
zum Abstellen des Summtons drücken (siehe auch
Paragraph “Alarm Übertemperatur”):
Durch Einstellen der Drehknöpfe Kühlschrank (F) und
Gefrierschrank (B) in eine mittlere Position, kann das
Gerät folgende Temperaturen angeben:
ca. +5°C im Kühlschrank
ca. -18°C im Gefrierschank
Symbol 5: die Funktion Schnellgefrierung
Symbol 8: die Funktion Shopping
Symbol 7: die Funktion Minidac
Symbol 6: die Funktion Performance Optimization
Kein Symbol: normaler Betrieb
Mehrere Funktionen können nicht gleichzeitig aktiviert
werden, um die Funktionen zu löschen, wird die Taste
mehrmals gedrückt bis kein Bildsymbol mehr zu
sehen ist.
Gerät abschalten
Wird die Taste “A” für mehr als 1 sec. gedrückt ,
schaltet sich das Gerät ab. Dabei wird statt der
Temperatur ein “Count -down” -3 - 2 - 1 angezeigt.
Dann ist auch das Display ausgeschaltet.
Temperaturanzeige
Bei normalen Bedingungen zeigt das Display die
Temperatur des Gefrierschrankes (Symbol 2).
bei jedem Drücken der Taste C zeigt das Display in
Sequenz:
1. das Symbol 1 leuchtet auf und die Anzeige 4 zeigt
die Temperatur des Kühlschrankfaches;
2. das Symbol 2 leuchtet auf und die Anzeige 4 zeigt
die Temperatur des Gefrierschrankfaches;
In jedem Fall kehrt das Display nach 10 Sekunden zu
den normalen Bedingungen zurück.
Gebrauch des Kühlschrankes
Temperaturregelung
Die Temperatur dieses Faches wird durch Drehen des
Wahlknopfes (F) eingestellt und kann zwischen + 2°C
und + 8°C wechseln.
Die Temperatur wird automatisch geregelt und kann
erhöht werden (wärmer) durch Drehen des
Thermostatknopfes auf das Minimum ● oder
verringert (kälter) durch das Drehen auf das
Maximum. ●
Die richtige Einstellung erhält man, unter
Berücksichtigung folgender, die Innentemperatur
beeinflussender Faktoren:
•
Raumtemperatur,
•
Häufigkeit des Türöffnens,
•
Menge der eingelagerten Lebensmittel,
•
Aufstellung des Gerätes.
Es wird empfohlen den Wahlknopf in mittlerer Stellung
zu lassen, um eine Innentemperatur von ca. +5°C zu
erhalten.
6
Wichtig
Höchste Kälteeinstellung bei hoher
Raumtemperatur und erheblicher
Lebensmittelmenge kann fortdauernden
Kühlschrank-Betrieb verursachen, dabei kann
sich eine Reif- oder Eisschicht an der hinteren
Innenwand bilden. In diesem Falle den
Thermostatknopf auf wärmere Temperaturen
stellen, damit das automatische Abtauen, mit
folglich geringerem Stromverbrauch,
gewährleistet werden kann.
Funktion Shopping
Soll eine grössere Menge warmer Lebensmittel, zum
Beispiel nach dem Einkaufen, untergebracht werden,
empfiehlt es sich, die Funktion Shopping zu aktivieren,
um sie schneller zu kühlen und einen
Temperaturanstieg der bereits im Kühlschrank
befindlichen Speisen zu vermeiden.
Die Funktion Shopping wird durch Drücken der Taste
E (falls nötig mehrmals) aktiviert, bis das
entsprechende Bildsymbol
erscheint.
Nach ca. 6 Stunden schaltet sich die Funktion
Shopping automatisch ab.
Während der Funktion Shopping aktiviert sich auch
automatisch der Ventilator im Kühlschrankraum.
Anmerkung: der interne Ventilator im Kühlschrankraum
wird auch dann automatisch aktiviert, wenn die
Raumtemperatur hoch ist (38°C übersteigt), ohne das
dabei die Funktion Shopping anläuft.
Die Funktion kann in jedem Moment durch Drücken
der Taste E (siehe Paragraph „Aktivierung der
Funktionen“) wieder abgestellt werden.
Hinweise zum richtigen Kühlen
von Lebensmitteln und Getränken
Um die besten Leistungen des Kühlschrankes zu
erreichen, beachten Sie bitte folgendes:
•
Keine warmen Speisen oder dampfenden
Flüssigkeiten in den Kühlschrank einstellen.
•
Geruchverbreitende Lebensmittel müssen
abgedeckt oder eingewickelt werden.
•
Die Lebensmittel müssen so eingelagert werden,
daß die Kälte um sie frei zirkulieren kann.
Feuchteregulierung
Vor der Abstellfläche über den Obst- und
Gemüseschalen befindet sich bei einigen Modellen
ein verstellbares Lüftungsgitter.
Die Öffnung der Lüftungsschlitze kann mit einem
Schieber stufenlos reguliert werden.
Schieber rechts: Lüftungsschlitze geöffnet.
Schieber links: Lüftungsschlitze geschlossen.
Bei geöffneten Lüftungsschlitzen stellt sich infolge
stärkerer Luftzirkulation ein niedrigerer
Feuchtegehalt der Luft in den Obst- und
Gemüseschalen ein.Bei geschlossenen
Lüftungsschlitzen bleibt der natürliche Feuchtegehalt
der Lebensmittel in den Obst- und Gemüseschalen
länger erhalten.
PR271
7
Gebrauch des Gefrierschrankes
Dieses Gefrierabteil ist mit dem
«Viersterne-» Symbol versehen, was bedeutet,
daß darin sowohl frische Lebensmittel
eingefroren werden können als auch
Tiefkühlkost langfristig gelagert werden kann.
Temperaturregelung
Die Temperatur dieses Faches wird durch Drehen des
Wahlknopfes (B) eingestellt und kann zwischen -15°C
und -24°C wechseln.
Die Temperatur wird automatisch geregelt und kann
erhöht werden (wärmer) durch Drehen des
Thermostatknopfes auf das Minimum ● oder
verringert (kälter) durch das Drehen auf das
Maximum. ●
Die richtige Einstellung erhält man, unter
Berücksichtigung folgender, die Innentemperatur
beeinflussender Faktoren:
•
Raumtemperatur,
•
Häufigkeit des Türöffnens,
•
Menge der eingelagerten Lebensmittel,
•
Aufstellung des Gerätes.
Es empfiehlt sich den Wahlknopf in mittlerer Stellung
zu lassen, um eine Innentemperatur von ca. -18°C zu
erhalten ,die eine korrekte Einfrierung und Erhaltung
der tiefgekühlten Speisen garantiert.
Einfrieren von frischen
Lebensmitteln
Das Gefrierfach ist zum Einfrieren frischer
Lebensmittel und zur langzeitigen Konservierung
eingefrorener und tiefgekühlter Lebensmittel geeignet.
Die Höchstmenge der einzufrierenden Lebensmittel
innerhalb 24 Stunden ist auf dem Typenschild
angegeben.
Zum Einfrieren der auf dem „Typenschild“
angegebenen Lebensmittelmenge muss diese in
direkten Kontakt mit der kühlenden Oberfläche
kommen (Schubkasten oder Korb entfernen).
Beim Einfrieren in den Schubkästen oder Körben
verringert sich die Höchstmenge leicht.
Die einzufrierenden Lebensmittel in das oberste
Fach des Gefrierschrankes legen, da hier der
kälteste Punkt ist.
Um frische Lebensmittel einzufrieren, aktiviert man die
Funktion Schnellgefrierung. Die Taste E (falls nötig
mehrmals) drücken bis das entsprechende Bildsymbol
erscheint.
Nach einem Zeitraum der Vorkühlung von 24 Stunden
werden die Lebensmittel im Gefrierschrank
untergebracht.
8
Der Gefriervorgang dauert 24 Stunden. Während
dieses Zeitraums keine weiteren Lebensmittel zum
Einfrieren einlegen.
Diese Funktion schaltet sich nach 54 Stunden
selbsttätig ab.
Die einzufrierenden Speisen in das oberste Fach
des Gefrierschrankes legen, da hier der kälteste
Punkt ist.
Die Funktion kann in jedem Moment durch Drücken
der Taste E (siehe Paragraph „Aktivierung der
Funktionen“) wieder abgestellt werden.
Aufbewahrung der Tiefkühlkost
Nach einem längeren Stillstand oder bei der ersten
Inbetriebnahme des Gerätes, vor Unterbringung der
Lebensmittel mindestens 12 Stunden warten.
Um optimale Leistungen des Gerätes zu erhalten,
sich vergewissern, sollen große Mengen an
Lebensmitteln eingelagert werden, können alle
Laden oder Körbe herausgenommen ( mit
Ausnahme von der letzten niedrigen Lade) und die
Lebensmittel direkt auf den gekühlten Abstellflächen
untergebracht werden. Darauf achten, das max.
Fassungsvermögen
nicht zu überschreiten,
das seitlich des Abteils angegeben ist (wo
vorgesehen).
Wichtig
Unbeabsichtigt aufgetaute Lebensmittel,
beispielsweise wegen Stromausfall, müssen,
wenn der Betrieb für länger als die in der Tabelle
technische Daten unter der Position „Lagerzeit
bei Störung“ angegebene Dauer unterbrochen
ist, kurzfristig verbraucht oder sofort gekocht
und erneut eingefroren werden (nach
Abkühlung).
Funktion Performance Optimization
Die Funktion Performance Optimization wird durch
Drücken der Taste E (falls nötig mehrmals) aktiviert,
bis das entsprechende Bildsymbol
sichtbar wird
und die waagrechten, sich bewegenden Linien
erscheinen .
Unter dieser Bedingung die gewählten Temperaturen
stellen sich automatisch auf die optimalsten
Bedingungen zur Lebensmittelkonservierung ein,
solange diese Funktion aktiv ist, haben daher
eventuelle Verstellungen der Wahlknöpfe keine
Auswirkung.
Die Funktion kann in jedem Moment durch Drücken
der Taste E (siehe Paragraph „Aktivierung der
Funktionen“) abgestellt werden.
Kälteakkus
Im Gefrierschrank sind ein oder mehrere Kälteakkus
(eutektische Masse) vorgesehen, die eine
Verlängerung der Aufbewahrungszeit des
Gefriergutes bei eventuellem Stromausfall oder
Störung ermöglicht.
Alarm Übertemperatur
Ein Temperaturanstieg im Gefrierfach (z.B.
Stromausfall) wird angezeigt durch:
- die Temperatur blinkt;
- Gefrierfach blinkt (Symbol 2);
- Display rot beleuchtet;
- Summton.
Bei Rücksetzung in normale Bedingungen:
- das akustische Signal verstummt;
- der Temperaturwert blinkt weiter;
- das Display bleibt rot beleuchtet.
Beim Drücken der Taste Deaktivierung des Alarms E
erscheint auf der Anzeige 4 für 5 Sekunden die im
Fach erreichte Höchsttemperatur, das Blinken und
die rote Beleuchtung des Displays erlöschen.
Während der Alarmphase kann der Summton durch
Drücken der Taste E abgestellt werden, das Display
bleibt bis zur Wiederherstellung der normalen
Betriebsbedingungen rot.
Eiswürfelbereitung
Das Gerät hat eine oder mehrere Eiswürfelschalen,
welche mit Wasser aufgefüllt in das Gefrierfach
gestellt werden.
Bitte zur Entnahme der Eiswürfelschalen keine
Metallgegenstände benutzen!
Auftauen
Die eingefrorenen oder tiefgekühlten Lebensmittel
sollten vor dem Gebrauch aufgetaut werden, indem
man sie am besten im Kühlabteil oder je nach der
zur Verfügung stehenden Zeit bei Raumtemperatur
auftaut. Kleine Stücke können eingefroren gekocht
werden. Selbstverständlich verlängert sich dabei die
Kochzeit.
9
Höhenverstellbare Abstellregale
Der Abstand zwischen den verschiedenen
Abstellregalen kann je nach Wunsch geändert
werden. Dazu die Regale herausnehmen und auf
das gewünschte Niveau einsetzen.
Zum besseren Raumnutzung können die vorderen
Halbteile auf die rückwärtigen hinaufgelegt werden.
D338
Höhenverstellung der
Innentürablagen
Zur Einlagerung von Lebensmittel-Packungen
verschiedener Größe, sind die Abstellregale der
Innentür höhenverstellbar.
Hierzu wie folgt vorgehen:
das Abstellregal stufenweise in Pfeilrichtung drücken
bis es frei wird; dann in der gewünschten Höhe
wieder anbringen.
Luftaustausch
Der Kühlschrankraum ist mit einem speziellen
Gebläse D.A.C. (Dynamic Air Cooling) ausgerüstet,
das durch die Taste E (falls nötig, mehrmals
drücken) aktiviert wird, es erscheint das Bildsymbol
und die grüne, eingeschaltete Betriebsanzeige
(Abb. 1) bedeutet, dass das Gebläse eingeschaltet
ist.
Der Einsatz des Gebläses (D.A.C.) empfiehlt sich,
wenn die Raumtemperatur 28° C übersteigt.
Diese Vorrichtung erlaubt eine schnelle Kühlung der
Lebensmittel und eine bessere, gleichmässige
Temperatur im Fachinnern.
Das spezielle Gebläse D.A.C. (Dynamic Air Cooling)
kann bei einer Temperatur von über 38°C oder bei
eingeschalteter Shopping-Funktion automatisch
aktiviert werden.
Die Funktion kann in jedem Moment durch Drücken
der Taste E (siehe Paragraph „Aktivierung der
Funktionen“) abgestellt werden.
10
Fig. 1
Kontrolllampe
TIPS
Tips für das Kühlen
Auftauen von kleineren Portionen.
•
Die Lebensmittel in Alu- oder Polyäthylenfolien
luftdicht verpacken.
•
Es soll vermieden werden, daß die
einzufrierenden Lebensmittel mit den bereits
eingefrorenen in Berührung kommen, um eine
Wärmeübertragung an diese zu verhindern.
•
Es ist zu beachten, daß mageres Fleisch besser
und länger haltbar ist. Fetthaltiges Fleisch hat
eine geringere Lagerzeit. Ferner reduziert Salz
die Haltbarkeitsdauer.
Obst und Gemüse: nach vorherigem Säubern und
Waschen in der Gemüseschale (in den
Gemüseschalen) aufbewahren.
•
Speiseeis, direkt aus dem Gefrierfach
genommen, kann Kälte-Brandwunden
verursachen.
Butter und Käse: in speziellen Behältern aufbewahren oder in Alu- bzw. Plastikfolie einpacken, um
den Kontakt mit der Luft zu vermeiden.
•
Es ist empfehlenswert, auf der Verpackung das
Einfrierdatum zu notieren, damit die
Aufbewahrungszeit eingehalten werden kann.
Milch in Flaschen: gut verschlossen auf die Konsol
der Innentür stellen.
•
Es sollten keine kohlensäurehaltigen
Getränke in das Gefrierfach eingestellt
werden, da sie explodieren können.
Nachstehend einige praktische Ratschläge:
Fleisch (alle Sorten) in Plastikfolie einpacken und
auf die Glasplatte, die sich über der Gemüseschale
(über den Gemüseschalen) befindet, legen.
In dieser Lage kann das Fleisch längstens 1-2
Tage aufbewahrt werden.
Gekochte Nahrungsmittel, kalte Platten, usw.
zugedeckt aufbewahren. Sie können auf jeden
beliebigen Rost gelegt werden.
Wenn Bananen, Kartoffeln, Zwiebeln und
Knoblauch nicht verpackt sind, sollen sie nicht
in den Kühlschrank gegeben werden.
Um optimale Leistungen des Gerätes zu erhalten,
sich vergewissern,
Tips für das Einfrieren
Für ein einwandfreies Einfrieren der Lebensmittel
geben wir folgende Ratschläge:
•
Tips für Tiefkühlkost
Das Gefriervermögen des Gefrierabteils (in 24
Std.) kann auf dem Typenschild abgelesen
werden.
•
daß die Tiefkühlkost beim Verkäufer gut
aufbewahrt wurde
•
daß der Transport vom Verkäufer zum
Verbraucher in kurzer Zeit erfolgt.
•
Tür so wenig wie möglich öffnen und nicht offen
lassen.
•
Der Gefriervorgang dauert ca. 24 Stunden. In
dieser Zeit sollte keine zusätzliche Ware in das
Gefrierabteil eingelegt werden.
•
Einmal aufgetaute Lebensmittel verderben
schnell und können kein ein zweites Mal
eingefroren werden.
•
Nur erstklassige, frische und gut gesäuberte
Produkte einfrieren.
•
•
Die Nahrungsmittel vor dem Einfrieren in kleine
Portionen einteilen, damit der Gefriervorgang
beschleunigt wird; dies ermöglicht das spätere
Das Haltbarkeitsdatum auf der
Tiefkühlkostverpackung sollte nicht überschritten
werden.
Gefrierkalendar
1-2
3-4
3-6
3-6
3-6
3-6
10 -12
10 -12
10 -12
10 -12
Die Symbole zeigen unterschiedliche Arten von Tiefkühlgut.
Die Zahlen geben für die jeweilige Art von Tiefkühlgut die Lagerzeit in Monaten an. Ob der obere oder der
untere Wert der angegebenen Lagerzeiten gültig ist, hängt von der Qualität der Lebensmittel und deren
Vorbehandlung vor dem Einfrieren ab.
11
WARTUNG
Vor jeder Reinigungsarbeit immer den
Netzstecker aus der Steckdose ziehen.
Achtung
Dieses Gerät enthält im Kältekreislauf Kohlenwasserstoff. Aus diesem Grund darf die Wartung
und das Nachfüllen aussschließlich von
autorisiertem Fachpersonal durchgeführt werden.
Regelmäßige Reinigung
Benutzen Sie nie Metallgegenstände um das Gerät
zu reinigen, da es beschädigt werden könnte. Den
Innenraum mit lauwarmem Wasser und Natron
reinigen.
Stillstandszeiten
Bei längerem Stillstand des Gerätes, müssen Sie
folgendermaßen vorgehen:
den Stecker aus der Steckdose ziehen;
alle Lebensmittel herausnehmen;
Gerät abtauen, Innenraum und Zubehörteile
reinigen;
die Türen offen lassen, um im Innern eine gute
Luftzirkulation zu gewährleisten und somit
Geruchsbildung zu vermeiden.
Gut nachwaschen und sorgfältig trocknen.
Den Kondensator und den Motorkompressor mit
einer Bürste oder einem Staubsauger reinigen. Dies
begünstigt den guten Betrieb mit folglicher
Stromersparnis
Innenlampe
Um die Lampe su wechseln, drücken die hintere
Kupplung und gleichzeitig nehmen die Abdeckung in
der Pfeil-Richtung heraus.
Ersetzen durch eine neue Birne gleicher Leistung
(die maximale Leistung ist am Leuchtkörper
angegeben).
Abtauen
Die sich auf dem Verdampfer des Kühlschrankes
bildende Reifschicht taut jedesmal in den Stillstandzeiten des Motorkompressors von selbst ab. Das
Tauwasser läuft durch eine Rinne in eine Plastikschale auf der Rückseite des Gerätes (über dem
Kompressor) und verdunstet dort.
Wir empfehlen, das in der Mitte der
Abtauwasserrinne des Kühlraumes befindliche
Ablaufloch für das Abtauwasser regelmäßig zu
reinigen, um zu vermeiden, daß das
Abtauwasser auf die eingelagerten Lebensmittel
tropft. Verwenden Sie den dafür vorgesehenen
Reiniger,der sich schon im Ablaufloch befindet.
12
D037
Die sich im Gefrierfach bildende Reifschicht soll,
sobald diese eine Stärke von 4 mm erreicht hat, mit
dem mitgelieferten Plastikschaber abgekratzt
werden. Während dieses Vorganges ist es nicht
nötig, das Gerät auszuschalten und die
Nahrungsmittel herauszunehmen.
Wenn sich jedoch eine dicke Eisschicht bildet, muß
man vollkommen abtauen. Um ein vollständiges
Abtauen durchzuführen, geht man wie folgt vor:
1. Den Thermostatknopf auf «■» einstellen oder den
Stecker aus der Steckdose herausziehen.
D068
2. Die eventuell im Frosterfach liegenden
Lebensmittel herausnehmen, sie in
Zeitungspapier einwickeln und sehr kühl
aufbewahren.
3. Die Tür offen lassen und den Plastikschaber, der
als Rinne dient, am vorgesehenen Platz
einsetzen, sodaß das Abtauwasser in ein
geeignetes, darunter gestelltes Gefäß fließen
kann.
4. Nach beendetem Abtauprozeß das Fach gut
trocknen. Plastikschaber für späteren Gebrauch
aufbewahren.
5. Den Thermostatknopf wieder in die gewünschte
Stellung drehen bzw. den Stecker wieder
einstecken.
6. Nachdem das Gerät für 2-3 Std. in Betrieb
genommen wurde, können tiefgefrorene
Lebensmittel darin zurückgelegt
Achtung:
Benutzen Sie niemals Metallgegenstände, um die
Reifschicht abzukratzen, damit eine
Beschädigungen des Gerätes vermieden werden
kann.
Benutzen Sie kein mechanisches oder anderes
Mittel für einen schnelleren Abtauprozeß mit
Ausnahme der vom Hersteller empfohlenen.
Ein Temperaturanstieg der Tiefkühlkost während
des Abtauens könnte die Aufbewahrungsdauer
verkürzen.
13
STÖRUNGEN
Falls das Gerät Störungen aufweisen sollte,
überprüfen Sie zuerst folgendes:
Sollten Sie nach o.e. Prüfungen zu keinem Resultat
kommen, so wenden Sie sich bitte an unseren
nächsten Kundendienst.
•
Steckt der Netzstecker in der Steckdose?
•
Befindet sich der Hauptschalter der elektrischen
Anlage in der richtigen Stellung?
•
Ist die Stromzufuhr unterbrochen?
•
Befindet sich der Thermostatknopf in richtiger
Stellung?
Um ein rasches Beheben des Schadens zu
ermöglichen, ist es beim Anruf an den
Kundendienst notwendig, die Modell- und
Seriennummer anzugeben, die Sie dem
Garantieschein oder dem Typenschild (– linke
Seite – unten) entnehmen können.
•
Wasserpfütze auf dem Boden des Kühlfaches:
•
Abtauwasserloch verstopft? (siehe Abschnitt
“Abtauen”)
TECHNISCHE DATEN
Nutzinhalt des Kühlschrankes in Liter
210
Nutzinhalt des Gefrierschrankes in Liter
70
Energieverbrauch in kWh/24h
0,57
Energieverbrauch in kWh/Jahr
208
Gefrierleistung kg/24h
13
Lagerzeit bei Störung -18°/-9°C in h
24
Die Technische Daten können Sie auf dem Typschild feststellen. Das Typschild befindet sich links unten an der
Seitewand.
INSTALLATION
Aufstellung
ACHTUNG!
Das Gerät sollte nicht in der Nähe von Wärmequellen wie Heizkörpern oder Öfen aufgestellt und
vor direkter Sonneneinstrahlung geschützt werden.
Die beste Leistung erzielt man erfahrungsgemäß bei
Raumtemperaturen
Es muß möglich sein, das Gerät vom Netz zu
trennen; nach der Installation muß die Steckdose
daher zugänglich bleiben.
Für den Einbau bitte den entsprechenden Abschnitt
durchlesen.
14
Transportsicherungen
A
Ihr Gerät ist mit Transportsicherung versehen, die
die Ablage während des Transportes sichern.
Entfernen Sie diese wie folgt:
die Transportsicherungen zunächst entlang der
Glasplattenkante so weit wie möglich nach vorne
ziehen, Glasplatte hinten hochheben, in Pfeilrichtung
ziehen bis sich das Glas löst und die Sicherungen
entfernen.
B
C
Elektrischer Anschluß
Bevor Sie den Stecker in die Steckdose einstecken,
überprüfen Sie bitte, daß die auf dem Typenschild
des Gerätes angegebene Spannung sowie
Frequenz mit dem Anschlußwert des Hauses
übereinstimmen. Eine Abweichung von ±6% von der
Nominalspannung ist zulässig. Für die Anpassung
des Gerätes an andere Spannungen muß ein
Spartransformator angemessener Leistung
vorgeschaltet werden.
Das Gerät muß unbedingt vorschriftsmäßig geerdet
werden. Zu diesem Zweck ist der Stecker des
Speisekabels mit dem dafür vorgesehenen Kontakt
versehen. Sollte die Netzleitung im Haus nicht mit
einer Erdleitung versehen sein, so muß das Gerät
an eine getrennte Erdleitung vorschriftsmäßig und
unter Hinzuziehung eines Fachmanns
angeschlossen werden.
Dieses Gerät entspricht der folgende EWG
Richtlinie:
- 87/308 EWG vom 2.6.87 (DeutschlandAusführung) bzw. der ÖVE-Richtlinie Nr. F
61/84 (Österreich-Ausführung) bezüglich
Funkentstörung.
- 73/23 EWG vom 19/02/73 (Niederspannung)
und folgende Änderungen;
- 89/336 EWG vom
03/05/89(Elektromagnetische Verträglichkeit)
und folgende Änderungen.
Die Erzeugerfirma lehnt jede Verantwortung ab,
falls diese Unfallverhütungsvorschrift nicht
beachtet wird.
15
Türanschlagwechsel
Das Gerät wird mit Türanschlag von rechts
oder links geliefert. Falls einen
gegenüberliegenden Türanschlag erfordert
wird; gehen Sie wie folgt vor bevor Sie das
Gerät einbauen.
1. Obere Scharnierstift abschrauben und
Kunstoffteil entfernen.
C
2. Entfernen Sie die obere Tür und den
Schwenkzapfen des oberen Scharniers.
B
3. Nehmen Sie die Scharnierabdeckung (A) ab.
Lösen Sie die Schrauben (B) und
Abstandsstücke (C). Bringen Sie die
Scharnierabdeckung (A) wieder an.
A
4. Schrauben Sie das untere Scharnier ab und
bringen Sie es an der gegenüberliegenden Seite
an.
5. Setzen Sie die untere Tür wieder ein.
6. Bringen Sie die Schrauben (B) und die
Abstandsstücke (C) an der gegenüberliegenden
Seite am mittleren Scharnier an.
7. Setzen Sie die obere Tür und den
Schwenkzapfen des Scharniers wieder ein
Montageanleitung für den
integrierten Einbau
50 mm
min. 2
200 cm
Nischenmaße
Höhe
(1)
1780 mm
Tiefe
(2)
550 mm
Breite (3)
560 mm
Aus Gründen der Sicherheit muß eine
Mindestbelüftung gesichert sein, wie aus der
Abb.hervorgeht.
min.
200 cm2
D567
Achtung: Die Ventilations - Öffnungen müssen
immer saubergehalten werden.
540
Ferner ist auch am hinteren Einbauschrankteil ein
Lüftungskamin mit filgenden Massen notwendig:
Tiefe
3
50 mm
2
Breite 540 mm
PR01
16
50
1
Vergewissern Sie sich, dass unten zwischen dem
Küchenmöbel und dem Rand des Geräts ein
Abstand von 44 mm besteht.
Die untere Scharnierabdeckung (im Zubehörbeutel)
dient zur genauen Ausrichtung zwischen
Küchenmöbel und Gerät.
Darüber hinaus darf das Gerät das Netzkabel nicht
quetschen.
1
m
44m
2
Gerät mit den 4 beiliegenden Schrauben befestigen.
I
I
Fugenabdeckprofiloben um die Winkeldicke
ausschneiden und zwischen Gerät und
Möbelseitenwand eindrücken.
D724
Brechen Sie aus der Plastikabdeckung (E), die das
Scharnier mit Stift bedeckt, die in der Abbildung
gekennzeichneten Teile heraus.
Dies wird durch die vorgestanzten Ausbruchlinien
erleichtert. "Entfernen Sie das mit DX
gekennzeichnete Teil, wenn der Stift am rechten
Scharnier angebracht werden soll, andernfalls das
mit SX gekennzeichnete Teil."
In die Befestigungs- und Scharnierlöcher
beiliegende Abdeckkappen (C-D) eindrücken.
Belüttungsgitter (B) und Scharnierabdeckungen (E)
aufstecken.
D
C
E
E
B
17
Die Teile Ha, Hb, Hc, Hd abnehmen, wie in der Abb.
gezeigt wird.
Ha
Hb
Hc
Hd
PR266
Die Schiene (Ha) auf der Innenseite der Möbeltür
oben und unten auflegen (siehe Abb.) und die
Position der äußeren Bohrlöcher anzeichnen.
Nachdem die Löcher gebohrt wurden, die Schiene
mit den mitgelieferten Schrauben befestigen.
ca. 50 mm
90°
21 m
m
90°
ca. 50 mm
21 m
m
Die Abdeckung (Hc) in die Schiene (Ha) eindrücken,
bis sie einrastet.
Ha
Hc
PR33
Gerätetür und Möbeltür auf ca. 90° öffnen. Den
Winkel (Hb) in der Schiene (Ha) einsetzen.
Gerätetür und Möbeltür zusammenhalten und die
Bohrlöcher anzeichnen (siehe Abb.).
8mm
Ha
PR167
18
Hb
Die Winkeleisen entfernen und 8 mm vom äusseren
Rand der Tür mit dem Nagel (K) kennzeichnen.
8mm
K
Ha
Den Winkel wieder auf der Schiene anbringen und
mit den mitgelieferten Schrauben befestigen.
Für eine allfällig notwendige Ausrichtung der
Möbeltür, den Spielraum der Langlöcher nutzen.
Nach Beendigung der Arbeiten den einwandfreien
Verschluß der Gerätetür überprüfen.
Hb
PR168
Die Abdeckung (Hd) in die Schiene (Hb) eindrücken,
bis sie einrastet.
Hb
Hd
PR167/1
Das Gerät ist mit 2 Winkeln (E) ausgestattet. Diese
sind zur seitlichen Befestigung des Gerätes am
Möbel zu verwenden.
Vergewissern Sie sich nach Ausführung des
Anschlagwechsels der Türen, daß alle Schrauben
fest angezogen sind und überprüfen Sie auch,
ob die Magnetdichtung am Möbel perfekt anliegt.
Bei einer niedrigen Raumtemperatur (z.B. im
Winter) kann es vorkommen, dass die Dichtung
nicht perfekt am Schrank haftet. Die
Wiederherstellung der Dichtung erfolgt
automatisch nach gewisser Zeit. Wollen Sie aber
diesen Prozess beschleunige, so genögt es die
Dichtung mit einem Fön zu erwärmen.
E
E
19
PER L’UTENTE
Avvertenze
Queste sono avvertenze di sicurezza. La preghiamo quindi di leggerle attentamente prima d’installare e
di utilizzare l’apparecchio.
Consigliamo di conservare questo libretto per future consultazioni e di fornirlo all’eventuale futuro proprietario.
riparazioni effettuate da persone non competenti
possono provocare dei danni. Contattare il Centro
di Assistenza più vicino ed esigere solo ricambi
originali.
Uso domestico
•
•
•
•
I frigoriferi e/o congelatori domestici sono
destinati unicamente alla conservazione e/o
congelazione degli alimenti.
Questo apparecchio non deve essere utilizzato
da persone (e bambini) con ridotte capacità
fisiche, sensoriali o mentali o prive
dell'esperienza e delle nozioni necessarie, salvo i
casi in cui agiscano sotto sorveglianza o siano
stati opportunamente istruiti sull'uso di tale
apparecchio da persone responsabili per la loro
sicurezza. Evitare che i bambini utilizzino
l'apparecchio in modo improprio.
Controllare prima dell’installazione che
l’apparecchiatura non sia danneggiata. In caso di
danno chiamare il rivenditore.
Mai riparare l’apparecchiatura da soli. Le
•
•
Non introdurre apparecchi elettrici all’interno
dell’apparecchiatura (ad es. gelatiera).
Dopo l’installazione assicurarsi che il cavo di
alimentazione non si trovi sotto l’apparecchiatura.
Sicurezza bambini
•
•
I componenti dell’imballaggio (es. sacchi,pellicole,
polistirolo) possono essere pericolosi per i
bambini. Pericolo di soffocamento!
In caso di smaltimento dell’apparecchiatura
tagliare il cavo di alimentazione e rendere la
chiusura porta inservibile, in modo che i bambini
non possano rimanere chiusi
nell’apparecchiatura.
Guida all’uso del libretto istruzioni
I seguenti simboli guideranno nella lettura del libretto:
Informazioni legate alla sicurezza nell’uso dell’apparecchiatura
Consigli per l’uso corretto dell’apparecchiatura e per ottenerne le migliori prestazioni.
Informazioni legate alla protezione dell’ambiente
Smaltimento
Materiali di imballaggio
•
I materiali contrassegnati dal simbolo
riciclabili.
sono
>PE<=politilene
>PS<=polistirolo
Provvedendo a smaltire questo prodotto in modo
appropriato, si contribuisce a evitare potenziali
conseguenze negative per l'ambiente e per la salute,
che potrebbero derivare da uno smaltimento
inadeguato del prodotto. Per informazioni più
dettagliate sul riciclaggio di questo prodotto,
contattare l'ufficio comunale, il servizio locale di
smaltimento rifiuti o il negozio in cui è stato
acquistato il prodotto.
>PP<=polipropilene
Tutti i materiali d’imballaggio sono reciclabili.
Informazioni sui centri di raccolta vengono forniti
dall’autorità comunale.
Smaltimento di apparecchi vecchi
Il simbolo
sul prodotto o sulla confezione
indica che il prodotto non deve essere considerato
come un normale rifiuto domestico, ma deve essere
portato nel punto di raccolta appropriato per il
riciclaggio di apparecchiature elettriche ed
elettroniche.
20
Protezione dell’ambiente
Questa apparecchiatura non contiene, nel circuito
refrigerante e nell’isolamento, gas refrigeranti
nocivi per l’ozono. L’apparecchiatura non deve
essere smaltita con rifiuti urbani e rottami. Deve
essere evitato il danneggiamento del circuito
refrigerante, soprattutto nella parte posteriore
vicino al condensatore grigliato. Informazioni sui
centri di raccolta vengono forniti dall’autorità
comunale.
Indice
Per l’utente
Avvertenze
Smaltimento
Protezione dell’ambiente
Prima della messa in funzione
20
Manutenzione
29
20
20
20
Sbrinamento
Pulizia
Lampada di illuminazione
29
29
30
22
Se qualcosa non va
30
22
Dati tecnici
30
22
Per l’installatore
30
Pannello comandi
Display
Funzionamento
Visualizzazione delle temperature
Attivazione delle funzioni
Spegnimento
22
22
23
23
23
23
Avvertenze
30
Installazione
31
Vano frigorifero
24
Uso del vano frigorifero
Regolazione della temperatura
Refrigerazione dei cibi
Funzione Shopping
24
24
24
24
Vano congelatore
25
Uso del vano congelatore
Regolazione della temperatura
Congelazione dei cibi freschi
Conservazione dei cibi surgelati
Funzione Performance optimization
Scongelazione
Masse eutettiche
Allarme Sovratemperatura
Accessori vano frigorifero
Ripiani e mensole
Controllo dell’umidita’
Ricircolo dell’aria
25
25
25
25
26
26
26
26
26
26
27
27
Accessori vano congelatore
Cubetti di ghiaccio
27
27
Pulizia delle parti interne
Uso
Consigli pratici
Consigli per la refrigerazione
Consigli per la congelazione e per la
conservazione dei surgelati
Consigli per il risparmio energetico
Posizionamento
Fermi-ripiani
Collegamento elettrico
Reversibilità delle porte
Istruzioni per l’incasso integrale
31
31
31
32
32
28
28
28
28
21
Prima della messa in funzione
Pulizia delle parti interne
Lasciare l’apparecchiatura in posizione
verticale almeno 2 ore prima di metterla in funzione
per dar modo all’olio di refluire nel compressore.
Prima dell’uso e del collegamento elettrico pulire
tutte le parti interne con acqua tiepida e sapone
neutro o bicarbonato di sodio.
Uso
Non usare detersivi nè polveri abrasive
che sono dannose alle finiture.
Pannello di controllo
MODE
A - Tasto di accensione / spegnimento
dell'apparecchiatura
B - Manopola di regolazione della temperatura
congelatore
C - Tasto di visualizzazione delle temperature
D - Display di visualizzazione temperature e
funzioni
E - Tasto di attivazione delle funzioni / reset allarme
F - Manopola di regolazione della temperatura frigo
DISPLAY
12 3
1.
2.
3.
4.
22
Se acceso, indica che la temperatura visualizzata
e' la temp. del vano frigorifero;
se lampeggia indica che l’allarme e’ relativo al
vano corrispondente
Se acceso, indica che la temperatura visulazzata
e' la temp. del vano congelatore;
se lampeggia indica che l’allarme e’ relativo al
vano corrispondente
Indicatore di temperatura positiva o negativa
Indicatore della temperatura
56 78
4
5.
6.
7.
8.
Se acceso, indica che e' attiva la funzione di
congelamento rapido
Se acceso indica che e' attiva la funzione di
Performance optimization
Se acceso indica che e' acceso il minidac
Se acceso indica che e' attiva la funzione
shopping
Funzionamento
Dopo aver inserito la spina nella presa di corrente, se il
display non e’ illuminato premere il tasto (A),
accensione apparecchiatura.
Appena accesa l'apparecchiatura, si avranno le
seguenti segnalazioni sul pannello comandi:
• Il simbolo (3) sara' positivo ad indicare che la
temperatura e' positiva.
•
la temperatura lampeggia, il fondo del display e'
rosso e si sente un suono (cicalino). Premere il
tasto (E) ed il suono si spegne (vedi anche
paragrafo "allarme sovratemperatura").
Ruotando le manopole il display lampeggia
visualizzando la temparatura desiderata. Per una
corretta conservazione dei cibi e’ consigliabile
impostare le seguenti temperature ;
+5°C nel frigorifero
-18°C nel congelatore.
Importante
Se la porta rimane aperta per piu’ di 7 minuti, la
lampada di illuminazione interna verra’ spenta
elettronicamente; in seguito il funzionamento della
lampada sara’ rispristinato dalla riapertura e chiusura
della porta stessa.
Visualizzazione delle temperature
In condizioni normali il display visualizza la
temperatura congelatore ( simbolo 2 ) .
Ogni volta che si preme il tasto C, il display visualizza
in sequenza :
1. si illumina il simbolo 1 e l’indicatore 4 visualizza la
temperatura del vano frigo;
2. si illumina il simbolo 2 e l’indicatore 4 visualizza la
temperatura del vano congelatore;
Comunque dopo 10 secondi il display ritorna nelle
condizioni normali.
Attivazione delle funzioni
Ogni volta che si preme il tasto E si attivano in senso
orario le seguenti funzioni :
Simbolo 5 : la funzione di congelamento rapido
Simbolo 8 : la funzione shopping
Simbolo 7 : la funzione di minidac
Simbolo 6 : la funzione di Performance optimization
Nessun Simbolo : funzionamento normale
Non possono essere attivate piu’ funzioni
contemporaneamente, per disattivare le funzioni
premere piu’ volte il tasto finche’ non compare
nessuna icona.
Spegnimento
Lo spegnimento si ottiene tenendo premuto il tasto (A)
per piu’ di un 1 secondo. Dopo di cio’ verra’ segnalato
un conto alla rovescia della temperatura da -3 -2 -1 .
Quando si spegne l'apparecchiatura si spegne anche
il display (D).
23
Uso del vano frigorifero
Regolazione della temperatura
La temperatura di questo scomparto puo' essere
regolata ruotando la manopola (F), e puo' variare tra
circa + 2°C e + 8°C.
Quando la manopola viene ruotata il display
lampeggia visualizzando la temperatura desiderata.
Dopo aver impostato la temperatura desiderata, se
non si ruota la manopola entro 5 secondi, verra’
visualizzata la temperatura del vano congelatore.
La temperatura è regolata automaticamente e può
essere aumentata (meno freddo) ruotando la
manopola verso i ● più piccoli oppure diminuita (più
freddo) ruotandola verso i ● più grandi.
La posizione corretta, comunque, va individuata
tenendo conto che la temperatura interna dipende da
questi fattori:
•
La temperatura ambiente
•
La frequenza di apertura delle porte
•
La quantita' di alimenti conservati
•
La collocazione dell'apparecchio
Per lo spegnimento del vano frigorifero ruotare la
manopola (F) in senso antiorario fino alla posizione
«O». In tale posizione per 5 secondi viene
visualizzata la scritta “OF”.
Il vano freezer continuera’ ad operare.
Nel momento in cui si spegne il vano frigo, l’unica
temperatura visualizzata e’ quella del congelatore.
(In corrispondenza del vano frigo comparira’ la scritta
“OF”). In tale condizione non e’ possibile attivare le
funzioni minidac, shopping e la lampada vano frigo
rimarra’ spenta.
Importante
Sulle posizioni di massimo freddo, con
temperatura ambiente elevata, ed una notevole
quantità di alimenti, il funzionamento può essere
continuo, con formazione di brina o ghiaccio
sulla parete posteriore della cella. In tal caso è
necessario ruotare la manopola su una
posizione di minor freddo, in modo da consentire
lo sbrinamento automatico e, di conseguenza, un
minor consumo di energia elettrica.
24
Funzione Shopping
Se si deve introdurre una gran quantita' di cibi caldi, ad
esempio dopo aver fatto la spesa, si consiglia di
attivare la funzione Shopping per raffreddarli piu'
velocemente e per evitare un innalzamento della
temperatura degli altri alimenti gia' contenuti nel
frigorifero.
La funzione shopping si attiva premendo il tasto E (se
necessario piu’ volte) finche’ non appare l’icona
corrispondente
La funzione shopping si spegne automaticamete dopo
circa 6 ore.
Durante la funzione shopping si attiva
automaticamente anche il ventilatore interno del vano
frigorifero.
Nota: il ventilatore interno del vano frigorifero si attiva
automaticamente anche quando la temperatura
ambiente e' elevata (supera i 38°C ), sebbene non sia
attiva la funzione shopping.
E' possibile disattivare la funzione in ogni momento
premendo il tasto E (vedi paragrafo “Attivazione delle
Funzioni”).
Refrigerazione dei cibi
Per utilizzare nel modo migliore lo scomparto
refrigerante è necessario:
- non introdurre nella cella vivande calde;
- coprire o avvolgere gli alimenti, specie se
contengono aromi;
- disporre gli alimenti in modo che l’aria possa
circolare liberamente attorno ad essi.
Uso del vano congelatore
Il congelatore è contraddistinto dal simbolo
il quale indica che esso è adatto alla
congelazione di cibi freschi e alla conservazione,
a lungo termine, di cibi congelati e surgelati.
Regolazione della temperatura
La temperatura di questo scomparto puo' essere
regolata ruotando la manopola (B), e puo' variare tra
circa -15°C e -24°C.
Quando la manopola viene ruotata il display
lampeggia visualizzando la temperatura desiderata.
Dopo aver impostato la temperatura desiderata, se
non si ruota la manopola entro 5 secondi, verra’
visualizzata la temperatura del vano congelatore.
La temperatura è regolata automaticamente e può
essere aumentata (meno freddo) ruotando la
manopola verso i ● più piccoli oppure diminuita (più
freddo) ruotandola verso i ● più grandi.
La posizione corretta, comunque, va individuata
tenendo conto che la temperatura interna dipende da
questi fattori:
•
La temperatura ambiente
•
La frequenza di apertura delle porte
•
La quantita' di alimenti conservati
•
La collocazione dell'apparecchio
Si suggerisce di impostare la manopola nella posizione
intermedia per avere una temperatura interna di circa 18°C, che garantisce un corretto congelamento e
mantenimento dei cibi surgelati.
Congelazione dei cibi freschi
Lo scomparto congelatore è adatto alla congelazione
di cibi freschi e alla conservazione a lungo termine di
cibi congelati e surgelati.
La quantità massima di alimenti da congelare nelle 24
ore è riportata sulla targa matricola.
Per ottenere la congelazione del quantitativo indicato
in «targhetta matricola», disporre gli alimenti
direttamente a contatto della superficie raffreddante
(togliere cassetto o cestello).
In caso di congelamento nei cassetti o cestelli il
quantitativo massimo si riduce lievemente.
Porre i cibi da congelare nello scomparto superiore
del congelatore, in quanto é il punto più freddo.
Per congelare alimenti freschi e' necessario attivare la
funzione di congelamento rapido. Premere il tasto E
(se necessario piu’ volte) finche’ non appare l’icona
Il processo di congelamento dura 24 ore. Durante
questo periodo non introdurre altri alimenti da
congelare.
Tale funzione termina in modo autonomo dopo 54 h.
E' possibile disattivare la funzione in ogni momento
premendo il tasto E (vedi paragrafo “Attivazione delle
Funzioni”).
Conservazione dei cibi surgelati
Al momento della messa in funzione o dopo un
periodo di inattività, attendere almeno12 ore prima di
introdurre gli alimenti nell’apparecchio.
Si consiglia di tenere la monopola in posizione
intermedia.
Se si devono sistemare grandi quantità di cibi, si
possono togliere dall’apparecchiatura tutti i cassetti
o cestelli e sistemare direttamente i cibi sui ripiani
raffreddanti, facendo attenzione a non superare il
limite di carico
posto sul fianco dello
scomparto superiore (ove previsto).
Importante
In caso di aumento anomalo della temperatura
all’interno del congelatore per cause accidentali,
ad esempio per mancanza di corrente, se il
periodo dell’interruzione é superiore al valore
riportato nella tabella dei dati tecnici sotto la
voce “tempo di risalita” sarà necessario
consumare i cibi entro breve o cucinarli subito e
ricongelarli (una volta raffreddati).
corrispondente
Dopo un periodo di preraffreddamento di 24 ore
introdurre gli alimenti nel congelatore.
25
Funzione Performance optimization
Allarme Sovratemperatura
La funzione Performance optimization si attiva
premendo il tasto E (se necessario piu’ volte) finche’
Un aumento della temperatura del vano congelatore
(es. mancanza di energia elettrica) viene indicato
da:
- lampeggio della temperatura;
- lampeggio del vano freezer (simbolo 2);
- illuminazione rossa del display;
- suono del cicalino.
non appare l’icona corrispondente
, e delle linee
orizzontali in movimento appaiono sul display .
In questa condizione le temperature selezionate si
impostano automaticamente, nelle condizioni ottimali
per la conservazione dei cibi e pertanto eventuali
azioni sulle manopole non comportano alcuna
variazione finche’ la funzione e’ attiva.
E' possibile disattivare la funzione in ogni momento
premendo il tasto E (vedi paragrafo “Attivazione delle
Funzioni”).
Masse eutettiche
L’apparecchiatura é dotata di una o piu’ masse
eutettiche. In caso di interruzione di corrente le
masse eutettiche aumenteranno di qualche ora la
conservazione dei cibi congelati.
Scongelazione
Al ripristino delle condizioni normali:
- il segnale acustico si spegne;
- continua a lampeggiare il valore della temperatura;
- l’illuminazione del dispay rimane rossa.
Premendo il tasto di disattivazione allarme E appare
sull’indicatore 4 per circa 5 secondi la temperatura
piu’ alta raggiunta nel vano, si spegne il lampeggio e
l’illuminazione rossa del display.
Durante la fase di allarme il suono del cicalino
puo’essere spento premendo il tasto E ,
l’illuminazione del display rimane rossa fino al
ripristino delle condizioni normali.
Gli alimenti surgelati o congelati, prima di essere
usati, possono essere scongelati nel frigorifero o a
temperatura ambiente, a seconda del tempo
disponibile per l’operazione. I pezzi piccoli possono
essere cucinati direttamente appena tolti dal
congelatore; in questo caso, però, il tempo di cottura
sarà più lungo.
Accessori vano frigorifero
Ripiani e Mensole
I ripiani e le mensole possono essere tolti per la
pulizia.
Per lo stoccaggio d’alimenti di diverse dimensioni, si
possono posizionare i ripiani e le mensole ad
altezze differenti. Per rimuovere i ripiani, rialzarli
posteriormente e toglierli. Per rimuovere le mensole
spingerle nel senso della freccia fino a quando non
si libera.
Per permettere una corretta circolazione
dell’aria, non si deve togliere il ripiano vetro sopra il/i
cassetto/i verdura e la mensola inferiore della porta.
26
D338
Controllo dell’umidità
Assiemato al ripiano vetro c’é un dispositivo
provvisto di feritoie (regolabili tramite una leva
scorrevole), che consente di regolare la temperatura
nel vano cassetto/i verdura.
Con le feritoie chiuse si otterrà una temperatura più
calda e una maggiore umidità.
Con le feritoie aperte si otterrà una temperatura più
fredda e una minore umidità.
PR271
Ricircolo dell’aria
SPIA LUMINOSA
Fig. 1
Il vano frigorifero é dotato di una speciale ventola
D.A.C. (Dynamic Air Cooling) che viene attivata
premendo il tasto E (se necessario piu’ volte) finche’
non appare l’icona corrispondente
, la spia verde
(fig. 1) accesa significa che la ventola é in funzione.
Si consiglia l’uso della ventola (D.A.C.) quando la
temperatura ambiente supera i 28° C.
Questo dispositivo consente un raffreddamento
veloce dei cibi e una migliore uniformità della
temperatura all’interno del vano.
La speciale ventola D.A.C. (Dynamic Air Cooling)
puo’ essere attivata automaticamente quando la
temperatura ambiente supera i 38°C o la funzione
shopping e’ inserita.
E' possibile disattivare la funzione in ogni momento
premendo il tasto E (vedi paragrafo “Attivazione delle
Funzioni”).
Accessori vano congelatore
Cubetti di ghiaccio
L’apparecchiatura è equipaggiata con una o più
vaschette per la formazione dei cubetti di ghiaccio.
Dette vaschette vanno riempite di acqua potabile e
riposte nello scomparto congelatore.
Si raccomanda di non usare utensili
metallici per staccare le vaschette.
27
Consigli pratici
Consigli per la refrigerazione
Consigli per il risparmio energetico
Carne (di tutti i tipi): va avvolta in sacchetti di
plastica e posta sul vetro sopra il cassetto verdura.
In questa posizione si potrà conservare per uno o
due giorni al massimo.
•
Non installare l’apparecchio vicino a fonti di
calore. Il compressore entra in funzione più
spesso con temperature ambientali elevate.
•
Garantire una sufficiente aereazione. Non coprire
mai le aperture d’aereazione.
•
Non collocare dei cibi caldi nell’apparecchio,
lasciarli prima raffreddare.
•
Aprire la porta lo stretto necessario.
•
Non regolare una temperatura più fredda di
quanto sia necessario.
•
Mettere i cibi da scongelare nel comparto
refrigerante. Il freddo derivante dal
scongelamento aiuta il raffreddamento del
comparto refrigerante.
•
Mantenere costantemente pulito il condensatore
posto sul lato posteriore dell’apparecchio.
Banane, patate, cipolla ed aglio, se non sono
confezionati, non vanno messi in frigorifero.
Consigli per la congelazione e per
la conservazione dei surgelati
•
dividere tutto in piccole parti, in modo da favorire
la rapidità della congelazione e consentire lo
scongelamento solo della quantità necessaria;
•
avvolgere gli alimenti in fogli di alluminio o
politene.
•
evitare di mettere i prodotti da congelare a
contatto di quelli già congelati; ciò eviterà
l’innalzamento della temperatura di questi ultimi;
•
non consumare immediatamente i ghiaccioli
prelevati dallo scomparto congelatore possono
provocare scottature da freddo;
•
è consigliabile indicare sulla confezione la data di
inizio della congelazione al fine di poter
controllare il tempo di conservazione;
•
non mettere nello scomparto congelatore
bevande gassate: possono esplodere
•
Una volta scongelati, gli alimenti si deteriorano in
breve tempo e non possono venir ricongelati.
Calendario di congelazione
I simboli indicano diversi tipi di prodotti da congelare.
Le cifre indicano il periodo di immagazzinaggio in mesi per ciascun tipo di prodotto da congelare. Se é valido il
valore superiore oppure quello inferiore del periodo di immagazzinaggio indicato, dipende dalla qualità dei
prodotti alimentari e dal proprio pretrattamento prima del congelamento. Per gli alimenti notevolmente grassi
vale sempre il valore inferiore.
28
Manutenzione
Importante
Attenzione:
Staccare la spina dalla presa di corrente prima di
eseguire qualsiasi operazione.
Questa apparecchiatura contiene idrocarburi nel
circuito refrigerante; pertanto la manutenzione e la
ricarica devono essere effettuate esclusivamente da
personale autorizzato dall’azienda.
Sbrinamento
Vano frigorifero
Lo sbrinamento nel vano frigorifero avviene
automaticamente. L’acqua derivante dallo
sbrinamento, viene raccolta in una bacinella, posta
nella parte posteriore sopra il compressore, dove
evapora.
Si raccomanda di pulire periodicamente il foro di
scarico dell’acqua di sbrinamento utilizzando
l’apposito “pulitore”.
3. a sbrinamento avvenuto asciugare le pareti
accuratamente.
4. reinserire la spina nella presa o accendere
l’apparecchiatura;
Attenzione:
Si raccomanda di non impiegare utensili metallici per
asportare la brina onde evitare gravi danni
all’apparecchio. Utilizzare solo la paletta raschiabrina.
Non usare alcun dispositivo meccanico o altro mezzo
artificiale per accelerare il processo di sbrinamento
tranne quelli qui raccomandati.
Un innalzamento della temperatura dei surgelati
potrebbe ridurne il tempo di conservazione.
D037
Vano congelatore
Eliminare la brina utilizzando una paletta di plastica.
In presenza di uno spesso strato di ghiaccio,
procedere come segue:
1. staccare la spina o spegnere l’apparecchiatura;
Pulizia
Pulire l’interno, togliendo le mensole e i ripiani con
acqua tiepida e detergente delicato.
Pulire periodicamente il condensatore e il
motocompressore con una spazzola o un
aspirapolvere. Questa operazione migliorerà il
funzionamnto con conseguente risparmio
energetico.
Durante i periodi in cui l’apparecchiatura non è in
funzione osservare le seguenti precauzioni:
D068
2. aprire la porta e inserire nell’apposita sede la
paletta raschiabrina come grondaia di
prolungamento: porre al di sotto una bacinella
per la raccolta dell’acqua derivante dallo
sbrinamento;
-
staccare la spina dalla presa di corrente;
-
sbrinare e pulire l’interno e tutti gli accessori;
-
lasciare le porte socchiuse per evitare la
formazione di odori sgradevoli.
Attenzione:
Non usare mai oggetti metallici per pulire
l’apparecchiatura.
29
Lampada di illuminazione
Per eventuale sostituzione della lampada premere
l’aggancio posteriore e contemporaneamente sfilare il
coperchietto nel senso delle frecce.
Attenzione:
Sostituire la lampada con una di pari potenza (la
potenza massima é riportata sul diffusore luce).
Se qualcosa non va ...
Sintomo
L’apparecchiatura non funziona
-
Soluzione
Verificare che la spina sia ben inserita nella presa di corrente
-
Verificare che il display sia acceso
-
Verificare che sia correttamente avvitata
-
Verificare che l’interuttore porta non sia inceppato
La temperatura dell’apparecchiatura é
troppo alta
-
Posizionarela manopola di regolazione verso i ● più grandi
-
Verificare che la temperatura ambiente del locale in cui é stato installato
l’apprecchiatura sia conforme alla classe indicata in targa matricola
L’acqua non defluisce dal convogliatore
-
Verificare che il foro di deflusso dell’acqua di sbrinamento non sia ostruito
La lampadina non funziona
Dati tecnici
Capacità netta in litri del frigorifero
210
Capacità netta in litri del congelatore
70
Consumo energetico in kWh/24h
0,57
Consumo energetico in kWh/annuo
208
Capacità di congelamento in kg/24h
13
Tempo di risalita da -18°C a -9°C ore
24
I dati tecnici sono riportati sulla targhetta matricola posizionata all’interno dell’apparecchiatura vano frigorifero
sul lato sinistro zona cassetti verdura.
Per l’installatore
l’installazione venga eseguita come da istruzioni
riportate sul libretto. Un’aerazione insufficiente
comporterà sicuramente un cattivo
funzionamento e dei danni all’apparecchiatura.
Avvertenze
•
È pericoloso modificare o tentare di modificare
le caratteristiche di quest’ apparecchiatura.
•
Prestare la massima cura nella movimentazione
per non dannegiare parti del circuito refrigerante
onde evitare possibili fuoriuscite di fluido.
•
Durante il normale funzionamento il
condensatore ed il compressore, che sono posti
sul retro dell’apparecchiatura, si riscaldano
sensibilmente. Assicurarsi quindi che
30
•
Se il cavo di alimentazione è danneggiato, esso
deve essere sostituito dal costruttore o dal suo
servizio assistenza tecnica o comunque da una
persona con qualifica similare, in modo da
prevenire ogni rischio.
Installazione
Posizionamento
L’apparecchiatura non deve essere collocata nelle
vicinanze di fonti di calore.
Le migliori prestazioni si hanno con temperature
dell’ambiente comprese tra
Attenzione
L’apparecchio deve poter essere scollegato dalla
rete; é quindi necessario che la spina rimanga
accessibile ad installazione avvenuta.
+18°C e +43°C (Classe T);
+18°C e +38°C (Classe ST);
+16°C e +32°C (Classe N);
+10°C e +32°C (Classe SN).
La classe di appartenenza é riportata sulla targa
matricola.
Al di fuori delle temperature ambiente indicate
dalla classe climatica di appartenenza di questo
prodotto, può non essere garantita la
temperatura di conservazione degli alimenti;
pertanto si consiglia di consumare al più presto
gli alimenti in esso contenuti .
Attenzione: mantenere le aperture per la
ventilazione libere da ogni ostruzione.
Fermi-Ripiani
La vostra apparecchiatura é dotata di fermi-ripiani
che consentono di bloccare i ripiani durante il
trasporto.
Per rimuoverli operare come segue :
muovere i fermi-ripiani nel senso della freccia ,
rialzare posteriormente il vetro e spingerlo in avanti
fino a quando non si libera e togliere i fermi.
Collegamento elettrico
Assicurarsi, prima di inserire la spina nella presa
di corrente, che la tensione e la frequenza
riportate sulla targhetta matricola corrispondano
a quelle dell’impianto domestico.
È ammessa una oscillazione di ±6% sulla tensione
nominale.
Importante
E’ indispensabile collegare l’apparecchio ad una
efficiente presa di terra.
A tale scopo la spina del cavo di alimentazione é
dotata dell’apposito contatto. Qualora la presa di
corrente dell’impianto domestico non sia collegata a
terra, allacciare l’apparecchiatura ad un impianto di
terra a parte conformemente alle norme in vigore
consultando in proposito un tecnico specializzato.
La Casa Costruttrice declina ogni responsabilità
qualora questa norma antinfortunistica non
fosse rispettata.
Questa apparecchiatura è conforme alle
seguenti Direttive Comunitarie
- 87/308/CEE del 2/6/87 relativa alla soppressione
dei disturbi radio.
A
- 73/23/CEE del 19/02/73 (Bassa Tensione) e
successive modificazioni;
B
- 89/336/CEE del 03/05/89 (Compatibilità
Elettromagnetica) e successive modificazioni.
C
31
Reversibilità delle porte
L’apparecchiatura viene fornita con
apertura delle porte verso destra o verso
sinistra. Per avere l’apertura delle porte nel
lato opposto eseguire le seguenti
operazioni prima di effettuare
l’installazione
1. Svitare il perno superiore e togliere il distanziale
2. Togliere la porta superiore ed il perno cerniera
superiore.
C
3. Togliere il copricerniera (A).Svitare i perni (B) e i
distanziali (C). Applicare il copricerniera (A).
B
4. Svitare il perno inferiore e rimontarlo nella parte
opposta.
5. Reinserire la porta inferiore.
6. Rimontare i perni (B) e i distanziali (C) sulla
cerniera intermedia nella parte opposta.
7. Reinserire la porta superiore , il perno cerniera e
il distanziale nella parte opposta.
Istruzioni per l’incasso
integrale
Dimensioni del vano
Altezza
(1)
1780 mm
Profondità (2)
550 mm
Larghezza (3)
560 mm
Per motivi si sicurezza la ventilazione deve essere
come indicato in figura.
Attenzione: mantenere le aperture per la
ventilazione libere da ogni ostruzione.
540
50
3
Inoltre é necessario che la nicchia sia provvista di
un camino d’areazione con le seguenti misure:
profondità:
50 mm
larghezza:
540 mm
32
2
PR01
1
A
Assicurarsi che nella par te inferiore venga
mantenuta una distanza di 44 mm tra il bordo del
mobile ed il bordo dell’apparecchiatura.
Il coperchio della cerniera inferiore inserito nel
sacchetto accessori, come indicato in figura, e’ utile
per stabilire l’esatta posizione del bordo del mobile e
dell’apparecchiatura.
1
m
44m
Assicurarsi che l’apparecchiatura non copra il cavo
alimentazione.
2
Fissare l’apparecchiatura con le 4 viti in dotazione.
I
I
Applicare a pressione il coprifuga, tra
apparecchiatura e mobile.
D724
Dal coperchio in plastica E, che viene utilizzato per
coprire la cerniera con perno, deve essere tolta la
parte, secondo il disegno.
Questa operazione e’ facilitata dalla presenza sulla
par te inter na del coperchio copricer niera di
scanalature che facilitano l’aspor tazione della
stessa.
Eliminare la parte contrassegnata con DX, se il
perno e’ inserito sulla cerniera destra, SX nel caso
contrario.
Applicare i coperchietti (C-D) sulle alette dei
coprifuga e nei fori per le cerniere.
Applicare la griglia di aerazione (B) e i coperchi
copricerniera (E) inserendoli a scatto.
D
C
E
E
B
33
Separare i pezzi Ha, Hb, Hc, Hd come da figura
Ha
Hb
Hc
Hd
PR266
ca. 50 mm
Appoggiare la guida (Ha) sulla parte interna della
porta del mobile sopra e sotto come indicato in
figura e segnare la posizione dei fori esterni. Dopo
aver preparato i fori fissare la guida con le viti in
dotazione.
90°
21 m
m
90°
ca. 50 mm
21 m
m
Inserire a scatto il coperchietto (Hc) sulla guida (Ha)
Ha
Hc
PR33
Aprire la porta dell’apparecchiatura e quella del
mobile a 90° ca. Inserire la squadretta (Hb) nella
guida (Ha). Tenere insieme la porta
dell’apparecchiatura e quella del mobile e segnare i
fori come indicato in figura.
8mm
Ha
PR167
Togliere le squadrette e segnare con il chiodo (K) a
8 mm dal bordo esterno della porta.
Hb
8mm
K
Ha
34
Posizionare nuovamente la squadretta sopra la
guida e fissare con le viti in dotazione.
Per l’eventuale operazione di allineamento della
porta del mobile, utilizzare il gioco dei fori asolati.
Al termine delle operazioni è necessario controllare
l’esatta chiusura della porta dell’apparecchiatura.
Hb
PR168
Inserire a scatto il coperchietto (Hd) sulla guida (Hb)
Hb
Hd
PR167/1
L’apparecchiatura è corredata di 2 squadrette (E)
per il fissaggio laterale al mobile colonna; per la loro
applicazione vedere le indicazioni come da figura.
E
E
Ultimata la reversibilità delle porte, controllare
che la guarnizione magnetica sia aderente al
mobile. Se la temperatura ambiente è fredda (ad
es. in inverno), può succedere che la guarnizione
non aderisca perfettamente al mobile. In tal caso
attendere il naturale rinvenimento della
guarnizione stessa oppure accelerare tale
processo riscaldando la parte interessata con un
normale asciugacapelli.
35
WARNINGS
It is most important that this instruction book should be retained with the appliance for future
reference. Should the appliance be sold or transferred to another owner, or should you move house
and leave the appliance, always ensure that the book is supplied with the appliance in order that the
new owner can be acquainted with the functioning of the appliance and the relevant warnings.
If this appliance featuring magnetic door seals is to replace an older appliance having a spring lock
(latch) on the door or lid, be sure to make that spring lock unusable before you discard the old
appliance. This will prevent it from becoming a death-trap for a child.
This must be done before the appliance is built intoThese warnings are provided in the interest of
safety. You must read them carefully before installing or using the appliance.
General Safety
•
This appliance is not intended for use by persons
(including children) with reduced physical,
sensory or mental capabilities, or lack of
experience and knowledge, unless they have
been given supervision or instruction concerning
use of the appliance by a person responsible for
their safety. Children should be supervised to
ensure that they do not play with the appliance.
•
It is dangerous to alter the specifications or
modify this product in any way.
•
Care must be taken to ensure that the appliance
does not stand on the electrical supply cable.
Important: if the supply cord is damaged, it must be
replaced by the manufacturer, its service agent or
similarly qualified person in order to avoid a hazard.
•
Before any cleaning or maintenance work is carried
out, be sure to switch off and unplug the appliance.
•
This appliance is heavy. Care should be taken
when moving it
•
Ice lollies can cause frost burns if consumed
straight from the appliance.
•
Take utmost care when handling your
appliance so as not to cause any damages to
the cooling unit with consequent possible
fluid leakages.
•
The appliance must not be located close to
radiators or gas cookers.
•
Avoid prolonged exposure of the appliance to
direct sunlight.
•
•
•
There must be adequate ventilation round the
back of the appliance and any damage to the
refrigerant circuit must be avoided.
For freezers only (except built-in models): an
ideal location is the cellar or basement.
Do not use other electrical appliances (such
as ice cream makers) inside of refrigerating
appliances, unless they are approved for this
purpose by the manufacturer.
Service/Repair
•
36
Any electrical work required to install this
appliance should be carried out by a qualified
electrician or competent person
•
This product should be serviced by an authorized
Service Centre, and only genuine spare parts
should be used.
•
Under no circumstances should you attempt to
repair the appliance yourself. Repairs carried out
by inexperienced persons may cause injury or
more serious malfunctioning. Refer to your local
Service Centre, and always
•
This appliance contains hydrocarbons in its
cooling unit; maintenance and recharging must
therefore only be carried out by authorized
technicians.
Use
•
The domestic refrigerators and freezers are
designed to be used specifically for the storage
of edible foodstuffs only.
•
Best performance is obtained with ambient
temperature between +18°C and +43°C (class T);
+18°C and +38°C (class ST); +16°C and +32°C
(class N); +10°C and +32°C (class SN). The class of
your appliance is shown on its rating plate.
Warning: when the ambient temperature is not
included within the range indicated for the class
of this appliance, the following instructions must
be observed: when the ambient temperature
drops below the minimum level, the storage
temperature in the freezer compartment cannot
be guaranteed; therefore it is advisable to use the
food stored as soon as possible.
•
Frozen food must not be re-frozen once it has
been thawed out.
•
Manufacturers’ storage recommendations should
be strictly adhered to. Refer to relevant
instructions.
•
The inner lining of the appliance consists of
channels through which the refrigerant passes. If
these should be punctured this would damage the
appliance beyond repair and cause food loss. DO
NOT USE SHARP INSTRUMENTS to scrape off
frost or ice. Frost may be removed by using the
scraper provided. Under no circumstances should
solid ice be forced off the liner. Solid ice should be
allowed to thaw when defrosting the appliance.
•
Do not place carbonated or fizzy drinks in the
freezer as it creates pressure on the container,
which may cause it to explode, resulting in
damage to the appliance.
Installation
•
•
•
•
•
During normal operation, the condenser and
compressor at the back of the appliance heat up
considerably. For safety reasons, minimum
ventilation must be as shown in the relevant
Figure.
Attention: keep ventilation openings clear of
obstruction.
If the appliance is transported horizontally, it is
possible that the oil contained in the compressor
flows in the refrigerant circuit. It is advisable to
wait at least two hours before connecting the
appliance to allow the oil to flow back in the
compressor.
There are working parts in this product which
heat up. Always ensure that there is adequate
ventilation as a failure to do this will result in
component failure and possible food loss. See
installation instructions.
Parts which heat up should not be exposed.
Wherever possible the back of the product should
be against a wall.
If the appliance has been transported
horizontally, it is possible that the oil contained in
the compressor ílows in the refrigerant circuit. It
is advisable to wait at least two hours before
connecting the appliance to allow tl¦e oil to flow
back in the compressor.
Environment Protection
This appliance does not contain gasses which
could damage the ozone layer, in either its
refrigerant circuit or insulation materials. The
appliance shall not be discarded together with
the urban refuse and rubbish. Avoid damaging
the cooling unit, especially at the rear near the
heat exchanger. Information on your local
disposal sites may be obtained from municipal
authorities. The materials used on this appliance
marked by the symbol
are recyclable.
Disposal of old Appliances
The symbol
on the product or on its packaging
indicates that this product may not be treated as
household waste. Instead it shall be handed over to
the applicable collection point for the recycling of
electrical and electronic equipment. By ensuring this
product is disposed of correctly, you will help prevent
potential negative consequences for the
environment and human health, which could
otherwise be caused by inappropriate waste
handling of this product. For more detailed
information about recycling of this product, please
contact your local city office, your household waste
disposal service or the shop where you purchased
the product.
CONTENTS
Warnings . . . . . . . . . . . . . . . . . . . . . . . . . . . . . . . . . . . . . . . . . . . . . . . . . . . . . . . . . . . . . . . . . . . . . . . . . . .36
Use - Cleaning the interior . . . . . . . . . . . . . . . . . . . . . . . . . . . . . . . . . . . . . . . . . . . . . . . . . . . . . . . . . . . . . . . . .37
Use - Control panel - Display - Operation - Temperature indication . . . . . . . . . . . . . . . . . . . . . . . . . . . . . . . . . .38
Activation of funztions - Switching Off - Use of the fridge compartment - Temperature regulation - Fresh food
refrigeration - Shopping Function . . . . . . . . . . . . . . . . . . . . . . . . . . . . . . . . . . . . . . . . . . . . . . . . . . . . . . . . . . . . . .39
Use of the freezer compartment - Temperature regulation - Freezing fresh food - Storage of frozen food . . . . .40
Excessive temperature alarm - Thawing - Ice-cube production - Performance optimization function . . . . . . . . .41
Use - Movable shelves - Positioning the door shelves - Air circulation - Humidity control . . . . . . . . . . . . . . . . . .42
Hints - Hints for refrigeration - Hints for freezing - Hints for storage of frozen food . . . . . . . . . . . . . . . . . . . . .43
Maintenance - Periods of no operation - Periodic cleaning Interior light - Defrosting . . . . . . . . . . . . . . . . . .44
Customer service and spare parts - Installation - Location - Electrical connection . . . . . . . . . . . . . . . . .45
Installation - Door reversibility - Building-in instructions . . . . . . . . . . . . . . . . . . . . . . . . . . . . . . . . . . . . . . . .46
USE
Cleaning the interior
Before using the appliance for the first time, wash
the interior and all internal accessories with lukewarm water and some neutral soap so as to remove
the typical smell of a brand-new product, then dry
thoroughly.
Do not use detergents or abrasive
powders, as these will damage the finish.
37
Control panel
MODE
D - Temperature and function indicator
E - Function button/ reset alarm
F - Fridge Thermostat knob
A - Applinace button ON/OFF
B - Freezer Thermostat control knob
C - Temperature indication button
DISPLAY
12 3
1.
2.
If on, the indicated temperature is that of the
fridge compartment;
if it flashes, the alarm corresponds to the
relative compartment.
If on, the indicated temperature is that of the
freezer compartment;
if it flashes, the alarm corresponds to the
relative compartment.
Operation
After plugging the plug into the power outlet, if the
display is not illuminated, press key (A), appliance on.
As soon as the appliance is turned on, the following
signals will appear on the control panel:
•
symbol (3) will be positive, indicating that the
temperature is positive.
•
the temperature flashes, the background of the
display is red and you will hear a buzzer. Press key
(E) and the buzzer will go off (also see the section
on "excessive temperature alarm").
By turning the knob the display flashes and shows
the desired temperature. For a correct storage of
the food the following temperatures should be set:
+5°C in the fridge
-18°C in the freezer
Important
If the door remains ajar for more than 7 minutes, the
internal lighting will turn off electronically; after this, the
lighting function will be reset by opening and closing
the door itself.
38
56 78
4
3.
positive and negative Temperture indicator
4.
Temperature indicator
5.
If on the fast freeze funcion is on
6.
7.
If on the Performance optimization function is on
If on the minidac is on
8.
If on the shopping function is on
Temperature indication
In normal conditions, the display indicates the freezer
temperature (symbol 2).
Each time key C is pressed, the display indicates in
sequence:
1. symbol 1 turns on and indicator 4 shows the
temperature of the fridge compartment;
2.symbol 2 turns on and indicator 4 shows the
temperature of the freezer compartment.
In any case, after 10 seconds normal display
conditions are restored.
Activation of functions
Switching off
Each time key E is pressed, the following functions are
activated in a clockwise direction:
The appliance is shut off by pressing key (A) for more
than 1 second. After this, a countdown of the
temperature from -3 -2 -1 will be shown.
When the appliance is shut off, display (D) also goes
off.
Symbol 5 : fast freeze function
Symbol 6 : Performance Optimization function
Symbol 7 : minidac function
Symbol 8 : shopping function
Symbol 7 : minidac function
No Symbol: Normal operation
Not more than one function can be activated at a time;
to de-activate the functions, press the key several
times until no icon appears
Use of the fridge compartment
Important
Temperature regulation
The temperature of this compartment may be
regulated by rotating the knob (F), and may vary
between more or less +2°C and +8°C.
When the knob is rotated, the display flashes and
indicates the set temperature. After having set the
desired temperature, if the knob is not rotated within
5 seconds, the temperature of the freezer
compartment will be indicated.
The temperature is automatically regulated and can
be increased to achieve a higher temperature
(warmer) by rotating the thermostat knob toward ●
settings or reduced (colder) rotating the knob
towards ● settings.
However, the exact setting should be chosen
keeping in mind that the temperature inside the
refrigerator depends on:
•
room temperature;
•
how often the door is opened;
• the quantity of food stored;
• location of appliance.
To shut off the refrigerator compartment, rotate the
knob (F) anticlockwise till position "O". In this
position the word "OF" is indicated for 5 seconds.
The freezer compartment will keep on working.
We suggest placing the knob in the middle position to
obtain an internal temperature of approximately +5° C.
Once the refrigerator compartment is shut off, the
only temperature which is indicated is that of the
freezer compartment. In this condition, the functions
minidac and shopping cannot be activated, and the
lighting in the refrigerator compartment will be
switched off.
If the ambient temperature is high or the
appliance is fully loaded, and the appliance is
set to the lowest temperatures, it may run
continuously causing frost to form on the rear
wall. In this case the dial must be set to a higher
temperature to allow automatic defrosting and
therefore reduced energy consumption.
Fresh food refrigeration
To obtain the best performance:
•
do not store warm food or evaporating liquids in
the refrigerator;
•
cover or wrap the food, particularly if it has a
strong flavour.
•
Position food so that air can circulate freely
around it.
Shopping Function
If you need to insert a large amount of warm food, for
example after doing the grocery shopping, we suggest
activating the Shopping function to chill the products
more rapidly and to avoid warming the other food
which is already in the refrigerator.
The shopping function is activated by pressing key E
(several times if necessary) until the corresponding
icon appears
The shopping function shuts off automatically after
approximately 6 hours.
During the shopping function also the fan inside the
refrigerator compartment is automatically activated.
Note: the fan inside the refrigerator compartment is
automatically activated also when the room
temperature is high (over 38°C), even though the
shopping function is not activated.
It is possible to de-activate the function at any time by
pressing key E (see paragraph "Function Activation").
39
Use of the freezer compartment
The freezer is provided with the symbol
which means that it is suitable for freezing fresh food
and for long term storage of frozen and deep-frozen
food.
Temperature regulation
The temperature of this compartment may be
regulated by rotating the knob (B), and may vary
between more or less -15°C and -24°C.
When the knob is rotated, the display flashes and
indicates the set temperature. After having set the
desired temperature, if the knob is not rotated within
5 seconds, the temperature of the freezer
compartment will be indicated.
The temperature is automatically regulated and can
be increased to achieve a higher temperature
(warmer) by rotating the thermostat knob toward ●
settings or reduced (colder) rotating the knob
towards ● settings.
However, the exact setting should be chosen
keeping in mind that the temperature inside the
freezer depends on:
necessary) until the corresponding icon appears
After a pre-cooling period of 24 hours, place the foods
in the freezer.
The freezing process takes 24 hours. During this
period do not put other foods in the freezer.
This function stops automatically after 54 hours.
The function can be de-activated at any time by
pressing key E (see paragraph "Activation of
Functions").
Ice packs
There are one or more ice packs in one drawer of the
freezer.
In the event of a power failure or malfunction, the ice
pack will lengthen the amount of time it takes for the
frozen food to become too warm by several hours. The
ice pack can only fulfil this task optimally if it is placed in
the uppermost drawer, at the front, above the frozen
food.You can use the ice pack for cooling cold bags.
•
room temperature;
•
how often the door is opened;
•
the quantity of food stored;
Storage of frozen food
•
location of appliance.
When first starting-up or after a period out of use,
before putting the products in the compartment let
the appliance run at least 12 hours on the fast freeze
setting. To obtain the best performance from this
appliance, you should:
We suggest setting the knob to the middle position
to obtain an internal temperature of approximately
-18°C, which guarantees proper freezing and
conservation of the frozen foods.
Freezing fresh food
The freezer compartment is suitable for long term
storage of commercially frozen and deep-frezen
food, and for freezing fresh food.
The maximum quantity of foods to freeze in 24 hours
is shown on the serial number plate.
To freeze the amount of food indicated on the serial
number plate, place the food directly in touch with the
cooling surface (remove the drawer or basket).
In case the food is frozen inside the drawers or
baskets, the maximum quantity is slightly reduced.
Place the food to be frozen in the upper part of the
freezer, as this is the coldest point.
To freeze fresh foods, you will need to activate the
rapid freezing function. Press key E (several times if
40
if large quantities of food are to be stored, remove all
drawers and baskets from appliance and place food
on cooling shelves.
Pay careful attention not to exceed load limit stated
on the side of the upper section (where applicable).
Important
In the event of accidental defrosting, for example
due to a power failure, if the power has been off
for longer that the value shown in the technical
characteristics chart under “rising time”, the
defrosted food must be consumed quickly or
cooked immediately and then refrozen (after
cooling).
Excessive temperature alarm
Performance optimization function
An increase in the temperature in the freezer
compartment (for example due to an power failure)
is indicated by:
- flashing temperature;
- freezer compartment flashing (symbol 2);
- red illumination of display;
- sounding of buzzer.
When normal conditions are restored:
- the acoustic signal shuts off;
- the temperature value continues to flash;
- the display illumination remains red.
When you press key "E" to de-activate the alarm, the
highest temperature reached in the compartment
appears on indicator 4 for approximately 5 seconds.
At this point the flashing stops and the display
illumination changes over from red to white.
During the alarm phase, the buzzer can be switched
off by pressing key E; the illumination of the display
remains red until normal storage conditions are
restored.
The performance optimization function is activated
by pressing key E (several times if necessary) until
the corresponding icon appears
and some moving horizontal lines appear on the
display.
In this condition the chosen temperatures are
automatically set, in the best conditions for storing
food and therefore any possible operation through
the keys does not cause any change as long as this
function is activated.
It is possible to de-activate the function at any time
by pressing key E (see paragraph "Function
Activation").
Thawing
Deep-frozen or frozen food, prior to being used, can
be thawed in the refrigerator compartment or at
room temperature, depending on the time available
for this operation.
Small pieces may even be cooked still frozen, directly
from the freezer: in this case, cooking will take longer.
Ice-cube production
This appliance is equipped with one or more trays
for the production of ice-cubes. Fill these trays with
water, then put them in the freezer compartment.
Do not use metallic instruments to remove the
trays from the freezer.
41
Movable shelves
The walls of the refrigerator are equipped with a
series of runners so that the shelves can be
positioned as desired.
For better use of space, the front half-shelves can lie
over the rear ones.
D338
Positioning the door shelves
To permit storage of food packages of various sizes,
the door shelves can be placed at different heights.
To make these adjustments proceed as follows:
Gradually pull the shelf in the direction of the arrows
until it comes free, then reposition as required.
Air circulation
The refrigerator compartment is provided with a
special fan D.A.C. (Dynamic Air Cooling) which is
activated by pressing key E (several times if
necessary) until the corresponding icon appears ;
if the green light is on (fig.1), this means that the fan
is working.
LIGHT
We suggest using the fan (D.A.C.) when the room
temperature is higher than 28°C.
This device enables the food to cool quickly and
helps to keep a regular temperature inside the
refrigerator compartment.
The special fan D.A.C. (Dynamic Air Cooling) is
automatically activated when the room temperature
is higher than 38°C or when the Shopping function is
activated.
It is possible to de-activate the function at any time
by pressing key E (see paragraph "Function
Activation").
Humidity control
The glass shelf incorporates a device with slits
(adjustable by means of a sliding lever), which
makes it possible to regulate the temperature in the
vegetable drawer(s). Close the slots to obtain a
warmer temperature and greater humidity. Open the
slots to obtain a cooler temperature and less
humidity.
PR271
42
Fig. 1
HINTS
Hints for refrigeration
•
wrap up the food in aluminium foil or polythene
and make sure that the packages are airtight;
Useful hints:
•
do not allow fresh, unfrozen food to touch food
which is already frozen, thus avoiding a rise in
temperature of the latter;
For safety, store in this way only one or two days
at the most.
•
lean foods store better and longer than fatty
ones; salt reduces the storage life of food;
Cooked foods, cold dishes, etc..: these should be
covered and may be placed on any shelf.
•
water ices, if consumed immediately after
removal from the freezer compartment, can
possibly cause the skin to be freeze burnt;
•
it is advisable to show the freezing-in date on
each individual pack to enable you to keep tab of
the storage time;
•
do not put carbonated liquids (fizzy drinks,
etc.) in the freezer compartment as they may
burst.
Meat (all types): wrap in polythene bags and place
on the glass shelf above the vegetable drawer.
Fruit and vegetables: these should be thoroughly
cleaned and placed in the special drawer(s)
provided.
Butter and cheese: these should be placed in
special airtight containers or wrapped in aluminium
foil or polythene bags to exclude as much air as
possible.
Milk bottles: these should have a cap and should
be stored in the bottle rack on the door.
Hints for storage of frozen food
Bananas, potatoes, onions and garlic, if not
packed, must not be kept in the refrigerator.
To obtain the best performance from this appliance,
you should:
• make sure that the commercially frozen
foodstuffs were adequately stored by the retailer;
• be sure that frozen foodstuffs are transferred
from the foodstore to the freezer in the shortest
possible time;
• not open the door frequently or leave it open
longer than absolutely necessary.
• Once defrosted, food deteriorates rapidly and
cannot be refrozen.
• Do not exceed the storage period indicated by
the food manufacturer.
Hints for freezing
To help you make the most of the freezing process,
here are some important hints:
•
the maximum quantity of food which can be
frozen in 24 hrs. is shown on the rating plate;
•
the freezing process takes 24 hours. No further
food to be frozen should be added during this
period;
•
only freeze top quality, fresh and thoroughly
cleaned, foodstuffs;
•
prepare food in small portions to enable it to be
rapidly and completely frozen and to make it
possible subsequently to thaw only the quantity
required;
Freezing Calendar
1-2
3-4
3-6
3-6
3-6
3-6
10 -12
10 -12
10 -12
10 -12
The symbols show different types of frozen goods.
The numbers indicate storage times in months for the appropriate types of frozen goods. Whether the upper or lower
value of the indicated storage time is valid depends on the quality of the foods and pre-treating before freezing.
43
MAINTENANCE
Periods of non-operation
Unplug the appliance before carrying out
any maintenance operation.
Warning
This appliance contains hydrocarbons in its cooling
unit; maintenance and recharging must therefore
only be carried out by authorized technicians.
Periodic cleaning
When the appliance is not in use for long periods,
take the following precautions:
remove the plug from the wall socket;
remove all food;
defrost and clean the interior and all accessories;
leave the door ajar to allow air to circulate to prevent
unpleasant smells.
Clean the inside with warm water and bicarbonate of
soda. Rinse and dry thoroughly.
Clean the condenser (black grill) and the
compressor at the back of the appliance with a
brush or a vacuum cleaner. This operstion will
improve the performance of the appliance and save
electricity consumption.
Interior light
If it becomes necessary to replace the lamp, press
on the rear hook and at the same time slide the
cover in the direction indicated by the arrow.
Replace the lamp with one of the same
power (the maximum power is shown on the
light diffuser).
Defrosting
Frost is automatically eliminated from the evaporator
of the refrigerator compartment every time the motor
compressor stops, during normal use. The defrost
water drains out through a trough into a special
container at the back of the appliance, over the
motor compressor, where it evaporates.
It is important to periodically clean the defrost
water drain hole in the middle of the refrigerator
compartment channel to prevent the water
overflowing and dripping onto the food inside.
Use the special cleaner provided, which you will
find already inserted into the drain hole.
44
D037
The freezer compartment, however, will become
progressively covered with frost. This should be
removed with the special plastic scraper provided,
whenever the thickness of the frost exceeds 4 mm.
During this operation it is not necessary to switch off
the power supply or to remove the foodstuffs.
However, when the ice becomes very thick on the
inner liner, complete defrosting should be carried out
and it is advisable to carry out this operation when
the appliance is empty.
To carry out complete defrosting of the freezer
compartment
proceed as follows:
1. pull out the plug from the wall socket or turn the
thermostat knob to the «O» setting;
2. remove any stored food, wrap it in several layers
of newspaper and put it in a cool place;
3. leave the door open, insert the plastic scraper in
the appropriate seating at the bottom centre,
placing a basin underneath to collect the defrost
water;
4. when defrosting is completed, dry the interior
thoroughly and refit the plug; keep the scraper for
future use;
5. turn the thermostat knob back to the required
setting or replace the plug in the power socket.
After letting the appliance run for at least half an
hour, replace the previously removed food into
the compartment.
D068
Important:
Never use sharp metal tools to scrape off frost
from the evaporator as you could damage it.
Do not use a maechanical device or any artificial
means to speed up the thawing process other
than those recommended by the manufacturer.
A temperature rise of the frozen food packs,
during defrosting, may shorten their safe storage
life.
CUSTOMER SERVICE AND SPARE PARTS
If the appliance is not functioning properly, check
that:
•
the plug is firmly in the wall socket and the mains
power switch is on;
•
there is an electricity supply (find out by plugging
in another appliance);
•
the thermostat knob is in the correct position.
•
If there are water drops on the bottom of the
cabinet, check that the defrost water drain
opening is not obstructed (see “Defrosting”
section).
•
If your appliance is still not working properly after
making the above checks, contact the nearest
service centre.
To obtain fast service, it is essential that when you
apply for it you specify the model and serial number
of your appliance which can be found on the
guarantee certificate or on the rating plate located
inside the appliance, on the bottom left-hand side.
INSTALLATION
Location
The appliance should be installed well away from
sources of heat such as radiators, boilers, direct
sunlight etc.
Electrical connection
Before plugging in, ensure that the voltage and
frequency shown on the serial number plate
correspond to your domestic power supply. Voltage
can vary by ±6% of the rated voltage.
For operation with different voltages, a suitably sized
auto-transformer must be used.
The appliance must be earthed.
The power supply cable plug is provided with a
contact for this purpose.
If the domestic power supply socket is not earthed,
connect the appliance to a separate earth in
compliance with current regulations, consulting a
specialist technician.
45
The Manufacturer declines all responsibility if
the above safety precautions are not observed.
This appliance complies with the following
E.E.C. Directives:
- 87/308 EEC of 2/6/87 relative to radio interference
suppression.
ATTENTION!
It must be possible to disconnect the appliance from
the mains power supply; the plug must therefore be
easily accessible after installation.
- 73/23 EEC of 19.2.73 (Low Voltage Directive) and
subsequent modifications;
- 89/336 EEC of 3.5.89 (Electromagnetic
Compatibility Directive) and subsequent
modifications.
Door reversibility
The appliance is supplied with the right
door opening. To change the opening
direction of the door proceed as in the
following instructions before installing it.
C
B
1. Unscrew the upper pin and remove the spacer
2. Remove the upper door and the upper hinge pin.
3. Remove the hinge cover (A). Unscrew the pins
(B) and spacers (C). Fit the hinge cover (A).
4. Unscrew the lower pin and refit it on the opposite
side.
5. Refit the lower door.
6. Refit the pins (B) and the spacers (C) on the
middle hinge on the opposite side.
7. Refit the upper door , the hinge pin and the
spacer on the opposite side .
Instructions for totally built-in appliances
Building-in instructions
50 mm
Dimensions of housing
min. 2
200 cm
Height 1780 mm
Depth
550 mm
Width
560 mm
For safety reasons, minimum ventilation must be as
shown in Fig.
min.
200 cm2
Attention: keep ventilation openings clear of
obstruction.
D567
46
A
540
It is necessary that the niche is provided with a
conduct of ventilation having the following
dimensions:
Depth
50 mm
Width
3
2
540 mm
Make sure that a distance of 44 mm is maintained in
the lower part between the kitchen furniture and the
border of the appliance.
50
1
PR01
The lower hinge cover inserted in the accessories
bag, is useful to guarantee the exact position of the
kitchen furniture and the appliance.
1
Also make sure that the appliance does not clamp
the mains cable.
m
44m
2
Fasten the appliance with 4 screws provided in the
kit included with the appliance.
I
I
Apply the sealing strip pushing it between the
refrigerator and the adjacent cabinet.
D724
From the plastic cover (E), which is used to cover the
hinge with the pivot pin, you must take away the part
as indicated in the drawing.
This operation is made easer since there is, in the
internal part of the cover hinge lid a groove that
facilates the removal of this coomponent.
“Remove the part marked with DX, if the pivot pin is
inserted in the right hinge, SX in opposite case.”
47
Apply covers (C-D) on joint cover lugs and into hinge
holes.
Snap vent grille (B) and hinge covers (E) into
position.
D
C
E
E
Separate parts Ha, Hb, Hc, Hd as shown in the
figure.
B
Ha
Hb
Hc
Hd
PR266
Place guide (Ha) on the inside part of the furniture
door, up and down as shown in the figure and mark
the position of external holes. After having drilled
holes, fix the guide with the screws supplied.
ca. 50 mm
90°
21 m
m
90°
ca. 50 mm
21 m
m
Fix cover (Hc) on guide (Ha) until it clips into place.
Ha
Hc
PR33
Open the appliance door and the furniture door at
90°. Insert the small square (Hb) into guide (Ha).
Put together the appliance door and the furniture
door and mark the holes as indicated in the figure.
8mm
Ha
PR167
48
Hb
Remove the brackets and mark a distance of 8 mm
from the outer edge of the door where the nail must
be fitted (K).
8mm
K
Ha
Place the small square on the guide again and fix it
with the screws supplied.
Should the lining up of the furniture door be
necessary, use the clearance of slots.
At the end of operations, it is necessary to check if
the door of the furniture closes properly.
Hb
PR168
Fix cover (Hd) on guide (Hb) until it clips into place.
Hb
Hd
PR167/1
If the appliance is fixed to the side of the kitchen unit,
simply slacken the screws in the fixing brackets (E), move
the brackets as shown in the figure and re-tighten the
screws.
E
E
D735
49
www.electrolux.com
www.electrolux.it
www.electrolux.pl
www.electrolux.hr
www.electrolux.cz
www.electrolux.hu
www.electrolux.ro
www.electrolux.sk
www.electrolux.si