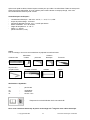
1
Montage-, Bedienungs- und Wartungsanleitung en fr it ASSEMBLY, USER AND MAINTENANCE INSTRUCTIONS NOTICE DE MONTAGE, D'UTILISATION ET D'ENTRETIEN ISTRUZIONI DI MONTAGGIO, USO E MANUTENZIONE Infrarotkabine Art.-Nr.: 542.1010.33.21 Stand: 1438 - de Sehr geehrte Kundin, sehr geehrter Kunde, lesen Sie diese Anleitung vor dem Aufbau der Infrarotkabine vollständig durch, um Montagefehler oder Beschädigungen zu vermeiden. Prüfen Sie sofort anhand der Packliste, ob die Kabine unbeschädigt und vollständig bei Ihnen angekommen ist. Bitte vernichten Sie die Packliste erst nach Ablauf der Garantiezeit. Diese Liste dient Ihnen zur Kontrolle auf Vollständigkeit der Einzelteile und ist mit dem Kaufbeleg aufzubewahren. Eventuelle Beanstandungen können mit Hilfe dieser Liste problemlos behoben werden. Die Positionsnummern der Packliste stimmen nicht mit denen in der Anleitung überein! Weiterentwicklungen im Sinne des technischen Fortschritts behalten wir uns vor. So können geringfügige Abweichungen in den Darstellungen oder Beschreibungen entstehen. Verpackung Verpackungsmaterial nicht einfach wegwerfen! Papier-, Pappe- und Wellpappeverpackungen, sowie Kunststoffverpackungsteile sollten in die entsprechenden Sammelbehälter gegeben werden. Werkstoff Holz Gesunde Äste, leichte Verfärbungen und kleine Risse sind für Holz charakteristisch, verleihen der Kabine ein natürliches Aussehen und sind kein Reklamationsgrund. Vor der Montage Für das Aufstellen der Kabine wird eine Mindestraumhöhe von 210 cm benötigt. Der Fußboden muss eben und waagerecht sein, da es sonst zu Funktionsstörungen kommen kann. Wir empfehlen Ihnen, die Montage mit zwei Personen durchzuführen. Zur Verhütung von Unfällen ist zu vermeiden, dass sich Kinder während der Montage in unmittelbarer Nähe befinden. Zum Aufbau des Kabinenkörpers benötigen Sie rund um die Kabine eine Montagefreiheit von ca. 60 cm. Nach erfolgter Montage schieben Sie die Kabine an den endgültigen Standort, wobei der Wandabstand mindestens 5cm betragen muss. Nutzungs- und Sicherheitshinweise Für die Nutzung dieser Infrarotkabine gibt es keine Altersbegrenzung. Prinzipiell kann jeder gesunde Mensch die Infrarotkabine benutzen. Bei gesundheitlichen Einschränkungen ist vor der Nutzung ein Arzt zu befragen. Konsultieren Sie ebenfalls Ihren Arzt - bei Schwangerschaft - bei Erkrankungen wie Lähmungen, Epilepsie, Bluthochdruck - wenn Sie Implantatträger sind - bei Hauterkrankungen, Sensibilitätsstörungen oder nach Behandlungen der Haut - bei Einnahme von Medikamenten Nutzen Sie die Infrarotkabine nicht - bei Fieber oder akuten Infektionen - Thrombosen, Entzündungen oder offenen Wunden - bei Stoffwechselkrisen - unter Alkohol- oder Drogeneinfluss Kinder, ältere sowie hitzeunempfindliche Menschen oder Behinderte dürfen sich nicht alleine in der Infrarotkabine aufhalten. Prüfen Sie vor dem Aufheizen, dass sich keine Haustiere in der Kabine aufhalten. Die Infrarotkabine ist ausschließlich für die Wärmeanwendung vorgesehen. Eine unsachgemäße Nutzung (z.B. zum Wäschetrocknen o.Ä.) ist strengstens verboten. Da es bei Erstbetrieb zu Geruchsbildung kommen kann, ist die Kabine vor der ersten Nutzung mindestens. 1 Stunde lang aufzuheizen und danach gut zu lüften. Gemäß VDE 0100 dürfen Installationen und Wartung an der Wärmekabine mit elektronischer Steuerung nur von einer Elektrofachkraft durchgeführt werden! Copyright HRB 3662 1 Technische Änderungen vorbehalten Beim Umgang mit 230V Netzspannung besteht Lebensgefahr ! Wenn die Anschlussleitung dieses Gerätes beschädigt wird, muss sie durch den Kundendienst der Firma weka oder durch einen zugelassenen Elektrofachmann unter Beachtung der VDE-und EVU-Richtlinien ersetzt werden, um Gefährdungen zu vermeiden. Die Strahler und Strahleröffnungen dürfen nicht abgedeckt werden – BRANDGEFAHR! Empfehlungen zum Aufbau Bohren Sie alle Schraubverbindungen vor, um Beschädigungen an den Holzteilen zu vermeiden! Folgendes Zeichen macht Sie während der Anleitung nochmals darauf aufmerksam: Türflügel Die Verstellexcenter Pos. 23 ermöglichen jederzeit auch nachträglich eine einfache Justierung des Glastürblattes. Dazu werden die Innenteile der Türbeschläge abmontiert und die Exzenter in die entsprechende Richtung gedreht. Bei der Montage der Türgriffe ist darauf zu achten, dass sich das Griffstück aus Metall auf der Außenseite der Tür befindet. Pflegehinweise Wir empfehlen, in der Kabine auf Saunatüchern zu sitzen, damit der Schweiß nicht auf die Holzteile läuft. Lassen Sie die Kabine nach jeder Nutzung gut durchlüften. Sorgen Sie auch für eine gute Durchlüftung des Raumes, in dem sich die Infrarotkabine befindet. Die Heizflächen im Kabineninneren sind wartungsfrei. Sie dürfen nicht abgedeckt oder mit Feuchtigkeit in Berührung kommen. Hartnäckige Schmutzeinwirkungen auf dem Holz können mit Schmirgelpapier entfernt werden. Geringer Harzausfluss an der Holzoberfläche ist unvermeidbar. Die trockenen Harzrückstände können mit feinem Schleifpapier entfernt werden. Verwenden Sie keine chemischen Klebstoffe im Inneren der Kabine, sondern allenfalls Holzleim. Bedienung Vor der ersten Nutzung sollten Sie Ihre Kabine aufheizen und anschließend gut durchlüften, damit eventueller Geruch der Strahler entweichen kann. Links oben an der Vorderseite der Kabine befindet sich das Bedienungspult mit Zeit- und Temperaturregler. Die Vorwärmzeit hängt von der Umgebungstemperatur ab und schwankt zwischen 5 und 10 Minuten. Nutzen Sie diese Zeit für eine warme Dusche. Sie bewirkt eine anschließend stärkere Schweißbildung. Trocknen Sie sich jedoch vor dem Wärmebad sorgfältig ab. Nach Ablauf der Vorwärmzeit beträgt die Kabinentemperatur um die 40°C. Es läßt sich eine Höchsttemperatur von 80°C erreichen. Sobald die vorgewählte Temperatur erreicht worden ist, bewirkt das Thermostat ein zeitweises Ausschalten der Strahler. Bei weiterem Absinken der Temperatur schalten sich die Elemente wieder an. Die Mindestzeit für einen Aufenthaltszeit in der Kabine für optimales Transpirieren beträgt 20 Minuten. Die maximale Zeit hängt von Ihrer persönlichen körperlichen Kondition ab. Nach Beendigung der Sitzung empfehlen wir Ihnen eine Nachschwitzzeit von 5 bis 10 Minuten. Danach können Sie mit lauwarmem Wasser duschen. Kaltes Wasser nach einem intensiven Aufwärmprozess kann zu Verkrampfungserscheinungen führen. Nach der Nutzung der Kabine lassen Sie diese bei geöffneter Tür auskühlen. Sorgen Sie stets für eine gute Durchlüftung des Raumes, in dem sich die Kabine befindet. Bei längerer Nichtbenutzung empfehlen wir, die Kabinentür offen zu halten. Copyright HRB 3662 2 Technische Änderungen vorbehalten Technische Daten: - Anschluss: 230 Volt ~ 50Hz ,I = 10A, P = 2,3KW betriebsbereit in 5 Minuten geringer Energieaufwand: ca. 1-2 kW pro Anwendung Anwendungsdauer: ca. 30 min Temperaturbereich: 0 – 80°C Zeitbereich: 0 – 60min ( kleinster Einstellwert 7,5 min ) Werkzeug Folgendes Werkzeug sollten Sie vor Beginn der Montage zurecht gelegt haben. Wasserwaage Inbusschlüssel Rollmaß Bohrmaschine Elektroschrauber Universalmesser Hammer Schraubendreher Bleistift Abkürzungen / Symbole: FW - Frontwand cm mm ca. - Zentimeter Millimeter circa - Bedienungsanleitung der IR-Steuerung beachten! Wir wünschen Ihnen viel Spaß beim Aufbau und jahrelange Freude an Ihrer Wärmekabine. Copyright HRB 3662 3 Technische Änderungen vorbehalten Garantiebestimmungen der weka Holzbau GmbH Wir gewähren Ihnen zu nachfolgenden Konditionen – jedoch nur auf die Holzteile unserer Produkte (wekaProdukt genannt), nicht auf damit verbundene Bauteile oder Bestandteile des weka-Produkts aus anderem Material als Holz – ab Lieferdatum 5 Jahre Garantie auf Funktion. Innerhalb der Garantiezeit werden fehlerhafte Teile oder fehlende Teile der Ware oder die Ware selbst nach unserer Wahl ersetzt. Vom Garantieumfang erfasst ist lediglich der kostenlose Ersatz des jeweils mangelhaften oder defekten Holzteils. Nicht im Garantieumfang enthalten sind Folge- oder Zusatzkosten, insbesondere keine Liefer- und Auf- oder Umbaukosten. Die Garantie ist ausgeschlossen, wenn: - von der jeweiligen Montageanleitung abgewichen wurde, Veränderungen (zusätzliche An- oder Umbauten) an dem Produkt im Vergleich zur Montageanleitung vorgenommen wurden, die jeweils angegebenen Belastungsgrenzen (z.B. Schneelast usw.) überschritten wurden, das weka-Produkt falsch gegründet (Fundament / Bodenplatte o.Ä.) wurde, insbesondere bei Verstößen gegen die Regeln der Baukunst, unterlassene oder nicht ausreichende Pflege (Wartung: Holzschutz, Holzanstrich usw.) des Holzes vorgenommen wurde. Windgeschwindigkeiten über Stärke 7, Naturkatastrophen oder gewaltsame Einwirkungen den Schaden am weka-Produkt verursacht haben. der Mangel in holztypischen Farbveränderungen, Rissbildungen, Verwerfungen, Schwinden, Quellen oder ähnlichen normalen, in der Natur des Werkstoffes „Holz“ begründeten Veränderungen besteht. Garantieansprüche können nur in Verbindung mit Originalpackzettel und Originalkaufbeleg in Anspruch genommen werden und müssen innerhalb der Garantiezeit schriftlich, per Telefax oder per e-Mail geltend gemacht werden. Anspruchsvoraussetzung ist eine unverzügliche Anzeige des Mangels bzw. des Schadens in Form einer geordneten Darstellung des Schadens in Bild und Text. Garantieansprüche sind zu richten an: weka Holzbau GmbH, Johannesstraße 16, 17034 Neubrandenburg Fax: 0395/42908-83; e-Mail: [email protected] Montagebedingungen für weka - Montageteam Wenn Sie Montagehilfe in Anspruch nehmen und dazu ein weka - Montageteam rufen, wird die weka Holzbau GmbH für Sie wie folgt tätig: Montage bedeutet das anleitungsgemäße Zusammenfügen (Aufbau) der gelieferten Einzelteile der Ware ohne Anstrich, Lieferung und Montage von Zubehör und Zubehörteilen. Elektrische Anschlüsse sind in den Montageleistungen nicht enthalten. Die aufzubauende Ware muss sich am Aufbauort/Standort/Standfläche befinden. Transport des Artikels oder der Einzelteile über eine Entfernung von 5m hinaus oder in ein anderes Geschoss sind im angebotenen Montagepreis nicht enthalten. Der Untergrund muss tragfähig, horizontal und eben sein. Im Zweifel gilt für die Ebenheit: DIN 18202 „Ebenheitstoleranzen im Hochbau“, Tab.3, Zeile 3, mit einer maximalen Höhendifferenz der am weitesten von einander entfernten Punkten von ca. 10 bis 11mm. Alle vorbereitenden Arbeiten müssen gemäß den technischen Regeln vor Beginn der Montage ausgeführt sein. Die von Ihnen gefertigten oder gewählten Untergründe/Fußböden/Fundamente müssen für die Montage geeignet sein. Copyright HRB 3662 4 Technische Änderungen vorbehalten - en Dear customer Read these instructions thoroughly before installing your infrared cabin in order to avoid installation errors or damage. Use the packing list to check immediately that you have received the cabin undamaged and complete. Please do not dispose of the packing list before the guarantee period has expired. This list enables you to check that all the individual parts are present and is to be retained with your proof of purchase. Any complaints can easily be rectified with the help of this list. Please note that the item numbers on the packing list do not correspond to those in the instructions. We reserve the right to update the product from a technical standpoint. This means that there may be minor deviations in the illustrations or descriptions. Packaging Please do not simply throw away the packaging material. Paper, cardboard and corrugated board, as well as plastic packaging materials, should be placed in the appropriate collection containers. Wood as a material Healthy knurls, light discolouration and small cracks are characteristic of wood, lend the cabin a natural appearance and are not a reason for complaint. Prior to assembly A minimum room height of 210 cm is required to install the cabin. The floor must be flat and horizontal; otherwise malfunctions may occur. We recommend that assembly be carried out by two persons. In order to prevent accidents, we recommend that children be kept out of the direct vicinity during assembly. When installing the body of the cabin, you need a free area of approx. 60 cm around the cabin in which to work. Once assembly is successfully completed, push the cabin into its final position, maintaining a distance of at least 5 cm from the wall. Usage and safety information There is no age restriction for the use of this infrared cabin. In principle, every healthy person can use the infrared cabin. If a person’s health is compromised, a doctor should be consulted before the cabin is used. Also consult a doctor - in case of pregnancy - in case of diseases such as paralysis, epilepsy and high blood pressure - if you have an implant - in case of skin diseases and sensitivity disorders or after skin treatments - when taking medication Do not use the infrared cabin - in case of fever or acute infection - if suffering from thrombosis, infections or open wounds - if suffering from a metabolic crisis - under the influence of alcohol or drugs Children, the elderly and persons not sensitive to heat, as well as handicapped persons, must not be permitted to stay in the infrared cabin by themselves. Before it is heated up, ensure that there are no pets in the cabin. The infrared cabin is to be used exclusively for the thermal application. Improper usage (e.g. for drying of laundry or the like) is prohibited under all circumstances. Since odours may be generated during initial start-up, the cabin must be heated for at least one hour and then well ventilated before being used for the first time. Copyright HRB 3662 5 Technische Änderungen vorbehalten According to VDE 0100, installation and maintenance of the thermal cabin with electronic controls may only be carried out by a professional electrician. There is a risk of serious injury or death from exposure to 230 V mains voltage. If the connector cable to this device is damaged, it must be replaced by a representative of weka customer service or an authorised electrician, taking into account the VDE and EVU directives, in order to avoid hazards. The radiators and radiator openings must not be covered – FIRE HAZARD Installation recommendations Pre-drill all screw connections in order to avoid damaging the wood parts. The following symbol will remind you to do this in the instructions: Door leaf The adjustable eccentric, item 23, permits easy adjustment of the glass door leaf even at a later point in time. The internal parts of the door fittings are removed, and the eccentric is rotated in the appropriate direction. During installation of the door grips, ensure that the metal grip piece is on the outside of the door. Instructions for care We recommend that you sit on sauna towels in the cabin so that the sweat does not run onto the wood parts. Air out the cabin well after each session. Also always ensure that the room in which the cabin is located is well ventilated. The heating surfaces inside the cabin are maintenance free. They should not be covered or allowed to come into contact with moisture. Stubborn stains on the wood can be removed with emery paper. It is unavoidable that small amounts of resin will appear on the surface of the wood. The dry resin residues can be removed with fine sandpaper. Always use wood glue, never chemical adhesives, inside the cabin. Operation Prior to initial use you should heat your cabin up and then ventilate it thoroughly to remove any odour emitted from the spotlights. At the upper front left of the cabin is the operator control console with the timer and temperature control. The heat-up time depends on the ambient temperature, and varies between 5 and 10 minutes. Make use of this time to take a warm shower. It will cause you to perspire more later. But be sure to dry yourself thoroughly before entering the cabin. At the end of the heat-up time the cabin temperature is around 40°C. The maximum temperature is 80°C. As soon as the pre-selected temperature is reached the thermostat temporarily disables the heating elements. As the temperature falls further the elements are reactivated. The minimum time to spend in the cabin for optimum transpiration is 20 minutes. The maximum time you should spend in the cabin depends on your personal physical condition. At the end of the session we recommend a cool-off period of 5 to 10 minutes. Then you can shower in luke-warm water. Cold water after a period of intense heat exposure may result in cramps. After using the cabin leave it to cool down with the door open. Always ensure the room in which the cabin is installed is well ventilated. If you are not going to use the cabin for a lengthy period of time, we recommend leaving the cabin door open. Copyright HRB 3662 6 Technische Änderungen vorbehalten Technical data: Connection: 230 volts ~ 50 Hz , I = 10 A, P = 2.3 kW Ready for operation in 5 minutes Low energy consumption: Approx. 1-2 kW per use Duration of use: Approx. 30 minutes Temperature range: 0 – 80°C Time range: 0 – 60 min (smallest setting increment 7.5 min.) - Tools You should have the following tools to hand before beginning assembly. Spirit level Tape measure Allen key Drill Electric screwdriver Universal cutter Hammer Screwdriver Pencil Abbreviations / Symbols: FW - Front wall cm mm ca. - Centimetre Millimetre approximately/approx. - Follow the operating instructions of the IR controller! We hope you have fun installing your thermal cabin and enjoy it for many years to come. Copyright HRB 3662 7 Technische Änderungen vorbehalten Warranty terms of weka Holzbau GmbH We guarantee the function of our products for 5 years from the date of delivery based on the following conditions – however only on the wooden parts of our products (hereinafter weka product) and not on connected components or parts of the weka product made of another material besides wood. Within the warranty period defective parts or missing parts of the product or the product itself will be replaced at our discretion. The warranty extends only to the free-of-charge replacement of the respective faulty or defective wooden part. The warranty does not cover any consequential or additional costs, in particular no delivery and installation or modification costs. The warranty is void in case of: - failure to follow the assembly instructions, changes (additions or modifications) made to the product diverging from the assembly instructions, load limits (e.g. snow load, etc.) having been exceeded, the weka product having been installed on an incorrect foundation or floor plate, etc., in particular in case of violation of the rules of architecture, lack of or insufficient care of the wood (maintenance measures such as preservation or painting of the wood), wind speeds stronger than force 7 (moderate gales), natural catastrophes or brute force having caused the damage to the weka product, the deficiency consisting in changes which are typical for wood, such as discoloration, formation of cracks, warping, shrinking, swelling or similar normal effects on the material "wood". Warranty claims must be accompanied by the original packing slip and the original sales receipt and must be submitted within the warranty period in writing or by fax or e-mail. A further prerequisite for a claim is the immediate notification of the defect or damage in the form of pictures and a written description of the defect. Address all warranty claims to: weka Holzbau GmbH, Johannesstraße 16, 17034 Neubrandenburg Fax: 0395/42908-83; E-mail: [email protected] Assembly conditions for a weka assembly team If you wish for help assembling your cabin and choose to employ a weka assembly team, weka Holzbau GmbH will carry out the following services for you: Assembly means putting together (installation) of the individual parts supplied. It does not include treating them with a wood protection agent, the delivery and assembly of accessories and accessory parts. Electrical connections are not included in the assembly service. The items to be assembled must be located at the installation site/location/base area. Transport of the article or the individual parts over a distance greater than 5 m or to another level is not included in the assembly price quoted. The substrate must be stable, horizontal and level. In the event of doubt, reference should be made to DIN 18202 ‘Level tolerances in building construction’, tab. 3, row 3, with a maximum height difference at the furthest points of approx. 10 to 11 mm. All preparatory work must have been carried out in accordance with the technical regulations before assembly begins. The substrates/floors/foundations constructed or selected by you must be suitable for the assembly. Copyright HRB 3662 8 Technische Änderungen vorbehalten - fr Chère cliente, cher client, Lisez attentivement la présente notice avant de procéder à l'assemblage de la cabine thermique à infrarouge afin d’éviter toute erreur de montage ou d’éventuels dommages. Contrôlez immédiatement à l’aide de la liste de colisage que la cabine vous est bien parvenue intacte et complète. Ne détruisez la liste de colisage qu'une fois la garantie écoulée. Cette liste vous permet de vérifier si les pièces détachées sont complètes et doit être conservée avec le justificatif d'achat. Elle vous permettra de faire valoir aisément d'éventuelles réclamations. Les numéros-repères de la liste de colisage ne correspondent pas à ceux de la notice ! Nous nous réservons le droit d'apporter aux produits des modifications liées au progrès technique, ce qui peut se traduire par de petites différences dans les représentations ou les descriptions. Emballage Ne jetez pas les matériaux d'emballage n'importe comment ! Les emballages en papier, en carton et en carton ondulé ainsi que les éléments d’emballage en plastique doivent être déposés dans les conteneurs prévus à cet effet. Le matériau bois Des nœuds sains, de légères décolorations et des petites fissures sont des signes caractéristiques du bois qui confèrent à la cabine un aspect naturel. Ils ne constituent pas un motif de réclamation. Préalablement au montage Pour mettre en place la cabine, vous devez disposer d’une hauteur de plafond minimum de 210 cm. Le sol doit être plat et parfaitement horizontal, sous peine dans le cas contraire de perturber le fonctionnement de la cabine. Nous vous recommandons d’effectuer le montage à deux. Pour prévenir les accidents, faites en sorte que les enfants ne se situent pas à proximité durant le montage. Prévoyez pour le montage un espace libre d’env. 60 cm autour de la cabine. Une fois le montage terminé, faites glisser la cabine jusqu’à son emplacement définitif, celui-ci devant respecter un écart d’au moins 5 cm par rapport au mur. Consignes d'utilisation et de sécurité Il n'existe pas de limite d'âge concernant l'utilisation de cette cabine à infrarouge. En principe, toutes les personnes en bonne santé peuvent s'en servir. En cas de problèmes de santé, il convient de demander l'avis d'un médecin avant toute utilisation. Consultez également votre médecin - en cas de grossesse - en cas de paralysie ou si vous souffrez d'hypertension artérielle et d'épilepsie - si vous avez des implants - en cas d'affections de la peau, de troubles de la sensibilité ou après des traitements cutanés - en cas de prise de médicaments N'utilisez pas la cabine à infrarouge - en cas de fièvre ou d'infections aiguës - en cas de thromboses, d'inflammations ou de plaies ouvertes - en cas de crises métaboliques - sous l'influence de l'alcool ou de la drogue Il est interdit aux enfants, aux personnes d'un certain âge, aux personnes insensibles à la chaleur et à celles souffrant d'un handicap de rester seuls dans la cabine à infrarouge. Avant de la faire chauffer, vérifiez qu'aucun de vos animaux ne s'y trouve. La cabine à infrarouge est exclusivement prévue pour l'utilisation de chaleur. Une utilisation non conforme (par ex. pour sécher du linge etc.) est formellement interdite. Du fait de l'apparition possible d'odeurs pouvant lors de la mise en service, il est recommandé de faire chauffer la cabine pendant au moins 1 heure puis de bien l'aérer avant la première utilisation. Copyright HRB 3662 9 Technische Änderungen vorbehalten Conformément à la norme VDE 0100, les travaux d’installation et de maintenance de la cabine thermique à commande électronique doivent être effectués exclusivement par un électricien. Une erreur de manipulation à une tension d’alimentation de 230 V est synonyme de danger de mort ! Si le câble de raccordement de cet appareil est endommagé, il doit être remplacé par le service clientèle de la société weka ou bien par un électricien agréé dans le respect des règlements en vigueur (VDE et EVU en Allemagne) afin d'éviter tout danger. Ne pas recouvrir les radiateurs et ouvertures de radiateurs – RISQUE D'INCENDIE ! ATTENTION ! Ne pas recouvrir les radiateurs, risque d'incendie ! Recommandations en vue de l'assemblage Pré-percez tous les assemblages vissés afin d'éviter d'endommager les éléments en bois ! Ceci vous est rappelé par le symbole suivant dans la notice : Battant de porte Les excentriques de positionnement, pos. 23, permettent d'ajuster simplement et à tout moment, même a posteriori, le panneau mobile de la porte vitrée. Pour cela, les parties intérieures des ferrures sont démontées et les excentriques tournés dans la direction désirée. Lors du montage des poignées de porte, bien veiller à ce que la pièce de préhension en métal soit positionnée sur le côté extérieur de la porte. Entretien Nous recommandons d'utiliser des serviettes de sauna pour s'asseoir dans la cabine afin d'éviter que la transpiration ne coule sur les éléments en bois. Aérez intégralement la cabine après chaque utilisation. Veillez aussi à bien aérer la pièce dans laquelle vous avez installé la cabine à infrarouge. Les surfaces de chauffage à l'intérieur de la cabine ne nécessitent pas d'entretien particulier. Elles ne doivent pas être recouvertes ou entrer en contact avec l’humidité. Vous pouvez éliminer les saletés les plus tenaces en frottant le bois avec du papier émeri. De faibles coulures de résine à la surface du bois sont inévitables. Les résidus de résine séchés peuvent être retirés à l'aide d'un papier émeri fin. N'utilisez aucune colle chimique à l'intérieur de la cabine, uniquement de la colle à bois. Fonctionnement Avant la première utilisation, nous vous recommandons de chauffer votre cabine, puis de bien l’aérer afin de laisser échapper d’éventuelles odeurs provenant des radiateurs. Le pupitre de commande, comprenant les régulateurs de temps et de température, se trouve en haut à gauche de la face avant de la cabine. Le temps de préchauffage est fonction de la température ambiante et varie entre 5 et 10 minutes. Profitez de ces quelques minutes pour prendre une bonne douche chaude. Celle-ci vous permettra ensuite d’avoir une transpiration plus abondante. N’oubliez pas cependant de bien vous sécher avant d’entrer dans la cabine. A l'issue du temps de préchauffage, la température de la cabine s'élève à env. 40 °C. La température maximale peut atteindre 80 °C. Dès que la température présélectionnée est atteinte, le thermostat arrête momentanément le radiateur. Les éléments de chauffe se remettent en marche lorsque la température baisse sous un certain niveau. Pour obtenir une transpiration optimale, il est conseillé de rester au minimum 20 minutes dans la cabine. La durée maximale dépend de votre condition physique. Après avoir quitté la cabine, nous vous recommandons un temps de pause de 5 à 10 minutes pour achever le processus de transpiration. Vous pouvez ensuite prendre une douche tiède. L'eau froide n'est en effet pas conseillée car elle peut provoquer des crispations après un réchauffement intense du corps. Copyright HRB 3662 10 Technische Änderungen vorbehalten Après avoir quitté la cabine, laissez la porte ouverte pour que celle-ci se refroidisse. Faites en sorte que la pièce soit toujours bien aérée. Si vous n’utilisez pas la cabine durant un temps prolongé, nous vous recommandons de laisser la porte ouverte. Caractéristiques techniques : - raccordement électrique : 230 volts ~ 50 Hz , I = 10 A, P = 2,3 kW temps de préchauffage : 5 minutes puissance absorbée minime : env. 1 à 2 kW par séance durée d’utilisation : env. 30 minutes Plage de température : 0 – 80 °C Durée : 0 – 60 min. (durée minimale 7,5 min.) Outils Pour le montage, nous vous recommandons de préparer les outils suivants. décamètre à ruban niveau à bulle clé pour vis à six pans creux visseuse électrique perceuse couteau universel marteau Tournevis crayon Abréviations / Symboles: FW - paroi avant cm mm ca. - centimètres millimètres environ / env. - Respecter la notice d'utilisation de la commande IR ! Nous vous souhaitons beaucoup de plaisir au montage et à l’usage de votre cabine thermique. Copyright HRB 3662 11 Technische Änderungen vorbehalten Conditions de garantie de la weka Holzbau GmbH Nous vous accordons, aux conditions qui suivent, 5 ans de garantie à compter de la date de livraison sur le bon fonctionnement des pièces en bois de nos produits exclusivement (désignés produits weka), à l’exclusion des pièces qui leur sont associées et à l’exclusion des composants du produit weka fabriqués en un matériau autre que le bois. Pendant la durée de la garantie, les pièces défectueuses, ou les pièces de la marchandise manquantes ou la marchandise elle-même seront remplacées suivant notre choix. L’étendue de la garantie se limite au remplacement gratuit de la pièce en bois défectueuse ou comportant un vice. Sont exclus de l’étendue de la garantie les coûts consécutifs ou supplémentaires et singulièrement les coûts de livraison, de montage ou de transformation. La garantie est exclue dans les cas suivants : - La notice de montage n’a pas été respectée, Le produit a été modifié (par des pièces rapportées ou des transformations) par rapport à ce qui est dit dans la notice de montage, Les limites de charge indiquées (par exemple le poids de la neige etc) ont été dépassées, Le produit weka a été monté sur des mauvaises fondations (dalle, plancher ou autre) et notamment en cas de non respect des règles de construction, L’entretien du bois a été négligé ou est insuffisant (entretien : protection du bois, peinture, etc.). Le vent de force supérieure à 7, les catastrophes naturelles ou des manifestations de violence ont endommagé le produit weka. Le défaut consiste en des modifications inhérentes à la nature du matériau « bois », comme par exemple les changements de couleur caractéristiques pour le bois, les fissures, le gauchissement, le rétrécissement, ou le gonflement ou autres. Le recours à la garantie ne peut se faire qu’avec le bordereau de colisage d’origine et le document d’achat d’origine pendant la période de garantie par écrit, par fax ou par courriel. Il est subordonné à la dénonciation immédiate du vice ou du défaut sous forme d’une description explicite du dommage par le texte et l’image. Le recours à la garantie sera adressé à : weka Holzbau GmbH, Johannesstrasse 16, 17034 Neubrandenburg Télécopie : 0395/42908-83; e-Mail : [email protected] Conditions de montage pour l'équipe de montage weka Si vous décidez de vous faire aider pour le montage et que vous faites appel à l'équipe de montage weka, weka Holzbau GmbH prendra en charge les éléments suivants à votre place : Le montage, ce qui signifie l'assemblage conforme aux instructions (montage) des pièces détachées livrées pour la marchandise sans application de produit, la livraison et le montage des accessoires. Les raccordements électriques ne sont pas compris dans les prestations de montage. La marchandise à installer doit se trouver sur le lieu de montage/d'implantation/de pose. Le transport de l'article ou des pièces détachées à une distance de plus de 5 m ou à un autre étage n'est pas compris dans le prix du montage. Le sous-sol doit être solide, horizontal et plan. En cas de doute sur la planéité, voir : DIN 18202 "Toleranzen im Hochbau" (Tolérances pour les constructions), tableau 3, ligne 3, avec une différence de hauteur maximale entre les points les plus éloignés de 10 à 11 mm. Tous les travaux préparatoires doivent avoir été faits avant le montage conformément aux règles de l'art. Les sous-sols/planchers/fondations réalisés par vous-même doivent être appropriés pour le montage. Copyright HRB 3662 12 Technische Änderungen vorbehalten - it Egregi clienti, si prega di leggere attentamente le presenti istruzioni per l'uso, prima di montare la cabina a raggi infrarossi, al fine di evitare errori di montaggio o danneggiamenti. Controllare subito con l'ausilio della lista di imballaggio che la cabina sia stata fornita completa e senza danni. Conservare la lista di imballaggio fino alla scadenza del periodo di garanzia. Questa lista serve per controllare la completezza della fornitura e deve essere conservata insieme allo scontrino. Con l'ausilio della lista è possibile risolvere eventuali reclami. I numeri delle posizioni della lista d’imballaggio non coincidono con quelli contenuti nelle istruzioni! Ci riserviamo di apportare ulteriori modifiche ai fini del progresso tecnologico. Per questo motivo non sono da escludere lievi deviazioni nelle rappresentazioni o descrizioni. Imballaggio Non gettate il materiale di imballaggio con i rifiuti comuni! La carta, il cartone normale e ondulato così come gli imballaggi in plastica devono essere smaltiti negli appositi contenitori di raccolta. Materiale legno Questo legno è caratterizzato da nodi sani, lievi scolorimenti e piccole incrinature, che donano alla cabina un aspetto naturale e che non costituiscono alcun motivo di reclamo. Prima del montaggio Per l'installazione della cabina è necessaria un'altezza dell’ambiente minima di 220 cm. Il pavimento deve essere piano e ben livellato; in caso contrario non sono da escludere anomalie di funzionamento. Raccomandiamo di eseguire le operazioni di montaggio sempre in due. Per la prevenzione di infortuni è necessario evitare la presenza di bambini nelle immediate vicinanze dei lavori di montaggio. Per il montaggio del corpo della cabina occorre disporre di una libertà di montaggio di circa 60 cm intorno alla cabina stessa. A montaggio eseguito, spostare la cabina nella posizione finale, dove la distanza dalla parete deve essere di almeno 5 cm. Avvertenze sull’uso e sulla sicurezza Per l’utilizzo di questa cabina a raggi infrarossi non ci sono limiti di età; in linea di principio può essere utilizzata da tutte le persone sane. Prima dell’utilizzo è necessario consultare un medico in caso di problemi di salute. Rivolgersi inoltre ad un medico - in caso di gravidanza - in caso di malattie, quali paralisi, epilessia, ipertensione - se si è stati sottoposti ad impianti - in caso di malattie cutanee, perdita di sensibilità oppure in seguito a trattamenti cutanei - in caso di assunzione di farmaci Non utilizzare la cabina a raggi infrarossi - in caso di febbre o infezioni acute - in presenza di trombosi, infiammazioni o ferite aperte - in caso di crisi metaboliche - sotto l’effetto di alcool o droghe. Bambini, anziani e persone sensibili al calore o diversamente abili non devono restare soli nella cabina a raggi infrarossi. Prima del riscaldamento controllare che non ci siano animali domestici in cabina. La cabina a raggi infrarossi è concepita esclusivamente per l’utilizzo del calore. È severamente proibito qualsiasi utilizzo non appropriato (ad es. per asciugare la biancheria, ecc.). Poiché in occasione della messa in esercizio può svilupparsi odore, prima del primo utilizzo la cabina deve essere riscaldata per 1 ora, poi ben areata. Copyright HRB 3662 13 Technische Änderungen vorbehalten Conformemente alla norma VDE 0100, gli interventi di installazione e di manutenzione sulla cabina termica con comando elettronico possono essere realizzati esclusivamente da elettricisti specializzati. Pericolo di morte in caso di contatto con la tensione di rete da 230 V! Se il cavo di collegamento dell'apparecchio viene danneggiato, deve essere sostituito dal servizio clienti Della ditta weka o da un elettricista autorizzato nell'osservanza delle direttive VDE e EVU per evitare rischi. I radiatori a raggi infrarossi e le relative aperture non devono essere coperti: PERICOLO DI INCENDIO! Suggerimenti per il montaggio Per evitare danni agli elementi in legno, si raccomanda di pre-forare tutti i punti di collegamento a vite! Il presente simbolo richiama l’attenzione su tale particolare nel corso delle istruzioni: Battente della porta Gli eccentrici di regolazione (pos. 23) consentono di regolare facilmente e in qualsiasi momento, anche a posteriori, l’anta della porta di vetro. A tale scopo le parti interne delle cerniere della porta vengono smontate e gli eccentrici ruotati nella direzione corrispondente. In fase di montaggio delle maniglie accertarsi che il pezzo in metallo della maniglia si trovi sul lato esterno della porta. Avvertenze per la manutenzione All’interno della cabina è consigliabile sedersi su asciugamani per saune, per evitare che il sudore si depositi sul legno. Dopo ogni utilizzo, ventilare opportunamente la cabina. Fare in modo che anche l'ambiente in cui si trova la cabina a raggi infrarossi sia ben ventilato. Le superfici riscaldanti presenti all'interno della cabina sono esenti da manutenzione. Non devono essere coperte o entrare in contatto con l'umidità. Lo sporco ostinato che agisce sul legno può essere rimosso con carta abrasiva. È comunque inevitabile un lieve efflusso di resina dalla superficie del legno. I residui di resina essiccata possono però essere eliminati con della carta abrasiva fine. Non utilizzare in nessun caso collanti chimici all'interno della cabina, bensì esclusivamente collanti per legno. Utilizzo Prima del primo utilizzo, riscaldare la cabina e successivamente ventilarla adeguatamente, affinché possa essere eliminato l'eventuale odore prodotto dai radiatori. In alto a sinistra sulla parete anteriore della cabina è presente il quadretto di comando con il temporizzatore e il termoregolatore. Il tempo di preriscaldamento dipende dalla temperatura ambiente e oscilla tra 5 e 10 minuti. Sfruttare questo intervallo di tempo per fare una doccia calda, che favorisce successivamente una sudorazione maggiore. Tuttavia subito prima del bagno di calore asciugarsi accuratamente. Al termine del tempo di preriscaldamento la temperatura della cabina è di circa 40 °C; è possibile raggiungere una temperatura massima di 80 °C. Non appena viene raggiunta la temperatura preimpostata, il termostato disattiva temporaneamente i radiatori. Al successivo abbassamento della temperatura gli elementi si attivano nuovamente. Il tempo minimo di una seduta nella cabina per una traspirazione ottimale è di 20 minuti. Il tempo massimo dipende dalla condizione corporea personale. Al termine della seduta consigliamo un tempo di post-sudorazione di 5-10 minuti. Quindi si può fare una doccia con acqua tiepida. L'acqua fredda dopo una fase di riscaldamento intensivo può determinare la comparsa di crampi. Copyright HRB 3662 14 Technische Änderungen vorbehalten Dopo l'utilizzo, lasciare raffreddare la cabina mantenendo aperta la porta. Fare in modo che l'ambiente in cui si trova la cabina sia sempre ben ventilato. In caso di mancato utilizzo prolungato, lasciare aperta la porta della cabina. Dati tecnici: - Allacciamento: 230 Volt ~ 50 Hz , I = 10 A, P = 2,3 kW Pronta operatività in 5 minuti Ridotto consumo di energia: circa 1-2 kW per utilizzo Durata d'utilizzo: circa 30 minuti Range temperatura: 0 – 80 °C Range tempo: 0 – 60 min (tempo di regolazione minimo 7,5 min) Utensili Prima di iniziare con il montaggio tenere a portata di mano i seguenti utensili. Livella ad acqua metro a nastro chiave a brugola avvitatore elettrico trapano coltello universale martello cacciavite Matita Abbreviazioni / Simboli: FW - parete frontale cm mm ca. - Centrimetri Millimetri circa / ca. - rispettare le istruzioni per l'uso del comando IR! Vi auguriamo buon divertimento durante il montaggio e un piacere prolungato negli anni con l'utilizzo della vostra cabina termica. Copyright HRB 3662 15 Technische Änderungen vorbehalten Condizioni di garanzia di weka Holzbau GmbH Concediamo alle seguenti condizioni – tuttavia soltanto sulle parti in legno dei nostri prodotti (qui di seguito designate prodotto weka), non sui componenti o gli elementi del prodotto weka a queste collegati – una garanzia di funzionalità di 5 anni dalla data di consegna. Per tutta la durata della garanzia sostituiamo, a nostra discrezione, le parti difettose o mancanti della merce o la merce stessa. La portata della garanzia comprende esclusivamente la sostituzione gratuita della parte in legno guasta o difettosa. La garanzia non copre invece i costi conseguenti o aggiuntivi, in particolare le spese di consegna, installazione e modifica. La garanzia è esclusa se: - non ci si è attenuti alle istruzioni per il montaggio, sono state apportate modifiche (aggiunte o cambiamenti) al prodotto rispetto alle istruzioni per il montaggio, sono stati superati i limiti di sollecitazione indicati (ad es. carico da neve ecc.), le fondazioni del prodotto weka sono state realizzate in maniera non corretta (fondamenta / piastra base o similare), in particolare se sono state violate le regole dell'architettura, il legno non è stato curato o è stato curato in misura insufficiente (manutenzione: protettivo o vernice per legno ecc.), velocità del vento superiori a forza 7, catastrofi naturali o azioni violente che hanno causato il danno al prodotto weka, il difetto consiste in alterazioni cromatiche, crepe, imbarcamenti, ritiri, rigonfiamenti o simili modificazioni che sono normali, in quanto legate alla natura del materiale „legno“. I diritti di garanzia possono essere fatti valere soltanto unitamente alla distinta di imballo originale e al giustificativo d'acquisto originale e devono essere rivendicati per iscritto oppure mediante fax o e-mail entro la durata della garanzia. Premessa per la rivendicazione è la tempestiva segnalazione del difetto o del danno sotto forma di rappresentazione ordinata dello stesso tramite testo e figure. Le richieste di garanzia devono essere rivolte a: weka Holzbau GmbH, Johannesstraße 16, 17034 Neubrandenburg Fax: 0395/42908-83; e-mail: [email protected] Condizioni di montaggio per weka – squadra di montaggio Se avete bisogno di aiuto per il montaggio e chiamate perciò una squadra di montaggio weka, weka Holzbau GmbH interverrà alle seguenti condizioni: Per montaggio si intende l’assemblaggio conforme alle istruzioni (installazione) dei singoli componenti forniti senza verniciatura, consegna e montaggio di accessori o parti di accessori. L’allacciamento elettrico non è compreso nel montaggio. I pezzi da montare devono trovarsi sul luogo/superficie/terreno di montaggio. Il trasporto dell’articolo o del componente singolo per oltre 5m all’aperto o su un altro piano non è incluso nel prezzo di montaggio. La base di appoggio deve essere stabile, orizzontale e piana. In caso di dubbio spianare il terreno in case a: DIN 18202 "Tolleranze di planarità nell'edilizia", tab.3, riga 3, con una differenza massima di livello tra i due punti più lontani da ca. 10 a 11mm. Tutti i lavori preparatori devono essere eseguiti allo stato dell’arte prima dell’inizio del montaggio. I sottofondi/pavimenti/le fondamenta che avete preparato o scelto devono essere idonei per il montaggio. Copyright HRB 3662 16 Technische Änderungen vorbehalten Pos Bild Abmessung [mm] Anzahl [Stück] 88/540/1895 1 88/540/1895 1 71/660/1895 1 52,5/850/1864 1 52,5/900/1864 1 58,5/974/974 1 86/8487848 1 3,2/848/848 1 B542.01.0009 FW1-540 B542.01.0010 FW2-540 B542.01.0011 T1-660 B542.01.0012 RW1-850 B542.01.0013 RW2-900 B542.02.0009 B542.02.0008 G542.01.0013 Copyright HRB 3662 17 Technische Änderungen vorbehalten Pos Bild Abmessung [mm] Anzahl [Stück] 58/475/1200 1 350 x820 1 60/842/360 1 3,2/74/1864 2 14/32/1864 2 30/30/640 2 18,5/18,5/850 1 18,5/18,5/832 1 B542.03.0001 B541.03.0002 B542.03.0002 G542.01.0021 G542.01.0022 G542.01.0016 G542.01.0017 G542.01.0018 Copyright HRB 3662 18 Technische Änderungen vorbehalten Pos Bild Abmessung [mm] Anzahl [Stück] 18,5/18,5/481 2 18,5/18,5/508 1 8/550/1895 1 G542.01.0019 G542.01.0020 K107.5518.0000 546.0106.10.00 1 10 m 1 2 2 2 Copyright HRB 3662 19 Technische Änderungen vorbehalten Pos Abmessung [mm] Bild Anzahl [Stück] 1 Copyright HRB 3662 20 5,0 x 80 3 4,5 x 70 15 6,0 x 60 6 4,0 x 60 10 3,5 x 35 40 3,0 x 30 16 3,5 x 25 10 Technische Änderungen vorbehalten Pos Bild Abmessung [mm] Anzahl [Stück] 3,5 x 15 28 1,6 x 30 40 40 x 90 1 350W 4 1 1 Copyright HRB 3662 21 3,9 x 25 4 Ø 12mm 4 Technische Änderungen vorbehalten Pos Abmessung [mm] Bild Anzahl [Stück] 1 1 1 1 Copyright HRB 3662 22 Technische Änderungen vorbehalten Copyright HRB 3662 23 Technische Änderungen vorbehalten Copyright HRB 3662 24 Technische Änderungen vorbehalten Copyright HRB 3662 25 Technische Änderungen vorbehalten Copyright HRB 3662 26 Technische Änderungen vorbehalten Copyright HRB 3662 27 Technische Änderungen vorbehalten Copyright HRB 3662 28 Technische Änderungen vorbehalten Copyright HRB 3662 29 Technische Änderungen vorbehalten Copyright HRB 3662 30 Technische Änderungen vorbehalten Copyright HRB 3662 31 Technische Änderungen vorbehalten Copyright HRB 3662 32 Technische Änderungen vorbehalten Copyright HRB 3662 33 Technische Änderungen vorbehalten Copyright HRB 3662 34 Technische Änderungen vorbehalten Copyright HRB 3662 35 Technische Änderungen vorbehalten Copyright HRB 3662 36 Technische Änderungen vorbehalten Copyright HRB 3662 37 Technische Änderungen vorbehalten - de - Netzanschluss 230VAC Steckdose Heizkreis 1 Eckstrahler, links Rückwandstrahler Heizkreis 2 Eckstrahler, rechts Beinstrahler Heizkreis 3 Dauerspannung 230VAC ( max.60W) - nicht belegt - nicht belegt - nicht belegt Licht Kabinenbeleuchtung Deckenelement Sicherheitskreis - nicht belegt ( optional ) Bussystem Bedienungseinheit - Folienfühler nicht belegt ( optional ) - Raumfühler nicht belegt Deckenelement, innen Copyright HRB 3662 38 Technische Änderungen vorbehalten - en - AC 230 V mains connection Socket Heating circuit 1 Corner spotlight, left Rear spotlight Heating circuit 2 Corner spotlight, right Floor spotlight Heating circuit 3 Continuous voltage AC 230 V (max. 60 W) - Not assigned - Not assigned - Not assigned Light Cabin illumination Ceiling element Safety circuit - Not assigned (optional) Bus system Control unit - Not assigned Film sensor Not assigned Room sensor Ceiling element, inner Copyright HRB 3662 39 Technische Änderungen vorbehalten - fr - Raccordement secteur 230 VAC Prise Circuit de chauffage 1 radiateur d'angle gauche radiateur dorsal Circuit de chauffage 2 radiateur d'angle droite radiateur inférieur Circuit de chauffage 3 Tension permanente 230 VAC (max. 60 W) - - Non affecté - Non affecté - Non affecté Lumière Éclairage de la cabine Élément de plafond Circuit de sécurité - Non affecté (en option) Système de bus Unité de commande - Capteur film Capteur pièce Copyright HRB 3662 - Non affecté - Non affecté Élément de plafond, intérieur 40 Technische Änderungen vorbehalten - it Collegamento di rete 230 V CA Presa Circuito di riscaldamento 1 riflettore d'angolo sinistra riflettore posteriore Circuito di riscaldamento 2 riflettore d'angolo destra riflettore inferiore Circuito di riscaldamento 3 Tensione continua 230 V CA (max. 600 W) - Non occupato - Non occupato - Non occupato Luce Illuminazione cabina Elemento soffitto Circuito di sicurezza - Sistema bus Unità di comando Sensore a membrana Sensore ambiente Copyright HRB 3662 Non occupato (opzionale) - Non occupato - Non occupato Elemento soffitto, interno 41 Technische Änderungen vorbehalten de Darstellung ohne Elektroteile en Representation without electrical parts fr schéma sans pièces électriques it Rappresentazione senza parti elettriche Copyright HRB 3662 42 Technische Änderungen vorbehalten Copyright HRB 3662 43 Technische Änderungen vorbehalten Copyright HRB 3662 44 Technische Änderungen vorbehalten Copyright HRB 3662 45 Technische Änderungen vorbehalten Copyright HRB 3662 46 Technische Änderungen vorbehalten weka Holzbau GmbH, Johannesstr. 16 D-17034 Neubrandenburg Tel. : +49 (0)395 42908-0 Fax : +49 (0)395 42908-83 MA Art.-Nr.: 800.0286.22.21 T2-20.34 Copyright HRB 3662 47 Technische Änderungen vorbehalten