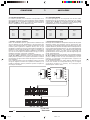
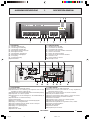
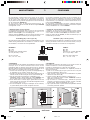
1
SERIE SERIES AX8000 AX8120 AX8240 Amplificatori Amplifiers Amplificateurs ISTRUZIONI PER LUSO INSTRUCTIONS FOR USE MANUEL DUTILISATION SOMMARIO 1. Descrizione generale 1.1 Pannello frontale ................................ 3 1.2 Pannello posteriore ............................ 3 TABLE OF CONTENTS 1. General description 1.1 Front panel ........................................ 3 1.2 Rear panel ......................................... 3 SOMMAIRE 1. Description générale 1.1 Panneau avant ................................. 19 1.2 Panneau arriêre ................................ 19 2. 2.1 2.2 2.3 2. 2.1 2.2 2.3 2. 2.1 2.2 2.3 Avvertenze generali Installazione ....................................... 4 Alimentazione e messa a terra ............ 4 Note di sicurezza ................................ 4 General warnings Installation ......................................... 4 Power supply and earthing ................. 4 Safety notes ...................................... 4 Précautions générales Installation ....................................... 20 Alimentation et mise à la terre ........... 20 Conseils de securitè .......................... 20 3. Connessioni 3.1 Criteri generali ................................... 5 3.2 Ingressi microfonici ............................. 5 - Microfoni dinamici ............................. 5 - Microfoni a condensatore elettrete .. 5 - Trasformatore microfonico ................ 6 3.3 Ingressi ausiliari ................................. 7 3.4 Ingresso base amplificata ................... 8 - Precedenza base amplificata ............ 8 - Precedenza automatica .................... 8 3.5 Precedenza microfonica con priorità scalare ............................. 8 3.6 Ingresso emergenza/telefono ............ 9 3.7 Uscite di segnale ................................ 9 3.8 Uscite di potenza .............................. 10 - Sistemi a tensione costante ............ 10 - Calcolo del numero di diffusori (tramite le potenze) ........................ 11 - Calcolo del numero di diffusori (tramite le impedenze) .................... 11 3.9 Presa equalizzatore .......................... 11 3.10 Filtro selezione voce ......................... 12 3.11 Moduli accessori ............................... 12 - Scheda din-don .............................. 12 - Scheda allarme .............................. 13 - Scheda di controllo volume a distanza .. 13 3.12 Moduli .............................................. 14 3. Connections 3.1 General features ................................ 5 3.2 Microphone inputs .............................. 5 - Dynamic microphones ....................... 5 - Microphones with electret capacitor . 5 - Microphone transformer ................... 6 3.3 Auxiliary inputs .................................. 7 3.4 Amplified stand input .......................... 8 - Amplified stand precedence ............. 8 - Automatic precedence ...................... 8 3.5 Microphone precedence with various priorities ......................... 8 3.6 Emergency/Telephone input ............... 9 3.7 Signal outputs .................................... 9 3.8 Power outputs .................................. 10 - Low-impedance system .................. 10 - Determining the number of speakers (through power values) .... 11 - Determining the number of speakers (through impedance values) ........... 11 3.9 Equalizer socket ................................ 11 3.10 Voice selection filter .......................... 12 3.11 Optional modules .............................. 12 - Chime module ................................. 12 - Alarm board ................................... 13 - Remote volume control board ......... 13 3.12 Modules ........................................... 14 3. Connexions 3.1 Criteres generaux ............................. 21 3.2 Entrées microphoniques .................... 21 - Microphones dynamiques ................ 21 - Microphones à condensateur électrète 22 - Transformateur microphonique ........ 22 3.3 Entrées auxiliaires ............................. 23 3.4 Entrée base amplifiée ........................ 24 - Priorité base amplifiée ..................... 24 - Priorité automatique ....................... 24 3.5 Priorité microphonique avec priorité graduelle ...................... 24 3.6 Entrée secours/téléphone ................. 25 3.7 Sorties de signal ............................... 25 3.8 Sorties de puissance ......................... 26 - Systèmes à tension constante ......... 26 - Calcul du nombre de diffuseurs (par les puissances) ........................ 27 - Calcul du nombre de diffuseurs (par les impedances) ....................... 27 3.9 Prise égalisateur ............................... 27 3.10 Filtre selectif voix .............................. 28 3.11 Modules accessoires ......................... 28 - Fiche ding-dong .............................. 28 - Fiche dalarme ................................ 29 - Fiche de contrôle du volume à distance 29 3.12 Modules ............................................ 30 4. 4.1 4.2 4.3 Uso dellapparecchio Accensione ....................................... 15 Controllo di volume principale ........... 15 Correzione acustica .......................... 15 - Controllo toni bassi ......................... 15 - Controllo toni acuti ......................... 15 4.4 Condizioni di sovraccarico e protezione ..................................... 15 4.5 Regolazione dellapparecchio ............ 16 4. 4.1 4.2 4.3 4. 4.1 4.2 4.3 5. Caratteristiche tecniche ........... 17 5. Technical specifications ............ 17 5. Caractéristiques techniques ...... 33 6. Lista delle parti di ricambio ....... 18 6. List of spare parts ...................... 18 SERIE AX8000 6. Liste des pièces détachées ........ 34 1 11-528.p65 1 Operation Power on ......................................... 15 Master volume control ...................... 15 Acoustic adjustment ......................... 15 - Bass control ................................... 15 - Treble control ................................. 15 4.4 Overload and protection conditions ........................ 15 4.5 Equipment adjustments .................... 16 Utilisation de lappareil Mise en marche ................................. 31 Contrôle de volume principal .............. 31 Correction acoustique ....................... 31 - Contrôle tonalité basses ................. 31 - Contrôle tonalité aigues .................. 31 4.4 Conditions de surcharge et protection .................................... 31 4.5 Reglage de l'appareil ......................... 32 08/06/01, 14.20 SERIE SERIES AX8000 AX8120 AX8240 Verstärker Versterker Amplificadores GEBRAUCHSANLEITUNG GEBRUIKSAANWIJZING INSTRUCCIONES DE EMPLEO INHALTSANGABE 1. Allgemeine Beschreibung 1.1 Frontplatte ....................................... 19 1.2 Rückpaneel ....................................... 19 INHOUD 1. Algemene beschrijving 1.1 Voorpaneel ....................................... 35 1.2 Achterpaneel .................................... 35 SUMARIO 1. Descripción general 1.1 Panel delantero ................................ 35 1.2 Panel trasero .................................... 35 2. 2.1 2.2 2.3 2. 2.1 2.2 2.3 2. 2.1 2.2 2.3 Allgemeine Hinweise Installation ....................................... 20 Stromversorgung und Erdung ............ 20 Sicherheitsanweisungen .................... 20 Algemene aanwijzingen Installatie ......................................... 36 Stroomvoerziening en aarding ........... 36 Opmerkingen over de veiligheid ......... 36 Advertencias generales Instalación ........................................ 36 Alimentación y puesta a tierra ........... 36 Notas para la seguridad .................... 36 3. Anschlüsse 3.1 Allgemeine Hinweise .......................... 21 3.2 Mikrophoneingänge ........................... 21 - Dynamische Mikrophone .................. 21 - Mikrophone mit Elektretkondensator 22 - Mikrophonübertrager ...................... 22 3.3 Hilfseingänge .................................... 23 3.4 Eingang Verstärkerbasis .................... 24 - Vorrang Verstärkerbasis .................. 24 - Automatischer Vorrang .................... 24 3.5 Mikrophonvorrang mit gestaffelter Priorität .................... 24 3.6 Eingang Notruf/Telefon ..................... 25 3.7 Signalausgänge ................................ 25 3.8 Leistungausgänge ............................. 26 - Konstantspannungssystem ............. 26 - Berechnung der lautsprecheranzahl (durch die leistungen) ..................... 27 - Berechnung der lautsprecheranzahl (durch die impedanzen) ................... 27 3.9 Buchse Entzerrer .............................. 27 3.10 Sprachselektionsfilter ........................ 28 3.11 Zubehörmodule ................................. 28 - Gong-Karte .................................... 28 - Alarmkarte ..................................... 29 - Karte für die Lautstärkeregelung aus der Ferne .. 29 3.12 Module ............................................. 30 3. Aansluitingen 3.1 Algemene criteria .............................. 37 3.2 Microfooningangen ........................... 37 - Dynamische microfoons ................... 37 - Microfoons met elektreet condensator . 38 - Microfoontransformator .................. 38 3.3 Hulpingangen ................................... 39 3.4 Basisversterkeringang ....................... 40 - Voorrang versterkte basis ............... 40 - Automatische prioriteit .................... 40 3.5 Voorrang van microfoo met scalaire prioriteit ......................... 40 3.6 Ingang noodgevallen/telefoon .......... 41 3.7 Signaaluitgangen .............................. 41 3.8 Vermogensuitgangen ......................... 42 - Gelijkspanningssystemen ................ 42 - Berekening van het aantal klankverspreiders (via de kracht) ..... 43 - Berekening van het aantal klankverspreiders (via de impedanties) 43 3.9 Stopcontact equalizer ....................... 43 3.10 Woordselectiefilter ............................ 44 3.11 Hulpsmodulen ................................... 44 - Ding-dong kaart .............................. 44 - Slow whoop print ............................ 45 - Kaart volumeafstandsregeling ................. 45 3.12 Modules ........................................... 46 3. Conexiones 3.1 Criterios generales ............................ 37 3.2 Entradas microfónicas ....................... 37 - Micrófonos dinámicos ...................... 37 - Micrófonos de condensador electreto .. 38 - Transformador microfónico .............. 38 3.3 Entradas auxiliares ........................... 39 3.4 Entrada base amplificada .................. 40 - Precedencia base amplificada .......... 40 - Precedencia automática .................. 40 3.5 Precedencia microfónica con prioridad escalar ......................... 40 3.6 Entrada emergencia/teléfono ............ 41 3.7 Salidas de señal ................................ 41 3.8 Salidas de potencia ........................... 42 - Sistemas de ténsion constante ........ 42 - Cálculo del número de difusores (mediante las potencias) ................. 43 - Cálculo del número de difusores (mediante las impedancias) .............. 43 3.9 Toma ecualizador .............................. 43 3.10 Filtro selectivo palabra ...................... 44 3.11 Módulos accessorios ......................... 44 - Tarjeta din-don ............................... 44 - Ficha alarma ................................... 45 - Tarjeta para el control del volumen a distancia ................. 45 3.12 Módulos ........................................... 46 4. 4.1 4.2 4.3 Gebraüch des gerates Einschalten ....................................... 31 Steuerung der Hauptlautstärke ......... 31 Tonkorrektur ..................................... 31 - Tiefenkontrolle ............................... 31 - Kontrolle hohe töne ........................ 31 4.4 Überlastung und Schutz .................... 31 4.5 Geréteinstellen ................................. 32 4. 4.1 4.2 4.3 Gebruik van het apparaat Aanzetten ........................................ 47 Hoofdvolumeregeling ........................ 47 Akoestiche correctie ......................... 47 - Regeling lage tonen ........................ 47 - Regeling hoge tonen ....................... 47 4.4 Overbelasting en beveiligingen ......... 47 4.5 Apparaatinstellingen ......................... 48 4. 4.1 4.2 4.3 5. Technische Eigenschaften .......... 33 5. Technische kenmerken .............. 49 5. Características técnicas ............. 49 6. Ersatzteilliste .............................. 34 2 6. List vervangingsonderdelen ...... 50 SERIE AX8000 6. Partes de recambio .................... 50 11-528.p65 2 Uso del aparato Encendido ........................................ 47 Control de volumen principal .............. 47 Corrección acustica ........................... 47 - Control tonos bajos ........................ 47 - Control tonos agudos ..................... 47 4.4 Sobrecarga y protecciones ............... 47 4.5 Regulación del aparato ..................... 48 08/06/01, 14.20 DESCRIZIONE GENERALE 1.1 [1] [2] [3] [4] [5] [6] [7] [8] [9] [10] 1 PANNELLO FRONTALE Indicatore del livello duscita. Spia luminosa di sovraccarico. Spia daccensione. Controlli di livello degli ingressi microfonici. Controllo di livello modulo. Selettore ingressi ausiliari. Controllo di livello ingressi ausiliari. Controlli di tono. Controllo principale di volume. Interruttore di rete. GENERAL DESCRIPTION 1.1 [1] [2] [3] [4] [5] [6] [7] [8] [9] [10] 1.2 PANNELLO POSTERIORE [11] Spina di rete con fusibile incorporato. [12] Morsettiera per connessione diffusori a bassa impedenza ed alimentazione esterna 24 Vcc. [13] Morsettiera per connessione diffusori a tensione costante. [14] Presa per equalizzatore esterno. [15] Morsettiera per attivazione segnale dallarme e controllo livello remoto. [16] Morsettiera per precedenza microfonica. [17] Ingressi microfonici. [18] Controlli di livello e di tono del segnale di preavviso. [19] Uscita per unità di potenza. [20] Ingresso base amplificata con regolazione di livello e soglia. [21] Ingresso emergenza/telefono. [22] Uscita per registratore. [23] Ingressi ausiliari. [24] Vano per modulo. FRONT PANEL Output level indicator. Overload signalling lamp. Power signalling lamp. Microphone inputs level controls. Module level control. Auxiliary inputs selector switch. Auxiliary inputs level control. Tone controls. Main volume control. Mains switch. 1.2 REAR PANEL [11] Mains plug with built-in fuse. [12] Terminal strip for connecting low-impedance loudspeakers and an external 24 VDC power supply unit. [13] Terminal strip for connecting constant voltage loudspeakers. [14] Socket for an external equaliser. [15] Terminal strip for activating an alarm signal and remote level control. [16] Terminal strip for microphone precedence. [17] Microphone inputs. [18] Warning signal tone and level controls. [19] Output for power unit. [20] Amplified base input with level and threshold control. [21] Emergency/telephone input. [22] Recorder output. [23] Auxiliary inputs. [24] Module compartment. SERIE AX8000 11-528.p65 3 3 08/06/01, 14.20 AVVERTENZE GENERALI 2 GENERAL WARNINGS 2.1 INSTALLAZIONE Tutti gli apparecchi PASO sono costruiti nel rispetto delle più severe normative internazionali di sicurezza ed in ottemperanza ai requisiti della Comunità Europea. Per un corretto ed efficace uso dellapparecchio è importante prendere conoscenza di tutte le caratteristiche leggendo attentamente le presenti istruzioni ed in particolare le note di sicurezza. Durante il funzionamento dellapparecchio è necessario assicurare unadeguata ventilazione. Evitare di racchiudere lapparecchio in un mobile privo di aerazione o di ostruire le fessure di ventilazione appoggiando oggetti od accessori sulla parte superiore. Evitare inoltre di tenere lapparecchio in prossimità di sorgenti di calore. Questo apparecchio è predisposto per il montaggio in mobile rack standard 19; allo scopo sono fornite a corredo quattro viti e quattro rondelle per il relativo fissaggio. Sono forniti, inoltre, quattro piedini in gomma autodesivi che devono essere applicati sul fondo dellapparecchio, in corrispondenza delle apposite cave, nel caso che questultimo non sia installato in un mobile rack. 2.1 INSTALLATION Each PASO apparatus is manufactured complying with the strictest international safety standards and in accordance with European Community requirements. In order to use the equipment correctly and efficiently, it is important to be aware of all its characteristics by reading these instructions, and in particular the safety notes, carefully. Adequate ventilation must be provided while the apparatus is in use. Avoid closing the apparatus inside a cabinet without ventilation or obstructing the ventilation slits by placing objects or accessories on top of it. Also keep the apparatus at a distance from sources of heat. This equipment is designed for mounting in a standard 19 rack. For this purpose it is supplied with four screws and four washers for securing it in place. In addition, four small self-adhesive rubber feet are provided for application to the bottom of the equipment, where special recesses are to be found, if the equipment is not installed in a rack. 2.2 ALIMENTAZIONE E MESSA A TERRA Lapparecchio è predisposto per il funzionamento con tensione di rete a 230 V ± 10% 50/60 Hz (117 V ± 10% 50/60 Hz per le versioni .../117). E prevista, in alternativa, la possibilità di alimentare lapparecchio con una tensione continua esterna di +24V. Tipicamente questa tensione proviene da accumulatori mantenuti sotto carica in tampone ed entra in funzione soltanto in caso di emergenza. In figura 2.2.1 sono riportati i grafici che evidenziano potenza di uscita (con THD=1%), potenza assorbita e corrente assorbita in funzione della tensione di alimentazione in continua. In accordo con le normative di sicurezza, linterruttore di accensione [10] agisce solo sulla tensione di rete. Lapparecchio é corredato di cavo di alimentazione con filo di terra ed il relativo terminale sulla spina di rete non deve essere rimosso in alcun caso. Assicurarsi che la presa di corrente sia dotata di collegamento di terra a norma di legge. 2.2 POWER SUPPLY AND EARTHING The apparatus is designed for operation with a mains power supply of 230 V ± 10% 50/60 Hz (117 V ± 10% 50/60 Hz for the .../117 versions). As an alternative, it is possible to supply the apparatus with an external continuous voltage of +24V. Typically, this voltage is provided by accumulators under floating charge, and is only applied in case of an emergency. Figure 2.2.1 shows diagrams with output power (THD=1%) power and current consumption according to the DC power supply. In accordance with the safety standards, the power supply switch [10] only switches the mains voltage. The apparatus is supplied with a power cord equipped with earthing wire and the relevant terminal on the mains plug should never be removed for any reason whatsoever. Make sure that the power outlet is equipped with an earthing connection in accordance with legal requirements. AX8240 AX8120 Fig. 2.2.1 2.3 NOTE DI SICUREZZA La rimozione del coperchio dell'apparecchio presenta il rischio di scosse elettriche. Ogni intervento all'interno dell'apparecchio, quale l'applicazione di accessori interni, deve essere eseguito da personale specializzato. All'interno non esistono regolazioni per l'utente. Prima della sostituzione dei flessibili accertarsi di avere staccato il cavo di rete. La sostituzione deve essere effettuata con fusibili dello stesso tipo e valore. Non rimuovere mai il conduttore di terra dal cavo di rete. Prima di applicare accessori all'apparecchio accertarsi che il cavo di rete sia staccato. Ad evitare il pericolo di scosse elettriche o guasti, non introdurre oggetti specialmente se metallici, attraverso i fori di aerazione. Nel caso di accidentale caduta di liquidi sull'apparecchio, staccare immediatamente la spina di rete ed interpellare il centro di assistenza PASO più vicino. SERIE AX8000 4 11-528.p65 2.3 SAFETY NOTES Do not remove the unit cover: danger of high voltage. Maintenance within the unit, such as the installation of internal accessories, should be performed by qualified personnel. There are no user adjustable parts within the unit. Before changing fuses, make sure that the mains cable is disconnected. Replacement fuses should be of the same type and rating. Never remove the ground wire from the mains cable. Before installing options within the unit, make sure that the mains cable is disconnected. To avoid high voltage risks and failures, do not introduce objects, especially metal ones, through ventilation slots. If liquids are accidentally spilled on the unit, disconnect the power supply immediately and call the nearest PASO service center. 4 08/06/01, 14.20 CONNESSIONI 3 CONNECTIONS 3.1 CRITERI GENERALI Per un corretto funzionamento dell'apparecchio è opportuno osservare alcuni criteri di massima nell'esecuzione dei collegamenti: - evitare il posizionamento di cavi e di microfoni sul mobile dell'apparecchio; - evitare di stendere le linee di segnale parallele a quelle di rete; - osservare una distanza minima di 30/40 cm; - posizionare le linee di ingresso e le linee di uscita distanti tra loro; - posizionare i microfoni al di fuori dell'angolo di radiazione dei diffusori sonori per evitare il fenomeno di reazione acustica (effetto Larsen). 3.1 GENERAL FEATURES For proper unit operation, use the following instructions when making the connections: - Do not place cables or microphones on the unit cabinet; - Do not lay signal lines parallel to power lines; - Ensure a minimum distance of 30/40 cm between them; - Keep input lines and the output lines far apart; - Keep the microphones outside the operating span of the speakers to avoid acoustic feedback (Larsen effect). ATTENZIONE L'installazione di accessori all'interno dell'apparecchio e la selezione di alcuni controlli di tipo impiantistico, richiede la rimozione del coperchio. Questo tipo di operazione deve essere effettuata solo da personale specializzato: la rimozione del coperchio rende accessibili parti con rischio di scosse elettriche. Prima di rimuovere il coperchio accertarsi sempre che il cavo di rete sia staccato. WARNING To install options within the unit and to select some system controls, the cover must be removed. This operation should only be performed by qualified service personnel as it poses the risk of electric shock. Before removing the cover, ensure that mains cable is disconnected. 3.2 INGRESSI MICROFONICI Sono previsti quattro ingressi [17] separati ed indipendenti per microfoni dinamici a bassa impedenza oppure a condensatore elettrete con alimentazione phantom a 12V dotati di spina CANNON femmina (tipo XLR 3-12 C). Tutti gli ingressi sono bilanciati elettronicamente per ottenere una elevata reiezione dei disturbi di modo comune raccolti dai cavi di collegamento dei microfoni sopratutto nei collegamenti a lunga distanza (p. es. ronzio). Nel caso di particolari situazioni di impianto, nelle quali sia richiesto l'isolamento galvanico fra sorgente ed amplificatore, è prevista la possibilità di inserire un trasformatore bilanciato. 3.2 MICROPHONE INPUTS Four separate and independent inputs [17] are available for dynamic low-impedance microphones or with electret-capacitor with phantom 12V power supply provided with CANNON female plug (XLR 3-12 C type). All inputs are electronically balanced to ensure high reduction of noise which is picked up during common operation by the connection cables of the microphones, especially in long distance connections (e.g.hum). For special systems requiring galvanic isolation between source and amplifier, a balanced transformer may be installed. Microfoni dinamici L'apparecchio prevede l'uso di microfoni a bassa impedenza con collegamento di tipo bilanciato. Le connessioni alla presa, vista dall'esterno, sono illustrate in figura 3.2.1. Tutti i microfoni dinamici PASO sono di tipo bilanciato, con spina CANNON femmina tipo XLR 3-12 C. Dynamic microphones This unit uses dynamic, low-impedance microphones with balanced connection. Connections to the socket are shown on Fig. 3.2.1 (from outside). All PASO dynamic microphones are of the balanced type with CANNON female plug type XLR 3-12 C. 1 = Schermo 2 = Segnale (lato caldo) 3 = Segnale (lato freddo) 1 = Shield 2 = Signal (warm side) 3 = Signal (cold side) Fig. 3.2.1 SERIE AX8000 11-528.p65 5 5 08/06/01, 14.20 CONNESSIONI CONNECTIONS 3 Microfoni a condensatore elettrete L'apparecchio è predisposto per ricevere segnali da microfoni a condensatore elettrete, fornendo loro l'alimentazione phantom necessaria al funzionamento. Per poter disporre di tale alimentazione, è necessario modificare i ponticelli mobili CN306 (mic. 1), CN307 (mic. 2), CN308 (mic.3) e CN309 (mic.4) sul circuito microfonico secondo le modalità indicate in figura 3.2.2. Microphones with electret capacitor This unit is designed to receive signals from microphones with electret capacitor and supply them with the phantom power supply required for operation. In order to have this power available, it is necessary to change the set-up jumpers CN306 (microphone 1), CN307 (microphone 2), CN308 (microphone 3) and CN309 (microphone 4) on the microphone circuit in the way shown on Fig. 3.2.2. Posizione A = Alimentazione Phantom disinserita Posizione B = Alimentazione Phantom inserita Position A = Phantom power supply OFF Position B = Phantom power supply ON Fig. 3.2.2 In figura 3.2.3 sono riportate le connessioni alla presa, vista dall'esterno. Figure 3.2.3 shows the connections to the socket as seen from the outside. 1 = Schermo e polo negativo della tensione di alimentazione. 2 = Segnale (lato caldo) e polo positivo della tensione di alimentazione. 3 = Segnale (lato freddo) e polo positivo della tensione di alimentazione. 1 = Shield and power supply negative pole 2 = Signal (warm side) and power supply positive pole 3 = Signal (cold side) and power supply positive pole Fig. 3.2.3 Trasformatore microfonico In alcuni casi può essere necessario effettuare un collegamento microfonico con isolamento galvanico tra sorgente ed amplificatore. In questi casi è necessario inserire la scheda con trasformatore microfonico TM90 nei connettori CN301 (mic. 1), CN302 (mic. 2), CN303 (mic. 3), CN304 (mic. 4) posti sul circuito ingressi microfonici, dopo aver rimosso i ponticelli mobili. SERIE AX8000 6 11-528.p65 Microphone transformer In some cases it may be necessary to make a microphone connection with galvanic isolation between source and amplifier. In this case, the board with a TM90 microphone transformer should be plugged in the CN301 (microphone 1), CN302 (microphone 2), CN303 (microphone 3) and CN304 (microphone 4) connectors on the microphone input circuit, after removing the set-up jumpers. 6 08/06/01, 14.20 CONNESSIONI 3 In figura 3.2.4 sono evidenziate le posizioni dei connettori all'interno dell'amplificatore. CONNECTIONS Figure 3.2.4 shows where connectors are placed within the amplifier. Fig. 3.2.4 3.3 INGRESSI AUSILIARI Per il collegamento dell'amplificatore a sorgenti musicali sono disponibili tre prese ausiliare [23]. La presa ausiliaria TUNER consente la connessione all'amplificatore di un sintonizzatore o di altra sorgente ausiliaria con equivalente livello di segnale. La presa ausiliaria CD consente la connessione di un lettore di compact disc all'amplificatore. Per il collegamento di un registratore si utilizzano le prese RCA IN/OUT [23]. La presa RCA TAPE OUT [22] fornisce un segnale di uscita costituito dalla miscelazione di tutti gli ingressi audio. 3.3 AUXILIARY INPUTS For the connection of the amplifier to music sources, three auxiliary sockets are available [23]. The auxiliary TUNER socket makes is possible to connect the amplifier to a tuner or another auxiliary source having the same signal level. The auxiliary CD socket allows for connection of a CD player to the amplifier. For the connection of a recorder the RCA IN/OUT sockets should be used [23]. An output signal, originating from the mixing of all the audio inputs is supplied by the RCA TAPE OUT socket [22]. 1 = Segnale 2 = Schermo e ritorno 1 = Signal 2 = Shield and return Fig. 3.3.1 SERIE AX8000 11-528.p65 7 7 08/06/01, 14.20 CONNESSIONI 3 3.4 INGRESSO BASE AMPLIFICATA La presa DIN pentapolare BASE [20] permette il collegamento dell'amplificatore alle basi preamplificate PASO Serie B600/B500, fino ad un massimo di sei. In figura 3.4.1 si evidenziano i collegamenti della presa, vista dall'esterno, con i relativi segnali ed alimentazioni. Il livello del segnale inviato alla presa BASE può essere regolato dal potenziometro LEVEL. Questa presa è utilizzabile anche per altri impieghi: ingresso di bassa frequenza aggiuntivo, con sensibilità 200 mV, soggetto ad attenuazione di precedenza dal solo ingresso emergenza/ telefono [21] ed eventualmente utilizzabile per la generazione di precendenza automatica. alimentazione di dispositivo esterno tramite la tensione stabilizzata 12 Vcc; l'erogazione massima di corrente è pari a 200 mA medi con picchi massimi di 1 A. 1 2 3 4 5 CONNECTIONS 3.4 AMPLIFIED STAND INPUT The BASE five-pin DIN socket [20] is designed to connect the amplifier to up to six preamplified PASO B600/B500 Series stands. Figure 3.4.1 shows socket connections as seen from the outside, with pertaining signals and power supplies. The level of the signal sent to the BASE socket may be adjusted through the LEVEL potentiometer. This socket may also be used in the following ways: Additional low-frequency input, with a sensitivity of 200 mV, subject to attenuation due to precedence of the emergency/telephone input only [21] and which can be used, if required, to generate automatic precedence. power supply of an external device by stabilized 12 Vdc voltage; maximum current output is 200 mA (average) with maximum peaks of 1 A. = Precedenza = Schermo e ritorno del segnale dingresso = Segnale dingresso = Alimentazione +12Vcc stabilizzati = Massa alimentazione 1 2 3 4 5 = Precedence = Shield and input signal return = Input signal = Stabilized +12Vcc power supply = Power ground Fig. 3.4.1 Precedenza base amplificata Amplified stand precedence Premendo il tasto di chiamata sulla base collegata al relativo ingresso When the call push-button on the base connected to the pertaining dell'amplificatore [20], si attiva il segnale di precedenza che attenua amplifier input [20] is pressed, this triggers the precedence signal which automaticamente gli ingressi ausiliari delle prese TAPE, CD e TUNER. automatically attenuated the auxiliary inputs of the TAPE, CD and TUNER sockets. In this way, a message can be sent by the microphone base E'così possibile inviare un messaggio dalla base microfonica senza without any music signal overlay. sovrapposizione di segnale musicale. Precedenza automatica Un circuito elettronico rivela la presenza di segnale all'ingresso BASE [20] e attiva automaticamente la precedenza per permettere la diffusione di un messaggio da questo ingresso. Il livello di segnale necessario all'attivazione della precedenza automatica può essere regolato tramite il controllo A.P.T. (Automatic Precedence Threshold), accessibile dal pannello posteriore. La regolazione è necessaria al fine di evitare l'attivazione della precedenza automatica per effetto di eventuali rumori di fondo raccolti dal microfono. Automatic precedence An electronic circuit detects the presence of the signal on the BASE input [20] and automatically controls the precedence for the emission of a message from this input. The signal level required to activate the automatic precedence may be adjusted through the A.P.T. (Automatic Precedence Threshold) control, which can be accessed from the rear panel. This adjustment is required to avoid the activation of the automatic precedence due to background noise picked up by the microphone. 3.5 PRECEDENZA MICROFONICA CON PRIORITÀ SCALARE Per attivare la precedenza microfonica si utilizza la morsettiera MICROPHONE PRECEDENCE [16]. I prodotti PASO che utilizzano questa funzione sono il microfono ad impugnatura M906 e le basi microfoniche B501-M/B601 (B501) che possiedono, oltre alla spina CANNON, due capicorda da collegare alla morsettiera. Per realizzare la connessione, inserire la spina microfonica nell'ingresso desiderato, collegare il capocorda con il filo bianco ad uno dei due morsetti contrassegnato dalla lettera +C (comune) e quello con il filo verde al morsetto corrispondente al livello di priorità prescelto. Sono disponibili quattro morsetti corrispondenti ad altrettanti livelli di priorità. La tabella 3.5.1 descrive i livelli di priorità. 3.5 MICROPHONE PRECEDENCE WITH VARIOUS PRIORITIES The MICROPHONE PRECEDENCE terminal board [16] is used to activate the microphone precedence. PASO products using this feature are the M906-C hand-held microphone and the B501-M/B601 (B501) microphone stand units which are provided with a CANNON plug as well as two spade terminals for connection to the terminal board. To make the connection, connect the microphone plug to the input required, connect the spade terminal with the white wire to one of the two terminals marked with +C (common) and that with the green wire to the terminal corresponding to the chosen priority level. Four terminals are available which correspond to as many priority levels. Table 3.5.1 contains priority levels. Morsetto di precedenza Ingressi attenuati dallattivazione della precedenza Precedence terminal Inputs attenuated by precedence activation I Microfoni 2, 3, 4 e tutti gli ingressi ausiliari I Microphones 2, 3, 4 and all auxiliary inputs II Microfoni 3, 4 e tutti gli ingressi ausiliari II Microphones 3, 4 and all auxiliary inputs III Microfono 4 e tutti gli ingressi ausiliari III Microphone 4 and all auxiliary inputs IV Tutti gli ingressi ausiliari IV All auxiliary inputs Tabella 3.5.1 Table 3.5.1 E' possibile così creare situazioni diverse di priorità. Si voglia, ad esempio, realizzare un impianto con una postazione microfonica principale dotata di massima priorità e di altre due secondarie aventi livello di priorità eguale fra loro ma inferiore alla principale. In this way, different priority configurations (layout) may be established. For example, if a system is to be created with a main microphone unit having the highest priority and two auxiliary ones having both the same priority level which is lower than the main one. SERIE AX8000 8 11-528.p65 8 08/06/01, 14.20 CONNESSIONI 3 La soluzione è la seguente: - la postazione principale utilizzerà l'ingresso 1 ed il morsetto di precedenza I (massima priorità); - le due posizioni secondarie saranno collegate agli ingressi 2 e 3, mentre i relativi capicorda saranno collegati entrambi al morsetto III della precedenza (uguale livello di precedenza). La figura 3.5.1 schematizza le connessioni dell'esempio. CONNECTIONS The solution is the following: - the main unit will use the input 1 and the priority terminal I (highest priority); - both auxiliary units will be connected to inputs 2 and 3, and both relative spade terminal III (same precedence level). The connections of this example are shown in Figure 3.5.1. M906 Postazione secondaria Secondary station B501-M Postazione principale Main station B501-M Postazione secondaria Secondary station Fig. 3.5.1 3.6 INGRESSO EMERGENZA/TELEFONO Lingresso emergenza/telefono [21] è caratterizzato dallattenuazione automatica (VOX) ed ha priorità su tutti gli altri ingressi. Il trimmer permette di regolare il livello del segnale demergenza. Lingresso emergenza/telefono è di tipo bilanciato e può essere regolato tramite il potenziometro MASTER. 3.6 EMERGENCY/TELEPHONE INPUT The emergency/telephone input [21] features automatic attenuation (VOX) and has priority over all the other inputs. The trimmer can be used to adjust the level of the emergency signal. The emergency/telephone input is of the balanced type, and can be adjusted by means of the MASTER potentiometer. Fig. 3.6.1 3.7 USCITE DI SEGNALE Il segnale ottenuto dalla miscelazione dei vari ingressi è disponibile alle prese TAPE e BOOSTER, con diversi livelli di ampiezza e di impedenza. Questo segnale è prelevato prima delle regolazioni di tono ed è indipendente dal controllo di volume generale MASTER. Per la presa TAPE riferirsi al paragrafo 3.3. Con la presa XLR maschio BOOSTER [19] è possibile il collegamento bilanciato dell'amplificatore ad una o più unità di potenza. In figura 3.7.1 sono riportati i collegamenti. 3.7 SIGNAL OUTPUTS The signal generated by mixing various inputs is available on the TAPE and BOOSTER sockets, with different amplitude and impedance levels. This signal is picked up before tone adjustments and does not depend upon the general MASTER volume control. As for the TAPE socket, see section 3.3. The XLR male socket BOOSTER [19] enables the balanced connection between the amplifier and one or more boosters. Figure 3.7.1 shows the connections. 1 = shield 2 = signal (warm side) 3 = signal (cold side) 1 = schermo 2 = segnale (lato caldo) 3 = segnale (lato freddo) Fig. 3.7.1 SERIE AX8000 11-528.p65 9 9 08/06/01, 14.20 CONNESSIONI 3 3.8 USCITE DI POTENZA Le uscite di potenza per i diffusori sono disponibili sulle due morsettiere per collegamenti di diffusori a bassa impedenza (8 e 16 ohm) o per impianti di distribuzione a tensione costante (50, 70 e 100 V). In tabella 3.8.1 sono riportati i valori nominali di tensione ed impedenza per le diverse uscite. CONNECTIONS 3.8 POWER OUTPUTS The power outputs for the speakers are available on both terminal board for the connection of low-impedance speakers (8 and 16 ohm) or constant voltage distribution systems (50, 70 and 100 V). Table 3.8.1 shows voltage and impedance rated values for the various outputs. Uscita AX8240 AX8120 Output AX8240 AX8120 8Ω 16 Ω 43,8 V 62 V 31 V 43,8 V 8Ω 16 Ω 43,8 V 62 V 31 V 43,8 V 50 V 70 V 100 V 10,4 Ω 20,4 Ω 41,7 Ω 20,8 Ω 40,8 Ω 83,3 Ω 50 V 70 V 100 V 10,4 Ω 20,4 Ω 41,7 Ω 20,8 Ω 40,8 Ω 83,3 Ω Tabella 3.8.1 Table 3.8.1 Sistemi a tensione costante Nel caso di impianti con un gran numero di diffusori e/o con distanze tra amplificatori ed altoparlanti molto elevate è preferibile utilizzare un sistema di distribuzione a tensione costante (definito anche ad alta impedenza). In questo tipo di impianto, i diffusori, provvisti di trasformatori di adattamento di impedenza, sono tutti collegati in derivazione alla linea (vedi es. di Fig. 3.8.1); questo particolare rende di facile realizzazione l'impianto e, nel caso in cui un altoparlante dovesse per qualche motivo scollegarsi dalla linea, il resto dell'impianto proseguirebbe nel suo regolare funzionamento. Le tensioni costanti disponibili in uscita dall'amplificatore sono da 50,70 e 100 V; la distribuzione a tensione elevata permette di avere basse perdite di potenza sulle linee di collegamento e di utilizzare sezioni dei conduttori della linea ridotti rispetto al collegamento a bassa impedenza. Per il corretto dimensionamento dell'impianto (scelta della tensione di linea dell'apparecchio e selezione della potenza del diffusore) è possibile individuare diverse procedure, di seguito riportate con esempi numerici. Low-impedance systems When a large number of speakers is used and/or the speakers are placed far from the amplifiers, constant voltage distribution system should be used (also known as high-impedance systems). In this type of system, the speakers are fitted with impedance adaptation transformers and all of them have shunt line connections (see example of Fig. 3.8.1). This simplifies the layout of the system and if, for any reason, a loudspeaker is disconnected from the line, the rest of the system will continue to work properly. The constant voltages output from the amplifier are 50, 70 and 100 V. Power distribution at high voltages gives low power losses on the connection lines and makes it possible to use line conductors with smaller cross section as compared to low-impedance connections. For the best system set-up (choice of the line voltage for the unit and selection of the speaker power) different methods may be used, which are described on the following pages together with numeric examples. Fig. 3.8.1 SERIE AX8000 10 11-528.p65 10 08/06/01, 14.20 CONNESSIONI 3 Calcolo del numero di diffusori (tramite le potenze) Si supponga di avere definito sia l'amplificatore (cioè la sua potenza di uscita) che il tipo di diffusore con relativa potenza assorbita. In questo caso il massimo numero di diffusori collegabile sulla linea è determinato dalla seguente formula: CONNECTIONS Determining the number of speakers (through power values) If both the amplifier (i.e. its output power) and the type of speaker with its power consumption have been established, the maximum number of speakers which may be connected to the line may be determined as follows: potenza amplificatore numero diffusori = number of speakers = potenza diffusore Esempio: si utilizzino un amplificatore AX8240 con plafoniere modello Paso C42. L'amplificatore è in grado di erogare una potenza pari a 240 W, mentre un diffusore assorbe una potenza di 6 W. Per sapere quanti diffusori sono collegabili alla linea di uscita si calcola: numero diffusori = 240 W 6W number of speakers = 240 W 6W = 40 Determining the number of speakers (through impedance) If the impedance of the speaker is known, the maximum number of speakers which may be connected to the line is: impedenza diffusore numero diffusori = speaker power Example: in a system including a AX8240 amplifier with ceiling speakers type Paso C42 is used, the amplifier can supply 240 W power whereas the speaker has a power consumption of 6 W. The number of speakers which may be connected to the output line is given by the following: = 40 Calcolo del numero di diffusori (tramite le impedenze) Se il dato disponibile è l'impedenza del diffusore, il numero massimo di diffusori collegabili ad una linea è: amplifier power number of speakers = impedenza amplificatore speaker impedance amplifier impedance dove l'impedenza nominale dell'amplificatore è ricavabile dalla tabella 3.8.1. Esempio: si utilizzino un amplificatore AX8240 con diffusori tipo Paso C55, che presentano una impedenza pari a 500 ohm. Dalla tabella 3.8.1 si trova che l'impedenza nominale di carico della linea a 100 V è pari a 41,7 ohm. Quindi: 500 Ω numero diffusori = = 12 41,7 Ω where the amplifier rated impedance may be determined referring to Table 3.8.1. Example: If a AX8240 amplifier is used with speakers type Paso C55 having a 500 ohm impedance, the rated load impedance of the line at 100 V may be determined from Table 3.8.1 as being equal to 41,7 ohm. Thus: 3.9 PRESA EQUALIZZATORE Nei casi in cui fosse richiesta una correzione acustica del segnale, è possibile collegare un equalizzatore all'amplificatore tramite le prese POWER IN e PRE OUT [14]. Per l'inserzione dell'equalizzatore, l'interrutore LINK posto sul retro dell'apparecchio non deve essere nella posizione ON. Questa realizzazione permette la correzione acustica di ambienti particolarmente riverberanti e la soppressione della retroazione acustica diffusore-microfono (effetto Larsen). Se all'amplificatore non sono collegate, tramite le prese POWER IN e PRE OUT, altre apparecchiature, l'interruttore LINK deve essere posto in posizione ON. 3.9 EQUALIZER SOCKET If a signal sound adjustment is required an equalizer may be connected to the amplifier through the POWER IN and PRE OUT sockets [14]. To activate the equalizer, make sure that the LINK switch on the back of the unit is not set to ON. This set-up makes possible the sound adjustment for highly reverberating environments as well as for the sound adjustment for highly reverberating environments as well as for the suppression of the acoustic feedback between the speaker and the microphone (Larsen effect). If no other device is connected to the amplifier through the POWER IN and PREOUT sockets, the LINK switch must be set to ON. number of speakers = 500 Ω 41,7 Ω = 12 Fig. 3.9.1 SERIE AX8000 11-528.p65 11 11 08/06/01, 14.20 CONNESSIONI 3 3.10 FILTRO SELEZIONE VOCE L'inserimento di questo filtro può contribuire al miglioramento dell'intelligibilità della parola in ambienti riverberanti o particolarmente affollati; esaltando le frequenze del parlato, si concentra tutta la potenza dell'amplificatore in questa banda, ottenendo quindi una più elevata dinamica in uscita ed una maggiore chiarezza. Si consiglia, in particolare, di inserire questo filtro in impianti con diffusori a tromba, in quanto un eccessivo livello di frequenze basse potrebbe danneggiare la membrana del diffusore. Per inserire il filtro é necessario modificare la posizione del ponticello, posto sul circuito di potenza dell'apparecchio, come indicato nella figura 3.10.1. CONNECTIONS 3.10 VOICE SELECTION FILTER The use of this filter improves the voice comprehension in highly reverberating or heavy-crowded rooms. By emphasizing voice frequencies, the whole amplifier power is concentrated in this band, thus offering higher output dynamics and better clarity. This filter should be installed in particular in systems with horn speakers, as too many low frequencies could damage the speaker diaphgram. To install the filter, the position of the jumper on the power circuit of the unit must be changed as shown in Figure 3.10.1. Posizione A = Filtro inserito Posizione B = Filtro disinserito Position A = Filter ON Position B = Filter OFF Fig. 3.10.1 3.11 MODULI ACCESSORI Per inserire i moduli accessori nell'amplificatore è necessario rimuovere il coperchio dell'apparecchio. Rammentiamo che questa operazione deve essere affidata a personale specializzato e, comunque, si richiama quanto riportato al paragrafo 3.1. 3.11 OPTIONAL MODULES To install optional modules in the amplifier, the cover of the unit must be removed. As mentioned above, this operation should only be performed by qualified personnel according to section 3.1. Scheda din-don Sulla basetta degli ingressi ausiliari è predisposto un connettore a 6 piedini, denominato CN201, per l'inserzione della scheda AC25 per la generazione del segnale di preavviso (DIN-DON). Tale segnale è attivato dalla chiusura dei contatti della morsettiera MICROPHONE PRECEDENCE [16] o dall'inserzione di una base amplificata collegata all'ingresso BASE [20]. Le regolazioni del volume e della tonalità del DIN-DON sono accessibili dal pannello posteriore tramite un piccolo cacciavite a taglio. CHIME Module A 6-pin connector named CN201 is available on the auxiliary input base, which can house the plug-in AC25 board for the generation of the pre-warning signal (CHIME). This signal is activated when the MICROPHONE PRECEDENCE terminal board contacts [16] are closed or when an amplified stand connected to the BASE input [20] is activated. The CHIME volume and tone controls may be accessed from the rear panel by means of a small screwdriver. 12 SERIE AX8000 CONNESSIONI 3 Scheda allarme Sul circuito di potenza è predisposto un connettore a 5 piedini, denominato CN102, per l'inserzione della scheda di allarme AC21. La piattina di collegamento della scheda deve essere inserita nel connettore a 3 piedini CN11 sul circuito ingressi ausiliari (vedi fig. 3.11.1). Per le regolazioni del segnale di allarme riferirsi al foglio di istruzioni dell'accessorio. L'attivazione del segnale avviene mettendo in cortocircuito i due contatti ALARM della morsettiera [15] posta sul pannello posteriore dell'apparecchio; la chiusura deve essere realizzata tramite un contatto a secco (tipo pulsante, interruttore o scambio di relais). In figura 3.11.2 si riporta un esempio di realizzazione. CONNECTIONS Alarm board A 5-pin connector called CN102 has been provided on the power unit for inserting the AC21 alarm card. The flat twin cable for connecting the card has to be plugged into the 3-pin connector, CN11, on the auxiliary input circuit (see Figure 3.11.1). For the alarm signal adjustment, see instructions supplied with the option. The signal is activated when the two ALARM contacts of the terminal board [15] on the rear panel of the unit are short circuited; the circuit must be closed by means of a dry contact (such as a push-button, a switch or a relay switching operation). An example of application is shown on Figure 3.11.2. Fig. 3.11.1 Sensori di fumo / Smoke sensors Sistema per allarme antincendio Fire alarm system Centralina rilev. di fuoco Fire detection unit Fig. 3.11.2 Scheda di controllo volume a distanza Sul circuito amplificatore di potenza è predisposto un connettore a 5 piedini, denominato CN104, per l'inserzione della scheda per il controllo di volume a distanza AC20. La piattina di collegamento deve essere inserita nel connettore a 3 piedini CN10 sul circuito ingressi ausiliari (vedi fig. 3.11.1). Il circuito possiede un range di regolazione maggiore di 40 dB in 16 passi. Di seguito si descrivono due tipiche applicazioni: Remote volume control board A 5-pin connector, CN104, has been provided on the power amplifier circuit for inserting the AC20 remote volume control card. The flat twin cable for connecting the card has to be plugged into the 3-pin connector, CN10, on the auxiliary input circuit (see Figure 3.11.1). The circuit has an adjustment range of 40 dB in 16 steps. Here follow the descriptions of two typical applications: 1) Regolazione continua di volume La regolazione può avvenire tramite un potenziometro da 50 kΩ lineare connesso come in figura 3.11.3. 1) Continuous volume adjustment The adjustment may be performed through a 50 kΩ linear potentiometer connected as shown on Figure 3.11.3. Fig. 3.11.3 SERIE AX8000 11-528.p65 13 13 08/06/01, 14.20 CONNESSIONI 3 CONNECTIONS La correzione logaritmica del volume è già realizzata dall'attenuatore interno all'amplificatore. Per una efficace pre-regolazione dei livelli, si consiglia di porre a centro corsa il potenziometro e selezionare il livello di uscita desiderato con il controllo principale MASTER [9]. In questo modo, il potenziometro di controllo a distanza ha una capacità di regolazione di 20 dB in aumento o in diminuzione rispetto al livello prefissato con il controllo MASTER. The volume logarithmic adjustment is already performed by the attenuator built into the amplifier. For an effective level pre-adjustment, the VR should be set to the mid-range and the output level should be selected as required by means of the MASTER control [9]. In this way, the remote control VR has an adjustment capacity of 20 dB above or below the level preset with the MASTER control. Controllo del livello di uscita su due livelli La regolazione, in questo caso, avviene tramite un partitore resistivo inserito da un contatto a secco come in configurazione di figura 3.11.4. Quando il contatto A è aperto, l'attenuazione è nulla. Quando il contatto A è chiuso, il segnale è attenuato di una quantità data dalla formula: Output two-level control In this case, adjustment is performed by means of a resistive d i v i d e r which is triggered by a dry contact as shown on Figure 3.11.4. When contact A is opened, damping is zero. When contact A is closed, the signal is attenuated by a value resulting from the following: attenuazione (dB) = 40 x R2/(R1+R2) attenuation (dB) = 40 x R2/(R1+R2) Questo controllo trova la sua applicazione in impianti con diffusione in luoghi aperti, per ridurre il livello sonoro nelle ore serali e notturne e l'attuatore di inserzione è il contatto di un timer. This control is switchable for outdoor sound systems in order to reduce the sound level in the evening and at night; the triggering actuator is a timer contact. ESEMPIO: R1 = 6K8 R2 = 27 K Attenuazione con contatto A chiuso: 40 x 27 K (27 K-6K8) = 32 dB EXAMPLE: R1 = 6K8 R2 = 27 K damping with closed A contact: 40 x 27 K (27 K-6K8) = 32 dB Scegliere R1 o R2 in modo che 30 kΩ ≤ R1 + R2 ≤ 50 KΩ Choose R1 or R2 in order that 30 kΩ ≤ R1 + R2 ≤ 50 KΩ Fig. 3.11.4 3.12 MODULI Per estendere le prestazioni dellapparecchio, è stata prevista una serie di moduli da inserire nellapposito vano [24]. Lapparecchio viene fornito con un pannellino di chiusura standard. Per inserire i moduli accessori nellamplificatore, operare come segue: 1. togliere le due viti (A) che fissano il pannellino di chiusura al posteriore dellamplificatore (figura 3.12.1). 2. Estrarre il pannellino e sfilare dai distanziali in plastica posti sul lato interno il circuito (B). 3. Posizionare il circuito (B) come illustrato in figura 3.12.2. NOTA: nel caso si dovesse utilizzare il modulo AC8051-B, collegare la piattina al connettore (C). 4. Fissare il modulo nel connettore (D) e, sfruttando gli scarichi presenti sul margine dellapertura, inserire il modulo così collegato allinterno dellamplificatore (fig. 3.12.3). 5. Fissare il pannello del modulo al posteriore dellamplificatore riutilizzando le viti precedentemente rimosse. 3.12 MODULES To extend the features of the equipment, a range of modules to be inserted into the compartment provided for this purpose has been envisaged [24]. The equipment is supplied with a standard panel for closing the compartment. To plug the accessory modules into the amplifier, proceed as follows: 1. Remove the two screws (A) that fix the panel covering the compartment to the rear of the amplifier (Figure 3.12.1). 2. Remove the panel and pull the circuit out of the plastic spacers situated on the inside (B). 3. Position the circuit (B) as illustrated in Figure 3.12.2. NOTE: If you wish to use module AC8051-B, connect the flat twin cable to connector (C). 4. Plug the module into the connector (D) and, exploiting the recesses present on the edge of the opening, insert the plugged-in module inside the amplifier (Figure 3.12.3). 5. Secure the panel of the module to the rear of the amplifier using the screws that had previously been removed. B A D C A Fig. 3.12.1 Fig. 3.12.2 SERIE AX8000 14 11-528.p65 Fig. 3.12.3 14 08/06/01, 14.20 USO DELLAPPARECCHIO 4 OPERATION 4.1 ACCENSIONE Prima di mettere in funzione l'apparecchio accertarsi di avere realizzato tutte le connessioni necessarie al completamento dell'impianto. Portare l'interruttore di rete [10] in posizione ON. La spia luminosa ON [3] confermerà l'accensione dell'apparecchio. Se necessario, regolare il livello di ascolto tramite il controllo MASTER [9] e ritoccare i livelli delle sorgenti sonore per una corretta equalizzazione dei segnali tramite i controlli del livello [4]. 4.1 POWER ON Before switching the unit on, check that all the connections have been correctly made. Set the mains switch [10] to the ON position. The ON [3] LED lights up, when the unit is switched on. If necessary, adjust the listening level by means of the MASTER control [9] and adjust the levels of the sound sources for correct equalisation of the signals by means of the level controls [4]. 4.2 CONTROLLO DI VOLUME PRINCIPALE Il controllo di volume principale MASTER [9] regola il livello complessivo del segnale di uscita, derivato dalla miscelazione dei vari segnali di ingresso. Per ottenere in uscita un segnale privo di distorsione, si raccomanda di controllare che sull'indicatore del livello di uscita [1] non si accenda la spia di colore rosso (+1 dB) o, comunque, che ciò avvenga saltuariamente; in caso contrario, è necessario diminuire il livello di uscita agendo sul comando MASTER [9]. La potenza di uscita nominale è segnalata dall'accensione della spia luminosa gialla (0 dB). 4.2 MASTER VOLUME CONTROL The main MASTER volume control [9] governs the overall level of the output signal originating from the mixing of the various different input signals. To obtain a flutter-free output signal, check that the red LED indicator (+1 dB) on the output level indicator [1] is not on, or at any rate that it does not light up frequently; otherwise, the output level should be reduced by the MASTER control [9]. The rated output power is reached when the yellow LED indicator (0 dB) lights up. 4.3 CORREZIONE ACUSTICA I controlli BASS e TREBLE [8] modificano la tonalità del segnale di uscita derivato dalla miscelazione dei vari segnali di ingresso. Questi comandi non agiscono sulle uscite TAPE e BOOSTER. 4.3 ACOUSTIC ADJUSTMENT The BASS and TREBLE controls [8] alter the tone of the output signal originating from the mixing of the various different input signals. These controls do not have any effect on the TAPE and BOOSTER outputs. Controllo toni bassi (BASS) Il controllo BASS regola le prestazioni dell'amplificatore alle basse frequenze. La posizione di centro, indicata dallo 0, fornisce una risposta lineare; per avere una esaltazione delle frequenze basse ruotare la manopola in senso ORARIO. Utilizzando diffusori a tromba è opportuno tramite il comando BASS, attenuare le frequenze basse; un eccessivo livello delle basse frequenze potrebbe danneggiare la membrana del diffusore. Bass control (BASS) The BASS control adjusts the amplifier performance at low frequencies. The center position 0 provides a linear response. To emphasize low frequencies, turn the knob clockwise; to attenuate them, turn the knob CLOCKWISE. When horn-type speakers are used, low frequencies should be attenuated by means of the BASS control. An excessive low frequency level could damage the speaker diaphragm. Controllo toni acuti (TREBLE) Il controllo TREBLE regola le prestazioni acustiche dell'amplificatore alle alte frequenze. La posizione di centro, indicata dallo 0, fornisce una risposta di tipo lineare; per avere una esaltazione delle frequenze alte ruotare la monopola in senso ORARIO. Questo comando è utile per minimizzare un eccessivo livello di fruscio o per rendere più dolci suoni particolarmente sibilanti. Treble control (TREBLE) The TREBLE control adjusts the amplifier performance at high frequencies. The center position 0 provides a linear response. To emphasize high frequencies, turn the knob clockwise; to attenuate them, turn the knob CLOCKWISE. This control can be used to minimize white noise levels and soften hissing tones. 4.4 CONDIZIONI DI SOVRACCARICO E PROTEZIONE Applicare un valore di impedenza di carico inferiore a quella nominale significa richiedere all'apparecchio una potenza superiore a quella erogabile con continuità. Questo potrebbe portare al danneggiamento degli stadi finali di potenza e del trasformatore di uscita. Per non incorrere in questi inconvenienti gli amplificatori della serie AX8000 sono dotati di circuito di protezione contro i sovraccarichi con ripristino automatico. 4.4 OVERLOAD AND PROTECTION CONDITIONS When a load impedance value lower than the rated one is applied, the unit will have to supply a greater power level than it can deliver continuously. This could damage the end power stages and the output transformer. To avoid such problems, the AX8000 series amplifiers are provided with an overload protection circuit with automatic reset. Il circuito di protezione interverrà immediatamente sull'amplificatore qualora si verificasse uno dei seguenti casi: - cortocircuito su una delle uscite per altoparlanti; - impedenza di carico inferiore al 70% del valore nominale; - potenza richiesta dal sistema di diffusori, collegati sulle linee a tensione costante, superiore a quella erogabile dall'amplificatore. The protection circuit will be immediately operated in the following cases: - short circuit at one of the loudspeaker outputs; - load impedance less than 70% of the rated value; - a demand for power from loudspeakers connected to constant voltage lines which is greater than the maximum power the amplifier can deliver. La condizione di sovraccarico è segnalata dall'accensione, intermittente della spia luminosa OVERLOAD [2] posta sul pannello frontale dall'apparecchio. L'apparecchio riprenderà il regolare funzionamento non appena si sarà provveduto a rimuovere la causa del sovraccarico. Per i valori di impedenza e di tensione nominali per le diverse uscite e per il corretto dimensionamento di un impianto si veda il par. 3.8. The overload condition is signalled by the intermittent lighting of the OVERLOAD LED indicator [2] on the unit front panel. The unit will resume normal operation as soon as the cause of the overload has been removed. The various rated impedance and voltage values for different outputs as well as for a proper system set-up can be found in section 3.8. SERIE AX8000 11-528.p65 15 15 08/06/01, 14.20 USO DELLAPPARECCHIO 4 OPERATION 4.5 REGOLAZIONE DELLAPPARECCHIO Taratura della corrente a riposo dello stadio finale (da effettuare con apparecchio freddo e con volume principale al minimo): 1. Regolare P110 fino a misurare una tensione di 6 mV ai capi di R158. 2. Regolare P111 fino a misurare una tensione di 6 mV ai capi di R151. 4.5 EQUIPMENT ADJUSTMENTS Calibration of the idle current on the end stage (to be performed when the equipment is cold and the main volume is to the minimum): 1. Adjust P110 until a 6 mV voltage is measured at the R158 ends. 2. Adjust P111 until a 6 mV voltage is measured at the R151 ends. Taratura di fondo-scala dell'indicatore della potenza di uscita: 1. Portare l'amplificatore a potenza nominale su carico nominale con segnale sinusoidale a 1 kHz. 2. Regolare P401 per avere l'accensione del led rosso. 3. Diminuire lentamente P401 fino allo spegnimento del led rosso. Full-scale calibration of the output power indicator: 1. Set the amplifier to the rated power at rated load and 1 kHz sinusoidal signal 2. Adjust P401 until the red LED lights up. 3. Gradually reduce P401 until the red LED extinguishes. SERIE AX8000 16 11-528.p65 16 08/06/01, 14.20 CARATTERISTICHE TECNICHE Potenza di usci ta nom i nal e 5 1 2 0 W ( A X 8 12 0 ) U sci te a tensi one costante TECHNICAL SPECIFICATIONS 2 4 0 W ( A X 8 2 40 ) Rated output power 100, 70, 50 V C onstant vol tage outputs 16, 8 Ω U sci te ad i m pedenza costante Di storsi one al l a potenza nom i nal e C onstant i m pedance outputs <1% Di storti on at rated power C ontrol l o toni - Tone control s Toni bassi ± 1 0 d B (a 1 0 0 H z) Bass tones Toni acuti ± 1 0 d B (a 1 0 k H z) Trebl e tones Ingressi m i crofoni ci - Mi crophone i nputs 1,6 m V / 15 00 Ω Sensi bi l i tà/i m pedenza i ngresso Rapporto segnal e/di sturbo Input sensi ti vi ty/i m pedance 6 3 dB Ri sposta i n frequenza S/N rati o 50 ÷ 20.000 Hz (0/3 dB) A ttenuazi one precedenza Frequency response 4 0 dB Fi l tro m i crofoni co Precedence attenuati on 500 Hz (3 dB) Mi cro fi l ter Ingr essi ausi l i ar i - A uxi l i ar y i nputs Sensi bi l i tà/i m pedenza i ngresso TA PE 1 5 0 m V / 4 7 kΩ TA PE i nput sensi ti vi ty/i m pedance Sensi bi l i tà/i m pedenza i ngresso C D 5 0 0 m V / 4 7 kΩ C D i nput sensi ti vi ty/i m pedance Sensi bi l i tà/i m pedenza i ngresso T U NER 1 5 0 m V / 4 7 kΩ T U NER i nput sensi ti vi ty/i m pedance Sensi bi l i tà/i m pedenza i ngresso EMERGENZA /T EL. 1 0 0 m V / 4 7 kΩ EMERGENC Y /PHO NE i nput sensi ti vi ty/i m pedance Sogl i a di atti vazi one V O X 55 m V V O X threshol d acti vati on Rapporto segnal e/di sturbo 8 5 dB S/N rati o Ri sposta i n frequenza 40 ÷ 20.000 Hz (0/3 dB) A ttenuazi one precedenza Frequency response 5 5 dB Precedence attenuati on Li vel l o/i m pedenza usci ta TA PE O U T 110 m V / 600 Ω TA PE O U T output l evel /i m pedance Li vel l o/i m pedenza usci ta BO O ST ER 1,1 V / 600 Ω (bi l anci ato - bal anced) BO O ST ER output l evel /i m pedance Li vel l o/i m pedenza usci ta PRE O U T 4 8 0 m V / < 1 0 kΩ PRE O U T output l evel /i m pedance Ingresso base am pl i fi cata - A m pl i fi ed base i nput Sensi bi l i tà/i m pedenza i ngresso Rapporto segnal e/di sturbo 2 5 0 m V / 1 0 kΩ Input sensi ti vi ty/i m pedance 8 0 dB Ri sposta i n frequenza S/N rati o 180 ÷ 12.000 (0/3 dB) Frequency response SERIE AX8000 11-528.p65 17 17 08/06/01, 14.21 LISTA DELLE PARTI DI RICAMBIO DE SC R IZIONE 6 LIST OF SPARE PARTS A X 8120 Pannel l o fr o ntal e ser i gr afato A X 8240 DE SC R IP T ION 3 6 /2 3 2 3 - S 1 Si l k scr een pr i nted fr o nt panel A ssi em e ci r cui to i ngr essi m i cr o fo ni ci 2 7 /4 4 7 0 Mi cr o pho ne i nputs ci r cui t assem bl y A ssi em e ci r cui to i ngr essi ausi l i ar i 2 7 /4 4 7 1 A uxi l i ar y i nputs ci r cui t assem bl y A ssi em e ci r cui to am pl i fi cato r e 2 7 /4 4 7 7 2 7 /4 4 7 2 A m pl i fi er ci r cui t assem bl y A ssi em e ci r cui to m o r setti er a 2 7 /4 4 7 4 Ter m i nal str i p ci r cui t assem bl y A ssi em e ci r cui to m o dul o 2 7 /4 4 7 5 Mo dul e ci r cui t assem bl y A ssi em e ci r cui to V u- Meter 2 7 /4 0 4 4 V u- Meter ci r cui t assem bl y Tr asfo r m ato r e d'al i m entazi o ne Tr asfo r m ato r e d'usci ta T F1 7 0 [T F1 8 2 ] T F1 6 9 [T F1 8 1 ] T U 118-A T U 117-A Po wer suppl y tr ansfo r m er O utput tr ansfo r m er Mano po l a 2 8 /5 1 Kno b Inter r utto r e di al i m entazi o ne 1 9 /1 1 3 Mai ns swi tch Spi na di r ete co n po r tafusi bi l e 2 5 /1 6 5 Mai ns pl ug wi th fuse ho l der Pr o tezi o ne m o r setti er a d'usci ta 4 1 /2 3 9 O utput str i p co ver Po nte r addr i zzato r e 3 5 A 2 0 0 V 1 6 /5 7 3 5 A 2 0 0 V Recti fi er br i dge C o ndensato r e el ettr o l i ti co 1 0 0 0 0 µF 5 0 V - 643050103 1 0 0 0 0 µF 5 0 V El ectr o l yti c capaci to r C o ndensato r e el ettr o l i ti co 6 8 0 0 µF 5 0 V 642050682 - 6 8 0 0 µF 5 0 V El ectr o l yti c capaci to r C o ndensato r e cer am i co 2 ,2 nF 4 0 0 V 709010222 2 ,2 nF 4 0 0 V C er am i c capaci to r Po tenzi o m etr o 1 0 kΩ Lo g. 1 2 /1 6 9 1 0 kΩ Lo g. Po tenti o m eter Po tenzi o m etr o 5 0 kΩ Li n. 1 2 /1 7 0 5 0 kΩ Li n. Po tenti o m eter Po tenzi o m etr o r ego l azi o ne l i vel l i 5 0 kΩ Li n. 1 2 /1 5 2 5 0 kΩ Li n. Level s adj ustm ent po tenti o m eter Tr ansi sto r T IP3 5 C 1 7 /7 9 T IP3 5 C Tr ansi sto r SERIE AX8000 18 11-528.p65 18 08/06/01, 14.21 DESCRIPTION GÉNÉRALE 1.1 [1] [2] [3] [4] [5] [6] [7] [8] [9] [10] 1 PANNEAU AVANT Indicateur de niveau de sortie. Témoin lumineux de surcharge. Témoin de mise en marche. Contrôles de niveau des entrées micro. Contrôle du volume module. Sélecteur des entrées auxiliaires. Contrôle de niveau des entrées auxiliaires. Contrôles tonalités. Contrôle principal de volume. Interrupteur de réseau. ALLGEMEINE BESCHREIBUNG 1.1 [1] [2] [3] [4] [5] [6] [7] [8] [9] [10] 1.2 PANNEAU ARRIERE [11] Fiche de réseau avec fusible incorporé. [12] Bornier pour connexion diffuseurs à basse impédance et alimentation externe 24 Vcc. [13] Bornier pour connexion diffuseurs à tension constante. [14] Prise pour égaliseur externe. [15] Bornier pour activation signal d'alarme et contrôle du volume à distance. [16] Plaquettes de connexion pour la précédence microphonique. [17] Entrées microphoniques. [18] Contrôles volume et tonalité du signal d'annonce. [19] Sortie pour unité de puissance. [20] Entrée base amplifiée à réglage du volume et seuil. [21] Entrée secours/téléphone. [22] Sortie pour enregistreur. [23] Entrées auxiliaires. [24] Logement pour module. FRONTPLATTE Anzeige der Ausgangsstufe. LED für Überlastungsanzeige. Betriebskontrolleuchte. Stufenkontrolle der Mikrofoneingänge. Stufenkontrolle Modul. Wählschalter der Hilfseingänge. Stufenkontroll der Hilfseingänge. Tonkontrolle. Hauptkontrolle für die Lautstärke. Netzschalter. 1.2 RÜCKPANEEL [11] Netzstecker mit integrierter Sicherung. [12] Klemmenbrett für den Anschluss von Lautsprechern mit niedriger Impedanz und externer 24 V-GS-Stromversorgung. [13] Klemmenbrett für den Anschluss von Lautsprechern mit Gleichspannung. [14] Buchse für externen Equalizer. [15] Klemmenbrett für die Aktivierung des Alarmsignals und der ferngesteuerten Stufenkontrolle. [16] Klemmenbrett für die Mikrofonprioritäten. [17] Mikrophoneingänge. [18] Stufen- und Tonkontrolle des Ankündigungssignals. [19] Ausgang für die Leistungseinheit. [20] Eingang für verstärkte Sprechstelle mit Stufen- und Schwellenregulierung. [21] Eingang Notruf/Telefon. [22] Ausgang für Aufnahmegerät. [23] Hilfseingänge. [24] Modulgehäuse. SERIE AX8000 11-528.p65 19 19 08/06/01, 14.21 PRÉCAUTIONS GÉNÉRALES 2 ALLGEMEINE HINWEISE 2.1 INSTALLATION Les amplificateurs PASO sont construits conformément aux normes internationales de sécurité. Pour étendre cette garantie également aux installations dont ces appareils font partie intégrante, il est important de prendre connaissance de toutes les caractéristiques en lisant attentivement ces instructions et en particulier les notices de sécurité. Pour un bon fonctionnement de l'appareil il est nécessaire d'assurer une ventilation correcte. A cette fin, éviter de placer l'appareil dans un meuble dépourvu d'aération ou d'obstruer les fissures d'aération en posant des objets ou des accessoires sur sa partie supérieure. Eviter en outre de tenir l'appareil à proximité de sources de chaleur. Cet appareil est prévu pour être monté dans une armoire standard pour racks de 19; à cet effet, sont fournis quatre vis et quatre rondelles de fixation. Sont également fournis quatre pieds adhésifs en caoutchouc à coller sous lappareil, au niveau des logements prévus à cet effet, dans le cas où celui-ci ne serait pas installé dans une armoire à racks. 2.1 INSTALLATION Die PASO - Verstärker werden unter Befolgung der internationalen Sicherheitsvorschriften gebaut.Um diese Garantie auch auf Einbauten auszudehnen, von denen diese Geräts ein wesentlicher Bestandteil sind, ist es wichtig über aller Eigenschaften Bescheid zu wissen und insbesondere der Sicherheitsanweisungen aufmerksam zu lesen. Füreinen fehlerfreien Betriebs des Geräts ist einen geeignete Belüftung erforderlich. Aus diesem Grunde muß vermieden werden, das Geräts in einen Möbel ohne Lüftungsöffnungen einzubauen oder die Belüftungschlitze dar Gegenstände oder Zubehörtelle auf der oberen Wand zu verschliessen.Außerdem solite das Gerät nicht in der Nähe von Wärmequellen stehen. Dieses Gerät ist für die Montage in einem Standardrack von 19 bestimmt. Zu diesem Zweck wird ein Montageset, bestehend aus vier Schrauben und vier Unterlegscheiben mitgeliefert. Außerdem liegen vier selbstklebende Gummifüßchen bei, die am Unterboden des Gerätes in die entsprechenden Vertiefungen geklebt werden, falls das Gerät nicht in ein Rack eingebaut wird. 2.2 ALIMENTATION ET MISE À LA TERRE Cet appareil est prévu pour fonctionner avec une tension d'alimentation de réseau de 230V ± 10% 50/60 Hz (117V ±10% 50/60Hz pour les versions .../117). Il est prévu, en alternative, la possibilité de l'alimenter avec une tension continue extérieure de +24V; généralement, ce type de tension provient d'accumulateurs pour entrant en fonction pendant les phases d'urgence. La figure 2.2.1 reporte les graphiques qui illustrent la puissance de sortie (avec THD=1%), la puissance absorbée et le courant absorbé en fonction de la tension d'alimentation en continu. Conformément aux normes de sécurité, l'interrupteur de mise sous tension [10] n'agit que sur la tension de réseau. L'appareil est pourvu d'un câble d'alimentation muni d'un fil de terre. S'assurer que la prise de courant soit munie d'une connexion de mise à la terre conforme aux normes en vigueur. 2.2 STROMVERSORGUNG UND ERDUNG Das Gerät ist für den Betrieb mit einer Netzspannung von 230 V±10% 50/60 Hz geliefert (117V ±10% 50/60 Hz für .../117). Als Alternativ ist die Möglichkeit vorgeschen, das Gerät mit externer Gleichspannung von + 24V zu speisen. Diese Spannung, stammt aus AkkumulatorenWeen bei Netwasfall die Batterie automatisch dazugeschaltet werden soll, muß zusätzlich ein Relais zwischen Batterie und Vestärker installiert werden. In Abbildung 2.2.1 sin Graphiken aufgeführt, die Ausgangsleistung (mit THD=1%), die Leistungs und Stromaufnahme in Abhängigkeit von der Speiseapannung aufzeigen. Entssprechend den Sicherheitsvorschriften funktioniert der Einschalter [10] nur bei Netzpannung. Das Gerät ist mit einem Speisekabel mit Erdungsdraht ausgestattet. Vergewissern Sie sich, daß die Steckdose mi t der gesetzlich vorgeschriebenen Erdung versehen ist. AX8240 AX8120 Fig./Abb. 2.2.1 2.3 CONSEILS DE SECURITE Le retrait du couvercle de l'appareil, présente le risque de décharges électriques. Toute intervetion à l'intérieur de l'appareil, comme l'application d'accessoire internes, doit être accomplie par un personnel spécialisé. Il n'y a aucun réglage pour l'utilisateur à l'intérieur de l'appareil. Avant de substituer les fusibles, s'assurer d'avoir débrancher le câble d'alimentation. Les fusibles doivent être substitués par des fusibles du même type et de même valeur. Ne jamais retirer le conducteur de terre du câble d'alimentation. Avant d'appliquer des accessoires à l'appareil, s'assurer que celui-ci soit hors tension. Afin d'éviter tout risque de décharges életriques ou tout endommagement, ne pas introduire d'objets, métalliques en particulier, à travers les trous d'aération. En cas de chute accidentelle de liquides sur l'appareil, débrancher immédiatement la fiche d'alimentation et appeler le centre d'assistance PASO le plus proche. SERIE AX8000 20 11-528.p65 2.3 SICHERHEITSANWEISUNGEN Die Entfernung des Gehäusedeckels bildet immer die Gefahr elektrischer Stromschläge. Jeder Eingriff im Innern des Geräts, wie die Anbringung interner Zubehör muß durch autorisiertes Fachpersonal ausgeführt werden. Imm Inner befiden sich keinerlei Einstellungen für den Benutzer. Vor dem Auswechsein der Sicherung muß immer das Netzskabel aus der Anschlußdose gezogen werden. Die Sicherungen müssen immer mit gleichartigen und gleichwertigen ersetzt werden. Niemals das Erdungskabel von dem Neztzkabel entfernen. Vor der Anbringung von Zubehörteilen überzeugen Sie sich, da3 das Gerät ausgeschaltet ist. Niemals Gegenstände, besonders metallische, durch die Belüftungsschlitze einführen wegen der Gefahr elektrischer Stromaschläge. Solite zufällig Flüssigkeit auf das Gerät fliessen, sofort den Stecker aus der Dose ziehen und den nächstgelegenen PASO Kundendienst befragen. 20 08/06/01, 14.21 CONNEXIONS 3 ANSCHLÜSSE 3.1 CRITERES GENERAUX Pour un bon fonctionnement de l'appareil il est conseillé de suivre certains critères généraux pour l'exécution de connexions: - éviter le positionnement de câbles et de microphones sur le meuble de l'appareil; - éviter de placer les lignes de signal parallèles à celles de réseau; - observer une distance minimum de 30/40 cm; - positionner les lignes d'entrée et les lignes de sortie séparées les unes des autres; - positionner les microphones hors de l'angle de radiation des diffuseurs sonores pour éviter le phénomène de réaction acoustique (effet Larsen). 3.1 ALLGEMEINE HINWEISE Für einen korrekten Betrieb des Gerät müssen folgende Hinweise für die Anschlüsse beachtet werden: - Kabel und Mikrophone nie auf das Möbel des Gerät legen; - Mikrophonleitungen und Netzkabel nie parallel führen, sondern einen Mindestabstand von 30-40 cm einhalten; - Eingangs- und Ausgangsleitungen immer entfernt voneinander legen; - Aufstellen von Mikrophonen vor Lautsprechern erzeugt einen Pfeifton (Larsen-Effekt). ATTENTION L'installation d'accessoires à l'intèrieur de l'appareil et la sélection de certains contrôles sur l'installation nècessitè le retrait du couvercle. Ce type d'operation doit être effectué par un personnel spécialisé: le retrait du couvercle rend accessibles des zones présentant le risque de décharges électriques. Avant d'enlever le couvercle, s'assurer toujours que le câble d'alimentation ait été débranché. ACHTUNG Für den Einbau von Zubehörteilen im Innern des Gerät und für die Einstellung von Wartungschaltern muß der Deckel abgenommen werden. Dies darf nur von autorisierten Fackräften durchgeführt werden, da durch das Entfernen des Deckels mit dem Berühren der stromführenden.Teile Lebensgefahr verbunden ist. Entfernen Sie erst den Deckel, wenn Sie sich vergewissert haben, daß das Stromkabel nicht angeschlossen ist. 3.2 ENTREES MICROPHONIQUES Quatre entrées [17] séparées et indépendantes ont été prévues pour le microphones dynamiques à basse impédance ou à condensateur électréte avec alimentation phantom à 12 V munis de fiche CANNON femelle (type XLR 3-12 C). Toutes les entrées sont compensèes èlectroniquement afin d'obtenir un rejet élevé des pertubations de type commun recueillis par le câbles de raccordement des microphones surtout dans les connexions à longue distance (par example: bourdonnement). Dans les cas de situation particulières de l'installation où l'isolation galvanique est requisée entre la source et l'amplificateur, il est prévu la possibilité d'introduire un transformateur de compensation. 3.2 MIKROPHONEINGÄNGE Vorgesehen sind vier getrennte und voneinander unabhängige Eingäge [17] für dynamische Mikrophone oder für Mikrophone mit Elektretkondensator mit Phantomspeisung zu 12 V und Stecker CANNON (Typ XLR 3-12 C). Alle Eingänge sind elektronisch ausbalanciert, um eine erhöhte Abweisung von Common-Mode-Störungen zu erhalten,die von den Anschlußkabeln der Mikropone, vor allem Verbindungen uber weite Entfernungen erfaßt werden (z.B. Summen). Bei speziellen Anlagesituationen, in denen die galvanische Isolierung zwischen Quelle und Verstärker erforderlich ist, die Moglichkeit vorgesehen. einen ausbalancierten Transformator einzusetzen. Microphones dynamiques L'appareil prévoit l'usage de microphone dynamiques à basse impédance avec connexion de type compensée. Les raccordements aux prises, vues de l' extérieur, sont illustrés à la figure 3.2.1. Tous les microphones dynamiques PASO sont de type compensé, avec fiche CANNON femelle de type XLR 3-12 C. Dynamische Mikrophone Das Gerät sieht die Verwendung von dynamischen Mikrophonen mit niedriger Impedanz und ausbalanciertem Anschluß vor. Die Außenansicht der Anschlüsse an die Steckdose wird in Abbildung 3.2.1 dargestellt. Alle dynamischen PASO-Mikropone sind ausbalanciert und haben einen CANNON-Steker XLR 3-12 C. 1 = Blindage 2 = Signal (côté chaud) 3 = Signal (côté froid) 1 = Shirm 2 = Signal (warme Seite) 3 = Signal (kalte Seite) Fig./Abb. 3.2.1 SERIE AX8000 11-528.p65 21 21 08/06/01, 14.21 CONNEXIONS ANSCHLÜSSE 3 Microphones à condensateur électrète L'appareil est prévu pour recevoir des signaux de microphones à condensateur électrète, en leur fournissant l'alimentation phantôm nécessaire pour leur fonctionnement. Pour pourvoir disposer de ce type d'alimentation il est nécessaire de modifier les pontets mobiles CN306 (mic. 1), CN307 (mic. 2), CN308 (mic. 3) et CN309 (mic. 4) sur le circuit microphoniques selon les modalités reportées à la figure 3.2.2. Mikrophone mit Elektretkondensator Das Gerät ist dazu ausgerüstet, um Signale von Mikrophonen mit Elwektretkondensator zu empfangen, und liefert thnen die für den Betrieb notwendige Scheinspeisung. Um über diese Speisung verfügen zu können, ist es notwending, die mobilen Brücken CN306 (Mik. 1), CN307 (Mik. 2), CN308 (Mik. 3) und CN309 (Mik. 4) auf dem Mikrophokreis so zu modifizieren, wie in Abbildung 3.2.2 angegeben. Pos. A = Alimentation phantôm OFF Pos. B = Alimentation phantôm ON Stell. A = Scheinspeisung AUS Stell. B = Scheinspeisung EIN Fig./Abb. 3.2.2 La figure 3.2.3 indique les connexions à la prise, vues de l'extérieur. In Abbildung 3.2.3 werden die Anschlüsse an die Buchse aufgeführt (Außenansicht). 1 = Blindage et pôle dalimentation negative. 2 = Signal (côté chaud) et pôle dalimentation positive. 3 = Signal (côté froid) et pôle dalimentation positive. 1 = Schirm und Speisungsminuspol 2 = Signal (warme Seite) und Speisungspluspol 3 = Signal (kalte Seite) und Speisungspluspol Fig./Abb. 3.2.3 Transformateur microphonique Dans certains cas il peut être nécessarie d'effectuer une connexion microphonique avec isolation galvanique entre la source et l'amplificateur. Dans ces cas il est nécessaire d'introduire la fiche avec transformateur microphonique TM90 dans les connecteurs CN301 (mic. 1), CN302 (mic. 2), CN303 (mic. 3), CN304 (mic. 4), situés sur le circuit entrées microphoniques, après avoir ôté les pontets mobiles. SERIE AX8000 22 11-528.p65 Mikrophonübertrager In eigen Fällen kann es notwending sein, einen Mikrophonanscluß mit galvanischer Isolierung zwischen Quelle und Verstärker durchzuführen. In diesen Fällen ist es notwending, nach Entfernung der mobilen Brücken die Karte mit Mikrophonübertrager TM90 in die Anschlüsse CN301 (Mik. 1), CN302 (Mik. 2), CN303 (Mik. 3), CN304 (Mik. 4) einzufügen, die auf den Mickrophoneingangskreis gesetzt sind. 22 08/06/01, 14.21 CONNEXIONS 3 La figures 3.2.4 illustre les positions des connecteurs à l'intérieur de l'amplificateur. ANSCHLÜSSE In Abbildung 3.2.4 werden die Positionen der Anschlüsse im Innern des Verstärkers verdeutlicht. Fig./Abb. 3.2.4 3.3 ENTREES AUXILIAIRES Pour la connexion de l'amplificateur à des sources musicales trois prises auxiliaires [23] sont disponibles. La prise auxiliaire TUNER permet de connecter à l'amplificateur un synthonisateur ou une autre source auxiliaire ayant un niveau de signal équivalent. La prise auxiliaire CD permet de connecter un lecteur de disques compacts à l'amplificateur. La double prise phono RCA IN/OUT [23] consent l'usage du câble stéréo standard et le mélange des deux canaux a lieux à l'intérieur de l'amplificateur. À la prise RCA TAPE OUT [22] on peut trouver un signal de sortie dérivant du mixage des différents signaux audio. 3.3 HILFSEINGÄNGE Für den Anschluß des Verstärkers au Musikquellen stehen drei Hilfsbuchsen zur Verfügung [23]. Die Hilfsbuchse TUNER erlaubt den Anschluß eines Abstimmgeräts oder einer anderen Hilfsquelle mit äquivalentem Signalpegel an den Verstarker. Die Hilfsbuchse CD erlaubt den Anschluß eines Abtasters für Compact Disc an den Verstärker. Die doppelte Phonobuchse RCA IN/OUT [23] erlaubt die Verwendung des Standardstereokabels; die Miscung der beiden Kanäle wird vollständig vom Verstärker durchgeführt. Die Hilfsbuchse RCA TAPE OUT [22] führt ausgangseitig die Mischung aller Audio-Eingänge. 1 = Signal 2 = Blindage et retour 1 = Signal 2 = Schirm und Rückgang Fig./Abb. 3.3.1 SERIE AX8000 11-528.p65 23 23 08/06/01, 14.21 CONNEXIONS 3 3.4 ENTREE BASE AMPLIFIEE La prise DIN à 5 pôles BASE [20] permet la connexion de l'amplificateur aux bases préamplifiées PASO Serie B600/B500 (6 maximum). La figure 3.4.1 illustre les connexions de la prise, vu de l'extérieur, avec les signaux et alimentations correspondants. Le niveau du signal envoyé à la prise BASE peut être réglé par le potentiomètre LEVEL. Cette prise sert également à d'autres usages: entrée supplémentaire à basse fréquence, à sensibilité de 200 mV, sujette à atténuation de priorité par la seule entrée secours/téléphone [21] et éventuellement utilisable pour l'activation de la priorité automatique; alimentation de dispositif externe au moyen de la tension stabilisée 12 Vcc; l'émission maximum de courant est de 200 mA en moyenne avec des pics maximum de 1 A. 1 2 3 4 5 = = = = = ANSCHLÜSSE 3.4 EINGANG VERSTÄRKERBASIS Die fünfpolige DIN-Buchse BASE [20] rlaubt den Anschluß des Verstärkers an die bis zu maximal sechs vorverstärkten Basen PASO B600/B500. In Abbildung 3.4.1 werden die Anschlüsse der Buchse mit den entsprechenden Signalen und Speisungen veranschaulicht (Außenansicht). Der an die Buchse BASE gesandte Signalpegel kann von dem Potentiometer mit Schraubenzieherschlitz LEVEL geregelt werden. Diese Buchse kann auch für andere Anwendungen benutzt werden: Zusätzlicher Niederfrequenzeingang mit einer Empfindlichkeit von 200 mV, nur über den Notruf-/Telefoneingang abschwächbare Vorrangschaltung [21], eventuel l für die Generierung der automatischen Vorrangschaltung verwendbar. Speisung einer externen Vorrichtung durch die geregelte Spannung von 12 VGs; die maximale Stromabgabe beträgt durchschnittlich 200 mA mit Höchstspitzen von 1 A. Priorité Blindage et retour du signal dentrée Signal dentrée Alimentation (+12Vcc stabilisée) Masse alimentation 1 = Vorrang 2 = Schirm und Eingangssignalrückgang 3 = Eingangssignal 4 = Speisung (Geregelte Spannung von +12VGs) 5 = Speisungserde Fig./Abb. 3.4.1 Priorité base amplifiée En appuyant sur la touche d'appel sur une base Serie B600/B500 reliée à l'entrée de l'amplificateur [20] correspondante, le signal de priorité atténuant automatiquement les entrées auxiliaires de les prises TAPE, CD et TUNER est activé. Il est ainsi possible d'envoyer un message depuis la base microphonique sans superposition du signal musical. Vorrang Verstärkerbasis Durch Drücken der Ruftaste auf der Basis B600/B500, die an den entsprechenden Verstärkereingang [20] angeschlossen ist, wird das Vorrangsignal ausgelöst, das die Hilfseingänge der Buchsen TAPE, CD und TUNER automatisch dämpft. Auf diese Weise ist es möglich, eine Nachricht von der Mikrophonbasis zu senden, ohne daß eine Überlagerung durch das Musiksignal auftritt. Priorité automatique Un circuit électronique détecte la présence d'un signal à l'entrée BASE [20] et active automatiquement la priorité pour permettre la diffusion d'un message depuis cette entrée. Le niveau de signal nécessaire pour activer la priorité automatique peut être réglé au moyen du contrôle A.P.T. (Automatic Precedence Threshold) accessible depuis le panneau arrière. Le réglage est nécessaire afin d'éviter que la priorité automatique ne s'active par suite de l'effet d'éventuels bruits de fond recueillis par le microphone. Automatischer Vorrang Die elektronische Schaltung erfaßt das am BASE-ingang [20] vorhandene Signal und schaltet automatisch den Vorrang ein, zur Übertragung des Rufsignals aus diesem Eingang. Der zur Einschaltung des automatischen Vorrangs notwendige Signalpegel wird durch die auf der Rückseite vorhandene A.P.T.-Kontrolle (Automatic Precedence Threshold) reguliert. Die Regulierung ist erforderlich, damit das Einschalten des automatischen Vorrangs aufgrund von Hintergrundgeräuschen, die von der verstärkten Mikrophonbasis erfaßt werden, vermieden wird. 3.5 PRIORITÉ MICROPHONIQUE AVEC PRIORITÉ GRADUELLE Pour activer la priorité microphonique il faut utiliser la barrette de raccordement MICROPHONE PRECEDENCE [16]. Les produits PASO utilisant cette fonction sont le microphone à poignée M906 et la bases microphoniques B501-M/B601 (B501) qui possèdent, outre le fiche CANNON, deux cosses à relier à la barrette de raccordement. Pour effectuer la connexion, introduire la fiche microphonique dans l'entrée souhaitée, relier la cosse ayant le fil blanc à l'un des deux plots indiqué par la lettre +C (commun) et celle ayant le fil vert au plot correspondant au niveau de priorité choisi. Il y a 4 plots correspondant à autant de niveaux de priorité. Le tableau 3.5.1 décrit les niveaux de priorité. 3.5 MIKROPHONVORRANG MIT GESTAFFELTER PRIORITÄT Um den mikrophonvorrang in Betrieb zu setzen, wird die Klemmleiste MICROPHONE PRECEDENCE [16] verwendet. Die PASO-Produkte, die diese Funktion verweden, sind das Mikrophon mit Griff M906 und die nicht verstärkte Mikrophonbasis B501-M/B601 (B501), die außer dem Stecker CANNON zwei Kabelschuhe besitzen, die an die Klemmleiste angechlossen werden müssen. m den Anschluß durchzuführen, den Mikrophonstecker in den gewümschten Eingang hineinstecken, den Kabelschuh mit dem weißen. Draht an eine der beiden mit dem Buchstaben +C (gemeinsam) gekennzeichneten Klemmen anschließen, und den Kabelschuh mit dem grünen Draht an die Klemme anschließen, die dem zuvor gewahlten Prioritätspegel entspricht. Es gibt vier Klemmen, die ebensoviel Prioritätspegeln entsprechen. Die Tabelle 3.5.1 beschreibt die Prioritätspegel. Plot de priorité Entrées atténuées par lactivation de la priorité Vorrangsklemme I Microphones 2, 3, 4 et toutes les entrées auxiliaires I Mikrophone 2, 3, 4 und alle Hilfseingänge II Microphones 3, 4 et toutes les entrées auxiliaires II Mikrophone 3, 4 und alle Hilfseingänge III Microphones 4 et toutes les entrées auxiliaires III Mikrophone 4 und alle Hilfseingänge IV Toutes les entrées auxiliaires IV Alle Hilfseingänge Tableau 3.5.1 Il est ainsi possible de créer diverses situations de priorité. Si l'on veut, par exemple, réaliser une installation avec une station microphonique principale pourvue de la priorité maxime un et de deux autres stations secondaires ayant un niveau de priorité égal entre elles mais inférieur à la station principale. Tabelle 3.5.1 Wenn man eine Anlage aufbauen möchte mit zum Beispiel einer Hauptmikrophonaufstellung mit höchster Priorität und zwei weiteren sekundären Aufstellungen, die untereinander die gleiche Priorität, aber eine niedrigere als die Hauptaufstellung haben. SERIE AX8000 24 11-528.p65 Gedämpfte Eingänge durch Betätigung des Vorrangs 24 08/06/01, 14.21 CONNEXIONS 3 La solution est la suivante: - la station principale utilisera l'entrée 1 et le plot de priorité 1 (priorité maxime). - les deux stations secondaires seront raccordèes aux entrèes 2 et 3, alors que les cosses respectives seront relièes toutes deux au plot III de la priorité (même niveau de priorité). La figure 3.5.1 schématise les connexions fournies par l'exemple. ANSCHLÜSSE Das Problem wird folgendermaßen gelöst: - die Hauptaufstellung verwendet den Eingang 1 und die Vorrangklemme (höchste Priorität). - die beiden sekundären Aufstellungen werden an die Eingänge 2 und 3 angechlossen werden (gleicher Prioritätspegel). Abbildung 3.5.1 zeigt schematisch die Anschlüsse des Beispiels. M906 Poste secondaire Nebensprechstelle B501-M Poste principal Hauptsprechstelle B501-M Poste secondaire Nebensprechstelle Fig./Abb. 3.5.1 3.6 ENTRÉE SECOURS/TÉLÉPHONE L'entrée secours/téléphone [21] est caractérisée par l'atténuation automatique (VOX) et a la priorité sur toutes les autres entrées. Le trimmer permet de régler le volume du signal de secours. L'entrée secours/téléphone est de type équilibré et peut être réglée par l'intermédiaire du potentiomètre MASTER. 3.6 EINGANG NOTRUF/TELEFON Der Eingang Notruf/Telefon [21] zeichnet sich durch die automatische Abschwächung (VOX) aus und hat Vorrang vor allen anderen Eingängen. Der Trimmer ermöglicht die Stufenregulierung des Notsignals. Der Eingang Notruf/Telefon ist symmetriert und kann über das Potentiometer MASTER reguliert werden. Fig./Abb. 3.6.1 3.7 SORTIES DE SIGNAL Le signal obtenu par le mélange des différentes entrées est disponible aux prises TAPE et BOOSTER, avec divers niveaux d'amplitude et d'impédance. Ce signal est prélevé avant le réglage de la tonalité et est indépendant du contrôle de volume général MASTER. Pour la prise TAPE, se reporter au paragraphe 3.3. Avec la prise XLR BOOSTER [19] il est possible de connecter l'amplificateur à une unité de puissance. La figure 3.7.1 indique les connexions à la prise, vue de l'extérieur. 3.7 SIGNALAUSGÄNGE Das durch die Mischung der verschiedenen Eingänge erhaltene Signal steht an den Buchsen TAPE und BOOSTER mit verschiedenen Amplitudenund Impedanzpegeln zur Verfügung. Dieses Signal wird vor der Lautstärkeregelung entnommen und ist von der Regelung der allgemeinen Lautstärke MASTER unabhängig. Für die Buchse TAPE wird auf den Absatz 3.3 verwiesen. Mit der XLR-Buchse BOOSTER [19] ist der Anschluß des Verstärkers an eine Leistungseinheit möglich. In Abbildung 3.7.1 werden die Anschlüsse an die Buchse gezeigt (Außenansicht) 1 = Blindage 2 = Signal (côté chaud) 3 = Signal (côté froid) 1 = Schirm 2 = Signal (warme Seite) 3 = Signal (kalte Seite) Fig./Abb. 3.7.1 SERIE AX8000 11-528.p65 25 25 08/06/01, 14.21 CONNEXIONS 3 3.8 SORTIES DE PUISSANCE Les sorties de puissance pour les diffuseurs sont disponibles sur les deux barrettes de raccordement pour des diffuseurs à basse impédance (8 et 16 ohm) ou pour des installations de distribution à tension constante (50, 70 und 100V). Le tableau 3.8.1 indique les valeurs nominales de tension et d'impédance pour les différentes sorties. ANSCHLÜSSE 3.8 LEISTUNGAUSGÄNGE Die Leistungsausgänge für die Lautsprecher sind auf den beiden Klemmenbrettern für die Anschlüsse der Lautsprecher mit niedriger Impedanz (8 und 16 ohm) oder Konstantspannung (50, 70 und 100V) wiedergegeben. Die Tabelle 3.8.1 enthält eine Liste der Spannungs- und Impedanznennwerte für die verschiedenen Ausgänge. Sortie AX8240 AX8120 Ausgang AX8240 AX8120 8Ω 16 Ω 43,8 V 62 V 31 V 43,8 V 8Ω 16 Ω 43,8 V 62 V 31 V 43,8 V 50 V 70 V 100 V 10,4 Ω 20,4 Ω 41,7 Ω 20,8 Ω 40,8 Ω 83,3 Ω 50 V 70 V 100 V 10,4 Ω 20,4 Ω 41,7 Ω 20,8 Ω 40,8 Ω 83,3 Ω Tableau 3.8.1 Tabelle 3.8.1 Systèmes à tension constante Dans le cas d'installations ayant un grand nombre de diffuseurs et/ou avec des distances entre les amplificateurs et les haut-parleurs très grandes il est préférable d'utiliser un système de distribution à tension constante (défini également à impédance élevée). Dans ce type d'installation, les diffuseurs pourvus de transformateurs d'adaptation de l'impédance sont tous reliés en dérivation à la ligne (voir exemple de la figure 3.8.1); cette caractéristique facilite la réalisation de l'installation et, au cas où un haut-parleur se débrancherait de la ligne, le reste de l'installation continuera à fonctionner normalement. Les tensions constantes disponibles à la sortie de l'amplificateur sont de 50, 70 et 100 V; la distribution à tension élevée permet d'avoir de faibles pertes de puissance sur le lignes de raccordement et d'utiliser des conducteurs de ligne à section réduite par rapport à la connexion à basse impédance. Pour un dimensionnement correct de l'installation (choix de la tension de ligne de l'appareil et selection de la puissance du diffuseur) il est possible de déterminer diverses procédures reportées ci-après avec des exemples numériques. Konstantspannungssystem Bei Anlagen mit einer Vielzahl von Lautsprechern und/oder mit sehr großen Abständen zwischen den Verstärkern und den Lautsprechern wird vorzugsweise ein Konstantspannungssystem angewendet (auch mit hoher Impedanz bezeichnet). Bei dieser Art Anlage müssen die Lautsprecher mit einem Impedanzanpassungstransformator an einer Nebenschlußleitung angeschlossen werden (siehe Abb. 3.8.1); dadurch kann die Anlage leicht zusammengebaut werden, und sollte sich ein Lautsprecher aus irgendeinem Grund von der Leitung lösen, würde die übrige Anlage doch regulär weiterfunktionieren. Die konstanten Spannungen am Ausgang des Verstärkers betragen 50, 70 und 100 V; dieb Wiedergabe bei hoher Nennspannung ermöglicht geringe Leistungsverluste auf den Anschlußleitungen und den Gebrauch von redurzierten Leitungsabschnitten verglichen mit dem Niederimpedanzaschluß. Für die korrekte Bemessung der Anlage (Wahl der Netzspannung des Geräts und Auswahl der Lautsprecherleistung) ist es möglich, verschiedene Verfahren zu ermitteln, die nachfolgend mit Zahlenbeispielen erläutert werden. Fig./Abb. 3.8.1 SERIE AX8000 26 11-528.p65 26 08/06/01, 14.21 CONNEXIONS 3 Calcul du nombre de diffuseurs (par les puissances) Supposons davoir défini aussi bien lamplificateur (cest-à-dire sa puissance de sortie) que le type de diffuseur, avec la puissance correspondante absorbée. Dans ce cas, le nombre maximum de diffuseurs connectables sur la ligne est déterminé par la formule suivante: ANSCHLÜSSE Berechnung der lautsprecheranzahl (durch die leistungen) Es wird vorausgesetzt, daß sowohl der Verstärker (d.h. seine Ausgangsleistung) als auch der Lautsprechertyp mit entsprechender Leistungsaufnahme definiert ist. In diesem Fall wird die höchste Anzahl der auf der Leitung anschließbaren Lautsprecher durch die folgende Formel festgelegt: Puissance amplificateur Nombre diffuseurs = Anzahl Lautsprecher = Puissance diffuseur Exemple: Emploi d'un amplificateur AX8240 avec un plafonnier modèle Paso C42. L'amplificateur est en mesure d'émettre une puissance équivalente à 240 W alors qu'un diffuseur absorbe une puissance de 6 W. Pour savoir combien de diffuseurs peuvent être reliés à la ligne de sortie on fait l'opération suivante: Nombre diffuseurs = 240 W 6W Beispiel: Es wird ein Verstärker AX8240, Modell Paso C42, verwendet. Der Verstärker kann eine Leistung von 240 W abgeben, wohingegen der Lautsprecher eine Leistung von 6 W aufnimmt. Um zu wissen, wie viele Lautsprecher an die Ausgangsleitung angeschlossen werden können, wird gerechnet: = 40 Anzahl Lautsprecher = Calcul du nombre de diffuseurs (par les impedances) Si la donnée disponible est limpedance du diffuseur, le nombre maximum de diffuseurs pouvant être relés à la ligne de sortie on fait lopération suivante: 240 W 6W = 40 Berechnung der lautsprecheranzahl (durch die impedanzen) Wenn die Impedanz des Lautsprechers die zur Verfügungstehende Größe ist, ist die maximale Anzahl von Lautsprechern, die an eine Leitung angeschlossen werden können, die folgende: Impédance diffuseur Nombre diffuseurs = Leistung Verstärker Leistung Lautsprecher Anzahl Lautsprecher = Impédance amplificateur Lautsprecherimpedanz Impedanz Verstärker où l'impédance nominale de l'amplificateur peut être obtenue avec le tableau 3.8.1. Exemple: Emploi d'un amplificateur AX8240 avec des diffuseurs de type Paso C55 présentant une impédance de 500 ohm. Le tableau 3.8.1 nous indique que l'impédance normale de charge de la ligne à 100 V est de 41,7 ohm. Par conséquent: 500 Ω Nombre diffuseurs = = 12 41,7 Ω Die Nennimpedanz des Verstärkers kann aus der Tabelle 3.8.1 entnommen werden. Beispiel: Es wird ein Verstärker AX8240 mit Lautsprechern Paso C55 verwendet, die eine Impedanz von 500 ohm aufweisen. Aus der Tabelle 3.8.1 ist ersichtlich, daß die Nennlastimpedanz der Leitung bei 100 V gleich 41,7 ohm ist. Daraus folgt: 500 Ω Anzahl Lautsprecher = = 12 41,7 Ω 3.9 PRISE EGALISATEUR Lorsqu'il est requis une correction acoustique du signal, il est possible de branche un égalisateur à l'amplificateur à l'aide des prises POWER IN et PRE OUT [14]. Pour insérer l'égalisateur, l'interrupteur LINK situé à l'arrière de l'appareil ne doit pas être en position ON. Cette caractéristique permet la correction acoustique des milieux particulièrement réverbérants et la suppression de la rétroaction acoustique diffuseur-microphone (effet Larsen). S'il n'est relié aucun autre appareil à l'amplificateur par l'intermédiaire des prises POWER IN et PRE OUT, l'interrupteur LINK doit être placée en position ON. 3.9 BUCHSE ENTZERRER In den Fällen, in denen eine akustische Korrektur des Signals gefordert ist, kann man durch die Buchsen POWER IN und PRE OUT [14] einen Entzerrer an den Verstärker anschließen. Um den Entzerrer einzuschalten, darf der Schalter LINK auf der Geräterückseite nicht auf Position ON stehen. Dies erlaubt die akustische Korrektur von besonders nachhallenden Umgebungen und die Unterdrückung der akustichen Rückkoplung Lautsprecher-Mikrofon (Larsen-Effekt). Wenn an den Verstärker durch die Buchsen POWER IN und PRE OUT keine anderen Apparaturen angeschlossen sind, muß der Schalter LINK auf Position ON stehen. Fig./Abb. 3.9.1 SERIE AX8000 11-528.p65 27 27 08/06/01, 14.21 CONNEXIONS 3 3.10 FILTRE SELECTIF VOIX L'installation de ce filtre peut contribuer à améliorer l'intelligibilité du message dans les milieux réverbérants ou particulièrement bondés; en exaltant la fréquence de la voix, on concentre toute la puissance de l'amplificateur dans cette bande, obtenant ainsi une dynamique plus élevée en sortie et une plus grande clarté. Il est conseillé, en particulier, d'installer ce filtre dans les installations ayant des diffuseurs à pavillon car un niveau excessif de fréquences basses pourrait endommager la membrane du diffuseur. Pour insere le filtre, il est necessaire de modifier la position du pont, placé sur le circuit de puissance de l'appareil. Voir indication sur la fig. 3.10.1. ANSCHLÜSSE 3.10 SPRACHSELEKTIONSFILTER Das Einsetzen dieses Filters kann zur Verbesserung der Sprechverständlichkeit in nachhallenden oder überfüllten Umgebungen beitragen; durch Unterstreichung der Frequenzen des Gesprochenen wird die ganze Leistung des Verstärkers in diesem Band konzentriert und man erhält somit eine höhere Ausgabedynamik und Klarheit. Es ist insbesondere ratsam, diesen Filter in Anlagen mit trichterförmigen Lautsprechern einzusetzen, da ein übermäßiger Pegel an niedrigen Frequenzen die Lautsprechermembran beschädigen könnte. Um den Filter einzusetzen, ist es notwendig, die Stellung der Brücke, die auf dem Leistungskreis des Geräts angebracht ist, so zu ändern, wie in Abbildung 3.10.1 angegeben. Pos. A = Filtre ON Pos. B = Filtre OFF Stell. A = Filter EIN Stell. B = Filter AUS Fig./Abb. 3.10.1 3.11 MODULES ACCESSOIRES Pour insérer les modules accessoires dans l'amplificateur, il faut enlever le couvercle de l'appareil. Cette opération doit être réalisée par un personnel spécialisé et il est conseillé de lire ce qui est reporté au paragraphe 3.1. 3.11 ZUBEHÖRMODULE Um die Zubehörmodule in den Verstärker einzusetzen, ist es notwendig, den Deckel des Geräts zu entfernen. Wir erinnern daran, daß diese Arbeit von Fachpersonal durchgeführt werden muß. Es wird jedoch in jedem Fall auf Absatz 3.1 verwiesen. Fiche ding-dong Sur la plaque des entrées auxiliaires il y a un connecteur à 6 broches, appelé CN201, servant à l'insertion de la fiche AC25 pour la génération du signal de l'appareil (DING-DONG). Ce signal est activé par la fermeture des contacts des contacts de la barre de connexion MICROPHONE PRECEDENCE [16] ou l'insertion d'une base amplifiée reliée à l'entrée BASE [20]. Les réglages du volume et de la tonalité du DING-DONG sont accessibles sur le panneau arrière au moyen d'un petit tournevis à fente. Gong-Karte Auf der Hilfseingangunterlage ist ein sechsfüßiger Anschluß CN201 für das Einführen einer Karte AC25 für das Aufrufsignal (KLANG-GONG) vorgesehen. Dieses Signal wird von dem Abschiließen der Kontakte des Klemmenbretts MICROPHONE PRECEDENCE [16] oder von dem Einschalten einer Sprechstelle ausgelöst, die an den BASE Eingang [20] angeschlossen ist. Die Lautstärke und die Tonhöhe des 2-KLANG-GONGS werden durch das Potentiometer auf der Rückseite mit einem Schraubenzieher eingestellt. 28 SERIE AX8000 CONNEXIONS 3 Fiche dalarme Sur le circuit de puissance est présent un connecteur à 5 fiches connecteur CN102 - pour le logement de la carte d'alarme AC21. Le câble-ruban de connexion de la carte doit être logé dans le connecteur à 3 fiches CN11 présent sur le circuit des entrées auxiliaires (voir fig. 3.11.1). Pour les réglages du signal d'alarme, se reporter au feuillet d'instructions de l'accesoire. L'activation du signal a lieu en mettant en court-circuit les deux contacts ALARM de la barrette de connexion [18] située sur le panneau arrière de l'appareil; la fermeture doit être réalisée à l'aide d'un contact à sec (bouton ou échange de relais): La figure 3.11.2 reporte un exemple de réalisation. ANSCHLÜSSE Alarmkarte Auf dem Leistungsschaltkreis ist ein Anschlussstück mit 5 Pinnen vorhanden, der als CN102 bezeichnet wird und für das Einsetzen der Alarmkarte AC21 dient. Die Anschlussplatine der Karte muss in das Anschlussstück mit den 3 Pinnen auf dem Schaltkreis der Hilfengänge eingesetzt werden (S. Abb. 3.11.1). Für die Einstellungen des Allarmsignals wir auf das Anleitungsblatt für das Zubehörs verwiesen. Die Betätigung des Signals erfolgt durch Kurzschließen der beiden Kontakte ALARM der Klemmleiste [18] auf der Rückwand des Geräts; das Schließen muß durch einen Trockenkontakt (Drckknopf, Schalter oder Relaisaustausch) durchgeführt werden. In Abbildung 3.11.2 wird ein Beispiel für die Durchführung dargestellt. Fig./Abb. 3.11.1 Capteurs de fumée/ Rauchsensore Système dalarme anti-incendie Feueralarmsystem Unité detection feu Feuereinheit Fig./Abb. 3.11.2 Fiche de contrôle du volume à distance Sur le circuit amplificateur de puissance est présent un connecteur à 5 fiches - connecteur CN104 - pour le logement de la carte de contrôle du volume à distance AC20. Le câble-ruban de connexion doit être logé dans le connecteur à 3 fiches CN10 présent sur le circuit des entrées auxiliaires (voir fig. 3.11.1). Le circuit possède une capacité de réglage majorée de 40 dB en 16 pas. Karte für die Lautstärkeregelung aus der Ferne Auf dem Schaltkreis des Leistungsverstärkers befindet sich ein Anschlussstück mit 5 Pinnen, bezeichnet als CN104, das für das Einsetzen der Karte für die Lautstärkefernsteuerung AC20 dient. Die Anschlussplatine muss in das Anschlussstück mit 3 Pinnen CN10 auf dem Schaltkreis der Hilfseingänge eingesetzt werden (s. Abb. 3.11.1). Der Kreis besitzt einen Einstellbereich über 40 dB in 16 Schritten. 1) Réglage continu du volume: Le réglage peut avoir lieu par l'intermédiaire d'un potentiomètre de 50 kΩ linéaire relié comme dans la figure 3.11.3. 1) Dauerlautstärkeregelung Die Regelung kann durch einen linearen Potentiometer mit 50 kΩ erfolgen, der wie in Abbildung 3.11.3 angeschlossen ist. Fig./Abb. 3.11.3 SERIE AX8000 11-528.p65 29 29 08/06/01, 14.21 CONNEXIONS 3 ANSCHLÜSSE La correction logarithmique du volume est déjà réalisée par l'atténuateur situé à l'intérieur de l'amplificateur. Pour un pré-réglage efficace des niveaux, il est conseillé de placer le potentiomètre en milieu de course et de sélectionner le niveau de sortie souhaité avec le contrôle principal MASTER [9]. De cette façon, le potentiomètre de contrôle à distance a une capacité de réglage en augmentation ou en diminution par rapport au niveau préfixé avec le contrôle MASTER. Die logarithmische Lautstärkekorrektur ist schon von dem Abschwächer im Innern des Verstärkers durchgeführt. Für eine wirksame Voreinstellung der Pegel wird geraten, den Potentiometer auf die Hubmitte zu stellen und mit der Hauptsteuerung MASTER [9] den gewünschte Ausgabepegel zu wählen. Auf diese Weise hat der Potentiometer zur Fernsteuerung eine Regulierungskapazität von 20 dB, die in Abhängigkeit von dem mit der Steuerung MASTER zuvor festgelegten Pegel steigt oder sinkt. Contrôle du niveau de sortie sur deux niveaux Dans ce cas, le réglage a lieu au moyen d'un diviseur à résistance inséré par un contact à sec comme dans la configuration illustrée à la figure 3.11.4. Lorsque le contact A est ouvert, l'atténuation est nulle. Lorsque le contact A est fermé, le signal est atténué d'une quantité fournie par la formule: Steuerung des Ausgabepegels auf zwei Ebenen Die Regelung erfolgt in diesem Fall durch einen Widerstandsteiler, der von einem Trockenkontakt eingefügt wird (siehe Darstellung in Abbildung 3.11.4). Wenn der Kontakt A geöffnet ist, ist die Abschwächung null. Wenn der Kontakt A geschlossen ist, wird das Segnal durch eine Menge abgeschwächt, die durch folgende Formel ermittelt wird: atténuation (dB) = 40 x R2/(R1+R2) Abschwächung (dB) = 40 x R2/(R1+R2) Ce contrôle trouve son application pour les installations de diffusion dans les espaces ouverts, pour réduire le niveau sonore en soirée ou durant la nuit, et le déclencheur d'insertion est le contact d'une minuterie. Diese Steuerung findet in Anlagen mit Streuung in offenen Räumen ihre Anwendung, um den Tonpegel in Abend- und Nachtstunden herabzusetzen; der Einschaltauslöser ist der Kontakt eines Timers. EXEMPLE: R1 = 6K8 R2 = 27 K Atténuation avec contact A fermé: 40 x 27 K (27 K-6K8) = 32 dB BEISPIEL: R1 = 6K8 R2 = 27 K abschwachung mit geschlossenem A Kontakt: 40 x 27 K (27 K-6K8) = 32 dB Sélectionner R1 ou R2 a fin que 30 kΩ ≤ R1 + R2 ≤ 50 KΩ R1 bzw. R2 wählen, sodap 30 kΩ ≤ R1 + R2 ≤ 50 KΩ Fig./Abb. 3.11.4 3.12 MODULES Les fonctionnalités de l'appareil pourront être étendues au moyen d'une série de modules à installer dans le logement prévu à cet effet [24]. L'appareil est fourni avec un panneau de fermeture standard. Pour l'installation des modules auxiliaires dans l'amplificateur, procéder comme suit: 1. Retirer les deux vis (A) de fixation du panneau de fermeture au dos de l'amplificateur (figure 3.12.1). 2. Retirer le panneau et extraire le circuit (B) des entretoises en plastique présentes sur la partie interne. 3. Positionner le circuit (B) comme indiqué sur la figure 3.12.2. NOTE: en cas d'utilisation du module AC8051-B, raccorder le câble-ruban de connexion au connecteur (C). 4. Fixer le module sur le connecteur (D) et, en utilisant les découpes présentes sur les bords de l'ouverture, introduire le module ainsi connecté à l'intérieur de l'amplificateur (fig. 3.12.3). 5. Fixer le panneau du module au dos de l'amplificateur à l'aide des vis précédemment retirées. 3.12 MODULE Zur Erweiterung der Leistungsfähigkeit des Geräts ist eine Serie von Modulen vorgesehen, die in den entsprechenden Einbauraum [24] eingesetzt werden müssen. Das Gerät wird mit einem Standard-Abschlusspaneel geliefert. Für den Einsatz der Zubehörmodule in den Verstärker wird wie folgt vorgegangen: 1. Die beiden Schrauben (A) entfernen, mit denen das Abschlusspaneel an der Rückseite des Verstärkers befestigt ist (Abb. 3.12.1). 2. Das Paneel herausnehmen und aus den Kunststoffabstandhaltern auf der Innenseite den Schaltkreis (B) herausziehen. 3. Den Schaltkreis (B) positionieren, wie in Abbildung 3.12.2 dargestellt. ANMERKUNG: falls das Modul AC8051-B verwendet wird, die Platine an das Anschlussstück (C) ansetzen. 4. Das Modul im Anschlussstück (D) befestigen und unter Verwendung der Einschnitte am Rand der Öffnung das so angeschlossene Modul in das Innere des Verstärkers einsetzen (Abb. 3.12.3). 5. Das Paneel des Moduls auf der Rückseite des Verstärkers befestigen und hierfür die zuvor entfernten Schrauben verwenden. B A D C A Fig./Abb. 3.12.1 Fig./Abb. 3.12.3 SERIE AX8000 30 11-528.p65 Fig./Abb. 3.12.2 30 08/06/01, 14.21 UTILISATION DE LAPPAREIL 4 GEBRAÜCH DES GERATES 4.1 MISE EN MARCHE Avant de mettre en marche l'appareil, vérifier si toutes les connexions nécessaires pour la préparation de l'installation ont été réalisées. Placer l'interrupteur d'alimentation [10] en position ON. Le voyant lumineux ON [3] confirmera la mise en marche de l'appareil. Si nécessaire, régler le volume d'écoute par l'intermédiaire du contrôle MASTER [9] et ajuster le volume des sources audio pour obtenir la bonne égalisation des signaux par l'intermédiaire des contrôles de volume [4]. 4.1 EINSCHALTEN Vor der Inbetriebnahme des Gerätes vergewissern Sie sich, daß Sie alle notwendigen Anschlüsse vorgenommen haben. Den Netzschalter [10] auf ON schalten. Die ON Leuchtanzeige [3] bestätigt das Einschalten des Gerätes. Falls erforderlich, die Lautstärkestufe mit Hilfe der Kontrolle MASTER [9] einstellen und die Feineinstellung der Stufen der Tonquellen zum Zweck eines richtigen Ausgleichs der Signale vornehmen [4]. 4.2 CONTROLE DE VOLUME PRINCIPAL Le contrôle de volume principal MASTER [9] règle le volume général du signal de sortie, dérivant du mixage des différents signaux d'entrée. Pour obtenir en sortie un signal sans distorsion, il est conseillé de contrôler que le voyant rouge (+1dB) de l'indicateur du niveau de sortie [1] ne s'allume pas ou, tout au plus, que cela n'ait lieu que de temps à autre; autrement, il faudra diminuer le niveau de sortie en actionnant la commande MASTER [9]. La puissance de sortie nominale est signalée par l'allumage du voyant lumineux jaune (0 dB). 4.2 STEUERUNG DER HAUPTLAUTSTÄRKE Die Hauptkontrolle der Lautstärke MASTER [9] reguliert die Gesamtstufe des Ausgangssignals, das aus der Mischung der verschiedenen Eingangssignale stammt. Um ein Ausgabesignal ohne Verzerrung zu erhalten, wird empfohlen, zu überprüfen, ob sich auf dem Ausgangspegelanzeiger [1] nicht die rote Kontrollampe einschaltet (+1 dB) oder ob dies in unregelmäßigen Abständen geschieht; wenn nicht, ist es notwendig, den Ausgabepegel durch Betätigung der Steuerung MASTER [9] herabzusetzen. Die Ausgangsnennleistung wird durch das Einschalten der gelben Kontrollampe (0 dB) angezeigt. 4.3 CORRECTION ACOUSTIQUE Les contrôles BASS et TREBLE [8] permettent de modifier la tonalité du signal de sortie dérivant du mixage des différents signaux d'entrée. Ces commandes n'ont aucun effet sur les sorties TAPE et BOOSTER. 4.3 TONKORREKTUR Die Kontrollen BASS und TREBLE [8] ändern den Ton des Ausgangssignals, das aus der Mischung der verschiedenen Eingangssignale stammt. Diese Befehle steuern nicht die Ausgänge TAPE und BOOSTER. Contrôle tonalité basses (BASS) La commande BASS règle les prestations de l'amplificateur pour les basses fréquences. La position médiane 0 fournit une réponse de type linéaire; pour avoir une exaltation des fréquences basses, tourner le bouton en sens HORAIRE. En utilisant des diffuseurs à pavillon il est conséillé d'atténuer les fréquences basses à l'aide de la commande BASS; un niveau excessif des basses fréquences pourrait endommager la membrane du diffuseur. Tiefenkontrolle (BASS) Die BASS-Steuerung reguliert die Tonleistung des Verstärkers bei niedriger Frequenz. Die zentrale Position 0 gibt eine lineare Antwort; für eineVerstärkung der Niederfrequenzen den Drehknopf im UHRZEIGERSINN drehen. Bei Benutzung trichterförmiger Lautsprecher ist es angebracht, die niedrigen Frequenzen mit der BASS-Steuerung zu dämpfen; übertrieben niedrige Frequenzen könnten die Membran des Lautsprechers beschädigen. Contrôle tonalité aigues (TREBLE) Le contrôle TREBLE règle les prestations acoustiques de l'amplificateur pour les hautes fréquences. La position médiane 0 fournit une réponse de type linéaire; pour avoir une exaltation des fréquences hautes, tourner le bouton en sens HORAIRE; pour obtenir une atténuation, tourner le bouton en sens anti-horaire. Cette commande est utile pour réduire un niveau de bruissement excessif ou pour rendre plus doux des sons particulièrement sifflants. Kontrolle hohe töne (TREBLE) Die TREBLE-Steuerung reguliert die Tonabgabe des Verstärkers bei hoher Frequenz. Die zentrale Position 0 gibt eine lineare Antwort; für eine Verstärkung der hohen Frequenzen den Drehknopf im Uhrzeigersinn drehen; für eine Dämpfung der hohen Frequenzen den Knopf gegen den UHRZEIGERSINN drehen. Diese Steuerung ist nützlich, um einen übertrieben hohen Rauschpegel auf ein Minimum abzusenken oder um besonders starke Pfeiftöne weicher zu machen. 4.4 CONDITIONS DE SURCHARGE ET PROTECTION Appliquer une valeur d'impédance de charge inférieure à la valeur nominale signifie demander à l'appareil une puissance supérieure à la puissance pouvant être émise avec continuité. Ceci pourrait endommager les stades finals de puissance du transformateur de sortie. Pour ne pas courir de tels risques, les amplificateurs de la série AX8000 sont munis d'un circuit de protection contre les surcharges avec restauration automatique. 4.4 ÜBERLASTUNG UND SCHUTZ Einen Belastungsimpedanzwert anwenden, der niedriger als der Nominalwert ist, bedeutet, daß das Gerät eine höhere Leistung abgeben muß als die kontinuierlich abgebbare. Das könnte zu einer Beschädigung und des Ausgangstranformators führen. Zur Vermeidung dieser Unannehmlichkeiten besitzen die Verstärker der Serie AX8000 einen automatischen Schutzstromkreis gegen Überlastungen. Le circuit de protection contre les surcharges interviendra immédiatement sur l'amplificateur chaque fois que se manifestera l'un des cas suivants: Der Schutzstromkreis greift sofort am Verstärker ein, wenn einer der nachfolgenden Fälle eintritt: - - court-circuit sur une des sorties pour haut-parleurs; impédance de charge inférieure à 70% de la valeur nominale; puissance requise par le système de diffuseurs, reliés sur les lignes à tension constante, supérieure à la puissance pouvant être émise par l'amplificateur. La condition de surcharge est indiquée par le clignotement du voyant lumineux OVERLOAD [2] situé sur le panneau avant de l'appareil. L'appareil recommencera à fonctionner normalement dès que la cause de surcharge aura été supprimée. Pour les valeurs d'impédance et de tension nominales des diverses sorties et pour le dimensionnement correct d'une installation, se reporter au paragraphe 3.8. Kurzschluß an einem der Ausgänge für Lautsprecher; Belastungsimpedanz schwächer als 70% des Nennwertes; von den Lautsprechern, die an Konstantspannungsleitungen angeschlossen sind, geforderte Leistung höher als die von dem Verstärker abzugebende. Die Überlastung wird durch das blinkende Aufleuchten der OVERLOADLeuchtanzeige [2] auf der Vorderseite des Geräts angezeigt. Das Gerät wird wieder normal funktionieren, wenn die Ursache der Überbelastung beseitigt worden ist. Für Impedanz- und Spannungsnennwerte der verschiedenen Ausgänge und für die korrekte Bemessung einer Anlage siehe Abs. 3.8. SERIE AX8000 11-528.p65 31 31 08/06/01, 14.21 UTILISATION DE LAPPAREIL 4 GEBRAÜCH DES GERATES 4.5 REGLAGE DE L'APPAREIL Etalonnage du courant à vide de l'étage final (à réaliser avec l'appareil froid et le volume principal au minimum): 1. Régler P110 jusqu'à la mesure d'une tension de 6 mV aux bouts de R158. 2. Régler P111 jusqu'à la mesure d'une tension de 6 mV aux bouts de R151. 4.5 GERÉTEINSTELLEN Eichung des Ruhestroms der Endstufe (bei kaltem Gerät und Hauptlaustürke auf der Minimum-Stellung durchzuführen): 1. P110 so einstellen, da eine Spannung von 6 mV an den R158-Enden gemessen werden kann. 2. P111 so einstellen, daß eine Spannung von 6 mV an den R151Enden gemessen werden kann. Etalonnage de fin d'échelle de l'indicateur de la puissance de sortie: 1. Porter l'amplificateur à la puissance nominale sur charge nominale avec signal sinusoïdal à 1 kHz. 2. Régler P401 pour faire allumer le LED rouge. 3. Réduir P401 lentement jusqu'à l'extinction du LED rouge. Eichung des Vollausschlags des Ausgangsleistungsanzeigers: 1. Den Verstärker auf die Solleistung bei Sollbelastung und 1 kHzSynusförmigem Signal einstellen. 2. P401 so einstellen, da das rote Led leuchtet. 3. Langsam P401 vermindern bis das rote Led auslïscht. SERIE AX8000 32 11-528.p65 32 08/06/01, 14.21 CARACTÉRISTIQUES TECHNIQUES Pui ssance nom i nal e de sorti e 5 1 2 0 W ( A X 8 12 0 ) Sorti es à tensi on constante Sorti es à i m pedance constante Di storsi on à l a pui ssance nom i nal e TECHNISCHE EIGENSCHAFTEN 2 4 0 W ( A X 8 2 40 ) Nom i nal e A usgangsl ei stung 100, 70, 50 V A usgänge bei Gl ei chspannung 16, 8 Ω A usgänge bei Gl ei chi m pedanz <1% Verzerrung bei Nom i nal l ei stung C o r r ecti o n de to nal i té - To nko r r ektur G r aves ± 1 0 d B (1 0 0 H z) T i eftö ne A i gus ± 1 0 d B (1 0 k H z) Ho chtö ne Entr ées m i cr o pho ni ques - Mi kr o fo nei ngänge 1,6 m V / 1500 Ω Sensi bi l i té / i m pédance entr ée Rappo r t si gnal /br ui t Em pfi ndl i chkei t / Im pedanz Ei ngang 63 dB Répo nse en fr équence Ver häl tni s vo n Si gnal /Stö r ung 5 0 ÷ 2 0 .0 0 0 Hz (0 / 3 dB) A tténuati o n pr i o r i té Fr equenzgang 40 dB Fi l tr e m i cr o Vo r r angdäm pfung 5 0 0 Hz ( 3 dB) Mi kr o fo nfi l ter Entr ées auxi l i ai r es - Hi l fsei ngänge Sensi bi l i té / i m pédance entr ée TA PE 1 5 0 m V / 4 7 kΩ Em pfi ndl i chkei t/Im pedanz TA PE- Ei ngang Sensi bi l i té / i m pédance entr ée C D 5 0 0 m V / 4 7 kΩ Em pfi ndl i chkei t/Im pedanz C D- Ei ngang Sensi bi l i té / i m pédance entr éeT U N ER 1 5 0 m V / 4 7 kΩ Em pfi ndl i chkei t/Im pedanz T U N ER- Ei ngang Sensi bi l i té / i m pédance entr ée EMERG EN C E/T EL. 1 0 0 m V / 4 7 kΩ Em pfi ndl i chkei t/Im pedanz N O T RU F- T ELEFO N Seui l d'acti vati o n V O X 55 m V A kti vi er ungsschwel l e V O X Rappo r t si gnal /br ui t 85 dB Ver häl tni s vo n Si gnal /Stö r ung Répo nse en fr équence 4 0 ÷ 2 0 .0 0 0 Hz (0 / 3 dB) A tténuati o n pr i o r i té Fr equenzgang 55 dB Vo r r angdäm pfung N i veau/i m pedance so r ti e TA PE O U T 110 m V / 600 Ω Pegel /Im pedanz TA PE O U T - A usgang N i veau/i m pedance so r ti e BO O ST ER 1,1 V / 600 Ω (équi l i br é - A bgegl i chener ) Pegel /Im pedanz BO O ST ER- A usgang N i veau/i m pedance so r ti e PRE O U T 4 8 0 m V / < 1 0 kΩ Pegel /Im pedanz PRE O U T - A usgang Entr ée base am pl i fi ée - Ei ngang Ver stär ker basi s 2 5 0 m V / 1 0 kΩ Sensi bi l i té/i m pedance entr ée Rappo r t si gnal /br ui t Em pfi ndl i chkei t/Ei ngängsi m pedanz 80 dB Répo nse en fr équence Ver häl tni s vo n Si gnal /Stö r ung 1 8 0 ÷ 1 2 .0 0 0 (0 / 3 dB) Fr equenzgang SERIE AX8000 11-528.p65 33 33 08/06/01, 14.21 LISTE DES PIÈCES DÉTACHÉES DE SC R IP T ION 6 ERSATZTEILLISTE A X 8120 A X 8240 BE SC HR E IBU NG Panneau avant sér i gr aphi é 3 6 /2 3 2 3 - S 1 Si ebdr uckvo r der fr o nt Ens. ci r cui t entr ées m i cr o 2 7 /4 4 7 0 Mi kr o fo nei ngangskr ei s Ens. ci r cui t entr ées auxi l i ai r es 2 7 /4 4 7 1 Hi l fsei ngangskr ei s Ens. ci r cui t am pl i fi cateur 2 7 /4 4 7 7 2 7 /4 4 7 2 Ver stär ker schal tkr ei sei nhei t Ens. ci r cui t bo r ni er de co nnexi o n 2 7 /4 4 7 4 Kl em m enschal tungskr ei s Ens. ci r cui t m o dul e 2 7 /4 4 7 5 Mo dul eschal tungskr ei s Ens. ci r cui t V U - m eter 2 7 /4 0 4 4 Baugr uppe Schal tung V u- Meter Tr ansfo r m ateur d'al i m entati o n Tr ansfo r m ateur de so r ti e T F1 7 0 [T F1 8 2 ] T F1 6 9 [T F1 8 1 ] T U 118-A T U 117-A Ver so r gungstr ansfo r m ato r A usgangstr ansfo r m ato r Bo uto n 2 8 /5 1 Kno pf Inter r upteur al i m entati o n 1 9 /1 1 3 Ei nschal ter Fi che r éseau de panneau avec fusi bl e 2 5 /1 6 5 N etzstecker m i t Si cher ung Pr o tège- bo r nes 4 1 /2 3 9 Kl em m enabdeckung 1 6 /5 7 3 5 A 2 0 0 V G l ei chr i chter br ücke Po nt r edr esseur 3 5 A 2 0 0 V C o ndensateur él ectr o l yti que 1 0 0 0 0 µF 5 0 V - 643050103 1 0 0 0 0 µF 5 0 V El ektr o l ytko ndensato r C o ndensateur él ectr o l yti que 6 8 0 0 µF 5 0 V 642050682 - 6 8 0 0 µF 5 0 V El ektr o l ytko ndensato r C o ndensateur 2 ,2 nF 4 0 0 V 709010222 2 ,2 nF 4 0 0 V Ko ndensato r Po tenti o m ètr e 1 0 kΩ Lo g. 1 2 /1 6 9 1 0 kΩ Lo g. Po tenti o m eter Po tenti o m ètr e 5 0 kΩ Li n. 1 2 /1 7 0 5 0 kΩ Li n. Po tenti o m eter Po tenti o m ètr e 5 0 kΩ Li n. (ni veaux) 1 2 /1 5 2 5 0 kΩ Li n. Po tenti o m eter (Stufe) Tr ansi sto r T IP3 5 C 1 7 /7 9 T IP3 5 C Tr ansi sto r SERIE AX8000 34 11-528.p65 34 08/06/01, 14.21 ALGEMENE BESCHRIJVING 1.1 [1] [2] [3] [4] [5] [6] [7] [8] [9] [10] 1 VOORPANEEL Aanwijzer uitgangsniveau. Controlelampje overbelasting. Controlelampje apparaat aan. Niveauregeling microfooningangen. Niveauregelaar module. Keuzeschakelaar hulpingangen. Niveauregeling hulpingangen. Toonregeling. Hoofdvolumeregeling. Netschakelaar. DESCRIPCIÓN GENERAL 1.1 [1] [2] [3] [4] [5] [6] [7] [8] [9] [10] 1.2 ACHTERPANEEL [11] Netstekker met ingebouwde zekering. [12] Klemmenstrook voor aansluiting van luidsprekers met een lage impedantie en externe voeding 24 Vdc. [13] Klemmenstrook voor aansluiting luidsprekers met constante spanning. [14] Stopcontact voor externe equalizer. [15] Klemmenstrook om het alarmsignaal en de afstandsbediening te activeren. [16] Klemmenbord voor microfoonvoorrang. [17] Microfooningangen. [18] Niveau- en toonregelaars van het waarschuwingssignaal. [19] Uitgang voor vermogenseenheid. [20] Ingang versterkte basis met regelaar niveau en drempel. [21] Ingang noodgevallen/telefoon. [22] Uitgang voor opname-apparaat. [23] Hulpingangen. [24] Ruimte voor module. PANEL DELANTERO Indicador del nivel de salida. Luz indicadora de sobrecarga. Luz indicadora de encendido. Controles de nivel de las entradas microfónicas. Control de nivel módulo. Selector de entradas auxiliares. Control del nivel de las entradas auxiliares. Controles de tono. Control principal de volumen. Interruptor de red. 1.2 PANEL TRASERO [11] Enchufe para red con fusible incorporado. [12] Bornera de conexión para difusores con baja impedancia y alimentación externa 24 Vdc. [13] Bornera para conexión difusores con tensión constante. [14] Toma para ecualizador externo. [15] Bornera para activación señal de alarma y control nivel remoto. [16] Barra de bornes para la precedencia microfónica. [17] Entradas microfónicas. [18] Controles de nivel y de tono de la señal de preaviso. [19] Salida para unidad de potencia. [20] Entrada base amplificada con regulación de nivel y umbral. [21] Entrada emergencia/teléfono. [22] Salida para grabadora. [23] Entradas auxiliares. [24] Alojamiento para el módulo. SERIE AX8000 11-528.p65 35 35 08/06/01, 14.21 ALGEMENE AANWIJZINGEN 2 ADVERTENCIAS GENERALES 2.1 INSTALLATIE Alle apparaten van PASO zijn vervaardigd met inachtneming van de strengste internationale veiligheidsnormen en overeenkomstig de eisen van de Europese Gemeenschap. Om het apparaat op de juiste manier doelmatig te kunnen gebruiken moet van alle kenmerken kennisgenomen worden door deze voorschriften en met name de opmerkingen betreffende de veiligheid aandachtig door te lezen. Wanneer het apparaat in werking is, moet gezorgd worden voor een adequate luchtdoorstroming. Sluit het apparaat niet in een meubel zonder luchtspleten en verstop de luchtspleten niet door er voorwerpen of accessoires bovenop te plaatsen. Zorg ervoor dat het apparaat zich niet in de nabijheid van warmtebronnen bevindt. Het apparaat is ingesteld voor montage in een standaard rekmeubel van 19, waarvoor vier bevestigingsschroeven en borgschijfjes bijgeleverd zijn. Tevens worden bijgeleverd vier zelfklevende rubberpootjes die ter hoogte van de speciale holtes aan de onderkant van het apparaat aangebracht moeten worden indien het apparaat niet in een rekmeubel geïnstalleerd wordt. Verzeker u ervan dat alle ingangen en uitgangen op de juiste wijzen zijn aangesloten alvorens het apparaat aan te zetten. 2.1 INSTALACION Todos los aparatos PASO están fabricados conformes a las severas normas internacionales de seguridad y responden a los requisitos de la Comunidad Europea. Para una correcto y eficaz uso del aparato es sumamente importante tomar consciencia de todas sus características, leyendo detenidamente las presentes instrucciones y en modo particular las notas sobre la seguridad. Durante el funcionamiento del aparato es necesario garantizar una ventilación adecuada. No encerrar el aparato en un mueble sin aireación y evitar la obstrucción de las aberturas de ventilación apoyando objetos o accesorios en la parte superior. Además, evitar el posicionamiento del aparato cerca de fuentes de calor. El mixer ha sido fabricado para el montaje sobre rack 19; para efectuar este tipo de instalación es necesario quitar los cuatro pies del fondo, a continuación, fijar el aparato al rack utilizando los tornillos y arandelas suministradas con el equipamiento básico. Antes de encenderlo, cerciorarse que todas las entradas y las salidas estén correctamente conectadas. 2.2 STROOMVOERZIENING EN AARDING Het apparaat is bedoeld voor werking met een netspanning van 230 V ± 10% 50/60 Hz (117 V ± 10% 50/60 Hz voor de versie .../117). Het apparaat kan eventueel ook gevoed worden met een externe gelijkspanning van +24V. Deze spanning is afkomstig uit batterijen die in bufferlading gehouden worden en treedt alleen in noodgevallen werking; in afbeelding 2.2.1 staat een grafische weergave van uitgangsvermogen (met THD=1%), opgenomen vermogen en opgenomen stroom afhankelijk van de gelijkstroomvoeding. De aan/uit schakelaar [8] werkt overeenkomstig de veiligheidsnormen alleen op netspanning. Het apparaat is uitgerust met een voedingskabel met aardedraad en bijbehorend uiteinde op de netstekker en mag en geen geval verwijderd worden. Verzeker u ervan dat de contactdoos voorzien is van de wettelijk voorgeschreven aardeverbinding. 2.2 ALIMENTACION Y PUESTA A TIERRA El aparato funciona con tensión de red de 230 V ± 10% 50/60 Hz (117 V ± 10% 50/60 Hz para la versión .../117). Como alternativa es posible alimentar el aparato con una tensión continua externa de +24V. Típicamente esta tensión proviene de acumuladores mantenidos bajo carga tampón y entra en función solamente en caso de emergencia. En la figura 2.2.1 se muestran los gráficos que destacan la potencia de salida (con THD=1%), el consumo de potencia y el consumo de corriente según la tensión de alimentación en continua De acuerdo con las normas de seguridad, el interruptor de encendido [10] obra solamente sobre la tensión de red. El aparato está dotado de una cable de alimentación con alambre a tierra y el relativo terminal sobre el enchufe de red, no debe ser quitado en ningún caso. Cerciorarse que la toma de corriente esté dotada de la conexión a tierra según los requisitos determinados por ley. AX8240 AX8120 Afb./Fig. 2.2.1 2.3 OPMERKINGEN OVER DE VEILIGHEID Ingrepen aan de binnenkant van het apparaat mag uitsluitend door gespecialiseerd personeel verricht worden: Indien u de deksel verwijdert krijgt u toegang tot de delen die gevaar op elektrische schokken kunnen opleveren. Controleer altijd of de netstekker is losgekoppeld alvorens het deksel te verwijderen. Indien er per ongeluk vloeistof op het apparaat valt, dient u onmiddellijk de stekker uit de contactdoos te verwijderen en het dichtstbijzijnde PASO servicecentrum te hulp te roepen. SERIE AX8000 36 11-528.p65 2.3 NOTAS PARA LA SEGURIDAD Toda intervención dentro del aparato debe ser efectuada por personal especializado: quitando la tapa se deja al descubierto las partes a riesgo con el peligro de sacudidas eléctricas. Antes de quitar la tapa cerciorarse siempre que el cable de conexión con la red esté desenchufado. Si accidentamente se vierten líquidos en el aparato, desenchufar inmediatamente el aparato y contactar el centro de asistencia posventa PASO más cercano. 36 08/06/01, 14.21 AANSLUITINGEN 3 CONEXIONES 3.1 ALGEMENE CRITERIA Voor een goede werking van het apparaat verdient het aanbeveling enkele algemene criteria in acht te nemen bij het uitvoeren van de aansluiting van de versterkerinstallatie: - plaats kabels en microfoons niet op het meubel van het apparaat; - leg de signaallijnen niet parallel aan die van het elektriciteitsnet; houd een afstand van tenminste 30/40 cm aan; - plaats de ingangs- en uitgangslijnen (luidsprekers) op een afstand van elkaar. - plaats de microfoons buiten de straalhoek van de luidsprekers ter voorkoming van het akoestischerondzing verschijnsel (Larseneffect). 3.1 CRITERIOS GENERALES Para un correcto funcionamiento del aparato es necesario observar algunos criterios de máxima cuando se efectúan las conexiones de la instalación de amplificación: - evitar el posizionamiento de cables y de micrófonos sobre el mueble del aparato; - evitar extender las líneas de señal paralelas a las de la red eléctrica; dejar una distancia mínima de 30/40 cm; - posicionar las líneas de entrada y las líneas de salida (altavoces) distantes entre ellas; - posicionar los micrófonos fuera del alcance del ángulo de los difusores sonoros para evitar el fenómeno de reacción acústica (efecto Larsen). LET OP Voor het installeren van accessoires binnenin het apparaat en de keuze van bepaalde besturingen die deel uit maken van het systeem, dient het deksel te worden verwijderd. Een dergelijke handeling mag alleen door gespecialiseerd personeel worden uitgevoerd: door het verwijderen van het deksel worden onderdelen bereikbaar die gevaar opleveren van elektrische schokken. Alvorens het deksel te verwijderen dient u er zich altijd van te verzekeren dat de voedingskabel is losgekoppeld. ATENCIÓN La instalación de accesorios dentro del aparato y la selección de algunos controles ligados a la instalación, precisan quitar la tapa. Este tipo de operación debe ser efectuada sólo por personal especializado: quitando la tapa es posible acceder a partes que presentan riesgo de electrocución. 3.2 MICROFOONINGANGEN Er zijn vier afzonderlijke en onafhankelijke ingangen [17] voor dynamische microfoons met een lage impedantie of met een elektreet condensator met phantomvoeding van 12 V voorzien van een CANNON vrouwtjesstekker (type XLR 3-12 C). Alle ingangen zijn elektronisch gebalanceerd om een hogere afstotingscapaciteit te verkrijgen van gewone storingen, die worden opgevangen door de verbindingskabels van de microfoons, vooral bij lange afstandsverbindingen (bijv. geruis). In bepaalde toestanden van het systeem, waarbij een galvanische isolatie is vereist tussen bron en versterker, bestaat de mogelijkheid om een gebalanceerde transformator te installeren. 3.2 ENTRADAS MICROFÓNICAS Están previstas cuatro entradas [17], separadas e independientes, para micrófonos dinámicos de baja impedancia o bien de condensador electreto, con alimentación phantom a 12 V, provistos de conectador CANNON hembra (tipo XLR 3-12 C). Todas las entradas están balanceadas electrónicamente para conseguir una alta reyección de las interferencias de modo común, recogidas por los cables de conexión de los micrófonos, sobre todo en las conexiones a larga distancia (p. es. zumbido). En el caso de situaciones particulares de instalación, en las cuales se precise el aislamiento galvánico entre fuente y amplificador, está prevista la posibilidad de introducir un transformador balanceado. Dynamische microfoons Het apparaat is gemaakt voor gebruik van microfoons met een lage impedantiewaarde met een verbinding van het gebalanceerde type. De aansluitingen op het stopcontact, gezien van buitenaf, staan op afbeelding 3.2.1. Alle dynamische microfoons van PASO behoren tot het gebalanceerde type, met een CANNON vrouwtjesstekker (type XLR 3-12 C). Micrófonos dinámicos El aparato prevé el uso de micrófonos de baja impedancia con conexión de tipo balanceado. Las conexiones con la toma, vista desde el exterior, están mostradas en la figura 3.2.1. Todos los micrófonos dinámicos PASO son de tipo balanceado, con conectador CANNON hembra tipo XLR 3-12 C. 1 = Scherm 2 = Signaal (warme kant) 3 = Signaal (koude kant) 1 = Pantalla 2 = Señal (lado caliente) 3 = Señal (lado frío) Afb./Fig. 3.2.1 SERIE AX8000 11-528.p65 37 37 08/06/01, 14.21 AANSLUITINGEN CONEXIONES 3 Microfoons met elektreet condensator Dit apparaat kan van signalen van microfoons met elektreet condensator opvangen, en zorgt voor de phantom voeding, noodzakelijk voor hun werking. Om over die voeding te kunnen beschikken, dienen de verplaatsbare bruggen CN306 (mic. 1), CN307 (mic. 2), CN308 (mic. 3) en CN309 (mic. 4) te worden gewijzigd op het microfonencircuit, op de op afbeelding 3.2.2 aangegeven wijze. Micrófonos de condensador electreto El aparato está predispuesto para recibir señales de micrófonos de condensador electreto, proporcionándoles la alimentación phantom necesaria para su funcionamiento. Para poder disponer de dicha alimentación es necesario modificar los puentes móviles CN306 (mic. 1), CN307 (mic. 2), CN308 (mic.3) y CN309 (mic. 4) en el circuito microfónico, según las modalidades indicadas en la figura 3.2.2. Posición A = Alimentación Phantom desactivada Posición B = Alimentación Phantom activada Stand A = phantom voeding uitgeschakeld Stand B = phantom voeding ingeschakeld Afb./Fig. 3.2.2 In figuur 3.2.3 zijn de contactbusverbindingen weergegeven van buitenaf gezien. La figura 3.2.3 muestra las conexiones de las tomas, vistas desde el exterior. 1 = Scherm en negatieve pool van spanning. 2 = Signaal (warme kant) en positieve pool van spanning. 3 = Signaal (koude kant) en positieve pool van spanning. 1 = Blindaje y polo negativo de la tensión de alimentación 2 = Señal (lado caliente) y polo positivo de la tensión de alimentación 3 = Señal (lado frío) y polo positivo de la tensión de alimentación Afb./Fig. 3.2.3 Microfoontransformator In bepaalde gevallen kan het noodzakelijk zijn om een microfoonverbinding uit te voeren met een galvanische isolatie tussen bron en versterker. Daarbij dient u de kaart met de microfoontransformator TM90 in de connectors CN301 (mic. 1), CN302 (mic. 2), CN303 (mic. 3), CN304 (mic. 4) te installeren op het circuit van microfooningangen, na eerst de verplaatsbare bruggen te hebben verwijderd. SERIE AX8000 38 11-528.p65 Transformador microfónico En algunos casos puede ser necesario efectuar una conexión microfónica con aislamiento galvánico entre fuente y amplificador. En estos casos es necesario introducir la tarjeta con transformador microfónico TM90 en los conectadores CN301 (mic. 1), CN302 (mic. 2), CN303 (mic. 3), CN304 (mic. 4) situados en el circuito de entradas microfónicas, tras haber quitado los puentes móviles. 38 08/06/01, 14.21 AANSLUITINGEN 3 Op afbeelding 3.2.4 zijn de posities van de connectors binnenin de versterker aangegeven. CONEXIONES En la figura 3.2.4 están resaltadas las posiciones de los conectadores dentro del amplificador. Afb./Fig. 3.2.4 3.3 HULPINGANGEN Voor de verbinding van de versterker op muzikale bronnen zijn drie hulpstopcontacten beschikbaar [23]. Het hulpstopcontact TUNER maakt de aansluiting op de tunerversterker of een andere hulpbron met een gelijkwaardig signaalniveau mogelijk. Het extra stopcontact CD maakt het mogelijk om een compactdiskspeler op de versterker aan te sluiten. Voor het aansluiten van een bandrecorder worden de stopcontacten RCA IN/OUT [23] gebruikt. Het stopcontact RCA TAPE OUT [22] geeft een uitgangssignaal dat bestaat uit een menging van alle audioingangen. 3.3 ENTRADAS AUXILIARES Para la conexión del amplificador a fuentes musicales, hay disponibles tres tomas auxiliares [23]. La toma auxiliar TUNER permite conectar el amplificador con un sintonizador u otra fuente auxiliar con un equivalente nivel de señal. La toma auxiliar CD permite conectar una platina de compact disk al amplificador. Para la conexión de una platina grabadora se utilizan las tomas RCA IN/OUT [23]. La toma RCA TAPE OUT [22] proporciona una señal de salida formada por la mezcla de todas las entradas audio. 1 = Signaal 2 = Afscherming en terugkeer 1 = Señal 2 = Blindaje y retorno Afb./Fig. 3.3.1 SERIE AX8000 11-528.p65 39 39 08/06/01, 14.21 AANSLUITINGEN 3 3.4 BASISVERSTERKERINGANG Dankzij de vijfpolen contactbus DIN BASE [20] is het mogelijk de versterker te verbinden met maximaal zes voorversterkte PASO bases Serie B600/B500. In Afb. 3.4.1 worden de contactbusverbindingen weergegeven, van buitenaf gezien, met de desbetreffende voedingssignalen. Het naar de contactbus BASE gezonden signaalniveau kan geregeld worden door de met een schroevendraaier te draaien potentiometer LEVEL. Deze contactbus is ook voor ander gebruik bruikbaar: Extra ingang voor lage frequentie, met een 200 mV gevoeligheid, met voorrangsverzwakking alleen door de ingang noodgevallen/telefoon [21], welke eventueel kan worden gebruikt om te zorgen voor een automatische voorrang. externe voedingsinrichting via gestabiliseerde 12VDC gelijkstroomspanning; maximaal stroomafgifte gelijk aan 200 mA medi met hoogste pieken van 1 A. 1 2 3 4 5 CONEXIONES 3.4 ENTRADA BASE AMPLIFICADA El enchufe DIN pentapolar BASE [20] ermite la conexión del amplificador a las bases preamplificadas PASO Serie B600/B500, hasta un máximo de seis. En la figura 3.4.1 se muestran las conexiones del enchufe, visto desde el exterior, con las correspondientes señales y alimentaciones. El nivel de la señal enviado a la toma BASE puede ser regulado por el potenciómetro que cuenta con una ranura para ser regulado con un destrnillador LEVEL. Esta toma se puede utilizar también para otros usos: entrada de baja frecuencia adicional, con sensibilidad 200 mV, sujeta a atenuación de precedencia desde únicamente la entrada emergencia/ teléfono [21] y eventualmente utilizable para la generación de precedencia automática. alimentación de dispositivo exterior mediante la tensión estabilizada 12 Vcc; el consumo máximo de corriente equivale a 200 mA medios con picos máximos de 1 A. 1 2 3 4 5 = Prioriteit = Afscherming en terugkeer ingangssignaal = Ingangssignaal = Voeding + 12VDC gestabiliseerd = Massa voeding = = = = = Precedencia Blindaje y retorno de la señal de entrada Señal de entrada Alimentación + 12 Vcc estabilizados Masa alimentación Afb./Fig. 3.4.1 Voorrang versterkte basis Door de oproeptoets in te drukken op een Serie B600/B500 basis, welke met de betreffende versterkeringang [20] is verbonden, wordt het voorrangssignaal geactiveerd die automatisch de hulpingangen verzwakt van de stopcontacten TAPE, CD en TUNER. Zo kan er een bericht worden uitgezonden vanaf de microfoonbasis, zonder dat deze wordt verstoord door een muzikaal signaal. Precedencia base amplificada Presionando la tecla de llamada, en la base Serie B600/B500 conectada a la correspondiente entrada del amplificador [20], se activa la señal de precedencia que atenúa automáticamente las entradas auxiliares de las tomas TAPE, CD y TUNER. De esta manera es posible enviar un mensaje desde la base microfónica sin superposición de señal musical. Automatische prioriteit Een elektronisch circuit geeft de signaalaanwezigheid door aan de BASE [20] ingang en activeert automatisch de prioriteit zodat er vanuit deze ingang een melding verspreid kan worden. Het voor de activering van de automatische prioriteit vereiste signaalniveau kan geregeld worden met behulp van de A.P.T. (Automatic Precedence Threshold) regelaar, die vanuit het achterpaneel bereiktbaar is. De regeling is nodig om te voorkomen dat de automatisch prioriteit automatisch geactiveerd wordt door eventueel door de microfoon opgevangen achtergrondgeluiden. Precedencia automática Un circuito electrónico detecta la presencia de señal en la entrada BASE [20] y activa automáticamente la precedencia para permitir la difusión de un mensaje desde esta entrada. El nivel de señal necesario para activar la precedencia automática puede regularse mediante el control A.P.T. (Automatic Precedence Threshold), al que se accede desde el panel de detrás. La regulación es necesaria con el fin de evitar la activación de la precedencia automática por efecto de posibles ruidos de fondo recogidos por el micrófono. 3.5 VOORRANG VAN MICROFOON MET SCALAIRE PRIORITEIT Voor het activeren van de microfoonvoorrang dient u gebruik te maken van de klemmenstrook MICROPHONE PRECEDENCE [16]. De PASO producten die van deze functie gebruik maken, zijn de microfoon met M906 handgreep en de microfoonbasis B501-M/B601 (B501), die, behalve de CANNON stekker, twee draaduiteinden bezitten die op de klemmenstrook moeten worden aangesloten. Om deze aansluiting tot stand te brengen, steekt u de microfoonstekker in de gewenste ingang en sluit u het snoeruiteinde met de witte draad aan op één van de twee klemmenstroken en voorzien van de letter +C (gewoon) en dat met de groene draad op de klem van het gekozen prioriteitsniveau. Er zijn vier klemmen in overeenstemming met evenveel prioriteitsniveau's. In tabel 3.5.1 staan de prioriteitsniveau's beschreven. 3.5 PRECEDENCIA MICROFÓNICA CON PRIORIDAD ESCALAR Para activar la precedencia microfónica se utiliza el terminal de conexión MICROPHONE PRECEDENCE [16]. Los productos PASO que utilizan esta función son el micrófono con empuñadura M906 y la base microfónica B501-M/B601 (B501), provistos, además que de conectador CANNON, de dos terminales a conectar en el terminal de conexión. Para realizar la conexión, enchufar el conectador del micrófono en la entrada deseada, conectar el terminal con el cable blanco en uno de los dos bornes marcado con la letra +C (común) y el terminal con el cable verde en el borne correspondiente al nivel de prioridad elegido. Hay disponibles cuatro bornes correspondientes a otros tantos niveles de prioridad. La tabla 3.5.1 indica los niveles de prioridad. Voorrangklem Ingangen die zijn verzwakt door activering van de voorrang Borne de precedencia Entradas atenuadas por la activación de la precedencia I Microfoons 2, 3, 4 en alle hulpingangen I Micrófonos 2, 3, 4 y todas las entradas auxiliares II Microfoons 3, 4 en alle hulpingangen II Micrófonos 3, 4 y todas las entradas auxiliares III Microfoons 4 en alle hulpingangen III Micrófonos 4 y todas las entradas auxiliares IV Alle hulpingangen IV Todas las entradas auxiliares Tabel 3.5.1 Tabla 3.5.1 Zo kunnen er verschillende prioriteitstoestanden worden gecreëerd. Men wenst bijvoorbeeld een systeem tot stand te brengen, waarbij een hoofdmicrofoon wordt geplaatst met de hoogste prioriteit en nog twee secundaire microfoons die onderling hetzelfde prioriteitsniveau hebben, maar beide met een lagere prioriteit dan de hoofdmicrofoon. De esta manera es posible crear situaciones diferentes de prioridad. Si por ejemplo se desea realizar una instalación con un puesto microfónico principal, provisto de la máxima prioridad, y con otros dos puestos secundarios con nivel de prioridad igual entre ellos pero inferior al del puesto principal. SERIE AX8000 40 11-528.p65 40 08/06/01, 14.21 AANSLUITINGEN 3 De oplossing is als volgt: - de hoofdmicrofoon gebruikt ingang 1 en voorrangklem I (hoogste prioriteit); - de twee secundaire microfoons worden aangesloten op ingangen 2 en 3, terwijl de betreffende snoeruiteinden beide worden aangesloten op klem III van de voorrang (gelijk niveau van voorrang). Op afbeelding 3.5.1 zijn de aansluitingen van het voorbeeld weergegeven. CONEXIONES La solución es la siguiente: - el puesto principal utiliza la entrada 1 y el borne de precedencia I (máxima prioridad); - los dos puestos secundarios estarán conectados con las entradas 2 y 3, mientras que sus respectivos terminales estarán conectados ambos con el borne III de la precedencia (igual nivel de precedencia). La figura 3.5.1 muestra las conexiones del ejemplo. M906 Secundaire positie Puesto secundario B501-M Hoofdpositie Puesto principal B501-M Secundaire positie Puesto secundario Afb./Fig. 3.5.1 3.6 INGANG NOODGEVALLEN/TELEFOON De ingang noodgevallen/telefoon [21] wordt gekenmerkt door een automatische verzwakking (VOX) en heeft voorrang op alle andere ingangen. Met behulp van trimmer kan het noodsignaalniveau worden ingesteld. De ingang noodgevallen/telefoon is van het gebalanceerde type en kan met behulp van de vermogensmeter MASTER worden ingesteld. Afb./Fig. 3.6.1 3.7 SIGNAALUITGANGEN Het signaal dat wordt verkregen door verschilende ingangen te mengen, is beschikbaar bij de stopcontacten TAPE e BOOSTER, met verschillende amplitude- en impedantieniveau's. Dat signaal wordt opgevangen voordat de toon wordt ingesteld en is niet afhankelijk van de algemene volumebesturing MASTER. Voor het stopcontact TAPE wordt verwezen naar paragraaf 3.3. Met het mannetjes stopcontact XLR BOOSTER [19] kan een gebalanceerde aansluting van de versterker tot stand worden gebracht op één of meerdere vermogenseenheden. Op afbeelding 3.7.1 kunt u de stekkeraansluitingen zien, gezien van buitenaf. 3.6 ENTRADA EMERGENCIA/TELÉFONO La entrada emergencia/teléfono [21] se caracteriza por la atenuación automática (VOX) y tiene la prioridad sobre todas las demás entradas. El condensador de ajuste permite ajustar el nivel de la señal de emergencia. La entrada emergencia/teléfono es de tipo balanceado y se puede regular mediante el potenciómetro MASTER. 3.7 SALIDAS DE SEÑAL La señal conseguida mezclando las varias entradas, está disponible en las tomas TAPE y BOOSTER, con diferentes niveles de amplitud y de impedancia. Esta señal es tomada antes de las regulaciones de tono y es independiente del control de volumen general Master. Para la toma TAPE se remite al párrafo 3.3. Con la toma XLR macho BOOSTER [19] es posible la conexión balanceada del amplificador con una o varias unidades de potencia. En la figura 3.7.1 se muestran las conexiones con la clavija, vista desde el exterior. 1 = Afscherming 2 = Signaal (warme kant) 3 = Signaal (koude kant) 1 = Blindaje 2 = Señal (lado caliente) 3 = Señal (lado frío) Afb./Fig. 3.7.1 SERIE AX8000 11-528.p65 41 41 08/06/01, 14.21 AANSLUITINGEN 3 3.8 VERMOGENSUITGANGEN De vermogensuitgangen voor de luidsprekers zijn beschikbaar op de twee klemmenstroken voor aansluitingen van luidsprekers met lage impedantie (8 en 16 ohm) of voor systemen waarbij een verspreiding plaatsvindt met constante spanning (50, 70 en 100 V). In tabel 3.8.1 zijn de nominale spannings-en impedantiewaarden voor de diverse uitgangen aangegeven. CONEXIONES 3.8 SALIDAS DE POTENCIA Las salidas de potencia para los difusores están disponibles en las dos borneras para conexiones de difusores de baja impedancia (8 y 16 ohm) o para instalaciones de distribución con tensión constante (50, 70 y 100 V). En la tabla 3.8.1 se indican los valores nominales de tensión y de impedancia para las diferentes salidas. Uitgang AX8240 AX8120 Salida AX8240 AX8120 8Ω 16 Ω 43,8 V 62 V 31 V 43,8 V 8Ω 16 Ω 43,8 V 62 V 31 V 43,8 V 50 V 70 V 100 V 10,4 Ω 20,4 Ω 41,7 Ω 20,8 Ω 40,8 Ω 83,3 Ω 50 V 70 V 100 V 10,4 Ω 20,4 Ω 41,7 Ω 20,8 Ω 40,8 Ω 83,3 Ω Tabel 3.8.1 Tabla 3.8.1 Gelijkspanningssystemen Bij installaties met een groot aantal klanlverspreiders en/of hele grote afstanden tussen versterkers en luidsprekers is het beter een gelijkspanningssysteem (ook wel systeem met hoge impedantie) te gebruiken. In dit soort installatie, zijn de met impedantieaanpaanpassing transformatoren uitgeruste klankverspreiders met een shunt verbinding op de lijn aangesloten (zie voorbeeld in di Fig. 3.8.1). Deze bijzonderheid maakt de uitvoering van de installatie heel gemakkelijk en bovendien zou, indien een luidspreker om de een of andere reden uitgeschakeld zou worden, de resterende installatie gewoon doorwerken. De in de versterkeruitgang beschikbare gelijkspanning is 50, 70 en 100 V. Voor een goede installatie-instelling (keuze van apparaatlijnspanning en van de kracht van de klankverspreider) zijn verschillende werkwijzen mogelijk die hieronder aangegeven worden met numerieke voorbeelden. Sistemas de ténsion constante En el caso de instalaciones con un gran número de difusores y/o con distancias entre los amplificadores y altavoces muy elevadas, es preferible utilizar un sistema de distribución de tensión constante (definido también de alta impedancia). En este tipo de instalación, los difusores, que cuentan con transformadores de adaptación de impedancia, están todos conectados en derivación a la línea (véase el ejemplo de la Fig. 3.8.1); esta particularidad hace que sea fácil la realización de la instalación y, en caso de que un altavoz tuviera que desconectarse por cualquier motivo de la línea, el resto de la instalación proseguiría su funcionamiento normal. Las tensiones constantes disponibles en la salida del amplificador son de 50, 70 y 100 V. Para un correcto dimensionamiento de la instalación (selección de la tensión de línea del aparato y selección de la potencia del difusor) se pueden identificar diversos procedimientos, que se indican a continuación con ejemplos numéricos. Afb./Fig. 3.8.1 SERIE AX8000 42 11-528.p65 42 08/06/01, 14.21 AANSLUITINGEN 3 Berekening van het aantal klankverspreiders (via de kracht) Er wordt vanuit gegaan dat zowel de versterker bepaald is (d.w.z. de uitgangskracht van de versterker) als het type klankverspreider met relatief opgenomen vermogen. In dit geval wordt het maximaal aantal klankverspreiders dat met de lijn verbonden kan worden, vastgesteld met behulp van de volgende formule: aantal klankverspreiders = CONEXIONES Cálculo del número de difusores (mediante las potencias) Supongamos que hemos definido tanto el amplificador (es decir su potencia de salida) como el tipo de difusor con la correspondiente potencia absorbida. En este caso el máximo número de difusores que se puede conectar a la línea está determinado por la siguiente fórmula: kracht versterker kracht klankverspreider número de difusores = potencia amplificador potencia difusor Voorbeeld: gebruik van een AX8240 versterker met plafondverbinding model Paso C42. De versterker kan een kracht van 240 W afgeven, terwijl een klankverspreider een kracht van 6 W opneemt. Om vast te stellen hoeveel klankverspreiders op de uitgangslijn zijn aangesloten, berekent men: 240 W = 40 aantal klankverspreiders = 6W Ejemplo: utilicen un amplificador AX8240 con un plafón modelo Paso C42. El amplificador es capaz de suministrar una potencia equivalente a 240 W, mientras un difusor absorbe una potencia de 6 W. Para saber cuántos difusores se pueden conectar a la línea de salida se calcula: 240 W = 40 número de difusores = 6W Berekening van het aantal klankverspreiders (via de impedanties) Indien men de impedantie van de klankverspreider kent, is het maximaal aantal op een lijn verbindbare klankverspreiders: Cálculo del número de difusores (mediante las impedancias) aantal klankverspreiders = Si el dato a disposición es la impedancia del difusor, el número máximo de difusores que se pueden conectar a una línea es: impedantie klankverspreider número de difusores = nominale versterkerimpedantie impedancia difusor impedancia nominal amplificador waar de nominale versterkerimpedantie afgeleid kan worden uit tabel 3.8.1. Voorbeeld: gebruik van een AX8240 versterker met klankverspreiders model Paso C55, met een impedantie gelijk aan 500 ohm. Op tabel 3.8.1 ziet men dat de nominale 100 V lijnbelastingsimpedantie gelijk is aan 41,7 ohm. Dus: 500 Ω = 12 aantal klankverspreiders = 41,7 Ω donde la impedancia nominal del amplificador se halla mediante la tabla 3.8.1. Ejemplo: utilicen un amplificador AX8240 con difusores tipo Paso C55, que presentan una impedancia equivalente a 500 ohm. on la tabla 3.8.1 se ve que la impedancia nominal de carga de la línea a 100 V equivale a 41,7 ohm. Por consiguiente: 500 Ω = 12 número de difusores = 41,7 Ω 3.9 STOPCONTACT EQUALIZER In die gevallen waarin een akoestische correctie van het signaal nodig is, kan er een equalizer op de versterker worden aangesloten met behulp van de stopcontacten POWER IN en PRE OUT [14]. Voor het installeren van de equalizer, mag de schakelaar LINK, die zich op de achterkant van het apparaat bevindt, niet op stand ON staan. Hiermee is het mogelijk om een akoestische correctie uit te voeren in bijzonder resonerende ruimtes waar de akoestische weerkaatsing van de luidspreker-microfoon kan worden onderdrukt (Larsen-effect). Als er met behulp van de stopcontacten POWER IN en PRE OUT geen andere apparaten op de versterker zijn aangesloten, dient de schakelaar LINK op stand ON te worden gebracht. 3.9 TOMA ECUALIZADOR En el caso de que se precise una corrección acústica de la señal, es posible conectar un ecualizador con el amplificador, mediante las tomas POWER IN y PRE OUT [14]. Para conectar el ecualizador, no se debe poner el interruptor LINK, situado en la parte trasera del aparato, en la posición ON. Esta realización permite conseguir la corrección acústica de entornos particularmente reverberadores, así como suprimir la retroacción acústica difusor-micrófono (efecto Larsen). Si con el amplificador no hay conectados, mediante las tomas POWER IN y PRE OUT, otros aparatos, el interruptor LINK se debe poner en la posición ON. Afb./Fig. 3.9.1 SERIE AX8000 11-528.p65 43 43 08/06/01, 14.21 AANSLUITINGEN 3 3.10 WOORDSELECTIEFILTER Aanbrenging van dit filter kan bijdragen tot een verbetering van de verstaanbaarheid van het gesproken woord in weerkaatsende of overvolle ruimtes. Door de nadruk te leggen op de frequenties van het gesprolen woord, wordt alle kracht van de versterker in deze band geconcentreerd waardoor een hogere uitgangsdynamiek en grotere helderheid verkregen wordt. Aangeraden wordt dit filter met name aan te brengen in installaties met hoorn klanklversrpeiders aangezien een overmatig laagfrequentieniveau de membraan van de klankverspreider kan beschadigen. Om het filter aan te brengen moet de brugverbinding op het regeling en besturingcircuit van het apparaat verplaatst worden, zoals aangegeven in figuur 3.10.1. CONEXIONES 3.10 FILTRO SELECTIVO PALABRA La introducción de este filtro puede contribuir a mejorar la inteligibilidad de la palabra en ambientes reverberantes o particularmente atestados de gente; intensificando las frecuencias de la banda sonora, se concentra toda la potencia del amplificador en esta banda, obteniéndose por lo tanto una dinámica más elevada en la salida y una mayor nitidez. Les aconsejamos, concretamente, que introduzcan este filtro en instalaciones con difusores de bocina, ya que un nivel excesivo de frecuencias bajas podría dañar la membrana del difusor. Para introducir el filtro es necesario modificar la posición del puente, colocado en el circuito control y mando, como indica la figura 3.10.1. Positie A = filter aangebracht Positie B = filter weggehaald Posic. A = filtro introducido Posic. B = filtro no introducido Fig. 3.10.1 3.11 HULPSMODULEN Om de hulpmodulen in de versterker te installeren, moet het deksel van het apparaat verwijderd worden. We herinneren er aan dat deze handeling aan gespecialiseerd personeel toevertrouwd moet worden, en in ieder geval wordt verwezen naar de aanwijzingen van punt 3.1. 3.11 MÓDULOS ACCESORIOS Para introducir los módulos accesorios en el amplificador hay que quitar la tapa del aparato. Les recordamos que esta operación la debe realizar el personal técnico especializado así como que lean de todos modos el punto 3.1. Ding-dong kaart Op de basis van de hulpingangen is een 6-polige connecter aangebracht, CN201, genoemd, waarin de kaart AC25 kan worden geïnstalleerd, voor het opwekken van het alarmsignaal (DING-DONG). Dat signaal wordt geactiveerd door de sluiting van de contacten op de klemmenstrook MICROPHONE PRECEDENCE [16] of door het plaatsen van een versterkte basis die op de ingang BASE [20] is aangesloten. De regelaars van het volume en de toon van de DING-DONG kunnen vanaf het achterpaneel worden bereikt met een kleine schroevendraaier. Tarjeta din-don En el terminal de conexiones de las entradas auxiliares hay predispuesto un conectador con 6 patas, denominado CN201, para introducir la tarjeta AC25, para generar la señal de preaviso (DIN-DON). Dicha señal es activada por el cierre de los contactos de la bornera MICROPHONE PRECEDENCE [16] o por la activación de una base amplificada conectada en la entrada BASE [20]. Se accede a las regulaciones del volumen y del tono del DIN-DON por el panel trasero, utilizando un destornillador plano pequeño. 44 SERIE AX8000 AANSLUITINGEN 3 Slow whoop print Op het vermogenscircuit is een 5-polige connector aangebracht, de CN102, voor het plaatsen van de alarmkaart AC21. De platte aansluitkabel van de kaart moet in de 3-polige connector CN11 worden gestoken op het circuit van de hulpingangen (zie afb. 3.11.1). Voor het instellen van het alarmsignaal wordt verwezen naar de instructies. Het signaal is te activeren met 2 ALARM contacten op de klemmenstrook [15] op het achterpaneel. Het signaal wordt geactiveerd door middel van een potentiaal vrij maakkontakt (zoals een druktoets, schakelaar of een relais). Een voorbeeld van deze aansluiting wordt weergegeven in figuur 3.11.2. CONEXIONES Ficha alarma En el circuito de potencia hay predispuesto un conectador con 5 patas, denominado CN102, para conectar la tarjeta de alarma AC21. El cable plano de conexión de la tarjeta se debe insertar en el conectador de 3 patas CN11, presente en el circuito de entradas auxiliares (ver fig. 3.11.1). Para las regulaciones del señal de alarma, ver la hoja de instruciones del accesorio. El señal se activa ponendo en corto circuito los dos contactos ALARM de la placa [15] puesta en el panel posterior del aparato; el cierre debe ser realizado por medio de un contacto a a seco (tipo botón, interruptor o cambio de relais). En la figura 3.11.2 puede verse un ejemplo de realización. Afb./Fig. 3.11.1 Brand alarm systeem Sistema para alarma antincendio Rook melder / Sensor de humo Feuereinheit Central rivelación fuego Afb./Fig. 3.11.2 Kaart volumeafstandsregeling Op het circuit van de vermogensversterker bevindt zich een 5-polige connector, CN104 genoemd, waarin de kaart voor afstandbesturing van volume AC20 kan worden geplaatst. De platte verbindingskabel moet in de 3-polige connector CN10 worden geplaatst op het hulpingangencircuit (zie afb. 3.11.1). Het circuit heeft een regelbereik van meer dan 40 dB in 16 stappen. Onderstaand vindt u de beschrijving van twee toepassingen: Tarjeta para el control del volumen a distancia En el circuito amplificador de potencia hay predispuesto un conectador con 5 patas, denominado CN104, para conectar la tarjeta para el control de volumen a distancia AC20. El cable plano de conexión se debe insertar en el conectador de 3 patas CN10 presente en el circuito de entradas auxiliares (ver fig. 3.11.1). El circuito cuenta con un rango de regulación mayor de 40 dB en 16 pasos. A continuación les describimos dos aplicaciones típicas: 1) Voortdurende volumeregeling De regeling kan plaatsvinden via een potentiometer van 50 kΩ , rechtlijnig, aangesloten als afgebeeld in figuur 3.11.3. 1) Regulación continua de volumen La regulación puede tener lugar mediante un potenciómetro de 50 kΩ lineal conectado como indica la figura 3.11.3. Afb./Fig. 3.11.3 SERIE AX8000 11-528.p65 45 45 08/06/01, 14.21 AANSLUITINGEN 3 CONEXIONES De logaritmische volumecorrectie wordt reeds diir de interne versterkerverzwakker verricht. Voor een doelkrachtige voorinstelling van de niveaus, wordt aangeraden de potentiometer halverwege de slag te plaatsen en het gewenste uitgangsniveau te kiezen met behulp van de hoofdregelaar MASTER [9]. Op deze manier heeft de afstandsregelpotentiometer een regelcapaciteit van 20 dB meer of minder dan het met regelaar MASTER vooringestelde niveau. La corrección logarítmica del volumen ha sido ya realizada por el atenuador interno del amplificador. Para obtener una pre-regulación eficaz de los niveles, les aconsejamos que pongan a mitad del recorrido el potenciómetro y que seleccionen el nivel de salida deseado con el control principal MASTER [9]. De esta manera, el potenciómetro del control a distancia tendrá una capacidad de regulación de 20 dB en aumento o en disminución respecto al nivel preestablecido con el control MASTER. Uitgangsregeling op twee niveaus In dit geval vindt de regeling plaats via een met een droogcontact ingeschakelde spanningsdeler, zoals aangegeven in figuur 3.11.4. Wanneer contact A open is, is de verzwakking nihil. Wanneer contact A gesloten is, wordt het signaal verzwakt door een hoeveelheid die bepaald is met behulp van de volgende formule: Control del nivel de salida en dos niveles a regulación, en este caso, tiene lugar mediante un divisor resistivo encendido por un contacto seco como indica la configuración de la figura 3.11.4. Cuando el contacto A está abierto, la atenuación es nula. Cuando el contacto A está cerrado, la señal está atenuada por una cantidad dada por la fórmula: verzwakking (dB) = 40 x R2/(R1+R2) atenuación (dB) = 40 x R2/(R1+R2) Dit regelsysteem wordt toegepast in klankverspreiderinstallaties in open ruimtes om het geluidsniveau in de avonduren en s nachts te verlagen. De inschakelaar is het contact van een tijdschakelaar. Este control encuentra su aplicación en instalaciones con difusor en sitios abiertos, para reducir el nivel sonoro en las horas de la tarde y noche; el accionador de conexión es el contacto de un temporizador. VOORBEELD: R1 = 6K8 R2 = 27 K verzwakking met contact A gesloten: 40 x 27 K (27 K-6K8) = 32 dB EJEMPLO: R1 = 6K8 R2 = 27 K atenuación con contacto A cerrado: 40 x 27 K (27 K-6K8) = 32 dB Kies R1 o R2 zodat 30 kΩ ≤ R1 + R2 ≤ 50 KΩ Elijan R1 or R2 de manera que 30 kΩ ≤ R1 + R2 ≤ 50 KΩ Afb./Fig. 3.11.4 3.12 MODULES Voor het uitbreiden van de prestaties van dit apparaat is een serie modules ontworpen die in de daartoe bestemde ruimte kunnen worden geïnstalleerd [24]. Het apparaat wordt geleverd met een standaard paneeltje waarmee het kan worden afgesloten. Voor het plaatsen van de extra modules in de versterker, dient u te handelen als volgt: 1. neem de twee schroeven (A) weg, waarmee het sluitingspaneeltje op de achterkant van de versterker vastzit (afb. 3.12.1). 2. Verwijder het paneeltje door het uit de plastic afstandshouders te schuiven die zich aan de binnenzijde van het circuit bevinden (B). 3. laats het circuit (B) zoals aangegeven op afbeelding 3.12.2. OPMERKING: Mocht u gebruik maken van module AC8051-B, dan dient de platte kabel te worden aangesloten op connector (C). 4. Zet de module vast in connector (D) en gebruik daarvoor de extra ruimte in de rand van de opening; schuif de aldus aangesloten module in de versterker (afb. 3.12.3). 5. Zet het modulepaneel vast tegen de achterzijde van de versterker, en gebruik daarbij weer de eerder verwijderde schroeven. 3.12 MÓDULOS Para ampliar las prestaciones del aparato, se ha previsto una serie de módulos a introducir en el hueco correspondiente [24]. El aparato es suministrado con un panel de cierre standard. Para introducir los módulos accesorios en el amplificador, efectuar las siguientes operaciones: 1. quitar los dos tornillos (A) que fijan el panel de cierre a la parte trasera del amplificador (figura 3.12.1). 2. Quitar el panel y sacar el circuito de los distanciadores en plástico situados en el lado interno (B). 3. Colocar el circuito (B) como mostrado en la figura 3.12.2. NOTA: si se tuviera que utilizar el módulo AC8051-B, conectar el cable plano al conectador (C). 4. Fijar el módulo en el conectador (D) y, utilizando las aperturas presentes en el margen de apertura, introducir el módulo, conectado de esta manera, dentro del amplificador (fig. 3.12.3). 5. Fijar el panel del módulo a la parte trasera del amplificador utilizando los tornillos previamente quitados. B A D C A Afb./Fig. 3.12.1 Afb./Fig. 3.12.3 SERIE AX8000 46 11-528.p65 Afb./Fig. 3.12.2 46 08/06/01, 14.21 GEBRUIK VAN HET APPARAAT 4 USO DEL APARATO 4.1 AANZETTEN Verzeker u ervan dat u alle nodige verbindingen tot stand gebracht heeft, alvorens het apparaat in werking te stellen. Zet de elektriciteitsnetschakelaar [10] op ON. Het controlelampje ON [3] bevestigt dat het apparaat aanstaat. Stel indien gewenst het geluidsniveau in, met behulp van de besturing MASTER [9] en stel de niveau's van de geluidsbronnen af voor een correcte vereffening van de signalen met behulp van de niveauregelaars [4]. 4.1 ENCENDIDO Antes de poner en funcionamiento el aparato hay que asegurarse de que se hayan realizado todas las conexiones necesarias una vez terminada la instalación. Pongan el interruptor de red [10] en la posición ON. La luz indicadora ON [3] confirmará el encendido del aparato. A ser necesario, ajustar el nivel de escucha mediante el mando MASTER [9] y retocar los niveles de las fuentes sonoras para conseguir una ecualización correcta de las señales mediante los mandos de nivel [4]. 4.2 HOOFDVOLUMEREGELING De hoofdbesturing van het volume MASTER [9] regelt het totaalniveau van het uitgangssignaal, dat voortkomt uit de menging van de verschillende ingangssignalen. Ter verkrijging van een uitgangssignaal zonder vervormingen, wordt aangeraden op de uitgangsniveauwijzer [1] te kijken totdat het rode controlelampje (+1 dB) gaat branden of in ieder geval of dit zo nu en dan gaat branden. Is dit niet het geval, dan moet het uitgangsniveau met behulp van de regelaar MASTER [9] verlaagd worden. De nominale uitgangskracht wordt aangegeven doordat het gele lampje (0 dB) gaat branden. 4.2 CONTROL DE VOLUMEN PRINCIPAL El control principal del volumen MASTER [9] ajusta el nivel global de la señal de salida, resultado de la mezcla de las varias señales de entrada. Para poder obtener en salida una señal sin distorsión, se recomienda controlar que en el indicador del nivel de salida [1] no se encienda la luz indicadora roja (+1 dB) o, en todo caso, que esto ocurra sólo de vez en cuando; de no ser así, habrá que disminuir el nivel de salida mediante el mando MASTER [9]. La potencia de salida nominal se indica porque se enciende la luz indicadora amarilla (0 dB). 4.3 AKOESTISCHE CORRECTIE De besturingen BASS en TREBLE [8] wijzigen de toon van het uitgangssignaal dat voortkomt uit de menging van de verschillende ingangssignalen. Deze bedieningen hebben geen invloed op de uitgangen TAPE en BOOSTER. 4.3 CORRECCIÓN ACÚSTICA Los mandos BASS y TREBLE [8] modifican el tono de la señal de salida, resultado de la mezcla de las varias señales de entrada. Estos mandos no actúan sobre las salidas TAPE y BOOSTER. Regeling lage tonen (BASS) Met regelknop BASS worden de prestaties van de lagefrequentieversterker geregeld. De middelste positie, aangegeven met 0, levert een rechtlijnige respons. Draai de knop naar rechts voor het accentueren van de lage frequenties. Bij hoornklankverspreiders is het beter de lage frequenties met behulp van de regelknop BASS te verzachten. Een te hoog niveau van de lage frequenties zou de membraan van de klankverspreider kunnen beschadigen. Control tonos bajos (BASS) El control BASS regula las prestaciones del amplificador en las bajas frecuencias. La posición de centro, indicada por el 0, suministra una respuesta lineal; para tener una intensificación de las frecuencias bajas hay que girar el botón en el sentido de las agujas del reloj; utilizando difusores de bocina es conveniente, mediante el mando BASS, atenuar las frecuencias bajas; un excesivo nivel de las bajas frecuencias podría dañar la membrana del difusor. Regeling hoge tonen (TREBLE) De regelknop TREBLE regelt de akoestische prestaties van de hogefrequentieversterker. De middelste positie, aangegeven met 0, levert een rechtlijnige respons. Draai de knop naar rechts voor het accentueren van de hoge frequenties. Deze regelknop is nuttig om een te hoog ruisniveau tot een minimum terug te brengen of om geluiden met een bijzondere fluittoon te verzachten. Control tonos agudos (TREBLE) El control TREBLE regula las prestaciones acústicas del amplificador a las altas frecuencias. La posición de centro, indicada por el 0, suministra una respuesta de tipo lineal; para obtener una intensificación de las frecuencias altas hay que girar el botón en el sentido de las agujas del reloj. Este mando es útil para minimizar un excesivo nivel de murmullo o para hacer que sean más suaves los sonidos particularmente silbantes. 4.4 OVERBELASTING EN BEVEILIGINGEN Een belastingsimpedantiewaarde onder de nominale waarde toepassen, betekent dat u van het apparaat een grotere kracht vraagt dan hij met continuiteit kan leveren. Dit zou de laatste krachtfasen en de uitgangstransformator kunnen beschadigen. Om problemen van deze aard te voorkomen, zijn de versterkers van de serie AX8000 uitgerust met een overbelastingsbeveiligingscircuit met automatische reset. 4.4 CONDICIONES DE SOBRECARGA Y PROTECCIONES Aplicar un valor de impedancia de carga inferior a la nominal significa solicitar al aparato una potencia superior a la suministrada con continuidad. Esto podría dañar las fases finales de potencia y del transformador de salida. Para no incurrir en estos inconvenientes los amplificadores de la serie AX8000 cuentan con un circuito de protección contra sobrecargas con restablecimiento automático. Het beveiligingscircuit op de versterker treedt onmiddellijk in werking indien zich een van de volgende gevallen voordoet: El circuito de protección intervendrá inmediatamente sobre el amplificador si surgiera uno de los siguientes casos: - - kortsluiting op een van de luidspreker uitgangen; belastingsimpedantie minder dan 70% van de nominale waarde. door het aan de gelijkspanningsleiden verbonden klankverspreidersysteem wordt een kracht gevraagd die hoger is dan die door de versterker gegeven kan worden. De overbelasting wordt gesignaleerd doordat het op het voorpaneel van het apparaat aangebrachte controlelampje OVERLOAD [2] gaat knipperen. Het apparaat hervat zijn normale werking zodra de oorzaak van de overbelasting verwijderd is. Zie punt 3.8 voor de nominale impedantie- en spanningswaarden voor de verschillende uitgangen en voor een goede instelling van de installatie. cortocircuito en una de las salidas para altavoces; impedancia de carga inferior al 70% del valor nominal. potencia solicitada por el sistema de difusores, conectados en las líneas de tensión constante, superior a la suministrada por el amplificador. La condición de sobrecarga está indicada porque se enciende intermitentemente la luz indicadora OVERLOAD [2] colocada en el panel frontal del aparato. El aparato volverá a funcionar con normalidad nada más que se haya eliminado la causa de la sobrecarga. Para lo relativo a los valores de impedancia y de tensión nominal para las diferentes salidas y para el correcto dimensionamiento de una instalación véase el punto 3.8. SERIE AX8000 11-528.p65 47 47 08/06/01, 14.21 GEBRUIK VAN HET APPARAAT 4 USO DEL APARATO 4.5 APPARAATINSTELLINGEN Stroomijking van de laatste fase in ruststand (uit te voeren met een koud apparaat en met het hoofdvolume op minimum): 1. Regel P110 tot een spanning van 6 mV gemeten wordt bij de klemmen R158. 2. Regel P111 tot een spanning van 6 mV gemeten wordt bij de klemmen R151. 4.5 REGULACIÓN DEL APARATO Regulación de la corriente en reposo de la fase final (que se efectúa con el aparato frío y con el volumen principal al mínimo): 1. Regulen P110 hasta medir una tensión de 6 mV en los extremos de R158. 2. Regulen P111 hasta medir una tensión de 6 mV en los extremos de R151. Schaalbodemijking van de uitgangskrachtaanwijzer: 1. Zet de nominale krachtversterker op nominale belasting met het sinusvormige teken op 1 kHz. 2. Regel P401 zodat de rode led gaat branden. 3. Verminder P401 langzaam tot de rode red uitgaat. Regulación de fin de escala del indicador de la potencia de salida: 1. Pongan el amplificador a potencia nominal en carga nominal con señal sinusoidal a 1 kHz. 2. Regulen P401 para que se encienda la luz indicadora roja. 3. Disminuyan lentamente P401 hasta que se apague la luz roja. SERIE AX8000 48 11-528.p65 48 08/06/01, 14.21 TECHNISCHE KENMERKEN Nom i nal e ui tgangsverm ogen 5 1 2 0 W (A X 8 12 0 ) Gel i j kspanni ngsui tgangen CARACTERÍSTICAS TÉCNICAS 2 4 0 W ( A X 8 2 40 ) Potenci a de sal i da nom i nal 100, 70, 50 V Gel i j ki m pedanti esui tgangen Vervorm i ng bi j nom i naal verm ogen Sal i das a tensi ón constante 16, 8 Ω Sal i das a i m pedanci a constante <1% Di storsi ón a l a potenci a nom i nal Tooregel i ng - C ontrol es de tono Lage tonen ± 1 0 d B (a 1 0 0 H z) Tonos baj os Hoge tonen ± 1 0 d B (a 1 0 k H z) Tonos agudos Mi crofooni ngangen -Entradas m i crofóni cas 1,6 m V / 15 00 Ω Ingangsgevoel i ghei d/i m pedanti e Verhoudi ng si gnaal /stori ng Sensi bi l i dad / i m pedanci a entrada 6 3 dB Respons i n frequenti e Pri ori tei tsdem pi ng Mi crofoonfi l ter Rel aci ón señal /rui do 50 ÷ 20.000 Hz (0/3 dB) Respuesta en frecuenci a 4 0 dB A tenuaci ón precedenci a 500 Hz (3 dB) Fi l tro m i crofóni co Hul pi ngangen - Entr adas auxi l i ar es TA PE-Ingangsgevoel i ghei d/i m pedanti e 1 5 0 m V / 4 7 kΩ Sensi bi l i dad / i m pedanci a entrada TA PE C D-Ingangsgevoel i ghei d/i m pedanti e 5 0 0 m V / 4 7 kΩ Sensi bi l i dad / i m pedanci a entrada C D T U NER-Ingangsgevoel i ghei d/i m pedanti e 1 5 0 m V / 4 7 kΩ Sensi bi l i dad / i m pedanci a entrada T U NER EMERGENZA /T EL-Ingangsgevoeligheid/im pedantie 1 0 0 m V / 4 7 kΩ Sensibilidad / im pedancia entrada EMERGENZA /T EL Drem pel acti veri ng V O X 55 m V U m bral acti vaci ón V O X Verhoudi ng si gnaal /stori ng 8 5 dB Rel aci ón señal /rui do Respons i n frequenti e Pri ori tei tsdem pi ng 40 ÷ 20.000 Hz (0/3 dB) Respuesta en frecuenci a 5 5 dB A tenuaci ón precedenci a Ni veau/i m pedanti e ui tgangTA PE O U T 110 m V / 600 Ω Ni vel /i m pedanci a sal i da TA PE O U T Ni veau/i m pedanti e ui tgangBO O ST ER 1,1 V / 600 Ω (bi l anci ato - bal anced) Ni vel /i m pedanci a sal i da BO O ST ER Ni veau/i m pedanti e ui tgangPRE O U T 4 8 0 m V / < 1 0 kΩ Ni vel /i m pedanci a sal i da PRE O U T Ingang versterkte basi s - Entrada base am pl i fi cada Ingangsgevoel i ghei d/i m pedanti e Verhoudi ng si gnaal /stori ng 2 5 0 m V / 1 0 kΩ Sensi bi l i dad / i m pedanci a entrada 8 0 dB Respons i n frequenti e Rel aci ón señal /rui do 180 ÷ 12.000 (0/3 dB) Respuesta en frecuenci a SERIE AX8000 11-528.p65 49 49 08/06/01, 14.21 LIST VERVANGINGSONDERDELEN BE SC HR IJV ING 6 PARTES DE RECAMBIO A X 8120 G ezeefdr ukt fr o ntpaneel A X 8240 DE SC R IP C IÓN 3 6 /2 3 2 3 - S 1 Panel fr o ntal ser i gr afi ado Sam enstel m i cr o fo o ni ngangenci r cui t 2 7 /4 4 7 0 C o nj unto ci r cui to entr adas m i cr o fó ni cas Sam enstel hul pi ngangenci r cui t 2 7 /4 4 7 1 C o nj unto ci r cui to entr adas auxi l i ar es Sam enstel ver ster ker sci r cui t 2 7 /4 4 7 7 2 7 /4 4 7 2 C o nj unto ci r cui to am pl i fi cado r Sam enstel kl em m enstr o o kci r cui t 2 7 /4 4 7 4 C o nj unto ci r cui to ter m i nal de co nexi ó n Sam enstel m o dul eci r cui t 2 7 /4 4 7 5 C o nj unto ci r cui to m ó dul o Sam enstel V u- Meter ci r cui t 2 7 /4 0 4 4 C o nj unto ci r cui to V u- Meter Vo edi ngstr ansfo r m ato r T F1 7 0 [T F1 8 2 ] T F1 6 9 [T F1 8 1 ] U i tgangstr ansfo r m ato r T U 118-A T U 117-A Tr ansfo r m ado r de al i m entaci ó n Tr ansfo r m ado r de sal i da Handvat 2 8 /5 1 Mando Vo edi ngsschakel aar 1 9 /1 1 3 Inter r upto r de al i m entaci ó n N etstekker m et zeker i ngho uder 2 5 /1 6 5 C l avi j a de r ed co n po r tafusi bl e Bescher m i ng ui tgangskl em m enstr o o k 4 1 /2 3 9 Pr o tecci ó n bo r ner a de sal i da 1 6 /5 7 Puente r ecti fi cado r 3 5 A 2 0 0 V G el i j kr i chter br ug 3 5 A 2 0 0 V El ektr o l yti sche co ndensato r 1 0 0 0 0 µF 5 0 V - 643050103 C o ndensado r el ectr o l í ti co 1 0 0 0 0 µF 5 0 V El ektr o l yti sche co ndensato r 6 8 0 0 µF 5 0 V 642050682 - C o ndensado r el ectr o l í ti co 6 8 0 0 µF 5 0 V Ker am i sche co ndensato r 2 ,2 nF 4 0 0 V 709010222 Lo gar i tm i sche ver m o gensm eter 1 0 kΩ 1 2 /1 6 9 Po tenci ó m etr o 1 0 kΩ l o gar í tm i co Li neai r e ver m o gensm eter 5 0 kΩ 1 2 /1 7 0 Po tenci ó m etr o 5 0 kΩ l i neal Li neai r e ver m o gensm eter ni veaur egel aar 5 0 kΩ 1 2 /1 5 2 Po tenci ó m etr o r egul aci ó n ni vel es 5 0 kΩ l i neal Tr ansi sto r T IP3 5 C 1 7 /7 9 Tr ansi sto r T IP3 5 C SERIE AX8000 50 11-528.p65 C o ndensado r cer ám i co 2 ,2 nF 4 0 0 V 50 08/06/01, 14.21 ○ ○ ○ ○ ○ ○ ○ ○ ○ ○ ○ ○ ○ ○ ○ ○ ○ ○ ○ ○ ○ ○ ○ ○ ○ ○ ○ ○ ○ ○ ○ ○ ○ ○ ○ ○ ○ ○ ○ ○ ○ ○ ○ ○ ○ ○ ○ ○ ○ ○ ○ ○ ○ ○ ○ ○ ○ ○ ○ ○ ○ ○ ○ ○ ○ ○ ○ ○ ○ ○ ○ ○ ○ ○ ○ ○ ○ ○ ○ ○ ○ ○ ○ ○ ○ ○ ○ ○ ○ ○ ○ ○ ○ ○ ○ ○ ○ ○ ○ ○ ○ ○ ○ ○ ○ ○ ○ ○ ○ ○ ○ ○ ○ ○ ○ ○ ○ ○ ○ ○ ○ ○ ○ ○ ○ ○ ○ ○ ○ ○ ○ ○ ○ ○ ○ ○ ○ ○ ○ ○ ○ ○ ○ ○ ○ ○ ○ ○ ○ ○ ○ ○ ○ ○ ○ ○ ○ ○ ○ ○ ○ ○ ○ ○ ○ ○ ○ ○ ○ ○ ○ ○ ○ ○ ○ ○ ○ ○ ○ ○ ○ ○ ○ ○ ○ ○ ○ ○ ○ ○ ○ ○ ○ ○ ○ ○ ○ ○ ○ ○ ○ ○ ○ ○ ○ ○ ○ ○ ○ ○ ○ ○ ○ ○ ○ ○ ○ ○ ○ ○ ○ ○ ○ ○ ○ ○ ○ ○ ○ ○ ○ ○ ○ ○ ○ ○ ○ ○ ○ ○ ○ ○ ○ ○ ○ ○ ○ ○ ○ ○ ○ ○ ○ ○ ○ ○ ○ ○ ○ ○ ○ ○ ○ ○ ○ ○ ○ ○ ○ ○ ○ ○ ○ ○ ○ ○ ○ ○ ○ ○ ○ ○ ○ ○ ○ ○ ○ ○ ○ ○ ○ ○ ○ ○ ○ ○ ○ ○ ○ ○ ○ ○ ○ ○ ○ ○ ○ ○ ○ ○ ○ ○ ○ ○ ○ ○ ○ ○ ○ ○ ○ ○ ○ ○ ○ ○ ○ ○ ○ ○ ○ ○ ○ ○ ○ ○ ○ ○ ○ ○ ○ ○ ○ ○ ○ ○ ○ ○ ○ ○ ○ ○ ○ ○ ○ ○ ○ ○ ○ ○ ○ ○ ○ ○ ○ ○ ○ ○ ○ ○ ○ ○ ○ ○ ○ ○ ○ ○ ○ ○ ○ ○ ○ ○ ○ ○ ○ ○ ○ ○ ○ ○ ○ ○ ○ ○ ○ ○ ○ ○ ○ ○ ○ ○ ○ ○ ○ ○ ○ ○ ○ ○ ○ ○ ○ ○ ○ ○ ○ ○ ○ ○ ○ ○ ○ ○ ○ ○ ○ ○ ○ ○ ○ ○ ○ ○ ○ ○ ○ ○ ○ ○ ○ ○ ○ ○ ○ ○ ○ ○ ○ ○ ○ ○ ○ ○ ○ ○ ○ ○ ○ ○ ○ ○ ○ ○ ○ ○ ○ ○ ○ ○ ○ ○ ○ ○ ○ ○ ○ ○ ○ ○ ○ ○ ○ ○ ○ ○ ○ ○ ○ ○ ○ ○ ○ ○ ○ ○ ○ ○ ○ ○ ○ ○ ○ ○ ○ ○ ○ ○ ○ ○ ○ ○ ○ ○ ○ ○ ○ ○ ○ ○ ○ ○ ○ ○ ○ ○ ○ ○ ○ ○ ○ ○ ○ ○ ○ ○ ○ ○ ○ ○ ○ ○ ○ ○ ○ ○ ○ ○ ○ ○ ○ ○ ○ ○ ○ ○ ○ ○ ○ ○ ○ ○ ○ ○ ○ ○ ○ ○ ○ ○ ○ ○ ○ ○ ○ ○ ○ ○ ○ ○ ○ ○ ○ ○ ○ ○ ○ ○ ○ ○ ○ ○ ○ ○ ○ ○ ○ ○ ○ ○ ○ ○ ○ ○ ○ ○ ○ ○ ○ ○ ○ ○ ○ ○ ○ ○ ○ ○ ○ ○ ○ ○ ○ ○ ○ ○ ○ ○ ○ ○ ○ ○ ○ ○ ○ ○ ○ ○ ○ ○ ○ ○ ○ ○ ○ ○ ○ ○ ○ ○ ○ ○ ○ ○ ○ ○ ○ ○ ○ ○ ○ ○ ○ ○ ○ ○ ○ ○ ○ ○ ○ ○ ○ ○ ○ ○ ○ ○ ○ ○ ○ ○ ○ ○ ○ ○ ○ ○ ○ ○ ○ ○ ○ ○ ○ ○ ○ ○ ○ ○ ○ ○ ○ ○ ○ ○ ○ ○ ○ ○ ○ ○ ○ ○ ○ ○ ○ ○ ○ ○ ○ ○ ○ ○ ○ ○ ○ ○ ○ ○ ○ ○ ○ ○ ○ ○ ○ ○ ○ ○ ○ ○ ○ ○ ○ ○ ○ ○ ○ ○ ○ ○ ○ ○ ○ ○ ○ ○ ○ ○ ○ ○ ○ ○ ○ ○ ○ ○ ○ ○ ○ ○ ○ ○ ○ ○ ○ ○ ○ ○ ○ ○ ○ ○ ○ ○ ○ ○ ○ ○ ○ ○ ○ ○ ○ ○ ○ ○ ○ ○ ○ ○ ○ ○ ○ ○ ○ ○ ○ ○ ○ ○ ○ ○ ○ ○ ○ ○ ○ ○ ○ ○ ○ ○ ○ ○ ○ ○ ○ ○ ○ ○ ○ ○ ○ ○ ○ ○ ○ ○ ○ ○ ○ ○ ○ ○ ○ ○ ○ ○ ○ ○ ○ ○ ○ ○ ○ ○ ○ ○ ○ ○ ○ ○ ○ ○ ○ ○ ○ ○ ○ ○ ○ ○ ○ ○ ○ ○ ○ ○ ○ ○ ○ ○ ○ ○ ○ ○ ○ ○ ○ ○ ○ ○ ○ ○ ○ ○ ○ ○ ○ ○ ○ ○ ○ ○ ○ ○ ○ ○ ○ ○ ○ ○ ○ ○ ○ ○ ○ ○ ○ ○ ○ ○ ○ ○ ○ ○ ○ ○ ○ ○ ○ ○ ○ ○ ○ ○ ○ ○ ○ ○ ○ ○ ○ ○ ○ ○ ○ ○ ○ ○ ○ ○ ○ ○ ○ ○ ○ ○ ○ ○ ○ ○ ○ ○ ○ ○ ○ ○ ○ ○ ○ ○ ○ ○ ○ ○ ○ ○ ○ ○ ○ ○ ○ ○ ○ ○ ○ ○ ○ ○ ○ ○ ○ ○ ○ ○ ○ ○ ○ ○ ○ ○ ○ ○ ○ ○ ○ ○ ○ ○ ○ ○ ○ ○ ○ ○ ○ ○ ○ ○ ○ ○ ○ ○ ○ ○ ○ ○ ○ ○ ○ ○ ○ ○ ○ ○ ○ ○ ○ ○ ○ ○ ○ ○ ○ ○ ○ ○ ○ ○ ○ ○ ○ ○ ○ ○ ○ ○ ○ ○ ○ ○ ○ ○ ○ ○ ○ ○ ○ ○ ○ ○ ○ ○ ○ ○ ○ ○ ○ ○ ○ ○ ○ ○ ○ ○ ○ ○ ○ ○ ○ ○ ○ ○ ○ ○ ○ ○ ○ ○ ○ ○ ○ ○ ○ ○ ○ ○ ○ ○ ○ ○ ○ ○ ○ ○ ○ ○ ○ ○ ○ ○ ○ ○ ○ ○ ○ ○ ○ ○ ○ ○ ○ ○ ○ ○ ○ ○ ○ ○ ○ ○ ○ ○ ○ ○ ○ ○ ○ ○ ○ ○ ○ ○ ○ ○ ○ ○ ○ ○ ○ ○ ○ ○ ○ ○ ○ ○ ○ ○ ○ ○ ○ ○ ○ ○ ○ ○ ○ ○ ○ ○ ○ ○ ○ ○ ○ ○ ○ ○ ○ ○ ○ ○ ○ ○ ○ ○ ○ ○ ○ ○ ○ ○ ○ ○ ○ ○ ○ ○ ○ ○ ○ ○ ○ ○ ○ ○ ○ ○ ○ ○ ○ ○ ○ ○ ○ ○ ○ ○ ○ ○ ○ ○ ○ ○ ○ ○ ○ ○ ○ ○ ○ ○ ○ ○ ○ ○ ○ ○ ○ ○ ○ ○ ○ ○ ○ ○ ○ ○ ○ ○ ○ ○ ○ ○ ○ ○ ○ ○ ○ ○ ○ ○ ○ ○ ○ ○ ○ ○ ○ ○ ○ ○ ○ ○ ○ ○ ○ ○ ○ ○ ○ ○ ○ ○ ○ ○ ○ ○ ○ ○ ○ ○ ○ ○ ○ ○ ○ ○ ○ ○ ○ ○ ○ ○ ○ ○ ○ ○ ○ ○ ○ ○ ○ ○ ○ ○ ○ ○ ○ ○ ○ ○ ○ ○ ○ ○ ○ ○ ○ ○ ○ ○ ○ ○ ○ ○ ○ ○ ○ ○ ○ ○ ○ ○ ○ ○ ○ ○ ○ ○ ○ ○ ○ ○ ○ ○ ○ ○ ○ ○ ○ ○ ○ ○ ○ ○ ○ ○ ○ ○ ○ ○ ○ ○ ○ ○ ○ ○ ○ ○ ○ ○ ○ ○ ○ ○ ○ ○ ○ ○ ○ ○ ○ ○ ○ ○ ○ ○ ○ ○ ○ ○ ○ ○ ○ ○ ○ ○ ○ ○ ○ ○ ○ ○ ○ ○ ○ ○ ○ ○ ○ ○ ○ ○ ○ ○ ○ ○ ○ ○ ○ ○ ○ ○ ○ ○ ○ ○ ○ ○ ○ ○ ○ ○ ○ ○ ○ ○ ○ ○ ○ ○ ○ ○ ○ ○ ○ ○ ○ ○ ○ ○ ○ ○ ○ ○ ○ ○ ○ ○ ○ ○ ○ ○ ○ ○ ○ ○ ○ ○ ○ ○ ○ ○ ○ ○ ○ ○ ○ ○ ○ ○ ○ ○ ○ ○ ○ ○ ○ ○ ○ ○ ○ ○ ○ ○ ○ ○ ○ ○ ○ ○ ○ ○ ○ ○ ○ ○ ○ ○ ○ ○ ○ ○ ○ ○ ○ ○ ○ ○ ○ ○ ○ ○ ○ ○ ○ ○ ○ ○ ○ ○ ○ ○ ○ ○ ○ ○ ○ ○ ○ ○ ○ ○ ○ ○ ○ ○ ○ ○ ○ ○ ○ ○ ○ ○ ○ ○ ○ ○ ○ ○ ○ ○ ○ ○ ○ ○ ○ ○ ○ ○ ○ ○ ○ ○ ○ ○ ○ ○ ○ ○ ○ ○ ○ ○ ○ ○ ○ ○ ○ ○ ○ ○ ○ ○ ○ ○ ○ ○ ○ ○ ○ ○ ○ ○ ○ ○ ○ ○ ○ ○ ○ ○ ○ ○ ○ ○ ○ ○ ○ ○ ○ ○ ○ ○ ○ ○ ○ ○ ○ ○ ○ ○ ○ ○ ○ ○ ○ ○ ○ ○ ○ ○ ○ ○ ○ ○ ○ ○ ○ ○ ○ ○ ○ ○ ○ ○ ○ ○ ○ ○ ○ ○ ○ ○ ○ ○ ○ ○ ○ ○ ○ ○ ○ ○ ○ ○ ○ ○ ○ ○ ○ ○ ○ ○ ○ ○ ○ ○ ○ ○ ○ ○ ○ ○ ○ ○ ○ ○ ○ ○ ○ ○ ○ ○ ○ ○ ○ ○ ○ ○ ○ ○ ○ ○ ○ ○ ○ ○ ○ ○ ○ ○ ○ ○ ○ ○ ○ ○ ○ ○ ○ ○ ○ ○ ○ ○ ○ ○ ○ ○ ○ ○ ○ ○ ○ ○ ○ ○ ○ ○ ○ ○ ○ ○ ○ ○ ○ ○ ○ ○ ○ ○ ○ ○ ○ ○ ○ ○ ○ ○ ○ ○ ○ ○ ○ ○ ○ ○ ○ ○ ○ ○ ○ ○ ○ ○ ○ ○ ○ ○ ○ ○ ○ ○ ○ ○ ○ ○ ○ ○ ○ ○ ○ ○ ○ ○ ○ ○ ○ ○ ○ ○ ○ ○ ○ ○ ○ ○ ○ ○ ○ ○ ○ ○ ○ ○ ○ ○ ○ ○ ○ ○ ○ ○ ○ ○ ○ ○ ○ ○ ○ ○ ○ ○ ○ ○ ○ ○ ○ ○ ○ ○ ○ ○ ○ ○ ○ ○ ○ ○ ○ ○ ○ ○ ○ ○ ○ ○ ○ ○ ○ ○ ○ ○ ○ ○ ○ ○ ○ ○ ○ ○ ○ ○ ○ ○ ○ ○ ○ ○ ○ ○ ○ ○ ○ ○ ○ ○ ○ ○ ○ ○ ○ ○ ○ ○ ○ ○ ○ ○ ○ ○ ○ ○ ○ ○ ○ ○ ○ ○ ○ ○ ○ ○ ○ ○ ○ ○ ○ ○ ○ ○ ○ ○ ○ ○ ○ ○ ○ ○ ○ ○ ○ ○ ○ ○ ○ ○ ○ ○ ○ ○ ○ ○ ○ ○ ○ ○ ○ ○ ○ ○ ○ ○ ○ ○ ○ ○ ○ ○ ○ ○ ○ ○ ○ ○ ○ ○ ○ ○ ○ ○ ○ ○ ○ ○ ○ ○ ○ ○ ○ ○ ○ ○ ○ ○ ○ ○ ○ ○ ○ ○ ○ ○ ○ ○ ○ ○ ○ ○ ○ ○ ○ ○ ○ ○ ○ ○ ○ ○ ○ ○ ○ ○ ○ ○ ○ ○ ○ ○ ○ ○ ○ ○ ○ ○ ○ ○ ○ ○ ○ ○ ○ ○ ○ ○ ○ ○ ○ ○ ○ ○ ○ ○ ○ ○ ○ ○ ○ ○ ○ ○ ○ ○ ○ ○ ○ ○ ○ ○ ○ ○ ○ ○ ○ ○ ○ ○ ○ ○ ○ ○ ○ ○ ○ ○ ○ ○ ○ ○ ○ ○ ○ ○ ○ ○ ○ ○ ○ ○ ○ ○ ○ ○ ○ ○ ○ ○ ○ ○ ○ ○ ○ ○ ○ ○ ○ ○ ○ ○ ○ ○ ○ ○ ○ ○ ○ ○ ○ ○ ○ ○ ○ ○ ○ ○ ○ ○ ○ ○ ○ ○ ○ ○ ○ ○ ○ ○ ○ ○ ○ ○ ○ ○ ○ ○ ○ ○ ○ ○ ○ ○ ○ ○ ○ ○ ○ ○ ○ ○ ○ ○ ○ ○ ○ ○ ○ ○ ○ ○ ○ ○ ○ ○ ○ ○ ○ ○ ○ ○ ○ ○ ○ ○ ○ ○ ○ ○ ○ ○ ○ ○ ○ ○ ○ ○ ○ ○ ○ ○ ○ ○ ○ ○ ○ ○ ○ ○ ○ ○ ○ ○ ○ ○ ○ ○ ○ ○ ○ ○ ○ ○ ○ ○ ○ ○ ○ ○ ○ ○ ○ ○ ○ ○ ○ ○ ○ ○ ○ ○ ○ ○ ○ ○ ○ ○ ○ ○ ○ ○ ○ ○ ○ ○ ○ ○ ○ ○ ○ ○ ○ ○ ○ ○ ○ ○ ○ ○ ○ ○ ○ ○ ○ ○ ○ ○ ○ ○ ○ ○ ○ ○ ○ ○ ○ ○ ○ ○ ○ ○ ○ ○ ○ ○ ○ ○ ○ ○ ○ ○ ○ ○ ○ ○ ○ ○ ○ ○ ○ ○ ○ ○ ○ ○ ○ ○ ○ ○ ○ ○ ○ ○ ○ ○ ○ ○ ○ ○ ○ ○ ○ ○ ○ ○ ○ ○ ○ ○ ○ ○ ○ ○ ○ ○ ○ ○ ○ ○ ○ ○ ○ ○ ○ ○ ○ ○ ○ ○ ○ ○ ○ ○ ○ ○ ○ ○ ○ ○ ○ ○ ○ ○ ○ ○ ○ ○ ○ ○ ○ ○ ○ ○ ○ ○ ○ ○ ○ ○ ○ ○ ○ ○ ○ ○ ○ ○ ○ ○ ○ ○ ○ ○ ○ ○ ○ ○ ○ ○ ○ ○ ○ ○ ○ ○ ○ ○ ○ ○ ○ ○ ○ ○ ○ ○ ○ ○ ○ ○ ○ ○ ○ ○ ○ ○ ○ ○ ○ ○ ○ ○ ○ ○ ○ ○ ○ ○ ○ ○ ○ ○ ○ ○ ○ ○ ○ ○ ○ ○ ○ ○ ○ ○ ○ ○ ○ ○ ○ ○ ○ ○ ○ ○ ○ ○ ○ ○ ○ ○ ○ ○ ○ ○ ○ ○ ○ ○ ○ ○ ○ ○ ○ ○ ○ ○ ○ ○ ○ ○ ○ ○ ○ ○ ○ ○ ○ ○ ○ ○ ○ ○ ○ ○ ○ ○ ○ ○ ○ ○ ○ ○ ○ ○ ○ ○ ○ ○ ○ ○ ○ ○ ○ ○ ○ ○ ○ ○ ○ ○ ○ ○ ○ ○ ○ ○ ○ ○ ○ ○ ○ ○ ○ ○ ○ ○ ○ ○ ○ ○ ○ ○ ○ ○ ○ ○ ○ ○ ○ ○ ○ ○ ○ ○ ○ ○ ○ ○ ○ ○ ○ ○ ○ ○ ○ ○ ○ ○ ○ ○ ○ ○ ○ ○ ○ ○ ○ ○ ○ ○ ○ ○ ○ ○ ○ ○ ○ ○ ○ ○ ○ ○ ○ ○ ○ ○ ○ ○ ○ ○ ○ ○ ○ ○ ○ ○ ○ ○ ○ ○ ○ ○ ○ ○ ○ ○ ○ ○ ○ ○ ○ ○ ○ ○ ○ ○ ○ ○ ○ ○ ○ ○ ○ ○ ○ ○ ○ ○ ○ ○ ○ ○ ○ ○ ○ ○ ○ ○ ○ ○ ○ ○ ○ ○ ○ ○ ○ ○ ○ ○ ○ ○ ○ ○ ○ ○ ○ ○ ○ ○ ○ ○ ○ ○ ○ ○ ○ ○ ○ ○ ○ ○ ○ ○ ○ ○ ○ ○ ○ ○ ○ ○ ○ ○ ○ ○ ○ ○ ○ ○ ○ ○ ○ ○ ○ ○ ○ ○ ○ ○ ○ ○ ○ ○ ○ ○ ○ ○ ○ ○ ○ ○ ○ ○ ○ ○ ○ ○ ○ ○ ○ ○ ○ ○ ○ ○ ○ ○ ○ ○ ○ ○ ○ ○ ○ ○ ○ ○ ○ ○ ○ ○ ○ ○ ○ ○ ○ ○ ○ ○ ○ ○ ○ ○ ○ ○ ○ ○ ○ ○ ○ ○ ○ ○ ○ ○ ○ ○ ○ ○ ○ ○ ○ ○ ○ ○ ○ ○ ○ ○ ○ ○ ○ ○ ○ ○ ○ ○ ○ ○ ○ ○ ○ ○ ○ ○ ○ ○ ○ ○ ○ ○ ○ ○ ○ ○ ○ ○ ○ ○ ○ ○ ○ ○ ○ ○ ○ ○ ○ ○ ○ ○ ○ ○ ○ ○ ○ ○ ○ ○ ○ ○ ○ ○ ○ ○ ○ ○ ○ ○ ○ ○ ○ ○ ○ ○ ○ ○ ○ ○ ○ ○ ○ ○ ○ ○ ○ ○ ○ ○ ○ ○ ○ ○ ○ ○ ○ ○ ○ ○ ○ ○ ○ ○ ○ ○ ○ ○ ○ ○ ○ ○ ○ ○ ○ ○ ○ ○ ○ ○ ○ ○ ○ ○ ○ ○ ○ ○ ○ ○ ○ ○ ○ ○ ○ ○ ○ ○ ○ ○ ○ ○ ○ ○ ○ ○ ○ ○ ○ ○ ○ ○ ○ ○ ○ ○ ○ ○ ○ ○ ○ ○ ○ ○ ○ ○ ○ ○ ○ ○ ○ ○ ○ ○ ○ ○ ○ ○ ○ ○ ○ ○ ○ ○ ○ ○ ○ ○ ○ ○ ○ ○ ○ ○ ○ ○ ○ ○ ○ ○ ○ ○ ○ ○ ○ ○ ○ ○ ○ ○ ○ ○ ○ ○ ○ ○ ○ ○ ○ ○ ○ ○ ○ ○ ○ ○ ○ ○ ○ ○ ○ ○ ○ ○ ○ ○ ○ ○ ○ ○ ○ ○ ○ ○ ○ ○ ○ ○ ○ ○ ○ ○ ○ ○ ○ ○ ○ ○ ○ ○ ○ ○ ○ ○ ○ ○ ○ ○ ○ ○ ○ ○ ○ ○ ○ ○ ○ ○ ○ ○ ○ ○ ○ ○ ○ ○ ○ ○ ○ ○ ○ ○ ○ ○ ○ ○ ○ ○ ○ ○ ○ ○ ○ ○ ○ ○ ○ ○ ○ ○ ○ ○ ○ ○ ○ ○ ○ ○ ○ ○ ○ ○ ○ ○ ○ ○ ○ ○ ○ ○ ○ ○ ○ ○ ○ ○ ○ ○ ○ ○ ○ ○ ○ ○ ○ ○ ○ ○ ○ ○ ○ ○ ○ ○ ○ ○ ○ ○ ○ ○ ○ ○ ○ ○ ○ ○ ○ ○ ○ ○ ○ ○ ○ ○ ○ ○ ○ ○ ○ ○ ○ ○ ○ ○ ○ ○ ○ ○ ○ ○ ○ ○ ○ ○ ○ ○ ○ ○ ○ ○ ○ ○ ○ ○ ○ ○ ○ ○ ○ ○ ○ ○ ○ ○ ○ ○ ○ ○ ○ ○ ○ ○ ○ ○ ○ ○ ○ ○ ○ ○ ○ ○ ○ ○ ○ ○ ○ ○ ○ ○ ○ ○ ○ ○ ○ ○ ○ ○ ○ ○ ○ ○ ○ ○ ○ ○ ○ ○ ○ ○ ○ ○ ○ ○ ○ ○ ○ ○ ○ ○ ○ ○ ○ ○ ○ ○ ○ ○ ○ ○ ○ ○ ○ ○ ○ ○ ○ ○ ○ ○ ○ ○ ○ ○ ○ ○ ○ ○ ○ ○ ○ ○ ○ ○ ○ ○ ○ ○ ○ ○ ○ ○ ○ ○ ○ ○ ○ ○ ○ ○ ○ ○ ○ ○ ○ ○ ○ ○ ○ ○ ○ ○ ○ ○ ○ ○ ○ ○ ○ ○ ○ ○ ○ ○ ○ ○ ○ ○ ○ ○ ○ ○ ○ ○ ○ ○ ○ ○ ○ ○ ○ ○ ○ ○ ○ ○ ○ ○ ○ ○ ○ ○ ○ ○ ○ ○ ○ ○ ○ ○ ○ ○ ○ ○ ○ ○ ○ ○ ○ ○ ○ ○ ○ ○ ○ ○ ○ ○ ○ ○ ○ ○ ○ ○ ○ ○ ○ ○ ○ ○ ○ ○ ○ ○ ○ ○ ○ ○ ○ ○ ○ ○ ○ ○ ○ ○ ○ ○ ○ ○ ○ ○ ○ ○ ○ ○ ○ ○ ○ ○ ○ ○ ○ ○ ○ ○ ○ ○ ○ ○ ○ ○ ○ ○ ○ ○ ○ ○ ○ ○ ○ ○ ○ ○ ○ ○ ○ ○ ○ ○ ○ ○ ○ ○ ○ ○ ○ ○ ○ ○ ○ ○ ○ ○ ○ ○ ○ ○ ○ ○ ○ ○ ○ ○ ○ ○ ○ ○ ○ ○ ○ ○ ○ ○ ○ ○ ○ ○ ○ ○ ○ ○ ○ ○ ○ ○ ○ ○ ○ ○ ○ ○ ○ ○ ○ ○ ○ ○ ○ ○ ○ ○ ○ ○ ○ ○ ○ ○ ○ ○ ○ ○ ○ ○ ○ ○ ○ ○ ○ ○ ○ ○ ○ ○ ○ ○ ○ ○ ○ ○ ○ ○ ○ ○ ○ ○ ○ ○ ○ ○ ○ ○ ○ ○ ○ ○ ○ ○ ○ ○ ○ ○ ○ ○ ○ ○ ○ ○ ○ ○ ○ ○ ○ ○ ○ ○ ○ ○ ○ ○ ○ ○ ○ ○ ○ ○ ○ ○ ○ ○ ○ ○ ○ ○ ○ ○ ○ ○ ○ ○ ○ ○ ○ ○ ○ ○ ○ ○ ○ ○ ○ ○ ○ ○ ○ ○ ○ ○ ○ ○ ○ ○ ○ ○ ○ ○ ○ ○ ○ ○ ○ ○ ○ ○ ○ ○ ○ ○ ○ ○ ○ ○ ○ ○ ○ ○ ○ ○ ○ ○ ○ ○ ○ ○ ○ ○ ○ ○ ○ ○ ○ ○ ○ ○ ○ ○ ○ ○ ○ ○ ○ ○ ○ ○ ○ ○ ○ ○ ○ ○ ○ ○ ○ ○ ○ ○ ○ ○ ○ ○ ○ ○ ○ ○ ○ ○ ○ ○ ○ ○ ○ ○ ○ ○ ○ ○ ○ ○ ○ ○ ○ ○ ○ ○ ○ ○ ○ ○ ○ ○ ○ ○ ○ ○ ○ ○ ○ ○ ○ ○ ○ ○ ○ ○ ○ ○ ○ ○ ○ ○ ○ ○ ○ ○ ○ ○ ○ ○ ○ ○ ○ ○ SERIE AX8000 11-528.p65 51 51 08/06/01, 14.21 ○ ○ ○ ○ ○ ○ ○ ○ ○ ○ ○ ○ ○ ○ ○ ○ ○ ○ ○ ○ ○ ○ ○ ○ ○ ○ ○ ○ ○ ○ ○ ○ ○ ○ ○ ○ ○ ○ ○ ○ ○ ○ ○ ○ ○ ○ ○ ○ ○ ○ ○ ○ ○ ○ ○ ○ ○ ○ ○ ○ ○ ○ ○ ○ ○ ○ ○ ○ ○ ○ ○ ○ ○ ○ ○ ○ ○ ○ ○ ○ ○ ○ ○ ○ ○ ○ ○ ○ ○ ○ ○ ○ ○ ○ ○ ○ ○ ○ ○ ○ ○ ○ ○ ○ ○ ○ ○ ○ ○ ○ ○ ○ ○ ○ ○ ○ ○ ○ ○ ○ ○ ○ ○ ○ ○ ○ ○ ○ ○ ○ ○ ○ ○ ○ ○ ○ ○ ○ ○ ○ ○ ○ ○ ○ ○ ○ ○ ○ ○ ○ ○ ○ ○ ○ ○ ○ ○ ○ ○ ○ ○ ○ ○ ○ ○ ○ ○ ○ ○ ○ ○ ○ ○ ○ ○ ○ ○ ○ ○ ○ ○ ○ ○ ○ ○ ○ ○ ○ ○ ○ ○ ○ ○ ○ ○ ○ ○ ○ ○ ○ ○ ○ ○ ○ ○ ○ ○ ○ ○ ○ ○ ○ ○ ○ ○ ○ ○ ○ ○ ○ ○ ○ ○ ○ ○ ○ ○ ○ ○ ○ ○ ○ ○ ○ ○ ○ ○ ○ ○ ○ ○ ○ ○ ○ ○ ○ ○ ○ ○ ○ ○ ○ ○ ○ ○ ○ ○ ○ ○ ○ ○ ○ ○ ○ ○ ○ ○ ○ ○ ○ ○ ○ ○ ○ ○ ○ ○ ○ ○ ○ ○ ○ ○ ○ ○ ○ ○ ○ ○ ○ ○ ○ ○ ○ ○ ○ ○ ○ ○ ○ ○ ○ ○ ○ ○ ○ ○ ○ ○ ○ ○ ○ ○ ○ ○ ○ ○ ○ ○ ○ ○ ○ ○ ○ ○ ○ ○ ○ ○ ○ ○ ○ ○ ○ ○ ○ ○ ○ ○ ○ ○ ○ ○ ○ ○ ○ ○ ○ ○ ○ ○ ○ ○ ○ ○ ○ ○ ○ ○ ○ ○ ○ ○ ○ ○ ○ ○ ○ ○ ○ ○ ○ ○ ○ ○ ○ ○ ○ ○ ○ ○ ○ ○ ○ ○ ○ ○ ○ ○ ○ ○ ○ ○ ○ ○ ○ ○ ○ ○ ○ ○ ○ ○ ○ ○ ○ ○ ○ ○ ○ ○ ○ ○ ○ ○ ○ ○ ○ ○ ○ ○ ○ ○ ○ ○ ○ ○ ○ ○ ○ ○ ○ ○ ○ ○ ○ ○ ○ ○ ○ ○ ○ ○ ○ ○ ○ ○ ○ ○ ○ ○ ○ ○ ○ ○ ○ ○ ○ ○ ○ ○ ○ ○ ○ ○ ○ ○ ○ ○ ○ ○ ○ ○ ○ ○ ○ ○ ○ ○ ○ ○ ○ ○ ○ ○ ○ ○ ○ ○ ○ ○ ○ ○ ○ ○ ○ ○ ○ ○ ○ ○ ○ ○ ○ ○ ○ ○ ○ ○ ○ ○ ○ ○ ○ ○ ○ ○ ○ ○ ○ ○ ○ ○ ○ ○ ○ ○ ○ ○ ○ ○ ○ ○ ○ ○ ○ ○ ○ ○ ○ ○ ○ ○ ○ ○ ○ ○ ○ ○ ○ ○ ○ ○ ○ ○ ○ ○ ○ ○ ○ ○ ○ ○ ○ ○ ○ ○ ○ ○ ○ ○ ○ ○ ○ ○ ○ ○ ○ ○ ○ ○ ○ ○ ○ ○ ○ ○ ○ ○ ○ ○ ○ ○ ○ ○ ○ ○ ○ ○ ○ ○ ○ ○ ○ ○ ○ ○ ○ ○ ○ ○ ○ ○ ○ ○ ○ ○ ○ ○ ○ ○ ○ ○ ○ ○ ○ ○ ○ ○ ○ ○ ○ ○ ○ ○ ○ ○ ○ ○ ○ ○ ○ ○ ○ ○ ○ ○ ○ ○ ○ ○ ○ ○ ○ ○ ○ ○ ○ ○ ○ ○ ○ ○ ○ ○ ○ ○ ○ ○ ○ ○ ○ ○ ○ ○ ○ ○ ○ ○ ○ ○ ○ ○ ○ ○ ○ ○ ○ ○ ○ ○ ○ ○ ○ ○ ○ ○ ○ ○ ○ ○ ○ ○ ○ ○ ○ ○ ○ ○ ○ ○ ○ ○ ○ ○ ○ ○ ○ ○ ○ ○ ○ ○ ○ ○ ○ ○ ○ ○ ○ ○ ○ ○ ○ ○ ○ ○ ○ ○ ○ ○ ○ ○ ○ ○ ○ ○ ○ ○ ○ ○ ○ ○ ○ ○ ○ ○ ○ ○ ○ ○ ○ ○ ○ ○ ○ ○ ○ ○ ○ ○ ○ ○ ○ ○ ○ ○ ○ ○ ○ ○ ○ ○ ○ ○ ○ ○ ○ ○ ○ ○ ○ ○ ○ ○ ○ ○ ○ ○ ○ ○ ○ ○ ○ ○ ○ ○ ○ ○ ○ ○ ○ ○ ○ ○ ○ ○ ○ ○ ○ ○ ○ ○ ○ ○ ○ ○ ○ ○ ○ ○ ○ ○ ○ ○ ○ ○ ○ ○ ○ ○ ○ ○ ○ ○ ○ ○ ○ ○ ○ ○ ○ ○ ○ ○ ○ ○ ○ ○ ○ ○ ○ ○ ○ ○ ○ ○ ○ ○ ○ ○ ○ ○ ○ ○ ○ ○ ○ ○ ○ ○ ○ ○ ○ ○ ○ ○ ○ ○ ○ ○ ○ ○ ○ ○ ○ ○ ○ ○ ○ ○ ○ ○ ○ ○ ○ ○ ○ ○ ○ ○ ○ ○ ○ ○ ○ ○ ○ ○ ○ ○ ○ ○ ○ ○ ○ ○ ○ ○ ○ ○ ○ ○ ○ ○ ○ ○ ○ ○ ○ ○ ○ ○ ○ ○ ○ ○ ○ ○ ○ ○ ○ ○ ○ ○ ○ ○ ○ ○ ○ ○ ○ ○ ○ ○ ○ ○ ○ ○ ○ ○ ○ ○ ○ ○ ○ ○ ○ ○ ○ ○ ○ ○ ○ ○ ○ ○ ○ ○ ○ ○ ○ ○ ○ ○ ○ ○ ○ ○ ○ ○ ○ ○ ○ ○ ○ ○ ○ ○ ○ ○ ○ ○ ○ ○ ○ ○ ○ ○ ○ ○ ○ ○ ○ ○ ○ ○ ○ ○ ○ ○ ○ ○ ○ ○ ○ ○ ○ ○ ○ ○ ○ ○ ○ ○ ○ ○ ○ ○ ○ ○ ○ ○ ○ ○ ○ ○ ○ ○ ○ ○ ○ ○ ○ ○ ○ ○ ○ ○ ○ ○ ○ ○ ○ ○ ○ ○ ○ ○ ○ ○ ○ ○ ○ ○ ○ ○ ○ ○ ○ ○ ○ ○ ○ ○ ○ ○ ○ ○ ○ ○ ○ ○ ○ ○ ○ ○ ○ ○ ○ ○ ○ ○ ○ ○ ○ ○ ○ ○ ○ ○ ○ ○ ○ ○ ○ ○ ○ ○ ○ ○ ○ ○ ○ ○ ○ ○ ○ ○ ○ ○ ○ ○ ○ ○ ○ ○ ○ ○ ○ ○ ○ ○ ○ ○ ○ ○ ○ ○ ○ ○ ○ ○ ○ ○ ○ ○ ○ ○ ○ ○ ○ ○ ○ ○ ○ ○ ○ ○ ○ ○ ○ ○ ○ ○ ○ ○ ○ ○ ○ ○ ○ ○ ○ ○ ○ ○ ○ ○ ○ ○ ○ ○ ○ ○ ○ ○ ○ ○ ○ ○ ○ ○ ○ ○ ○ ○ ○ ○ ○ ○ ○ ○ ○ ○ ○ ○ ○ ○ ○ ○ ○ ○ ○ ○ ○ ○ ○ ○ ○ ○ ○ ○ ○ ○ ○ ○ ○ ○ ○ ○ ○ ○ ○ ○ ○ ○ ○ ○ ○ ○ ○ ○ ○ ○ ○ ○ ○ ○ ○ ○ ○ ○ ○ ○ ○ ○ ○ ○ ○ ○ ○ ○ ○ ○ ○ ○ ○ ○ ○ ○ ○ ○ ○ ○ ○ ○ ○ ○ ○ ○ ○ ○ ○ ○ ○ ○ ○ ○ ○ ○ ○ ○ ○ ○ ○ ○ ○ ○ ○ ○ ○ ○ ○ ○ ○ ○ ○ ○ ○ ○ ○ ○ ○ ○ ○ ○ ○ ○ ○ ○ ○ ○ ○ ○ ○ ○ ○ ○ ○ ○ ○ ○ ○ ○ ○ ○ ○ ○ ○ ○ ○ ○ ○ ○ ○ ○ ○ ○ ○ ○ ○ ○ ○ ○ ○ ○ ○ ○ ○ ○ ○ ○ ○ ○ ○ ○ ○ ○ ○ ○ ○ ○ ○ ○ ○ ○ ○ ○ ○ ○ ○ ○ ○ ○ ○ ○ ○ ○ ○ ○ ○ ○ ○ ○ ○ ○ ○ ○ ○ ○ ○ ○ ○ ○ ○ ○ ○ ○ ○ ○ ○ ○ ○ ○ ○ ○ ○ ○ ○ ○ ○ ○ ○ ○ ○ ○ ○ ○ ○ ○ ○ ○ ○ ○ ○ ○ ○ ○ ○ ○ ○ ○ ○ ○ ○ ○ ○ ○ ○ ○ ○ ○ ○ ○ ○ ○ ○ ○ ○ ○ ○ ○ ○ ○ ○ ○ ○ ○ ○ ○ ○ ○ ○ ○ ○ ○ ○ ○ ○ ○ ○ ○ ○ ○ ○ ○ ○ ○ ○ ○ ○ ○ ○ ○ ○ ○ ○ ○ ○ ○ ○ ○ ○ ○ ○ ○ ○ ○ ○ ○ ○ ○ ○ ○ ○ ○ ○ ○ ○ ○ ○ ○ ○ ○ ○ ○ ○ ○ ○ ○ ○ ○ ○ ○ ○ ○ ○ ○ ○ ○ ○ ○ ○ ○ ○ ○ ○ ○ ○ ○ ○ ○ ○ ○ ○ ○ ○ ○ ○ ○ ○ ○ ○ ○ ○ ○ ○ ○ ○ ○ ○ ○ ○ ○ ○ ○ ○ ○ ○ ○ ○ ○ ○ ○ ○ ○ ○ ○ ○ ○ ○ ○ ○ ○ ○ ○ ○ ○ ○ ○ ○ ○ ○ ○ ○ ○ ○ ○ ○ ○ ○ ○ ○ ○ ○ ○ ○ ○ ○ ○ ○ ○ ○ ○ ○ ○ ○ ○ ○ ○ ○ ○ ○ ○ ○ ○ ○ ○ ○ ○ ○ ○ ○ ○ ○ ○ ○ ○ ○ ○ ○ ○ ○ ○ ○ ○ ○ ○ ○ ○ ○ ○ ○ ○ ○ ○ ○ ○ ○ ○ ○ ○ ○ ○ ○ ○ ○ ○ ○ ○ ○ ○ ○ ○ ○ ○ ○ ○ ○ ○ ○ ○ ○ ○ ○ ○ ○ ○ ○ ○ ○ ○ ○ ○ ○ ○ ○ ○ ○ ○ ○ ○ ○ ○ ○ ○ ○ ○ ○ ○ ○ ○ ○ ○ ○ ○ ○ ○ ○ ○ ○ ○ ○ ○ ○ ○ ○ ○ ○ ○ ○ ○ ○ ○ ○ ○ ○ ○ ○ ○ ○ ○ ○ ○ ○ ○ ○ ○ ○ ○ ○ ○ ○ ○ ○ ○ ○ ○ ○ ○ ○ ○ ○ ○ ○ ○ ○ ○ ○ ○ ○ ○ ○ ○ ○ ○ ○ ○ ○ ○ ○ ○ ○ ○ ○ ○ ○ ○ ○ ○ ○ ○ ○ ○ ○ ○ ○ ○ ○ ○ ○ ○ ○ ○ ○ ○ ○ ○ ○ ○ ○ ○ ○ ○ ○ ○ ○ ○ ○ ○ ○ ○ ○ ○ ○ ○ ○ ○ ○ ○ ○ ○ ○ ○ ○ ○ ○ ○ ○ ○ ○ ○ ○ ○ ○ ○ ○ ○ ○ ○ ○ ○ ○ ○ ○ ○ ○ ○ ○ ○ ○ ○ ○ ○ ○ ○ ○ ○ ○ ○ ○ ○ ○ ○ ○ ○ ○ ○ ○ ○ ○ ○ ○ ○ ○ ○ ○ ○ ○ ○ ○ ○ ○ ○ ○ ○ ○ ○ ○ ○ ○ ○ ○ ○ ○ ○ ○ ○ ○ ○ ○ ○ ○ ○ ○ ○ ○ ○ ○ ○ ○ ○ ○ ○ ○ ○ ○ ○ ○ ○ ○ ○ ○ ○ ○ ○ ○ ○ ○ ○ ○ ○ ○ ○ ○ ○ ○ ○ ○ ○ ○ ○ ○ ○ ○ ○ ○ ○ ○ ○ ○ ○ ○ ○ ○ ○ ○ ○ ○ ○ ○ ○ ○ ○ ○ ○ ○ ○ ○ ○ ○ ○ ○ ○ ○ ○ ○ ○ ○ ○ ○ ○ ○ ○ ○ ○ ○ ○ ○ ○ ○ ○ ○ ○ ○ ○ ○ ○ ○ ○ ○ ○ ○ ○ ○ ○ ○ ○ ○ ○ ○ ○ ○ ○ ○ ○ ○ ○ ○ ○ ○ ○ ○ ○ ○ ○ ○ ○ ○ ○ ○ ○ ○ ○ ○ ○ ○ ○ ○ ○ ○ ○ ○ ○ ○ ○ ○ ○ ○ ○ ○ ○ ○ ○ ○ ○ ○ ○ ○ ○ ○ ○ ○ ○ ○ ○ ○ ○ ○ ○ ○ ○ ○ ○ ○ ○ ○ ○ ○ ○ ○ ○ ○ ○ ○ ○ ○ ○ ○ ○ ○ ○ ○ ○ ○ ○ ○ ○ ○ ○ ○ ○ ○ ○ ○ ○ ○ ○ ○ ○ ○ ○ ○ ○ ○ ○ ○ ○ ○ ○ ○ ○ ○ ○ ○ ○ ○ ○ ○ ○ ○ ○ ○ ○ ○ ○ ○ ○ ○ ○ ○ ○ ○ ○ ○ ○ ○ ○ ○ ○ ○ ○ ○ ○ ○ ○ ○ ○ ○ ○ ○ ○ ○ ○ ○ ○ ○ ○ ○ ○ ○ ○ ○ ○ ○ ○ ○ ○ ○ ○ ○ ○ ○ ○ ○ ○ ○ ○ ○ ○ ○ ○ ○ ○ ○ ○ ○ ○ ○ ○ ○ ○ ○ ○ ○ ○ ○ ○ ○ ○ ○ ○ ○ ○ ○ ○ ○ ○ ○ ○ ○ ○ ○ ○ ○ ○ ○ ○ ○ ○ ○ ○ ○ ○ ○ ○ ○ ○ ○ ○ ○ ○ ○ ○ ○ ○ ○ ○ ○ ○ ○ ○ ○ ○ ○ ○ ○ ○ ○ ○ ○ ○ ○ ○ ○ ○ ○ ○ ○ ○ ○ ○ ○ ○ ○ ○ ○ ○ ○ ○ ○ ○ ○ ○ ○ ○ ○ ○ ○ ○ ○ ○ ○ ○ ○ ○ ○ ○ ○ ○ ○ ○ ○ ○ ○ ○ ○ ○ ○ ○ ○ ○ ○ ○ ○ ○ ○ ○ ○ ○ ○ ○ ○ ○ ○ ○ ○ ○ ○ ○ ○ ○ ○ ○ ○ ○ ○ ○ ○ ○ ○ ○ ○ ○ ○ ○ ○ ○ ○ ○ ○ ○ ○ ○ ○ ○ ○ ○ ○ ○ ○ ○ ○ ○ ○ ○ ○ ○ ○ ○ ○ ○ ○ ○ ○ ○ ○ ○ ○ ○ ○ ○ ○ ○ ○ ○ ○ ○ ○ ○ ○ ○ ○ ○ ○ ○ ○ ○ ○ ○ ○ ○ ○ ○ ○ ○ ○ ○ ○ ○ ○ ○ ○ ○ ○ ○ ○ ○ ○ ○ ○ ○ ○ ○ ○ ○ ○ ○ ○ ○ ○ ○ ○ ○ ○ ○ ○ ○ ○ ○ ○ ○ ○ ○ ○ ○ ○ ○ ○ ○ ○ ○ ○ ○ ○ ○ ○ ○ ○ ○ ○ ○ ○ ○ ○ ○ ○ ○ ○ ○ ○ ○ ○ ○ ○ ○ ○ ○ ○ ○ ○ ○ ○ ○ ○ ○ ○ ○ ○ ○ ○ ○ ○ ○ ○ ○ ○ ○ ○ ○ ○ ○ ○ ○ ○ ○ ○ ○ ○ ○ ○ ○ ○ ○ ○ ○ ○ ○ ○ ○ ○ ○ ○ ○ ○ ○ ○ ○ ○ ○ ○ ○ ○ ○ ○ ○ ○ ○ ○ ○ ○ ○ ○ ○ ○ ○ ○ ○ ○ ○ ○ ○ ○ ○ ○ ○ ○ ○ ○ ○ ○ ○ ○ ○ ○ ○ ○ ○ ○ ○ ○ ○ ○ ○ ○ ○ ○ ○ ○ ○ ○ ○ ○ ○ ○ ○ ○ ○ ○ ○ ○ ○ ○ ○ ○ ○ ○ ○ ○ ○ ○ ○ ○ ○ ○ ○ ○ ○ ○ ○ ○ ○ ○ ○ ○ ○ ○ ○ ○ ○ ○ ○ ○ ○ ○ ○ ○ ○ ○ ○ ○ ○ ○ ○ ○ ○ ○ ○ ○ ○ ○ ○ ○ ○ ○ ○ ○ ○ ○ ○ ○ ○ ○ ○ ○ ○ ○ ○ ○ ○ ○ ○ ○ ○ ○ ○ ○ ○ ○ ○ ○ ○ ○ ○ ○ ○ ○ ○ ○ ○ ○ ○ ○ ○ ○ ○ ○ ○ ○ ○ ○ ○ ○ ○ ○ ○ ○ ○ ○ ○ ○ ○ ○ ○ ○ ○ ○ ○ ○ ○ ○ ○ ○ ○ ○ ○ ○ ○ ○ ○ ○ ○ ○ ○ ○ ○ ○ ○ ○ ○ ○ ○ ○ ○ ○ ○ ○ ○ ○ ○ ○ ○ ○ ○ ○ ○ ○ ○ ○ ○ ○ ○ ○ ○ ○ ○ ○ ○ ○ ○ ○ ○ ○ ○ ○ ○ ○ ○ ○ ○ ○ ○ ○ ○ ○ ○ ○ ○ ○ ○ ○ ○ ○ ○ ○ ○ ○ ○ ○ ○ ○ ○ ○ ○ ○ ○ ○ ○ ○ ○ ○ ○ ○ ○ ○ ○ ○ ○ ○ ○ ○ ○ ○ ○ ○ ○ ○ ○ ○ ○ ○ ○ ○ ○ ○ ○ ○ ○ ○ ○ ○ ○ ○ ○ ○ ○ ○ ○ ○ ○ ○ ○ ○ ○ ○ ○ ○ ○ ○ ○ ○ ○ ○ ○ ○ ○ ○ ○ ○ ○ ○ ○ ○ ○ ○ ○ ○ ○ ○ ○ ○ ○ ○ ○ ○ ○ ○ ○ ○ ○ ○ ○ ○ ○ ○ ○ ○ ○ ○ ○ ○ ○ ○ ○ ○ ○ ○ ○ ○ ○ ○ ○ ○ ○ ○ ○ ○ ○ ○ ○ ○ ○ ○ ○ ○ ○ ○ ○ ○ ○ ○ ○ ○ ○ ○ ○ ○ ○ ○ ○ ○ ○ ○ ○ ○ ○ ○ ○ ○ ○ ○ ○ ○ ○ ○ ○ ○ ○ ○ ○ ○ ○ ○ ○ ○ ○ ○ ○ ○ ○ ○ ○ ○ ○ ○ ○ ○ ○ ○ ○ ○ ○ ○ ○ ○ ○ ○ ○ ○ ○ ○ ○ ○ ○ ○ ○ ○ ○ ○ ○ ○ ○ ○ ○ ○ ○ ○ ○ ○ ○ ○ ○ ○ ○ ○ ○ ○ ○ ○ ○ ○ ○ ○ ○ ○ ○ ○ ○ ○ ○ ○ ○ ○ ○ ○ ○ ○ ○ ○ ○ ○ ○ ○ ○ ○ ○ ○ ○ ○ ○ ○ ○ ○ ○ ○ ○ ○ ○ ○ ○ ○ ○ ○ ○ ○ ○ ○ ○ ○ ○ ○ ○ ○ ○ ○ ○ ○ ○ ○ ○ ○ ○ ○ ○ ○ ○ ○ ○ ○ ○ ○ ○ ○ ○ ○ ○ ○ ○ ○ ○ ○ ○ ○ ○ ○ ○ ○ ○ ○ ○ ○ ○ ○ ○ ○ ○ ○ ○ ○ ○ ○ ○ ○ ○ ○ ○ ○ ○ ○ ○ ○ ○ ○ ○ ○ ○ ○ ○ ○ ○ ○ ○ ○ ○ ○ ○ ○ ○ ○ ○ ○ ○ ○ ○ ○ ○ ○ ○ ○ ○ ○ ○ ○ ○ ○ ○ ○ ○ ○ ○ ○ ○ ○ ○ ○ ○ ○ ○ ○ ○ ○ ○ ○ ○ ○ ○ ○ ○ ○ ○ ○ ○ ○ ○ ○ ○ ○ ○ ○ ○ ○ ○ ○ ○ ○ ○ ○ ○ ○ ○ ○ ○ ○ ○ ○ ○ ○ ○ ○ ○ ○ ○ ○ ○ ○ ○ ○ ○ ○ ○ ○ ○ ○ ○ ○ ○ ○ ○ ○ ○ ○ ○ ○ ○ ○ ○ ○ ○ ○ ○ ○ ○ ○ ○ ○ ○ ○ ○ ○ ○ ○ ○ ○ ○ ○ ○ ○ ○ ○ ○ ○ ○ ○ ○ ○ ○ ○ ○ ○ ○ ○ ○ ○ ○ ○ ○ ○ ○ ○ ○ ○ ○ ○ ○ ○ ○ ○ ○ ○ ○ ○ ○ ○ ○ ○ ○ ○ ○ ○ ○ ○ ○ ○ ○ ○ ○ ○ ○ ○ ○ ○ ○ ○ ○ ○ ○ ○ ○ ○ ○ ○ ○ ○ ○ ○ ○ ○ ○ ○ ○ ○ ○ ○ ○ ○ ○ ○ ○ ○ ○ ○ ○ ○ ○ ○ ○ ○ ○ ○ ○ ○ ○ ○ ○ ○ ○ ○ ○ ○ ○ ○ ○ ○ ○ ○ ○ ○ ○ ○ ○ ○ ○ ○ ○ ○ ○ ○ ○ ○ ○ ○ ○ ○ ○ ○ ○ ○ ○ ○ ○ ○ ○ ○ ○ ○ ○ ○ ○ ○ ○ ○ ○ ○ ○ ○ ○ ○ ○ ○ ○ ○ ○ ○ ○ ○ ○ ○ ○ ○ ○ ○ ○ ○ ○ ○ ○ ○ ○ ○ ○ ○ ○ ○ ○ ○ ○ ○ ○ ○ ○ ○ ○ ○ ○ ○ ○ ○ ○ ○ ○ ○ ○ ○ ○ ○ ○ ○ ○ ○ ○ ○ ○ ○ ○ ○ ○ ○ ○ ○ ○ ○ ○ ○ ○ ○ ○ ○ ○ ○ ○ ○ ○ ○ ○ ○ ○ ○ ○ ○ ○ ○ ○ ○ ○ ○ ○ ○ ○ ○ ○ ○ ○ ○ ○ ○ ○ ○ ○ ○ ○ ○ ○ ○ ○ ○ ○ ○ ○ ○ ○ ○ ○ ○ ○ ○ ○ ○ ○ ○ ○ ○ ○ ○ ○ ○ ○ ○ ○ ○ ○ ○ ○ ○ ○ ○ ○ ○ ○ ○ ○ ○ ○ ○ ○ ○ ○ ○ ○ ○ ○ ○ ○ ○ ○ ○ ○ ○ ○ ○ ○ ○ ○ ○ ○ ○ ○ ○ ○ ○ ○ ○ ○ ○ ○ ○ ○ ○ ○ ○ ○ ○ ○ ○ ○ ○ ○ ○ ○ ○ ○ ○ ○ ○ ○ ○ ○ ○ ○ ○ ○ ○ ○ ○ ○ ○ ○ ○ ○ ○ ○ ○ ○ ○ ○ ○ ○ ○ ○ ○ ○ ○ ○ ○ ○ ○ ○ ○ ○ ○ ○ ○ ○ ○ ○ ○ ○ ○ ○ ○ ○ ○ ○ ○ ○ ○ ○ ○ ○ ○ ○ ○ ○ ○ ○ ○ ○ ○ ○ ○ ○ ○ ○ ○ ○ ○ ○ ○ ○ ○ ○ ○ ○ ○ ○ ○ ○ ○ ○ ○ ○ ○ ○ ○ ○ ○ ○ ○ ○ ○ ○ ○ ○ ○ ○ ○ ○ ○ ○ ○ ○ ○ ○ ○ ○ ○ ○ ○ ○ ○ ○ ○ ○ ○ ○ ○ ○ ○ ○ ○ ○ ○ ○ ○ ○ ○ ○ ○ ○ ○ ○ ○ ○ ○ ○ ○ ○ ○ ○ ○ ○ ○ ○ ○ ○ ○ ○ ○ ○ ○ ○ ○ ○ ○ ○ ○ ○ ○ SERIE AX8000 52 11-528.p65 52 08/06/01, 14.21 ○ ○ ○ ○ ○ ○ ○ ○ ○ ○ ○ ○ ○ ○ ○ ○ ○ ○ ○ ○ ○ ○ ○ ○ ○ ○ ○ ○ ○ ○ ○ ○ ○ ○ ○ ○ ○ ○ ○ ○ ○ ○ ○ ○ ○ ○ ○ ○ ○ ○ ○ ○ ○ ○ ○ ○ ○ ○ ○ ○ ○ ○ ○ ○ ○ ○ ○ ○ ○ ○ ○ ○ ○ ○ ○ ○ ○ ○ ○ ○ ○ ○ ○ ○ ○ ○ ○ ○ ○ ○ ○ ○ ○ ○ ○ ○ ○ ○ ○ ○ ○ ○ ○ ○ ○ ○ ○ ○ ○ ○ ○ ○ ○ ○ ○ ○ ○ ○ ○ ○ ○ ○ ○ ○ ○ ○ ○ ○ ○ ○ ○ ○ ○ ○ ○ ○ ○ ○ ○ ○ ○ ○ ○ ○ ○ ○ ○ ○ ○ ○ ○ ○ ○ ○ ○ ○ ○ ○ ○ ○ ○ ○ ○ ○ ○ ○ ○ ○ ○ ○ ○ ○ ○ ○ ○ ○ ○ ○ ○ ○ ○ ○ ○ ○ ○ ○ ○ ○ ○ ○ ○ ○ ○ ○ ○ ○ ○ ○ ○ ○ ○ ○ ○ ○ ○ ○ ○ ○ ○ ○ ○ ○ ○ ○ ○ ○ ○ ○ ○ ○ ○ ○ ○ ○ ○ ○ ○ ○ ○ ○ ○ ○ ○ ○ ○ ○ ○ ○ ○ ○ ○ ○ ○ ○ ○ ○ ○ ○ ○ ○ ○ ○ ○ ○ ○ ○ ○ ○ ○ ○ ○ ○ ○ ○ ○ ○ ○ ○ ○ ○ ○ ○ ○ ○ ○ ○ ○ ○ ○ ○ ○ ○ ○ ○ ○ ○ ○ ○ ○ ○ ○ ○ ○ ○ ○ ○ ○ ○ ○ ○ ○ ○ ○ ○ ○ ○ ○ ○ ○ ○ ○ ○ ○ ○ ○ ○ ○ ○ ○ ○ ○ ○ ○ ○ ○ ○ ○ ○ ○ ○ ○ ○ ○ ○ ○ ○ ○ ○ ○ ○ ○ ○ ○ ○ ○ ○ ○ ○ ○ ○ ○ ○ ○ ○ ○ ○ ○ ○ ○ ○ ○ ○ ○ ○ ○ ○ ○ ○ ○ ○ ○ ○ ○ ○ ○ ○ ○ ○ ○ ○ ○ ○ ○ ○ ○ ○ ○ ○ ○ ○ ○ ○ ○ ○ ○ ○ ○ ○ ○ ○ ○ ○ ○ ○ ○ ○ ○ ○ ○ ○ ○ ○ ○ ○ ○ ○ ○ ○ ○ ○ ○ ○ ○ ○ ○ ○ ○ ○ ○ ○ ○ ○ ○ ○ ○ ○ ○ ○ ○ ○ ○ ○ ○ ○ ○ ○ ○ ○ ○ ○ ○ ○ ○ ○ ○ ○ ○ ○ ○ ○ ○ ○ ○ ○ ○ ○ ○ ○ ○ ○ ○ ○ ○ ○ ○ ○ ○ ○ ○ ○ ○ ○ ○ ○ ○ ○ ○ ○ ○ ○ ○ ○ ○ ○ ○ ○ ○ ○ ○ ○ ○ ○ ○ ○ ○ ○ ○ ○ ○ ○ ○ ○ ○ ○ ○ ○ ○ ○ ○ ○ ○ ○ ○ ○ ○ ○ ○ ○ ○ ○ ○ ○ ○ ○ ○ ○ ○ ○ ○ ○ ○ ○ ○ ○ ○ ○ ○ ○ ○ ○ ○ ○ ○ ○ ○ ○ ○ ○ ○ ○ ○ ○ ○ ○ ○ ○ ○ ○ ○ ○ ○ ○ ○ ○ ○ ○ ○ ○ ○ ○ ○ ○ ○ ○ ○ ○ ○ ○ ○ ○ ○ ○ ○ ○ ○ ○ ○ ○ ○ ○ ○ ○ ○ ○ ○ ○ ○ ○ ○ ○ ○ ○ ○ ○ ○ ○ ○ ○ ○ ○ ○ ○ ○ ○ ○ ○ ○ ○ ○ ○ ○ ○ ○ ○ ○ ○ ○ ○ ○ ○ ○ ○ ○ ○ ○ ○ ○ ○ ○ ○ ○ ○ ○ ○ ○ ○ ○ ○ ○ ○ ○ ○ ○ ○ ○ ○ ○ ○ ○ ○ ○ ○ ○ ○ ○ ○ ○ ○ ○ ○ ○ ○ ○ ○ ○ ○ ○ ○ ○ ○ ○ ○ ○ ○ ○ ○ ○ ○ ○ ○ ○ ○ ○ ○ ○ ○ ○ ○ ○ ○ ○ ○ ○ ○ ○ ○ ○ ○ ○ ○ ○ ○ ○ ○ ○ ○ ○ ○ ○ ○ ○ ○ ○ ○ ○ ○ ○ ○ ○ ○ ○ ○ ○ ○ ○ ○ ○ ○ ○ ○ ○ ○ ○ ○ ○ ○ ○ ○ ○ ○ ○ ○ ○ ○ ○ ○ ○ ○ ○ ○ ○ ○ ○ ○ ○ ○ ○ ○ ○ ○ ○ ○ ○ ○ ○ ○ ○ ○ ○ ○ ○ ○ ○ ○ ○ ○ ○ ○ ○ ○ ○ ○ ○ ○ ○ ○ ○ ○ ○ ○ ○ ○ ○ ○ ○ ○ ○ ○ ○ ○ ○ ○ ○ ○ ○ ○ ○ ○ ○ ○ ○ ○ ○ ○ ○ ○ ○ ○ ○ ○ ○ ○ ○ ○ ○ ○ ○ ○ ○ ○ ○ ○ ○ ○ ○ ○ ○ ○ ○ ○ ○ ○ ○ ○ ○ ○ ○ ○ ○ ○ ○ ○ ○ ○ ○ ○ ○ ○ ○ ○ ○ ○ ○ ○ ○ ○ ○ ○ ○ ○ ○ ○ ○ ○ ○ ○ ○ ○ ○ ○ ○ ○ ○ ○ ○ ○ ○ ○ ○ ○ ○ ○ ○ ○ ○ ○ ○ ○ ○ ○ ○ ○ ○ ○ ○ ○ ○ ○ ○ ○ ○ ○ ○ ○ ○ ○ ○ ○ ○ ○ ○ ○ ○ ○ ○ ○ ○ ○ ○ ○ ○ ○ ○ ○ ○ ○ ○ ○ ○ ○ ○ ○ ○ ○ ○ ○ ○ ○ ○ ○ ○ ○ ○ ○ ○ ○ ○ ○ ○ ○ ○ ○ ○ ○ ○ ○ ○ ○ ○ ○ ○ ○ ○ ○ ○ ○ ○ ○ ○ ○ ○ ○ ○ ○ ○ ○ ○ ○ ○ ○ ○ ○ ○ ○ ○ ○ ○ ○ ○ ○ ○ ○ ○ ○ ○ ○ ○ ○ ○ ○ ○ ○ ○ ○ ○ ○ ○ ○ ○ ○ ○ ○ ○ ○ ○ ○ ○ ○ ○ ○ ○ ○ ○ ○ ○ ○ ○ ○ ○ ○ ○ ○ ○ ○ ○ ○ ○ ○ ○ ○ ○ ○ ○ ○ ○ ○ ○ ○ ○ ○ ○ ○ ○ ○ ○ ○ ○ ○ ○ ○ ○ ○ ○ ○ ○ ○ ○ ○ ○ ○ ○ ○ ○ ○ ○ ○ ○ ○ ○ ○ ○ ○ ○ ○ ○ ○ ○ ○ ○ ○ ○ ○ ○ ○ ○ ○ ○ ○ ○ ○ ○ ○ ○ ○ ○ ○ ○ ○ ○ ○ ○ ○ ○ ○ ○ ○ ○ ○ ○ ○ ○ ○ ○ ○ ○ ○ ○ ○ ○ ○ ○ ○ ○ ○ ○ ○ ○ ○ ○ ○ ○ ○ ○ ○ ○ ○ ○ ○ ○ ○ ○ ○ ○ ○ ○ ○ ○ ○ ○ ○ ○ ○ ○ ○ ○ ○ ○ ○ ○ ○ ○ ○ ○ ○ ○ ○ ○ ○ ○ ○ ○ ○ ○ ○ ○ ○ ○ ○ ○ ○ ○ ○ ○ ○ ○ ○ ○ ○ ○ ○ ○ ○ ○ ○ ○ ○ ○ ○ ○ ○ ○ ○ ○ ○ ○ ○ ○ ○ ○ ○ ○ ○ ○ ○ ○ ○ ○ ○ ○ ○ ○ ○ ○ ○ ○ ○ ○ ○ ○ ○ ○ ○ ○ ○ ○ ○ ○ ○ ○ ○ ○ ○ ○ ○ ○ ○ ○ ○ ○ ○ ○ ○ ○ ○ ○ ○ ○ ○ ○ ○ ○ ○ ○ ○ ○ ○ ○ ○ ○ ○ ○ ○ ○ ○ ○ ○ ○ ○ ○ ○ ○ ○ ○ ○ ○ ○ ○ ○ ○ ○ ○ ○ ○ ○ ○ ○ ○ ○ ○ ○ ○ ○ ○ ○ ○ ○ ○ ○ ○ ○ ○ ○ ○ ○ ○ ○ ○ ○ ○ ○ ○ ○ ○ ○ ○ ○ ○ ○ ○ ○ ○ ○ ○ ○ ○ ○ ○ ○ ○ ○ ○ ○ ○ ○ ○ ○ ○ ○ ○ ○ ○ ○ ○ ○ ○ ○ ○ ○ ○ ○ ○ ○ ○ ○ ○ ○ ○ ○ ○ ○ ○ ○ ○ ○ ○ ○ ○ ○ ○ ○ ○ ○ ○ ○ ○ ○ ○ ○ ○ ○ ○ ○ ○ ○ ○ ○ ○ ○ ○ ○ ○ ○ ○ ○ ○ ○ ○ ○ ○ ○ ○ ○ ○ ○ ○ ○ ○ ○ ○ ○ ○ ○ ○ ○ ○ ○ ○ ○ ○ ○ ○ ○ ○ ○ ○ ○ ○ ○ ○ ○ ○ ○ ○ ○ ○ ○ ○ ○ ○ ○ ○ ○ ○ ○ ○ ○ ○ ○ ○ ○ ○ ○ ○ ○ ○ ○ ○ ○ ○ ○ ○ ○ ○ ○ ○ ○ ○ ○ ○ ○ ○ ○ ○ ○ ○ ○ ○ ○ ○ ○ ○ ○ ○ ○ ○ ○ ○ ○ ○ ○ ○ ○ ○ ○ ○ ○ ○ ○ ○ ○ ○ ○ ○ ○ ○ ○ ○ ○ ○ ○ ○ ○ ○ ○ ○ ○ ○ ○ ○ ○ ○ ○ ○ ○ ○ ○ ○ ○ ○ ○ ○ ○ ○ ○ ○ ○ ○ ○ ○ ○ ○ ○ ○ ○ ○ ○ ○ ○ ○ ○ ○ ○ ○ ○ ○ ○ ○ ○ ○ ○ ○ ○ ○ ○ ○ ○ ○ ○ ○ ○ ○ ○ ○ ○ ○ ○ ○ ○ ○ ○ ○ ○ ○ ○ ○ ○ ○ ○ ○ ○ ○ ○ ○ ○ ○ ○ ○ ○ ○ ○ ○ ○ ○ ○ ○ ○ ○ ○ ○ ○ ○ ○ ○ ○ ○ ○ ○ ○ ○ ○ ○ ○ ○ ○ ○ ○ ○ ○ ○ ○ ○ ○ ○ ○ ○ ○ ○ ○ ○ ○ ○ ○ ○ ○ ○ ○ ○ ○ ○ ○ ○ ○ ○ ○ ○ ○ ○ ○ ○ ○ ○ ○ ○ ○ ○ ○ ○ ○ ○ ○ ○ ○ ○ ○ ○ ○ ○ ○ ○ ○ ○ ○ ○ ○ ○ ○ ○ ○ ○ ○ ○ ○ ○ ○ ○ ○ ○ ○ ○ ○ ○ ○ ○ ○ ○ ○ ○ ○ ○ ○ ○ ○ ○ ○ ○ ○ ○ ○ ○ ○ ○ ○ ○ ○ ○ ○ ○ ○ ○ ○ ○ ○ ○ ○ ○ ○ ○ ○ ○ ○ ○ ○ ○ ○ ○ ○ ○ ○ ○ ○ ○ ○ ○ ○ ○ ○ ○ ○ ○ ○ ○ ○ ○ ○ ○ ○ ○ ○ ○ ○ ○ ○ ○ ○ ○ ○ ○ ○ ○ ○ ○ ○ ○ ○ ○ ○ ○ ○ ○ ○ ○ ○ ○ ○ ○ ○ ○ ○ ○ ○ ○ ○ ○ ○ ○ ○ ○ ○ ○ ○ ○ ○ ○ ○ ○ ○ ○ ○ ○ ○ ○ ○ ○ ○ ○ ○ ○ ○ ○ ○ ○ ○ ○ ○ ○ ○ ○ ○ ○ ○ ○ ○ ○ ○ ○ ○ ○ ○ ○ ○ ○ ○ ○ ○ ○ ○ ○ ○ ○ ○ ○ ○ ○ ○ ○ ○ ○ ○ ○ ○ ○ ○ ○ ○ ○ ○ ○ ○ ○ ○ ○ ○ ○ ○ ○ ○ ○ ○ ○ ○ ○ ○ ○ ○ ○ ○ ○ ○ ○ ○ ○ ○ ○ ○ ○ ○ ○ ○ ○ ○ ○ ○ ○ ○ ○ ○ ○ ○ ○ ○ ○ ○ ○ ○ ○ ○ ○ ○ ○ ○ ○ ○ ○ ○ ○ ○ ○ ○ ○ ○ ○ ○ ○ ○ ○ ○ ○ ○ ○ ○ ○ ○ ○ ○ ○ ○ ○ ○ ○ ○ ○ ○ ○ ○ ○ ○ ○ ○ ○ ○ ○ ○ ○ ○ ○ ○ ○ ○ ○ ○ ○ ○ ○ ○ ○ ○ ○ ○ ○ ○ ○ ○ ○ ○ ○ ○ ○ ○ ○ ○ ○ ○ ○ ○ ○ ○ ○ ○ ○ ○ ○ ○ ○ ○ ○ ○ ○ ○ ○ ○ ○ ○ ○ ○ ○ ○ ○ ○ ○ ○ ○ ○ ○ ○ ○ ○ ○ ○ ○ ○ ○ ○ ○ ○ ○ ○ ○ ○ ○ ○ ○ ○ ○ ○ ○ ○ ○ ○ ○ ○ ○ ○ ○ ○ ○ ○ ○ ○ ○ ○ ○ ○ ○ ○ ○ ○ ○ ○ ○ ○ ○ ○ ○ ○ ○ ○ ○ ○ ○ ○ ○ ○ ○ ○ ○ ○ ○ ○ ○ ○ ○ ○ ○ ○ ○ ○ ○ ○ ○ ○ ○ ○ ○ ○ ○ ○ ○ ○ ○ ○ ○ ○ ○ ○ ○ ○ ○ ○ ○ ○ ○ ○ ○ ○ ○ ○ ○ ○ ○ ○ ○ ○ ○ ○ ○ ○ ○ ○ ○ ○ ○ ○ ○ ○ ○ ○ ○ ○ ○ ○ ○ ○ ○ ○ ○ ○ ○ ○ ○ ○ ○ ○ ○ ○ ○ ○ ○ ○ ○ ○ ○ ○ ○ ○ ○ ○ ○ ○ ○ ○ ○ ○ ○ ○ ○ ○ ○ ○ ○ ○ ○ ○ ○ ○ ○ ○ ○ ○ ○ ○ ○ ○ ○ ○ ○ ○ ○ ○ ○ ○ ○ ○ ○ ○ ○ ○ ○ ○ ○ ○ ○ ○ ○ ○ ○ ○ ○ ○ ○ ○ ○ ○ ○ ○ ○ ○ ○ ○ ○ ○ ○ ○ ○ ○ ○ ○ ○ ○ ○ ○ ○ ○ ○ ○ ○ ○ ○ ○ ○ ○ ○ ○ ○ ○ ○ ○ ○ ○ ○ ○ ○ ○ ○ ○ ○ ○ ○ ○ ○ ○ ○ ○ ○ ○ ○ ○ ○ ○ ○ ○ ○ ○ ○ ○ ○ ○ ○ ○ ○ ○ ○ ○ ○ ○ ○ ○ ○ ○ ○ ○ ○ ○ ○ ○ ○ ○ ○ ○ ○ ○ ○ ○ ○ ○ ○ ○ ○ ○ ○ ○ ○ ○ ○ ○ ○ ○ ○ ○ ○ ○ ○ ○ ○ ○ ○ ○ ○ ○ ○ ○ ○ ○ ○ ○ ○ ○ ○ ○ ○ ○ ○ ○ ○ ○ ○ ○ ○ ○ ○ ○ ○ ○ ○ ○ ○ ○ ○ ○ ○ ○ ○ ○ ○ ○ ○ ○ ○ ○ ○ ○ ○ ○ ○ ○ ○ ○ ○ ○ ○ ○ ○ ○ ○ ○ ○ ○ ○ ○ ○ ○ ○ ○ ○ ○ ○ ○ ○ ○ ○ ○ ○ ○ ○ ○ ○ ○ ○ ○ ○ ○ ○ ○ ○ ○ ○ ○ ○ ○ ○ ○ ○ ○ ○ ○ ○ ○ ○ ○ ○ ○ ○ ○ ○ ○ ○ ○ ○ ○ ○ ○ ○ ○ ○ ○ ○ ○ ○ ○ ○ ○ ○ ○ ○ ○ ○ ○ ○ ○ ○ ○ ○ ○ ○ ○ ○ ○ ○ ○ ○ ○ ○ ○ ○ ○ ○ ○ ○ ○ ○ ○ ○ ○ ○ ○ ○ ○ ○ ○ ○ ○ ○ ○ ○ ○ ○ ○ ○ ○ ○ ○ ○ ○ ○ ○ ○ ○ ○ ○ ○ ○ ○ ○ ○ ○ ○ ○ ○ ○ ○ ○ ○ ○ ○ ○ ○ ○ ○ ○ ○ ○ ○ ○ ○ ○ ○ ○ ○ ○ ○ ○ ○ ○ ○ ○ ○ ○ ○ ○ ○ ○ ○ ○ ○ ○ ○ ○ ○ ○ ○ ○ ○ ○ ○ ○ ○ ○ ○ ○ ○ ○ ○ ○ ○ ○ ○ ○ ○ ○ ○ ○ ○ ○ ○ ○ ○ ○ ○ ○ ○ ○ ○ ○ ○ ○ ○ ○ ○ ○ ○ ○ ○ ○ ○ ○ ○ ○ ○ ○ ○ ○ ○ ○ ○ ○ ○ ○ ○ ○ ○ ○ ○ ○ ○ ○ ○ ○ ○ ○ ○ ○ ○ ○ ○ ○ ○ ○ ○ ○ ○ ○ ○ ○ ○ ○ ○ ○ ○ ○ ○ ○ ○ ○ ○ ○ ○ ○ ○ ○ ○ ○ ○ ○ ○ ○ ○ ○ ○ ○ ○ ○ ○ ○ ○ ○ ○ ○ ○ ○ ○ ○ ○ ○ ○ ○ ○ ○ ○ ○ ○ ○ ○ ○ ○ ○ ○ ○ ○ ○ ○ ○ ○ ○ ○ ○ ○ ○ ○ ○ ○ ○ ○ ○ ○ ○ ○ ○ ○ ○ ○ ○ ○ ○ ○ ○ ○ ○ ○ ○ ○ ○ ○ ○ ○ ○ ○ ○ ○ ○ ○ ○ ○ ○ ○ ○ ○ ○ ○ ○ ○ ○ ○ ○ ○ ○ ○ ○ ○ ○ ○ ○ ○ ○ ○ ○ ○ ○ ○ ○ ○ ○ ○ ○ ○ ○ ○ ○ ○ ○ ○ ○ ○ ○ ○ ○ ○ ○ ○ ○ ○ ○ ○ ○ ○ ○ ○ ○ ○ ○ ○ ○ ○ ○ ○ ○ ○ ○ ○ ○ ○ ○ ○ ○ ○ ○ ○ ○ ○ ○ ○ ○ ○ ○ ○ ○ ○ ○ ○ ○ ○ ○ ○ ○ ○ ○ ○ ○ ○ ○ ○ ○ ○ ○ ○ ○ ○ ○ ○ ○ ○ ○ ○ ○ ○ ○ ○ ○ ○ ○ ○ ○ ○ ○ ○ ○ ○ ○ ○ ○ ○ ○ ○ ○ ○ ○ ○ ○ ○ ○ ○ ○ ○ ○ ○ ○ ○ ○ ○ ○ ○ ○ ○ ○ ○ ○ ○ ○ ○ ○ ○ ○ ○ ○ ○ ○ ○ ○ ○ ○ ○ ○ ○ ○ ○ ○ ○ ○ ○ ○ ○ ○ ○ ○ ○ ○ ○ ○ ○ ○ ○ ○ ○ ○ ○ ○ ○ ○ ○ ○ ○ ○ ○ ○ ○ ○ ○ ○ ○ ○ ○ ○ ○ ○ ○ ○ ○ ○ ○ ○ ○ ○ ○ ○ ○ ○ ○ ○ ○ ○ ○ ○ ○ ○ ○ ○ ○ ○ ○ ○ ○ ○ ○ ○ ○ ○ ○ ○ ○ ○ ○ ○ ○ ○ ○ ○ ○ ○ ○ ○ ○ ○ ○ ○ ○ ○ ○ ○ ○ ○ ○ ○ ○ ○ ○ ○ ○ ○ ○ ○ ○ ○ ○ ○ ○ ○ ○ ○ ○ ○ ○ ○ ○ ○ ○ ○ ○ ○ ○ ○ ○ ○ ○ ○ ○ ○ ○ ○ ○ ○ ○ ○ ○ ○ ○ ○ ○ ○ ○ ○ ○ ○ ○ ○ ○ ○ ○ ○ ○ ○ ○ ○ ○ ○ ○ ○ ○ ○ ○ ○ ○ ○ ○ ○ ○ ○ ○ ○ ○ ○ ○ ○ ○ ○ ○ ○ ○ ○ ○ ○ ○ ○ ○ ○ ○ ○ ○ ○ ○ ○ ○ ○ ○ ○ ○ ○ ○ ○ ○ ○ ○ ○ ○ ○ ○ ○ ○ ○ ○ ○ ○ ○ ○ ○ ○ ○ ○ ○ ○ ○ ○ ○ ○ ○ ○ ○ ○ ○ ○ ○ ○ ○ ○ ○ ○ ○ ○ ○ ○ ○ ○ ○ ○ ○ ○ ○ ○ ○ ○ ○ ○ ○ ○ ○ ○ ○ ○ ○ ○ ○ ○ ○ ○ ○ ○ ○ ○ ○ ○ ○ ○ ○ ○ ○ ○ ○ ○ ○ ○ ○ ○ ○ ○ ○ ○ ○ ○ ○ ○ ○ ○ ○ ○ ○ ○ ○ ○ ○ ○ ○ ○ ○ ○ ○ ○ ○ ○ ○ ○ ○ ○ ○ ○ ○ ○ ○ ○ ○ ○ ○ ○ ○ ○ ○ ○ ○ ○ ○ ○ ○ ○ ○ ○ ○ ○ ○ ○ ○ ○ ○ ○ ○ ○ ○ ○ ○ ○ ○ ○ ○ ○ ○ ○ ○ ○ ○ ○ ○ ○ ○ ○ ○ ○ ○ ○ ○ ○ ○ ○ ○ ○ ○ ○ ○ ○ ○ ○ ○ ○ ○ ○ ○ ○ ○ ○ ○ ○ ○ ○ ○ ○ ○ ○ ○ ○ ○ ○ ○ ○ ○ ○ ○ ○ ○ ○ ○ ○ ○ ○ ○ ○ ○ ○ ○ ○ ○ ○ ○ ○ ○ ○ ○ ○ ○ ○ ○ ○ ○ ○ ○ ○ ○ ○ ○ ○ ○ ○ ○ ○ ○ ○ ○ ○ ○ ○ ○ ○ ○ ○ ○ ○ ○ ○ ○ ○ ○ ○ ○ ○ ○ ○ ○ ○ ○ ○ ○ ○ ○ ○ ○ ○ ○ ○ ○ ○ ○ ○ ○ ○ ○ ○ ○ ○ ○ ○ ○ ○ ○ ○ ○ ○ ○ ○ ○ ○ ○ ○ ○ ○ ○ ○ ○ ○ ○ ○ ○ ○ ○ ○ ○ ○ ○ ○ ○ ○ ○ ○ ○ ○ ○ ○ ○ ○ ○ ○ ○ ○ ○ ○ ○ ○ ○ ○ ○ ○ ○ ○ ○ ○ ○ ○ ○ ○ ○ ○ ○ ○ ○ ○ ○ ○ ○ ○ ○ ○ ○ ○ ○ ○ ○ ○ ○ ○ ○ ○ ○ ○ ○ ○ ○ ○ ○ ○ ○ ○ ○ ○ ○ ○ ○ ○ ○ ○ ○ ○ ○ ○ ○ ○ ○ ○ ○ ○ ○ ○ ○ ○ ○ ○ ○ ○ ○ ○ ○ ○ ○ ○ ○ ○ ○ ○ ○ ○ ○ ○ ○ ○ ○ ○ ○ ○ ○ ○ ○ ○ ○ ○ ○ ○ ○ ○ ○ ○ ○ ○ ○ ○ ○ ○ ○ ○ ○ ○ ○ ○ ○ ○ ○ ○ ○ ○ ○ ○ ○ ○ ○ ○ ○ ○ ○ ○ ○ ○ ○ ○ ○ ○ ○ ○ ○ ○ ○ ○ ○ ○ ○ ○ ○ ○ ○ ○ ○ ○ ○ ○ ○ ○ ○ ○ ○ ○ ○ ○ ○ ○ ○ ○ ○ ○ ○ ○ ○ ○ ○ ○ ○ ○ ○ ○ ○ ○ ○ ○ ○ ○ ○ ○ ○ ○ ○ ○ ○ ○ ○ ○ ○ ○ ○ ○ ○ ○ ○ ○ ○ ○ ○ ○ ○ ○ ○ ○ ○ ○ ○ ○ ○ ○ ○ ○ ○ ○ ○ ○ ○ ○ ○ ○ ○ ○ ○ ○ ○ ○ ○ ○ ○ ○ ○ ○ ○ ○ ○ ○ ○ ○ ○ ○ ○ ○ ○ ○ ○ ○ ○ ○ ○ ○ ○ ○ ○ ○ ○ ○ ○ ○ ○ ○ ○ ○ ○ ○ ○ ○ ○ ○ ○ ○ ○ ○ ○ SERIE AX8000 11-528.p65 53 53 08/06/01, 14.21 NOTA Nel continuo intento di migliorare i propri prodotti, la PASO S.p.A. si riserva il diritto di apportare modifiche ai disegni e alle caratteristiche tecniche in qualsiasi momento e senza alcun preavviso. NOTES PASO S.p.A. strive to improve their products continuously, and therefore reserve the right to make changes to the drawings and technical specifications at any time and without notice. NOTE En raison de lamélioration constante de ses produits, PASO S.p.A. se réserve le droit dapporter des modifications aux dessins et caractéristiques techniques à tout instant et sans préavis aucun. MERKE In der Überzeugung, die eigenen Produkte beständig verbessern zu wollen, behält sich PASO S.p.A. das Recht vor, jederzeit und ohne Vorankündigung Änderungen an technischen Zeichnungen und - Merkmalen vorzunehmem. OPMERKING Aangezien PASO S.p.A. voortdurend verbeteringen aanbrengt aan haar producten, behoudt zij zich het recht voor op ieder moment zonder voorbericht de tekeningen en technische eigenschappen aan wijzigen te onderwerpen. NOTA Siempre con la firme intención de mejorar sus productos, Paso S.p.A. se reserva el derecho de modificar los dibujos y las características técnicas, sin preaviso alguno. S.p.A Via Mecenate, 90 - 20138 MILANO - ITALIA TEL. +39-02-580 77 1 (15 linee r.a.) FAX +39-02-580 77 277 http://www.paso.it Printed in Italy - 05/01 - 1K - 11/528 SERIE AX8000 54 11-528.p65 54 08/06/01, 14.21