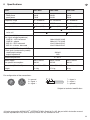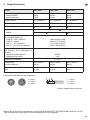
1
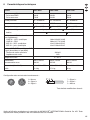
AKTIV-LAUTSPRECHERBOX
ACTIVE SPEAKER SYSTEM
ENCEINTE ACTIVE
CASSA ACUSTICA ATTIVA
PAK-10XC
PAK-12XC
PAK-15XC
Bestellnummer 25.4230
Bestellnummer 25.4240
Bestellnummer 25.4250
BEDIENUNGSANLEITUNG • INSTRUCTION MANUAL
MODE D’EMPLOI • ISTRUZIONI PER L’USO • MANUAL DE INSTRUCCIONES
INSTRUKCJA OBSŁUGI • VEILIGHEIDSVOORSCHRIFTEN
SIKKERHEDSOPLYSNINGER • SÄKERHETSFÖRESKRIFTER • TURVALLISUUDESTA
D
A
CH
F
B
CH
Bevor Sie einschalten …
GB
Before switching on …
Wir wünschen Ihnen viel Spaß mit Ihrem neuen
Gerät von „img Stage Line“. Bitte lesen Sie diese
Bedienungsanleitung vor dem Betrieb gründlich
durch. Nur so lernen Sie alle Funktionsmöglichkeiten kennen, vermeiden Fehlbedienungen und
schützen sich und Ihr Gerät vor eventuellen Schäden durch unsachgemäßen Gebrauch. Heben
Sie die Anleitung für ein späteres Nachlesen auf.
We wish you much pleasure with your new “img
Stage Line” unit. Please read these operating
instructions carefully prior to operating the unit.
Thus, you will get to know all functions of the unit,
operating errors will be prevented, and yourself
and the unit will be protected against any damage
caused by improper use. Please keep the operating instructions for later use.
Der deutsche Text beginnt auf der Seite 4.
The English text starts on page 8.
Avant toute installation …
I
Nous vous souhaitons beaucoup de plaisir à utiliser cet appareil “img Stage Line”. Lisez ce mode
dʼemploi entièrement avant toute utilisation. Uniquement ainsi, vous pourrez apprendre lʼensemble des possibilités de fonctionnement de lʼappareil, éviter toute manipulation erronée et vous
protéger, ainsi que lʼappareil, de dommages
éventuels engendrés par une utilisation inadaptée. Conservez la notice pour pouvoir vous y
reporter ultérieurement.
Prima di accendere …
Vi auguriamo buon divertimento con il vostro
nuovo apparecchio di “img Stage Line”. Leggete
attentamente le istruzioni prima di mettere in funzione lʼapparecchio. Solo così potete conoscere
tutte le funzionalità, evitare comandi sbagliati e
proteggere voi stessi e lʼapparecchio da eventuali danni in seguito ad un uso improprio. Conservate le istruzioni per poterle consultare anche
in futuro.
Il testo italiano inizia a pagina 16.
La version française se trouve page 12.
E
Antes de la utilización …
PL
Przed uruchomieniem …
Zyczymy zadowolenia z nowego produktu “img
Stage Line”. Dzięki tej instrukcji obsługi będą
państwo w stanie poznać wszystkie funkcje tego
urządzenia. Stosując się do instrukcji unikną
państwo błędów i ewentualnego uszkodzenia
urządzenia na skutek nieprawidłowego użytkowania. Prosimy zachować instrukcję.
Le deseamos una buena utilización para su nuevo aparato “img Stage Line”. Por favor, lea estas
instrucciones de uso atentamente antes de hacer
funcionar el aparato. De esta manera conocerá
todas las funciones de la unidad, se prevendrán
errores de operación, usted y el aparato estarán
protegidos en contra de todo daño causado por
un uso inadecuado. Por favor, guarde las instrucciones para una futura utilización.
Tekst polski zaczyna się na stronie 24.
El texto en español empieza en la página 20.
NL
B
Voor u inschakelt …
DK
Wij wensen u veel plezier met uw nieuwe apparaat van “img Stage Line”. Lees de veiligheidsvoorschriften grondig door, alvorens het apparaat
in gebruik te nemen. Zo behoedt u zichzelf en het
apparaat voor eventuele schade door ondeskundig gebruik. Bewaar de handleiding voor latere
raadpleging.
Før du tænder …
Tillykke med dit nye “img Stage Line” produkt.
Læs sikkerhedsanvisningerne nøje før ibrugtagning, for at beskytte Dem og enheden mod skader, der skyldes forkert brug. Gem manualen til
senere brug.
Sikkerhedsanvisningerne findes på side 28.
De veiligheidsvoorschriften vindt u op pagina 28.
S
Innan du slår på enheten …
Vi önskar dig mycket glädje med din nya “img
Stage Line” produkt. Läs igenom säkerhetsföreskrifterna innan enheten tas i bruk för att undvika
skador till följd av felaktig hantering. Behåll
instruktionerna för framtida bruk.
Säkerhetsföreskrifterna återfinns på sidan 29.
FIN
Ennen kytkemistä …
Toivomme Sinulle paljon miellyttäviä hetkiä uuden
“img Stage Line” laitteen kanssa. Ennen laitteen
käyttöä pyydämme Sinua huolellisesti tutustumaan turvallisuusohjeisiin. Näin vältyt vahingoilta,
joita virheellinen laitteen käyttö saattaa aiheuttaa.
Ole hyvä ja säilytä käyttöohjeet myöhempää tarvetta varten.
Turvallisuusohjeet löytyvät sivulta 29.
w w w.imgstageline.com
2
PAK-10XC
3
D
A
Auf der ausklappbaren Seite 3 finden Sie alle beschriebenen Bedienelemente und Anschlüsse.
CH
1
Übersicht der Bedienelemente
und Anschlüsse
1 Eingang MIC IN als XLR-Buchse und Klinkenbuchse (symmetrisch beschaltet) zum Anschluss eines Mikrofons; beim PAK-15XC sind
beide Anschlüsse in einer Buchse kombiniert
2 Eingang LINE IN als XLR-Buchse zum Anschluss von Signalquellen mit Line-Pegel (z. B.
Mischpult)
3 Eingang LINE IN als Cinch-Buchsen; beim Anschluss beider Buchsen (z. B. Stereosignal von
einem CD-Spieler) wird aus den Signalen die
Summe (Mono) gebildet.
2
Das Gerät entspricht allen relevanten Richtlinien
der EU und ist deshalb mit
gekennzeichnet.
WARNUNG Das Gerät wird mit lebensgefährlich
hoher Netzspannung versorgt. Nehmen Sie deshalb niemals selbst Eingriffe am Gerät vor. Es besteht die
Gefahr eines elektrischen Schlages.
Beachten Sie auch unbedingt folgende Punkte:
G
Verwenden Sie das Gerät nur im Innenbereich
und schützen Sie es vor Tropf- und Spritzwasser,
hoher Luftfeuchtigkeit und Hitze (zulässiger Einsatztemperaturbereich 0 – 40 °C).
G
Stellen Sie keine mit Flüssigkeit gefüllten Gefäße, z. B. Trinkgläser, auf das Gerät.
G
Nehmen Sie das Gerät nicht in Betrieb oder ziehen Sie sofort den Netzstecker aus der Steckdose,
1. wenn sichtbare Schäden am Gerät oder am
Netzkabel vorhanden sind,
2. wenn nach einem Sturz oder Ähnlichem der
Verdacht auf einen Defekt besteht,
3. wenn Funktionsstörungen auftreten.
Geben Sie das Gerät in jedem Fall zur Reparatur
in eine Fachwerkstatt.
G
Ziehen Sie den Netzstecker nie am Kabel aus
der Steckdose, fassen Sie immer am Stecker an.
G
Verwenden Sie für die Reinigung nur ein trockenes, weiches Tuch, niemals Wasser oder Chemikalien.
G
Wird das Gerät zweckentfremdet, nicht richtig
installiert, falsch bedient oder nicht fachgerecht
repariert, kann keine Haftung für daraus resultierende Sach- oder Personenschäden und keine
Garantie für das Gerät übernommen werden.
4 Ausgang LINE OUT als XLR-Buchse und Klinkenbuchse (symmetrisch beschaltet) zum Weiterleiten des Mischsignals z. B. zu einer weiteren Aktiv-Lautsprecherbox
5 Lautstärkeregler MIC LEVEL für den MikrofonEingang MIC IN (1)
6 Lautstärkeregler LINE LEVEL für den Line-Eingang LINE IN (2, 3)
7 Regler MAIN LEVEL für die Gesamtlautstärke
8 Klangregler TREBLE für die Höhen
9 Klangregler BASS für die Tiefen
10 Übersteuerungsanzeige CLIP
11 Betriebsanzeige ON
12 Netzschalter POWER
13 Netzbuchse zum Anschluss an eine Steckdose
(230 V~ / 50 Hz) über das beiliegende Netzkabel
14 Halterung für die Netzsicherung
Eine durchgebrannte Sicherung nur durch eine
gleichen Typs ersetzen.
15 Stativhülse mit Feststellschraube
4
Hinweise
für den sicheren Gebrauch
Soll das Gerät endgültig aus dem Betrieb
genommen werden, übergeben Sie es zur
umweltgerechten Entsorgung einem örtlichen Recyclingbetrieb.
3
Einsatzmöglichkeiten
Die PAK-10XC, PAK-12XC und PAK-15XC sind
leistungsfähige Aktiv-Lautsprecherboxen in stabilen Kunststoffgehäusen. Sie sind vielseitig einsetzbar, z. B. für Tanzveranstaltungen, zur Ausstattung
kleinerer Bühnen oder als Monitorlautsprecher in
einer Band. Die 2-Wege-Lautsprecherboxen sind
mit Klasse-D-Verstärkern ausgestattet, die über
einen besonders hohen Wirkungsgrad verfügen.
Ein Line-Signal kann über die symmetrisch beschaltete XLR-Buchse oder asymmetrisch über die
Cinch-Buchsen zugeführt werden. Zusätzlich verfügen die Geräte über einen Mikrofoneingang, dessen Signal zum Line-Signal dazugemischt werden
kann. Der Signalausgang ermöglicht den Anschluss einer weiteren Aktiv-Lautsprecherbox.
Die Lautsprecherboxen sind mit Schutzschaltungen gegen Überlastung und Überhitzung ausgestattet.
4
Aufstellen und Anschließen
Die Lautsprecherbox auf einen festen Untergrund
z. B. auf die Bühne oder einen Tisch stellen und auf
die Zuhörer ausrichten. Die Hochtöner sollten sich
möglichst auf Ohrhöhe befinden. Mit ihrer abgeschrägten Gehäuseform kann die Box auch als
schräg nach oben abstrahlender Bühnenmonitor
eingesetzt werden. Soll ein Mikrofon verwendet
werden, den Lautsprecher nicht auf das Mikrofon
richten und genügend Abstand zum Mikrofon halten, da es sonst zu einer akustischen Rückkopplung (lauter Pfeifton) kommen kann.
Alternativ kann die Lautsprecherbox über die
Stativhülse in der Unterseite auf ein Standard-Lautsprecherstativ mit 35 mm Rohrdurchmesser gestellt werden (z. B. aus der PAST-Serie von „img
Stage Line“). Nach dem Ausrichten der Lautsprecherbox die Schraube (15) festdrehen.
Für zusätzliche Montagemöglichkeiten, z. B.
Aufhängung, sind M8-Gewindebuchsen in das Gehäuse eingelassen (zwei auf der Oberseite und
eine auf der Unterseite). Um diese zu nutzen, die
betreffenden Gummiabdeckungen entfernen.
Vor dem Anschluss bzw. vor dem Ändern bestehender Anschlüsse die Lautsprecherbox und die
anzuschließenden Geräte ausschalten.
4.1 Signalquelle anschließen
Für den Anschluss einer Signalquelle mit LinePegel (z. B. CD-Spieler, Mischpultausgang) gibt es
folgende Möglichkeiten:
D
A
CH
– Für symmetrische Signale eignet sich die XLRBuchse (2) [Belegung der Kontakte Kapitel 6].
– Für asymmetrische Signale eignen sich die
Cinch-Buchsen (3). Bei der gleichzeitigen Nutzung beider Cinch-Buchsen oder der CinchBuchsen und der XLR-Buchse (2) werden die
Eingangssignale gemischt. Dadurch wird beim
Anschluss einer Stereo-Signalquelle ein Monosignal erzeugt. Für die stereophone Wiedergabe
jeden Stereokanal an eine eigene Lautsprecherbox anschließen.
Ein Mikrofon lässt sich an die XLR-Buchse oder
die Klinkenbuchse MIC IN (1) anschließen. Beide
Buchsen sind für symmetrische Signale beschaltet.
Beim PAK-15XC sind beide Anschlüsse in einer
Buchse kombiniert; zum Herausziehen eines XLRSteckers aus dieser Buchse den PUSH-Hebel
drücken. Ein Mikrofon mit asymmetrischem Ausgangssignal kann mit einem zweipoligen Klinkenstecker an die Klinkenbuchse angeschlossen werden.
4.2 Signalausgang
An der XLR-Buchse und an der (parallel geschalteten) Klinkenbuchse LINE OUT (4) steht das Mischsignal der Eingangssignale zum Weiterleiten zu
einer weiteren Aktiv-Lautsprecherbox, einem Verstärker oder einem Aufnahmegerät als symmetrisches Signal mit Line-Pegel zur Verfügung. Das
Ausgangssignal ist unabhängig von der Einstellung
des Gesamtlautstärkereglers MAIN LEVEL (7).
4.3 Stromversorgung
Das beiliegende Netzkabel an die Netzbuchse (13)
anschließen und den Stecker in eine Steckdose
(230 V~/ 50 Hz) stecken.
5
D
5
A
VORSICHT Stellen Sie die Lautstärke nie sehr
hoch ein. Hohe Lautstärken können
auf Dauer das Gehör schädigen! Das
Ohr gewöhnt sich an sie und empfindet sie nach einiger Zeit als nicht
mehr so hoch. Darum eine hohe
Lautstärke nach der Gewöhnung
nicht weiter erhöhen.
CH
Bedienung
Hinweis: Um Schaltgeräusche zu vermeiden, die
Aktiv-Lautsprecherbox immer nach der
angeschlossenen Signalquelle einschalten und nach dem Gebrauch als erstes
Gerät ausschalten.
1) Den Regler MAIN LEVEL (7) zunächst auf Minimum (Linksanschlag) stellen und den Verstärker
mit dem Schalter POWER (12) einschalten. Die
LED ON (11) leuchtet.
Die folgenden Bedienschritte dienen nur als Hilfestellung, es sind auch andere Vorgehensweisen
möglich.
2) Zur Grundeinstellung vorerst die LEVEL-Regler
(5 – 7) auf Minimum (Linksanschlag) und die
Klangregler (8, 9) in die Mittelposition stellen.
3) Mit dem Regler MAIN LEVEL (7) wird die Gesamtlautstärke eingestellt. Den Regler etwa zur
Hälfte aufdrehen, sodass die nachfolgenden
Einstellungen zu hören sind.
4) Ist eine Signalquelle an den Eingang LINE IN (2,
3) angeschlossen, den dazugehörigen Regler
LINE LEVEL (6) soweit aufdrehen, dass der Ton
noch nicht verzerrt wiedergegeben wird.
5) Ist ein Mikrofon angeschlossen, dessen Signal
mit dem Regler MIC LEVEL (5) dazumischen
und wenn erforderlich, den Pegel des Line-Signals mit dem Regler LINE LEVEL (6) reduzieren.
VORSICHT! Um ein Rückkopplungspfeifen zu
vermeiden, halten Sie das Mikrofon nicht in
Richtung des Lautsprechers oder zu nah an ihn
heran. Bei einer zu hoch eingestellten Lautstärke kann ebenfalls eine Rückkopplung auftreten. In diesem Fall mit dem Regler MIC LEVEL
(5) eine niedrigere Mikrofonlautstärke einstellen.
6
6) Mit den beiden Reglern TREBLE (8) und BASS
(9) den Klang wie gewünscht einstellen.
7) Mit dem Regler MAIN LEVEL (7) die gewünschte
Gesamtlautstärke einstellen. Den Regler nur so
weit aufdrehen, dass der Ton nicht verzerrt wiedergegeben wird. Leuchtet die Übersteuerungsanzeige CLIP (10), den Regler entsprechend
zurückdrehen. Bei Bedarf anschließend die
Klangeinstellungen korrigieren.
8) Nach dem Gebrauch die Lautsprecherbox mit
dem Schalter POWER wieder ausschalten.
6
Technische Daten
D
A
Modell
PAK-10XC
PAK-12XC
PAK-15XC
Verstärkerleistung
Sinusleistung
Spitzenleistung
100 W
170 W
120 W
210 W
150 W
250 W
Frequenzbereich
59 – 20 000 Hz
59 – 20 000 Hz
48 – 20 000 Hz
Max. Nennschalldruck
115 dB
117 dB
118 dB
Basslautsprecher
∅ 25 cm (10″)
∅ 30 cm (12″)
∅ 38 cm (15″)
CH
dynamischer Hornhochtöner, ∅ 2,54 cm (1″)
Hochtonlautsprecher
∅ 34 mm
Schwingspule
∅ 44 mm
Eingänge (Empfindlichkeit/ max. Eingangsspannung/ Impedanz)
LINE IN – XLR, symmetrisch
LINE IN – Cinch
MIC IN – XLR, symmetrisch
MIC IN – Klinke, symmetrisch
100 mV/ 0,6 V/ 10 kΩ
200 mV/ 1,7 V/ 10 kΩ
6 mV/ 120 mV/ 2 kΩ
6 mV/ 120 mV/ 2 kΩ
Ausgänge LINE OUT, symmetrisch,
XLR und Klinke (parallelgeschaltet)
Nennausgangsspannung
Ausgangsimpedanz
200 mV
1 kΩ
Einsatztemperatur
0 – 40 °C
Stromversorgung
230 V~/ 50 Hz
230 V~/ 50 Hz
230 V~/ 50 Hz
max. Leistungsaufnahme
200 VA
225 VA
300 VA
Abmessungen (B × H × T)
360 × 500 × 270 mm 420 × 585 × 320 mm 470 × 680 × 390 mm
Gewicht
12,3 kg
17,1 kg
20 kg
Kontaktbelegung der Anschlüsse:
1 = Masse
2 = Signal +
3 = Signal -
T = Signal +
R = Signal S = Masse
Änderungen vorbehalten.
Diese Bedienungsanleitung ist urheberrechtlich für MONACOR ® INTERNATIONAL GmbH & Co. KG
geschützt. Eine Reproduktion für eigene kommerzielle Zwecke – auch auszugsweise – ist untersagt.
7
GB
All operating elements and connections described can be found on the fold-out page 3.
1
Operating Elements
and Connections
humidity and heat (admissible ambient temperature range 0 – 40 °C).
G
Do not place any vessels filled with liquid, e. g.
drinking glasses, on the unit.
G
Do not set the unit into operation, or immediately
disconnect the mains plug from the mains socket
if
1. there is visible damage to the unit or to the
mains cable,
2. a defect might have occurred after a drop or
similar accident,
3. malfunctions occur.
The unit must in any case be repaired by skilled
personnel.
G
Never pull the mains cable to disconnect the
mains plug from the mains socket, always seize
the plug.
G
For cleaning only use a dry, soft cloth, never use
chemicals or water.
G
No guarantee claims for the unit and no liability
for any resulting personal damage or material
damage will be accepted if the unit is used for
other purposes than originally intended, if it is not
correctly mounted or operated, or not repaired in
an expert way.
G
Important for U. K. Customers!
The wires in this mains lead are coloured in
accordance with the following code:
green/yellow = earth
blue = neutral
brown = live
As the colours of the wires in the mains lead of
this appliance may not correspond with the
coloured markings identifying the terminals in
your plug, proceed as follows:
1. The wire which is coloured green and yellow
must be connected to the terminal in the plug
which is marked with the letter E or by the earth
symbol , or coloured green or green and yellow.
2. The wire which is coloured blue must be connected to the terminal which is marked with the
letter N or coloured black.
3. The wire which is coloured brown must be connected to the terminal which is marked with the
letter L or coloured red.
Warning – This appliance must be earthed.
1 Input MIC IN: XLR jack and 6.3 mm jack (balanced) for connection of a microphone; PAK15XC: both connections are combined in one
jack
2 Input LINE IN: XLR jack for connection of signal
sources with line level (e. g. mixer)
3 Input LINE IN: phono jacks; when connecting
both jacks (e. g. stereo signal from a CD player),
the sum (mono) is created from the signals
4 Output LINE OUT: XLR jack and 6.3 mm jack
(balanced) for passing on the mixed signal e. g.
to another active speaker system
5 Volume control MIC LEVEL for the microphone
input MIC IN (1)
6 Volume control LINE LEVEL for the line input
LINE IN (2, 3)
7 Control MAIN LEVEL for the total volume
8 Tone control TREBLE for the high range
9 Tone control BASS for the bass range
10 Overload indication CLIP
11 Power LED ON
12 POWER switch
13 Mains jack for connection to a socket (230 V~ /
50 Hz) via the supplied mains cable
14 Support for the mains fuse
Only replace a blown fuse by one of the same
type
15 Stand sleeve with setscrew
2
Safety Notes
The unit corresponds to all relevant directives of
the EU and is therefore marked with .
WARNING The unit is supplied with hazardous
mains voltage. Leave servicing to
skilled personnel only. Inexpert handling or modification of the unit may
cause an electric shock hazard.
It is essential to observe the following items:
G
8
The unit is suitable for indoor use only. Protect it
against dripping water and splash water, high air
If the unit is to be put out of operation
definitively, take it to a local recycling plant
for a disposal which is not harmful to the
environment.
3
Applications
The PAK-10XC, PAK-12XC and PAK-15XC are
powerful active speaker systems in robust plastic
housings. They are suitable for versatile applications, e. g. for dances, for smaller stages or as
monitor speakers for bands. The 2-way speaker
systems are equipped with class D amplifiers which
have an especially high efficiency.
A line signal can be fed in via the balanced XLR
jack or, in an unbalanced way, via the phono jacks.
In addition, the speaker systems are equipped with
a microphone input. The signal of this input can be
added to the line signal. The signal output will allow
connection of another active speaker system.
The speaker systems are equipped with protective circuits against overload and overheating.
4
Setting Up and Connecting
Set up the speaker system on a solid surface, e. g.
on the stage or on a table and position it towards
the audience. The tweeters should be at ear level,
if possible. With its bevelled cabinet shape, the
speaker system can also be used as a stage monitor radiating diagonally upwards. If a microphone
should be used, do not direct the speaker to the
microphone and keep sufficient distance towards
the microphone, otherwise acoustic feedback (loud
howling) may occur.
Alternatively, place the speaker system via the
stand sleeve on its lower side onto a standard
speaker stand with 35 mm tube diameter (e. g. of
the PAST series from “img Stage Line”). After aligning the speaker system, tighten the screw (15).
For additional mounting facilities, e. g. suspension, M8 threaded jacks are recessed into the cabinet (two on the upper side and one on the lower
side). To use them, remove the corresponding rubber covers.
4.1 Connecting a signal source
GB
For connection of a signal source with line level
(e. g. CD player, mixer output) there are the following possibilities:
– For balanced signals, use the XLR jack (2) [configuration of the pins chapter 6]
– For unbalanced signals, use the phono jacks (3).
When using both phono jacks or the phono jacks
and the XLR jack (2) at the same time, the input
signals are mixed. Thus, when connecting a
stereo signal source, a mono signal is created.
For stereophonic reproduction connect each
stereo channel to an individual speaker system.
A microphone can be connected to the XLR jack
or the 6.3 mm jack MIC IN (1). Both jacks are suitable for balanced signals. PAK-15XC: both connections are combined in one jack; to pull out an
XLR plug from this jack, press the PUSH lever. A
microphone with unbalanced output signal may be
connected to the 6.3 mm jack with a two-pole
6.3 mm plug.
4.2 Signal output
The mixed signal of the input signals is available as
a balanced signal with line level at the XLR jack and
at the 6.3 mm jack LINE OUT (4) [connected in parallel] to be passed on to another active speaker
system, an amplifier or a recorder. The output signal is independent of the adjustment of the total volume control MAIN LEVEL (7).
4.3 Power supply
Connect the supplied mains cable to the mains jack
(13) and the plug to a socket (230 V~ / 50 Hz).
Prior to connection or changing existing connections, switch off the speaker system and the units to
be connected.
9
GB
5
Operation
CAUTION Never adjust a very high volume. Permanent high volumes may damage
your hearing! The human ear will get
accustomed to high volumes which
do not seem to be that high any more
after some time. Therefore, do not
further increase a high volume after
getting used to it.
Note: To prevent switching noise, always switch on
the active speaker system after the signal
source connected and after use switch it off
first.
1) Set the control MAIN LEVEL (7) to minimum (left
stop) for the time being and switch on the amplifier with the POWER switch (12). The LED ON
(11) lights up.
The following steps merely serve as an aid, other
ways of proceedings are possible.
2) As a basic setting, first set the LEVEL controls
(5 to 7) to minimum (left stop) and the tone controls (8, 9) to mid-position.
3) Adjust the total volume with the control MAIN
LEVEL (7). Turn up the control approx. half-way
so that the following adjustments can be heard.
4) If a signal source has been connected to the
input LINE IN (2, 3), turn up the corresponding
control LINE LEVEL (6) so that the sound reproduced will not be distorted yet.
5) If a microphone has been connected, add its signal with the control MIC LEVEL (5) and, if
required, reduce the level of the line signal with
the control LINE LEVEL (6).
CAUTION! To prevent a howling noise, do not
hold the microphone in the direction of the
speaker or too close to it. If a volume has been
adjusted too high, a howling noise may occur as
well. In this case adjust a lower microphone volume with the control MIC LEVEL (5).
10
6) Adjust the sound as desired with both controls
TREBLE (8) and BASS (9).
7) Adjust the desired total volume with the control
MAIN LEVEL (7). Only turn up the control so
that the sound reproduced will not be distorted.
If the overload LED CLIP (10) lights up, turn
back the control accordingly. If required, readjust
the sound.
8) After use, always switch off the speaker system
with the POWER switch.
6
Specifications
GB
Model
PAK-10XC
PAK-12XC
PAK-15XC
Amplifier power
RMS power
peak power
100 W
170 W
120 W
210 W
150 W
250 W
Frequency range
59 – 20 000 Hz
59 – 20 000 Hz
48 – 20 000 Hz
Max. rated SPL
115 dB
117 dB
118 dB
Bass speaker
∅ 25 cm (10″)
∅ 30 cm (12″)
∅ 38 cm (15″)
dynamic horn tweeter, ∅ 2.54 cm (1″)
Tweeter
∅ 34 mm
voice coil
Inputs (sensitivity/
max. input voltage / impedance)
LINE IN – XLR, balanced
LINE IN – phono
MIC IN – XLR, balanced
MIC IN – 6.3 mm, balanced
∅ 44 mm
100 mV/ 0.6 V/ 10 kΩ
200 mV/ 1.7 V/ 10 kΩ
6 mV/ 120 mV/ 2 kΩ
6 mV/ 120 mV/ 2 kΩ
Outputs LINE OUT, balanced, XLR and
6.3 mm jacks (connected in parallel)
rated output voltage
output impedance
200 mV
1 kΩ
Ambient temperature
0 – 40 °C
Power supply
230 V~/ 50 Hz
230 V~/ 50 Hz
230 V~/ 50 Hz
Max. power consumption
200 VA
225 VA
300 VA
Dimensions (W × H × D)
360 × 500 × 270 mm 420 × 585 × 320 mm 470 × 680 × 390 mm
Weight
12.3 kg
17.1 kg
20 kg
Pin configuration of the connections:
1 = ground
2 = signal +
3 = signal -
T = signal +
R = signal S = ground
Subject to technical modification.
All rights reserved by MONACOR ® INTERNATIONAL GmbH & Co. KG. No part of this instruction manual
may be reproduced in any form or by any means for any commercial use.
11
F
B
Ouvrez le présent livret page 3, dépliable, de
manière à visualiser les éléments et branchements.
2
1
AVERTISSEMENT Lʼappareil est alimenté par une
tension dangereuse. Ne touchez
jamais lʼintérieur de lʼappareil,
vous pourriez subir une décharge
électrique.
CH
Eléments et branchements
1 Entrée MIC IN, XLR femelle et jack 6,35 femelle
(symétrique) pour brancher un microphone ; sur
la PAK-15XC, les deux branchements sont
combinés en une prise
2 Entrée LINE IN, XLR femelle, pour brancher
des sources de signal avec niveau ligne (par
exemple table de mixage)
3 Entrée LINE IN, prises RCA : lorsque les deux
prises sont branchées (par exemple signal stéréo dʼun lecteur CD), la somme (mono) est formée à partir des signaux
4 Sortie LINE OUT, XLR femelle et jack 6,35
femelle (symétrique) pour diriger le signal de
mixage par exemple vers une autre enceinte
active
5 Réglage de volume MIC LEVEL pour lʼentrée
micro MIC IN (1)
6 Réglage de volume LINE LEVEL pour lʼentrée
ligne LINE IN (2, 3)
7 Réglage MAIN LEVEL pour le volume général
8 Réglage de tonalité TREBLE pour les aigus
9 Réglage de tonalité BASS pour les graves
10 Témoin dʼécrêtage CLIP
11 Témoin de fonctionnement ON
12 Interrupteur secteur POWER
13 Prise secteur à brancher via le cordon secteur
livré à une prise 230 V~ / 50 Hz.
14 Porte-fusible : tout fusible fondu doit être remplacé uniquement par un fusible de même type
15 Insert pour pied avec vis de fixation
Conseils dʼutilisation et de sécurité
Lʼappareil répond à toutes les directives nécessaires de lʼUnion européenne et porte donc le symbole .
Respectez scrupuleusement les points suivants :
G
Lʼappareil nʼest conçu que pour une utilisation en
intérieur. Protégez-le de tout type de projections
dʼeau, des éclaboussures, dʼune humidité élevée
de lʼair et de la chaleur (plage de température de
fonctionnement autorisée : 0 – 40 °C).
G
En aucun cas, vous ne devez poser dʼobjet contenant du liquide ou un verre sur lʼappareil.
G
Ne faites pas fonctionner lʼappareil ou débranchez la fiche secteur immédiatement du secteur
lorsque :
1. des dommages visibles apparaissent sur lʼappareil ou le cordon secteur,
2. après une chute ou un cas similaire, vous avez
un doute sur lʼétat de lʼappareil,
3. des défaillances apparaissent.
Dans tous les cas, les dommages doivent être
réparés par un technicien spécialisé.
G
Ne débranchez jamais lʼappareil en tirant sur le
cordon secteur, tenez-le toujours par la fiche.
G
Pour le nettoyer, utilisez uniquement un chiffon
sec et doux, en aucun cas, de produits chimiques
ou dʼeau.
G
Nous déclinons toute responsabilité en cas de
dommages matériels ou corporels consécutifs si
lʼappareil est utilisé dans un but autre que celui
pour lequel il a été conçu, sʼil nʼest pas correctement monté, utilisé ou sʼil nʼest pas réparé par
une personne habilitée ; de même, la garantie
deviendrait caduque.
Lorsque lʼappareil est définitivement retiré
du service, vous devez le déposer dans
une usine de recyclage adaptée pour contribuer à son élimination non polluante.
12
3
Possibilités dʼutilisation
Les enceintes PAK-10XC, PAK-12XC et PAK-15XC
sont des enceintes actives puissantes proposées
dans des ébénisteries plastiques solides. Elles
peuvent être utilisées pour tout type dʼapplications,
par exemple manifestations de danse, équipements de petites scènes ou haut-parleurs moniteur
dans un groupe. Les enceintes 2 voies sont dotées
dʼamplificateurs classe D avec un rendement particulièrement élevé.
Un signal ligne peut être dirigé via la prise XLR
symétrique ou via les prises RCA en asymétrique.
De plus, les appareils disposent dʼune entrée micro
dont le signal peut être mixé au signal ligne. La sortie signal permet de brancher une autre enceinte
active.
Les enceintes sont dotées de circuits de protection contre les surcharges et surchauffes.
4
Positionnement et branchements
Placez lʼenceinte sur une surface fixe par exemple
sur scène ou sur une table et orientez-la vers les
auditeurs. Les haut-parleurs dʼaigu devraient être
placés si possible à hauteur dʼoreille. Grâce à sa
forme trapézoïdale, lʼenceinte peut être utilisée
comme moniteur de scène diffusant vers le haut en
diagonale. Si un microphone doit être utilisé, nʼorientez pas lʼenceinte vers le micro et laissez une
distance suffisante avec le micro sinon des effets
larsen peuvent survenir.
Elle peut également être placée sur un pied
dʼenceinte avec diamètre de tube de 35 mm grâce
à lʼinsert pour pied sur la face inférieure (par exemple série PAST de “img Stage Line”). Une fois lʼenceinte positionnée, serrez la vis (15).
Pour dʼautres possibilités de montage, par
exemple suspension, des vis filetées M8 sont placées dans lʼenceinte (deux sur la face supérieure et
une sur la face inférieure). Pour les utiliser, retirez
les caches caoutchouc respectifs.
4.1 Branchement dʼune source de signal
F
Pour brancher une source de signal avec niveau
ligne (par exemple lecteur CD, sortie table de
mixage), plusieurs possibilités sʼoffrent à vous :
CH
B
– pour des signaux symétriques, utilisez la prise
XLR femelle (2) [configuration des contacts,
chapitre 6].
– pour des signaux asymétriques, utilisez les prises RCA (3). Si vous utilisez simultanément les
prises RCA ou les prises RCA et la prise XLR
(2), les signaux dʼentrée sont mixés. Ainsi lorsquʼon branche une source stéréo de signal, un
signal mono est créé. Pour une restitution stéréo, reliez chaque canal stéréo à une enceinte
distincte.
On peut relier un microphone à la prise XLR
femelle ou à la prise jack 6,35 MIC IN (1) ; les deux
prises sont configurées pour des signaux symétriques. Sur la PAK-15XC, les deux branchements
sont combinés dans une prise ; pour retirer la fiche
XLR mâle de la prise, appuyez sur le levier PUSH.
Un microphone avec signal de sortie asymétrique
peut être branché à la fiche jack 6,35 mâle avec
une fiche jack 6,35 2 pôles.
4.2 Sortie signal
Le signal de mixage des signaux dʼentrée est présent à la prise XLR femelle et à la prise jack LINE
OUT (4) [branchée en parallèle] comme signal
symétrique avec niveau ligne pour être dirigés vers
une autre enceinte active, un amplificateur ou un
enregistreur. Le signal de sortie est indépendant du
réglage du volume général MAIN LEVEL (7).
4.3 Alimentation
Reliez le cordon secteur livré à la prise secteur (13)
et reliez la fiche à une prise secteur 230 V~ / 50 Hz.
Avant dʼeffectuer les branchements ou de modifier
les branchements existants, éteignez lʼenceinte et
les appareils à relier.
13
F
5
B
PRECAUTION Ne réglez pas jamais le volume trop
fort. Un volume trop élevé peut, à
long terme, générer des troubles de
lʼaudition. Lʼoreille humaine sʼhabitue à des volumes élevés et ne les
perçoit plus comme tels au bout dʼun
certain temps. Nous vous conseillons donc de régler le volume et de
ne plus le modifier.
CH
Utilisation
Conseil : pour éviter tout bruit fort de commutation, allumez lʼenceinte active toujours
après la source de signal reliée et après
utilisation, éteignez-la en premier.
1) Mettez dʼabord le réglage MAIN LEVEL (7) sur
le minimum (butée de gauche) et allumez lʼamplificateur avec lʼinterrupteur POWER (12). La
LED ON (11) brille.
Les points suivants sont des aides de réglage, il
existe dʼautres méthodes.
2) Comme réglage de base, mettez tout dʼabord
les réglages LEVEL (5 – 7) sur le minimum
(butée de gauche) et mettez les réglages de
tonalité (8, 9) sur la position médiane.
3) Avec le réglage MAIN LEVEL (7), réglez le
volume général souhaité. Tournez le réglage à la
moitié environ pour que les réglages suivants
soient audibles.
4) Si une source de signal est reliée à lʼentrée LINE
IN (2, 3), tournez le réglage correspondant LINE
LEVEL (6) jusquʼà ce que le son soit restitué de
manière non distordue.
5) Si un micro est relié, mixez son signal avec le
réglage MIC LEVEL (5) et si besoin, diminuez le
niveau du signal ligne avec le réglage LINE
LEVEL (6).
ATTENTION ! Pour éviter les sifflements, ne
tenez pas le micro en direction de lʼenceinte ou
trop près dʼelle. Si le volume réglé est trop élevé,
un sifflement peut également intervenir. Dans ce
cas, réglez un volume micro plus faible avec le
réglage MIC LEVEL (5).
14
6) Avec les deux réglages TREBLE (8) et BASS
(9), réglez la tonalité comme souhaité.
7) Avec le réglage MAIN LEVEL (7), réglez le
volume général souhaité. Tournez le réglage de
telle sorte que le son soit restitué de manière
non distordu. Si la LED CLIP (10) brille, tournez
le réglage dans lʼautre sens. Si besoin, corrigez
les réglages de tonalité.
8) Après utilisation, éteignez lʼenceinte avec lʼinterrupteur POWER.
6
Caractéristiques techniques
F
B
Modèle
PAK-10XC
PAK-12XC
PAK-15XC
Puissance amplificateur
Puissance RMS
Puissance max.
100 W
170 W
120 W
210 W
150 W
250 W
Bande passante
59 – 20 000 Hz
59 – 20 000 Hz
48 – 20 000 Hz
Pression sonore max.
115 dB
117 dB
118 dB
Haut-parleur de grave
∅ 25 cm (10″)
∅ 30 cm (12″)
∅ 38 cm (15″)
CH
aigu dynamique à pavillon, ∅ 2,54 cm (1″)
Haut-parleur dʼaigu
∅ 34 mm
bobine
∅ 44 mm
Entrées (sensibilité / tension dʼentrée
max. / impédance)
LINE IN – XLR, symétrique
LINE IN – RCA
MIC IN – XLR, symétrique
MIC IN – jack, symétrique
100 mV/ 0,6 V/ 10 kΩ
200 mV/ 1,7 V/ 10 kΩ
6 mV/ 120 mV/ 2 kΩ
6 mV/ 120 mV/ 2 kΩ
Sorties LINE OUT, symétrique, XLR
et jack (branchées en parallèle)
Tension de sortie nominale
Impédance de sortie
200 mV
1 kΩ
Température fonc.
0 – 40 °C
Alimentation
230 V~/ 50 Hz
230 V~/ 50 Hz
230 V~/ 50 Hz
Consommation max.
200 VA
225 VA
300 VA
Dimensions (L × H × P)
360 × 500 × 270 mm 420 × 585 × 320 mm 470 × 680 × 390 mm
Poids
12,3 kg
17,1 kg
20 kg
Configuration des contacts des branchements :
1 = Masse
2 = Signal +
3 = Signal -
T = Signal +
R = Signal S = Masse
Tout droit de modification réservé.
Notice dʼutilisation protégée par le copyright de MONACOR ® INTERNATIONAL GmbH & Co. KG. Toute
reproduction même partielle à des fins commerciales est interdite.
15
I
A pagina 3, se aperta completamente, vedrete
tutti gli elementi di comando e i collegamenti
descritti.
1
Elementi di comando
e collegamenti
1 Ingresso MIC IN come presa XLR e presa jack
(bilanciata) per il collegamento di un microfono;
nel PAK-15XC, i due contatti sono combinati in
una sola presa
2 Ingresso LINE IN come presa XLR per il collegamento di sorgenti di segnali con livello Line
(p. es. mixer)
3 Ingresso LINE IN come prese RCA; collegando
le due prese (p. es. segnale stereo di un lettore
CD), dai segnali si crea la somma (mono).
4 Uscita LINE OUT come presa XLR e presa jack
(bilanciata) per inoltrare il segnale miscelato,
p. es. ad unʼulteriore cassa attiva
2
AVVERTIMENTO Lʼapparecchio funziona con pericolosa tensione di rete. Non intervenire mai personalmente al suo
interno. Esiste il pericolo di una
scarica elettrica.
Si devono osservare assolutamente anche i seguenti punti:
G
Usare lʼapparecchio solo allʼinterno di locali e proteggerlo dallʼacqua gocciolante e dagli spruzzi
dʼacqua, da alta umidità dellʼaria e dal calore
(temperatura dʼimpiego ammessa fra 0 e 40 °C).
G
Non depositare sullʼapparecchio dei contenitori
riempiti di liquidi, p. es. bicchieri.
G
Non mettere in funzione lʼapparecchio e staccare
subito la spina dalla presa di rete se:
1. lʼapparecchio o il cavo rete presentano dei
danni visibili;
2. dopo una caduta o dopo eventi simili sussiste
il sospetto di un difetto;
3. lʼapparecchio non funziona correttamente.
Per la riparazione rivolgersi sempre ad unʼofficina competente.
G
Staccare il cavo rete afferrando la spina, senza
tirare il cavo.
G
Per la pulizia usare solo un panno morbido,
asciutto; non impiegare in nessun caso acqua o
prodotti chimici.
G
Nel caso dʼuso improprio, dʼinstallazione scorretta, dʼimpiego scorretto o di riparazione non a
regola dʼarte dellʼapparecchio, non si assume
nessuna responsabilità per eventuali danni consequenziali a persone o a cose e non si assume
nessuna garanzia per lʼapparecchio.
5 Regolatore volume MIC LEVEL per lʼingresso
microfono MIC IN (1)
6 Regolatore volume LINE LEVEL per lʼingresso
LINE IN (2, 3)
7 Regolatore MAIN LEVEL per il volume globale
8 Regolatore toni TREBLE per gli alti
9 Regolatore toni BASS per i bassi
10 Spia di sovrapilotaggio CLIP
11 Spia di funzionamento ON
12 Interruttore di rete POWER
13 Presa per il collegamento con una presa di rete
(230 V~ / 50 Hz) tramite il cavo in dotazione
14 Portafusibile
Sostituire un fusibile difettoso sempre con uno
dello stesso tipo.
15 Boccola per stativo con vite di bloccaggio
16
Avvertenze di sicurezza
Questʼapparecchio è conforme a tutte le direttive
rilevanti dellʼUE e pertanto porta la sigla .
Se si desidera eliminare lʼapparecchio
definitivamente, consegnarlo per lo smaltimento ad unʼistituzione locale per il riciclaggio.
3
Possibilità dʼimpiego
I PAK-10XC, PAK-12XC e PAK-15XC sono casse
acustiche attive potenti in contenitori robusti di plastica. Si possono impiegare in vari modi, p. es. su
piste di ballo, per spettacoli minori o come altoparlanti monitor di una band. Le casse a 2 vie sono
equipaggiati con amplificatori di classe D che
dispongono di un rendimento particolarmente alto.
Tramite la presa XLR bilanciata o tramite le
prese RCA sbilanciate è possibile inserire un
segnale Line. In più, gli apparecchi dispongono di
un ingresso per microfono il cui segnale può essere
miscelato nel segnale Line. Lʼuscita dei segnali
permette il collegamento di unʼulteriore cassa acustica attiva.
Le casse sono equipaggiate con circuiti di protezione contro sovraccarico e surriscaldamento.
4
Collocare e collegare
Sistemare la cassa su una base stabile, p. es. sul
palcoscenico e su un tavolo, e orientarla verso gli
ascoltatori. I tweeter dovrebbero trovasi, se possibile, allʼaltezza dellʼorecchio delle persone. Data la
forma smussata della cassa, la si può usare anche
come monitor con irradiazione diretta in modo obliquo verso lʼalto. Se si deve usare un microfono,
non orientare la cassa verso il microfono e mantenere una distanza sufficiente fra cassa e microfono
per escludere il feedback acustico (un fischio forte).
In alternativa, per mezzo della boccola per stativo sul lato inferiore, la cassa può essere sistemata su uno stativo standard per casse acustiche
con diametro del tubo di 35 mm (p. es. della serie
PAST di “img Stage Line”). Dopo aver orientato la
cassa, stringere bene la vite di bloccaggio (15).
Per ulteriori possibilità di montaggio, p. es. in
modo sospeso, nella cassa si trovano delle boccole
filettate M8 (due sul lato superiore e una sul lato
inferiore). Per usarle occorre togliere le loro coperture di gomma.
4.1 Collegare la sorgente di segnali
I
Per il collegamento di una sorgente di segnali
con livello Line (p. es. lettore CD, uscita di un
mixer) esistono le seguenti possibilità:
– Per i segnali bilanciati è adatta la presa XLR (2)
[piedinatura dei contatti Capitolo 6].
– Per i segnali sbilanciati sono adatte le prese
RCA (3). Se si usano contemporaneamente le
due prese RCA o le prese RCA e la presa XLR
(2), i segnali dʼingresso saranno miscelati. In
questo modo, collegando una sorgente stereo,
si genera un segnale mono. Per la riproduzione
stereo, collegare ogni canale stereo con una
sua cassa acustica.
Un microfono può essere collegato con la presa
XLR o jack MIC IN (1). Entrambe le prese sono
previste per segnali bilanciati. Nel PAK-15XC i due
contatti sono combinati in una sola presa; per sfilare un connettore XLR da questa presa, esercitare
una pressione sulla levetta PUSH. Un microfono
con segnale dʼuscita sbilanciato può essere collegato con la presa jack per mezzo di un jack a 2 poli.
4.2 Uscita dei segnali
Alla presa XLR e alla presa jack (collegata in parallelo) LINE OUT (4) è disponibile il segnale miscelato dei segnali dʼingresso come segnale bilanciato
con livello Line, per essere inoltrato a unʼulteriore
cassa attiva, a un amplificatore o a un registratore.
Il segnale dʼuscita non dipende dallʼimpostazione
del regolatore del volume globale MAIN LEVEL (7).
4.3 Alimentazione
Inserire il cavo in dotazione nella presa (13) e
quindi in una presa di rete (230 V~ / 50 Hz).
Prima di effettuare i collegamenti o di modificare
dei collegamento esistenti, spegnere la cassa e gli
apparecchi da collegare.
17
I
5
Funzionamento
ATTENZIONE Mai tenere molto alto il volume. A
lungo andare, il volume eccessivo
può procurare danni allʼudito! Lʼorecchio si abitua agli alti volumi e dopo
un certo tempo non se ne rende più
conto. Perciò non aumentare il
volume successivamente.
Nota: Per evitare rumori di commutazione, accendere la cassa attiva sempre dopo la sorgente
collegata di segnali, e dopo lʼuso spegnerla
per prima.
1) Portare il regolatore MAIN LEVEL (7) per il
momento sul minimum (arresto a sinistra) e
accendere lʼamplificatore con lʼinterruttore
POWER (12). Il LED ON (11) si accende.
I passi seguenti servono solo come aiuto, perché
sono possibili anche altri modi di procedere.
2) Per il momento, per unʼimpostazione base portare i regolatori LEVEL (5 – 7) sul minimum
(arresto a sinistra) e spostare i regolatori toni (8,
9) in posizione centrale.
3) Con il regolatore MAIN LEVEL (7) sʼimposta il
volume globale. Aprire il regolatore a metà circa,
in modo che le impostazioni seguenti siano udibili.
4) Se allʼingresso LINE IN (2, 3) è collegata una
sorgente di segnali, aprire il relativo regolatore
LINE LEVEL (6) al punto tale che lʼaudio non sia
riprodotto in modo distorto.
5) Se è collegato un microfono, aggiungere il suo
segnale con il regolatore MIC LEVEL (5) e, se
necessario, ridurre il livello del segnale Line tramite il regolatore LINE LEVEL (6).
ATTENZIONE! Per escludere il fischio di feedback, non tenere il microfono in direzione dellʼaltoparlante oppure troppo vicino allo stesso.
Anche con un volume impostato troppo alto è
possibile che si manifesti un feedback. In questo
caso impostare con il regolatore MIC LEVEL (5)
un volume minore del microfono.
18
6) Con i due regolatori TREBLE (8) e BASS (9)
impostare i toni secondo desiderio.
7) Con il regolatore MAIN LEVEL (7) impostare il
volume globale desiderato. Aprire il regolatore
solo al punto che lʼaudio non sia riprodotto in
modo distorto. Se si accende la spia di sovrapilotaggio CLIP (10), ridurre il regolatore in corrispondenza. Se necessario correggere successivamente le impostazioni dei toni.
8) Dopo lʼuso, spegnere la cassa con lʼinterruttore
POWER.
6
Dati tecnici
I
Modello
PAK-10XC
PAK-12XC
PAK-15XC
Potenza dellʼamplificatore
Potenza efficace
Potenza di picco
100 W
170 W
120 W
210 W
150 W
250 W
Gamma di frequenza
59 – 20 000 Hz
59 – 20 000 Hz
48 – 20 000 Hz
Pressione sonora nom.le max.
115 dB
117 dB
118 dB
Woofer
∅ 25 cm (10″)
∅ 30 cm (12″)
∅ 38 cm (15″)
tweeter dinamico a tromba, ∅ 2,54 cm (1″)
Tweeter
∅ 34 mm
Bobina mobile
Ingressi (Sensibilità / Tensione max.
dʼingresso / Impedenza)
LINE IN – XLR, bilanciato
LINE IN – RCA
MIC IN – XLR, bilanciato
MIC IN – jack, bilanciato
∅ 44 mm
100 mV/ 0,6 V/ 10 kΩ
200 mV/ 1,7 V/ 10 kΩ
6 mV/ 120 mV/ 2 kΩ
6 mV/ 120 mV/ 2 kΩ
Uscite LINE OUT, bilanciato, XLR e
jack (collegati in parallelo)
Tensione nominale dʼuscita
Impedenza dʼuscita
200 mV
1 kΩ
Temperatura dʼesercizio
0 – 40 °C
Alimentazione
230 V~/ 50 Hz
230 V~/ 50 Hz
230 V~/ 50 Hz
Potenza assorbita max.
200 VA
225 VA
300 VA
Dimensioni (l × h × p)
360 × 500 × 270 mm 420 × 585 × 320 mm 470 × 680 × 390 mm
Peso
12,3 kg
17,1 kg
20 kg
Piedinatura dei contatti:
1 = Massa
2 = Segnale +
3 = Segnale -
T = Segnale +
R = Segnale S = Massa
Con riserva di modifiche tecniche.
La MONACOR ® INTERNATIONAL GmbH & Co. KG si riserva ogni diritto di elaborazione in qualsiasi forma
delle presenti istruzioni per lʼuso. La riproduzione – anche parziale – per propri scopi commerciali è vietata.
19
E
Todos los elementos de funcionamiento y las
conexiones que se describen pueden encontrarse en la página 3 desplegable.
1
Elementos de Funcionamiento
y Conexiones
1 Entrada MIC IN: Toma XLR y jack 6,3 mm (simétrica) para conectar un micrófono; PAK-15XC:
ambas conexiones están combinadas en una
toma
2 Entrada LINE IN: Toma XLR para conectar
fuentes de señal con nivel de línea (p. ej. mezclador)
3 Entrada LINE IN: Tomas phono; cuando se
conectan ambas tomas (p. ej. señal estéreo de
un lector CD), se crea la suma (mono) de las
señales
2
ADVERTENCIA El aparato está alimentado con un
voltaje peligroso. Deje el mantenimiento en manos del personal cualificado. El manejo inexperto o la
modificación del aparato pueden
provocar una descarga.
Es imprescindible que preste atención a los puntos
siguientes:
G
El aparato está adecuado para su utilización sólo
en interiores. Protéjalo de goteos y salpicaduras,
elevada humedad del aire y calor (temperatura
ambiente admisible: 0 – 40 ºC).
G
No coloque ningún recipiente lleno de líquido
encima del aparato, como por ejemplo un vaso.
G
No ponga el aparato en funcionamiento o desconecte inmediatamente el enchufe de la toma de
corriente si:
1. Existe algún daño visible en el aparato o en el
cable de corriente.
2. Aparece algún defecto por caída o accidente
similar.
3. No funciona correctamente.
Sólo el personal cualificado puede reparar el
aparato bajo cualquier circunstancia.
G
No tire nunca del cable de corriente para desconectar el enchufe de la toma de corriente, tire
siempre del enchufe.
G
Utilice sólo un paño suave y seco para la limpieza, no utilice nunca ni productos químicos ni
agua.
G
No podrá reclamarse garantía o responsabilidad
alguna por cualquier daño personal o material
resultante si el aparato se utiliza para otros fines
diferentes a los originalmente concebidos, si no
se utiliza o se monta adecuadamente o no se
repara por expertos.
4 Salida LINE OUT: Toma XLR y jack 6,3 mm
(simétrica) para enviar la señal mezclada p. ej.
a otro recinto activo
5 Control de volumen MIC LEVEL para la entrada
de micrófono MIC IN (1)
6 Control de volumen LINE LEVEL para la
entrada de línea LINE IN (2, 3)
7 Control MAIN LEVEL para el volumen total
8 Control de tono TREBLE para los agudos
9 Control de tono BASS para los graves
10 Indicación de sobrecarga CLIP
11 LED ON de corriente
12 Interruptor POWER
13 Toma de corriente para la conexión a un
enchufe (230 V~ / 50 Hz) mediante el cable de
corriente entregado
14 Soporte para el fusible de corriente
Cambie siempre un fusible fundido sólo por otro
del mismo tipo
15 Vaso para pie con tornillo de cierre
20
Notas de Seguridad
El aparato cumple con todas las directivas relevantes de la UE y por lo tanto está marcado con el símbolo .
Si va a poner el aparato fuera de servicio
definitivamente, llévelo a la planta de reciclaje más cercana para que su eliminación
no perjudique el medioambiente.
3
Aplicaciones
Los PAK-10XC, PAK-12XC y PAK-15XC son recintos activos potentes en carcasa de plástico
robusto. Están adecuados para una gran variedad
de aplicaciones, p. ej. en salas de baile, pequeños
escenarios o como altavoces monitor para grupos.
Los recintos de 2 vías están equipados con amplificadores de la clase D, que tienen una eficiencia
especialmente elevada.
Se puede alimentar una señal de línea mediante
la toma XLR simétrica o, en modo asimétrico,
mediante las tomas phono. Además, los recintos
están equipados con una entrada de micrófono. La
señal de esta entrada se puede añadir a la señal de
línea. La salida de señal permitirá conectar otro
recinto activo.
Los recintos están equipados con circuitos de
protección contra sobrecargas y sobrecalentamientos.
4
Colocación y Conexión
Ponga el recinto en una superficie sólida, p. ej. en
el escenario o en una mesa y diríjalo hacia la
audiencia. Los tweeters deberían estar a la altura
de los oídos, si es posible. Con su forma de recinto
biselado, el recinto también se puede utilizar como
monitor de escenario radiando hacia arriba en diagonal. Si hay que utilizar un micrófono, no dirija el
altavoz hacia el micrófono y mantenga distancia
suficiente con el micrófono, de lo contrario puede
aparecer feedback acústico (pitido estridente).
Como alternativa, coloque el recinto con el vaso
para pie de su parte inferior en un pie de recinto
estándar con un diámetro de tubo de 35 mm (p. ej.
de la gama PAST de “img Stage Line”). Después
de alinear el recinto, fije el tornillo (15).
Para instalaciones de montaje adicionales, p. ej.
en suspensión, hay tomas roscadas M8 empotradas en el recinto (dos en la parte superior y una en
la inferior). Para utilizarlas, extraiga las tapas de
caucho correspondientes.
4.1 Conexión de una fuente de señal
E
Para conectar una fuente de señal con nivel de
línea (p. ej. lector CD, salida de mezclador) tiene
las siguientes opciones:
– Para señales simétricas, utilice la toma XLR (2)
[configuración de los pines apartado 6]
– Para señales asimétricas, utilice las tomas
phono (3). Si se utilizan ambas tomas phono o
las tomas phono y la toma XLR (2) al mismo
tiempo, se mezclan las señales de entrada. De
este modo, cuando se conecta una fuente de
señal estéreo, se crea una señal mono. Para
una reproducción estereofónica, conecte cada
canal estéreo a un recinto individual.
Se puede conectar un micrófono a la toma XLR o
al jack 6,3 mm MIC IN (1). Ambas tomas están
adecuadas para señales simétricas. PAK-15XC:
Ambas conexiones se combinan en una toma; para
sacar un conector XLR de esta toma, pulse la
palanca PUSH. Un micrófono con señal de salida
asimétrica puede conectarse al jack 6,3 mm con un
conector jack 6,3 mm de dos polos.
4.2 Salida de señal
La señal mezclada de las señales de entrada está
disponible como señal simétrica con nivel de línea
en la toma XLR y en el jack 6,3 mm LINE OUT (4)
[conectado en paralelo] para enviarse a otro
recinto activo, a un amplificador o a un grabador.
La señal de salida es independiente del ajuste del
control de volumen total MAIN LEVEL (7).
4.3 Alimentación
Conecte el cable de corriente entregado a la toma
de corriente (13) y el conector a un enchufe
(230 V~ / 50 Hz).
Antes de conectar o modificar cualquier conexión
existente, desconecte el recinto y todos los aparatos conectados.
21
E
5
Funcionamiento
ADVERTENCIA No ajuste nunca un volumen muy
elevado. Los volúmenes altos permanentes pueden dañar su oído. El
oído humano se acostumbra a los
volúmenes altos que no lo parecen
tanto después de un rato. Por lo
tanto, no aumente un volumen alto
después de acostumbrarse a él.
Nota: Para prevenir el ruido de conexión, conecte
siempre el recinto activo después de la
fuente de señal conectada y desconéctelo
en primer lugar cuando acabe.
1) Ponga el control MAIN LEVEL (7) al mínimo
(tope izquierdo) primero y conecte el amplificador con el interruptor POWER (12). Se iluminará
el LED ON (11).
Los siguientes pasos sirven simplemente como
ayuda, hay otros procedimientos posibles.
2) Como ajuste básico, ponga primero los controles LEVEL (5 a 7) al mínimo (tope izquierdo) y
los controles de tono (8, 9) en la posición intermedia.
3) Ajuste el volumen total con el control MAIN
LEVEL (7). Aumente el control aprox. hasta la
mitad de modo que se pueden escuchar los
ajustes siguientes.
4) Si se ha conectado una fuente de señal a la
entrada LINE IN (2, 3), aumente el control
correspondiente LINE LEVEL (6) sin que el
sonido reproducido se distorsione.
5) Si se ha conectado un micrófono, añada su
señal con el control MIC LEVEL (5) y, si es
necesario, reduzca el nivel de la señal de línea
con el control LINE LEVEL (6).
¡PRECAUCIÓN! Para prevenir zumbidos, no
mantenga el micrófono en la dirección del altavoz
o muy cerca de él. Si se ha ajustado un volumen
demasiado alto, también puede aparecer algún
zumbido. En este caso, ajuste un volumen de
micrófono inferior con el control MIC LEVEL (5).
22
6) Ajuste el sonido como quiera con los controles
TREBLE (8) y BASS (9).
7) Ajuste el volumen total que desee con el control
MAIN LEVEL (7). Aumente el control siempre
que el sonido no se distorsione. Si el LED CLIP
de sobrecarga (10) se ilumina, baje el control
según corresponda. Si es necesario, reajuste el
sonido.
8) Después de utilizarlo, desconecte el recinto con
el interruptor POWER.
6
Especificaciones
E
Modelo
PAK-10XC
PAK-12XC
PAK-15XC
Potencia de amplificación
Potencia RMS
Potencia de pico
100 W
170 W
120 W
210 W
150 W
250 W
Banda pasante
59 – 20 000 Hz
59 – 20 000 Hz
48 – 20 000 Hz
SPL máx.
115 dB
117 dB
118 dB
Altavoz de graves
∅ 25 cm (10″)
∅ 30 cm (12″)
∅ 38 cm (15″)
Tweeter dinámico, ∅ 2,54 cm (1″)
Tweeter
∅ 34 mm
Bobina
Entradas (sensibilidad / voltaje máx.
de entrada / impedancia)
LINE IN – XLR, simétrica
LINE IN – phono
MIC IN – XLR, simétrica
MIC IN – jack 6,3 mm, simétrica
∅ 44 mm
100 mV/ 0,6 V/ 10 kΩ
200 mV/ 1,7 V/ 10 kΩ
6 mV/ 120 mV/ 2 kΩ
6 mV/ 120 mV/ 2 kΩ
Salidas LINE OUT, simétricas, tomas
jack 6,3 mm y XLR (conectadas en
paralelo)
Voltaje de salida nominal
Impedancia de salida
200 mV
1 kΩ
Temperatura ambiente
0 – 40 °C
Alimentación
230 V~/ 50 Hz
230 V~/ 50 Hz
230 V~/ 50 Hz
Consumo máximo
200 VA
225 VA
300 VA
Dimensiones (B × H × P)
360 × 500 × 270 mm 420 × 585 × 320 mm 470 × 680 × 390 mm
Peso
12,3 kg
17,1 kg
20 kg
Configuración de pines de las conexiones:
1 = masa
2 = señal +
3 = señal -
T = señal +
R = señal S = masa
Sujeto a modificaciones técnicas.
Manual de instrucciones protegido por el copyright de MONACOR ® INTERNATIONAL GmbH & Co. KG.
Toda reproducción mismo parcial para fines comerciales está prohibida.
23
PL
Proszę otworzyć instrukcję na stronie 3. Pokazano tam rozkład opisanych elementów operacyjnych oraz złączy.
2
Środki bezpieczeństwa
Urządzenie spełnia wszystkie wymagania norm UE
dzięki czemu jest oznaczone symbolem .
UWAGA
1
Elementy operacyjne i złącza
1 Wejście MIC IN: gniazdo XLR oraz 6,3 mm
(symetryczne) do podłączania mikrofonu; PAK15XC: oba złącza w gnieździe Combo
2 Wejście LINE IN: gniazdo XLR do podłączania
źródła sygnału z wyjściem liniowym (np. miksera)
Urządzenie jest zasilane wysokim napięciem sieciowym. Wszelkie naprawy
należy zlecić przeszkolonemu personelowi; nieodpowiednia obsługa może
spowodować porażenie prądem elektrycznym.
Należy przestrzegać następujących zasad:
G
Urządzenie jest przeznaczone tylko do użytku
wewnątrz pomieszczeń. Należy chronić je przed
działaniem wody, dużej wilgotności powietrza
oraz wysokiej temperatury (dopuszczalny zakres
0 – 40 °C).
G
Na urządzeniu nie należy stawiać żadnych
pojemników z płynem np. szklanek.
G
Nie wolno włączać urządzenia lub natychmiast
odłączyć wtyczkę zasilającą z gniazdka
1. jeżeli stwierdzono istnienie widocznego uszkodzenia urządzenia, lub kabla zasilającego,
2. jeżeli uszkodzenie urządzenia mogło nastąpić
w wyniku upadku lub innego podobnego zdarzenia,
3. jeżeli urządzenie działa nieprawidłowo.
W każdym przypadku, naprawę należy zlecić
specjaliście.
G
Nie wolno odłączać urządzenia z gniazdka sieciowego ciągnąc za kabel zasilania, należy
zawsze chwytać za wtyczkę.
13 Gniazdo zasilania do łączenia z gniazdkiem sieciowym (230 V~ / 50 Hz) za pomocą dołączonego kabla zasilającego
G
Do czyszczenia należy używać suchej, miękkiej
tkaniny. Nie stosować wody ani chemicznych
środków czyszczących.
14 Pokrywa bezpiecznika
Spalony bezpiecznik wymieniać na nowy o
identycznych parametrach.
G
Producent ani dostawca nie ponoszą odpowiedzialności za wynikłe szkody: uszkodzenie sprzętu
lub obrażenia użytkownika, jeśli urządzenie było
używane niezgodnie z ich przeznaczeniem, nieprawidłowo zamontowane, podłączone lub
obsługiwane bądź poddane nieautoryzowanej
naprawie.
3 Wejście LINE IN: gniazda phono; po podłączeniu obu gniazd (np. dla sygnału stereo z odtwarzacza CD), sygnały są sumowane do postaci
mono
4 Wyjście LINE OUT: gniazdo XLR oraz 6.3 mm
(symetryczne) do przesyłania zmiksowanego
sygnału np. do kolejnego aktywnego zestawu
głośnikowego
5 Regulator głośności MIC LEVEL dla wejścia
mikrofonowego MIC IN (1)
6 Regulator głośności LINE LEVEL dla wejścia
liniowego LINE IN (2, 3)
7 Regulator MAIN LEVEL głośności całkowitej
8 Regulator barwy TREBLE dla wysokich tonów
9 Regulator barwy BASS dla niskich tonów
10 Wskaźnik przesterowania CLIP
11 Dioda Power ON
12 Włącznik POWER
15 Gniazdo na statyw ze śrubą blokującą
Po całkowitym zakończeniu eksploatacji,
urządzenie należy oddać do punktu recyklingu, aby nie zaśmiecać środowiska.
24
3
Zastosowanie
PAK-10XC, PAK-12XC oraz PAK-15XC są aktywnymi zestawami głośnikowymi o dużej mocy, w
wytrzymałych obudowach z tworzywa sztucznego.
Mogą pracować w wielu systemach, np. w salach
tanecznych, w klubach muzycznych lub na scenie,
w charakterze monitora podłogowego. Dwudrożna
konstrukcja wyposażona jest w cyfrowe wzmacniacze klasy D o wysokiej efektywności.
Do podłączania sygnałów liniowych można
wykorzystać symetryczne gniazda XLR oraz niesymetryczne gniazda phono. Dodatkowo, zestawy
posiadają wejście mikrofonowe. Sygnały z wejść
podawane są równocześnie na wyjście liniowe,
umożliwiające podłączenie kolejnego aktywnego
zestawu głośnikowego.
Zestawy głośnikowe wyposażono w obwody
zabezpieczające przed przeciążeniem oraz przegrzaniem.
4
Przygotowanie do pracy
i podłączanie
Ustawić zestaw głośnikowy na solidnym podłożu,
np. na scenie lub na stole i skierować przodem do
słuchaczy. Zalecane jest ustawienie na takiej wysokości, aby głośnik wysokotonowy znajdował się na
poziomie ucha. Alternatywnie do ustawienia na
gumowych nóżkach, zestaw głośnikowy można
położyć na boku, aby pracował w charakterze
odsłuchu podłogowego. W przypadku używania
mikrofonu, należy zwrócić uwagę na to, aby znajdował się on w odpowiedniej odległości oraz nie był
on skierowany w kierunku głośnika gdyż może to
spowodować powstanie sprzężenia akustycznego.
Alternatywnie, umieścić zestaw głośnikowy na
standardowym statywie o średnicy rury 35 mm (np.
serii PAST marki “img Stage Line”), wykorzystując
gniazdo na spodniej stronie. Po ustawieniu na statywie, dokręcić śrubę blokującą (15).
Istnieją także inne sposoby montażu głośnika.
W tym celu dostępne są otwory z gwintem M8 (dwa
na górze i jeden na dole). Przed ich wykorzystaniem należy wyjąć gumowe zaślepki.
4.1 Podłączanie źródeł dźwięku
PL
Do podłączania źródła sygnału z wyjściem liniowym (np. wyjścia miksera lub odtwarzacza CD),
dostępne są wejścia:
– Dla sygnałów symetrycznych, gniazdo XLR (2)
[konfiguracja pinów rozdz. 6]
– Dla sygnałów niesymetrycznych, gniazda phono
(3). W przypadku równoczesnego wykorzystywania obu gniazd phono lub gniazd phono oraz
XLR (2), sygnały zostają zmiksowane. Ponadto,
sygnał stereo miksowany jest do postaci mono.
Aby uzyskać stereofoniczną emisję, należy
podać każdy kanał na osobny zestaw głośnikowy.
Do podłączania mikrofonu służą gniazda XLR
oraz 6,3 mm MIC IN (1), przystosowane do sygnałów symetrycznych. Zestaw PAK-15XC: Oba złącza zrealizowane są przez gniazdo Combo; aby
odłączyć wtyk XLR od gniazda, wcisnąć blokadę
PUSH. Do podłączania mikrofonu z niesymetrycznym wyjściem, wykorzystać 2-polowy wtyk 6,3 mm.
4.2 Wyjście przelotowe
Zmiksowany sygnał ze wszystkich wejść dostępny
jest na gnieździe XLR LINE OUT (4) i pozwala na
[równoległe] podłączenie kolejnego aktywnego
zestawu głośnikowego, wzmacniacza lub rejestratora. Poziom sygnału na tym wyjściu nie zależy od
ustawienia regulatora MAIN LEVEL (7).
4.3 Zasilanie
Podłączyć, znajdujący się w zestawie, kabel zasilający do gniazda zasilania (13), a następnie do
gniazdka sieciowego (230 V~ / 50 Hz).
Przed przystąpieniem do podłączania lub zmiany
połączeń należy bezwzględnie wyłączyć zestaw
głośnikowy oraz podłączane urządzenia.
25
PL
5
Obsługa
UWAGA
Nigdy nie ustawiać bardzo dużej
głośności wzmacniacza! Stały, bardzo wysoki poziom dźwięku może
uszkodzić narząd słuchu. Ucho ludzkie adaptuje się do wysokiego poziomu dźwięku, który po pewnym
czasie nie jest już percepowany jako
wysoki. Dlatego nie wolno przekraczać raz już ustawionego maksymalnego poziomu głośności.
Uwaga: Aby uniknąć trzasku w głośniku, należy
włączać aktywny zestaw głośnikowy na
końcu, po włączeniu wszystkich źródeł
sygnału, a wyłączać jako pierwszy.
1) Ustawić regulator MAIN LEVEL (7) na minimum
(maksymalnie w lewo) na czas uruchamiania, a
następnie włączyć wzmacniacz przełącznikiem
POWER (12). Zapali się dioda ON (11).
Opisana poniżej kolejność czynności jest przykładowa.
2) Początkowo, ustawić regulatory LEVEL (5 do 7)
na minimum (maksymalnie w lewo), a regulatory
barwy (8, 9) w pozycję środkową.
3) Ustawić regulator głośności całkowitej MAIN
LEVEL (7) na około na połowę zakresu, aby
wprowadzane ustawienia były słyszalne.
4) Jeżeli podłączono źródło sygnału do wejścia
LINE IN (2, 3), ustawić odpowiedni regulator
LINE LEVEL (6) na taki poziom głośności, aby
sygnał nie został przesterowany.
5) Jeżeli podłączono mikrofon, dodać jego sygnał
za pomocą regulatora MIC LEVEL (5) oraz,
jeżeli trzeba, zredukować poziom sygnału liniowego regulatorem LINE LEVEL (6).
UWAGA! Aby uniknąć powstania sprzężenia
akustycznego, zachować odpowiedni dystans i
nie kierować mikrofonu w stronę zestawu głośnikowego. Sprzężenie może powstać również
przypadku wysokich poziomów głośności.
Należy wówczas zmniejszyć poziom sygnału
mikrofonowego regulatorem MIC LEVEL (5).
26
6) Ustawić barwę dźwięku regulatorami TREBLE
(8) oraz BASS (9).
7) Ustawić żądany poziom głośności całkowitej
regulatorem MAIN LEVEL (7) na taki poziom
głośności, aby sygnał nie został przesterowany.
Jeżeli zapala się dioda CLIP (10), sygnał ma
zbyt wysoki poziom. Należy wówczas skręcić
regulator.
8) Po zakończeniu użytkowania, wyłączyć urządzenie przełącznikiem POWER.
6
Specyfikacja
PL
Model
PAK-10XC
PAK-12XC
PAK-15XC
Moc wzmacniacza
moc rms
moc szczytowa
100 W
170 W
120 W
210 W
150 W
250 W
Pasmo przenoszenia
59 – 20 000 Hz
59 – 20 000 Hz
48 – 20 000 Hz
Max SPL
115 dB
117 dB
118 dB
Głośnik basowy
∅ 25 cm (10″)
∅ 30 cm (12″)
∅ 38 cm (15″)
dynamiczny tubowy, ∅ 2,54 cm (1″)
Wysokotonowy
∅ 34 mm
cewka
∅ 44 mm
Wejścia (czułość / max napięcie wejściowe /impedancja)
LINE IN – XLR, symetryczne
LINE IN – phono
MIC IN – XLR, symetryczne
MIC IN – 6,3 mm, symetryczne
100 mV/ 0,6 V/ 10 kΩ
200 mV/ 1,7 V/ 10 kΩ
6 mV/ 120 mV/ 2 kΩ
6 mV/ 120 mV/ 2 kΩ
Wyjście LINE OUT, symetryczne,
(gniazda XLR oraz 6,3 mm zrównoleglone)
napięcie wyjściowe
impedancja wyjściowa
200 mV
1 kΩ
Zakres temperatur
0 – 40 °C
Zasilanie
230 V~/ 50 Hz
230 V~/ 50 Hz
230 V~/ 50 Hz
Max pobór mocy
200 VA
225 VA
300 VA
Wymiary (S × W × G)
360 × 500 × 270 mm 420 × 585 × 320 mm 470 × 680 × 390 mm
Waga
12,3 kg
17,1 kg
20 kg
Konfiguracja pinów złączy:
1 = mase
2 = sygnał +
3 = sygnał -
T = sygnał +
R = sygnał S = mase
Z zastrzeżeniem możliwości zmian.
Instrukcje obsługi są chronione prawem copyright for MONACOR ® INTERNATIONAL GmbH & Co. KG.
Przetwarzanie całości lub części instrukcji dla osobistych korzyści finansowych jest zabronione.
27
NL
B
Aktieve luidsprekerbox
Aktivt højttalersystem
Lees aandachtig de onderstaande veiligheidsvoorschriften, alvorens het toestel in gebruik te nemen.
Mocht u bijkomende informatie over de bediening
van het toestel nodig hebben, lees dan de Engelse
tekst van deze handleiding.
Læs nedenstående sikkerhedsoplysninger opmærksomt igennem før ibrugtagning af enheden. Bortset
fra sikkerhedsoplysningerne henvises til den engelske tekst.
Veiligheidsvoorschriften
Vigtige sikkerhedsoplysninger
Dit apparaat is in overeenstemming met alle vereiste
EU-Richtlijnen en is daarom met
gekenmerkt.
Denne enhed overholder alle nødvendige EUdirektiver og er som følge deraf mærket .
WAARSCHUWING De netspanning (230 V~) van
het apparaat is levensgevaarlijk. Open het apparaat
niet, want door onzorgvuldige
ingrepen loopt u het risico
van elektrische schokken.
ADVARSEL
Let eveneens op het volgende:
G
Het apparaat is enkel geschikt voor gebruik binnenshuis. Vermijd druip- en spatwater, uitzonderlijk
warme plaatsen en plaatsen met een hoge vochtigheid (toegestaan omgevingstemperatuur: 0 – 40 °C).
G
Plaats geen bekers met vloeistof zoals drinkglazen etc. op het apparaat.
Dette produkt benytter 230 V~. Overlad al servicering til autoriserede personer. Ukyndig håndtering kan føre til
elektrisk stød.
Vær altid opmærksom på følgende:
G Enheden er kun beregnet til indendørs brug.
Beskyt den mod vanddråber og -stænk, høj luftfugtighed og varme (tilladt omgivelsestemperatur
0 – 40 °C).
G Undgå at placere væskefyldte genstande, som
f. eks. glas, ovenpå enheden.
G
Schakel het toestel niet in resp. trek onmiddellijk
de stekker uit het stopcontact,
1. wanneer het apparaat of het netsnoer zichtbaar beschadigd is,
2. wanneer er een defect zou kunnen optreden
nadat het apparaat bijvoorbeeld is gevallen,
3. wanneer het apparaat slecht functioneert.
Het apparaat moet in elk geval worden hersteld
door een gekwalificeerd vakman.
Tag ikke enheden i brug og tag straks stikket ud
af stikkontakten i følgende tilfælde:
1. hvis der er synlig skade på enheden eller netkablet.
2. hvis der kan være opstået skade, efter at
enheden er tabt eller lignende.
3. hvis der forekommer fejlfunktion.
Enheden skal altid repareres af autoriseret personel.
G
G
Trek de stekker nooit met het snoer uit het stopcontact, maar met de stekker zelf.
Tag aldrig netstikket ud af stikkontakten ved at
trække i kablet, tag fat i selve stikket.
G
G
Verwijder het stof met een droge, zachte doek.
Gebruik zeker geen water of chemicaliën.
Til rengøring må kun benyttes en tør, blød klud;
der må under ingen omstændigheder benyttes
kemikalier eller vand.
G
In geval van ongeoorloofd of verkeerd gebruik, verkeerde aansluiting, foutieve bediening of van herstelling door een niet-gekwalificeerd persoon vervalt
de garantie en de verantwoordelijkheid voor hieruit
resulterende materiële of lichamelijke schade.
G
Hvis enheden benyttes til andre formål, end den
oprindeligt er beregnet til, hvis den ikke er korrekt
tilsluttet, hvis den betjenes forkert, eller hvis den
ikke repareres af autoriseret personel, omfattes
eventuelle skader ikke af garantien.
G
Wanneer het apparaat definitief uit bedrijf
wordt genomen, bezorg het dan voor
milieuvriendelijke verwerking aan een
plaatselijk recyclagebedrijf.
28
DK
Hvis enheden skal tages ud af drift for
bestandigt, skal den bringes til en lokal
genbrugsstation for bortskaffelse.
S
Aktiv Högtalare System
FIN
Aktiivikaiutin
Innan enheten tas i bruk, läs noga igenom säkerhetsföreskrifterna. För ytterligare information, läs
den Engelska delen av bruksanvisningen.
Ole hyvä ja huomioi aina seuraavat turvallisuutta
koskevat ohjeet ennen laitteen käyttöön ottoa.
Katso käyttöön liittyviä ohjeita myös Englanninkielisistä ohjeista, jos tarvitset lisää tietoa laitteen käytöstä.
Säkerhetsföreskrifter
Turvallisuudesta
Enheten uppfyller samtliga Eu-direktiv och har därför försett med symbolen .
Laite vastaa kaikkia vaadittuja EU direktiivejä, joten
se on varustettu
merkinnällä.
VARNING Enheten använder högspänning internt
(230 V~). Överlåt all service till auktoriserad personal. Egna ingrepp kan ge
elektriska överslag med risk för skada
på person och/eller materiel.
VAROITUS Tämä laite toimii vaarallisella 230 V~
jännitteellä. Laiteen huolto tulee
tehdä siihen valtuutetun huollon toimesta. Asiaa tuntematon käsittely voi
aiheuttaa sähköiskun vaaran.
Ge även akt på följande:
Huomioi seuraavat seikat:
G
Enheten är endast avsedd för inomhusbruk.
Skydda enheten mot vätskor, hög luftfuktighet
och hög värme (tillåten omgivningstemperatur
0 – 40 °C).
G
Laitteet soveltuvat vain sisätilakäyttöön. Suojele
niitä kosteudelta, vedeltä ja kuumuudelta (sallittu
ympäröivä lämpötila 0 – 40 °C).
G
G
Placera inte föremål innehållande vätskor, t. ex.
dricksglas, på enheten.
Älä sijoita laitteen päälle mitään nestettä sisältävää, kuten vesilasia tms.
G
G
Använd inte enheten och tag omedelbart ut kontakten ur eluttaget om något av följande uppstår:
1. Enheten eller elsladden har synliga skador.
2. Enheten är skadad av fall e. d.
3. Enheten har andra felfunktioner.
Enheten skall alltid lagas av kunnig personal.
G
Drag aldrig ur kontakten genom att dra i sladden,
utan ta tag i kontaktkroppen.
Älä kytke virtaa päälle ja irrota laite välittömästi
sähköverkosta jos:
1. laitteessa tai virtajohdossa on näkyvä vika.
2. laite on saattanut vaurioitua pudotuksessa tai
vastaavassa tilanteessa.
3. laite toimii väärin.
Kaikissa näissä tapauksissa laitteen saa korjata
vain hyväksytty huolto.
G
G
Rengör endast med en mjuk och torr trasa, använd aldrig kemikalier eller vatten vid rengöring.
Älä koskaan irrota virtajohtoa pistorasiasta johdosta vetämällä.
G
G
Om enheten används på annat sätt än som
avses, om den inte kopplas in ordentligt, om den
används på fel sätt eller inte repareras av auktoriserad personal upphör alla garantier att gäll. I
dessa fall tas inget ansvar för uppkommen skada
på person eller materiel.
Käytä puhdistamiseen pelkästään kuivaa, pehmeää kangasta. Älä käytä kemikaaleja tai vettä.
G
Laitteen takuu raukeaa, eikä valmistaja, maahantuoja tai myyjä ota vastuuta mahdollisista
välittömistä tai välillisistä vahingoista, jos laitetta
on käytetty muuhun kuin alkuperäiseen käyttötarkoitukseen, laitetta on taitamattomasti käytetty
tai kytketty tai jos laitetta on huollettu muussa
kuin valtuutetussa huollossa.
Om enheten skall kasseras skall den lämnas till återvinning.
Kun laite poistetaan lopullisesti käytösta,
vie se paikalliseen kierrätyskeskukseen
jälkikäsittelyä varten.
29
®
MONACOR INTERNATIONAL GmbH & Co. KG • Zum Falsch 36 • 28307 Bremen • Germany
Copyright © by MONACOR INTERNATIONAL. All rights reserved.
A-1311.99.01.02.2012