1
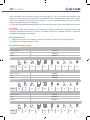
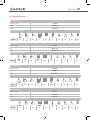
MA RP5XX 01 A_02-2014
Pantone 7452C
Pantone 431C
ROLLATORS IN ALLUMINIO
MANUALE DI ISTRUZIONI
ALUMINUM ROLLATORS
INSTRUCTION MANUAL
INDICE
1. CODICI.................................................................................................................................... .pag.3
2. INTRODUZIONE...................................................................................................................... pag.3
3. DESTINAZIONE D’USO.......................................................................................................... pag.3
4. DICHIARAZIONE DI CONFORMITÀ CE................................................................................ pag.3
5. AVVERTENZE......................................................................................................................... pag.4
5.1 Avvertenze generali................................................................................................................pag.4
5.2 Avvertenze per l’uso.............................................................................................................pag.4
5.3 Avvertenze stabilità..............................................................................................................pag.4
5.4 Avvertenze per il montaggio...............................................................................................pag.4
6. PRIMA DI OGNI USO.............................................................................................................. pag.5
7. ISTRUZIONI DI MONTAGGIO................................................................................................. pag.5
7.1 Prima del montaggio...............................................................................................................pag.5
7.2 Montaggio modello RP520........................................................................................... pag.5
7.2.1 Chiusura del rollator....................................................................................................pag.5
7.2.2 Regolazione dell’altezza delle maniglie...................................................................pag.5
7.2.3 Cestino portaoggetti...................................................................................................pag.5
7.2.4 Sedile.............................................................................................................................pag.6
7.3 Montaggio modello RP525............................................................................................ pag6
7.3.1 Chiusura del rollator....................................................................................................pag.6
7.3.2 Installazione delle maniglie e regolazione delle impugnature............................pag.6
7.3.3 Installazione borsa portaoggetti...............................................................................pag.6
7.3.4 Sedile............................................................................................................................. pag.7
7.4 Montaggio modello RP530........................................................................................... pag.7
7.4.1 Chiusura del rollator.................................................................................................... pag.7
7.4.2 Installazione delle maniglie e regolazione delle impugnature............................ pag.7
7.4.3 Installazione borsa portaoggetti.............................................................................. pag.7
7.4.4 Sedile.............................................................................................................................pag.8
7.5 Montaggio modello RP535........................................................................................... pag.8
7.5.1 Chiusura del rollator....................................................................................................pag.8
7.5.2 Installazione delle maniglie e regolazione delle impugnature............................. pag.9
7.5.3 Installazione del poggia schiena............................................................................... pag.9
7.5.4 Installazione borsa portaoggetti.............................................................................. pag.9
7.5.5 Sedile............................................................................................................................. pag.9
8. MODALITÀ DI UTILIZZO.................................................................................................. pag.9
9. FRENI....................................................................................................................................... pag.9
9.1 Utilizzo del freno ............................................................................................................ pag.9
9.2 Blocco del freno (freno di stazionamento)................................................................. pag.9
10. MANUTENZIONE.................................................................................................................... pag.9
11. PULIZIA..................................................................................................................................pag.10
12. CURA DELLE RUOTE............................................................................................................pag.10
13. CARATTERISTICHE TECNICHE...........................................................................................pag.10
14. PARTI DI RICAMBIO/ACCESSORI........................................................................................pag.11
15. GARANZIA..............................................................................................................................pag.11
15.1 Riparazioni...............................................................................................................pag.11
15.2 Ricambi..................................................................................................................pag.12
15.3 Clausole esonerative.............................................................................................pag.12
ITALIANO
Pantone 7452C
Pantone 431C
3
Pantone 7452C
Pantone 431C
Dispositivo Medico di Classe I D. Lgs. 24/02/97 n.46 attuazione della direttiva CEE 93/42
e successive modifiche
1. Codici
RP520 RP525 RP530 RP535 Rollator in alluminio 4 con sedile ATLANTE
Rollator in alluminio 4 ruote con sedile e pedane GAYA
Rollator in alluminio 4 ruote con sedile OCEANO
Rollator in alluminio 4 ruote smontabile URANO
2. Introduzione
Grazie per aver scelto il rollator MOPEDIA by MORETTI S.p.A. realizzato per sostenere persone
con difficoltà di movimento sia dentro che fuori casa, durante il viaggio o nelle semplici attività
giornaliere. La produzione risponde ai requisiti dettati dalle vigenti disposizioni europee sui
dispositivi medici (93/42/CEE). Questo manuale d’uso contiene dei piccoli suggerimenti per un
corretto uso dell’ausilio da voi scelto e dei preziosi consigli per la vostra sicurezza. Si consiglia di
leggere attentamente la totalità del presente manuale prima di usare il Rollator. In caso di dubbi
la preghiamo di contattare il rivenditore, il quale saprà aiutarvi e consigliarvi correttamente.
Nota Controllare che tutte le parti del Rollator non abbiano subito danni durante la spedizione.
In caso di danni non utilizzare il prodotto e contattare il rivenditore per ulteriori istruzioni.
3. Destinazione d’uso
Questo Rollator è destinato a persone con difficolta’ motorie e puo’ essere utilizzato come ausilio per
facilitare la deambulazione. Il rollator fornisce una maggiore stabilità, sostegno e sicurezza durante la
marcia. In ogni caso, non può essere usato da persone con una funzionalità della mano e/o del braccio
visibilmente debole e da persone con problemi di equilibrio. Il rollator può essere usato sia all’esterno
che all’interno. Si consiglia l’uso solamente su superfici sulle quali tutte le ruote toccano per terra.
Non deve essere usato su terreno roccioso o su piani inclinati perché il rollator può risultare instabile.
L’apparecchio non è concepito per il trasporto di persone o altro materiale.
ATTENTIONE!
E’ vietato l’utilizzo del seguente prodotto per fini diversi da quanto definito nel seguente
manuale. La MORETTI S.p.A. declina qualsiasi responsabilità su danni provocati da un
uso improprio del dispositivo o da un uso diverso da quanto indicato nel presente
manuale. Il produttore si riserva il diritto di apportare modifiche al dispositivo e al
seguente manuale senza preavviso allo scopo di migliorarne le caratteristiche.
4. Dichiarazione di conformità CE
La MORETTI S.p.A. dichiara sotto la sua esclusiva responsabilità che il prodotto fabbricato ed
immesso nel commercio dalla stessa MORETTI S.p.A. e facente parte della famiglia Rollators è
conforme alle disposizioni applicabili della direttiva 93/42/CEE sui dispositivi medici. A tal scopo
la MORETTI S.p.A. garantisce e dichiara sotto la propria esclusiva responsabilità quanto segue:
1. I dispositivi in oggetto soddisfano i requisiti essenziali richiesti dall’allegato
I° della direttiva 93/42/CEE come prescritto dall’allegato VII° della suddetta direttiva.
2. I dispositivi in oggetto NON SONO STRUMENTI DI MISURA.
3. I dispositivi in oggetto NON SONO DESTINATI AD INDAGINI CLINICHE.
4. I dispositivi in oggetto vengono commercializzati in confezione NON STERILE.
5. I dispositivi in oggetto sono da considerarsi come appartenenti alla classe I°.
4
ITALIANO
Pantone 7452C
Pantone 431C
Pantone 7452C
Pantone 431C
6. NON È CONSENTITO utilizzare e/o installare i dispositivi in oggetto
al di fuori della destinazione d’uso prevista dalla MORETTI S.p.A.
7. MORETTI S.p.A. mantiene e mette a disposizione delle Autorità Competenti
la documentazione tecnica comprovante la conformità alla Direttiva 93/42/CEE.
5. Avvertenze
5.1 Avvertenze generali
• NON installare o utilizzare il prodotto prima di leggere e comprendere questo manuale
di istruzioni. Se non si è in grado di comprendere le avvertenze, precauzioni e le istruzioni, rivolgersi ad un operatore sanitario, ad un rivenditore o a personale tecnico prima di tentare di installare il prodotto evitando danni o lesioni personali;
• Il rollator deve essere utilizzato solo da pazienti con un’adatta capacità motoria
che ne garantisca l’uso senza rischi;
• Consultare il proprio medico o terapista per determinare l’adeguatezza del prodotto,
la giusta regolazione e il corretto utilizzo del rollator;
• Il proprio medico o il terapista dovrebbero contribuire alla regolazione in altezza del
rollator per il massimo sostegno, per la corretta attivazione del freno,
per il corretto montaggio in generale;
• I rollators non sono destinati ad essere utilizzati ad autospinta;
5.2 Avvertenze per l’uso
1. Assicurarsi sempre che il cavo dei freni sia fissato correttamente.
2. Verificare sempre il corretto funzionamento del freno dopo ogni regolazione in altezza
per evitare una flessione libera ed eccessiva del cavo.
3. Il mancato rispetto di queste semplici avvertenze può provocare lesioni personali.
4. Il rollator può essere usato solo su una superficie solida e piatta. Non usare il rollator
per salire le scale!
5. Appoggiarsi sempre su entrambi i manubri per mantenere l’equilibrio.
6. Prestare particolare attenzione alle superfici bagnate, ghiacciate o innevate.
7. Non caricare troppo il rollator.
8. Non utilizzare il sedile del rollator (dove presente) per trasportare cose o persone; il sedile è destinato alla seduta dell’utilizzatore con freno di stazionamento inserito;
9. Tutte le ruote devono essere a contatto con il pavimento in qualsiasi momento
durante l’uso per garantire il corretto bilanciamento del rollator e la massima sicurezza.
10. Il freno di stazionamento deve essere inserito prima di utilizzare il sedile.
N.B Quando si usa il rollator in una posizione di fermo, il freno di stazionamento deve essere bloccato
5.3 Avvertenze stabilità
• Il rollator fornisce assistenza ad un individuo di peso fino a 136 kg,
compreso il carico della borsa.
• La borsa/cestino hanno un limite di peso di 5 kg. Non sovraccaricare per evitare
sbilanciamenti e rischi di ribaltamento.
5.4 Avvertenze per il montaggio
• Dopo aver montato o dopo aver aperto il rollator, assicurarsi che il sostegno del sedile sia bloccato
su entrambi i lati e verificare che il dispositivo di sicurezza sia fissato nella posizione corretta.
• Verificare che entrambi i tubi di supporto delle maniglie siano inseriti correttamente
ITALIANO
Pantone 7452C
Pantone 431C
•
•
5
Pantone 7452C
Pantone 431C
nella struttura e fissati con le manopole di bloccaggio bloccati nel supporto principale
con relativi galletti e manopole senza movimenti.
Non appendere niente al telaio del rollator per evitare la distorsione dei tubi
e per evitare di pregiudicarne la stabilità.
Fare attenzione ad intrappolamento di dita e/o vestiario durante la fase di apertura e chiusura
6. Prima di ogni uso
Prima di utilizzare il dispositivo verificare sempre:
• Che tutte le parti del rollator siano bloccate in modo sicuro;
• Controllare che tutte le viti siano ben strette;
• Assicurarsi che la seduta sia bloccata correttamente
(se cosi’ non fosse, premere ulteriormente con forza la seduta in basso verso il telaio);
• Controllare che il dispositivo di bloccaggio della seduta sia correttamente inserito;
• Controllare il corretto funzionamento del freno normale e del freno di stazionamento;
7. Istruzioni di montaggio
7.1 Prima del montaggio
Sballare il prodotto e controllare che non abbia subito danni durante il trasporto. Nel caso in cui
il rollator sia danneggiato, si prega di contattare il rivenditore più vicino.
7.2 Montaggio modello RP520
Aprire il rollator tirando la parte anteriore facendo leva sulle gambe posteriori. Inserire i tubi
delle maniglie nella struttura. Girare le manopole di bloccaggio finchè non risultano bloccate. Il
foro esagonale serve per alloggiare la testa della vite.
7.2.1 Chiusura del rollator
Fare leva sulle barre laterali e portare indietro la parte anteriore del rollator
7.2.2 Regolazione dell’altezza delle maniglie
Regolare l’altezza delle maniglie utilizzando le manopole laterali. Svitare la manopola,
posizionare la maniglie all’altezza desiderata, girare la manopola in senso orario per fissarla di
nuovo e stringere bene. Ripetere l’operazione per l’altra maniglia e assicurarsi che entrambe le
maniglie siano posizionate alla stessa altezza.
ATTENZIONE!
Fare attenzione che il manubrio sia in linea con la direzione di movimento del
rollator. Se il manubrio non rimane dritto, c’è il rischio che il rollator si ribalti o
perda di stabilità, specialmente se viene spinto con più forza.
7.2.3 Cestino portaoggetti
Il cestino portaoggetti è appeso tramite due ganci alla struttura del rollator. (solo modello
RP520). Il cestino è inserito nella parte inferiore della struttura del rollator.
ATTENZIONE! Usare il cestino solo per piccoli oggetti. Non sovraccaricare, il
cestino per evitare sbilanciamenti e rischi di ribaltamento.
6
ITALIANO
Pantone 7452C
Pantone 431C
Pantone 7452C
Pantone 431C
7.2.4 Sedile
Prima di sedersi posizionare il rollator su una superficie piatta e solida quindi bloccare i freni.
Assicurarsi che il fermo del bloccaggio sia fissato bene e che il rollator sia in una posizione stabile.
ATTENZIONE! Mettersi a sedere distribuendo il peso su tutto il sedile.
Non sedersi spingendo solo su un lato.
7.3 Montaggio modello RP525
- Il rollator è consegnato con le pedane imballate separatamente.
- Impugnare le due manopole ed esercitare una forza verso l’esterno in modo da distendere
la seduta. (la prima volta che il rollator verrà montato le maniglie con le manopole non
saranno collegate, quindi per aprire il rollator afferrare i due tubi dei montanti verticali).
- Premere la seduta del rollator fino a far arrestare i tubi del telaio nella posizione
di bloccaggio e quindi bloccare la clip di sicurezza
- Prima dell’uso assicurarsi sempre che il rollator non tenda a richiudersi sotto l’effetto
di una piccola forza laterale.
- Installare le pedane.
ATTENZIONE! Assicurarsi che le manopole sia ben inserite nei fori
- Prima dell’uso assicurarsi sempre che il rollator non tenda a richiudersi sotto l’effetto
di una piccola forza laterale.
ATTENZIONE!
Fare attenzione a non intrecciare i cavi dei freni durante il collegamento del
manubrio e delle ruote
7.3.1 Chiusura del rollator
Sollevare energicamente verso l’alto il nastro sulla seduta per chiudere il rollator.
7.3.2 Installazione delle maniglie e regolazione delle impugnature
Inserire le maniglie nella struttura. premere il pulsante a molla e impostare l’altezza desiderata. Ripetere
per il lato opposto e fare in modo che entrambe le maniglie siano bloccate in modo sicuro e alla stessa
altezza. Il rollator è dotato di maniglie regolabili in altezza per soddisfare tutte le esigenze dell’utente.
ATTENZIONE!
Regolare l’altezza del rollator in modo tale che un utente che si trova in piedi con
le braccia lungo i fianchi abbia il polso all’altezza delle impugnature. Ciò garantirà il
posizionamento delle braccia piegate a circa 20 ° -30 ° quando si usa il rollator.
7.3.4 Installazione borsa portaoggetti
Per installare la borsa portaoggetti, appendere le orecchie della borsa sul supporto del sedile,
fermare i nastri con velcro alla struttura
ATTENZIONE! Portata massima della borsa 5 kg. Non sovraccaricare,
per evitare sbilanciamenti e rischi di ribaltamento.
ITALIANO
Pantone 7452C
Pantone 431C
7
Pantone 7452C
Pantone 431C
7.3.5 Sedile
Prima di sedersi posizionare il rollator su una superficie piatta e solida quindi bloccare i freni.
Assicurarsi che il fermo del bloccaggio sia fissato bene e che il rollator sia in una posizione stabile.
ATTENZIONE! Mettersi a sedere distribuendo il peso su tutto il sedile.
Non sedersi spingendo solo su un lato.
7.4 Montaggio modello RP530
- Girare la ruota nel senso corretto, slacciare il nastro che blocca le ruote posteriori
e bloccare le ruote posteriori ed anteriori con le manopole in dotazione
- Impugnare le due manopole ed esercitare una forza verso l’esterno in modo da distendere
la seduta. (la prima volta che il rollator verrà montato le maniglie con le manopole non
saranno collegate, quindi per aprire il rollator afferrare i due tubi dei montanti verticali).
- Premere la seduta del rollator fino a far arrestare i tubi del telaio nella posizione
di bloccaggio e quindi bloccare la clip di sicurezza.
- Prima dell’uso assicurarsi sempre che il rollator non tenda a richiudersi sotto l’effetto
di una piccola forza laterale.
ATTENZIONE! Assicurarsi che le manopole sia ben inserite nei fori
- Prima dell’uso assicurarsi sempre che il rollator non tenda a richiudersi sotto l’effetto
di una piccola forza laterale.
ATTENZIONE!
Fare attenzione a non intrecciare i cavi dei freni durante il collegamento del
manubrio e delle ruote
7.4.1 Chiusura del rollator
Sollevare energicamente verso l’alto il nastro sulla seduta per chiudere il rollator.
7.4.2 Installazione delle maniglie e regolazione delle impugnature
Inserire le maniglie nella struttura. premere il pulsante a molla e impostare l’altezza desiderata.
Ripetere per il lato opposto e fare in modo che entrambe le maniglie siano bloccate in modo
sicuro e alla stessa altezza. Il rollator è dotato di maniglie regolabili in altezza per soddisfare
tutte le esigenze dell’utente.
ATTENZIONE!
Regolare l’altezza del rollator in modo tale che un utente che si trova in piedi con
le braccia lungo i fianchi abbia il polso all’altezza delle impugnature. Ciò garantirà il
posizionamento delle braccia piegate a circa 20 ° -30 ° quando si usa il rollator.
7.4.3 Installazione borsa portaoggetti
Per installare la borsa portaoggetti, appendere le orecchie della borsa sul supporto del sedile,
fermare i nastri con velcro alla struttura.
8
ITALIANO
Pantone 7452C
Pantone 431C
Pantone 7452C
Pantone 431C
ATTENZIONE! Portata massima della borsa 5 kg. Non sovraccaricare
per evitare sbilanciamenti e rischi di ribaltamento
7.4.4 Sedile
Prima di sedersi posizionare il rollator su una superficie piatta e solida quindi bloccare i freni.
Assicurarsi che il fermo del bloccaggio sia fissato bene e che il rollator sia in una posizione stabile.
ATTENZIONE! Mettersi a sedere distribuendo il peso su tutto il sedile.
Non sedersi spingendo solo su un lato.
7.5 Montaggio modello RP535
- Aprire il rollator
- Sganciare il blocco di sicurezza rosso, nel caso sia inserito
- Impugnare le due manopole ed esercitare una forza verso l’esterno in modo da distendere la
seduta. (la prima volta che il rollator verrà montato le maniglie con le manopole non saranno
collegate, quindi per aprire il rollator afferrare i due tubi dei montanti verticali)
- Premere la seduta del rollator fino a far arrestare i tubi del telaio nella posizione
di bloccaggio e quindi bloccare la clip di sicurezza
- Inserire le ruote posteriori nella struttura del rollator per mezzo del bottone a scatto
ATTENZIONE!
Il bottone deve fuoriuscire dalla struttura per garantire il corretto inserimento della ruota
- Prima dell’uso assicurarsi sempre che il rollator non tenda a richiudersi sotto l’effetto
di una piccola forza laterale.
ATTENZIONE!
Fare attenzione a non intrecciare i cavi dei freni durante il collegamento del
manubrio e delle ruote
- Inserire le ruote anteriori nella struttura, le ruote sono correttamente inserite quando
si sente un “clic”. Smontare le ruote premendo il pulsante rosso sulla struttura del rollator.
7.5.1 Chiusura del rollator
- Sollevare energicamente verso l’alto la seduta per chiudere il rollator
- Inserire il blocco di sicurezza rosso una volta richiuso completamente il rollator
7.5.2 Installazione delle maniglie e regolazione delle impugnature
Inserire le maniglie nella struttura, e bloccarle in modo adeguato. Il rollator è dotato di maniglie
ad altezza regolabile attraverso dei pins per soddisfare tutte lem esigenze dell’utente.
ATTENZIONE!
Regolare l’altezza del rollator in modo tale che un utente che si trova in piedi con
le braccia lungo i fianchi abbia il polso all’altezza delle impugnature. Ciò garantirà il
posizionamento delle braccia piegate a circa 20 ° -30 ° quando si usa il rollator
ITALIANO
Pantone 7452C
Pantone 431C
9
Pantone 7452C
Pantone 431C
7.5.3 Installazione del poggia schiena
Inserire il poggia schiena nelle apposite guide in plastica sulla struttura del rollator.
7.5.4 Installazione borsa portaoggetti
Per installare la borsa portaoggetti, appendere le orecchie della borsa sul supporto del sedile,
fermare i nastri con velcro alla struttura.
ATTENZIONE! Portata massima della borsa 5 kg. Non sovraccaricare,
il cestino per evitare sbilanciamenti e rischi di ribaltamento.
7.5.5 Sedile
Prima di sedersi posizionare il rollator su una superficie piatta e solida quindi bloccare i freni.
Assicurarsi che il fermo del bloccaggio sia fissato bene e che il rollator sia in una posizione stabile.
ATTENZIONE! Mettersi a sedere distribuendo il peso su tutto il sedile.
Non sedersi spingendo solo su un lato.
8.
•
•
•
•
•
•
•
Modalità di utilizzo
Iniziare a spingere quando si è in posizione eretta con entrambe le mani sulle impugnature;
Assicurarsi di avere le mani asciutte prima di usare il rollator per evitare rischi di scivolamento;
Camminare mantenendo la posizione eretta con lo sguardo rivolta in avanti e non in basso;
Non spingere il rollator troppo lontano dal corpo, ciò potrebbe causare cadute e carichi inadeguati;
Non utilizzare il rollator per superare gradini superiori a 20mm;
Durante l’utilizzo all’esterno, prediligere i marciapiedi adeguatamente predisposti secondo
le normative per l’abbattimento delle barriere architettoniche;
Per superare piccoli ostacoli fare leva sulle pedane posteriori per alzare la parte
anteriore del rollator (solo modelli RP525 - RP530 - RP535)
9. Freni
Il buon funzionamento dei freni dipende dall’usura e dallo sporco accumulato sulle ruote.
Verificare la condizione dei freni e delle ruote prima di ogni utilizzo.
9.1 Utilizzo del freno
Per frenare il rollator tirare le leve dei freni con le dita verso l’alto fino a quando il rollator
rallenta o si ferma. Per continuare a muovere il rollator, rilasciare le maniglie del freno.
9.2 Blocco del freno (freno di stazionamento)
Premere verso il basso le leve dei freni con il palmo della mano, quando si sente “click” le
ruote sono bloccate. Sollevare le maniglie del freno sbloccandola dalla posizione di stop.
ATTENZIONE! Quando l’utilizzatore è fermo i freni devono essere bloccati
10. Manutenzione
I dispositivi della linea MOPEDIA by Moretti S.p.A. al momento dell’immissione in commercio
10 ITALIANO
Pantone 7452C
Pantone 431C
Pantone 7452C
Pantone 431C
sono controllati accuratamente e provvisti di marchio CE. Per la sicurezza del paziente e del
medico si raccomanda di far controllare dal produttore o da un laboratorio autorizzato, almeno
ogni 2 anni, l’idoneità all’uso del vostro rollator. In caso di riparazione devono essere utilizzati
soltanto ricambi ed accessori originali.
La vita utile del prodotto dipende dall’utilizzo, dalla manutenzione, dallo stoccaggio e dalla pulizia.
11. Pulizia
Per la pulizia delle parti utilizzare esclusivamente un panno umido con detergenti neutri. Non
utilizzare detergenti contenenti solventi e spazzole metalliche o oggetti abrasivi o appuntiti,
potrebbero danneggiare il prodotto.
12. Cura delle ruote
1. Pulire le ruote con acqua tiepida e detersivo neutro. Asciugare con un panno pulito.
2. Lubrificare periodicamente le ruote.
13. Caratteristiche tecniche
Serie ATLANTE
Codice prodotto
RP520
Seduta
38x34 cm
Struttura
Alluminio
Dimensioni e pesi
Kg
Portata
MAX
RP520
69
84
99
56
61
44
36
7,4
20
20
136
Serie GAYA
RP525
Codice prodotto
Seduta
45x31 cm
Struttura
Alluminio
Dimensioni e pesi
Kg
Portata
MAX
RP525
50
86
98
56
67
44,5
27
9,7
20
20
136
Serie OCEANO
Codici prodotto
RP530
Seduta
45x20 cm
Struttura
Alluminio
Dimensioni e pesi
Kg
Portata
MAX
RP530
69
79
92
53,5
62
46,5
27x74h
7,6
20
17,5
136
11
ENGLISH
Pantone 7452C
Pantone 431C
Pantone 7452C
Pantone 431C
Serie URANO
Codice prodotto
RP535
Seduta
44x24 cm
Struttura
Alluminio
Dimensioni e pesi
Kg
Portata
MAX
RP535
72
86
96
55
65
48
29
7,2
20
17,5
136
14. Parti di ricambio/accessori
Per le parti di ricambio e gli accessori fare riferimento al catalogo master Moretti S.p.A.
15. Garanzia
Tutti i prodotti Moretti sono garantiti da difetti di materiale o fabbricazione per un periodo di 2 (due) anni
dalla data di vendita del prodotto, salvo eventuali esclusioni e limitazioni specificate di seguito. Questa
garanzia non è valida in caso di uso improprio, abuso o modifica del prodotto e per la mancata aderenza
alle istruzioni per l’uso. La corretta destinazione d’uso del prodotto è indicata nel manuale d’uso.
Moretti non è responsabile di danni risultanti, di lesioni personali o quant’altro causato o relativo
all’installazione e/o all’uso dell’apparecchiatura non scrupolosamente conforme alle istruzioni
riportate nei manuali per l’installazione, il montaggio e l’uso.
Moretti non garantisce i prodotti Moretti contro danni o difetti nelle seguenti condizioni: calamità
naturali, operazioni di manutenzione o riparazione non autorizzate, danni derivanti da problemi
dell’alimentazione elettrica (dove prevista), utilizzo di parti o componenti non forniti da Moretti,
mancata aderenza alle linee guida e istruzioni per l’uso, modifiche non autorizzate, danni di
spedizione (diversa dalla spedizione originale da Moretti), oppure dalla mancata esecuzione della
manutenzione così come indicato nel manuale. Non sono coperti da questa garanzia componenti
usurabili se il danno è da imputarsi al normale utilizzo del prodotto.
15.1 Riparazioni
Riparazione in garanzia: Nel caso in cui un prodotto Moretti presenti difetti di materiale o fabbricazione
durante il periodo di garanzia, Moretti valuterà con il cliente se il difetto del prodotto è coperto dalla
garanzia. Moretti, a sua insindacabile discrezione, può sostituire o riparare l’articolo in garanzia, presso un
rivenditore Moretti specificato o presso la propria sede. I costi della manodopera relativi alla riparazione
del prodotto possono essere a carico di Moretti se si determina che la riparazione ricade nell’ambito della
garanzia. Una riparazione o sostituzione non rinnova né proroga la garanzia.
Riparazione di un prodotto non coperto dalla garanzia: Si può restituire, affinché sia riparato, un
prodotto non coperto dalla garanzia solo dopo aver ricevuto autorizzazione preventiva dal servizio clienti
Moretti. I costi della manodopera e di spedizione relativi a una riparazione non coperta dalla garanzia
saranno completamente a carico del cliente o del rivenditore. Le riparazioni su prodotti non coperti dalla
garanzia sono garantite per 6 (sei) mesi, a decorrere dal giorno in cui si riceve il prodotto riparato.
Prodotti non difettosi: Il cliente sarà avvisato se, dopo avere esaminato e provato un prodotto
restituito, Moretti conclude che il prodotto non è difettoso. Il prodotto sarà restituito al cliente e
12 ITALIANO
Pantone 7452C
Pantone 431C
Pantone 7452C
Pantone 431C
saranno a suo carico i costi di spedizione dovuti alla restituzione.
15.2 Ricambi
I ricambi originali MORETTI sono garantiti per 6 (sei) mesi a decorrere dal giorno in cui si riceve il ricambio.
15.3 Clausole esonerative
Salvo quanto specificato espressamente in questa garanzia ed entro i limiti di legge, Moretti
non offre nessun’altra dichiarazione, garanzia o condizione, espressa o implicita, comprese
eventuali dichiarazioni, garanzie o condizioni di commerciabilità, idoneità per uno scopo
particolare, non violazione e non interferenza. Moretti non garantisce che l’uso del prodotto
Moretti sarà ininterrotto o senza errori. La durata di eventuali garanzie implicite che possano
essere imposte dalle norme di legge è limitata al periodo di garanzia, nei limiti delle norme di
legge. Alcuni stati o paesi non permettono limitazioni sulla durata di una garanzia implicita
oppure l’esclusione o la limitazione di danni accidentali o indiretti in relazione a prodotti per
i consumatori. In tali stati o paesi, alcune esclusioni o limitazioni di questa garanzia possono
non applicarsi all’utente. La presente garanzia è soggetta a variazioni senza preavviso.
--------------------------------------------------------------------------------
CERTIFICATO DI GARANZIA
Pantone 7452C
Pantone 431C
Pantone 7452C
Pantone 431C
Prodotto_____________________________________________________________
Acquistato in data____________________________________________________
Rivenditore __________________________________________________________
Via _______________________ Località ___________________________________
Venduto a____________________________________________________________
Via __________________________ Località________________________________
MORETTI S.P.A.
Via Bruxelles, 3 - Meleto 52022 Cavriglia (Arezzo) Tel. +39 055 96 21 11
www.morettispa.com email: [email protected]
MADE IN P.R.C.
ENGLISH
Pantone 7452C
Pantone 431C
13
Pantone 7452C
Pantone 431C
INDICE
1. CODES.....................................................................................................................................pag.14
2. INTRODUCTION.....................................................................................................................pag.14
3. INTENDED USE......................................................................................................................pag.14
4. DECLARATION OF CONFORMITY EC..................................................................................pag.14
5. WARNINGS.............................................................................................................................pag.15
5.1 General warnings.......................................................................................................................pag.15
5.2 Warnings for use.......................................................................................................................pag.15
5.3 Stability warnings.....................................................................................................................pag.15
5.4 Assembling warnings...............................................................................................................pag.15
6. BEFORE USE..........................................................................................................................pag.16
7. ASSEMBLING INSTRUCTION...............................................................................................pag.16
7.1 Before assembling the product.............................................................................................pag.16
7.2. Assembling model RP520.............................................................................................pag.16
7.2.1 Folding the rollator..........................................................................................................pag.16
7.2.2 Adjustment of the handles............................................................................................pag.16
7.2.3 Basket Storage.................................................................................................................pag.16
7.2.4 Seat....................................................................................................................................pag.16
7.3 Assembling model RP525.............................................................................................. pag.17
7.3.1 Folding the rollator...........................................................................................................pag.17
7.3.2 Installation of the handles and adjustable handles...................................................pag.17
7.3.3 Bag installation................................................................................................................pag.17
7.3.4 Seat....................................................................................................................................pag.17
7.4Assembling model RP530............................................................................................... pag.17
7.4.1 Folding the rollator...........................................................................................................pag.18
7.4.2 Installation of the handles and adjustable handles...................................................pag.18
7.4.3 Bag installation................................................................................................................pag.18
7.4.4 Seat....................................................................................................................................pag.18
7.5Assembling model RP535...............................................................................................pag.18
7.5.1 Folding the rollator...........................................................................................................pag.19
7.5.2 Installation of the handles and adjustable handles...................................................pag.19
7.5.3 Installation of the backrest............................................................................................pag.19
7.5.4 Bag installation................................................................................................................pag.19
7.5.5 Seat....................................................................................................................................pag.19
8. HOW TO USE.........................................................................................................................pag.20
9. BRAKES.................................................................................................................................pag.20
9.1 To brake............................................................................................................................... pag.20
9.2 Lock the brake (handbrake)............................................................................................ pag.20
10. CARE AND MAINTANANCE.................................................................................................pag.20
11. CLEANING.............................................................................................................................pag.20
12. WHEEL CARE........................................................................................................................pag.20
13. TECHNICAL FEATURES.........................................................................................................pag21
14. SPARE PARTS / ACCESSORIES..........................................................................................pag.22
15. WARRANTY............................................................................................................................pag.22
15.1 Repairing..........................................................................................................................pag.22
15.2 Spare parts.....................................................................................................................pag.22
15.3 Exempt clauses..............................................................................................................pag.22
14 ENGLISH
Pantone 7452C
Pantone 431C
Pantone 7452C
Pantone 431C
I Class Medical Device according to directive 93/42/EEC
and subsequent amendments
1. Codes
RP520 4-wheel aluminum rollator with seat ATLANTE
RP525 4-wheel aluminum rollator with seat and footrest GAYA
RP530 4-wheel aluminum rollator with seat OCEANO
RP535 4-wheel aluminum rollator with seat URANO
2. Introduction
Thank you for purchasing the rollator, MOPEDIA by MORETTI S.p.A., realized to help people with
movement difficulty inward and outward, during voyages or in everyday life. The production has
been made according to the highest quality and safety standards in accordance with European
Directive on Medical devices (93/42/EEC).
This instruction manual gives you suggestion for a correct use and for your safety. We
recommend you to read carefully this instruction manual before using. In case of doubts, please
contact your dealer.
Note: Check all parts to verify it won’t be any shipping damage. In case of shipping damages, do
not use. Contact the dealer for further instructions.
3.Intended use
This rollator fit for people with movement problems. Can be used as assistance to facilitate
ambulation or even servo-assisted ambulatory. Anyway, it can’t be used by people with evident
malfunction of the hand or the arm, even by people with balance problems. The rollator can be
used inward and outward. We recommend using on flat surface where the wheels can reach the
land. It can’t be used on rock ground or on slanted area as the rollator can be unstable. The
device is not intended to carry people or things.
WARNING!
Do not use the product for a purpose not indicated in this manual. Moretti Spa
declines all responsibilities for any consequences resulting from an incorrect
use of this product and from unauthorized alteration to the frame of the
product. The manufacturer can modify the device or the instruction manual
without prior notification.
4. Declaration of conformity EC
Moretti S.p.A. declare under sole responsibility that the product made and traded by Moretti S.p.A.
and belonging to rollator range are in accordance with the European Directive on Medical devices
(93/42/EEC). Moretti S.p.A. guarantees and declared under sole responsibility what follow:
1. The devices under discussion satisfy the essential requisites requested by the I° enclosure
directive 93/42/CEE as laid down by the VII° enclosure of the above mentioned Directive.
2. The devices under discussion ARE NOT MEASURING INSTRUMENTS.
3. The devices under discussion ARE NOT MADE FOR CLINICAL PROBES.
4. The devices under discussion are traded with NON STERILE BOX.
5. The devices under discussion belong to class I°.
6. IT IS NOT ALLOWED to use and install devices except for the use provided by Moretti S.p.A. ENGLISH
Pantone 7452C
Pantone 431C
7. 15
Pantone 7452C
Pantone 431C
Moretti S.p.A. places technical documentation at relevant authorities in order to prove
the conformity of 92/42/EEC device.
Moretti S.p.A maintains and provides for authorities, the technical documentation
proving the accordance to European Directive on Medical devices (93/42/EEC).
5. Warnings
5.1 General warnings
• Do NOT install or use the device before reading and understanding this manual;
If you are unable to understand the warnings, cautions or instructions, contact a healthcare
professional dealer or technical personnel before attempting to install this equipment
to avoid injure or damage;
• The rollator should only be used by patients with a suitable motor capacity
which ensures their use without risks;
• Advise with physician or therapist to determinate the correct adjustment and
the correct use;
• Physician or therapist should contribute to height adjustment for the maximum support,
for a correct brake activation and for a general assembly;
• The rollators are not intended to be used as self-propelled devices.
5.2 Warnings for use
• Insure the brake cable to be correctly set;
• Verify the correct operation of the brake after every height adjustment
to avoid a free flexion of the cable;
• Breaking this simple rules can cause personal damages;
• The rollator can be used only on a hard, flat surface. Do not use the rollator to climb the stairs
• Leaning always on both dumbbells to maintain balance;
• Pay particular attention to wet, icy or snowy;
• Do not overload the rollator;
• Do not use the rollator seat (where present) to carry persons or property, the seat is
for the user’s session with the parking brake engaged;
• All wheels must be in contact with the floor at any time during use to ensure the proper
balancing of the rollator and maximum safety;
• The brake must be engaged before using the seat.
Note When the rollator is used in steady position, the handbrake must be locked
5.3 Stability warnings
• The rollator can provide ambulatory assistance to an individual weighing
up to 136 kg, INCLUDING the loading bag;
• The rollator bag has a weight limitation of 5 kg.
5.4 Assembling & folding warnings
• Verify that both handle support tubes are correctly inserted in the frame and secured with
locking knobs locked into the holder with its main wing nuts and knobs without movement;
• Both handle tubes are securely locked in the main support part with wing
nuts and knobs without any movements;
• Do not hanging anything on the rollator frame to avoid distortions of the tubes
when the rollator is open and damage the stability. Injury may also be caused by distortions;
• Take care to entrapment of fingers and / or clothing during the opening and closing.
16 ENGLISH
Pantone 7452C
Pantone 431C
Pantone 7452C
Pantone 431C
6. Before use
Before using the device, always check:
1. That all parts of the rollator are locked in a secure manner.
2. Check that all screws are tight.
3. Make sure that the seat is properly locked
(if that ‘not press further with the power seat bottom frame).
4. Check that the locking of the seat is correctly inserted.
5. Check the correct operation of the brake and the regular brake.
7. Assembling instruction
7.1 Before assembling the product
Unpack the product and check that no damage has occurred during shipping. In the event when
the rollator is damaged, please contact your nearest dealer.
7.2 Assembling model RP520
- Open the rollator pulling the front part by leveraging on the legs.
- Place the handle tubes in the frame.
- Turn the locking knobs until they are locked.
- The hexagonal hole is needed to accommodate the screw head
7.2.1 Folding the rollator
Make lever on the lateral bars and bring back the front of the rollator.
7.2.2 Adjustment of the handles
Adjust the height of the handles using the side knobs. Unscrew the knob, place the handles to the
desired height, turn the knob clockwise to tighten and fasten it again. Repeat for the other handle
and make sure that both handles are positioned at the same height.
WARNING!
Make sure that the handle is in line with the direction of movement of the
rollator. If the handle does not stay straight, there is a risk that the rollator
wobbling or tipping over, especially if you push it harder
7.2.3 Basket Storage
The shopping basket is hung by two hooks to the structure of the rollator. (only model RP520)
The basket is placed in the lower part of the structure of the rollator.
WARNING! Use the basket for small items only. Do not overload the
basket to prevent imbalances and the risk of overturning
7.2.4 Seat
Before sitting , place the rollator on a flat and solid surface and then lock the brakes.
Make sure the latch of the lock is secured properly and that the rollator is in a stable position.
WARNING! Questions to sit down with your weight on the seat assembly.
Do not sit by pushing only on one side
ENGLISH
Pantone 7452C
Pantone 431C
17
Pantone 7452C
Pantone 431C
7.3 Assembling model RP525
- The rollator is dispatched with footrest packed separately.
- Grasp the two knobs and exert a force toward the outside so as to distend the session.
(the first time that the rollator will be mounted handles with the knobs will not be connected, and then to open the rollator grasp the two tubes the uprights).
- Press the seat of the rollator up to arrest the frame tubes in position lock
and then lock the safety clip
- Before use, always make sure that the rollator does not tend to close up under the effect
of a small lateral force.
- Install the footrest on the rollator frame
WARNING! Make sure that the knobs is located into the holes
7.3.1 Folding the rollator
Lift up the seat firmly pulling the straps in the middle of seat.
7.3.2 Installation of the handles and adjustable handles
Insert the handles into the frame. Simply depress the spring button and set to the desired height.
Repeat the opposite side and make sure that both handles are secure and set at the same height
before use. The rollator is equipped with height adjustable handles through the pins to meet all
user needs.
WARNING!
Adjust the height of the rollator so that a user who is standing with his arms at
his sides have the pulse height handles. This will ensure the positioning of the
arms bent at about 20° -30° when using the rollator
7.3.3 Bag installation
To install the bag, hang the ears of the bag on the seat, stop the tape with Velcro to the structure
WARNING! Use the basket for small items only. Do not overload the bag to
prevent imbalances and the risk of overturning
7.3.4 Seat
Before sitting , place the rollator on a flat and solid surface and then lock the brakes.
Make sure the latch of the lock is secured properly and that the rollator is in a stable position.
WARNING! Questions to sit down with your weight on the seat assembly.
Do not sit by pushing only on one side.
7.4 Assembling model RP530
- Turn the wheel in the correct direction, unbuckle the belt which locks the rear wheels and lock the rear wheels and front with knobs supplied
- Grasp the two knobs and exert a force toward the outside so as to distend the session.
(the first time that the rollator will be mounted handles with the knobs will not be 18 ENGLISH
Pantone 7452C
Pantone 431C
-
-
Pantone 7452C
Pantone 431C
connected, and then to open the rollator grasp the two tubes the uprights).
Press the seat of the rollator up to arrest the frame tubes in position lock
and then lock the safety clip
Before use, always make sure that the rollator does not tend to close up under the effect
of a small lateral force.
WARNING! Make sure that the knobs is located into the holes
- Before use, always make sure that the rollator does not tend to close up under the influence a small lateral force
WARNING! Be careful not to twist the brake cables when connecting
the handlebar and wheels
7.4.1 Folding the rollator
Lift up the seat firmly pulling the straps in the middle of seat
7.4.2 Installation of the handles and adjustable handles
Insert the handles into the frame. Simply depress the spring button and set to the desired height.
Repeat the opposite side and make sure that both handles are secure and set at the same height before
use. The rollator is equipped with height adjustable handles through the pins to meet all user needs.
WARNING!
Adjust the height of the rollator so that a user who is standing with his arms at his
sides have the pulse height handles. This will ensure the positioning of the arms bent
at about 20 ° -30 ° when using the rollator.
7.4.3 Bag installation
To install the bag, hang the ears of the bag on the seat, stop the tape with Velcro to the structure.
WARNING! Maximum capacity for bag 5 kg. Use the bag for small items only.
Do not overload the bag to prevent imbalances and the risk of overturning
7.4.4 Seat
Before sitting , place the rollator on a flat and solid surface and then lock the brakes.
Make sure the latch of the lock is secured properly and that the rollator is in a stable position.
WARNING! Questions to sit down with your weight on the seat assembly.
Do not sit by pushing only on one side.
7.5 Assembling model RP535
- Open rollator
- Release the red safety lock, if it is inserted.
- Grasp the two knobs and exert a force toward the outside so as to distend the session.
(the first time that the rollator will be mounted handles with the knobs will not be connected,
ENGLISH
Pantone 7452C
Pantone 431C
-
-
19
Pantone 7452C
Pantone 431C
and then to open the rollator grasp the two tubes of the vertical uprights).
Press the seat of the rollator up to arrest the frame tubes in position lock and
then lock the safety clip.
Insert the rear wheels in the structure of the rollator by means of snap button.
WARNING!
Beware the button is outside the structure to ensure proper placement of the wheel
- Before use, always make sure that the rollator does not tend to close up under the effect
of a small lateral force.
WARNING!
Be careful not to twist the brake cables when connecting the handlebars and wheels
- Place the front wheels in the frame, the wheels are properly seated when you hear a “click”.
Remove the wheels by pressing the red button on the structure of the rollator.
7.5.1 Fold the rollator
- Lift up the seat firmly to close the rollator
- Insert the red safety lock when closed completely the rollator
7.5.2 Installation of the handles and adjustable handles
Insert the handles into the frame, and lock them in an appropriate manner. The rollator is
equipped with height adjustable handles through the pins to meet all user needs.
WARNING!
Adjust the height of the rollator so that a user who is standing with his arms at his
sides have the pulse height handles. This will ensure the positioning of the arms bent
at about 20 ° -30 ° when using the rollator.
7.5.3 Installation of the backrest
Insert the backrest into the guides on the plastic structure of the rollator
7.5.4 Bag installation
To install the bag, hang the ears of the bag on the seat , stop the tape with Velcro to the structure
WARNING! Maximum capacity for bag 5 kg. Use the bag for small items only. Do
not overload the bag to prevent imbalances and the risk of overturning
7.5.5 Seat
Before sitting , place the rollator on a flat and solid surface and then lock the brakes.
Make sure the latch of the lock is secured properly and that the rollator is in a stable position.
WARNING! Questions to sit down with your weight on the seat assembly.
Do not sit by pushing only on one side.
20 ENGLISH
Pantone 7452C
Pantone 431C
Pantone 7452C
Pantone 431C
8. How to use
• Start pushing when you are in an upright position with both hands on the handle;
• Make sure your hands are dry before using the rollator to avoid the risk of slipping;
• Walking maintaining an upright position with his eyes facing forward and not down;
• Do not push the rollator too far away from the body, this may cause falls
and loads inadequate;
• Do not use the rollator to overcome steps higher than 20mm;
• When using outdoors, prefer the sidewalks properly prepared in accordance
regulations for the removal of architectural barriers;
• To overcome small obstacles to leverage the rear footrests to raise the front of the rollator
(models RP525 - RP530 - RP535)
9. Brakes
9.1 To brake
To brake the rollator pull the brake lever with your fingers upwards until the rollator slows
down or stops. To continue to move the rollator, release the brake handles.
9.2 Lock the brake (handbrake)
Press down on the brake lever with the palm of your hand, when you hear a “click” wheels are
locked. Lift the handle of the brake releasing it from the stop position.
WARNING! When the user is stationary, the brakes must be locked
10. Care and maintanance
The devices MOPEDIA by Moretti SpA on the market are carefully checked and carry the
CE mark. For the safety of the patient and the doctor is recommended to be checked by the
manufacturer or by an approved laboratory, at least every 2 years, the suitability for use of your
rollator. If repairs are to be used only original spare parts and accessories.
The useful life of the product depends on the use, maintenance, storage and cleaning.
11. Cleaning
To clean parts, use only a damp cloth with a neutral detergent, not use cleaners containing
solvents and metal brushes or abrasive or sharp objects, may damage the product.
12. Wheel care
1. Clean the wheels with warm water and mild detergent. Wipe dry with a clean cloth.
2. Periodically lubricate the wheels.
ENGLISH
Pantone 7452C
Pantone 431C
21
Pantone 7452C
Pantone 431C
13. Technical features
Series ATLANTE
Product codes
RP520
Seat
38x34 cm
Frame
Aluminum
Weight and dimensions
Kg
MAX
Weight
84
99
69
RP520
56
61
44
36
7,4
20
20
136
Series GAYA
RP525
Product codes
Seat
45x31 cm
Frame
Weight and dimensions
Aluminum
Kg
MAX
Weight
RP525
50
86
98
56
67
44,5
27
9,7
20
20
136
Series OCEANO
Product codes
RP530
Seat
45x20 cm
Frame
Aluminum
Weight and dimensions
Kg
MAX
Weight
RP530
69
79
92
53,5
62
46,5
27x74h
7,6
20
17,5
136
Series URANO
Product codes
RP535
Seat
44x24 cm
Frame
Weight and dimensions
Aluminum
Kg
MAX
Weight
RP535
72
86
96
55
65
48
29
7,2
20
17,5
136
22
ENGLISH
Pantone 7452C
Pantone 431C
Pantone 7452C
Pantone 431C
14. Spare parts / accessories
For spare parts and accessories please refer to the Moretti S.p.A. master catalogue
15. Warranty
Moretti products are guaranteed from material or manufacturing faults for 2 years from the
purchasing date, except possible exclusion or restriction as follows. The warranty shall not be apply
in the event damages caused by improper use, abuse or alteration, and for the warranty will not be
valid if the instructions for use are not strictly adhered to. The correct intended use is specified in
this manual.
Moretti is not responsible of consequent damages, personal injuries or whatever caused by or in
relation with mistaken installation or with device improper use.
Moretti does not guarantee for damages caused by the following condition: natural disaster,
not authorized maintenance or repairs , faults caused by problems on electricity supply (when
necessary), use of spare parts not covered by Moretti, improper use, alteration not authorized,
shipment damages (different from original Moretti shipment), or in case of insufficient maintenance
as indicated in the manual.
The warranty doesn’t cover components subject to wear and tear during the correct use of the
device.
15.1 Repairing
Warranty repair: If a Moretti item presents material or manufacturing faults during the
warranty period, Moretti will estimate with customer if the fault can be cover from warranty.
Moretti, at its unquestionable discretion, could repair or replace the item, with a Moretti
dealer or with own base. Labor cost can be in charge to Moretti if the repair is cover from
warranty. A repair or a replacement doesn’t extend the warranty.
Repair not cover from warranty: A product without warranty can be given back after Moretti
authorization. The labor and shipping costs for a bath lift out of warranty are to be payed
by the customer or by the dealer. The repairs are guaranteed for 6 months as from the good
received.
Non-defective device: The customer will be informed if, after the device return and
examination, Moretti declares that the device is not faulty. In this case the good will be sent
back to customer, the shipping charge will be to be payed by the customer.
15.2 Spare parts
The original Moretti spare parts are guaranteed for 6 months as from the receiving date.
15.3 Exempt clauses
Moretti doesn’t offer any other declarations, warranty or conditions, explicit or implicit,
including possible declarations, warranties or condition of merchantability, fitness for a
specific purpose, non infringement and non interference, all but what expressly specified
in this warranty. Moretti doesn’t guarantee the nonstop and faultless usage. The duration
of possible implicit warranties which can be fixed by according to the law is limited by the
warranty period, in the limits of law. Some states or countries don’t allow to limit the implicit
warranty or the exclusion or the limitation for accidental damages. In such countries, some
of those exclusions or limitation may not be applied to the user.
ENGLISH
Pantone 7452C
Pantone 431C
23
Pantone 7452C
Pantone 431C
The present warranty may be modified without prior notification.
--------------------------------------------------------------------------------
Pantone 7452C
Pantone 431C
Pantone 7452C
Pantone 431C
WARRANTY CERTIFICATE
Product_ _____________________________________________________________
Purchasing date_______________________________________________________
Authorized dealer ______________________________________________________
Street_______________________________Place____________________________
Sold to_______________________________________________________________
Street_______________________________Place____________________________
MORETTI S.p.A.
Via Bruxelles, 3 - Meleto 52022 Cavriglia (Arezzo) Tel. +39 055 96 21 11
www.morettispa.com email: [email protected]
MADE IN P.R.C.
Via Bruxelles, 3 - Meleto
52022 Cavriglia (Arezzo)
Tel. +39 055 96 21 11
Fax. +39 055 96 21 200
www.morettispa.com
[email protected]