1
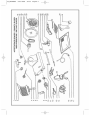
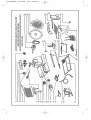
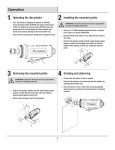
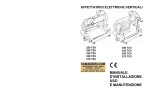
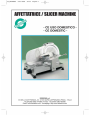
ISTRUZIONI PER L'USO DELL'AFFETTATRICE A GRAVITA' / VERTICALE
1.
a)
b)
c)
d)
2.
a)
b)
c)
d)
e)
f)
3.
-
USO DELLA MACCHINA
Assicurarsi che la tensione della rete sia corrispondente a quella indicata sulla targhetta (A) della macchina
e collegare sempre la presa a terra.
Appoggiare la merce sul piatto (D) fissandola con l'apposito braccio (E).
Girare la manopola numerata (F) fino ad ottenere lo spessore voluto.
Azionare l'interruttore (G) per far girare la lama (L) ed accertarsi che il senso di rotazione sia sempre
antiorario e manovrare a mano il piatto porta merci (D). Usare sempre il pressatore (E) per il taglio,
non usare mai le mani per tenere la merce durante l'operazione, impugnare l'apposita maniglia
(T) per la spinta del carrello.
AFFILATURA
Disinserire la corrente attraverso l'interruttore (G).
Pulire perfettamente la lama (L) con alcool.
Sollevare il gruppo affilatoio (C), allentando il pomello (K); ruotare lo stesso in senso orario a 180° (Fig. 3).
Fissare l'affilatoio stringendo il pomello (K).
Azionare l'interruttore (G), mettendo in moto la lama (L) e contemporaneamente premere il pulsante (W)
ed entrerà in funzione la mola affettatrice (H) (Fig. 4).
Togliere la sbavatura con la mola sbavatrice (M) premendo il pulsante (N) (Fig. 4).
Importante: detta operazione va eseguita per soli 2 o 3 secondi con la lama (L) in movimento.
Spegnere l'interruttore (G), rimettere il gruppo affilatoio (C) in posizione di riposo.
PULIZIA
Togliere la spina dalla presa di corrente.
Pulire accuratamente la macchina dopo ogni uso (a macchina ferma).
Usare alcool, non materiali duri o abrasivi.
Accertarsi prima di iniziare la pulizia della macchina che la manopola numerata (F) sia posizionata sullo
zero. Per pulire la lama (L) togliere il coprilama (O) servendosi di apposita chiave per svitare il dado (B).
Per pulire il gruppo piatto porta merci (D) munirsi di apposita chiave per svitare il dado (P).
Lubrificare tutte le parti di scorrimento con olio di vasellina.
4.
-
AVVERTENZE
Assolutamente non togliere o manomettere la paratia di sicurezza (Q).
Non affettare materiale che non sia di genere alimentare.
E' importante ai fini del buon funzionamento della macchina controllare periodicamente lo stato
di conservazione della lama, delle mole affilatoio, della cinghia di trasmissione.
-
Per ogni problema rivolgersi al Rivenditore autorizzato e non manomettere la macchina.
La Ditta declina ogni responsabilità se non saranno osservate le norme sopra descritte.
LEGENDA
A) Targhetta
B) Dado
C) Affilatoio
D) Piatto porta merci
T) Maniglia
E) Braccio pressatore
F) Manopola numerata
G) Interruttore
H) Mola affilatrice
K) Pomello affilatoio
L) Lama
M) Mola sbavatrice
N) Pulsante
O) Coprilama
P) Dado
W) Pulsante
Q) Paratia
INSTRUCTIONS ON HOW TO USE A GRAVITY / VERTICAL SLICER
1.
a)
b)
c)
d)
2.
a)
b)
c)
d)
e)
f)
3.
-
INSTRUCTIONS
Make sure that the voltage shown on the nameplate (A) affixed to the machine is the same as that of your
electricity supply and always earth the tap.
Lay the goods on the platform (D) fixing them by the food pusher (E).
Turn the thickness adjusting knob (F) till you get the desired thickness.
Switch on (G=switch) in order to make the blade (L) run and make sure about its anti-clockwise rotation
and operate manually the platform (D). Always use the food pusher (E) when you cut, never use the
hands to hold the goods during the cut operation, grasp the apposite handle (T) for the thrust of
the trolley.
SHARPENING THE KNIFE
Disconnect the appliance by switch (G).
Clean perfectly the blade (L) using alcohol.
Pull on the sharpener group (C), loosening (K) knob; turn it clockwise to 180° (Fig.3). Fix the sharpener
tightening the knob (K).
Switch on (G) starting the blade (L) turns; at the same time push on botton (W) and the sharpening stone
(H) will start working (Fig. 4).
Remove the burr by deburring stone (M) pressing button (N) (Fig.4).
Important: said operation must be made for 2 or 3 seconds only and with the blade (L) running.
Switch off (G=switch) and let down the sharpener body (C) to its original storage position.
CLEANING
Clean up carefully the machine after each use (with the machine standing still).
Don't use hard or abrasive products but alcohol.
To clean the blade (L) remove the blade cover (O) by unscrewing knob (B) (Fig.2).
Verify that the thickness adjusting knob (F) is positioned on zero before starting with the cleaning operation
of the machine.
Lubrificate all the sliding parts with non-vegetable oil.
4.
-
WARNING
Absolutely do not remove or tamper the security builkhead (Q).
Do not slice up material which isn't foodstuff.
If you want your machine to work properly check periodically that the blade, the sharpening
stones and the drive belt are in good conditions.
-
For any problem please apply to the authorized Dealer and never tamper with the machine.
The Company declines all responsability in case of non-compliance with the given instructions.
LIST
A) Nameplate
B) Knob
C) Sharpening body
D) Platform
T) Handle
E) Food pusher
K) Sharpener knob
F) Thickness adjusting knob L) Blade
G) Switch
M) Deburring stone
H) Sharpening stone
N) Pressing button
O) Bladecover
P) Immovable bolt
W) Button
Q) Security bulkhead