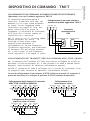
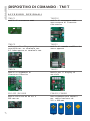
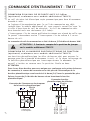
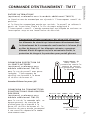
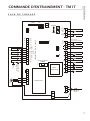
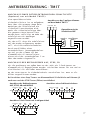
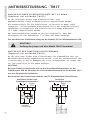
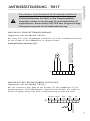
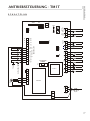
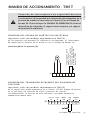
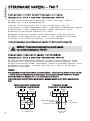
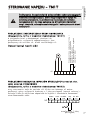
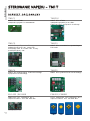
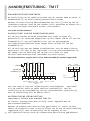
1
TM1T
Drive Control
Instructions and warnings for the fitter
Istruzioni ed avvertenze per l’installatore
Instructions et recommandations pour l’installateur
Anweisungen und Hinweise für den Installateur
Instrucciones y advertencias para el instalador
Instrukcje i uwagi dla instalatora
Aanwijzingen en aanbevelingen voor de installateur
INDEX - TM1T
3
ENGLISH
INSTRUCTIONS AND WARNINGS FOR THE FITTER
21
ITALIANO
ISTRUZIONI ED AVVERTENZE PER L’INSTALLATORE
39
FRANÇAIS
INSTRUCTIONS ET RECOMMANDATIONS POUR L’INSTALLATEUR
57
DEUTSCH
ANWEISUNGEN UND HINWEISE FÜR DEN INSTALLATEUR
75
ESPAÑOL
INSTRUCCIONES Y ADVERTENCIAS PARA EL INSTALADOR
93
POLSKI
INSTRUKCJE I UWAGI DLA INSTALATORA
111
NEDERLANDS
AANWIJZINGEN EN AANBEVELINGEN VOOR DE INSTALLATEUR
2
ENGLISH
TM1T
Drive Control
Instructions and warnings for the fitter
3
ENGLISH
4
DRIVE CONTROL - TM1T
GENERALITIES
The TM1T is a gate control for roll-up gates and sectional gates with
three phase motors or single-phase motors. All usual safety elements
can be connected to. Additional possibilities of use are possible by
adding different with different insert cards.
ENGLISH
DRIVE CONTROL - TM1T
To open or close a gate, the corresponding button of the cover
respectively the outside button has to be actuated.
In automatic operation mode, the gate is also able to be opened or
closed by remote control.
FEATURE OF PERFORMANCE
The most important features of performance of TM1T are:
4
4
4
easy operation and adjustment
weatherproof (IP 65)
big connexions space for wiring
Most high safety by:
4
4
4
radio remote control 433 MHz / 868 MHz (optional)
conformity to the valid directives and norms
a wide range of safety elements are able to be connected
USE ACCORDING TO PURPOSE
The Drive Control TM1T is suitable for controlling industrial gates
such as sectional, roll-up gates, multiple leaf doors and roll-up
grilles.
5
ENGLISH
DRIVE CONTROL - TM1T
SAFETY INSTRUCTIONS
If following safety instructions are not respected,
the company assembling the equipment will be
responsible of the resulting damages to persons
and material.
The company assembling the equipment is responsible of the complete
equipment. He has to care for the respect of the relevant norms and
directives (such as DIN 1986, EN 12050). He is responsible of the
establishment of the technical documentation of the complete equipment
which must be enclosed to the equipment.
This sign in the description of the control points
out to a possible danger that is explained in details
in this description.
Installation, use and operation of control that is contrary to these
operating instructions or the technical specifications given inside
lead to endanger persons and result to an exclusion of liability and
warranty.
National and local regulations and norms related to the installation as
well as Regulations for Prevention of Accidents of the German
Employer's Liability Insurance Association are to be respected.
Installation and maintenance works should only be done by specialised
personnel who are trained for.
During works at the gate, it has absolutely to be cut off from power
supply.
Dead man operation mode of a gate is only permitted if the gate is
visible from the operating devices.
6
DEAR CUSTOMERS !
You have decided in favour of a high quality product.
ENGLISH
DRIVE CONTROL - TM1T
In production, we applied the most possible care to dispatch this
control in a perfect state. Nevertheless, if you still experience a
case that is subject to claim, so please send this control unit to us,
directly to the plant with the details on a short description of
faults.
The range of guaranty only concerns trouble shooting of functions'
errors on equipment that result from production's fault respectively
material fault, including necessary spare parts needed for the purpose.
Before starting to install the control unit, please carefully
read these operating instructions first.
If changes in construction or improper installation were done or
charged to be done other than our set directions of assembling without
our previous written agreement, so we are free of liability of warranty
and guaranty of product.
The assembling company should take care that EMV directions, directions
of product's construction are respected.
WARNING!
The control unit should not be used in the explosive area.
CAUTION!
Connect the mains cable to the screw terminal X1 (L1, L2, L3)
and the screw terminal PE to the mother board.
The mains cable must be protected by fuse 3 x 6A
and/or 3 x 10A at the building side.
The value of protection fuse has to be chosen the way
that it is activated by a blocked motor.
7
ENGLISH
DRIVE CONTROL - TM1T
DESCRIPTION
Plug-in strip of modules
Terminal screw
of antenna
Setting key OPEN
Setting key CLOSE
Plug-in strip
of radio
Plug-in terminal
of safety
elements
Plug-in strip
of brake relay
Plug-in strip
of triple switch
Plug-in terminal
of passing
through
light barrier
Plug-in
terminal of
limit switch
Plug-in strip
of key
operated switch
Plug-in terminal
of instruction
switch
Plug-in
terminal
of motor
Plug-in terminal
of mains
Terminal screw
PE
LED (green)
limit switch DOWN,
is on in case of
disturbance
LED (green)
limit switch UP,
is on in case of
disturbance
8
LED (red)
safety circuit STOP,
is off in case of
disturbance
LED (red)
in case of disturbance,
the light barrier is off
LED (green)
gate DOWN, is on when
the button is activated
LED (yellow)
Impulse, is on when
the button is activated
LED (green)
gate UP, is on when
the button is activated
ENGLISH
DRIVE CONTROL - TM1T
DESCRIPTION OF EQUIPMENT
OPERATING ELEMENTS
The gate is activated to move in OPEN or CLOSED position by the push
button installed in the cover of impulse respectively dead-man
operation mode OPEN or CLOSED. If the gate is moving in impulse
operation mode, the gate can be stopped by the STOP button at any time.
Additional operating elements such as triple push buttons are able to
be connected for operation from outside.
A traction switch (ceiling traction switch) assembled inside and/or
outside controls the gate in the function.
OPEN-STOP-CLOSE (only if module TM1C2 is used).
If a receiver 433 MHz / 868 MHz is plugged (optionally), stopping the
gate by means of radio hand-held transmitter is always possible.
CONNEXION MAINS CABLE
A 16A CEE plug is connected to the screw
terminal L1, L2, L3 and PE.
PE
X1 L1 L2 L3
The mains supply to UST1 can also occur
with an optional three phase main switch.
In this case, the CEE plug is took off
during assembling.
16 A CEE plug
of supply line
X2 U V W
CONNEXION THREE PHASE DRIVES
The three phase drive is connected to the
screw terminal U, V, W and PE. If the
drive is equipped with an N line, so it
will be connected at the loose screw
terminal N from the main supply.
For example: for a brake that is operated
to 230 V through a rectifier.
M
3~
Motor
PE
JUMPER BRIDGES
In case of basic drive, a jumper is plugged in the plugs X11 (Pin 5/6),
X3A(Pin 1/2) and X3B (Pin 1/2).
9
ENGLISH
DRIVE CONTROL - TM1T
CONTROL OF TURNING DIRECTION
After connexion of drives, the turning direction in dead man mode of
operation must be checked with the buttons OPEN and CLOSED.
If the direction does not correspond to the direction of the arrow of
the pushed button, the CEE plug must be pulled out and the U and V
connexions must be exchanged (phase inverter).
Caution, mind the limit switch!
CONNEXION OF LIMIT SWITCH (LS)
In case of TM1T, both limit switches OPEN and CLOSED are connected as
contacts free of potential to the screw terminal J20 and J19 of the
terminal block x5. The safety circuit with the integrated safety limit
switch is connected to the screw terminal J22 of the terminal block x5.
In case of TM1T, it is possible to connect a second additional limit
switch switch up (J26 x 4B) to choose between two different OPEN
positions (summer / winter adjustments) through a position switch on
the housing cover (optional) of the TM1T.
Adjustments of limit switch have to be done in dead man operation mode!
LS-DOWN
Emergency
crank handle
SKS
STOP
or DW half OPEN
X4b
LS-UP
Pre-LS
Thermo
-
+
B
J25
5 6
J26
7 8
A
LShalf height
X5
J22
J21
J20
J19
J32
J33
Thermo PRE-LS STOP
STOP 12V DC RS485
CLOSED totally CLOSED
OPEN
The modules TM1C2 and TM1C4 are absolutely necessary to operate with
EES (Electronic limit switch optional). Please find the description of
adjustment and programming of EES limit switch in the operating
instructions of module TM1C4.
AUTOMATIC CLOSING
(optional, only in addition with module TM1C2)
The function automatic closing has to be set at the rotary switch of
position.
10
If the function automatic closing is activated, the gate is closing
again after the time set at the rotary switch from the final position.
By actuating the stop button or a safety device, the automatic closing
is blocked.
ENGLISH
DRIVE CONTROL - TM1T
CONNEXION OF AN OPTOELECTRONIC SAFETY BAR
(optional, only in addition with module TM1C2)
+12V SIG 0V
green
Optoelectronic
safety bar OSE
white
For the event that the switching bar
should be pressed on the floor, the
reversing function is neutralised by
connecting a prelimit switch
(additional limit switch pre-LS) to
the screw terminals J21 of the
terminal box X5. In this case, the
prelimit switch is adjusted 5 cm
over the floor.
Connexion at the triple-pole screw
terminal on the module TM1C2
brown
The optoelectronic safety bar is
structured the way that a ray of
light is interrupted by operating
the rubber tube. To able to control
a safety bar over the whole length,
a receiver must be connected at the
end of the switching bar.
Transmitter Receiver
brown
green
white
CONNEXION OF THE PICK-UP OPEN, STOP, CLOSE
To operate from outside, a triple-pole push button can be connected to
the terminal block X3 at the TM1T. Here, both switches for OPEN and
CLOSE should be performed as NO.
Since the stop switch of the safety circuit is given away, it has to be
connected as NC.
Move the bridge on screw terminal J9 to connect the stop switch (NO) at the
terminal block X3!
Connexion of the operating elements
OPEN, STOP, DOWN and IMPULS
Lock
J8
STOP
J9
OPEN
J10
Imp
J11
CLOSED
J12
X3 1 2 3 4 5 6 7 8 9 10
Connexion of a key switch
Lock
J8
STOP
J9
OPEN
J10
Imp
J11
CLOSED
J12
X3 1 2 3 4 5 6 7 8 9 10
Connexion of a triple-pole switch
with four-conductor cable
Lock
J8
STOP
J9
OPEN
J10
Imp
J11
CLOSED
J12
X3 1 2 3 4 5 6 7 8 9 10
11
ENGLISH
DRIVE CONTROL - TM1T
CONNEXION OF A SAFETY BAR WITH 8.2 kOhm
(optional, only in addition with module TM1C2)
An electrical and/or a pneumatic electric safety bar can be directly
connected to the TM1T.
The interpreter logic for the rubber tube is already integrated in the
module TM1C2. To be able to monitor the complete electronic circuit of
the safety bar, the rubber tube must be connected with a resistance.
The additional prelimit switch CLOSE is adjusted the way that the gate
running downwards activates the prelimit switch 5 cm over the floor.
The connexion of the rubber tube occurs at the screw terminal J25 of the terminal
block X4b!
CAUTION!
Mind the position of the jumper on the module TM1C2!
CONNEXION OF FUNCTION LIGHT BARRIER
(optional, only in addition with module TM1C2)
A light barrier (at the terminal block X4a) can be connected directly
to TM1T to safe passing through. If the infrared ray is interrupted
while the gate is closing, the gate stops and reverses to the upper
final position.
CAUTION:
In case of a one-way light barrier (with only three points of connecting terminals),
the switching contact and the Plus of the electronic device of the light barrier are
connected to the screw terminal J24/3.
While connecting the light barrier, move the bridge of J24 of block of screw
terminal X4a!
J23
Foto
J24
1
3
1
3
2
4
E
S=Transmitter
E=Receiver
12
Foto
J24
Power
supply
24V DC
Contact
(NC)
S
4
J23
Safety
light
barrier
2
Connexion of
reflection light barrier
X4a
X4a
Connexion transmitter and
receiver light barrier
Connexion of direct safety switches
Safety elements which intervene directly in the control
sequence are connected to the screw terminal J6 at the
terminal block X2. Emergency shutdown and/or safety catch,
feed protection and safety slip door count to them.
ENGLISH
DRIVE CONTROL - TM1T
CONNEXION SAFETY SLIP DOOR
(optional, only in addition with module TM1C2)
Slack rope switch/
safety spring fracture
or safety unroll
In case of gates with a build-in slip door, the safety switch is
connected to the screw terminal J6 at the terminal block X2.
Caution! Move bridges (J6)!
X2
U
V
W
B1 B2
J1
J6
CONNEXION OF PICK-UP TRACTION SWITCH
(optional, only in addition with module TM1C2)
In case of the control TM1T, a ceiling traction switch (NO contact) can
be connected to the screw terminal J11 at the terminal block X3, the
function of this entry corresponds to the sequential phase control
CLOSE-STOP-OPEN-STOP.
Lock
J8
STOP
J9
OPEN
J10
Imp
J11
CLOSED
J12
Traction
switch
X3 1 2 3 4 5 6 7 8 9 10
13
ENGLISH
DRIVE CONTROL - TM1T
RADIO REMOTE CONTROL
A plug-in place (x9) for a single-channel wireless receiver is on the
control TM1T. Please find other in the operating instructions
receiver and hand-transmitter EK1-433/EK1-868.
LEGEND
14
S2
S1
J1
SW1
SW2
J26
J20
J22
J19
J21
J8
J6
J9
J10
J11
J12
J24
J25
J26
T1
X1
X2
X3
X3A
X3B
X4a
X4b
X5
X8a
X8b
X9
X11
Main contactor
Contactor CLOSE/OPEN
Motor
Setting key OPEN
Setting key CLOSE
Additional limit switch OPEN (half opening height)
Limit switch OPEN (NC)
Safety circuit (NC)
Limit switch CLOSE (NC)
Additional limit switch CLOSE (prelimit switch)
Emergency shut-down (NC)
Slip door contact (NC) / feed protection
STOP key (NC)
OPEN key (NO)
Impulse key (NO)
CLOSE key (NO)
Passing through light barrier (NC)
Closing edge protection
Limit switch HALF OPEN (NC)
Transformer
Terminal strip network
Plug-in terminal motor
Plug-in terminal pick-ups
Plug-in strip for key operated switch
Plug-in strip for triple switch
Plug-in terminal passing through light barrier
Plug-in terminal safety elements
Plug-in terminal limit switch
Plug-in strip for plug-in module (20 channels plug)
Plug-in strip for plug-in module (10 channels plug)
Plug-in strip for wireless receiver
Plug-in strip for brake relay
J1
V
W
X3
J9
3 4
F1
X5
J22
J21
J20
J19
+
J32
-
A
J33
B
J10
5 6
Transformer
J11
7 8
X3A
J12
9 10
J23
1 2
X3B
LIMIT SWITCH
Foto
J24
3 4
X8a
Thermo Pre-LS STOP
STOP 12V DC RS485
CLOSED totally CLOSED
OPEN
FUSE
T600mA
J8
1 2
J6
B1 B2
Pre-LS
J4
X1 L3 L2 L1
U
LS-OPEN
PE PE PE
X2
Emergency
crack handle
X11
5
6
7
8
RADIO
ANTENNA
X8b
SKS
STOP
or DW half OPEN
J25
J26
CLOSED
X4a
Thermo
LS-CLOSED
X9
M1
DIAGRAM OF CONNEXIONS
ENGLISH
DRIVE CONTROL - TM1T
OPEN
LS-half height
X4b
Safety bar
Light barrier
CLOSED
IMPULS
OPEN
STOP
Lock
CONTACTOR
380-415V
N/PE
15
ENGLISH
DRIVE CONTROL - TM1T
TECHNICAL DATA
Model
TM1T
Power supply
3x400V AC 50Hz (6 and/or 10A safe)
Motor connexion through reverse 2x3 NO contractor contact,
contractor
400V/max. 1,2kVA
16
Connecting terminal
1,5 mm² max.
Ambient temperature
-20°C bis +60°C
Control voltage 24V DC
Fuse protection secondary 0,8A delayaction fuse
Type of protection
IP 65
Dimension
255 x 120 x 180mm (BxHxD)
[TM1T is produced by Mtec mbH (D) and is identical of the corresponding model: UST 1]
EU MANUFACTURER’S DECLARATION
According to the machines' directive 98/37/EU annexe II B of the EU
ENGLISH
DRIVE CONTROL - TM1T
Herewith, the manufacturer:
Mtec Gesellschaft für Antriebssysteme mbH
Friethöfer Kamp 23
D-48727 Billerbeck
declares that the product:
DRIVE CONTROL UST 1
corresponds to the following directions of the EU:
98/37/EG
machines' directive (former 89/392/EWG)
89/336/EWG
EMC directive (with changes 91/263/EWG, 92/31/EWG, 93/68/EWG)
73/23/EWG
directive of low voltage (with changes 93/68/EWG)
and following test certificate of conformity:
Number 78/781/551722 of TÜV Nord Anlagenbau / Systems
Following European norms/norm drafts were particularly applied:
EN 12445:2001
Safety use of motorised gates; testing processes
EN 12453:2001
Safety use of motorised gates; requirements
prEN 12978:1997
Gates, safety installations, requirements and testing processes
EN 954-1:1996
Machines' safety, control's parts related to safety
EN 60204-1:1997
Machines' safety; electrical equipment
EN 60335-1:1994
Safety of electrical devices; general requirements
REMARK:
The start up of the gate unit where this control should be installed in;
is forbidden till it is ascertained that the gate unit corresponds to
the directive 98/37/EG.
Billerbeck, April 2005
(Place, date)
(Signature)
Peter Menke, Managing Director
(Name and function of signatory)
17
ENGLISH
18
DRIVE CONTROL - TM1T
OPTIONAL ACCESSORY
TM1C1
TM1C1E
Module for impulse OPEN
Module for impulse OPEN
electronic limit switch
TM1C2
TM1C3
Module to connect a DW-strip,
an SKS 8.2 kOhm or an
OSE strip
Module for two-way traffic
control and test entering
light barriers
TM1C4
TM1C5
Module to connect an
electronic limit switch
Module for service display
EK1-433 | EK1-868
FSK433 | FSK868
433 or 868 MHz wireless receiver AM
Hand-held transmitter for the
433 or 868 MHz wireless
receiver AM
ENGLISH
COMMENTS
19
ENGLISH
DRIVE CONTROL - TM1T
Copyright.
No part of this manual may be reproduced without our prior consent.
Subject to changes which are in the interest of technical improvements.
Headquarter
Nice worldwide
Nice SpA
Oderzo TV Italia
Tel. +39.0422.85.38.38
Fax +39.0422.85.35.85
[email protected]
Nice France
Buchelay
Tel. +33.(0)1.30.33.95.95
Fax +33.(0)1.30.33.95.96
[email protected]
Nice in Italy
Nice Padova
Sarmeola di Rubano PD Italia
Tel. +39.049.89.78.93.2
Fax +39.049.89.73.85.2
[email protected]
Nice Roma
Roma Italia
Tel. +39.06.72.67.17.61
Fax +39.06.72.67.55.20
[email protected]
20
www.niceforyou.com
Nice Rhône-Alpes
Decines Charpieu France
Tel. +33.(0)4.78.26.56.53
Fax +33.(0)4.78.26.57.53
[email protected]
Nice España Madrid
Tel. +34.9.16.16.33.00
Fax +34.9.16.16.30.10
[email protected]
Nice Romania
Cluj Napoca
Tel/Fax +40.264.45.31.27
[email protected]
Nice España Barcelona
Tel. +34.9.35.88.34.32
Fax +34.9.35.88.42.49
[email protected]
Nice Deutschland
Gelnhausen-Hailer
Tel. +49.60.51.91.52-0
Fax +49.60.51.91.52-119
[email protected]
Nice Polska
Pruszków
Tel. +48.22.728.33.22
Fax +48.22.728.25.10
[email protected]
Nice France Sud
Aubagne France
Tel. +33.(0)4.42.62.42.52
Nice UK
Fax +33.(0)4.42.62.42.50
[email protected] Chesterfield
Tel. +44.87.07.55.30.10
Nice Belgium
Fax +44.87.07.55.30.11
Leuven (Heverlee)
[email protected]
Tel. +32.(0)16.38.69.00
Fax +32.(0)16.38.69.01
[email protected]
Nice China
Shanghai
Tel. +86.21.575.701.46
+86.21.575.701.45
Fax +86.21.575.701.44
[email protected]
Nice USA Inc.
Jacksonville, FI.
Tel. +001.904.786.7133
Fax +001.904.786.7640
[email protected]
ITALIANO
TM1T
Drive Control
Istruzioni ed avvertenze per l’installatore
21
ITALIANO
22
DISPOSITIVO DI COMANDO - TM1T
GENERALITÀ
L'TM1T è un comando per portoni ad avvolgimento (rapido) e portoni
sezionali con motori trifase o monofase. Possono essere connessi tutti
gli elementi di sicurezza di tipo tradizionale. Ulteriori possibilità
d'impiego sono possibili tramite l'applicazione di diverse schede.
ITALIANO
DISPOSITIVO DI COMANDO - TM1T
Per l'apertura o la chiusura di un portone viene azionato solamente il
rispettivo pulsante del tastatore dotato di coperchio o il pulsante
esterno.
Durante l'esercizio automatico è possibile aprire e chiudere il portone
via radio.
CARATTERISTICHE
Le più importanti caratteristiche dell'TM1T sono:
4
4
4
uso e regolazione facili
modello resistente agli agenti atmosferici (IP 65)
grande spazio di collegamento per il cablaggio
Massimo grado di sicurezza grazie a:
4
4
4
radiotelecomando 433 MHz / 868 MHz (optional)
conformità alle regole e norme vigenti
possibilità di collegamento di una vasta gamma di elementi di
sicurezza
UTILIZZO SECONDO LE DISPOSIZIONI
Il comando per portoni TM1T è adatto per il comando di portoni
industriali, come per esempio portoni sezionali, ad avvolgimento
(rapido), pieghevoli o avvolgibili a griglia.
23
ITALIANO
DISPOSITIVO DI COMANDO - TM1T
AVVERTENZE PER LA SICUREZZA
Se non vengono rispettate le seguenti avvertenze di
sicurezza per il montaggio e la messa in servizio, allora
per i relativi danni causati alle persone o alle cose sarà
responsabile il costruttore dell'impianto.
Il costruttore dell'impianto è responsabile per l'impianto completo.
Egli deve provvedere all'adempimento di tutte le relative norme e
direttive (come per esempio DIN 1986, EN 12050). Egli è responsabile
per la redazione della documentazione tecnica dell'intero impianto, la
quale deve essere allegata all'impianto stesso.
Il simbolo che si trova nella descrizione del comando
richiama l'attenzione ad un possibile pericolo che viene
descritto in dettaglio in queste istruzioni.
L'installazione, l'esercizio e l'uso del comando difformi da queste
istruzioni o dalle specifiche tecniche qui contenute costituiscono
pericolo per le persone e comportano l'esclusione della responsabilità
e della garanzia.
Le direttive e le norme nazionali e locali per l'installazione nonché
le norme per la prevenzione degli infortuni emesse dalle associazioni
professionali di categoria devono essere rispettate.
I lavori d'installazione e di manutenzione dell'impianto del portone
devono essere effettuati solamente da personale specializzato ed
appositamente addestrato.
Durante i lavori all'impianto del portone, questo deve essere staccato
dalla tensione elettrica.
Il servizio di tipo “uomo morto” è ammissibile solo se l'impianto del
portone è visibile dal punto in cui si trovano i dispositivi di
comando.
24
EGREGIO CLIENTE !
Lei ha scelto un prodotto di grande valore tecnico.
ITALIANO
DISPOSITIVO DI COMANDO - TM1T
Durante la produzione siamo proceduti con la massima cura per poter
fornire questo comando in uno stato perfetto. Se lo stesso dovesse dare
motivi di reclamo, allora La preghiamo di spedircelo, assieme ad una
breve descrizione del difetto contestato, direttamente al nostro
stabilimento.
La garanzia include solamente l'eliminazione gratuita di errori
funzionali dell'apparecchio che siano provatamente riconducibili ad
errori di produzione o di materiale, inclusi i pezzi di ricambio
necessari.
Si prega di leggere attentamente le istruzioni d'uso prima
di iniziare l'installazione del comando.
Saremo esonerati dagli obblighi di garanzia e dalla responsabilità per
il prodotto, qualora vengano apportate modifiche costruttive senza la
nostra previa approvazione scritta o effettuate installazioni
contrastanti con le nostre direttive di montaggio.
Il costruttore dell'impianto deve fare attenzione a che vengano
rispettate le direttive EMV, le direttive per la bassa tensione, le
direttive per le macchine e la direttiva sui prodotti di costruzione.
ATTENZIONE!
Il comando non può essere impiegato in zone esplosive.
ATTENZIONE!
Collegare il cavo elettrico al morsetto X1 (L1, L2, L3) e al
morsetto PE della piastrina di base.
Il cavo elettrico deve essere messo in sicurezza tramite
fusibili 3x 6A o 3x 10A.
Va scelto un valore del fusibile tale che l'azionamento
collegato, in caso di bloccaggio, faccia intervenire il fusibile.
25
ITALIANO
DISPOSITIVO DI COMANDO - TM1T
DESCRIZIONE
Terminale ad innesto
per moduli aggiuntivi
Morsetto a vite
per antenna
Pulsante di
regolazione APRI
Pulsante di
regolazione CHIUDI
Terminale ad
innesto per
radio
Morsettiera
per elementi
di sicurezza
Terminale ad
innesto per
relè di
frenatura
Terminale
ad innesto
pulsante triplo
Morsetto ad
innesto barriera
fotoelettrica
di passaggio
Morsetto ad
innesto per
il finecorsa
Terminale ad
innesto per
commutatori
a chiave
Morsetto ad
innesto per
apparecchi
di comando
Morsetto ad
innesto per
il motore
Morsettiera
per la rete
Morsetto a
vite PE
LED (verde)
finecorsa GiÙ, si
accende in caso
di guasto
LED (verde)
finecorsa SU, si
accende in caso
di guasto
26
LED (rossa)
barriera fotoelettrica,
spenta in caso di guasto
LED (verde)
CHIUDI portone, si accende in
caso di azionamento pulsante
LED (gialla)
impulso, si accende in caso
di azionamento pulsante
LED (rossa)
LED (verde)
circuito di sicurezza
APRI portone, si accende in
STOP spenta in caso
caso di azionamento pulsante
di guasto
ITALIANO
DISPOSITIVO DI COMANDO - TM1T
DESCRIZIONE DELL'APPARECCHIO
ELEMENTI DI COMANDO
Con i pulsanti inseriti nel coperchio il portone può essere APERTO e
CHIUSO nella modalità di autotenuta o “uomo morto”. Se il portone viene
messo nella modalità di autotenuta, allora esso può essere fermato in
qualsiasi momento mediante il pulsante STOP.
Per la manovra dall'esterno si possono collegare elementi di manovra
aggiuntivi come per esempio un pulsante triplo.
Un interruttore di trazione (interruttore di trazione sotto il
soffitto) montato all'interno o all'esterno comanda la funzione del
portone.
APRI-STOP-CHIUSO (solo utilizzando il modulo aggiuntivo TM1C2).
In caso di impiego di radioricevitore opzionale è sempre possibile
fermare il portone tramite il radiotrasmettitore manuale.
COLLEGAMENTO CAVO DI
ALIMENTAZIONE DALLA RETE
Ai morsetti L1, L2, L3 e PE è collegata
una spina del tipo CEE da 16A.
PE
X1 L1 L2 L3
Per il collegamento dell'TM1T alla rete
si può usare anche un interruttore
principale trifase.
In tal caso, durante il montaggio, viene
rimossa la spina CEE.
cavo di alimentazione
spina CEE da 16A
X2 U V W
COLLEGAMENTO MOTORE TRIFASE
Il motore trifase viene collegato ai
morsetti U, V, W e PE. Nel caso in cui il
motore dovesse essere dotato di un
conduttore N, allora questo verrà
collegato al morsetto sciolto N della
conduttura di rete.
Questo vale per esempio per un freno
azionato mediante un raddrizzatore
collegato a 230 V.
M
3~
Motore
PE
PONTI JUMPER
Nel dispositivo di comando base sulle spine x11 (Pin 5/6), x3A (Pin
1/2) e x3B (Pin 1/2) è innestato un jumper.
27
ITALIANO
DISPOSITIVO DI COMANDO - TM1T
CONTROLLO DEL SENSO DI ROTAZIONE
Dopo la connessione, si deve verificare il senso di rotazione del motore
mediante i pulsanti APRI e CHIUDI, nella modalità di esercizio “uomo morto”.
Nel caso in cui il senso di rotazione non dovesse corrispondere alla
direzione indicata dalla freccia sul pulsante premuto, allora si deve tirare
la spina CEE ed invertire i collegamenti U e V (invertitore di fase).
Attenzione ai finecorsa!
COLLEGAMENTO DIE FINECORSA (FS)
Nell'TM1T i due finecorsa APRI e CHIUDI vengono collegati ai morsetti
J20 e J19 del blocco morsetti x5 come contatti privi di potenziale. Il
circuito di sicurezza con i finecorsa integrati viene collegato al
morsetto J22 del blocco di morsetti x5.
L'TM1T offre la possibilità di collegare un secondo finecorsa
aggiuntivo per il sollevamento (J26 x4B), per poi poter scegliere tra
due posizioni APRI (commutazione estate / -inverno) mediante
l'interruttore di posizionamento che si trova sul coperchio della
carcassa dell'TM1T(opzionale).
Manovella
d'emergenza
X4b
FC APRI
Pre-FC
Termointerruttore
FC CHIUDI
La regolazione dei finecorsa deve essere effettuata nella modalità di esercizio
“uomo morto”!
-
+
B
A
X5
J22
J21
Termo Pre-FC
CHIUDI
J20
J19
J32
SKS
o DW
STOP
APRI
a metà
J25
5 6
J26
7 8
FC mezza
altezza
J33
STOP
STOP 12V DC RS485
APRI CHIUDI
tutto
Per l'esercizio con l'EES (FCE finecorsa elettronico - opzionale) sono
assolutamente necessari i moduli aggiuntivi TM1C2 e TM1C4. La
descrizione della regolazione e della programmazione dei finecorsa è
rilevabile dalle istruzioni per l'uso del modulo aggiuntivo TM1C4.
CHIUSURA AUTOMATICA (Opzionale, solo con il modulo TM1C2)
La funzione di chiusura automatica viene regolata sull'interruttore
girevole di posizionamento.
28
Se la funzione di chiusura automatica è attivata, allora il portone
dalla posizione finale si chiude alla scadenza del tempo impostato
sull'interruttore girevole. Azionando il pulsante di fermata (Stop) o
dietro intervento di un impianto di sicurezza, la corsa di chiusura si
arresta.
COLLEGAMENTO DI UN TERMINALE DI COMMUTAZIONE OPTOELETTRONICO
(Opzionale, solo con il modulo aggiuntivo TM1C2)
verde
+12V SIG 0V
bianco
Nel il caso in cui il circuito debba
essere pressato sul suolo, la
funzione d'inversione viene
neutralizzata mediante il
collegamento di un pre-finecorsa
(finecorsa aggiuntivo, pre-finecorsa)
al morsetto J21 del blocco morsetti
x5. A tale scopo il pre-finecorsa
viene regolato a 5 cm sopra il suolo.
Collegamento al morsetto tripolare
situato sul modulo aggiuntivo TM1C2
marrone
Il terminale optoelettronico è
costruito in maniera tale che, nel
momento in cui esso viene azionato,
su tutta la sua lunghezza viene
interrotto un raggio di luce. Per
poter controllare su tutta la
lunghezza il terminale di sicurezza,
alla fine del circuito stesso va
installato un ricevitore.
ITALIANO
DISPOSITIVO DI COMANDO - TM1T
Terminale
optoelettronico
OSE
Trasmettitore
Ricevitore
marrone
verde
bianco
COLLEGAMENTO DEI TRASMETTITORI DEI COMANDI APRI, STOP, CHIUDI
Per la manovra dall'esterno all'TM1T può essere collegato un triplice
pulsante al blocco morsetti X3. I due pulsanti di APRI e CHIUDI vanno
eseguiti come contatti di chiusura (normalmente aperto).
Poiché il pulsante di STOP è collegato nel circuito di sicurezza, esso
va eseguito come contatto di apertura (normalmente chiuso).
In caso di collegamento di un pulsante di STOP al blocco morsetti X3, asportare il
ponte dal morsetto J9 e collegare il pulsante di STOP (contatto di apertura)!
Collegamento degli elementi di comando
APRI; STOP; CHIUDI ed IMPULSO
Serratura STOP
J8
J9
APRI
J10
Imp
J11
CHIUDI
J12
X3 1 2 3 4 5 6 7 8 9 10
Collegamento di un
interruttore a chiave
Serratura STOP
J8
J9
APRI
J10
Imp
J11
CHIUDI
J12
X3 1 2 3 4 5 6 7 8 9 10
Collegamento del pulsante
triplo con cavo a 4 anime
Serratura STOP
J8
J9
APRI
J10
Imp
J11
CHIUDI
J12
X3 1 2 3 4 5 6 7 8 9 10
29
ITALIANO
DISPOSITIVO DI COMANDO - TM1T
COLLEGAMENTO DI UN TERMINALE DI SICUREZZA DA 8.2 kOhm
(Opzionale, solo con il modulo aggiuntivo TM1C2)
ALL'TM1T si può collegare direttamente un terminale di sicurezza
elettrico oppure uno pneumatico-elettrico.
La logica di elaborazione per il terminale di commutazione è già
integrata nel modulo aggiuntivo TM1C2. Per poter controllare l'intero
circuito di sicurezza del terminale si deve collegare lo stesso ad una
resistenza elettrica (8,2).
Il finecorsa aggiuntivo pre-FC-CHIUDI viene regolato in maniera che il
portone, chiudendosi, azioni il finecorsa situato 5 cm sopra il suolo.
Il collegamento del terminale di commutazione si effettua sul morsetto J25 del
blocco morsetti X4b!
ATTENZIONE! Fare attenzione alla posizione die
jumper sul modulo aggiuntivo TM1C2!
COLLEGAMENTO DELLA BARRIERA FOTOELETTRICA FUNZIONALE
(Opzionale, solo con il modulo aggiuntivo TM1C2)
All'TM1T può essere collegata direttamente una barriera fotoelettrica
(al blocco morsetti X4a) per la sicurezza del passaggio. Nel caso in
cui il raggio infrarosso della barriera fotoelettrica venga interrotto
durante il movimento di chiusura del portone, il portone si blocca
automaticamente e ritorna nella posizione finale superiore.
ATTENZIONE:
Se viene utilizzata una barriera fotoelettrica a senso unico con soli tre punti di
collegamento morsetti, il contatto di commutazione e il lato positivo della parte
elettronica della barriera fotoelettrica vengono connessi al morsetto J24/3 con il
potenziale positivo.
R
T=Trasmettitore
R=Ricevitore
Foto
J24
1
3
2
4
Contatto di apertura
(normalmente chiuso)
T
4
J23
Alimentazione
tensione
24V DC
3
2
X4a
1
Connessione della barriera
fotoelettrica di riflessione
J23
Foto
J24
Barriera fotoelettrica
di sicurezza
30
X4a
Connessione trasmettitore
e ricevitore della
barriera fotoelettrica
In caso di connessione della barriera fotoelettrica, rimuovere il ponte da J24,
blocco morsetti X4a!
Collegamento di interruttori di sicurezza diretti
Interruttore a fune
lenta / Interruttore
di sicurezza in caso
di rottura della molla
o Interruttore di
sicurezza per lo
svolgimento
Gli elementi di sicurezza che intervengono direttamente nel processo
di comando, vengono collegati direttamente al morsetto J6 del blocco
morsetti X2. Di questi fanno parte lo STOP D'EMERGENZA oppure il
dispositivo di captazione, il dispositivo di sicurezza
antintrappolamento e la sicurezza per la porta pedonale.
ITALIANO
DISPOSITIVO DI COMANDO - TM1T
COLLEGAMENTO DELL'INTERRUTTORE
DI SICUREZZA DELLA PORTA
PEDONALE
(Opzionale, solo con il modulo
aggiuntivo TM1C2)
Nei portoni con porta pedonale integrata,
l'interruttore di sicurezza viene
collegato al morsetto J6 del blocco
morsetti X2.
Attenzione! Rimuovere i ponti (J6)!
X2
U
V
W
B1 B2
J1
COLLEGAMENTO DEL TRASMETTITORE
DEL COMANDO PULSANTE DI
Serratura STOP
TRAZIONE
(Opzionale, solo con il
modulo aggiuntivo TM1C2)
J8
J9
J6
APRI
J10
Imp
J11
CHIUDI
J12
X3 1 2 3 4 5 6 7 8 9 10
Con il dispositivo di comando TM1T è
possibile collegare al morsetto J11 del
blocco morsetti X3 un pulsante per la
trazione sotto il soffitto (contatto di
chiusura). La funzione di quest'ingresso
corrisponde ad un Comando sequenziale
CHIUDI-STOP-APRI-STOP.
Pulsante di trazione
RADIOTELECOMANDO
Nel dispositivo di comando TM1T si trova un punto d'innesto (X9) per
un apparecchio radiotrasmittente ad un canale. Per ulteriori
informazioni vedi istruzioni EK1-433/EK1-868 per l'uso del ricevitore
e del trasmettitore manuale.
31
ITALIANO
32
DISPOSITIVO DI COMANDO - TM1T
LEGENDA
S2
relè principale
S1
relè APRI/CHIUDI
J1
Motore
SW1
pulsante di regolazione APRI
SW2
pulsante di regolazione CHIUDI
J26
finecorsa aggiuntivo APRI (mezza altezza di apertura)
J20
finecorsa APRI (contatto di apertura)
J22
circuito di sicurezza (contatto di apertura)
J19
finecorsa CHIUSO (contatto di apertura)
J21
finecorsa aggiuntivo CHIUSO (pre-finecorsa)
J8
Stop d'emergenza (contatto di apertura)
J6
contatto per porta pedonale (contatto di apertura) /
interruttore di sicurezza antintrappolamento
J9
pulsante di STOP (contatto di apertura)
J10
pulsante APRI (contatto di chiusura)
J11
pulsante IMPULSO (contatto di chiusura)
J12
pulsante CHIUDI (contatto di chiusura)
J24
barriera fotoelettrica (contatto di apertura)
J25
interruttore di sicurezza per il margine di chiusura
J26
finecorsa APRI a metà (contatto di apertura)
T1
trasformatore
X1
morsettiera di rete
X2
morsetto ad innesto motore
X3
morsetto ad innesto per apparecchi di comando
X3A
morsettiera ad innesto per interruttore a chiave
X3B
morsettiera ad innesto per il pulsante triplo
X4a
morsetto ad innesto per la barriera fotoelettrica di
passaggio
X4b
morsetto ad innesto per gli elementi di sicurezza
X5
morsetto ad innesto per il finecorsa
X8a
terminale per i moduli d'innesto (a 20 poli)
X8b
terminale per i moduli d'innesto (a 10 poli)
X9
terminale ad innesto per il radioricevitore
X11
terminale ad innesto per relè di frenatura
J1
V
W
X3
J9
3 4
F1
X5
J22
J21
J20
J19
+
J32
-
A
J33
B
J10
5 6
Trasformatore
J11
7 8
X3A
J12
9 10
J23
1 2
X3B
LIMIT SWITCH
Foto
J24
3 4
X8a
Thermo Pre-LS STOP
STOP 12V DC RS485
CLOSED totally CLOSED
OPEN
FUSIBILE
T600mA
J8
1 2
J6
B1 B2
Pre-FC
J4
X1 L3 L2 L1
U
FC APRI
PE PE PE
X2
Manovella
d'emergenza
8
7
5
6
STOP
APRI
a metà
J26
X11
SKS
o DW
J25
CHIUDI
X4a
Termointerruttore
FC CHIUDI
ANTENNA
X8b
RADIO
X9
M1
SCHEMA ELETTRICO
ITALIANO
DISPOSITIVO DI COMANDO - TM1T
APRI
FC mezza altezza
X4b
Terminale
di contatti
Barriera fotoelettrica
CHIUDI
IMPULSO
APRI
STOP
Serratura
RELÈ
380-415V
N/PE
33
ITALIANO
34
DISPOSITIVO DI COMANDO - TM1T
DATI TECNICI
Modello
TM1T
Tensione di alimentazione
3x400V AC 50Hz (fusibile da 6 o 10A)
Collegamento motore mediante
contattore d'inversione
2x3 contattori NO, 400V/max. 1,2kVA
Morsetti di collegamento
1,5 mm² max.
Temperatura ambiente
-20°C bis +60°C
Tensione di comando 24V DC
Protezione secondaria 0,8A inerte
Grado di protezione
IP 65
Dimensioni
255 x 120 x 180mm (LxAxP)
[TM1T è prodotto da Mtec mbH (D) ed è identico al corrispettivo modello: UST 1]
DICHIARAZIONE CE DEL PRODUTTORE
In conformità alla direttiva CE sui macchinari 98/37/CE allegato II B
ITALIANO
DISPOSITIVO DI COMANDO - TM1T
Il produttore:
Mtec Gesellschaft für Antriebssysteme mbH
Friethöfer Kamp 23
D-48727 Billerbeck
dichiara con la presente che il prodotto:
DISPOSITIVO DI COMANDO UST 1
è rispondente alle seguenti direttive CE:
98/37/CE
Direttiva sui macchinari (ex 89/392/CEE)
89/336/CEE
Direttiva EMV (con modifiche 91/263/CEE, 92/31/CEE, 93/68/CEE)
71/23/CEE
Direttiva per la bassa tensione (con modifica 93/68/CEE)
nonché al seguente certificato di controllo della conformità:
Numero 78/781/551722 del TÜV Nord Anlagenbau / Systems
In particolare sono state applicate le seguenti normative europee:
EN 12445:2001
sicurezza nell'uso dei portoni azionati ad energia; procedimento di controllo
EN 12453:2001
sicurezza nell'uso dei portoni azionati ad energia: requisiti
prEN 12978:1997
portoni; dispositivi di protezione; requisiti e procedimenti di controllo
EN 954-1:1966
sicurezza delle macchine; parti di comandi relativi alla sicurezza
EN 60204-1:1997
sicurezza delle macchine; equipaggiamento elettrico
EN 60335-1:1994
sicurezza degli strumenti elettrici; requisiti generali
NOTA:
La messa in servizio dell'impianto del portone in cui sarà installato
questo comando è vietata fino a che non sarà stato verificato che
l'impianto stesso è conforme alle disposizioni della direttiva 98/37/CE.
Billerbeck, aprile 2005
(Luogo, data)
(firma)
Peter Menke, Amministratore
(nome e carica del firmatario)
35
ITALIANO
36
DISPOSITIVO DI COMANDO - TM1T
ACCESSORI OPZIONALI
TM1C1
TM1C1E
Modulo di autotenuta APRI
Modulo di autotenuta APRI
Interruttore di finecorsa
elettronico
TM1C2
TM1C3
odulo per il collegamento di un
terminale DW, un terminale SKS
8.2 kohm oppure un terminale OSE
Modulo di comando traffico in
senso opposto
TM1C4
TM1C5
Modulo collegamento di
finecorsa elettrico
Modulo per il display di
servizio
EK1-433 | EK1-868
FSK433 | FSK868
Radioricevitore AM da 433 o
868 MHz AM
Radiotrasmettitore manuale
per radioricevitore da
433 o 868 MHz
ITALIANO
NOTE
37
ITALIANO
DISPOSITIVO DI COMANDO - TM1T
Tutti i diritti riservati.
Riproduzione, anche parziale, solo previa nostra autorizzazione.
La ditta si riserva la facoltà di apportare modifiche in base al
progresso tecnologico.
Headquarter
Nice worldwide
Nice SpA
Oderzo TV Italia
Tel. +39.0422.85.38.38
Fax +39.0422.85.35.85
[email protected]
Nice France
Buchelay
Tel. +33.(0)1.30.33.95.95
Fax +33.(0)1.30.33.95.96
[email protected]
Nice in Italy
Nice Padova
Sarmeola di Rubano PD Italia
Tel. +39.049.89.78.93.2
Fax +39.049.89.73.85.2
[email protected]
Nice Roma
Roma Italia
Tel. +39.06.72.67.17.61
Fax +39.06.72.67.55.20
[email protected]
38
www.niceforyou.com
Nice Rhône-Alpes
Decines Charpieu France
Tel. +33.(0)4.78.26.56.53
Fax +33.(0)4.78.26.57.53
[email protected]
Nice España Madrid
Tel. +34.9.16.16.33.00
Fax +34.9.16.16.30.10
[email protected]
Nice Romania
Cluj Napoca
Tel/Fax +40.264.45.31.27
[email protected]
Nice España Barcelona
Tel. +34.9.35.88.34.32
Fax +34.9.35.88.42.49
[email protected]
Nice Deutschland
Gelnhausen-Hailer
Tel. +49.60.51.91.52-0
Fax +49.60.51.91.52-119
[email protected]
Nice Polska
Pruszków
Tel. +48.22.728.33.22
Fax +48.22.728.25.10
[email protected]
Nice France Sud
Aubagne France
Tel. +33.(0)4.42.62.42.52
Nice UK
Fax +33.(0)4.42.62.42.50
[email protected] Chesterfield
Tel. +44.87.07.55.30.10
Nice Belgium
Fax +44.87.07.55.30.11
Leuven (Heverlee)
[email protected]
Tel. +32.(0)16.38.69.00
Fax +32.(0)16.38.69.01
[email protected]
Nice China
Shanghai
Tel. +86.21.575.701.46
+86.21.575.701.45
Fax +86.21.575.701.44
[email protected]
Nice USA Inc.
Jacksonville, FI.
Tel. +001.904.786.7133
Fax +001.904.786.7640
[email protected]
FRANÇAIS
TM1T
Drive Control
Instructions et recommandations pour l’installateur
39
FRANÇAIS
40
COMMANDE D’ENTRAINEMENT - TM1T
GENERALITES
La TM1T est une commande de portails pour des portails coulissants et
sectionnés avec des moteurs triphasés ou monophasé. Tous les autres
éléments de sécurité sont connectables.
FRANÇAIS
COMMANDE D’ENTRAINEMENT - TM1T
Des possibilités d'usage additionnelles sont possibles par l'équipage
avec différentes cartes enfichables.
Pour ouvrir ou fermer un portail, il suffit d'activer la touche du
couvercle ou/et la touche extérieure correspondante.
En mode d'opération automatique, le portail peut aussi être ouvert et
fermé par radio.
CARACTERISTIQUE DE CAPACITE
Les caractéristiques les plus importants de l'TM1T sont:
4
4
4
opération et ajustement facile
modèles résistants aux intempéries (IP 65)
grande place de connexions pour câblage
Une sécurité élevée grâce à:
4
4
4
radio télécommande 433 MHz / 868 MHz (optionnel)
conformité aux directives et normes en vigueurs
variétés d'éléments de sécurité connectables
EMPLOIE CONFORME A LA DISPOSITION
La commande de portail TM1T convient à commander des portails
industriels comme par ex.: les portails sectionnés, coulissants,
pliants et des rideaux de fer roulants.
41
FRANÇAIS
COMMANDE D’ENTRAINEMENT - TM1T
INSTRUCTIONS DE SECURITE
Si les instructions de sécurité suivantes ne sont pas
respectées durant le montage et la mise en marche, la
compagnie de montage est responsable des dommages
corporels et dégâts matériels qui en résultent.
La compagnie de montage est responsable de la totalité de
l'installation. Elle doit s'occuper du respect des normes et directives
(comme DIN 1986, EN 12050) importants. Il est responsable de
l'établissement de la documentation de toute l'installation qui doit y
être joint.
Ce symbole dans la description de la commande indique
un danger possible qui est expliqué en détails dans
cette description.
L'installation, la mise en service et l'opération de la commande
contraire à ces instructions d'opération ou aux spécifications
techniques qui y figurent mènent à des dommages corporels et entraînent
une exclusion de tout recours en garantie et une exonération de la
responsabilité.
Les règlements nationaux et locaux et les normes pour l'installation
aussi bien que les prescriptions sur la lutte contre les accidents du
travail selon l'association professionnelle allemande sont à respecter.
Les travaux d'installation et de maintenance des portails ne doivent se
faire que par des spécialistes qui sont formés dans le domaine.
Durant des travaux aux portails, ils sont absolument à mettre hors
circuit.
Le mode d'opération homme mort n'est admissible que quand le portail
est visible des appareils d'instruction.
42
CHER CLIENT!
Vous vous êtes décidés pour un produit de qualité technique supérieure.
FRANÇAIS
COMMANDE D’ENTRAINEMENT - TM1T
Lors de la production, nous avons appliqué les plus grands soins
possibles pour expédier le contrôle dans un état impeccable.
Dorénavant, si vous avez des raisons de vous plaindre, veuillez nous
envoyer le contrôle directement à notre adresse en notant brièvement la
description de l'erreur.
L'étendue de garantie ne s'applique qu'à l'élimination gratuite des
erreurs de fonction à l'installation, qui résultent d'erreur de
production ou/et de matérielle dont la preuve peut être fournie, les
pièces de rechange inclus.
Veuillez lire attentivement ces instructions d'opération
avant de commencer l'installation du contrôle.
Nous sommes exclus de tout recours en garantie et de la responsabilité
du fabricant si des changements à la construction ont été fait ou des
installations incorrectes contraire aux directives de montage indiquées
auparavant ont été fait ou/et fussent faire sans notre accord
préliminaire à l'écrite.
La compagnie qui monte l'installation doit veiller à ce que les
directives EMV, les règlements de basse tension, les directives de
machines et les directives de construction de produits soient
respectés.
ATTENTION !
Le contrôle ne doit pas être mis en service à l'extérieure.
Connecter le câble d'alimentation à la borne X1 (L1, L2, L3)
et à la borne PE de la platine de base.
Le câble d'alimentation doit être assuré par un coupe-circuit
fusible 3x6A ou/et 3x10A.
La valeur de coupe-circuit fusible doit être choisie de telle
que la commande branchée déclanche le coupe-circuit en
cas de blocage.
43
FRANÇAIS
COMMANDE D’ENTRAINEMENT - TM1T
DESCRIPTION
Réglette à fiche pour
module additionnel
Borne à vis
pour antenne
Interrupteur
de mise au
point OUVERT
Interrupteur
de mise au
point FERMEE
Réglette à
fiche pour radio
Rail à bornes
pour éléments
de sécurité
Réglette à
fiche pour
freinage relais
Réglette pour
interrupteur
triple
Borne à insérer
pour barrière
photoélectrique
de passage
Borne à
insérer pour
interrupteur
fin de course
Réglette à fiche
pour interrupteur
à clé
Borne à insérer
pour appareil
d'instruction
Borne à insérer
pour moteur
Rail à borne
pour réseau
Borne à vis
PE
LED (vert) interrupteur fin de course
DESCENTE,s'allume en cas d'erreur
LED (rouge) barrière photoélectrique,
off en cas d'erreur
LED (vert) portail DESCENTE,
s'allume en activant
l'interrupteur à touche
LED (vert) interrupteur
fin de course MONTEE,
LED (jaune) impulse,
s'allume en
s'allume en activant
cas d'erreur
l'interrupteur à touche
44
LED (rouge) circuit
de sécurité STOP,
off en cas d'erreur
LED (vert) portail MONTEE,
s'allume en activant
l'interrupteur à touche
DESCRIPTION DE L'INSTALLATION
ELEMENT D'OPERATION
FRANÇAIS
COMMANDE D’ENTRAINEMENT - TM1T
Le portail est OUVERT ou FERME avec le bouton-poussoir se trouvant sur
le couvercle en mode d'opération auto-verouillage ou/et homme mort. Si
le portail marche en auto-verouillage, le portail peut être stoppé à
tout moment par la touche STOP.
Pour l'opération de l'extérieure, des éléments d'opération additionnels
comme les boutons-poussoirs triples sont connectables.
Un interrupteur à traction (bouton-poussoir de traction de plafond)
installé à l'intérieur ou à l'extérieur commande le portail dans la
fonction MONTEE-STOP-DESCENTE (seulement en employant un module
additionnel TM1C2).
Dans le cas d'un récepteur radio inséré optionnel, arrêter le portail
est toujours possible par radio émetteur à main.
CONNEXION DE CABLE
D'ALIMENTATION
Un interrupteur CEE 16A est branché aux
bornes L1, L2, L3 et à la borne PE.
PE
X1 L1 L2 L3
La connexion du réseau vers UST1 peut
aussi se faire avec un interrupteur
principal triphasé optionnel.
Dans ce cas, l'interrupteur CEE est
enlevé durant le montage.
Ligne d'alimentation
pour fiche CEE 16A
X2 U V W
CONNEXION DE LA COMMANDE
TRIPHASEE
La commande triphasée est branchée aux
bornes U, V, W et PE. Dans le cas où la
commande est équipée d'un conducteur du
type N, ceci est branché au conducteur de
type N libre de la ligne de réseau.
Exemple: pour un frein qui est opéré à
230V sur un redresseur.
M
3~
Moteur
PE
PONT DE JUMPER
Au contrôle de base un jumper est embroché aux interrupteurs
x11 (Pin 5/6), x3A (Pin 1/2) et x3B (Pin 1/2).
45
FRANÇAIS
COMMANDE D’ENTRAINEMENT - TM1T
CONTROLE DE SENS DE ROTATION
Après le raccordement de la commande, le sens de rotation doit être
vérifié avec les touches MONTEE et DESCENTE en mode d'opération homme
mort.
Si le sens de rotation ne correspond pas à direction de la flèche de la
touche poussée, l'interrupteur CEE doit être retiré et les prises U et
V doivent être échangées (changeur de phase).
Attention tenir compte de l'interrupteur fin de course!
RACCORDEMENT DE L'INTERRUPTEUR FIN DE COURSE
Pour TM1T, les deux interrupteurs fin de course MONTEE et DESCENTE
comme contacte libre de potentielle sont branchés aux bornes J20 et J19
du bloc de bornes x5. Le circuit de sécurité avec les interrupteurs de
fin de course de sécurité intégrés sont raccordés aux bornes J22 du
bloc de bornes x5.
Pour TM1T il est possible de brancher (J26 x 4B) un deuxième
interrupteur fin de course additionnel pour le dressage et puis de
faire le choix entre deux différentes positions MONTEE (ajustage été /
hiver) par un interrupteur de position situé sur le couvercle de la
boîte (optionnel).
SKS
ou DW
X4b
Manivelle
de secours
IC-MONTEE
Pré-IC
Thermo
IC-DESCENTE
Les ajustages des interrupteurs fin de course sont à faire en mode d'opération
homme mort!
-
+
B
J25
5 6
STOP
MI-OUVERT
J26
7 8
A
ICMI-HAUTEUR
X5
J22
J21
J20
Thermo Pré-IC STOP
FERMEE
J19
J32
J33
STOP 12V DC RS485
TOUT FERMEE
OUVERT
Les modules additionnels TM1C2 et TM1C4 sont absolument nécessaire pour
l'opération avec EES (Interrupteur fin de course électronique
optionnel). Veuillez trouver la description de l'ajustage et de la
programmation de l'interrupteur fin de course.
46
CONNEXION D'UN RAIL DE COMMUTATION OPTOELECTRONIQUE
(optionnel, seulement avec le module additionnel TM1C2)
FRANÇAIS
COMMANDE D’ENTRAINEMENT - TM1T
vert
blanc
marron
Un rail de sécurité optoélectronique Connexion à la borne tripolaire sur
est construit de telle qu'en activant le module additionnel TM1C2
le rail de commutation, un rayon de
+12V SIG 0V
lumière est interrompu sur toute la
longueur. Pour qu'ici le rail de
sécurité soit contrôlé sur toute la
Rail de commutation
longueur, un récepteur doit être
optoélectronique OSE
branché au bout du rail de
commutation.
Emetteur
Récepteur
Dans le cas où le rail de commutation
doit être serré, la fonction de
réversion est neutralisée en
branchant un interrupteur fin de
course préliminaire (interrupteur fin
marron
de course additionnel Pré-IC) aux
vert
bornes J21 du bloc de bornes x5. Pour
blanc
cette fin, l'interrupteur de fin de
course préliminaire est ajusté à 5 cm
au-dessus du sol.
CONNEXION DE L'EMETTEUR D'INSTRUCTION OUVERT, STOP, FERME
Pour l'opération de l'extérieur, un interrupteur triple peut être
branché au bloc de bornes x3. Dans ce cas, les deux interrupteurs pour
MONTEE et DESCENTE sont à réaliser comme fermeur.
Comme l'interrupteur de STOP du circuit de sécurité est occupé, il faut
qu'il soit branché comme ouvreur.
Pour la connexion d'un interrupteur de STOP au bloc de bornes x3, retirer le pont
sur la borne J9 et brancher l'interrupteur de STOP (ouvreur)!
Connexion des éléments d'opération
MONTEE, STOP, DESCENTE et IMPULSE
Serrure STOP
J8
J9
MONTEE
J10
Imp
J11
FERME
J12
X3 1 2 3 4 5 6 7 8 9 10
Connexion d'un interrupteur à clé
Serrure STOP
J8
J9
MONTEE
J10
Imp
J11
FERME
J12
X3 1 2 3 4 5 6 7 8 9 10
Connexion d'un interrupteur triple avec un câble à quatre conducteurs
Serrure STOP
J8
J9
MONTEE
J10
Imp
J11
FERME
J12
X3 1 2 3 4 5 6 7 8 9 10
47
FRANÇAIS
COMMANDE D’ENTRAINEMENT - TM1T
CONNEXION D'UN RAIL DE SECURITE AVEC 8,2 kOhm
(optionnel, seulement avec module additionnel TM1C2)
Un rail de sécurité électrique ou/et pneumatique peut être directement
branché à TM1T.
Le logique d'interprétation pour le rail de commutation est déjà
intégré dans le module additionnel k2. Pour pouvoir surveiller tout le
circuit électrique du rail de sécurité, le rail de commutation doit
être branché avec une résistance (8,2 kOhm).
L'interrupteur fin de course préliminaire FERME est ajusté de telle que
le portail descendant active l'interrupteur fin de course à 5 cm audessus du sol.
La connexion du rail de commutation se fait à la borne J25 du bloc de bornes X4b!
ATTENTION ! Il faut tenir compte de la position du jumper
sur le module additionnel TM1C2!
CONNEXION DE LA BARRIERE PHOTOELECTRIQUE DE FONCTION
(optionnel, seulement avec module additionnel TM1C2)
Une barrière photoélectrique (au bloc de bornes x4a) pour assurer le
passage peut être branché directement à UST1. Si le rayon infrarouge de
la barrière photoélectrique est interrompu durant la DESCENTE, le
portail s'arrête et reverse vers la position finale en haut.
ATTENTION:
Dans le cas d'une barrière pour sens unique avec seulement trois points de bornes
de connexion, le contact de connexion et le côté plus de l'électronique de la
barrière photoélectrique sont branchés à la borne J24/3 avec le potentiel de plus.
Enlever le pont de J24 du bloc de bornes x4a en branchant la barrière
photoélectrique!
Connexion barrière
photoélectrique de réflexion
Photo
J24
1
3
S
2
3
4
4
E
S=émetteur
E=récepteur
48
1
Photo
J24
Alimentation
de tension
24V DC
Contact
(ouvreur)
2
X4a
J23
J23
Barrière
photoélectrique
de sécurité
X4a
Connexion de l'émetteur et du récepteur
de la barrière photoélectrique
ENTREE AUTOMATIQUE
(optionnel, seulement avec le module additionnel TM1C2)
FRANÇAIS
COMMANDE D’ENTRAINEMENT - TM1T
La fonction entrée automatique est ajustée à l'interrupteur rotatif de
position.
Si la fonction automatique entrée est activée, le portail se referme à
partir de la position finale à la fin du temps enregistré à
l'interrupteur rotatif. L'entrée automatique est bloquée en activant un
interrupteur stop ou une installation de sécurité.
Connexion d'interrupteurs de sécurité directes
Les éléments de sécurité qui interviennent directement dans
le déroulement de la commande sont branchés à la borne J6 et
au bloc de bornes x2. Les éléments suivants y comptent:
élément d'arrêt d'urgence ou/et le mécanisme d'arrêt, la
protection de tirage et la protection pour portail glissant.
Interrupteur du
câble lâche /
protection contre la
rupture du ressort
ou protection contre
le déroulement
CONNEXION PROTECTION DE
LA PORTE INTÉGRÉE
(optionnel, seulement avec
module additionnel TM1C2)
Dans le cas de portail avec porte
intégrée, l'interrupteur de
sécurité est branché à la borne
J6 du bloc de bornes x2.
X2
Attention! Enlever les ponts (J6)!
CONNEXION DU TRANSMETTEUR
D'INSTRUCTIONS POUR BOUTONPOUSSOIR
(optionnel, seulement avec
module additionnel TM1C2)
Dans le cas de la commande TM1T, un
bouton-poussoir de traction de
plafond peut être branché à la
borne J11 du bloc de bornes x3, la
fonction de cette entrée correspond
à une contrôle séquentielle FERMESTOP-OUVERT-STOP.
U
V
W
B1 B2
J1
J6
Serrure STOP
J8
J9
X3
1
2
3
4
MONTEE
J10
5
6
Imp
J11
7
8
FERME
J12
9 10
Bouton-poussoir
de traction
48
FRANÇAIS
COMMANDE D’ENTRAINEMENT - TM1T
RADIOTELECOMMANDE
Un point de fiche (x9) pour un récepteur radio à monocanal est situé
sur la commande UST1. Veuillez trouver d'autre dans les instructions
d'utilisation de récepteur et d'émetteur à main EK1-433 / EK1-868.
LÉGENDE
S2
S1
J1
SW1
SW2
J26
J20
J22
J19
J21
J8
J6
J9
J10
J11
J12
J24
J25
J26
T1
X1
X2
X3
X3A
X3B
X4a
X4b
X5
X8a
X8b
X9
X11
50
Contacteur principal
Contacteur FERME / OUVERT
Moteur
Interrupteur de mise au point OUVERT
Interrupteur de mise au point FERME
Interrupteur fin de course additionnel OUVERT (mi hauteur
d'ouverture)
Interrupteur fin de course OUVERT (Ouvreur)
Circuit de sécurité (ouvreur)
Interrupteur fin de course FERME (ouvreur)
Interrupteur fin de course additionnel FERME (interrupteur fin de
course préliminaire)
Arrêt d'urgence (ouvreur)
Contact pour portail intégré (ouvreur) / protection de tirage
Interrupteur STOP (ouvreur)
Interrupteur OUVERT (fermeur)
Interrupteur IMPULSE (fermeur)
Interrupteur FERME (fermeur)
Barrière photoélectrique du passage (ouvreur)
Protection des bouts fermants
Interrupteur fin de course MI OUVERT (ouvreur)
Transformateur
Réglette à bornes réseau
Bornes à insérer moteur
Bornes à insérer transmetteur d'instructions
Réglette à fiches pour interrupteur à clé
Réglette à fiches pour interrupteur triple
Borne à insérer barrière photoélectrique du passage
Borne à insérer éléments de sécurité
Borne à insérer interrupteur de fin de course
Réglette à fiche pour modules enfichables (à 20 pôles)
Réglette à fiche pour modules enfichables (déca polaire)
Réglette à fiche pour récepteur radio
Réglette à fiche pour relais de freinage
J1
V
W
X3
J6
B1 B2
J9
3 4
J22
J21
J19
J32
+
J10
5 6
TRANSFORMATEUR
X3A
J11
7 8
A
J33
B
STOP
STOP 12V DC RS485
TOUT FERME
OUVERT
J20
-
J12
9 10
J23
1 2
X3B
Foto
J24
3 4
X8a
INTERRUPTEUR FIN DE COURSE
Thermo Pré-IC
FERME
COUPE-CIRCUIT
T600mA
J8
1 2
F1
X5
Pré-IC
J4
X1 L3 L2 L1
U
IC-MONTEE
PE PE PE
X2
Manivelle
de secours
X11
J26
7 8
IC-mi hauteur
J25
5 6
RADIO
ANTENNE
X8b
SKS
STOP
o.DW Halb AUF
FERME
X4a
Thermo
IC-DESCENTE
X9
M1
PLAN DE CÂBLAGE
Rail de contact
FRANÇAIS
COMMANDE D’ENTRAINEMENT - TM1T
MONTEE
Barrière
photoélectrique
FERME
IMPULSE
MONTEE
STOP
Serrure
CONTACTEUR
380-415V
N/PE
51
X4b
FRANÇAIS
52
COMMANDE D’ENTRAINEMENT - TM1T
DONNEES TECHNIQUES
Modèle
TM1T
Alimentation de tension
3x400V AC 50Hz (6 ou/et 10A protégé)
Connexion du moteur par
contacteur de renversement
2x3 NO contactes de contacteurs,
400V/mas. 1,2kVA
Bornes de raccordement
1,5 mm² mas.
Température ambiante
-20°C jusqu'à +60°C
Tension de contrôle 24V DC
Protection par fusible secondaire 0,8A
à action retardée
Genre de protection
IP 65
Dimensions
255 x 120 x 180mm (LxHxP)
[TM1T est produit par Mtec mbh (D) et est identique au modèle correspondant: UST 1]
DÉCLARATION DU PRODUCTEUR SELON LA CE
selon les directives de machines de la Communauté Européenne 98/37/CE annexe
FRANÇAIS
COMMANDE D’ENTRAINEMENT - TM1T
Le producteur:
Mtec Gesellschaft für Antriebssysteme mbH
Friethöfer Kamp 23
D-48727 Billerbeck
déclare ci-dessous que le produit:
COMMANDE D'ENTRAINEMENT UST 1
correspond aux directives de la CE suivantes:
98/37/CE
directive de machines (ancienne 89/392/CEE)
89/336/CEE
directive EEC (avec les changements 91/263/CEE, 92/31/CEE, 93/68/CEE)
73/23/CEE
directive de basse tension (avec le changement 93/68/CEE)
et le certificat d'épreuve de conformité suivant:
numéro 78/781/551722 du TÜV Nord Anlagenbau / Systems
En particulier, les normes / les conceptions de normes européens sont appliqués:
EN 12445:2001
Sécurité d'utilisation de portails motorisés; procédé d'essais
EN 12453:2001
Sécurité d'utilisation de portails motorisés, demandes
prEN 12978:1997
Portails, équipements de sécurité, demandes et procédés d'essais
EN 954-1:1996
La sécurité de machines, des parties de commandes relatives à la sécurité
EN 60204-1:1997
La sécurité de machines, équipement électrique
EN 60335-1:1994
La sécurité d'appareils électriques, demandes générales
REMARQUE:
La mise en marche de l'installation de portail dans laquelle cette
commande doit être intégrée n'est pas autorisée jusqu'à ce que ce
soit assuré que l'installation de portail correspond aux dispositions
de la directive 98/37/CE.
Billerbeck, Avril 2005
(Lieu, date)
(Signature)
Peter Menke, Directeur-Gérant
(Nom et fonction du signataire)
53
FRANÇAIS
54
COMMANDE D’ENTRAINEMENT - TM1T
ACCESSOIRES D'OPTION
TM1C1
TM1C1E
Module pour auto-verouillage
MONTEE
Module pour auto-verouillage
en MONTEE
Interrupteur fin de course
électronique
TM1C2
TM1C3
Module pour brancher un rail
DW, un SKS 8,2 kOhm ou un rail
OSE
Module pour le contrôle de la
circulation en sens inverse
TM1C4
TM1C5
Module pour brancher un interrupteur
fin de course électronique
Module pour l'affichage du
service
EK1-433 | EK1-868
FSK433 | FSK868
433 ou 868 MHZ récepteur radio AM
Emetteur à main pour la 433 ou
868 MHZ récepteur radio AM
FRANÇAIS
NOTES
55
FRANÇAIS
COMMANDE D’ENTRAINEMENT - TM1T
Protégé par le droit d'auteur.
La reproduction, aussi partielle, seulement avec notre autorisation.
Sous réserves de modifications qui servent au progrès techniques.
Headquarter
Nice worldwide
Nice SpA
Oderzo TV Italia
Tel. +39.0422.85.38.38
Fax +39.0422.85.35.85
[email protected]
Nice France
Buchelay
Tel. +33.(0)1.30.33.95.95
Fax +33.(0)1.30.33.95.96
[email protected]
Nice in Italy
Nice Padova
Sarmeola di Rubano PD Italia
Tel. +39.049.89.78.93.2
Fax +39.049.89.73.85.2
[email protected]
Nice Roma
Roma Italia
Tel. +39.06.72.67.17.61
Fax +39.06.72.67.55.20
[email protected]
56
www.niceforyou.com
Nice Rhône-Alpes
Decines Charpieu France
Tel. +33.(0)4.78.26.56.53
Fax +33.(0)4.78.26.57.53
[email protected]
Nice España Madrid
Tel. +34.9.16.16.33.00
Fax +34.9.16.16.30.10
[email protected]
Nice Romania
Cluj Napoca
Tel/Fax +40.264.45.31.27
[email protected]
Nice España Barcelona
Tel. +34.9.35.88.34.32
Fax +34.9.35.88.42.49
[email protected]
Nice Deutschland
Gelnhausen-Hailer
Tel. +49.60.51.91.52-0
Fax +49.60.51.91.52-119
[email protected]
Nice Polska
Pruszków
Tel. +48.22.728.33.22
Fax +48.22.728.25.10
[email protected]
Nice France Sud
Aubagne France
Tel. +33.(0)4.42.62.42.52
Nice UK
Fax +33.(0)4.42.62.42.50
[email protected] Chesterfield
Tel. +44.87.07.55.30.10
Nice Belgium
Fax +44.87.07.55.30.11
Leuven (Heverlee)
[email protected]
Tel. +32.(0)16.38.69.00
Fax +32.(0)16.38.69.01
[email protected]
Nice China
Shanghai
Tel. +86.21.575.701.46
+86.21.575.701.45
Fax +86.21.575.701.44
[email protected]
Nice USA Inc.
Jacksonville, FI.
Tel. +001.904.786.7133
Fax +001.904.786.7640
[email protected]
DEUTSCH
TM1T
Drive Control
Anweisungen und Hinweise für den Installateur
57
DEUTSCH
58
ANTRIEBSSTEUERUNG - TM1T
ALLGEMEIN
Die TM1T ist eine Torsteuerung für Roll- und Sektionaltore mit 3- oder
1-Phasen Motoren. Alle üblichen Sicherungselemente sind anschließbar.
DEUTSCH
ANTRIEBSSTEUERUNG - TM1T
Zusätzliche Anwendungsmöglichkeiten sind durch das Aufrüsten mit
verschiedenen Steckkarten möglich.
Zum Öffnen oder Schließen eines Tores wird lediglich die entsprechend
Taste des Deckel- bzw. Aussentasters betätigt.
Im Automatikbetrieb kann das Tor auch per Funk geöffnet und geschlossen
werden.
LEISTUNGSMERKMALE
Die wichtigsten Leistungsmerkmale der TM1T sind:
4
4
4
leichte Bedienung und Einstellung
wettergeschützte Ausführung (IP 65)
großer Anschlussraum für Verdrahtung
Ein Höchstmaß an Sicherheit durch:
4
4
4
Funkfernsteuerung 433 MHz / 868 MHz (optional)
konform den geltenden Richtlinien und Normen
umfangreiche Sicherheitselemente anschließbar
BESTIMMUNGSGEMÄSSE VERWENDUNG
Die Tor-Steuerung TM1T ist geeignet zur Steuerung von Industrietoren,
wie z.B. Sektional-, Roll-, Falt- und Rollgitter-Toren.
59
DEUTSCH
ANTRIEBSSTEUERUNG - TM1T
SICHERHEITSHINWEISE
Wenn die folgenden Sicherheitshinweise bei der Montage
und Inbetriebnahme nicht beachtet werden,
ist der Anlagenersteller für die daraus resultierenden
Personen- und Sachschäden verantwortlich.
Der Anlagenersteller ist für die Gesamtanlage verantwortlich. Er muss
für die Einhaltung der einschlägigen Normen und Richtlinien (z.B. DIN
1986, EN 12050) sorgen. Er ist verantwortlich für die Erstellung der
technischen Dokumentation der Gesamtanlage, die der Anlage beigefügt
sein muss.
Das Symbol in der Steuerungsbeschreibung weist auf eine
mögliche Gefährdung hin, die im Detail in dieser Beschreibung
erklärt ist.
Installation, Betrieb und Bedienung der Steuerung entgegen dieser
Bedienungsanleitung oder der darin angegebenen technischen
Spezifikationen führt zu einer Gefährdung von Personen und erzeugt
einen Haftungs- und Gewährleistungsausschluss.
Nationale und lokale Vorschriften und Normen zur Installation sowie
Unfallverhütungsvorschriften der Berufsgenossenschaften sind zu
beachten.
Installations- und Wartungsarbeiten an der Toranlage dürfen nur von
hierfür geschulten Fachkräften durchgeführt werden.
Bei Arbeiten an der Toranlage ist diese grundsätzlich spannungsfrei zu
schalten.
Der Totmann-Betrieb einer Toranlage ist nur dann zulässig, wenn die
Toranlage von den Befehlsgeräten aus eingesehen werden kann.
60
SEHR GEEHRTER KUNDE !
Sie haben sich für ein technisch hochwertiges Produkt entschieden.
DEUTSCH
ANTRIEBSSTEUERUNG - TM1T
Bei der Herstellung haben wir größtmögliche Sorgfalt walten lassen, um
diese Steuerung in einem einwandfreien Zustand zu versenden. Sollten
Sie trotzdem Anlass zur Beanstandung haben, so senden Sie bitte die
Steuerung, mit Angabe einer Kurzen Fehlerbeschreibung, direkt an unser
Werk.
Der Garantieumfang bezieht sich lediglich auf die kostenfreie
Beseitigung von Funktionsfehlern am Gerät, die nachweisbar auf
Produktions- bzw. Materialfehler zurückzuführen sind, inklusive der
dazu benötigten Ersatzteile.
Bitte lesen Sie erst diese Gebrauchsanweisung sorgfältig
durch, bevor Sie mit der Installation der Steuerung beginnen.
Wir sind von der Gewährleistung und Produkthaftung befreit, wenn ohne
unsere vorherige schriftliche Zustimmung eigene bauliche Veränderungen
vorgenommen werden oder unsachgemäße Installationen, gegen unsere
vorgegebenen Montagerichtlinien, ausgeführt bzw. veranlasst werden.
Der Anlagenersteller hat darauf zu achten, dass die EMV-Richtlinien,
Niederspannungsvorschriften, Maschinenrichtlinien und die
Bauproduktenrichtlinie eingehalten werden.
ACHTUNG !
Die Steuerung darf nicht im Ex- Bereich eingesetzt werden.
ACHTUNG !
Netzkabel an der Klemme X1 (L1, L2, L3) und an der
Klemme PE der Grundplatine anschließen.
Das Netzkabel muss bauseitig durch Schmelzsicherungen
3x 6 A bzw. 3x 10 A abgesichert sein.
Der Schmelzsicherungswert muss so gewählt sein, dass
der angeschlossene Antrieb im Blockierungsfall
die Sicherung auslöst.
61
DEUTSCH
ANTRIEBSSTEUERUNG - TM1T
BESCHREIBUNG
Steckleiste
für Module
Schraubklemme
Antenne
Einstelltaster AUF
Einstelltaster ZU
Steckleiste
Funk
Klemmleiste
Sicherheitselemente
Steckleiste
Bremsrelais
Steckleiste
3-fach-Taster
Steckklemme
Durchfahrtlichtschranke
Steckklemme
Endschalter
Steckleiste
Schlüsselschalter
Steckklemme
Befehlsgeräte
Steckklemme
Motor
Klemmleiste
Netz
Schraubklemme
PE
LED (grün)
Endschalter AB
leuchtet bei Fehler
LED (grün)
Endschalter AUF
leuchtet bei Fehler
62
LED (rot)
Sicherheitskreis STOP
bei Fehler aus
LED (rot)
Lichtschranke
bei Fehler aus
LED (grün)
Tor AB, leuchtet
bei Tasterbetätigung
LED (gelb)
Impuls, leuchtet
bei Tasterbetätigung
LED (grün)
Tor AUF, leuchtet
bei Tasterbetätigung
DEUTSCH
ANTRIEBSSTEUERUNG - TM1T
GERÄTEBESCHREIBUNG
BEDIENELEMENTE
Mit den im Deckel angebrachten Drucktasten wird das Tor in
Selbsthaltung bzw. Totmann AUF oder ZU gefahren. Fährt das Tor in
Selbsthaltung, kann das Tor jederzeit über die STOP Taste gestoppt
werden.
Für die Bedienung von außen sind zusätzliche Bedienelemente wie z.B.
Dreifachdrucktaster, anschließbar.
Ein innen, bzw. außen montierter Zugschalter (Deckenzugtaster) steuert
das Tor in der Funktion AUF-STOP-ZU (Nur bei Verwendung des Moduls
TM1C2).
Bei optional gestecktem Funkempfänger ist das Anhalten des Tores über
den Funk-Handsender immer möglich.
ANSCHLUSS NETZKABEL
An den Klemmen L1, L2, L3 und PE-Klemme
ist ein CEE-Stecker 16A angeschlossen.
Der Netzanschluss zur TM1T kann auch mit
optionalem 3-Phasen Hauptschalter
erfolgen.
Hierbei wird der CEE- Stecker bei der
Montage entfernt.
PE
X1 L1 L2 L3
Zuleitung
CEE- Stecker 16A
X2 U V W
ANSCHLUSS 3-PHASEN ANTRIEB
Der 3-Phasen Antrieb wird an den Klemmen
U, V, W und PE angeschlossen. Für den
Fall, dass der Antrieb mit einem N-Leiter
ausgestattet ist, wird dieser an der
losen Klemme N der Netzleitung
angeschlossen.
Z.B. für eine Bremse die über einen
Gleichrichter an 230 V betrieben wird.
M
3~
Motor
PE
JUMPERBRÜCKEN
Bei der Grundsteuerung ist auf den Steckern X11 (Pin 5/6), X3A(Pin 1/2)
und X3B (Pin 1/2) ein Jumper aufgesteckt.
63
DEUTSCH
ANTRIEBSSTEUERUNG - TM1T
DREHRICHTUNGSKONTROLLE
Nach dem Anschluss des Antriebs muss mit den Tasten AUF und ZU die
Drehrichtung im Totmann-Betrieb überprüft werden.
Entspricht die Laufrichtung nicht der Pfeilrichtung der gedrückten
Taste, muss der CEE-Stecker gezogen werden und die Anschlüsse U und V
getauscht werden (Phasenwender).
Achtung Endschalter beachten!
ANSCHLUSS DER ENDSCHALTER
Bei der TM1T werden die beiden Endschalter AUF und ZU als
potentialfreie Kontakte an den Klemme J20 und J19 des Klemmenblocks X5
angeschlossen. Der Sicherheitskreis mit den integrierten
Sicherheitsendschaltern wird an der Klemme J22 des Klemmenblocks X5
angeschlossen.
Bei der TM1T ist es möglich einen zweiten Zusatz- Endschalter für die
Aufrichtung anzuschließen (J26 X4B) und dann über einen
Positionsschalter auf dem Gehäusedeckel (Optional) der TM1T zwischen
zwei unterschiedlichen AUF Positionen zu wählen (Sommer- / WinterUmschaltung).
Die Einstellungen der Endschalter sind in Totmannbetrieb vorzunehmen!
ES-AB
SKS
STOP
o.DW Halb AUF
X4b
ES-AUF
Vor-ES
Thermo
Nothandkurbel
-
+
B
J25
5 6
J26
7 8
A
EShalbe Höhe
X5
J22
J21
J20
J19
Thermo Vorend STOP
STOP
ZU Ganz AUF ZU
J32
J33
12V DC RS485
Für den Betrieb mit EES (Elektronischer Endschalter - Optional) sind
die Module TM1C2 und TM1C4 unbedingt erforderlich. Die Beschreibung der
Endschaltereinstellung und -programmierung ist der Betriebsanleitung
des Moduls TM1C4 zu entnehmen.
AUTOMATISCHER ZULAUF
(Optional, nur mit Modul TM1C2)
Die Funktion automatischer Zulauf wird an dem Positionsdrehschalter
eingestellt.
64
Ist die Funktion Automatischer Zulauf aktiviert, fährt das Tor aus der
Endlage nach der am Drehschalter eingestellten Zeit wieder zu. Durch
betätigen der Stopp- Taste oder einer Sicherheitseinrichtung wird der
automatische Zulauf gesperrt.
ANSCHLUSS EINER OPTOELEKTRONISCHEN SCHALTLEISTE
(Optional, nur mit Modul TM1C2)
Anschluss an der 3-poligen Klemme
auf dem Modul TM1C2
+12V SIG 0V
Grün
Weiß
Optoelektronische
Schaltleiste OSE
Braun
Eine Optoelektronische
Sicherheitsleiste ist so aufgebaut,
dass über die gesamte Länge beim
Betätigen der Schaltleiste ein
Lichtstrahl unterbrochen wird.
Damit die Sicherheitsleiste über
die gesamte Länge kontrolliert
werden kann, muss hier am Ende der
Schaltleiste ein Empfänger
angeschlossen werden.
DEUTSCH
ANTRIEBSSTEUERUNG - TM1T
Sender
Für den Fall, dass die Schaltleiste
auf den Boden aufgepresst werden
soll, wird die Reversierfunktion
durch Anschließen eines
Vorendschalters (Zusatzendschalter
Vor-ES) an der Klemme J21 des
Klemmenblocks X5 neutralisiert.
Hierzu wird der Vorendschalter 5 cm
über dem Boden eingestellt.
Empfänger
Braun
Grün
weiß
ANSCHLUSS DER BEFEHLSGEBER AUF, STOP, ZU
Für die Bedienung von außen kann an der TM1T ein 3-fach-Taster am
Klemmenblock X3 angeschlossen werden. Die beiden Taster für AUF und ZU
sind hierbei als Schließer auszuführen.
Da der STOP-Taster im Sicherheitskreis verschaltet ist, muss er als
Öffner angeschlossen werden.
Bei Anschluss eines Stop-Tasters am Klemmenblock X3 die Brücke auf Klemme J9
entfernen und den STOP-Taster (Öffner) anschließen!
Anschluss der Bedienelemente
AUF, STOP, AB und IMPULS
Schloss STOP
J8
J9
AUF
J10
Imp
J11
ZU
J12
X3 1 2 3 4 5 6 7 8 9 10
Anschluss eines Schlüsselschalters
Schloss STOP
J8
J9
AUF
J10
Imp
J11
ZU
J12
X3 1 2 3 4 5 6 7 8 9 10
Anschluss 3-fach Taster mit 4-adrigem Kabel
Schloss STOP
J8
J9
AUF
J10
Imp
J11
ZU
J12
X3 1 2 3 4 5 6 7 8 9 10
65
DEUTSCH
ANTRIEBSSTEUERUNG - TM1T
ANSCHLUSS EINER SICHERHEITSLEISTE MIT 8,2 kOhm
(Optional, nur mit Modul TM1C2)
An der TM1T kann direkt eine elektrische bzw. eine
pneumatischelektrische Sicherheitsleiste angeschlossen werden.
Die Auswertelogik für die Schaltleiste ist bereits im Modul TM1C2
integriert. Um den gesamten elektrischen Kreis der Sicherheitsleiste
überwachen zu können muss die Schaltleiste mit einem Widerstand
(8,2 kOhm) abgeschlossen werden.
Der Zusatzendschalter Vorend-ZU wird so eingestellt, dass das
zulaufende Tor den Endschalter 5 cm über dem Boden betätigt.
Der Anschluss der Schaltleiste erfolgt an der Klemme J25 des Klemmenblocks X4b!
ACHTUNG !
Stellung der Jumper auf dem Modul TM1C2 beachten!
ANSCHLUSS DER FUNKTIONSLICHTSCHRANKE
(Optional, nur mit Modul TM1C2)
An der TM1T kann direkt eine Lichtschranke (am Klemmenblock X4a) zur
Durchfahrtabsicherung angeschlossen werden. Wird der Infrarotstrahl der
Lichtschranke in der ZU Bewegung des Tores unterbrochen, so stoppt das
Tor und reversiert in die obere Endlage.
ACHTUNG:
Bei einer Einweg Lichtschranke mit nur drei Anschlussklemmpunkten ist der
Schaltkontakt und die Plusseite der Lichtschrankenelektronik an der Klemme J24/3
mit dem Pluspotential verbunden.
Bei Anschluss der Lichtschranke Brücke von J24 Klemmenblock X4a entfernen!
J23
Foto
J24
1
3
S
4
Foto
J24
1
3
2
4
E
S=Sender
E=Empfänger
66
J23
Sicherheitslichtschranke
Spannungsversorgung
24V DC
Kontakt
(öffner)
2
Anschluss
Reflektionslichtschranke
X4a
X4a
Anschluss Sender- und
Empfängerlichtschranke
Anschluss von direkten Sicherheitsschaltern
Sicherheitselemente die direkt in den Steuerungsablauf
eingreifen, werden an der Klemme J6 am Klemmenblock X2
angeschlossen. Hierzu zählen NOT-AUS bzw. Fangvorrichtung,
Einzugsicherung und die Schlupftürabsicherung.
DEUTSCH
ANTRIEBSSTEUERUNG - TM1T
ANSCHLUSS SCHLUPFTÜRABSICHERUNG
(Optional, nur mit Modul TM1C2)
Bei Toren mit einer eingebauten Schlupftür wird der Sicherheitsschalter
an der Klemme J6 am Klemmenblock X2 angeschlossen.
Schlaffseilschalter/
Federbruchsicherung
oder Abrollsicherung
Achtung! Brücken entfernen (J6)!
X2
U
V
W
B1 B2
J1
J6
ANSCHLUSS DES BEFEHLSGEBERS ZUGTASTER
(Optional, nur mit Modul TM1C2)
Bei der Steuerung TM1T kann an der Klemme J11 des Klemmblocks X3 ein
Deckenzugtaster (Schließerkontakt) angeschlossen werden, die Funktion
dieses Eingangs entspricht einer Folgesteuerung ZU-STOP-AUF-STOP.
Schloss STOP
J8
J9
AUF
J10
Imp
J11
ZU
J12
Zugtaster
X3 1 2 3 4 5 6 7 8 9 10
67
DEUTSCH
ANTRIEBSSTEUERUNG - TM1T
FUNKFERNSTEUERUNG
Auf der Steuerung TM1T befindet sich ein Steckplatz (X9) für einen 1Kanal Funkempfänger. Weiteres siehe Bedienungsanleitung Empfänger und
Handsender EK1-433/EK1-868.
LEGENDE
68
S2
S1
J1
SW1
SW2
J26
J20
J22
J19
J21
J8
J6
J9
J10
J11
J12
J24
J25
J26
T1
X1
X2
X3
X3A
X3B
X4a
X4b
X5
X8a
X8b
X9
X11
Hauptschütz
Schütz ZU/AUF
Motor
Einstelltaster AUF
Einstelltaster ZU
Zusatzendschalter AUF (Halbe Öffnungshöhe)
Endschalter AUF (Öffner)
Sicherheitskreis (Öffner)
Endschalter ZU (Öffner)
Zusatzendschalter ZU (Vorendschalter)
Not-Aus (Öffner)
Schlupftürkontakt (Öffner) / Einzugsicherung
Taster STOP (Öffner)
Taster AUF (Schließer)
Taster Impuls (Schließer)
Taster ZU (Schließer)
Durchfahrt Lichtschranke (Öffner)
Schließkantensicherung
Endschalter HALB AUF (Öffner)
Transformator
Klemmleiste Netz
Steckklemme Motor
Steckklemme Befehlsgeräte
Steckleiste für Schlüsselschalter
Steckleiste für 3-fach-Taster
Steckklemme Durchfahrtlichtschranke
Steckklemme Sicherheitselemente
Steckklemme Endschalter
Steckleiste für Steckmodule (20-polig)
Steckleiste für Steckmodule (10-polig)
Steckleiste für Funkempfänger
Steckleiste für Bremsrelais
J1
V
W
X3
J9
3 4
F1
X5
J22
J21
J20
J19
J10
5 6
Trafo
J11
7 8
X3A
J12
9 10
+
J32
-
A
J33
B
Foto
J24
3 4
X8a
12V DC RS485
J23
1 2
X3B
ENDSCHALTER
Thermo Vorend STOP
STOP
ZU Ganz AUF ZU
SICHERUNG
T600mA
J8
1 2
J6
B1 B2
Vor-ES
J4
X1 L3 L2 L1
U
ES-AUF
PE PE PE
X2
Nothandkurbel
X11
J25
5 6
J26
7 8
FUNK
ANTENNE
X8b
SKS
STOP
o.DW Halb AUF
ZU
X4a
Thermo
ES-AB
X9
M1
SCHALTPLAN
DEUTSCH
ANTRIEBSSTEUERUNG - TM1T
AUF
ES-halbe Höhe
X4b
Kontaktleiste
Lichtschranke
ZU
IMPULS
AUF
STOP
Schloss
Schütz
380-415V
N/PE
69
DEUTSCH
ANTRIEBSSTEUERUNG - TM1T
TECHNISCHE DATEN
Modell
TM1T
Spannungsversorgung
3x400V AC 50Hz (6 bzw. 10A abgesichert)
Motoranschluss über Wendeschütz 2x3 NO Schützkontakte, 400V/max. 1,2kVA
70
Anschlussklemmen
1,5 mm² max.
Umgebungstemperatur
-20°C bis +60°C
Steuerspannung 24V DC
Absicherung sekundär 0,8A Träge
Schutzart
IP 65
Abmessung
255 x 120 x 180mm (BxHxT)
[TM1T wird von Mtec mbH (D) hergestellt und entspricht dem Modell: UST 1]
EG-HERSTELLERERKLÄRUNG
im Sinne der EG-Maschinenrichtlinie 98/37/EG Anhang II B
DEUTSCH
ANTRIEBSSTEUERUNG - TM1T
Der Hersteller:
Mtec Gesellschaft für Antriebssysteme mbH
Friethöfer Kamp 23
D-48727 Billerbeck
erklärt hiermit, dass das Produkt:
ANTRIEBSSTEUERUNG UST 1
folgenden EG-Richtlinien:
98/37/EG
Maschinenrichtlinie (ehemals 89/392/EWG)
89/336/EWG
EMV-Richtlinie (mit Änderungen 91/263/EWG, 92/31/EWG, 93/68/EWG)
73/23/EWG
Niederspannungsrichtlinie (mit Änderung 93/68/EWG)
und folgender Konformitätsprüfbescheinigung entspricht:
Nummer 78/781/551722 des TÜV Nord Anlagenbau / Systems
Insbesondere wurden die europäischen Normen/Normentwürfe angewandt:
EN 12445:2001
Nutzungssicherheit kraftbetätigter Tore; Prüfverfahren
EN 12453:2001
Nutzungssicherheit kraftbetätigter Tore; Anforderungen
prEN 12978:1997
Tore; Schutzeinrichtungen; Anforderungen und Prüfverfahren
EN 954-1:1996
Sicherheit von Maschinen; Sicherheitsbezogene Teile von Steuerungen
EN 60204-1:1997
Sicherheit von Maschinen; Elektrische Ausrüstung
EN 60335-1:1994
Sicherheit elektrischer Geräte; Allgemeine Anforderungen
HINWEIS:
Die Inbetriebnahme der Toranlage, in der diese Steuerung eingebaut
werden soll, ist so lange untersagt, bis festgestellt wurde, dass die
Toranlage den Bestimmungen der Richtlinie 98/37/EG entspricht.
Billerbeck, April 2005
(Ort, Datum)
(Unterschrift)
Peter Menke, Geschäftsführer
(Name und Funktion des Unterzeichners)
71
DEUTSCH
72
ANTRIEBSSTEUERUNG - TM1T
OPTIONALES ZUBEHÖR
TM1C1
TM1C1E
Modul für Selbsthaltung AUF
für mechanischen Endschalter
Modul für Selbsthaltung AUF
für digitalen Endschalter
TM1C2
TM1C3
Modul für den Anschluss einer
DW-Leiste, einer SKS 8.2 kOhm
oder einer OSE-Leiste mit
automatischem Zulauf und Funk
(mit Zusatzmodul Ek1)
Modul für Gegenverkehrssteuerung und Testung
Einzugslichtschranken
TM1C4
TM1C5
Modul für den Anschluss eines
digitalen Endschalters mit
Rotvorlauf und zwei
potentialfreien Kontakten
Servicemodul zur Anzeige und
Einstellungen von Torzyklen
EK1-433 | EK1-868
FSK433 | FSK868
433 oder 868 MHz Funkempfänger AM
Handsender für den 433 oder
868 MHz Funkempfänger AM
DEUTSCH
NOTIZEN
73
DEUTSCH
ANTRIEBSSTEUERUNG - TM1T
Urheberrechtlich geschützt.
Nachdruck, auch auszugsweise, nur mit unserer Genehmigung.
Änderungen, die dem technischen Fortschritt dienen, vorbehalten.
Headquarter
Nice worldwide
Nice SpA
Oderzo TV Italia
Tel. +39.0422.85.38.38
Fax +39.0422.85.35.85
[email protected]
Nice France
Buchelay
Tel. +33.(0)1.30.33.95.95
Fax +33.(0)1.30.33.95.96
[email protected]
Nice in Italy
Nice Padova
Sarmeola di Rubano PD Italia
Tel. +39.049.89.78.93.2
Fax +39.049.89.73.85.2
[email protected]
Nice Roma
Roma Italia
Tel. +39.06.72.67.17.61
Fax +39.06.72.67.55.20
[email protected]
74
www.niceforyou.com
Nice Rhône-Alpes
Decines Charpieu France
Tel. +33.(0)4.78.26.56.53
Fax +33.(0)4.78.26.57.53
[email protected]
Nice España Madrid
Tel. +34.9.16.16.33.00
Fax +34.9.16.16.30.10
[email protected]
Nice Romania
Cluj Napoca
Tel/Fax +40.264.45.31.27
[email protected]
Nice España Barcelona
Tel. +34.9.35.88.34.32
Fax +34.9.35.88.42.49
[email protected]
Nice Deutschland
Gelnhausen-Hailer
Tel. +49.60.51.91.52-0
Fax +49.60.51.91.52-119
[email protected]
Nice Polska
Pruszków
Tel. +48.22.728.33.22
Fax +48.22.728.25.10
[email protected]
Nice France Sud
Aubagne France
Tel. +33.(0)4.42.62.42.52
Nice UK
Fax +33.(0)4.42.62.42.50
[email protected] Chesterfield
Tel. +44.87.07.55.30.10
Nice Belgium
Fax +44.87.07.55.30.11
Leuven (Heverlee)
[email protected]
Tel. +32.(0)16.38.69.00
Fax +32.(0)16.38.69.01
[email protected]
Nice China
Shanghai
Tel. +86.21.575.701.46
+86.21.575.701.45
Fax +86.21.575.701.44
[email protected]
Nice USA Inc.
Jacksonville, FI.
Tel. +001.904.786.7133
Fax +001.904.786.7640
[email protected]
ESPAÑOL
TM1T
Drive Control
Instrucciones y advertencias para el instalador
75
ESPAÑOL
76
MANDO DE ACCIONAMIENTO - TM1T
GENERALIDADES
El TM1T es un sistema de mando de puertas para puertas de enrollar y
seccionales con motores trifásicos o de una fase. Pueden conectarse
todos los elementos de seguridad habituales.
ESPAÑOL
MANDO DE ACCIONAMIENTO - TM1T
El equipamiento con diferentes tarjetas enchufables ofrece
posibilidades de aplicación adicionales.
Para la apertura o el cierre de una puerta se acciona la tecla
correspondiente del pulsador de tapa y/o exterior.
En el modo de servicio automático, la puerta también puede ser abierta
o cerrada por radio.
CARACTERÍSTICAS DE RENDIMIENTO
Características de rendimiento más importantes del TM1T:
4
4
4
manejo y ajuste sencillos
versión al abrigo de la intemperie (IP 65)
espacio de conexión grande para el cableado
Un nivel máximo de seguridad gracias a:
4
4
4
telecontrol por radio 433 MHz / 868 MHz (opcional)
conformidad con directivas y normas vigentes
posibilidad de conexión de complejos elementos de seguridad
USO DEBIDO
El mando de la puerta TM1T se presta para el control de puertas
industriales, como por ejemplo puertas seccionales, de enrollar,
plegadizas y de verja corrediza.
77
ESPAÑOL
MANDO DE ACCIONAMIENTO - TM1T
AVISOS DE SEGURIDAD
Si no se respetan los siguientes avisos de seguridad en el
montaje y la puesta en servicio, el confeccionador de la
instalación responderá en caso de daños personales y
materiales resultantes.
La empresa que confecciona la instalación es responsable de la
instalación entera. Debe velar por el cumplimiento de las normas y
directivas pertinentes (p. ej. DIN 1986, EN 12050). Es responsable de la
elaboración de la documentación técnica de la instalación entera que se
adjunta a la instalación.
El símbolo en la descripción de la unidad de mando
advierte sobre una posible amenaza que ha de describirse
detalladamente en estas instrucciones.
La instalación, la operación y el manejo del sistema de mando
contrarios a las presentes instrucciones de uso o a las
especificaciones técnicas indicadas induce a una amenaza para personas
y con ello a la exoneración de responsabilidad y garantía.
Deben respetarse las prescripciones y normas nacionales y locales para
la instalación así como las prescripciones de prevención de accidentes
de las mutuas profesionales.
Los trabajos de instalación y mantenimiento en el equipo de la puerta
sólo deben ser realizados por personal técnico instruido.
Antes de realizar trabajos en la instalación de la puerta, debe
desconectarse en principio la tensión.
El régimen de servicio de hombre muerto en una instalación de puerta
sólo es admisible si ésta puede ser vista desde los aparatos de mando.
78
¡MUY ESTIMADO CLIENTE!
Usted ha optado por un producto de elevada calidad técnica.
ESPAÑOL
MANDO DE ACCIONAMIENTO - TM1T
En su fabricación hemos sido sumamente meticulosos a fin de suministrar
esta unidad de mando en un estado impecable. Si, no obstante, hubiera
motivo de reclamación, sírvase enviar la unidad de mando, con una breve
descripción del defecto, directamente a nuestra fábrica.
El alcance de la garantía incluye sólo la eliminación gratuita de
fallas del funcionamiento en el aparato atribuibles en forma
demostrable a defectos de producción o de material, incluyendo las
piezas de repuesto requeridas.
Antes de comenzar con la instalación de la unidad de
mando debe leer atentamente estas instrucciones de uso.
Quedamos exonerados de toda prestación de garantía y responsabilidad de
productos si se realizaron o bien ordenaron modificaciones
constructivas o bien instalaciones indebidas sin nuestro consentimiento
escrito previo o bien en contra de nuestras directivas de montaje.
El confeccionador de la instalación debe velar por un cumplimiento de
las directivas CEM, las prescripciones de baja tensión, las directivas
de máquina y las directivas de productos constructivos.
¡ATENCIÓN!
La unidad de mando no debe emplearse en zonas explosivas.
¡ATENCIÓN!
Conectar el cable de la red al borne X1 (L1, L2, L3) y al
borne PE de la placa base.
El cable de la red debe ser protegida, por parte del
propietario, por fusibles 3 x 6 A ó 3 x 10 A.
El nivel del fusible debe elegirse de modo que en caso
de un bloqueo el accionamiento conectado dispare el fusible.
79
ESPAÑOL
MANDO DE ACCIONAMIENTO - TM1T
DESCRICPCIÓN
Regleta de enchufe
para módulos adicionales
Borne con rosca
Antena
Pulsador de
ajuste ABRIR
Pulsador de
ajuste CERRAR
Regleta de
enchufe Radio
Regleta de
bornes
Elementos de
seguridad
Regleta de
enchufe
Relé de freno
Regleta de
enchufe
Pulsador triple
Borne de
enchufe
Interruptor
de fin de
carrera
Borne de enchufe
Barrera de
luz de paso
Regleta de
enchufe
Interruptor
con llave
Borne de enchufe
Aparatos de mando
Borne de
enchufe Motor
Regleta de
fijación Red
Borne con rosca
PE
LED (verde)
Interruptor de fin
de carrera ABAJO
LED (verde)
Interruptor de fin
de carrera ARRIBA
se enciende en caso
de falla
80
LED (rojo)
Circuito de seguridad
STOP en caso de falla
LED (rojo) Barrera
de luz desconexión
en caso de falla
LED (verde)
Puerta ABAJO, se enciende
al accionar el pulsador
LED (amarillo)
Impulso, se enciende
al accionar el pulsador
LED (verde) Puerta
ARRIBA, se enciende al
accionar el pulsador
DESCRIPCIÓN DEL APARATO
ELEMENTOS DE MANDO
ESPAÑOL
MANDO DE ACCIONAMIENTO - TM1T
Con los pulsadores incorporados en la tapa, la puerta se ABRE o CIERRA
en régimen de autoenclavamiento o de hombre muerto. Si la puerta se
abre y cierra en régimen de autoenclavamiento, podrá ser parada en todo
momento mediante la tecla STOP.
Para el mando desde el exterior puede conectarse elementos de mando
adicionales, como por ejemplo pulsadores triples.
Un interruptor de tirador montado en el interior y/o exterior (pulsador
de tirador de techo) controla la puerta en la función ABRIR - STOP CERRAR (sólo si se emplea el módulo adicional TM1C2).
En caso de un radiorreceptor enchufado opcionalmente es posible en todo
momento parar la puerta a través del radiotransmisor manual.
CONEXIÓN DEL CABLE DE LA RED
En los bornes L1, L2, L3 y el borne PE
está conectado una clavija CEE de 16A.
La conexión de red al TM1T también puede
efectuarse con interruptor general
trifásico opcional.
Entonces, se quita la clavija CEE en el
montaje.
PE
X1 L1 L2 L3
Cable de alimentación
Clavija CEE de 16A
X2 U V W
CONEXIÓN ACCIONAMIENTO TRIFÁSICO
El accionamiento trifásico se conecta en
los bornes U, V,W y PE. Para el caso de
que el accionamiento está dotado de
conductor N, éste es conectado al borne
suelto N del cable de red.
M
3~
P. ej. para un freno, accionado a través
de un rectificador en 230V.
Motor
PE
PUENTES JUMPER
En la unidad de mando básica se encuentra enchufado un jumper en las
clavijas X11 (pin 5/6), X3A (pin 1/2) y X3B (pin 1/2).
81
ESPAÑOL
MANDO DE ACCIONAMIENTO - TM1T
CONTROL DEL SENTIDO DE GIRO
Después de la conexión del accionamiento debe comprobarse con las
teclas ABRIR y CERRAR el sentido de giro en régimen de hombre muerto.
Si el sentido de marcha no corresponde a la dirección de flecha de la
tecla accionada, debe retirarse la clavija CEE, intercambiándose las
conexiones U y V (inversor de fase).
¡Atención! ¡Tenga en cuenta el interruptor de fin carrera!
CONEXIÓN DE LOS INTERRUPTORES DE FIN DE CARRERA
En el TM1T, los dos interruptores de fin de carrera ABRIR y CERRAR se
conectan como contactos libres de potencia al J20 y J19 del bloque de
bornes X5. El circuito de seguridad con los interruptores de fin de
carrera de seguridad integrados se conecta en el borne J22 del bloque
de bornes X5.
En el TM1T es posible conectar un segundo interruptor suplementario de
fin de carrera para la dirección de apertura (J26 X4B), eligiendo luego
a través de un conmutador de posición en la tapa del aparato (opcional)
del TM1T entre dos posiciones diferentes de ABRIR (conmutación verano /
invierno).
Manivela de
emergencia
FC = Interruptor
de fin de carrera
-
+
B
A
X5
J22
J21
Termo
Pre FC
CERRAR
J20
J19
STOP
STOP
ABRIR CERRAR
completo
J32
J33
12V DC
RS485
Seguro de
canto de STOP
cierre o ABRIR
pulsador mitad
X4b
FC ABRIR
Pre FC
Termo
FC CERRAR
¡Los ajustes de los interruptores de fin de carrera deben efectuarse en régimen de
hombre muerto!
J25
5 6
7
J26
8
Interruptor de
fin de carrera
media altura
Para el funcionamiento con EES (interruptor electrónico de fin de
carrera - opcional) se requieren imprescindiblemente los módulos
suplementarios TM1C2 y TM1C4. Vea las instrucciones de uso del módulo
suplementario TM1C4 por la descripción del ajuste y de la programación
de los interruptores de fin de carrera.
CIERRE AUTOMÁTICO
(opcional, sólo con módulo suplementario TM1C2)
La función de cierre automático se ajusta en el conmutador giratorio de
posición.
82
Si está activada la función de cierre automático, la puerta vuelva a
cerrar desde la posición final después del intervalo de tiempo ajustado
en el conmutador giratorio. Mediante accionamiento de la tecla Stop o de
un dispositivo de seguridad, el cierre automático queda bloqueado.
CONEXIÓN DE UNA REGLETA DE CONMUTACIÓN OPTOELECTRÓNICA
(opcional, sólo con módulo suplementario TM1C2)
Conexión en el borne de 3 polos
en el módulo suplementario TM1C2
verde
Para el caso de que la regleta de
conmutación debe apretarse en el
suelo, la función de reversión es
neutralizada mediante conexión de un
interruptor previo de fin de carrera
(interruptor adicional de fin de
carrera - interruptor previo de fin de
carrera) en el borne J21 del bloque de
bornes X5. Para ello, el interruptor
previo de fin de carrera se ajusta a
unos 5 cm encima del suelo.
blanco
+12V SIG 0V
marrón
La regleta optoelectrónica de
seguridad está diseñada de modo que
en el largo entero y al accionarse la
regleta de conmutación se interrumpe
un rayo de luz. Para que pueda
controlarse la regleta de seguridad
en el largo completo, debe conectarse
aquí, en el extremo de la regla de
conmutación, un receptor.
ESPAÑOL
MANDO DE ACCIONAMIENTO - TM1T
Regleta de conmutación
optoelectrónica OSE
Transmisor Receptor
marrón
verde
blanco
CONEXIÓN DEL TRANSMISOR DE MANDOS ABRIR, STOP, CERRAR
Para el manejo desde el exterior puede conectarse en el TM1T un pulsador
triple en el bloque de bornes X3. En este caso, los dos pulsadores para
ABRIR y CERRAR deben ejecutarse como contactos de cierre.
Puesto que el pulsador STOP está cableado en el circuito de seguridad,
debe ser conectado como contacto de apertura.
Al conectar un pulsador Stop en el bloque de bornes X3, ¡debe quitar el puente en
el borne J9 y el pulsador STOP (contacto de apertura)!
Conexión de los elementos de mando
ABRIR,STOP,CERRRA e IMPULSO
Cierre
J8
STOP
J9
ABRIR
J10
Imp
J11
CERRAR
J12
X3 1 2 3 4 5 6 7 8 9 10
Conexión de un interruptor de llave
Cierre
J8
STOP
J9
ABRIR
J10
Imp
J11
CERRAR
J12
X3 1 2 3 4 5 6 7 8 9 10
Conexión de un pulsador triple con cable de 4 conductores
Cierre
J8
STOP
J9
ABRIR
J10
Imp
J11
CERRAR
J12
X3 1 2 3 4 5 6 7 8 9 10
83
ESPAÑOL
MANDO DE ACCIONAMIENTO - TM1T
CONEXIÓN DE UNA REGLETA DE SEGURIDAD CON 8,2 kOhmios
(opcional, sólo con el módulo suplementario TM1C2)
En el TM1T puede conectarse directamente una regleta de seguridad
eléctrica o neumático-eléctrica.
La lógica de evaluación para la regleta de conexión ya se encuentra
integrada en el módulo suplementario TM1C2. Para poder vigilar el
circuito eléctrico entero de la regleta de seguridad, la regleta de
conmutación debe concluir con una resistencia (8,2 kOhmios).
El interruptor adicional de fin de carrera Interruptor previo de fin de
carrera "CERRAR" se ajusta de modo que la puerta que cierra acciona el
interruptor de fin de carrera a 5 cm por encima del suelo.
¡La conexión de la regleta de conmutación se realiza en el borne J25 del bloque de
bornes X4b!
¡ATENCIÓN! ¡Tenga en cuenta la posición de los
jumpers en el módulo suplementario TM1C2!
CONEXIÓN DE LA BARRERA DE LUZ FUNCIONAL
(opcional, sólo con módulo suplementario TM1C2)
En el TM1T puede conectarse directamente una barrera de luz (en el
bloque de bornes X4a) para el seguro de paso. Cuando se interrumpe el
rayo infrarrojo de la barrera de luz en el movimiento de CIERRE de la
puerta, ésta se detiene e invierte a la posición final superior.
ATENCIÓN:
En una barrera de luz de una dirección con sólo tres puntos de bornes de
conexión, está unido el contacto de conmutación y el lado positivo del equipo
electrónico de la barrera de luz en el borne J24/3 con el potencial positivo!
J23
Foto
J24
1
3
1
3
2
4
R
T = Transmisor
R = Receptor
84
Foto
J24
Tensión de
alimentación
24V DC
Contacto
(de apertura)
T
4
J23
Barrera de de
luz de seguridad
2
Conexión de la barrera
de luz de reflexión
X4a
X4a
Conexión de la barrera de
luz de transmisor y receptor
Conexión de interruptores de seguridad directos
Los elementos de seguridad que intervienen directamente en el
proceso de mando se conectan en el borne J6 en el bloque de
bornes X2. Éstos incluyen la PARADA DE EMERGENCIA o bien el
dispositivo de retención, el seguro contra arrastre y el seguro
de puertecilla supletoria.
ESPAÑOL
MANDO DE ACCIONAMIENTO - TM1T
CONEXIÓN DEL SEGURO DE PUERTECILLA SUPLETORIA
(opcional, sólo con módulo suplementario TM1C2)
En las puertas con puertecilla supletoria incorporada, el interruptor
de seguridad se conecta en el borne J6 en el bloque de bornes X2.
Interruptor para
cable flojo/
Protección contra
rotura de ballestas
o bien seguro de
desenrollado
¡Atención! ¡Quitar los puentes (J6)!
X2
U
V
W
B1 B2
J1
J6
CONEXIÓN DEL TRANSMISOR DE MANDOS DEL PULSADOR DE
TRACCIÓN
(opcional, sólo con módulo suplementario TM1C2)
En el mando TM1T puede conectarse en el borne J11 del bloque de bornes
X3 un pulsador de tracción de techo (contacto de cierre),
correspondiendo la función de esta entrada a un mando secuencial
CERRAR-STOP-ABRIR-STOP.
Cierre
J8
STOP
J9
ABRIR
J10
Imp
J11
CERRAR
J12
X3 1 2 3 4 5 6 7 8 9 10
Pulsador de tracción
85
ESPAÑOL
MANDO DE ACCIONAMIENTO - TM1T
TELECONTROL POR RADIO
En el mando TM1T se halla una ranura (X9) para un radiorreceptor de
1 canal. Por más información véanse las instrucciones de uso del
receptor y del transmisor manual EK1-433/EK1-868.
LEYENDA
S2
S1
J1
SW1
SW2
J26
J20
J22
J19
J21
J8
J6
J9
J10
J11
J12
J24
J25
J26
86
T1
X1
X2
X3
X3A
X3B
X4a
X4b
X5
X8a
X8b
X9
X11
Contactor principal
Contactor ABRIR/CERRAR
Motor
Pulsador de ajuste ABRIR
Pulsador de ajuste CERRAR
Interruptor de fin de carrera adicional ABRIR (media mitad de
apertura)
Interruptor de fin de carrera ABRIR (contacto de apertura)
Circuito de seguridad (contacto de apertura)
Interruptor de fin de carrera CERRAR (contacto de apertura)
Interruptor de fin de carrera adicional CERRAR (interruptor
previo de fin de carrera)
Parada de emergencia (contacto de apertura)
Contacto de puertecilla supletoria (contacto de apertura) /
seguro contra arrastre
Pulsador STOP (contacto de apertura)
Pulsador ABRIR (contacto de cierre)
Pulsador Impulso (contacto de cierre)
Pulsador CERRAR (contacto de cierre)
Paso barrera de luz (contacto de apertura)
Seguro de canto de cierre
Interruptor de fin de carrera MEDIO ABIERTO (contacto de
apertura)
Transformador
Regleta de bornes motor
Borne de enchufe motor
Borne de enchufe aparatos de mando
Regleta de enchufe para interruptor de llave
Regleta de enchufe para pulsador triple
Borne de enchufe barrera de luz de paso
Borne de enchufe elementos de seguridad
Borne de enchufe interruptor de fin de carrera
Regleta de enchufe para módulos enchufables (20 polos)
Regleta de enchufe para módulos enchufables (10 polos)
Regleta de enchufe para radiorreceptor
Regleta de enchufe para relé de freno
U
J1
V
W
X3
FC = Interruptor de fin de carrera
J9
3 4
F1
X5
J22
J20
J19
J32
+
J10
5 6
A
J33
B
completo
Pre FC STOP
STOP 12V DC RS485
CERRAR ABRIR CERRAR
J21
-
Transformador
J11
7 8
X3A
J12
9 10
J23
1 2
X3B
Seguro de canto
de cierre
Foto o pulsador
J25
J24
3 4
5 6
X8a
Interruptor de fin de carrera
Termo
FUSIBLE
T600mA
J8
1 2
J6
B1 B2
Pre FC
J4
X1 L3 L2 L1
PE PE PE
X2
Manivela de
emergencia
Termo
FC ABRIR
X4a
CERRAR
X4b
FC CERRAR
J26
7 8
STOP
ABRIR
mitad
X11
ANTENA
X8b
RADIO
X9
M1
ESQUEMA DE CONEXIONES
ESPAÑOL
MANDO DE ACCIONAMIENTO - TM1T
ABRIR
FC media altura
Regleta de
fijación Red
Barrera de luz
CERRAR
IMPULSO
ABRIR
STOP
Cierre
Contactor
380-415V
N/PE
87
ESPAÑOL
MANDO DE ACCIONAMIENTO - TM1T
DATOS TÉCNICOS
Modelo
TM1T
Alimentación de tensión
3x400V AC 50Hz (6 ó 10A protegidos)
Conexión del motor vía contactor 2x3 NO contactores protectores NO,
inversor
400V/máx. 1,2kVA
88
Bornes de conexión
1,5 mm² máx.
Temperatura ambiente
-20°C hasta +60°C
Tensión de mando 24V DC
Fusible secundario 0,8 A inerte
Grado de protección
IP 65
Dimensiones
255 x 120 x 180mm (an x al x pr)
[TM1T es produco de Mtec mbh (D) y es identico al que corresponde modelo: UST 1]
DECLARACIÓN CE DE FABRICANTE
en el sentido de la directiva de máquinas CE 98/37/CE Anexo II B
ESPAÑOL
MANDO DE ACCIONAMIENTO - TM1T
El fabricante:
Mtec Gesellschaft für Antriebssysteme mbH
Friethöfer Kamp 23
D-48727 Billerbeck
declara por la presente que el producto:
MANDO DE ACCIONAMIENTO UST 1
satisface las siguientes directivas CE:
98/37/CE
Directiva de máquinas (antes 89/392/CEE)
89/336/CEE
Directiva de CEM (con cambios 91/263/CEE, 92/31/CEE, 93/68/CEE)
73/23/CEE
Directiva de baja tensión (con cambio 93/68/CEE)
y el siguiente certificado de comprobación de conformidad:
Número 78/781/551722 de TÜV Nord Anlagenbau / Systems
Se aplicaron, especialmente, las siguientes normas/borradores de normas:
EN 12445:2001
Seguridad de uso de puertas accionadas por fuerza; procedimiento de ensayo
EN 12453:2001
Seguridad de uso de puertas accionadas por fuerza; requerimientos
prEN 12978:1997
Puerta; dispositivos protectores; requerimientos
EN 954-1:1996
Seguridad de máquinas; piezas de mandos importantes para la seguridad
EN 60204-1:1997
Seguridad de máquinas; equipamiento eléctrico
EN 60335-1:1994
Seguridad de aparatos eléctricos; exigencias generales
AVISO:
La puesta en servicio de la instalación de puerta en la que debe
montarse este mando, queda prohibida hasta que no se haya
comprobado que satisface las disposiciones de la Directiva 98/37/CE.
Billerbeck, Abril 2005
(Lugar y fecha)
(Firma)
Peter Menke, Administrador
(Nombre y función del firmante)
89
ESPAÑOL
90
MANDO DE ACCIONAMIENTO - TM1T
ACCESORIOS OPCIONALES
TM1C1
TM1C1E
Módulo para autoenclavamiento
ABRIR
Módulo para autoenclavamiento
ABRIR
Interruptor electrónico de fin
de carrera
TM1C2
TM1C3
Módulo para la conexión a una
regleta de pulsadores (DW), un
seguro de canto de cierre de
8,2 kOhm o una regleta OSE
Módulo para control de tráfico
en sentido contrario
TM1C4
TM1C5
Módulo para la conexión de un
interruptor electrónico de fin
de carera
Módulo para indicación de
servicio
EK1-433 | EK1-868
FSK433 | FSK868
Radiorreceptor AM de 433 ó 868 MHz
Transmisor manual para el
radiorreceptor AM de 433 ó 868
MHz
ESPAÑOL
APUNTES
91
ESPAÑOL
MANDO DE ACCIONAMIENTO - TM1T
Propiedad intelectual.
Reimpresión, aunque se trate sólo de extractos, sólo con nuestro permiso.
Sujeto a modificaciones en función del progreso técnico.
Headquarter
Nice worldwide
Nice SpA
Oderzo TV Italia
Tel. +39.0422.85.38.38
Fax +39.0422.85.35.85
[email protected]
Nice France
Buchelay
Tel. +33.(0)1.30.33.95.95
Fax +33.(0)1.30.33.95.96
[email protected]
Nice in Italy
Nice Padova
Sarmeola di Rubano PD Italia
Tel. +39.049.89.78.93.2
Fax +39.049.89.73.85.2
[email protected]
Nice Roma
Roma Italia
Tel. +39.06.72.67.17.61
Fax +39.06.72.67.55.20
[email protected]
92
www.niceforyou.com
Nice Rhône-Alpes
Decines Charpieu France
Tel. +33.(0)4.78.26.56.53
Fax +33.(0)4.78.26.57.53
[email protected]
Nice España Madrid
Tel. +34.9.16.16.33.00
Fax +34.9.16.16.30.10
[email protected]
Nice Romania
Cluj Napoca
Tel/Fax +40.264.45.31.27
[email protected]
Nice España Barcelona
Tel. +34.9.35.88.34.32
Fax +34.9.35.88.42.49
[email protected]
Nice Deutschland
Gelnhausen-Hailer
Tel. +49.60.51.91.52-0
Fax +49.60.51.91.52-119
[email protected]
Nice Polska
Pruszków
Tel. +48.22.728.33.22
Fax +48.22.728.25.10
[email protected]
Nice France Sud
Aubagne France
Tel. +33.(0)4.42.62.42.52
Nice UK
Fax +33.(0)4.42.62.42.50
[email protected] Chesterfield
Tel. +44.87.07.55.30.10
Nice Belgium
Fax +44.87.07.55.30.11
Leuven (Heverlee)
[email protected]
Tel. +32.(0)16.38.69.00
Fax +32.(0)16.38.69.01
[email protected]
Nice China
Shanghai
Tel. +86.21.575.701.46
+86.21.575.701.45
Fax +86.21.575.701.44
[email protected]
Nice USA Inc.
Jacksonville, FI.
Tel. +001.904.786.7133
Fax +001.904.786.7640
[email protected]
POLSKI
TM1T
Drive Control
Instrukcje i uwagi dla instalatora
93
POLSKI
94
STEROWANIE NAPĘDU - TM1T
INFORMACJE OGÓLNE
POLSKI
STEROWANIE NAPĘDU - TM1T
TM1T jest uniwersalnym sterowaniem dla bram zwijanych i sekcyjnych z
silnikami 3- lub 1- fazowymi. Wszelkie powszechnie stosowane
zabezpieczenia mogą zostać przyłączone.
Dodatkowe możliwości zastosowania są zrealizowane poprzez zamontowanie
różnych modułów dodatkowych ze złączami wtykowymi.
Aby otworzyć lub zamknąć bramę należy jedynie nacisnąć odpowiedni
przycisk dot. całej strony pokrywy wzgl. przycisk zewnętrzny.
W ruchu automatycznym brama może być otwierana i zamykana także przez
sygnał radiowy.
CECHY CHARAKTERYSTYCZNE
Najważniejszymi cechami charakteryzującymi TM1T są:
4
4
4
łatwa obsługa i programowanie
obudowa wykonana według standardu ochrony przed wpływami
atmosferycznymi (IP 65)
duża komora zacisków dla okablowania
Najwyższy stopień bezpieczeństwa zapewnia:
4
4
4
zdalne sterowanie radiowe 433 MHz / 868 MHz (opcjonalne)
zgodne z obowiązującym dyrektywami i normami
możliwość podłączenia wielu różnych elementów
zabezpieczających
ZASTOSOWANIE ZGODNE Z PRZEZNACZENIEM
Sterowanie bram TM1T nadaje się do sterowania bram sekcyjnych,
zwijanych, składanych i kratowo-toczących, przenaczonych do obiektów
przemysłowych.
95
POLSKI
STEROWANIE NAPĘDU - TM1T
PRZEPISY BEZPIECZEŃSTWA PRACY
Brak przestrzegania niżej wymienionych przepisów
bezpieczeństwa pracy zwalnia producenta od wszelkiej
odpowiedzialności za wynikające z tego wypadki z udziałem
osób oraz za szkody materialne.
Producent bramy przemysłowej jest odpowiedzialny za działanie
kompletnego wyrobu. W jego gestii leży zapewnienie przestrzegania
właściwych norm i dyrektyw (np. DIN 1986, EN 12050). Do jego zakresu
odpowiedzialności należy sporządzenie dokumentacji technicznej dla
całego urządzenia, która musi być dołączona do urządzenia.
Ten symbol w opisie sterowania wskazuje na możliwość
wystąpienia zagrożenia, które jest szczegółowo wyjaśnione
w tym opisie.
Instalacja, eksploatacja i obsługa sterowania niezgodna z niniejszą
instrukcją obsługi lub podanymi w niej technicznymi specyfikacjami
prowadzi do zagrożenia osób i do wykluczenia odpowiedzialności i utraty
prawa do roszczeń z tytułu gwarancji.
Przestrzegać przepisów i norm instalacyjnych obowiązujących w danym
kraju oraz lokalnie, a także przepisów bezpieczeństwa pracy wydanych
przez branżowe związki zawodowe.
Wykonanie czynności instalacyjnych i konserwacyjnych przy bramach
przemysłowych należy powierzać tylko odpowiednio wyszkolonym
pracownikom.
Wykonywanie robót przy bramach przemysłowych jest generalnie dozwolone
tylko po odłączeniu zasilania elektrycznego.
Uruchomienie bramy za pomocą przycisk dot. całej stronya samopowrotnego
jest tylko wtedy dozwolone, gdy brama jest widoczna z miejsca
zainstalowania tego elementu sterującego.
96
SZANOWNY UŻYTKOWNIKU!
POLSKI
STEROWANIE NAPĘDU - TM1T
Państwo zdecydowali się na zakup technicznie wysokojakościowego
produktu.
Wytworzono go z możliwie najwyższą starannością tak, aby Państwa
urządzenie sterownicze w chwili wysyłki było w nienagannym stanie.
Jeżeli mimo to mają Państwo podstawy do reklamacji, to prosimy o
odesłanie sterownika bezpośrednio do naszego zakładu, z podaniem
krótkiego opisu występującej usterki.
Zakres gwarancji rozciąga się jedynie na bezpłatne usunięcie błędów w
funkcjonowaniu sprzętu, które wynikają jednoznacznie z błędów
produkcyjnych wzgl. wad materiałowych, włącznie z niezbędnymi częściami
zapasowymi.
Prosimy o dokładne przeczytanie instrukcji użytkowania,
przed przystąpieniem do instalowania sterowania.
Prawo do roszczeń z tytułu udzielonej gwarancji i odpowiedzialności za
produkt wygasa, gdy bez naszej wcześniejszej pisemnej zgody zostaną
przeprowadzane samowolne przeróbki lub nastąpi wadliwe zainstalowanie,
niezgodne z naszymi przepisami montażowymi.
Producent bram przemysłowych musi zapewnić przestrzeganie dyrektyw
dotyczących: kompatybilności elektromagnetycznej; sprzętu
niskonapięciowego; budowy maszyn i dyrektywy dotyczącej wyrobów dla
budownictwa.
UWAGA!
Sterowania nie wolno użytkować w obszarach zagrożenia
wybuchowego
wybuchowego..
UWAGA!
Kabel sieciowy podłączyć do listwy zacisków X1 (L1, L2, L3) i
zacisku PE podstawowej płytki obwodu drukowanego.
Do zadań Inwestora należy zabezpieczenie kabla sieciowego
bezpiecznikami to
pikowymi 3x 6A wzgl. 3x 10A.
topikowymi
Wartość nominalna bezpieczników topikowych musi być tak
dobrana, żeby zablokowanie podłączonego napędu
spowodowało wyzwolenie bezpiecznika
bezpiecznika..
97
POLSKI
STEROWANIE NAPĘDU - TM1T
OPIS
Listwa wtykowa dla
modułów dodatkowych
strony ustalający
dot. całej strony ustalający
Zacisk przycisk
śrubowy dot. całej przycisk
DO GÓRY
NA DÓŁ
dla anteny
Listwa wtykowa
sterowania falami
Listwa zaciskowa
elementów
bezpieczeństwa
Listwa wtykowa
przekaźnika
hamulcowego
Listwa wtykowa
dla zespołu
3 przycisk dot. całej stronyy
zacisk dot. całej strony
bramki
fotokomórkowej
przejazdu
Listwa wtykowa
wyłącznika
krańcowego
Listwa wtykowa
wyłącznika
z kluczem
Zacisk wciskowy
urządzeń
sygnałów
sterujących
Listwa wtykowa
silnika
Listwa zaciskowa
sieci
Zacisk skręcany
PE
LED (zielona)
wyłącznik krańcowy NA DÓŁ
świeci w przypadku usterki
LED (czerwona)
bramka fotokomórkowa
wyłączona w
przypadku usterki
LED (zielona)
opuszczanie bramy na dół
świeci
po
naciśnięciu
przycisk
dot.
całej stronya
LED (zielona)
wyłącznik krańcowy DO GÓRY
LED (żółta)
świeci w przypadku usterki
impuls świeci po
naciśnięciu przycisk dot. całej stronya
98
LED (zielona)
LED (czerwona)
podnoszenie bramy
obwód zabezpieczający STOP
DO GÓRY świeci po
wyłączona w przypadku usterki
naciśnięciu przycisk dot. całej stronya
POLSKI
STEROWANIE NAPĘDU - TM1T
OPIS URZĄDZEŃ
ELEMENTY OBSŁUGOWE
Za pomocą przycisk dot. całej stronyy umieszczonych w pokrywie, brama
jest poruszana DO GÓRY lub NA DÓŁ w układzie samopodtrzymującym lub
podtrzymywania ręcznego za pomocą przycisk dot. całej stronya
samopowrotnego. Podczas ruchu bramy w układzie samopodtrzymującym, może
ona zostać natychmiast zatrzymana przez naciśnięcie przycisk dot. całej
stronya STOP.
W celu obsługi z zewnątrz możliwe jest podłączenie dodatkowych
elementów jak np. zespół 3 przełączników przycisk dot. całej
stronyowych.
Wewnętrznie wzgl. zewnętrznie zamontowany wyłącznik krańcowy górny
steruje bramą w funkcji DO GÓRY - STOP - NA DÓŁ; (tylko przy użyciu
modułu dodatkowego TM1C2).
Przy opcjonalnie zamontowanym odbiorniku fal radiowych możliwe jest w
każdej chwili zatrzymanie bramy pilotem zdalnego sterowania.
PODŁĄCZENIE KABLA SIECIOWEGO
Na zaciskach Ll, L2, L3 i zacisku PE
przyłączona jest wtyczka 16 A zgodna ze
standardem CEE.
PE
X1 L1 L2 L3
Przyłączenie TM1T do sieci może być
zrealizowane także za pomocą opcjonalnego
3- fazowego wyłącznika głównego.
W tym przypadku wtyczka CEE zostanie w
czasie montażu usunięta.
przewód zasilania
z wtyczką 16A CEE
X2 U V W
PODŁĄCZENIE ZASILANIA 3-FAZOWEGO
Zasilanie 3- fazowe podłączane jest na
zaciskach U, V, W i PE. Jeżeli zasilanie
wyposażone jest w przewód N, zostanie on
przyłączony do wolnego zacisku N
zasilania sieciowego.
Przykład hamulca uruchamianego poprzez
podłączenie do prostownika o napięciu
230V.
M
3~
Silnik
PE
MOSTKI
W przypadku sterowania podstawowego, na wtyczkach X11 (końcówka 5/6),
X3A (końcówka 1/2) i X3B (końcówka 1/2) założony jest mostek.
99
POLSKI
STEROWANIE NAPĘDU - TM1T
KONTROLA KIERUNKU OBROTÓW
Po podłączeniu zasilania należy sprawdzić przycisk dot. całej stronyami
DO GÓRY i NA DÓŁ kierunek obrotów przy uruchomienia za pomocą przycisk
dot. całej stronya samopowrotnego.
Jeżeli kierunek ruchu nie jest zgodny z kierunkiem strzałki
naciśniętego przycisk dot. całej stronya, to należy wyciągnąć wtyczkę
CEE i zamienić przyłącza U i V (zmieniacz fazy).
Uwaga, zważać na wyłącznik krańcowy
krańcowy!
PODŁĄCZENIE WYŁĄCZNIKA KRAŃCOWEGO
Obydwa wyłączniki krańcowe DO GÓRY i NA DÓŁ sterowania TM1T są podłączone
jako styki bezpotencjałowe do zacisku J20 i J19 bloku zacisków X5. Obwód
zabezpieczający ze zintegrowanymi zabezpieczającymi wyłącznikami
krańcowymi jest podłączony do zacisku J22 bloku zacisków X5.
Przy TM1T możliwe jest również przyłączenie drugiego dodatkowego
wyłącznika krańcowego dla funkcji podnoszenia (J26 X4B) aby następnie
poprzez wyłącznik pozycyjny na pokrywie oprawy (opcjonalny) TM1T móc
wybrać pomiędzy dwoma różnymi pozycjami DO GÓRY (przełączanie na sezon
letni/zimowy).
Ustawianie wyłączników krańcowych przeprowadzać tylko przez naciskanie przycisk
dot. całej stronya samopowrotnego!
X4b
Ręczna korba
awaryjna
WK-NA DÓŁ
WK-DO GÓRY
Przed-WK
Czujnik
termiczny
-
+
B
A
X5
J22
J21
J20
J19
Czujnik
Przed
STOP
STOP
termiczny NA DÓŁ Całkowicie NA DÓŁ
DO GÓRY
J32
J33
12V DC
RS485
SKS
lub
DW
STOP
Połowa
DO GÓRY
J25
5 6
J26
7 8
Wyłącznik
krańcowy
(WK)
w połowie
wysokości
Dla eksploatacji z EES (elektroniczny wyłącznik krańcowy - opcjonalny)
bezwzględnie konieczne są moduły dodatkowe TM1C2 i TM1C4. Opis
ustawienia i programowania wyłącznika krańcowego znajduje się w
instrukcji obsługi modułu dodatkowego TM1C4.
AUTOMATYCZNE ZAMYKANIE
(Opcjonalne, tylko z modułem dodatkowym TM1C2)
Funkcja automatycznego zamykania jest ustawiana przez pozycję na
przełączniku obrotowym.
Jeśli funkcja automatycznego zamykania jest aktywowana, to brama zamyka
się z położenia krańcowego po upływie czasu nastawionego na
przełączniku obrotowym. Przez uruchomienie przycisk dot. całej stronya
100 Stop lub poprzez obwód zabezpieczający, zamykanie ulega automatycznemu
zablokowaniu.
PODŁĄCZENIE OPTYCZNO-ELEKTRONICZNEJ LISTWY WŁĄCZAJĄCEJ
(Opcjonalne, tylko z modułem dodatkowym TM1C2)
+12V SIG 0V
Optyczno-elektroniczna
listwa przełączająca OSE
biały
zielony
Jeżeli wymagane jest dociśnięcie listwy
włączającej do podłoża, to funkcja
odwracania kierunku ruchu zostanie
zneutralizowana poprzez zainstalowanie
wstępnego wyłącznika krańcowego
(dodatkowy WK -wyłącznik krańcowyprzed osiągnięciem położenia
krańcowego) na zacisku J21 bloku
zacisków X5. Ten wstępny wyłącznik
krańcowy należy umieścić 5 cm ponad
podłożem.
Podłączenie 3-biegunowego zacisku
na module dodatkowym TM1C2
brązowy
Optoelektroniczna listwa
zabezpieczająca jest tak skonstruowana,
że po zadziałaniu na całej jej długości
ulega przerwaniu strumień świetlny. Do
kontrolowania listwy zabezpieczającej
na całej długości, musi zostać
podłączony odbiornik na końcu listwy
włączającej.
POLSKI
STEROWANIE NAPĘDU - TM1T
Nadajnik Odbiornik
brązowy
zielony
biały
PODŁĄCZENIE NADAJNIKA IMPULSÓW STERUJĄCYCH DO GÓRY, STOP, NA DÓŁ
Do obsługi z zewnątrz służy zespół 3 przycisk dot. całej stronyy
funkcyjnych, podłączony do TM1T na bloku zaciskowym X3. Obydwa przycisk
dot. całej stronye dla funkcji DO GÓRY i NA DÓŁ muszą być stykami
zwiernymi.
Z uwagi na zintegrowanie przycisk dot. całej stronya STOP w obwodzie
zabezpieczającym, musi on działać jako styk rozwierny.
W przypadku połączenia przycisk dot. całej stronya STOP na bloku zaciskowym X3
należy usunąć mostek na zacisku J9 i przyłączyć przycisk dot. całej strony STOP (styk
rozwierny)!
Podłączenie elementów obsługujących
DO GÓRY, STOP, NA DÓŁ i IMPULS
Zamek
J8
STOP
J9
DO GÓRY
J10
Imp
J11
NA DÓŁ
J12
X3 1 2 3 4 5 6 7 8 9 10
Podłączenie przełącznika z kluczem
Zamek
J8
STOP
J9
DO GÓRY
J10
Imp
J11
NA DÓŁ
J12
X3 1 2 3 4 5 6 7 8 9 10
Podłączenie zespołu 3 przycisk dot. całej stronyy kablem 4-żyłowym
Zamek
J8
STOP
J9
DO GÓRY
J10
Imp
J11
NA DÓŁ
J12
X3 1 2 3 4 5 6 7 8 9 10
101
POLSKI
STEROWANIE NAPĘDU - TM1T
PODŁĄCZENIE LISTWY ZABEZPIECZAJĄCEJ 8,2 kOhm
(Opcjonalne, tylko z modułem dodatkowym TM1C2)
Do TM1T można bezpośrednio podłączyć elektryczną wzgl. elektropneumatyczną listwę zabezpieczającą.
Logiczny układ analizujący dla listwy przełączącej jest już
zintegrowany w module dodatkowym TM1C2. Kompleksowe nadzorowanie obwodu
elektrycznego listwy zabezpieczającej wymaga zamknięcia listwy
przełączącej opornikiem końcowym (8,2 kOhm).
Dodatkowy wyłącznik krańcowy stanu zamkniętego przed dojściem do
położenia krańcowego należy tak umieścić, aby zamykająca się brama
uruchomiła ten wyłącznik krańcowy 5 cm ponad podłożem.
Listwa przełączająca jest podłączana do zacisku J25 bloku zaciskowego X4b!
UWAGA! Przestrzegać właściwych pozycji zworek
na module dodatkowym TM1C2!
PODŁĄCZENIE STERUJĄCEJ BRAMKI FOTOKOMÓRKI
(Opcjonalne, tylko z modułem dodatkowym TM1C2)
Do TM1T można bezpośrednio podłączyć bramkę fotokomórkową (na bloku
zaciskowym X4a) spełniającą funkcję zabezpieczenie przejazdu. Jeżeli
promień podczerwony bramki fotokomórki zostanie przerwany podczas ruchu
zamykającej się bramy, to brama zatrzyma się i zawróci do górnego
położenia krańcowego.
UWAGA:
W przypadku bramki fotokomórki ze zwierciadłem - wyposażonej jedynie w trzy zaciski
- należy razem podłączyć styk przełączający oraz biegun plusowy elektroniki bramki
fotokomórkowej do zacisku J24 / 3 z potencjałem dodatnim.
Przy połączeniu bramki fotokomórk
4 bloku zaciskowego
fotokomórkii należy usunąć mostek z J2
J24
X4a!
J23
Foto
J24
1
3
2
N
4
O
N = Nadajnik
O = Odbiornik
102
Połączenie bramki
fotokomórkii ze zwierciadłem
fotokomórk
X4a
X4a
Połączenie bramki fotokomórki
z nadajnikiem i odbiornikiem
J23
Foto
J24
1
3
2
4
Zabezpieczająca
bramka
fotokomórkowa
Styk
(rozwierny)
Zasilanie
napięciem
24V DC
Podłączenie bezpośrednich wyłączników zabezpieczających
Elementy zabezpieczające, które mają bezpośredni wpływ na
przebieg sterowania, są podłączone na zacisku J6 na bloku
zaciskowym X2. Do tego zaliczają się WYŁĄCZNIK AWARYJNY
wzgl. chwytnik, zabezpieczenie wciągarki i zabezpieczenie drzwi
awaryjnych.
POLSKI
STEROWANIE NAPĘDU - TM1T
W przypadku bram z wbudowanymi drzwiami do
przechodzenia, wyłącznik zabezpieczający jest
podłączony do zacisku J6, bloku zaciskowego X2.
Uwaga! Usunąć mostki (J6)!
X2
U
V
W
J1
Przełącznik ze zwisającą linką /
Zabezpieczenie na wypadek
pęknięcia sprężyny
lub Zabezpieczenie na wypadek
odwijania drzwi
PODŁĄCZENIE ZABEZPIECZENIA DRZWI AWARYJNYCH
(Opcjonalnie, tylko z modułem dodatkowym TM1C2)
B1 B2
J6
PODŁĄCZENIE NADAJNIKA IMPULSÓW STERUJĄCYCH przycisk dot.
całej stronyA CIĘGŁOWEGO
(Opcjonalnie, tylko z modułem dodatkowym TM1C2)
Przy sterowaniu TM1T do zacisku J11 bloku zaciskowego X3 można
podłączyć górny wyłącznik krańcowy z linką pociągową (zestyk zwierny),
którego funkcja wejściowa odpowiada kolejności sterowania ZAMYKANIESTOP-OTWIERANIE-STOP.
ZAMEK
J8
STOP
J9
DO GÓRY
J10
Imp
J11
NA DÓŁ
J12
X3 1 2 3 4 5 6 7 8 9 10
Przełącznik linką
pociągową
103
POLSKI
STEROWANIE NAPĘDU - TM1T
ZDALNE STEROWANIE FALAMI RADIOWYMI
Na sterowaniu TM1T znajduje się miejsce wtyku (X9) dla 1-kanałowego
odbiornika radiowego. Dalsze informacje - patrz instrukcja obsługi
odbiornika i nadajnika ręcznego EK1-433 / EK1-868.
LEGENDA
S2
stycznik główny
S1
stycznik ZAMYKANIE/OTWIERANIE
J1
silnik
SW1
przycisk dot. całej strony regulacyjny OTWIERANIE (OTWIERANIE)
SW2
przycisk dot. całej strony regulacyjny ZAMYKANIE (ZAMYKANIE)
J26
dodatkowy wyłącznik krańcowy OTWIERANIE (połowa wysokości otwierania)
J20
wyłącznik krańcowy OTWIERANIE (styk rozwierny)
J22
obwód zabezpieczający (styk rozwierny)
J19
wyłącznik krańcowy ZAMYKANIE (styk rozwierny)
J21
dodatkowy wyłącznik krańcowy ZAMYKANIE (wyłącznik krańcowy przed
osiągnięciem pozycji końcowej)
J8
WYŁĄCZNIK AWARYJNY dla otwierania
J6
kontakt drzwi awaryjnych (styk rozwierny)/zabezpieczenie wciągarki
J9
przycisk dot. całej strony STOP (styk rozwierny)
J10
przycisk dot. całej strony OTWIERANIE (styk zwierny)
J11
przycisk dot. całej strony impulsowy (styk zwierny)
J12
przycisk dot. całej strony ZAMYKANIE (styk zwierny)
J24
bramka fotokomórkowa przejazdu (styk rozwierny)
J25
zabezpieczenie krawędzi zamykającej
J26
wyłącznik krańcowy OTWIERANIE DO POŁOWY (styk rozwierny)
Tl
transformator
X1
listwa zaciskowa zasilania
X2
zacisk dot. całej strony silnika
X3
zacisk dot. całej strony urządzeń sterujących
X3A
listwa wtykowa dla przełącznika z kluczem
X3B
listwa wtykowa dla zespołu 3 przycisk dot. całej stronyy funkcyjnych
X4a
zacisk dot. całej strony bramka fotokomórkowa przejazdu
X4b
zacisk dot. całej strony elementów zabezpieczających
X5
zacisk dot. całej strony wyłącznika krańcowego
X8a
listwa wtykowa dla modułów wtykowych (20-biegunowa)
X8b
listwa wtykowa dla modułów wtykowych (10- biegunowa)
X9
listwa wtykowa dla odbiornika fal radiowych
104 X11
listwa wtykowa dla przekaźnika hamulca
POLSKI
STEROWANIE NAPĘDU - TM1T
J26
7
6
J25
8
WKpołowa wysokości
5
FALE RADIOWE
ZAMYKANIE
SKS
STOP
lub otwarcie
DW do połowy
X9
X8b
OTWIERANIE
X11
ANTENA
SCHEMAT IDEOWY
J23
1 2
J12
9 10
X3B
ZAMYKANIE
J11
7 8
X3A
Czujnik
termiczny
Foto
J24
3 4
X8a
J22
J32
J21
Przed-WK
Zamykanie
WK-DO GÓRY
WYŁĄCZNIK KRAŃCOWY
J33
B
+
-
12V DC RS485
J19
J20
STOP
całkowicie
OTWIERANIE
Przed-WK
J10
5 6
IMPULS
BEZPIECZNIK
T600mA
J9
3 4
X5
F1
OTWIERANIE
J8
1 2
J6
ZAMEK
X3
B1 B2
STOP
Trafo
J1
U
Stycznik
J4
X1 L3 L2 L1
PE PE PE
X2
M1
V
W
Nouzová
ruční klika
Czujnik
termiczny
bramka
fotokomórkowa
X4a
A
X4b
STOP
ZAMYKANIE
WK-NA DÓŁ
Listwa kontaktów
380-415V
N/PE
WK
= wyłącznik krańcowy
Przed-WK = WK przed osiągnięciem położenia krańcowego
105
POLSKI
106
STEROWANIE NAPĘDU - TM1T
DANE TECHNICZNE
Model
TM1T
Zasilanie napięciem
3x400V AC 50Hz (bezpiecznik 6 lub 10 A)
Podłączenie silnika poprzez
stycznik zwrotny
2x3 NO styki stycznia, 400 V / max 1,2 kVA
Zaciski podłączeniowe
max. 1,5 mm²
Temperatura otoczenia
zakres od -20 °C
Napięcie sterowania 24V DC
bezpiecznik wtórny 0,8 A zwłoczny
Rodzaj zabezpieczenia
IP 65
Gabaryty
255 x 120 x 180mm (S x W x G)
do + 60 °C
[TM1T został wyprodukowany przez Mtec (D) i jest identyczny z odpowiednim modelem: UST 1]
OŚWIADCZENIE PRODUCENTA UE
według wymogów Dyrektywy 98/37/UE dotyczącej Budowy Maszyn, Aneks II B
POLSKI
STEROWANIE NAPĘDU - TM1T
Producent:
Mtec Gesellschaft für Antriebssysteme mbH
Friethöfer Kamp 23
D-48727 Billerbeck
oświadcza niniejszym, że produkt:
STEROWANIE NAPĘDU UST 1
spełnia następujące Dyrektywy UE:
98/37/EG
Budowa maszyn (wcześniejsza 89/392/EWG)
89/336/EWG
Interferencje elektromagnetyczne (z nowelizacją 91/263/EWG, 92/31/EWG,
93/68/EWG)
73/23/EWG
Urządzenia niskonapięciowe (z nowelizacją 93/68/EWG)
oraz posiada zaświadczenie kontrolne zgodności
zgodności:
Numer 78/781/551722 TÜV Nord Anlagenbau / Systems
W szczególności zastosowano następujące normy europejskie / projekty norm:
EN 12445:2001
Bezpieczeństwo użytkowania bram z napędem mechnicznym; procedura
kontrolna
EN 12453:2001
Bezpieczeństwo użytkowania bram z napędem mechnicznym; wymagania
prEN 12978:1997
Bramy; wyposażenie ochronne, wymagania i procedura kontrolna
EN 954-1:1996
Bezpieczeństwo pracy maszyn; części sterowników istotne dla bezpieczeństwa
EN 60204-1:1997
Bezpieczeństwo pracy maszyn, wyposażenie elektryczne
EN 60335-1:1994
Bezpieczeństwo pracy sprzętu elektrycznego, wymagania ogólne
WSKAZÓWKA:
Rozruch bramy z napędem, w której ma być zainstalowany sterownik, jest
niedozwolony aż do momentu stwierdzenia, że przedmiotowa brama
spełnia wymogi określone
określone w Dyrektywie UE 98/37/EG.
Billerbeck, kwiecień 2005
(miejscowość, data)
(Podpis)
Peter Menke, Geschäftsführer
(Nazwisko i funkcja osoby upoważnionej)
107
POLSKI
108
STEROWANIE NAPĘDU - TM1T
OSPRZĘT OPCJONALNY
TM1C1
TM1C1E
Moduł dla układu
samopodtrzymywania OTWIERANIA
Moduł dla układu
samopodtrzymywania DO GÓRY
Elektroniczny wyłącznik krańcowy
TM1C2
TM1C3
Moduł dla podłączenia listwy
zabezpieczającej DW, opornika
końcowego SKS 8,2 kOhm lub listwy
przełączającej OSE
Moduł dla sterowania w przeciwnym
kierunku
TM1C4
TM1C5
Moduł dla podłączenia elektronicznego
wyłącznika krańcowego
Moduł dla wyświetlacza serwisowego
EK1-433 | EK1-868
FSK433 | FSK868
Odbiornik fal radiowych AM o
częstotliwości 433 lub 868 MHz
Pilot nadajnika fal radiowych AM o
częstotliwości 433 lub 868 MHz
POLSKI
NOTATKI
109
POLSKI
STEROWANIE NAPĘDU - TM1T
Chroniona prawem autorskim.
Przy wykonywaniu przedruku, także fragmentów, konieczne jest uzyskanie naszej zgody.
Zastrzegamy sobie prawo do wprowadzenia zmian wynikających z postępu technicznego.
Headquarter
Nice worldwide
Nice SpA
Oderzo TV Italia
Tel. +39.0422.85.38.38
Fax +39.0422.85.35.85
[email protected]
Nice France
Buchelay
Tel. +33.(0)1.30.33.95.95
Fax +33.(0)1.30.33.95.96
[email protected]
Nice in Italy
Nice Padova
Sarmeola di Rubano PD Italia
Tel. +39.049.89.78.93.2
Fax +39.049.89.73.85.2
[email protected]
Nice Roma
Roma Italia
Tel. +39.06.72.67.17.61
Fax +39.06.72.67.55.20
[email protected]
110 www.niceforyou.com
Nice Rhône-Alpes
Decines Charpieu France
Tel. +33.(0)4.78.26.56.53
Fax +33.(0)4.78.26.57.53
[email protected]
Nice España Madrid
Tel. +34.9.16.16.33.00
Fax +34.9.16.16.30.10
[email protected]
Nice Romania
Cluj Napoca
Tel/Fax +40.264.45.31.27
[email protected]
Nice España Barcelona
Tel. +34.9.35.88.34.32
Fax +34.9.35.88.42.49
[email protected]
Nice Deutschland
Gelnhausen-Hailer
Tel. +49.60.51.91.52-0
Fax +49.60.51.91.52-119
[email protected]
Nice Polska
Pruszków
Tel. +48.22.728.33.22
Fax +48.22.728.25.10
[email protected]
Nice France Sud
Aubagne France
Tel. +33.(0)4.42.62.42.52
Nice UK
Fax +33.(0)4.42.62.42.50
[email protected] Chesterfield
Tel. +44.87.07.55.30.10
Nice Belgium
Fax +44.87.07.55.30.11
Leuven (Heverlee)
[email protected]
Tel. +32.(0)16.38.69.00
Fax +32.(0)16.38.69.01
[email protected]
Nice China
Shanghai
Tel. +86.21.575.701.46
+86.21.575.701.45
Fax +86.21.575.701.44
[email protected]
Nice USA Inc.
Jacksonville, FI.
Tel. +001.904.786.7133
Fax +001.904.786.7640
[email protected]
Drive Control
NEDERLANDS
TM1T
Aanwijzingen en aanbevelingen voor de installateur
111
NEDERLANDS
112
AANDRIJFBESTURING - TM1T
ALGEMEEN
De TM1T is een deurbesturing voor rol- en sectionaaldeuren met 3- of 1fase-motoren. Alle gebruikelijke veiligheidselementen zijn
aansluitbaar.
NEDERLANDS
AANDRIJFBESTURING - TM1T
Door uitbreiding met verschillende insteekkaarten kunt u beschikken
over extra toepassingsmogelijkheden.
Voor het openen of sluiten van een deur wordt alleen de
dienovereenkomstige toets op het deksel of de buitentoets bediend.
In het automatische bedrijf kan de deur ook per aftstandsbediening
geopend en gesloten worden.
EIGENSCHAPPEN
De belangrijkste eigenschappen van de TM1T zijn:
4
4
4
eenvoudige bediening en instelling
tegen weersinvloeden beschermde uitvoering (IP 65)
grote aansluitruimte voor bedrading
Optimale veiligheid dankzij:
4
4
4
afstandsbediening 433 MHz / 868 MHz (optioneel)
conformiteit met de van toepassing zijnde richtlijnen en normen
aansluitmogelijkheid voor omvangrijke veiligheidselementen
REGLEMENTAIR GEBRUIK
De deurbesturing TM1T is bedoeld voor het aansturen van industriedeuren
zoals bijv. sectionaal-, rol-, vouw- en rolluikdeuren.
113
NEDERLANDS
AANDRIJFBESTURING - TM1T
VEILIGHEIDSINSTRUCTIES
Wanneer bij de montage en de inbedrijfstelling de volgende
veiligheidsinstructies niet in acht worden genomen, is de
installateur aansprakelijk voor de daaruit resulterende
persoonlijke en materiële schade.
De installateur van de deurinstallatie is verantwoordelijk voor de
complete installatie. Hij dient zorg te dragen voor de inachtneming van
de desbetreffende normen en richtlijnen (bijv. DIN 1986, EN 12050). Hij
is verantwoordelijk voor het vervaardigen van de technische documentatie
die bij de complete installatie moet zijn bijgevoegd.
Dit symbool in de besturingsbeschrijving attendeert op
mogelijk gevaar dat in deze handleiding nader wordt
beschreven.
Installatie, bedrijf en bediening van de besturing die in strijd is met
deze handleiding of de daarin beschreven technische specificaties leidt
tot gevaar voor personen en tot uitsluiting van elke aansprakelijkheid
of garantieverlening.
De nationale en lokale voorschriften en normen voor de installatie en de
ongevallenpreventievooschriften van de bedrijfsongevallenverzekeringen
dienen in acht te worden genomen.
Installatie- en onderhoudswerkzaamheden aan de deurinstallatie mogen
alleen worden uitgevoerd door hiervoor geschoold vakpersoneel.
Bij werkzaamheden aan de deurinstallatie moet deze altijd spanningsvrij
geschakeld zijn.
Het dodemansbedrijf van een deurinstallatie is alleen toegestaan
wanneer vanaf de bedieningsapparatuur ongehinderd blikcontact met de
deurinstallatie bestaat.
114
GEACHTE KLANT !
U hebt gekozen voor een technische hoogwaardig product.
NEDERLANDS
AANDRIJFBESTURING - TM1T
Bij de vervaardiging hebben wij uiterst zorgvuldig gewerkt om deze
besturing in optimale toestand te verzenden. Mocht u desondanks reden
tot reclamatie hebben, kunt u ons de besturing met een korte
omschrijving van het probleem direct toesturen.
De garantieverlening heeft uitsluitend betrekking op de kosteloze
reparatie bij functiestoringen aan het apparaat (inclusief de daarvoor
benodigde reservedelen) die aantoonbaar zijn ontstaan door productieof materiaalfouten.
Lees deze handleiding zorgvuldig door voordat u begint
met de installatie van de besturing.
Wij zijn gevrijwaard van garantieverlening en aansprakelijkheid wanneer
zonder onze schriftelijke toestemming constructietechnische
veranderingen zijn aangebracht of wanneer de installatie ondeskundig en
in strijd met onze montagerichtlijnen is uitgevoerd.
De installateur dient erop toe te zien dat de EMC-richtlijnen, de
laagspanningsvoorschriften, de machinerichtlijnen en de
bouwproductrichtlijn in acht worden genomen.
OPGELET!
De besturing mag niet worden gebruikt in explosiegevaarlijke
ruimten.
OPGELET!
Sluit de netkabel aan op de klem X1 (L1, L2, L3) en op de
klem PE van de basisprintplaat.
De netkabel moet bedrijfsintern worden beveiligd met
3 smeltzekeringen van 6 A of 10 A, al naargelang de
gebruikte motor.
De waarde van de smeltzekering moet zodanig worden
gekozen dat de aangesloten aandrijving bij blokkering
geactiveerd wordt.
115
NEDERLANDS
AANDRIJFBESTURING - TM1T
BESCHRIJVING
Insteekpaneel voor module
Schroefklem
Antenne
Insteltoets OPEN
Insteltoets SLUITEN
Contactstrip
Radio ontvanger
Steekklem
veiligheidselementen
Contactstrip
Remrelais
Contactstrip
3-voudige toets
Steekklem
fotocelbewaking
doorgang
Steekklem
eindschakelaars
Contactstrip
sleutelschakelaar
Steekklem
commandoapparatuur
Steekklem
motor
steekklem
net
Schroefklem
PE
LED (groen)
eindschakelaar DICHT
brandt bij fout
LED (groen)
eindschakelaar OPEN
brandt bij fout
116
LED (rood)
veiligheidscircuit STOP
bij fout uit
LED (rood)
fotocelbewaking
bij fout uit
LED (groen)
deur DICHT brandt
bij toetsbediening
LED (geel)
impuls, brandt
bij toetsbediening
LED (groen)
deur OPEN brandt
bij toetsbediening
NEDERLANDS
AANDRIJFBESTURING - TM1T
BESCHRIJVING VAN DE BESTURING
BEDIENINGSELEMENTEN
Met de in het deksel gemonteerde druktoetsen wordt de deur in
zelfhouding of dodemansbedrijf OPEN en DICHT gestuurd. Wanneer de deur
in zelfhouding beweegt, kan hij met de STOP-toets op elk tijdstip
worden stilgezet.
Voor de bediening van buitenaf kunnen extra bedieningselementen,
bijvoorbeeld een drievoudige druktoets, worden aangesloten.
Een binnen of buiten gemonteerde trekschakelaar (plafondtrekschakelaar)
stuurt de deur aan in de functie OPEN-STOP-SLUITEN (alleen bij het
gebruik van de module TM1C2).
Bij de optioneel aangesloten radio-ontvanger kan de deur altijd via de
radio-handzender worden stilgezet.
AANSLUITING NETKABEL
Op de klemmen L1, L2, L3 en de PE-klem is
een CEE-stekker 16A aangesloten.
De netaansluiting van de TM1T is ook
mogelijk met de optionele 3-fasehoofdschakelaar.
In dit geval wordt de CEE-stekker bij de
montage verwijderd.
PE
X1 L1 L2 L3
Toevoerleiding
CEE-stekker 16A
X2 U V W
AANLSUITING 3-FASE-AANDRIJVING
De 3-fase-aandrijving wordt aangesloten
op de klemmen U, V, W en PE. Wanneer de
aandrijving beschikt over een N-geleider,
wordt deze aangesloten op de losse klem N
van de netleiding.
M
3~
Voor bijvoorbeeld een rem die via een
gelijkrichter aan 230 V wordt bediend.
motor
PE
JUMPERBRUGGEN
Bij de basisbesturing is op de stekkers X11 (pin 5/6), X3A(pin 1/2) en
X3B (pin 1/2) een jumper geplaatst.
117
NEDERLANDS
AANDRIJFBESTURING - TM1T
DRAAIRRICHTINGSCONTROLE
Na aansluiting van de aandrijving moet met de toetsen OPEN en DICHT in
dodemansbedrijf de draairichting gecontroleerd worden.
Wanneer de draairichting niet overeenstemt met de pijlrichting van de
ingedrukte toetsen, moet de CEE-stekker eruit getrokken en moeten de Uen V-aansluitingen verwisseld worden (fase-omkeer).
Let op de eindschakelaars!
AANSLUITING VAN DE EINDSCHAKELAARS
Bij de TM1T worden de beide eindschakelaars OPEN en DICHT als
potentiaalvrije contacten aangesloten op de klemmen J20 en J19 van het
klemmenblok X5. Het veiligheidscircuit met de geïntegreerde
veiligheidseindschakelaar wordt aangesloten op klem J22 van het
klemmenblok X5.
Bij de TM1T kan men een tweede eindschakelaar voor de OPEN-richting
aansluiten (J26 X4B) en dan (optioneel) via een positieschakelaar op
het deksel van de behuizing van de TM1T te kiezen uit twee
verschillende OPEN-posities (omschakeling zomer-winter).
De eindschakelaars mogen alleen in het dodemansbedrijf worden uitgevoerd!
ES-DICHT
SKS
STOP
of DW Half OPEN
X4b
Handkruk
noodbedrijf
ES-OPEN
Nadering
Thermo
-
+
B
J25
5 6
7
J26
8
A
EShalve hoogte
X5
J22
J21
J20
J19
Thermo Nadering STOP
STOP
DICHT Helemaal DICHT
OPEN
J32
J33
12V DC
RS485
Voor het bedrijf met EES (elektronische eindschakelaar - optioneel)
zijn de modules TM1C2 en TM1C4 absoluut noodzakelijk. Voor de
instelling en de programmering van de eindschakelaars verwijzen wij
naar de handleiding voor de module TM1C4.
AUTOMATISCHE DEURSLUITING
(optioneel, alleen met module TM1C2)
De functie “automatische deursluiting” wordt ingesteld aan de
positiedraaischakelaar.
Wanneer de automatische deursluiting geactiveerd is, stuurt de deur
vanuit de eindpositie weer dicht na afloop van de aan de draaischakelaar
ingestelde tijd. Door de bediening van de toptoets of een
118 veiligheidsinrichting wordt de automatische deursluiting geblokkeerd.
AANSLUITING VAN EEN OPTO-ELEKTRONISCHE SCHAKELSTRIP
(optioneel, alleen met module TM1C2)
Aansluiting op de 3-polige klem op
de module TM1C2
+12V SIG 0V
Groen
Wit
Opto-elektronische
onderhoutbeveiliging
Bruin
Een opto-elektronische
onderhoutbeveiliging is zodanig
opgebouwd dat bij activering van de
contactstrip over de hele lengte een
lichtstraal wordt onderbroken. Om de
veiligheidsstrip over de hele lengte
te kunnen controleren, moet u hier
aan het einde van de
onderhoutbeveiliging een ontvanger
aansluiten.
NEDERLANDS
AANDRIJFBESTURING - TM1T
Zender
Wanneer de onderhoutbeveiliging op
de vloer moet worden geperst, wordt
de omkeerfunctie door het aansluiten
van een naderingsschakelaar (extra
naderingsschakelaar voor ES) aan
klem J21 van het klemmenblok X5
geneutraliseerd. Hiervoor wordt de
naderingsschakelaar 5 cm boven de
vloer ingesteld.
Ontvanger
Bruin
Groen
Wit
AANSLUITING VAN DE COMMANDOBESTURING OPEN, STOP, DICHT
Voor de bediening van de TM1T van buitenaf kan een drievoudige toets op
klemmenblok X3 worden aangesloten. Hierbij moeten de beide toetsen voor
OPEN en DICHT als sluiters worden uitgevoerd.
Aangezien de STOP-toets in het veiligheidscircuit geschakeld is, moet
hij als opener worden uitgevoerd.
Bij de aansluiting van een stoptoets op klemmenblok X3 moet de brug op klem J9
verwijderd en de STOP-toets (opener) aangesloten worden!
Aansluiting van de bedieningselementen
OPEN, STOP, DICHT en IMPULS
Slot
J8
STOP
J9
OPEN
J10
Imp
J11
DICHT
J12
X3 1 2 3 4 5 6 7 8 9 10
Aansluiting van een sleutelschakelaar
Slot
J8
STOP
J9
OPEN
J10
Imp
J11
DICHT
J12
X3 1 2 3 4 5 6 7 8 9 10
Aansluiting van een 3-voudige toets met 4-draadse kabel
Slot
J8
STOP
J9
OPEN
J10
Imp
J11
DICHT
J12
X3 1 2 3 4 5 6 7 8 9 10
119
NEDERLANDS
AANDRIJFBESTURING - TM1T
AANSLUITING VAN EEN ONDERHOUTBEVEILIGING MET 8,2 kOhm
(optioneel, alleen met module TM1C2)
Op de TM1T kan direct een elektrische of pneumatisch-elektrische
onderhoutbeveiliging worden aangesloten.
De analyse voor de contactstrip is reeds in de module TM1C2
geïntegreerd. Voor de bewaking van het complete elektrische circuit van
de onderhoutbeveiliging moet de schakelstrip worden afgesloten met een
weerstand (8,2 kOhm).
De extra eindschakelaar nadering-DICHT wordt zodanig ingesteld dat de
sluitende deur de eindschakelaar 5 cm boven de vloer activeert.
De contactstrip wordt op klem J25 van klemmenblok X4b aangesloten!
OPGELET!
Let op de jumperstand op de module TM1C2!
AANSLUITING VAN DE FOTOCELBEWAKING
(optioneel, alleen met module TM1C2)
Op de TM1T kan direct een elektrische of pneumatisch-elektrische
onderhoutbeveiliging worden aangesloten. Wanneer de infrarood-straal
van de fotocelbewaking in de DICHT-beweging van de deur onderbroken
wordt, stopt de deur en keert hij terug naar de bovenste eindpositie.
OPGELET!
Bij een eenrichtings-fotocel met slechts 3 aansluitpunten is het schakelcontact en
de pluszijde van de fotocel-elektronica aan klem J24/3 met het pluspotentiaal
verbonden. Bij aansluiting van de fotocel moet de brug van het J24-klemmenblok
X4 verwijderd worden!
Aansluiting
reflectiefotocel
J23
Foto
J24
1
3
1
3
2
4
O
Z=Zender
O=Ontvanger
120
Foto
J24
Spanningstoevoer
24V DC
Contact
(opener)
Z
4
J23
fotocelbewaking
2
X4a
X4a
Aansluiting zender en ontvanger
van de fotocelbewaking
Aansluiting van directe veiligheidsschakelaars
Veiligheidselementen die direct in de besturing ingrijpen,
worden op klem J6 van het klemmenblok X2 aangesloten.
Hiertoe behoren NOODSTOP, vanginrichting, intrekbeveiliging
en klinketdeurbeveiliging.
NEDERLANDS
AANDRIJFBESTURING - TM1T
AANSLUITING KLINKETDEURBEVEILIGING
(optioneel, alleen met module TM1C2)
Bij deuren met een ingebouwde klinketdeur wordt de
veiligheidsschakelaar op klem J6 van het klemmenblok X2 aangesloten.
Slapkabelschakelaar/
eerbreuk- of
afrolbeveiliging
Opgelet! Bruggen verwijderen (J6)!
X2
U
V
W
B1 B2
J1
J6
AANSLUITING VAN DE COMMANDOBESTURING TREKSCHAKELAAR
(optioneel, alleen met module TM1C2)
Bij de besturing TM1T kan op klem J11 van klemmenblok X3 een
plafondtrekschakelaar (sluitercontact) worden aangesloten. De functie
van deze ingang komt overeen met een volgordebesturing DICHT-STOP-OPENSTOP.
Slot
J8
STOP
J9
OPEN
J10
Imp
J11
DICHT
J12
X3 1 2 3 4 5 6 7 8 9 10
Trekschakelaar
121
NEDERLANDS
AANDRIJFBESTURING - TM1T
RADIOGRAFISCHE AFSTANDSBEDIENING
Op de besturing TM1T bevindt zich een steekplaats (X9) voor een 1kanaals radio-ontvanger. Voor nadere informatie verwijzen wij naar de
handleiding van ontvanger en handzender EK1-433/EK1-868.
LEGENDA
122
S2
S1
J1
SW1
SW2
J26
J20
J22
J19
J21
J8
J6
J9
J10
J11
J12
J24
J25
J26
T1
X1
X2
X3
X3A
X3B
X4a
X4b
X5
X8a
X8b
X9
X11
hoofdrelais
starter DICHT/OPEN
motor
insteltoets OPEN
insteltoets DICHT
extra eindschakelaar OPEN (halve openingshoogte)
eindschakelaar OPEN (opener)
veiligheidscircuit (opener)
eindschakelaar DICHT (opener)
extra eindschakelaar DICHT (naderingsschakelaar)
noodstop (opener)
klinketdeurcontact (opener) / intrekbeveiliging
toets STOP (opener)
toets OPEN (sluiter)
toets “impuls” (sluiter)
toets DICHT (sluiter)
doorgang fotocelbewaking (opener)
onderhoutbeveiliging
eindschakelaar HALF OPEN (opener)
transformator
steekklem net
steekklem motor
steekklem commandobesturing
insteeklijst voor sleutelschakelaar
insteeklijst voor 3-voudige toets
steekklem doorgangsfotocel
steekklem veiligheidselementen
steekklem eindschakelaar
insteeklijst voor insteekmodule (20-polig)
insteeklijst voor insteekmodule (10-polig)
insteeklijst voor radio-ontvanger
insteeklijst voor remrelais
J1
V
W
X3
J9
3 4
J22
J21
J20
J19
+
J32
-
A
J33
B
J10
5 6
Trafo
J11
7 8
X3A
J12
9 10
J23
1 2
X3B
EINDSCHAKELAAR
X11
Fotocelbewaking
J25
5 6
J26
7 8
X9 RADIO-ONTVANGER
ANTENNE
X8b
SKS
STOP
o.DW Halb AUF
onderhoutbeveiliging
8,2 kOhm
Foto
J24
3 4
X8a
Thermo Nadering STOP
STOP 12V DC RS485
DICHT Helemaal DICHT
OPEN
F1
X5
ZEKERING
T600mA
J8
1 2
J6
B1 B2
Nadering
J4
X1 L3 L2 L1
U
ES-OPEN
PE PE PE
X2
Handkruk
noodbedrijf
Thermo
ES-DICHT
X4a
DICHT
X4b
M1
BEDRADINGSSCHEMA
NEDERLANDS
AANDRIJFBESTURING - TM1T
OPEN
ES halve hoogte
DICHT
IMPULS
OPEN
STOP
Slot
Relais
380-415V
N/PE
123
NEDERLANDS
124
AANDRIJFBESTURING - TM1T
TECHNISCHE GEGEVENS
Model
TM1T
Spanningstoevoer
3x400V AC 50Hz (6 bzw. 10A-zerkeringen)
Motoraansluiting via starter
2x3 NO relaiscontacten, 400V/max. 1,2kVA
Aansluitklemmen
1,5 mm² max.
Omgevingstemperatuur
-20°C bis +60°C
Stuurspanning 24V DC
Zekering secundair 0,8A traag
Isolatieklasse
IP 65
Afmeting
255 x 120 x 180mm (BxHxD)
[TM1T werd geproduceerd door Mtec mbH (D) en is identiek met het overeenkomstige model: UST 1]
EG-FABRIKANTENVERKLARING
volgens machinerichtlijnen 98/37/EG Anhang II B
NEDERLANDS
AANDRIJFBESTURING - TM1T
De fabrikant:
Mtec Gesellschaft für Antriebssysteme mbH
Friethöfer Kamp 23
D-48727 Billerbeck
verklaart hiermede dat het produkt:
AANDRIJFBESTURING UST 1
volgens EG-richtlijnen:
98/37/EG
Machinerichtlijn (voormalig 89/392/EWG)
89/336/EWG
EMC richtlijn (inclusief 91/263/EWG, 92/31/EWG, 93/68/EWG)
73/23/EWG
Laagsspanningsrichtlijn (inclusief 93/68/EWG)
en overeenkomt met de volgende conformiteitsproef:
Nummer 78/781/551722 welke werd afgenomen bij TÜV Nord Anlagenbau / Systems
In bijzonder zijn de volgende Europese normen in acht gehouden:
EN 12445:2001
Gebruiksveiligheid van aangedreven deuren; beproevingsmethoden
EN 12453:2001
Gebruiksveiligheid van aangedreven deuren; eisen
prEN 12978:1997
Deuren; eisen en beproevingsmethoden
EN 954-1:1996
Veiligheid van machines; delen met betrekking tot veiligheid in besturingen
EN 60204-1:1997
Veiligheid van machines; elektrische uitrusting
EN 60335-1:1994
Veiligheid van elektrische apparaten; algemene eisen
LET OP:
De in bedrijf-name van de aangedreven deur of poort, waar deze
besturing toegepast zal worden, is verboden tot vastgesteld is dat
deze installatie voldoet aan de richtlijn 98/37/EG.
Billerbeck, April 2005
(Plaats, datum)
(Handtekening)
Peter Menke, leidende directeur
(Naam en functie)
125
NEDERLANDS
126
AANDRIJFBESTURING - TM1T
OPTIONELE ACCESSOIRES
TM1C1
TM1C1E
Module voor zelfhouding OPEN
Module voor zelfhouding OPEN
elektronische eindschakelaar
TM1C2
TM1C3
Module voor de aansluiting van
de DW-lijst, een SKS 8.2 kOhm
of een OSE-lijst
Module voor tegenliggerregeling
en voor het testen van
intrekfotocellen
TM1C4
TM1C5
Module voor de aansluiting van
een elektronische eindschakelaar
Module voor Serviceweergave
EK1-433 | EK1-868
FSK433 | FSK868
433 of 868 MHz radio-ontvanger AM
Handzender voor de 433 of 868
MHz radio-ontvanger AM
NEDERLANDS
AANTEKENINGEN
127
Auteursrechtelijk beschermd.
Nadruk, ook gedeeltelijk, uitsluitend met onze toestemming.
Wijzigingen met het oog op de technische vooruitgang voorbehouden.
Headquarter
Nice worldwide
Nice SpA
Oderzo TV Italia
Tel. +39.0422.85.38.38
Fax +39.0422.85.35.85
[email protected]
Nice France
Buchelay
Tel. +33.(0)1.30.33.95.95
Fax +33.(0)1.30.33.95.96
[email protected]
Nice in Italy
Nice Padova
Sarmeola di Rubano PD Italia
Tel. +39.049.89.78.93.2
Fax +39.049.89.73.85.2
[email protected]
Nice Roma
Roma Italia
Tel. +39.06.72.67.17.61
Fax +39.06.72.67.55.20
[email protected]
128 www.niceforyou.com
Nice Rhône-Alpes
Decines Charpieu France
Tel. +33.(0)4.78.26.56.53
Fax +33.(0)4.78.26.57.53
[email protected]
Nice España Madrid
Tel. +34.9.16.16.33.00
Fax +34.9.16.16.30.10
[email protected]
Nice Romania
Cluj Napoca
Tel/Fax +40.264.45.31.27
[email protected]
Nice España Barcelona
Tel. +34.9.35.88.34.32
Fax +34.9.35.88.42.49
[email protected]
Nice Deutschland
Gelnhausen-Hailer
Tel. +49.60.51.91.52-0
Fax +49.60.51.91.52-119
[email protected]
Nice Polska
Pruszków
Tel. +48.22.728.33.22
Fax +48.22.728.25.10
[email protected]
Nice France Sud
Aubagne France
Tel. +33.(0)4.42.62.42.52
Nice UK
Fax +33.(0)4.42.62.42.50
[email protected] Chesterfield
Tel. +44.87.07.55.30.10
Nice Belgium
Fax +44.87.07.55.30.11
Leuven (Heverlee)
[email protected]
Tel. +32.(0)16.38.69.00
Fax +32.(0)16.38.69.01
[email protected]
Nice China
Shanghai
Tel. +86.21.575.701.46
+86.21.575.701.45
Fax +86.21.575.701.44
[email protected]
Nice USA Inc.
Jacksonville, FI.
Tel. +001.904.786.7133
Fax +001.904.786.7640
[email protected]
[TM1T | Rev. 00 | 22-06-2006]
NEDERLANDS
AANDRIJFBESTURING - TM1T