1
SAFELINK
EPIRB
User Manual
Manuel Utilisateur / Manual del Usuario /
Benutzerhandbuch / Manuale dell’utente / Gebruikershandleiding
SafeLink Auto Categorie 1 / Category 1 / Categoria 1 / Kategorie 1
SafeLink Manual+ Categorie 2 / Category 2 / Categoria 2 / Kategorie 2
Disclaimer
Kannad Marine is a brand of McMurdo Ltd. The information and illustrations contained in this publication are to the best of our
knowledge correct at the time of going to print. We reserve the right to change specifications, equipment, installation and maintenance instructions without notice as part of our policy of continuous product development and improvement. No part of this publication may be reproduced, stored in a retrieval system or transmitted in any form, electronic or otherwise without permission in
writing from McMurdo Limited. No liability can be accepted for any inaccuracies or omissions in the publication, although every
care has been taken to make it as complete and accurate as possible.
Clause de non-responsabilité
Kannad Marine est une marque de la société McMurdo Ltd. Les informations et les illustrations contenues dans la présente
publication sont, pour autant que nous sachions, exactes au moment de l'impression. Nous nous réservons le droit de modifier
les caractéristiques techniques, l'équipement, l'installation et les instructions de maintenance sans préavis dans le cadre de
notre politique de développement continu et d'amélioration du produit. Aucune partie de la présente publication ne peut être
reproduite, stockée dans un système de recherche automatique ni transmise sous quelque forme que ce soit par voie électronique ou autre sans autorisation écrite de l'entreprise McMurdo Limited. Aucune responsabilité ne sera admise pour toute imprécision ou omission présente dans la publication, même si un soin tout particulier a été apporté pour rendre ce document aussi
complet et précis que possible.
Descargo de responsabilidad
Kannad Marine es una marca de McMurdo Ltd. La información e ilustraciones incluidas en esta publicación son correctas en el
momento de su impresión. Nos reservamos el derecho de modificar las especificaciones, así como las instrucciones relativas al
equipo, su instalación y mantenimiento, sin previo aviso, como parte de nuestra política de desarrollo y mejora continua de producto. Queda totalmente prohibido reproducir, almacenar o transmitir de cualquier modo, ya sea electrónico u otro, la totalidad o
parte de esta publicación sin autorización escrita de McMurdo Limited. Si bien hemos elaborado una publicación completa y precisa, no aceptaremos responsabilidad alguna por imprecisiones u omisiones existentes en la misma.
Haftungsausschluss
Kannad Marine ist eine Marke der McMurdo Ltd. Die Angaben und Abbildungen dieser Veröffentlichung entsprechen zum Zeitpunkt der Drucklegung nach bestem Wissen und Gewissen den Gegebenheiten. Wir behalten uns das Recht vor, im Rahmen
unserer kontinuierlichen Produktentwicklung und -verbesserung Spezifikationen, Ausrüstung, Installations- und Wartungsanweisungen unangekündigt zu verändern. Kein Bestandteil dieser Veröffentlichung darf ohne vorheriges schriftliches Einverständnis
der McMurdo Limited reproduziert, in einem Datenabfragesystem gespeichert oder in elektronischer oder anderer Form übertragen werden. Für Ungenauigkeiten oder Auslassungen in der Veröffentlichung wird keine Haftung übernommen. Jedoch haben
wir uns darum bemüht, sie so vollständig und genau wie möglich zu gestalten.
Clausola di esclusione della responsabilità
Kannad Marine è un marchio della McMurdo Ltd. Al momento della stampa, le informazioni e le illustrazioni contenute nella presente pubblicazione, al meglio delle nostre conoscenze, sono corrette. Nell'ottica di un costante miglioramento e sviluppo del
prodotto, ci riserviamo il diritto di modificare, senza preavviso, le specifiche e le istruzioni relative ad apparecchio, installazione e
manutenzione. Nessuna parte della presente pubblicazione può essere riprodotta, conservata in un sistema di recupero dati né
trasmessa in qualsivoglia forma, elettronica o di altro tipo, senza il permesso scritto della McMurdo Limited. Nonostante sia stata
prestata la massima cura per redigere una pubblicazione il più possibile completa e accurata, la McMurdo Ltd non si assume
alcuna responsabilità per eventuali imprecisioni o omissioni relative alla stessa.
Aansprakelijkheidsbeperking
Kannad Marine is een merknaam van McMurdo Ltd. De informatie en illustraties in deze publicatie zijn volgens ons correct op het
moment dat dit document wordt gedrukt. We behouden het recht om de specificaties, materialen, installatie- en
onderhoudsinstructies te wijzigen zonder notificatie ten aanzien van ons beleid voor continue productontwikkeling en -verbetering.
Geen enkele deel van deze publicatie mag op welke wijze dan ook, elektronisch of anders worden gereproduceerd, worden
opgeslagen in en opslagsysteem of worden verzonden zonder schriftelijke toestemming van McMurdo Limited. Er wordt geen
aansprakelijkheid geaccepteerd voor onjuistheden of weglatingen in de publicatie, ondanks dat alle voorzorgsmaatregelen zijn
getroffen om deze publicatie zo compleet en volledig mogelijk te maken.
End of Life Statement
At the end of the products useful life, it is vital that the battery is removed to prevent false alerts. False alerts cause expensive
disruption to Search and Rescue services and may endanger lives as a consequence.
Safe disposal
Contains traces of lithium, may contain traces of lead and brominated flame retardants
(BFRs), both in the housing material and circuit boards
DO NOT INCINERATE
Allways dispose of this prioduct in a sensible and considerate manner. For example, do not simply discard the product in the
domestic waste. Instead take it to a civil recycling facility, or contact McMurdo Ltd for further advice.
Déclaration de fin de vie
À la fin de la durée de vie utile des produits, il est essentiel de retirer la batterie pour éviter les fausses alertes. Les fausses alertes
provoquent une interruption onéreuse des services de recherche et de sauvetage (SAR) et peuvent en conséquence mettre en
danger des vies.
Mise en décharge sûre
Contient des traces de lithium, peut contenir des traces de plomb et d'agents ignifuges au
brome, tant au niveau du matériau du boîtier que des cartes imprimées
NE PAS INCINÉRER
Toujours se débarrasser du présent produit de manière sensée et avec soin. Par exemple, ne pas mettre simplement
au rebut le produit dans les déchets ménagers. Amener plutôt ce dernier dans une installation de recyclage civile, ou
contacter la société McMurdo Ltd pour de plus amples informations.
Fin de vida útil del producto
Al final de la vida útil de los productos, es vital retirar la batería para evitar falsas alarmas. Las falsas alarmas causan muchas
molestias a los servicios de Búsqueda y rescate y podrían poner en peligro las vidas de sus integrantes innecesariamente.
Eliminación segura del productol
Contiene trazas de litio. Podría contener trazas de plomo e ignífugos bromados (BFR)
tanto en la carcasa como en las placas de circuitos.
NO INCINERAR ESTE PRODUCTO
Se recomienda eliminar este producto de forma razonable y considerada. No debe echarse a la basura doméstica,
sino llevarse a un punto de reciclaje o contactar con McMurdo Ltd.
Entsorgung
Um einen falschen Alarm zu vermeiden, muss die Batterie am Ende der Produktlebensdauer unbedingt ausgebaut werden. Ein
falscher Alarm bedeutet eine kostspielige Störung der Such- und Rettungsdienste und kann in der Folge das Leben Dritter gefährden.
Sichere Entsorgung
Enthält Spuren von Lithium, kann in Gehäuse und Schaltplatten Spuren von Blei und bromiertem Flammverzögerer enthalten.
NICHT VERBRENNEN
Dieses Produkt immer vernünftig und umsichtig entsorgen. Das Produkt beispielsweise nicht mit dem Haushaltsabfall
entsorgen. Bringen Sie es zu einer Wiederverwertungsanlage oder nehmen Sie für weitere Empfehlungen Kontakt mit
McMurdo Ltd. auf.
Dichiarazione di fine uso
Al termine dell'uso dei prodotti, è importante rimuovere la batteria onde evitare i falsi allarmi. I falsi allarmi comportano costosi disagi
ai servizi di Ricerca e Salvataggio e, di conseguenza, possono mettere in pericolo delle vite umane.
Smaltimento sicuro
Contiene tracce di litio, può contenere tracce di piombo e di ritardanti di fiamma bromati
(BFR), sia nel materiale che costituisce l'alloggiamento che nelle schede dei circuiti.
NON INCENERIRE
Smaltire il presente prodotto sempre in modo coscienzioso e rispettoso. Ad esempio, non limitarsi a gettare il prodotto
nei rifiuti domestici. È, invece, opportuno portarlo in un'area di riciclo comunale, o contattare la McMurdo Ltd per ulteriori informazioni.
Instructie bij einde levensduur
Aan het einde van de levensduur van het product is het uitermate belangrijk dat de batterij wordt verwijderd om vals alarm te
voorkomen. Een vals alarm veroorzaakt een kostbare onderbreking van werkzaamheden van de reddingsdiensten en kan dientengevolge levens in gevaar brengen.
Veilige afvalverwijdering
Bevat sporen van lithium en kan zowel in de behuizing als op de printplaten sporen van
lood en broomhoudende brandvertragers bevatten.
NIET VERBRANDEN
Zorg altijd voor een verstandige en veilige afvalverwijdering van dit product. Gooi dit product niet simpelweg bij het
huishoudelijk afval. Lever het af bij een gemeentelijk afvalstation of klein chemisch afval, of neem contact op met
McMurdo Ltd voor additioneel advies.
RECOMMENDATIONS AND SAFETY NOTICES
•
•
•
•
•
•
•
•
This EPIRB is an emergency device for use only in grave and imminent danger.
False alerts endanger lives. Help to prevent them; understand how to activate and de-activate your
equipment. Intentional false alerts may involve penalties.
Read the complete manual before installing, testing or using the EPIRB.
Ensure you test the EPIRB monthly
Ensure the EPIRB is registered with your local authorities (Flag State nation)
The EPIRB contains no user serviceable parts. Do not open. Return to your dealer for battery replacement
or other service.
This device contains Lithium batteries; do not incinerate, puncture, deform or short-circuit. Take care if
you need to dispose of these batteries or the complete EPIRB.
This device emits radio frequency radiation when activated. This radiation is not classed as harmful;
however, it is advisable not to handle the antenna while the unit is activated.
RECOMMANDATIONS ET CONSIGNES DE SECURITE
•
•
•
•
•
•
•
•
Cette Radio Balise de Localistion et de sauvetage (RBL) est un dispositif de détresse destiné à être utilisé
uniquement en cas de danger grave et imminent.
Les fausses alertes mettent en danger des vies. Il faut tout faire pour les éviter ; comprendre comment
activer et désactiver votre matériel. Les fausses alertes intentionnelles peuvent entraîner des sanctions.
Lire le manuel dans son intégralité avant d'installer, de tester ou d'utiliser la RBLS.
Veiller à tester la balise tous les mois.
S'assurer que la balise est enregistrée auprès des autorités locales (Etat du pavillon)
La RBL ne contient aucune pièce pouvant être réparée par l'utilisateur. Ne pas ouvrir. Renvoyer à votre
distributeur pour changer la batterie ou tout autre service.
Ce dispositif contient des batteries au lithium ; ne pas incinérer, perforer, déformer ni court-circuiter.
Faites attention si vous devez vous débarrasser de ces batteries ou de la balise complète.
Le présent dispositif émet un rayonnement radioélectrique dès activation. Ce rayonnement n'est pas
classé comme dangereux ; mais il est préférable de ne pas manipuler l'antenne pendant que l'unité
fonctionne.
RECOMENDACIONES E INSTRUCCIONES DE SEGURIDAD
•
•
•
•
•
•
•
•
Esta RLS es un dispositivo de emergencia y solamente debe utilizarse en caso de peligro grave e
inminente.
Las falsas alarmas pueden poner vidas en peligro. Ayúdenos a evitarlas aprendiendo cómo activar y
desactivar su equipo correctamente. Las falsas alarmas intencionadas serán penalizadas.
Lea el manual en su totalidad antes de instalar, probar o utilizar la RLS.
Realice una prueba a su RLS mensualmente.
Asegúrese de que la RLS está registrada en las autoridades locales correspondientes (estado del
pabellón).
La RLS contiene piezas que el usuario no debe tocar. No la abra. Devuélvala a su distribuidor para que
proceda al cambio de batería o a realizar cualquier otra operación.
Este dispositivo contiene baterías de litio. No debe quemarse, ni perforarse, ni provocarse cortocircuitos
en él. Asegúrese de eliminar correctamente las baterías o la RLS cuando sea necesario.
Este dispositivo emite radiación por radiofrecuencia cuando se activa. Dicha radiación no está
clasificada como peligrosa. No obstante, es recomendable no manipular la antena mientras la unidad esté
activada.
EMPFEHLUNGEN UND SICHERHEITSHINWEISE
•
•
•
•
•
•
•
•
Diese Notfunkbake stellt ein Notgerät dar, das nur bei erheblicher und drohender Gefahr eingesetzt
werden darf.
Ein falscher Alarm gefährdet Leben. Tragen Sie dazu bei, dies zu vermeiden; informieren Sie sich, wie Ihr
Gerät zu aktivieren und zu deaktivieren ist. Absichtlicher falscher Alarm kann zu Ordnungsstrafen führen.
Vor Installation, Test oder Einsatz der Notfunkbake sollten Sie das gesamte Handbuch lesen.
Testen Sie Ihre Notfunkbake monatlich.
Sorgen Sie dafür, dass Ihre Notfunkbake bei den Behörden vor Ort registriert wird (Registrierland)
Die Notfunkbake enthält keine Teile, die von dem Benutzer gewartet werden können. Nicht öffnen. Lassen
Sie die Batterie von Ihrem Händler austauschen, der auch sonstigen Service leistet.
Dieses Gerät enthält Lithium Batterien; nicht verbrennen, anstechen, verformen und keinen Kurzschluss
herbei führen. Wenn diese Batterien oder die gesamte Notfunkbake zu entsorgen sind, sorgfältig
vorgehen.
Bei Aktivierung gibt dieses Gerät HF-Strahlungen ab. Diese Strahlung ist nicht als schädigend
klassifiziert; es wird jedoch empfohlen, die Antenne bei aktivierter Bake nicht zu berühren.
RACCOMANDAZIONI E AVVERTENZE DI SICUREZZA
•
•
•
•
•
•
•
•
L'EPIRB (Emergency Position Indicating Radio Beacon - Radiotrasmettitore per indicazione posizione
d'emergenza) è un dispositivo di emergenza da usarsi esclusivamente in casi di pericolo grave ed
imminente.
I falsi allarmi mettono in pericolo vite umane. L'utente deve cercare di evitarli; accertarsi pertanto di aver
compreso come attivare e disattivare l'apparecchio. I falsi allarmi intenzionali possono comportare
l'applicazione di multe.
Leggere tutto il manuale prima d'installare, testare o usare l'EPIRB.
Accertarsi di testare l'EPIRB ogni mese.
Accertarsi che l'EPIRB sia registrato presso le autorità locali (Stato di Bandiera)
L'EPIRB non contiene pezzi riparabili dall'utente. Non aprire. Riportare l'apparecchio al rivenditore per la
sostituzione della batteria o per altri interventi di manutenzione.
Questo apparecchio contiene batterie al litio; non bruciare, perforare, deformare o cortocircuitare.
Procedere allo smaltimento delle batterie o dell'intero EPIRB prestando la massima attenzione.
L'apparecchio emette radiazioni di radiofrequenza se attivato. Questo tipo di radiazioni non è classificato
come dannoso; si consiglia, tuttavia, di non maneggiare l'antenna mentre l'unità è attiva.
AANBEVELINGEN EN VEILIGHEIDSVOORSCHRIFTEN
•
•
•
•
•
•
•
•
Deze EPIRB is een noodapparaat dat alleen mag worden gebruikt in gevallen van serieus en direct gevaar.
Een vals alarm brengt levens is gevaar. Voorkom dit; leer hoe u uw uitrusting moet activeren en
deactiveren. Opzettelijk vals alarm kan worden bestraft.
Lees de gehele handleiding voor het installeren, testen of gebruik van de EPIRB.
Zorg ervoor dat de EPIRB maandelijks wordt getest.
Zorg ervoor dat de EPIRB wordt geregistreerd bij de locale overheidsinstanties (vlaggenstaat)
De EPIRB bevat geen onderdelen die door de gebruiker kunnen worden onderhouden. Niet openen.
Retourneren aan dealer voor het verwisselen van de batterijen of ander onderhoud.
Dit apparaat bevat lithiumbatterijen; niet verbranden, doorboren, verminken of kortsluiten. Zorg voor
juiste afvalverwerking van deze batterijen of de gehele EPIRB.
Dit apparaat stuurt een radiofrequetieradiatie uit als het wordt geactiveerd. Deze radiatie is niet als
schadelijk geclassificeerd; we adviseren u echter op de antenne niet aan te raken als de eenheid
geactiveerd is.
1 . INTRODUCTION ................................................................................................................................ 1
1.1. COSPAS-SARSAT system description .......................................................................................... 1
1.2. Immediate alerting and location calculation ................................................................................... 1
2 . APPLICATION ................................................................................................................................... 1
3 . REGISTRATION ................................................................................................................................ 2
ENGLISH
CONTENTS
9 . TECHNICAL SPECIFICATIONS ........................................................................................................ 12
10 . MANDATORY REGISTRATION ...................................................................................................... 12
10.1. Overview ........................................................................................................................................ 12
10.2. How to register ............................................................................................................................... 13
10.3. Radio licence ................................................................................................................................. 13
10.4. Sale or transfer .............................................................................................................................. 14
10.5. Mandatory information for Australia and New Zealand .................................................................. 14
10.6. USA Advice to owners of Emergency Position Indicating Radio Beacons: ................................... 14
10.7. Emergency Contact ....................................................................................................................... 14
11 . MAINTENANCE ............................................................................................................................... 14
11.1. Battery replacement ....................................................................................................................... 14
11.2. Servicing ........................................................................................................................................ 14
11.3. GMDSS inspections ....................................................................................................................... 15
12 . TRANSPORTATION ........................................................................................................................ 15
13 . BATTERY REPLACEMENT PROCEDURE ..................................................................................... 15
13.1. Battery pack removal ..................................................................................................................... 15
13.2. Battery pack reassembly ................................................................................................................ 16
14 . AUTOMATIC RELEASE SYSTEM REPLACEMENT ...................................................................... 16
14.1. Description ..................................................................................................................................... 16
14.2. Replacement .................................................................................................................................. 16
15 . BEACON LOCATION LOG .............................................................................................................. 100
16 . SBM - BATTERY REPLACEMENT................................................................................................... 101
17 . RELEASE SYSTEM REPLACEMENT.............................................................................................. 102
18 . WARRANTY STATEMENT............................................................................................................... 103
ESPAÑOL
8 . BEACON INSTALLATION ................................................................................................................. 7
8.1. Mounting instructions plate ............................................................................................................ 7
8.2. SafeLink Auto Category 1 (Float Free) .......................................................................................... 8
8.3. SafeLink Manual+ category 2 ........................................................................................................ 10
DEUTSCH
7 . FALSE ALARMS ................................................................................................................................ 6
7.1. False alarms prevention ................................................................................................................. 6
7.2. Beacon de-activation ..................................................................................................................... 6
ITALIANO
6 . INSTRUCTIONS FOR USE ............................................................................................................... 4
6.1. Automatic activation ....................................................................................................................... 4
6.2. Manual activation ........................................................................................................................... 4
NEDERLANDS
5 . TEST INSTRUCTIONS ...................................................................................................................... 4
FRANCAIS
4 . DESCRIPTION ................................................................................................................................... 2
4.1. Container and mounting bracket description ................................................................................. 2
4.2. Beacon description ........................................................................................................................ 2
FRANCAIS
ENGLISH
SOMMAIRE
1 . INTRODUCTION ................................................................................................................................18
1.1. Présentation du système COSPAS-SARSAT ................................................................................18
1.2. Déclenchement de l’alerte et calcul de la position .........................................................................18
2 . APPLICATION ....................................................................................................................................18
3 . ENREGISTREMENT ..........................................................................................................................19
4 . PRESENTATION ................................................................................................................................19
4.1. Description du conteneur et du support mural ...............................................................................19
4.2. Description de la balise ..................................................................................................................20
5 . INSTRUCTIONS DE TESTS ..............................................................................................................22
6 . UTILISATION .....................................................................................................................................22
6.1. Activation automatique ...................................................................................................................22
6.2. Activation manuelle ........................................................................................................................22
DEUTSCH
ESPAÑOL
7 . FAUSSES ALARMES .........................................................................................................................24
7.1. Prévention des fausses alarmes ....................................................................................................24
7.2. Désactivation de la balise ...............................................................................................................24
8 . INSTALLATION DE LA BALISE .........................................................................................................25
8.1. Montage de la plaquette d’instructions ...........................................................................................25
8.2. SafeLink Auto Catégorie 1 (Pont) ...................................................................................................26
8.3. SafeLink Manual+ catégorie 2 (Survie) ..........................................................................................28
9 . SPECIFICATIONS TECHNIQUES .....................................................................................................30
10 . OBLIGATION D’ENREGISTREMENT ..............................................................................................30
10.1. Vue d’ensemble ..............................................................................................................................30
10.2. Comment s’enregistrer ...................................................................................................................30
10.3. Licence Radio .................................................................................................................................31
10.4. Vente ou transfert ...........................................................................................................................31
10.5. Contact d'urgence ..........................................................................................................................31
11 . MAINTENANCE ...............................................................................................................................31
11.1. Remplacement de la batterie .........................................................................................................31
11.2. Entretien .........................................................................................................................................31
11.3. Inspections SMDSM .......................................................................................................................32
NEDERLANDS
ITALIANO
12 . TRANSPORT ...................................................................................................................................32
13 . REMPLACEMENT DES PILES ........................................................................................................32
13.1. Démontage du pack piles ...............................................................................................................32
13.2. Remontage du pack piles ...............................................................................................................33
14 . REMPLACEMENT DU LARGUEUR HYDROSTATIQUE ...............................................................33
14.1. Description .....................................................................................................................................33
14.2. Remplacement ...............................................................................................................................33
15 . AFFECTATIONS SUCCESSIVES DE LA BALISE............................................................................100
16 . SBM - REMPLACEMENT PILES ......................................................................................................101
17 . REMPLACEMENT LARGUEUR........................................................................................................102
18 . DÉCLARATION DE GARANTIE........................................................................................................104
2 . APLICACIÓN ..................................................................................................................................... 35
3 . REGISTRO ........................................................................................................................................ 36
4 . PRESENTACIÓN ............................................................................................................................... 36
4.1. Descripción del contenedor y del soporte mural ............................................................................ 36
4.2. Descripción de la baliza ................................................................................................................. 36
5 . INSTRUCCIONES DE TESTS ........................................................................................................... 38
6 . UTILIZACIÓN ..................................................................................................................................... 38
6.1. Activación automática .................................................................................................................... 38
6.2. Activación manual .......................................................................................................................... 38
FRANCAIS
1 . INTRODUCCIÓN ............................................................................................................................... 35
1.1. Presentación del sistema COSPAS-SARSAT ............................................................................... 35
1.2. Activación de la alerta y cálculo de la posición .............................................................................. 35
ENGLISH
INDICE
11 . MANTENIMIENTO ........................................................................................................................... 47
11.1. Sustitución de la batería ................................................................................................................ 47
11.2. Revisiones y mantenimiento .......................................................................................................... 47
11.3. Inspecciones del SMSSM .............................................................................................................. 47
12 . TRANSPORTE ................................................................................................................................. 48
13 . SUSTITUCIÓN DE PILAS ................................................................................................................ 48
13.1. Desmontaje del pack de pilas ........................................................................................................ 48
13.2. Montaje del pack de pilas .............................................................................................................. 49
14 . SUSTITUCIÓN DEL LANZADOR HIDROSTÁTICO ........................................................................ 50
14.1. Descripción .................................................................................................................................... 50
14.2. Sustitución ..................................................................................................................................... 50
15 . SUCESIVOS DESTINOS DE LA BALIZA ........................................................................................ 100
16 . SBM - SUSTITUCIÓN DE PILAS...................................................................................................... 101
17 . SUSTITUCIÓN LANZADOR ............................................................................................................. 102
18 . GARANTÍA........................................................................................................................................ 105
DEUTSCH
10 . REGISTRO OBLIGATORIO ............................................................................................................. 46
10.1. Información general ....................................................................................................................... 46
10.2. Cómo registrar su RLS .................................................................................................................. 46
10.3. Licencia de radio ............................................................................................................................ 47
10.4. Venta o traspaso ............................................................................................................................ 47
10.5. Contacto de emergencia ................................................................................................................ 47
ITALIANO
9 . ESPECIFICACIONES TÉCNICAS ..................................................................................................... 46
NEDERLANDS
8 . INSTALACIÓN DE LA BALIZA .......................................................................................................... 41
8.1. Montaje de la lámina de instrucciones ........................................................................................... 41
8.2. SafeLink Auto categoría 1 (Puente) ............................................................................................... 42
8.3. SafeLink Manual+ categoría 2 (Supervivencia) ............................................................................. 44
ESPAÑOL
7 . FALSAS ALARMAS ........................................................................................................................... 40
7.1. Prevención de falsas alarmas ........................................................................................................ 40
7.2. Desactivación de la baliza ............................................................................................................. 40
FRANCAIS
ENGLISH
INHALT
1 . EINLEITUNG ......................................................................................................................................52
1.1. Einführung in das System COSPAS-SARSAT ...............................................................................52
1.2. Alarmauslösung und Positionsberechnung ....................................................................................52
2 . ANWENDUNG ....................................................................................................................................52
3 . REGISTRIERUNG ..............................................................................................................................53
4 . DESCRIPTION ...................................................................................................................................53
4.1. Beschreibung des Behälters und der Wandbefestigung ................................................................53
4.2. Beschreibung der Bake ..................................................................................................................53
5 . TESTANWEISUNGEN .......................................................................................................................55
6 . EINSATZ ............................................................................................................................................55
6.1. Automatische Aktivierung ...............................................................................................................55
6.2. Auslösen von Hand ........................................................................................................................55
NEDERLANDS
ITALIANO
DEUTSCH
ESPAÑOL
7 . FALSCHER ALARM ...........................................................................................................................57
7.1. Verhinderung eines falschen Alarms ..............................................................................................57
7.2. Deaktivierung der Bake ..................................................................................................................57
8 . INSTALLATION DER BAKE ...............................................................................................................58
8.1. Montage der Anweisungstafel ........................................................................................................58
8.2. SafeLink Auto Kategorie 1 (Deck) ..................................................................................................59
8.3. SafeLink Manual+ Kategorie 2 (Überleben) ...................................................................................61
9 . TECHNISCHE DATEN .......................................................................................................................63
10 . OBLIGATORISCHE REGISTRIERUNG ...........................................................................................63
10.1. Überblick ........................................................................................................................................63
10.2. Registrierung ..................................................................................................................................63
10.3. Funklizenz ......................................................................................................................................64
10.4. Verkauf oder Übertragung ..............................................................................................................64
10.5. Notrufkontakt ..................................................................................................................................64
11 . UNTERHALT ....................................................................................................................................64
11.1. Austausch der Batterie ...................................................................................................................64
11.2. Wartung ..........................................................................................................................................64
11.3. GMDSS Inspektionen .....................................................................................................................64
12 . TRANSPORT ...................................................................................................................................65
13 . AUSTAUSCH DER BATTERIEN ......................................................................................................65
13.1. Ausbau des Batterienpakets ..........................................................................................................65
13.2. Wiedereinbau des Batterienpakets ................................................................................................66
14 . AUSTAUSCH DES HYDROSTATISCHEN AUSWERFERS ............................................................66
14.1. Beschreibung .................................................................................................................................66
14.2. Austausch .......................................................................................................................................66
15 . AUFEINANDERFOLGENDE ZUWEISUNG DER BAKE...................................................................100
16 . SBM - BATTERIENAUSTAUSCH ....................................................................................................101
17 . AUSTAUSCH AUSWERFER ............................................................................................................102
18 . GARANTIEERKLÄRUNG..................................................................................................................106
2 . APPLICAZIONE ................................................................................................................................. 68
3 . REGISTRAZIONE .............................................................................................................................. 69
4 . PRESENTAZIONE ............................................................................................................................. 69
4.1. Descrizione del contenitore e del supporto murale ........................................................................ 69
4.2. Descrizione del gavitello ................................................................................................................ 69
5 . ISTRUZIONI PER TEST .................................................................................................................... 71
6 . UTILIZZO ........................................................................................................................................... 71
6.1. Attivazione automatica ................................................................................................................... 71
6.2. Attivazione manuale ....................................................................................................................... 71
FRANCAIS
1 . INTRODUZIONE ................................................................................................................................ 68
1.1. Presentazione del sistema COSPAS-SARSAT ............................................................................. 68
1.2. Innesco dell'allarme e calcolo della posizione ............................................................................... 68
ENGLISH
SOMMARIO
11 . MANUTENZIONE ............................................................................................................................ 80
11.1. Sostituzione della batteria .............................................................................................................. 80
11.2. Manutenzione ................................................................................................................................ 80
11.3. Ispezioni GMDSS ........................................................................................................................... 80
12 . TRASPORTO ................................................................................................................................... 81
13 . SOSTITUZIONE DELLE PILE ......................................................................................................... 81
13.1. Montaggio del pacco batterie ......................................................................................................... 81
13.2. Rimontaggio del pacco batterie ..................................................................................................... 82
14 . SOSTITUZIONE DEL DISPOSITIVO DI RILASCIO IDROSTATICO ............................................... 82
14.1. Descrizione .................................................................................................................................... 82
14.2. Sostituzione ................................................................................................................................... 82
15 . DESTINAZIONI SUCCESSIVE DEL GAVITELLO............................................................................ 100
16 . SBM - SOSTITUZIONE PILE............................................................................................................ 101
17 . SOSTITUZIONE DEL DISPOSITIVO DI RILASCIO ......................................................................... 102
18 . DICHIARAZIONE DI GARANZIA ...................................................................................................... 107
DEUTSCH
10 . REGISTRAZIONE OBBLIGATORIA ................................................................................................ 79
10.1. Cenni generali ................................................................................................................................ 79
10.2. Modalità di registrazione ................................................................................................................ 79
10.3. Licenza radio .................................................................................................................................. 80
10.4. Vendita o trasferimento .................................................................................................................. 80
10.5. Contatti per Emergenze ................................................................................................................. 80
ITALIANO
9 . SPECIFICHE TECNICHE .................................................................................................................. 79
NEDERLANDS
8 . INSTALLAZIONE DEL GAVITELLO .................................................................................................. 74
8.1. Montaggio della targhetta delle istruzioni ....................................................................................... 74
8.2. SafeLink Auto Categoria 1 (Ponte) ................................................................................................ 75
8.3. SafeLink Manual+ categoria 2 (Sopravvivenza) ............................................................................ 77
ESPAÑOL
7 . FALSI ALLARMI ................................................................................................................................. 73
7.1. Prevenzione dei falsi allarmi .......................................................................................................... 73
7.2. Disattivazione del gavitello ............................................................................................................. 73
FRANCAIS
ENGLISH
INHOUD
1 . INTRODUCTIE ...................................................................................................................................84
1.1. Presentatie van het COSPAS-SARSAT systeem ..........................................................................84
1.2. Alarmsignaal en positieberekening ................................................................................................84
2 . TOEPASSING ....................................................................................................................................84
3 . REGISTRATIE ....................................................................................................................................85
4 . PRESENTATIE ...................................................................................................................................85
4.1. Omschrijving van de houder en de muurbevestiging .....................................................................85
4.2. Omschrijving van het baken ...........................................................................................................85
5 . TESTINSTRUCTIES ..........................................................................................................................87
6 . GEBRUIK ...........................................................................................................................................87
6.1. Automatische activering .................................................................................................................87
6.2. Handmatige activering ....................................................................................................................87
NEDERLANDS
ITALIANO
DEUTSCH
ESPAÑOL
7 . VALSE ALARMEN ..............................................................................................................................89
7.1. Valse alarmen voorkomen ..............................................................................................................89
7.2. Het baken uitschakelen ..................................................................................................................89
8 . INSTALLATIE VAN HET NOODBAKEN ............................................................................................90
8.1. Montage van de instructieplaat ......................................................................................................90
8.2. SafeLink Auto Categorie 1 (automatische afwerpingversie) ..........................................................91
8.3. SafeLink Manual+ categorie 2 (Handmatige afwerping) ................................................................93
9 . TECHNISCHE SPECIFICATIES ........................................................................................................95
10 . VERPLICHTE REGISTRATIE ..........................................................................................................95
10.1. Algemeen .......................................................................................................................................95
10.2. Hoe werkt de registratie .................................................................................................................95
10.3. Zendvergunning .............................................................................................................................96
10.4. Verkoop of overdracht ....................................................................................................................96
10.5. Contactgegevens voor noodgevallen .............................................................................................96
11 . ONDERHOUND ...............................................................................................................................96
11.1. Batterijen vervangen ......................................................................................................................96
11.2. Onderhoud .....................................................................................................................................96
11.3. GMDSS-inspecties .........................................................................................................................96
12 . TRANSPORT ...................................................................................................................................97
13 . VERVANGING VAN DE BATTERIJEN ............................................................................................97
13.1. Demontage van de batterijbehuizing ..............................................................................................97
13.2. Montage van de batterijbehuizing ..................................................................................................98
14 . VERVANGING VAN DE HYDROSTATISCHE AFWERP KIST ........................................................98
14.1. Omschrijving ...................................................................................................................................98
14.2. Vervanging .....................................................................................................................................98
15 . OPEENVOLGENDE BESTEMMINGEN VAN HET BAKEN LOG .....................................................100
16 . VERVANGING SBM / BATTERIJEN.................................................................................................101
17 . VERVANGING AFWERPING............................................................................................................102
18 . GARANTIE ........................................................................................................................................108
1. INTRODUCTION
ITALIANO
DEUTSCH
ESPAÑOL
FRANCAIS
ENGLISH
1.1. COSPAS-SARSAT system description
COSPAS-SARSAT is a global distress warning system operating in the 406.0 - 406.1 MHz frequency band.
The 406 MHz frequency coded with the beacon ID, is used to determine the position of the beacon to alert the nearest
Search and Rescue Services (S.A.R.).
The system consists of:
(1)
Distress beacons;
(2)
Satellites on polar orbits (LEOSAR) and geostationary satellites (GEOSAR);
(3)
Local User Terminals (LUTs);
(4)
Mission and Rescue Control Centers (MRCC's).
(5)
MCCs receive alerts produced by LUTs and forward them to Rescue Coordination Centers (RCCs) or Search
and Rescue (S.A.R.) Points Of Contacts.
COSPAS-SARSAT System
NEDERLANDS
1.2. Immediate alerting and location calculation
When activated, the SafeLink beacons transmit, in the 406 MHz frequency, a coded message with a unique number
to identify the distress and the beacon’s owner, and the GPS position. This message is picked up by the COSPASSARSAT satellites which store it and continuously retransmit it to the Local User Terminals (L.U.T) Thanks to the
geostationary satellites (GEOSAR), the distress is received within minutes and transmitted anywhere in the world.
Thanks to the orbital satellites (LEOSAR), the position of the distress is calculated within one nautical mile anywhere
in the world using Doppler techniques. The typical waiting time for calculating a position in average latitudes is less
than one hour.
Thanks to the built-in GPS receiver, its position (accuracy typically about 120 meters) will be transmitted by the
beacon within minutes following the distress.
The data are processed and retransmitted to Mission and Rescue Control Centers (MRCC's) and to the Search And
Rescue Center (RCC or S.A.R.) nearest to the distress to organize the rescue operations.
The 121.5 MHz frequency is also transmitted by the beacon and is used as a homing frequency in the final stages of
rescue.
2. APPLICATION
This EPIRB (Emergency Position Indicating Radio Beacon) is designed for use in maritime emergencies, and is
approved for these contingencies.
It is not designed or recommended for use on land or in the air.
Use the EPIRB only in situations of grave and imminent danger. Intentional false alerts may result in penalties.
1
3. REGISTRATION
ENGLISH
This EPIRB must be registered with the appropriate national authority.
Refer to Section 10. MANDATORY REGISTRATION page 12.
The function of the EPIRB is to send an alert to the COSPAS-SARSAT satellites. How soon an alert is received
depends on the positions of the satellites at the time, and can be influenced by overhead obstructions aboard the
vessel. Rescue time following an alert depends on the overall performance of the Search and Rescue organisations.
NEDERLANDS
ITALIANO
DEUTSCH
ESPAÑOL
FRANCAIS
4. DESCRIPTION
SafeLink beacons are Emergency Position Indicating Radio Beacons (EPIRB) Float Free version category 1
(SafeLink Auto) or non Float Free version category 2 (SafeLink Manual+). Both versions are fitted with a built-in GPS.
4.1. Container and mounting bracket description
The beacon is supplied either in an automatic
container (A) for the Float Free version
category 1, or with a wall mounting bracket for
the Non Float Free version category.
The container (A) is designed to protect the
beacon and to ensure its automatic release in
the event of a ship wreck thanks to the
HAMMAR H20 release system (1A). This
container is also fitted with a locking pin (2A).
It is mounted either in horizontal position on
the wheel house or deck of the vessel, or in
vertical position against a bulkhead or any
vertical and flat surface (§ 8.2.1. Installation of
container).
When installed in its container, a magnet avoids beacon activation (water, moisture)
The wall mounting bracket (B) is designed to be mounted vertically against a bulkhead or any vertical flat surface.
The mounting bracket is fitted with a locking pin (1B). When installed in its mounting bracket, a magnet avoids
beacon activation (water, moisture).
4.2. Beacon description
(1)
Tamper proof seal
to prove the beacon has been intentionally activated.
(2)
Locking system
to avoid unintentional activation of the beacon.
(3)
TEST pushbutton:
to perform a self-test;
to stop the beacon transmission if manually activated by ON button if required by authorities.
(4)
ON button:
to activate manually the beacon.
(5)
Strobe lights:
to improve or help visual localization of the beacon by the SAR operations.
(6)
Beacon control lamps (red and green):
to check good operation when activating the beacon;
to check good operation when performing a self-test;
(7)
Programming led:
to program the beacon (by manufacturer or authorized programming stations).
(8)
Water switch contact:
to activate automatically the beacon when submerged in water.
(9)
Retroreflective tape
(10) Tether line:
to secure the beacon to a liferaft, life jacket, boat, etc.
Important: The tether line is used to moor the EPIRB when floating in the water. Do not tie lanyard
to ship when installing beacon inside bracket.
(11) 406 / 121.5 MHz antenna.
2
3
NEDERLANDS
ITALIANO
DEUTSCH
ESPAÑOL
FRANCAIS
ENGLISH
5. TEST INSTRUCTIONS
FRANCAIS
ENGLISH
Test of 406 / 121.5 MHz frequencies.
It is recommended to perform a self test once a month. The self test may be performed with the beacon inside
its bracket or container.
NOTE: This check shall only be conducted during the first five minutes of any UTC hour.
(1)
Press TEST / READY push button (3) for 2 seconds.
(2)
During the test, the strobe lights (5) blink, the buzzer transmits an audible signal, and the red programming
led (7) flashes once.
(3)
At the end of the test, the result is displayed by green (6a) or red (6b) leds:
Green led (6a), 1 flash indicates the system is operational;
Red led (6b), 1 flash indicates the test has failed.
Repeat 3 times to confirm failure before contacting agent.
NOTE: Do not confuse the red programming led (7) and the «default» red led (6b).
WARNING: It is unlawful to transmit a distress signal unless an emergency exists. Do not operate inside life
raft or under any similar cover of canopy. Do not obstruct GPS antenna's view of sky to maximize
self locating performance (do not place the hands over the transparent dome of the beacon).
6.1. Automatic activation
IMPORTANT: Only for SafeLink Auto Float Free version, category 1.
If the vessel sinks, the release system ejects the cover to enable the beacon to rise to the surface. The beacon is
automatically activated when submerged in water and out of its container.
The beacon should be recovered and tied to a life raft to locate the survivors and not the wreck location.
NEDERLANDS
ITALIANO
DEUTSCH
ESPAÑOL
6. INSTRUCTIONS FOR USE
6.2. Manual activation
6.2.1. Beacon removal
SafeLink Auto category 1 (Float Free)
Remove the beacon from its container:
(1)
Lift up the red locking pin of the container;
(2)
Remove the locking pin;
(3)
Remove the cover of the container and extract the beacon.
4
ESPAÑOL
FRANCAIS
ENGLISH
SafeLink Manual+ category 2 (Non Float Free)
Remove the beacon from its mounting bracket:
(1)
Lift up the red locking pin;
(2)
Pull and remove the red locking pin to unlock the bracket;
(3)
Extract the beacon from the mounting bracket.
ITALIANO
DEUTSCH
6.2.2. Activation by water switch sensor
Tie the beacon with lanyard before throwing overboard.
The beacon will start to transmit as soon as submerged (water switch sensor activation).
TO STOP BEACON: remove the beacon from water. Transmission will stop 10 seconds after.
NEDERLANDS
6.2.3. Manual Activation by ON pushbutton
(1)
Break the seal by pushing the locking system up.
(2)
Press ON pushbutton for 1 at least second.
(3)
The buzzer transmits an audible signal every second.
(4)
The beacon performs a self-test.
(5)
After the self-test, only the white strobe lights blink 3 seconds. The buzzer continues to transmit every second.
(6)
Tie the beacon with the lanyard to the boat or a liferaft and throw it overboard.
TO STOP THE BEACON: press TEST pushbutton.
5
7.1. False alarms prevention
Important: before extracting the beacon, check there is neither salt nor moisture on the water switch sensor.
Clean if necessary (risk of activation).
False alarms caused by accidental activation of beacons result in unnecessary search and rescue services.
Therefore, if the beacon has been activated by mistake, it is mandatory to:
(1)
Immediately contact the nearest search and rescue authorities (coast guards, etc.) to tell them it is a false
alarm to stop SAR operations. Report:
beacon unique ID (15 hexadecimal code on label);
time and duration of alarm;
location when activated.
(2)
According to instructions of authorities, manually de-activate the beacon (see § 7.2.).
7.2. Beacon de-activation
If the beacon has been activated by mistake, de-activate as indicated below (according to instructions of authorities):
7.2.1. Beacon overboard
• Remove the beacon from water;
• wait a few seconds for the water switch sensor to de-activate;
• if the beacon still transmits (flash operating), de-activate it manually (see § 7.2.2.).
7.2.2. Beacon manually activated
• Press and release the TEST button for at least 2 seconds;
DEUTSCH
ESPAÑOL
FRANCAIS
ENGLISH
7. FALSE ALARMS
if the beacon still transmits (strobe lights operating), stop the transmission by fully disabling the beacon (see§
7.2.3.).
7.2.3. Fully disabling the beacon
In the event that the beacon does not switch off despite the above actions, it is necessary to stop the transmission
by fully disabling the beacon (See paragraph 13.1. Battery pack removal).
NEDERLANDS
ITALIANO
•
6
8. BEACON INSTALLATION
NEDERLANDS
ITALIANO
DEUTSCH
ESPAÑOL
FRANCAIS
ENGLISH
8.1. Mounting instructions plate
The SafeLink beacons are supplied with an instructions plate. This is a rigid plate with basic visual instructions for
how to operate the beacon in an emergency.
The instruction plate should be mounted next to the beacon so that it is easily visible in an emergency. Use four
screws (not supplied) to mount the plate.
Important: do not paint the plate; do not use strong degreasing solvent to clean it.
7
8.2.1. Installation of container
The container should be installed outside on deck or wheelhouse, or against a bulkhead or any vertical and flat
surface and comply with the following instructions:
• horizontal or vertical position;
• clear area to allow the beacon to rise the surface, should the vessel sink;
ESPAÑOL
FRANCAIS
ENGLISH
8.2. SafeLink Auto Category 1 (Float Free)
Caution: watch rigging, antenna or shroud that could build obstacles;
easy access to the crew for manual operation;
strongly fix to the vessel with 4 screws according to drilling mask hereunder.
NEDERLANDS
ITALIANO
DEUTSCH
•
•
Note: dimensions are in millimeters (inches in bracket).
Reminder: The instructions plate must be fixed close to the container.
8
(3)
Fold the cover onto the support making sure the slots (a) of the cover are inserted into the lugs (b) of the
support.
FRANCAIS
Put the beacon into the container by sliding the antenna below the HAMMAR release system.
DEUTSCH
ESPAÑOL
(2)
ENGLISH
8.2.2. Installation of beacon into container
Caution: If a mounting bracket is installed on the beacon, remove it before installing the beacon into its container.
(1)
To remove the cover, lift the locking pin then extract it from the cover.
(b)
ITALIANO
(a)
(a)
(4)
Slide the locking pin into the hole of the cover and the hole of the fastening screw of HAMMAR release system.
(5)
Lock the pin by turning it down making sure it is locked by the lug of cover.
9
NEDERLANDS
(b)
8.3.1. Mounting bracket installation
The mounting bracket should be installed in a clear area, well known and identified so that it can be reached easily
for emergency used. It should be strongly fixed onto a vertical surface with 3 screws according to drilling mask
hereunder.
NEDERLANDS
ITALIANO
DEUTSCH
ESPAÑOL
FRANCAIS
ENGLISH
8.3. SafeLink Manual+ category 2
Note: the mounting bracket is fitted with a magnet to avoid beacon activation (water, moisture) when installed in its
mounting bracket.
Note: dimensions are in millimeters (inches in bracket).
Reminder: The instructions plate must be fixed close to the mounting bracket.
10
(1)
(2)
(3)
NEDERLANDS
ITALIANO
DEUTSCH
ESPAÑOL
FRANCAIS
ENGLISH
8.3.2. Installation of beacon into its mounting bracket
Insert the beacon into its mounting bracket.
Insert the locking pin in the locking sleeve of the mounting bracket.
Turn downwards the locking pin up to hear a click that proves the bracket is locked.
11
ENGLISH
9. TECHNICAL SPECIFICATIONS
Operating temperature range
: -20°C to +55°C.
Storage temperature
: -30°C to +70°C.
Lithium manganese batteries
• Battery life
: 6 years storage life
Operating life
: 48 hours mini. at -20°C.
: Non dangerous LiMnO2
FRANCAIS
Watertight at 1 bar.
Dimensions
ESPAÑOL
Weight
Beacon
Beacon with bracket
Container
250 x 106 x 83 mm
250 x 111 x 91 mm
287.6 x 147.5 x 96.7 mm
Beacon
Beacon with bracket
Beacon with container
627 g.
679 g.
1280 g.
DEUTSCH
406 MHz SATELLITE TRANSMISSION
Frequency
: 406.037 MHz ± 0.001 MHz
UHF output power
: 5W Nominal (37dBm ± 2 dB)
Phase modulation
:16K0G1D, Biphase L ± 1.1 ± 0.1 radians
Repetition period
: 50 sec. ± 5%
Transmission time
: 520 msec. ± 1%
ITALIANO
121.5 MHz HOMING TRANSMITTER
Frequency
: 121.5 MHz ± 0.006 MHz
Power
: 50 mW (17dBm ± 3 dB)
Modulation
: AM audio sweep
Modulation format
: 3K20A3X
Transmission
: Continuous
STROBE LIGHT
: Super LEDs / 0.75 Candela / 23 flashes per minute
GPS
: FASTRAX UC322
NEDERLANDS
10.MANDATORY REGISTRATION
You must register your EPIRB with the appropriate authorities.
Failure to register may slow the rescue and lead to loss of life.
You are legally required to register your EPIRB.
10.1. Overview
The EPIRB is pre-programmed with a unique identity before it reaches the end customer. This is done by the
manufacturer or, in some cases, the distributor. The identity includes a 3 digit country code. This is the country that
takes responsibility for storing that particular EPIRB's registration details. In most cases this is the country to which
the vessel is flagged. The country ID programmed into your EPIRB can be found from its rear identity label. You must
register your EPIRB ownership detail with this authorities in this country.
When you activate your EPIRB in an emergency, the nearest maritime search and rescue coordination centre
(MRCC) will receive the message and decode the country code. They will then access the registration database for
that country and expect to find details of your vessel, its radio equipment and who to contact. If they fail to find this
information, this may slow down any rescue.
12
FRANCAIS
ENGLISH
10.2. How to register
Register on-line (were available) or complete the appropriate registration form with
your EPIRB's identity; vessels details and emergency 24 hour contact numbers.
Wherever possible the forms are also pre-printed with the correct mailing address
and a faxback number. If your form does not have a mailing address, contact your
supplier. When you have completed the form, you can choose to fax it or mail it.
ESPAÑOL
It is usual to receive confirmation when you register. USA and UK owners will also
receive a "Decal" sticker which you must fit to the EPIRB itself. The Decal is proof
of registration. Not having a Decal may be an offence in some countries.
UK EPIRB Registry
Mail or Fax to:
NOAA/SARSAT
The Epirb Registry, Falmouth MRCC, Pendennis
Point, Castle Drive, Falmouth, Cornwall, TR11 4WZ
NSOF, E/SP3
Tel: + 44 (0)1326 211569
4231 Suitland Road
Fax: + 44 (0)1326 319264
Suitland, MD 20746
Email: [email protected]
Fax No. 301-817-4565
On-line registration
Tel; 1-888-212-SAVE (7283) or 301-817-4515.
www.mcga.gov.uk/c4mca/epirb
ITALIANO
USA Sarsat Beacon Registration
DEUTSCH
Useful registration contacts are:
On-line registration
www.beaconregistration.noaa.gov
Australian coded beacons
Canada Beacon Registration
Australian Maritime Safety Authority
Canadian Beacon Registry
GPO Box 2181 Canberra City ACT 2601
CFB Trenton
Tel. +61 2 6279 5766
PO Box 1000 Stn Forces
Fax.+61 2 9332 6323
Astra, ON K0K 3W0
On-line registration
Tel. 1-877-406-SOS1 (7671)
www.beacons.amsa.gov.au
NEDERLANDS
Beacon Registration Section,
Fax: 1-877-406-FAX8 (3298)
Email: [email protected]
New Zealand coded beacons
On-line registration
Rescue Co-ordination Centre New Zealand PO Box
30050, Lower Hutt 5040
www.canadianbeaconregistry.forces.gc.ca
Tel: +64 4 577 8033
Fax +64 4 577 8041
Email: [email protected]
COSPAS-SARSAT provide registration details for many countries; use the web address www.cospas-sarsat.org and
follow the links to 406 MHz Beacons and Registration; alternatively. There is direct access to the database on line
at: www.406registration.com.
10.3. Radio licence
An EPIRB is a radio transmitter, if you vessel has already been allocated a radio callsign then you will already have
a radio licence. It is recommended that you should update your licence to include details of your EPIRB.
13
ENGLISH
FRANCAIS
ESPAÑOL
DEUTSCH
ITALIANO
NEDERLANDS
10.4. Sale or transfer
EPIRBs registered in the USA, Canada, UK, Australia and New Zealand do not normally need to be re-programmed
when transferred to a new vessel. Simply go on line (detail above) and complete another registration. For most other
countries, the EPIRB must be re-programmed with either the new vessel's Maritime Mobile Station Identity (MMSI)
or its radio callsign, whichever is required by the country controlling the new vessel. Since the EPIRB identity
contains a country code, it follows that changing the flag state of the vessel also means the EPIRB must be reprogrammed. For details of your nearest agent, either contact Kannad Marine using the details in the warranty
section, or visit the service section of the web site: www.kannadmarine.com.
10.5. Mandatory information for Australia and New Zealand
Advice to owners of Emergency Position Indicating Radio Beacons:
Registration of 406 MHz satellite Emergency Position Indicating Radio Beacons (EPIRB) with the EPIRB
Registration Section of the appropriate Maritime Safety Authority (MSA - see below) is mandatory because of the
global alerting nature of the system. The information provided in the registration card is used only for rescue
purposes. Fill in the owner registration card immediately on completion of the sales transaction. Mail the registration
card immediately. If the beacon is to enter service immediately, complete the registration card and fax the information
to the MSA. The original card must still be mailed to the MSA for hard-copy reference and filing. If the current owner
is transferring the beacon to a new owner, the current owner is required to inform the MSA by letter, fax or telephone
of the name and address of the new owner. The subsequent owner of the beacon is required to provide the MSA
with the information shown on the owner registration card. This obligation transfers to all subsequent owners.
*The MSA is the Australian Maritime Safety Authority or the Maritime Safety Authority of New Zealand, as
appropriate, whose respective fax numbers are .+61 2 9332 6323 (Australia) and +64 4 577 8041 (NZ).
10.6. USA Advice to owners of Emergency Position Indicating Radio Beacons:
Failure to register the EPIRB may result in a fine.
Beacon registration is now available on-line. This is the preferred method of registration; point your browser to
http://www.beaconregistration.noaa.gov and follow the instructions on-screen. Use the EPIRB form.
Other Information
At present, NOAA still accepts registration by mail or fax. The registration forms are pre-printed with the correct
mailing address and fax number. A registration form may be downloaded from the website given above. However
you register the beacon, you will be sent a decal which must be attached to the beacon
10.7. Emergency Contact
It is VITAL that the Emergency Contact information is accurate, particularly regarding the telephone number, as this
will be used to validate an alert. Only if the beacon registration and approximate location details can be confirmed
will USCG (United States Coast Guard) launch an immediate rescue, otherwise there will be a delay whilst further
alerts from the same source are received and verified.
11.MAINTENANCE
11.1. Battery replacement
Non SOLAS Vessels: The battery must be replaced before expiration date marked on the EPIRB body. Or if the
EPIRB is used for more than 30 minutes or for any reasons other than testing.
Important: The replacement of the battery pack may only be performed by the end user were it is allowed by your
local and national maritime authorities.
Only ever fit an original Kannad Marine branded replacement battery pack. If non original manufacturers
replacement parts are ever used KANNAD Marine declines all responsibility and warranty is invalidated.
You will need to replace the battery when:
• The indicated expiry date has been reached or
• The EPIRB has been used in an emergency situation or
• A false activation exceeds 30 minutes of use.
SOLAS Vessels: Any vessel subject to GMDSS inspection. The battery must be changed every 5 years according
to EPIRB Shore-based maintenance and annual testing guidelines IMO MSC/Circ. 1039. Replacement must be done
regardless of the expiration date marked on the EPIRB body.
11.2. Servicing
All servicing must be carried out by a McMurdo Ltd approved service agent. Always call your nearest agent and talk
to their service department before returning equipment. You can find your nearest service agent from:
• The Kannad Marine web site: www.kannadmarine.com.
• Contacting Kannad Marine direct (see warranty page).
• Contacting a Kannad Marine distributor.
Always retain the original packaging carton as it will be needed when sending the EPIRB for service.
14
ENGLISH
11.3. GMDSS inspections
If your vessel is subject to GMDSS regulations then you can expect to get regular visits from ship surveyors enforcing
national legislation. They will check the expiry dates and activate the EPIRB to prove that it really works and they will
read the identity message stored inside the EPIRB to check that you have registered it properly. Leisure vessels are
not subject to these inspections. However, in some countries passenger and fishing vessels are covered by the
legislation.
Passenger Aircraft;
This product contains small lithium metal batteries. The Safelink EPIRB can normally be taken on board a passenger
aircraft as a personal item in carry-on hand baggage. We recommend declaring the EPIRB to airline staff at check
in, in the same way you would for a laptop PC or video camera.
As air cargo;
This product contains small lithium metal batteries and may be classed as 'not restricted' for air cargo when handled
according to requirement PI 970 of the IATA Dangerous Goods Regulations (51st Edition). Always check with the
carrier concerned for any additional shipment restrictions that may apply.
FRANCAIS
12.TRANSPORTATION
ESPAÑOL
13.BATTERY REPLACEMENT PROCEDURE
DEUTSCH
• DO NOT CHARGE THE BATTERY
• DO NOT THROW IN FIRE
• DO NOT EXPOSE TO TEMPERATURE OVER 90°C
• DO NOT SHORT CIRCUIT
Important: The replacement of the battery pack may be performed by the user (if authorized by local
authorities) who will only use factory replacement pack (P/N 1202368).
CAUTION: Many states have regulations in place requiring some form of battery recycling. Please refer to
your local authorities before disposal.
NEDERLANDS
ITALIANO
13.1. Battery pack removal
(1)
(2)
(3)
(4)
Using a standard cross head screwdriver, fully unscrew the housing of battery pack located at the lower part
of the beacon.
Remove the housing.
Disconnect the white connector (a) located in the bottom of the housing and remove the connectors
harness (b).
Disconnect the battery pack from the connectors harness (b) by lifting up the locking straps of the 3 male
connectors (c).
15
ESPAÑOL
FRANCAIS
ENGLISH
13.2. Battery pack reassembly
DEUTSCH
(1)
(2)
(3)
14. AUTOMATIC RELEASE SYSTEM REPLACEMENT
14.1. Description
The automatic release system assembly is composed of a HAMMAR release system (A) and a severable axis (B)
fitted with a rubber washer (C).
NEDERLANDS
ITALIANO
(4)
(5)
Replace the O-ring (d) of the housing then connect the 3 male connectors (c) of the new battery pack to the 3
female connectors of the connectors harness (b).
CAUTION: to avoid reversal of polarity, the male connectors are fitted with a locking strap (e) and the
female connectors are fitted with a positioning lug (f); lift the locking straps (e) of each male connector
(c) and fix them to the positioning lugs (f) of each female connector.
Connect the connectors harness (b) to the white connector (a) located in the bottom of the housing.
Insert the battery pack into the housing of the beacon taking care not to pinch the wires.
CAUTION: the wires must be positioned on the opposite side of the white connector (a).
Reassemble and screw the housing of the battery pack.
Note the new expiration date (date of replacement + 6 years) in the field «Lithium battery Expiration date»
located on the beacon.
14.2. Replacement
Refer to drawing next page.
Open the container and remove the beacon (See 8.2.2. Installation of beacon into container).
(1)
Unscrew the severable axis (B) while maintaining pressed down the ejection plate (D) of the beacon and its
blocking piece (E).
(2)
Remove the automatic release system assembly.
(3)
On the new HAMMAR release system, tick the new replacement date (actual month / year + 2 years. Example
on drawing next page: release system replaced on Nov 2008, valid until Nov. 2010).
(4)
Press down the ejection plate (D) and maintain it pressed with its blocking piece (E).
(5)
Screw the new automatic release system assembly in the screw of the blocking piece.
16
NEDERLANDS
ITALIANO
DEUTSCH
ESPAÑOL
FRANCAIS
ENGLISH
Put back the beacon into the container and close the container (See 8.2.2. Installation of beacon into container).
Record the release system replacement page 102 of this manual.
17
1.1. Présentation du système COSPAS-SARSAT
COSPAS-SARSAT est un système global de détresse par satellites opérant dans la bande de fréquence 406 - 406.1
MHz.
La fréquence 406 MHz, codée avec l'identification de la balise, permet de déterminer la position de la détresse et
d'alerter rapidement les services de recherche et de sauvetage (S.A.R.) les plus proches.
Le système se compose de :
(1)
Radiobalises de détresse,
(2)
Satellites en orbite polaire (LEOSAR) et géostationnaires (GEOSAR),
(3)
Stations terrestres (LUTs),
(4)
Centres de Contrôles et de Mission (MCCs).
(5)
Les MCCs reçoivent les alertes produites par les LUT et les envoient soit à un centre de coordination de
sauvetage (RCC), soit à un point de contact SAR (centre d’alerte et de secours).
NEDERLANDS
ITALIANO
DEUTSCH
ESPAÑOL
FRANCAIS
ENGLISH
1. INTRODUCTION
Système COSPAS-SARSAT
1.2. Déclenchement de l’alerte et calcul de la position
Lorsqu’elles sont activées, les balises SafeLink transmettent, dans la fréquence 406 MHz, un message de détresse
contenant un numéro unique permettant d’identifier le type de détresse et le propriétaire de la balise ainsi que la
position GPS. Ce message est intercepté par les satellites COSPAS-SARSAT qui le stockent et le retransmettent
en permanence aux stations terrestres (LUTs). Grâce aux satellites géostationnaires (GEOSAR), l’alerte est lancée
dans les minutes qui suivent et transmise en tout point du globe. Le système LEOSAR (satellites en orbite polaire)
calcule la position de la détresse à un mile nautique près en utilisant les techniques de traitement Doppler. Le temps
typique d'attente pour le calcul d’une position est de moins d'une heure aux latitudes moyennes.
Grâce au récepteur GPS intégré, la position est transmise à 120 mètres près maximum dans les minutes qui
suivent le déclenchement de la détresse.
Les données sont traitées par les centres de contrôle de mission (MCC) qui les envoient aux centres de recherche
et de secours (RCC ou SAR) les plus proches de la détresse afin d'organiser les opérations de secours.
La fréquence 121.5 MHz est également transmise par la balise mais est seulement utilisée comme fréquence de
guidage dans la dernière phase des secours.
2. APPLICATION
Cette radiobalise de localisation des sinistres (RLS) est destinée à une utilisation en cas d'urgence maritime. Elle
est également homologuée pour ces risques.
Il n'est pas prévu ou il est déconseillé de l'utiliser sur terre ou dans l'air.
Utiliser la radiobalise uniquement dans des situations de danger grave et imminent. Les fausses alertes
intentionnelles peuvent entraîner des sanctions.
18
Cette radiobalise doit être enregistrée auprès de l'autorité nationale appropriée.
Voir Section 10. OBLIGATION D’ENREGISTREMENT page 30.
La fonction de cette radiobalise consiste à envoyer une alerte aux satellites COSPAS-SARSAT. Le délai de réception
d'une alerte dépend des positions des satellites à un moment précis, et peut être influencé par des obstructions
aériennes au-dessus du navire. Le délai de sauvetage après une alerte dépend de la performance globale des
organisations de recherche et de sauvetage.
ENGLISH
3. ENREGISTREMENT
NEDERLANDS
ITALIANO
DEUTSCH
4.1. Description du conteneur et du support mural
La balise est livrée soit dans un conteneur automatique (A) pour la version Pont catégorie 1, soit avec un support
mural (B) pour la version Survie catégorie 2.
Le conteneur (A) est destiné à protéger la balise et assurer son largage automatique en cas de naufrage grâce à un
largueur type HAMMAR H20 (1A). Ce conteneur est également équipé d'une goupille de verrouillage (2A). Il est
également équipé d’un aimant pour empêcher toute activation de la balise lorsqu’elle est dans son conteneur.
Il peut être fixé soit en position horizontale sur le pont du navire, soit en position verticale sur une cloison extérieure
(§ 8.2.1. Installation du conteneur).
Le support mural (B) est destiné à fixer la balise sur une paroi verticale. Il est équipé d'une goupille de verrouillage
(1B) pour empêcher toute éjection intempestive de la balise et d'un aimant pour empêcher l'activation de la balise
lorsqu'elle est dans son support.
ESPAÑOL
Les balises SafeLink sont des balises de détresse maritime (RBL) catégorie 1 Pont (SafeLink Auto) ou catégorie 2
Survie (SafeLink Manual+) à activation automatique. Les 2 versions sont équipées d’un GPS intégré.
FRANCAIS
4. PRESENTATION
19
ENGLISH
FRANCAIS
ESPAÑOL
DEUTSCH
NEDERLANDS
ITALIANO
4.2. Description de la balise
(1)
Sceau d’inviolabilité
pour prouver que la balise n’a jamais été manuellement activée.
(2)
Système de verrouillage :
pour empêcher toute activation accidentelle de la balise.
(3)
Bouton poussoir TEST :
pour effectuer un auto - test de la balise,
pour arrêter la balise si elle a été activée manuellement par le bouton ON (selon recommandations des
autorités locales).
(4)
Bouton MARCHE (ON) :
pour activer manuellement la balise.
(5)
Flash
pour une localisation visuelle de la balise par les opérations de SAR.
(6)
Témoins de bon fonctionnement (leds rouge et verte) :
pour vérifier le bon fonctionnement lors de la mise en MARCHE,
pour vérifier le bon fonctionnement lors d’un auto test.
(7)
Led de programmation
pour programmer la balise (par le constructeur ou les stations agréées).
(8)
Contacts eau de mer:
pour activer automatiquement la balise dès qu’elle est immergée.
(9)
Bande réfléchissante
(10) Orin :
pour amarrer la balise à un gilet de sauvetage, radeau, embarcation, etc.
Important: L'orin est utilisé pour amarrer la balise lorsqu'elle flotte dans l'eau. Ne pas fixer l'orin
au bateau lorsque vous installez la balise dans son support.
(11) Antenne 406 / 121.5 MHz
20
21
NEDERLANDS
ITALIANO
DEUTSCH
ESPAÑOL
FRANCAIS
ENGLISH
5. INSTRUCTIONS DE TESTS
FRANCAIS
ENGLISH
Test fréquences 406 / 121,5 MHz.
Il est conseillé d'effectuer un auto test une fois par mois. Il n’est pas nécessaire de retirer la balise de son support
ou du container pour effectuer l’auto test.
NOTE : Ce test doit donc être effectué uniquement durant les 5 premières minutes d'une heure ronde (H à H+5).
(1)
Appuyer sur le bouton TEST (3) pendant 2 secondes.
(2)
Pendant le test, les flashes (5) clignotent, le buzzer émet un signal sonore, la led de programmation rouge (7)
s’allume une fois.
(3)
A la fin du test, le résultat est indiqué par les leds verte (6a) ou rouge (6B) :
led verte (6a), 1 éclat : bon fonctionnement,
led rouge (6b), 1 éclat : fonctionnement défectueux.
Répéter 3 fois pour confirmer un mauvais fonctionnement de la balise avant de contacter le distributeur.
NOTE : ne pas confondre la led de programmation rouge (7) et le témoin rouge (6b) de fonctionnement défectueux.
ATTENTION : L'utilisation de cette balise est prohibée en dehors de toute condition réelle de détresse. Ne
pas utiliser à l’intérieur d’un radeau ou de toute embarcation couverte. Afin d'optimiser les
performances en localisation, éviter de masquer l'antenne GPS (ne pas placer les mains sur
le dôme transparent) et faire en sorte qu'il n'y ait aucun obstacle entre l'antenne GPS et le ciel.
6.1. Activation automatique
Attention : SafeLink Auto version Pont, catégorie 1 uniquement.
Lors d’un naufrage, le largueur se déclenche à une profondeur comprise entre 1.5 m et 4 m, libérant le couvercle et
permettant à la balise de remonter à la surface. La balise se met en route automatiquement lorsqu’elle est éjectée
du conteneur et au contact de l’eau.
Si possible, la balise doit être récupérée et attachée à un des radeaux de survie afin de marquer la position des
naufragés et non le lieu du naufrage.
NEDERLANDS
ITALIANO
DEUTSCH
ESPAÑOL
6. UTILISATION
6.2. Activation manuelle
6.2.1. Libération de la balise
SafeLink Auto Catégorie 1 (Pont)
Libérer la balise de son conteneur :
(1)
Soulever la goupille rouge de verrouillage du conteneur,
(2)
extraire la goupille de verrouillage,
22
enlever le capot du conteneur et extraire la balise.
FRANCAIS
ENGLISH
(3)
ITALIANO
DEUTSCH
ESPAÑOL
SafeLink Manual + Catégorie 2 (Survie)
Libérer la balise de son support mural :
(1)
Soulever la goupille de verrouillage.
(2)
Extraire la goupille de verrouillage en tirant vers soi pour déverrouiller le support.
(3)
Extraire la balise de son support.
NEDERLANDS
6.2.2. Activation par contact eau de mer
Mettre la balise à l’eau en ayant pris soin auparavant de l’attacher au bateau ou à un radeau de survie à l’aide de
l’orin.
La balise commencera à émettre dès qu’elle sera immergée (activation par contact eau de mer).
ARRÊT : sortir la balise de l’eau. L'émission s'arrêtera 10 secondes après.
23
NEDERLANDS
ITALIANO
DEUTSCH
ESPAÑOL
FRANCAIS
ENGLISH
6.2.3. Activation manuelle par bouton poussoir ON
(1)
(2)
(3)
(4)
(5)
Briser le sceau en poussant le système de verrouillage vers le haut.
Appuyer sur le bouton ON pendant 1 seconde.
Le buzzer émet un signal sonore toutes les secondes.
La balise effectue d’abord un auto test.
Après l’auto-test seul les flash blancs clignotent à une période de 3 secondes. Le buzzer continue à émettre
toutes les secondes.
(6)
Jeter la balise à la mer en prenant soin de l’attacher à l’aide de l’orin.
ARRÊT : appuyer sur le bouton TEST.
7. FAUSSES ALARMES
7.1. Prévention des fausses alarmes
Important: avant d’extraire la balise, vérifier qu’il n’y a ni sel ni d’humidité sur les contacts eau de mer.
Nettoyer si nécessaire (risque d’activation).
Les fausses alarmes causées par des activations accidentelles de balises provoquent inutilement le déclenchement
des secours.
Il est donc impératif, lorsqu’une activation accidentelle a été provoquée, de :
(1)
contacter immédiatement les autorités S.A.R. les plus proches (garde côtes, CROSS, sémaphores, etc.) afin
de les prévenir qu’il s’agit d’une fausse alarme, ceci afin d’éviter la mise en oeuvre des opérations de secours.
Dans ce cas les éléments suivants doivent être fournis :
numéro unique de la balise (code hexadécimal 15 chiffres sur l’étiquette de la balise),
heure et durée de l’alarme,
position au moment de l’alarme.
(2)
Sur instructions des autorités, désactiver manuellement la balise (voir § 7.2.).
7.2. Désactivation de la balise
Si la balise a été activée par erreur, la désactiver de la manière suivante (en relation avec autorités) :
7.2.1. Balise mise à l’eau
• Retirer la balise de l’eau,
• attendre quelques secondes la désactivation du contact eau de mer,
• si la balise émet toujours (flash en fonction), la désactiver manuellement (voir § 7.2.2.).
7.2.2. Balise activée manuellement
• Appuyer puis relâcher le bouton TEST pendant 2 secondes,
•
si la balise émet toujours (flash en fonction), priver l’émetteur de toute source d’énergie (voir § 7.2.3.).
7.2.3. Mise hors service de la balise
Si malgré les actions précédentes la balise ne s’arrêtait pas, dévisser, extraire puis déconnecter le pack piles (Voir
13.1. Démontage du pack piles).
24
NEDERLANDS
ITALIANO
DEUTSCH
ESPAÑOL
FRANCAIS
8.1. Montage de la plaquette d’instructions
Les balises SafeLink sont livrées avec une plaquette d'instructions d’utilisation. Il s'agit d'une plaquette rigide donnant
des instructions visuelles de base permettant d'utiliser la balise en cas d'urgence.
ENGLISH
8. INSTALLATION DE LA BALISE
La plaquette d’instructions doit être fixée à côté de la balise de façon à ce qu’elle soit clairement visible en cas
d’urgence. Elle doit être fixée à l’aide de quatre vis (non fournies). Les dimensions pour le montage et le perçage
sont indiquées dans le schéma ci-dessus.
Important : ne pas peindre la plaquette ni utiliser de solvants de dégraissage pour la nettoyer.
25
8.2.1. Installation du conteneur
Le conteneur doit être fixé à l’extérieur, sur le pont du navire ou contre une cloison. Les impératifs sont les suivants :
• position horizontale ou verticale,
• lieu dégagé permettant la remontée à la surface de la balise en cas de naufrage,
ESPAÑOL
FRANCAIS
ENGLISH
8.2. SafeLink Auto Catégorie 1 (Pont)
Attention : prendre garde aux obstacles que peuvent constituer cordages, antennes ou haubans ;
être accessible à l’équipage pour une utilisation manuelle,
être solidement fixé au bateau au moyen de 4 vis selon le gabarit de perçage indiqué ci-dessous.
NEDERLANDS
ITALIANO
DEUTSCH
•
•
Note: dimensions en millimètres (pouces entre parenthèses).
Rappel : la plaquette d’instructions doit être placée à côté du conteneur.
26
ENGLISH
FRANCAIS
8.2.2. Installation de la balise dans le conteneur
Attention : Si le support mural est déjà installé sur la balise, retirer le avant d'installer la balise dans son conteneur.
(1)
Soulever puis extraire la goupille du capot supérieur afin d’ôter le capot supérieur.
Placer la balise dans le conteneur en glissant l’antenne sous le largueur HAMMAR.
(3)
Mettre en place le capot supérieur en veillant à placer les encoches arrière (a) du capot dans les languettes
arrières (b) du support.
DEUTSCH
ESPAÑOL
(2)
(b)
ITALIANO
(a)
(a)
(4)
Insérer la goupille dans le capot supérieur et le trou de la vis de fixation du largueur HAMMAR.
(5)
Abaisser la goupille jusqu’à ce qu’elle soit bloquée par l’ergot situé sur le capot supérieur.
NEDERLANDS
(b)
27
8.3.1. Installation du support
Le support doit être fixé dans un endroit aussi dégagé que possible, connu de tous et accessible à l’équipage pour
une utilisation d’urgence. Il doit être solidement fixé sur une paroi verticale au moyen de 3 vis selon le gabarit de
perçage indiqué ci-dessous.
NEDERLANDS
ITALIANO
DEUTSCH
ESPAÑOL
FRANCAIS
ENGLISH
8.3. SafeLink Manual+ catégorie 2 (Survie)
Note : un aimant inséré dans le support empêche l’activation de la balise (eau, humidité) lorsqu’elle est installée sur
son support.
Note: dimensions en millimètres (pouces entre parenthèses).
Rappel : la plaquette d'instructions doit être placée à proximité du support mural.
28
(1)
(2)
(3)
NEDERLANDS
ITALIANO
DEUTSCH
ESPAÑOL
FRANCAIS
ENGLISH
8.3.2. Installation de la balise dans le support
Insérer la balise dans son support.
Insérer la goupille dans le manchon de verrouillage du support.
Verrouiller la goupille en la rabattant vers le bas jusqu’à entendre le click de verrouillage.
29
ENGLISH
9. SPECIFICATIONS TECHNIQUES
Température de fonctionnement
: -20°C à +55°C.
Température de stockage
: -30°C à +70°C.
Piles au lithium
• Validité
: Durée de stockage 6 ans
Durée de fonctionnement
: 48 heures mini. à -20°C.
: LiMnO2 non dangereuses
FRANCAIS
Etanche à 1 bar
Dimensions
Poids
Balise avec support
Conteneur
250 x 106 x83 mm
250 x 111 x 91 mm
287.6 x 147.5 x 96.7 mm
Balise seule
Balise avec support
Balise avec conteneur
627 g.
679 g.
1280 g.
ESPAÑOL
EMISSION SATELLITE 406 MHz
DEUTSCH
ITALIANO
NEDERLANDS
Balises seule
Fréquence
: 406.037 MHz ± 0.001 MHz
Puissance de sortie UHF
: 5W nominal (37dBm ± 2 dB)
Modulation
: 16K0G1D, Biphase L ± 1.1 ± 0.1 radians
Période de répétition
: 50 sec. ± 5%
Durée d’émission
: 520 msec. ± 1%
RADIORALLIEMENT 121.5 MHz
Fréquence
: 121.5 MHz ± 0.006 MHz
Puissance
: 50 mW (17dBm ± 3 dB)
Modulation
: Balayage audio AM
Format de modulation
: 3K20A3X
Emission
: Continue
Flash
: Super LEDs / 0.75 Candela / 23 flashes par minute
GPS
: FASTRAX UC322
10.OBLIGATION D’ENREGISTREMENT
Vous devez enregistrer votre radiobalise auprès des autorités appropriées. Le non-enregistrement peut ralentir le
sauvetage et entraîner la mort. Vous devez légalement enregistrer votre radiobalise.
10.1. Vue d’ensemble
La radiobalise est préprogrammée avec une identité unique avant d'atteindre le client final. Ceci est effectué par le
fabricant ou, dans certains cas, le distributeur. L'identité comprend un code de pays à 3 chiffres. C'est le pays qui
prend en charge le stockage des détails spécifiques d'enregistrement de la radiobalise. Dans la plupart des cas, c'est
le pavillon arboré par le navire qui spécifie le pays de la balise. Le numéro d'identification du pays programmé dans
votre radiobalise peut être consulté sur l'étiquette située à l'arrière du dispositif. Vous devez enregistrer les
informations propriétaires de votre radiobalise auprès des autorités du pays concerné.
Lorsque vous activez votre radiobalise en cas d'urgence, le centre de coordination des recherches de secours
maritimes (MRCC) le plus proche va recevoir le message et décoder le code de pays. Le centre va ensuite accéder
à la base de données d'enregistrement pour ce pays et doit y trouver les informations détaillées concernant votre
navire, son matériel radio et la personne à contacter. S'il n'arrive pas à trouver ces informations, cela peut ralentir
tout sauvetage.
10.2. Comment s’enregistrer
10.2.1. Général
S'enregistrer en ligne (si disponible) ou compléter le formulaire d'enregistrement approprié en indiquant l'identité de
votre radiobalise ; des informations sur le navire et les numéros des personnes à contacter d'urgence 24 heures sur
24. Partout où c'est possible, les formulaires sont également pré-imprimés avec une adresse postale correcte et un
30
10.5. Contact d'urgence
Il est VITAL que les informations relatives à la personne à contacter d'urgence soient précises, en particulier
concernant le numéro de téléphone, puisque ce dernier sera utilisé pour valider une alerte. Uniquement après
confirmation des informations sur l'enregistrement de la balise et son emplacement approximatif, le centre de
secours le plus proche va lancer un sauvetage immédiat, sinon il y a un délai d'attente pendant que d'autres alertes
provenant de la même source sont reçues et vérifiées.
DEUTSCH
10.4. Vente ou transfert
Il n'est pas nécessaire de reprogrammer les radiobalises enregistrées aux Etats-Unis, au Canada, au Royaume-Uni,
en Australie et en Nouvelle Zélande si les balises sont transférées vers un nouveau navire. Il faut simplement aller
en ligne (voir détails ci-dessus) et compléter un autre formulaire d'enregistrement. Pour la plupart des autres pays,
la radiobalise doit être reprogrammée avec soit l'identité de station mobile maritime (MMSI) du nouveau navire, soit
son signal d'appel radio, en fonction du pays contrôlant le nouveau navire. Puisque l'identité de la radiobalise contient
un code de pays, le changement de l'Etat du pavillon du navire signifie alors qu'il faut également reprogrammer la
radiobalise. Pour obtenir des renseignements de votre agent le plus proche, veuillez contacter Kannad Marine en
utilisant les informations indiquées dans la section garantie, ou visiter la section service du site Web :
www.kannadmarine.com.
ITALIANO
10.3. Licence Radio
Une radiobalise de détresse est un émetteur radio. Si un signal d'appel radio a déjà été affecté à votre navire, c'est
que vous avez déjà une licence radio. Il est recommandé de mettre à jour votre licence afin de saisir les informations
détaillées de votre radiobalise.
ESPAÑOL
FRANCAIS
10.2.2. Canada
Enregistrement des balises au Canada
Registre Canadien des balises
CFB Trenton
PO Box 1000 Stn Forces
Astra, ON K0K 3W0
Tel. 1-877-406-SOS1 (7671)
Fax: 1-877-406-FAX8 (3298)
Email: [email protected]
Enregistrement en ligne
www.canadianbeaconregistry.forces.gc.ca
ENGLISH
numéro de télécopie. Si votre formulaire ne contient pas d'adresse postale, veuillez contacter votre fournisseur.
Lorsque vous avez complété le formulaire, vous pouvez choisir de l'envoyer par télécopie ou par la poste.
Les satellites COSPAS-SARSAT fournissent les détails d'enregistrement pour de nombreux pays, utiliser l'adresse
Internet suivante www.cospas-sarsat.org et suivre les liens jusqu'à Balises 406 MHz et Enregistrement; ou bien vous
pouvez accéder directement à la base de données en ligne en cliquant sur : www.406registration.com.
11.1. Remplacement de la batterie
Navire non SOLAS : La batterie doit être remplacée avant la date d'expiration indiquée sur le corps de la radiobalise.
Ou si la radiobalise est utilisée pendant plus de 30 minutes ou pour des raisons autres que le test.
Important : Le remplacement du bloc-batterie peut être effectué uniquement par l'utilisateur final, si cela est autorisé
par vos autorités maritimes locales et nationales.
N'utiliser toujours qu'un bloc-batterie de remplacement de la marque d'origine Kannad Marine. Si des pièces de
rechange qui ne sont pas de fabrication d'origine sont utilisées, KANNAD Marine décline toute responsabilité et la
garantie est annulée.
Vous devrez donc remplacer la batterie si :
• La date d'expiration indiquée a été atteinte ou
• La Radiobalise a été utilisée dans une situation d'urgence ou
• Une activation involontaire dépasse 30 minutes d'utilisation.
Navire SOLAS : Tout navire soumis à l'inspection SMDSM (système mondial de détresse et de sécurité en mer). La
batterie doit être changée tous les 5 ans selon les directives de test annuel et de maintenance côtière IMO MSC/Circ.
1039 de la radiobalise. Le remplacement doit être effectué sans tenir compte de la date d'expiration indiquée sur le
corps de la radiobalise.
11.2. Entretien
Tous les travaux d'entretien doivent être réalisés par un agent de service accrédité par la société McMurdo Ltd. Il
31
NEDERLANDS
11.MAINTENANCE
FRANCAIS
ENGLISH
faut toujours appeler votre agent le plus proche et contacter le service après-vente avant de renvoyer le matériel.
Vous pouvez trouver votre agent de service le plus proche à partir :
• Du site Web de Kannad Marine : www.kannadmarine.com.
• D'un contact direct avec Kannad Marine (voir page de garantie).
• D'un contact direct avec un distributeur de Kannad Marine.
Il faut toujours conserver l'emballage d'origine qui pourrait être nécessaire lors de l'envoi de la radiobalise pour
entretien ou réparation.
11.3. Inspections SMDSM
Si votre navire est soumis à la réglementation SMDSM, attendez-vous à recevoir régulièrement la visite
d'inspecteurs maritimes faisant respecter la législation nationale. Ils vont contrôler les dates d'expiration et activer la
radiobalise afin de vérifier si elle fonctionne vraiment ; ils vont également lire le message d'identité contenu à
l'intérieur de la radiobalise pour vérifier si vous avez correctement enregistrée cette dernière. Les navires de loisirs
ne sont pas soumis à ces inspections. Cependant, dans certains pays les bateaux de pêche et les bateaux chargés
du transport de personnes sont couverts par la législation.
12.TRANSPORT
13.REMPLACEMENT DES PILES
Avertissement relatif aux piles
• NE PAS TENTER DE RECHARGER LA PILE
• NE PAS LA JETER DANS LE FEU
• NE PAS L'EXPOSER A UNE TEMPERATURE DE PLUS DE 90°C
• NE PAS COURT-CIRCUITER
Important : Le remplacement des piles peut être effectué par l’utilisateur si autorisé par les autorités
nationales) qui utilisera uniquement les piles d’origine (P/N 1202368)
ATTENTION : La réglementation concernant le recyclage des piles peut être différente selon les états.
Renseignez vous auprès de vos autorités locales avant de vous en débarrasser.
13.1. Démontage du pack piles
NEDERLANDS
ITALIANO
DEUTSCH
ESPAÑOL
Avion de passagers
Ce produit contient des petites batteries métalliques au lithium. La radiobalise Safelink peut être normalement
transportée à bord d'un avion de passagers en tant qu'objet personnel dans un bagage à main. Nous vous
recommandons de déclarer la radiobalise au personnel de l'aéroport lors de l'enregistrement, tout comme vous le
feriez pour un ordinateur portable ou une caméra vidéo.
Fret aérien
Ce produit contient des petites batteries métalliques au lithium et peut être classé comme «non réglementé» pour
fret aérien s'il est manipulé selon l'exigence PI 970 de la 51ème édition de la Réglementation pour le transport des
marchandises dangereuses de l'Association du Transport Aérien International (IATA). Toujours contrôler avec le
transporteur concernant toute restriction supplémentaire d'expédition pouvant s'appliquer.
(1)
(2)
32
A l’aide d’un tournevis cruciforme, dévisser le boîtier pack piles situé au bas de la balise.
Extraire le boîtier.
Déconnecter le connecteur blanc (a) situé au fond du boîtier et extraire le faisceau de connecteurs (b)
Déconnecter le pack piles du faisceau de connecteurs (b) en soulevant les languettes de verrouillage des 3
connecteurs mâle.
ENGLISH
(3)
(4)
(2)
(3)
(4)
(5)
Changer le joint (d) du boîtier puis connecter les 3 connecteurs male (c) du nouveau pack de piles aux 3
connecteurs femelles du faisceau de connecteurs (b).
ATTENTION: pour éviter toute inversion de polarité, les connecteurs males sont équipés de languettes
(e) et les connecteurs femelles de détrompeurs (f) ; soulever les languettes (e) de chaque connecteur
male (c) et fixer les aux détrompeurs (f) de chaque connecteur femelle.
Connecter le faisceau de connecteurs (b) au connecteur blanc (a) situé au fond du boîtier.
Insérer le pack piles dans le boîtier de la balise en prenant garde de ne pas pincer les fils.
ATTENTION: les fils doivent être positionnés du côté opposé au connecteur blanc (a).
Remonter et visser le boîtier pack piles sur la balise.
Noter la nouvelle date d’expiration des piles (date de remplacement + 6 ans) dans le champ «Lithium battery
Expiration date» de l’étiquette située au dos de la balise.
ITALIANO
(1)
DEUTSCH
ESPAÑOL
FRANCAIS
13.2. Remontage du pack piles
14.1. Description
L'ensemble largueur hydrostatique est composé d'un largueur hydrostatique HAMMAR (A) et d'une vis sectionnable
(B) équipée d'une rondelle caoutchouc (C).
14.2. Remplacement
Voir schéma détaillé page suivante.
Ouvrir le conteneur et extraire la balise (Voir 8.2.2. Installation de la balise dans le conteneur).
(1)
Dévisser la vis sectionnable (B) tout en maintenant appuyée la plaque d'éjection (D) de la balise et sa pièce
de blocage (E).
33
NEDERLANDS
14. REMPLACEMENT DU LARGUEUR HYDROSTATIQUE
Enlever l'ensemble largueur hydrostatique.
Sur le nouveau largueur, cocher la nouvelle date de remplacement (mois / année actuels + 2 ans. Exemple
schéma page suivante : largueur remplacé Nov 2008, validité Nov. 2010).
(4)
Rabattre la plaque d'éjection (D) en la maintenant appuyée avec sa pièce de blocage (E).
(5)
Visser le nouvel ensemble hydrostatique dans la vis de la pièce de blocage.
Remettre en place la balise et fermer le conteneur (Voir 8.2.2. Installation de la balise dans le conteneur).
Enregistrer le changement de largueur page 102 de ce manuel.
NEDERLANDS
ITALIANO
DEUTSCH
ESPAÑOL
FRANCAIS
ENGLISH
(2)
(3)
34
COSPAS-SARSAT System
1.2. Activación de la alerta y cálculo de la posición
Al activarse, las balizas SafeLink transmiten, en la frecuencia de 406 MHz, un mensaje de socorro con un número
único que permite identificar el tipo de emergencia, el propietario de la baliza y la posición GPS. Dicho mensaje es
interceptado por los satélites COSPAS-SARSAT, que lo almacenan y lo retransmiten continuamente a las
estaciones terrestres (LUT). Gracias a los satélites geoestacionarios (GEOSAR), la alerta se emite a todo el globo
minutos después de su activación. El sistema LEOSAR (satélites en órbita polar) calcula la posición de la
emergencia con una precisión de una milla náutica mediante técnicas de tratamiento Doppler. El tiempo típico de
cálculo de una posición es de menos de una hora en las latitudes medias.
Gracias al receptor GPS, la posición se transmite con una precisión de 120 metros unos minutos después de la
activación de la emergencia.
Los centros de control de misión (MCC) tratan los datos y los envían a los centros de investigación y de socorro
(RCC o SAR) más próximos a la emergencia para organizar cuanto antes la operación de salvamento.
La baliza también utiliza la frecuencia de 121,5 MHz, pero únicamente como frecuencia guía en la última fase del
salvamento.
2. APLICACIÓN
Esta RLS (Radiobaliza de Localización de Siniestros) ha sido diseñada para su uso en emergencias marítimas y
aprobada para dichas contingencias.
No ha sido diseñada ni se recomienda su uso en tierra o en aire.
Esta RLS deberá utilizarse únicamente en situaciones de peligro grave e inminente. Las falsas alarmas
intencionadas serán penalizadas.
35
FRANCAIS
NEDERLANDS
ITALIANO
DEUTSCH
ESPAÑOL
1.1. Presentación del sistema COSPAS-SARSAT
COSPAS-SARSAT es un sistema global de socorro mediante satélites que operan en la banda de frecuencia 406 406.1 MHz.
La frecuencia de 406 MHz, codificada junto a la identificación de la baliza, permite determinar su posición y alertar
rápidamente a los servicios de búsqueda y rescate (SAR) más próximos.
El sistema está formado por:
(1)
Distress beacons;
(2)
Satellites on polar orbits (LEOSAR) and geostationary satellites (GEOSAR);
(3)
Local User Terminals (LUTs);
(4)
Mission and Rescue Control Centers (MRCC's).
(5)
MCCs receive alerts produced by LUTs and forward them to Rescue Coordination Centers (RCCs) or Search
and Rescue (S.A.R.) Points Of Contacts.
ENGLISH
1. INTRODUCCIÓN
3. REGISTRO
ENGLISH
Esta RLS deberá registrarse ante la autoridad nacional correspondiente.
Ver Sección 10. REGISTRO OBLIGATORIO página 46.
La función de esta RLS es enviar un mensaje de alarma a los satélites COSPAS-SARSAT. La velocidad de
recepción de dicho mensaje dependerá de las posiciones de los satélites en el momento de su envío y puede verse
afectada por posibles obstáculos existentes en el buque. El tiempo de rescate tras la recepción de un mensaje de
alerta dependerá de las organizaciones de Búsqueda y salvamento correspondientes.
NEDERLANDS
ITALIANO
DEUTSCH
ESPAÑOL
FRANCAIS
4. PRESENTACIÓN
Las balizas SafeLink son balizas de emergencia marítima (RBLS) de activación automática de categoría 1 Puente
(SafeLink Auto) o categoría 2 Supervivencia (SafeLink Auto). Ambas versiones cuentan con GPS integrado.
4.1. Descripción del contenedor y del soporte mural
La baliza se entrega en un contenedor
automático (A) (versión Puente, categoría 1) o
con soporte mural (B) (versión Supervivencia,
categoría 2).
El contenedor (A) está diseñado para proteger
la baliza y garantizar su lanzamiento
automático en caso de naufragio gracias a un
lanzador tipo HAMMAR H20 (1A). El
contenedor cuenta con un pasador de
bloqueo (2A) ara evitar cualquier expulsión
intempestiva y con un imán para evitar la
activación de la baliza cuando está en su
contenedor.
Puede fijarse en posición horizontal (en el
puente del navío) o en posición vertical (en un
tabique exterior) (§ 8.2.1. Instalación del contenedor).
El soporte mural (B) está diseñado para fijar la baliza en una pared vertical. Cuenta con un pasador de bloqueo (1B)
para evitar cualquier expulsión intempestiva y con un imán para evitar la activación de la baliza cuando está en su
soporte.
4.2. Descripción de la baliza
(1)
Sello de inviolavilidad
Demuestra que la baliza no se ha activado nunca manualmente.
(2)
Sistema de bloqueo
Evita cualquier activación accidental de la baliza.
(3)
Pulsador TEST:
Realiza un auto-test de la baliza.
Detiene la baliza, si activación manual mediante pulsador ON (según recomendaciones de las
autoridades locales).
(4)
Botón MARCHA (ON):
Activa manualmente la baliza.
(5)
Flash
Permite la localización visual de la baliza durante las operaciones de SAR.
(6)
Testigos del correcto funcionamiento de la baliza (leds rojo y verde):
Permiten comprobar el correcto funcionamiento de la baliza tras su puesta en MARCHA.
Permiten comprobar el correcto funcionamiento de la baliza tras un auto-test.
(7)
Led de programación
Permite programar la baliza (por el constructor o por estaciones certificadas).
(8)
Contactos agua de mar:
Permite activar automáticamente la baliza cuando se sumerge.
(9)
Banda reflectante
(10) Orinque:
Permite amarrar la baliza a un chaleco salvavidas, a una balsa de salvamento, a una embarcación, etc.
Importante: El orinque se utiliza para amarrar la baliza de forma que flote. No fijar el orinque al
barco si se instala la baliza en su soporte.
(11) Antena 406 / 121,5 MHz
36
37
NEDERLANDS
ITALIANO
DEUTSCH
ESPAÑOL
FRANCAIS
ENGLISH
5. INSTRUCCIONES DE TESTS
FRANCAIS
ENGLISH
Test de frecuencias 406 / 121,5 MHz.
Se recomienda realizar un autotest una vez al mes. No es necesario retirar la baliza de su soporte o del
contenedor para realizar el autotest.
NOTA: Este test deberá realizarse únicamente en los 5 primeros minutos después de la hora en punto (H a H+5).
(1)
Pulsar el botón TEST (3) durante 2 segundos.
(2)
Durante el test, los flashes (5) parpadearán, la bocina emitirá una señal sonora y el led de programación rojo
(7) se encenderá una vez.
(3)
Al finalizar el test, el resultado se indicará mediante los leds verde (6a) o rojo (6B):
led verde (6a), 1 destello: funcionamiento correcto
led rojo (6b), 1 destello: funcionamiento defectuoso
Repetir 3 veces para confirmar el funcionamiento defectuoso de la baliza antes de contactar con el distribuidor.
NOTA: no confundir el led de programación rojo (7) con el testigo rojo (6b) de funcionamiento defectuoso.
ADVERTENCIA: La utilización de esta baliza está totalmente prohibida en el caso de no producirse una
situación real de socorro. No debe utilizarse en el interior de una balsa de salvamento ni en
ninguna embarcación cubierta. Para optimizar su rendimiento de localización, evitar tapar la
antena GPS (no poner las manos sobre la cúpula transparente) y evitar los obstáculos entre la
antena GPS y el cielo.
6.1. Activación automática
Advertencia: únicamente para SafeLink Auto versión Puente, categoría 1.
Si se produce un naufragio, el lanzador se activará a una profundidad de entre 1,5 y 4 metros, donde abrirá la tapa
y permitirá que la baliza salga a la superficie. La baliza se pondrá en marcha automáticamente al salir expulsada
del contenedor y entrar en contacto con el agua.
Si fuera posible, deberá recuperarse y amarrarse la baliza a una de las balsas de salvamento para marcar la
posición de los supervivientes y no el lugar del naufragio.
NEDERLANDS
ITALIANO
DEUTSCH
ESPAÑOL
6. UTILIZACIÓN
6.2. Activación manual
6.2.1. Liberación de la baliza
SafeLink Auto Categoría 1 (Puente)
Liberar la baliza de su contenedor:
(1)
Levantar el pasador de bloqueo rojo del contenedor
(2)
Retirar el pasador de bloqueo.
(3)
Quitar la tapa del contenedor y extraer la baliza..
38
ESPAÑOL
FRANCAIS
ENGLISH
SafeLink Manual+ Categoría 2 (Supervivencia)
Liberar la baliza de su soporte manual:
(1)
Levantar el pasador de bloqueo.
(2)
Extraer el pasador de bloqueo tirando hacia sí para desbloquear el soporte.
(3)
Extraer la baliza de su soporte.
ITALIANO
DEUTSCH
6.2.2. Activación por contacto con agua de mar
Poner la baliza en el agua después de amarrarla a un barco o a una balsa de salvamento mediante el orinque.
La baliza comenzará a emitir al entrar en contacto con el agua de mar.
PARADA: sacar la baliza del agua (parada a los 10 segundos).
NEDERLANDS
6.2.3. Activación manual mediante pulsador ON
(1)
(2)
(3)
(4)
(5)
Romper el sello empujando hacia arriba.
Pulsar el botón ON durante 1 segundo.
La bocina emitirá una señal sonora cada segundo.
La baliza realizará un auto-test.
Tras el auto-test, solamente parpadearán los flashes blancos cada 3 segundos. La bocina continuará
emitiendo cada segundo.
(6)
Echar al mar la baliza después de amarrarla con ayuda del orinque.
(7)
Importante: aunque se active la baliza mediante el botón ON, deberá echarse al agua para garantizar su
óptimo funcionamiento.
PARADA: pulsar el botón TEST.
39
7.2. Desactivación de la baliza
Si la baliza se ha activado por error, desactivarla de la siguiente forma (junto a las autoridades):
7.2.2. Baliza activada manualmente
• Pulsar el botón TEST durante 2 segundos y soltar;
7.2.1. Baliza en el agua
• Sacar la baliza del agua
• Esperar unos segundos a que se desactive el contacto de agua de mar
• Si la baliza sigue emitiendo (flash en funcionamiento), desactivarla manualmente (véase § 7.2.2.).
•
-Si la baliza continúa emitiendo (flash en funcionamiento), privar al emisor de cualquier fuente de energía
(véase § 7.2.3.).
7.2.3. Apagado de la baliza
Si, a pesar de las acciones anteriores, la baliza no se desactivase, extraer y desconectar el pack de pilas (véase §
13.1. SUSTITUCIÓN DE PILAS).
NEDERLANDS
ITALIANO
ESPAÑOL
7.1. Prevención de falsas alarmas
Importante: antes de extraer la baliza, comprobar que no haya sal ni humedad en los contactos de agua de
mar. Limpiarlos si fuera necesario (riesgo de activación).
Las falsas alarmas causadas por activaciones accidentales de balizas provocan la activación del proceso de
salvamento innecesariamente.
Por ello, si se produce una activación accidental, es obligatorio:
(1)
Contactar inmediatamente con las autoridades S.A.R. más próximas (guardacostas, CROSS, semáforos,
etc.) para informarles de que se trata de una falsa alarma y evitar que se lleven a cabo operaciones de
rescate. En ese caso, habrá que facilitar la siguiente información:
-número único de la baliza (código hexadecimal de 15 cifras indicado en la etiqueta de la baliza)
-hora y duración de la alarma
-posición en el momento de la alarma.
(2)
Seguir las instrucciones de las autoridades para desactivar la baliza (véase § 7.2.).
Importante: antes de extraer la baliza, compruebe que no haya ni sal ni humedad en los contactos de agua
de mar. Limpiarlos si fuera necesario (riesgo de activación).
DEUTSCH
FRANCAIS
ENGLISH
7. FALSAS ALARMAS
40
8. INSTALACIÓN DE LA BALIZA
La lámina de instrucciones deberá fijarse junto a la baliza, de forma que quede visible en caso de emergencia. Se
fijará mediante cuatro tornillos (no incluidos). Las dimensiones de montaje y perforado están incluidas en el esquema
anterior.
Importante: no pintar la lámina ni utilizar disolventes desengrasantes para limpiarla.
41
NEDERLANDS
ITALIANO
DEUTSCH
ESPAÑOL
FRANCAIS
ENGLISH
8.1. Montaje de la lámina de instrucciones
Las balizas SafeLink se entregan con una lámina de instrucciones de uso. Se trata de una lámina rígida con
instrucciones visuales básicas sobre la utilización de la baliza en caso de emergencia.
8.2.1. Instalación del contenedor
El contenedor deberá fijarse en el exterior, sobre el puente del navío o sobre un tabique del mismo. Deberán
cumplirse las siguientes condiciones:
• posición horizontal o vertical;
• lugar despejado que permita que la baliza salga a la superficie en caso de naufragio;
ESPAÑOL
FRANCAIS
ENGLISH
8.2. SafeLink Auto categoría 1 (Puente)
Advertencia: téngase en cuenta que los cabos, antenas y obenques pueden constituir obstáculos;
lugar accesible para la tripulación en caso de requerirse una activación manual;
baliza fijada sólidamente al barco mediante 4 tornillos de las dimensiones indicadas a continuación.
NEDERLANDS
ITALIANO
DEUTSCH
•
•
Nota: dimensiones en milímetros (pulgadas entre paréntesis).
Recordatorio: la lámina de instrucciones debe colocarse cerca del contenedor.
42
ENGLISH
FRANCAIS
8.2.2. Instalación de la baliza en el contenedor
Advertencia: Si al soporte mural ya está instalado en la baliza, retirarlo antes de instalar la baliza en su contenedor.
(1)
Levantar y extraer el pasador de la tapa superior para retirar la tapa superior.
Colocar la baliza en el contenedor deslizando la antena bajo el lanzador HAMMAR.
(3)
Colocar la tapa superior encajando las muestras traseras de la tapa (a) en las lengüetas traseras del soporte
(b).
DEUTSCH
ESPAÑOL
(2)
(b)
(a)
(b)
(4)
Introducir el pasador en la tapa superior y en el agujero del tornillo superior de fijación del lanzador HAMMAR.
(5)
Bajar el pasador hasta que quede bloqueado por la guía situada en la tapa superior.
43
NEDERLANDS
ITALIANO
(a)
8.3.1. Instalación del soporte
El soporte deberá fijarse en un lugar despejado, conocido por todos y accesible para la tripulación en caso de
producirse una emergencia. Deberá fijarse sólidamente a una pared vertical mediante 3 tornillos, tal y como indica
la plantilla de perforación incluida a continuación.
NEDERLANDS
ITALIANO
DEUTSCH
ESPAÑOL
FRANCAIS
ENGLISH
8.3. SafeLink Manual+ categoría 2 (Supervivencia)
Nota: un imán situado en el soporte impide la activación de la baliza (agua, humedad) mientras esté instalada en su
soporte.
Nota: dimensiones en milímetros (pulgadas entre paréntesis).
Recordatorio: la lámina de instrucciones deberá colocarse cerca del soporte.
44
(1)
(2)
(3)
NEDERLANDS
ITALIANO
DEUTSCH
ESPAÑOL
FRANCAIS
ENGLISH
8.3.2. Instalación de la baliza en el soporte
Introducir la baliza en el soporte.
Introducir el pasador en el tubo de bloqueo del soporte.
Bloquear el pasador llevándolo hacia abajo hasta oír el clic de bloqueo.
45
ENGLISH
9. ESPECIFICACIONES TÉCNICAS
Temperatura de funcionamiento
: -20°C a +55°C.
Temperatura de almacenamiento
: -30°C a +70°C.
Pilas de litio
• Fecha de caducidad
: LiMnO2 no peligrosas
Tiempo de funcionamiento
: 48 horas mín. a -20°C.
: vida limita 6 años
FRANCAIS
Estanca a 1 bar.
Dimensiones
ESPAÑOL
Peso
Baliza
Baliza + soporte
Baliza + contenedor
250 x 106 x 83 mm
250 x 111 x 91 mm
287.6 x 147.5 x 96.7 mm
Baliza
Baliza + soporte
Baliza + contenedor
627 g.
679 g.
1280 g.
DEUTSCH
EMISSIÓN SATÉLITE 406 MHz
Frecuencia
: 406.037 MHz ± 0.001 MHz
Potencia de salida UHF
: 5W nominal (37dBm ± 2 dB)
Modulación
:16K0G1D, Bifase L± 1.1 ± 0.1 radians
Periodo de repetición
: 50 seg. ± 5%
Tiempo de emisión
: 520 mseg. ± 1%
ITALIANO
RECALADA 121.5 MHz
Frecuencia
: 121.5 MHz ± 0.006 MHz
Potencia
: 50 mW (17dBm ± 3 dB)
Modulación
: Barrido audio AM
Formato de modulación
: 3K20A3X
Emisión
: Continua
FLASH
: Super LEDs / 0.75 Candela / 23 flashes / minute
GPS
: FASTRAX UC322
NEDERLANDS
10.REGISTRO OBLIGATORIO
Deberá registrar su RLS ante las autoridades correspondientes.
De no hacerlo así, este hecho podría ralentizar el proceso de rescate e implicar la pérdida de vidas humanas.
La ley le obliga a registrar su RLS.
10.1. Información general
La RLS está pre-programada con una identidad única antes de llegar al usuario final. Esta programación previa la
realiza el fabricante y, en algunos casos, el distribuidor. Dicha identidad incluye un código de país de 3 dígitos
correspondiente al país que se responsabiliza de almacenar los detalles de registro de dicha RLS en concreto. En
la mayoría de los casos suele tratarse del estado del pabellón del buque. La identidad de país programada en su
RLS puede encontrarse en la etiqueta de identificación trasera. Es obligatorio registrar los detalles de propiedad de
su RLS ante las autoridades de dicho país.
Cuando active su RLS debido a una emergencia, el Centro de coordinación de búsqueda y salvamento (MRCC)
recibirá un mensaje y descodificará el código de país. A continuación, accederá a la base de datos de registro de
dicho país para obtener los detalles de su buque, su equipo de radio y el nombre de la persona de contacto. Si no
encontrara dicha información, el proceso de rescate podría verse ralentizado.
10.2. Cómo registrar su RLS
Regístrese online (si fuera posible) o rellene el correspondiente formulario de registro con la identidad de su RLS:
detalles del buque y números de contacto de emergencia 24 horas. Si no encuentra la dirección a la que enviar su
formulario, póngase en contacto con su proveedor. Cuando haya rellenado el formulario, puede enviarlo por correo
46
10.4. Venta o traspaso
Las RLS registradas en EEUU, Canadá, Reino Unido, Australia y Nueva Zelanda no deben reprogramarse cuando
se traspasan a un nuevo buque. Basta con entrar en la página Web indicada anteriormente y rellenar otro formulario
de registro. Sin embargo, en la mayoría de países, la RLS debe reprogramarse con la Identidad de estación móvil
marítima (MMSI) del nuevo buque o con un nuevo indicativo de llamada de radio, según los requisitos del país que
controle el nuevo buque. Dado que la identidad de la RLS contiene un código de país, al cambiar el estado del
pabellón del buque habrá que reprogramar la RLS. Si desea localizar al técnico más cercano, póngase en contacto
con Kannad Marine mediante los datos de contacto incluidos en la garantía o entre en la sección de servicios de la
página Web: www.kannadmarine.com.
10.5. Contacto de emergencia
Es VITAL que la información de Contacto de emergencia sea precisa, especialmente los números de teléfono, ya
que se utilizarán para confirmar una alerta. Los Servicios de Ayuda no pondrán en marcha una operación de rescate
inmediata hasta que se confirmen los detalles de localización y el registro de la baliza. En caso de no lograr dicha
confirmación, se producirán retrasos provocados por la recepción y comprobación de más alertas enviadas desde
la misma fuente.
ENGLISH
FRANCAIS
10.3. Licencia de radio
Una RLS es un radiotransmisor. Si a su buque ya se le ha asignado un indicativo de llamada de radio, ya posee una
licencia de radio. Es recomendable actualizar su licencia para incluir en ella los detalles de su RLS.
ESPAÑOL
postal o por fax.
COSPAS-SARSAT facilita los detalles de registro de distintos países. Entre en su página Web
www.cospas-sarsat.org y pinche en los enlaces 406 MHz Beacons y Registration. Otra alternativa sería acceder a
la base de datos directamente online en la siguiente dirección: www.406registration.com.
11.2. Revisiones y mantenimiento
Cualquier operación de revisión o mantenimiento correrá a cargo de un técnico autorizado por McMurdo Ltd. Llame
al técnico más cercano y hable con su departamento de mantenimiento antes de enviarle el equipo. Podrá encontrar
al técnico más cercano del siguiente modo:
• En la página Web de Kannad Marine: www.kannadmarine.com.
• Poniéndose en contacto con Kannad Marine directamente (véase página de garantía).
• Poniéndose en contacto con un distribuidor de Kannad Marine.
Guarde siempre la caja original de la baliza, ya que la necesitará cada vez que tenga que enviar su RLS al técnico.
11.3. Inspecciones del SMSSM
Si su buque está sujeto a la normativa del SMSSM, recibirá visitas periódicas de inspectores de buques que se
asegurarán del cumplimiento de la legislación nacional. Dichos inspectores comprobarán las fechas de caducidad y
activarán la RLS para asegurarse de que funciona correctamente. Asimismo, leerán el mensaje de identificación
guardado en la RLS para comprobar que el registro es correcto. Las embarcaciones de recreo no se someten a
inspección. No obstante, algunos países sí que aplican esta legislación a buques de pasajeros y pesqueros.
47
ITALIANO
NEDERLANDS
11.1. Sustitución de la batería
Buques que no cumplen el protocolo SOLAS: la batería debe sustituirse antes de la fecha de caducidad incluida
en la carcasa de la RLS, siempre que RLS se haya acitivado por más de 30 minutos o para algo más que las pruebas
periódicas necesarias.
Importante: El usuario final solamente podrá proceder a la sustitución de la batería si las autoridades locales
y nacionales correspondientes así lo permiten.
Solamente deberá utilizarse un pack de sustitución de baterías original de Kannad Marine. Si se utilizan repuestos
que no sean del fabricante original, KANNAD Marine declinará cualquier responsabilidad y anulará automáticamente
su garantía.
Habrá que sustituir la batería cuando:
• Se cumpla la fecha de caducidad indicada o
• La RLS haya sido utilizada en una situación de emergencia o
• Se haya producido una falsa activación de más de 30 minutos de duración.
Buques que cumplen el protocolo SOLAS: Buques sujetos a inspecciones del SMSSM. Deberá sustituirse la
batería cada 4 años, de acuerdo con el mantenimiento de la RLS desde el litoral y con las instrucciones de prueba
anuales IMO MSC/Circ.1039. La sustitución deberá realizarse independientemente de la fecha de caducidad
indicada en la carcasa de la RLS.
DEUTSCH
11.MANTENIMIENTO
12.TRANSPORTE
13.SUSTITUCIÓN DE PILAS
Advertencias relativas a las pilas:
• NO DEBE INTENTARSE RECARGAR LAS PILAS
• NO DEBEN ECHARSE AL FUEGO
• NO EXPONER LAS PILAS A UNA TEMPERATURA SUPERIOR A LOS 90°C
• NO REALIZAR CORTOCIRCUITOS
Importante: La sustitución de las pilas puede realizarse por parte del usuario (si las autoridades nacionales
así lo permiten), quien utilizará únicamente pilas originales (P/N 1202368).
ADVERTENCIA: La reglamentación sobre reciclaje de pilas puede variar de un estado a otro. Infórmese
antes de deshacerse de ellas.
13.1. Desmontaje del pack de pilas
NEDERLANDS
ITALIANO
DEUTSCH
ESPAÑOL
FRANCAIS
ENGLISH
En aviones de pasajeros
Este producto contiene pequeñas baterías de litio. Normalmente la RLS puede llevarse a bordo como equipaje de
mano. Recomendamos indique al personal de su línea aérea que lleva una RLS, del mismo modo que le indicaría
que lleva un PC o una cámara de vídeo.
En aviones de carga
Este producto contiene pequeñas baterías de litio y está clasificado como "no restringido" como carga aérea si se
manipula de acuerdo con la norma PI 970 del Reglamento sobre mercancías peligrosas de la IATA (51ª edición).
Consulte con su transportista la existencia de posibles restricciones adicionales.
(1)
(2)
(3)
(4)
48
Desenroscar la caja del pack de pilas situado en la parte inferior de la baliza con ayuda de un destornillador
de estrella.
Extraer la caja.
Desconectar el conector blanco (a) situado en el fondo de la caja y extraer el haz de conectores (b).
Desconectar el pack pilas del mazo de cableado de conectores (b) levantando la lengüeta de bloqueo de los
3 conectores machos.
(4)
(5)
ITALIANO
(2)
(3)
Cambiar la junta (d) de la caja y conectar los 3 conectores machos (c) del nuevo pack de pilas a los 3
conectores hembras del mazo de cableado de conectores (b).
ATENCIÓN: para evitar toda inversión de polaridad, los conectores machos se equipan de lengüetas
(e) y los conectores hembras de aletas de orientación f); levantar las lengüetas (e) de cada conector
macho (c) y fijar el en los aletas de orientación (F) de cada conector hembra.
Conectar el mazo de cableado de conectores (b) al conector blanco (a) situado en el fondo de la caja
Introducir el pack de pilas en la caja de la baliza sin pinzar los cables.
ATENCIÓN: los hilos deben colocarse del lado opuesto al conector blanco (a).
Volver a montar y atornillar la caja del pack de pilas en la baliza.
Anotar la nueva fecha de expiración de las pilas (fecha de sustitución + 4 años) en el campo "Lithium battery
Expiration date" de la etiqueta situada en la parte trasera de la baliza.
NEDERLANDS
(1)
DEUTSCH
ESPAÑOL
FRANCAIS
ENGLISH
13.2. Montaje del pack de pilas
49
14.1. Descripción
El conjunto del lanzador hidrostático está formado por un lanzador hidrostático HAMMAR (A) y un tornillo
seccionable (B) equipado con una arandela de caucho (C).
14.2. Sustitución
Véase el esquema detallado de la página siguiente.
Abrir el contenedor y extraer la baliza (Véase 8.2.2. Instalación de la baliza en el contenedor).
(1)
Desenroscar el tornillo seccionable (B) manteniendo presionada la placa de eyección (D) de la baliza y su
pieza de bloqueo (E).
(2)
Retirar el conjunto del lanzador hidrostático.
(3)
En el nuevo lanzador, marcar la nueva fecha de sustitución (mes / año actual + 2 años. Ejemplo esquema
pág. siguiente: lanzador sustituido Nov 2008, validez Nov. 2010).
(4)
Cerrar la placa de eyección (D) manteniéndola presionada con su pieza de bloqueo (E).
(5)
Atornillar el nuevo conjunto hidrostático en el tornillo de la pieza de bloqueo.
Volver a colocar en su sitio la baliza y cerrar el contenedor (Véase 8.2.2. Instalación de la baliza en el contenedor).
Registrar el cambio de lanzador en la pág. 102 de este manual.
NEDERLANDS
ITALIANO
DEUTSCH
ESPAÑOL
FRANCAIS
ENGLISH
14. SUSTITUCIÓN DEL LANZADOR HIDROSTÁTICO
50
51
NEDERLANDS
ITALIANO
DEUTSCH
ESPAÑOL
FRANCAIS
ENGLISH
1.1. Einführung in das System COSPAS-SARSAT
COSPAS-SARSAT ist ein über Satelliten funktionierendes globales Notrufsystem, das auf der Frequenz 406-406.1
MHz arbeitet.
Dank der mit der Identifizierung der Bake kodierten Frequenz 406 MHz können die Position des Notrufes bestimmt
und die nächstgelegenen Such- und Rettungsdienste (S.A.R.) schnell benachrichtigt werden.
Das System besteht aus:
(1)
Notfunkbaken,
(2)
Satelliten in polarer Umlaufbahn (LEOSAR) und erdstationären Satelliten (GEOSAR),
(3)
Bodenstationen (LUTs),
(4)
Mission Control Center (MCC).
(5)
Die von den LUT ausgegebenen Alarmmeldungen gehen bei den MCC ein, die sie entweder an eine Leitstelle
zur Koordination der Rettungsdienste (RCC) oder an einen SAR-Kontaktpunkt (Alarm- und Rettungszentrum)
weiter leiten.
NEDERLANDS
ITALIANO
DEUTSCH
ESPAÑOL
FRANCAIS
ENGLISH
1. EINLEITUNG
Das System COSPAS-SARSAT
1.2. Alarmauslösung und Positionsberechnung
Bei Auslösung übermitteln die SafeLink Notbaken über die Frequenz 406 MHz einen Notruf, der eine einmalige
Nummer enthält, anhand der Art des Notfalls und Eigentümer der Bake, wie auch GPS-Position ermittelt werden
können. Diese Mitteilung wird von den COSPAS-SARSAT-Satelliten empfangen, von diesen gespeichert und
permanent an die Bodenstationen (LUT) weiter geleitet. Dank der erdstationären Satelliten GEOSAR) wird innerhalb
von Minuten Alarm ausgelöst und an jeden Punkt der Erde weiter geleitet. Das LEOSAR-System (Satelliten in der
Erdumlaufbahn) berechnet die Position des Notrufs mit der Genauigkeit von einer nautischen Meile über DopplerTechnik. Bei mittleren Längengraden liegt die typische Wartezeit für die Berechnung einer Position bei unter einer
Stunde.
Dank der GPS-Empfänger wird die Position mit einer Genauigkeit von max. 120 m innerhalb von Minuten nach
Auslösung des Notrufs übermittelt.
Die Daten werden von den Mission Control Center (MCC) bearbeitet, die sie an die dem Notruf am nächsten
gelegene Such- und Rettungsleitstellen (RCC oder SAR) weiter leiten, um die Rettungsmaßnahmen einzuleiten.
Die Frequenz 121,5 MHz wird auch von der Bake übertragen, aber in der letzten Phase der Rettung nur als
Leitfrequenz eingesetzt.
2. ANWENDUNG
Diese Notfunkbake (EPIRB) ist für den Einsatz bei Notfällen auf See ausgelegt und für diese Notfälle zugelassen.
Sie wurde nicht für den Gebrauch an Land oder in der Luft ausgelegt und wird für diesen Einsatz auch nicht
empfohlen.
Die Notfunkbake darf nur bei erheblicher und drohender Gefahr eingesetzt werden. Absichtlicher falscher Alarm
kann zu Ordnungsstrafen führen.
52
Diese Notfunkbake muss bei der zuständigen nationalen Behörde registriert werden.
Sieh Sektion 10. OBLIGATORISCHE REGISTRIERUNG Seite 63.
Die Funktion der Notfunkbake besteht im Absetzen einer Alarmierung an die COSPAS-SARSAT Satelliten. Wie
schnell eine Alarmierung empfangen wird, ist von der Position der Satelliten zum jeweiligen Zeitpunkt abhängig und
kann durch obenliegende Hindernisse an Bord des Schiffes beeinträchtigt werden. Die Rettungszeit nach einer
Alarmierung ist von der Gesamtleistung der Such- und Rettungsorganisationen abhängig.
ENGLISH
3. REGISTRIERUNG
4.2. Beschreibung der Bake
(1)
Unverletzbarkeitsversiegelung
um zu beweisen, dass die Bake nie manuell ausgelöst wurde.
(2)
Verriegelungssystem
um ein versehenlichtes Auslösen der Bake zu verhindern.
(3)
TEST-Drucktaste:
um einen Selbsttest der Bake durchzuführen,
um die Bake zu stoppen wenn aktivierung von Hand über Drucktaste ON (nach Empfehlungen der
Behörden vor Ort.
(4)
Taste EIN (ON):
zur manuellen Aktivierung der Bake.
(5)
Flash:
-zur visuellen Ortung der Bake durch SAR-Einsatz.
(6)
Leuchtanzeigen für den einwandfreien Betrieb (rote und grüne LED-Anzeigen):
zur Überprüfung des einwandfreien Zustands bei Einschaltung,
zur Überprüfung des einwandfreien Zustands bei einem Selbsttest;
(7)
Programmierungs-LED:
zur Programmierung der Bake (durch den Hersteller oder zugelassene Stellen).
(8)
Meerwasserkontakte:
zur automatischen Aktivierung der Bake, sobald diese ins Wasser eintaucht.
(9)
Reflektorband
(10) Anker:
zur Befestigung der Bake an einer Rettungsweste, einem Floß, einem Boot, etc.
Wichtig: Der Anker wird verwendet, um die Bake zu befestigen, wenn diese im Wasser schwimmt.
Anker nicht am Boot befestigen, wenn die Bake in ihrem Träger angebracht wird.
(11) Antenne 406 / 121.5 MHz.
53
ESPAÑOL
DEUTSCH
ITALIANO
4.1. Beschreibung des Behälters und der Wandbefestigung
Die Version Brücke Kategorie 1 wird in einem
Automatikbehälter (A), die Version Überleben
der Kategorie 2 wird mit einer
Wandbefestigung (B) ausgeliefert.
Der Behälter (A) soll die Bake schützen und
dank des Notabwurfs des Typs HAMMAR H20
(1A) bei Schiffbruch für einen automatischen
Notruf sorgen. Dieser Behälter ist ebenfalls mit
einem Verriegelungsstift (2A) ausgestattet.
Er kann entweder waagerecht auf der Brücke
des Schiffes oder senkrecht an einer
Außenwand befestigt werden
(§ 8.2.1. Einbau des Behälters).
Anhand der Wandbefestigung (B) kann die
Bake an einer senkrechten Wand befestigt
werden. Die Wandbefestigung beinhaltet
einen Verriegelungsstift (1B), um ein unbeabsichtigtes Abwerfen der Bake zu verhindern und einen Magneten, um
ein Auslösen der Bake im installierten Zustand zu verhindern.
NEDERLANDS
Die SafeLink-Baken sind maritime Notfallbaken (RBLS) der Kategorie 1 Deck (SafeLink Auto) oder Kategorie 2
Überleben (SafeLink Manual+) und werden automatisch aktiviert. Beide Versionen verfügen über ein integriertes
GPS-System.
FRANCAIS
4. DESCRIPTION
54
NEDERLANDS
ITALIANO
DEUTSCH
ESPAÑOL
FRANCAIS
ENGLISH
FRANCAIS
Testfrequenzen 406 /121,5 MHz.
Es wird empfohlen, monatlich einen Selbsttest durchzuführen.Zur Durchführung des Selbsttests ist es nicht
erforderlich, die Bake aus ihrem Träger oder Behälter zu nehmen.
HINWEIS: Dieser Test ist nur in den ersten 5 Minuten nach einer vollen Stunde (H bis H+5) durchzuführen.
(1)
2 Sekunden lang auf die Taste TEST (3) drücken.
(2)
Während des Tests blinken die Blitzlichter (5), der Summer gibt ein akustisches Signal ab, die rote
Programmierungs-LED (7) leuchtet einmal auf.
(3)
Am Ende des Tests wird das Ergebnis über grüne (6a) oder rote (6b) LED angezeigt:
grüne LED (6a), 1maliges Aufleuchten: Betrieb einwandfrei,
rote LED (6b), 1maliges Aufleuchten: Fehlermeldung.
Bevor Sie mit dem Vertrieb Kontakt aufnehmen, zur Bestätigung der Fehlermeldung den Vorgang dreimal
wiederholen.
HINWEIS: die rote Programmierungs-LED (7) ist nicht mit der roten Leuchtanzeige (6b) zu verwechseln, die einen
Fehler der Bake anzeigt.
ENGLISH
5. TESTANWEISUNGEN
NEDERLANDS
ITALIANO
6.1. Automatische Aktivierung
Achtung: Nur SafeLink Auto Version Deck, Kategorie 1.
Bei Schiffbruch löst der Abwerfer sich in einer Tiefe von 1,5 bis 4 m aus, gibt den Deckel frei und ermöglicht der Bake,
an die Oberfläche aufzusteigen. Die Bake löst sich automatisch aus, wenn sie aus dem Behälter ausgeworfen wird
und bei Kontakt mit Wasser.
Wenn möglich, sollte die Bake eingesammelt und an einem der Floße befestigt werden, um die Position der
Schiffbrüchigen und nicht die des Schiffbruchs anzugeben.
DEUTSCH
ACHTUNG: Der Einsatz dieser Bake ist außer in tatsächlichen Notsituationen streng untersagt. Nicht in
einem Floß oder einem überdachten Boot nutzen. Zur Optimierung der Lokalisierung vermeiden,
die GPS-Antenne zu beeinträchtigen (die Hände nicht auf die transparente Haube legen) und
dafür Sorge tragen, dass zwischen der GPS-Antenne und dem Himmel kein Hindernis vorhanden
ist.
ESPAÑOL
6. EINSATZ
6.2. Auslösen von Hand
6.2.1. Freigabe der Bake
SafeLink Auto Kategorie 1 (Deck)
Die Bake aus dem Behälter nehmen:
(1)
Den roten Verriegelungsstift des Behälters anheben,
(2)
den Verriegelungsstift heraus ziehen,
(3)
die Behälterhaube entfernen und die Bake heraus nehmen.
55
6.2.2. Aktivierung bei Meerwasserkontakt
Die Bake mit dem Anker an das Boot oder das Rettungsfloß befestigen und ins Wasser werfen.
ITALIANO
DEUTSCH
ESPAÑOL
FRANCAIS
ENGLISH
SafeLink Manual+ Kategorie 2 (Überleben)
Die Bake aus der Wandbefestigung nehmen:
(1)
Den Verriegelungsstift heraus ziehen,
(2)
Zur Entriegelung des Trägers den Verriegelungsstift nach hinten ziehen.
(3)
Die Bake aus dem Träger nehmen.
Sobald sie ins Wasser taucht, fängt die Bake an, Signale abzugeben (Aktivierung durch Meerwasserkontakt).
STOPP: Bake aus dem Wasser nehmen (stoppt nach 10 Sekunden).
NEDERLANDS
6.2.3. Aktivierung von Hand über Drucktaste ON
(1)
(2)
(3)
(4)
(5)
Das Verriegelungssystem nach oben schieben, um die Versiegelung zu brechen.
1 Sekunden lang auf die Taste ON drücken.
Der Summer gibt jede Sekunde ein akustisches Signal ab.
Die Bake führt zunächst einen Selbsttest durch.
Nach dem Selbsttest blinken 3 Sekunden lang weiße Blitzsignale. Der Summer sendet weiterhin jede
Sekunde akustische Signale.
(6)
Die Bake mittels Anker befestigen und ins Wasser werfen.
(7)
Wichtig: auch wenn die Bake über die ON-Taste aktiviert wurde, muss sie ins Wasser geworfen werden, um
optimal zu funktionieren.
STOPP: TEST-Taste drücken.
56
ESPAÑOL
7.2. Deaktivierung der Bake
Wenn die Bake versehentlich aktiviert wurde, erfolgt die Deaktivierung folgendermaßen (in Kontakt mit den
Behörden):
7.2.1. Ins Wasser geworfene Bake
• Bake aus dem Wasser nehmen,
• einige Sekunden auf die Deaktivierung des Meerwasserkontaktes warten,
• wenn die Bake weiterhin sendet (Blitz erscheint), Bake von Hand deaktivieren (s. § 7.2.2.).
-wenn die Bake weiterhin sendet (Blitz arbeitet), den Sender von seinen Energiequellen trennen (s. § 7.2.3.).
NEDERLANDS
7.2.3. Außerbetriebnahme der Bake
Wenn die Bake sich trotz der vorgehend beschriebenen Vorgehensweise nicht ausschaltet, das Batterienpaket los
schrauben, heraus nehmen und den Kontakt trennen (s. § 13.1. Ausbau des Batterienpakets).
ITALIANO
DEUTSCH
7.2.2. Von Hand aktivierte Bake
• TEST-Taste 2 Sekunden lang drücken und loslassen,
•
FRANCAIS
7.1. Verhinderung eines falschen Alarms
Wichtig: bevor die Bake aus dem Behälter/der Halterung genommen wird, prüfen, dass die
Meerwasserkontakte weder Salz, noch Feuchtigkeit aufweisen. Bei Bedarf reinigen (Aktivierungsgefahr).
Ein falscher Alarm aufgrund versehentlicher Aktivierung der Bake führt zur Auslösung überflüssiger
Rettungsmaßnahmen.
Bei versehentlicher Aktivierung ist unbedingt folgendermaßen vorzugehen:
(1)
sofort die nächstgelegene SAR-Behörde benachrichtigen (Küstenwache, CROSS, Semaphore, etc.), dass es
sich um einen falschen Alarm handelt, um die Einleitung von Rettungsmaßnahmen zu verhindern. In diesem
Fall sind folgende Angaben erforderlich:
-einmalige Nummer der Bake (Hexadezimalcode mit 15 Ziffern auf der Etikette der Bake),
-Uhrzeit und Dauer der Alarmierung,
-Position zum Zeitpunkt der Alarmierung.
(2)
Auf Anweisung der Behörden die Bake manuell deaktivieren (s.§ 7.2.)
ENGLISH
7. FALSCHER ALARM
57
8.1. Montage der Anweisungstafel
Die SafeLink Baken werden mit einer Anweisungstafel für den Einsatz geliefert. Es handelt sich um eine feste Tafel
mit grundlegenden Abbildungen für den Einsatz der Bake im Notfall.
NEDERLANDS
ITALIANO
DEUTSCH
ESPAÑOL
FRANCAIS
ENGLISH
8. INSTALLATION DER BAKE
Die Anweisungstafel ist so neben der Bake anzubringen, dass sie im Notfall deutlich sichtbar ist. Sie ist mit vier (nicht
im Lieferumfang enthaltenen) Schrauben zu befestigen. Die Maße für Montage und Bohrung sind nachstehender
schematischer Darstellung zu entnehmen.
Wichtig: die Tafel nicht anstreichen, zur Reinigung keine entfettenden Lösungsmittel einsetzen.
58
Achtung: auf Hindernisse wie Taue, Antennen oder Wanten achten;
für den manuellen Einsatz für die Mannschaft zugänglich anbringen,
über 4 Schrauben mit nachfolgender Bohrschablone fest an dem Schiff befestigen.
NEDERLANDS
ITALIANO
DEUTSCH
•
•
ESPAÑOL
FRANCAIS
8.2.1. Einbau des Behälters
Der Behälter ist außen an der Brücke des Schiffes oder an einer Wand zu befestigen. Für die Montage sind folgende
Angaben unbedingt zu beachten:
• waagerechte oder senkrechte Anbringung
• freier Raum, der es der Bake im Falle eines Schiffbruchs ermöglicht, an die Oberfläche aufzusteigen,
ENGLISH
8.2. SafeLink Auto Kategorie 1 (Deck)
Hinweis: Maßangaben in Millimeter (Zollangaben in Klammern).
Zur Erinnerung: Die Tafel mit den Anweisungen muss in unmittelbarer Nähe des Behälters angebracht werden.
59
(2)
Bake in dem Behälter anbringen. Dabei die Antenne unter die HAMMAR-Auswurfvorrichtung gleiten lassen.
(3)
Obere Haube anbringen. Dabei darauf achten, die hinteren Kerben (a) der Haube in die hinteren
Ausspartungen (b) des Trägers einzuführen.
ENGLISH
DEUTSCH
ESPAÑOL
FRANCAIS
8.2.2. Anbringung der Bake im Behälter
Achtung: Wenn die Wandbefestigung bereits an der Bake befestigt ist, die Bake von der Befestigung trennen, bevor
sie in ihren Behälter eingeführt wird.
(1)
Den Stift der oberen Haube anheben und heraus ziehen, um die obere Haube zu entfernen.
(b)
ITALIANO
(a)
(a)
NEDERLANDS
(b)
60
(4)
Stift in die obere Haube und das Befestigungsloch des HAMMAR-Auswerfers einführen.
(5)
Stift senken, bis er von dem Dorn auf der oberen Haube blockiert wird.
NEDERLANDS
ITALIANO
DEUTSCH
ESPAÑOL
FRANCAIS
8.3.1. Montage des Trägers
Der Träger muss an einer so frei liegenden Stelle wie möglich montiert werden, die allen bekannt und der Mannschaft
im Notfall zugänglich ist. Er muss über 3 Schrauben mit nachfolgender Bohrschablone fest an dem Schiff befestigt
werden.
ENGLISH
8.3. SafeLink Manual+ Kategorie 2 (Überleben)
Hinweis: ein Magnet im Träger verhindert die Aktivierung der Bake (Wasser, Feuchtigkeit), wenn sie auf dem Träger
angebracht ist.
Hinweis: Maßangaben in Millimeter (Zollangaben in Klammern).
Zur Erinnerung: Die Tafel mit den Anweisungen muss in unmittelbarer Nähe des Trägers angebracht werden.
61
NEDERLANDS
ITALIANO
DEUTSCH
ESPAÑOL
FRANCAIS
ENGLISH
8.3.2. Einführung der Bake in den Träger
(1)
(2)
(3)
62
Die Bake in den Träger einführen.
2.Den Stift in die Verriegelungsmuffe des Trägers einführen.
3.Stift zum Verriegeln nach unten drücken, bis ein Klicken die Verriegelung bestätigt.
9. TECHNISCHE DATEN
: -20°C bis +55°C.
Lagertemperatur
: -30°C bis +70°C.
Lithium-Batterien
• Verfallsdatum
: 6 Jahre Lagerfähigkeit
Betriebsdauer
: mindestens 48 Stunden bei -20°C.
ENGLISH
Betriebstemperatur
: LiMnO2 nicht gefährlich
Maße
Gewicht
Bake
Bake + Träger
Bake + Behälter
250 x 106 x 83 mm
250 x 111 x 91 mm
287.6 x 147.5 x 96.7 mm
Bake
Bake + Träger
Bake + Behälter
627 g.
679 g.
1280 g.
FRANCAIS
Dicht bei 1 bar
: 406.037 MHz ± 0.001 MHz
UHF-Ausgangsleistung
: 5W (37dBm ± 2 dB)
Modulation
:16K0G1D,Zweiphasig L± 1.1 ± 0.1 Radianten
Wiederholungszeit
: 50 sec. ± 5%
Sendedauer
: 520 msec. ± 1%
DEUTSCH
Frequenz
ESPAÑOL
SATELLITENSENDEFREQUENZ 406 MHz
Frequenz
: 121.5 MHz ± 0.006 MHz
Leistung
: 50 mW (17dBm ± 3 dB)
Modulation
: AM Audioabtastung
Modulationsformat
: 3K20A3X
Sendung
: Permanent
BLITZ
: Super LED - 0.75 Candela - 23 Blitze / min
GPS
: FASTRAX UC322
ITALIANO
PEILUNG 121,5 MHz
Sie sind verpflichtet, Ihre Notfunkbake bei den zuständigen Behörden registrieren zu lassen.
Eine fehlende Registrierung kann die Rettung beeinträchtigen und zum Verlust von Leben führen.
Die Registrierung der Notfunkbake ist gesetzlich vorgeschrieben.
10.1. Überblick
Die Notfunkbake wird vor Auslieferung an den Endkunden mit einer einmaligen Kennung vorprogrammiert. Diese
Vorprogrammierung erfolgt durch den Hersteller oder, in einigen Fällen, durch den Vertrieb. Diese Kennung
beinhaltet einen dreistelligen Ländercode. Dieser Code bezeichnet das Land, das die Verantwortung für die
Speicherung der registrierten Daten der betreffenden Notfunkbake übernimmt. In den meisten Fällen handelt es sich
um das Land, unter dessen Flagge das Schiff registriert ist. Die Länderkennung, die in Ihrer Notfunkbake
programmiert ist, ist der Kennzeichnungsetikette auf der Rückseite zu entnehmen. Sie sind verpflichtet, die
Eigentümerdaten Ihrer Notfunkbake bei den zuständigen Behörden dieses Landes zu registrieren.
Wenn Sie Ihre Notfunkbake in einem Notfall aktivieren, geht die Alarmierung beim nächstgelegenen Seenot Suchund -rettungsdienst (MRCC) ein, der den Ländercode dechiffriert. Anschließend wird die Datenbank für das
betroffene Land aufgerufen, in der die Einzelheiten zu Ihrem Schiff, der Funkausstattung und der Kontaktperson
gespeichert sein sollen. Sollte der Rettungsdienst diese Angaben nicht finden, kann das zu einer Verzögerung der
Rettungsmaßnahmen führen.
10.2. Registrierung
Die Registrierung kann (so verfügbar) online erfolgen oder Sie füllen das entsprechende Registrierungsformular mit
den Angaben zu Ihrer Notfunkbake, dem Schiff und einer 24-Stunden Notfallrufnummern aus. So möglich, beinhaltet
63
NEDERLANDS
10.OBLIGATORISCHE REGISTRIERUNG
ENGLISH
der Formularvordruck auch schon die zutreffende E-Mail Adresse und eine Fax-Nummer, an die das Formular gefaxt
werden kann. Sollte Ihr Formular keine E-Mail Adresse enthalten, nehmen Sie bitte mit Ihrem Lieferanten Kontakt
auf. Das ausgefüllte Formular können Sie entweder per Fax oder E-Mail einsenden.
COSPAS-SARSAT liefert registrierte Daten vieler Länder; nutzen Sie die Internet Adresse www.cospas-sarsat.org
und folgen Sie den Links zu den 406 MHz Beacons und Registration; als Alternative finden Sie unter
www.406registration.com direkten online Zugang zur Datenbankt.
NEDERLANDS
ITALIANO
DEUTSCH
ESPAÑOL
FRANCAIS
10.3. Funklizenz
Eine Notfunkbake ist ein Funksender. Wenn Ihrem Schiff bereits ein Sendezeichen zugeteilt wurde, verfügen Sie
bereits über eine Funklizenz. Wir empfehlen, die Lizenz mit den Daten Ihrer Notfunkbake zu aktualisieren.
10.4. Verkauf oder Übertragung
Notfunkbaken, die in den USA, Kanada, Großbritannien, Australien und Neuseeland registriert sind, müssen
normalerweise nicht neu programmiert werden, wenn sie auf ein anderes Schiff übertragen werden. Es reicht, wie
oben beschrieben online ein neues Registrierungsformular auszufüllen. Für die meisten anderen Länder muss die
Notfunkbake neu programmiert werden. Je nach Anforderungen des Landes, unter dessen Flagge das Schiff
registriert ist, ist dabei entweder die Rufnummer des mobilen Seefunkdienstes (MMSI) oder das Sendezeichen des
Schiffes anzugeben. Da die Kennzeichnung der Notrufbake einen Ländercode enthält, ergibt sich daraus, dass,
wenn das Schiff den Flaggstaat wechselt, die Notrufbake neu programmiert werden muss. Nähere Angaben zu
Ihrem nächstgelegenen Händler erhalten Sie entweder von Kannad Marine unter Angabe der Informationen aus
dem Garantieabschnitt oder im Bereich Service der Website: www.kannadmarine.com.
10.5. Notrufkontakt
Es ist LEBENSNOTWENDIG, dass die Notrufkontaktangaben zutreffen. Das gilt insbesondere für die
Telefonnummer, die verwendet wird, um eine Alarmierung zu validieren. Nur wenn die Registrierung der Bake und
ungefähre Angaben zur Ortsangabe bestätigt werden, wird die Hilfsdienste sofort Rettungsmaßnahmen einleiten.
Ansonsten vergeht Zeit, während der weitere Alarmierungen von dem gleichen Absender empfangen und geprüft
werden.
11.UNTERHALT
11.1. Austausch der Batterie
Non-SOLAS-Schiffe: Die Batterie ist vor dem auf dem Gehäuse der Notfunkbake angegebenen Verfallsdatum
auszutauschen. Oder wenn die Notrufbake länger als 30 Minuten oder zu anderen als zu Testzwecken eingesetzt
wird.
Wichtig: Der Austausch des Batteriepakets darf vom Endnutzer nur dann vorgenommen werden, wenn die
zuständigen Behörden vor Ort und die nationalen Seefahrtsbehörden dies zulassen.
Nur ein original Batteriepaket mit Aufdruck der Marke Kannad Marine verwenden. Sollten andere als die original
Ersatzteile des Herstellers verwendet werden, lehnt KANNAD Marine jede Haftung ab und die Garantie verfällt.
Die Batterie ist in folgenden Fällen auszutauschen:
• Wenn das angegebene Verfallsdatum erreicht wird oder
• Die Notfallbake in einer Notsituation eingesetzt wurde oder
• Bei versehentlicher Aktivierung mit mehr als 30 Minuten Einsatz.
SOLAS Schiffe: Jedes Schiff, dass der GMDSS-Inspektion unterliegt. Nach Richtlinien für Wartungen an Land und
jährlichen Test der Notrufbake IMO MSC/Circ. 1039 muss die Batterie alle 5 Jahre ausgetauscht werden. Der
Austausch ist unabhängig von dem auf dem Gehäuse der Notrufbake vermerkten Verfallsdatum.
11.2. Wartung
Jegliche Wartung muss von einem von McMurdo Ltd zugelassenen Wartungsdienst erfolgen. Vor Einsenden des
Gerätes immer mit dem Wartungsdienst des nächstgelegenen Händlers Kontakt aufnehmen. Den nächstgelegenen
Wartungsdienst finden Sie:
• Auf der Kannad Marine Website: www.kannadmarine.com.
• Durch Kontaktaufnahme direkt mit Kannad Marine (s. Garantie Seite).
• Durch Kontaktaufnahme mit einem Kannad Marine Händler.
Bewahren Sie die Originalverpackung auf, da sie zum Einsenden der Notrufbake zu Wartungszwecken erforderlich
ist.
11.3. GMDSS Inspektionen
Wenn Ihr Schiff den GMDSS-Bestimmungen unterliegt, müssen Sie mit regelmäßigen Besuchen der Schiffsaufsicht
rechnen, die für die Einhaltung nationaler Vorschriften sorgt. Die Aufsicht prüft Verfallsdaten und aktiviert die
Notrufbake, um festzustellen, ob sie tatsächlich funktioniert und liest die Kennzeichnung ab, die in der Notrufbake
gespeichert ist, um zu überprüfen, ob diese vorschriftsgemäß registriert ist. Diese Inspektion gilt nicht für
Freizeitschiffe. In machen Ländern fallen jedoch Passagier- und Fischerboote unter diese Gesetzgebung.
64
Warnung zu den Batterien
• NICHT VERSUCHEN, DIE BATTERIE WIEDER AUFZULADEN
• BATTERIE NICHT INS FEUER WERFEN
• BATTERIE NICHT TEMPERATUREN ÜBER 90 °C AUSSETZEN
• BATTERIE NICHT KURZSCHLIESSEN
Wichtig: Der Austausch der Batterien kann durch den Benutzer erfolgen (wenn die nationalen Behörden es
zulassen), der ausschließlich von KANNAD oder das zugelassene Händlernetz gelieferte Originalbatterien
(P/N 1202368).
ACHTUNG: Die Vorschriften bezüglich des Recycling der Batterien können von Staat zu Staat
unterschiedlich ausfallen. Informieren Sie sich bei den örtlichen Behörden, bevor sie sie entsorgen.
(1)
(2)
(3)
(4)
NEDERLANDS
ITALIANO
DEUTSCH
13.1. Ausbau des Batterienpakets
FRANCAIS
13.AUSTAUSCH DER BATTERIEN
ESPAÑOL
Passagierflugzeug
Dieses Produkt enthält kleine Lithium Metall Batterien. Normalerweise kann die Safelink Notrufbake im Flugzeug im
normalen Handgepäck befördert werden. Wir empfehlen, die Notrufbake dem Personal der Fluglinie beim
Einchecken genauso anzuzeigen, wie Sie einen Laptop oder eine Videokamera angeben würden.
Als Luftfracht
Dieses Produkt enthält kleine Lithium Metall Batterien und kann als 'ohne Einschränkung' für Luftfracht klassifiziert
werden, wenn es nach Anforderung PI970 der IATA Gefahrgut-Vorschriften (51. Ausgabe) behandelt wird.
Eventuelle zusätzliche Beförderungsbedingungen bei der betroffenen Luftfahrtgesellschaft erfragen.
ENGLISH
12.TRANSPORT
Das Gehäuse des Batterienpakets im unteren Teil der Bake mit einem kreuzförmigen Schraubenzieher
abschrauben.
Gehäuse entfernen.
Die weiße Verbindung (a) abschalten, die tief im Gehäuse angesiedelt ist, und das Verbindungsbündels (b)
entfernen.
Das Batteriepack des Verbindungsbündels (b) heraus nehmen, Dazu die Verriegelungszunge der drei
Steckverbinders anheben.
65
ESPAÑOL
FRANCAIS
ENGLISH
13.2. Wiedereinbau des Batterienpakets
(2)
(3)
(4)
(5)
Die Gehäusedichtung (d) austauschen, dann die drei männlicher Steckverbinder (c) des neuen Batterienpake
an die drei Steckverbindungen des Verbindungsbündels (b) anschließen.
BEACHTUNG: um jede Polaritätsumstellung zu vermeiden werden die männlicher Steckverbinder mit
Verriegelungszungen (e) und die Steckverbindungen von Fixiernasen (f) ausgestattet; die
Verriegelungszungen (e) jeder männlicher Steckverbinder (C) aufzurichten und an Fixiernasen (f)
jeder Steckverbindunge zu befestigen.
Das Verbindungsbündel (b) an die weiße Verbindung (a) anschließen..
Das Batterienpaket in das Gehäuse der Bake einführen. Dabei vermeiden, die Drähte einzuklemmen.
BEACHTUNG: die Leitungsdrahten müssen von der Seite lokalisiert werden, die der weißen
Verbindung entgegengesetzt wurde.
Das Batteriengehäuse wieder an der Bake anbringen und verschrauben.
Das neue Ablaufdatum der Batterien (Datum des Austauschs + 6 Jahre) in das Feld "Lithium battery
Expiration date" der Kennzeichnung an der Rückseite der Bake eintragen.
14.AUSTAUSCH DES HYDROSTATISCHEN AUSWERFERS
14.1. Beschreibung
Der hydrostatische Auswerfer besteht aus dem hydrostatischen HAMMAR-Auswerfer (A) selbst und einer
trennbaren Schraube (B) mit Gummiunterlegscheibe (C).
NEDERLANDS
ITALIANO
DEUTSCH
(1)
14.2. Austausch
Refer to drawing next page
Steckverbinder öffnen und Bake heraus nehmen (S. § 8.2.2. Anbringung der Bake im Behälter).
(1)
Die trennbare Schraube (B) lösen. Dabei auf de Auswurfplatte (D) und das blockierende Teil (E) drücken.
(2)
Den gesamten hydrostatischen Auswerfer heraus nehmen.
(3)
Auf dem neuen Auswerfer das neue Austauschdatum (Monat / Jahr des Austausches + 2 Jahre) vermerken.
Beispiel schematische Darstellung auf der nächsten Seite: Austausch des Auswerfers Nov. 2008, Gültigkeit
Nov. 2010).
66
NEDERLANDS
ITALIANO
DEUTSCH
ESPAÑOL
FRANCAIS
ENGLISH
(4)
Die Auswurfplatte (D) herunter klappen und mit dem blockierenden Teil (E) gedrückt halten.
(5)
Die neue hydrostatische Einheit in der Schraube des blockierenden Teils verschrauben.
Bake wieder einführen und Behälter schließen (S. § 8.2.2. Anbringung der Bake im Behälter).
Austausch des Auswerfers auf Seite 102 dieses Handbuchs registrieren.
67
1.1. Presentazione del sistema COSPAS-SARSAT
COSPAS-SARSAT è un sistema globale di soccorso basato su satelliti funzionante nella banda di frequenza 406 406.1 MHz.
La frequenza 406 MHz, codificata con l'identificazione del gavitello, consente di determinare la posizione della
richiesta di soccorso e di allertare rapidamente i servizi di ricerca e soccorso (S.A.R.) più vicini.Il sistema è composto
da:
(1)
Radiogavitelli di richiesta di soccorso,
(2)
Satelliti ad orbita polare (LEOSAR) e geostazionari (GEOSAR),
(3)
Stazioni terrestri (LUT),
(4)
Centri Controllo Missioni (MCC),
(5)
I MCC ricevono le allerte prodotte dalle LUT e le inviano o ad un centro di coordinamento e soccorso (RCC),
o ad un punto di contatto SAR (centro di ricerca e soccorso).
NEDERLANDS
ITALIANO
DEUTSCH
ESPAÑOL
FRANCAIS
ENGLISH
1. INTRODUZIONE
Sistema COSPAS-SARSAT
1.2. Innesco dell'allarme e calcolo della posizione
Se attivati, i gavitelli SafeLink trasmettono, nella frequenza 406 MHz, un messaggio di richiesta di soccorso
contenente un numero unico che consente d'identificare il tipo di richiesta di soccorso e il proprietario del gavitello e
la posizione GPS. Questo messaggio viene intercettato dai satelliti COSPAS-SARSAT che lo memorizzano e lo
ritrasmettono in permanenza alle stazioni terrestri (LUT). Grazie ai satelliti geostazionari (GEOSAR), l'allarme viene
lanciato nei minuti successivi e trasmesso in tutti i punti del pianeta. Utilizzando le tecniche di elaborazione Doppler,
il sistema LEOSAR (satelliti ad orbita polare) calcola la posizione della richiesta di soccorso con un margine di
precisione pari ad un miglio nautico. In generale, il tempo di attesa per il calcolo di una posizione è inferiore ad un'ora
alle latitudini medie.
Grazie al ricevitore GPS, la posizione viene trasmessa nel raggio di massimo 120 metri nei minuti successivi
all'attivazione della richiesta di soccorso.
I dati vengono elaborati dai Centri Controllo Missioni (MCC) che li inviano ai Centri di Ricerca e di Soccorso (RCC o
SAR) più vicini al punto di pericolo al fine di organizzare le operazioni di soccorso.
La frequenza 121.5 MHz viene inoltre trasmessa tramite il gavitello, ma viene usata solo come frequenza di guida
nell'ultima fase del soccorso.
2. APPLICAZIONE
Questo EPIRB (Emergency Position Indicating Radio Beacon - Radiotrasmettitore per indicazione posizione
d'emergenza) è stato progettato per l'uso nei casi di emergenze in mare ed è stato approvato per contingenze di
questo tipo.
Non è stato progettato e non è raccomandato per l'uso a terra o in aria.
Usare l'EPIRB esclusivamente in situazioni di pericolo grave ed imminente. I falsi allarmi intenzionali possono
comportare l'applicazione di multe.
68
Questo EPIRB deve essere registrato presso l'autorità nazionale competente.
Vedere Sezione 10. REGISTRAZIONE OBBLIGATORIA pagina 79.
La funzione dell'EPIRB consiste nell'invio di allerte ai satelliti COSPAS-SARSAT. La rapidità con cui viene ricevuta
un'allerta dipende dalle posizioni dei satelliti in quel preciso istante; può inoltre essere influenzata dagli ostacoli aerei
a bordo dell'imbarcazione. Le tempistiche dei soccorsi in seguito ad un'allerta dipendono dalle prestazioni generali
delle organizzazioni di Ricerca e Soccorso.
ENGLISH
3. REGISTRAZIONE
I SafeLink sono gavitelli di soccorso marittimo (RBLS) categoria 1 Ponte (SafeLink Auto) o categoria 2 Sopravvivenza
(SafeLink Manual+) ad attivazione automatica. Entrambe le versioni sono dotate di GPS integrato.
69
NEDERLANDS
4.2. Descrizione del gavitello
(1)
Sigillo d'inviolabilità:
per provare che il gavitello non è stato mai attivato manualmente.
(2)
Sistema di blocco:
per impedire eventuali attivazioni accidentali del gavitello.
(3)
Pulsante TEST:
per effettuare un autotest del gavitello,
per fermare il gavitello se attivazione manuale tramite pulsante ON (in base alle raccomandazioni delle
autorità locali).
(4)
Pulsante AVVIO (ON):
per attivare manualmente il gavitello.
(5)
Flash:
per una localizzazione visiva del gavitello mediante le operazioni di SAR.
(6)
Spie di funzionamento corretto (led rosso e verde):
per verificare il corretto funzionamento al momento della messa in FUNZIONE,
per verificare il corretto funzionamento al momento dell'autotest.
(7)
Led di programmazione :
per programmare il gavitello (ad opera del costruttore o delle stazioni autorizzate).
(8)
Contatti acqua marina:
per attivare automaticamente il gavitello non appena avviene l'immersione.
(9)
Banda fluorescente
(10) Grippia:
per ormeggiare il gavitello a giubbotti di salvataggio, zattere, imbarcazioni, ecc.
Importante: la grippia va utilizzata per ormeggiare il gavitello quando questo galleggia nell'acqua.
Non fissare la grippia alla barca mentre s'installa il gavitello al relativo supporto.
(11) Antenna 406 / 121.5 MHz.
ITALIANO
DEUTSCH
ESPAÑOL
4.1. Descrizione del contenitore e del supporto murale
Il gavitello viene consegnato in un contenitore
automatico (A) per la versione Ponte categoria
1, oppure con un supporto murale (B) per la
versione Sopravvivenza categoria 2.
Il contenitore (A) è destinato a proteggere il
gavitello e ad assicurare il rilascio automatico
dello stesso, in caso di naufragio, grazie ad un
dispositivo di rilascio tipo HAMMAR H20 (1A).
Questo contenitore è inoltre dotato di una
coppiglia di blocco (2A).
Può essere fissato in posizione orizzontale sul
ponte dell'imbarcazione o in posizione
verticale su una paratia esterna (§ 8.2.1.
Installazione del contenitore).
Il supporto murale (B) serve a fissare il
gavitello ad una parete verticale. È dotato di
una coppiglia di blocco (1B) per impedire l'eventuale espulsione accidentale del gavitello e di un magnete per
impedire l'attivazione del gavitello quando viene installato.
FRANCAIS
4. PRESENTAZIONE
70
NEDERLANDS
ITALIANO
DEUTSCH
ESPAÑOL
FRANCAIS
ENGLISH
FRANCAIS
Test frequenze 406 / 121,5 MHz.
Si consiglia di eseguire un autotest una volta al mese. Non è necessario rimuovere il gavitello dal proprio
supporto o dal contenitore per eseguire l'autotest.
NOTA: Questo test deve essere eseguito esclusivamente nei primi 5 minuti a partire dallo scoccare dell'ora precisa
(da H a H+5).
(1)
Premere il pulsante TEST (3) per 2 secondi.
(2)
Durante il test, i flash (5) lampeggiano, il buzzer emette un segnale sonoro, il led di programmazione rosso (7)
si accende una volta.
(3)
Alla fine del test, il risultato viene indicato dal led verde (6a) o da quello rosso (6B):
led verde (6a), 1 lampeggio: funzionamento corretto,
led rosso (6b), 1 lampeggio: funzionamento difettoso.
Ripetere 3 volte per avere la conferma del funzionamento scorretto del gavitello prima di contattare il distributore.
NOTA: non confondere il led di programmazione rosso (7) e la spia rossa (6b) di funzionamento difettoso.
ENGLISH
5. ISTRUZIONI PER TEST
NEDERLANDS
ITALIANO
6.1. Attivazione automatica
Attenzione: esclusivamente per gavitelli SafeLink Auto versione Ponte, categoria 1.
In caso di naufragio, il dispositivo di rilascio s'innesca ad una profondità compresa tra 1.5 m e 4 m, e libera il
coperchio consentendo al gavitello di risalire in superficie. Il gavitello si avvia automaticamente, non appena viene
espulso dal contenitore e viene a contatto con l'acqua.
Se possibile, il gavitello dev'essere recuperato e assicurato ad una delle zattere di salvataggio al fine di segnalare la
posizione dei naufraghi e non quella del luogo del naufragio.
DEUTSCH
ATTENZIONE: L'utilizzazione di questo gavitello è vietata al di fuori di eventuali condizioni di pericolo reale.
Non utilizzare all'interno di zattere di salvataggio o altre imbarcazioni coperte. Al fine di
ottimizzare le prestazioni di localizzazione, evitare di mascherare l'antenna GPS (non mettere le
mani sulla cupola trasparente) e far sì che non ci sia nessun ostacolo tra l'antenna GPS e il cielo.
ESPAÑOL
6. UTILIZZO
6.2. Attivazione manuale
6.2.1. Liberazione del gavitello
SafeLink Auto Categoria 1 (Ponte)
Liberare il gavitello dal contenitore:
(1)
sollevare la coppiglia rossa di blocco del contenitore,
(2)
estrarre la coppiglia di blocco,
(3)
rimuovere il coperchio del contenitore ed estrarre il gavitello.
71
6.2.2. Attivazione tramite contatto con acqua marina
Mettere il gavitello in acqua, avendolo prima legato alla barca o ad una zattera di salvataggio mediante la grippia.
ITALIANO
DEUTSCH
ESPAÑOL
FRANCAIS
ENGLISH
SafeLink Manual+ Categoria 2 (Sopravvivenza)
Liberare il gavitello dal supporto murale:
(1)
Sollevare la coppiglia di blocco.
(2)
Estrarre la coppiglia di blocco tirando verso di sé per sbloccare il supporto.
(3)
Estrarre il gavitello dal supporto.
Il gavitello inizierà a trasmettere non appena verrà immerso (attivazione mediante contatto con acqua marina).
SPEGNIMENTO: far uscire il gavitello dall'acqua (spegnimento dopo 10 secondi).
NEDERLANDS
6.2.3. Attivazione manuale tramite pulsante ON
(1)
(2)
(3)
(4)
(5)
(6)
Rompere il sigillo spingendo il sistema di blocco verso l'alto.
Premere il pulsante ON per 1 secondo.
Il buzzer emette un segnale sonoro ogni secondo.
Il gavitello effettua innanzitutto un autotest.
Dopo l'autotest, solo i flash bianchi lampeggiano ogni 3 secondi. Il buzzer continua ad emettere ogni secondo.
Gettare il gavitello in mare facendo attenzione a legarlo mediante la grippia.
Importante: anche se il gavitello viene attivato mediante il pulsante ON, per un funzionamento ottimale, esso
dev'essere gettato in acqua.
SPEGNIMENTO: premere il pulsante TEST.
72
7. FALSI ALLARMI
FRANCAIS
ENGLISH
7.1. Prevenzione dei falsi allarmi
Importante: Prima di estrarre il gavitello, accertarsi che non ci siano né sale né umidità sui contatti per
l'acqua marina. Pulire se necessario (rischio di attivazione).
I falsi allarmi causati da attivazioni accidentali dei gavitelli provocano inutilmente l'innesco dei soccorsi.
In caso di attivazione accidentale, è pertanto imperativo:
(1)
contattare immediatamente le autorità S.A.R. più vicine (guardie costiere, CROSS, semafori, ecc) al fine di
avvertire che si è trattato di un falso allarme, onde evitare l'attuazione di operazioni soccorso. In tal caso,
devono essere forniti i seguenti elementi:
-numero unico del gavitello (codice esadecimale 15 cifre sull'etichetta del gavitello),
-ora e durata dell'allarme,
-posizione al momento dell'allarme.
(2)
2.Su istruzioni delle autorità, disattivare manualmente il gavitello (si veda § 7.2.).
ESPAÑOL
7.2. Disattivazione del gavitello
Se il gavitello è stato attivato erroneamente, disattivarlo nel seguente modo (d'accordo con l'autorità):
7.2.1. Gavitello immerso in acqua
• ritirare il gavitello dall'acqua,
• attendere qualche secondo la disattivazione del contatto con acqua marina,
• se il gavitello continua a trasmettere (flash in funzione), disattivarlo manualmente (si veda § 7.2.2.).
DEUTSCH
7.2.2. Gavitello attivato manualmente
• -premere e quindi rilasciare il pulsante TEST per 2 secondi,
se il gavitello continua a trasmettere (flash in funzione), privare il trasmettitore della fonte di energia (si veda §
7.2.3.).
NEDERLANDS
7.2.3. Messa fuori servizio del gavitello
Qualora, malgrado le azioni precedenti, il gavitello non si dovesse spegnere, svitare, estrarre e quindi scollegare il
pacco batterie (si veda (§ 13.1.).
ITALIANO
•
73
8.1. Montaggio della targhetta delle istruzioni
I gavitelli SafeLink vengono consegnati con una targhetta delle istruzioni per l'utilizzazione. Si tratta di una targhetta
rigida che riporta istruzioni visive di base che permettono di utilizzare il gavitello in caso di emergenze.
NEDERLANDS
ITALIANO
DEUTSCH
ESPAÑOL
FRANCAIS
ENGLISH
8. INSTALLAZIONE DEL GAVITELLO
La targhetta delle istruzioni deve essere fissata sul lato del gavitello affinché sia ben visibile in caso di emergenza.
Deve essere fissata mediante quattro viti (non in dotazione). Le misure per il montaggio e la foratura sono riportate
nello schema illustrato sopra.
Importante: non dipingere la targhetta e non pulirla utilizzando solventi sgrassanti.
74
Attenzione: considerare gli ostacoli che possono essere costituiti da funi, antenne e tiranti;
accessibilità all'equipaggio per l'eventuale utilizzazione manuale,
fissaggio solido alla barca per mezzo di 4 viti a seconda della maschera di foratura indicata di seguito.
NEDERLANDS
ITALIANO
DEUTSCH
•
•
ESPAÑOL
FRANCAIS
8.2.1. Installazione del contenitore
Il contenitore dev'essere fissato all'esterno, sul ponte dell'imbarcazione o contro una paratia. I requisiti obbligatori
sono:
• posizione orizzontale o verticale,
• luogo sgombro che consente la risalita alla superficie del gavitello in caso di naufragio,
ENGLISH
8.2. SafeLink Auto Categoria 1 (Ponte)
Nota: dimensioni in millimetri (pollici tra parentesi).
Da ricordare: la targhetta delle istruzioni deve essere collocata vicino al contenitore.
75
(2)
Collocare il gavitello nel contenitore facendo scorrere l'antenna sotto il dispositivo di rilascio HAMMAR.
(3)
Posizionare il coperchio superiore assicurandosi d'inserire le tacche posteriori (a) del coperchio nelle linguette
posteriori (b) del supporto.
ENGLISH
DEUTSCH
ESPAÑOL
FRANCAIS
8.2.2. Installazione del gavitello nel contenitore
Attenzione: Se il supporto murale è già installato sul gavitello, rimuoverlo prima d'installare il gavitello nel proprio
contenitore.
(1)
Sollevare e quindi estrarre la coppiglia del coperchio superiore per rimuovere lo stesso.
(b)
ITALIANO
(a)
(a)
NEDERLANDS
(b)
76
(4)
Inserire la coppiglia nel coperchio superiore e nel foro della vite di fissaggio del dispositivo di rilascio
HAMMAR.
(5)
Abbassare la coppiglia finché non viene bloccata dal nasello posto sul coperchio superiore.
NEDERLANDS
ITALIANO
DEUTSCH
ESPAÑOL
FRANCAIS
8.3.1. Installazione del supporto
Il supporto deve essere fissato in un luogo il più possibile sgombro, noto a tutti ed accessibile all'equipaggio per l'uso
in caso di emergenza. Deve essere fissato saldamente ad una parete verticale per mezzo di 3 viti a seconda della
maschera di foratura indicata di seguito.
ENGLISH
8.3. SafeLink Manual+ categoria 2 (Sopravvivenza)
Nota: un magnete inserito nel supporto impedisce l'attivazione del gavitello (acqua, umidità) quando viene installato
nel proprio supporto.
Nota: dimensioni in millimetri (pollici tra parentesi).
Da ricordare: la targhetta delle istruzioni deve essere collocata vicino al supporto.
77
NEDERLANDS
ITALIANO
DEUTSCH
ESPAÑOL
FRANCAIS
ENGLISH
8.3.2. Installazione del gavitello nel supporto
(1)
(2)
(3)
78
Inserire il gavitello nel proprio supporto.
Inserire la coppiglia nel manicotto di bloccaggio del supporto.
Bloccare la coppiglia portandola verso il basso finché non si sente il click del bloccaggio.
Temperatura di funzionamento
: -20°C a +55°C.
Temperatura di conservazione
: -30°C a +70°C.
Pile al litio
• Data di scadenza
: LiMnO2 non pericolose
Durata di funzionamento
: 48 ore min. a -20°C.
ENGLISH
9. SPECIFICHE TECNICHE
: Conservabilità 6 anni
Peso
Gavitello
Gavitello + supporto
Gavitello + contenitore
250 x 106 x 83 mm
250 x 111 x 91 mm
287.6 x 147.5 x 96.7 mm
Gavitello
Gavitello + supporto
Gavitello + contenitore
627 g.
679 g.
1280 g.
ESPAÑOL
Dimensioni
FRANCAIS
Stagno a 1 bar
Frequenza
: 406.037 MHz ± 0.001 MHz
Potenza in uscita UHF
: 5W (37dBm ± 2 dB)
Modulazione
:16K0G1D, Bifase L± 1.1 ± 0.1 radianti
Periodo di ripetizione
: 50 sec. ± 5%
Durata della trasmissione
: 520 msec. ± 1%
DEUTSCH
TRASMISSIONE SATELLITE 406 MHz
Frequenza
: 121.5 MHz ± 0.006 MHz
Potenza
: 50 mW (17dBm ± 3 dB)
Modulazione
: Scansione audio AM
Formato di modulazione
: 3K20A3X
Trasmissione
: Continua
FLASH
: Super LED / 0.75 Candela / 23 flash / minuto
GPS
: FASTRAX UC322
ITALIANO
AUTOGUIDA 121.5 MHz
È necessario registrare l'EPIRB presso le autorità competenti.
La mancata registrazione può rallentare le procedure di soccorso e comportare la morte.
La legge impone all'utente la registrazione dell'EPIRB.
10.1. Cenni generali
TL'EPIRB è preprogrammato con un'identità unica prima di essere consegnato al cliente finale. La programmazione
viene eseguita dal produttore o, in alcuni casi, dal distributore. L'identità comprende un codice a 3 cifre che identifica
il paese. Sarà quello il paese che si assumerà la responsabilità di conservare i dettagli della registrazione di quello
specifico EPIRB. Nella maggior parte dei casi, è il paese di cui batte bandiera l'imbarcazione. L'ID del paese
programmata nell'EPIRB si trova sull'etichetta identificativa posta sul retro. L'utente deve registrare i dettagli relativi
alla proprietà dell'EPIRB presso le autorità in quello specifico paese.
Quando l'EPIRB viene attivato in caso di emergenza, il centro di coordinamento ricerca e soccorso marittimo (MRCC)
più vicino riceve il messaggio e decodifica il codice del paese. Il centro accede quindi al database delle registrazioni
di quello specifico paese e si aspetta di trovare i dettagli di imbarcazione, apparecchiatura radio e persona da
contattare. Se il personale del centro non riesce a trovare queste informazioni, l'eventuale soccorso può rallentare.
10.2. Modalità di registrazione
Registrarsi online (ove possibile) o completare l'apposito formulario di registrazione con l'identità dell'EPIRB, i
dettagli dell'imbarcazione e i numeri di contatto per il soccorso 24h/24h. Quando possibile, i formulari sono
prestampati con l'indirizzo di spedizione corretto e un numero di fax. Se il vostro formulario non presenta l'indirizzo
79
NEDERLANDS
10.REGISTRAZIONE OBBLIGATORIA
ENGLISH
FRANCAIS
ESPAÑOL
DEUTSCH
ITALIANO
NEDERLANDS
di spedizione, contattate il vostro fornitore. Dopo aver completato il formulario, potete scegliere se inviarlo tramite
fax o posta.
COSPAS-SARSAT fornisce i dettagli di registrazione per molti paesi; visitare il sito www.cospas-sarsat.org e seguire
i link 406 MHz Beacons e Registration; in alternativa, si può accedere direttamente al database online dall'indirizzo:
www.406registration.com.
10.3. Licenza radio
L'EPIRB è un radiotrasmettitore. Se alla vostra imbarcazione è già stato assegnato un segnale di chiamata radio,
significa che possedete già una licenza radio. Si consiglia di aggiornare la licenza al fine d'inserire i dettagli
dell'EPIRB.
10.4. Vendita o trasferimento
Generalmente gli apparecchi EPIRB registrati negli USA, in Canada, Gran Bretagna, Australia e Nuova Zelanda non
richiedono la riprogrammazione al momento del trasferimento in una nuova imbarcazione. Basta andare sul sito
(vedi sopra) e completare un'altra registrazione. Nella maggior parte degli altri paesi, l'EPIRB deve essere
riprogrammato inserendo il Maritime Mobile Station Identity (MMSI) della nuova imbarcazione o il relativo segnale di
chiamata radio, a seconda di quanto richiesto dal paese che controlla la nuova imbarcazione. L'identità dell'EPIRB
include il codice del paese; di conseguenza, se cambia lo stato di bandiera dell'imbarcazione, dovrà essere
riprogrammato anche l'EPIRB. Per i dettagli sull'agente più vicino, contattare Kannad Marine servendosi dei dati
riportati nella sezione sulla garanzia o visitare la pagina dedicata alla manutenzione nel sito:
www.kannadmarine.com.
10.5. Contatti per Emergenze
È d'importanza VITALE che le informazioni riguardanti i Contatti per le Emergenze siano precise, in particolare quelle
relative al numero di telefono; questo verrà, infatti, usato per confermare l'allerta. I servizi di soccorso potrà
procedere all'immediata attivazione dei soccorsi solo previa conferma dei dettagli riguardanti la registrazione del
gavitello e la sua posizione approssimativa. In caso contrario, si accumulerà un ritardo a causa della ricezione e della
verifica delle ulteriori allerte provenienti dalla medesima fonte.
11.MANUTENZIONE
11.1. Sostituzione della batteria
Imbarcazioni non SOLAS: La batteria deve essere sostituita prima della data di scadenza indicata sul corpo
dell'EPIRB o se l'EPIRB viene usato per più di 30 minuti o per qualsiasi altra ragione diversa dal test.
Importante: La sostituzione del pacco batteria può essere eseguita dall'utente finale solo se consentito dalle autorità
marittime locali e nazionali competenti.
In caso di sostituzione, installare esclusivamente pacchi batteria originali recanti il marchio Kannad Marine. Qualora
vengano usati pezzi sostitutivi di produttori non originali, la KANNAD Marine declinerà ogni responsabilità e la
garanzia verrà invalidata.
La batteria dovrà essere sostituita nei casi seguenti:
• si è arrivati alla data di scadenza riportata oppure
• l'EPIRB è stato usato in una situazione di emergenza oppure
• l'EPIRB è stato usato per oltre 30 minuti in seguito ad una falsa attivazione.
Imbarcazioni SOLAS: Imbarcazioni soggette all'ispezione dell'apparato GMDSS. La batteria deve essere cambiata
ogni 5 anni ai sensi delle direttive IMO MSC/Circ. 1039 sulla manutenzione e i test annuali di terra dell'EPIRB.La
sostituzione deve essere eseguita indipendentemente dalla data di scadenza indicata sul corpo dell'EPIRB.
11.2. Manutenzione
Tutti gli interventi di manutenzione devono essere eseguiti da un agente di manutenzione approvato dalla McMurdo
Ltd. Prima di procedere alla restituzione dell'apparecchio, chiamare l'agente più vicino e parlare con il servizio
manutenzione. Per trovare l'agente di manutenzione più vicino, contattare:
• il sito Kannad Marine: www.kannadmarine.com
• la Kannad Marine direttamente (vedi garanzia)
• un distributore Kannad Marine.
Conservare l'imballaggio di cartone originale. Servirà, infatti, per l'eventuale invio dell'EPIRB in caso di
manutenzione.
11.3. Ispezioni GMDSS
Se l'imbarcazione è soggetta ai regolamenti GMDSS, sarà sottoposta a visite periodiche da parte degli ispettori
navali che si occupano dell'applicazione della legislazione nazionale. Verificheranno le date di scadenza ed
attiveranno l'EPIRB per accertarsi che funzioni veramente e leggeranno il messaggio d'identità che si trova all'interno
dell'EPIRB per verificare che l'utente l'abbia registrato correttamente. Le imbarcazioni da diporto non sono soggette
a tali ispezioni. Tuttavia, in alcuni paesi, le navi da pesca e quelle passeggeri sono coperte dalla legislazione.
80
12.TRASPORTO
FRANCAIS
ENGLISH
Aereo passeggeri
Il prodotto contiene piccole batterie al litio/metallo. Generalmente il Safelink EPIRB può essere portato a bordo di
aerei passeggeri come oggetto personale nel bagaglio a mano. Consigliamo di dichiarare l'EPIRB al personale
aeroportuale al momento del check-in, come fareste per un PC portatile o una videocamera.
Aereo merci
Il prodotto contiene piccole batterie al litio/metallo e può essere classificato come "senza restrizioni" per gli aerei
merci se maneggiato secondo i requisiti PI 970 dei Regolamenti sulle Merci Pericolose IATA (51a Edizione).
Accertarsi presso il vettore interessato dell'eventuale applicazione di ulteriori restrizioni riguardanti il trasporto.
13.SOSTITUZIONE DELLE PILE
ESPAÑOL
Avvertenza pile
• NON TENTARE DI RICARICARE LA PILA
• NON GETTARLA NEL FUOCO
• NON ESPORLA AD UNA TEMPERATURA SUPERIORE AI 90°C
• NON CORTOCIRCUITARE
Importante: La sostituzione delle pile può essere realizzata dall'utente (se autorizzato dalle autorità
nazionali) che utilizzerà esclusivamente le pile originarie (P/N 1202368)
ATTENZIONE: La legislazione relativa al riciclaggio delle pile può variare a seconda degli stati. Informarsi
presso le autorità locali prima di procedere allo smaltimento.
(1)
(2)
(3)
(4)
Aiutandosi con un cacciavite a croce, svitare l'alloggiamento del pacco batterie posto sul fondo del gavitello.
Estrarre l'alloggiamento.
Staccare il connettore bianco (a) situato in fondo alla cassa ed estrarre il fascio di connettori (b).
Staccare il pacco batterie del fascio di connettori (b) sollevando la linguetta di bloccaggio dei 3 connettori
maschile.
81
NEDERLANDS
ITALIANO
DEUTSCH
13.1. Montaggio del pacco batterie
ESPAÑOL
FRANCAIS
ENGLISH
13.2. Rimontaggio del pacco batterie
DEUTSCH
(1)
(2)
(3)
14.SOSTITUZIONE DEL DISPOSITIVO DI RILASCIO IDROSTATICO
14.1. Descrizione
Il gruppo del dispositivo di rilascio idrostatico è composto da un dispositivo di rilascio idrostatico HAMMAR (A) e da
una vite sezionabile (B) dotata di rondella di gomma (C).
NEDERLANDS
ITALIANO
(4)
(5)
Cambiare a guarnizione dell'alloggiamento (d) della cassa quindi collegare i 3 connettori maschile (C) del
nuovo pacco batterie ai 3 connettori femmine del fascio di connettori (b).
ATTENZIONE: per evitare ogni inversione di polarità, i connettori maschili sono forniti di linguetta di
bloccaggio (e) ed i connettori femmine di aletta di orientamento (f); sollevare le linguetta di bloccaggio
(e) di ogni connettore maschile (c) e fissare ai aletta di orientamento (f) di ogni connettore femminile.
Collegare il fascio di connettori (b) al connettore bianco (a) situato in fondo alla cassa.
Inserire il pacco batterie nell'alloggiamento del gavitello facendo attenzione a non impigliare i fili.
ATTENZIONE: i fili devono essere piazzati della parte opposta al connettore bianco (a).
Rimontare e avvitare l'alloggiamento del pacco batterie sul gavitello.
Riportare la nuova data di scadenza delle pile (data di sostituzione + 8 anni) nel campo "Lithium battery
Expiration date" dell'etichetta posta sul retro del gavitello.
14.2. Sostituzione
Si veda schema dettagliato alla pagina seguente.
Aprire il contenitore ed estrarre il gavitello (Si veda § 8.2.2. Installazione del gavitello nel contenitore).
(1)
Svitare la vite sezionabile (B) tenendo premuta la placca di estrazione (D) del gavitello e il relativo pezzo di
bloccaggio (E).
(2)
Rimuovere il gruppo del dispositivo di rilascio idrostatico.
(3)
Sul nuovo dispositivo di rilascio, segnalare la nuova data di sostituzione (mese / anno correnti + 2 anni.
Esempio schema pagina seguente: dispositivo di rilascio sostituito Nov. 2008, validità Nov. 2010).
(4)
Abbassare la placca di estrazione (D) tenendola premuta con il relativo pezzo di bloccaggio (E).
(5)
Avvitare il nuovo gruppo idrostatico nella vite del pezzo de bloccaggio.
82
NEDERLANDS
ITALIANO
DEUTSCH
ESPAÑOL
FRANCAIS
ENGLISH
Riposizionare il gavitello e chiudere il contenitore (Si veda § 8.2.2. Installazione del gavitello nel contenitore).
Registrare la sostituzione del dispositivo di rilascio a pag. 102 del presente manuale.
83
1.1. Presentatie van het COSPAS-SARSAT systeem
COSPAS-SARSAT is een internationaal op satellieten gebaseerd systeem dat een signaal uitzendt op de 406-406.1
MHz band.
De 406 MHz frequentie, gecodeerd met de identificatie van het baken, maakt het mogelijk om de noodpositie te
bepalen en snel de dichtst bijzijnde opsporing- en reddingsdiensten te waarschuwen.
Het systeem bestaat uit:
(1)
Automatisch plaatsaanduidende noodzender,
(2)
Low Earth Orbit (LEOSAR) en geostationaire satellieten (GEOSAR),
(3)
Grondstations (LUTs),
(4)
Controle en missiecentra (MCCs).
(5)
De MCCs ontvangen de door de LUT uitgezonden alarmsignalen en sturen deze of naar een
ReddingsCoördinatieCentrum (RCC), of naar een SAR (Search And Rescue) contactpunt.
NEDERLANDS
ITALIANO
DEUTSCH
ESPAÑOL
FRANCAIS
ENGLISH
1. INTRODUCTIE
COSPAS-SARSAT Systeem
1.2. Alarmsignaal en positieberekening
Wanneer het SafeLink noodbaken geactiveerd is, zendt deze op de 406 MHz frequentie een alarmboodschap uit die
een uniek nummer bevat waardoor het alarmtype en de eigenaar van het baken, evenals de GPS gegevens
geïdentificeerd kunnen worden. De boodschap wordt opgevangen door de COSPAS-SARSAT satellieten die deze
opslaan en permanent doorgeven aan de grondstations (LUTs). Dankzij de geostationaire satellieten (GEOSAR),
wordt het alarm gelanceerd in de minuten die volgen en verspreid in alle hoeken van de wereld. Het LEOSAR
systeem (satellieten in polaire omloopbaan) berekent de positie van het noodbaken door toepassing van de Doppler
techniek op een zeemijl na. Normaalgesproken is de positie binnen een uur op middenbreedtegraden berekend.
Dankzij de GPS wordt de positie met een nauwkeurigheid van maximaal 120 meter doorgegeven in de minuten die
volgen op de zending van het alarmsignaal.
De gegevens worden behandeld door de controle en missiecentra (MCC) die deze doorgeven aan het dichtst
bijzijnde reddingscoördinatiecentrum (RCC of SAR) om de hulpverlening op touw te zetten.
De frequentie 121.5 MHz wordt eveneens door het baken uitgezonden maar wordt alleen gebruikt als
opsporingsfrequentie in de laatste fase van de hulpverlening.
2. TOEPASSING
Deze EPIRB (Emergency Position Indicating Radio Beacon) (noodradiobaken) is ontworpen voor maritieme
noodgevallen en is goedgekeurd voor dergelijk gebruik.
Het is niet ontworpen of aanbevolen voor gebruik op land of in de lucht.
Gebruik de EPIRB alleen in situaties van serieus en direct gevaar. Opzettelijk vals alarm kan worden bestraft.
84
Deze EPIRB moet worden geregistreerd bij de verantwoordelijke nationale overheidsinstantie.
Zie Sectie 10. VERPLICHTE REGISTRATIE bladzijde 95.
De functie van de EPIRB is het versturen van een alarmsignaal naar de COSPAS-SARSAT satellieten. Hoe snel een
alarmsignaal wordt ontvangen is afhankelijk van de posities van de satellieten op een bepaald moment en kan
worden beïnvloed door ruimtelijke obstructies aan boord van het schip. De reddingstijd na het alarmsignaal is
afhankelijk van de algemene prestaties van de reddingsorganisaties.
ENGLISH
3. REGISTRATIE
De SafeLink bakens zijn maritieme noodbakens (EPIRB) categorie 1 (SafeLink Auto) automatische afwerping of
categorie 2 (SafeLink Manual+) Handmatige afwerping met automatische activering. De 2 versies zijn voorzien van
een geïntegreerde GPS.
DEUTSCH
ESPAÑOL
4.1. Omschrijving van de houder en de muurbevestiging
Het baken wordt geleverd in een automatische
houder (A) voor de Automatische Afwerping
versie categorie 1, of met een muurbevestiging
(B) voor de versie Handmatige Afwerping
categorie 2.
De houder (A) dient als bescherming voor het
baken en om de automatische afwerping te
verzekeren bij zinken dankzij een afwerping
type HAMMAR H20 (1A). Deze houder is
eveneens voorzien van een
vergrendelingspen (2A).
Dit kan horizontalig op het dek van de boot, of
verticaal op aan een scheidingswand buiten
bevestigd worden.
(§ 8.2.1. Installatie van de houder).
De muurbevestiging (B) moet op het baken
aan een verticale wand bevestigd worden. Is voorzien van een vergrendelingspen (1B) om te voorkomen dat het
baken valt, en van een magneet om de activering van het baken te voorkomen als deze geïnstalleerd is.
FRANCAIS
4. PRESENTATIE
NEDERLANDS
ITALIANO
4.2. Omschrijving van het baken
(1)
Onschendbare zegel
Bewijs dat het baken nog nooit handmatig is geactiveerd.
(2)
Vergrendelingsysteem
Om te voorkomen dat het baken per ongeluk geactiveerd wordt.
(3)
TEST drukknop :
Om een zelftest van het baken uit te voeren,
Om het baken te stoppen, wanneer Handmatige activering door drukknop ON (op aanbeveling van de
plaatselijke autoriteiten).
(4)
AAN knop (ON) :
Om het baken handmatig te activeren.
(5)
Flitslicht:
Voor een visuele lokalisatie van het baken door de SAR reddingsoperaties.
(6)
Lichtjes storingsvrije werking (rode en groene leds):
Om de goede werking na inschakeling te controleren,
Om de goede werking tijdens een zelftest te controleren.
(7)
Led programmering:
Om het baken te programmeren (door de fabrikant of erkende stations).
(8)
Zeewatercontact:
Om het baken automatisch te activeren bij onderdompeling.
(9)
Reflecterende band
(10) Boeireep:
Om het baken aan bijvoorbeeld een reddingsvest, vlot of bootje vast te binden.
Belangrijk: de boeireep wordt gebruikt om het baken vast te binden wanneer deze in het water
drijft. De boeireep niet aan de boot binden wanneer u het baken in de bevestiging installeert.
(11) Antenne 406 / 121.5 MHz.
85
86
NEDERLANDS
ITALIANO
DEUTSCH
ESPAÑOL
FRANCAIS
ENGLISH
FRANCAIS
Test frequenties 406 / 121,5 MHz.
Er wordt aangeraden om één keer per maand een zelftest uit te voeren. Het is niet nodig om het baken uit zijn
bevestiging of houder te halen om de zelftest uit te voeren.
NB: Deze test moet uitgevoerd worden tijdens de eerste 5 minuten van een heel uur (uur tot uur +5).
(1)
Druk 2 seconden op de TEST button (3).
(2)
Tijdens de test knipperen de flitsen (5), de buzzer geeft een geluidssignaal, de rode programmering LED (7)
gaat één keer aan.
(3)
Wanneer de test voltooid is wordt het resultaat aangegeven door de groene (6a) of rode (6B) leds:
Groene led (6a), 1 flitslicht: goede werking,
Rode led (6b), 1 flitslicht: slechte werking.
3 keer herhalen om een slechte werking van het baken te bevestigen alvorens contact op te nemen met de
distributeur.
NB: de rode programmering LED (7) niet verwarren met het rode defect lichtje (6b).
ENGLISH
5. TESTINSTRUCTIES
NEDERLANDS
ITALIANO
6.1. Automatische activering
Pas op: alléén SafeLink Auto automatische afwerpingversie, categorie 1.
Bij schipbreuk gaat de afwerping af op een diepte tussen 1.5 m en 4 m, waardoor de deksel losgaat en het baken
naar de oppervlakte drijft. Het noodbaken gaat automatisch aan wanneer deze uit de houder geworpen wordt en met
water in contact komt.
Indien mogelijk moet het noodbaken gepakt en aan een reddingsboot bevestigd worden om de positie van de
drenkelingen en niet die van de schipbreuk aan te geven.
DEUTSCH
PAS OP: Het gebruik van dit baken is verboden buiten werkelijke alarmsituaties. Niet gebruiken in een bootje
of ander overdekt vaartuig. Voor een optimale lokalisering de GPS antenne niet bedekken (de
handen niet op de doorzichtige koepel plaatsen) en ervoor zorgen dat er geen obstakel tussen de
GPS antenne en de hemel zit.
ESPAÑOL
6. GEBRUIK
6.2. Handmatige activering
6.2.1. Het baken losmaken
SafeLink Auto Categorie 1 (Automatische afwerping)
RHet baken uit de houder halen:
(1)
De vergrendelingspen van de houder omhoog drukken,
(2)
De vergrendelingspen verwijderen,
(3)
De kap van de houder verwijderen en het baken eruit halen.
87
6.2.2. Activering door zeewatercontact
Het baken te water laten na deze eerst aan een reddingsboot bevestigd te hebben met behulp van de boeireep.
ITALIANO
DEUTSCH
ESPAÑOL
FRANCAIS
ENGLISH
SafeLink Manual+ Categorie 2 (Handmatige afwerping)
Het baken van de muurbevestiging halen:
(1)
De vergrendelingspen omhoog halen.
(2)
De vergrendelingspen verwijderen door naar u toe te trekken om de bevestiging te ontgrendelen.
(3)
Het baken uit zijn bevestiging verwijderen.
Het baken begint bij onderdompeling meteen met zenden (activering door zeewatercontact).
STOP: het baken uit het water halen (stopt na 10 seconden).
NEDERLANDS
6.2.3. Handmatige activering door drukknop ON
(1)
(2)
(3)
(4)
(5)
De zegel breken door het vergrendelingsysteem naar boven te drukken.
Druk 1 seconde op de knop ON.
De buzzer zendt iedere seconde een geluidssignaal uit.
Het noodbaken voert eerst een zelftest uit.
Na de zelftest knipperen alleen het witte flitslicht 3 seconden lang. De buzzer zendt nog steeds iedere
seconde een geluidssignaal uit.
(6)
Het baken bevestigen met behulp van de boeireep en in zee gooien.
(7)
Belangrijk: voor een optimale werking moet het noodbaken zelfs na activering met de ON button in het water
gegooid worden.
STOP: op de TEST knop drukken.
88
7. VALSE ALARMEN
FRANCAIS
ENGLISH
7.1. Valse alarmen voorkomen
Belangrijk: Voor verwijdering van het baken controleren of er zout of water zit op de zeewater sensors.
Reinigen indien nodig (activering risico).
De valse alarmen veroorzaakt door onbedoelde activeringen van de bakens brengen onnodig het inzetten van
reddingsacties te weeg.
Het is dus belangrijk om na een onbedoelde activering:
(1)
Onmiddellijk contact op te nemen met de dichtst bijzijnde S.A.R. autoriteiten (kustwachten, CROSS,
semafoors enz.) om te waarschuwen dat het om een vals alarm gaat, om te voorkomen dat er een
reddingsactie op touw gezet wordt. In dit geval moeten de volgende elementen doorgegeven worden:
Het unieke bakennummer (hexadecimale code met 15 cijfers op het etiket van het baken),
Tijd en duur van het alarm,
Positie op het moment van het alarm.
(2)
Het baken volgens de instructies van de autoriteiten handmatig uitschakelen (zie § 7.2.).
ESPAÑOL
7.2. Het baken uitschakelen
Wanneer het baken per ongeluk geactiveerd is, moet deze op de volgende manier uitgeschakeld worden (samen
met de autoriteiten):
7.2.1. Baken in het water
• Het baken uit het water halen,
• Enkele seconden op de uitschakeling van het zeewatercontact wachten,
• Wanneer het baken nog altijd signalen uitzendt (flitslicht aan), deze handmatig uitschakelen (zie § 7.2.3.).
Wanneer het baken nog altijd uitzendt (flitslicht aan), de zender van alle energiebronnen afsluiten (zie § 7.2.3.).
NEDERLANDS
7.2.3. Het noodbaken uitschakelen
Indien het noodbaken ondanks de voorgaande acties niet stopt, de batterijbehuizing verwijderen en uitschakelen (zie
(§ 13.1. Demontage van de batterijbehuizing).
ITALIANO
•
DEUTSCH
7.2.2. Handmatig geactiveerde baken
• 2 seconden op de TEST button drukken en weer loslaten,
89
8.1. Montage van de instructieplaat
De SafeLink noodbakens worden geleverd met een gebruikinstructieplaat. Dit is een hard plaatje met visuele
basisinstructies waardoor het noodbaken in geval van nood gebruikt kan worden.
NEDERLANDS
ITALIANO
DEUTSCH
ESPAÑOL
FRANCAIS
ENGLISH
8. INSTALLATIE VAN HET NOODBAKEN
De instructieplaat moet naast het noodbaken bevestigd worden opdat deze goed zichtbaar is in geval van nood.
Bevestigen met behulp van de vier schroeven (niet geleverd). De afmetingen voor de montage en het boren zijn
aangegeven in het hier onderstaande schema.
Belangrijk: de plaat niet verven en geen ontvettingsmiddelen gebruiken voor de reiniging.
90
Pas op: let op obstakels als koorden, antennes of tuikabels
Moet toegankelijk zijn voor de bemanning voor een handmatig gebruik,
Moet stevig aan de boot bevestigd zijn met de 4 schroeven volgens de hieronder aangegeven boormal.
NEDERLANDS
ITALIANO
DEUTSCH
•
•
ESPAÑOL
FRANCAIS
8.2.1. Installatie van de houder
TDe houder moet buiten bevestigd worden, op het bootdek of tegen een afscheiding. De volgende punten moeten
gerespecteerd worden:
• Horizontale of verticale positie,
• Een vrije plaats opdat het noodbaken naar het oppervlak kan komen bij een schipbreuk,
ENGLISH
8.2. SafeLink Auto Categorie 1 (automatische afwerpingversie)
NB: afmetingen in millimeter (inches tussen haakjes).
Herhaling: het instructieplaatje moet naast de houder bevestigd worden.
91
(2)
Het baken in de houder plaatsen door de antenne onder de HAMMAR afwerping te glijden.
(3)
De bovenkap plaatsen door de gleuven aan de achterkant (a) van de kap in de lipjes aan de achterkant (b)
van de bevestiging te plaatsen.
ENGLISH
DEUTSCH
ESPAÑOL
FRANCAIS
8.2.2. Installatie van het baken in de houder
Pas op: wanneer de muurbevestiging al op het baken geïnstalleerd is, deze verwijderen alvorens het baken in de
houder te installeren.
(1)
De pen omhoog duwen en verwijderen van de bovenkap om de bovenkap te verwijderen.
(b)
ITALIANO
(a)
(a)
NEDERLANDS
(b)
92
(4)
De pen in de bovenkap en het gat van de bevestigingsschroef van HAMMAR afwerping plaatsen.
(5)
De pen omlaag drukken tot deze geblokkeerd is door de pin op de bovenkap.
NEDERLANDS
ITALIANO
DEUTSCH
ESPAÑOL
FRANCAIS
8.3.1. Installatie van de bevestiging
De bevestiging moet bevestigd zijn op een zo vrij mogelijke plaats, die bij iedereen bekend is en toegankelijk is voor
de bemanning in geval van nood. Hij moet stevig op een verticale wand bevestigd zijn met de 3 schroeven waarvan
de boormal hieronder aangegeven staat.
ENGLISH
8.3. SafeLink Manual+ categorie 2 (Handmatige afwerping)
NB: een magneet in de bevestiging voorkomt de activering van het baken (water, vochtigheid) wanneer deze op de
bevestiging geïnstalleerd is.
NB: afmetingen in millimeters (inches tussen haakjes).
Herinnering: het instructieplaatje moet naast de bevestiging geplaatst worden.
93
NEDERLANDS
ITALIANO
DEUTSCH
ESPAÑOL
FRANCAIS
ENGLISH
8.3.2. Installatie van het baken in de bevestiging
(1)
(2)
(3)
94
Het baken in de bevestiging plaatsen.
De pen in de vergrendelingmof van de bevestiging plaatsen.
De pen vergrendelen door deze naar beneden te drukken tot een " klik " te horen is.
Werktemperatuur
: -20°C tot +55°C.
Opslagtemperatuur
: -30°C tot +70°C.
Lithium batterijen
• Vervaldatum
: 6 jaar houdbaarheidsperiode
Werkingsduur
: minimaal 48 uur. op -20°C.
ENGLISH
9. TECHNISCHE SPECIFICATIES
: Ongevaarlijke LiMnO2
Afmetingen
Gewicht
Baken
Baken + bevestiging
Baken + houder
250 x 106 x 83 mm
250 x 111 x 91 mm
287.6 x 147.5 x 96.7 mm
Baken
Baken + bevestiging
Baken + houder
627 g.
679 g.
1280 g.
FRANCAIS
Waterdicht op 1 bar
: 406.037 MHz ± 0.001 MHz
Uitgangsvermogen UHF
: 5W (37dBm ± 2 dB)
Modulatie
:16K0G1D, Bifase L ± 1.1 ± 0.1 radians
Herhalingsperiode
: 50 sec. ± 5%
Zendingsduur
: 520 msec. ± 1%
DEUTSCH
Frequentie
ESPAÑOL
ZENDSATELLIET 406 MHz
Frequentie
: 121.5 MHz ± 0.006 MHz
Vermogen
: 50 mW (17dBm ± 3 dB)
Modulatie
: AM geluidsscan
Modulatieformaat
: 3K20A3X
Emissie
: Permanent
FLITSLICHT
: Super LEDs / 0.75 Candela / 23 flitslichten / mn
GPS
: FASTRAX UC322
ITALIANO
RADIOGELEIDING 121.5 MHz
U moet duw EPIRB registreren bij de verantwoordelijke overheidsinstanties.
Het nalaten van registratie kan de redding vertragen en levens in gevaar brengen.
U bent wettelijk verplicht om uw EPIRB te registreren.
10.1. Algemeen
TDe EPIRB is voorgeprogrammeerd met een unieke identificatie voordat het de eindgebruiker bereikt. Dit wordt
gedaan door de fabrikant of, in sommige gevallen, door de distributeur. De identiteit bevat een 3-cijferige landcode.
Dit is het land dat verantwoordelijk is voor de registratie van de gegevens van deze specifieke EPIRB. In de meeste
gevallen is dat het land waar het schip is geregistreerd. De landidentificatie die is geprogrammeerd in uw EPIRB is
te lezen op het identificatielabel aan de achterkant. U moet het bezit van uw EPIRB registreren bij de
overheidsinstanties van dit land.
Als u uw EPIRB in een noodgeval activeert, ontvangt het dichtstbijzijnde maritieme reddingscoördinatiecentrum
(MRCC) het bericht en decodeert de landcode. Daarna openen ze de registratiedatabase van dat land en zullen ze
verwachten de gegevens van uw schip te vinden, haar radioapparatuur en contactpersoon. Als zij dit niet vinden, kan
dit een redding vertragen.
10.2. Hoe werkt de registratie
Registreer online (indien beschikbaar) of vul uw EPIRB-identiteit en de gegevens van uw schip en contactnummers
waarop u 24 uur per dag bereikbaar bent voor noodgevallen in op het juiste registratieformulier. Waar mogelijk zijn
deze formulieren voorzien van het juiste retouradres en faxnummer. Als het formulier geen postadres bevat, neem
dan contact op met uw leverancier. Als u het formulier hebt ingevuld, kunt u kiezen of u het per post wilt terugsturen
95
NEDERLANDS
10.VERPLICHTE REGISTRATIE
ENGLISH
FRANCAIS
ESPAÑOL
DEUTSCH
ITALIANO
NEDERLANDS
of faxen.
COSPAS-SARSAT verzorgt registratiegegevens voor vele landen; kijk op de website www.cospas-sarsat.org en
volg de koppeling naar 406 MHz Beacons and Registration (406 MHz bakens en registratie); of ga direct naar de
database via: www.406registration.com.
10.3. Zendvergunning
Een EPIRB is een radiozender, als voor uw schip al roepletters voor radioverbindingen zijn toegewezen dan beschikt
u al over een zendvergunning. We raden u aan om uw vergunning bij te werken en de gegevens van uw EPIRB op
te nemen.
10.4. Verkoop of overdracht
Voor EPIRB´s die zijn geregistreerd in de VS, Canada, Groot-Brittannië, Australië en Nieuw Zeeland is het in het
algemeen niet noodzakelijk om opnieuw geprogrammeerd te worden als ze worden overgezet op een nieuw schip.
Ga naar de website (zie hierboven) en vul een nieuw registratieformulier in. Voor de meeste landen moet de EPIRB
opnieuw worden geprogrammeerd met ofwel het nieuwe Maritieme Mobile Service Identitieit-nummer (MMSI) of de
roepletters, afhankelijk van de vereisten van het land waaronder het nieuwe schip vaart. Omdat de EPIRB-identiteit
een landcode bevat, is het logisch dat bij wijziging van het vlaggenland van het schip dit betekent dat de EPIRB
opnieuw geprogrammeerd moet worden. Voor de gegevens van de dichtstbijzijnde agent kunt u contact opnemen
met Kannad Marine via de gegevens in de garantiesectie, of door de servicesectie op de website te bezoeken:
www.kannadmarine.com.
10.5. Contactgegevens voor noodgevallen
Het is van VITAAL BELANG dat de contactgegevens voor noodgevallen juist zijn, in het bijzonder de informatie over
het telefoonnummer, omdat dit gebruikt wordt om een alarmsignaal te bevestigen. Alleen als de registratie van het
baken en de approximatieve locatiegegevens kunnen worden vastgesteld zal de Hulpdiensten direct een
reddingsactie starten, anders wordt dit vertraagd terwijl andere alarmsignalen van dezelfde bron worden ontvangen
en gecontroleerd.
11.ONDERHOUND
11.1. Batterijen vervangen
Niet SOLAS-schepen: De batterij moet worden vervangen voor de uiterste datum aangegeven op de behuizing van
de EPIRB. Of als de EPIRB langer dan 30 minuten is gebruikt of voor andere redenen dan voor testen.
Belangrijk: Het vervangen van de batterij mag alleen worden uitgevoerd door de eindgebruiker indien dit is
toegestaan door de locale en nationale maritieme instanties.
Gebruik alleen originele vervangende batterijen van het merk Kannad Marine. Indien u ooit niet-originele
vervangende onderdelen gebruikt, wijst KANNAD Marine alle verantwoordelijkheid af en wordt de garantie ongeldig
verklaard.
U moet de batterij vervangen wanneer:
• De aangegeven uiterste datum is bereikt of
• De EPIRB is gebruikt in een noodsituatie of
• Door een foutieve activering het apparaat langer dan 30 minuten wordt gebruikt.
SOLAS-schepen: Ieder schip dat in voor GMDSS wordt geïnspecteerd. De batterij moet iedere 5 jaar worden
vervangen volgens de richtlijnen IMO MSC/Circ. 1039 van de EPIRB voor onderhoud aan wal en jaarlijkse testen.
Ze moeten worden vervangen ongeacht de uiterste datum aangegeven op de behuizing van de EPIRB.
11.2. Onderhoud
Al het onderhoud moet worden uitgevoerd door een serviceagent goedgekeurd door McMurdo Ltd. Neem altijd
contact op met de dichtstbijzijnde agent en praat met de afdeling onderhoud voordat u de apparatuur terugstuurt. U
vindt de dichtstbijzijnde serviceagent op:
• De website van Kannad Marine: www.kannadmarine.com.
• Door direct contact op te nemen met Kannad Marine (zie garantiepagina).
• Door contact op te nemen met een distributeur van Kannad Marine.
Bewaar altijd de originele verpakking omdat u deze nodig hebt om de EPIRB terug te sturen voor onderhoud.
11.3. GMDSS-inspecties
Als uw schip moet voldoen aan de voorschriften voor GMDSS kunt u regelmatig bezoek verwachten van
scheepsinspecteurs die toezien op de nationale wetgeving. Zij controleren de uiterste data en activeren de EPIRB
om te bewijzen dat deze ook daadwerkelijk werkt en ze lezen het identiteitsbericht uit dat is opgeslagen in de EPIRB
om te controleren dat u deze correct hebt geregistreerd. Pleziervaartuigen zijn niet aan deze inspecties onderhavig.
In sommige landen vallen passagiers- en vissersschepen echter wel onder deze wetgeving.
96
13.VERVANGING VAN DE BATTERIJEN
ESPAÑOL
Waarschuwing met betrekking tot de batterijen
• DE BATTERIJ NIET PROBEREN OP TE LADEN
• NIET IN VUUR GOOIEN
• NIET AAN TEMPERATUREN BOVEN DE 90°C BLOOTSTELLEN
• NIET KORTSLUITEN
Belangrijk: De batterijen kunnen door de gebruiker vervangen worden (als de nationale autoriteiten dit
toestaan) als hij batterijen gebruikt (P/N 1202368).
PAS OP: De reglementering betreffende het hergebruik van de batterijen kan per land verschillen. Informeer eerst
bij de lokale autoriteiten alvorens de batterijen weg te doen.
FRANCAIS
Passagiersvliegtuig
Dit product bevat kleine lithiumbatterijen. De Safelink EPIRB kan normaal aan boord worden genomen van een
passagiersvliegtuig als persoonlijke handbagage. We raden u aan het bezit van de EPIRB te melden bij het
personeel van de luchtvaartmaatschappij, zoals u dat zou doen voor een laptop PC of videocamera.
Als luchtvracht
Dit product bevat kleine lithiumbatterijen en kan worden geregistreerd onder 'geen beperkingen' voor luchtvracht
indien behandeld volgens vereiste PI 970 van de richtlijnen voor gevaarlijke goederen van de IATA (51ste editie).
Neem altijd contact op met de luchtvaartmaatschappij in kwestie voor eventuele verschepingsrestricties die mogelijk
van toepassing zijn.
ENGLISH
12.TRANSPORT
(1)
(2)
(3)
(4)
NEDERLANDS
ITALIANO
DEUTSCH
13.1. Demontage van de batterijbehuizing
Het omhulsel van de batterijbehuizing aan de onderkant van het baken met behulp van een
kruisschroevendraaier verwijderen.
Het omhulsel verwijderen.
De witte aansluiter (a) uitschakelen gelegen onderin de doos en de bundel van aansluiters (b) uittrekken.
De batterijbehuizing afsluiten door het vergrendelingslipje van de connector naar boven te drukken.
97
ESPAÑOL
FRANCAIS
ENGLISH
13.2. Montage van de batterijbehuizing
NEDERLANDS
ITALIANO
DEUTSCH
(1)
(2)
(3)
(4)
(5)
Batterijbehuizing (c) aansluiten op de bundel (b).
OPGELET: om elke omzetting van polariteit te vermijden, worden de mannelijke aansluiters uitgerust
met ergrendelingslipje (e) en de aansluiters wijfjes van veiligheidsvoorzieningen (f);
ergrendelingslipje (e) van elke mannelijke aansluiter (c) optillen en op de veiligheidsvoorzieningen (f)
van elke wijfjesaansluiter vaststellen.
De voeg van het omhulsel vervangen en de nieuwe batterijenbehuizing aan de connector aan de onderkant
van het omhulsel verbinden.
De batterijbehuizing in het omhulsel van het baken plaatsen, opletten dat de draden niet klem komen te zitten.
OPGELET: de draden moeten van de kant automatisch ingesteld worden die aan de witte aansluiter
(a) wordt tegenovergesteld.
Het omhulsel weer op de batterijbehuizing van het baken zetten en aanschroeven.
Noteer de nieuwe vervaldatum van de batterijen (vervangdatum + 6 jaar) in het veld "Lithium battery Expiration
date" van het etiket achter op het baken.
14.VERVANGING VAN DE HYDROSTATISCHE AFWERP KIST
14.1. Omschrijving
Het hydrostatische afwerp geheel bestaat uit de hydrostatische afwerp kist HAMMAR (A) en een scharnierende
schroef (B) voorzien van een rubberen afdichtring (C).
14.2. Vervanging
Refer to drawing next page
Zie het gedetailleerde schema op de volgende pagina.
Open de houder en verwijder het baken (Zie § 8.2.2. Installatie van het baken in de houder).
(1)
De scharnierende schroef (B) afdraaien, en daarbij op de uitstootplaat drukken (D) van het baken en het
blokkeerstuk (E).
(2)
Verwijder het hydrostatische afwerpdeel.
(3)
Op de nieuwe afwerping de nieuwe vervangingsdatum zetten (huidig maand / jaar + 2 jaar. Voorbeeld op het
98
NEDERLANDS
ITALIANO
DEUTSCH
ESPAÑOL
FRANCAIS
ENGLISH
volgende schema: afwerping verplaatst in Nov 2008, geldig tot Nov. 2010).
(4)
De uitstootplaat er weer op zetten (D) door op het blokkeerstuk te drukken (E).
(5)
Het nieuwe hydrostatische afwerp geheel in de schroef van het blokkeerstuk draaien.
Het baken weer terugplaatsen en de houder sluiten (Zie § 8.2.2. Installatie van het baken in de houder).
Registreer de verandering van de afwerping op pagina 102 van deze handleiding.
99
ENGLISH
AFFECTATIONS SUCCESSIVES DE LA BALISE / BEACON LOCATION LOG / SUCESIVOS DESTINOS DE LA
BALIZA / AUFEINANDERFOLGENDE ZUWEISUNG DER BAKE / DESTINAZIONI SUCCESSIVE DEL GAVITELLO
/ OPEENVOLGENDE BESTEMMINGEN VAN HET BAKEN LOG/
Nom du bateau / Vessel name / Nombre del barco / Name des Schiffes / Nome della barca / Naam van het schip:
......................................................................................................................................................................
MMSI / NMSI
Code radio / Radio code / Código radio / Funkcode / Codice radio / Radiocode
ESPAÑOL
FRANCAIS
Code sérialisé / Serialised code / Código serie / Seriencode / Codice serializzato / Geserialiseerde code
Nom propriétaire / Owner’s name / Nombre del armador / Name des Eigentümers / Nome proprietario / Naam
eigenaar:
......................................................................................................................................................................
Code ID (HEX) / ID Code (HEX) :
Nom du bateau / Vessel name / Nombre del barco / Name des Schiffes / Nome della barca / Naam van het schip:
......................................................................................................................................................................
MMSI / NMSI
Code radio / Radio code / Código radio / Funkcode / Codice radio / Radiocode
DEUTSCH
Code sérialisé / Serialised code / Código serie / Seriencode / Codice serializzato / Geserialiseerde code
Nom propriétaire / Owner’s name / Nombre del armador / Name des Eigentümers / Nome proprietario / Naam
eigenaar:
......................................................................................................................................................................
Code ID (HEX) / ID Code (HEX) :
NEDERLANDS
ITALIANO
Nom du bateau / Vessel name / Nombre del barco / Name des Schiffes / Nome della barca / Naam van het schip:
......................................................................................................................................................................
MMSI / NMSI
Code radio / Radio code / Código radio / Funkcode / Codice radio / Radiocode
Code sérialisé / Serialised code / Código serie / Seriencode / Codice serializzato / Geserialiseerde code
Nom propriétaire / Owner’s name / Nombre del armador / Name des Eigentümers / Nome proprietario / Naam
eigenaar:
......................................................................................................................................................................
Code ID (HEX) / ID Code (HEX) :
100
......................................................
Piles / Battery / Pilas / Batterien
Pile / Batterijen
......................................................
SBM
......................................................
Piles / Battery / Pilas / Batterien
Pile / Batterijen
......................................................
SBM
......................................................
Piles / Battery / Pilas / Batterien
Pile / Batterijen
......................................................
SBM
......................................................
Piles / Battery / Pilas / Batterien
Pile / Batterijen
......................................................
SBM
......................................................
Piles / Battery / Pilas / Batterien
Pile / Batterijen
......................................................
SBM
......................................................
Piles / Battery / Pilas / Batterien
Pile / Batterijen
......................................................
SBM
......................................................
FRANCAIS
SBM
ESPAÑOL
......................................................
DEUTSCH
Piles / Battery / Pilas / Batterien
Pile / Batterijen
ITALIANO
Signature - Firma - Unterschrift
Handtekening
Prochain remplacement / SBM
Next replacement / SBM
Próxima sustitución / SBM
Nächster Austausch / SBM
Prossima sostituzione / SBM
Volgende vervanging / SBM
NEDERLANDS
Date - Fecha - Datum - Data
ENGLISH
SBM - REMPLACEMENT PILES / SBM - BATTERY REPLACEMENT / SBM - SUSTITUCIÓN DE PILAS
SBM - BATTERIENAUSTAUSCH / SBM - SOSTITUZIONE PILE / VERVANGING SBM / BATTERIJEN
101
NEDERLANDS
ITALIANO
DEUTSCH
ESPAÑOL
FRANCAIS
ENGLISH
REMPLACEMENT LARGUEUR / RELEASE SYSTEM REPLACEMENT / SUSTITUCIÓN LANZADOR
AUSTAUSCH AUSWERFER / SOSTITUZIONE DEL DISPOSITIVO DI RILASCIO / VERVANGING AFWERPING
102
Date - Fecha - Datum - Data
Signature - Firma - Unterschrift
Handtekening
Prochain remplacement / Next replacement / Próxima sustitución
Nächster Austausch / Prossima sostituzione / Volgende vervanging
Following a valid warranty claim McMurdo Ltd shall be entitled to repair or replace the product (or part) in question
free of charge, or at McMurdo Ltd's sole discretion to refund to the buyer the price of the product (or a proportional
part of the price). McMurdo Ltd shall not be liable to a buyer who is not a consumer for any other loss or damage
(whether indirect, special or consequential loss of profit or otherwise) costs, expenses or other claims for
compensation which arise out of or in connection with this product. In the case of a consumer McMurdo Ltd shall only
be liable where other loss or damage is foreseeable.
Nothing shall limit McMurdo Ltd's liability for death or personal injury caused by its negligence. This warranty is to be
interpreted under English law.
FRANCAIS
ITALIANO
All enquiries relating to this warranty or approved service agents should be sent to:
ESPAÑOL
In order to be valid, claims must be made under the above warranty in writing as soon as practicable after discovery
of the defect or failure and within the warranty period referred to above. Proof of purchase will be required. The claim
should be sent together with the product in question to the address set out below or to an Approved Service Agent.
DEUTSCH
THE LIMITED WARRANTY STATED ABOVE IS EXCLUSIVE AND IN LIEU OF ANY OTHER WARRANTY,
EXPRESS OR IMPLIED, INCLUDING BUT NOT LIMITED TO ANY IMPLIED WARRANTY OF MERCHANTABILITY
OR FITNESS FOR A PARTICULAR PURPOSE. McMurdo Ltd will not be liable for indirect, special, incidental or
consequential damages of any kind sustained from any cause. In no event shall McMurdo Ltd be liable for any breach
of warranty or other claim in an amount exceeding the purchase price of the product. This warranty does not affect
any statutory rights of the consumer.
ENGLISH
Warranty Statement
Kannad Marine is a brand of McMurdo Limited. Subject to the provisions set out below McMurdo Ltd warrants that
this product will be free of defects in materials and workmanship for a period of five years from the date of purchase.
McMurdo Ltd will not be liable to the buyer under the above warranty:• for any defect arising from fair wear and tear, wilful damage, negligence, abnormal working conditions, failure to
follow McMurdo Ltd's instructions (whether oral or in writing) including a failure to install properly and/or to use
batteries recommended and/or supplied by McMurdo Ltd, misuse or alterations or repair of the product by persons
other than McMurdo Ltd or an approved service agent;
• for parts, materials or equipment not manufactured by McMurdo Ltd in respect of which the buyer shall only be
entitled to the benefit of any warranty or guarantee given by the manufacturer to McMurdo Ltd;
• for the battery storage life which is specifically excluded from this warranty;
• for the HRU (were fitted) storage life which is specifically excluded from this warranty;
• if the total price for the product has not been paid.
NEDERLANDS
McMurdo Limited, Silver Point, Airport Service Road, Portsmouth, Hampshire, PO3 5PB, UK
Telephone: Int + 44 (0) 23 9262 3900 Fax: Int + 44 (0) 23 9262 3998
Web: www.kannadmarine.com Email: [email protected]
103
ITALIANO
DEUTSCH
ESPAÑOL
FRANCAIS
ENGLISH
Déclaration de garantie
Kannad Marine est une marque de la société McMurdo Limited. Sous réserve des dispositions présentées cidessous, l'entreprise McMurdo Ltd garantit que le présent produit est exempt de défauts de fabrication et de maind’oeuvre pour une période de cinq années à compter de la date de l'achat. La société McMurdo Ltd décline toute
responsabilité envers l'acheteur selon la garantie ci-dessus :• pour tout défaut lié à une usure normale, un dommage délibéré, une négligence, des conditions d'utilisation
anormales, le non-respect des instructions (orales ou écrites) de McMurdo Ltd dont une installation impropre et
/ ou la non-utilisation des batteries recommandées et / ou fournies par McMurdo Ltd, un mauvais usage ou des
modifications ou des réparations du produit effectués par des personnes autres que l'entreprise McMurdo Ltd ou
qu'un agent de service accrédité ;
• pour les parties, les matériaux ou le matériel non fabriqués par McMurdo Ltd pour lesquels l'acheteur ne peut
bénéficier que de la garantie donnée par le fabricant à McMurdo Ltd ;
• pour la durée de stockage de la batterie qui est spécifiquement exclue de la présente garantie ;
• pour la durée de stockage du dispositif hydrostatique de largage automatique (si équipé) qui est spécifiquement
exclue de la présente garantie ;
• si le montant total du produit n'a pas été payé.
LA GARANTIE LIMITÉE EXPOSÉE CI-DESSUS EST EXCLUSIVE ET À LA PLACE DE TOUTE AUTRE
GARANTIE, SOIT IMPLICITE OU EXPLICITE, Y COMPRIS MAIS NON LIMITÉE À TOUTE GARANTIE LÉGALE
OU DE BON FONCTIONNEMENT DANS UN BUT PARTICULIER. La société McMurdo Ltd ne saura être tenue
responsable des dommages indirects, spéciaux, accidentels ou consécutifs de toute sorte subis pour une raison
quelconque. En aucun cas, l'entreprise McMurdo Ltd ne sera tenue responsable de toute violation de garantie ou de
toute autre réclamation pour un montant supérieur au prix d'achat du produit. La présente garantie n'affecte pas les
droits accordés par la loi au client.
Afin d'être valables, les réclamations doivent être faites selon la garantie ci-dessus par écrit dès que possible après
avoir décelé le défaut ou le manquement et ce pendant la période de garantie référencée ci-dessus. Une preuve
d'achat sera requise. La réclamation sera envoyée conjointement avec le produit en question à l'adresse indiquée
ci-dessous ou à un agent de service accrédité.
Suite à une réclamation de garantie valable, la société McMurdo Ltd peut réparer ou remplacer le produit (ou une
partie) en question, ou rembourser à la seule discrétion de McMurdo Ltd à l'acheteur le montant du produit (une part
proportionnelle au prix). La société McMurdo Ltd décline toute responsabilité envers l'acheteur qui n'est pas un client
pour toute autre perte ou tout autre dommage (soit indirect, spécial ou consécutif, perte de bénéfice ou autre), pour
les frais, dépenses ou autres demandes en réparation découlant de ou en lien avec le présent produit. Si l'acheteur
est un client, l'entreprise McMurdo Ltd ne sera responsable que si toute autre perte ou dommage est prévisible.
Rien ne doit limiter la responsabilité de la société McMurdo Ltd en cas de décès ou de blessures corporelles dû (ues)
à sa négligence. La présente garantie doit être interprétée selon le droit anglais.
NEDERLANDS
Toutes demandes liées à la présente garantie ou aux agents de service accrédités doivent être envoyées à l'adresse
suivante :
104
McMurdo Limited, Silver Point, Airport Service Road, Portsmouth, Hampshire, PO3 5PB, Royaume Uni
Telephone: Int + 44 (0) 23 9262 3900 Fax: Int + 44 (0) 23 9262 3998
Web: www.kannadmarine.com Email: [email protected]
Tras recibir una reclamación válida, McMurdo Ltd podrá reparar o sustituir el producto (o pieza) en cuestión de forma
gratuita o bien devolver al comprador el precio del producto (o una parte proporcional del mismo). McMurdo Ltd no
será responsable ante ningún comprador que no sea consumidor (ya sea en concepto de pérdida de beneficios
indirectos, especiales o resultantes u otros) por ningún coste, gasto u otras reclamaciones de compensación que
pudieran surgir en relación con este producto. Si se tratara de un consumidor, McMurdo Ltd solamente será
responsable en los casos en que se pudieran prever otras pérdidas o daños.
McMurdo Ltd será responsable de todo fallecimiento o daño personal en el que se incurra debido a su negligencia.
Esta garantía se enmarca dentro de la ley inglesa.
Cualquier duda relativa a la presente garantía o a los técnicos de servicio autorizados deberá remitirse a:
FRANCAIS
ESPAÑOL
NEDERLANDS
McMurdo Limited, Silver Point, Airport Service Road, Portsmouth, Hampshire, PO3 5PB, Reino Unido
Telephone: Int + 44 (0) 23 9262 3900 Fax: Int + 44 (0) 23 9262 3998
Web: www.kannadmarine.com Email: [email protected]
DEUTSCH
ILas reclamaciones que entren en garantía deberán realizarse por escrito lo antes posible tras descubrirse un
defecto o fallo y siempre dentro del periodo de garantía indicado anteriormente. Se exigirá un comprobante de
compra. La reclamación deberá enviarse junto al producto en cuestión bien a la dirección indicada a continuación o
bien a un técnico de servicio autorizado.
ITALIANO
LA PRESENTE GARANTÍA LIMITADA ES EXCLUSIVA Y SUSTITUYE A CUALQUIER OTRA GARANTÍA, YA
FUERA EXPLÍCITA O IMPLÍCITA, LO QUE INCLUYE CUALQUIER GARANTÍA IMPLÍCITA DE
APROVECHAMIENTO O ADECUACIÓN PARA UN PROPÓSITO DETERMINADO. McMurdo Ltd no se
responsabilizará de daños indirectos, especiales, fortuitos o resultantes por cualquier causa. McMurdo Ltd no se
responsabilizará en ningún caso de anulación alguna de garantía.
ENGLISH
Garantía
Kannad Marine es una marca de McMurdo Limited. Según lo estipulado a continuación, McMurdo Ltd garantiza este
producto frente a cualquier defecto de piezas y mano de obra durante un periodo de cinco (5) años a contar desde
la fecha de venta. La presente garantía se invalidará en los siguientes casos:
• cualquier defecto debido al desgaste normal del producto, a un daño causado deliberadamente, a negligencia, a
unas condiciones de trabajo anormales, al no respeto de las instrucciones de McMurdo Ltd (ya sean orales o
escritas), a una instalación inadecuada y/o al uso de baterías no recomendadas y/o suministradas por McMurdo
Ltd, a un uso indebido o a modificaciones o reparaciones del producto por parte de personas que no pertenezcan
a McMurdo Ltd o a uno de sus técnicos de servicio autorizados;
• piezas, material o equipo no fabricado por McMurdo Ltd, de cuya garantía deberá encargarse el fabricante
correspondiente y por el que el comprador no recibirá garantía alguna por parte de McMurdo Ltd;
• durante la duración de conservación de la batería, explícitamente excluida de la presente garantía;
• durante la duración de conservación de la Unidad hidrostática de liberación (en los productos que la lleven),
explícitamente excluida de la presente garantía;
• en caso de no haberse abonado la totalidad del precio del producto.
105
DIE OBEN ERWÄHNTE EINGESCHRÄNKTE HAFTUNG GILT EXKLUSIV UND ERSETZT JEDE ANDERE
AUSDRÜCKLICHE ODER VORAUSGESETZTE HAFTUNG, EINSCHLIESSLICH, ABER NICHT BESCHRÄNKT
AUF EINE VORAUSGESETZTE HAFTUNG DER EIGNUNG FÜR DEN VERKAUF ODER EIGNUNG FÜR EINEN
BESONDEREN ZWECK. McMurdo Ltd. übernimmt keine Haftung für indirekte, besondere, zufällige oder
Folgeschäden gleich welcher Art aus beliebigem Grund. McMurdo Ltd übernimmt in keinem Fall eine Haftung für
Zuwiderhandlungen gegen die Garantie oder andere Ansprüche über einen den Kaufpreis des Produktes
überschreitenden Betrag hinaus. Diese Garantie berührt keine gesetzlichen Rechte des Verbrauchers.
NEDERLANDS
ITALIANO
DEUTSCH
ENGLISH
FRANCAIS
ESPAÑOL
Garantieerklärung
Kannad Marine ist eine Marke der McMurdo Limited. Bei Einhaltung nachstehender Bedingungen übernimmt
McMurdo Ltd. für Material- und Konstruktionsfehler eine fünfjährige Garantie Jahre ab Kaufdatum. In folgenden
Fällen übernimmt die McMurdo Ltd. dem Käufer gegenüber keine Garantie:
• Für Fehler aufgrund von normalem Verschleiß, vorsätzlicher Beschädigung, Nachlässigkeit, anormaler
Belastung, Nichteinhaltung der (mündlichen oder schriftlichen) Anweisungen von McMurdo Ltd einschließlich
fehlerhafter Montage und/oder Nutzung der empfohlenen und/oder von McMurdo Ltd. gelieferten Batterien,
Missbrauch oder Änderungen oder Reparatur des Produktes durch andere als McMurdo Ltd oder einen
zugelassenen Kundendienst;
• Bei Teilen, Material oder Ausrüstung, die nicht von McMurdo Ltd hergestellt wurden, hat der Käufer nur Anspruch
auf die Haftung oder Gewährleistung, die der Hersteller McMurdo Ltd gegenüber gewährt;
• Lagerlebensdauer der Batterie, die explizit aus dieser Gewährleistung ausgeschlossen wird;
• (So vorhanden) für die Lagerlebensdauer des Wasserdruckauslösers, die explizit aus dieser Gewährleistung
ausgeschlossen wird;
• Wenn der Gesamtpreis für das Produkt nicht bezahlt wurde.
106
Berechtigte Ansprüche im Rahmen der og. Garantie müssen schriftlich so schnell wie möglich nach Entdeckung des
Fehlers oder Ausfalls und innerhalb der og. Garantiezeit geltend gemacht werden. Ein Kaufbeleg ist vorzulegen. Der
Anspruch und das fragliche Produkt sollten an untenstehende Adresse oder einen zugelassenen Kundendienst
eingeschickt werden.
Bei berechtigtem Garantieanspruch hat McMurdo Ltd das Recht, das fragliche Produkt kostenlos zu reparieren oder
(teilweise) zu ersetzen oder dem Käufer im alleinigen Ermessen von McMurdo Ltd den Kaufpreis (ganz oder
teilweise) zurückzuerstatten. McMurdo Ltd haftet einem Käufer gegenüber, der nicht Verbraucher ist, nicht für
Verlust oder Schäden (indirekter, besonderer oder sich daraus ergebender Verlust von Gewinnen oder sonstiger
Verlust), Ausgaben oder andere Kompensationsansprüche, die sich aus oder in Verbindung mit diesem Produkt
ergeben. Bei Verbrauchern haftet McMurdo Ltd nur, wenn der Verlust oder Schaden vorhersehbar ist.
Im Todesfall oder bei Körperverletzungen bedingt durch Nachlässigkeit gibt es keine Haftungsbeschränkung für
McMurdo Ltd. Für diese Garantie gilt englisches Gesetz.
Anfragen in Verbindung mit dieser Garantie oder zugelassenem Kundendienst sind zu richten an:
McMurdo Limited, Silver Point, Airport Service Road, Portsmouth, Hampshire, PO3 5PB, Vereinigte
Königreich
Telefon: Int + 44 (0) 23 9262 3900 Fax: Int + 44 (0) 23 9262 3998
Web: www.kannadmarine.com Email: [email protected]
Qualora il reclamo in garanzia sia valido, la McMurdo Ltd sarà tenuta a riparare o sostituire il prodotto (o il pezzo) in
questione a titolo gratuito o, a discrezione della McMurdo Ltd, a rimborsare all'acquirente il prezzo del prodotto (o
una percentuale del prezzo). La McMurdo Ltd non sarà ritenuta responsabile verso un acquirente non consumatore
per eventuali altre perdite o danni (siano esse perdite di profitto indirette, speciali o consequenziali o di altro tipo)
costi, spese o altre richieste di risarcimento derivanti o connessi al presente prodotto. Nel caso di un consumatore,
la McMurdo Ltd sarà ritenuta responsabile unicamente ove altre perdite o danni siano prevedibili.
Nulla limiterà la responsabilità della McMurdo Ltd in caso di morte o lesioni fisiche causate dalla propria negligenza.
Questa garanzia va interpretata ai sensi delle leggi inglesi.
Le richieste d'informazioni riguardanti la presente garanzia o gli agenti di manutenzione approvati devono essere
inviate a:
FRANCAIS
ESPAÑOL
NEDERLANDS
McMurdo Limited, Silver Point, Airport Service Road, Portsmouth, Hampshire, PO3 5PB, Gran Bretagna
Telefono: Int + 44 (0) 23 9262 3900 Fax: Int + 44 (0) 23 9262 3998
Web: www.kannadmarine.com Email: [email protected]
DEUTSCH
Per essere validi, i reclami devono essere presentati ai sensi della presente garanzia per iscritto subito dopo la
scoperta del difetto o del guasto e comunque entro il summenzionato periodo coperto dalla garanzia. Sarà
necessaria la prova d'acquisto. Il reclamo deve essere inviato con il prodotto in questione all'indirizzo sotto riportato
o presso l'agente di manutenzione approvato.
ITALIANO
LA GARANZIA LIMITATA COME DEFINITA SOPRA È ESCLUSIVA E SOSTITUISCE TUTTE LE ALTRE
GARANZIE, ESPRESSE O IMPLICITE, COMPRESE, MA NON LIMITATE A, QUELLE IMPLICITE RELATIVE ALLA
COMMERCIABILITÀ O ALL'IDONEITÀ AD UNO SCOPO SPECIFICO.
La McMurdo Ltd non sarà ritenuta responsabile per danni indiretti, speciali, accidentali o consequenziali di alcun tipo
derivanti da qualsivoglia causa. In alcun caso la McMurdo Ltd dovrà essere ritenuta responsabile per eventuali
violazioni della garanzia o altri reclami per somme superiori al prezzo d'acquisto del prodotto. La presente garanzia
non pregiudica i diritti stabiliti dalla legge a difesa del consumatore.
ENGLISH
Dichiarazione di garanzia
Kannad Marine è un marchio della McMurdo Limited. Fatte salve le disposizioni definite di seguito, la McMurdo Ltd
garantisce il presente prodotto contro qualsivoglia difetto di materiale o di fabbricazione per una durata di cinque anni
a contare dalla data d'acquisto. Nei seguenti casi, la McMurdo Ltd non potrà essere ritenuta responsabile verso
l'acquirente ai sensi della garanzia di cui sopra:
• difetti derivanti da normale deterioramento, danni intenzionali, negligenza, condizioni di esercizio anomale,
mancata osservanza delle istruzioni impartite dalla McMurdo Ltd (orali o scritte), compresa l'errata installazione
e/o utilizzazione delle batterie consigliate e/o fornite dalla McMurdo Ltd, uso errato o alterazioni o riparazione del
prodotto ad opera di persone diverse da incaricati della McMurdo Ltd o da un agente di manutenzione approvato;
• parti, materiali o apparecchi non realizzati dalla McMurdo Ltd, rispetto ai quali l'acquirente avrà unicamente diritto
a beneficiare delle eventuali garanzie riconosciute dal produttore alla McMurdo Ltd;
• durata di conservazione della batteria, specificamente esclusa dalla presente garanzia;
• durata di conservazione del dispositivo idrostatico di rilascio automatico (ove presente), specificamente esclusa
dalla presente garanzia;
• se il prodotto non è stato pagato nella sua totalità.
107
DE BEPERKTE GARANTIE HIERBOVEN VERMELD IS EXCLUSIEF EN VERVANGT IEDERE ANDERE
GARANTIE, IMPLICIET OF EXPLICIET, INCLUSIEF MAAR NIET BEPERKT TOT EEN IMPLICIETE GARANTIE
VAN VERHANDELBAARHEID OF GESCHIKTHEID VOOR EEN BEPAALD DOEL. McMurdo Ltd is niet
aansprakelijk voor enige indirecte, speciale, incidentele of gevolgschade van als gevolg van welke oorzaak dan ook.
In geen enkel geval is McMurdo Ltd aansprakelijk voor een inbreuk op de garantie of iedere andere aanspraak voor
een bedrag hoger dan de aankoopwaarde van het product. Deze garantie beperkt geen enkele manier de wettelijke
rechten van de consument.
ITALIANO
DEUTSCH
ENGLISH
FRANCAIS
ESPAÑOL
Garantie
Kannad Marine is een merknaam van McMurdo Limited. Onder de onderstaande voorwaarden garandeert McMurdo
Ltd dat dit product vrij is van defecten in materialen en arbeid voor een periode van vijf jaar vanaf de aankoopdatum.
McMurdo Ltd is niet aansprakelijk naar de koper onder de bovenstaande aansprakelijkheidsbeperking:
• voor ieder defect ontstaan uit normale slijtage, opzettelijke beschadiging, nalatigheid, abnormale
gebruiksomstandigheden, niet opvolgen van de instructies van McMurdo Ltd (zowel mondeling als schriftelijk)
inclusief verkeerde installatie en/of het gebruik van aanbevolen batterijen en/of geleverd door McMurdo Ltd,
misbruik of aanpassingen of reparatie van het product door personen anders dan van McMurdo Ltd of een
goedgekeurd onderhoudsbedrijf;
• voor onderdelen, materialen en apparatuur niet gefabriceerd door McMurdo Ltd in betrekking tot welke de koper
alleen recht heeft op een garantie of waarborg afgegeven aan McMurdo Ltd door de fabrikant;
• voor de houdbaarheid van de batterij die specifiek is uitgesloten van deze garantie;
• voor de houdbaarheid van de hydrostatische ontkoppelingsinrichting (indien geïnstalleerd) die specifiek is
uitgesloten van deze garantie;
• als niet de volledige prijs voor het product is betaald.
Om geldig te zijn moeten aanspraken onder bovenstaande garantie zo snel mogelijk na ontdekking van het defect
of de fout en binnen de hierboven beschreven garantieperiode schriftelijk worden ingediend. Een betalingsbewijs is
vereist. De aanspraken moeten samen met het desbetreffende product worden verstuurd naar het onderstaande
adres of een goedgekeurd onderhoudsbedrijf.
Bij een geldige aanspraak op de garantie behoudt McMurdo Ltd het recht om het desbetreffende product (of
onderdeel) kosteloos te repareren of te vervangen, of geheel naar eigen goeddunken van McMurdo Ltd de koper het
aankoopbedrag van het product (of een proportioneel deel van de prijs) te restitueren. McMurdo Ltd is niet
aansprakelijk voor een koper die geen consument is, voor enig verlies of schade (ongeacht of dit indirecte, speciale
of gevolgschade of winst is of anders) kosten, onkosten of andere aanspraken op compensatie die voortvloeien uitof in verband worden gebracht met dit product. In het geval van een consument is McMurdo Ltd alleen aansprakelijk
indien verlies of schade te voorzien is.
Niets beperkt McMurdo Ltd aansprakelijkheid voor sterfgevallen of persoonlijk letsel veroorzaakt door haar
nalatigheid. Deze garantie is geldig onder de Engelse wetgeving.
NEDERLANDS
Alle informatieaanvragen betreffende deze garantie of goedgekeurde onderhoudsbedrijven moeten geadresseerd
worden aan:
108
McMurdo Limited, Silver Point, Airport Service Road, Portsmouth, Hampshire, PO3 5PB, Groot-Brittannië
Telefoon: Int + 44 (0) 23 9262 3900 Fax: Int + 44 (0) 23 9262 3998
Web: www.kannadmarine.com Email: [email protected]
PREMIERE AFFECTATION DE LA BALISE / BEACON FIRST ASSIGNMENT / PRIMER DESTINO DE LA
BALIZA / ERSTE ZUWEISUNG DER BAKE / PRIMA DESTINAZIONE DEL GAVITELLO/EERSTE BESTEMMING
CSN
Nom du bateau / Vessel name / Nombre del barco / Name des Schiffes / Nome della barca / Naam van het schip:
......................................................................................................................................................................
MMSI / NMSI.
Code radio / Radio code / Código radio / Funkcode / Codice radio / Radiocode
Code sérialisé / Serialised code / Código serie / Seriencode / Codice serializzato / Geserialiseerde code
Nom propriétaire / Owner’s name / Nombre del armador / Name des Eigentümers / Nome proprietario / Naam
eigenaar:
......................................................................................................................................................................
Code ID (HEX) / ID Code (HEX) / Código ID (HEX / Codice ID (HEX) / Codice ID (ESADECIMALE):
Prochain remplacement largueur / Release system replacement / Sustitución del sistema de liberación / Austausch des
Auswerfers / Prossima sostituzione dispositivo di rilascio / Vervanging ontkoppelingssysteem:
.......................................................................................................................................................................
Prochain entretien à terre SBM / Next inspection on shore SBM / Próximo mantenimiento en taller SBM / Datum des
nächsten Erdwartung SBM / Prossima Intervista a terra SBM / Volgende onderhoud aan aarde SBM:
.......................................................................................................................................................................
Remplacement piles / Battery replacement / Sustitución de la batería / Austausch der Batterien / Sostituzione pile/
Batterijwissel:
.......................................................................................................................................................................
Cachet / Stamp / Sello / Stempel / Timbro/ Stempel
Date / Datum /Fecha
Identification / Identificación / Identifizierung / Identificazion / Identificatie
Categorie / Category / Categoria / Kategorie
Kannad Marine
McMurdo Ltd
Silver Point
Airport Service Road
Portsmouth PO3 5PB
United Kingdom
Phone:
Fax:
Email:
Website:
+44 (0)23 9262 3900
+44 (0)23 9262 3998
[email protected]
www.kannadmarine.com
DOC09028B
94-220 Iss 1

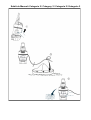

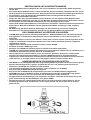
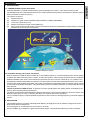
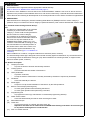
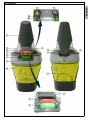
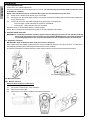
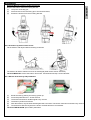
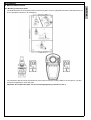
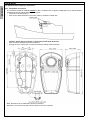
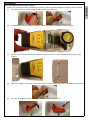
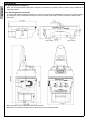
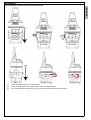

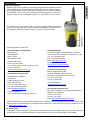
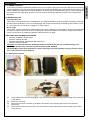
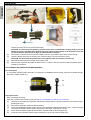

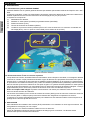
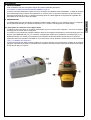
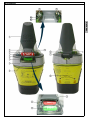
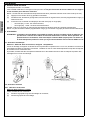
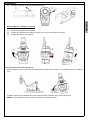
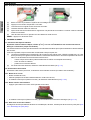
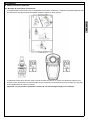
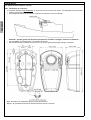
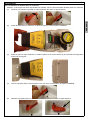
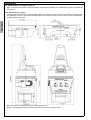
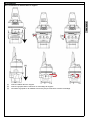
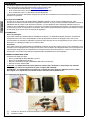
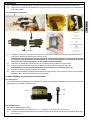
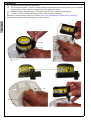
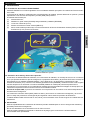
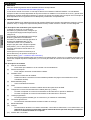
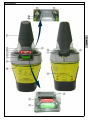
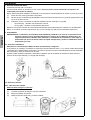
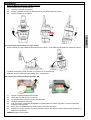
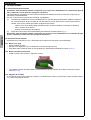
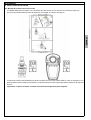
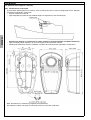
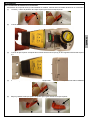
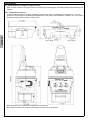


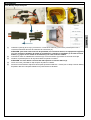
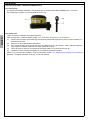
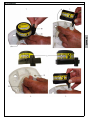
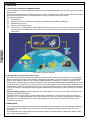
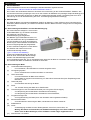
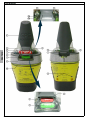
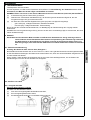
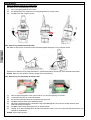
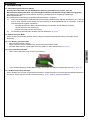
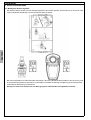
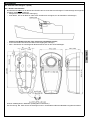

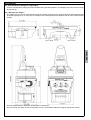
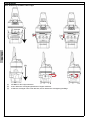
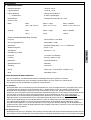
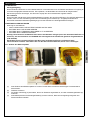
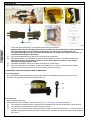
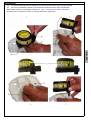
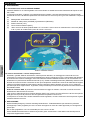
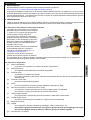
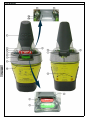
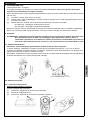
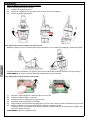

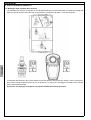
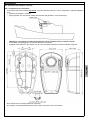
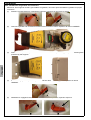
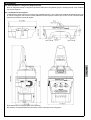
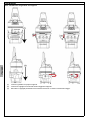
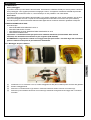
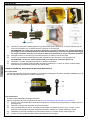
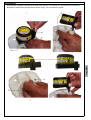
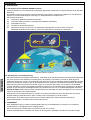
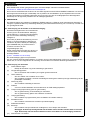
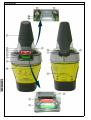
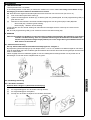
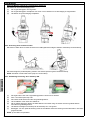
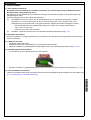
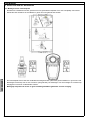
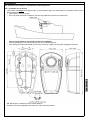
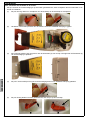
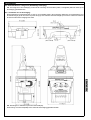
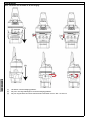
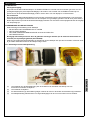
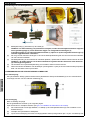
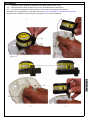
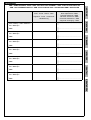
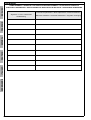
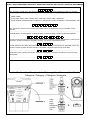

![3 Drücken Sie [NÄCH]. - Rex-Rotary Vertriebsgesellschaft Essen mbH](http://vs1.manualzilla.com/store/data/006738268_1-544ddc8745a6bd67004f03f7636cb78c-150x150.png)