1
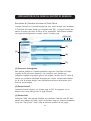
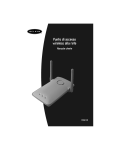
Wireless Network Access Point
Point d'accès Réseau sans fil
Kabelloser Netzwerk Access Point
Draadloos netwerk accesspoint
Punto de acceso a la red inalámbrico
Access point di rete wireless
User Manual
Manuel de
l'Utilisateur
Benutzerhandbuch
Handleiding
Manual del usuario
Manuale utente
F5D6130
Wireless Network
Access Point
User Manual
F5D6130
TABLE OF CONTENTS
Introduction . . . . . . . . . . . . . . . . . . . . . . . . . . . . . . . . . . . . . . . . . . 1
Key Features . . . . . . . . . . . . . . . . . . . . . . . . . . . . . . . . . . . . . . .2
Package Contents . . . . . . . . . . . . . . . . . . . . . . . . . . . . . . . . . . . .3
Optional Management . . . . . . . . . . . . . . . . . . . . . . . . . . . . . . . . .3
Software Requirements . . . . . . . . . . . . . . . . . . . . . . . . . . . . . . . . .3
System Requirements . . . . . . . . . . . . . . . . . . . . . . . . . . . . . . . . . .3
Specifications . . . . . . . . . . . . . . . . . . . . . . . . . . . . . . . . . . . . . .4
Knowing your Access Point . . . . . . . . . . . . . . . . . . . . . . . . . . . . . . . . .5
Placement of your Access Point . . . . . . . . . . . . . . . . . . . . . . . . . . . . . .7
Quick Setup . . . . . . . . . . . . . . . . . . . . . . . . . . . . . . . . . . . . . . . . . . .8
Step 1: Connect the AP to a Router, Ethernet Switch, or Hub . . . . . . . .8
Step 2: Install the Discovery Wizard . . . . . . . . . . . . . . . . . . . . . . . .9
Using the Discovery Wizard to Configure the AP . . . . . . . . . . . . . . . . . .11
Configuring the Wireless Network Settings . . . . . . . . . . . . . . . . . . . . . .15
Troubleshooting . . . . . . . . . . . . . . . . . . . . . . . . . . . . . . . . . . . . . . .29
Information . . . . . . . . . . . . . . . . . . . . . . . . . . . . . . . . . . . . . . . . . .30
INTRODUCTION
Thank you for purchasing the Belkin Wireless Network Access Point (AP) and
welcome to the world of wireless networking. Now you can take advantage of
this great new high-speed wireless technology and gain the freedom you need
around the home or office—without using cables. The AP acts as a bridge
between your existing wired network and your wireless-equipped computers.
The easy installation and setup will have you networking wirelessly in
minutes. Please be sure to read through this manual completely to be sure
that you are getting the most out of your AP.
1
INTRODUCTION
Key Features
Wide Area Coverage at High Speeds
The Belkin AP provides coverage over an indoor area up to 300 feet in radius,
and outdoor area over 1,500 feet in radius.
Up to 128-Bit Encryption
Your Belkin AP is capable of encrypting (scrambling) the transmitted radio
waves so you can be sure that your data is secure. The optional encryption
feature allows you to encrypt at 64 bits or 128 bits using a key that you
enter yourself.
MAC Address Filtering
For added security, you can set up a list of MAC addresses (unique client
identifiers) that are allowed access to your network. Every computer has its
own MAC address. Simply enter these MAC addresses into a list using the
web-based user interface and you can control access to your network.
Works with Both PCs and Mac® Computers
The Access Point supports a variety of networking environments including Mac
OS® 8.x, 9.x, X v10.x, AppleTalk®, Linux®, Windows® 95, 98, Me, NT®, 2000,
and XP, and others.
Note: The Access Point can be managed through a web browser without the
included software. The software included supports Windows 98 SE, Me, 2000, and
XP only but IS NOT necessary to use the Access Point.
Web-Based Advanced User Interface
You can set up the AP’s advanced functions easily through your web browser,
without having to install additional software onto the computer. There are no
disks to install or keep track of and, best of all, you can make changes and
perform setup functions from any computer on the network quickly and easily.
Applications and Advantages
• Economically connect multiple wireless computers to a network
• SOHO (Small Office/Home Office) networking needs
• Provides the easy and quick small network installation SOHO users need.
2
INTRODUCTION
Package Contents
• Belkin Wireless Network Access Point
• Power Supply
• Software CD
• User Manual
• Registration Card
Optional Management Software Requirements
• Windows® 98SE, Me, 2000, or XP
• Minimum 64MB RAM
System Requirements
• At least one computer with TCP/IP networking protocol installed
• CAT5 networking cable (or better)
• Microsoft® Internet Explorer 4.0 or later, or Netscape® 4.0 or later
3
INTRODUCTION
Specifications
Standards:
IEEE 802.3 10Base-T Ethernet/100 Base-Tx Ethernet
IEEE 802.11b
Wireless:
Radio Technology: Direct Sequence Spread Spectrum (DSSS)
802.11b: 11, 5.5, 2, 1Mbps
802.11b: CCK, DQPSK, DBPSK
2.412-2.497GHz ISM band
802.11b: 11 for North America, 14 for Japan, 13 for Europe
64/128-bit WEP
Protocol Supported:
CSMA/CD, TCP, IP, UDP, and DHCP (client)
Management:
Browser-Based
Maximum Users:
32 (WLAN)
Ports:
1 10Base-T/100Base-Tx RJ45 port
1 Power jack
1 Reset button
LEDs:
Power
LAN Activity
WLAN Activity
4
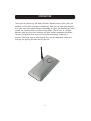
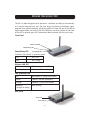
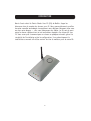
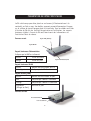
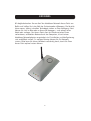
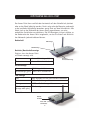
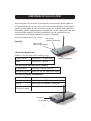
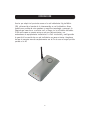
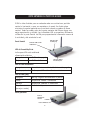
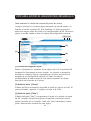
KNOWING YOUR ACCESS POINT
The AP has been designed to be placed on a desktop vertically or horizontally,
or it may be mounted to a wall. The slim design minimizes the desktop space
required when placed vertically. All of the cables exit from the rear of the AP for
better organization and utility. The LED indicators are easily visible on the front
of the AP to provide you with information about network activity and status.
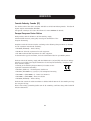
Front Panel
Wireless LAN LED
LAN (Network) LED
Power/Ready LED
Power/Ready LED
Indicates that the AP is receiving power.
Off
AP is OFF
Red
AP is ready
Wireless LAN LED
Off
Wireless network is OFF
Blinking Green
Indicates AP is working
LAN (Network) LED
Off
No network is linked to the port
Green
10Base-T device connected
Orange
100Base-Tx device connected
Blinking
(Orange or Green)
Port activity
Rear Panel
Power Jack
RJ-45 LAN Port
5
KNOWING YOUR ACCESS POINT
Power Jack
Connect the included 5V DC power supply to this jack.
RJ45 Ethernet Jack
Connect an Ethernet cable to this socket, and connect to an open RJ45
10Base-T or 100Base-T port on a switch, router, or hub.
Reset Button
The Reset button is used in rare cases when the AP may function improperly.
Resetting the AP will restore the AP’s normal operation while maintaining the
programmed settings. You can also restore the factory default settings by
using the Reset button. Use the restore option in instances where you may
have forgotten your custom password.
a. Resetting the AP
Push and release the Reset button. The lights on the AP will momentarily
flash. The Power/Ready light will begin to blink. When the Power/Ready light
becomes solid again, the reset is complete.
b. Restoring the Factory Defaults
Press and hold the Reset button for five seconds then release it. The lights on
the AP will momentarily flash. The Power/Ready light will begin to blink.
When the Power/Ready light becomes solid again, the restore is complete.
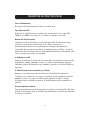
Rotatable Dipole Antenna
One unidirectional dipole antennas is located on the side of the AP. The
antennas can rotate 180 degrees. The antenna should be oriented in the vertical position for best performance.
6
PLACEMENT OF YOUR ACCESS POINT
Proper placement of your AP is important to ensure the best performance of
your wireless network. Indoors, your Wireless Access Point can typically provide a circular coverage area of 300 feet or more. However, different types of
construction materials and other obstructions in a building can greatly affect
the wireless signal and decrease the range. If possible, place your AP as close
as possible to the center of the area that you want to cover. In multistory
homes, place the AP on a floor that is as close to the center of the home as
possible; this may mean placing the AP on an upper floor.
Use care when choosing the location of your AP
• Be aware of appliances or large objects such as a refrigerator or
washer/dryer unit that may be on the opposite side of a wall from where
you decide to place your AP.
• Place the AP on top of a desk and away from metal cabinets and
computer cases.
• Do not place objects or components on top of the AP.
• Make sure that the antenna is pointing UP at all times.
• Metallic-based UV window tint can affect wireless performance. Do not
place the AP next to a tinted window.
We realize that in the real world, it may not be possible to place your AP in
the center of your coverage area. In cases where you may experience difficulty
covering the entire area you want, try placing the AP as high as possible.
Wireless devices work best in a line-of-sight situation where there are no
obstacles between the wireless computer and the AP. The AP may also be
mounted to a wall with the antennas facing UP. There are other options for
expanding your wireless coverage area. Visit http://www.belkin.com/networking
for solutions.
The wireless signal can be affected by many things including neighboring
wireless networks, microwave ovens in operation, and 2.4GHz cordless phones.
While these things can affect the network performance, your wireless network
typically will work fine under most conditions where these devices exist.
7
QUICK SETUP
The AP is configured at the factory to operate correctly out-of-the-box. Simply
connecting the AP to your existing network will instantly add wireless capabilities to your network with no further configuration required. Belkin ships
software that will allow you to locate and connect to the Access Point on
your network so you can easily change or modify the settings if you wish.
Before you can use the software, you must physically install the Access Point.
Once the AP is installed, you can use the software to modify the settings.
Follow the steps below to install your AP.
Step 1: Connect the AP to a Router, Ethernet Switch, or Hub
Verify the contents of your box. You should have the following:
• Belkin Wireless Network Access Point
• Power Supply
• Software CD
• User Manual
• Registration Card
1. Select a suitable place for your AP as described in the previous section of
this manual.
2. Connect a CAT5 cable between the AP and your router’s LAN port, Ethernet
switch, or hub. Connect the power supply to the AP by plugging the round
DC connector into the DC jack on the AP. Plug the power supply into the
wall. Verify that the Power LED and the Link LED are illuminated. If both
LEDs are illuminated, this indicates that the AP is connected properly.
3. Connection and placement of your AP is now complete.
8
QUICK SETUP
Step 2: Install the Discovery Wizard
The Discovery Wizard is a convenient tool for locating and connecting to your
AP. The Discovery Wizard is only necessary if you want to make changes to
the AP’s settings, otherwise, the AP will work out-of-the-box in most cases.
Since the AP is shipped from the factory as a DHCP client, it will obtain an IP
address automatically from the DHCP server on your network. Since this
address is somewhat random, the Discovery Wizard will locate the AP on the
network for you so you don’t have to take extra steps to determine the IP
address of the AP.
1. Insert the CD into your CD-ROM drive.
2. The Belkin Wireless Network Access Point Setup Utility screen will
automatically appear. If it does not appear within 15-20 seconds, then
select your CD-ROM drive and double-click on the folder named “Files”.
Next double-click on the icon named “start.exe”.
3. In the menu window, drag your mouse over the “Install” button then select
“Click here” to start the software installation program.
9
QUICK SETUP
4. The software installation Wizard will start. Click “Next” on the first screen.
5. Accept the user agreement and click “Next” while following the installation
Wizard through its steps. Click “Finish” on the last screen.
6. The Discovery Wizard is now installed. Go to the next section to learn how
to use the Wizard.
10
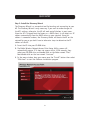
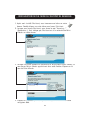
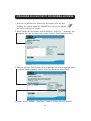
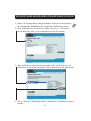
USING THE DISCOVERY WIZARD TO CONFIGURE THE AP
1. After you have installed the Discovery Wizard, you will see an
icon on the desktop. Double-click the icon to start the Wizard.
2. When you start the Wizard, you will see the word “Scanning…”.
This means the Wizard is looking for Access Points on your network.
3. When the Wizard finds your Access Point(s), the Access Point’s name will
appear in this window. Click on the Access Point’s name.
4. Click “Connect”. This will launch your web browser.
11
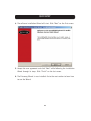
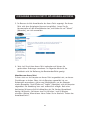
USING THE DISCOVERY WIZARD TO CONFIGURE THE AP
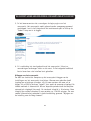
5. You will see the AP’s login page in your browser window. The AP ships with
no password entered. In the login screen, leave the password blank and
click the “Submit” button to log in.
6. You are now connected to the AP and can make any changes you want to.
See the following section of this manual to learn how to use the interface.
Logging Out of the AP
One computer at a time can log into the AP for the purposes of making
changes to the settings of the AP. Once a user has logged in to make
changes, there are two ways that the computer can be logged out. Clicking
the “Logout” button will log the computer out. The second method is automatic. The login will time out after a specified period of time. The default
login time out is 10 minutes. This can be changed from 1 to 99 minutes. For
more information, see the section in this manual titled “Changing the Login
Timeout Setting”.
12
USING THE DISCOVERY WIZARD TO CONFIGURE THE AP
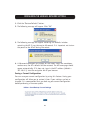
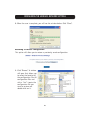
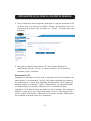
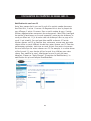
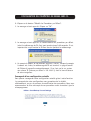
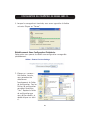
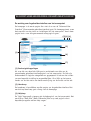
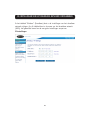
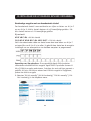
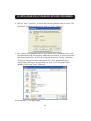
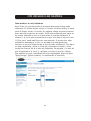
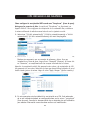
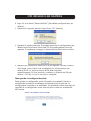
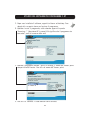
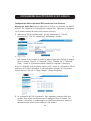
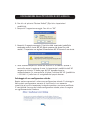
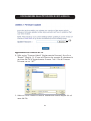
Understanding the Access Point User Interface
The home page is the first page you will see when you access the Advanced
User Interface (UI). The home page shows you a quick view of the AP’s status
and settings. All advanced setup pages can be reached from this page.
(2) (3) (4)
(5)
(1)
(6)
(7)
(1) Quick-Navigation Links
You can go directly to any of the AP’s advanced UI pages by clicking directly
on these links. The links are divided into logical categories and grouped by
tabs to make finding a particular setting easier to find. Clicking on the purple
header of each tab will show you a short description of the tab’s function.
(2) Home Button
The home button is available in every page of the UI. Pressing this button
will take you back to the home page.
(3) Help Button
The “Help” button gives you access to the AP’s help pages. Help is also available on many pages by clicking “more info” next to certain sections of each
page.
13
USING THE DISCOVERY WIZARD TO CONFIGURE THE AP
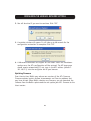
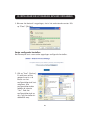
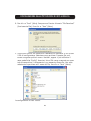
(4) Login/Logout Button
This button enables you to log in and out of the AP with the press of one
button. When you are logged into the AP, this button will change to read
“Logout”. Logging into the AP will take you to a separate login page where
you will need to enter a password. When you are logged in to the AP, you can
make changes to the settings. When you are finished making changes, you
can log out of the AP by clicking the “Logout” button. For more information
about logging into the AP, see the section called “Logging into the AP”.
(5) Version Info
Shows the firmware version, boot-code version, hardware version, and serial
number of the AP.
(6) LAN Settings
Shows you the settings of the Local Area Network (LAN) side of the AP.
Changes can be made to the settings by clicking on any one of the links (IP
Address, Subnet Mask) or by clicking the “LAN” Quick Navigation link on the
left side of the screen.
(7) Wireless
Shows the status of the AP’s wireless setting. Changes can be made to the
settings by clicking on any one of the links or by clicking the “Quick
Navigation” links on the left side of the screen.
14
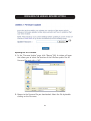
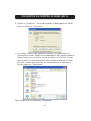
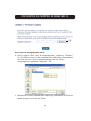
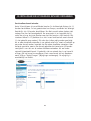
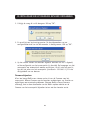
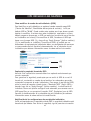
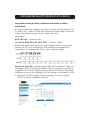
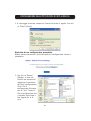
CONFIGURING THE WIRELESS NETWORK SETTINGS
The Wireless tab lets you make changes to the wireless network settings. From
this tab you can make changes to the wireless network name (SSID), operating channel, and encryption security settings.
IP Settings
15
CONFIGURING THE WIRELESS NETWORK SETTINGS
Changing the Wireless Channel
Auto: There are a number of operating channels you can choose from. In the
United States, there are 11 channels. In the United Kingdom and most of
Europe, there are 13 channels. In a small number of other countries, there are
other channel requirements. Your AP is configured to operate on the proper
channels for the country you reside in. The default channel is 11 (unless you
are in a country that does not allow channel 11). The channel can be changed
if needed. If there are other wireless networks operating in your area, your
network should be set to operate on a channel that is different than the
other wireless networks. For best performance, use a channel that is at least
five channels away from the other wireless network. For instance, if another
network is operating on channel 11, then set your network to channel 6 or
below. To change the channel, select the channel from the drop-down list.
Click “Apply Changes”. The change is immediate.
16
CONFIGURING THE WIRELESS NETWORK SETTINGS
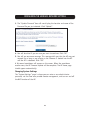
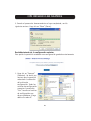
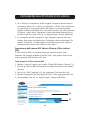
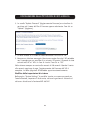
Changing the Wireless Network Name (SSID)
To identify your wireless network, a name called the SSID (Service Set Identifier)
is used. The default SSID of the AP is “WLAN”. You can change this to anything
you want to or you can leave it unchanged. If there are other wireless networks
operating in your area, you will want to make sure that your SSID is unique
(does not match that of another wireless network in the area). To change the
SSID, type in the SSID that you want to use in the SSID field (1) and click
“Apply Changes” (2). The change is immediate. If you make a change to the
SSID, your wireless-equipped computers may also need to be reconfigured to
connect to your new network name. Refer to the documentation of your wireless network adapter for information on making this change.
(1)
(2)
Using the Broadcast SSID Feature
Note: This advanced feature should be employed by advanced users only.
For security, you can choose not to broadcast your network’s SSID. Doing so
will keep your network name hidden from computers that are scanning for the
presence of wireless networks. To turn off the broadcast of the SSID, remove
the check mark from the box next to “Broadcast SSID”, and then click “Apply
Changes”. The change is immediate. Each computer now needs to be set to
connect to your specific SSID; an SSID of “ANY” will no longer be accepted.
Refer to the documentation of your wireless network adapter for information
on making this change.
Changing the Wireless Security Settings
Your AP is equipped with the security standard called WEP (Wired Equivalent
Privacy). By default, wireless security is disabled. To enable security, follow
the steps in this section.
17
CONFIGURING THE WIRELESS NETWORK SETTINGS
Setting WEP Encryption using a Passphrase
Note to Mac users: The Passphrase option will not operate with Apple® AirPort®.
To configure encryption for your Mac computer, set the encryption using the
manual method described in the next section.
1. Select “128-bit automatically” or “64-bit automatically” from the
drop-down menu.
2. Type in a passphrase. A passphrase is like a password. It can be a mixture
of numbers and letters. After you type in your passphrase, click “Generate”.
When you click “Generate”, the key fields below will become populated.
Note: 64-bit encryption will generate four keys and 128-bit encryption will generate
only one key. Select the key you want to use by clicking the radio button next to
it. Click “Apply Changes”.
3. Encryption in the AP is now set. Each of your computers on your wireless
network will now need to be configured with the same passphrase. Refer to
the documentation of your wireless network adapter for information on
making this change.
18
CONFIGURING THE WIRELESS NETWORK SETTINGS
Setting Encryption Manually Using a Hexadecimal Key
A hexadecimal key is a mixture of numbers and letters from A–F and 0–9.
64-bit keys are five 2-digit numbers. 128-bit keys are 13 2-digit numbers.
For instance:
AF 0F 4B C3 D4 = 64-bit key
C3 03 0F AF 0F 4B B2 C3 D4 4B C3 D4 E7 = 128-bit key
In the boxes below, make up your key by writing in two characters between
A–F and 0–9. You will use this key to program the encryption settings on your
AP and your wireless computers.
Note to Mac users: Original Apple AirPort products support 64-bit encryption only.
Apple AirPort 2 products can support 64-bit or 128-bit encryption. Please check
your product to see which version you are using. If you cannot configure your
network with 128-bit encryption, try 64-bit encryption.
1. Select “64-bit manually” or “128-bit manually” from the drop-down menu.
19
CONFIGURING THE WIRELESS NETWORK SETTINGS
2. If using 64-bit encryption, there will be four key fields. If using 128-bit
encryption, there will be one key field. In the key field(s), type in the
hexadecimal key(s) that you wish to use. When finished typing in your
keys, select which key you want to use by clicking the radio button next to
it. Click “Apply Changes”.
3. Encryption in the AP is now set. Each of your computers on your wireless
network will now need to be configured with the same hexadecimal key.
Refer to the documentation of your wireless network adapter for
information on making this change.
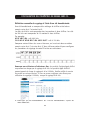
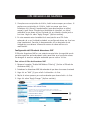
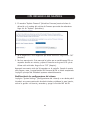
Setting MAC Address Filtering
The MAC address filter is a powerful security feature that allows you to specify
which computers are allowed access to the Access Point. Any computer NOT in
the list will be denied access to the network.
To Enable the MAC Address Filter
1. Place a check mark in the “Enable MAC Address Filtering” box (1).
2. Enter the MAC addresses of a computer that you want to allow access to
the network.
3. Click “Add” (2) to add the address to the list.
4. Repeat for each computer you want to add to the list.
5. Click “Apply Changes” to finish.
(1)
(2)
20
CONFIGURING THE WIRELESS NETWORK SETTINGS
Client List
You can view a list of clients that are currently associated with the AP using
the Client List feature. You will be presented with the MAC address of the
client and the speed at which it is connected.
Advanced Settings
Belkin provides a number of advanced functions that you can set. With exception to the AP name, it is recommended that you make no changes to these
settings unless you have a specific reason to do so. From the Advanced
Settings page you can do the following:
• Change the AP name (used to uniquely identify the AP on your network)
• Select the Basic Rate Set (1, 2Mbps or 1, 2, 5.5, 11Mbps)
• Select the Transmit rate (Auto, 11Mbps, 5.5Mbps, 2Mbps, 1Mbps)
• Set the RTS threshold
• Set the Fragmentation threshold
• Select the Preamble Type (Long or Short)
When making changes, be sure to click “Apply Changes” for the changes to
take effect.
Utilities
The Utilities screen lets you manage different parameters of the AP and perform certain administrative functions.
Restarting the AP
Sometimes it may be necessary to restart or reboot the AP if it begins working improperly. Restarting or rebooting the AP will NOT delete any of your
configuration settings.
21
CONFIGURING THE WIRELESS NETWORK SETTINGS
Restarting the AP to Restore Normal Operation
1. Click the “Restart AP” button.
2. The following message will appear. Click “OK”.
3. The following message will appear. Restarting the AP can take up to 60
seconds. It is important not to turn off the power to the AP during the restart.
4. A 30-second countdown will appear on the screen. When the countdown
reaches zero, the AP will be restarted. The AP home page should appear
automatically. If not, type in the AP’s address (default = 192.168.2.254)
into the navigation bar of your browser.
Restoring Factory Default Settings
Using this option will restore all of the settings in the AP to the factory
(default) settings. It is recommended that you back up your settings before
you restore all of the defaults.
22
CONFIGURING THE WIRELESS NETWORK SETTINGS
1. Click the “Restore Defaults” button.
2. The following message will appear. Click “OK”.
3. The following message will appear. Restoring the defaults includes
restarting the AP. It can take up to 60 seconds. It is important not to turn
the power to the AP off during the restart.
4. A 30-second countdown will appear on the screen. When the countdown
reaches zero, the AP’s defaults will be restored. The AP home page should
appear automatically. If it does not, type in the AP’s address (default =
192.168.2.1) into the navigation bar of your browser.
Saving a Current Configuration
You can save your current configuration by using this feature. Saving your
configuration will allow you to restore it later if your settings are lost or
changed. It is recommended that you back up your current configuration
before performing a firmware update.
23
CONFIGURING THE WIRELESS NETWORK SETTINGS
1. Click “Save”. A window called “File Download” will open. Click “Save”.
2. A window will open that allows you to select the location where you want
to save the configuration file. Select a location. You can name the file
anything you want, or use the default name “Config”. Be sure to name the
file so you can locate it yourself later. When you have selected the
location and name of the file, click “Save”.
The configuration is now saved.
24
CONFIGURING THE WIRELESS NETWORK SETTINGS
3. When the save is complete, you will see the window below. Click “Close”.
Restoring a Previous Configuration
This option will allow you to restore a previously saved configuration.
1. Click “Browse”. A window
will open that allows you
to select the location of
the configuration file. All
configuration files end
with a “.bin”. Locate the
configuration file you
want to restore and
double-click on it.
25
CONFIGURING THE WIRELESS NETWORK SETTINGS
2. You will be asked if you want to continue. Click “OK”.
3. A reminder window will appear. It will take up to 60 seconds for the
configuration restoration to complete. Click “OK”.
4. A 60-second countdown will appear on the screen. When the countdown
reaches zero, the AP’s configuration will be restored. The AP home page
should appear automatically. If not, type in the AP’s address (default =
192.168.2.1) into the navigation bar of your browser.
Updating Firmware
From time to time, Belkin may release new versions of the AP’s firmware.
Firmware updates contain feature improvements and fixes to problems that
may have existed. When Belkin releases new firmware, you can download the
firmware from the Belkin update website and update your AP’s firmware to the
latest version.
26
CONFIGURING THE WIRELESS NETWORK SETTINGS
(1)
Updating the AP’s Firmware
1. In the “Firmware Update” page, click “Browse” (1). A window will open
that allows you to select the location of the firmware update file. All
firmware files end with a “.dlf”.
2. Browse to the firmware file you downloaded. Select the file by doubleclicking on the file name.
27
CONFIGURING THE WIRELESS NETWORK SETTINGS
3. The “Update Firmware” box will now display the location and name of the
firmware file you just selected. Click “Update”.
4. You will be asked if you are sure you want to continue. Click “OK”.
5. You will see one more message. This message tells you that the AP may not
respond for as long as one minute as the firmware is loaded into the AP
and the AP is rebooted. Click “OK”.
A 30-second countdown will appear on the screen. When the countdown
reaches zero, the AP firmware update will be complete. The AP home page
should appear automatically.
Changing System Settings
The “System Settings” page is where you can enter a new administrator
password, set the time zone, enable remote management, and turn on and off
the NAT function of the AP.
28
CONFIGURING THE WIRELESS NETWORK SETTINGS
Setting or Changing the Administrator Password
The AP ships with NO password entered. If you wish to add a password for
greater security, you can set a password here. Write down your password and
keep it in a safe place, as you will need it if you need to log into the AP in
the future. It is also recommended that you set a password if you plan to use
the remote management feature of your AP.
29
TROUBLESHOOTING
You can find technical support information at www.belkin.com/networking or
www.belkin.com through the tech support area. If you want to contact technical support by phone, please call 00 800 223 55 460.
30
INFORMATION
FCC Statement
DECLARATION OF CONFORMITY WITH FCC RULES FOR
ELECTROMAGNETIC COMPATIBILITY
We, Belkin Corporation, of 501 West Walnut Street, Compton, CA 90220, declare under our sole
responsibility that the product,
F5D6130
to which this declaration relates,
complies with Part 15 of the FCC Rules. Operation is subject to the following two conditions: (1) this
device may not cause harmful interference, and (2) this device must accept any interference
received, including interference that may cause undesired operation.
Caution: Exposure to Radio Frequency Radiation.
The radiated output power of this device is far below the FCC radio frequency exposure limits.
Nevertheless, the device shall be used in such manner that the potential for human contact
normal operation is minimized.
When connecting an external antenna to the device, the antenna shall be placed in such a
manner to minimize the potential for human contact during normal operation. In order to avoid
the possibility of exceeding the FCC radio frequency exposure limits, human proximity to the
antenna shall not be less than 20cm (8 inches) during normal operation.
Federal Communications Commission Notice
This equipment has been tested and found to comply with the limits for a Class B digital device,
pursuant to Part 15 of the FCC Rules. These limits are designed to provide reasonable protection
against harmful interference in a residential installation.
This equipment generates, uses, and can radiate radio frequency energy. If not installed and used
in accordance with the instructions, it may cause harmful interference to radio or television
reception, which can be determined by turning the equipment off and on, the user is encouraged
to try and correct the interference by one or more of the following measures:
• Reorient or relocate the receiving antenna.
• Increase the distance between the equipment and the receiver.
• Connect the equipment to an outlet on a circuit different from that to which the receiver
is connected.
• Consult the dealer or an experienced radio/TV technician for help.
Modifications
The FCC requires the user to be notified that any changes or modifications to this device that
are not expressly approved by Belkin Corporation may void the users authority to operate
the equipment.
31
INFORMATION
Canada-Industry Canada (IC)
The wireless radio of this device complies with RSS 139 & RSS 210 Industry Canada. This Class B
digital complies with Canadian ICES-003.
Cet appareil numérique de la classe B conforme á la norme NMB-003 du Canada.
Europe-European Union Notice
Radio products with the CE 0682 or CE alert marking comply
with the R&TTE Directive (1995/5/EC) issued by the Commission of the
European Community.
Compliance with this directive implies conformity to the following European Norms (in brackets
are the equivalent international standards).
• EN 60950 (IEC60950) – Product Safety
• EN 300 328 Technical requirement for radio equipment
• ETS 300 826 General EMC requirements for radio equipment.
To determine the type of transmitter, check the identification label on your Belkin product.
Products with the CE marking comply with the EMC Directive (89/336/EEC) and the Low Voltage
Directive (72/23/EEC) issued by the Commission of the European Community. Compliance with
these directives implies
conformity to the following European Norms (in brackets are the
equivalent international standards).
• EN 55022 (CISPR 22) – Electromagnetic Interference
• EN 55024 (IEC61000-4-2,3,4,5,6,8,11)- Electromagnetic Immunity
• EN 61000-3-2 (IEC610000-3-2) - Power Line Harmonics
• EN 61000-3-3 (IEC610000) – Power Line Flicker
• EN 60950 (IEC60950) – Product Safety
Products that contain the radio transmitter are labeled with CE 0682 or CE alert marking and may
also carry the CE logo.
Please refer to http://networking.belkin.com for all networking certificates along with the R&TTE
Directive Statements.
32
INFORMATION
Belkin Corporation Limited Lifetime Product Warranty
Belkin Corporation warrants this product against defects in materials and workmanship for its
lifetime. If a defect is discovered, Belkin will, at its option, repair or replace the product at no
charge provided it is returned during the warranty period, with transportation charges prepaid,
to the authorized Belkin dealer from whom you purchased the product. Proof of purchase may
be required.
This warranty does not apply if the product has been damaged by accident, abuse, misuse, or
misapplication; if the product has been modified without the written permission of Belkin; or if
any Belkin serial number has been removed or defaced.
THE WARRANTY AND REMEDIES SET FORTH ABOVE ARE EXCLUSIVE IN LIEU OF ALL OTHERS,
WHETHER ORAL OR WRITTEN, EXPRESSED OR IMPLIED. BELKIN SPECIFICALLY DISCLAIMS ANY AND
ALL IMPLIED WARRANTIES, INCLUDING, WITHOUT LIMITATION, WARRANTIES OF MERCHANTABILITY
AND FITNESS FOR A PARTICULAR PURPOSE.
No Belkin dealer, agent, or employee is authorized to make any modification, extension, or
addition to this warranty.
BELKIN IS NOT RESPONSIBLE FOR SPECIAL, INCIDENTAL, OR CONSEQUENTIAL DAMAGES RESULTING
FROM ANY BREACH OF WARRANTY, OR UNDER ANY OTHER LEGAL THEORY, INCLUDING BUT NOT
LIMITED TO, LOST PROFITS, DOWNTIME, GOODWILL, DAMAGE TO OR REPROGRAMMING OR
REPRODUCING ANY PROGRAM OR DATA STORED IN, OR USED WITH, BELKIN PRODUCTS.
Some states do not allow the exclusion or limitation of incidental or consequential damages or
exclusions of implied warranties, so the above limitations of exclusions may not apply to you.
This warranty gives you specific legal rights, and you may also have other rights that vary from
state to state.
33
belkin.com
Belkin Corporation
5501 West Walnut Street
Compton • CA • 90220-5221 • USA
Tel: +1 310 898 1100
Fax: +1 310 898 1111
Belkin Components, Ltd.
Express Business Park • Shipton Way
Rushden • NN10 6GL • United Kingdom
Tel: +44 (0) 1933 35 2000
Fax: +44 (0) 1933 31 2000
Belkin Components B.V.
Boeing Avenue 333
1119 PH Schiphol-Rijk • The Netherlands
Tel: +31 (0) 20 654 7300
Fax: +31 (0) 20 654 7349
Belkin Components GmbH
Hanebergstrasse 2
80637 Munich • Germany
Tel: +49 (0) 89 143405 0
Fax: +49 (0) 89 143405 100
Belkin Components SAS
5 Rue du Petit Robinson • 3ème étage
78350 Jouy en Josas • France
Tel: +33 (0) 1 34 58 14 00
Fax: +33 (0) 1 39 46 62 89
Belkin Ltd
7 Bowen Cresent • West Gosford
NSW 2250 • Australia
Tel: +61 (0) 2 4372 8600
Fax: +61 (0) 2 4372 8603
Belkin Tech Support
Europe: 00 800 223 55 460
US: 877 736 5771
P74341ea
© 2004 Belkin Corporation. All rights reserved.
All trade names are registered trademarks of respective manufacturers listed. Mac, Mac OS, AppleTalk, Apple, and
AirPort are trademarks of Apple Computer, Inc., registered in the U.S. and other countries.
Point d'accès
Réseau sans fil
Manuel de l’Utilisateur
F5D6130
TABLE DES MATIÈRES
Introduction . . . . . . . . . . . . . . . . . . . . . . . . . . . . . . . . . . . . . . . . . . . . . . . . 1
Fonctions Clés . . . . . . . . . . . . . . . . . . . . . . . . . . . . . . . . . . . . . . . . . . . .2
Contenu de l'emballage . . . . . . . . . . . . . . . . . . . . . . . . . . . . . . . . . . . . . .3
Gestion facultative . . . . . . . . . . . . . . . . . . . . . . . . . . . . . . . . . . . . . . . . .3
Configuration requise - logiciel . . . . . . . . . . . . . . . . . . . . . . . . . . . . . . . . .3
Configuration Requise - Système . . . . . . . . . . . . . . . . . . . . . . . . . . . . . . . .3
Spécifications . . . . . . . . . . . . . . . . . . . . . . . . . . . . . . . . . . . . . . . . . . . .4
Présentation de votre Point d'Accès . . . . . . . . . . . . . . . . . . . . . . . . . . . . . . . . .5
Choix du site d'installation du Point d'Accès . . . . . . . . . . . . . . . . . . . . . . . . . . .7
Installation rapide . . . . . . . . . . . . . . . . . . . . . . . . . . . . . . . . . . . . . . . . . . . .8
Étape 1 : Connectez le PA à un Routeur, un Switch Ethernet ou un Hub . . . . . .8
Étape 2 : Installation de l'Assistant de Recherche (Discovery Wizard) . . . . . . . .9
Configuration du PA à l'aide de l'Assistant de Recherche . . . . . . . . . . . . . . . . . . .11
Configuration des paramètres du réseau sans fil . . . . . . . . . . . . . . . . . . . . . . . .15
Dépannage . . . . . . . . . . . . . . . . . . . . . . . . . . . . . . . . . . . . . . . . . . . . . . . .29
Information . . . . . . . . . . . . . . . . . . . . . . . . . . . . . . . . . . . . . . . . . . . . . . . .30
INTRODUCTION
Merci d'avoir choisi le Point d'Accès Sans Fil (PA) de Belkin. Soyez les
bienvenus dans le monde des réseaux sans fil. Vous pouvez désormais profiter
de cette nouvelle technologie incroyable et vous déplacer librement chez vous
ou dans votre bureau — sans vous préoccuper des câbles. Le PA sert de pont
entre le réseau câblé existant et vos ordinateurs équipés d'un dispositif sans
fil. Vous serez prêt à communiquer en réseau en quelques minutes grâce à la
simplicité de l'installation et de la configuration. Lisez attentivement la
totalité de ce manuel afin d'être certain de tirer le meilleur parti de votre PA.
1
INTRODUCTION
Fonctions clés
Couverture d'une zone étendue à haut débitLe PA de Belkin permet de couvrir
une zone intérieure dans un rayon de 90 mètres et une zone extérieure dans
un rayon de 548 m.
Cryptage de sécurité jusqu'à 128 bits
Votre PA de Belkin peut crypter (brouiller) les ondes radio émises de manière
à ce que vous soyez assurés de la sécurité de vos données. Cette
fonctionnalité de cryptage facultative vous permet de crypter sur 64 ou 128
bits grâce à une clé que vous entrez vous-même.
Filtrage des adresses MAC
Pour une plus grande sécurité, vous pouvez créer une liste d'adresses MAC. Il
s'agit des identificateurs uniques des clients qui sont autorisés à accéder à
votre réseau sans fil. Chaque ordinateur dispose de sa propre adresse MAC. Il
vous suffit d'entrer ces adresses dans une liste grâce à l'interface utilisateurs
basée sur le Web afin de contrôler l'accès à votre réseau.
Fonctionne avec les ordinateurs PC et Mac®
Le PA prend en charge plusieurs environnements réseau, tels que Mac OS® 8.x,
9.x, X v10.x, AppleTalk®, Linux®, Windows® 95, 98, Me, NT®, 2000, et XP, et
plusieurs autres.
Remarque : Il est possible d'administrer le PA par le biais d'un navigateur Web,
sans avoir recours au logiciel inclus. Le logiciel inclus est compatible avec Windows
98 SE, Me, 2000 et XP seulement, mais N'EST PAS nécessaire pour utiliser le Point
d'Accès.
Interface utilisateur basée sur le Web
Vous pouvez accéder aux fonctions avancées de votre PA par le biais de votre
navigateur Web, sans avoir besoin d'installer un logiciel supplémentaire sur
votre ordinateur. Aucun disque à installer ou surveiller. Vous pouvez même
apporter des modifications et effectuer les fonctions de configuration sur tout
ordinateur du réseau, rapidement et en toute simplicité.
Applications et avantages
• Solution abordable pour relier plusieurs ordinateurs en un réseau sans fil
• Mise en réseau pour particuliers ou petites entreprises
• Permet l'installation simple et rapide d'un petit réseau à usage privé ou pour
les petites entreprises.
2
INTRODUCTION
Contenu de l'emballage
• Point d'Accès Réseau Sans Fil de Belkin
• Bloc d'alimentation
• CD-ROM avec logiciel
• Manuel de l'utilisateur
• Carte d'enregistrement
Configuration requise pour le logiciel de gestion facultatif
• Windows® 98SE, Me, 2000, ou XP
• Minimum 64 Mo de mémoire vive
Configuration Requise
• Protocole réseau TCP/IP installé sur au moins un ordinateur
• Câble réseau CAT5 (ou catégorie supérieure)
• Microsoft® Internet Explorer 4.0 ou version ultérieure, ou Netscape® 4.0 ou
version ultérieure.
3
INTRODUCTION
Spécifications
Normes :
IEEE 802.3 10Base-T Ethernet/100 Base-Tx Ethernet
IEEE 802.11b
Sans fil :
Technologie radio : DSSS (Direct Sequence Spread Spectrum)
802.11b : 11, 5.5, 2, 1 Mbits/s
802.11b : CCK, DQPSK, DBPSK
bande ISM 2.412-2.497 GHz
802.11b : 11 pour l'Amérique du Nord, 14 pour le Japon et 13 pour l'Europe
WEP à 64 et 128 bits
Protocoles pris en charge :
CSMA/CD, TCP, IP, UDP, et DHCP (client)
Gestion :
basée sur le navigateur
Nombre max. d'utilisateurs :
32 (WLAN)
Ports :
1 port RJ45 10Base-T/100Base-Tx
1 prise d'alimentation
1 bouton de réinitialisation
Voyants lumineux :
Alimentation
Activité LAN
Activité WLAN
4
PRÉSENTATION DE VOTRE POINT D'ACCÈS
Le PA a été conçu pour être placé sur un bureau (à l'horizontale ou à la
verticale) ou fixé au mur. Son boîtier compact permet d'économiser l'espace
sur la surface de travail lorsque placé à la verticale. Tous les câbles sont fixés
à l'arrière du PA afin de faciliter l'organisation et l'utilisation. Les voyants
lumineux visibles à l'avant du PA vous fournissent des informations sur
l'activité et l'état du réseau.
Voyant LAN (Réseau)
Panneau avant
Voyant WLAN
Voyant lumineux d'alimentation
Indique que le WAP est alimenté
Éteint
Le PA est éteint
Rouge
Le PA est prêt
Voyant Alimentation/Prêt
Voyant lumineux WLAN
Éteint
Aucune activité réseau sans fil
Vert clignotant
Indique que le PA fonctionne
Voyant réseau (LAN)
Éteint
Aucune activité réseau au port
Vert
Périphérique 10Base-T connecté
Orange
Périphérique 10Base-Tx connecté
Clignotant
(Orange ou Vert)
Activité au port
Panneau arrière
Prise d’alimentation
Port réseau RJ-45
5
PRÉSENTATION DE VOTRE POINT D'ACCÈS
Prise d'alimentation
Branchez le bloc d'alimentation fourni sur cette prise.
Port Ethernet RJ45
Branchez un câble Ethernet sur cette prise et branchez-le à un port RJ45
10BaseT ou 100Base-T ouvert sur un switch, un routeur ou un hub.
Bouton de réinitialisation
Le bouton de réinitialisation est utilisé lorsque le PA fonctionne de façon
incongrue Lorsque vous réinitialisez le PA, celui-ci retrouve un
fonctionnement normal et les paramètres de configuration demeurent
inchangés. Vous pouvez aussi rétablir la configuration par défaut à l'aide du
bouton de réinitialisation. Utilisez cette option lorsque vous avez oublié votre
mot de passe personnalisé, par exemple.
a. Redémarrer le PA
Appuyez et relachez le bouton de réinitialisation. Les voyants lumineux du PA
clignoteront pendant quelques instants. Le voyant d'alimentation clignote.
Lorsque le voyant d'alimentation est allumé en continu, la réinitialisation est
terminée.
b. Rétablissement des paramètres par défaut
Appuyez et maintenez enfoncé le bouton de réinitialisation pendant 5
secondes, puis relâchez-le. Les voyants lumineux du PA clignoteront pendant
quelques instants. Le voyant d'alimentation clignote. Lorsque le voyant
d'alimentation est allumé en continu, le rétablissement des paramètres est
terminé.
Antenne bipolaire rotative
Une antenne bipolaire unidirectionnelle est située sur le côté du PA. Elle peut
pivoter à 180 degrés. Pour un meilleur fonctionnement, elle doit être orientée
en position verticale.
6
CHOIX DU SITE D'INSTALLATION
La performance de votre réseau sans fil dépend du choix de l'emplacement de
votre PA. À l'intérieur, votre PA offre de façon générale une zone de
couverture d'un rayon de 90 mètres ou plus. Toutefois, certains matériaux de
construction et autres obstacles se trouvant dans un immeuble peuvent
grandement affecter le signal sans fil et réduire la portée. De manière
générale, le meilleur emplacement pour votre PA est le centre de la zone de
couverture sans fil. Pour les habitations à plusieurs étages, placez votre PA le
plus près possible du centre de la maison; par exemple, il se peut que vous
deviez placer le PA sur un étage supérieur.
Soyez vigilants lors du choix de l'emplacement de votre PA
• N'oubliez pas que des appareils ou des objets volumineux tels que le
réfrigérateur ou les lave-linge/sèche-linge peuvent se trouver de l'autre
côté du mur dans la zone que vous pensez choisir pour l'installation du PA.
• Placez votre PA sur le dessus d'un bureau, loin d'étagères de métal
ou de boîtiers d'ordinateur.
• Ne placez aucun objet ou composant sur votre PA.
• Assurez-vous que l'antenne pointe vers le HAUT en tout temps.
• Les teintures UV pour fenêtres à base de métal peuvent affecter la
performance de votre réseau sans fil. Ne placez pas votre PA près d'une
fenêtre teintée.
Nous comprenons que dans la plupart des cas, il vous sera difficile de placer
votre PA au centre de votre zone de couverture. Si vous éprouvez des
difficultés à obtenir la couverture désirée, placez votre PA le plus haut
possible. Les périphériques sans fil fonctionnent de façon optimale lorsqu'il
n'y a pas d'obstacles entre l'ordinateur et le PA. Le PA peut aussi être fixé au
mur, les antennes pointant toujours vers le HAUT. Il existe d'autres solutions
pour étendre votre zone de couverture sans fil. Visitez le site
www.belkin.com/networking pour les connaître.
Le signal sans fil peut être affecté par différents facteurs, incluant les réseaux
sans fil de vos voisins, les fours à micro-ondes en fonctionnement, et les
téléphones sans fil 2.4 GHz. Même si ces situations peuvent affecter la
performance du réseau, votre réseau sans fil fonctionnera de façon normale
dans la plupart des environnements dans lesquels on retrouve ces appareils.
7
INSTALLATION RAPIDE
Le PA est configuré de façon à pouvoir fonctionner sans installation. Vous
n'avez qu'à brancher le PA à votre réseau déjà en place et vous ajoutez
instantanément des fonctionnalités sans fil à votre réseau. Nul besoin de
configuration. Belkin fournit un logiciel qui vous permettra de rechercher et
vous connecter au Point d'Accès afin d'apporter des modifications aux
paramètres. Avant d'utiliser le logiciel, vous devez mettre en route le Point
d'Accès. Après avoir mis en route le PA, vous pouvez utiliser le logiciel afin
d'apporter des modifications aux paramètres. Veuillez suivre les instructions
d'installation ci-dessous.
Étape 1 : Connectez le PA à un Routeur, un Switch Ethernet ou un Hub
Vérifiez le contenu de l'emballage. Vous devriez y trouver les articles suivants:
• Point d'Accès Réseau Sans Fil de Belkin
• Bloc d'alimentation
• CD-ROM avec logiciel
• Manuel de l'utilisateur
• Carte d'enregistrement
1. Choisissez un endroit approprié pour votre PA, tel que décrit dans la
section précédente de ce manuel.
2. Branchez un câble CAT5 entre le PA et le port LAN de votre routeur, switch
Ethernet ou hub. Branchez le bloc d'alimentation sur le PA en insérant le
connecteur CC rond dans la prise d'alimentation CC du PA. Branchez le bloc
d'alimentation sur la prise murale. Vérifiez que les témoins Power et
Liaison sont allumés. S'ils sont tous les deux allumés, cela indique que le
PA est correctement branché.
3. La connexion et l'installation de votre PA est terminée.
8
INSTALLATION RAPIDE
Étape 2 : Installation de l'Assistant de Recherche (Discovery Wizard)
L'Assistant de Recherche est un outil pratique vous permettant de rechercher et
vous connecter à votre PA. L'Assistant de Recherche n'est nécessaire que
lorsque vous désirez apporter des changements aux paramètres du PA. Sinon,
de façon générale, le PA fonctionne sans configuration préalable. Puisque le PA
est considéré comme un client DHCP, il obtiendra automatiquement un adresse
IP du serveur DHCP de votre réseau. Puisque cette adresse est plutôt aléatoire,
l'Assistant de Recherche recherche le PA pour vous. Ainsi, vous n'aurez pas à
effectuer plusieurs manipulations afin de déterminer l'adresse IP de votre PA.
1. Insérez le CD dans le lecteur de CD-ROM.
2. L'écran de l'utilitaire d'installation du point d'accès sans fil de Belkin
apparaît automatiquement. S'il n'apparaît pas dans un laps de temps de 15
à 20 secondes, sélectionnez votre lecteur de CD-ROM, puis cliquez deux fois
sur le dossier " Fichiers ". Ensuite, cliquez deux fois sur l'icône " start.exe ".
3. Dans la fenêtre de menu, faites glisser votre souris sur le bouton " Install "
(Installer), puis sélectionnez " Click Here " (Cliquez ici) pour lancer le
programme d'installation du logiciel.
9
INSTALLATION RAPIDE
4. L'assistant d'installation du logiciel est lancé. Cliquez sur " Next "
(Suivant) au premier écran.
5. Acceptez les termes d'utilisation, et cliquez sur " Next ", tout en suivant
une à une les étapes de l'Assistant. Cliquez sur " Next " (Suivant) au
dernier écran.
6. L'Assistant de Recherche est maintenant installé. Passez à la section
suivante pour savoir comment utiliser l'Assistant.
10
CONFIGURATION DU PA À L'AIDE DE L'ASSISTANT DE RECHERCHE
1. Après avoir installé l'Assistant, vous trouverez une icône sur votre
bureau. Double-cliquez sur cette icône pour lancer l'Assistant.
2. Lorsque vous lancez l'Assistant, vous verrez le mot “Scanning…”
(Recherche...). Ceci indique que l'Assistant est à la recherche de Point
d'Accès sur votre réseau.
3. Lorsque l'Assistant découvre la présence d'un ou plusieurs Points d'Accès, le
nom de ces Points d'Accès apparaîssent dans cette fenêtre. Cliquez sur le
nom du Point d'Accès.
4. Cliquez sur "Connect" (Connexion). Ceci aura pour effet de lancer votre
navigateur Web.
11
CONFIGURATION DU PA À L'AIDE DE L'ASSISTANT DE RECHERCHE
5. Dans la fenêtre de votre navigateur apparaîtra la page de connexion du PA.
Le PA est livré sans mot de passe défini. À l'écran de connexion, laisser le
champ de mot de passe vide, et cliquez sur " Submit " (Envoyer) pour vous
connecter.
6. Vous êtes maintenant connectés au PA. Vous pouvez effectuer les
modifications désirées. Passez à la section suivante afin de connaître
comment utiliser l'interface.
Déconnexion du PA
Seulement un ordinateur à la fois peut se connecter au PA afin d'apporter des
modifications à ses paramètres. Une fois l'utilisateur connecté pour apporter
des modifications, il existe deux méthodes de déconnexion. Vous pouvez par
exemple cliquer sur le bouton "Logout" (Déconnexion). La seconde méthode
est automatique. La connexion expirera après un intervalle de temps
spécifique. L'intervalle de temps par défaut est de 10 minutes. Vous pouvez le
modifier à votre guise, mais il doit être compris entre 1 et 99 minutes. Pour
de plus amples informations, référez-vous à la section intitulée "Modification
du paramètre de temporisation de la connexion".
12
CONFIGURATION DU PA À L'AIDE DE L'ASSISTANT DE RECHERCHE
Description de l'interface utilisateur du Point d'Accès
La page d'accueil est la première page que vous verrez lorsque vous accéderez
à l'Interface utilisateur basée sur navigateur web (IU). La page d'accueil vous
montre un aperçu de l'état du PA et de ses paramètres. Vous pouvez accéder
aux pages de configuration avancée à partir de cette page.
(2) (3) (4)
(5)
(1)
(6)
(7)
(1) Raccourcis de navigation
Vous pouvez accéder à n'importe quelle des pages de l'interface utilisateur
avancée du PA grâce aux raccourcis. Les raccourcis sont classées par
catégories logiques et groupés grâce à des onglets, rendant ainsi la tâche de
trouver un paramètre spécifique beaucoup plus simple. Lorsque vous cliquez
sur le titre de chaque onglet, vous obtiendrez une courte description de la
fonction de cet onglet.
(2) Bouton Accueil
Le bouton Accueil apparaît sur chaque page de l'IU. En appuyant sur ce
bouton, vous serez redirigé vers la page d'accueil.
(3) Bouton Aide
Le bouton “Aide” vous permet d'accéder aux rubriques d'aide de votre PA. Vous
pouvez aussi obtenir de l'aide à partir de plusieurs page, en cliquant simplement
sur le lien "Plus d'infos" situé à côté de certaines sections de ces pages.
13
CONFIGURATION DU PA À L'AIDE DE L'ASSISTANT DE RECHERCHE
(4) Bouton Connexion/Déconnexion
Ce bouton vous permet de vous connecter et de vous déconnecter du PA.
Lorsque vous êtes connecté, ce bouton devient le bouton "Déconnexion".
Lorsque vous vous connectez au PA, vous serez redirigé vers une page de
connexion différente, à laquelle vous serez invité à entrer un mot de passe.
Une fois connecté, vous pouvez apporter des modifications aux paramètres.
Lorsque vous avez terminé, vous pouvez vous déconnecter en cliquant sur le
bouton "Déconnexion". Pour de plus amples informations concernant la
connexion au PA, référez-vous à la section intitulée "Connexion au PA".
(5) Information sur la version
Affiche la version du microprogramme, la version du code d'amorce, la version
du matériel et le numéro de série du PA.
(6) Paramètres réseau local (LAN)
Affiche les paramètres du Réseau local (LAN) du côté du PA. Vous pouvez
effectuer des modifications aux paramètres en cliquant sur un des liens
(Adresse IP, Masque de Sous-Réseau) ou en cliq
uant sur le raccourci de
navigation "LAN", à la gauche de l'écran.
(7) Sans Fil
Affiche l'état des paramètres sans fil du PA. Vous pouvez effectuer des
modifications aux paramètres en cliquant sur l'un de ces liens ou en cliquant
sur les raccourcis de navigation, à la gauche de l'écran.
14
CONFIGURATION DES PARAMÈTRES DU RÉSEAU SANS FIL
L'onglet Sans Fil vous permet d'effectuer des modifications aux paramètres du
réseau sans fil. À partir de cet onglet, vous pouvez apporter des modifications
au nom du réseau sans fil (SSID), le canal de fonctionnement et les
paramètres de sécurité par cryptage.
Paramètres IP
15
CONFIGURATION DES PARAMÈTRES DU RÉSEAU SANS FIL
Modification du canal sans fil
Auto: Vous pouvez choisir un canal à partir d'un certain nombre de canaux.
Aux États-Unis, il existe 11 canaux. Au Royaume-Uni et dans la plupart des
pays d'Europe, il existe 13 canaux. Dans un petit nombre de pays, il existe
d'autres réglementations concernant les canaux permis. Votre PA est configuré
de manière à fonctionner sur le canal approprié à votre pays de résidence. Le
canal par défaut est 11 (si du moins vous ne résidez pas dans un pays où le
canal 11 est interdit). Ce canal peut être modifié au besoin. S'il existe
d'autres réseaux sans fil en fonction dans votre zone, assurez-vous que votre
réseau utilise un canal différent de celui des autres réseaux sans fil. Pour des
performances optimales, choisissez un canal distant d'au moins cinq canaux
du canal utilisé par les autres réseaux sans fil. Par exemple, si un autre réseau
utilise le canal 11, vous devriez utiliser le canal 6 ou inférieur pour votre
réseau. Pour modifier le canal, sélectionnez le canal à partir du menu
déroulant. Cliquez sur “Apply Changes” (Enregistrer les Modifications). La
modification est prise en compte immédiatement.
16
CONFIGURATION DES PARAMÈTRES DU RÉSEAU SANS FIL
Modification du nom du réseau sans fil (SSID)
Le SSID (Service Set Identifier) correspond au nom du réseau sans fil. Il est parfois
appelé "Nom du Réseau". Le SSID par défaut de votre PA est "WLAN". Vous pouvez
modifier ce nom à votre guise, ou vous pouvez le laisser tel quel. S'il existe d'autres
réseaux sans fil en fonction dans votre zone, assurez-vous que votre SSID soit
unique (n'est pas le même que celui d'un autre réseau sans fil dans votre zone).
Pour modifier le SSID, entrer le SSID désiré dans le champ SSID (1) et cliquez sur
“Apply Changes” (Enregistrer les Modifications) (2). La modification est prise en
compte immédiatement. Si modifiez votre SSID, il est probable que vos ordinateurs
équipés d'adaptateurs sans fil nécessitent aussi une modification de leurs
paramètres, afin qu'ils puissent se connecter au nouveau nom de réseau. Référez-vous
à la documentation accompagnant votre adaptateur réseau sans fil pour de plus
amples informations sur la modification de ce paramètre.
(1)
(2)
Utilisation de la fonction de Diffusion du SSID
Remarque : Cette fonction avancée ne devrait être utilisée que par des utilisateurs aguerris.
Pour plus de sécurité, vous pouvez choisir de ne pas diffuser le SSID de votre réseau.
Cette fonction vous permet de cacher le nom de votre réseau lorsque d'autres
ordinateurs recherchent la présence de réseaux sans fil. Pour désactiver la diffusion
du SSID, enlevez le crochet se trouvant dans la case située à côté de "Diffusion SSID"
et cliquez ensuite sur "Enregistrer les Modifications". La modification est prise en
compte immédiatement. Chaque ordinateur doit maintenant être configuré de façon à
ce qu'il se connecte seulement à votre SSID spécifique; un SSID "TOUT" ne sera plus
accepté. Référez-vous à la documentation accompagnant votre adaptateur réseau
sans fil pour de plus amples informations sur la modification de ce paramètre.
Modifications des paramètres de sécurité
Votre PA est équipé de la norme de sécurité appelée WEP (Wired Equivalent
Privacy). Par défaut, la sécurité sans fil est désactivée. Pour activer la
sécurité, veuillez suivre les instructions suivantes.
17
CONFIGURATION DES PARAMÈTRES DU RÉSEAU SANS FIL
Définition du cryptage WEP en utilisant une phrase de passe
Remarque aux utilisateurs d'ordinateurs Mac: L'option de Phrase de passe ne
fonctionne pas avec l'Apple® AirPort®. Pour configurer le mode de cryptage pour votre
ordinateur Mac, configurez-le de façon manuelle, tel que décrit à la section suivante.
1. Choisissez “128 bits automatiquement” ou “64 bits automatiquement”
à partir du menu déroulant.
2. Entrez une phrase de passe. Une phrase de passe, c'est en quelque sorte un
mot de passe. Elle peut être consituée de chiffres et de lettres. Après avoir
entré la phrase de passe, cliquez sur "Générer". Lorsque vous cliquez sur
"Générer", les champs de clés situés au dessus se rempliront.
Remarque : Le cryptage à 64 bits génère quatre clés alors que le cryptage à 128 bits
ne génère qu'une seule clé. Sélectionnez une clé au choix en cliquant le bouton
radio à côté de celle-ci. Cliquez sur “Apply Changes” (Enregistrer les Modifications).
3. Le mode de cryptage de votre PA est maintenant configuré. Vous devez
maintenant configurer tous les ordinateurs de votre réseau sans fil, afin
qu'ils aient tous les mêmes paramètres de cryptage (phrase de passe).
Référez-vous à la documentation accompagnant votre adaptateur réseau sans
fil pour de plus amples informations sur la modification de ce paramètre.
18
CONFIGURATION DES PARAMÈTRES DU RÉSEAU SANS FIL
Définition manuelle du cryptage à l'aide d'une clé hexadécimale.
Une clé hexadécimale se compose d'un mélange de chiffres et de lettres
compris entre A et F et entre 0 et 9.
Les clés de 64 bits sont composées de cinq nombres à deux chiffres. Les clés
de 128 bits sont composées de 13 nombres à deux chiffres.
Par exemple:
AF 0F 4B C3 D4 = clé à 64 bits
C3 03 0F AF 0F 4B B2 C3 D4 4B C3 D4 E7 = clé à 128 bits
Composez votre clé dans les cases ci-dessous, en inscrivant deux caractères
compris entre A et F, et entre 0 et 9. Vous utiliserez cette clé pour configurer
les paramètres de cryptage de votre PA et de vos ordinateurs.
Remarque aux utilisateurs d'ordinateurs Mac: Les produits d'origine Apple AirPort
ne prennent en charge que le cryptage à 64 bits. Les produits Apple AirPort 2
peuvent prendre le charge le cryptage à 64 et 128 bits. Veuillez vérifier la version
du produit en votre possession. Si vous ne pouvez configurer votre réseau pour
utilisation du cryptage à 128 bits, essayez le cryptage à 64 bits.
1. Choisissez "64 bits manuellement” ou “128 bits manuellement” à partir du
menu déroulant.
19
CONFIGURATION DES PARAMÈTRES DU RÉSEAU SANS FIL
2. Si vous utilisez le cryptage à 64 bits, vous verrez quatre champs. Si vous
utilisez le cryptage à 128 bits, vous verrez un seul champ. Dans le(s)
champ(s), entrez la(les) clé(s) hexadécimale(s) que vous désirez utiliser.
Lorsque vous avez terminé, sélectionnez un clé au choix en cliquant le
bouton radio à côté de celle-ci. Cliquez sur “Apply Changes” (Enregistrer
les Modifications).
3. Le mode de cryptage de votre PA est maintenant configuré. Vous devez
maintenant configurer tous les ordinateurs de votre réseau sans fil, afin
qu'ils aient tous les mêmes paramètres de cryptage (même clé
hexadécimale). Référez-vous à la documentation accompagnant votre
adaptateur réseau sans fil pour de plus amples informations sur la
modification de ce paramètre.
Configuration du Filtrage d'adresses MAC
Le Filtre d'Adresse MAC représente une puissante caractéristique de sécurité, vous
permettant d'autoriser, à des ordinateurs spécifiques, l'accès à votre réseau. Tout
ordinateur non spécifié dans la liste se verra refuser l'accès au réseau.
Pour activer le filtrage d'adresses MAC
1. Cochez la case “Enable MAC Address Filtering” (Activer le Filtrage des
Adresses MAC) (1).
2. Entrez les adresses MAC de tous les ordinateurs auxquels vous désirez
autoriser l'accès à votre réseau.
3. Cliquez sur "Add" (Ajouter) (2) pour ajouter des adresses à la liste.
4. Répétez pour chaque ordinateur que vous souhaitez ajouter à la liste.
5. Cliquez sur “Apply Changes” (Enregistrer les Modifications) pour terminer.
(1)
(2)
20
CONFIGURATION DES PARAMÈTRES DU RÉSEAU SANS FIL
Liste de clients
Vous pouvez visualiser une liste de clients présentement reliés au PA grâce à
la fonction Liste de clients. Vous verrez l'adresse MAC du client et sa vitesse
de connexion.
Paramètres avancés
Belkin vous offre plusieurs fonctions avancées pouvant être configurées. À
l'exception du nom du PA, nous vous recommandons de n'apporter aucune
modification à ces paramètres que si vous le devez absolument. À partir de la
page de Paramètres avancés, vous pouvez :
• Modification du nom du PA (permet d'identifier le PA sur votre réseau)
• Sélectionnez le Mode débit de base (1, 2 Mbits/s ou 1, 2, 5.5, 11 Mbits/s)
• Sélectionnez un Taux de transmission (Auto, 11 Mbits/s, 5.5 Mbits/s, 2
Mbits/s, 1 Mbits/s)
• Définition du Seuil RTS
• Définition du Seuil de fragmentation
• Sélectionnez le Type de préambule (Long ou Court)
Lorsque vous apportez des modifications, assurez-vous de cliquer sur "Apply Changes"
(Enregistrer les modifications) afin que les modifications soient prises en compte.
Utilitaires
Cet écran vous permet de gérer plusieurs paramètres de votre PA et accomplir
certaines tâches liées à la gestion.
Redémarrer le PA
Parfois il peut parfois être utile de redémarrer le PA lorsque celui-ci fonctionne
de façon inappropriée. Redémarrer le PA n'affectera en rien vos paramètres de
configuration.
21
CONFIGURATION DES PARAMÈTRES DU RÉSEAU SANS FIL
Redémarrage du PA pour rétablir le fonctionnement normal
1. Cliquez sur le bouton "Redémarrer le PA".
2. Le message suivant apparaît. Cliquez sur "OK".
3. Le message suivant apparaît. Le redémarrage du PA peut prendre jusqu'à 60
secondes. Il est important de ne pas mettre le PA hors tension pendant le
redémarrage.
4. Un compte à rebours de 30 secondes apparaît à l'écran. Lorsque le compte
à rebours est à zéro, le redémarrage du PA est terminé. La page d'accueil
du PA devrait apparaître automatiquement. Si ce n'est pas le cas, entrez
son adresse IP (adresse par défaut = 192.168.2.254) dans la barre d'adresse
de votre navigateur.
Rétablissement des paramètres par défaut du constructeur
Cette option rétablira les paramètres du PA vers les paramètres par défaut.
Nous vous recommandons de faire une copie de vos paramètres avant de
rétablir la configuration par défaut.
22
CONFIGURATION DES PARAMÈTRES DU RÉSEAU SANS FIL
1. Cliquez sur le bouton "Rétablir les Paramètres par Défaut".
2. Le message suivant apparaît. Cliquez sur "OK".
3. Le message suivant apparaît. Le rétablissement des paramètres par défaut
inclut le redémarrage du PA. Ceci peut prendre jusqu'à 60 secondes. Il est
important de ne pas mettre le PA hors tension pendant le redémarrage.
4. Un compte à rebours de 30 secondes apparaît à l'écran. Lorsque le compte
à rebours est à zéro, le redémarrage du PA est terminé. La page d'accueil
du PA devrait apparaître automatiquement. Si ce n'est pas le cas, entrez
son adresse IP (adresse par défaut = 192.168.2.1) dans la barre d'adresse
de votre navigateur.
Sauvegarde d'une configuration actuelle
Vous pouvez sauvegarder votre configuration actuelle grâce à cette fonction.
La sauvegarde de votre configuration vous permettera de la rétablir
ultérieurement, en cas de perte ou de modification des paramètres. Nous vous
recommandons de faire une copie de vos paramètres avant de mettre à jour le
microprogramme.
23
CONFIGURATION DES PARAMÈTRES DU RÉSEAU SANS FIL
1. Cliquez sur "Enregistrer". Une fenêtre appelée "Téléchargement de fichier"
s'ouvrira. Cliquez sur "Enregistrer".
2. Une fenêtre s'ouvrira, vous permettant de choisir un emplacement où
sauvegarder le fichier. Choisissez un emplacement. Vous pouvez nommer le
fichier à votre guise, ou utiliser le nom par défaut, soit "Config". Assurezvous de choisir un nom représentatif, pour facilement retrouver le fichier
plus tard. Lorsque vous avez choisi un emplacement et un nom pour le
fichier, cliquez sur “Sauvegarder”.
Votre configuration est maintenant sauvegardée.
24
CONFIGURATION DES PARAMÈTRES DU RÉSEAU SANS FIL
3. Lorsque la sauvegarde est terminée, vous verrez apparaître la fenêtre
suivante. Cliquez sur "Fermer".
Rétablissement d'une Configuration Précédente
Cette option vous permet de rétablir une configuration sauvegardée
précédemment.
1. Cliquez sur "Parcourir".
Une fenêtre s'ouvrira,
vous permettant de
sélectionner
l'emplacement du fichier
de configuration. Tous les
fichiers de configuration
possèdent l'extension
".bin". Repérez le fichier
de configuration que
vous désirez rétablir, et
double-cliquez sur celuici.
25
CONFIGURATION DES PARAMÈTRES DU RÉSEAU SANS FIL
2. Le programme vous demandera si vous désirez poursuivre. Cliquez sur "OK".
3. Une fenêtre de rappel apparaîtra. Le rétablissement de la configuration
peut prendre jusqu'à 60 secondes pour être complétée. Cliquez sur "OK".
4. Un compte à rebours de 60 secondes apparaît à l'écran. Lorsque le compte
à rebours est à zéro, la configuration du PA est terminée. La page d'accueil
du PA devrait apparaître automatiquement. Si ce n'est pas le cas, entrez
son adresse IP (adresse par défaut = 192.168.2.1) dans la barre d'adresse
de votre navigateur.
Mise à jour du microprogramme
De temps à autre, Belkin peut lancer une nouvelle version du microprogramme
du PA Ces mises à jour peuvent contenir des améliorations et des solutions
aux problèmes existants. Lorsque Belkin lance un nouveau microprogramme,
vous pouvez le télécharger directement du site web de Belkin, et ainsi mettre
à jour le microprogramme de votre PA avec la toute dernière version.
26
CONFIGURATION DES PARAMÈTRES DU RÉSEAU SANS FIL
(1)
Mise à jour du microprogramme du PA
1. Dans la page de "Mise à jour du microprogramme", cliquez sur "Parcourir"
(1). Une fenêtre s'ouvrira, vous permettant de sélectionner l'emplacement
du fichier de mise à jour du microprogramme. Tous les fichiers
microprogrammes possèdent l'extension ".dlf".
2. Recherchez le fichier précédemment téléchargé. Sélectionnez le fichier en
double-cliquant sur le nom du fichier.
27
CONFIGURATION DES PARAMÈTRES DU RÉSEAU SANS FIL
3. La boîte de dialogue "Mise à jour du Microprogramme" affichera
maintenant l'emplacement et le nom du fichier sélectionné. Cliquez sur
"Mise à jour".
4. Le programme vous demandera si vous désirez poursuivre. Cliquez sur "OK".
5. Vous verrez apparaître un autre message. Ce message vous indique que
votrePA peut ne pas répondre pendant une période pouvant aller jusqu'à
une minute, pendant laquelle le microprogramme est installé et le PA
redémarre. Cliquez sur "OK".
Un compte à rebours de 30 secondes apparaît à l'écran. Lorsque le compte à
rebours est à zéro, la mise à jour du microprogramme du PA est terminée. La
page d'accueil du PA devrait apparaître automatiquement.
Modification des Paramètres du Système
À la page des Paramètres du Système, vous pouvez entrer un nouveau mot de
passe administrateur, régler le fuseau horaire, activer la gestion à distance, et
activer/désactiver la fonction de NAT du Routeur.
28
CONFIGURATION DES PARAMÈTRES DU RÉSEAU SANS FIL
Ajout ou Modification du mot de passe administrateur
Le PA est livré sans mot de passe défini. Si par souci de sécurité vous désirer
ajouter un mot de passe, vous pouvez le configurer ici. Écrivez votre mot de
passe et conservez-le dans un endroit sûr, puisque vous en aurez besoin plus
tard pour vous connecter au PA. Nous recommandons aussi l'ajout d'un mot de
passe si vous prévoyez utiliser la fonction de gestion à distance du PA.
29
DÉPANNAGE
Vous trouverez des informations techniques sur le site
www.belkin.com/networking ou www.belkin.com dans la zone d'assistance
technique. Pour contacter l'assistance technique par téléphone,
appelez le 00 800 223 55 460.
30
INFORMATIONS
Déclaration FCC
DÉCLARATION DE CONFORMITÉ À LA RÉGLEMENTATION FCC EN
MATIÈRE DE COMPATIBILITÉ ÉLECTROMAGNÉTIQUE.
"Nous, Belkin Components, sis au 501 West Walnut Street , Compton CA, 90220, États-Unis,
déclarons sous notre seule responsabilité que le produit :
F5D6130
auquel se réfère la présente déclaration,
est conforme aux normes énoncées à l'alinéa 15 de la réglementation FCC. Le fonctionnement est
assujetti aux deux conditions suivantes : (1) cet appareil ne peut pas provoquer d'interférence
nuisible et (2) cet appareil doit accepter toute interférence reçue, y compris des interférences
pouvant entraîner un fonctionnement non désiré.
Attention : Exposition aux radiations dues aux fréquences radio.
La puissance d'émission en sortie de cet appareil reste largement en dessous des limites
d'exposition aux fréquences radios de la FCC. Toutefois, il est conseillé d'utiliser l'appareil de
manière à minimiser les risques d'exposition
dans des conditions de fonctionnement normales.
Lorsqu'une antenne extérieure est raccordée à l'appareil, la placer de manière à
minimiser les risques d'exposition dans des conditions de fonctionnement normales. Pour éviter
la possibilité d'excéder les limites d'exposition aux fréquences radio de la FCC, il est conseillé
d'éviter qu'une personne se trouve à moins de 20 cm de l'antenne dans des conditions de
fonctionnement normales.
Avertissement de la Commission Fédérale des Communications (FCC)
L'appareil a été testé et satisfait aux limites de la classe B des appareils numériques, conformément
à la partie 15 de la réglementation de la FCC. Ces limites sont conçues de manière à assurer une
protection raisonnable contre les interférences nuisibles au sein d'une installation domestique.
L'appareil génère, utilise et peut irradier une énergie radio fréquence. S'il n'est pas installé et
utilisé conformément aux instructions, il peut causer des interférences nuisibles sur le plan de
la réception radio ou télévision, pouvant être déterminées en mettant l'appareil sous et hors
tension. L'utilisateur est invité à tester et à corriger l'interférence en prenant une des mesures
suivantes :
• Réorienter ou changer de place l'antenne de réception.
• Augmenter la distance entre l'appareil et le récepteur.
• Connecter l'appareil à une prise située sur un circuit différent de celui sur lequel le récepteur
est connecté.
• Consulter le revendeur ou un technicien en radio/TV pour obtenir de l'aide.
Modifications
La réglementation de la FCC souligne la nécessité d'indiquer à l'utilisateur que toute modification,
de quelque nature que ce soit et non agréée par Belkin Components, lui retire le droit
d'utiliser l'appareil.
31
INFORMATIONS
Canada-Industrie Canada (IC)
La radio sans fil de cet appareil est conforme aux normes RSS 139 & RSS 210 d'Industrie Canada.
This Class B digital complies with Canadian ICES-003.
Cet appareil numérique de la classe B est conforme à la norme NMB-003 du Canada.
Europe - Prescription Union européenne
Les produits radio portant le label CE 0682 ou CE alert satisfont
à la directive R&TTE (1995/5/CE) établie par la Commission de la
Communauté européenne.
L'accord avec cette directive implique la conformité aux normes européennes suivantes (le
standard international équivalent est indiqué entre parenthèses).
• EN 60950 (IEC60950) - Sécurité des produits
• EN 300 328 Conditions techniques exigées pour les appareils radio
• ETS 300 826 Conditions générales en matière de compatibilité électromagnétique pour les
appareils radio.
Prière de consulter la plaque d'identification apposée sur votre produit Belkin pour déterminer le
type d'émetteur.
Les produits portant le label CE satisfont à la directive relative à la compatibilité
électromagnétique (89/336/EEC) et la directive sur la basse tension
(72/23/EEC) publiées par la Commission de la Communauté européenne. La
conformité avec ces normes sous-entend la
conformité avec les normes européennes suivantes (le standard international
équivalent est indiqué entre parenthèses).
• EN 55022 (CISPR 22) - Interférences électromagnétiques
• EN 55024 (IEC61000-4-2,3,4,5,6,8,11)- Immunité électromagnétique
• EN 61000-3-2 (IEC610000-3-2) - Émissions de courants harmoniques
• EN 61000-3-3 (IEC610000) - Émissions de courants harmoniques
• EN 60950 (IEC60950) - Sécurité des produits
Les produits équipés de transmetteurs radio portent la marque CE 0682 ou CE alert et peuvent
également afficher le logo CE.
Référez-vous au site http://networking.belkin.com pour connaître la certification réseau et les
directives R&TTE.
32
INFORMATIONS
Garantie limitée à vie du produit de Belkin Corporation
Belkin Corporation garantit ce produit contre tout défaut matériel ou de fabrication pendant toute
sa durée de vie. Si l'appareil s'avère défectueux, Belkin le réparera ou le remplacera gratuitement,
à sa convenance, à condition que le produit soit retourné, port payé, pendant la durée de la
garantie, au dépositaire Belkin agréé auprès duquel le produit a été acheté. Une preuve d'achat
peut être exigée.
La présente garantie est caduque si le produit a été endommagé par accident, abus, usage
impropre ou mauvaise application, si le produit a été modifié sans autorisation écrite de Belkin,
ou si un numéro de série Belkin a été supprimé ou rendu illisible.
LA GARANTIE ET LES VOIES DE RECOURS SUSMENTIONNÉES FONT FOI EXCLUSIVEMENT ET
REMPLACENT TOUTES LES AUTRES, ORALES OU ÉCRITES, EXPLICITES OU IMPLICITES. BELKIN
REJETTE EXPRESSÉMENT TOUTES LES GARANTIES IMPLICITES, Y COMPRIS MAIS SANS RESTRICTION,
LES GARANTIES AFFÉRENTES À LA QUALITÉ LOYALE ET MARCHANDE ET À LA POSSIBILITÉ
D'UTILISATION À UNE FIN DONNÉE.
Aucun dépositaire, représentant ou employé de Belkin n'est habilité à apporter des modifications
ou adjonctions à la présente garantie, ni à la proroger.
BELKIN N'EST PAS RESPONSABLE DES DOMMAGES SPÉCIAUX, DIRECTS OU INDIRECTS, DÉCOULANT
D'UNE RUPTURE DE GARANTIE, OU EN VERTU DE TOUTE AUTRE THÉORIE JURIDIQUE, Y COMPRIS
MAIS SANS RESTRICTION LES PERTES DE BÉNÉFICES, TEMPS D'ARRÊT, FONDS DE COMMERCE,
REPROGRAMMATION OU REPRODUCTION DE PROGRAMMES OU DE DONNÉES MÉMORISÉS OU UTILISÉS
AVEC DES PRODUITS BELKIN OU DOMMAGES CAUSÉS À CES PROGRAMMES OU À CES DONNÉES.
Certains pays ne permettent pas d'exclure ou de limiter les dommages accidentels ou consécutifs
ou les exclusions de garanties implicites, de sorte que les limitations d'exclusions ci-dessus ne
s'appliquent pas dans votre cas. La garantie vous confère des droits légaux spécifiques. Vous
pouvez également bénéficier d'autres droits qui varient d'un pays à l'autre.
33
belkin.com
Belkin Corporation
501 West Walnut Street
Compton • CA • 90220-5221 • États-Unis
Tél.: +1 310 898 1100
Fax: +1 310 898 1111
Belkin Components, Ltd.
Express Business Park • Shipton Way
Rushden • NN10 6GL • Royaume-Uni
Tél.: +44 (0) 1933 35 2000
Fax: +44 (0) 1933 31 2000
Belkin Components B.V.
Boeing Avenue 333
1119 PH Schiphol-Rijk • Pays-Bas
Tél.: +31 (0) 20 654 7300
Fax: +31 (0) 20 654 7349
Belkin Components GmbH
Hanebergstrasse 2
80637 Munich • Allemagne
Tél.: +49 (0) 89 143405 0
Fax: +49 (0) 89 143405 100
Belkin Components SAS
5 Rue du Petit Robinson • 3ème étage
78350 Jouy en Josas • France
Tél.: +33 (0) 1 34 58 14 00
Fax: +33 (0) 1 39 46 62 89
Belkin Ltd.
7 Bowen Cresent • West Gosford
NSW 2250 • Australie
Tél.: +61 (0) 2 4372 8600
Fax: +61 (0) 2 4372 8603
Assistance technique Belkin
Europe: 00 800 223 55 460
États-Unis: 877 736 5771
P74341ea
© 2004 Belkin Corporation. Tous droits réservés. Toutes les raisons commerciales sont des marques
déposées de leurs fabricants respectifs. Mac, Mac OS, AppleTalk, Apple, et AirPort sont des marques de commerce de
Apple Computer, Inc., enregistrées aux Etats-Unis et dans d’autres pays.
Kabelloser Netzwerk
Access Point
Benutzerhandbuch
F5D6130
INHALTSVERZEICHNIS
Einführung . . . . . . . . . . . . . . . . . . . . . . . . . . . . . . . . . . . . . . . . . . . . . . . . . 1
Wichtigste Merkmale . . . . . . . . . . . . . . . . . . . . . . . . . . . . . . . . . . . . . . . .2
Verpackungsinhalt . . . . . . . . . . . . . . . . . . . . . . . . . . . . . . . . . . . . . . . . .3
Optionale Verwaltung . . . . . . . . . . . . . . . . . . . . . . . . . . . . . . . . . . . . . . .3
Softwareanforderungen . . . . . . . . . . . . . . . . . . . . . . . . . . . . . . . . . . . . . .3
Systemanforderungen . . . . . . . . . . . . . . . . . . . . . . . . . . . . . . . . . . . . . . .3
Technische Daten . . . . . . . . . . . . . . . . . . . . . . . . . . . . . . . . . . . . . . . . . .4
Komponenten des Access Point . . . . . . . . . . . . . . . . . . . . . . . . . . . . . . . . . . . .5
Aufstellung des Access Point . . . . . . . . . . . . . . . . . . . . . . . . . . . . . . . . . . . . .7
Schnellkonfigurierung . . . . . . . . . . . . . . . . . . . . . . . . . . . . . . . . . . . . . . . . . .8
Schritt 1: Anschließen des Access Point an einen Router,
Ethernet-Switch oder Hub . . . . . . . . . . . . . . . . . . . . . . . . . . . . . . . . . . . .8
Schritt 2: Installieren des Erkennungs-Assistenten ("Discovery Wizard") . . . . . .9
Konfigurieren des Access Point mit dem Erkennungs-Assistenten . . . . . . . . . . . . .11
Konfigurieren der kabellosen Netzwerkeinstellungen . . . . . . . . . . . . . . . . . . . . . .15
Fehlerbehebung . . . . . . . . . . . . . . . . . . . . . . . . . . . . . . . . . . . . . . . . . . . . .29
Rechtliche Hinweise . . . . . . . . . . . . . . . . . . . . . . . . . . . . . . . . . . . . . . . . . .30
EINFÜHRUNG
Wir beglückwünschen Sie zum Kauf des kabellosen Netzwerk Access Point von
Belkin und heißen Sie in der Welt der Funknetzwerke willkommen. Die Vorteile
dieser neuen, äußerst schnellen Technologie stehen zu Ihrer Verfügung: Jetzt
können Sie sich im Büro oder zu Hause frei bewegen— und müssen keine
Kabel mehr verlegen. Der Access Point dient als Brücke zwischen Ihrem
vorhandenen, verkabelten Netzwerk und den Computern, die mit einem
kabellosen Netzwerkadapter ausgestattet sind. Installation und Konfigurierung
sind verblüffend einfach. In wenigen Minuten können Sie Ihr Netzwerk
starten. Bitte lesen Sie dieses Handbuch vollständig durch, damit Sie Ihren
Access Point optimal nutzen können.
1
EINFÜHRUNG
Wichtigste Merkmale
Große Flächenabdeckung bei hohen Datenraten
Mit dem Access Point von Belkin decken Sie eine Innenraumfläche mit bis zu
100 m Radius oder eine Außenfläche mit mehr als 500 m Radius ab.
Verschlüsselung mit bis zu 128 Bit
Der Belkin Access Point kann die übertragenen Funkwellen verschlüsseln, so
dass die Sicherheit Ihrer Daten gewährleistet bleibt. Mit der fakultativen
Verschlüsselung können Sie wahlweise mit 64 oder 128 Bit verschlüsseln. Den
Schlüssel geben Sie selbst ein.
MAC-Adressfilter
Sie können die Sicherheit erhöhen, indem Sie eine Liste von MAC-Adressen
festlegen (eindeutige Client-Kennungen), die auf Ihr Netzwerk zugreifen
dürfen. Jeder Computer verfügt über eine eigene MAC-Adresse. Sie können
diese MAC-Adressen in eine Liste auf der browsergestützten
Benutzeroberfläche eingeben und dadurch den Zugriff auf das Netzwerk
kontrollieren.
Geeignet für PCs und Macintosh® Computer
Der Access Point unterstützt eine Reihe von Netzwerkumgebungen, darunter
unter anderem Mac OS® 8.x, 9.x, X v10.x, AppleTalk®, Linux®, Windows® 95,
98, ME, NT®, 2000 und XP.
Hinweis: Der Access Point kann ohne die enthaltene Software über einen WebBrowser verwaltet werden. Die enthaltene Software unterstützt Windows 98 SE, ME,
2000 und XP, ist jedoch nicht zur Arbeit mit dem Access Point erforderlich.
Webgestützte Erweiterte Benutzeroberfläche
Sie können die vielseitigen Funktionen des Access Point bedienerfreundlich
mit Ihrem Browser einstellen, ohne zusätzliche Software auf dem Computer zu
installieren. Es müssen also keine Installations-CDs eingelegt werden. Alle
Änderungen und Konfigurierungen können Sie einfach und schnell an einem
beliebigen Computer im Netz vornehmen.
Anwendungsbereiche und Vorzüge
• Kostengünstiges Einbinden von mehreren kabellosen Computern in ein
Netzwerk
• Netzwerke im SoHo-Bereich (Kleinbüros und Privatanwender)
• Schnelle und einfache Installation von Netzwerken für Privatanwender,
2
EINFÜHRUNG
Freiberufler und kleine Unternehmen
Verpackungsinhalt
• 1 kabelloser Belkin Netzwerk Access Point
• Netzteil
• Software-CD
• Benutzerhandbuch
• Registrierkarte
Anforderungen für die optionale Verwaltungssoftware
• Windows® 98 SE, ME, 2000 oder XP
• Mindestens 64 MB Arbeitsspeicher
Systemanforderungen
• Mindestens ein Computer mit installiertem TCP/IP-Protokoll
• Netzwerkkabel, mindestens CAT5
• Microsoft® Internet Explorer 4.0 oder höher oder Netscape® 4.0 oder höher
3
EINFÜHRUNG
Technische Daten
Standards:
IEEE 802.3 10Base-T Ethernet/100 Base-Tx Ethernet
IEEE 802.11b
Kabelloser Aufbau:
Funk-Technologie: DSSS (Direct Sequence Spread Spectrum)
802.11b: 11 / 5,5 / 2 / 1 Mbit/s
802.11b: CCK, DQPSK, DBPSK
2,412-2,497 GHz ISM Frequenzband
802.11b: 11 für Nordamerika, 14 für Japan, 13 für Europa
64/128 Bit WEP-Verschlüsselung
Unterstütztes Protokoll:
CSMA/CD, TCP, IP, UDP und DHCP (Client)
Verwaltung:
browsergestützt
Max. Benutzeranzahl:
32 (WLAN)
Schnittstellen:
1 x 10Base-T/100Base-Tx RJ45-Schnittstelle
1 Netzbuchse
1 Rücksetztaste
LEDs:
Betrieb
LAN-Aktivität
WLAN-Aktivität
4
KOMPONENTEN DES ACCESS POINT
Der Access Point kann vertikal oder horizontal auf dem Schreibtisch platziert
oder an der Wand befestigt werden. Durch seine schmale Bauweise verbraucht
er bei vertikaler Aufstellung besonders wenig Platz auf dem Schreibtisch. Alle
Kabel sind an der Rückseite des Access Point angeschlossen, um eine
ordentliche Installation zu erleichtern. Die LED-Anzeigen sind gut sichtbar an
der Vorderseite des Access Point angebracht, so dass Sie Status und Aktivität
des Netzwerks jederzeit ablesen können.
Bedienfeld
LAN-Anzeige
WLAN-Anzeige
Betriebs-/Bereitschaftsanzeige
Zeigt an, dass der Access Point
mit Strom versorgt wird.
Aus
Access Point abgeschaltet
Rot
Access Point betriebsbereit
Betriebs-/
Bereitschaftsanzeige
WLAN-Anzeige
Aus
WLAN abgeschaltet
Blinkanzeige (grün) Access Point funktioniert
LAN-Anzeige
Aus
Kein Netzwerk mit der Schnittstelle verbunden
Grün
10BaseT-Gerät angeschlossen
Orange
100Base-Tx-Gerät angeschlossen
Blinkanzeige
(orange oder grün)
Blinkanzeige
Rückseite
Netzteilanschluss
RJ-45 LANSchnittstelle
5
KOMPONENTEN DES ACCESS POINT
Netzteilanschluss
Schließen Sie hier das enthaltene 5 V DC Netzteil an.
RJ45 Ethernet-Buchse
An diese Buchse schließen Sie ein Ethernet-Kabel an. Das andere Kabelende
wird an eine freie RJ45 10Base T- oder 100Base-T Schnittstelle eines Switch,
Routers oder Hubs angeschlossen.
Rücksetztaste
Die Taste "Reset" (Rücksetzstaste) wird nur in seltenen Fällen benötigt, wenn
der Access Point nicht mehr korrekt arbeitet. Beim Zurücksetzen wird der
Access Point in den Normalbetrieb versetzt. Die programmierten Einstellungen
bleiben erhalten. Mit der Rücksetztaste können Sie auch die
Werkseinstellungen wiederherstellen. Dies ist zum Beispiel nützlich, wenn Sie
das von Ihnen eingestellte Kennwort vergessen haben.
a) Zurücksetzten des Access Point
Drücken Sie kurz die Rücksetztaste. Die Anzeigen am Access Point blinken kurz
auf. Die Betriebs-/Bereitschaftsanzeige beginnt zu blinken. Wenn die Betriebs/Bereitschaftsanzeige wieder Dauerlicht anzeigt, ist das Zurücksetzen
abgeschlossen.
b) Wiederherstellen der Werkseinstellungen
Halten Sie die Rücksetztaste fünf Sekunden lang gedrückt. Die Anzeigen am
Access Point blinken kurz auf. Die Betriebs-/Bereitschaftsanzeige beginnt zu
blinken. Wenn die Betriebs-/Bereitschaftsanzeige wieder Dauerlicht anzeigt,
ist die Wiederherstellung abgeschlossen.
Drehbare Dipolantenne
Eine Dipolrichtantenne, die seitlich am Access Point angebracht ist. Die
Antennen sind um 180° drehbar. Die Antenne sollte für eine optimale
Leistung möglichst vertikal positioniert werden.
6
AUFSTELLUNG DES ACCESS POINT
Die richtige Positionierung des Access Point ist für eine optimale Leistung des
kabellosen Netzwerks wichtig. Normalerweise kann der kabellose Access Point in
Innenräumen eine Kreisfläche mit mindestens 90 m abdecken. Allerdings können
sich die verwendeten Baustoffe und andere Hindernisse in einem Gebäude
beträchtlich auf das Funksignal auswirken und die Reichweite verringern. Der
Access Point sollte weitmöglichst in der Mitte der Fläche aufgestellt werden, die
vom Funknetz abgedeckt werden soll. In Gebäuden mit mehreren Stockwerken
sollte der Access Point jedoch möglichst in der Gebäudemitte platziert werden.
Oft empfiehlt sich daher die Aufstellung in einem der oberen Stockwerke.
Wählen Sie den Standort des Access Point sorgfältig aus:
• Achten Sie auf Geräte und große Gegenstände wie Kühlschränke,
Waschmaschinen oder Trockner, die sich auf der anderen Seite der Wand
befinden, an der Sie den Access Point aufstellen möchten.
• Platzieren Sie den Access Point auf einem Schreibtisch und halten Sie
Abstand zu Metallschränken und Computergehäusen.
• Stellen Sie keine Gegenstände oder Bauteile auf dem Access Point ab.
• Sorgen Sie dafür, dass die Antenne jederzeit nach oben ausgerichtet ist.
• Fensterscheiben mit UV-Schutz auf Metallbasis können die Funkleistung
beeinträchtigen. Stellen Sie den Access Point nicht an einer getönten
Fensterscheibe auf.
Es ist wünschenswert, aber nicht immer möglich, den Access Point in der
Mitte des Funkbereichs aufzustellen. Wenn Sie Schwierigkeiten haben, den
gesamten gewünschten Funkbereich abzudecken, sollten Sie den Access Point
so hoch wie möglich positionieren. Die Verbindung funktioniert am besten,
wenn die Sicht zwischen dem kabellosen Computer und dem Access Point
unverdeckt ist, also keine Hindernisse im Weg sind. Der Access Point kann
auch an einer Wand montiert werden, wobei die Antenne(n) nach oben
auszurichten sind. Es gibt weitere Möglichkeiten für eine Vergrößerung des
Funkbereichs. Lösungsvorschläge finden Sie unter
http://www.belkin.com/networking for solutions.
Das Funksignal kann durch benachbarte kabellose Netzwerke,
Mikrowellengeräte und schnurlose Telefone, die im 2,4 GHz Bereich senden,
beeinträchtigt werden. Meistens funktioniert das kabellose Netzwerk jedoch
auch in diesen Fällen problemlos.
7
SCHNELLKONFIGURIERUNG
Der Access Point ist werkseitig so eingestellt, dass er sofort nach der
Aufstellung in Betrieb genommen werden kann. Wenn Sie den Access Point an
das vorhandene Netzwerk anschließen, erweitern Sie es um ein Funknetz, ohne
dass eine weitere Konfiguration erforderlich ist. Im Paket enthalten ist eine
Software, mit der Sie den Access Point gezielt in das Netzwerk einbinden können, so dass Sie die Einstellungen ohne großen Aufwand ändern oder
anpassen können. Vor Gebrauch der Software müssen Sie den Access Point an
das Netzwerk anschließen. Danach können Sie die Einstellungen mit der
Software verändern. Folgen Sie den nachstehenden Schritten, um den Access
Point zu installieren:
Schritt 1: Anschließen des Access Point an einen Router, Ethernet-Switch
oder Hub
Überprüfen Sie den Inhalt der Packung. Die Packung müsste Folgendes enthalten:
• 1 kabelloser Belkin Access Point
• Netzteil
• Software-CD
• Benutzerhandbuch
• Registrierkarte
1. Wählen Sie einen geeigneten Aufstellungsort für den Access Point aus, wie
weiter oben beschrieben.
2. Verbinden Sie den Access Point und den Router, Ethernet-Switch oder Hub
mit einem CAT5-Kabel. Schließen Sie das Netzteil an die Netzbuchse des
Access Point an. Stecken Sie das Netzteil in eine ordnungsgemäß geerdete
Steckdose. Überprüfen Sie, ob die Betriebsanzeige und die
Verbindungsanzeige aufleuchten. Leuchten beide LEDs auf, ist der Access
Point korrekt angeschlossen.
3. Sie haben den Access Point angeschlossen und aufgestellt.
8
SCHNELLKONFIGURIERUNG
Schritt 2: Installieren des Erkennungs-Assistenten ("Discovery Wizard")
Der Erkennungs-Assistent hilft Ihnen dabei, den Access Point korrekt
aufzustellen und anzuschließen. Sie benötigen ihn nur dann, wenn Sie die
Einstellungen des Access Point verändern möchten. Andernfalls kann der Access
Point normalerweise ohne jede Konfigurierung in Betrieb genommen werden.
Da der Access Point werkseitig als DHCP-Client konfiguriert ist, bezieht er seine
IP-Adresse automatisch vom DHCP-Server in Ihrem Netzwerk. Da diese Adresse
willkürlich festgelegt wird, sucht der Erkennungs-Assistent den Access Point im
Netzwerk, damit Sie die IP-Adressse nicht selbst bestimmen müssen.
1. Legen Sie die CD in das CD-ROM-Laufwerk ein.
2. Das Installationsprogramm für den Belkin Access Point wird automatisch
geöffnet. Erscheint das entsprechende Fenster nicht innerhalb von 15 bis 20
Sekunden, wählen Sie das CD-ROM-Laufwerk aus, und doppelklicken Sie auf den
Ordner "Files" (Dateien). Doppelklicken Sie dann auf das Symbol "start.exe".
3. Ziehen Sie im Menüfenster den Mauszeiger auf die Schaltfläche "Install"
(Installieren), und wählen Sie "Click here" (Hier klicken) aus, um das
Installationsprogramm zu starten.
9
SCHNELLKONFIGURIERUNG
4. Der Softwareinstallations-Assistent wird gestartet. Klicken Sie im folgenden
Bildschirm auf “Next” (Weiter):
5. Bestätigen Sie die Annahme der Benutzervereinbarung, und klicken Sie auf
"Weiter". Folgen Sie den Schritten des Installations-Assistenten. Klicken
Sie im letzten Bildschirm auf “Finish” (Fertig stellen).
6. Der Erkennungs-Assistent ist jetzt installiert. Im nächsten Abschnitt wird
die Bedienung des Assistenten beschrieben.
10
KONFIGURIEREN DES ACCESS POINT MIT DEM ERKENNUNGS-ASSISTENTEN
1. Nach der Installation des Erkennungs-Assistenten wird auf dem
Desktop ein Symbol angezeigt. Doppelklicken Sie auf das Symbol,
um den Assistenten zu starten.
2. Beim Starten des Assistenten wird die Meldung "Scanning..." angezeigt. Das
bedeutet, dass der Assistent nach Access Points in Ihrem Netzwerk sucht.
3. Wenn der Assistent Ihre(n) Access Point(s) gefunden hat, wird der jeweilige Name
in diesem Fenster angezeigt. Klicken Sie auf den Namen des Access Points.
4.Klicken Sie auf "Connect" (Verbinden). Dadurch starten Sie Ihren Browser.
11
KONFIGURIEREN DES ACCESS POINT MIT DEM ERKENNUNGS-ASSISTENTEN
5. Im Browser wird die Anmeldeseite des Access Point angezeigt. Der Access
Point wird ohne festgelegtes Kennwort ausgeliefert. Lassen Sie die
Kennwortzeile auf dem Anmeldefenster leer, und klicken Sie auf "Submit"
(Absenden), um sich anzumelden.
6. Jetzt sind Sie mit dem Access Point verbunden und können die
gewünschten Änderungen vornehmen. Im folgenden Abschnitt des
Handbuchs wird die Bedienung der Benutzeroberfläche gezeigt.
Abmelden vom Access Point
Es kann stets nur ein Computer am Access Point angemeldet sein, um dessen
Einstellungen zu ändern. Wenn sich ein Benutzer angemeldet hat, um
Änderungen vorzunehmen, gibt es zwei Möglichkeiten, um den Computer
wieder abzumelden. Durch Klicken auf "Logout" (Abmelden) wird der Computer
abgemeldet. Die Abmeldung kann auch automatisch erfolgen. Nach einer
bestimmten Zeitspanne läuft die Abmeldung ab. Die Standard-Anmeldezeit
beträgt 10 Minuten. Sie können eine Frist zwischen 1 und 99 Minuten
einstellen. Weitere Informationen hierzu finden Sie im Abschnitt "Ändern des
Anmeldezeitlimits".
12
KONFIGURIEREN DES ACCESS POINT MIT DEM ERKENNUNGS-ASSISTENTEN
Arbeiten mit der Benutzeroberfläche des Access Point
Wenn Sie die Erweiterte Benutzeroberfläche öffnen, sehen Sie zunächst die
Homepage. Sie gibt einen Überblick über den Status und die Einstellungen des
Access Point. Alle weiteren Konfigurationsseiten können von dieser Seite aus
abgerufen werden.
(2) (3) (4)
(5)
(1)
(6)
(7)
(1) Navigationslinks
Wenn Sie auf einen dieser Links klicken, gelangen Sie direkt auf eine
Einstellungsseite der Benutzeroberfläche. Die Links sind in mehrere Rubriken
gegliedert und auf Registerkarten angeordnet, damit Sie die gesuchten
Einstellungen leichter finden. Wenn Sie auf den roten Reiter einer Registerkarte
klicken, wird eine kurze Beschreibung der Registerfunktion angezeigt.
(2) Home-Schaltfläche
Die Home-Schaltfläche finden Sie auf jeder Seite der Erweiterten
Benutzeroberfläche. Mit ihr gelangen Sie zurück auf die Homepage.
(3) Schaltfläche "Help" (Hilfe)
Mit der Schaltfläche "Help" (Hilfe) öffnen Sie die Hilfeseiten des Access Point.
Die Hilfe kann auf vielen Seiten mit der Option "more info" (Weitere
Informationen) aufgerufen werden, die neben vielen Abschnitten angezeigt
wird.
13
KONFIGURIEREN DES ACCESS POINT MIT DEM ERKENNUNGS-ASSISTENTEN
(4) Schaltfläche "Login/Logout" (Anmelden/Abmelden)
Mit dieser Schaltfläche melden Sie sich am Access Point an oder ab. Wenn Sie
am Access Point angemeldet sind, heißt die Schaltfläche "Logout"
(Abmelden). Beim Anmelden gelangen Sie auf eine eigene Anmeldeseite, auf
der Sie ein Kennwort eingeben müssen. Wenn Sie am Access Point angemeldet
sind, können Sie seine Einstellungen verändern. Wenn Sie mit den Änderungen
fertig sind, können Sie sich mit der Schaltfläche "Logout" (Abmelden) wieder
vom Access Point abmelden. Weitere Hinweise zur Anmeldung finden Sie unter
"Anmelden an den Access Point".
(5) Version Info (Version)
Ruft die Firmware-Version, Bootcode-Version, Hardwareversion und die
Seriennummer des Access Point ab.
(6) LAN Settings (LAN-Einstellungen)
Ruft die LAN-seitigen Einstellungen des Access Point ab. Sie können die
Einstellungen ändern, indem Sie auf einen der Links (IP Address, Subnet Mask)
oder auf den Navigationslink "LAN" links auf dem Bildschirm klicken.
(7) Wireless (Funk)
Zeigt den Funkstatus des Access Point an. Sie können die Einstellungen
ändern, indem Sie auf einen dieser Links oder auf einen der Navigationslinks
links auf dem Bildschirm klicken.
14
KONFIGURIEREN DES KABELLOSEN NETZWERKS
Auf der Registerkarte "Wireless" (Funk) können Sie die Einstellungen des
kabellosen Netzwerks ändern. Sie können Änderungen am Namen des
kabellosen Netzwerks (SSID), am Betriebskanal und an der
Sicherheitsverschlüsselung vornehmen.
IP-Einstellungen
15
KONFIGURIEREN DES KABELLOSEN NETZWERKS
Wechseln des Funkkanals
Autom. Sie können einen von mehreren Betriebskanälen auswählen. In den
USA stehen 11 Kanäle zur Auswahl, in Großbritannien und den meisten
anderen europäischen Ländern 13 Kanäle. Bestimmte Länder haben
abweichende Funkvorschriften. Der Access Point ist für den zulässigen Betrieb
Ihres Landes konfiguriert. Der Standardkanal ist Kanal 11, es sei denn, Sie
befinden sich einem Land, in dem Kanal 11 nicht zugelassen ist. Bei Bedarf
können Sie den Kanal wechseln. Sind im Funkgebiet weitere kabellose
Netzwerke in Betrieb, sollten Sie für Ihr Netzwerk einen Kanal wählen, der von
diesen nicht genutzt wird. Wählen Sie am besten einen Kanal aus, der sich um
mindestens fünf Kanalstufen von den anderen Netzwerken unterscheidet. Wenn
zum Beispiel ein Netzwerk auf Kanal 11 betrieben wird, stellen Sie Ihr
Netzwerk auf Kanal 6 oder einen niedrigeren Kanal ein. Sie wechseln den
Kanal, indem Sie den Kanal aus der Dropdown-Liste wählen. Klicken Sie auf
"Apply Changes" (Änderungen übernehmen). Die Änderung wird unmittelbar
wirksam.
16
KONFIGURIEREN DES KABELLOSEN NETZWERKS
Ändern des Netzwerknamens (SSID)
Zur Kennzeichnung Ihres kabellosen Netzwerks dient die sogenannte SSID, der
Netzwerkname. Die Standard-SSID des Access Point lautet "WLAN". Sie können
sie beliebig verändern oder die Vorgabe beibehalten. Werden weitere kabellose
Netzwerke im Funkbereich betrieben, sollten Sie eine eindeutige SSID festlegen,
also eine SSID, die von keinem anderen Netzwerk in der Nähe genutzt wird. Sie
können die SSID ändern, indem Sie im Feld "SSID" die gewünschte SSID
eingeben (1) und auf "Apply Changes" (Änderungen übernehmen) klicken(2).
Die Änderung wird unmittelbar wirksam. Wenn Sie die SSID ändern, müssen
Ihre kabellos vernetzten Computer ggf. an den neuen Netzwerknamen angepasst
werden. Informationen zur Vornahme dieser Änderung finden Sie in der
Dokumentation Ihres kabellosen Netzwerkadapters.
(1)
(2)
Verwenden der Funktion "Broadcast SSID" (SSID rundsenden)
Hinweis: Diese weiterführende Funktion sollte nur von erfahrenen Benutzern
bedient werden.
Aus Sicherheitsgründen können Sie festlegen, dass die SSID Ihres Netzwerks
nicht gesendet wird. Dadurch bleibt der Netzwerkname Computern verborgen, die
in der Umgebung nach kabellosen Netzwerken suchen. Sie stellen das Senden der
SSID ab, indem Sie das Kontrollkästchen "Broadcast SSID" (SSID rundsenden)
deaktivieren und dann auf "Apply Changes" (Änderungen übernehmen) klicken.
Die Änderung wird unmittelbar wirksam. Jeder Computer muss jetzt genau auf die
SSID Ihres Netzwerks eingestellt werden. Die SSID-Einstellung "Any" (Beliebig)
wird nicht mehr akzeptiert. Informationen zur Vornahme dieser Änderung finden
Sie in der Dokumentation Ihres kabellosen Netzwerkadapters.
Ändern der Sicherheitsseinstellungen
Ihr Access Point ist mit dem Sicherheitsstandard WEP (Wired Equivalent Privacy)
ausgestattet. In der Voreinstellung ist die kabellose Sicherheitseinstellung
deaktiviert. Zur Aktivierung gehen Sie vor wie im Folgenden beschrieben.
17
KONFIGURIEREN DES KABELLOSEN NETZWERKS
Einstellen der WEP-Verschlüsselung mit einer Kennfolge
Hinweis an Mac-Benutzer: Die Kennfolgenoption eignet sich nicht für Apple®
AirPort®. Wenn Sie die Verschlüsselung für Ihren Mac-Computer nutzen möchten,
müssen Sie sie manuell festlegen wie im nächsten Abschnitt beschrieben.
1. Wählen Sie die Option "128 Bit automatically" oder "64 Bit automatically"
aus dem Dropdown-Menü.
2. Geben Sie eine Kennfolge ein. Eine Kennfolge ist eine Art Kennwort. Sie
kann aus Ziffern und Buchstaben bestehen. Klicken Sie nach der Eingabe
der Kennfolge auf "Generate" (Erzeugen). Wenn Sie auf "Generate" klicken,
werden die Schlüsselfelder darunter ausgefüllt.
Hinweis: Bei der 64-Bit-Verschlüsselung werden vier Schlüssel, bei der 128-BitVerschlüsselung nur ein Schlüssel erzeugt. Wählen Sie den gewünschten Schlüssel,
indem Sie auf das entsprechende Optionsfeld klicken. Klicken Sie auf "Apply
Changes" (Änderungen übernehmen).
3. Jetzt ist die Verschlüsselung im Access Point eingestellt. Jeder der
Computer im kabellosen Netzwerk muss jetzt auf die gleiche Kennfolge
eingestellt werden. Informationen zur Vornahme dieser Änderung finden Sie
in der Dokumentation Ihres kabellosen Netzwerkadapters.
18
KONFIGURIEREN DES KABELLOSEN NETZWERKS
Manuelles Einstellen der Verschlüsselung mit einem Hexadezimalschlüssel
Ein Hexadezimalschlüssel besteht aus Ziffern (0-9) und den Buchstaben A-F.
64-Bit-Schlüssel bestehen aus fünf zweistelligen Zahlen. 128-Bit-Schlüssel
bestehen aus dreizehn zweistelligen Zahlen.
Beispiel:
AF 0F 4B C3 D4 = 64-Bit-Schlüssel
C3 03 0F AF 0F 4B B2 C3 D4 4B C3 D4 E7 = 128-Bit-Schlüssel
Legen Sie in den Feldern unten Ihren Schlüssel fest, indem Sie zwei Zeichen
zwischen A-F und 0-9 eingeben. Mit diesem Schlüssel programmieren Sie später die
Verschlüsselungseinstellungen in Ihrem Access Point und den kabellosen Computern.
Hinweis an Mac-Benutzer:Produkte mit dem ursprünglichen Apple AirPort
unterstützen nur die 64-Bit-Verschlüsselung. Produkte mit Apple AirPort 2
unterstützen sowohl 64-Bit- als auch 128-Bit-Verschlüsselung. Bitte prüfen Sie,
welche Version Ihr Produkt nutzt. Wenn Sie Ihr Netzwerk nicht mit 128
verschlüsseln können, sollten Sie es mit der 64-Bit-Verschlüsselung probieren.
1. Wählen Sie die Option "64 Bit manually" (64 Bit manuell) oder "128 Bit
automatically" (128 Bit manuell) aus dem Dropdown-Menü.
19
KONFIGURIEREN DES KABELLOSEN NETZWERKS
2. Wenn Sie mit 64-Bit-Verschlüsselung arbeiten, werden vier Schlüsselfelder
angezeigt. Wenn Sie mit 128-Bit-Verschlüsselung arbeiten, wird nur ein
Schlüsselfeld angezeigt. Geben Sie in das/die Feld(er) den/die
gewünschten Hexadezimalschlüssel ein. Wählen Sie nach der Eingabe den
gewünschten Schlüssel aus, indem Sie das entsprechende Optionsfeld
markieren. Klicken Sie auf "Apply Changes" (Änderungen übernehmen).
3. Jetzt ist die Verschlüsselung im Access Point eingestellt. Jeder der Computer
im kabellosen Netzwerk muss jetzt auf denselben Hexadezimalschlüssel
eingestellt werden. Informationen zur Vornahme dieser Änderung finden Sie
in der Dokumentation Ihres kabellosen Netzwerkadapters.
Einstellen des MAC-Adressfilters
Der MAC-Adressfilter ist eine leistungsstarke Sicherheitsfunktion, mit der Sie
festlegen können, welche Computer auf den Access Point zugreifen dürfen.
Allen Computern, die nicht in der Liste stehen, wird der Zugriff auf das
Netzwerk verweigert.
So aktivieren Sie den MAC-Adressfilter
1. Markieren Sie die Option "Enable MAC Address Filtering" (MAC-Adressfilter
aktivieren) (1).
2. Geben Sie die MAC-Adresse eines Computers ein, dem Sie Zugriff auf das
Netzwerk einräumen möchten.
3. Klicken Sie auf "Hinzufügen" (2), um die Adresse in die Liste einzutragen.
4. Wiederholen Sie diese Schritte für jeden weiteren Computer, den Sie in die
Liste aufnehmen möchten.
(1)
(2)
5. Klicken Sie auf "Apply Changes" (Änderungen übernehmen), um den
Vorgang abzuschließen.
20
KONFIGURIEREN DES KABELLOSEN NETZWERKS
Client-Liste
Mit der Funktion "Client List" (Client-Liste) können Sie alle Clients auflisten
lassen, die derzeit mit dem Access Point verbunden sind. Angegeben werden
die MAC-Adresse des jeweiligen Clients und seine Verbindungsgeschwindigkeit.
Erweiterte Einstellungen
Belkin bietet eine Reihe zusätzlicher Funktionen. Mit Ausnahme des Namens
des Access Point wird jedoch empfohlen, dass Sie diese Einstellungen
unverändert lassen, wenn nicht ein besonderer Grund für eine Änderung
vorliegt. In den Erweiterten Einstellungen können Sie Folgendes durchführen:
• Ändern des AP-Namens (mit dem der Access Point im Netzwerk eindeutig
identifiziert wird)
• Auswählen des Basisratensatzes (1, 2 Mbit/s oder 1, 2, 5,5, 11 Mbit/s)
• Auswählen der Übertragungsrate (Autom., 11 Mbit/s, 5,5 Mbit/s, 2 Mbit/s,
1 Mbit/s)
• Einstellen des RTS-Grenzwerts
• Einstellen der Fragmentierungsgrenze
• Auswählen des Präambeltyps (lang oder kurz)
Wenn Sie Änderungen vornehmen, müssen Sie auf "Apply changes" (Änderung
übernehmen) klicken, damit sie wirksam werden.
Dienstprogramme
Auf dieser Seite können Sie verschiedene Parameter des Access Point
verwalten und Verwaltungsfunktionen durchführen.
Neustarten des Access Point
Wenn der Access Point nicht mehr fehlerfrei funktioniert, kann oft ein
Neustart Abhilfe schaffen. Bei einem Neustart bleiben die
Konfigurationseinstellungen erhalten.
21
KONFIGURIEREN DES KABELLOSEN NETZWERKS
Wiederherstellen des Normalbetriebs durch einen Neustart
1. Klicken Sie auf die Schaltfläche "Restart AP" (Access Point neu starten).
2. Das folgende Meldungsfenster wird geöffnet. Klicken Sie auf "OK".
3. Das folgende Meldungsfenster wird geöffnet. Der Neustart des Access Point
nimmt bis zu 60 Sekunden in Anspruch. Während des Neustarts darf der
Access Point keinesfalls abgeschaltet werden.
4. Auf dem Bildschirm erscheint ein Countdown von 30 Sekunden. Wenn der
Countdown Null erreicht, wird der Access Point neu gestartet. Jetzt müsste
die Access Point-Homepage automatisch geöffnet werden. Geben Sie
andernfalls die Adresse des Access Point (standardmäßig 192.168.2.254) in
die Adresszeile des Browsers ein.
Wiederherstellen der Werkseinstellungen
Mit dieser Option setzen Sie alle Einstellungen des Access Point auf die
Werkseinstellungen zurück. Es wird empfohlen, die aktuellen Einstellungen zu
sichern, bevor Sie die Werkseinstellungen wiederherstellen.
22
KONFIGURIEREN DES KABELLOSEN NETZWERKS
1. Klicken Sie auf die Schaltfläche "Restore Defaults" (Vorgaben wiederherstellen).
2. Das folgende Meldungsfenster wird geöffnet. Klicken Sie auf "OK".
3. Das folgende Meldungsfenster wird geöffnet. Beim Wiederherstellen der
Werkseinstellungen wird der Access Point neu gestartet. Das kann bis zu 60
Sekunden dauern. Während des Neustarts darf der Access Point keinesfalls
abgeschaltet werden.
4. Auf dem Bildschirm erscheint ein Countdown von 30 Sekunden. Wenn der
Countdown Null erreicht, werden die Werkseinstellungen des Access Point
wiederhergestellt. Jetzt müsste die Access Point-Homepage automatisch
geöffnet werden. Geben Sie andernfalls die Access Point-Adresse
(standardmäßig 192.168.2.1) in die Adresszeile des Browsers ein.
Sichern der aktuellen Konfiguration
Mit dieser Funktion können Sie die aktuelle Konfiguration sichern. Dadurch
können Sie Ihre Einstellungen später wiederherstellen, wenn sie
zwischenzeitlich verloren gehen oder geändert werden. Sie sollten die aktuelle
Konfiguration sichern, bevor Sie ein Firmware-Upgrade durchführen.
23
KONFIGURIEREN DES KABELLOSEN NETZWERKS
1. Klicken Sie auf "Save" (Sichern). Das Fenster "File Download" (Datei
herunterladen) wird geöffnet. Klicken Sie auf "Save" (Sichern).
2.Es wird ein Fenster geöffnet, in dem Sie den Pfad für die
Konfigurationsdatei festlegen können. Legen Sie den Pfad fest. Sie können
einen beliebigen Dateinamen festlegen oder die Vorgabe "Config"
übernehmen. Geben Sie der Datei einen einprägsamen Namen, damit Sie sie
später wiederfinden. Wenn Sie Pfad und Namen der Datei festgelegt haben,
klicken Sie auf "Save" (Sichern).
Die Konfiguration ist jetzt gesichert.
24
KONFIGURIEREN DES KABELLOSEN NETZWERKS
3. Nach dem Sichern erscheint das folgende Fenster. Klicken Sie auf "Close "
(Schließen).
Wiederherstellen einer früheren Konfiguration
Mit dieser Funktion können Sie eine gesicherte Konfiguration wieder
aktivieren.
1. Klicken Sie auf "Browse"
(Durchsuchen). Es wird
ein Fenster geöffnet, in
dem Sie den Pfad der
Konfigurationsdatei
festlegen können. Alle
Konfigurationsdateien
haben die Dateinamenerweiterung ".bin".
Doppelklicken Sie auf die
Konfigurationsdatei, die
Sie wiederherstellen
möchten.
25
KONFIGURIEREN DES KABELLOSEN NETZWERKS
2. Sie werden gefragt, ob Sie fortfahren möchten. Klicken Sie auf "OK".
3. Daraufhin erscheint ein Meldungsfenster. Die Wiederherstellung nimmt bis
zu 60 Sekunden in Anspruch. Klicken Sie auf "OK".
4. Auf dem Bildschirm erscheint ein Countdown von 60 Sekunden. Wenn der
Countdown Null erreicht, wird die Konfiguration des Access Point
wiederhergestellt. Jetzt müsste die Access Point-Homepage automatisch
geöffnet werden. Geben Sie andernfalls die Adresse des Access Point
(standardmäßig 192.168.2.1) in die Adresszeile des Browsers ein.
Firmware aktualisieren
Von Zeit zu Zeit veröffentlicht Belkin möglicherweise neue Versionen der
Access Point-Firmware. Firmware-Updates enthalten verbesserte Funktionen
und Lösungen für eventuelle Probleme. Wenn Belkin eine neue Firmware
veröffentlicht, können Sie sie von der Belkin Website herunterladen und die
Firmware Ihres Access Point auf den neuesten Stand bringen.
26
KONFIGURIEREN DES KABELLOSEN NETZWERKS
(1)
Aktualisieren der Access Point-Firmware
1. Klicken Sie auf der Seite "Firmware Update" (Firmware-Aktualisierung) auf
"Browse" (1) [Durchsuchen]. Es wird ein Fenster geöffnet, in dem Sie den
Pfad der Firmware-Aktualisierungsdatei wählen können. Alle FirmwareDateien haben die Dateinamenerweiterung ".dlf".
2. Suchen Sie die Firmware-Datei, die Sie heruntergeladen haben.
Doppelklicken Sie auf den Dateinamen.
27
KONFIGURIEREN DES KABELLOSEN NETZWERKS
3. Im Feld "Update Firmware" (Firmware aktualisieren) werden jetzt der Pfad
und der Name der ausgewählten Firmware-Datei angezeigt. Klicken Sie auf
"Update" (Aktualisieren).
4. Sie werden gefragt, ob Sie fortfahren möchten. Klicken Sie auf "OK".
5. Ein weiteres Meldungsfenster erscheint. Es weist darauf hin, dass der
Access Point eine Minute lang nicht reagieren wird, während die Firmware
geladen und der Access Point neu gestartet wird. Klicken Sie auf "OK".
Auf dem Bildschirm erscheint ein Countdown von 30 Sekunden. Wenn der
Countdown Null erreicht, ist die Aktualisierung der Access Point-Firmware
abgeschlossen. Jetzt müsste die Access Point-Homepage automatisch geöffnet
werden.
Ändern der Systemeinstellungen
Auf der Seite "Systems Settings" (Systemeinstellungen) können Sie ein neues
Administratorkennwort festlegen, die Zeitzone einstellen, die Fernverwaltung
aktivieren und die NAT-Funktion des Access Point ein- oder ausschalten.
28
KONFIGURIEREN DES KABELLOSEN NETZWERKS
Einstellen oder Ändern des Administratorkennworts
Der Access Point wird ohne festgelegtes Kennwort ausgeliefert. Sie können auf
dieser Seite ein Kennwort festlegen und dadurch die Sicherheit erhöhen.
Notieren Sie sich das Kennwort, und bewahren Sie es sicher auf. Sie benötigen
es, wenn Sie sich künftig am Access Point anmelden möchten. Sie sollten ein
Kennwort festlegen, wenn Sie die Fernverwaltung des Access Point nutzen
möchten.
29
FEHLERBEHEBUNG
Technische Informationen und Unterstützung erhalten Sie unter
www.belkin.com/networking oder www.belkin.com im Bereich "Tech Support"
(Kundendienst). Support per Telefon erhalten Sie bei Bedarf unter der
Nummer 00 800 223 55 460.
30
RECHTLICHE HINWEISE
FCC-Erklärung
KONFORMITÄTSERKLÄRUNG ZUR EINHALTUNG DER FCCBESTIMMUNGEN ÜBER DIE ELEKTROMAGNETISCHE VERTRÄGLICHKEIT
Wir, Belkin Corporation, eine Gesellschaft mit Sitz in 501 West Walnut Street, Compton, CA
90220, USA, erklären hiermit in alleiniger Verantwortung, dass dieser Artikel Nr.
F5D6130
auf den sich diese Erklärung bezieht,
in Einklang mit Teil 15 der FCC- Regelungen steht. Der Betrieb unterliegt den beiden folgenden
Bedingungen: (1) Dieses Gerät darf schädigende Störungen nicht verursachen, und (2) dieses Gerät
muss jedwede Störung annehmen, einschließlich der Störungen, die einen unerwünschten Betrieb
verursachen könnten.
Achtung: Hochfrequente Strahlungen
Die Strahlungsleistung dieses Geräts liegt deutlich unter den FCC-Grenzwerten für hochfrequente
Strahlungen. Dennoch ist bei der Gerätenutzung darauf zu achten, dass im Normalbetrieb
Menschen möglichst wenig mit schädlichen Strahlungen in Berührung kommen.
Beim Anschluss einer externen Antenne an das Gerät muss die Antenne so aufgestellt werden,
dass im Normalbetrieb Menschen möglichst wenig mit schädlichen Strahlungen in Berührung
kommen. Um sicherzustellen, dass die FCC-Grenzwerte für Belastungen durch hochfrequente
Strahlungen nicht überschritten werden, ist im Normalbetrieb stets ein Abstand von mindestens
20 cm zur Antenne einzuhalten.
FCC-Erklärung zur Funkentstörung
Dieses Gerät entspricht nachweislich den Grenzwerten für Digitalgeräte der Klasse B gemäß
Abschnitt 15 der FCC-Bestimmungen. Diese Grenzwerte dienen dem angemessenen Schutz vor
schädlichen Strahlungen beim Betrieb von Geräten im Wohnbereich.
Das Gerät erzeugt und verwendet hochfrequente Strahlungen und kann sie ausstrahlen. Wird das
Gerät nicht gemäß den Bedienungsanweisungen aufgestellt und betrieben, so können Störungen
beim Radio- und Fernsehempfang auftreten (was sich durch Ein- und Ausschalten des Geräts
feststellen lässt). In diesem Fall empfiehlt sich die Behebung der Störung durch eine oder
mehrere der folgenden Maßnahmen:
• Richten Sie die Empfangsantenne neu aus.
• Vergrößern Sie den Abstand zwischen Gerät und Empfänger.
• Schließen Sie das Gerät an einer anderen Steckdose an, so dass Gerät und Empfänger an
verschiedenen Stromkreisen angeschlossen sind.
• Wenden Sie sich an Ihren Händler oder einen qualifizierten Rundfunk-/Fernsehtechniker, wenn
Sie weitere Hilfe benötigen.
Änderungen und Eingriffe
Gemäß den FCC-Bestimmungen weisen wir darauf hin, dass Änderungen und Eingriffe, die ohne
ausdrückliche Genehmigung seitens Belkin Corporation erfolgen, zum Erlöschen der
Betriebsgenehmigung für dieses Gerät führen können.
31
RECHTLICHE HINWEISE
IC-Hinweis (Kanada)
Das Funksystem dieses Geräts entspricht den Bestimmungen RSS 139 und RSS 210 von Industry
Canada. Dieses digitale Gerät der Klasse B entspricht der kanadischen Norm ICES-003.
Cet appareil numérique de la classe B conforme à la norme NMB-003 du Canada.
Europa: CE-Hinweis
Die Kennzeichnung von Endeinrichtungen mit dem Zeichen CE 0682 oder
dem CE-Hinweis gibt an, dass das Gerät der Richtlinie 1999/5/EG (R&TTERichtlinie) der EU-Kommission entspricht.
Aus einer solchen Kennzeichnung geht hervor, dass das Gerät den folgenden europäischen Normen
entspricht (in Klammern die entsprechenden internationalen Standards):
• EN 60950 (IEC60950): Sicherheit von Einrichtungen der Informationstechnik
• EN 300 328 Technische Anforderungen an Funkgeräte
• ETS 300 826 Allgemeine Anforderungen zu elektromagnetischen Strahlungen von Funkgeräten
Den Sendertyp finden Sie auf dem Produkterkennungsschild Ihres Belkin-Produkts.
Produkte mit dem CE-Zeichen entsprechen der Richtlinie zur Elektromagnetischen Verträglichkeit
(89/336/EWG) und der Niederspannungsrichtlinie (72/23/EWG) der EU-Kommission. Aus der
Einhaltung dieser Richtlinien geht hervor, dass das Gerät den folgenden europäischen Normen
entspricht (in Klammern die entsprechenden internationalen Standards):
• EN 55022 (CISPR 22): Funkstörungen
• EN 55024 (IEC61000-4-2,3,4,5,6,8,11) - Störfestigkeit
• EN 61000-3-2 (IEC610000-3-2) - Oberschwingungsströme
• EN 61000-3-3 (IEC610000-3-2) - Grenzwerte für Spannungsschwankungen und Flicker
• EN 60950 (IEC60950): Sicherheit von Einrichtungen der Informationstechnik
Produkte mit diesem Sender werden mit dem CE 0682 oder CE-Hinweis versehen und sind ggf.
auch mit dem CE-Zeichen gekennzeichnet.
Unter http://networking.belkin.com finden Sie sämtliche Netzwerkbescheinigungen sowie die
Erklärungen zur R/TTE-Richtlinie.
32
RECHTLICHE HINWEISE
Eingeschränkte lebenslange Garantie von Belkin Corporation
Belkin Corporation gewährleistet hiermit, dass dieses Produkt während seiner gesamten
Lebensdauer keine Verarbeitungs- und Materialfehler aufweisen wird. Bei Feststellung eines
Fehlers wird Belkin das Produkt nach eigenem Ermessen entweder kostenlos reparieren oder
austauschen, sofern es während des Garantiezeitraums ausreichend frankiert an den autorisierten
Belkin-Händler zurückgegeben wurde, bei dem es erworben wurde. Ein Kaufnachweis kann verlangt
werden.
Diese Garantie erstreckt sich nicht auf die Beschädigung des Produkts durch Unfall,
missbräuchliche, unsachgemäße oder fehlerhafte Verwendung oder Anwendung. Ebenso ist die
Garantie unwirksam, wenn das Produkt ohne schriftliche Genehmigung durch Belkin verändert oder
wenn eine Belkin-Seriennummer entfernt oder unkenntlich gemacht wurde.
Die vorstehenden Garantiebedingungen und Rechtsbehelfe schließen alle anderen
Gewährleistungen und Rechtsbehelfe - ob mündlich oder schriftlich, ausdrücklich oder konkludent
- aus und treten an deren Stelle. Belkin übernimmt insbesondere keinerlei konkludente
Gewährleistungen, u.a. auch keine Gewährleistung der Eignung für einen bestimmten Zweck oder
der handelsüblichen Qualität.
Kein Händler, Bevollmächtigter bzw. Vertreter oder Mitarbeiter von Belkin ist befugt, diese
Gewährleistungsregelung in irgendeiner Weise abzuändern oder zu ergänzen.
Belkin haftet nicht für konkret besondere, durch Zufall eingetretene oder Folgeschäden aufgrund
der Verletzung einer Gewährleistung oder nach Maßgabe einer anderen Rechtslehre (u.a. für
entgangene Gewinne, Ausfallzeiten, Geschäfts- oder Firmenwerteinbußen bzw. die Beschädigung,
Neuprogrammierung oder Wiederherstellung von Programmen oder Daten nach Speicherung in oder
Nutzung in Verbindung mit Belkin-Produkten).
Da in manchen Ländern der Ausschluss oder die Beschränkung der Haftung für durch Zufall
eingetretene oder Folgeschäden bzw. ein Ausschluss konkludenter Gewährleistungen nicht zulässig
ist, haben die vorstehenden Beschränkungen und Ausschlussregelungen für Sie möglicherweise
keine Gültigkeit. Diese Garantie räumt Ihnen spezifische Rechte ein, die von Land zu Land
unterschiedlich ausgestaltet sind.
33
belkin.com
Belkin Corporation
501 West Walnut Street
Compton • CA • 90220-5221 • USA
Tel: +1 310 898 1100
Fax: +1 310 898 1111
Belkin Components, Ltd.
Express Business Park • Shipton Way
Rushden • NN10 6GL • Großbritannien
Tel: +44 (0) 1933 35 2000
Fax: +44 (0) 1933 31 2000
Belkin Components B.V.
Boeing Avenue 333
1119 PH Schiphol-Rijk • Niederlande
Tel: +31 (0) 20 654 7300
Fax: +31 (0) 20 654 7349
Belkin Components GmbH
Hanebergstrasse 2
80637 München • Deutschland
Tel: +49 (0) 89 143405 0
Fax: +49 (0) 89 143405 100
Belkin Components SAS
5 Rue du Petit Robinson • 3ème étage
78350 Jouy en Josas • Frankreich
Tel: +33 (0) 1 34 58 14 00
Fax: +33 (0) 1 39 46 62 89
Belkin Ltd.
7 Bowen Cresent • West Gosford
NSW 2250 • Australien
Tel: +61 (0) 2 4372 8600
Fax: +61 (0) 2 4372 8603
Belkin Technischer Support
Europa: 00 800 223 55 460
USA: 877 736 5771
P74341ea
© 2004 Belkin Corporation. Alle Rechte vorbehalten.
Alle Produktnamen sind eingetragene Marken der angegebenen Hersteller. Mac, Mac OS, AppleTalk, Apple und AirPort
sind Marken der Apple Computer, Inc., die in den USA und anderen Ländern eingetragen sind.
Draadloos netwerk
accesspoint
Handleiding
F5D6130
INHOUD
Inleiding . . . . . . . . . . . . . . . . . . . . . . . . . . . . . . . . . . . . . . . . . . . . . . . . . . 1
Belangrijkste productkenmerken . . . . . . . . . . . . . . . . . . . . . . . . . . . . . . . .2
Inhoud van de verpakking . . . . . . . . . . . . . . . . . . . . . . . . . . . . . . . . . . . .3
Optioneel beheer . . . . . . . . . . . . . . . . . . . . . . . . . . . . . . . . . . . . . . . . . .3
Softwarevereisten . . . . . . . . . . . . . . . . . . . . . . . . . . . . . . . . . . . . . . . . .3
Systeemvereisten . . . . . . . . . . . . . . . . . . . . . . . . . . . . . . . . . . . . . . . . . .3
Technische gegevens . . . . . . . . . . . . . . . . . . . . . . . . . . . . . . . . . . . . . . .4
Kennismaking met uw accesspoint . . . . . . . . . . . . . . . . . . . . . . . . . . . . . . . . . .5
De ideale plaats voor uw draadloze accesspoint . . . . . . . . . . . . . . . . . . . . . . . . .7
Snelle installatie . . . . . . . . . . . . . . . . . . . . . . . . . . . . . . . . . . . . . . . . . . . . .8
Stap 1: Sluit het accesspoint aan op een router, Ethernet-switch of hub . . . . . .8
Stap 2: Installeer de Discovery Wizard . . . . . . . . . . . . . . . . . . . . . . . . . . . .9
De Discovery Wizard gebruiken voor de configuratie van het accesspoint . . . . . . . .11
De instellingen van het draadloze netwerk configureren . . . . . . . . . . . . . . . . . . .15
Problemen oplossen . . . . . . . . . . . . . . . . . . . . . . . . . . . . . . . . . . . . . . . . . .29
Informatie . . . . . . . . . . . . . . . . . . . . . . . . . . . . . . . . . . . . . . . . . . . . . . . . .30
INLEIDING
Belkin dankt u hartelijk voor uw aankoop van het Belkin 54g draadloze
netwerkaccesspoint en heet u welkom in de wereld van draadloos netwerken.
U kunt nu profiteren van deze indrukwekkende nieuwe high-speed draadloze
technologie om in alle vrijheid in uw woonhuis en kantoor te netwerken—
zonder kabels Het draadloze accesspoint fungeert als een brug tussen uw
bestaande bekabelde netwerk en uw voor draadloos gebruik geschikte
computers. Dankzij de gemakkelijke installatie en setup kunt u in een mum
van tijd draadloos aan de slag. Lees deze handleiding volledig door om alles
uit uw accesspoint te halen wat erin zit.
1
INLEIDING
Belangrijkste productkenmerken
Groot bereik bij hoge transmissiesnelheden
Het draadloze accesspoint van Belkin bestrijkt een gebied met een straal van
ruim 90 m binnenshuis en van ruim 500 m in de open lucht.
Encryptie tot 128 bit
Uw draadloze accesspoint van Belkin kan de overgestuurde radiogolven onleesbaar
coderen (scramblen) zodat uw gegevens veilig zijn. Met deze facultatieve encryptiefunctie kunt u data met 64 of 128 bit coderen d.m.v. sleutels die u zelf invoert.
MAC-adressenfilter
Voor extra veiligheid, kunt u een lijst met MAC-adressen opstellen (unieke
cliëntidentificatiecodes) die toegang hebben tot uw netwerk. Iedere computer
heeft zijn eigen MAC-adres. Via deze lijst, die u opstelt via de webgebruikersinterface, kunt u de toegang tot uw netwerk beheersen.
Dit geldt zowel voor pc's als Mac® computers
Het draadloze accesspoint ondersteunt een groot aantal netwerkomgevingen
zoals ondermeer Mac® OS 8.x, 9.x, X v10.x, AppleTalk®, Linux®, Windows® 95,
98, Me, NT®, 2000 en XP.
Let op: Het accesspoint kan via een webbrowser beheerd worden, zonder dat
meegeleverde software geïnstalleerd is. De meegeleverde software ondersteunt
uitsluitend Windows 98 SE, Me, 2000 en XP maar hoeft niet geïnstalleerd te zijn
om het accesspoint te kunnen gebruiken.
Geavanceerde web-gebruikersinterface
U kunt de geavanceerde functies van het accesspoint eenvoudig instellen via
uw webbrowser, zonder dat u extra software moet installeren op de computer.
U hoeft geen disks te installeren of in de gaten te houden en bovendien kunt
u snel en gemakkelijk wijzigingen aanbrengen en set-upfuncties uitvoeren
vanaf iedere op het netwerk aangesloten computer.
Toepassingen en voordelen
• Voor relatief lage kosten sluit u meerdere draadloze computers op een
netwerk aan
• Geschikt voor privé- en kleinzakelijke netwerken (SOHO)
• Biedt de mogelijkheid in een handomdraai een netwerk op te zetten dat
voldoet aan de behoeften van kleinzakelijke en privé gebruikers.
2
INLEIDING
Inhoud van de verpakking
• Draadloos accesspoint
• Voeding
• Software-cd
• Handleiding
• Registratiekaart
Optioneel beheer, softwarevereisten
• Windows® 98SE, 2000, Me of XP
• Minstens 64MB RAM
Systeemvereisten
• Tenminste een computer waarop het netwerkprotocol TCP/IP is
geïnstalleerd
• CAT5-netwerkkabel (of beter)
• Microsoft® Internet Explorer 4.0 of hoger, of Netscape® 4.0 of hoger
3
INLEIDING
Technische gegevens
Standaarden:
IEEE 802.3 10Base-T Ethernet/100 Base-Tx Ethernet
IEEE 802.11b
Draadloos:
Radiotechnologie: Direct Sequence Spread Spectrum (DSSS)
802.11b: 11, 5,5, 2, 1Mbps
802.11b: CCK, DQPSK, DBPSK
2.412-2.497 GHz ISM-band
802.11b: 11 voor Noord-Amerika, 14 voor Japan, 13 voor Europa
64/128-bits WEP
Ondersteunde protocollen:
CSMA/CD, TCP, IP, UDP, AppleTalk en DHCP (cliënt)
Beheer:
Op browser gebaseerd
Maximum aantal gebruikers:
32 (WLAN)
Poorten:
1 10Base-T/100Base-Tx RJ45-poort
1 voedingsbus
1 resetknop
LED's:
Voeding
LAN-activiteit
WLAN-activiteit
4
KENNISMAKING MET UW ACCESS POINT
Het accesspoint kan verticaal of horizontaal op een bureau worden geplaatst,
of worden bevestigd aan een muur. Het slanke ontwerp beperkt de benodigde
ruimte op het bureau tot een minimum wanneer hij verticaal wordt geplaatst.
Alle kabels worden aangesloten op de achterkant van het accesspoint voor een
overzichtelijker gebruik. De LED-signaallampjes aan de voorzijde van het
accesspoint zijn duidelijk zichtbaar en geven u informatie
over de netwerkactiviteit en -status.
LED voor LAN
(draadloos kabelnetwerk)
Voorzijde
LED voor WLAN
(draadloos lokaal netwerk)
LED voor Voeding/Gereed
Geeft aan dat het accesspoint voeding krijgt.
Uitgeschakeld
Accesspoint is uitgeschakeld
Rood
Accesspoint is gereed
LED voor Voeding/Gereed
LED voor WLAN (draadloos lokaal netwerk)
Uitgeschakeld
Draadloos netwerk staat UIT
Knipperend groen
Geeft aan dat het accesspoint werkt
LED voor LAN (lokaal kabelnetwerk)
Uitgeschakeld
Er is geen netwerk met de poort verbonden
Groen
Verbinding met 10Base-T-apparaat
Oranje
Verbinding met 100Base-Tx-apparaat
Knippert
(Oranje of groen)
Poortactiviteit
Achterzijde
Voedingsbus
RJ-45-LAN-poort
5
KENNISMAKING MET UW ACCESS POINT
Voedingsbus
Verbindt de meegeleverde 5V gelijkstroomvoeding met deze aansluiting.
RJ45 Ethernet contrasteker
Aansluitpunt voor Ethernet-kabel die met een open RJ45 10BaseT- of
100Base-T-poort op een switch, hub of draadloos accesspoint is aangesloten.
Resetknop
U gebruikt de resetknop in het zeldzame geval dat het accesspoint niet goed
functioneert. Het resetten van het accesspoint herstelt de normale werking
van het accesspoint terwijl de geprogrammeerde instellingen van kracht
blijven. U kunt ook de standaard fabrieksinstellingen weer instellen met de
resetknop. Gebruik de herstelfunctie bijvoorbeeld in het geval u uw
persoonlijke wachtwoord bent vergeten.
a. Het accesspoint resetten
Druk kort op de resetknop. De lampjes op het accesspoint zullen kort
knipperen. Het Voeding/Gereed-lampje begint te knipperen. Wanneer het
Voeding/Gereed-lampje weer ononderbroken brandt, is de resetprocedure
voltooid.
b. De standaard fabrieksinstellingen herstellen
Druk de resetknop gedurende vijf seconden in en laat hem daarna los. De
lampjes op het accesspoint zullen kort knipperen. Het Voeding/Gereed-lampje
begint te knipperen. Wanneer het Voeding/Gereed-lampje weer ononderbroken
brandt, is het herstellen klaar.
Draaibare dipoolantenne
Aan de zijkant van het draadloze accesspoint bevindt zich een unidirectionele
dipoolantenne. De antenne kan over 180 graden roteren. Voor optimale
prestaties dient de antenne verticaal opgesteld te worden.
6
DE IDEALE PLAATS VOOR UW ACCESS POINT
De plaats van uw accesspoint is belangrijk voor een optimale werking van uw
draadloze netwerk. Binnenshuis heeft een draadloos accesspoint een bereik
van minimaal 90 meter. Andere bouwmaterialen en obstakels in het gebouw
kunnen het draadloze signaal echter sterk beïnvloeden en het bereik
verminderen. Plaats het accesspoint zo dicht mogelijk bij het middelpunt van
het gebied dat u wilt bestrijken. In een huis met verschillende verdiepingen
kunt u het accesspoint het beste op de verdieping plaatsen die het dichtst bij
het midden van het huis ligt; dit kan betekenen dat u het accesspoint op een
hogere verdieping moet plaatsen.
Kien de plaats voor uw accesspoint dus goed uit.
• Let op apparatuur of grote voorwerpen zoals een koelkast of
wasmachine/droger die misschien aan de andere kant van de muur staan
van waar u uw accesspoint wilt plaatsen.
• Plaats het accesspoint bovenop een bureau en niet in de buurt van
metalen kasten en computerkasten.
• Plaats geen voorwerpen of apparatuur bovenop het accesspoint.
• Zorg ervoor dat de antenne te allen tijde naar BOVEN is gericht.
• Metaalhoudende UV-werende getinte ramen kunnen de draadloze prestaties
beïnvloeden. Plaats het accesspoint niet naast een getint raam.
Wij zijn ons ervan bewust dat het in de praktijk misschien niet mogelijk is het
accesspoint in het midden te plaatsen van het gebied dat u wilt bestrijken.
Wanneer u problemen heeft het gehele door u gewenste gebied te bestrijken,
probeer het accesspoint dan zo hoog mogelijk te plaatsen. Draadloze
apparatuur werkt het best in situaties waarin zich geen obstructies bevinden
tussen de draadloze computer en het accesspoint. Het accesspoint kan ook
aan de muur worden gemonteerd met de antennes naar BOVEN gericht. Er zijn
ook andere mogelijkheden voor het vergroten van het gebied voor draadloze
ontvangst. Ga voor oplossingen naar www.belkin.com/networking.
Het draadloze signaal kan door vele dingen worden beïnvloed, zoals
nabijgelegen draadloze netwerken, magnetrons die aan staan, en draadloze
telefoons van 2,4 GHz. Hoewel deze bronnen de prestaties van uw netwerk
kunnen aantasten, werkt uw draadloze netwerk meestal voortreffelijk in
situaties waarin dit soort apparaten aanwezig zijn.
7
SNELLE INSTALLATIE
Het accesspoint word in de fabriek zo geconfigureerd dat hij op de juiste
manier werkt als u hem uit de doos haalt. U sluit het accesspoint gewoonweg
aan op uw bestaande netwerk en uw netwerk is dan onmiddelijk geschikt voor
draadloos netwerken, zonder dat verdere configuratie vereist is. Belkin levert
ook software mee, die u in staat stelt het accesspoint te lokaliseren en aan te
sluiten op uw netwerk zodat u op eenvoudige wijze de instellingen kunt wijzigen, indien u dat wilt. Voordat u de software kunt gebruiken, dient u het
accesspoint fysiek te installeren. Zodra dat gebeurd is, kunt u de software
gebruiken om de instellingen te wijzigen. Om uw accesspoint te installeren
dient u de volgende stappen te volgen.
Stap 1: Sluit het accesspoint aan op een router, Ethernet-switch of hub
Controleer de inhoud van de doos. U zou moeten beschikken over het
volgende:
• Draadloos netwerkaccesspoint
• Voeding
• Software-cd
• Handleiding
• Registratiekaart
1. Kies een geschikte plaats uit voor uw accesspoint, zoals eerder in deze
handleiding is besproken.
2. Sluit een CAT5-kabel aan tussen het accesspoint en de LAN-poort van uw
router, een Ethernet-switch of een hub. Sluit de voeding voor het
accesspoint aan door de ronde gelijkstroomstekker te bevestigen in de
gelijkstroomvoedingsbus op het accesspoint. Sluit de voeding vervolgens
aan op een stopcontact. Controleer of de LED's voor voeding en voor de
verbinding allebei branden. Als dit het geval is, weet u dat het accesspoint
correct is aangesloten.
3. De aansluiting en plaatsing van uw accesspoint is nu gereed.
8
SNELLE INSTALLATIE
Stap 2: Installeer de Discovery Wizard
De Discovery Wizard is een praktische utility voor het lokaliseren en aansluiten
van uw accesspoint. De Discovery Wizard hoeft u alleen te gebruiken als u
wijzigingen wilt aanbrengen in de instellingen van het accesspoint. In de meeste
gevallen werkt het accesspoint zodra u hem uit de doos hebt gehaald en hem
hebt geïnstalleerd. Aangezien het accesspoint wordt geleverd als DHCP-cliënt, zal
het automatisch van de DHCP-server op uw netwerk een IP-adres toegewezen
krijgen. Aangezien dit adres tamelijk willekeurig tot stand komt, zal de Discovery
Wizard het accesspoint op uw netwerk lokaliseren, zodat u geen extra stappen
hoeft te ondernemen om het IP-adres van het accesspoint te bepalen.
1. Plaats de cd in het cd-romstation.
2. Het installatieprogramma voor het draadloze netwerkaccesspoint van Belkin
zal nu automatisch worden gestart. Als het openingsscherm van het
installatieprogramma niet binnen 15 tot 20 seconden verschijnt, selecteer
dan uw cd-romstation en dubbelklik op de map met de naam 'Files'
(Bestanden). Dubbelklik daarna op het pictogram met de naam: “start.exe”.
3. Beweeg in het menuvenster uw cursor over de knop "Install" (Installeren)
en selecteer vervolgens "Click here" (Hier klikken) om het softwareinstallatieprogramma te starten.
9
SNELLE INSTALLATIE
4. Nu start het software-installatiewizard zal starten. Klik op "Next"
(Volgende) op het eerste scherm.
5. Accepteer de gebruikersovereenkomst en klik op "Next" (Volgende). Volg de
stappen van de installatiewizard. Klik op "Finish" (Beëindigen) op het
laatste scherm.
6. De Discovery Wizard wordt nu geïnstalleerd. Het volgende hoofdstuk vertelt
u hoe u de Wizard kunt gebruiken.
10
DE DISCOVERY WIZARD GEBRUIKEN VOOR DE CONFIGURATIE VAN HET ACCESSPOINT
1. Nadat u de Discovery Wizard hebt geïnstalleerd, verschijnt er een pictogram
op uw bureaublad. Dubbelklik op dit pictogram om de Wizard te starten.
2. Als u de Wizard start verschijnt het woord “Scanning…”. Dit houdt in
dat de Wizard op zoek is naar accesspoints binnen uw netwerk.
3. Zodra de Wizard uw accesspoint(s) gevonden heeft, zal de naam van het
accesspoint in dit venster verschijnen. Klik op de naam van het accesspoint.
4. Klik op "Connect" (Verbinding maken). Hierdoor zal de webbrowser gestart
worden.
11
DE DISCOVERY WIZARD GEBRUIKEN VOOR DE CONFIGURATIE VAN HET ACCESSPOINT
5. In het browservenster ziet u vervolgens de login-pagina van het
accesspoint. Het accesspoint wordt geleverd zonder voorgeprogrammeerd
wachtwoord. Laat in het inlogscherm het wachtwoord open en klik op de
"Submit"-knop om in te loggen.
6. Er is verbinding tot stand gebracht met het accesspoint. U kunt nu
veranderingen aanbrengen indien u dat wenst. In het volgende hoofdstuk
kunt u lezen hoe u de interface kunt gebruiken.
Uitloggen van het accesspoint
Per keer kan slechts één computer op het accesspoint inloggen om de
instellingen van het accesspoint te wijzigen. Wanneer een gebruiker heeft
ingelogd om wijzigingen te maken, zijn er twee manieren om weer uit te
loggen. Als u klikt op de knop "Logout", dan wordt de computer uitgelogd. De
tweede methode is automatisch. Na een bepaalde periode wordt de computer
automatisch uitgelogd (time out). De standaard inlogtijd is 10 minuten. Deze
inlogtijd kan worden veranderd in een periode van 1 tot 99 minuten. Zie voor
verdere informatie het onderdeel in deze handleiding genaamd "Wijzigen van
de instelling voor de Inlog-timeout".
12
DE DISCOVERY WIZARD GEBRUIKEN VOOR DE CONFIGURATIE VAN HET ACCESSPOINT
De werking van de gebruikersinterface van het accesspoint
De homepage is de eerste pagina die u ziet als u naar de "Advanced User
Interface" (Geavanceerde gebruikersinterface) gaat. De homepage toont u een
kort overzicht van de status en instellingen van het accesspoint. Vanuit deze
pagina kunt u naar alle geavanceerde setup-pagina's gaan.
(2) (3) (4)
(5)
(1)
(6)
(7)
(1) Snelnavigatiekoppelingen
Als u op één van deze links klikt gaat u rechtstreeks naar één van de
geavanceerde gebruikersinterfacepagina's van het accesspoint. De links zijn
onderverdeeld in logische categorieën en gegroepeerd in tabs om het vinden
van een bepaalde instelling te vergemakkelijken. Als u klikt op het paarse
header van de tabs ziet u een korte omschrijving van de functie van de tab.
(2) Homeknop
De homeknop is beschikbaar op elke pagina van de gebruikersinterface. Met
een druk op deze knop gaat u terug naar de homepage.
(3) Helpknop
De "Help"-knop geeft u toegang tot de helppagina's van het accesspoint. Met
een klik op "More Info" (Meer informatie) kunt u op veel pagina's naast
bepaalde paragrafen ook om hulp vragen.
13
DE DISCOVERY WIZARD GEBRUIKEN VOOR DE CONFIGURATIE VAN HET ACCESSPOINT
(4) Login/Logout-knop
Met deze enkele knop kunt u inloggen op en uitloggen uit het accesspoint.
Wanneer u op het accesspoint bent ingelogd, verandert de tekst op de knop in
"Logout". Als u inlogt op het accesspoint gaat u naar een aparte inlogpagina
waar u een wachtwoord moet invullen. Als u bent ingelogd op het
accesspoint, kunt u wijzigingen aanbrengen in de instellingen. Wanneer u
klaar bent met het aanbrengen van wijzigingen, kunt u van het accesspoint
uitloggen door een klik op de knop "Logout". Meer informatie over inloggen
op het accesspoint vindt u in het hoofdstuk "Inloggen op het accesspoint".
(5) Versie-informatie
Toont de firmware-versie, bootcode-versie, hardwareversie, en het serienummer
van het accesspoint.
(6) LAN-instellingen
Toont u de instellingen van de LAN (Local Area Network) -kant van het
accesspoint. U kunt deze instellingen wijzigen door te klikken op een van de
koppelingen (IP Address, Subnet Mask) of door te klikken op de LANsnelnavigatiekoppeling links op het scherm.
(7) Draadloos
Toont de status van de draadloze instelling van het draadloze accesspoint. U
kunt deze instellingen wijzigen door te klikken op een van de koppelingen of
door te klikken op de LAN-snelnavigatiekoppelingen aan de linkerzijde van het
scherm.
14
DE INSTELLINGEN VAN HET DRAADLOZE NETWERK CONFIGUREREN
In het tabblad "Wireless" (Draadloos) kunt u de instellingen van het draadloos
netwerk wijzigen. Op dit tabblad kunt u de naam van het draadloze netwerk
(SSID), het gebruikte kanaal en de encryptie-instellingen aanpassen.
IP-instellingen
15
DE INSTELLINGEN VAN HET DRAADLOZE NETWERK CONFIGUREREN
Van draadloos kanaal wisselen
Auto: U kunt kiezen uit verschillende kanalen. In de Verenigde Staten zijn 11
kanalen beschikbaar. In het grootste deel van Europa, waaronder het Verenigd
Koninkrijk, zijn 13 kanalen beschikbaar. Een klein aantal andere landen stelt
andere eisen aan het kanaalgebruik. Uw accesspoint is zo ingesteld dat hij
actief kan zijn op de juiste kanalen voor het land waarin u zich bevindt. Het
standaard kanaal is 11 (behalve als u zich in een land bevindt waarin kanaal
11 niet gebruikt mag worden). Dit adres kan indien nodig worden gewijzigd.
Als er meer draadloze netwerken in uw gebied actief zijn, moet uw netwerk op
een ander kanaal worden ingesteld dan de andere draadloze netwerken. Voor
de beste prestaties moet u een kanaal gebruiken dat tenminste vijf kanalen
verwijderd is van dat van de andere draadloze netwerken. Als een ander
netwerk bijvoorbeeld kanaal 11 gebruikt, stel uw netwerk dan in op kanaal 6
of lager. Om het kanaal te veranderen, kiest u een kanaal uit het dropdownmenu. Klik op "Apply Changes" (Wijzigingen aanbrengen). De wijziging is
onmiddellijk van kracht.
16
DE INSTELLINGEN VAN HET DRAADLOZE NETWERK CONFIGUREREN
De naam van het draadloos netwerk (SSID) wijzigen
Om uw draadloze netwerk te identificeren, wordt een naam gebruikt die bekend is als
SSID (Service Set Identifier). De standaard SSID van het accesspoint is "WLAN". U kunt
deze naam veranderen in alles wat u maar wilt of u kunt hem onveranderd laten. Als er
andere draadloze netwerken in uw omgeving actief zijn, stelt u het waarschijnlijk op
prijs dat uw SSID uniek is (dus niet hetzelfde als die van een ander draadloos netwerk
in uw omgeving). Als u de SSID wil veranderen, typ dan de SSID die u wilt gebruiken in
het SSID-veld (1) in en klik op "Apply Changes" (Wijzigingen aanbrengen) (2). De
verandering gaat onmiddellijk van kracht. Als u de SSID verandert, moeten ook uw
draadloos werkende computers opnieuw worden geconfigureerd om verbinding te
maken met uw nieuwe netwerknaam. Zie de handleiding van uw draadloze
netwerkadapter voor informatie over hoe u deze verandering moet aanbrengen.
(1)
(2)
De Broadcast SSID-functie gebruiken
Let op: Deze geavanceerde functie mag uitsluitend door ervaren gebruikers worden
toegepast.
Om veiligheidsredenen kunt u ervoor kiezen de SSID van uw netwerk niet uit te zenden.
Daardoor blijft de naam van uw netwerk verborgen voor computers die de ether
aftasten op zoek naar de aanwezigheid van draadloze netwerken. Om de uitzending van
uw SSID stil te leggen, maakt u het vakje naast "Broadcast SSID" (SSID uitzenden) leeg
en klikt u vervolgens op "Apply changes" (Veranderingen aanbrengen). De verandering
gaat onmiddellijk van kracht. Elke computer moet nu worden ingesteld op het maken
van verbinding met uw specifieke SSID; een SSID in de vorm van 'ANY' (Elke) wordt niet
langer geaccepteerd. Zie de handleiding van uw draadloze netwerkadapter voor
informatie over hoe u deze verandering moet aanbrengen.
Instellingen voor draadloze encryptie wijzigen
Uw accesspoint is uitgerust met WEP (Wired Equivalent Privacy)-beveiliging.
Draadloze beveiliging is standaard uitgeschakeld. Om van beveiliging gebruik te
kunnen maken, dient u de stappen te volgen die in dit hoofdstuk zijn opgenomen.
17
DE INSTELLINGEN VAN HET DRAADLOZE NETWERK CONFIGUREREN
WEP-encryptie instellen, met behulp van een passphrase
Opmerking voor Mac-gebruikers: De "Passphrase" (meervoudig wachtwoord)-optie
werkt niet met Apple® AirPort®. Om encryptie te configureren voor uw Maccomputer, stelt u de encryptie in met behulp van de handmatige methode
beschreven in het volgende gedeelte.
1. Selecteer "128-bit automatically" (128-bit automatisch) of "64-bit
automatically" (64-bit automatisch) in het dropdown-menu.
2. Typ een passphrase in. Een meervoudig wachtwoord ofwel "passphrase"
heeft dezelfde functie als een wachtwoord ofwel "password". Het kan uit
een combinatie van cijfers en letters bestaan. Nadat u uw samengestelde
wachtwoord hebt ingevuld, klikt u op "Generate" (Genereren). Als u op
"Generate" (Genereren) klikt, worden de onderstaande sleutelvelden bezet.
Let op: 64-bits encryptie genereert vier sleutels en 128-bits encryptie genereert
slechts één sleutel. Door op de bijbehorende drukknop te klikken, selecteert u de
sleutel die u wilt gebruiken. Klik op "Apply Changes" (Wijzigingen aanbrengen).
3. De encryptie in het accesspoint is nu ingesteld. Alle computers van uw
draadloze netwerk moeten nu met hetzelfde meervoudige wachtwoord
worden geconfigureerd. Zie de handleiding van uw draadloze netwerkadapter
voor informatie over hoe u deze verandering moet aanbrengen.
18
DE INSTELLINGEN VAN HET DRAADLOZE NETWERK CONFIGUREREN
Handmatige encyptie met een hexadecimale sleutel
Een hexadecimale sleutel is een combinatie van cijfers en letters van A t/m F
en van 0 t/m 9. 64-bits sleutels bestaan uit vijf tweecijferige getallen. 128bits sleutels bestaan uit 13 tweecijferige getallen.
Bijvoorbeeld:
AF 0F 4B C3 D4 = 64-bits sleutel
C3 03 0F AF 0F 4B B2 C3 D4 4B C3 D4 E7 = 128-bits sleutel
Stel in de onderstaande vakken uw sleutel samen door twee letters van A t/m F
en twee cijfers van 0 t/m 9 in te vullen. U gebruikt deze sleutel om de encryptieinstellingen van uw accesspoint en uw draadloze computers te programmeren.
Opmerking voor Mac-gebruikers: De oorspronkelijke Apple AirPort-producten
ondersteunen uitsluitend 64-bits encryptie. Apple AirPort 2-producten kunnen 64bits of 128-bits encryptie ondersteunen. Controleer dus eerst welk type apparaat u
gebruikt. Als het u niet lukt uw netwerk met 128-bits encryptie te configureren,
probeer dan 64-bits encryptie.
1. Selecteer “64-bit manually” (64-bit handmatig) "128-bit manually" (128bits handmatig) in het dropdown-menu.
19
DE INSTELLINGEN VAN HET DRAADLOZE NETWERK CONFIGUREREN
2. Als u gebruikmaakt van 64-bits encryptie, dan zijn er vier sleutelvelden. Als u
128-bits encryptie gebruikt, ziet u er één sleutelveld. Typ in het/de sleutelveld(en) de hexadecimale sleutel(s) in die u wilt gebruiken. Als u uw sleutels
heeft ingetypt, selecteert u de sleutel die u wilt gebruiken door te klikken op
de radioknop ernaast. Klik op "Apply Changes" (Wijzigingen aanbrengen).
3. De encryptie in het accesspoint is nu ingesteld. Alle computers van uw
draadloze netwerk moeten nu met dezelfde hexadecimale sleutel worden
geconfigureerd. Zie de handleiding van uw draadloze netwerkadapter voor
informatie over hoe u deze verandering moet aanbrengen.
MAC-adressenfilter instellen
Het MAC-adresfilter is een krachtige beveiligingsfunctie die u de mogelijkheid
biedt te specificeren welke computers toegang verleend mag worden tot het
accesspoint. Elke computer die NIET in die lijst is opgenomen zal de toegang
tot het netwerk geweigerd worden.
De MAC-adressenfilter activeren
1. Vink het vakje voor “Enable MAC Address Filtering” (1) aan.
2. Voer de MAC-adressen in van alle computers die u toegang wilt verlenen
tot het netwerk.
3. Klik op "Add" (Toevoegen) (2) om een adres aan de lijst toe te voegen.
4. Doe dit voor elke computer die u toe wilt voegen.
5. Klik op “Apply Changes” (Wijzigingen aanbrengen) te de wijzigingen aan te
brengen en te stoppen.
(1)
(2)
20
DE INSTELLINGEN VAN HET DRAADLOZE NETWERK CONFIGUREREN
Cliëntenlijst
De cliëntenlijst kunt gebruiken om een overzicht te krijgen van de cliënten
die op dit moment met het accesspoint te maken hebben. U krijgt het MACadres te zien van de cliënt evenals de snelheid van de verbinding.
Geavanceerde instellingen
Er zijn een aantal gevanceerde functies waarvan u gebruik kunt maken. Wij raden u
aan om, met uitzondering van de naam van het accesspoint, geen wijzigingen aan te
brengen in de instellingen als u daar niet een uitdrukkelijke reden toe heeft. Vanuit de
pagina "Advanced Settings" (Geavanceerde instellingen) kunt u het volgende doen:
• Wijzig de naam van het accesspoint (de unieke naam die uw accesspoint
binnen uw netwerk kenmerkt)
• Selecteer de minimum snelheid (1,2Mbps of 1, 2, 5,5, 11Mbps)
• Selecteer de Transmissiesnelheid (Auto, 11Mbps, 5,5Mbps, 2Mbps, 1Mbps)
• Stel de RTS-drempel in
• Stel de fragmentatie-drempel in
• Selecteer het type aanloopsignaal (lang of kort)
Zorg ervoor dat u als u wijzigingen aanbrengt op "Apply Changes" klikt om ze
door te voeren.
Hulpprogramma's
In het scherm voor utilities (hulpprogramma's) kunt u verschillende parameters
van het accesspoint beheren en bepaalde administratieve functies uitvoeren.
Het accesspoint herstarten
Soms kan het nodig zijn het accesspoint opnieuw op te starten wanneer deze
onregelmatigheden begint te vertonen. Het opnieuw opstarten van het
accesspoint verwijdert GEEN configuratie-instellingen.
21
DE INSTELLINGEN VAN HET DRAADLOZE NETWERK CONFIGUREREN
Het accesspoint opnieuw starten om de normale werking te herstellen
1. Klik op de knop "Restart Router" (Accesspoint opnieuw opstarten).
2. De volgende melding verschijnt. Klik op "OK".
3. De volgende melding verschijnt. Het opnieuw starten van het draadloze
accesspoint kan tot 60 seconden duren. Het is belangrijk dat u tijdens het
opnieuw opstarten de voeding van het accesspoint niet uitschakelt.
4. Op het scherm worden 30 seconden afgeteld. Wanneer tot nul is afgeteld,
wordt het accesspoint opnieuw opgestart. De homepage van het
accesspoint zou automatisch moeten verschijnen. Als dit niet het geval is,
typ dan het adres van het accesspoint (standaard = 192.168.2.254) in in
de navigatiebalk van uw browser.
Standaard fabrieksinstellingen herstellen
Wanneer u deze optie gebruikt, worden alle instellingen in het accesspoint naar de
standaard-fabrieksinstellingen teruggezet. Wij raden u aan eerst van uw eigen
instellingen een reservekopie te maken voordat u de standaard instellingen herstelt.
22
DE INSTELLINGEN VAN HET DRAADLOZE NETWERK CONFIGUREREN
1. Klik op de knop "Restore Defaults" (Standaard instellingen herstellen).
2. De volgende melding verschijnt. Klik op "OK".
3. De volgende melding verschijnt. Na het herstelllen van de standaard
instellingen, wordt het accesspoint opnieuw opgestart. Deze procedure kan
tot 60 seconden duren. Tijdens het opnieuw starten mag u de
stroomvoorziening van het draadloze accesspoint niet uitschakelen.
4. Op het scherm worden 30 seconden afgeteld. Wanneer tot nul is afgeteld,
zijn de standaard instellingen van het accesspoint hersteld. De homepage
van het accesspoint zou automatisch moeten verschijnen. Is dat niet het
geval, vul dan het adres van het accesspoint (standaard = 192.168.2.1) in
op de navigatiebalk van uw browser.
Huidige configuratie opslaan
Met deze functie kunt u de huidige configuratie van het draadloze accesspoint
opslaan. Door een reservekopie te maken van uw huidige configuratie kunt u deze
in het geval van verlies of beschadiging herstellen. Het is raadzaam een
reservekopie te maken van uw huidige configuratie voordat u uw firmware bijwerkt.
23
DE INSTELLINGEN VAN HET DRAADLOZE NETWERK CONFIGUREREN
1. Klik op "Save" (Opslaan). Er wordt een venster geopend met de naam "File
Download" (Downloaden Bestand). Klik op "Save" (Opslaan).
2. Een scherm wordt geopend waarin u de locatie kunt selecteren waar u het
configuratiebestand wilt opslaan. Selecteer een locatie. U kunt het bestand
elke naam geven die u wilt of de standaard benaming "Config" gebruiken.
Zorg dat u het bestand een naam geeft die u later gemakkelijk kunt
terugvinden. Wanneer u de locatie en de naam van het bestand hebt
gekozen, klikt u op "Save" (Opslaan).
De configuratie is nu opgeslagen.
24
DE INSTELLINGEN VAN HET DRAADLOZE NETWERK CONFIGUREREN
3. Wanneer het bestand is opgeslagen, ziet u het onderstaande venster. Klik
op "Close" (Sluiten).
Vorige configuratie herstellen
Met deze optie kunt u een eerder opgeslagen configuratie herstellen.
1. Klik op "Save" (Opslaan).
Er wordt een venster
geopend waarin u de
locatie van het
configuratiebestand kunt
selecteren. Alle
configuratiebestanden
hebben de extensie
".bin". Zoek het
configuratiebestand op
dat u wilt herstellen en
dubbelklik erop.
25
DE INSTELLINGEN VAN HET DRAADLOZE NETWERK CONFIGUREREN
2. U krijgt de vraag of u wilt doorgaan. Klik op "OK".
3. Er verschijnt een herinneringsvenster. De herstelprocedure van uw
configuratiebestand kan tot 60 seconden in beslag nemen. Klik op "OK".
4. Op het scherm worden 60 seconden afgeteld. Wanneer tot nul is afgeteld,
zal de configuratie van het accesspoint zijn hersteld. De homepage van het
accesspoint zou automatisch moeten verschijnen. Als dit niet het geval is,
typ dan het adres van het accesspoint (standaard = 192.168.2.1) in in de
navigatiebalk van uw browser.
Firmware bijwerken
Af en toe brengt Belkin een nieuwe versie uit van de firmware voor het
accesspoint. Nieuwe firmware-versies bevatten verbeteringen van functies en
oplossingen voor eventuele problemen. Wanneer Belkin nieuwe firmware
uitbrengt, kunt u deze downloaden van de Belkin update-website en de
firmware van het accesspoint bijwerken tot en met de nieuwste versie.
26
DE INSTELLINGEN VAN HET DRAADLOZE NETWERK CONFIGUREREN
(1)
Firmware van het accesspoint bijwerken
1. Op de pagina "Firmware Update" (Firmware bijwerken) klikt u op "Browse"
(Zoeken) (1). Er gaat een venster open waarin u de locatie van het
bijgewerkte firmware-bestand kunt selecteren. Alle firmwarebestanden
eindigen op ".dlf".
2. Ga naar het firmwarebestand dat u hebt gedownload. Selecteer het bestand
door dubbel te klikken op de bestandsnaam.
27
DE INSTELLINGEN VAN HET DRAADLOZE NETWERK CONFIGUREREN
3. Het venster "Update Firmware" (Firmware bijwerken) toont nu de locatie en
de naam van het firmwarebestand dat u zojuist hebt geselecteerd. Klik op
"Update" (Bijwerken).
4. U krijgt de vraag of u zeker weet dat u wilt doorgaan. Klik op "OK".
5. U krijgt nu nog een bericht te zien. Deze mededeling geeft aan dat het
accesspoint mogelijk één minuut niet reageert in verband met het laden
van de software in het accesspoint en het opnieuw opstarten van het
accesspoint. Klik op "OK".
Op uw beeldscherm worden 30 seconden afgeteld. Wanneer het aftellen op
nul komt, is de firmware-update van het accesspoint klaar. De homepage van
het accesspoint zou automatisch moeten verschijnen.
Systeeminstellingen wijzigen
Op de pagina "System Settings" (Systeeminstellingen) kunt u een nieuw
wachtwoord invoeren voor de systeembeheerder, de tijdzone instellen, beheer
op afstand inschakelen, en de NAT-functie van het accesspoint aan- en
uitschakelen.
28
DE INSTELLINGEN VAN HET DRAADLOZE NETWERK CONFIGUREREN
Het wachtwoord voor de systeembeheerder instellen of wijzigen
Het accesspoint wordt geleverd ZONDER voorgeprogrammeerd wachtwoord. Als
u een wachtwoord wilt toevoegen voor grotere beveiliging, dan kunt u hier
een wachtwoord instellen. Schrijf het wachtwoord op en bewaar het op een
veilige plaats, aangezien u het nodig heeft als u in de toekomst moet
inloggen op het accesspoint. Wij raden u ook aan een wachtwoord in te
stellen als u van plan bent gebruik te maken van de afstandsbeheerfunctie
van het accesspoint.
29
PROBLEMEN OPLOSSEN
Via het gebied voor technische ondersteuning op www.belkin.com/networking
of www.belkin.com vindt u informatie voor technische ondersteuning. Als u
telefonisch contact wilt opnemen met de afdeling technische ondersteuning,
bel dan 00 800 223 55 460.
30
INFORMATIE
FCC-verklaring
VERKLARING VAN CONFORMITEIT MET DE FCC-VOORSCHRIFTEN VOOR
ELEKTROMAGNETISCHE COMPATIBILITEIT
Wij, Belkin Corporation, gevestigd 501 West Walnut Street, Compton, CA 90220, Verenigde
Staten van Amerika, verklaren hierbij dat wij de volledige verantwoordelijkheid aanvaarden dat
het product met het artikelnummer
F5D6130
waarop deze verklaring betrekking heeft, voldoet aan Deel 15 van de FCC- voorschriften. Het
gebruik van het apparaat is onderworpen aan de volgende twee voorwaarden: (1) dit apparaat mag
geen schadelijke storingen veroorzaken, en (2) dit apparaat moet ongevoelig zijn voor storingen van
buitenaf, waaronder storingen die de werking van het apparaat nadelig kunnen beïnvloeden.
Let op: Blootstelling aan radiofrequente straling.
Het door dit apparaat uitgestraalde vermogen ligt ver beneden de hiervoor in de FCC-voorschriften
vastgelegde grenswaarden. Niettemin dient dit apparaat zodanig te worden gebruikt dat bij normaal
gebruik de mogelijkheid van persoonlijk contact tot een minimum beperkt blijft.
Bij het aansluiten van een externe antenne op dit apparaat moet de antenne zodanig worden geplaatst
dat bij normaal gebruik de mogelijkheid van persoonlijk contact tot een minimum beperkt blijft. Om
de mogelijkheid van het overschrijden van de FCC-normen voor blootstelling aan radiofrequentieenergie, dient de afstand tussen mensen en de antenne ten minste 20 cm zijn tijdens normaal gebruik.
Kennisgeving van de Federal Communications Commission
Deze apparatuur is getest en voldoet aan de grenswaarden voor digitale apparaten van Klasse B,
zoals vastgesteld in Deel 15 van de FCC-voorschriften. Deze normen zorgen voor een aanvaardbare
bescherming tegen schadelijke interferentie bij installatie thuis.
Deze apparatuur genereert en gebruikt radiofrequentie-energie en kan deze uitstralen. Indien het
aparaat niet volgens de aanwijzingen wordt geïnstalleerd en gebruikt, kan het schadelijke
storingen op de ontvangst van radio en televisie veroorzaken. Dit kan worden vastgesteld door de
installatie in- en uit te schakelen. De gebruiker wordt aangespoord te trachten de storing op te
heffen door een of meer van de volgende maatregelen:
• Verdraai of verplaats de ontvangstantenne.
• Vergroot de afstand tussen de apparatuur en het ontvangende apparaat.
• Sluit de apparatuur aan op een stopcontact van een andere groep dan die waarop de ontvanger
is aangesloten.
• Als u hulp nodig hebt, neem dan contact op met de verkoper of een deskundig
radio/televisietechnicus.
Aanpassingen
De Federal Communications Commission (FCC) eist dat de gebruiker ervoor wordt gewaarschuwd
dat elke verandering aan het apparaat die niet uitdrukkelijk door Belkin Corporation is
goedgekeurd, de bevoegdheid van de gebruiker om het apparaat te bedienen teniet kan doen.
31
INFORMATIE
Canada-Industry Canada (IC)
De draadloze radio van dit apparaat voldoet aan RSS 139 & RSS 210 Industry Canada. Dit apparaat
van Klasse B voldoet aan de voorschriften van de Canadese ICES-003.
Cet appareil numérique de la classe B conforme á la norme NMB-003 du Canada.
Europa - Kennisgeving betreffende de Europese Unie
Radioproducten die voorzien zijn van de CE 0682- of de CE-aanduiding
voldoen aan de R&TTE-richtlijn (1995/5/EC) van de Commissie van de
Europese Gemeenschap.
Het voldoen aan deze richtlijn houdt in dat de betreffende apparatuur beantwoordt aan de
volgende Europese normen (tussen haakjes zijn de overeenkomstige internationale normen
vermeld).
• EN 60950 (IEC60950) - Productveiligheid
• EN 300 328 - Technische vereisten voor radioapparatuur
• ETS 300 826 Algemene EMC-vereisten voor radioapparatuur.
Om het type zender vast te stellen, kunt u het identificatielabel op uw Belkin-product
controleren.
Producten met het CE-merk voldoen aan de Richtlijn voor Elektromagnetische Compatibiliteit
(89/336/EEC) en aan de Richtlijn voor Laagspanningsapparatuur (72/23/EEC)
van de Commissie van de Europese Economische Gemeenschap. Het voldoen aan
deze richtlijn houdt in dat de betreffende apparatuur beantwoordt aan de
volgende Europese normen (tussen haakjes zijn de overeenkomstige
internationale normen vermeld).
• EN 55022 (CISPR 22) - Elektromagnetische storingen
• EN 55024 (IEC61000-4-2,3,4,5,6,8,11)- Elektromagnetische immuniteit
• EN 61000-3-2 (IEC610000-3-2) - Harmonischen in elektrische leidingen
• EN 61000-3-3 (IEC610000) - Spanningsfluctuaties in elektrische leidingen
• EN 60950 (IEC60950) - Productveiligheid
Producten die een radiozender bevatten zijn voorzien van de CE 0682- of CE-aanduiding en
kunnen tevens zijn voorzien van het CE-beeldmerk.
Ga naar http://networking.belkin.com voor alle netwerkcertificaten evenals de R&TTE Directive
Statements.
32
INFORMATIE
Beperkte levenslange productgarantie van Belkin Components
Belkin Components geeft levenslange garantie op materiaal- en
fabricagefouten. In geval van defecten heeft Belkin de keuze tussen een gratis reparatie of
vervanging, op voorwaarde dat het product binnen de garantieperiode wordt teruggebracht naar
de leverancier en dat de transportkosten aan de leverancier vooruitbetaald worden. Er kan naar
uw aankoopbewijs
worden gevraagd.
Deze garantie geldt niet indien het product is beschadigd door een ongeval, door opzettelijk of
onopzettelijk misbruik en/of door onjuiste toepassing hetzij door wijziging van het product
zonder uitdrukkelijke schriftelijke toestemming van Belkin dan wel door verwijdering of
verminking van een Belkin-serienummer.
ER KAN ALLEEN EEN BEROEP WORDEN GEDAAN OP DE BOVENSTAANDE GARANTIES EN
TOEZEGGINGEN, ONGEACHT ENIGE ANDERE UITDRUKKELIJKE OF IMPLICIETE VERBALE OF
SCHRIFTELIJKE UITINGEN. BELKIN VERWERPT MET NAME ELKE EN ALLE IMPLICIETE GARANTIE(S),
WAARONDER GARANTIES INZAKE VERKOOPBAARHEID EN/OF GESCHIKTHEID VOOR EEN BEPAALDE
TOEPASSING.
Leveranciers, vertegenwoordigers en werknemers van Belkin zijn niet gemachtigd deze garantie op
enigerlei wijze te wijzigen, te verlengen of uit te breiden.
BELKIN IS NIET AANSPRAKELIJK VOOR BIJZONDERE, BIJKOMENDE OF VERVOLGSCHADE ONTSTAAN
DOOR GARANTIEVERBREKING VAN WELKE AARD OOK OF UIT HOOFDE VAN ENIG ANDER JURIDISCH
BEGINSEL, MET INBEGRIP VAN MAAR NIET BEPERKT TOT BEDRIJFSSTILSTAND, VERLIES VAN WINST
OF GOODWILL, BESCHADIGING HETZIJ HERPROGRAMMERING OF REPRODUCTIE VAN ENIG
PROGRAMMA OF VAN DATA OPGESLAGEN IN OF GEBRUIKT IN SAMENHANG MET PRODUCTEN VAN
BELKIN.
In sommige staten of landen is het niet toegestaan om incidentele schade, gevolgschade en
impliciete garanties uit te sluiten, in dat geval gelden de bovenstaande garantiebeperkingen
wellicht niet voor u. Deze garantie verleent u specifieke rechten. Maar afhankelijk van waar u
bent, beschikt u mogelijk ook over andere rechten.
33
belkin.com
Belkin Corporation
501 West Walnut Street
Compton • CA • 90220-5221 • USA
Tel: +1 310 898 1100
Fax: +1 310 898 1111
Belkin Components, Ltd.
Express Business Park • Shipton Way
Rushden • NN10 6GL • Verenigd Koninkrijk
Tel: +44 (0) 1933 35 2000
Fax: +44 (0) 1933 31 2000
Belkin Components B.V.
Boeing Avenue 333
1119 PH Schiphol-Rijk • Nederland
Tel: +31 (0) 20 654 7300
Fax: +31 (0) 20 654 7349
Belkin Components GmbH
Hanebergstrasse 2
80637 München • Duitsland
Tel: +49 (0) 89 143405 0
Fax: +49 (0) 89 143405 100
Belkin Components SAS
5 Rue du Petit Robinson • 3ème étage
78350 Jouy en Josas • Frankrijk
Tel: +33 (0) 1 34 58 14 00
Fax: +33 (0) 1 39 46 62 89
Belkin Ltd.
7 Bowen Cresent • West Gosford
NSW 2250 • Australië
Tel: +61 (0) 2 4372 8600
Fax: +61 (0) 2 4372 8603
Belkin technische ondersteuning
Europa: 00 800 223 55 460
USA: 877 736 5771
P74341ea
© 2004 Belkin Corporation. Alle rechten voorbehouden. Alle handelsnamen zijn gedeponeerde handelsmerken
van de betreffende rechthebbenden. Mac, Mac OS, AppleTalk, Apple en Airport zijn handelsmerken van Apple
Computer, Inc., die gedeponeerd zijn in de Verenigde Staten en in andere landen.
Punto de acceso
a la red inalámbrico
Manual del usuario
F5D6130
ÍNDICE DE CONTENIDOS
Introducción . . . . . . . . . . . . . . . . . . . . . . . . . . . . . . . . . . . . . . . . . . 1
Características principales . . . . . . . . . . . . . . . . . . . . . . . . . . . . . . . . . .2
Contenido del paquete . . . . . . . . . . . . . . . . . . . . . . . . . . . . . . . . .3
Gestión opcional . . . . . . . . . . . . . . . . . . . . . . . . . . . . . . . . . . . . .3
Requisitos de software
. . . . . . . . . . . . . . . . . . . . . . . . . . . . . . . .3
Requisitos del sistema . . . . . . . . . . . . . . . . . . . . . . . . . . . . . . . . .3
Especificaciones . . . . . . . . . . . . . . . . . . . . . . . . . . . . . . . . . . . . .4
Cómo entender su punto de acceso . . . . . . . . . . . . . . . . . . . . . . . . . . . .5
Emplazamiento de su punto de acceso . . . . . . . . . . . . . . . . . . . . . . . . .7
Instalación rápida . . . . . . . . . . . . . . . . . . . . . . . . . . . . . . . . . . . . . . .8
Paso 1: Conecte el PA a un enrutador, conmutador ethernet o
concentrador. . . . . . . . . . . . . . . . . . . . . . . . . . . . . . . . . .8
Paso 2: Instale el asistente de localización . . . . . . . . . . . . . . . . . . .9
Cómo usar el asistente de localización para configurar el PA . . . . . . . . . .11
Cómo configurar la red inalámbrica . . . . . . . . . . . . . . . . . . . . . . . . . . .15
Resolución de problemas . . . . . . . . . . . . . . . . . . . . . . . . . . . . . . . . .29
Información . . . . . . . . . . . . . . . . . . . . . . . . . . . . . . . . . . . . . . . . . .30
INTRODUCCIÓN
Gracias por adquirir el punto de acceso a la red inalámbrico 54g de Belkin
(PA) y bienvenido al mundo de la interconexión en red inalámbrica. Ahora
puede sacar partido de esta novedosa y magnífica tecnología y conseguir la
libertad que necesita en su oficina o en su hogar sin la utilización de cables.
El PA actúa como un puente entre su red por cable existente y sus
ordenadores de equipamiento inalámbrico. La fácil instalación y configuración
le permitirá la creación de una red inalámbrica en pocos minutos. Asegúrese
de leer el presente manual completamente con el fin de sacar el mayor partido
posible a su AP.
1
INTRODUCCIÓN
Características principales
Amplia área de cobertura a alta velocidad
El PA de Belkin ofrece una cobertura de hasta 300 pies (90m) de radio en el
interior y una cobertura de más de 1.500 (450m) pies de radio en el exterior.
Encriptación de hasta 128 bits
Su PA de Belkin es capaz de encriptar (codificar) las ondas de radioemisión
transmitidas para garantizarle la seguridad de sus datos. La opción de
encriptación le permite encriptar a 64 o 128 bits utilizando una clave que
introduce usted mismo.
Filtrado de direcciones MAC
Para lograr una seguridad adicional, puede configurar una lista de direcciones
MAC (identificadores exclusivos de los clientes) que dispongan de permiso para
acceder a su red. Cada ordenador cuenta con su propia dirección MAC.
Simplemente deberá introducir dichas direcciones MAC en una lista utilizando
la interfaz de usuario a través de Internet y podrá controlar el acceso a su red.
Funciona tanto con PCs como con ordenadores Mac®
El punto de acceso es válido para varios entornos de network como Mac OS® 8.x,
9.x, X v10.x, AppleTalk®, Linux®, Windows® 95, 98, Me, NT®, 2000 y XP, entre otros.
Atención: El punto de acceso puede gestionarse desde un navegador sin necesidad
del software. El software es válido solamente para Windows 98 SE, Me, 2000 y XP
pero no es necesario usar el punto de acceso.
Interfaz de usuario avanzada mediante el navegador de Internet
Puede configurar de forma sencilla las funciones avanzadas del PA a través de
su navegador de Internet, sin necesidad de instalar software adicional en su
ordenador. No es preciso instalar discos y, lo que es aún mejor, puede efectuar
cambios y llevar a cabo funciones de configuración desde cualquier ordenador
de la red de forma rápida y sencilla.
Aplicaciones y ventajas
• Conecte múltiples ordenadores inalámbricos a una red inalámbrica de
manera económica
• Necesidades de la interconexión en red para SOHO (Oficina pequeña /
oficina en casa)
• Permite la rápida y sencilla instalación de las redes pequeñas que necesitan
los usuarios de SOHO.
2
INTRODUCCIÓN
Contenido del paquete
• Punto de acceso inalámbrico a la red de Belkin
• Fuente de alimentación
• CD del software
• Manual del usuario
• Tarjeta de registro
Requisitos opcionales para la gestión del software
• Windows® 98SE, Me, 2000 o XP
• Un mínimo de 64MB de RAM
Requisitos del sistema
• Por lo menos un ordenador con protocolo de red TCP/IP instalado
• Cable de interconexión en red CAT5 (o superior)
• Microsoft® Internet Explorer 4.0 o posterior, o Netscape® 4.0 o posterior
3
INTRODUCCIÓN
Especificaciones
Estándares:
Ethernet IEEE 802.3 10Base-T /Ethernet 100 Base-Tx
IEEE 802.11b
Inalámbrico:
Tecnología de radioemisión Espectro extendido de secuencia directa (DSSS,
Direct Sequence Spread Spectrum)
802.11b: 11, 5.5, 2, 1Mbps
802.11b: CCK, DQPSK, DBPSK
Banda ISM de 2.412-2.497GHz
802.11b: 11 para América del Norte, 14 para Japón, 13 para Europa
WEP de 64/128 bits
Protocolos soportados:
CSMA/CD, TCP, IP, UDP y DHCP (cliente)
Gestión:
Mediante navegador
Número máximo de usuarios:
32 (WLAN)
Puertos:
1 puerto RJ45 10Base-T /100Base-Tx
1 toma de alimentación
1 botón de reinicio
LEDs (diodos electro-luminiscentes):
Alimentación
Actividad LAN
Actividad WLAN
4
CÓMO ENTENDER SU PUNTO DE ACCESO
El PA ha sido diseñado para ser colocado sobre un escritorio en posición
vertical u horizontal, o para ser montado en la pared. Su diseño plano
minimiza el espacio requerido en el escritorio cuando se coloca de forma
vertical. Todos los cables salen de la parte posterior del PA para lograr una
mejor organización y utilidad. Los indicadores LED se encuentran fácilmente
visibles en la parte frontal del PA para proporcionarle información acerca de
la actividad y del estado de la red.
Indicador LED
de LAN (red)
Panel frontal
Indicador LED de LAN
inalámbrica
LED de Encendido/Listo
indica que el PA está recibiendo
alimentación eléctrica
Apagado
El PA está apagado
Rojo
El PA está listo
Indicador LED de
Encendido/Listo
LED de LAN inalámbrica
Apagado
La red de interconexión inalámbrica está apagada.
Verde parpadeante
Indica que el PA está en funcionamiento
LED de LAN (red)
Apagado
No hay ninguna red conectada al puerto
Verde
Dispositivo 10Base-T conectado
Naranja
Dispositivo 100Base-Tx conectado
Parpadeante
(naranja o verde)
Actividad del puerto
Panel posterior
Toma de
alimentación
eléctrica
Puerto LAN RJ-45
5
CÓMO ENTENDER SU PUNTO DE ACCESO
Toma de alimentación
Conecte a esta toma la fuente de alimentación de 5V CC adjunta.
Toma Ethernet RJ45
Conecte un cable Ethernet a esta toma y también a un puerto abierto RJ45
10Base-T o 100Base-T de un conmutador, concentrador o enrutador.
Botón de reinicio
El botón de “Reset” (Reinicio) se emplea en casos excepcionales cuando el PA
puede estar funcionando mal. Al reiniciar el PA se restablecerá el
funcionamiento normal del mismo manteniendo las configuraciones
programadas. También puede restablecer las configuraciones de fábrica por
defecto utilizando el botón de reinicio. Emplee la función de restablecimiento
en casos como cuando haya olvidado su contraseña personal.
a. Reinicio del PA
Pulse y suelte el botón de reinicio. Las luces del PA se iluminarán
momentáneamente. La luz de Encendido/Listo comenzará a parpadear. Cuando
la luz de Encendido/Listo obtenga de nuevo un color permanente, el reinicio
se habrá completado.
b. Restablecimiento de las configuraciones de fábrica por defecto
Pulse y mantenga pulsado el botón de reinicio durante cinco segundos y
suéltelo después. Las luces del PA se iluminarán momentáneamente. La luz de
Encendido/Listo comenzará a parpadear. Cuando la luz de Encendido/Listo
obtenga de nuevo un color permanente, el restablecimiento se habrá
completado.
Antena rotatoria dipolar
Dos antenas unidireccionales de dos polos están situadas en la parte lateral
del PA. Las antenas pueden girar 180 grados. Las antenas deberán estar
orientadas en posición vertical para un mejor rendimiento.
6
EMPLAZAMIENTO DE SU PUNTO DE ACCESO
La colocación adecuada de su PA es muy importante para garantizar un
rendimiento óptimo de su red inalámbrica. Habitualmente, el PA inalámbrico
proporciona un área de cobertura circular de 300 pies (91m) o más. Sin
embargo, los diferentes tipos de materiales de construcción y otras
obstrucciones presentes en un edificio, pueden afectar en gran medida a la
señal inalámbrica y reducir su ámbito de acción. Si puede ser, coloque su PA
lo más cerca posible del centro de la área que desee cubrir. En las casas con
varias plantas, coloque el PA en el piso más cercano posible al centro de la
casa; esto puede implicar la colocación del PA en uno de los pisos superiores.
Tome precauciones para la selección de una ubicación para su PA
• Tenga en cuenta los aparatos u objetos de gran tamaño, como un
frigorífico o una lavadora/secadora, que puedan estar colocados en la
pared opuesta al lugar de colocación del PA.
• Coloque el PA sobre un escritorio y alejado de armarios de metal y
carcasas de ordenador.
• No coloque objetos o piezas encima del PA.
• Asegúrese de que la antena esté orientada hacia ARRIBA en todo momento.
• El tintado de ventanas contra radiaciones ultravioletas de base metálica
puede afectar al rendimiento inalámbrico. No coloque el PA junto a una
ventana tintada.
Somos conscientes de que en circunstancias normales, a veces no es posible
colocar el PA en el centro de su área de cobertura. En lo casos en los que
tenga dificultades a la hora de cubrir el área completa que desea, pruebe a
colocar el PA en la posición más elevada posible. Los dispositivos
inalámbricos funcionan mejor en una situación de línea de visión en la que no
existan obstáculos entre el ordenador inalámbrico y el PA. Asimismo, el PA
puede montarse en la pared con las antenas orientadas hacia ARRIBA. Existen
otras opciones para ampliar su área de cobertura inalámbrica. Visite la página
http://www.belkin.com/networking para buscar posibles soluciones.
La señal inalámbrica puede verse afectada por muchos elementos, incluyendo
redes inalámbricas cercanas, hornos microondas en funcionamiento y teléfonos
inalámbricos de 2,4GHz. Si bien estos elementos pueden afectar al rendimiento
de la red, su red inalámbrica funcionará habitualmente de forma óptima en la
mayoría de situaciones en las que estén presentes dichos dispositivos.
7
INSTALACÓN RÁPIDA
El PA está configurado en fábrica para operar de forma correcta "out-of-thebox" (instalación automática) Simplemente con conectar el PA a la red
existente se añadirán a su network opciones inalámbricas de forma
instantánea cuando no se necesiten configuraciones ulteriores. Belkin envía
software que le permitirá localizar y conectarse al punto de acceso de su
network de modo que podrá modificar las configuraciones si así lo desea.
Antes de que pueda usar el software, debe instalar físicamente el punto de
acceso. Una vez instalado el PA, ya puede utilizar el software para modificar
las configuraciones. Siga los pasos que se indican a continuación para instalar
su PA .
Paso 1: Conecte el PA a un enrutador, conmutador ethernet o concentrador.
Compruebe el contenido de la caja. Deberá contener los siguientes elementos:
• Punto de acceso inalámbrico a la red de Belkin
• Fuente de alimentación
• CD del software
• Manual del usuario
• Tarjeta de registro
1. Seleccione un lugar apropiado para su PA, tal y como se describe en la
sección previa de este manual.
2. Conecte un cable CAT5 entre el PA y el puerto LAN de su enrutador,
conmutador ethernet o concentrador. Conecte la fuente de alimentación al
PA insertando el enchufe redondo DC en la toma DC del PA. Enchufe la
fuente de alimentación en la pared. Compruebe que el LED (POWER) de
encendido y el LED de vínculo (LINK) se encuentren iluminados. Si ambos
LEDs se encuentran iluminados, esto indica que el PA está conectado
correctamente.
3. La conexión y colocación de su PA se han completado.
8
INSTALACÓN RÁPIDA
Paso 2: Instale el asistente de localización
El asistente de localización es una herramienta útil para localizar y conectar su
PA. El asistente de localización sólo es necesario si desea realizar cambios en las
configuraciones del PA, de otro modo el PA funcionará "out-of- the-box"
(instalación automática) en la mayoría de los casos. Desde que el PA se envía
desde fábrica hasta el cliente DHCP, obtendrá una dirección IP desde el servidor
de DHCP de su network de forma automática. Como esta dirección es en cierto
modo aleatoria , el asistente de localización ubicará el PA en el network de modo
que no tenga que seguir pasos adicionales para determinar la dirección IP del PA.
1. Inserte el CD en su unidad de CD-ROM.
2. La pantalla de Utilidad de la Instalación del Punto de Acceso del Network
Inalámbrico de Belkin aparecerá de manera automática. Si no aparece en
un plazo de 15-20 segundos, seleccione su unidad de CD-ROM y haga doble
clic sobre la carpeta con el nombre “Files” (Archivos). A continuación,
haga doble clic sobre el icono denominado “start.exe”.
3. En la ventana de menú, desplace el ratón hasta el botón “Install”
(Instalar) y después seleccione “Click here” (Hacer clic aquí) para iniciar el
programa de instalación del software.
9
INSTALACÓN RÁPIDA
4. El asistente de instalación del software entrará en funcionamiento. Haga
clic en "Next" (Siguiente) en la primera pantalla.
5. Acepte el acuerdo de usuario y haga clic en “Next” (Siguiente) mientras
sigue los pasos que le va marcando el asistente para la instalación. Haga
clic en "Next" (Siguiente) en la última pantalla.
6. El asistente de localización ya está instalado. Continue hasta la próxima
sección para aprender a utilizar el asistente.
10
CÓMO USAR EL ASISTENTE DE LOCALIZACIÓN PARA CONFIGURAR EL PA
1. Después de haber instalado el asistente de localización, verá un icono
en el escritorio. Haga doble clic sobre este icono para abrir el asistente.
2. Cuando active el asistente, verá la palabra "Scanning" (Escaneando)
Esto significa que el asistente está buscando los puntos de acceso en su red.
3. Cuando el asistente encuentra los puntos de acceso, el nombre de los mismos
aparecerá en la pantalla. Haga clic en el nombre del punto de acceso.
4. Haga clic en “Connect” (Conectar). De este modo el navegador se iniciará.
11
CÓMO USAR EL ASISTENTE DE LOCALIZACIÓN PARA CONFIGURAR EL PA
5. Verá la página de ingreso de su PA en la ventana de su navegador. El PA
efectúa el envío sin necesidad de introducir contraseña. En la pantalla de
acceso, deje la contraseña en blanco y haga clic en el botón “Submit”
(Enviar) para acceder.
6. Ya está conectado al PA y puede realizar los cambios que desee. Véase la
próxima sección de este manual para aprender a utilizar la interfaz.
Salida del PA
Sólo puede acceder al PA un ordenador cada vez con el fin de efectuar
cambios en las configuraciones del mismo. Una vez que el usuario ha accedido
para efectuar cambios, existen dos formas de hacer salir al ordenador del
sistema. Al hacer clic sobre el botón “Logout” (Salir), el ordenador saldrá del
sistema. El segundo método es automático. El acceso tendrá un límite de
tiempo y se desactivará transcurrido un periodo de tiempo especificado. El
tiempo por defecto de permanencia es de 10 minutos. Este plazo puede ser
modificado desde 1 a 99 minutos. Para obtener más información, consulte la
sección “Changing the Login Timeout Setting” (Modificación de las
configuraciones del tiempo límite de acceso) del presente manual.
12
CÓMO USAR EL ASISTENTE DE LOCALIZACIÓN PARA CONFIGURAR EL PA
Cómo entender la interfaz del usuario del punto de acceso
La página principal es la primera página que podrá ver cuando acceda a la
Interfaz de usuario avanzada (UI, User Interface). La página principal le
ofrece una imagen rápida del estado y las configuraciones del PA. Desde esta
página es posible acceder a todas las páginas de configuración avanzada.
(2) (3) (4)
(5)
(1)
(6)
(7)
(1) Vínculos de navegación rápida
Puede ir directamente a cualquiera de las páginas de la UI avanzada del PA
haciendo clic directamente en estos vínculos. Los vínculos se encuentran
divididos en categorías lógicas y agrupados por pestañas para facilitar la
búsqueda de una configuración concreta. Al hacer clic sobre el
encabezamiento de color morado de cada pestaña aparecerá una breve
descripción de la función de la misma.
(2) Botón de Inicio (“Home”)
El botón de Inicio se encuentra disponible en todas las páginas de la UI. Al
pulsar este botón, regresará a la página principal o de inicio.
(3) Botón de Ayuda (“Help”)
El botón de Ayuda (“Help”) le proporciona el acceso a las páginas de ayuda
del PA. La opción de ayuda se encuentra disponible asimismo en muchas
páginas haciendo clic en la opción “more info” (más información) situada
junto a determinadas secciones de cada página.
13
CÓMO USAR EL ASISTENTE DE LOCALIZACIÓN PARA CONFIGURAR EL PA
(4) Botón de “Login”/“Logout” (Acceder/Salir)
Este botón le permite acceder y salir del PA pulsando un botón. Cuando ha
accedido al PA, este botón mostrará la palabra “Logout” (Salir). El acceso al
PA le llevará a una página independiente de acceso en la que será preciso
introducir una contraseña. Cuando haya accedido al PA podrá efectuar cambios
en las configuraciones. Cuando haya terminado de realizar los cambios, podrá
salir del PA haciendo clic sobre el botón de “Logout” (Salir). Para obtener más
información acerca del acceso al PA, consulte la sección “Logging into the
AP” (Acceso al PA).
(5) Información sobre la versión
Muestra la versión del firmware, la versión del código de arranque, la versión
del hardware y el número de serie del PA.
(6) Configuraciones LAN (“LAN Settings”)
Le muestra las configuraciones del Local Area Network (LAN, Red de área
local) del PA. Es posible efectuar cambios en las configuraciones haciendo clic
en cualquiera de los vínculos (“IP Address” [dirección IP], “Subnet Mask”
[Máscara de subred], “DHCP Server” [Servidor DHCP]) o haciendo clic en el
vínculo de navegación rápida “LAN” de la parte izquierda de la pantalla.
(7) Inalámbrico
Muestra el estado de las configuraciones inalámbricas del PA. Es posible
efectuar cambios en las configuraciones haciendo clic en cualquiera de los
vínculos o haciendo clic en los vínculos de “Quick Navigation” (Navegación
rápida) de la parte izquierda de la pantalla.
14
CÓMO CONFIGURAR LA RED INALÁMBRICA
La pestaña “Wireless” (Inalámbrico) le permite realizar cambios en las
configuraciones de red inalámbrica. Desde esta pestaña puede efectuar
cambios en el nombre de red inalámbrica (SSID), en el canal de
funcionamiento y en los ajustes de seguridad en la encriptación.
Configuraciones IP
15
CÓMO CONFIGURAR LA RED INALÁMBRICA
Cómo modificar el canal inalámbrico
Auto: Existe una serie de canales de funcionamiento entre los que puede
seleccionar. En Estados Unidos, existen 11 canales. En Reino Unido y la mayor
parte de Europa, existen 13 canales. Un pequeño número de países presentan
otros requisitos respecto a los canales. Su PA está configurado para operar en
los canales adecuados al país en el que reside. El canal por defecto es el
número 11 (a no ser que se encuentre en un país en el que no haya un canal
11) Este canal puede modificarse en caso necesario. Si existen otras redes
inalámbricas operando en su área, su red deberá ser configurada para
funcionar en un canal diferente que el resto de redes inalámbricas. Para lograr
un mejor rendimiento, utilice un canal que se encuentre al menos a cinco
canales de distancia del de la otra red inalámbrica. Por ejemplo, si la otra red
está funcionando en el canal 11, configure su red en el canal 6 o inferior.
Para modificar el canal, selecciónelo de la lista desplegable. Haga clic sobre
“Apply Changes” (Aplicar cambios). La modificación es inmediata.
16
CÓMO CONFIGURAR LA RED INALÁMBRICA
Cómo modificar el nombre de red inalámbrica (SSID)
Para identificar su red inalámbrica, se emplea el nombre conocido como SSID
("Service Set Identifier", Identificador del conjunto de servicios). La PA por
defecto SSID es "WLAN". Puede cambiar este nombre por el que desee o puede
dejarlo sin modificar. Si existen otras redes inalámbricas operando en su área,
deberá asegurarse de que que su SSID sea exclusivo (no coincida con el de otra
red inalámbrica en la zona). Para modificar el SSID, introduzca el SSID que
desee usar el campo SSID (1) y haga clic en “Apply Changes” (Aplicar cambios)
(2). La modificación es inmediata. Si modifica el SSID, es posible que sus
ordenadores de equipamiento inalámbrico deban ser configurados de nuevo con
su nuevo nombre de red. Consulte la documentación de su adaptador de red
inalámbrica para obtener información acerca de cómo realizar este cambio.
(1)
(2)
Empleo de la propiedad de emisión SSID
Atención: Esta característica avanzada deberá ser empleada exclusivamente por
usuarios avanzados.
Para garantizar la seguridad, puede optar por no emitir el SSID de su red. Al
hacerlo así, mantendrá su nombre de red oculto a los ordenadores que estén
rastreando la presencia de redes inalámbricas. Para apagar la emisión del SSID,
retire la marca del recuadro situado junto a “Broadcast SSID” (Emitir SSID) y
después haga clic en “Apply Changes” (Aplicar cambios). La modificación es
inmediata. Ahora será preciso configurar cada ordenador para conectar con su
SSID específico; ya no se aceptará la opción “ANY” (Cualquiera) para el SSID.
Consulte la documentación de su adaptador de red inalámbrica para obtener
información acerca de cómo realizar esta modificación.
Modificación de las configuraciones de encriptación inalámbrica
Su PA está equipado con la seguridad estándar WEP La seguridad inalámbrica está
desactivada por defecto. Para activar la seguridad, siga los pasos de esta sección.
17
CÓMO CONFIGURAR LA RED INALÁMBRICA
Cómo configurar la encriptación WEP usando una "Passphrase" (frase de paso)
Nota para los usuarios de Mac: La opción de “Passphrase” no funcionará con
Apple® AirPort®. Para configurar la encriptación de su ordenador Mac, establezca
la misma utilizando el método manual descrito en la siguiente sección.
1. Seleccione “128-bit automatically” (128 bits automáticamente) o “64-bit
automatically” (64 bits automáticamente) del menú desplegable.
2. Introduzca una “passphrase” . Una frase de paso es similar a una contraseña.
Puede estar compuesta por una mezcla de números y letras. Una vez
introducida su frase de paso, haga clic en “Generate” (Generar). Al hacer clic
en “Generate”, se cumplimentarán los campos inferiores de las claves.
Atención: La encriptación de 64 bits generará cuatro claves y la encriptación de 128
bits generará sólo una clave. Seleccione la clave que desea utilizar haciendo clic en el
botón situado junto a la misma. Haga clic sobre “Apply Changes” (Aplicar cambios).
3. En este momento estará establecida la encriptación en el PA. Cada ordenador
de su red inalámbrica deberá ser configurado ahora con la misma “passphrase”
(frase de paso). Consulte la documentación de su adaptador de red inalámbrica
para obtener información acerca de cómo realizar esta modificación.
18
CÓMO CONFIGURAR LA RED INALÁMBRICA
Establecimiento de la encriptación de modo manual utilizando una
clave hexadecimal
Una clave hexadecimal es una mezcla de números y letras de la A a la F y del
0 al 9. Las claves de 64 bits son cinco cifras de 2 dígitos. Las claves de 128
bits son 13 cifras de 2 dígitos.
Por ejemplo:
AF 0F 4B C3 D4 = clave de 64 bits
C3 03 0F AF 0F 4B B2 C3 D4 4B C3 D4 E7 = clave de 128 bits
En los cuadros presentados a continuación, podrá componer su clave
introduciendo dos caracteres entre de A a F y de 0 a 9. Utilizará esta clave
para programar los ajustes de encriptación de su PA y de sus ordenadores
inalámbricos.
Nota para los usuarios de Mac: Los productos originales Apple AirPort soportan
exclusivamente la encriptación de 64 bits. Los productos Apple AirPort 2 soportan
la encriptación de 64 o de 128 bits. Compruebe qué versión del producto está
utilizando. Si no puede configurar su red con una encriptación de 128 bits, pruebe
con una encriptación de 64 bits.
1. Seleccione “64-bit manually” (64 bits manualmente) o “128-bit manually”
(128 bits manualmente) del menú desplegable.
19
CÓMO CONFIGURAR LA RED INALÁMBRICA
2. Si emplea una encriptación de 64 bits, habrá cuatro campos para claves. Si
emplea una encriptación de 128 bits, habrá un campo para clave.
Introduzca la(s) clave(s) hexadecimal(es) que desee emplear en el(los)
campo(s) para claves. Cuando haya terminado de introducir sus claves,
seleccione la que desea utilizar haciendo clic en el botón situado junto a
la misma. Haga clic sobre “Apply Changes” (Aplicar cambios).
3. En este momento estará establecida la encriptación en el PA. Cada
ordenador de su red inalámbrica deberá ser configurado ahora con la misma
clave hexadecimal. Consulte la documentación de su adaptador de red
inalámbrica para obtener información acerca de cómo realizar esta
modificación.
Configuración del filtrado de direcciones MAC
El filtro de direcciones MAC es una potente característica de seguridad que le
permite especificar qué ordenadores están permitidos en el punto de acceso.
Se denegará el acceso a cualquier ordenador que no esté en la lista.
Para activar el filtro de direcciones MAC
1. Marque el recuadro “Enable MAC Address Filtering” (Activar el filtrado de
direcciones MAC) (1).
2. Introduzca las direcciones MAC del ordenador al que desa dar acceso al network
3. Haga clic en "Add" (2) para añadir la dirección a la lista.
4. Repita el mismo proceso para cada ordenador que desee añadir a la lista.
5. Haga clic sobre “Apply Changes” (Aplicar cambios).
(1)
(2)
20
CÓMO CONFIGURAR LA RED INALÁMBRICA
Lista de clientes
Puede visualizar la lista de clientes que están asociados actualmente con el
PA utilizando la capacidad de "Client List" (Lista de clientes). Será presentado
con la dirección MAC del cliente y con la velocidad con la que está conectado.
Configuraciones avanzadas
Belkin le proporciona varias funciones avanzadas que puede configurar. Se
recomienda que no se hagan cambios a estas configuraciones a no ser por un
motivo específico, con la excepción del nombre del PA. Desde la página de
configuraciones avanzadas, puede hacer lo siguiente:
• Cambie el nombre del PA (para identificar el PA en su network
unívocamente)
• Seleccione la velocidad básica establecida (1, 2Mbps o 1, 2, 5.5, 11Mbps)
• Seleccione la velocidad de transmisión (Auto, 11Mbps, 5.5Mbps, 2Mbps, 1Mbps)
• Configure el umbral RTS
• Configure el umbral de fragmentación RTS
• Seleccione el tipo de preámbulo (largo o corto)
Cuando realice algún cambio, asegúrese de que hace clic en "Apply Changes"
(Aplicar cambios) para que éstos se produzcan.
Utilidades
Esta pantalla le permite gestionar diferentes parámetros del PA y llevar a cabo
determinadas funciones administrativas.
Cómo reiniciar el PA
Algunas veces es posible que sea necesario reiniciar el PA en caso de que
comience a funcionar de modo incorrecto. Al reiniciar el PA NO se borrará
ninguno de sus ajustes de configuración.
21
CÓMO CONFIGURAR LA RED INALÁMBRICA
Cómo reinicio del PA para restablecer el funcionamiento normal
1. Haga clic en el botón “Restart AP” (Reiniciar PA).
2. Aparecerá el siguiente mensaje. Haga clic en “OK” (Aceptar).
3. Aparecerá el siguiente mensaje. El reinicio del PA puede conllevar hasta 60
segundos. Es importante no apagar la alimentación del PA durante el reinicio.
4. Aparecerá en pantalla una cuenta atrás de 30 segundos. Cuando la cuenta
atrás llegue a cero, el PA se habrá reiniciado. La página principal del PA
deberá aparecer automáticamente. En caso contrario, introduzca la dirección
del PA (por defecto = 192.168.2.254) en la barra de su navegador.
Restablecimiento de las configuraciones de fábrica por defecto
El empleo de esta opción restablecerá las configuraciones (por defecto) de
fábrica del PA. Se recomienda que realice una copia de seguridad de sus
configuraciones antes de restablecerlas por defecto.
22
CÓMO CONFIGURAR LA RED INALÁMBRICA
1. Haga clic en el botón “Restore Defaults” (Restablecer configuraciones por
defecto).
2. Aparecerá el siguiente mensaje. Haga clic en “OK” (Aceptar).
3. Aparecerá el siguiente mensaje. El restablecimiento de las configuraciones por
defecto implica asimismo el reinicio del PA. Esto puede conllevar hasta 60
segundos. Es importante no apagar la alimentación del PA durante el reinicio.
4. Aparecerá en pantalla una cuenta atrás de 30 segundos. Cuando la cuenta
atrás llegue a cero, habrán sido restablecidas las configuraciones por
defecto del PA. La página principal del PA deberá aparecer
automáticamente. En caso contrario, introduzca la dirección del PA (por
defecto = 192.168.2.1) en la barra de su navegador.
Cómo guardar la configuración actual
Puede guardar su configuración actual utilizando esta propiedad. Guardar su
configuración le permitirá restablecerla posteriormente en caso de que sus
configuraciones se pierdan o se modifiquen. Se recomienda realizar una copia de
seguridad de su configuración actual antes de llevar a cabo una actualización
del firmware.
23
CÓMO CONFIGURAR LA RED INALÁMBRICA
1. Haga clic en “Connect” (Conectar). Se abrirá una ventana llamada “File
Download” (Descarga de archivos). Haga clic en “Save” (Guardar).
2. Se abrirá una ventana que le permitirá seleccionar la ubicación en la que
desea guardar el archivo de configuración. Seleccione una ubicación. Puede
dar al archivo el nombre que quiera o utilizar el nombre por defecto
“Config”. Asegúrese de dar un nombre al archivo que le permita encontrarlo
más tarde. Cuando haya seleccionado la ubicación y el nombre del archivo,
haga clic en “Save” (Guardar).
La configuración ha sido guardada.
24
CÓMO CONFIGURAR LA RED INALÁMBRICA
3. Cuando el proceso de almacenamiento se haya completado, verá la
siguiente ventana. Haga clic en “Close” (Cerrar).
Restablecimiento de la configuración anterior
Esta opción le permitirá restablecer una configuración guardada anteriormente.
1. Haga clic en “Connect”
(Conectar). Se abrirá una
ventana que le permitirá
seleccionar la ubicación
del archivo de
configuración. Todos los
archivos de configuración
presentan la extensión
“.bin”. Localice el archivo
de configuración que
desea restablecer y haga
doble clic sobre él.
25
CÓMO CONFIGURAR LA RED INALÁMBRICA
2. Se le preguntará si desea continuar. Haga clic en “OK” (Aceptar).
3. Aparecerá una ventana de aviso. El restablecimiento de la configuración
conllevará un máximo de 60 segundos. Haga clic en “OK” (Aceptar).
4. Aparecerá en pantalla una cuenta atrás de 60 segundos. Cuando la cuenta
atrás llegue a cero, habrán sido restablecidos las configuraciones por
defecto del PA. La página principal del PA deberá aparecer
automáticamente. En caso contrario, introduzca la dirección del PA (por
defecto = 192.168.2.254) en la barra de su navegador.
Actualización del firmware
De vez en cuando, es posible que Belkin publique nuevas versiones del
firmware del PA. Las actualizaciones del firmware contienen mejoras en las
propiedades y soluciones para los problemas que puedan haber existido.
Cuando Belkin publique un nuevo firmware, podrá descargarlo de la página
web de actualizaciones de Belkin y así instalar la última versión del firmware
de su PA.
26
CÓMO CONFIGURAR LA RED INALÁMBRICA
(1)
Actualización del firmware del PA
1. En “Firmware Update” (Actualización del firmware), haga clic en “Browse”
(Examinar)(1). Se abrirá una ventana que le permitirá seleccionar la
ubicación del archivo de actualización del firmware. Todos los archivos de
firmware presentan la extensión “.dlf”.
2. Navegue hasta llegar al archivo de firmware descargado. Seleccione el
archivo haciendo doble clic en el nombre del mismo.
27
CÓMO CONFIGURAR LA RED INALÁMBRICA
3. El recuadro “Update Firmware” (Actualizar firmware) mostrará ahora la
ubicación y el nombre del archivo de firmware que acaba de seleccionar.
Haga clic en “Update” (Actualizar).
4. Se le preguntará si está seguro de que desea continuar. Haga clic en “OK”
(Aceptar).
5. Verá un mensaje más. Este mensaje le indica que es posible que el PA no
responda durante un minuto, ya que el firmware se carga en el PA y éste
último está reiniciado. Haga clic en “OK” (Aceptar).
Aparecerá una cuenta atrás de 30 segundos en la pantalla. Cuando la cuenta
atrás llegue a cero, la actualización del firmware del PA se habrá completado.
La página principal del PA deberá aparecer automáticamente.
Modificación de las configuraciones del sistema
La página “System Settings” (Configuraciones del sistema) es en donde podrá
introducir una nueva contraseña de administrador, establecer la zona horaria,
activar la gestión a distancia y encender y apagar la función NAT del PA.
28
CÓMO CONFIGURAR LA RED INALÁMBRICA
Configuración o modificación de la contraseña del administrador
El PA efectúa el envío sin necesidad de introducir contraseña. Si desea añadir
una contraseña para disfrutar de una mayor seguridad, puede establecerla
aquí. Escriba su contraseña y guárdela en un lugar seguro, ya que la
necesitará si precisa acceder al PA en el futuro. Se recomienda asimismo que
establezca una contraseña si prevé utilizar la capacidad de gestión a distancia
de su PA.
29
RESOLUCIÓN DE PROBLEMAS
Podrá encontrar información de asistencia técnica en las páginas
networking.belkin.com o www.belkin.com a través del área de asistencia
técnica. Si desea ponerse en contacto con la asistencia técnica a través del
teléfono, llame al 00 800 223 55 460.
30
INFORMACIÓN
Normativa FCC (Comisión federal para la comunicación)
DECLARACIÓN DE CONFORMIDAD CON LAS NORMATIVAS DE LA FCC SOBRE
COMPATIBILIDAD ELECTROMAGNÉTICA
Nosotros, Belkin Corporation, con sede en 501 West Walnut Street, Compton, CA 90220
(EEUU), declaramos bajo nuestra sola responsabilidad que el producto
F5D6130
al que hace referencia la presente declaración
cumple con la sección 15 de las normativas de la FCC. La operación está bajo las siguientes dos
condiciones: (1) este dispositivo no debe provocar interferencias nocivas y (2) este dispositivo debe
aceptar cualquier interferencia recibida, incluidas las interferencias que puedan provocar un
funcionamiento no deseado.
Advertencia: Exposición a las radiaciones de radiofrecuencia.
La energía de salida emitida por este dispositivo se encuentra muy por debajo de los límites de
exposición a radiofrecuencias de la FCC. En todo caso, el dispositivo será empleado de tal forma
que se minimice la posibilidad de contacto humano durante el funcionamiento normal.
Cuando se conecta una antena externa al dispositivo, dicha antena deberá ser colocada de tal
manera que se minimice la posibilidad de contacto humano durante el funcionamiento normal.
Con el fin de evitar la posibilidad de superar los límites de exposición a radiofrecuencias
establecidos por la FCC, la proximidad del ser humano a la antena no deberá ser inferior a los
20 cm (8 pulgadas) durante el funcionamiento normal.
Declaración sobre interferencias de la Federal Communications
Commission (FCC, Comisión de comunicaciones de EEUU)
Las pruebas realizadas con este equipo dan como resultado el cumplimiento con los límites
establecidos para un dispositivo digital de la clase B, de acuerdo a la sección 15 de las
normativas de la FCC. Los límites se establecen con el fin de proporcionar una protección
razonable contra interferencias nocivas en zonas residenciales.
Este equipo genera, emplea y puede irradiar energía de radiofrecuencias. Si no se instala y se
emplea de acuerdo con las instrucciones, puede causar interferencias nocivas para la recepción de
radio y televisión, las cuales se pueden determinar encendiendo y apagando seguidamente el
dispositivo. El propio usuario puede intentar corregir dichas interferencias tomando una o más de
las siguientes medidas:
• Reorientar o colocar en otro lugar la antena de recepción.
• Aumentar la distancia entre el equipo y el receptor.
• Conectar el equipo a la toma de un circuito distinto de aquel al que está conectado el receptor.
• Solicitar la ayuda del vendedor o de un técnico experto en radio / televisión.
Modificaciones
El FCC requiere que el usuario sea notificado de que cualquier cambio o modificación del presente
dispositivo que no sea aprobado expresamente por Belkin Corporation podría invalidar el derecho
del usuario para utilizar este equipo.
31
INFORMACIÓN
Canadá – Industria de Canadá (IC)
La radioemisión inalámbrica de este dispositivo cumple con las especificaciones RSS 139 & RSS
210 de la Industria de Canadá. Este dispositivo digital de la Clase B cumple con la norma
canadiense ICES-003.
Este dispositivo numérico de la clase B cumple la norma NMB-003 de Canadá.
Europa – Declaración de la Unión Europea
Los productos de radioemisión con la indicación CE 0682 o CE cumplen con
la Directiva R&TTE (1995/5/CE) de la Comisión de la Comunidad Europea.
El cumplimiento de esta directiva implica la conformidad con las siguientes Normas Europeas
(entre paréntesis se encuentran las normativas internacionales equivalentes).
• EN 60950 (IEC60950) – Seguridad de los productos
• EN 300 328 Requisitos técnicos para equipos de radioemisión
• ETS 300 826 Requisitos generales de la EMC para equipos de radioemisión
Para determinar el tipo de transmisor, compruebe la etiqueta identificativa de su producto Belkin.
Los productos con la indicación CE cumplen con la directiva EMC (89/336/CEE) y la Directiva de
Bajo Voltaje (72/23/CEE) establecidas por la Comisión de la Comunidad Europea. El cumplimiento
de estas directivas implica la conformidad con las siguientes Normas Europeas (entre paréntesis
se encuentran las normativas internacionales equivalentes).
• EN 55022 (CISPR 22) – Interferencias electromagnéticas
• EN 55024 (IEC61000-4-2,3,4,5,6,8,11)- Inmunidad electromagnética
• EN 61000-3-2 (IEC610000-3-2) - Movimiento armónico de la línea eléctrica
• EN 61000-3-3 (IEC610000) – Fluctuaciones de la línea eléctrica
• EN 60950 (IEC60950) – Seguridad de los productos
Los productos que contienen el radiotransmisor llevan la etiqueta CE 0682 o CE y es posible que
lleven asimismo el logotipo CE.
Por favor, dirijanse a http://networking.belkin.com para conseguir todos los certificados de
networking junto con las afirmaciones directivas R&TTE
32
INFORMACIÓN
Garantía de por vida para los productos de Belkin Corporation
Belkin Corporation proporciona para el presente producto una garantía de por vida de reparación
gratuita, por lo que respecta a mano de obra y materiales.
En el caso de presentarse un fallo, Belkin decidirá entre la reparación del mismo o la sustitución
del producto, en ambos casos sin costes, siempre que se devuelva durante el periodo de garantía
y con los gastos de transporte abonados al vendedor autorizado de Belkin en el que se adquirió.
Es posible que se solicite una prueba de compra.
Esta garantía perderá su validez en el caso de que el producto haya sido dañado de forma
accidental, por abuso o empleo erróneo del mismo; si el producto ha sido modificado sin la
autorización por escrito de Belkin; o si alguno de los números de serie de Belkin ha sido
eliminado o deteriorado.
LA GARANTÍA Y RESTITUCIONES LEGALES ESTABLECIDAS EXPRESAMENTE EN EL PRESENTE ACUERDO
SUSTITUYEN A TODAS LAS DEMÁS, ORALES O ESCRITAS, EXPRESAS O IMPLÍCITAS. BELKIN RECHAZA
DE MANERA EXPLÍCITA TODAS LAS DEMÁS GARANTÍAS IMPLÍCITAS, INCLUYENDO, SIN LIMITACIÓN,
LAS GARANTÍAS DE COMERCIABILIDAD Y DE IDONEIDAD PARA UN FIN ESPECÍFICO.
Ningún comerciante, agente o empleado de Belkin está autorizado a realizar ningún tipo de
modificación, extensión o alteración de la presente garantía.
BELKIN NO SE HARÁ EN NINGÚN CASO RESPONSABLE POR LOS DAÑOS IMPREVISTOS O
CONSIGUIENTES RESULTANTES DE UN INCUMPLIMIENTO DE LA GARANTÍA, O BAJO NINGUNA OTRA
CONDICIÓN LEGAL, INCLUYENDO, PERO NO EXCLUSIVAMENTE, LOS BENEFICIOS PERDIDOS, PERIODOS
DE INACTIVIDAD, BUENA VOLUNTAD, DAÑOS DURANTE LA REPROGRAMACIÓN O REPRODUCCIÓN DE
CUALQUIERA DE LOS PROGRAMAS O DATOS ALMACENADOS EN O EMPLEADOS CON LOS PRODUCTOS
BELKIN.
Algunas jurisdicciones no permiten la exclusión o limitación de los daños imprevistos o
consecuentes ni las exclusiones de las garantías implícitas, por lo que cabe la posibilidad de que
las anteriores limitaciones de exclusiones no le afecten. Esta garantía le proporciona derechos
legales específicos y usted puede beneficiarse asimismo de otros derechos legales específicos que
varían entre las distintas jurisdicciones.
33
belkin.com
Belkin Corporation
501 West Walnut Street
Compton • CA • 90220-5221 • EE.UU.
Tel: +1 310 898 1100
Fax: +1 310 898 1111
Belkin Components, Ltd.
Express Business Park • Shipton Way
Rushden • NN10 6GL • Reino Unido
Tel: +44 (0) 1933 35 2000
Fax: +44 (0) 1933 31 2000
Belkin Components B.V.
Boeing Avenue 333
1119 PH Schiphol-Rijk • Holanda
Tel: +31 (0) 20 654 7300
Fax: +31 (0) 20 654 7349
Belkin Components GmbH
Hanebergstrasse 2
80637 München • Alemania
Tel: +49 (0) 89 143405 0
Fax: +49 (0) 89 143405 100
Belkin Components SAS
5 Rue du Petit Robinson • 3ème étage
78350 Jouy en Josas • Francia
Tel: +33 (0) 1 34 58 14 00
Fax: +33 (0) 1 39 46 62 89
Belkin Ltd.
7 Bowen Cresent • West Gosford
NSW 2250 • Australia
Tel: +61 (0) 2 4372 8600
Fax: +61 (0) 2 4372 8603
Asistencia técnica de Belkin
Europa: 00 800 223 55 460
EE.UU.: 877 736 5771
P74341ea
© 2004 Belkin Corporation. Todos los derechos reservados.
Todos los nombres comerciales son marcas registradas de los respectivos fabricantes enumerados. Mac, Mac OS,
AppleTalk, Apple y AirPort son marcas registradas de Apple Computer, Inc., registradas en EEUU y otros países.
Access point di rete
wireless
Manuale utente
F5D6130
INDICE
Introduzione . . . . . . . . . . . . . . . . . . . . . . . . . . . . . . . . . . . . . . . . . . . . . . . 1
Principali Caratteristiche . . . . . . . . . . . . . . . . . . . . . . . . . . . . . . . . . . . . .2
Contenuto della confezione . . . . . . . . . . . . . . . . . . . . . . . . . . . . . . . . . . .3
Gestione facoltativa . . . . . . . . . . . . . . . . . . . . . . . . . . . . . . . . . . . . . . . .3
Requisiti del software . . . . . . . . . . . . . . . . . . . . . . . . . . . . . . . . . . . . . . .3
Requisiti del sistema . . . . . . . . . . . . . . . . . . . . . . . . . . . . . . . . . . . . . . .3
Specifiche: . . . . . . . . . . . . . . . . . . . . . . . . . . . . . . . . . . . . . . . . . . . . . .4
Conoscere l'Access Point . . . . . . . . . . . . . . . . . . . . . . . . . . . . . . . . . . . . . . . .5
Collocazione dell'Access Point . . . . . . . . . . . . . . . . . . . . . . . . . . . . . . . . . . . . .7
Impostazione rapida . . . . . . . . . . . . . . . . . . . . . . . . . . . . . . . . . . . . . . . . . . .8
Fase 1: Collegate l'AP al Router, Switch Ethernet o Hub . . . . . . . . . . . . . . . . .8
Fase 2: Installazione del Discovery Wizard . . . . . . . . . . . . . . . . . . . . . . . . . .9
Usare il Discovery Wizard per configurare l'AP . . . . . . . . . . . . . . . . . . . . . . . . . .11
Configurazione delle impostazioni di rete wireless . . . . . . . . . . . . . . . . . . . . . . .15
Individuazione e risoluzione delle anomalie . . . . . . . . . . . . . . . . . . . . . . . . . . .29
Informazioni . . . . . . . . . . . . . . . . . . . . . . . . . . . . . . . . . . . . . . . . . . . . . . .30
INTRODUZIONE
Vi ringraziamo per aver acquistato l’ Access point wireless (AP) Belkin e vi
diamo il benvenuto nel mondo delle reti wireless. Ora potrete trarre il massimo
vantaggio da questa nuova tecnologia wireless ad alta velocità e ottenere la
libertà di cui avete bisogno a casa e in ufficio—senza dover ricorrere ad
alcun tipo di cavo. L'AP agisce come ponte tra la rete cablata già esistente e i
computer wireless. Grazie alla semplicità d'installazione, potrete realizzare una
rete wireless in pochi minuti. Leggete attentamente questo manuale per trarre
il massimo vantaggio dal vostro AP.
1
INTRODUZIONE
Principali Caratteristiche
Ampia area di copertura ad alte velocità
L'AP Belkin garantisce 10 m di raggio di copertura in uno spazio chiuso e
600 m in uno spazio aperto.
Crittografia fino a 128 bit
L'AP Belkin è in grado di di criptare (rendere indecifrabili) le onde radio
trasmesse garantendo in questo modo la protezione dei vostri dati. Questa
caratteristica optional vi consente di criptare i vostri dati a 64 o 128 bit
utilizzando una chiave che provvederete ad inserire voi direttamente.
Filtro con indirizzi MAC
Per una maggiore sicurezza, è possibile creare un elenco di indirizzi MAC
(identificatori unici client) ai quali consentire l’accesso alla propria rete. Ogni
computer ha il proprio indirizzo MAC. È sufficiente che riportiate questi
indirizzi MAC in un elenco utilizzando il software di gestione rete per poter
controllare l'accesso alla vostra rete.
Funziona sia con i PC, che con i computer MAC®
L’ access point supporta diversi ambienti di rete, tra cui Mac OS® 8.x, 9.x, X
v10.x, AppleTalk®, Linux®, Windows® 95, 98, Me, NT®, 2000, XP ed altri
ancora.
Nota: L’ access point può essere gestito attraverso un browser senza usare il
software incluso. Il software incluso è compatibile solo con Windows 98 SE, Me,
2000, ed XP. Tuttavia NON È necessario usare l’ access point
Interfaccia utente avanzata basata sul web
Tutte le funzioni avanzate dell'AP possono essere impostate facilmente tramite
il browser web, senza dover installare altro software nel computer. Non ci
sono dischetti da installare o da conservare e le funzioni di installazione
possono essere modificate ed eseguite in modo rapido e semplice da qualsiasi
computer collegato in rete.
Applicazioni e vantaggi
• Si possono connettere vari computer wireless alla rete
• Possibilità di realizzare una rete SOHO (Small Office/Home Office)
• Consente di eseguire con rapidità e facilità l’installazione di rete tipo SOHO
di cui hanno bisogno gli utenti.
2
INTRODUZIONE
Contenuto della confezione
• Access point wireless Belkin
• Alimentatore di corrente
• CD Sofware
• Manuale utente
• Cartolina di registrazione
Requisiti del sistema
• Windows® 98SE, Me, 2000, XP
• Minimo 64MB di memoria RAM
Requisiti del sistema
• Almeno un computer dotato di protocollo di rete TCP/IP
• Cavo di rete CAT5 o superiore
• Microsoft® Internet Explorer 4.0 o successivo, oppure Netscape® 4.0 o
successivo
3
INTRODUZIONE
Specifiche:
Standard:
IEEE 802.3 10Base-T Ethernet/100 Base-Tx Ethernet
IEEE 802.11b
Standard wireless:
Tecnologia radio: Sequenza diretta a diffusione di spettro (DSSS)
802.11b: 11, 5.5, 2, 1Mbps
802.11b: CCK, DQPSK, DBPSK
Banda ISM 2,412-2,497GHz
802.11b: 11 per il Nord America, 14 per il Giappone, 13 per l’Europa
64/128-bit WEP
Protocollo supportato:
CSMA/CD, TCP, IP, UDP, AppleTalk, e DHCP (client)
Gestione:
Su base browser
Numero massimo utenti:
32 (WLAN)
Porte:
1 porta 10Base-T RJ45
1 jack alimentazione
1 pulsante di reset
LED:
Alimentazione
Attività LAN
Attività WLAN
4
CONOSCERE L’ ACCESS POINT
Questo AP è stato progettato per essere posizionato verticalmente o orizzontalmente sulla scrivania o per essere montato ad una parete. Se posizionato
verticalmente, lo spazio occupato sulla scrivania è minimo grazie al suo straordinario design sottile. Tutti i cavi escono dal retro dell'AP, consentendo una
migliore organizzazione e utilizzabilità. I LED luminosi sono facilmente visibili
sul lato anteriore dell' AP per fornire all’utente tutte
le informazione sull’attività e lo stato della rete.
LED LAN (rete)
Pannello anteriore
LED LAN Wireless
LED alimentazione/pronto
Indica che L’ access point è alimentato.
Spento
L'AP è spento
Rosso
L'AP è pronto
LED alimentazione/pronto
LED LAN Wireless
Spento
La rete wireless è SPENTA
Verde lampeggiante Indica che l'AP è attivo
LED LAN (rete)
Spento
Nessuna rete è stata collegata alla porta
Verde
Periferica 10Base-T collegata
Arancione
Periferica 100Base-Tx collegata
Lampeggiante
Funzionamento porta
(Arancione o verde)
Pannello posteriore
Jack di alimentazione
Porta LAN RJ-45
5
CONOSCERE L’ ACCESS POINT
Jack di alimentazione
L’alimentatore da 5V DC fornito deve essere collegato a questo jack.
Connettore Ethernet RJ45
Collegare a questa presa un cavo Ethernet, per eseguire successivamente il
collegamento con una porta aperta RJ45 10Base-T o 100Base-T su uno switch,
router o hub.
Pulsante di reset
Il pulsante “Reset” viene utilizzato in alcuni casi rari, nel caso in cui l'AP non
dovesse funzionare in maniera inadeguata. Resettando l'AP, si ripristina la
normale modalità di funzionamento dell' AP pur mantenendo le impostazioni
programmate. Il pulsante di reset consente anche di ripristinare le
impostazioni predefinite. L’opzione di ripristino si può utilizzare ad esempio
nel caso sia stata dimenticata la password cliente.
a. Reset dell' AP
Premere e lasciare il pulsante di reset. Le spie sull' AP lampeggiano per un
istante. La spia alimentazione/pronto inizia a lampeggiare. Quando la spia
alimentazione/pronto è di nuovo fissa, significa che l’operazione di reset è
stata completata.
b. Ripristino delle impostazioni predefinite
Premere e tenere premuto il pulsante di reset per cinque secondi, quindi
lasciarlo. Le spie sull' AP lampeggiano per un istante. La spia
alimentazione/pronto inizia a lampeggiare. Quando la spia
alimentazione/pronto è di nuovo fissa, significa che l’operazione di ripristino
è stata completata.
Antenna dipolare regolabile
Sul lato dell'AP è prevista un'antenna dipolare unidirezionale Le antenne
ruotano di 180 gradi. Per un funzionamento ottimale, le antenne devono
essere orientate in posizione verticale.
6
DOVE POSIZIONARE L’ ACCESS POINT
Il corretto posizionamento dell' AP è importante per garantire le migliori
prestazioni della rete wireless. Generalmente, in un ambiente chiuso, l'AP può
offrire una copertura circolare di 75 metri o più. Tuttavia, i diversi tipi di
materiali edili ed altri ostacoli presenti in un edificio possono influire
notevolmente sul segnale wireless, compromettendone la portata. Se possibile,
è consigliabile posizionare l'AP il più vicino possibile al centro dell’area che si
desidera coprire. Negli edifici a più piani, posizionare l'AP su un pavimento
che sia il più vicino possibile al centro dell’edificio, ad esempio sul pavimento
di un piano superiore.
La posizione dell'AP va scelta con attenzione
• Considerare la presenza di eventuali apparecchi o oggetti ingombranti come
un frigorifero o una lavatrice che potrebbero trovarsi sulla parte opposta
della parete contro la quale si è deciso di posizionare l' AP.
• Posizionare l'AP sopra la scrivania, lontano da armadietti in metallo e
case dei computer.
• Non posizionare alcun tipo di oggetto sopra l' AP.
• Accertarsi che l' antenna sia costantemente rivolta verso l’ALTO.
• La presenza di una vernice a base metallica di protezione dai raggi UV
applicata alle finestre può compromettere le prestazioni wireless. Non
posizionare l' AP vicino ad una finestra verniciata.
Ci rendiamo conto che in circostanze normali potrebbe non essere possibile
posizionare l' AP al centro della propria area di copertura. Nei casi in cui si
possono avere difficoltà a coprire l’intera aerea desiderata, provare a
posizionare l' AP il più in alto possibile. Gli apparecchi wireless funzionano
meglio in assenza di ostacoli tra il computer wireless e l' AP. l' AP potrebbe
anche essere montato su una parete, sempre comunque con l' antenna rivolta
verso l’ALTO. Esistono anche altre possibilità per estendere la propria area di
copertura wireless. Andate su http://www.belkin.com/networking per le nostre
soluzioni.
Il segnale wireless può venire disturbato da molti fattori, tra cui le reti
wireless vicine, i forni a microonde in funzione ed i telefoni cordless da
2,4GHz. Nonostante questi fattori possano influire sulle prestazioni della rete,
in presenza di queste apparecchiature, la rete wireless generalmente funziona
bene nella maggior parte dei casi..
7
IMPOSTAZIONE RAPIDA
Le impostazioni predefinite dell' AP Belkin vi permettono di iniziare a lavorare
subito. Basta collegare l'AP alla rete esistente per avere una rete wireless,
senza bisogno di ulteriori impostazioni. Belkin vi spedirà il software necessario per posizionare e collegare il punto d'accesso alla rete, in modo tale da
permettervi di poter cambiare o modificare le impostazioni con facilità. Prima
di usare il software, bisogna installare L’ access point. Una volta installato
l'AP, potete usare il software per modificare la configurazione. Per installare
l'AP, eseguite le seguenti operazioni.
Fase 1: Collegate l'AP al router, Switch Ethernet o hub
Accertare che la confezione contenga:
• Access point di rete wireless Belkin
• Alimentatore di corrente
• CD Sofware
• Manuale utente
• - Cartolina di registrazione
1. Scegliere un luogo adatto dove posizionare l'AP, come descritto
precedentemente.
2. Collegate l' AP e la porta LAN del router, lo switch Ethernet o l'hub usando
un cavo CAT5. Inserite l'alimentatore all'AP inserendo il connettore
circolare DC al jack DC dell'AP. Inserite l'alimentatore nella presa a muro.
Assicuratevi che il LED dello stato di alimentazione ed il LED Link siano
illuminati. Se entrambi i LED sono illuminati, l'AP è collegato
correttamente.
3. Il collegamento e la preparazione dell'AP sono terminati.
8
IMPOSTAZIONE RAPIDA
Fase 2: Installazione del Discovery Wizard
Il Discovery Wizard è una utility che individua l' AP e vi collega ad esso. Il
software è necessario solo se si vuole modificare la configurazione dell'AP,
altrimenti nella maggior parte dei casi l' AP potrà essere usato subito. Poichè
l' AP viene consegnato dalla fabbrica come cliente DHCP, gli sarà assegnato
automaticamente un indirizzo IP dal server DHCP. Poiche l'indirizzo è casuale,
il software Discovery Wizard individuerà per voi l' AP sulla rete, evitandovi di
dover prendere altre misure per determinare l'indirizzo IP dell' AP.
1. Inserire il CD nell’apposito drive.
2. Il programma di installazione dell’ access point di rete wireless Belkin
comparirà automaticamente. Se non compare entro 15-20 secondi,
selezionare il proprio drive del CD-ROM e fare doppio clic sulla cartella con
il nome “Files”. Quindi, fare doppio clic sull’icona “start.exe”.
3. Nella nuova finestra di menu, trascinare il mouse sul pulsante “Install”
(Installa) e selezionare “Click here” (Fare clic qui) per avviare il programma
di installazione del software.
9
IMPOSTAZIONE RAPIDA
4. Il programma di installazione del software si avvierà. Fare clic su "Next"
(Avanti).
5. Accettate le condizioni di utilizzo e fate clic su "Next" (Avanti) mentre
eseguite l'installazione del software in tutti i suoi passi. Fare clic su
"Finish" (Fine) sull'ultima schermata.
6. Il software Discovery Wizard è stato installato. Leggere la prossima parte
per imparare ad usare il software.
10
UTILIZZO DEL SOFTWARE PER CONFIGURARE L' AP
1. Dopo aver installato il software, apparirà un'icona sul desktop. Fare
doppio clic su questa icona per lanciare il programma.
2. Quando si avvia il programma, sullo schermo apparirà la parola
"Scanning..." (Scansione AP in corso) Ciò significa che il programma sta
cercando i punti di accesso della rete.
3. Quando il programma troverà i punti di accesso, il nome dell’ Access point
comparirà nella finestra. Fare clic sul nome dell’ Access point.
4. Fare clic su "Connect" Il web browser verrà lanciato.
11
UTILIZZO DEL SOFTWARE PER CONFIGURARE L' AP
5. Nella finestra del proprio browser compare la pagina login dell' AP. L' AP
viene fornito senza alcuna password. Nella schermata di connessione,
lasciare vuoto lo spazio per la password e fare clic su “Submit” (Inoltra)
per registrarsi.
6. Ora siete collegati all' AP e potete apportare qualsiasi modifica vogliate.
Leggere la prossima parte per sapere come usare l'interfaccia.
Disconnessione dell' AP
Per modificare le impostazioni dell' AP, è consentito l'accesso soltanto ad un
computer alla volta. Una volta che un utente si è connesso per apportare
delle modifiche, ci sono due modi per fare in modo che il computer si
disconnetta: facendo clic sul pulsante “Logout” (Disconnetti) o con il metodo
automatico. La connessione nel secondo caso scade dopo un determinato
intervallo di tempo. L’intervallo di connessione predefinito è di 10 minuti e
può essere modificato da 1 a 99 minuti. Per maggiori informazioni, vedere il
capitolo di questo manuale dal titolo “Modifica delle impostazioni di durata
connessione”.
12
UTILIZZO DEL SOFTWARE PER CONFIGURARE L' AP
Capire l' interfaccia utente dell’ Access point
La home page è la prima pagina che compare quando si accede all’Interfaccia
Utente Avanzata (UI). La home page fornisce una breve panoramica dello
stato attuale e delle impostazioni dell' AP. Da questa pagina è possibile
accedere a tutte le pagine di impostazione avanzata.
(2) (3) (4)
(5)
(1)
(6)
(7)
(1) Link di navigazione rapida
Facendo clic su questi link è possibile passare direttamente a qualsiasi altra
pagina avanzata UI dell' AP. I link sono suddivisi per categorie logiche e
raggruppati per schede, in modo da facilitare la ricerca di una particolare
impostazione. Facendo clic sul titolo di ogni scheda appare una breve
descrizione delle funzioni della scheda scelta.
(2) Pulsante Home
Il pulsante Home è presente in ogni pagina dell’interfaccia utente. Premendo
questo pulsante si ritorna alla home page.
(3) Pulsante Help
Il pulsante “Help” consente di accedere alle pagine guida dell' AP. La guida è
disponibile anche in molte pagine, è sufficiente fare clic su “more info”
(maggiori informazioni) accanto ad alcune sezioni specifiche di ogni pagina.
13
UTILIZZO DEL SOFTWARE PER CONFIGURARE L' AP
(4) Pulsante Login/Logout
Questo pulsante consente di connettere e disconnettere l' AP. Una volta
collegati all' AP, il pulsante riporta l’indicazione “Logout” (Disconnetti).
Collegandosi all' AP si viene condotti in una pagina di connessione a parte
dove viene richiesta una password. Quando si è collegati all' AP, è possibile
modificare le impostazioni. Una volta terminate le modifiche, ci si può
disconnettere dall' AP facendo clic sul pulsante “Logout” (Disconnetti). Per
maggiori informazioni sulla connessione all' AP, vi rimandiamo al capitolo
“Connessione all' AP”.
(5) Informazioni versione
Visualizza la versione del firmware, la versione di boot-code, di hardware ed il
numero di serie dell' AP.
(6) Impostazioni LAN
Visualizza le impostazioni della rete locale (Local Area Network – LAN) dell'
AP. Per apportare delle modifiche, è sufficiente fare clic su uno dei link
(indirizzo IP, Subnet Mask) o sul link di navigazione rapida “LAN” nella parte
sinistra dello schermo.
(7) Wireless
Questa schermata visualizza le impostazioni wireless dell' AP. Per apportare
delle modifiche, è sufficiente fare clic su uno qualsiasi dei link o sul link
“Quick Navigation” (navigazione rapida) nella parte sinistra dello schermo.
14
CONFIGURAZIONE DELLE IMPOSTAZIONI DI RETE WIRELESS
Nella scheda “Wireless” è possibile modificare le impostazioni di
configurazione di rete. Da questa scheda è possibile modificare il nome della
rete wireless (SSID), il canale operativo e le impostazioni di protezione
crittografata.
Impostazioni IP
15
CONFIGURAZIONE DELLE IMPOSTAZIONI DI RETE WIRELESS
Modifica del canale wireless
Auto: Esistono numerosi canali operativi tra cui scegliere. Negli Stati Uniti i
canali sono 11. Nel Regno Unito e in gran parte d’Europa, i canali sono 13. In
pochi altri paesi ancora i requisiti per i canali sono diversi. L' AP e'
configurato in modo tale da scegliere i canali del paese nel quale vi trovate. Il
canale predefinito è il 11 (A meno che non vi troviate in un paese in cui l'uso
del canale 11 non è consentito). Questo canale, se necessario, può essere
cambiato. In presenza di altre reti wireless nella stessa area, la rete dovrà
essere impostata in modo da funzionare su un canale diverso dalle altre reti
wireless. Per ottenere prestazioni migliori, utilizzare un canale che sia almeno
a cinque canali di distanza dalla rete wireless. Ad esempio, in presenza di
un’altra rete che funziona sul canale 11, impostare la propria rete sul canale 6
o su un canale minore. Per cambiare canale, selezionare il canale desiderato
dall’elenco a discesa. Fare clic su “Apply Changes” (Esegui modifiche). La
variazione è immediata.
16
CONFIGURAZIONE DELLE IMPOSTAZIONI DI RETE WIRELESS
Modifica del nome della rete wireless (SSID)
Per identificare la propria rete wireless, viene utilizzato un nome chiamato SSID
(Service Set Identifier). Il nome SSID predefinito dell' AP è “WLAN”. E’ possibile
sostituire questo nome con un altro qualsiasi o lasciarlo così com’è. In presenza di
altre reti wireless nella stessa area, assicuratevi che il nome SSID sia unico (diverso
da quello di un’eventuale altra rete wireless in zona). Per modificare il nome SSID,
inserire nel campo SSID (1) il valore da impostare come SSID e fare clic su “Apply
Changes” (2) (Esegui modifiche). La variazione è immediata. Nel caso si modifichi
il nome SSID, anche i computer wireless devono essere riconfigurati per collegarsi
al nuovo nome della rete. Per ulteriori indicazioni su come eseguire le modifiche
necessarie, vedere la documentazione relativa alla scheda di rete wireless.
(1)
(2)
Utilizzo della funzione SSID broadcast
Nota: Questa funzione avanzata dovrebbe essere implementata soltanto dagli
utenti esperti.
Per questioni di sicurezza si può scegliere di non trasmettere la propria SSID di
rete. In questo modo, il proprio nome di rete rimane nascosto per i computer che
stanno eseguendo un’analisi per rilevare la presenza di eventuali reti wireless. Per
disattivare la trasmissione SSID, togliere il segno di spunta dall’opzione
“Broadcast SSID” e fare clic su “Apply Changes” (Esegui modifiche). La variazione
è immediata. A questo punto, tutti i computer devono essere impostati in modo
da collegarsi al proprio SSID specifico; un SSID di tipo “QUALSIASI” non sarà più
accettato. Per ulteriori indicazioni su come eseguire le modifiche necessarie,
vedere la documentazione relativa alla scheda di rete wireless.
Modifica delle impostazioni di sicurezza della rete wireless
L' AP è provvisto di un sistema di protezione chiamato WEP (Wired Equivalent
Privacy). Per impostazione predefinita, la protezione wireless è disabilitata.
Per abilitarla, seguire le seguenti istruzioni.
17
CONFIGURAZIONE DELLE IMPOSTAZIONI DI RETE WIRELESS
Configurazione della criptazione WEP usando una frase d'accesso
Nota per gli utenti Mac:L’opzione della frase di accesso non funziona con Apple®
AirPort®. Per configurare la crittografia nei computer Mac, impostare la crittografia
con il metodo manuale descritto nella sezione successiva.
1. Selezionare “64-bit automatically” (64-bit automatico) o “128-bit
automatically” (128-bit automatico)” dall’elenco a discesa.
2. Digitare una frase di accesso. Una frase di accesso è come una password. Si
può trattare di un insieme di numeri e lettere. Dopo aver digitato la propria
frase di accesso, fare clic su “Generate” (Crea). Facendo clic su “Generate”
(Crea), i campi di inserimento codice riportati di seguito si riempiono.
Nota: La crittografia a 64-bit genera quattro codici, mentre la crittografia a 128-bit
genera un solo codice. Selezionare il codice desiderato facendo clic sul pulsante
accanto ad esso. Fare clic su “Apply Changes” (Esegui modifiche).
3. La crittografia dell' AP è impostata. Ogni computer presente nella rete
wireless deve essere configurato con la medesima frase di accesso. Per
ulteriori indicazioni su come eseguire le modifiche necessarie, vedere la
documentazione relativa alla scheda di rete wireless.
18
CONFIGURAZIONE DELLE IMPOSTAZIONI DI RETE WIRELESS
Impostazione manuale della criptazione utilizzando un codice
esadecimale
Un codice esadecimale è composto da numeri e lettere che vanno dalla A alla
F e dallo 0 al 9. I codici a 64-bit sono composti da cinque numeri a due cifre.
I codici 128-bit sono composti da 13 numeri a due cifre.
Ad esempio:
AF 0F 4B C3 D4 = codice a 64-bit
C3 03 0F AF 0F 4B B2 C3 D4 4B C3 D4 E7 = codice a 128-bit
Nelle caselle riportate di seguito va creato il proprio codice, inserendo due
caratteri tra A-F e 0-9. Questo codice sarà utilizzato per programmare le
impostazioni di criptazione dell' AP ed i propri computer wireless.
Nota per gli utenti Mac: I prodotti originali Apple AirPort supportano soltanto la
crittografia a 64-bit. I prodotti Apple Airport 2 possono supportare la modalità di
crittografia a 64 o 128 bit. Verificare quale sia la versione utilizzata. Non potendo
configurare la rete con una crittografia a 128 bit, provare una crittografia a 64 bit.
1. Selezionare “64-bit manually” (64-bit manuale) o “128-bit manually”
(128-bit manuale)” dall’elenco a discesa.
19
CONFIGURAZIONE DELLE IMPOSTAZIONI DI RETE WIRELESS
2. Se si utilizza la crittografia a 64-bit vengono visualizzati quattro campi di
inserimento codice. Se si utilizza la crittografia a 128-bit viene visualizzato
un solo campo di inserimento codice. Nei campi di inserimento codice,
digitare il codice esadecimale che si desidera utilizzare. Una volta terminato
di digitare i propri codici, selezionare il codice desiderato facendo clic sul
pulsante accanto ad esso. Fare clic su “Apply Changes” (Esegui modifiche).
3. La crittografia dell' AP è impostata. Ogni computer presente nella rete
wireless deve essere configurato con il medesimo codice esadecimale. Per
ulteriori indicazioni su come eseguire le modifiche necessarie, vedere la
documentazione relativa alla scheda di rete wireless.
Impostazione dell’opzione MAC Address Filtering (Filtro indirizzi
MAC)
Il filtro indirizzi MAC è un potente mezzo per specificare quali sono i
computer che possono accedere all’ Access point. Sarà negato l'accesso alla
rete ai computer NON riportati nella lista.
Come impostare il filtro indirizzi MAC
1. Mettere il segno di spunta nella casella “Enable MAC Address Filtering” (1).
2. Inserire gli indirizzi MAC del computer che volete autorizzare ad accedere
alla rete.
3. Fare clic su "Add" (Aggiungi) (2) per aggiungere l'indirizzo alla lista.
4. Ripetere l'operazione per ogni computer che si vuole aggiungere alla lista.
5. Per concludere, fare clic su “Apply Changes” (Esegui modifiche).
(1)
(2)
20
CONFIGURAZIONE DELLE IMPOSTAZIONI DI RETE WIRELESS
Lista client
Potete visualizzare la lista dei clients associati all' AP usando l'opzione Client
list. Appariranno gli indirizzi MAC del client e la velocità di connessione.
Impostazioni avanzate
Belkin offre una serie di funzioni avanzate che potete impostare. Si
raccomanda di non cambiare tali impostazioni, ad eccezione del nome dell' AP,
a meno che ci sia un motivo particolare per farlo. Dalla pagina delle
Impostazioni Avanzate si può:
• Cambiare il nome dell' AP (Usato esclusivamente per identificare l'AP nella
rete)
• Selezionare il Basic Rate Set (1, 2Mbps or 1, 2, 5.5, 11Mbps)
• Selezionare la velocità di trasmissione (Auto, 11Mbps, 5.5Mbps, 2Mbps,
1Mbps)
• Impostare la soglia RTS
• Impostare la soglia di frammentazione
• Selezionare le modalità Preamble (Long o short)
Dopo aver apportato delle modifiche, cliccate su "Apply changes" per memorizzarle.
Utility:
La schermata Utility consente di gestire diversi parametri dell' AP ed eseguire
alcune specifiche funzioni amministrative.
Riavviare l' AP
A volte, se inizia a funzionare in modo scorretto, può essere necessario
riavviare l' AP. Se l' AP dovesse essere riavviato, le impostazioni di
configurazione NON verrebbero cancellate.
21
CONFIGURAZIONE DELLE IMPOSTAZIONI DI RETE WIRELESS
Riavvio dell' AP per ripristinare il normale funzionamento
1. Fare clic sul pulsante “Restart AP” (Riavvia l' AP).
2. Comparirà il seguente messaggio. Fare clic su “OK”.
3. Comparirà il seguente messaggio. Il riavvio dell' AP può durare fino a 60
secondi. E’ importante non togliere l’alimentazione dall' AP durante il suo riavvio.
4. Sullo schermo compare un conto alla rovescia di 30 secondi. Quando il
conto alla rovescia raggiunge lo zero, l' AP viene riavviato. La home page
dell' AP dovrebbe apparire automaticamente. In caso contrario, digitare
l’indirizzo dell' AP (predefinito = 192.168.2.254) nella barra di navigazione
del proprio browser.
Ripristino delle impostazioni predefinite
Con questa opzione si possono ripristinare tutte le impostazioni eseguite dal
produttore dell’ Access point. E’ consigliabile fare una copia di tutte le
impostazioni prima di ripristinare quelle predefinite.
22
CONFIGURAZIONE DELLE IMPOSTAZIONI DI RETE WIRELESS
1. Fare clic sul pulsante “Restore Default” (Ripristina impostazioni
predefinite).
2. Comparirà il seguente messaggio. Fare clic su “OK”.
3. Comparirà il seguente messaggio. Il ripristino delle impostazioni predefinite
comprende anche il riavvio dell' AP. Questo processo può durare fino a 60
secondi. E’ importante non togliere l’alimentazione dall' AP durante il suo riavvio.
4. Sullo schermo compare un conto alla rovescia di 30 secondi. Quando il
conto alla rovescia raggiunge lo zero, le impostazioni predefinite dell' AP
vengono ripristinate. La home page dell' AP dovrebbe apparire
automaticamente. In caso contrario, digitare l’indirizzo dell' AP (predefinito
= 192.168.2.1) nella barra di navigazione del proprio browser.
Salvataggio di una configurazione attuale
Questa opzione consente di salvare una configurazione attuale. Il salvataggio
della propria configurazione consente di ripristinarla in un momento
successivo nel caso le impostazioni andassero perdute o venissero modificate.
E’ consigliabile fare una copia della configurazione attuale prima di eseguire
un aggiornamento del firmware.
23
CONFIGURAZIONE DELLE IMPOSTAZIONI DI RETE WIRELESS
1. Fare clic su "Save" (Salva). Compare una finestra chiamata “File Download”
(Scaricamento file). Fare clic su "Save" (Salva).
2. Si apre una finestra che consente di selezionare la posizione in cui salvare
il file di configurazione. Selezionare una posizione. A questo file può
essere assegnato qualsiasi nome si desideri, oppure si può utilizzare il
nome predefinito “Config”. Accertarsi che al file venga assegnato un nome
tale da consentirne il ritrovamento in un momento successivo. Una volta
selezionata la posizione ed il nome del file, fare clic su “Save” (Salva).
La configurazione è stata salvata.
24
CONFIGURAZIONE DELLE IMPOSTAZIONI DI RETE WIRELESS
3. A salvataggio terminato, compare la finestra illustrata di seguito. Fare clic
su "Close" (Chiudi).
Ripristino di una configurazione precedente
Questa opzione consente di ripristinare qualsiasi configurazione salvata in
precedenza.
1. Fare clic su "Browse"
(Sfoglia). Si apre una
finestra che consente di
selezionare la posizione
del file di configurazione.
Tutti i file di
configurazione finiscono
con un “.bin”. Trovare il
file di configurazione che
si desidera ripristinare e
fare doppio clic su di
esso.
25
CONFIGURAZIONE DELLE IMPOSTAZIONI DI RETE WIRELESS
2. Verrà chiesto se si desidera continuare. Fare clic su “OK”.
3.
Compare una finestra di promemoria. Perché il processo di configurazione
si completi ci vorranno fino a 60 secondi. Fare clic su “OK”.
4. Sullo schermo compare un conto alla rovescia di 60 secondi. Quando il
conto alla rovescia raggiunge lo zero, la configurazione dell' AP sarà
ripristinata. La home page dell' AP dovrebbe apparire automaticamente. In
caso contrario, digitare l’indirizzo dell' AP (predefinito = 192.168.2.1) nella
barra di navigazione del proprio browser.
Aggiornamento Firmware
Di tanto in tanto, Belkin potrebbe pubblicare delle nuove versioni del
firmware dell' AP. Gli aggiornamenti del firmware contengono alcuni
miglioramenti e consentono di risolvere possibili problemi esistenti nelle
versioni precedenti. Quando la Belkin immette sul mercato un nuovo firmware,
questo può essere scaricato dal sito di aggiornamento Belkin, aggiornando in
questo modo il firmware dell' AP alla versione più recente.
26
CONFIGURAZIONE DELLE IMPOSTAZIONI DI RETE WIRELESS
(1)
Aggiornamento del firmware dell' AP
1. Dalla pagina “Firmware Update” (Aggiornamento firmware), fare clic su
“Browse” (Sfoglia) (1). Si apre una finestra che consente di selezionare la
posizione del file di aggiornamento firmware. Tutti i file del firmware
finiscono con un “.dlf”.
2. Andare al file di firmware scaricato. Selezionarlo facendo doppio clic sul
nome del file.
27
CONFIGURAZIONE DELLE IMPOSTAZIONI DI RETE WIRELESS
3. La casella “Update Firmware” (Aggiornamento firmware) ora visualizza la
posizione ed il nome del file di firmware appena selezionato. Fare clic su
“Update” (Aggiorna).
4. Vi verrà chiesto se si è certi di voler continuare. Fare clic su “OK”.
5. Compare un ulteriore messaggio. Questo messaggio dice che l' AP potrebbe
non rispondere per un massimo di un minuto, in quanto il firmware è stato
caricato nell' AP e l' AP è in fase di riavvio. Fare clic su “OK”.
Sullo schermo compare un conto alla rovescia di 30 secondi. Quando il conto
alla rovescia raggiunge lo zero, l’aggiornamento del firmware dell' AP è
completo. La home page dell' AP dovrebbe apparire automaticamente.
Modifica delle impostazioni di sistema
Nella pagina “System Settings” è possibile inserire una nuova password per
l’amministratore, impostare il fuso orario, attivare la gestione a distanza ed
attivare e disattivare la funzione NAT dell' AP.
28
CONFIGURAZIONE DELLE IMPOSTAZIONI DI RETE WIRELESS
Impostazione o modifica della password amministratore
L' AP viene fornito SENZA alcuna password. Se si desidera aggiungere una
password per avere una maggiore protezione, lo si può fare da qui. La
password deve essere annotata e custodita in un posto sicuro, in quanto sarà
necessaria per connettersi all' AP in futuro. E’ anche consigliabile inserire una
password nel caso si intenda utilizzare l’opzione di gestione a distanza dell'
AP.
29
INDIVIDUAZIONE E RISOLUZIONE DELLE ANOMALIE
Per avere assistenza tecnica, rivolgersi a www.belkin.com/networking o
www.belkin.com. Per contattare l’assistenza tecnica telefonicamente, chiamare
il numero 00 800 223 55 460.
30
INFORMAZIONI
Dichiarazione FCC
DICHIARAZIONE DI CONFORMITÀ CON LE LEGGI FCC PER
LA COMPATIBILITÀ’ ELETTROMAGNETICA
Noi sottoscritti, Belkin Corporation, con sede al 501 West Walnut Street, Compton, CA 90220,
dichiariamo sotto la nostra piena responsabilità che il prodotto,
F5D6130
cui questa dichiarazione fa riferimento, è conforme alla sez. 15 delle norme FCC. FCC. Bisogna
rispettare le seguenti condizioni d'uso: (1) il dispositivo non deve causare interferenze dannose e
(2) il dispositivo deve accettare qualsiasi interferenza ricevuta, comprese eventuali interferenze che
possano causare un funzionamento anomalo.
Cautela: Esposizione alle radiazioni di radiofrequenza
La potenza in uscita irradiata da questa periferica è molto inferiore ai limiti di esposizione alla
radiofrequenza FCC. Tuttavia, la periferica dovrà essere utilizzata in modo da ridurre al minimo il
potenziale rischio di contatto umano nel corso del suo funzionamento.
Se la periferica viene collegata ad un’antenna esterna, l’antenna deve essere posizionata in modo
da ridurre al minimo il potenziale rischio di contatto umano nel corso del suo funzionamento..
Per evitare un eventuale superamento dei limiti di esposizione alle radiofrequenze FCC, non è
consentito avvicinarsi all’antenna di oltre 20 cm nel corso del normale funzionamento.
Informazione della Commissione Federale per le Comunicazioni
Questa attrezzatura è stata testata ed è risultata conforme ai limiti previsti per le periferiche
digitali di classe B, in conformità alla Sezione 15 delle normative FCC. Questi limiti sono stati
stabiliti per fornire un livello di protezione ragionevole contro eventuali interferenze dannose in
un’installazione di tipo domestico.
Questo dispositivo genera, utilizza e può emettere energia in radiofrequenza. Se non installata
ed utilizzata in conformità alle istruzioni, questa attrezzatura può causare interferenze dannose
alla ricezione radiotelevisiva che possono essere determinate accendendo o spegnendo
l'attrezzatura. L’utente è invitato a tentare di correggere l’interferenza mediante una o più delle
seguenti misure:
• Modificando la direzione o la posizione dell' antenna ricevente.
• Aumentando la distanza tra il dispositivo ed il ricevitore.
• Collegando il dispositivo ad una presa di un circuito diversa da quella cui è collegato
il ricevitore.
• Consultando il rivenditore o un tecnico radio/TV specializzato.
Modifiche
Le indicazioni FCC prevedono che l’utente venga informato del fatto che eventuali variazioni o
modifiche apportate a questo dispositivo non espressamente approvate da Belkin Corporation
potrebbero annullare la facoltà dell’utente di utilizzare il dispositivo.
31
INFORMAZIONI
Canada- Industry Canada (IC)
L’apparecchio radio wireless di questo dispositivo è conforme alle indicazioni RSS 139 & RSS 210
Industry Canada. Questo dispositivo digitale di Classe B è conforme alle indicazioni canadesi
ICES-003.
Cet appareil numérique de la classe B conforme á la norme NMB-003 du Canada.
Europa –Comunicato dell’Unione Europea
I prodotti radio con la sigla di avvertenza CE 0682 o CE sono conformi
alla direttiva R&TTE (1995/5/EC) emessa dalla Commissione della Comunità
Europea.
La conformità a tale direttiva implica la conformità alle seguenti norme europee (tra parentesi
sono indicati i rispettivi standard internazionali).
• EN 60950 (IEC 60950)- Sicurezza del prodotto
• EN 300 328 Requisiti tecnici per apparecchi radio
• ETS 300 826 Indicazioni generali di compatibilità elettromagnetica per apparecchi radio.
Per stabilire il tipo di trasmettitore utilizzato, verificare la targhetta di identificazione del proprio
prodotto Belkin.
I prodotti con il marchio CE sono conformi alla Direttiva EMC (89/336/CEE) e alla Direttiva per la
Bassa Tensione (72/23/CEE) emesse dalla Commissione della Comunità Europea.
La conformità a tali direttive implica
la conformità alle seguenti norme europee (tra parentesi sono indicati
i rispettivi standard internazionali).
• EN 55022 (CISPR 22)- Interferenze elettromagnetiche
• EN 55024 (IEC61000-4-2,3,4,5,6,8,11)- Immunità elettromagnetica
• EN 61000-3-2 (IEC610000-3-2)- Armoniche della linea di alimentazione
• EN 61000-3-3 (IEC610000) - Sfarfallio della linea di alimentazione
• EN 60950 (IEC 60950)- Sicurezza del prodotto
I prodotti che contengono il radio trasmettitore sono contrassegnati con il marchio CE 0682 o CE
e possono anche riportare il logo CE.
Per tutti i certificati di impostazione rete e le dichiarazioni della direttiva R&TTE, vedere il sito
http://networking.belkin.com
32
INFORMAZIONI
Garanzia a vita sul prodotto della Belkin Corporation
La Belkin Corporation garantisce a vita questo prodotto da eventuali difetti di materiale
e lavorazione.. Qualora venisse rilevata un’anomalia, Belkin provvederà, a propria discrezione, a
riparare o sostituire il prodotto gratuitamente, a condizione che sia restituito entro il periodo di
garanzia, con le spese di trasporto prepagate,
al rivenditore Belkin autorizzato da cui è stato acquistato il prodotto. Potrebbe venire richiesta
la
prova di acquisto.
Questa garanzia non sarà valida nel caso il prodotto sia stato danneggiato accidentalmente, per
abuso, uso non corretto o non conforme, qualora sia stato modificato senza il permesso scritto di
Belkin, o nel caso il numero di serie Belkin fosse stato cancellato o reso illeggibile.
LA GARANZIA ED I RIMEDI DI CUI SOPRA PREVALGONO SU QUALSIASI ALTRO ACCORDO, SIA ORALE
CHE SCRITTO, ESPRESSO O IMPLICITO. BELKIN DECLINA SPECIFICATAMENTE QUALSIASI OBBLIGO DI
GARANZIA IMPLICITO COMPRESE, SENZA LIMITI, LE GARANZIE DI COMMERCIABILITÀ O IDONEITÀ
AD UN PARTICOLARE SCOPO.
Nessun rivenditore, agente o dipendente Belkin è autorizzato ad apportare modifiche,
ampliamenti o aggiunte alla presente garanzia.
BELKIN DECLINA QUALSIASI RESPONSABILITÀ PER EVENTUALI DANNI SPECIALI, ACCIDENTALI,
DIRETTI O INDIRETTI IMPUTABILI AD UN’EVENTUALE VIOLAZIONE DELLA GARANZIA O IN BASE A
QUALSIASI ALTRA TEORIA LEGALE, COMPRESI, MA NON SOLO, I CASI DI MANCATO GUADAGNO,
INATTIVITÀ, DANNI O RIPROGRAMMAZIONE O RIPRODUZIONE DI PROGRAMMI O DATI MEMORIZZATI
O UTILIZZATI CON I PRODOTTI BELKIN.
Alcuni Stati non consentono l’esclusione o la limitazione dei danni accidentali o diretti, pertanto
i limiti di esclusione di cui sopra potrebbero non fare al caso vostro. Questa garanzia consente di
godere di diritti legali specifici ed eventuali altri diritti che possono variare di stato in stato.
33
belkin.com
Belkin Corporation
501 West Walnut Street
Compton • CA • 90220-5221 • USA
Tel: +1 310 898 1100
Fax: +1 310 898 1111
Belkin Components, Ltd.
Express Business Park • Shipton Way
Rushden • NN10 6GL • Regno Unito
Tel: +44 (0) 1933 35 2000
Fax: +44 (0) 1933 31 2000
Belkin Components B.V.
Boeing Avenue 333
1119 PH Schiphol-Rijk • Paesi Bassi
Tel: +31 (0) 20 654 7300
Fax: +31 (0) 20 654 7349
Belkin Components GmbH
Hanebergstrasse 2
80637 Monaco di Baviera • Germania
Tel: +49 (0) 89 143405 0
Fax: +49 (0) 89 143405 100
Belkin Components SAS
5 Rue du Petit Robinson • 3ème étage
78350 Jouy en Josas • Francia
Tel: +33 (0) 1 34 58 14 00
Fax: +33 (0) 1 39 46 62 89
Belkin Ltd.
7 Bowen Cresent • West Gosford
NSW 2250 • Australia
Tel: +61 (0) 2 4372 8600
Fax: +61 (0) 2 4372 8603
Assistenza tecnica Belkin
Europa: 00 800 223 55 460
USA: 877.736.5771
P74341ea
© 2004 Belkin Corporation. Tutti i diritti riservati.
Tutti i nomi commerciali sono marchi registrati dai rispettivi produttori elencati. Mac, Mac OS, AppleTalk e Apple
sono marchi della Apple Computer, Inc., registrati negli USA e in altri Paesi.