1
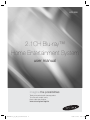
HT-F4200
2.1CH Blu-ray™
Home Entertainment System
user manual
imagine the possibilities
Thank you for purchasing this Samsung product.
To receive more complete service,
please register your product at
www.samsung.com/register
HT-F4200_50_XU_130211-1.indd 1
2013-02-13 오후 6:51:27
Safety Information
Warning
TO REDUCE THE RISK OF ELECTRIC SHOCK, DO NOT REMOVE THE COVER(OR BACK).
NO USER-SERVICEABLE PARTS ARE INSIDE. REFER SERVICING TO QUALIFIED SERVICE PERSONNEL.
CAUTION
RISK OF ELECTRIC SHOCK
DO NOT OPEN
This symbol indicates “dangerous
voltage” inside the product that
presents a risk of electric shock
or personal injury.
CAUTION: TO PREVENT ELECTRIC
SHOCK, MATCH WIDE BLADE OF PLUG
TO WIDE SLOT, FULLY INSERT.
WARNING
• To reduce the risk of fire or electric shock, do not
expose this appliance to rain or moisture.
CAUTION
• Apparatus shall not be exposed to dripping or
splashing and no objects filled with liquids, such as
vases, shall be placed on the apparatus.
• The Mains plug is used as a disconnect device and
shall stay readily operable at any time.
• This apparatus shall always be connected to an AC
outlet with a protective grounding connection.
• To disconnect the apparatus from the mains, the plug
must be pulled out from the mains socket, therefore
the mains plug shall be readily operable.
CLASS 1
KLASSE 1
LUOKAN 1
KLASS 1
PRODUCTO
This symbol indicates
important instructions
accompanying the product.
LASER PRODUCT
LASER PRODUKT
LASER LAITE
LASER APPARAT
LÁSER CLASE 1
CLASS 1 LASER PRODUCT
This Compact Disc player is classified as a CLASS 1
LASER product.
Use of controls, adjustments or performance of
procedures other than those specified herein may result
in hazardous radiation exposure.
CAUTION
INVISIBLE LASER RADIATION WHEN OPEN AND
INTERLOCKS DEFEATED, AVOID EXPOSURE TO BEAM.
Wiring the Main Power Supply Plug (UK Only)
IMPORTANT NOTICE
The mains lead on this equipment is supplied with a moulded plug incorporating a fuse. The value of the fuse is indicated on the pin
face of the plug and if it requires replacing, a fuse approved to BS1362 of the same rating must be used. Never use the plug with the
fuse cover removed. If the cover is detachable and a replacement is required, it must be of the same colour as the fuse fitted in the plug.
Replacement covers are available from your dealer. If the fitted plug is not suitable for the power points in your house or the cable is not
long enough to reach a power point, you should obtain a suitable safety approved extension lead or consult your dealer for assistance.
However, if there is no alternative to cutting off the plug, remove the fuse and then safely dispose of the plug. Do not connect the plug to
a mains socket as there is a risk of shock hazard from the bared flexible cord. Never attempt to insert bare wires directly into a mains
socket. A plug and fuse must be used at all times.
IMPORTANT
The wires in the mains lead are coloured in accordance with the following code:– BLUE = NEUTRAL BROWN = LIVE As these
colours may not correspond to the coloured markings identifying the terminals in your plug, proceed as follows:–The wire
coloured BLUE must be connected to the terminal marked with the letter N or coloured BLUE or BLACK. The wire coloured
BROWN must be connected to the terminal marked with the letter L or coloured BROWN or RED.
WARNING : DO NOT CONNECT EITHER WIRE TO THE EARTH TERMINAL WHICH IS MARKED WITH LETTER E OR BY THE EARTH
, OR COLOURED GREEN OR GREEN AND YELLOW.
SYMBOL
| 2 English
HT-F4200_50_XU_130211-1.indd 2
2013-02-13 오후 6:51:41
Disc Storage & Management
• Do not expose this apparatus to dripping or splashing.
Do not put objects filled with liquids, such as vases, on
the apparatus.
• To turn this apparatus off completely, you must pull the
power plug out of the wall socket. Consequently, the
power plug must be easily and readily accessible at all
times.
• Do not touch the power plug with a wet hand.
It can cause an electric shock.
• Do not plug multiple electric devices into the same wall
socket. Overloading a socket can cause it to overheat,
resulting in a fire.
• Maintenace of the Cabinet
- Before connecting other components to this
product, be sure to turn them off.
- If you move your product suddenly from a cold place
to a warm place, condensation may occur on the
operating parts and lens and cause abnormal disc
playback. If this occurs, unplug the product, wait for
two hours, and then connect the plug to the power
outlet. Then, insert the disc, and try to play back
again.
Licence
Manufactured under licence
from Dolby Laboratories.
Dolby, Pro Logic, and
the double-D symbol are
trademarks of Dolby Laboratories.
Manufactured
under licence under
U.S. Patent Nos:
5,956,674; 5,974,380;
6,226,616; 6,487,535; 7,392,195; 7,272,567;
7,333,929; 7,212,872 & other U.S. and worldwide
patents issued & pending. DTS-HD, the Symbol,
& DTS-HD and the Symbol together are registered
trademarks & DTS-HD Master Audio | Essential is a
trademark of DTS, Inc. Product includes software.
© DTS, Inc. All Rights Reserved.
ABOUT DIVX VIDEO: DivX® is
a digital video format created
by DivX, LLC, a subsidiary of
Rovi Corporation. This is an
official DivX Certified® device that plays DivX video.
Visit divx.com for more information and software tools
to convert your files into DivX videos.
ABOUT DIVX VIDEO-ON-DEMAND: This DivX
Certified® device must be registered in order to play
purchased DivX Video-on-Demand (VOD) movies. To
obtain your registration code, locate the DivX VOD
section in your device setup menu. Go to vod.divx.
com for more information on how to complete your
registration.
DivX Certified® to play DivX® video up to HD 1080p,
including premium content.
DivX®, DivX Certified® and associated logos are
trademarks of Rovi Corporation or its subsidiaries and
are used under licence.
Covered by one or more of the following U.S. patents
: 7,295,673; 7,460,668; 7,515,710; 7,519,274
English
HT-F4200_50_XU_130211-1.indd 3
Safety Information
Handling Cautions
01
• Holding Discs
- Fingerprints or scratches on
a disc may reduce sound and picture
quality or cause skipping.
- Avoid touching the surface of a disc where data has
been recorded.
- Hold the disc by the edges so that fingerprints will
not get on the surface.
- Do not stick paper or tape on the disc.
• Cleaning Discs
- If you get fingerprints or dirt on a disc,
clean it with a mild detergent diluted in
water and wipe with a soft cloth.
- When cleaning, wipe gently from the
inside to the outside of the disc.
- Disc Storage
Do not keep in direct sunlight.
Keep in a cool ventilated area.
Keep in a clean protection jacket and store
vertically.
• If the product makes an abnormal noise or produces
a burning smell or smoke, turn off the power switch
immediately and disconnect the power plug from
the wall outlet. Then, contact the nearest customer
service centre for technical assistance. Do not use the
product. Using the product as it is may cause a fire or
an electric shock.
• To turn this apparatus off completely, you must pull the
power plug out of the wall socket. Consequently, the
power plug must be easily and readily accessible at all
times.
3|
2013-02-13 오후 6:51:42
Safety Information
The terms HDMI and HDMI
High-Definition Multimedia
Interface, and the HDMI
Logo are trademarks or registered trademarks of
HDMI Licencing LLC in the United States and other
countries.
DLNA®, the DLNA Logo
and DLNA CERTIFIED® are
trademarks, service marks,
or certification marks of the Digital Living Network
Alliance.
Oracle and Java are registered trademarks
of Oracle and/or its affiliates. Other names
may be trademarks of their respective
owners.
This item incorporates copy protection technology
that is protected by U.S. patents and other intellectual
property rights of Rovi Corporation. Reverse engineering
and disassembly are prohibited.
Blu-ray Disc™, Blu-ray™, and the logos are trademarks
of Blu-ray Disc Association.
This product uses Cinavia technology to limit the
use of unauthorized copies of some commerciallyproduced film and videos and their soundtracks. When
a prohibited use of an unauthorized copy is detected, a
message will be displayed and playback or copying will
be interrupted.
More information about Cinavia technology is provided
at the Cinavia Online Consumer Information Centre
at http://www.cinavia.com. To request additional
information about Cinavia by mail, send a postcard with
your mailing address to: Cinavia Consumer Information
Centre, P.O. Box 86851, San Diego, CA, 92138, USA.”
This product incorporates proprietary technology
under licence from Verance Corporation and is
protected by U.S. Patent 7,369,677 and other U.S.
and worldwide patents issued and pending as well
as copyright and trade secret protection for certain
aspects of such technology. Cinavia is a trademark of
Verance Corporation. Copyright 2004-2010 Verance
Corporation. All rights reserved by Verance. Reverse
engineering or disassembly is prohibited.
- Open Source Licence Notice
In the case of using open source software, Open
Source Licences are available on the product menu.
Using the 3D Function
IMPORTANT HEALTH AND SAFETY INFORMATION FOR
3D PICTURES.
Read and understand the following safety information
before using the 3D function.
• Some viewers may experience discomfort while viewing
3D TV such as dizziness, nausea, and headaches.
If you experience any such symptom, stop viewing 3D
TV, remove the 3D Active Glasses, and rest.
• Watching 3D images for an extended period of time
may cause eye strain. If you feel eye strain, stop
viewing 3D TV, remove your 3D Active Glasses, and
rest.
• A responsible adult should frequently check on children
who are using the 3D function.
If there are any reports of tired eyes, headaches,
dizziness, or nausea, have the child stop viewing 3D
TV and rest.
• Do not use the 3D Active Glasses for other purposes
(such as general eyeglasses, sunglasses, protective
goggles, etc.)
• Do not use the 3D function or 3D Active Glasses while
walking or moving around. Using the 3D function or 3D
Active Glasses while moving around may cause you to
bump into objects, trip, and/or fall, and cause serious
injury.
• If you want to enjoy 3D content, connect a 3D device
(3D compliant AV receiver or TV) to the product’s HDMI
OUT port using a high-speed HDMI cable. Put on 3D
glasses before playing the 3D content.
• The product outputs 3D signals only through HDMI
cable connected to the HDMI OUT port.
• As the video resolution in 3D play mode is fixed
according to the resolution of the original 3D video, you
can not change the resolution to your preference.
• Some functions such as BD Wise, screen size
adjustment, and resolution adjustment may not operate
properly in 3D play mode.
• You must use a high-speed HDMI cable for proper
output of the 3D signal.
• Stay at least three times the width of the screen from
the TV when watching 3D images. For example, if
you have a 46 inch screen, stay 3.5 meters from the
screen.
- Place the 3D video screen at eye level for the best
3D picture.
• When the product is connected to some 3D devices,
the 3D effect may not function properly.
• This product does not convert 2D content into 3D.
• “Blu-ray 3D” and “Blu-ray 3D” logo are trademarks of
the Blu-ray Disc Association.
| 4 English
HT-F4200_50_XU_130211-1.indd 4
2013-02-13 오후 6:51:43
Copyright
MEDIA PLAY
Playing Files on a USB Device
Playing a Disc with User Recorded Content
Playing a Commercial Video Disc
Controlling Video Playback
Playing a Pre-Recorded Commercial Audio Disc
Controlling Music Playback
Controlling Photo Playback
Listening to Radio
Using the TV Sound Button on the Remote control
Safety Information
23
23
24
24
25
25
26
27
28
01
© 2013 Samsung Electronics Co.,Ltd.
All rights reserved; No part or whole of this user’s manual
may be reproduced or copied without the prior written
permission of Samsung Electronics Co.,Ltd.
NETWORK SERVICES
Contents
SAFETY INFORMATION
2
3
3
3
4
5
Warning
Disc Storage & Management
Handling Cautions
Licence
Using the 3D Function
Copyright
GETTING STARTED
6
7
9
10
10
11
Disk and Format Compatibility
Logos of Discs the Product can Play
Accessories
Front Panel
Rear Panel
Remote Control
CONNECTIONS
12 Connecting the Speakers
14 Connecting to a Network Router
15 Connecting to TV/External Devices
29 Using BD-LIVE™
29 Using DLNA
APPENDIX
30 Additional Information
33 Troubleshooting
36 Specifications
Figures and illustrations in this User Manual are
provided for reference only and may differ from
actual product appearance.
An administration fee may be charged if either
a. an engineer is called out at your request and
there is no defect in the product (i.e. where
you have failed to read this user manual)
b. you bring the unit to a repair centre and
there is no defect in the product (i.e. where
you have failed to read this user manual).
The amount of such administration charge will
be advised to you before any work or home
visit is carried out.
SETTINGS
16
17
17
18
20
21
22
The Initial Settings Procedure
The Home Screen
Accessing the Settings Screen
Settings Menu Functions
Networks and the Internet
Upgrading Software
Setting Up DLNA
English
HT-F4200_50_XU_130211-1.indd 5
5|
2013-02-13 오후 6:51:44
Getting Started
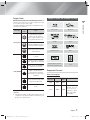
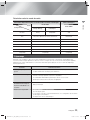
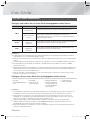
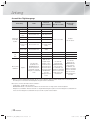
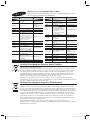
Disk and Format Compatibility
Disc Types and Contents your Product can Play
Media
Disc Type
Blu-ray Disc
3D Blu-ray Disc
VIDEO
Details
BD-ROM or BD-RE/-R disc recorded in the BD-RE format.
DVD-VIDEO, DVD-RW,
DVD-R, DVD+RW,
DVD+R
DVD-VIDEO, recorded DVD+RW/DVD-RW(V)/DVD-R/+R discs that have
been recorded and finalised, or a USB storage media containing DivX,
MKV, MP4 contents.
MUSIC
CD-RW/-R,
DVD-RW/-R,
BD-RE/-R
Music recorded on CD-RW/-R, DVD-RW/-R, BD-RE/-R discs or a USB
storage media containing MP3 or WMA contents.
PHOTO
CD-RW/-R,
DVD-RW/-R,
BD-RE/-R
Photos recorded on CD-RW/-R, DVD-RW/-R, BD-RE/-R discs or a USB
storage media containing JPEG contents.
| NOTES |
The product may not play certain CD-RW/-R and DVD-R because of the disc type or recording conditions.
If a DVD-RW/-R disc has not been recorded properly in DVD video format, it will not be playable.
Your product will not play content that has been recorded on a DVD-R at a bit rate that exceeds 10 Mbps.
Your product will not play content that has been recorded on a BD-R or USB device at a bit rate that exceeds 30
Mbps.
Playback may not work for some types of discs, or when you use specific operations, such as angle change
and aspect ratio adjustment. Information about the discs is written in detail on the disc box. Please refer to this if
necessary.
When you play a BD-J title, loading may take longer than a normal title or some functions may perform slowly.
Disc Types your Product cannot Play
• HD DVD
• DVD-ROM/PD/MV-Disc,
etc
• DVD-RAM
• Super Audio CD
(except CD layer)
• DVD-RW(VR mode)
• CVD/CD-ROM/CDV/
CD-G/CD-I/LD
(CD-Gs play audio only,
not graphics.)
• 3.9 GB DVD-R Disc for
Authoring.
| NOTES |
This product may not respond to all operating commands because some Blu-ray Disc, DVD, and CD discs allow
specific or limited operation and provide only certain features during playback.
Please note that this is not a defect in the product.
Samsung cannot guarantee that this product will play every disc bearing the Blu-ray Disc, DVD or CD logo because
disc formats evolve, and problems and errors may occur during the creation of Blu-ray Disc, DVD, and CD software
and/or the manufacture of discs.
Please contact the SAMSUNG Customer Care Centre at, if you have questions or encounter difficulty when playing
Blu-ray Disc, DVD, or CD discs in this product. Also, refer to rest of this user manual for additional information on
playback restrictions.
Some commercial discs and DVD discs purchased outside your region may not play on this product.
| 6 English
HT-F4200_50_XU_130211-1.indd 6
2013-02-13 오후 6:51:45
Region Code
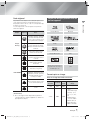
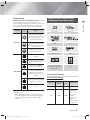
Logos of Discs the Product can Play
Region
Code
Area
A
North America, Central
America, South America,
Korea, Japan, Taiwan, Hong
Kong and South East Asia.
B
Europe, Greenland, French
territories, Middle East, Africa,
Australia and New Zealand.
C
India, China, Russia, Central
and South Asia.
1
The U.S., U.S. territories and
Canada
2
Europe, Japan, the Middle
East, Egypt, Africa, Greenland
3
Taiwan, Korea, the Philippines,
Indonesia, Hong Kong
4
Mexico, South America,
Central America, Australia,
New Zealand, Pacific Islands,
Caribbean
5
Russia, Eastern Europe, India,
North Korea, Mongolia
6
China
Blu-ray Disc
DVD-VIDEO
Blu-ray Disc
BD-LIVE
Dolby
DTS
3D Blu-ray Disc
DivX
PAL broadcast system in
U.K, France, Germany, etc.
Java
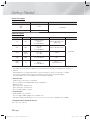
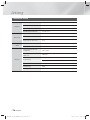
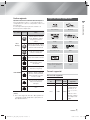
Supported Formats
Music File Support
File
Extension
Container
Audio
Codec
Support Range
*.mp3
MP3
MP3
-
WMA
* Sampling rates
(in kHz) - 8, 11, 16,
22, 32, 44.1, 48
* Bit Rates - All bit
rates from 5kbps
to 384kbps
*.wma
| NOTES |
If the Region number of a Blu-ray Disc/DVDs does not
Getting Started
Disc Type
02
Both products and discs are coded by region. These
regional codes must match for a disc to play. If the codes
do not match, the disc will not play.
The Region Number for this product is displayed on the
rear panel of the product.
WMA
correspond to the Region number of this product, the
product cannot play the disc.
English
HT-F4200_50_XU_130211-1.indd 7
7|
2013-02-13 오후 6:51:46
Getting Started
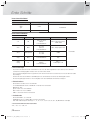
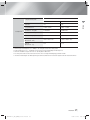
Picture File Support
File Extension
Type
*.jpg
*.jpeg
*.jpe
JPEG
*.png
PNG
Resolution
15360x8640
Video File Support
File Extension
Container
Video Codec
Audio Codec
*.avi
AVI
DivX 3.11/4/5/6
MP4v3
H.264 BP/MP/HP
MP3, Dolby Digital, DTS,
WMA, PCM
*.mkv
MKV
VC-1 AP
DivX 5/6
H.264 BP/MP/HP
MP3, Dolby Digital, DTS
*.wmv
WMV
(wmv9)
VC-1 AP
VC-1 SM
WMA
*.mp4
MP4
MP4 (mp4v)
H.264 BP/MP/HP
AAC
*.mpg
*.mpeg
PS
MPEG1
MPEG2
H.264 BP/MP/HP
MP1, 2
Dolby Digital, DTS
Resolution
1920x1080
Limitations
- Even when a file is encoded by a supported codec listed above, the file might not be played if its content has a
problem.
- Normal playback is not guaranteed if the file’s container information is wrong or the file itself is corrupted.
- Files having a higher bit rate/frame rate than standard may stutter during sound/video playback.
- The Seek (skip) function is not available if the file’s index table is damaged.
Video decoder
- Supports up to H.264 Level 4.1 and AVCHD
- Does not support H.264 FMO/ASO/RS and VC1 SP/MP/AP L4
- MPEG4 SP, ASP :
Below 1280 x 720 : 60 frames max
Above 1280 x 720 : 30 frames max
- Does not support GMC 2 or higher
Audio decoder
- Supports WMA 7, 8, 9 and STD
- Does not support WMA sampling rate of 22050Hz mono.
- AAC: Max sampling rate: 96Khz (8, 11, 12, 16, 22,24, 32,44.1, 48, 64, 88.2, 96) Max bit rate: 320kbps
Supported DivX subtitle file formats
*.ttxt, *.smi, *.srt, *.sub, *.txt
| 8 English
HT-F4200_50_XU_130211-1.indd 8
2013-02-13 오후 6:51:48
AVCHD (Advanced Video Codec High Definition)
02
Getting Started
• This product can play back AVCHD format discs. These discs are normally recorded and used in camcorders.
• The AVCHD format is a high definition digital video camera format.
• The MPEG-4 AVC/H.264 format compresses images with greater efficiency than the conventional image compressing
format.
• Some AVCHD discs use the “x.v.Colour” format. This product can play back AVCHD discs that use “x.v.Colour”
format.
• “x.v.Colour” is a trademark of Sony Corporation.
• “AVCHD” and the AVCHD logo are trademarks of Matsushita Electronic Industrial Co., Ltd. and Sony Corporation.
| NOTES |
Some AVCHD format discs may not play, depending on the recording conditions.
AVCHD format discs need to be finalised.
“x.v.Colour” offers a wider colour range than normal DVD camcorder discs.
Some DivX, MKV and MP4 format discs may not play, depending on their video resolution and frame rate.
Notes on the USB connection
•
•
•
•
•
•
•
•
•
•
•
•
•
Your product supports USB storage media, MP3 players, digital cameras, and USB card readers.
The product does not support folder or file names longer than 128 characters.
Some USB/External HDD/digital camera devices may not be compatible with the product.
Your product supports the FAT 16, FAT 32, and NTFS files systems.
Connect USB devices directly to the product’s USB port. Connecting through a USB cable may cause compatibility
problems.
Inserting more than one memory device into a multi-card reader may cause the reader to operate improperly.
The product does not support the PTP protocol.
Do not disconnect a USB device during a “loading” process.
The bigger the image resolution, the longer the image takes to display.
This product cannot play MP3 files with DRM (Digital Rights Management) downloaded from commercial sites.
Your product only supports video that is under 30fps (frame rate).
You must remove the USB storage device safely (by performing the “Safely Remove USB” function) to prevent
possible damage to the USB memory.
Press the HOME button to move to the home menu, press the YELLOW (C) button, and then press the E button.
SAMSUNG is not responsible for any data file damage or data loss.
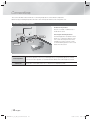
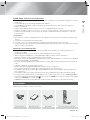
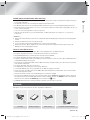
Accessories
Check for the supplied accessories below.
FUNCTION
VOLUME
-
MUTE
+
RDS DISPLAY
TA
1
2
PTY -
PTY SEARCH
4
5
7
8
3
PTY +
6
9
TITLE MENU
DISC MENU
0
SUBTITLE
POPUP
HOME
REPEAT
TOOLS
INFO
EXIT
RETURN
TUNER
MEMORY MO/ST
A
B
TV SOUND DPS/EQ
C
Power Cable
User Manual
FM Antenna
D
TUNING
DOWN
UP
Remote Control
Batteries (AAA size)
English
HT-F4200_50_XU_130211-1.indd 9
9|
2013-02-13 오후 6:51:48
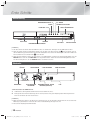
Getting Started
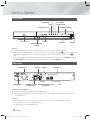
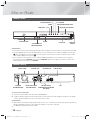
Front Panel
PLAY/PAUSE
ENTER
STOP
OPEN/CLOSE
VOLUME CONTROL
FUNCTION
5V 500mA
DISPLAY
DISC TRAY
USB HOST
POWER
REMOTE CONTROL
SENSOR
| NOTES |
To upgrade the product's software through the USB Host jack, you must use a USB memory stick.
When the product displays the Blu-ray menu, you cannot start the movie by pressing the 6 button on the product
or the remote. To play the movie, you must select Play Movie or Start in the disc menu, and then press the E
button.
If you use the Internet service or play the USB device contents on the TV, you cannot select the BD/DVD mode with
the FUNCTION button. Stop the playing contents on the TV first to select the BD/DVD mode.
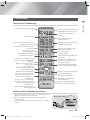
Rear Panel
AUX IN
COOLING FAN
AUX IN
FRONT R
FRONT L
SUBWOOFER
,03('$1&(ȍ
POWER
SPEAKER OUTPUT
CONNECTORS
HDMI OUT
FM ANT
L
R
SPEAKERS OUT
POWER CORD
*FM ANT
OPTICAL
DIGITAL
AUDIO IN
HDMI OUT
LAN
EXTERNAL DIGITAL AUDIO
IN (OPTICAL)
LAN
* Connecting the FM Antenna
1.
2.
Connect the FM antenna supplied to the FM ANTENNA Jack.
Slowly move the antenna wire around until you find a location where reception is good, then fasten it to a wall or
other rigid surface.
| NOTES |
Ensure a minimum of 10 cm of clear space on all sides of the home cinema to ensure adequate ventilation.
Do not obstruct the cooling fan or ventilation holes.
This product does not receive AM broadcasts.
| 10 English
HT-F4200_50_XU_130211-1.indd 10
2013-02-13 오후 6:51:51
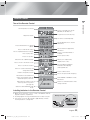
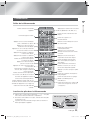
Remote Control
02
Tour of the Remote Control
Getting Started
Turn the product on and off.
FUNCTION
VOLUME
Adjust the volume.
-
MUTE
TA
1
2
3
PTY -
PTY SEARCH
PTY +
4
5
6
7
8
Press to view the disc menu.
Cut off the sound temporarily.
Use the RDS function to receive
FM stations.
9
TITLE MENU
DISC MENU
0
POPUP
Press to skip backwards or forwards.
Use to enter the Popup menu/
Title menu.
Press to search backwards or
forwards.
Press to play a disc.
Press to pause a disc.
Press to stop a disc.
SUBTITLE
HOME
REPEAT
Allows you to repeat a title,
chapter, track or disc.
Selects the disc subtitle language.
Press to move to the Home screen.
To open and close the disc tray.
+
RDS DISPLAY
Press numeric buttons to operate
options.
Press to select Blu-ray's mode.
(BD/DVD, D. IN, AUX, etc.).
TOOLS
INFO
Press to use the Tools menu.
Use to display the playback
information when playing
a Blu-ray/DVD disc.
Select on-screen menu items and
change menu value.
Return to the previous menu.
EXIT
RETURN
TUNER
MEMORY MO/ST
These buttons are used both for
menus on the product and also
several Blu-ray Disc functions.
A
B
TV SOUND DPS/EQ
C
Audio signal can output to home
cinema speaker or TV speaker.
(See page 28)
Select the desired DSP/EQ audio
mode.
Use to set a preset radio frequency.
D
TUNING
DOWN
Press to exit the menu.
UP
Select MONO or STEREO for radio
broadcasts.
Search for active FM stations and to
change channels.
Installing batteries in the Remote Control
Make sure to match the “+” and “–” ends of the batteries with the
diagram inside the compartment.
Battery size: AAA
Assuming typical TV usage, the batteries last for about one year.
The remote control can be used up to approximately 7 meters
from the product in a straight line.
English
HT-F4200_50_XU_130211-1.indd 11
11 |
2013-02-13 오후 6:51:52
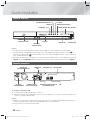
Connections
This section describes various methods of connecting the product to other external components.
Before moving or installing the product, be sure to turn off the power and disconnect the power cord.
Connecting the Speakers
Position of the product
Place it on a stand or cabinet shelf, or
under the TV stand.
Subwoofer
Front (R)
Centre
Front (L)
Front Speakers
Subwoofer
Selecting the Listening Position
The listening position should be located
about 2.5 to 3 times the distance of the
TV's screen size away from the TV. For
example, if you have a 46 inch screen,
locate the listening position 2.92 to 3.50
meters from the screen.
Place these speakers in front of your listening position, facing inwards (about 45°) toward
you. Place the front speakers so that their tweeters will be at the same height as your ear.
The position of the subwoofer is not so critical. Place it anywhere you like.
| 12 English
HT-F4200_50_XU_130211-1.indd 12
2013-02-13 오후 6:51:55
Connecting The Speakers
2.
To attach speaker wire to each speaker:
a. Press down the red tab on the back of the speaker, insert the red wire, and then
release the tab.
b. Press down the black tab on the back of the speaker, insert the black wire, and
then release the tab.
Connect the speaker wire plugs from each speaker to the back of the product by
matching the colours of the speaker plugs to the colours of the speaker jacks.
Front Speaker (R)
FRONT
FRONT
R
L
IMPEDANCE : 3
3.
Red
Black
Connections
Match each speaker cable bundle to the correct speaker by matching the colour
coded plug on each bundle to the coloured sticker on the bottom of each speaker.
03
1.
Front Speaker (L)
SUBWOOFER
SPEAKERS OUT
Subwoofer
R
FRONT
L
IMPEDANCE : 3
AUX
IN
FRONT
SUBWOOFER
SPEAKERS OUT
FM ANT
L
R
OPTICAL
DIGITAL
AUDIO IN
| CAUTION |
If you want to install the product on the wall, fasten the screws or nails on the wall firmly and use the holes on the
rear of speaker to install. However, when you install it, accessories (nails or screws) and installation is not provided by
the company.
Do not let children play with or near the speakers. They could get hurt if a speaker falls.
When connecting the speaker wires to the speakers, make sure that the polarity (+/ –) is correct.
Keep the subwoofer speaker out of reach of children to prevent children from inserting their hands or alien
substances into the duct (hole) of the subwoofer speaker.
Do not hang the subwoofer on the wall through the duct (hole).
| NOTES |
If you place a speaker near your TV set, the screen colour may be distorted because of the magnetic field.
English
HT-F4200_50_XU_130211-1.indd 13
13 |
2013-02-13 오후 6:51:56
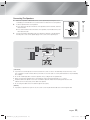
Connections
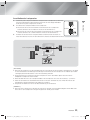
Connecting to a Network Router
AUX
IN
FM ANT
FRONT
R
FRONT
SUBWOOFER
SPEAKERS OUT
L
IMPEDANCE : 3
POWER
L
R
OPTICAL
DIGITAL
AUDIO IN
HDMI OUT
LAN
Broadband
modem
Broadband
service
Or
Broadband
service
Broadband modem (with integrated router)
Router
| NOTES |
Your router or your Internet Service Provider's policies may prevent the product from accessing Samsung's software
update server. If this occurs, contact your Internet Service Provider (ISP) for more information.
DSL users, please use a router to make a network connection.
To use the DLNA function, you must connect a PC to the network as shown in the figure. The connection can be
wired or wireless.
| 14 English
HT-F4200_50_XU_130211-1.indd 14
2013-02-13 오후 6:51:57
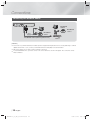
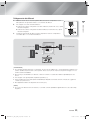
Connecting to TV/External Devices
03
Connections
AUX
IN
FM ANT
L
FRONT
R
FRONT
SUBWOOFER
SPEAKERS OUT
L
IMPEDANCE : 3
AUX
IN
POWER
FM ANT
L
R
OPTICAL
DIGITAL
AUDIO IN
HDMI OUT
LAN
R
OPTICAL
DIGITAL
AUDIO IN
Method 1
R
Red
W
White
HDMI OUT
LAN
Method 2
External Devices
OPTICAL OUT
HDMI IN
Connecting to a TV
Connect an HDMI cable (not supplied) from the HDMI OUT jack on the back of the product to the HDMI IN jack on
your TV. If the TV supports ARC, you can hear the audio from your TV through the home cinema with only this cable
connected. See page 19 in this manual and the section on ARC in your TV's user's manual for details.
Connecting to External Devices
To select the correct mode for an external device after you have connected the device, press the FUNCTION button.
Each time you press the button, the mode changes in this order : BD/DVD D. IN AUX FM
Method 1 AUX IN : Connecting an External Analogue Component
Using an RCA audio cable (not supplied), connect the AUDIO In jack on the product to the AUDIO Out jack on the
external analogue component. Select the AUX mode.
• Be sure to match the colours on the cable plugs to the colours on the input and output jacks.
Method 2 OPTICAL : Connecting an External Digital Audio Component
To connect the digital audio output of digital signal components such as Cable Boxes and Satellite Receivers (Set-TopBoxes).
Using a digital optical cable (not supplied), connect the Optical Digital Audio In jack on the product to the Digital Optical
Out jack of the external digital device using a digital optical cable.
Select the D. IN mode.
| NOTES |
To see video from your Cable Box/Satellite receiver, you must connect its video output directly to your TV.
This system supports Digital sampling frequencies of 32 kHz or higher from external digital components.
This system supports only DTS and Dolby Digital audio. MPEG audio, a bitstream format, is not supported.
English
HT-F4200_50_XU_130211-1.indd 15
15 |
2013-02-13 오후 6:51:58
Settings
4:3 Letter Box - For older, standard screen
analogue TVs. Displays 4:3 pictures in full screen
and 16:9 pictures in letter box format that retains
the 16:9 aspect ratio but puts black bars above and
below the picture.
4:3 Pan-Scan - For older, standard screen analogue
TVs. Displays 4:3 pictures in full screen and 16:9
pictures in Pan-Scan format that fills the screen, but
cuts off the left and right sides of the picture and
enlarges the middle vertically.
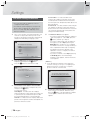
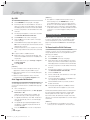
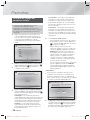
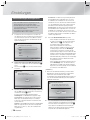
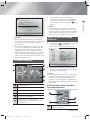
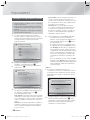
The Initial Settings Procedure
• The Home menu will not appear if you do not
configure the initial settings.
• The OSD (On Screen Display) may change in this
product after you upgrade the software version.
• The access steps may differ depending on the
menu you selected.
1.
Turn on your TV after connecting the product, and
then turn on the product. When you turn on the
product for the first time, the product automatically
displays the Initial Settings Language screen.
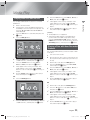
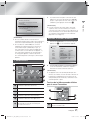
5 . The Network - Wired screen appears.
- If you have a network with dynamic IP addresses
- and most people do - select Auto, press the
E button, and then go to Step 6.
- If you have a network with static IP addresses,
we suggest you select Skip by pressing the
BLUE (D) button, and then go to "Configuring
Your Network Connection" on page 20 after you
have completed the initial setup. "Configuring
Your Network Connection" provides a full
explanation of how to configure your network
connection manually.
- If you have no network, select Skip by pressing
the BLUE (D) button. The Initial Settings
Complete screen appears, and then the Home
screen appears.
Initial Settings I On-Screen Language
Select a language for the on-screen displays.
English
Français
Deutsch
Español
Italiano
Nederlands
> Move
" Select
2.
Press the ▲▼ buttons to select the desired
language, and then press the E button.
3.
Press the E button to start function setup.
| NOTES |
If you skip network setup here or the setup does
not work correctly, you can go to "Configuring Your
Network Connection" on page 20 to set up the
product's network connection later.
p
Initial Settings
TV Aspect and Network will be set.
Each setting may be changed later under "Settings".
Initial Settings I Network - Wired
Choose the method to configure Internet Protocol (IP).
Please make sure that the Ethernet cable is connected.
Start
Auto : Configure IP automatically.
Auto
a Previous
4.
Manual
" Select
The TV Aspect screen appears. Press the ▲▼
buttons to select desired a TV Aspect ratio, and
then press the E button.
You have four choices:
16:9 Original - For widescreen TVs. Displays
widescreen pictures in their original 16:9 format and
4:3 pictures (the old, standard format) in 4:3 pillar
box format with black bars on the left and right.
16:9 Full - For widescreen TVs. Displays widescreen
pictures in their original 16:9 format and expands 4:3
pictures to fill the 16:9 screen.
a Previous d Skip
6.
< Move " Select
The product verifies the network connection and
then connects to the network. When it is done,
press the E button. The Initial Settings Complete
screen appears, and then the Home screen
appears.
| 16 English
HT-F4200_50_XU_130211-1.indd 16
2013-02-13 오후 6:51:59
MAC Address (d0:66:7b:dc:28:fc)
IP Address, Subnet Mask, Gateway, DNS Server
| NOTES |
To play or view video, photo, music files located on
Your network is operating properly.
If you still have a network problem, contact your network service provider.
your PC, you must connect your home cinema and
PC to a home network and you must download,
install, and configure the DLNA software on your PC.
(See page 22.)
OK
" Select
Settings
Gateway Ping
Internet Service Test
04
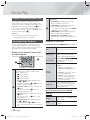
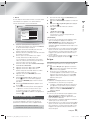
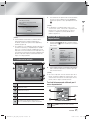
To select an option on the Home screen, move the
cursor using the ▲▼◄► buttons until it highlights
the option of your choice, and then press the E
button.
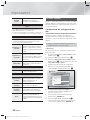
1.
Initial Settings I Network - Wired
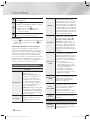
Accessing the Settings Screen
| NOTES |
If you want to display the Initial Setting screen again
and make changes, select the Reset option. (See
page 20)
If you use a HDMI cable to connect the product to
an Anynet+ (HDMI-CEC)-compliant Samsung TV and
1.) You have set the Anynet+ (HDMI-CEC) feature to
ON in both the TV and the product and 2.) You have
set the TV to a language supported by the product,
the product will select that language as the preferred
language automatically.
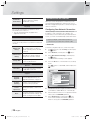
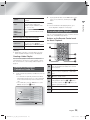
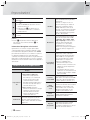
Select Settings on the Home screen, and then
press the E button. The Settings screen appears.
1.
Settings
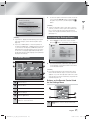
The Home Screen
1
Display
3D Settings
Audio
TV Aspect Ratio
: 16:9 Original
Network
BD Wise
: Off
System
Resolution
: Auto
Language
Movie Frame (24 Fs)
: Off
Security
HDMI Color Format
: Auto
General
HDMI Deep Color
: Off
Support
Progressive Mode
: Auto
►
3
Videos
Photos
Music
To access the menus, sub-menus, and options
on the Settings screen, please refer to the remote
control illustration below.
2.
Settings
4
2
| NOTES |
If you leave the product in the stop mode for more
5
App 1
No Disc
App 2
a Change Device
App 3
d View Devices
App 4
" Enter
1
Selects Photos.
2
Selects Videos.
3
Selects Music.
4
Selects Settings.
5
Selects applications.
6
Displays the buttons you can use on the
remote to access functions.
6
than 5 minutes without using it, a screen saver will
appears on your TV. If the product is left in the screen
saver mode for more than 20 minutes, the power will
automatically turns off.
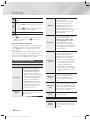
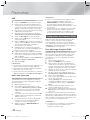
Buttons on the Remote Control Used
for the Settings Menu
SUBTITLE
HOME
REPEAT
1
TOOLS
INFO
RETURN
EXIT
3
2
4
TUNER
1
HOME Button : Press to move to the Home
screen.
English
HT-F4200_50_XU_130211-1.indd 17
17 |
2013-02-13 오후 6:52:02
Settings
2
RETURN (') Button : Return to the previous
menu.
3
E (Enter) / DIRECTION Button :
• Press ▲▼◄►to move the cursor or select an
item.
• Press the E button to activate the currently
selected item or confirm a setting.
4
EXIT Button : Press to exit the current menu.
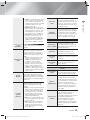
BD Wise
BD Wise is Samsung’s latest interconnectivity feature.
When you connect a Samsung
product and a Samsung TV
with BD Wise to each other via
HDMI, and BD Wise is on in
both the product and TV, the
product outputs video at the video
resolution and frame rate of the
Blu-ray/DVD Disc.
Resolution
Lets you set the output resolution
of the HDMI video signal to
BD Wise, Auto, 1080p, 1080i,
720p, 576p/480p. The number
indicates the number of lines
of video per frame. The i and p
indicate interlaced and progressive
scan, respectively. The more lines,
the higher quality.
Movie Frame
(24 Fs)
Setting the Movie Frame (24 Fs)
feature to Auto lets the product
adjust its HDMI output to 24
frames per second automatically
for improved picture quality if
attached to a 24Fs compatible TV.
• You can enjoy the Movie Frame
(24 Fs) feature only on a TV
supporting this frame rate.
• Movie Frame is only available
when the product is in the HDMI
1080i or 1080p output resolution
modes.
HDMI Color
Format
Lets you set the colour space
format for the HDMI output to
match the capabilities of the
connected device (TV, monitor,
etc).
HDMI Deep
Color
Lets you set the product to output
video from the HDMI OUT jack with
deep colour. Deep colour provides
more accurate colour reproduction
with greater colour depth.
Progressive
Mode
Lets you improve picture quality
when viewing DVDs.
| NOTES |
The E button on the product's front panel can be
used for same purpose as the E button on the
remote control.
Detailed Function Information
Each Settings function, menu item, and individual option
is explained in detail on-screen. To view an explanation,
use the ▲▼◄► buttons to select the function, menu
item, or option.
The explanation will usually appear on the bottom of the
screen. A short description of each Settings function
starts on this page. Additional information on some of the
functions is also in the Appendix of this manual.
Settings Menu Functions
Display
3D Settings
TV Aspect
Ratio
Set up the 3D related functions.
3D Blu-ray Playback Mode:
Select whether to play a Bluray Disc with 3D contents in 3D
Mode. If you move to the Home
or Smart Hub Home menu while
in 3D mode, the product will
switch to 2D automatically.
Screen Size: Enter the size of
the TV attached to the product.
The product will automatically
adjust the 3D output to the
screen size of the TV.
Lets you adjust the output of the
product to the screen size of your
TV. See page 16.
Audio
Speaker
Settings
Lets you adjust the following
speaker settings and turn the test
tone on and off so you can test the
speakers.
| 18 English
HT-F4200_50_XU_130211-1.indd 18
2013-02-13 오후 6:52:06
Lets you select which speakers you
want active, either the TV's speakers
or the home cinema's speakers.
Audio Return
Channel
Lets you direct the sound from the
TV to the Home Cinema speakers.
Requires a HDMI connection and
an Audio Return Channel (ARC)
compatible TV.
• When Audio Return Channel set
to on, use HDMI Cable to connect
the product to the TV. At this time,
optical input does not work.
• When Audio Return Channel
set to auto, use HDMI Cable to
connect the product to the TV. At
this time, ARC and optical input is
selected automatically.
Digital Output
Dynamic
Range Control
Lets you set the Digital Output to
match the capabilities of the AV
receiver you’ve connected to the
product. For more details, please
refer to the digital output selection
table. (See page 32)
Lets you apply dynamic range
control to Dolby Digital, Dolby Digital
Plus, and Dolby TrueHD audio.
Auto: Automatically controls the
dynamic range of Dolby TrueHD
audio, based on information in the
Dolby TrueHD soundtrack. Also
turns dynamic range control off for
Dolby Digital and Dolby Digital Plus.
Off: Leaves the dynamic range
uncompressed, letting you hear the
original sound.
On: Turns dynamic range control on
for all three Dolby formats. Quieter
sounds are made louder and the
volume of loud sounds is reduced.
Downmixing
Mode
Lets you select the multi-channel
downmix method that is compatible
with your stereo system. You
can choose to have the product
downmix to normal stereo or to
surround compatible stereo.
Network
Wired
Network
Settings
For more information about Network
Settings and network functions, see
"Networks and the Internet" starting
on page 20.
Network Test
Lets you test the Internet Protocol
setup to see if it is working correctly.
Network
Status
BD-Live
Internet
Connection
Lets you check whether a
connection to the network and the
Internet have been established.
Lets you allow or prohibit an Internet
connection for the BD-Live service.
System
Initial Settings
Lets you re-run the Initial Settings
procedure. See page 16 for details.
Anynet+
(HDMI-CEC)
Anynet+ is a convenient function
that offers linked operations with
other Samsung products that have
the Anynet+ feature and lets you
control those products with one
Samsung TV remote. To operate
this function, you must connect this
product to an Anynet+ Samsung TV
using a HDMI cable.
BD Data
Management
Lets you manage the contents you
downloaded through a Blu-ray disc
that supports the BD-Live service.
You can view the information about
the USB device you are using for
BD Live data storage including
the storage space. You can also
delete BD Live data and change the
device.
English
HT-F4200_50_XU_130211-1.indd 19
Settings
Speaker
Selection
Audio Sync
When the product is attached to a
digital TV, lets you adjust the audio
delay so that the audio syncs with
the video. You can set the delay
between 0 and 300 milliseconds.
04
Level: Lets you adjust the relative
loudness of each speaker from 6db
to -6db. For example, if you like
deep bass, you can increase the
loudness of the subwoofer by 6db.
Distance: Lets you adjust the
relative distance of each speaker
from the listening position up to 30
feet. The farther the distance, the
louder the speaker will be.
Test Tone: Lets you run the test
tone function so you can test your
adjustments. Setting Test Tone to
On turns the Test Tone on. Setting
it to Off turns it off.
19 |
2013-02-13 오후 6:52:06
Settings
DivX® Video
On Demand
View DivX® VOD Registration
Codes to purchase and play
DivX® VOD contents.
Language
You can select the language you prefer for the OnScreen Menu, disc menu, etc.
• The selected language will only appear if it is
supported on the disc.
Networks and the Internet
When you connect this product to a network, you can
use network based applications and functions such as
BD-LIVE and upgrade the product's software through the
network connection.
Configuring Your Network Connection
Before you begin, contact your ISP to find out if your
IP address is static or dynamic. If it is dynamic, we
recommend you use the Automatic procedure below. If it
is static, you must use the Manual procedure that follows.
Security
The default PIN is 0000. Enter the default PIN to
access the security function if you haven't created your
own PIN.
BD Parental
Rating
Prevents playback of Blu-ray Discs
with a rating equal to or above a
specific age ratings unless the PIN
is entered.
DVD Parental
Rating
Prevents playback of DVDs with a
rating above a specific numerical
ratings unless the PIN is entered.
Change PIN
Change the 4-digit PIN used to
access security functions.
• Before you begin, confirm that the product is
connected to your router with a network cable.
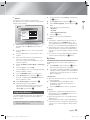
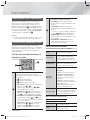
1.
In the Home menu, select Settings, and then press
the E button.
2.
Select Network, and then press the E button.
3.
Select Wired Network Settings, and then press
the E button.
The Wired Network Settings screen appears.
4.
Press the ► button on the Internet Protocol Setup
menu.
Use ▲▼ button to select Auto, and then press the
E button.
General
Time Zone
You can specify the time zone that
is applicable to your area.
Settings
Audio
For more information about the
Software Upgrade function, see
"Upgrading Software" on page 21.
Terms of
Service
Agreement
Reset
Provides contact information for
assistance with your product.
View the general disclaimer
regarding third party contents and
services.
All settings will revert to the default
except for the network settings. The
default security password is 0000.
Internet Protocol Setup : Auto
Network
IP Address
System
Subnet Mask
: 0
0
0
0
: 0
0
0
0
Language Gateway
: 0
0
0
0
Security DNS
: Auto
0
0
0
General
Contact
Samsung
Wired Network Settings
Display
Support
Software
Upgrade
Automatic
To start the configuration process, follow these steps:
: 0
DNS Server
Support
> Move
" Select
' Return
5.
The Network function acquires and fills in the values
for IP Address, Subnet Mask, etc., automatically.
6.
After the Network function has acquired the network
values, press the RETURN (') button.
7.
Select Network Test, and then press E. The
home cinema validates the network connection.
When it is done, press the RETURN (') button.
| 20 English
HT-F4200_50_XU_130211-1.indd 20
2013-02-13 오후 6:52:07
Manual
Wired Network Settings
Display
Audio
Network
IP Address
: 0
System
Subnet Mask
: 255 255 255
0
Language Gateway
: 0
Security DNS
: Manual
General
: 0
0
0
Select Support, and then press the E button.
0
0
0
0
0
0
" Select
' Return
Select Software Upgrade, and then press the E
button.
4.
Select one of the following methods:
• By Online
• By USB
• Auto Upgrade Notification
5.
Press the E button.
Directions for each method begin below.
0
Support
> Move
2.
3.
Internet Protocol Setup : Manual
DNS Server
In the Home menu, select Settings, and then press
the E button.
Settings
Settings
1.
04
If you have a static IP address or the Automatic
procedure does not work, you’ll need to set the Network
Settings values manually.
| NOTES |
The update is complete when the product turns off
1.
Follow the first four steps in the Automatic
procedure, but select Manual instead of Auto in
Step 4.
2.
Press the ▼ button to go to the first entry field (IP
Address).
3.
Use the number buttons on your remote to enter
numbers.
4.
When done with each field, use the ► button to
move successively to the next field.
You can also use the other arrow buttons to move
up, down, and back.
5.
Enter the IP Address, Subnet Mask, and Gateway
values.
6.
7.
Press the ▼ button to go to DNS.
8.
9.
Press the RETURN (') button on your remote.
Press the ▼ button to go to the first DNS entry field.
Enter the numbers as above.
Select Network Test, and then press E. When
the test is completed, press RETURN (') button to
exit to the previous screen.
10. Select Network Status, and then press E.
after restarting. Press the POWER button to turn
on the updated product for your use. Never turn the
product on or off manually during the update process.
Samsung Electronics takes no legal responsibility for
product malfunction caused by an unstable Internet
connection or consumer negligence during a software
upgrade.
If you want to cancel the upgrade while the upgrade
software is downloading, press the E button.
By Online
Your product must be connected to the Internet to use
the By Online function. Remove all discs before you
begin.
1.
Select By Online, and then press the E button.
The Connecting to Server message appears.
2.
If an update is available, a popup message appears
asking if you want to upgrade. If you select Yes, the
product turns off automatically, turns on, and then
begins the upgrade.
| IMPORTANT |
Never turn the home cinema on or off manually during
3.
11. The Network Status screen appears.
The product verifies the network connection and
then connects to the network. When it is done,
highlight OK, and then press E.
4.
a software upgrade.
The update progress popup appears. When
the update is completed, the product turns off
automatically again.
Press the POWER button to turn on the product.
| NOTES |
Upgrading Software
The Software Upgrade menu allows you to upgrade the
product’s software for performance improvements or
additional services.
• Never turn the product off or back on manually
during the update process.
The update is complete when the product turns off
after restarting. Press the POWER button to turn on
the updated product for your use.
Never turn the product off or on manually during the
update process.
Samsung Electronics takes no legal responsibility for
a product malfunction caused by an unstable internet
connection or consumer negligence during software
upgrade.
English
HT-F4200_50_XU_130211-1.indd 21
21 |
2013-02-13 오후 6:52:09
Settings
By USB
1.
2.
3.
Visit www.samsung.com.
4.
Left click your product's model number in the drop
down list.
5.
On the page that appears, scroll down to and then
click Firmware Manuals & Downloads.
6.
7.
Click Firmware in the centre of the page.
8.
Click Send in the first pop-up that appears. Click
OK in the second pop-up to download and save the
firmware file to your PC.
9.
Unzip the zip archive to your computer. You should
have a single folder with the same name as the zip
file.
Click SUPPORT on the top right of the page.
Enter the product's model number into the search
field. As you enter the model number, a drop down
will display products that match the model number.
Click the ZIP icon in the File column on the right
side of the page.
10. Copy the folder to a USB flash drive.
11. Make sure no disc is inserted in the product, and
then insert the USB flash drive into the USB port of
the product.
12. In the product’s menu, go to Settings > Support >
| NOTES |
The update is complete when the product turns off
after restarting. Press the POWER button to turn
on the updated product for your use. Never turn the
product on or off manually during the update process.
Samsung Electronics shall take no legal responsibility
for product malfunction caused by unstable of Internet
connection or consumer negligence during software
upgrade.
Setting Up DLNA
DLNA enables you to play music, video and photo files
in your PC using this product. To use DLNA, you must
connect the product to your PC via the network (See
page 14) and install the SAMSUNG PC Share Manager
on the PC.
To Download the DLNA Software
To use DLNA with your PC, you must install DLNA
software on your PC. You can download the PC software
and get detailed instructions for using DLNA from the
Samsung.com website.
1.
2.
3.
Go to www.samsung.com.
4.
Left click your product's model number in the drop
down list.
5.
On the page that appears, scroll down to and then
click Firmware Manuals & Downloads.
6.
7.
Click the Software tab.
8.
In the first pop-up that appears, click Send. In the
second pop-up, click Save File.
9.
Find the DLNA install file on your disk, and then
double click the file.
Software Upgrade.
13. Select By USB.
| NOTES |
There should be no disc in the product when you
upgrade the software using the USB Host jack.
Never turn the product off or on manually during the
update process.
When the software upgrade is done, check the
software details in the Software Upgrade menu.
Auto Upgrade Notification
If your product is connected to the network and you
set Auto Upgrade Notification on, the product will notify
you if a new software version is available with a pop-up
message.
1.
2.
Turn on the product.
3.
To upgrade the firmware, select Yes. The product
turns off automatically, turns on, and then begins
the upgrade.
4.
The update progress popup will appear. When
the update is complete, the product will turn off
automatically again.
5.
In the Software Upgrade menu, set Auto Upgrade
Notification to On.
If there is a new software version available, the
product will notify you with a pop-up message.
Click SUPPORT at the top of the page.
Enter the product's model number into the search
field. As you enter the model number, a drop down
will display products that match the model number.
On the software tab, click the EXE icon on the right
side of the DLNA line.
10. In the pop-up that appears, click Run, and then
follow the directions that appear on your screen.
Download the DLNA Installation/Instruction manual from
the same Software Tab by clicking the corresponding
PDF file symbol in the File column on the right. The
file, in PDF format, will download and open. Follow the
directions to install and setup DLNA. You can view and/or
save the file.
| NOTES |
To use DLNA with your smartphone, you need to
connect your set & smartphone to the same router.
Press the POWER button to turn on the product.
| 22 English
HT-F4200_50_XU_130211-1.indd 22
2013-02-13 오후 6:52:10
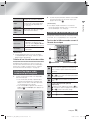
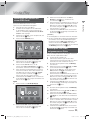
Media Play
Playing Files on a USB Device
Move to the Home menu.
3.
Press the ◄► button to select Yes, then press the
E button.
4.
Press the RED (A) button.
In Stop mode, connect the USB storage device to
the USB port on the front panel of the product. The
message “Do you want to access the device?”
will be displayed.
Videos
Photos
Music
8-1. Use the ▲▼◄► buttons to select a file to play or
view, and then press the E button.
Media Play
1.
2.
7-1. If files appear on the screen go to Step 8-1. If file
folders appear on the screen, use the ▲▼◄►
buttons to select a folder, press E, and then go to
Step 8-1.
05
You can play multimedia files located on a connected
USB device.
6-1. Press the ▲▼ buttons to select Videos, Photos or
Music, then press the E button.
| NOTES |
3D file playback is not supported.
To prevent possible damage to the USB memory,
you must remove the USB storage device safely
using the “Safely Remove USB” function. Press the
HOME button to move to the Home menu, select the
YELLOW (C) button, and then press the E button.
Settings
Playing a Disc with User Recorded
Content
CD
USB Flash Disk
App 2
App 3
a Change Device
CD
App 4
d View Devices
" Enter
5.
Press the ▲▼ buttons to select USB Flash Memory
or USB Flash Disc, and then press the E button.
6.
Press the ▲▼◄► buttons to select Videos,
Photos or Music, then press the E button.
7.
If files appear on the screen go to Step 8. If file
folders appear on the screen, use the ▲▼◄►
buttons to select a folder, press E, and then go to
Step 8.
8.
You can play multimedia files you have recorded on DVD
or CD discs.
1.
2.
Turn on the home cinema.
3.
4.
After the disc loads, press the RED (A) button.
5.
Press the ▲▼ buttons to select Videos, Photos or
Music, then press the E button.
6.
If files appear on the screen, go to Step 7. If file
folders appear on the screen, use the ▲▼◄►
buttons to select a folder, press E, and then go to
Step 7.
7.
Use the ▲▼◄► buttons to select a file to play or
view, and then press the E button.
Use the ▲▼◄► buttons to select a file to play or
view, and then press the E button.
OR
4-1. Press the BLUE (D) button.
CD
USB Flash Disk
Open the disc tray, place a user recorded disc into the
disc tray with the disc’s label facing up, and then close
the tray.
Press the ▲▼◄► buttons to select CD or DVD,
and then press the E button.
OR
Settings
3-1. After the disc loads, press the BLUE (D) button.
4-1. Press the ◄► buttons to select CD or DVD, and
then press the E button.
5-1. Press the ▲▼ buttons to select Videos, Photos or
Music, and then press the E button.
App 1
App 2
USB Flash Disk
App 3
App 4
d Home
" Enter
5-1. Press the ◄► buttons to select USB Flash Memory
or USB Flash Disc, and then press the E button.
6-1. If files appear on the screen go to Step 7-1. If file
folders appear on the screen, use the ▲▼◄►
buttons to select a folder, press E, and then go to
Step 7-1.
7-1. Use the ▲▼◄► buttons to select a file to play or
view, and then press the E button.
English
HT-F4200_50_XU_130211-1.indd 23
23 |
2013-02-13 오후 6:52:12
Media Play
Playing a Commercial Video Disc
Place a disc into the disc tray with the disc’s label
facing up and then close the disc tray. Playback starts
automatically. If it does not playback automatically, move
to Videos in the Home menu and press the E button.
In most cases, commercial videos will display a disc
menu. To play the movie on the disc, select Play on the
disc menu, and then press E.
2
| NOTES |
For more information about playing videos, go to
"Controlling Video Playback" on this page.
Controlling Video Playback
Using the disc menu, title menu, popup menu
and title list
• DISC MENU : During playback, press this
button to display the Disc menu.
• TITLE MENU : During playback, press this
button to display the Title menu.
- If your disc has a playlist, press the GREEN
(B) button to go to the playlist.
• POPUP MENU : During playback, press this
button to display the Pop-up menu.
• DISC MENU or TITLE MENU : During
playback, press this button to display the title
list.
Using the TOOLS Menu
You can control the playback of video files located
on Blu-ray, DVD, and CD discs, and on USB storage
devices. Depending on the media, some of the functions
described in this manual may not be available.
Buttons on the Remote Control used
for Video Playback
During playback, press the TOOLS button.
Title
If the movie or video have more than
one title, move to or select a desired
title.
Playing Time
Select to move to the specific
playback point. Use the numeric
buttons to input the playback point.
Repeat Mode
Select to repeat a specific title,
chapter (BD/DVD discs only) or
marked section.
Picture
Settings
Select to set the picture mode.
- Mode
User : Lets you adjust the
Brightness, Sharpness and so
on.
Dynamic : Choose this setting
to increase Sharpness.
Normal : Choose this setting
for most viewing applications.
Movie : This is the best setting
for watching movies.
Audio Sync
Lets you adjust the audio delay so
that the audio syncs with the video.
You can set the delay between 0
and 300 milliseconds.
TITLE MENU
DISC MENU
0
POPUP
2
1
SUBTITLE
1
HOME
REPEAT
Playback related buttons
The product does not play sound in Search,
Slow, or Step mode.
• 6 : Starts playback.
• 5 : Stops playback.
• 7 : Pauses playback.
• Fast Motion Play : During playback, press
the 3 or button.
Each time you press the 3 or button, the
playback speed will change.
• Slow Motion Play : In pause mode, press the
button.
Each time you press the button, the
playback speed will change.
• Step Motion Play : In pause mode, press the
7 button.
Each time you press the 7 button, a new
frame appears.
• Skip Motion Play : During playback, press
the 1 or 2 button.
Each time you press 1 or 2 button, the
disc moves to the previous or next chapter or
file.
Menu that appears only when a BD/DVD
disc plays
Chapter
Select to move to a chapter that you
desire to watch.
Audio
Select to set the desired audio
language.
| 24 English
HT-F4200_50_XU_130211-1.indd 24
2013-02-13 오후 6:52:16
Angle
To view a scene from another angle.
The Angle option displays the
number of angles available to view
(1/1, 1/2, 1/3, etc.).
BONUSVIEW
Video /
BONUSVIEW
Audio
Select to set the desired bonusview
option.
Information
| NOTES |
For more information about playing music, go to
"Controlling Music Playback" on this page.
Controlling Music Playback
You can control the playback of music content located on
DVDs, CDs, and USB storage devices.
Menu that appears only when a file plays
Full Screen
To play a particular track, use the ▲▼ buttons on the
remote to select the track, and then press the E
button.
2.
Select to set the desired full screen
size. You can select Original,
Mode1 (larger), and Mode2 (largest).
Check the video file's information.
Buttons on the Remote Control used
for Music Playback
RDS DISPLAY
1
| NOTES |
You can create a playlist of video files in a way that is
nearly identical to the way you create a playlist of music
files. For instructions, see "Creating a Music Playlist" on
page 26.
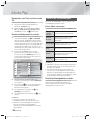
Playing a Pre-Recorded
Commercial Audio Disc
Insert an Audio CD (CD-DA) or an MP3 Disc into the
disc tray.
• For an Audio CD (CD-DA), the first track will be
played automatically. Tracks on a disc are played
in the order in which they were recorded on the
disc.
• For an MP3 disc, press the ▲▼ buttons to select
Music, then press the E button.
Playlist
TRACK 001
4
5
6
7
8
9
TITLE MENU
POPUP
4
5
6
O
1
NUMBER buttons : During Playlist playback,
press the desired track number. The selected
track is played.
2
Skip : During playback, press the 1 or 2
button to move to the previous or next music
track.
3
5 button : Stops a track.
4
Fast Play (Audio CD (CD-DA) only) :
During playback, press the 3 or button.
Each time you press the 3 or button, the
playback speed will change.
5
7 button : Pauses a track.
6
6 button : Plays the currently selected track.
04:07
TRACK 004
03:41
TRACK 005
03:17
TRACK 006
" Pause
3
S
04:27
TRACK 003
CD
1/12
05:57
TRACK 002
00:08 / 05:57
3
PTY +
2
Creating a Video Playlist
+
2
PTY SEARCH
0
menu may differ. All options may not be displayed.
TRACK 001
TA
1
PTY -
DISC MENU
Depending on the disc or storage device, the Tools
1.
Media Play
Select to set the desired subtitle
language.
05
Subtitle
03:35
Tools
' Return
English
HT-F4200_50_XU_130211-1.indd 25
25 |
2013-02-13 오후 6:52:18
Media Play
Repeating Tracks
Controlling Photo Playback
You can set the product to repeat tracks.
1.
2.
During music playback, press the TOOLS button.
You can control the playback of photos located on
DVDs, CDs, and USB storage devices.
Use ◄► button to select Off, Track or One, All or
Shuffle in Repeat Mode, and then press the E
button.
Using the Tools Menu
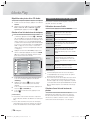
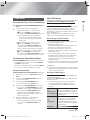
Creating a Music Playlist
1.
2.
If playing music from a commercial CD or DVD,
press the 5 or RETURN (') button. The Music
List Screen appears. If you are creating a playlist
from music on a user created disk or USB device,
access the Music list as described in "Playing Files
on a USB Device" on page 23 or "Playing a Disc
with User Recorded Content" on page 23.
Press the ▲▼◄► buttons to move to the desired
file, and then press the YELLOW (C) button to
select it. Repeat this procedure to select additional
files.
Music
TRACK 002
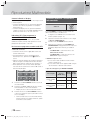
During playback, press the TOOLS button.
Start / Stop
Slide Show
Select to play/pause the slide show.
Slide Show
Speed
Select to adjust the slide show speed.
Background
Music
Select to listen to music while viewing
a slide show.
Zoom
Select to enlarge the current picture.
(Enlarge up to 4 times)
Rotate
Select to rotate a picture. (This will
rotate the picture either clockwise or
counter clockwise.)
Information
Shows the picture information including
the name and size, etc.
2 files selected 1/2 Page
TRACK 001
TRACK 002
05:57
04:27
TRACK 003
TRACK 004
04:07
03:41
TRACK 005
TRACK 006
03:17
03:35
| NOTES |
TRACK 007
TRACK 008
03:47
03:49
Depending on the disc or storage device, the Tools
TRACK 009
TRACK 010
03:53
03:45
CD
Select Jump page
menu may differ. All options may not be displayed.
To enable the background music function, the photo
' Return
3.
To remove a file from the Playlist, move to the file,
and then press the YELLOW (C) button.
4.
Press the E button to play the selected files. The
Playlist screen appears.
5.
To go to the Music List, press the 5 or RETURN (')
button.
6.
To go back to the Playlist, press the E button.
file must be in the same storage media as the music
file. However, the sound quality can be affected by the
bit rate of the MP3 file, the size of the photo, and the
encoding method.
Creating a Photo Playlist
You can create a playlist of photos in a way that is nearly
identical to the way you create a playlist of music files. For
instructions, see "Creating a Music Playlist" on this page.
| NOTES |
You can create a playlist with up to 99 tracks on Audio
CDs (CD-DA).
If you go to the Music List from the Playlist, and then
return to the Playlist, the Playlist will start playing again
from the beginning.
| 26 English
HT-F4200_50_XU_130211-1.indd 26
2013-02-13 오후 6:52:20
Listening to Radio
receive FM stations
Press the FUNCTION button to select FM.
Tune in to the desired station.
• Preset Tuning 1 : Press the 5 button to select
PRESET and then press the TUNING UP,
DOWN button to select the preset station.
- Before you can tune to preset stations, you
must add preset stations to the product's
memory.
• Manual Tuning : Press the 5 button to select
MANUAL and then press the TUNING UP,
DOWN button to tune in to a lower or higher
frequency.
• Automatic Tuning : Press the 5 button to select
MANUAL and then press and hold the TUNING
UP, DOWN button to automatically search the
band.
RDS allows FM stations to send an additional signal along
with their regular program signals.
For example, the stations send their station names, as
well as information about what type of program they
broadcast, such as sports or music, etc.
When tuned to an FM station which provides the RDS
service, the RDS indicator lights up on the display.
Description on RDS function
Press the MO/ST button.
• Each time the button is pressed, the sound switches
between STEREO and MONO.
• In a poor reception area, select MONO for a clear,
interference-free broadcast.
• PTY (Program Type) : Displays the type of program
currently being broadcast.
• PS NAME (Program Service Name) : Indicates the
name of broadcasting station and is composed of 8
characters.
• RT (Radio Text) : Decodes the text broadcast by
a station (if any) and is composed of maximum 64
characters.
• CT (Clock Time) : Decodes the real time clock from the
FM frequency. Some stations may not transmit PTY, RT
or CT information therefore this may not be displayed
in all cases.
• TA (Traffic Announcement) : TA ON/OFF it shows that
the traffic announcement is in progress.
Presetting Stations
| NOTES |
Example : Presetting FM 89.10 into memory.
RDS may not operate correctly if the station tuned is
Setting Mono/Stereo
1.
2.
Press the FUNCTION button to select FM.
Press the TUNING UP, DOWN button to select
<89.10>.
3.
Press the TUNER MEMORY button.
• NUMBER flashes on the display.
4.
Press the TUNER MEMORY button again.
• Press the TUNER MEMORY button before
NUMBER disappears from the display on its own.
• After you press the TUNER MEMORY button,
NUMBER disappears from the display and the
station is stored in memory.
5.
To preset another station, repeat steps 2 to 4.
• To tune in to a preset station, press the TUNING
UP, DOWN button.
not transmitting RDS signal properly or if the signal
strength is weak.
To show the RDS signals
You can see the RDS signals the station sends on the
display.
Press the RDS DISPLAY button while listening to an FM
station.
• Each time you press the button, the display change to
show you the following information : PS NAME RT
CT Frequency
PS
(Program
Service)
While searching, <PS NAME>
appears and then the station names
will be displayed. <NO PS> appears
if no signal is sent.
RT
(RadioText)
While searching, <RT> appears
and then text messages the station
sends will be displayed. <NO RT>
appears if no signal is sent.
Frequency
Station frequency (non-RDS service)
English
HT-F4200_50_XU_130211-1.indd 27
Media Play
1.
2.
Using the RDS (Radio Data System) to
05
Using Buttons on the Remote Control
About RDS Broadcasting
27 |
2013-02-13 오후 6:52:22
Media Play
About characters shown in the display
When the display shows PS,or RT signals,the following
characters are used.
• The display window cannot differentiate upper case
and lower case letters and always uses upper case
letters.
• The display window cannot show accented letters,
<A,> for instance, may stands for accented <A’s> like
<À, Â, Ä, Á, Å and Ã.>
PTY (Program Type) indication and
Using the TV Sound Button on the
Remote Control
TV SOUND
TV Sound
You can listen to TV's audio via Home cinema speakers
or TV Speaker by TV SOUND button.
1.
Connect the HDMI cable to TV and Home cinema.
(See page 15)
2.
Set the connected Home cinema and TV to
Anynet+ (HDMI-CEC) On.
3.
4.
Press the TV SOUND button on the remote control.
PTY-SEARCH function
One of the advantages of the RDS service is that you
can locate a particular kind of program from the preset
channels by specifying the PTY codes.
To search for a program using the PTY codes
Before you start!
• The PTY Search is only applicable to preset stations.
• To stop searching any time during the process, press
5 button while searching.
• There is a time limit in doing the following steps.
If the setting is cancelled before you finish, start from
step 1 again.
• When pressing the buttons on the primary remote
control, make sure that you have selected the FM
station using the primary remote control.
TA
1
2
3
PTY -
PTY SEARCH
PTY +
4
5
6
1.
Press the PTY SEARCH button while listening to an
FM station.
2.
Press the PTY- or PTY+ button until the PTY code
you want appears on the display.
• The display gives you the PTY codes described
to the right.
3.
Use in this case:
1) When you want to listen to the TV's audio via home
cinema speakers.
2) When you want to listen to the sound from the USB
media that plugged to the TV via home cinema
speakers
+
RDS DISPLAY
Each time you press the TV SOUND button, TV
SOUND ON/OFF flashes shortly on the Display part
on the Front panel, then changes to D.IN.
- TV SOUND ON : Output to Home cinema
speakers.
- TV SOUND OFF : Output to Anynet+ connected
TV Speaker.
TV SOUND ON/OFF support specification
Connected TV
Anynet+
(HDMI-CEC)
supported TV
Anynet+
(HDMI-CEC) not
supported TV
Anynet+
(HDMI-CEC)
Setting
TV
Sound
ON
TV
Sound
OFF
ON
O
O
OFF
O
X
No operation
O
X
Press the PTY SEARCH button again, while the
PTY code selected in the previous step is still on the
display.
• The centre unit searches 15 preset FM stations,
stops when it finds the one you have selected,
and tunes in that station.
| 28 English
HT-F4200_50_XU_130211-1.indd 28
2013-02-13 오후 6:52:23
Network Services
Using BD-LIVE™
2.
Configure the network settings.
(See pages 20~21)
Once the product is connected to your network, you can
enjoy various movie-related service contents available on
BD-LIVE compliant discs.
1.
Attach a USB memory stick to the USB jack on
the front of the product, and then use BD Data
Management to check its remaining memory. The
memory device must have at least 1GB of free
space to accommodate the BD-LIVE services.
DLNA lets you access and play files located on your PC
through your home cinema.
Follow the directions in the DLNA user's guide to setup
DLNA on your PC and to tag folders and files you want to
share with the home cinema.
To access and play files located on your PC after you
have setup DLNA, follow these steps:
1.
2.
Turn on your PC, your TV, and the home cinema.
3.
On your home cinema, press the BLUE (D) button
(View Devices).
4.
Use the ◄► button to select your PC in the Device
List.
5.
Select the kind of file you want to view or play,
Videos, Photos, or Music, and then press E.
6.
Use the ▲%◄► button to select the folder with the
kind of files you selected, and then press E. The
File List is displayed.
Select the file you want to view or play, and then
press E.
Make sure the DLNA Shared server is running on
your PC.
2.
Select Settings on the Home screen, and then
press the E button.
3.
4.
Select System, and then press the E button.
5.
Select Change Device, and then press the E
button.
7.
6.
Select USB Flash Disk, and then press the E
button.
| NOTES |
7.
8.
Insert a Blu-ray Disc that supports BD-LIVE.
You can create Playlists from files on your PC in the
Select an item from the list of BD-LIVE service
contents provided by the disc manufacturer.
same way you create playlists from files on USB
devices and discs.
With a few exceptions, you can control the playback
of files on your PC in the same fashion you control the
playback of files on USB devices and discs.
You can also access files on your PC by first selecting
Videos, Photos, or Music on the Home screen,
and then selecting your PC from the device list that
appears.
Select BD Data Management, and then press the
E button.
| NOTES |
The way you use BD-LIVE and the provided contents
may differ, depending on the disc manufacturer.
English
HT-F4200_50_XU_130211-1.indd 29
Network Services
Connect the product to the network.
(See page 14)
06
1.
Using DLNA
29 |
2013-02-13 오후 6:52:25
Appendix
Additional Information
Notes
Connections
HDMI OUT
• Certain HDMI output resolutions may not work,
depending on your TV.
• You must have an HDMI connection to enjoy videos
with 3D technology.
• A long HDMI cable may cause screen noise. If this
occurs, set HDMI Deep Color to Off in the menu.
Settings
3D Settings
• Regular DVDs do not have BONUSVIEW audio and
Navigation Sound Effects.
• Some Blu-ray Discs do not have BONUSVIEW audio
and Navigation Sound Effects.
• This Digital Output setup does not affect the
analogue (L/R) audio or HDMI audio output to your
TV. It affects the optical and HDMI audio output when
your product is connected to an AV receiver.
• If you play MPEG audio soundtracks, the audio signal
outputs as PCM regardless of your Digital Output
selections (PCM or Bitstream).
• Digital Output can be activated when Speaker
Selection is selected to TV Speaker.
BD-Live Internet Connection
• The Internet connection may be restricted while you
are using BD-LIVE contents.
• For some 3D discs, to stop a movie during 3D
playback, press the 5 button once. The movie
stops and the 3D mode option is de-activated.
To change a 3D option selection when you are
playing a 3D movie, press the 5 button once.
The Blu-ray menu appears. Press the 5 button
again, then select 3D Settings in the Blu-ray menu.
• Depending on the content and the position of the
picture on your TV screen, you may see vertical black
bars on the left side, right side, or both sides.
Anynet+ (HDMI-CEC)
TV Aspect Ratio
• In the external memory mode, disc playback may
be stopped if you disconnect the USB device in the
middle of playback.
• Only those USB devices formatted in the FAT file
system (DOS 8.3 volume label) are supported.
We recommend you use USB devices that support
USB 2.0 protocol with 4 MB/sec or faster read/write
speed.
• The Resume Play function may not work after you
format the storage device.
• The total memory available to BD Data Management
may differ, depending on the conditions.
• Depending on the disc type, some aspect ratios may
not be available.
• If you select an aspect ratio and option which is
different than the aspect ratio of your TV screen, then
the picture might appear to be distorted.
• If you select the 16:9 Original, your TV may display
4:3 Pillarbox (black bars on sides of picture).
BD Wise (Samsung Products only)
• When BD Wise is on, the Resolution setting
automatically defaults to BD Wise and BD Wise
appears in the Resolution menu.
• If the product is connected to a device that does
not support BD Wise, you can not use the BD Wise
function.
• For proper operation of BD Wise, set the BD Wise
option in both the product and the TV to On.
Digital Output
• Depending on your TV, certain HDMI output
resolutions may not work. Please refer to the user
manual of your TV.
• This function is not available if the HDMI cable does
not support CEC.
• If your Samsung TV has an Anynet+ logo, then it
supports the Anynet+ function.
BD Data Management
DivX® Video On Demand
• For more information about DivX(R) VOD, visit “http://
vod.divx.com”.
Speaker Settings
• When Speaker Selection is set to TV Speaker,
audio is produced through the TV speakers.
• Be sure to select the correct Digital Output or you will
hear no sound or just loud noise.
• If the HDMI device (AV receiver, TV) is not compatible
with compressed formats (Dolby Digital, DTS), the
audio signal outputs as PCM.
| 30 English
HT-F4200_50_XU_130211-1.indd 30
2013-02-13 오후 6:52:27
HDMI audio
Media Play
• When Anynet+ (HDMI-CEC) is Off, the Audio Return
Channel function is not available.
• Using a HDMI cable not certified for ARC (Audio
Return Channel) may cause a compatibility problem.
• The ARC function is only available if an ARCcompliant TV is connected.
Playback
Playing a Video files
• Video files with high bit rates of 20Mbps or more
strain the product’s capabilities and may stop playing
during playback.
• If the system is connected to a BD Wise compliant
TV that has set BD Wise to On, the Picture Settings
menu will not appear.
• The Background Music function will not work unless
the music file and the photo file are located on the
same storage media. Also, sound quality can be
impacted by the bit rate of the MP3 music file, the
size of the photos, and the encoding method.
Appendix
Audio Return Channel
Using the TOOLS button while playing pictures
07
• When HDMI audio is outputted to the TV speaker, it
is automatically down-mixed to 2 channels.
Playing back a USB Storage Device
• You must remove the USB storage device safely by
performing the “Safely Remove USB” function to
prevent possible damage to the USB memory. Press
the HOME button to move to the Home menu, select
the YELLOW (C) button, and then press the E
button.
Selecting the Audio Language
• The ◄► indicator will not appear on the screen
if the BONUSVIEW section does not contain any
BONUSVIEW audio settings.
• The languages available through the Audio Language
function depend on the languages that are encoded
on the disc. This function or certain languages may
not be available.
• Some Blu-ray Discs may allow you to select either
the PCM or Dolby Digital audio soundtrack in English.
Selecting the Subtitle Language
• Depending on the Blu-ray Disc / DVD, you may be
able to change the subtitle language in the Disc
Menu. Press the DISC MENU button.
• This function depends on the selection of subtitles
that are encoded on the disc and may not be
available on all Blu-ray Discs/DVDs.
• Information about the main feature BONUSVIEW
mode will also appear if the Blu-ray Disc has a
BONUSVIEW section.
• This function changes both the primary and
secondary subtitles at the same time.
• The total number of primary and secondary subtitles
are displayed respectively.
Playing a JPEG files
• You can’t enlarge the subtitle and PG graphic in the
full screen mode.
English
HT-F4200_50_XU_130211-1.indd 31
31 |
2013-02-13 오후 6:52:28
Appendix
Digital Output Selection
Setup
PCM
Connection
Audio
Stream on
Blu-ray Disc
Audio
Stream on
DVD
Definition for
Blu-ray Disc
Bitstream
(Unprocessed)
Bitstream
(Re-encoded DTS)
Bitstream
(Re-encoded
Dolby D)
HDMI supported AV receiver
PCM
Up to PCM 7.1ch
PCM
Dolby Digital
Up to PCM 2.1ch
Dolby Digital
Dolby Digital
Plus
Up to PCM 2.1ch
Dolby Digital Plus
Dolby TrueHD
Up to PCM 2.1ch
Dolby TrueHD
DTS
Up to PCM 5.1ch
DTS
DTS-HD High
Resolution
Audio
Up to PCM 7.1ch
DTS-HD High
Resolution Audio
DTS-HD Master
Audio
Up to PCM 7.1ch
DTS-HD Master
Audio
DTS re-encoded
Re-encoded
Dolby Digital *
PCM
Up to PCM 2ch
PCM 2ch
PCM 2ch
PCM 2ch
Dolby Digital
Up to PCM 2.1ch
Dolby Digital
Dolby Digital
Dolby Digital
DTS
Up to PCM 5.1ch
DTS
DTS
DTS
Any
Decodes the main
Outputs only the
feature audio and
Decodes the main
main feature audio
BONUSVIEW
feature audio and
Decodes the main
stream so that your
audio stream
BONUSVIEW audio
feature audio and
AV receiver can
together into PCM
stream together into
BONUSVIEW audio
decode the audio
audio and adds
PCM audio and adds
stream together
bitstream.
Navigation Sound
Navigation Sound
into PCM audio and
You will not hear
Effects, then reEffects, then re-encodes
adds Navigation
BONUSVIEW audio
encodes the PCM
the PCM audio into DTS
Sound Effects.
or Navigation Sound
audio into Dolby
bitstream.
Effects.
Digital bitstream
or PCM.
If the Source Stream is 2ch or mono, “Re-encoded Dolby D” Setting are not applied. Output will be PCM 2ch.
Blu-ray Discs may include three audio streams :
- Main Feature Audio : The audio soundtrack of the main feature.
- BONUSVIEW audio : An additional soundtrack such as the director or actor’s commentary.
- Navigation Sound Effects: Sound effects that occur when you navigate the disc's or movie's menu. Navigation Sound
Effects are different on each Blu-ray disc.
| 32 English
HT-F4200_50_XU_130211-1.indd 32
2013-02-13 오후 6:52:28
Resolution according to the output mode
BD Wise
E-contents/
Digital contents
HDMI Mode
Blu-ray Disc
Resolution of Blu-ray
Disc
1080p@60F
480i
Appendix
HDMI Mode
Output
Setup
DVD playback
07
Blu-ray Disc/E-contents/Digital Contents playback
Auto
Max. Resolution of TV input
Max. Resolution of TV input
1080p@60F
1080p@60F
-
1080p
-
1080p
Movie Frame : Auto (24Fs)
1080p@24F
-
1080i
1080i
1080i
720p
720p
720p
576p/480p
576p/480p
576p/480p
Troubleshooting
Refer to the table below when this product does not function properly. If the problem you are experiencing is not listed
below or if the instructions below do not help, turn off the product, disconnect the power cord and contact the nearest
authorized dealer or Samsung Electronics Service Centre.
Symptom
Check/Remedy
I cannot eject the disc.
• Is the power cord plugged securely into the outlet?
• Turn off the power and then turn it back on.
Playback does not start.
• Check the region number of the Blu-ray/DVD disc.
A Blu-ray/DVD disc purchased from abroad may not be playable.
• CD-ROMs and DVD-ROMs cannot be played on this product.
• Make sure that the rating level is correct.
Playback does not start
immediately when the
Play/Pause button is
pressed.
• Are you using a deformed disc or a disc with scratches on the surface?
• Wipe the disc clean.
Sound is not produced.
• The home cinema does not play sound during fast playback, slow playback, and
step motion playback.
• Are the speakers connected properly? Is the speaker setup correctly customized?
• Is the disc severely damaged?
English
HT-F4200_50_XU_130211-1.indd 33
33 |
2013-02-13 오후 6:52:29
Appendix
Symptom
Check/Remedy
The remote control does
not work.
• Are you operating the remote within its operational range and within the proper
angle relative to the sensor?
• Are the batteries drained?
• The disc is rotating but
no picture is produced.
• Picture quality is poor
and picture is shaking.
•
•
•
•
Audio language and
subtitles do not work.
• Audio language and subtitles will not work if the disc does not contain them.
The menu screen does
not appear even when the
menu function is selected.
• Are you using a disc that does not contain menus?
The aspect ratio cannot be
changed.
Is the TV power on?
Are the video cables connected properly?
Is the disc dirty or damaged?
A poorly manufactured disc may not be playable.
• You can play 16:9 Blu-ray/DVD discs in 16:9 Full mode, 4:3 Letter Box mode, or
4:3 Pan-Scan mode, but 4:3 Blu-ray/DVD discs are played in 4:3 ratio only. Refer to
the Blu-ray Disc jacket and then select the appropriate function.
The product is not
working.
• Press and hold the remote control's 5 button for 5 seconds in NO DISC mode.
This will reset the unit.
- Using the RESET function will erase all stored settings.
Do not use this unless necessary.
You have forgotten the
rating level password.
• With no disc in the product, press and hold the product's 5 button for longer
than 5 seconds. INIT appears on the display and all settings will return to the
default values.
Then, press the POWER button.
- Using the RESET function will erase all stored settings.
Do not use this unless necessary.
Can't receive radio
broadcasts.
• Is the antenna connected properly?
• If the antenna's input signal is weak, install an external FM antenna in an area with
good reception.
While listening to TV audio
through the Product, no
sound is heard.
• If the OPEN/CLOSE ^ button is pressed while listening to TV audio using the
D. IN or AUX functions, the Blu-ray/DVD disc functions are turned on and the TV
audio is muted.
"Not Available" appears
on screen.
• The features or action cannot be completed at this time because:
1. The Blu-ray/DVD disc's software restricts it.
2. The Blu-ray/DVD disc's software doesn’t support the feature (e.g., angles)
3. The feature is not available at the moment.
4. You’ve requested a title or chapter number or search time that is out of range.
If the HDMI output is
set to a resolution your
TV cannot support (for
example, 1080p), you may
not see a picture on your
TV.
• Press and hold the 5 button on front panel for more than 5 seconds with no disc
inserted. All settings will revert to the factory settings.
| 34 English
HT-F4200_50_XU_130211-1.indd 34
2013-02-13 오후 6:52:30
Symptom
Check/Remedy
Abnormal HDMI output
screen.
• If random noise appears on the screen, it means that TV does not support HDCP
(High-bandwidth Digital Content Protection).
DLNA function
I can see folders shared
through DLNA, but I
cannot see the files.
• DLNA shows only files corresponding to the Photo, Music, and Movie files. Files
that do not correspond to these categories may not be displayed.
Video is played
intermittently.
• Check if the network is stable.
• Check if the network cable is properly connected and if the network is not
overloaded.
The DLNA connection
between the TV and PC is
unstable.
• IP addresses under the same subnetwork should be unique, otherwise IP collision
can results in such a phenomenon.
• Check if you have a firewall enabled.
If so, disable the firewall function.
Appendix
• Check the connection between the TV and the HDMI jack of the product.
• Check if your TV supports 576p/480p/720p/1080i/1080p HDMI input resolution.
07
No HDMI output.
BD-LIVE
I cannot connect to the
BD-LIVE server.
• Test whether the network connection is active by using the Network Status
function.
• Check whether a USB memory device is connected to the product.
• The memory device must have at least 1GB of free space to accommodate the
BD-LIVE service.
You can check the available size in BD Data Management. (See page 30)
• See if the BD-LIVE Internet Connection option is set to Allow(All).
• If all above fails, contact the contents provider or update to the latest firmware.
When using the BD-LIVE
service, an error occurs.
• The USB memory device must have at least 1GB of free space to accommodate the
BD-LIVE service.
You can check the available size in BD Data Management. (See page 30)
| NOTES |
When the factory default settings are restored, all stored user BD data is deleted.
English
HT-F4200_50_XU_130211-1.indd 35
35 |
2013-02-13 오후 6:52:31
Appendix
Specifications
Weight
2,3 kg
Dimensions
430 (W) x 55 (H) x 250 (D) mm
Operating Temperature Range
+5°C to +35°C
Operating Humidity Range
10 % to 75 %
Signal/noise ratio
55 dB
Usable sensitivity
12 dB
Total harmonic distortion
0.5 %
Video
1080p, 1080i, 720p, 576p/480p
Audio
PCM multichannel audio, Bitstream audio, PCM audio
General
FM Tuner
HDMI
Front speaker output
75W x 2 (3)
Subwoofer speaker output
100W (3)
Analogue input : 20Hz~20kHz (±3dB)
Frequency response
Amplifier
Digital input : 20Hz~40kHz (±4dB)
S/N Ratio
70dB
Channel separation
60dB
Input sensitivity
(AUX) 500mV
| 36 English
HT-F4200_50_XU_130211-1.indd 36
2013-02-13 오후 6:52:32
Subwoofer
Impedance
3
3
Frequency
range
140Hz~20kHz
40Hz ~ 160Hz
Output sound
87dB/W/M
pressure level
88dB/W/M
Rated input
75W
100W
Maximum
input
150W
200W
Dimension
(Unit : mm)
950 x 1160 x 740
1550 x 3000 x 2855
0,34
3,76
Weights
(Unit : kg)
•
•
•
•
•
Appendix
Front
07
Speaker
2,1ch speaker system
Speaker
system
Network speeds equal to or below 10Mbps are not supported.
Samsung Electronics Co., Ltd reserves the right to change the specifications without notice.
Weight and dimensions are approximate.
Design and specifications are subject to change without prior notice.
For the power supply and Power Consumption, refer to the label attached to the product.
English
HT-F4200_50_XU_130211-1.indd 37
37 |
2013-02-13 오후 6:52:33
Contact SAMSUNG WORLD WIDE
If you have any questions or comments relating to Samsung products, please
contact the SAMSUNG customer care centre.
Area
` Europe
Austria
Contact Centre
0810 - SAMSUNG (7267864,
€ 0.07/min)
Belgium
02-201-24-18
Bosnia
Bulgaria
Croatia
051 133 1999
07001 33 11 normal tariff
062 SAMSUNG (062 726 786)
800-SAMSUNG (800-726786)
Samsung Electronics Czech and Slovak,
s.r.o., Oasis Florenc, Sokolovská
394/17, 180 00, Praha 8 till 8.2.2013
: From 8.2.2013: Samsung Electronics
Czech and Slovak, s.r.o. V Parku
2343/24, 148 00 - Praha 4
70 70 19 70
030 - 6227 515
01 48 63 00 00
0180 5 SAMSUNG bzw.
0180 5 7267864* (*0,14 €/Min.
aus dem dt. Festnetz, aus dem
Mobilfunk max. 0,42 €/Min.)
8009 4000 only from landline
(+30) 210 6897691 from
mobile and land line
80111-SAMSUNG (80111 726
7864) only from land line
(+30) 210 6897691 from mobile
and land line
06-80-SAMSUNG (726-7864)
800-SAMSUNG (726-7864)
Czech
Denmark
Finland
France
Germany
Cyprus
Greece
Hungary
Italia
Web Site
www.samsung.com
www.samsung.com/
be (Dutch)
www.samsung.com/
be_fr (French)
www.samsung.com
www.samsung.com
www.samsung.com
Area
Luxemburg
Montenegro
Netherlands
Norway
Poland
Portugal
www.samsung.com
Rumania
Serbia
www.samsung.com
www.samsung.com
www.samsung.com/fr
Slovakia
www.samsung.com
Spain
Sweden
www.samsung.com
www.samsung.com
www.samsung.com
www.samsung.com
Contact Centre
261 03 710
020 405 888
0900-SAMSUNG (09007267864) (€ 0,10/Min)
815-56 480
0 801-1SAMSUNG(172-678) *
lub +48 22 607-93-33 **
* (całkowity koszt połączenia
jak za 1 impuls według taryfy
operatora)
** (koszt połączenia według
taryfy operatora)
808 20-SAMSUNG (808 20 726-7)
08008 SAMSUNG (08008 726
7864)
TOLL FREE No.
+381 11 321 6899
(old number still active 0700
7267864)
0800-SAMSUNG (0800-726786)
902-1-SAMSUNG (902 172 678)
0771 726 7864 (SAMSUNG)
Switzerland
0848-SAMSUNG (7267864,
CHF 0.08/min)
U.K
Eire
Lithuania
Latvia
Estonia
0330 SAMSUNG (7267864)
0818 717100
8-800-77777
8000-7267
800-7267
Web Site
www.samsung.com
www.samsung.com
www.samsung.com
www.samsung.com
www.samsung.com/pl
www.samsung.com
www.samsung.com
www.samsung.com
www.samsung.com
www.samsung.com
www.samsung.com
www.samsung.com/ch
(German)
www.samsung.com/
ch_fr/(French)
www.samsung.com
www.samsung.com
www.samsung.com/lt
www.samsung.com/lv
www.samsung.com/ee
Correct disposal of batteries in this product
(Applicable in countries with separate collection systems)
This marking on the battery, manual or packaging indicates that the batteries in this product should not be
disposed of with other household waste at the end of their working life. Where marked, the chemical symbols
Hg, Cd or Pb indicate that the battery contains mercury, cadmium or lead above the reference levels in EC
Directive 2006/66. If batteries are not properly disposed of, these substances can cause harm to human health
or the environment.
To protect natural resources and to promote material reuse, please separate batteries from other types of waste
and recycle them through your local, free battery return system.
Correct Disposal of This Product (Waste Electrical & Electronic Equipment)
(Applicable in countries with separate collection systems)
This marking on the product, accessories or literature indicates that the product and its electronic accessories
(e.g. charger, headset, USB cable) should not be disposed of with other household waste at the end of their
working life. To prevent possible harm to the environment or human health from uncontrolled waste disposal,
please separate these items from other types of waste and recycle them responsibly to promote the sustainable
reuse of material resources.
Household users should contact either the retailer where they purchased this product, or their local government
office, for details of where and how they can take these items for environmentally safe recycling.
Business users should contact their supplier and check the terms and conditions of the purchase contract.
This product and its electronic accessories should not be mixed with other commercial wastes for disposal.
HT-F4200_50_XU_130211-1.indd 38
2013-02-13 오후 6:52:34
HT-F4200
Système Home Entertainment
Blu-ray™ 2,1 canaux
Manuel d'utilisation
imaginez les possibilités
Merci d'avoir acheté ce produit Samsung.
Pour obtenir notre service complet, veuillez enregistrer votre
produit sur
www.samsung.com/register
HT-F4200_XU_FRA_130208-1.indd 1
2013-02-13 오후 4:06:54
Consignes de Sécurité
Avertissement
POUR RÉDUIRE LES RISQUES D’ÉLECTROCUTION, NE RETIREZ JAMAIS LE CAPOT (NI L’ARRIÈRE). LES PIÈCES DE
CE PRODUIT NE SONT PAS RÉPARABLES PAR L’UTILISATEUR. VEUILLEZ CONTACTER UN TECHNICIEN QUALIFIÉ
POUR TOUTE RÉPARATION.
ATTENTION
RISQUE D’ÉLECTROCUTION
NE PAS OUVRIR
Ce symbole indique la présence
d’une tension dangereuse dans
l’appareil, présentant un risque
d’électrocution ou de blessures.
ATTENTION : POUR ÉVITER TOUT RISQUE
D’ÉLECTROCUTION, LA BROCHE LA PLUS
LARGE DE LA FICHE DOIT ÊTRE TOTALEMENT
INSÉRÉE DANS LE TROU PLUS LARGE.
AVERTISSEMENT
• Afin de réduire tout risque d’incendie ou d’électrocution,
n’exposez jamais cet appareil à la pluie ou à l’humidité.
ATTENTION
• Évitez toute projection d’eau sur l’appareil et ne posez
jamais d’objet contenant un liquide dessus (ex : un
vase).
• La fiche permet de débrancher l’appareil et doit
toujours être facilement accessible.
• Cet appareil doit toujours être branché à une prise de
courant alternatif reliée à la terre.
• Pour débrancher l'appareil, il convient de retirer la fiche
de la prise murale, il faut donc que cette dernière soit
facilement accessible.
CLASS 1
KLASSE 1
LUOKAN 1
KLASS 1
PRODUCTO
Ce symbole indique les
directives importantes qui
accompagnent le produit.
LASER PRODUCT
LASER PRODUKT
LASER LAITE
LASER APPARAT
LÁSER CLASE 1
PRODUIT LASER DE CLASSE 1
Le lecteur de disque compact est homologué comme
produit LASER DE CLASSE 1.
L'utilisation des commandes, les réglages ou l'exécution
de procédures autres que celles spécifiées ci-dessus
peuvent conduire à une exposition à des radiations
dangereuses.
ATTENTION
DES RAYONS LASER INVISIBLES SONT PRÉSENTS
LORSQUE L'APPAREIL EST OUVERT OU QUE
LES DISPOSITIFS DE VERROUILLAGE SONT
CIRCONVENUS. ÉVITEZ L'EXPOSITION AUX RAYONS.
| 2 Français
HT-F4200_XU_FRA_130208-1.indd 2
2013-02-13 오후 4:07:26
Rangement et gestion des disques
• Évitez toute projection d’eau sur l’appareil. Ne posez
jamais d’objet contenant un liquide (ex : un vase)
dessus.
• Pour éteindre complètement l'appareil, vous devez
retirer le cordon d'alimentation de la prise murale.
Par conséquent, le cordon d'alimentation doit être
facilement accessible à tout moment.
• Ne tenez pas le cordon d'alimentation avec les mains
mouillées. Vous risquez de vous exposer à un choc
électrique.
• Ne branchez pas plusieurs appareils électriques sur
une prise murale. Surcharger une prise murale peut
provoquer une surchauffe et donc un incendie.
• Entretien du meuble
- Avant de brancher un composant sur cet appareil,
assurez-vous que celui-ci est hors tension.
- Si vous déplacez soudainement l'appareil d'un
endroit froid à un endroit chaud, de la condensation
pourra se former sur les pièces et la lentille, et
occasionner des problèmes de lecture. Dans pareil
cas, débranchez l'appareil et patientez deux heures
avant de le rebrancher sur la prise d’alimentation.
Insérez ensuite le disque et essayez à nouveau de le
lire.
Fabriqué sous licence par
Dolby Laboratories. Dolby et le
symbole représentant deux D
sont des marques déposées de
Dolby Laboratories.
Fabriqué sous licence sous les brevets américains
Nº : 5,956,674; 5,974,380; 6,226,616; 6,487,535;
7,392,195; 7,272,567; 7,333,929; 7,212,872 et
d’autres brevets américains et internationaux accordés
et en attente. DTS-HD, le symbole, et DTS-HD et
le symbole qui lui est associé sont des marques
déposées, et DTS-HD Master Audio | Essential est une
marque déposée de DTS, Inc. Ce produit comporte
des logiciels. © DTS, Inc. Tous droits réservés.
À PROPOS DES VIDÉOS
DIVX : DivX® est un format
vidéo numérique créé
par la société DivX, LLC,
filiale de Rovi Corporation. Ceci est un appareil DivX
Certified® qui prend en charge la lecture des vidéos
DivX. Pour obtenir les détails et en savoir plus sur
les outils logiciels qui vous permettent de convertir
vos fichiers au format vidéo DivX, consultez le site
Web à l’adresse suivante : divx.com. À PROPOS DU
FORMAT VIDÉO À LA DEMANDE DIVX : Cet appareil
DivX Certified® doit être enregistré afin de servir à
visionner des films vidéo à la demande (VOD) au
format DivX achetés dans le commerce. Pour obtenir
votre code d’enregistrement, identifiez l’emplacement
de la section DivX VOD dans le menu de configuration
de votre appareil. Allez sur le site Web vod.divx.
com pour obtenir de plus amples informations sur
la procédure d’enregistrement. Les appareils DivX
Certified® peuvent lire des vidéos DivX® dans une
résolution HD de 1080p, y compris les programmes
d’appel. DivX®, DivX Certified® et les logos qui
leur sont associés sont des marques déposées de
Rovi Corporation ou de ses filiales et font l’objet
d’une licence. Cette norme est couverte par un ou
plusieurs des brevets américains suivants : 7,295,673;
7,460,668; 7,515,710; 7,519,274
Français
HT-F4200_XU_FRA_130208-1.indd 3
Consignes de Sécurité
Précautions de manipulation
Licence
01
• Comment tenir le disque
- Des empreintes digitales ou des
rayures sur la surface d'un disque
peuvent altérer la qualité du son et
de l’image ou provoquer des sauts.
- Évitez de toucher la surface du disque sur laquelle
les données ont été enregistrées.
- Tenez le disque par les bords afin de ne pas laisser
d’empreintes sur sa surface.
- Ne collez pas de papier ou d’adhésif sur le disque.
• Nettoyage des disques
- En cas d’empreintes ou de saleté sur
un disque, nettoyez-le à l'aide d'eau
additionnée de détergent doux et d’un
chiffon doux.
- Lors de son nettoyage, essuyez le disque du centre
vers le bord.
- Rangement des disques
N’exposez pas le disque à la lumière directe du
soleil.
Stockez-le dans un endroit frais et aéré.
Rangez-le dans une pochette propre et
verticalement.
• Si vous entendez un bruit inhabituel ou décelez
un dégagement anormal de fumée ou une odeur
suspecte, coupez immédiatement l’alimentation et
débranchez la fiche électrique de la prise murale. Puis
contactez le service après-vente le plus proche pour
obtenir de l’aide. N’utilisez plus l'appareil.
Utiliser l'appareil en l’état peut provoquer un incendie
ou un choc électrique.
• Pour éteindre complètement l'appareil, vous devez
retirer le cordon d'alimentation de la prise murale.
Par conséquent, le cordon d'alimentation doit être
facilement accessible à tout moment.
3|
2013-02-13 오후 4:07:27
Consignes de Sécurité
HDMI, le logo HDMI et
l’expression "High-Definition
Multimedia Interface"
sont des marques commerciales ou des marques
déposées de HDMI Licensing LLC.
DLNA®, DLNA Logo et
DLNA CERTIFIED® sont
des marques déposées, des
marques de service ou des marques de certification
de Digital Living Network Alliance.
Oracle et Java sont des marques
déposées de Oracle et/ou ses filiales.
D'autres noms mentionnés peuvent être
des marques de commerce de leurs
propriétaires respectifs.
Ce produit intègre la technique de protection contre
la copie applicable aux brevets américains ainsi que
d’autres droits de propriété intellectuelle de Rovi
Corporation. Il est interdit de tenter de démonter l’appareil
et d’en étudier le fonctionnement en vue de le reproduire.
Blu-ray Disc™, Blu-ray™ et les logos y afférents sont
des marques de commerce de Blu-ray Disc Association.
Cet appareil utilise la technologie Cinavia qui limite
l'utilisation de copies non autorisées de certains films et
vidéos ainsi que leurs bandes son disponibles dans le
commerce. Lorsqu'une utilisation interdite d'une copie
non autorisée est détectée, un message s'affiche et la
lecture ou la copie est interrompue.
Pour obtenir de plus amples informations sur la
technologie Cinavia, veuillez consulter le « Cinavia
Online Consumer Information Centre » (Centre
d'informations consommateur en ligne Cinavia)
à l'adresse http://www.cinavia.com. Pour toute
demande d'informations complémentaires par courrier
concernant Cinavia, envoyez une carte postale
comportant votre adresse postale à : Cinavia Consumer
Information Centre, P.O. Box 86851, San Diego, CA,
92138, États-Unis. Cet appareil intègre une technologie
brevetée sous licence de Verance Corporation et qui
est protégée par le brevet américain 7 369 677 ainsi
que par d'autres brevets américains et internationaux
accordés et en attente ainsi que par des droits d'auteur
et une protection commerciale confidentielle pour
certains aspects de cette technologie. Cinavia est
une marque de commerce de Verance Corporation.
Copyright 2004-2010 Verance Corporation. Tous
droits réservés par Verance. Il est interdit de tenter de
démonter l’appareil et d’en étudier le fonctionnement
en vue de le reproduire.
- Avis de licence libre
En cas d'utilisation de logiciels libres, les licences libres
sont disponibles dans le menu du produit.
Utilisation de la fonction 3D
CONSIGNES IMPORTANTES RELATIVES À LA SANTÉ ET
LA SÉCURITÉ EN CAS DE VISIONNAGE D'IMAGES 3D.
Lisez attentivement les consignes de sécurité avant
d'utiliser la fonction 3D.
• Certains utilisateurs peuvent ressentir une gêne en
visionnant des images de télévision en 3D, comme par
exemple des vertiges, des nausées ou des maux de
tête. Dès que vous ressentez l'un de ces symptômes,
arrêtez immédiatement le visionnage en 3D, retirez les
lunettes Active 3D et essayez de vous reposer.
• Le visionnage d'images en 3D sur une période de
temps prolongée peut occasionner une fatigue oculaire.
Dès que vous ressentez une fatigue oculaire, cessez
immédiatement le visionnage en 3D, retirez les lunettes
Active 3D et essayez de vous reposer.
• Des enfants utilisant la fonction 3D doivent être
constamment surveillés par un adulte responsable.
Au moindre signalement de fatigue visuelle, mal de
tête, vertige ou nausée, interrompez immédiatement
le visionnage en 3D par les enfants, et laissez-les se
reposer.
• N'utilisez pas les lunettes Active 3D à d'autres fins
(comme lunettes de vue, de soleil ou de protection, par
exemple).
• N'utilisez pas la fonction 3D ou les lunettes Active 3D en
marchant ou en bougeant. En utilisant la fonction 3D ou
en portant des lunettes Active 3D en cours de marche
ou de mouvement, vous risquez de vous cogner contre
des objets, de trébucher et/ou de tomber, et de vous
blesser gravement.
• Pour bénéficier du visionnage de contenus en 3D,
connectez un appareil 3D (récepteur AV ou téléviseur
compatible 3D) au port de sortie SORTIE HDMI de
l'appareil à l'aide d'un câble HDMI haut débit. Veillez à
porter des lunettes 3D avant de visionner le contenu 3D.
• Le produit émet des signaux 3D uniquement via le câble
HDMI connecté au port de sortie HDMI OUT.
• La résolution de l'image vidéo en mode de lecture 3D
étant déterminée par la définition de l'image vidéo 3D
d'origine, vous ne pourrez pas modifier la résolution de
l'image selon vos préférences.
• Des fonctions telles que BD Wise, l'adaptation de la
taille de l'écran ou le réglage de la résolution peuvent ne
pas fonctionner correctement en mode de lecture 3D.
• Il vous faut obligatoirement utiliser un câble HDMI haut
débit pour garantir une émission appropriée du signal 3D.
• Lorsque vous visionnez des images en 3D, assurezvous de vous tenir éloigné du téléviseur à une distance
équivalente à au moins trois fois la taille de l'écran. Par
exemple, si vous avez un écran 46 pouces, vous devrez
rester à une distance de 3,5 mètres (138 pouces) du
téléviseur.
- Positionnez l'écran à hauteur des yeux pour mieux
apprécier l'image en 3D.
• Lorsque l'appareil est connecté à plusieurs appareils
3D, l'effet 3D peut ne pas fonctionner correctement.
• Ce lecteur ne convertit pas de contenus 2D en contenus 3D.
• « Blu-ray 3D » et le logo « Blu-ray 3D » sont des
marques de commerce de Blu-ray Disc Association.
| 4 Français
HT-F4200_XU_FRA_130208-1.indd 4
2013-02-13 오후 4:07:29
Copyright
MEDIA PLAY
CONSIGNES DE SÉCURITÉ
2
3
3
3
4
5
Avertissement
Rangement et gestion des disques
Précautions de manipulation
Licence
Utilisation de la fonction 3D
Copyright
MISE EN ROUTE
6
7
9
10
10
11
Compatibilité des disques et des formats
Logos des disques pouvant être lus sur cet appareil
Accessoires
Panneau avant
Panneau arrière
Télécommande
BRANCHEMENTS
12 Connexion des enceintes
14 Connexion à un routeur réseau
15 Connexion de l'appareil à un téléviseur /
Périphériques Externes
PARAMÈTRES
16
17
17
18
20
21
22
Consignes de Sécurité
Sommaire
23 Lecture de fichiers sur un périphérique USB
23 Lecture d’un disque dont le contenu est enregistré
par l’utilisateur
24 Lecture des disques vidéo du commerce
24 Contrôle de la lecture Vidéo
25 Lecture d'un disque audio commercial préenregistré
25 Contrôle de la lecture de Musique
26 Contrôle de la lecture des photos
27 Ecouter la radio
28 Utilisation du bouton TV Sound de la télécommande
01
© 2012 Samsung Electronics Co.,Ltd. Tous droits
réservés ; il est interdit de reproduire ou de copier tout ou
partie de ce manuel d'utilisation sans l'accord préalable
écrit de Samsung Electronics Co.,Ltd.
SERVICES RÉSEAU
29 BD-LIVE™
29 Utilisation du DLNA
ANNEXES
30 Informations complémentaires
33 Dépannage
36 Caractéristiques techniques
Les figures et les illustrations du présent
Manuel d'utilisation sont fournies à titre de
référence uniquement et peuvent différer de
l'apparence du produit réel.
Des frais supplémentaires pourront vous être
facturés dans les cas suivants :
a. vous demandez l'intervention d'un ingénieur
mais il s'avère que l'appareil ne présente
aucune anomalie (par ex. vous n'avez pas lu
ce Manuel d'utilisation).
b. vous portez l'unité à un centre de réparation
mais il s'avère que celle-ci ne présente
aucune défaillance (par ex. vous n'avez pas
lu ce Manuel d'utilisation).
Le montant de ces frais administratifs vous
sera notifié avant que tout travail ou toute visite
à votre domicile ne soit effectué(e).
Procédure de réglage des paramètres initiaux
L'écran Accueil
Accéder à l'écran Paramètres
Fonctions du menu Paramètres
Réseaux et Internet
Mise à niveau du logiciel
Configuration de la fonction DLNA
Français
HT-F4200_XU_FRA_130208-1.indd 5
5|
2013-02-13 오후 4:07:29
Mise en Route
Compatibilité des disques et des formats
Types de disques et contenus pouvant être lus sur cet appareil
Support
Type de disque
Disque Blu-ray
Disque Blu-ray 3D
VIDÉO
DVD-VIDEO, DVD-RW,
DVD-R, DVD+RW,
DVD+R
Détails
Disque BD-ROM ou BD-RE/-R disc enregistré au format BD-RE.
DVD-VIDEO, disques DVD+RW/DVD-RW(V)/DVD-R/+R enregistrés
qui ont été enregistrés et finalisés, ou un support de stockage USB
possédant des contenus DivX, MKV, MP4.
MUSIQUE
CD-RW/-R,
DVD-RW/-R,
BD-RE/-R
Musique enregistrée sur des disques CD-RW/-R, DVD-RW/-R, BD-RE/-R
ou un support de stockage USB possédant des contenus MP3 ou WMA.
PHOTO
CD-RW/-R,
DVD-RW/-R,
BD-RE/-R
Photos enregistrées sur des disques CD-RW/-R, DVD-RW/-R, BD-RE/-R
ou un support de stockage USB possédant des contenus JPEG.
| REMARQUE |
Selon le type de disque ou les conditions d'enregistrement, il se peut que certains disques CD-RW/-R et DVD-R ne
puissent pas être lus sur cet appareil.
Si un disque DVD-RW/-R n'a pas été enregistré correctement au format vidéo DVD, il ne pourra pas être lu.
Votre appareil ne lit pas les contenus ayant été enregistrés sur un disque DVD-R selon un débit binaire dépassant les
10 Mbps.
Il ne lit pas les contenus ayant été enregistrés sur un disque BD-R ou un périphérique USB selon un débit binaire
dépassant les 30 Mbps.
La lecture peut être inopérante sur certains types de disque ou lorsque vous effectuez des opérations spécifiques
telles que les changements d'angle ou le réglage du format de l'image. Des informations détaillées concernant le
disque sont inscrites sur le boîtier. Consultez-les si nécessaire.
Lors de la lecture d'un titre BD-J, il se peut que le chargement prenne plus de temps que pour un titre normal et que
certaines fonctions s'exécutent plus lentement que d'habitude.
Types de disques ne pouvant pas être lus sur cet appareil
• HD DVD
• Disque DVD-ROM/ PD/
MV, etc.
• DVD-RAM
• CD Super Audio (à
l'exception de la couche
CD)
• DVD-RW (mode VR)
• Disque DVD-R 3,9 Go
enregistrable.
• CVD/CD-ROM/ CDV/
CD-G/CD-I/ LD (Les
CD-G lisent des données
audio uniquement et non
des données graphiques.)
| REMARQUE |
Il se peut que l'appareil ne réponde pas à toutes les commandes car certains disques Blu-ray, DVD et CD ne
permettent qu'un fonctionnement limité ou spécifique et offrent certaines fonctions seulement lors de la lecture.
Nous attirons votre attention sur le fait qu'il ne s'agit pas d'un dysfonctionnement de l'appareil.
Samsung ne peut garantir que cet appareil pourra lire tous les disques portant les logos Blu-ray, DVD ou CD car les
formats évoluent et des problèmes et erreurs peuvent se produire lors de la création d'un logiciel BD, DVD et CD et/
ou la fabrication du disque.
Veuillez contacter le service après-vente de SAMSUNG pour toute question ou tout problème concernant la lecture
des disques Bluray, DVD ou CD sur cet appareil. Vous pouvez également vous reporter au manuel d'utilisation pour
obtenir plus d'informations sur les restrictions en matière de lecture.
Il se peut que certains disques et DVD du commerce achetés en dehors de votre zone ne puissent pas être lus sur
cet appareil.
| 6 Français
HT-F4200_XU_FRA_130208-1.indd 6
2013-02-13 오후 4:07:30
Code régional
Code
régional
Zone
A
Amérique du Nord, Amérique
centrale, Amérique du Sud,
Corée, Japon, Taïwan, Hong
Kong et Sud-Est asiatique.
B
Europe, Groenland, France
d'outre-mer, Moyen-Orient,
Afrique, Australie et NouvelleZélande.
C
Inde, Chine, Russie, Asie
centrale et Asie du Sud.
1
États-Unis, Territoires
organisés des États-Unis et
Canada
2
Europe, Japon, MoyenOrient, Égypte, Afrique,
Groenland
3
Taïwan, Corée, Philippines,
Indonésie, Hong Kong
4
Mexique, Amérique du Sud,
Amérique centrale, Australie,
Nouvelle-Zélande, Îles du
Pacifique, Caraïbes
Disque
Blu-ray
DVD-VIDEO
5
Russie, Europe de l’Est, Inde,
Corée du Nord, Mongolie
6
Chine
Disque Blu-ray
BD-LIVE
Dolby
DTS
Disque Blu-ray 3D
DivX
Norme de lecture PAL au
Royaume-Uni, en France,
en Allemagne, etc.
Java
Formats pris en charge
Prise en charge des fichiers musicaux
Extension
de fichier
Conteneur
Codec
audio
Plage de prise en
charge
*.mp3
MP3
MP3
-
WMA
* Taux
d'échantillonnage
(en kHz) - 8, 11,
16, 22, 32, 44,1,
48
* Débits binaires
- Tous les débits
binaires dans la
plage allant de 5
kbps à 384 kbps
| REMARQUE |
Si le code régional d'un disque Blu-ray/DVD ne
correspond pas à celui de l'appareil, ce dernier ne
peut pas lire le disque.
*.wma
WMA
Français
HT-F4200_XU_FRA_130208-1.indd 7
Mise en Route
Type de
disque
Logos des disques pouvant être lus
sur cet appareil
02
Les produits et les disques sont codés par région. Ces
codes régionaux doivent correspondre pour que le
disque puisse être lu. Si les codes ne correspondent pas,
le disque ne sera pas lu.
Le code régional de ce lecteur figure sur le panneau
arrière de l’appareil.
7|
2013-02-13 오후 4:07:31
Mise en Route
Prise en charge de fichier image
Extension de fichier
Type
*.jpg
*.jpeg
*.jpe
JPEG
*.png
PNG
Résolution (Définition)
15360x8640
Prise en charge des fichiers vidéo
Extension de
fichier
Conteneur
Codec vidéo
Codec audio
*.avi
AVI
DivX 3.11/4/5/6
MP4v3
H.264 BP/MP/HP
MP3, Dolby Digital, DTS,
WMA, PCM
*.mkv
MKV
VC-1 AP
DivX 5/6
H.264 BP/MP/HP
MP3, Dolby Digital, DTS
*.wmv
WMV
(wmv9)
VC-1 AP
VC-1 SM
WMA
*.mp4
MP4
MP4 (mp4v)
H.264 BP/MP/HP
AAC
*.mpg
*.mpeg
PS
MPEG1
MPEG2
H.264 BP/MP/HP
MP1, 2
Dolby Digital, DTS
Résolution
(Définition)
1920x1080
Limitations
- Même lorsqu'un fichier est codé selon un codec pris en charge mentionné ci-dessus, ce fichier peut ne pas être lu en
cas de problème au niveau de son contenu.
- La lecture normale ne sera pas garantie si les informations relatives au conteneur du fichier sont erronées ou si le
fichier lui-même est corrompu.
- Les fichiers ayant un débit binaire ou une vitesse de défilement supérieur(e) à la normale peuvent présenter des
discontinuités lors de la lecture.
- La fonction Recherche (Saut) sera indisponible si la table d'indexage du fichier est corrompue.
Décodeur vidéo
- Prend en charge le format H.264 de niveau 4.1 et AVCHD
- Ne prend pas en charge les formats H.264 FMO/ASO/RS et VC1 SP/MP/AP L4
- MPEG4 SP, ASP :
Inférieure à 1280 x 720 : 60 images maxi.
Supérieure à 1280 x 720 : 30 images maxi.
- Ne prend pas en charge le format GMC 2 ou supérieur
Décodeur audio
- Prend en charge les formats WMA 7, 8, 9 et STD
- Ne prend pas en charge le taux d'échantillonnage WMA de 220/50 Hz mono
- AAC : Taux d'échantillonnage maxi. : 96 Khz (8, 11, 12, 16, 22, 24, 32, 44,1, 48, 64, 88,2, 96) Débit binaire maxi. :
320 kbps
❏ Formats des fichiers de sous-titrage DivX pris en charge
*.ttxt, *.smi, *.srt, *.sub, *.txt
| 8 Français
HT-F4200_XU_FRA_130208-1.indd 8
2013-02-13 오후 4:07:34
AVCHD (Codec vidéo avancé haute définition)
02
Mise en Route
• Cet appareil prend en charge les disques au format AVCHD. Ces disques sont normalement enregistrés et lus sur des
caméscopes.
• Le format AVCHD est un format vidéo numérique haute définition.
• Le format MPEG-4 AVC/H.264 compresse les images de manière plus efficace que le format de compression
d'image conventionnel.
• Certains disques AVCHD utilisent le format « x.v.Colour ». Cet appareil peut lire les disques
• AVCHD faisant appel au format « x.v.Colour ». • « x.v.Colour » est une marque de commerce de Sony Corporation.
• « AVCHD » et le logo AVCHD sont des marques de commerce de Matsushita Electronic Industrial Co., Ltd. et de
Sony Corporation.
| REMARQUE |
En fonction des conditions d’enregistrement, il est possible que certains disques au format AVCHD ne puissent pas
être lus.
Les disques au format AVCHD doivent être finalisés.
Le format « x.v.Colour » offre une gamme de couleurs plus large qu’un DVD de caméscope normal.
Il est possible que certains disques de format DivX, MKV ou MP4 ne puissent pas être lus, selon leur résolution d’image
vidéo et leur vitesse de défilement.
Remarques sur la connexion USB
• Cet appareil prend en charge les supports de stockage USB, les lecteurs MP3, les caméras numériques et les
lecteurs de carte USB.
• Cet appareil ne gère pas les noms de dossier ou de ficher dépassant 128 caractères.
• Il peut ne pas être compatible avec certains périphériques USB ou certaines caméras numériques.
• Il prend en charge les systèmes de fichiers FAT 16, FAT 32 et NTFS.
• Effectuez la connexion des périphériques USB directement au port USB de l'appareil. La connexion via un câble USB
peut causer des problèmes de compatibilité.
• L’insertion de plusieurs périphériques de mémoire dans un lecteur multicarte peut entraîner le dysfonctionnement de
celui-ci.
• L'appareil ne prend pas en charge le protocole PTP.
• Ne déconnectez pas un périphérique USB durant un processus de « chargement ».
• Plus la résolution de l’image est élevée, plus le délai d'affichage de cette image est long.
• Cet appareil ne peut pas lire les fichiers MP3 de type DRM (Gestion des droits numériques) téléchargés depuis des
sites commerciaux.
• Votre appareil ne prend en charge que les vidéos dont la vitesse de défilement des images est inférieure à 30 fps.
• Vous devez retirer le périphérique de stockage USB en toute sécurité (en exécutant la fonction « Retirer péri. USB »
pour éviter d'endommager la mémoire USB. Appuyez sur le bouton HOME pour accéder au menu d'accueil, appuyez
sur le bouton JAUNE (C) puis sur le bouton E.
• SAMSUNG ne peut être tenu responsable de la corruption de fichiers de données ou de la perte de données.
Accessoires
Vérifiez que les accessoires ci-dessous sont fournis.
FUNCTION
VOLUME
-
MUTE
+
RDS DISPLAY
TA
1
2
PTY -
PTY SEARCH
PTY +
4
5
6
7
8
3
9
TITLE MENU
DISC MENU
0
SUBTITLE
POPUP
HOME
REPEAT
TOOLS
INFO
EXIT
RETURN
TUNER
MEMORY MO/ST
A
B
TV SOUND DPS/EQ
C
Câble d'alimentation
Manuel d'utilisation
Antenne FM
D
TUNING
DOWN
UP
Télécommande/Piles (taille AAA)
Français
HT-F4200_XU_FRA_130208-1.indd 9
9|
2013-02-13 오후 4:07:34
Mise en Route
Panneau avant
MARCHE/ARRÊT
ENTRÉE
ARRÊT
OUVERTURE/FERMETURE
RÉGLAGE DU VOLUME
FONCTION
5V 500mA
ÉCRAN
TIROIR DISQUE
HÔTE USB
CAPTEUR DE LA
TÉLÉCOMMANDE
MARCHE/
ARRÊT
| REMARQUE |
Pour mettre à niveau le logiciel du produit via la prise de l'hôte USB, vous devez utiliser une carte mémoire flash USB.
Lorsque l'appareil affiche le menu du disque Blu-ray, vous ne pouvez pas lancer la vidéo en appuyant sur le bouton
6 situé sur l'appareil ou la télécommande. Pour lire la vidéo, sélectionnez Lire la vidéo ou Démarrer dans le menu
du disque puis appuyez sur le bouton E .
Si vous utilisez le service Internet ou si le contenu du périphérique USB est lu sur le téléviseur, vous ne pouvez
pas sélectionner le mode BD/DVD avec le bouton FONCTION. Arrêtez tout d'abord la lecture du contenu sur le
téléviseur pour sélectionner le mode BD/DVD.
Panneau arrière
VENTILATEUR
ENTRÉE AUX
AUX IN
FRONT R
FRONT L
SUBWOOFER
,03('$1&(ȍ
POWER
SPEAKERS OUT
CORDON
D'ALIMENTATION
PRISES DE SORTIE
DES ENCEINTES
* ANTENNE FM
SORTIE HDMI
FM ANT
L
R
OPTICAL
DIGITAL
AUDIO IN
HDMI OUT
LAN
ENTRÉE AUDIO
NUMÉRIQUE EXTÉRIEURE
(OPTIQUE)
LAN
* Connexion de l’antenne FM
1.
2.
Branchez l’antenne FM fournie dans la prise FM ANTENNA.
Déplacez progressivement le fil de l’antenne jusqu’à trouver une position dans laquelle la réception est de qualité,
fixez-le ensuite solidement à un mur ou une autre surface solide.
| REMARQUE |
Veillez à prévoir un minimum d'espace libre de 10 cm sur tous les côtés du Home cinéma dans le but de garantir une
ventilation appropriée. Veillez à ne pas obstruer le ventilateur ou les orifices d’aération.
Cet appareil ne reçoit pas les émissions AM.
| 10 Français
HT-F4200_XU_FRA_130208-1.indd 10
2013-02-13 오후 4:07:40
Télécommande
02
Boîtier de la télécommande
Appuyez pour sélectionner le mode de
Blu-ray (BD/DVD, D. IN, AUX, etc.).
FUNCTION
VOLUME
Permet de régler le volume.
-
MUTE
+
RDS DISPLAY
Appuyez sur les touches numériques
pour commander les options.
Appuyez sur cette touche pour
visualiser le menu du disque.
Appuyez sur ces touches pour effectuer
un saut vers l'arrière ou l'avant.
Appuyez ici pour arrêter ou démarrer
la lecture d'un disque.
Appuyez ici pour arrêter ou démarrer
la lecture d'un disque.
Permet de sélectionner la langue de
sous-titrage du disque.
Appuyez sur cette touche pour
passer à l’écran Accueil.
Appuyez sur cette touche pour utiliser
le menu Outils.
Sélectionnez les éléments de menu
à l’écran, puis changez la valeur du
menu sélectionné.
Permet de revenir au menu précédent.
Ces touches sont utilisées à la fois pour
les menus de l'appareil et certaines
fonctions liées aux disques Blu-ray.
TA
1
2
3
PTY -
PTY SEARCH
PTY +
4
5
6
7
8
9
TITLE MENU
DISC MENU
0
SUBTITLE
POPUP
HOME
REPEAT
TOOLS
INFO
RETURN
EXIT
TUNER
MEMORY MO/ST
A
B
C
D
TUNING
TV SOUND DPS/EQ
DOWN
Permet d'émettre le signal audio vers les
enceintes du Home cinéma ou l'enceinte
du téléviseur. (Reportez-vous en page 28)
Sélectionnez le mode audio DSP/EQ
souhaité.
UP
Permet d’ouvrir et de fermer le tiroir
disque.
Mise en Route
Permet d'allumer et d'éteindre
l'appareil.
Permet de couper le son
momentanément.
Utilisez la fonction RDS pour recevoir
des stations FM.
Permet d'accéder au menu
contextuel/menu titre.
Appuyez sur ces touches pour
effectuer une recherche vers l'arrière
ou l'avant.
Appuyez sur cette touche pour
suspendre la lecture d’un disque.
Permet de répéter la lecture d’un
titre, d’un chapitre, d’une piste ou
d’un disque.
Permet d'afficher les informations
relatives à la lecture, en cours de
lecture d'un disque Blu-ray/DVD.
Appuyez sur cette touche pour quitter
le menu.
Permet de configurer une fréquence
radio préréglée.
Permet de sélectionner les réglages
MONO ou STEREO pour les
radiodiffusions.
Permet de rechercher les stations FM
actives et de changer les canaux en
conséquence.
Insertion des piles dans la télécommande
Veillez à faire correspondre les extrémités « + » et « - » des piles
avec le dessin situé à l’intérieur du compartiment.
Taille des piles : AAA
Sur la base d’une utilisation classique, la durée de vie des piles
est d’environ un an.
La portée de la télécommande en ligne droite est d'environ 7
mètres par rapport à l'appareil.
Français
HT-F4200_XU_FRA_130208-1.indd 11
11 |
2013-02-13 오후 4:07:41
Branchements
Dans ce chapitre, vous trouverez plusieurs méthodes vous expliquant comment connecter votre appareil à d’autres
composants externes.
Avant de déplacer ou d'installer l'appareil, éteignez-le et débranchez le cordon d'alimentation.
Connexion des enceintes
Position de l’appareil
Posez-le sur un support, sur une étagère
ou sous un meuble TV.
Caisson de graves
Avant (D)
Appareil
Avant (G)
Enceintes avant
Caisson de
graves
Choix de la position d’écoute
La position d’écoute doit être située à
une distance équivalente à environ 2,5
à 3 fois la taille de l’écran du téléviseur.
Si vous avez par exemple un écran 46
pouces, situez les positions d’écoute
entre 2,92 et 3,5 m de l'écran.
Placez les enceintes face à votre position d’écoute en les orientant vers vous (d’environ 45°).
Positionnez-les de manière à ce que les haut-parleurs d’aigus se situent à la hauteur de vos
oreilles.
La position du caisson de graves n’a pas d’importance. Vous pouvez l’installer où vous
voulez.
| 12 Français
HT-F4200_XU_FRA_130208-1.indd 12
2013-02-13 오후 4:07:46
Connexion des enceintes
2.
Pour fixer le câble d'enceinte à chaque enceinte :
a. Appuyez sur la languette rouge située à l’arrière de l’enceinte, insérez le câble
rouge, puis relâchez la languette.
b. Appuyez sur la languette noire située à l’arrière de l’enceinte, insérez le câble noir,
puis relâchez la languette.
Branchez les fiches des câbles d'enceinte à l’arrière de l'appareil en respectant les
couleurs entre les fiches et les prises femelles des enceintes.
Enceinte avant (G)
FRONT
FRONT
R
L
IMPEDANCE : 3
3.
Rouge
Noir
Branchements
Chaque ensemble de câble d'enceinte doit être relié à l'enceinte correspondante.
Pour cela, la prise avec le codage couleur sur chaque ensemble doit correspondre
à l'autocollant coloré situé sur la face inférieure de chaque enceinte.
03
1.
Enceinte avant (D)
SUBWOOFER
SPEAKERS OUT
Caisson de gravesr
R
FRONT
L
IMPEDANCE : 3
AUX
IN
FRONT
SPEAKERS OUT
FM ANT
L
SUBWOOFER
R
OPTICAL
DIGITAL
AUDIO IN
| ATTENTION |
Si vous souhaitez installer l'appareil au mur, fixez les vis ou les clous fermement au mur et utilisez pour l'installation
les orifices situés à l'arrière de l'enceinte. Cependant, lorsque vous installez l'appareil au mur, les accessoires (clous
ou vis) et l'installation ne sont pas fournis par notre entreprise.
Ne laissez pas jouer des enfants avec ou à proximité des enceintes. Ils peuvent se blesser en cas de chute d'une
enceinte.
Lors du raccordement des câbles d'enceinte aux enceintes, assurez-vous que la polarité (+/ –) est correcte.
Conservez l'enceinte de caisson de graves hors de portée des enfants afin d'éviter qu'ils ne mettent leurs mains ou
des objets étrangers dans le conduit (orifice) de l'enceinte du caisson de graves.
N'accrochez pas le caisson de graves au mur à l'aide du conduit (orifice).
| REMARQUE |
Si vous placez une enceinte à proximité de votre téléviseur, la couleur des images peut être déformée en raison du
champ magnétique.
Français
HT-F4200_XU_FRA_130208-1.indd 13
13 |
2013-02-13 오후 4:07:47
Branchements
Connexion à un routeur réseau
AUX
IN
FM ANT
FRONT
R
FRONT
L
SUBWOOFER
SPEAKERS OUT
IMPEDANCE : 3
POWER
L
R
OPTICAL
DIGITAL
AUDIO IN
HDMI OUT
LAN
Modem large
bande
Service large
bande
Ou
Service large
bande
Modem large bande (avec routeur intégré)
Routeur
| REMARQUE |
Votre routeur ou la politique de votre fournisseur de services Internet peut empêcher l’accès de l’appareil au serveur
de mise à jour du logiciel Samsung. Si cela se produit, contactez votre fournisseur de services Internet pour plus
d’informations.
Les utilisateurs DSL doivent passer par un routeur pour la connexion au réseau.
Pour utiliser la fonction DLNA, vous devez connecter l’ordinateur au réseau, tel qu’indiqué sur les illustrations cidessus.
La connexion peut être câblée ou sans fil.
| 14 Français
HT-F4200_XU_FRA_130208-1.indd 14
2013-02-13 오후 4:07:48
Connexion de l'appareil à un téléviseur / Périphériques Externes
03
Branchements
AUX
IN
FM ANT
L
FRONT
R
FRONT
SUBWOOFER
SPEAKERS OUT
L
IMPEDANCE : 3
AUX
IN
POWER
FM ANT
L
R
OPTICAL
DIGITAL
AUDIO IN
HDMI OUT
LAN
R
OPTICAL
HDMI OUT
DIGITAL
AUDIO IN
Méthode 1
R
Rouge
W
Blanc
LAN
Méthode 2
Périphériques externes
OPTICAL OUT
HDMI IN
Connexion de l'appareil à un téléviseur
À l'aide d'un câble HDMI (non fourni), connectez la prise HDMI OUT située à l'arrière de l'appareil à la
prise HDMI IN de votre téléviseur. Si le téléviseur prend en charge la fonction ARC, vous pouvez écouter le son de votre
téléviseur depuis votre Home cinéma juste en connectant ce câble. Consultez la page 19 de ce manuel et la section sur
l'ARC du manuel d'utilisation de votre téléviseur pour obtenir plus de détails.
Connexion de périphériques externes
Pour sélectionner le mode correct pour un périphérique externe, appuyez sur la touche FUNCTION. Chaque appui sur
cette touche change le mode selon cet ordre : BD/DVD D. IN AUX FM
Deux méthodes de connexion des périphériques externes à votre Home cinéma sont décrites ci-dessous.
Méthode 1 ENTRÉE AUX : Connexion d’un composant analogique externe
En utilisant un câble audio RCA (non fourni), connectez la prise d'Entrée AUDIO située sur l'appareil à la prise de Sortie
AUDIO située sur le composant analogique externe. Sélectionnez le mode AUX.
• Assurez-vous de faire correspondre les couleurs des fiches des câbles avec celles des prises d'entrée et de sortie.
Méthode 2 OPTIQUE : Connexion d’un composant audio numérique externe
Pour connecter la sortie audio numérique des composants à signaux numériques tels que les récepteurs câble/satellite
(décodeur). En utilisant un câble optique numérique (non fourni), connectez la prise d'Entrée Audio numérique optique
située sur l'appareil à la prise de Sortie optique numérique située sur le périphérique numérique externe.
Sélectionnez le mode D. IN.
| REMARQUE |
Pour visionner un film depuis votre récepteur câble/satellite, vous devez connecter sa prise de sortie vidéo
directement à votre téléviseur.
Ce système prend en charge les fréquences d’échantillonnage numériques de 32 kHz minimum provenant de
composants numériques externes.
Ce système prend en charge uniquement les données audionumériques DTS et Dolby. Les données audio MPEG,
un format type train de bits n'est pas pris en charge.
Français
HT-F4200_XU_FRA_130208-1.indd 15
15 |
2013-02-13 오후 4:07:50
Paramètres
4:3 Letter Box - Pour les plus anciens téléviseurs
analogiques à écran standard. Permet d'afficher
les images 4:3 en plein écran et les images 16.9
au format boîte aux lettres qui conserve le rapport
16:9 mais place des barres noires au-dessus et endessous de l'image.
Procédure de réglage des
paramètres initiaux
• Le menu Accueil n'apparaîtra pas si vous ne
configurez pas les paramètres initiaux.
• L'affichage à l'écran (OSD) peut changer sur cet
appareil après la mise à niveau de la version du logiciel.
• Les étapes d'accès peuvent varier selon le menu
sélectionné.
1.
Mettez votre téléviseur sous tension après avoir
connecté l'appareil, puis mettez ce dernier à son
tour sous tension. Lorsque vous mettez l'appareil
sous tension pour la première fois, il affiche
automatiquement l'écran Langue des paramètres
initiaux.
4:3 Pan-Scan - Pour les plus anciens téléviseurs
analogiques à écran standard. Permet d'afficher
les images 4:3 en plein écran et les images 16.9 au
format Pan-Scan qui remplit l'écran, mais coupe les
côtés droit et gauche de l'image et agrandit le milieu
verticalement.
5 . L'écran Réseau - Câblé apparaît.
- Si vous disposez d’un réseau avec des adresses
IP dynamiques (c’est le cas pour la plupart des
gens), sélectionnez Auto, appuyez sur le bouton
E puis passez à l’étape 6.
- Si vous disposez d’un réseau avec des
adresses IP statiques, nous vous conseillons de
sélectionner Ignorer en appuyant sur le bouton
BLEU (D), puis reportez-vous à la page 20 «
Configuration de votre connexion au réseau » à
la page 20 après avoir terminé la configuration
initiale. La section « Configuration de votre
connexion au réseau » fournit une explication
complète concernant la configuration manuelle
de votre connexion au réseau.
- Si vous ne disposez d’aucun réseau, sélectionnez
Ignorer en appuyant sur le bouton BLEU (D).
L’écran Initial Settings Complete (Paramètres
initiaux terminés) apparaît puis l’écran d’accueil
apparaît également.
Initial Settings I On-Screen Language
Select a language for the on-screen displays.
English
Français
Deutsch
Español
Italiano
Nederlands
> Move
2.
3.
" Select
Appuyez sur les boutons ▲▼ pour sélectionner la
langue appropriée, puis appuyez sur le bouton E.
Appuyez sur le bouton E pour démarrer la
g
configuration
de la fonction.
| REMARQUE |
Paramètre initial
Si vous ignorez la configuration du réseau ou si la
Les paramètres d'aspect TV et de réseau vont être définis.
Chaque paramètre peut être ensuite modifié sous le menu "Paramètres".
configuration ne fonctionne pas correctement, vous
pouvez vous reportez à la section « Configuration de
votre connexion au réseau » à la page 23 pour configurer
la connexion au réseau de l’appareil
plus tard.
pp
p
Démarrage
Paramètre initial | Réseau - Câblé
Choisissez la méthode pour configurer le protocole Internet (IP).
Vérif. câble est connecté.
a Précédent " Sélectionner
Auto : Configurer IP automatiquement.
4.
L'écran TV Aspect (Format TV) apparaît. Appuyez sur
les boutons ▲▼ pour sélectionner le format d'image
du téléviseur souhaité, puis appuyez sur le bouton E.
Vous avez quatre choix :
16:9 Original - Pour les téléviseurs grand écran.
Permet d'afficher les images en grand écran dans leur
format original 16.9 et les images 4:3 (l'ancien format
standard) en format Encadrement horizontal du 4:3
avec des barres noires sur la gauche et la droite.
16:9 Entier - Pour les téléviseurs grand écran.
Permet d'afficher les images en grand écran dans
leur format original 16.9 et d'étirer les images 4:3
pour remplir l'écran 16:9.
Auto
Manuel
a Précédent d Ignorer < Déplacer
6.
" Sélectionner
L'appareil se connecte au réseau une fois que la
connexion réseau a été confirmée. Une fois terminé,
appuyez sur le bouton E. L’écran Initial Settings
Complete (Paramètres initiaux terminés) apparaît
puis l’écran d’accueil apparaît également.
| 16 Français
HT-F4200_XU_FRA_130208-1.indd 16
2013-02-13 오후 4:07:51
MAC adresse (d0:66:7b:dc:28:fc)
Adresse IP,Masque sous-réseau,Passerelle, Serveur DNS
| REMARQUE |
Pour lire ou afficher des fichiers vidéos, musicaux
Votre réseau fonctionne correctement.
Si vous rencontrez encore des problèmes réseau, contactez votre
fournisseur de services réseau.
ou photos situés sur votre ordinateur, vous devez
connecter votre Home cinéma et votre ordinateur à un
réseau domestique et vous devez télécharger, installer
et configurer le logiciel DLNA sur votre ordinateur.
(Reportez-vous en page 22)
OK
" Sélectionner
| REMARQUE |
Paramètres
Ping passerelle
Test service internet
04
Pour sélectionner une option sur l'écran Accueil,
déplacez le curseur à l'aide des boutons ▲▼◄►
jusqu'à ce que l'option de votre choix soit mise en
surbrillance, puis appuyez sur le bouton E.
1.
Paramètre initial | Réseau - Câblé
Accéder à l'écran Paramètres
Si vous souhaitez afficher à nouveau l'écran
Paramètres initiaux pour procéder à des modifications,
sélectionnez l'option Réinitialisation. (Voir page 20)
Si vous utilisez un câble HDMI pour connecter
l'appareil à un téléviseur Samsung conforme à la
fonctionnalité Anynet+ (HDMI-CEC) et que ; 1.)
Vous avez réglé la fonction Anynet+ (HDMI-CEC)
sur Activé à la fois sur le téléviseur et l'appareil ; 2.)
Vous avez réglé le téléviseur sur une langue prise
en charge par l'appareil, ce dernier sélectionne
alors automatiquement cette langue comme langue
préférée.
Sélectionnez Paramètres sur l'écran Accueil, puis
appuyez sur E
E. L'écran Paramètres apparaît.
1.
Paramètres
Affichage
Paramètres 3D
Audio
Format TV
: 16:9 Original
Réseau
BD Wise
: Arrêt
Système
Résolution
: Auto
Langue
Trame vidéo (24Fs)
: Arrêt
Sécurité
Format couleur HDMI
: Auto
Général
Couleur intense HDMI
: Arrêt
Assistance
Mode progressif
: Auto
►
L'écran Accueil
1
3
Vidéos
Photos
Musique
Pour accéder aux menus, sous-menus et options
sur l'écran Paramètres, veuillez vous reporter à
l'illustration de la télécommande cidessous.
2.
Paramètres
4
2
| REMARQUE |
Si l'appareil reste en mode Arrêt pendant plus de 5
5
App 1
App 2
Pas de Disque a Changer périph.
App 3
App 4
d Afficher périph. " Entrer
1
Permet de sélectionner les Photos.
2
Permet de sélectionner les Vidéos.
3
Permet de sélectionner des Musiques.
4
Permet de sélectionner des Paramètres.
6
minutes sans l'utiliser, un écran de veille s'affichera sur
le téléviseur. Si l'appareil reste en mode d’écran de
veille pendant plus de 20 minutes, l'alimentation sera
automatiquement coupée.
Touches de la télécommande utilisées
pour le menu Paramètres
SUBTITLE
5
Permet de sélectionner des applications.
HOME
REPEAT
1
TOOLS
INFO
RETURN
EXIT
3
2
4
TUNER
6
Permet d'afficher les boutons que vous
pouvez utiliser sur la télécommande pour
accéder aux fonctions.
1
Touche HOME : Appuyez sur cette touche pour
passer à l’écran Accueil.
Français
HT-F4200_XU_FRA_130208-1.indd 17
17 |
2013-02-13 오후 4:07:56
Paramètres
2
Touche RETURN (') : Permet de revenir au
menu précédent.
3
Touche E / DIRECTION :
• Appuyez sur ▲▼◄► pour déplacer le curseur
ou sélectionner un élément.
• Appuyez sur la touche E pour activer
l'élément sélectionné actuellement ou
confirmer un réglage.
4
Touche EXIT : Appuyez sur cette touche pour
quitter le menu actuellement sélectionné.
BD Wise
BD Wise est la fonctionnalité
d’interconnectivité de Samsung la
plus récente. Lorsque vous connectez
un appareil Samsung et un téléviseur
Samsung doté de la fonction BD Wise
via l'interface HDMI et que l'appareil et
le téléviseur disposent tous deux de la
fonctionnalité BD Wise, le produit émet
des images dont la résolution vidéo et
la vitesse de défilement sont identiques
à celles du disque Blu-ray/DVD.
Résolution
Cette option vous permet de régler
la définition du signal vidéo HDMI
respectivement sur les valeurs BD
Wise, Auto., 1080p, 1080i, 720p,
576p/480p. Ces valeurs sont
indicatives du nombre de lignes vidéo
par image. Les lettres i et p signifient
respectivement balayage entrelacé (i)
et balayage progressif (p). Plus il y a
de lignes, plus la qualité de l'image est
supérieure.
Trame vidéo
(24Fs)
Le réglage de la fonction Trame vidéo
(24Fs) sur Auto vous permet de
spécifier automatiquement la sortie
HDMI de l'appareil sur 24 images par
seconde pour une qualité d'image
améliorée si un téléviseur compatible
24Fs est connecté.
• Vous ne pouvez bénéficier de la
fonction Trame vidéo (24Fs) que
sur un téléviseur prenant en charge
cette vitesse de défilement.
• Trame vidéo est uniquement
disponible lorsque l'appareil est
en modes de résolution de sortie
HDMI 1080i ou 1080p.
| REMARQUE |
Le bouton E sur le panneau frontal de l'appareil peut
être utilisé dans le même but que la touche E de la
télécommande.
Informations détaillées sur les fonctions
Chaque fonction Paramètres, élément de menu, et
chaque option sont expliqués en détails à l'écran. Pour
afficher les informations, utilisez les touches ▲▼◄► pour
sélectionner la fonction, l'élément de menu ou l'option.
Les informations apparaissent en général à droite de
l'écran. Vous trouverez une courte description de chaque
fonction Paramètres à la page suivante. Vous pourrez
également trouver des informations complémentaires sur
certaines fonctions dans l'Annexe de ce manuel.
Fonctions du menu Paramètres
Affichage
Permet de configurer les fonctions
relatives à la 3D.
Mode lecture Blu-ray 3D: Vous
permet de choisir de lire en mode
3D ou non un disque Blu-ray
comportant des contenus 3D. Si
vous passez au menu Accueil ou
Paramètres 3D
Accueil Smart Hub tout en étant
en mode 3D, l'appareil passera
automatiquement en 2D.
Taille écran: Permet d'entrer la taille
du téléviseur connecté à l'appareil.
L'appareil règle automatiquement la
sortie 3D en fonction de la taille de
l'écran du téléviseur.
Format TV
Vous permet de régler la sortie de
l'appareil sur la taille de l'écran de
votre téléviseur. Reportez-vous à la
page 16.
Vous pouvez régler le format de
l'espace chromatique pour la sortie
Format couleur
HDMI afin qu'il corresponde aux
HDMI
capacités de l'appareil branché
(télévision, moniteur, etc.).
Couleur
intense HDMI
Mode
progressif
Cette option vous permet de régler
l'appareil pour émettre des données
vidéo en sortie avec Couleur intense
via la prise HDMI OUT. L'option
Couleur intense permet une
reproduction plus fidèle des couleurs,
notamment en termes de profondeur.
Cette option permet d'améliorer la
qualité de l'image lors de la lecture
d'un DVD.
Audio
Paramètre
haut-parleur
Vous permet de régler les paramètres
des enceintes suivantes et d'activer
et désactiver la tonalité d'essai afin de
tester les enceintes.
| 18 Français
HT-F4200_XU_FRA_130208-1.indd 18
2013-02-13 오후 4:08:04
Sortie
numérique
Contrôle de la
dynamique
Mode sousmixage
Permet de sélectionner la méthode du
sous-mixage multicanal compatible
avec le système stéréo utilisé. Vous
pouvez alors choisir de spécifier le
sous-mixage de l'appareil sur l'option
stéréo normal ou stéréo compatible
surround.
Paramètres
réseau câblé
Pour obtenir de plus amples
informations sur les Paramètres
réseau et les fonctions réseau,
reportez-vous à la section «Réseaux
et Internet » à partir de la page 20.
Test réseau
Vous permet de tester la configuration
du protocole Internet pour voir s’il
fonctionne correctement.
Réseau
État du réseau
Permet de vérifier le réseau actuel et
l'état d'Internet.
Connexion
internet BDLive
Vous permet d'autoriser ou d'interdire
une connexion Internet pour les
services BD-Live.
Paramètre
initial
Cette option vous permet de
relancer la procédure de réglage des
paramètres initiaux. Reportez-vous à
la page 16 pour les détails.
Anynet+
(HDMI-CEC)
Anynet+ est une fonction pratique
qui autorise des commandes liées
entre plusieurs produits Samsung
compatibles Anynet+ et vous
permet de contrôler ces produits
via une télécommande de téléviseur
Samsung. Pour utiliser cette fonction,
vous devez connecter cet appareil
à un téléviseur Samsung Anynet+ à
l'aide d'un câble HDMI.
Gestion
données BD
Vous permet de gérer les contenus
que vous avez téléchargés via un
disque Blu-ray prenant en charge
le service BD-Live. Vous pouvez
afficher les informations concernant
le périphérique USB que vous utilisez
ou concernant le stockage des
données BD Live, y compris l’espace
de stockage. Vous pouvez également
supprimer les données BD Live et
changer le périphérique.
Système
Français
HT-F4200_XU_FRA_130208-1.indd 19
Paramètres
Fonct. Retour
Audio
Sync. audio
Lorsque l'appareil est relié à un
téléviseur numérique, cette option
vous permet de régler le temps de
retard audio afin que le son soit
synchronisé avec la vidéo. Vous
pouvez régler le retard entre 0 et 300
millisecondes.
04
Sélect.
haut-parleur
Niveau : vous permet de régler le niveau
sonore relatif de chaque enceinte de 6
dB à -6 dB. Par exemple, si vous aimez
les basses puissantes, vous pouvez
augmenter le niveau sonore du caisson
de graves de 6 dB.
Distance : vous permet de régler la
distance relative de chaque enceinte à
partir de la position d'écoute jusqu'à 9
mètres. Plus la distance est grande, plus
le son de l'enceinte sera fort.
Tonalité d'essai : vous permet
d'exécuter la fonction de Tonalité
d'essai afin que vous puissiez tester
vos réglages. Régler la Tonalité d’essai
sur On permet d’activer cette tonalité
d’essai. La régler sur Arrêt permet de la
désactiver.
Cette option vous permet de sélectionner
les haut-parleurs activés, ceux du téléviseur
ou ceux du Home cinéma.
Cette option vous permet de diriger le son
du téléviseur vers les haut-parleurs du
Home cinéma. Elle nécessite une connexion
HDMI et un téléviseur compatible avec la
fonction Canal de retour audio (ARC).
• Lorsque le Canal de retour audio (ARC)
est activé, utilisez un câble HDMI pour
relier l'appareil au téléviseur. À ce stade,
une entrée optique ne fonctionne pas.
• Lorsque la fonction Canal de retour
audio (ARC) est réglée sur auto, utilisez
un câble HDMI pour relier l'appareil
au téléviseur. À ce stade, ARC et une
entrée optique sont automatiquement
sélectionnés.
Cette option vous permet de définir la
Sortie numérique de manière à ce qu'elle
corresponde aux capacités du récepteur AV
que vous avez connecté à l'appareil. Pour
les détails, reportez-vous au tableau de
sélection des sorties numériques. (Voir page
32)
Cette option vous permet d'appliquer le
contrôle de la dynamique au son Dolby
Digital, Dolby Digital Plus et Dolby TrueHD.
Auto.: permet de contrôler
automatiquement la plage dynamique
du son Dolby TrueHD, sur la base des
informations contenues dans la bande
son de Dolby TrueHD. Cette option active
également le contrôle de la dynamique
pour Dolby Digital et Dolby Digital Plus.
Arrêt: la plage dynamique reste non
compressée, vous permettant ainsi
d'entendre le son original.
Activé: cette option active le contrôle
de la dynamique pour les trois formats
Dolby. Les sons les moins forts sont
amplifiés et le volume des sons forts est
abaissé.
19 |
2013-02-13 오후 4:08:05
Paramètres
Affichez les codes d'enregistrement
DivX® Vidéo à
DivX® VOD pour acheter et lire des
la demande
contenus DivX® VOD.
Langue
Vous pouvez sélectionner la langue de votre choix pour le
menu à l’écran, le menu du disque, les sous-titres, etc.
• La langue que vous avez sélectionnée pour le menu
du disque, la bande-son du disque ou les sous-titres
apparaîtra seulement si elle est prise en charge sur le
disque.
Sécurité
Le code PIN par défaut est 0000. Saisissez ce code PIN
par défaut pour accéder à la fonction de sécurité si vous
n'avez pas créé votre propre mot de passe.
Contrôle
parent. BD
Cette option empêche la lecture
des disques Blu-ray ayant une
classification égale ou supérieure à
une classification d'âge particulière
que vous avez définie jusqu'à la saisie
du code PIN.
Contrôle
parent. DVD
Cette option empêche la lecture des
disques DVD ayant une classification
supérieure à une classification
numérique particulière que vous avez
sélectionnée jusqu'à la saisie du code
PIN.
Modifier PIN
Cette option permet de modifier le
code PIN à 4 chiffres utilisé pour
accéder aux fonctions de sécurité.
Réseaux et Internet
Lorsque vous connectez cet appareil à un réseau, vous
pouvez utiliser les applications et les fonctions basées
sur les réseaux telles que BD-LIVE, et mettre à niveau le
logiciel de l'appareil via la connexion réseau.
Configuration de votre connexion réseau
Avant de commencer, contactez votre fournisseur de
services Internet pour savoir si votre adresse IP est fixe
ou dynamique. Si l’adresse est dynamique, nous vous
recommandons d’utiliser la procédure automatique cidessous. Si l’adresse est statique, vous devez utiliser la
procédure manuelle suivante.
• Avant de commencer, veuillez confirmer que l’appareil
est connecté à votre routeur avec un câble réseau.
❏ Automatique
Pour démarrer le processus de configuration, suivez les
étapes suivantes :
1. Dans le menu Accueil, sélectionnez Paramètres,
puis appuyez sur le bouton E.
2. Sélectionnez Réseau puis appuyez sur le bouton
E.
3. Sélectionnez Paramètres réseau câblé, puis
appuyez sur le bouton E. L'écran Paramètres
réseau câblé apparaît.
4. Appuyez sur le bouton + sur le menu Config. prot.
Internet. Utilisez les boutons ▲▼ pour sélectionner
Auto puis appuyez sur le bouton E
E.
Paramètres
Paramètres réseau câblé
Général
Fuseau horaire
Affichage
Audio Config. prot. Internet
Vous pouvez spécifier le fuseau
horaire applicable à votre région.
Permet d’obtenir les informations
de contact pour les demandes
d’assistance relatives à votre appareil.
Conditions
contrat de
service
Permet d’afficher la clause de nonresponsabilité générale concernant
les contenus et services de tiers.
Tous les parametres sont retablis sur
leur valeur d'origine par defaut sauf
Réinitialisation en ce qui concerne les parametres
reseau. Le code PIN de sécurité par
défaut est 0000.
0
0
0
Système
0
0
0
Langue
Passerelle
: 0
0
0
0
0
0
Général
Pour obtenir de plus amples
Mise à jour du informations sur la fonction de Mise
logiciel
à jour logicielle, consultez « Mise à
niveau du logiciel » en page 21.
Contacter
Samsung
: 0
Masque sous-réseau : 0
Sécurité DNS
Assistance
: Auto
Réseau
Adresse IP
: Auto
Serveur DNS
: 0
0
Assistance
> Déplacer " Sélectionner
5.
6.
7.
' Retour
La fonction Réseau permet automatiquement
d’obtenir et de renseigner les valeurs de l'Adresse
IP, du Masque de Sous-réseau, etc.
Une fois que la fonction Réseau a acquis les valeurs
du réseau, appuyez sur le bouton RETURN (').
Sélectionnez Test réseau puis appuyez sur le
bouton E.
Le Home cinéma valide la connexion du réseau.
Une fois terminée, appuyez sur le bouton RETURN
(').
| 20 Français
HT-F4200_XU_FRA_130208-1.indd 20
2013-02-13 오후 4:08:05
❏ Manuel
1.
3.
4.
Paramètres réseau câblé
Affichage
Audio Config. prot. Internet
: Manuel
: 0
0
0
0
Réseau
Adresse IP
Système
Masque sous-réseau : 255 255 255
Langue
Passerelle
Sécurité DNS
Général
: 0
0
0
0
0
0
0
: Manuel
Serveur DNS
: 0
0
Assistance
> Déplacer " Sélectionner
' Retour
Suivez les quatre premières étapes dans la
procédure automatique, mais sélectionnez Manuel
au lieu de Automatique à l’étape 4.
2. Appuyez sur le bouton fléché ▼ pour aller sur le
premier champ de saisie (Adresse IP).
3. Utilisez les boutons numériques de la télécommande
pour entrer les numéros.
4. Une fois que vous avez terminé avec chaque
champ, utilisez le bouton ► pour passer
successivement au champ suivant. Vous pouvez
utiliser les autres boutons fléchés pour aller vers le
haut, vers le bas et revenir en arrière.
5. Entrez les valeurs des options Adresse IP, Masque
sous-réseau et Passerelle.
6. Appuyez sur le bouton ▼ pour aller sur DNS.
7. Appuyez sur le bouton ▼ pour aller sur le
premier champ de saisie DNS. Entrez les chiffres
correspondant aux valeurs ci-dessus.
8. Appuyez sur le bouton RETURN (') de votre
télécommande.
9. Sélectionnez Test réseau puis appuyez sur le
bouton E. Une fois le test terminé, appuyez
sur le bouton RETURN (') pour revenir à l'écran
précédent.
10. Sélectionnez État du réseau puis appuyez sur le
bouton E.
11. L'écran Network Status (État du réseau) apparaît.
L'appareil se connecte au réseau une fois que
la connexion réseau a été confirmée. Une fois
terminée, mettez OK en surbrillance et appuyez sur
le bouton E.
1.
Mise à niveau du logiciel
Le menu Mise à niveau du logiciel vous permet de mettre
le logiciel de l'appareil à niveau pour en améliorer la
performance et obtenir des services supplémentaires.
• Évitez d’éteindre et de rallumer le produit
manuellement durant le processus de mise à jour.
5.
| REMARQUE |
La mise à jour est terminée lorsque l’appareil s’éteint
après avoir redémarré. Appuyez sur le bouton
MARCHE/ARRÊT pour allumer l’appareil mis à jour
pour une utilisation ultérieure. Évitez d’allumer et
d’éteindre l’appareil manuellement durant le processus
de mise à jour.
Samsung Electronics n’accepte aucune responsabilité
légale concernant un dysfonctionnement de l'appareil
provoqué par une connexion Internet instable ou une
négligence de la part de l’utilisateur durant la mise à
jour du logiciel.
Si vous souhaitez annuler la mise à niveau en cours de
téléchargement, appuyez sur le bouton E.
En ligne
Votre appareil doit être connecté à Internet pour exploiter
la fonction En ligne. Retirez tous les disques avant de
démarrer.
1. Sélectionnez En ligne puis appuyez sur le bouton
E. Le message Connecting to Server (Connexion
au serveur en cours) apparaît.
2. Si une mise à jour est disponible, un message
contextuel apparaît vous demandez si vous voulez
effectuer la mise à niveau. Si vous choisissez Oui,
l'appareil s’éteint automatiquement, s’allume puis
démarre la mise à jour.
| IMPORTANT | |
N'allumez ou n'éteignez jamais le Home cinéma
manuellement lors d'une mise à jour logicielle.
3. La fenêtre contextuelle de progression de la mise à
jour apparaît. Lorsque la mise à jour est terminée,
l’appareil s’éteint à nouveau automatiquement.
4. Appuyez sur le bouton MARCHE/ARRET afin
d’allumer l’appareil.
| REMARQUE |
La mise à jour est terminée lorsque l’appareil s’éteint
après avoir redémarré. Appuyez sur le bouton
MARCHE/ARRÊT pour allumer l’appareil mis à jour
pour une utilisation ultérieure.
Évitez d’allumer et d’éteindre l’appareil manuellement
durant le processus de mise à jour.
Samsung Electronics n’accepte aucune responsabilité
légale concernant un dysfonctionnement de l'appareil
provoqué par une connexion Internet instable ou une
négligence de la part de l’utilisateur durant la mise à
niveau du logiciel.
Français
HT-F4200_XU_FRA_130208-1.indd 21
Paramètres
Paramètres
2.
Sur l'écran Accueil, sélectionnez Paramètres, puis
appuyez sur le bouton E.
Sélectionnez Assistance puis appuyez sur le bouton
E.
Sélectionnez Mise à jour du logiciel, puis appuyez
sur le bouton E.
Sélectionnez l’une des méthodes suivantes :
• En ligne
• USB
• Notif. mise à jour auto
Appuyez sur le bouton E.
Les instructions concernant chaque méthode
commencent ci-dessous.
04
Si vous disposez d'une adresse IP fixe ou si la procédure
automatique est inopérante, vous devrez définir les
valeurs de Paramètres réseau manuellement.
21 |
2013-02-13 오후 4:08:07
Paramètres
USB
1.
2.
3.
4.
5.
6.
7.
8.
9.
10.
11.
12.
13.
Connectez-vous sur www.samsung.com.
Cliquez sur SUPPORT en haut à droite de la page.
Entrez le numéro de modèle de l’appareil dans le
champ de recherche. Une fois que vous avez entré
le numéro du modèle, une liste déroulante affiche les
appareils correspondant aux numéros de modèle.
Effectuez un clic gauche sur le numéro de modèle de
l'appareil dans la liste déroulante.
Une page s'affiche, faites défiler puis cliquez sur
Téléchargements et manuels des micrologiciels.
Cliquez sur Micrologiciel au centre de la page.
Cliquez sur l’icône ZIP dans la colonne Fichier sur le
côté droit de la page.
Cliquez sur Envoyer dans la fenêtre contextuelle qui
s’affiche. Cliquez sur OK dans la fenêtre contextuelle
qui s’affiche pour télécharger et enregistrer le
micrologiciel sur votre ordinateur.
Dézippez le dossier compressé sur l'ordinateur.
Vous devriez avoir un seul dossier dézippé portant le
même nom que le fichier compressé.
Copiez le dossier sur une clé USB à mémoire flash.
Vérifiez qu’aucun disque n'est inséré dans l'appareil,
puis insérez la clé USB à mémoire flash dans le port
USB de l'appareil.
Dans le menu de l'appareil, accédez à Paramètres >
Assistance > Mise à jour du logiciel.
Sélectionnez USB.
| REMARQUE |
Aucun disque ne doit être inséré dans l'appareil lors de
la mise à niveau du logiciel via la prise USB Hôte.
Évitez d’allumer et d’éteindre l’appareil manuellement
durant le processus de mise à jour.
Une fois la mise à jour du logiciel terminée, consultez les
détails du logiciel dans le menu Mise à jour du logiciel.
Notif. mise à jour auto
Si votre appareil est connecté au réseau et si vous avez
activé Notif. mise à jour auto, l’appareil vous notifiera si
une nouvelle version logicielle est disponible à l’aide d’un
message contextuel.
1.
2.
3.
4.
5.
Mettez l'appareil sous tension.
Dans le menu Software Update (Mise à jour du
logiciel), placez Notif. mise à jour auto sur Activée.
Si une nouvelle version du logiciel est disponible,
l’appareil vous en informe grâce à un message
contextuel.
Pour mettre à jour le micrologiciel, sélectionnez Oui.
L’appareil s’éteint automatiquement, s’allume puis
démarre la mise à jour.
La fenêtre du processus de mise à jour apparaît.
Lorsque la mise à jour est terminée, l’appareil
s’éteindra à nouveau automatiquement.
Appuyez sur le bouton MARCHE/ARRET afin
d’allumer l’appareil.
| REMARQUE |
La mise à jour est terminée lorsque l’appareil s’éteint
après avoir redémarré. Appuyez sur le bouton
MARCHE/ARRÊT pour allumer l’appareil mis à jour
pour une utilisation ultérieure. Évitez d’allumer et
d’éteindre l’appareil manuellement durant le processus
de mise à jour.
Samsung Electronics ne saurait être tenu responsable
du dysfonctionnement de l’appareil causé par une
connexion Internet instable ou une négligence de la
part de l’utilisateur durant la mise à jour du logiciel.
Configuration de la fonction DLNA
DLNA vous permet de lire des fichiers musicaux, vidéos
et photos sur votre ordinateur à l’aide de l’appareil.
Pour utiliser DLNA, vous devez connecter l’appareil à
votre ordinateur via le réseau (voir page 14) et installer le
SAMSUNG PC Share Manager (Gestionnaire de partage
PC SAMSUNG) sur votre ordinateur.
Pour télécharger le logiciel DLNA
Pour utiliser DLNA avec votre ordinateur ou un
périphérique DLNA, vous devez installer le logiciel DLNA
sur votre ordinateur. Vous pouvez télécharger le logiciel
pour ordinateur et obtenir des instructions détaillées
sur l'utilisation de la fonction DLNA depuis le site Web
Samsung.com.
1. Allez sur www.samsung.com.
2. Cliquez sur SUPPORT en haut de la page.
3. Entrez le numéro de modèle de l’appareil dans le
champ de recherche. Une fois que vous avez entré
le numéro du modèle, une liste déroulante affiche les
appareils correspondant aux numéros de modèle.
4. Effectuez un clic gauche sur le numéro de modèle de
l'appareil dans la liste déroulante.
5. Une page s'affiche, faites défiler puis cliquez sur
Téléchargements et manuels des micrologiciels.
6. Cliquez sur l’onglet Logiciel.
7. Dans l'onglet Logiciel, cliquez sur l'icône EXE, située
à droite de la ligne DLNA.
8. Cliquez sur Envoyer dans la première fenêtre
contextuelle qui apparaît. Dans la seconde fenêtre
contextuelle qui s'affiche, cliquez sur Enregistrer
fichier.
9. Cherchez le fichier d’installation DLNA sur votre
disque et double-cliquez sur ce fichier.
10. Dans la fenêtre contextuelle qui s’affiche, cliquez sur
Exécuter puis suivez les directives qui s’affichent sur
votre écran.
Téléchargez le manuel d’installation/instruction DLNA à
partir du même onglet Logiciel en cliquant sur le symbole
du fichier PDF correspondant dans la colonne Fichier sur la
droite. Le fichier, au format PDF, sera téléchargé et ouvert.
Vous pouvez lire et/ou enregistrer le fichier.
| REMARQUE |
Pour utiliser la fonction DLNA avec votre smartphone,
vous devez connecter votre appareil et votre
smartphone au même routeur.
| 22 Français
HT-F4200_XU_FRA_130208-1.indd 22
2013-02-13 오후 4:08:09
Media Play
Lecture de fichiers sur un
périphérique USB
3.
4.
Allez sur le menu Accueil.
En mode Stop (Arrêt), connectez le périphérique de
stockage USB au port USB situé sur le panneau
avant de l’appareil. Le message « Souhaitez-vous
accéder au périphérique ? » s'affiche.
Appuyez sur les boutons ◄► pour sélectionner
Oui, puis sur le bouton E.
Appuyez
pp y sur le bouton ROUGE ((A).
)
Vidéos
Photos
Musique
Paramètres
Media Play
1.
2.
05
Vous pouvez lire les fichiers multimédia situés sur un
périphérique USB connecté.
6-1. Appuyez sur les boutons ▲▼ pour sélectionner
Vidéos, Photos ou Musique, puis appuyez sur le
bouton E.
-1
7 . Si des fichiers apparaissent à l’écran, passez à l’étape
8-1. Si des dossiers de fichiers apparaissent à l’écran,
utilisez les boutons ▲▼◄► pour sélectionner un
dossier, appuyez sur E, puis passez à l’étape 8-1.
8-1. Utilisez les boutons ▲▼◄► pour sélectionner
un fichier à lire ou à visionner puis appuyez sur le
bouton E.
| REMARQUE |
La lecture de fichiers 3D n'est pas prise en charge.
Pour éviter un endommagement possible de la
mémoire USB, vous devez retirer le périphérique de
stockage USB en toute sécurité à l’aide de la fonction
« Retirer péri. USB ». Appuyez sur le bouton HOME
pour accéder au menu Accueil, sélectionnez le bouton
JAUNE (C), puis appuyez sur le bouton E
Lecture d’un disque dont le contenu
est enregistré par l’utilisateur
CD
USB Flash Disk
6.
7.
8.
App 3
a Changer périph.
CD
5.
App 2
App 4
d Afficher périph. " Entrer
Appuyez sur les boutons ▲▼ pour sélectionner la
mémoire Flash USB ou le disque puis appuyez sur
le bouton E.
Appuyez sur les boutons ▲▼◄► pour sélectionner
Vidéos, Musique ou Photos puis appuyez sur le
bouton E.
Si des fichiers apparaissent à l’écran, passez à l’étape
8. Si des dossiers de fichiers apparaissent à l’écran,
utilisez les boutons ▲▼◄► pour sélectionner un
dossier, appuyez sur E, puis passez à l’étape 8.
Utilisez les boutons ▲▼◄► pour sélectionner un
fichier à lire ou à visionner puis appuyez sur le bouton
E.
Vous pouvez lire les fichiers multimédia que vous avez
enregistrés sur des disques DVD ou CD.
1.
2.
3.
4.
5.
6.
7.
OU
4-1. Appuyez
pp y sur le bouton BLEU
U (D).
( )
Allumez le Home cinéma.
Ouvrez le tiroir disque, placez-y un disque enregistré
par l'utilisateur en veillant à ce que l'étiquette du disque
soit orientée vers le haut puis fermez le tiroir disque.
Une fois que le disque est chargé, appuyez sur le
bouton ROUGE (A).
Appuyez sur les boutons ▲▼◄► pour sélectionner
CD ou DVD puis appuyez sur le bouton E.
Appuyez sur les boutons ▲▼ pour sélectionner
Vidéos, Photos ou Musique puis appuyez sur le
bouton E.
Si des fichiers apparaissent à l’écran, passez à l’étape
7. Si des dossiers de fichiers apparaissent à l’écran,
utilisez les boutons ▲▼◄► pour sélectionner un
dossier, appuyez sur E, puis passez à l’étape 7.
Utilisez les boutons ▲▼◄► pour sélectionner un
fichier à lire ou à visionner puis appuyez sur le bouton
E.
OU
CD
App 1
USB Flash Disk
App 2
USB Flash Disk
Paramètres
App 3
App 4
d Accueil
" Entrer
5-1. Appuyez sur les boutons ◄► pour sélectionner la
mémoire Flash USB ou le disque puis appuyez sur
le bouton E.
3-1. Une fois que le disque est chargé, appuyez sur le
bouton BLEU (D).
4-1. Appuyez sur les boutons ◄► pour sélectionner CD
ou DVD puis appuyez sur le bouton E.
5-1. Appuyez sur les boutons ▲▼ pour sélectionner
Vidéos, Photos ou Musique puis appuyez sur le
bouton E.
-1
6 . Si des fichiers apparaissent à l’écran, passez à
l’étape 7-1. Si des dossiers de fichiers apparaissent
à l’écran, utilisez les boutons ▲▼◄► pour
sélectionner un dossier, appuyez sur E, puis
passez à l’étape 7-1.
7-1. Utilisez les boutons ▲▼◄► pour sélectionner
un fichier à lire ou à visionner puis appuyez sur le
bouton E.
Français
HT-F4200_XU_FRA_130208-1.indd 23
23 |
2013-02-13 오후 4:08:10
Media Play
Lecture des disques vidéo du
commerce
Placez un disque dans le tiroir disque en veillant à ce que
l'étiquette du disque soit orientée vers le haut puis fermez
le tiroir disque. La lecture commence automatiquement.
Si la lecture ne se lance pas automatiquement, passez
à Vidéos dans le menu Home (Accueil) puis appuyez
sur le bouton E. Dans la plupart des cas, les vidéos
commerciales affichent un menu du disque. Pour lire le film
sur le disque, sélectionnez Lire sur le menu du disque puis
appuyez sur le bouton E.
| REMARQUE |
Pour de plus amples informations concernant la lecture
de vidéos, reportez-vous à « Contrôle de la lecture de
Vidéos » sur cette page.
2
Utilisation du menu du disque, du menu des
titres, du menu contextuel et de la liste des
titres
• DISC MENU : Au cours de la lecture, appuyez
sur cette touche pour afficher le menu Disque.
• TITLE MENU : Au cours de la lecture, appuyez
sur cette touche pour afficher le menu Titre.
- Si le disque possède une liste de lecture,
appuyez sur le bouton VERT (B) pour y
accéder.
• POPUP MENU : Au cours de la lecture,
appuyez sur cette touche pour afficher le menu
Pop-up (Contextuel).
• DISC MENU ou TITLE MENU : Au cours de la
lecture, appuyez sur cette touche pour afficher
la liste des titres.
Utilisation du menu OUTILS
Contrôle de la lecture Vidéo
Durant la lecture, appuyez sur le bouton OUTILS.
Vous pouvez contrôler la lecture des fichiers vidéo
situés dans les disques Blu-ray, DVD et CD et sur les
périphériques de stockage USB. En fonction du disque,
certaines fonctions décrites dans ce manuel peuvent ne
pas être disponibles.
Touches de la télécommande servant à
la lecture vidéo
TITLE MENU
DISC MENU
0
POPUP
2
Titre
Si le film ou la vidéo a plusieurs
titres, passez au titre souhaité ou
sélectionnez-le.
Durée de
lecture
Permet de passer au point de lecture
spécifique. Utilisez les boutons
numériques pour entrer le point de
lecture.
Mode
Répétition
Sélectionnez cette option pour
répéter un titre, un chapitre spécifique
(uniquement pour les disques BD/DVD)
ou la section repérée.
Paramètres
d'image
Sélectionnez cette option pour régler le
mode image.
- Mode
Utilisateur : Vous permet de régler
la luminosité, la netteté, etc.
Dynamique : Choisissez ce réglage
pour accentuer la Netteté de l'image.
Normal : Choisissez ce réglage
pour la plupart des applications
d'affichage.
Film : Ceci est le réglage le mieux
adapté au visionnage de films.
Sync. audio
Cette option vous permet de régler le
temps de retard audio afin que le son
soit synchronisé avec la vidéo. Vous
pouvez régler le retard entre 0 et 300
millisecondes.
1
SUBTITLE
1
HOME
REPEAT
Touches liées à la lecture
L'appareil ne lit pas de données audio en mode
Recherche, Lecture au ralenti ou Lecture pas à pas.
• 6 : Permet de démarrer la lecture.
• 5 : Permet d'arrêter la lecture.
• 7 : Permet d’interrompre la lecture.
• Lecture rapide : Pendant la lecture, appuyez
sur le bouton 3 ou . Chaque fois que vous
appuyez sur le bouton 3 ou la vitesse de
lecture change.
• Lecture au ralenti : En mode Pause, appuyez
sur le bouton .
Chaque fois que vous appuyez sur le bouton
, la vitesse de lecture change.
• Lecture pas à pas : En mode Pause, appuyez
sur le bouton 7. Chaque fois que vous
appuyez sur le bouton 7, une nouvelle image
apparaît.
• Saut de lecture : Pendant la lecture, appuyez
sur le bouton 1 ou 2. Chaque fois que vous
appuyez sur le bouton 1 ou 2, le disque se
déplace sur le chapitre ou le fichier précédent
ou suivant.
Menu qui s’affiche uniquement lors de la
lecture d’un disque BD/DVD
Chapitre
Sélectionnez cette option pour
accéder à un chapitre que vous
désirez regarder.
Audio
Sélectionnez cette option pour régler
la langue de bande son souhaitée.
| 24 Français
HT-F4200_XU_FRA_130208-1.indd 24
2013-02-13 오후 4:08:15
Angle
Utilisé pour regarder une scène sous
un autre angle. L’option Angle affiche
le nombre d'angles disponibles (1/1,
1/2, 1/3, etc.).
BONUSVIEW
Vidéo /
BONUSVIEW
Audio
Sélectionnez cette option pour régler
l’option bonusview désirée.
Pour de plus amples informations concernant la
lecture de musique, reportez-vous à « Contrôle de la
lecture de Musique » sur cette page.
Vous pouvez contrôler la lecture du contenu musical situé
sur un DVD, CD ou un périphérique de stockage USB.
lecture d’un fichier
Information
| REMARQUE |
Contrôle de la lecture de Musique
Menu qui s’affiche uniquement lors de la
Plein écran
Pour lire une piste particulière, utilisez les touches ▲▼
de la télécommande pour sélectionner la piste, puis
appuyez sur le bouton E.
2.
Sélectionnez cette option pour régler
la taille plein écran désirée. Vous
pouvez sélectionner Original, Mode1
(plus grand) et Mode2 (le plus grand).
Permet de vérifier les informations liées
au fichier vidéo.
Touches de la télécommande servant à
l'écoute de musique
RDS DISPLAY
1
| REMARQUE |
Création d’une liste de lecture des vidéos
Vous pouvez créer une liste de lecture des fichiers vidéos
pratiquement de la même façon que vous créez une
liste de lecture de fichiers musicaux. Pour obtenir plus
d’instructions, veuillez consulter la section « Création
d'une liste de lecture de musiques » en page 26.
2
3
PTY SEARCH
PTY +
4
5
6
7
8
Insérez un CD audio (CD-DA) ou un disque MP3
dans le tiroir disque.
• Pour un CD audio (CD-DA), la première piste
s'exécute automatiquement. Les plages d'un
disque sont lues dans l'ordre dans lequel elles
ont été enregistrées sur le disque.
• Pour un disque MP3, appuyez sur les boutons
▲▼ et sélectionnez Musique, puis appuyez sur
le bouton E
E.
Liste de lecture
PISTE 001
PISTE 001
PISTE 002
2
3
S
5
6
O
1
Touches NUMÉRIQUES : Durant l'exécution
de la liste d'écoute, appuyez sur le numéro de
piste souhaitée. La piste sélectionnée est alors
reproduite.
2
Saut : Pendant la lecture, appuyez sur le bouton
1 ou 2 pour accéder à la musique précédente
ou suivante de la liste.
3
Touche 5 : Permet d'arrêter la lecture d'une
piste.
4
Lecture rapide (CD audio (CD-DA)
uniquement):
Pendant la lecture, appuyez sur le bouton 3 ou
. Chaque fois que vous appuyez sur le bouton
3 ou , la vitesse de lecture change.
5
Touche 7 : Mise en pause d’une piste.
6
Touche 6 : permet de lire la plage sélectionnée.
03:41
PISTE 005
03:17
PISTE 006
" Pause
4
04:07
PISTE 004
CD
POPUP
04:27
PISTE 003
00:08 / 05:57
1/12
05:57
9
TITLE MENU
0
Lecture d'un disque audio
commercial pré-enregistré
+
TA
1
PTY -
DISC MENU
Le menu Outils peut varier en fonction du disque
ou du périphérique de stockage. Toutes les options
peuvent ne pas être affichées.
1.
Media Play
Sélectionnez cette option pour régler
la langue des sous-titres souhaitée.
05
Sous-titre
03:35
Outils
' Retour
Français
HT-F4200_XU_FRA_130208-1.indd 25
25 |
2013-02-13 오후 4:08:19
Media Play
Répétition des pistes d’un CD Audio
Contrôle de la lecture des photos
Vous pouvez configurer la répétition de pistes sur l’appareil.
1.
Durant la lecture de musique, appuyez sur le bouton
OUTILS.
2.
Utilisez les boutons ◄► pour sélectionner Arrêt,
Piste ou Un seul, Tous ou Aléatoire en Mode
répétition puis appuyez sur le bouton E.
Création d’une liste de lecture de musiques
1.
2.
En cas de lecture de musiques sur CD ou DVD
commercial, appuyez sur le bouton 5 or RETURN
('). L’écran Music List (Liste des musiques) s'affiche.
Si vous créez une liste de lecture de musiques sur un
disque créé par vous ou sur un périphérique USB,
accédez à la liste des musiques de la manière décrite
à la section « Lecture de fichiers sur un périphérique
USB » en page 23 ou à la section « Lecture d’un
disque dont le contenu est enregistré par l’utilisateur
» en page 23.
Appuyez sur les boutons ▲▼◄► pour passer au
fichier souhaité puis appuyez sur le bouton JAUNE
(C) pour le sélectionner. Répétez cette procédure
pour sélectionner d’autres fichiers.
Musique
PISTE 002
PISTE 002
05:57
04:27
PISTE 003
PISTE 004
04:07
03:41
PISTE 005
PISTE 006
03:17
03:35
PISTE 007
PISTE 008
03:47
03:49
PISTE 009
03:53
CD
3.
4.
5.
6.
Fich.2 sélect 1/2 Page
PISTE 001
PISTE 010
Utilisation du menu Outils
Durant la lecture, appuyez sur le bouton OUTILS.
Lancer/
Arreter le
diaporama
Sélectionnez cette option pour
démarrer/arreter le diaporama.
Vit.
diaporama
Sélectionnez cette option pour régler la
vitesse du diaporama.
Sélectionnez cette option pour écouter
Fond musical de la musique tout en visionnant un
diaporama.
Zoom
Sélectionnez cette option pour agrandir
l'image actuellement sélectionnée.
(Agrandissement jusqu'à 4 fois la taille
réelle)
Pivoter
Sélectionnez cette option pour faire
tourner l'image. (Ceci entraînera la
rotation de l'image dans le sens des
aiguilles d'une montre ou dans le sens
inverse.)
Information
Cette option permet d'afficher les
informations relatives à l'image,
notamment son nom et sa taille.
| REMARQUE |
03:45
Sélectionner Acc à page
Vous pouvez contrôler la lecture de photos situées sur
des DVD, CD et des clés USB.
' Retour
Pour retirer un fichier de la liste de lecture, placezvous sur le fichier puis appuyez sur le bouton
JAUNE (C).
Appuyez sur le bouton E pour lire les fichiers
sélectionnés. L’écran Playlist (Liste de lecture)
apparaît.
Pour accéder à la liste des musiques, appuyez sur
le bouton 5 ou RETURN (') .
Pour revenir à la liste de lecture, appuyez sur le
bouton E.
| REMARQUE |
Vous pouvez créer une liste de lecture comportant
jusqu'à 99 pistes extraites de différents CD audio (CDDA).
Si vous allez sur la Music List (Liste des musiques)
de la Playlist (Liste de lecture), revenez sur la liste de
lecture. Elle redémarrera la lecture depuis le début.
Le menu Outils peut varier en fonction du disque
ou du périphérique de stockage. Toutes les options
peuvent ne pas être affichées.
Pour activer la fonction de musique de fond, le fichier
photo et le fichier musical doivent être contenus sur
le même support de stockage. Cependant, la qualité
sonore peut être affectée par le débit binaire du fichier
MP3, la taille de la photo et la méthode d'encodage
utilisée.
Création d’une liste de lecture de
photos
Vous pouvez créer une liste de lecture de photos
pratiquement de la même façon que vous créez une
liste de lecture de fichiers musicaux. Pour obtenir plus
d’instructions, veuillez consulter la section « Création
d'une liste de lecture de musiques » sur cette page.
| 26 Français
HT-F4200_XU_FRA_130208-1.indd 26
2013-02-13 오후 4:08:24
Ecouter la radio
Appuyez sur la touche FUNCTION pour
sélectionner FM.
2.
Syntonisez la station désirée.
• Syntonisation préréglée 1 : Appuyez sur la touche
5 pour sélectionner PRESET puis appuyez sur
la touche TUNING UP, DOWN pour sélectionner
la station préréglée.
- Avant de syntoniser des stations préréglées,
vous devez ajouter les stations préréglées à la
mémoire de l'appareil.
• Syntonisation manuelle : Appuyez sur la touche
5 pour sélectionner MANUAL puis appuyez sur
la touche TUNING UP, DOWN pour syntoniser
une fréquence inférieure ou supérieure.
• Syntonisation automatique : Appuyez sur la
touche 5 pour sélectionner MANUAL puis
appuyez et maintenez la touche TUNING
UP, DOWN pour rechercher la fréquence
automatiquement.
Réglage Mono/Stéréo
Appuyez sur la touche MO/ST.
• À chaque appui sur la touche, le son commute entre
STEREO et MONO.
• Dans une région où la réception est faible, sélectionnez
MONO pour une diffusion claire et sans interférence.
Préréglage des stations
Exemple : Préréglage de FM 89.10 dans la mémoire.
1.
Appuyez sur la touche FUNCTION pour
sélectionner FM.
2.
Appuyez sur la touche TUNING UP, DOWN pour
sélectionner <89.10>.
3.
Appuyez sur la touche TUNER MEMORY.
• NUMBER clignote sur l’écran.
Appuyez à nouveau sur la touche TUNER
MEMORY.
• Appuyez sur la touche TUNER MEMORY avant
que NUMBER disparaisse lui-même de l’écran.
• Après avoir appuyé sur la touche TUNER
MEMORY, NUMBER disparaît de l’écran et la
station est stockée en mémoire.
4.
5.
Pour prérégler une autre station, répétez les étapes
2 à 4.
• Pour syntoniser sur une station préréglée,
appuyez sur la touche TUNING UP, DOWN.
Système de radiocommunication de données)
pour recevoir des stations FM.
Grâce à la fonction RDS, des stations FM peuvent
envoyer un signal supplémentaire avec leurs signaux de
programmes réguliers.
Les stations envoient p. ex. leurs noms de station ainsi
que des informations sur le type de programme diffusé
(sport, musique, etc.).
Lorsque vous réglez une station FM qui fournit le service
RDS, le témoin RDS s'affiche sur l'écran.
Description de la fonction RDS
• PTY (Type de programme) : permet d'afficher le type
de programme en cours de diffusion.
• PS NAME (Nom du service de programme) : permet
d'indiquer le nom de la station de radiodiffusion. Il est
composé de 8 caractères.
• RT (Texte de radio) : permet de décoder le texte diffusé
par une station (s'il y en a). Il est composé de 64
caractères au maximum.
• CT (Heure) : permet de décoder l'heure réelle de la
fréquence FM. Certaines stations peuvent ne pas
transmettre les informations PTY, RT ou CT. Il n'est
donc pas toujours possible de les afficher.
• TA (Annonce de trafic) : la mention « TA ON/ OFF »
(ANNONCE DE TRAFIC ACTIVÉE/ DÉSACTIVÉE)
montre l’état de progression de l’annonce de trafic.
| REMARQUE |
La fonction RDS peut ne pas fonctionner correctement
si la station réglée ne transmet pas correctement le
signal RDS ou si le signal est faible.
Pour afficher les signaux RDS
Vous pouvez visualiser les signaux RDS envoyés par la
station sur l'écran.
Appuyez sur le bouton RDS DISPLAY lorsque vous
écoutez une station FM.
• Chaque fois que vous appuyez sur ce bouton,
l'affichage des informations suivantes est modifié
comme suit : PS NAME RT CT Fréquence
PS
(Service de
programme)
Lors de la recherche, <PS NAME>
apparaît, puis les noms de stations
s'affichent. <NO PS> apparaît si
aucun signal n'est envoyé.
RT
(Texte de radio)
Lors de la recherche, <RT> apparaît,
puis les messages texte envoyés
par la station s'affichent. <NO RT>
apparaît si aucun signal n'est envoyé.
Fréquence
Fréquence de la station (sans service
RDS)
Français
HT-F4200_XU_FRA_130208-1.indd 27
Media Play
1.
Utilisez la fonction RDS (RadioData System =
05
Utilisation des touches de la télécommande
A propos de la radiodiffusion RDS
27 |
2013-02-13 오후 4:08:27
Media Play
A propos des caractères affichés sur l'écran
Lorsque l'écran affiche des signaux PS ou RT, les
caractères suivants sont utilisés.
• L'écran d'affichage ne peut pas faire la différence entre
des lettres majuscules et minuscules et n'utilise que
des majuscules.
• L'écran ne peut pas afficher des lettres accentuées.
Par exemple, <A,> peut signifier des lettres <A’s>
accentuées comme <À, Â, Ä, Á, Å et Ã.>
Indication PTY (Type de programme) et
fonction PTY-SEARCH (RECHERCHER
TYPE DE PROGRAMME)
L'un des avantages du service RDS consiste en la
possibilité de localiser un type de programme particulier à
partir des canaux préréglés en spécifiant les codes PTY.
Pour rechercher un programme à l'aid e
Utilisation du bouton TV Sound
de la télécommande
TV SOUND
TV Sound
Vous pouvez écouter le son via les enceintes du Home
cinéma ou l’enceinte du téléviseur avec le bouton TV
SOUND.
1.
Connectez le câble HDMI au téléviseur et au Home
cinéma. (Reportez-vous en page 15)
2.
Placez le Home cinéma et le téléviseur connectés
sur Anynet+ (HDMI-CEC) On (Anynet+ (HDMICEC) activé).
Appuyez sur le bouton TV SOUND de la
télécommande.
Chaque fois que vous appuyez sur le bouton TV
SOUND, TV SOUND ON/OFF clignote brièvement
à l'écran sur la façade puis passe à D.IN.
- TV SOUND ON : émet le son jusqu'aux
enceintes du Home cinéma.
- TV SOUND OFF : émet jusqu'à l’enceinte du
téléviseur connecté par Anynet+.
Utilisez dans ce cas :
1) Si vous souhaitez écouter le son à travers les
enceintes du Home cinéma lorsque vous regardez
la télévision.
2) Si vous souhaitez écouter le son à partir d'une clé
USB branchée au téléviseur à travers les enceintes
du Home cinéma.
Spécification de prise en charge SON DU
TÉLÉVISEUR ACTIVÉ/DÉSACTIVÉ
3.
4.
des codes PTY
❏ Avant de démarrer !
• La fonction de recherche PTY ne peut être appliquée
qu'aux stations préréglées.
• Pour arrêter la recherche à tout moment au cours du
processus, appuyez sur le bouton 5 pendant que la
recherche est en cours.
• Il y a une limite de temps pour réaliser les étapes
suivantes. Si le réglage est annulé avant que vous ayez
terminé, recommencez à nouveau par l'étape 1.
• Lorsque vous appuyez sur les boutons de la
télécommande principale, assurez-vous d'avoir
sélectionné la station FM à l'aide de cette
télécommande principale.
+
RDS DISPLAY
❏
❏
TA
1
2
3
PTY -
PTY SEARCH
PTY +
4
5
6
1.
Appuyez sur le bouton PTY SEARCH lorsque que
vous écoutez une station FM.
2.
Appuyez sur le bouton PTY- ou PTY+ jusqu'à ce
que le code PTY souhaité s'affiche sur l'écran.
• L'écran affiche les codes PTY décrits à droite.
3.
Appuyez à nouveau sur le bouton PTY SEARCH
lorsque le code PTY sélectionné à l'étape
précédente est toujours affiché sur l'écran.
• L'unité centrale recherche les 15 stations FM
préréglées, s'arrête lorsqu'elle trouve la station
sélectionnée et règle cette station.
Téléviseur connecté
Téléviseur prenant en
charge le paramètre
Anynet+ (HDMI-CEC)
Téléviseur ne prenant
pas en charge le
paramètre Anynet+
(HDMI-CEC)
Paramètre
SON DU
Anynet+
TÉLÉVISEUR
(HDMI-CEC)
ACTIVÉ
SON DU
TÉLÉVISEUR
DÉSACTIVÉ
MARCHE
O
O
ARRÊT
O
X
Aucune
opération
O
X
| 28 Français
HT-F4200_XU_FRA_130208-1.indd 28
2013-02-13 오후 4:08:28
Services Réseau
BD-LIVE™
Insérez une clé USB dans la prise USB située à
l’avant de l'appareil, puis contrôlez sa mémoire
restante. Le périphérique de mémoire doit avoir
au moins 1 Go d'espace libre pour satisfaire aux
exigences des services BD-LIVE.
1.
Allumez votre ordinateur, votre téléviseur et le Home
cinéma.
2.
Assurez-vous que le serveur de partage DLNA
(DLNA Shared) fonctionne sur votre ordinateur.
2.
Sélectionnez Paramètres sur l'écran Accueil, puis
appuyez sur le bouton E.
3.
Sur votre Home cinéma, appuyez sur le bouton
BLEU (D) (Affichage des périphériques).
3.
Sélectionnez Système et appuyez sur le bouton
E.
Sélectionnez Gestion données BD, puis appuyez
sur le bouton E.
Sélectionnez Changer périph., puis appuyez sur le
bouton E.
Sélectionnez USB Flash Disk, puis appuyez sur le
bouton E.
Insérez un disque Blu-ray prenant en charge la
technologie BD-LIVE.
4.
Utilisez les boutons ◄► pour sélectionner votre
ordinateur dans la liste des périphériques.
5.
Sélectionnez le type de fichier que vous voulez
afficher ou lire, les Vidéos, Photos ou Musique, puis
appuyez sur le bouton E.
Utilisez les boutons ▲▼◄► pour sélectionner
le dossier avec le type de fichiers que vous avez
sélectionné puis appuyez sur E. La liste des
fichiers s’affiche.
1.
4.
5.
6.
7.
8.
Sélectionnez un élément dans la liste des contenus
de service BD-LIVE fournis par le fabricant de
disque.
| REMARQUE |
L’utilisation du service BD-LIVE ainsi que des contenus
fournis peuvent varier selon le fabricant du disque.
6.
7.
Sélectionnez le fichier que vous voulez visualiser ou
lire, puis appuyez sur le bouton E.
| REMARQUES |
Vous pouvez créer des listes de lectures à partir de
fichiers sur votre ordinateur de la même façon que
vous créer des listes de lectures à partir de fichiers
situés des clés USB ou des disques.
En dehors de quelques exceptions, vous pouvez
contrôler la lecture de fichiers sur votre ordinateur
de la même façon que vous contrôlez la lecture de
fichiers sur des clés USB et des disques.
Vous pouvez également accéder à des fichiers sur
votre ordinateur pour sélectionner tout d’abord
Vidéos, Photos ou Musique à l’écran Home (Accueil),
puis sélectionner votre ordinateur à partir de la liste
des périphériques qui apparaît.
Français
HT-F4200_XU_FRA_130208-1.indd 29
Services Réseau
Une fois que l'appareil est connecté au réseau, vous
pouvez profiter de différents contenus de services liés aux
films en utilisant des disques compatibles BD-LIVE.
Le DLNA vous permet d’accéder aux fichiers situés sur
votre ordinateur et de les lire à partir de votre Home
cinéma.
Suivez les directives indiquées dans le guide d’utilisation
du DLNA pour configurer le DLNA sur votre ordinateur
et pour étiqueter les dossiers et les fichiers que vous
souhaitez partager avec le Home cinéma.
Pour accéder aux fichiers situés sur votre ordinateur et
les lire après avoir configuré le DLNA, suivez les étapes
suivantes.
06
Pour utiliser les services réseau, vous devez tout d’abord :
1. Connectez l'appareil au réseau.
(Reportez-vous en page 14)
2. Configurez les paramètres réseau.
(Reportez-vous aux pages 20 à 21)
Utilisation du DLNA
29 |
2013-02-13 오후 4:08:32
Annexes
Informations complémentaires
Remarque
Branchements
SORTIE HDMI
• Selon votre téléviseur, il est possible que certaines
résolutions de sortie HDMI ne fonctionnent pas.
• Vous devez disposer d'une connexion HDMI pour
visionner les vidéos en 3D.
• Un câble HDMI trop long peut provoquer du bruit
à l'écran. Si tel est le cas, réglez Couleur intense
HDMI sur Arrêt dans le menu.
Paramètres
Paramètres 3D
• Sur certains disques 3D, pour arrêter un film en cours
de lecture 3D, appuyez une seule fois sur le bouton
5 Le film s’arrête et l’option 3D est désactivée.
Pour changer la sélection de l’option 3D lorsque vous
regardez un film 3D, appuyez une fois sur le bouton
5. Le menu Blu-ray apparaît. Appuyez à nouveau
sur le bouton 5, puis sélectionnez Paramètres 3D
dans le menu Blu-ray.
• Selon le contenu et le positionnement de l'image sur
l'écran de votre téléviseur, vous pouvez visualiser
apparaître des barres verticales noires à droite ou à
gauche de l'écran ou sur les deux côtés à la fois.
Format TV
• Selon le type de disque utilisé, certains formats
d'image peuvent être indisponibles.
• Si vous sélectionnez un format d’image différent de
celui de votre téléviseur, il est possible que l’image
affichée soit déformée.
• Si vous sélectionnez l'option 16:9 Original,
le téléviseur pourra afficher l'image dans un
encadrement horizontal au format 4:3 Pillarbox
(bandes noires sur les côtés de l’image).
BD Wise (produits Samsung uniquement)
• Lorsque la fonction BD Wise est activée, le paramètre
Résolution est automatiquement spécifié sur BD
Wise et BD Wise apparaît dans le menu Résolution.
• Si l'appareil est connecté à un appareil ne prenant
pas en charge BD Wise, vous ne pourrez pas utiliser
la fonction BD Wise.
• Pour garantir le bon fonctionnement de BD Wise,
réglez l’option BD Wise de l'appareil et du téléviseur
sur Activé.
Sortie numérique
• Assurez-vous de sélectionner la sortie numérique
appropriée, sinon vous n'entendrez aucun son ou un
son très fort.
• Si le périphérique HDMI (récepteur AV, téléviseur) n'est
pas compatible avec les formats compressés (Dolby
digital, DTS), le signal audio sera émis en sortie au
format PCM.
• Les DVD n’ont pas habituellement de fonctionnalité
audio BONUSVIEW ni d’effet sonore de navigation.
• Certains disques Blu-ray ne sont pas dotés de
fonctionnalité audio BONUSVIEW ni d’effet sonore de
navigation.
• La configuration de la sortie numérique n’affecte pas
la sortie audio analogique (G/D) ou HDMI de votre
téléviseur. Elle affecte les sorties audio optique et HDMI
lorsque l'appareil est connecté à un récepteur AV.
• Si vous lisez des pistes de son audio MPEG, le
signal audio sera émis en sortie au format PCM
indépendamment de vos sélections de sortie
numérique (PCM ou Bitstream).
• La sortie numérique peut être activée lorsque Sélect.
haut-parleur est sélectionné sur Haut-parleur TV.
Connexion Internet BD-Live
• Il est possible que la connexion Internet soit limitée
lorsque vous utilisez des contenus BD-LIVE.
Anynet+ (HDMI-CEC)
• Selon votre téléviseur, il est possible que certaines
résolutions de sortie HDMI ne fonctionnent pas.
Veuillez vous reporter au manuel d'utilisation de votre
téléviseur.
• Cette fonction sera indisponible si le câble HDMI ne
prend pas en charge le format CEC.
• Si votre téléviseur Samsung dispose d'un logo
Anynet+, cela signifie qu'il est compatible Anynet+.
Gestion données BD
• En mode mémoire externe, la lecture du disque
pourra s’arrêter si vous déconnectez le périphérique
USB en cours d'exécution.
• Seuls les périphériques USB formatés selon le
système de fichiers FAT (label de volume DOS 8.3)
sont pris en charge. Nous vous recommandons
d'utiliser des périphériques USB prenant en charge
le protocole USB 2.0 avec une vitesse de lecture/
d'écriture supérieure ou égale à 4 Mo/s.
• La fonction Resume Play (Reprise de la lecture) peut
être inopérante après le formatage du périphérique
de stockage.
• La capacité totale de mémoire disponible pour
l'option Gestion données Blu-ray peut varier selon les
conditions.
| 30 Français
HT-F4200_XU_FRA_130208-1.indd 30
2013-02-13 오후 4:08:34
• Pour plus d'informations concernant DivX(R) à la
demande(VOD), veuillez visiter le site « http://vod.
divx.com ».
• En fonction du disque Blu-ray/DVD, vous pouvez
changer la langue des sous-titres dans le Menu du
disque. Appuyez sur la touche MENU DU DISQUE.
• Cette fonction dépend de la sélection des sous-titres
encodés sur le disque et peut ne pas être disponible
sur tous les disques Blu-ray/DVD.
• Les informations concernant la fonction principale ou
le mode BONUSVIEW s’afficheront également si le
disque Blu-ray dispose d'une section BONUSVIEW.
• Cette fonction modifie à la fois les sous-titres
principaux et secondaires au même moment.
• Le nombre total de sous-titres principaux et
secondaires s’affiche.
Paramètre haut-parleur
• Lorsque Sélect. haut-parleur est sélectionné
pour Haut-parleur TV, le son est émis depuis les
enceintes du téléviseur.
HDMI audio
• Lorsque le son HDMI sort vers le haut-parleur du
téléviseur, il subit automatiquement un mixage final
en deux canaux.
Annexes
Sélection de la langue des sous-titres
07
DivX® Vidéo à la demande
Lecture de fichiers JPEG
Fonct. Retour Audio
• Lorsque la fonction Anynet+ (HDMI-CEC) est
désactivée, la fonction Audio Return Channel (Fonct.
Retour Audio) est indisponible.
• L’utilisation d’un câble HDMI non certifié pour ARC
(Audio Return Channel (Fonct. Retour Audio)) peut
provoquer un problème de compatibilité.
• La fonction ARC est uniquement disponible si un
téléviseur compatible ARC est connecté.
Lecture
Lecture des fichiers vidéo
• La lecture des fichiers vidéo au débit binaire élevé,
égal ou supérieur à 20 Mbps, exerce une forte
charge sur les capacités du lecteur et risque, de ce
fait, de s’interrompre en cours d’exécution.
Sélection de la langue de la bande son
• L’indicateur ◄► ne s’affichera pas à l’écran si la
section BONUSVIEW ne contient pas de réglages
BONUSVIEW audio.
• La disponibilité des langues proposées via la
fonction de la langue de la bande son dépend des
langues encodées sur le disque. Par conséquent,
cette fonction ou certaines langues peuvent être
indisponibles.
• Certains disques Blu-ray vous autorisent à
sélectionner la bande son anglaise PCM ou Dolby
Digital.
• Vous ne pouvez pas agrandir les sous-titres ou les
graphiques PG (Accord parental) pour les afficher en
mode plein écran.
Media Play
Utilisation de la touche OUTILS lors du visionnage
d’images.
• Si le système est connecté à un téléviseur compatible
BD Wise dont la fonction BD Wise est activée, le
menu Picture Settings (Paramètres des images) ne
s'affiche pas.
• La fonction Background Music (Musique de fond)
ne fonctionne que si le fichier musical et le fichier
photo sont situés sur le même support de stockage.
Cependant, la qualité sonore peut être affectée par
le débit binaire du fichier musical MP3, la taille des
photos et la méthode d'encodage utilisée.
Lecture de contenu à partir d'un périphérique de
stockage USB
• Vous devez retirer le périphérique de stockage USB
en toute sécurité (en exécutant la fonction « Retirer
péri. USB » pour éviter d'endommager la mémoire
USB. Appuyez sur le bouton HOME pour accéder au
menu Home (Accueil), sélectionnez le bouton JAUNE
(C), puis appuyez sur la touche E.
Français
HT-F4200_XU_FRA_130208-1.indd 31
31 |
2013-02-13 오후 4:08:35
Annexes
Sélections des sorties numériques
Configuration
Connexion
PCM
Flux de
données
audio sur
disque Bluray
Flux de
données
audio sur
DVD
Train de bits
(non traités)
PCM
PCM
Dolby Digital
Dolby Digital
Jusqu'à PCM 2,1 ca
Plus
Dolby Digital Plus
Dolby
TrueHD
Jusqu'à PCM 2,1 ca
Dolby TrueHD
DTS
Jusqu'à PCM 5,1 ca
DTS
DTSHD High
Resolution Jusqu'à PCM 7,1 ca
Audio
DTS-HD
Master
Audio
Jusqu'à PCM 7,1 ca
PCM
Jusqu'à PCM 2 ca
Dolby Digital Jusqu'à PCM 2,1 ca
Résolution
pour disque
Blu-ray
Any
Train de bits
(Dolby D. Réencodé)
Récepteur AV prenant en charge l'interface HDMI
Jusqu'à PCM 7,1 ca
Dolby Digital Jusqu'à PCM 2,1 ca
DTS
Train de bits
(DTS Réencodé)
Jusqu'à PCM 5,1 ca
Décode la principale
fonction audio et
le flux de données
audio BONUSVIEW
en données PCM
et ajoute des
effets sonores de
navigation.
DTS réencodé
Dolby D.
Réencodé *
DTS-HD High
Resolution Audio
DTS-HD Master
Audio
PCM 2 ca
PCM 2 ca
PCM 2 ca
Dolby Digital
Dolby Digital
Dolby Digital
DTS
DTS
DTS
Émet uniquement
Décode la principale
Décode la principale
le flux de données
fonction audio et
fonction audio et
audio de la fonction
le flux de données
le flux de données
principale, de sorte
audio BONUSVIEW
audio BONUSVIEW
que votre récepteur
en données PCM
en données PCM
AV puisse décoder
et ajoute des
et ajoute des
les trains de bits
effets sonores
effets sonores
audio.
de navigation,
de navigation,
Vous n’entendrez
puis réencode les
puis réencode les
pas de données
données audio
données audio PCM
audio BONUSVIEW
PCM en trains de
en trains de bits
ni d'effets sonores
bits Dolby Digital ou
DTS.
de navigation.
PCM.
Si le flux de données source est 2 ca ou mono, le réglage « Re-encoded Dolby D » (Dolby D. réencodé) ne sera pas
appliqué. La sortie sera PCM 2 ca.
Les disques Blu-ray peuvent contenir trois types de flux de données audio :
- Principale fonction audio : Bande son de la fonction principale.
- Fonctionnalité audio BONUSVIEW : Bande son supplémentaire, comportant, par exemple, le commentaire du
réalisateur ou de l’acteur.
- Effets sonores de navigation : Lorsque vous choisissez une navigation via un quelconque menu, les effets sonores de
navigation peuvent retentir. Les effets sonores de navigation sont différents sur chaque disque Blu-ray.
| 32 Français
HT-F4200_XU_FRA_130208-1.indd 32
2013-02-13 오후 4:08:35
Résolution selon le mode de sortie
BD Wise
Mode HDMI
E-content/Contenus
numériques
Mode HDMI
Disque Blu-ray
Résolution du disque
Bluray
1080p@60F
480i
Annexes
Sortie
Configuration
DVD numériques
07
Lecture du disque Blu-ray/des e-contenus/des contenus numériques
Auto
Résolution optimale de l'entrée du téléviseur
Résolution optimale de l'entrée
du téléviseur
1080p@60F
1080p@60F
-
1080p
-
1080p
Trame vidéo : Auto (24Fs)
1080p@24F
-
1080i
1080i
1080i
720p
720p
720p
576p/480p
576p/480p
576p/480p
Dépannage
Reportez-vous au tableau ci-dessous lorsque cet appareil ne fonctionne pas correctement. Si le problème que
vous rencontrez n’est pas répertorié ci-dessous ou si les consignes ne vous sont d’aucune aide, éteignez l’appareil,
débranchez le cordon d’alimentation et contactez le revendeur agréé le plus proche ou un centre de dépannage
Samsung Electronics.
Problème
Vérification/Solution
Le disque ne peut pas être
éjecté.
• Le cordon d’alimentation est-il branché correctement sur la prise secteur ?
• Coupez l’alimentation électrique, puis rallumez-la.
La lecture ne démarre pas.
• Vérifiez le numéro de zone du disque Blu-ray/DVD. Les disques Blu-ray/DVD
achetés à l’étranger peuvent ne pas être compatibles.
• Les CD-ROM et DVD-ROM ne peuvent pas être lus sur ce lecteur.
• Vérifiez que le niveau de classification est approprié.
La lecture ne démarre pas
immédiatement lorsque le
bouton Lecture/Pause est
actionné.
• Le disque est-il déformé ou rayé ?
• Nettoyez le disque.
Aucun son n’est produit.
• Le système home cinéma n’émet aucun son pendant la lecture rapide, au ralenti,
et en mode pas à pas.
• Les enceintes sont-elles correctement branchées ? La configuration des enceintes
est-elle réglée correctement ?
• Le disque est-il sale ou endommagé ?
Français
HT-F4200_XU_FRA_130208-1.indd 33
33 |
2013-02-13 오후 4:08:36
Annexes
Problème
Vérification/Solution
La télécommande ne
fonctionne pas.
• Faites-vous fonctionner la télécommande dans sa plage opérationnelle et dans
l’angle correct par rapport au capteur ?
• Les piles sont-elles déchargées ?
• Le disque tourne mais
aucune image ne
s’affiche.
• La qualité est mauvaise
et l’image tremble.
•
•
•
•
La langue de la bandeson et les sous-titres ne
fonctionnent pas.
• La langue de la bande son et les sous-titres ne fonctionnent pas si le disque n’en
comporte pas.
L’écran de menu n’apparaît
pas même si la fonction de
menu est sélectionnée.
• Le disque que vous utilisez contient-il des menus ?
Impossible de modifier le
format d'image.
• La lecture des disques Blu-ray/DVD 16:9 est possible en mode 16/9 Plein écran,
4/3 Boîte aux lettres ou 4/3 Panoramique – Balayage en revanche, les disques
Blu-ray/DVD 4:3 peuvent être lus au format 4:3 uniquement. Reportez-vous à la
pochette du disque Blu-ray et sélectionnez la fonction appropriée.
L'appareil ne fonctionne
pas.
• Appuyez et maintenez la touche 5 de la télécommande pendant 5 secondes en
mode VEILLE.
- L’utilisation de la fonction RÉINITIALISATION efface tous les réglages
enregistrés. N’utilisez ce bouton que si cela est vraiment nécessaire.
Vous avez oublié le mot
de passe du niveau de
classification.
• Sans disque dans le lecteur, appuyez et maintenez la touche 5 de l'appareil
pendant plus de 5 secondes. Le message INIT s’affiche sur l’écran et les réglages
par défaut sont rétablis.
Puis, appuyez sur la touche MARCHE/ARRÊT.
- L’utilisation de la fonction RÉINITIALISATION efface tous les réglages
enregistrés. N’utilisez ce bouton que si cela est vraiment nécessaire.
Réception des émissions
de radio impossible.
• L’antenne est-elle correctement branchée ?
• Si le signal d’entrée de l’antenne est faible, installez une antenne FM extérieure
dans une zone bénéficiant d’une bonne réception.
Lors de l’écoute du son
du téléviseur via l'appareil,
aucun son n’est entendu.
• Si la touche OUVERTURE/FERMETURE ^ est appuyée lors de l’écoute du son
du téléviseur en utilisant le D. IN ou les fonctions AUX, les fonctions du disque Bluray/DVD sont activées et le son du téléviseur est coupé.
« Indisponible » s’affiche à
l’écran.
• Les fonctions ou les commandes ne peuvent être exécutées pour le moment car :
1. Le logiciel du disque Blu-ray/DVD les limite.
2. Le logiciel du disque Blu-ray/DVD ne prend pas en charge la fonction en
question (par ex. : les angles).
3. La fonction n'est pas disponible pour le moment.
4. Vous avez demandé un titre, un numéro de chapitre ou un temps de recherche
hors de portée du disque.
Il est possible que l'écran
du téléviseur n'affiche
pas d'image lorsque la
résolution de la sortie
HDMI n'est pas prise en
charge par le téléviseur (par
exemple 1080p).
• Appuyez et maintenez la touche 5 du panneau avant pendant plus de 5
secondes en l'absence de disque inséré dans l'appareil. Tous les paramètres
seront réinitialisés sur leur valeur d'origine.
Le téléviseur est-il sous tension ?
Les câbles vidéo sont-ils correctement branchés ?
Le disque est-il sale ou endommagé ?
La lecture d’un disque de mauvaise fabrication peut s’avérer impossible.
| 34 Français
HT-F4200_XU_FRA_130208-1.indd 34
2013-02-13 오후 4:08:37
Problème
Vérification/Solution
• Vérifiez la connexion entre le téléviseur et la prise HDMI de l'appareil.
• Vérifiez que votre téléviseur prend en charge les résolutions d'entrée HDMI
576p/480p/720p/1080i/1080p.
Écran de sortie HDMI
anormal.
• Si du bruit aléatoire apparaît à l'écran, cela signifie que le téléviseur ne prend pas
en charge la protection HDCP (High-bandwidth Digital Content Protection).
07
Aucune sortie HDMI.
Annexes
Fonction de DLNA
Je peux visualiser les
dossiers partagés via
DLNA mais pas les fichiers.
• DLNA affiche uniquement les fichiers vidéo, photo et musique. Les autres types de
fichiers ne sont pas affichés.
La vidéo est lue par
intermittence.
• Vérifiez si le réseau est stable.
• Vérifiez que le câble réseau est correctement branché et que le réseau n'est pas
surchargé.
La connexion de DLNA
entre le téléviseur et
l'ordinateur est instable.
• L’adresse IP sous le même sous-réseau doit être unique, dans le cas contraire
une collision IP peut résulter de ce phénomène.
• Vérifiez si vous avez un pare-feu activé.
Si tel est le cas, désactivez la fonction pare-feu.
BD-LIVE
Je n'arrive pas à me
connecter au serveur
BD-LIVE.
• Vérifiez si la connexion réseau a été établie ou non en utilisant la fonction État
réseau.
• Vérifiez si le périphérique de mémoire USB est connecté à l'appareil.
• Le périphérique de mémoire doit avoir au moins 1 Go d'espace libre pour satisfaire
aux exigences du service BD-LIVE.Vous pouvez vérifier la taille disponible dans
Gestion données Blu-ray. (Voir page 30)
• Vérifiez si l’option Connexion Internet BD-Live est spécifiée sur Allow(All) (Permettre
tout).
• Si toutes les mesures préconisées ci-dessus échouent, contactez le fournisseur de
contenus ou mettez à jour l'appareil à l'aide de la dernière version de micrologiciel
disponible.
Une erreur s'est produite
en cours d'utilisation du
service BD-LIVE.
• Le périphérique de mémoire doit avoir au moins 1 Go d'espace libre pour satisfaire
aux exigences du service BD-LIVE.
Vous pouvez vérifier la taille disponible dans Gestion données Blu-ray. (Voir page 30)
| REMARQUE |
Lorsque les réglages d'usine par défaut sont rétablis, toutes les données Blu-ray utilisateur stockées sur le lecteur
seront effacées.
Français
HT-F4200_XU_FRA_130208-1.indd 35
35 |
2013-02-13 오후 9:38:04
Annexes
Caractéristiques techniques
Généralités
Tuner FM
Poids
2,3 kg
Dimensions
430 (L) x 55 (H) x 250 (P) mm
Plage de températures de
fonctionnement
+5°C à +35°C
Plage de taux d'humidit
10 % à 75 %
Rapport signal/bruit
55 dB
Sensibilité utilisable
12 dB
Distorsion harmonique totale
0,5 %
Vidéo
1080p, 1080i, 720p, 576p/480p
Audio
Audio PCM multicanaux, audio Bitstream et audio PCM
Sortie de l’enceinte avant
75W x 2(3)
Sortie du caisson de basse
100W(3)
HDMI
Entrée analogique : 20Hz~20kHz (±3dB)
Réponse en fréquence
Amplificateur
Entrée numérique : 20Hz~40kHz (±4dB)
Rapport signal/bruit
70dB
Séparation des canaux
60dB
Sensibilité d’entrée
(AUX)500mV
| 36 Français
HT-F4200_XU_FRA_130208-1.indd 36
2013-02-13 오후 4:08:38
07
Système d’enceintes 2,1 canaux
Enceinte
•
•
•
•
•
Annexes
Enceintes
Avant
Caisson de graves
IImpédance
3
3
Plage de fréquences
140Hz~20kHz
40Hz ~ 160Hz
Niveau de pression acoustique
de sortie
87dB/W/M
88dB/W/M
Entrée nominale
75W
100W
Entrée maximale
150W
200W
Dimensions (L x H x P)
(Unité : mm)
950 x 1160 x 740
1550 x 3000 x 2855
Poids
(Unité : kg)
0,34
3,76
Les vitesses de réseau égales ou inférieures à 10 Mbps ne sont pas prises en charge.
Samsung Electronics Co., Ltd se réserve le droit de modifier les caractéristiques techniques sans avis préalable.
Le poids et les dimensions sont approximatifs.
La conception et les caractéristiques techniques sont susceptibles d'être modifiées sans préavis.
Pour l’alimentation et la consommation d’énergie, reportez-vous à l'étiquette apposée sur l'appareil.
Français
HT-F4200_XU_FRA_130208-1.indd 37
37 |
2013-02-13 오후 4:08:39
Comment contacter Samsung dans le monde
Si vous avez des suggestions ou des questions concernant les produits Samsung,
veuillez contacter le Service Consommateurs Samsung.
Area
` Europe
Austria
Contact Centre
0810 - SAMSUNG (7267864,
€ 0.07/min)
Belgium
02-201-24-18
Bosnia
Bulgaria
Croatia
051 133 1999
07001 33 11 normal tariff
062 SAMSUNG (062 726 786)
800-SAMSUNG (800-726786)
Samsung Electronics Czech and Slovak,
s.r.o., Oasis Florenc, Sokolovská
394/17, 180 00, Praha 8 till 8.2.2013
: From 8.2.2013: Samsung Electronics
Czech and Slovak, s.r.o. V Parku
2343/24, 148 00 - Praha 4
70 70 19 70
030 - 6227 515
01 48 63 00 00
0180 5 SAMSUNG bzw.
0180 5 7267864* (*0,14 €/Min.
aus dem dt. Festnetz, aus dem
Mobilfunk max. 0,42 €/Min.)
8009 4000 only from landline
(+30) 210 6897691 from
mobile and land line
80111-SAMSUNG (80111 726
7864) only from land line
(+30) 210 6897691 from mobile
and land line
06-80-SAMSUNG (726-7864)
800-SAMSUNG (726-7864)
Czech
Denmark
Finland
France
Germany
Cyprus
Greece
Hungary
Italia
Web Site
www.samsung.com
www.samsung.com/
be (Dutch)
www.samsung.com/
be_fr (French)
www.samsung.com
www.samsung.com
www.samsung.com
Netherlands
Norway
Poland
Portugal
www.samsung.com
Rumania
Serbia
www.samsung.com
www.samsung.com
www.samsung.com/fr
Slovakia
www.samsung.com
Spain
Sweden
www.samsung.com
www.samsung.com
261 03 710
020 405 888
0900-SAMSUNG (09007267864) (€ 0,10/Min)
815-56 480
0 801-1SAMSUNG(172-678) *
lub +48 22 607-93-33 **
* (całkowity koszt połączenia
jak za 1 impuls według taryfy
operatora)
** (koszt połączenia według
taryfy operatora)
808 20-SAMSUNG (808 20 726-7)
08008 SAMSUNG (08008 726
7864)
TOLL FREE No.
+381 11 321 6899
(old number still active 0700
7267864)
0800-SAMSUNG (0800-726786)
902-1-SAMSUNG (902 172 678)
0771 726 7864 (SAMSUNG)
Switzerland
0848-SAMSUNG (7267864,
CHF 0.08/min)
U.K
Eire
Lithuania
Latvia
Estonia
0330 SAMSUNG (7267864)
0818 717100
8-800-77777
8000-7267
800-7267
www.samsung.com
www.samsung.com
Contact Centre
Area
Luxemburg
Montenegro
Web Site
www.samsung.com
www.samsung.com
www.samsung.com
www.samsung.com
www.samsung.com/pl
www.samsung.com
www.samsung.com
www.samsung.com
www.samsung.com
www.samsung.com
www.samsung.com
www.samsung.com/ch
(German)
www.samsung.com/
ch_fr/(French)
www.samsung.com
www.samsung.com
www.samsung.com/lt
www.samsung.com/lv
www.samsung.com/ee
Elimination des batteries de ce produit
(Applicable aux pays disposant de systèmes de collecte séparés)
Le symbole sur la batterie, le manuel ou l'emballage indique que les batteries de ce produit ne doivent
pas être éliminées en fin de vie avec les autres déchets ménagers. L'indication éventuelle des symboles
chimiques Hg, Cd ou Pb signifie que la batterie contient des quantités de mercure, de cadmium ou de
plomb supérieures aux niveaux de référence stipulés dans la directive CE 2006/66. Si les batteries ne
sont pas correctement éliminées, ces substances peuvent porter préjudice à la santé humaine ou à
l'environnement.
Afin de protéger les ressources naturelles et d'encourager la réutilisation du matériel, veillez à séparer les
batteries des autres types de déchets et à les recycler via votre système local de collecte gratuite des batteries.
Les bons gestes de mise au rebut de ce produit
(Déchets d’équipements électriques et électroniques)
(Applicable aux pays disposant de systèmes de collecte séparés)
Ce symbole sur le produit, ses accessoires ou sa documentation indique que ni le produit, ni ses accessoires
électroniques usagés (chargeur, casque audio, câble USB, etc.) ne peuvent être jetés avec les autres
déchets ménagers. La mise au rebut incontrôlée des déchets présentant des risques environnementaux et
de santé publique, veuillez séparer vos produits et accessoires usagés des autres déchets. Vous favoriserez
ainsi le recyclage de la matière qui les compose dans le cadre d’un développement durable.
Les particuliers sont invités à contacter le magasin leur ayant vendu le produit ou à se renseigner auprès
des autorités locales pour connaître les procédures et les points de collecte de ces produits en vue de leur
recyclage.
Les entreprises et particuliers sont invités à contacter leurs fournisseurs et à consulter les conditions de leur
contrat de vente. Ce produit et ses accessoires ne peuvent être jetés avec les autres déchets.
HT-F4200_XU_FRA_130208-1.indd 38
2013-02-13 오후 4:08:40
HT-F4200
2.1CH Blu-ray™
Heimkino-System
Bedienungsanleitung
Erleben Sie die Möglichkeiten
Vielen Dank, dass Sie sich für dieses Produkt von Samsung
entschieden haben.
Um unseren umfassenden Service nutzen zu können,
registrieren Sie Ihr Produkt unter
www.samsung.com/register
HT-F4200_XU_GER_130206-1.indd 1
2013-02-13 오후 4:35:20
Sicherheitsinformationen
Warnung
ZUR VERMEIDUNG VON STROMSCHLÄGEN DARF DIESES GERÄT NICHT GEÖFFNET WERDEN.
ES ENTHÄLT KEINE BAUTEILE, DIE VOM BENUTZER GEWARTET WERDEN KÖNNEN. LASSEN SIE REPARATUREN
NUR VON QUALIFIZIERTEM FACHPERSONAL DURCHFÜHREN.
ACHTUNG
STROMSCHLAGGEFAHR!
NICHT ÖFFNEN!
Dieses Symbol weist auf „gefährliche
Netzspannung“ im Inneren des Geräts
hin. Es besteht somit die Gefahr von
Stromschlägen und Verletzungen.
ACHTUNG: UM STROMSCHLÄGE ZU
VERMEIDEN, RICHTEN SIE DEN BREITEN
KONTAKTSTIFT DES STECKERS VOLLIG AN
DEM BREITEN STECKPLATZ AUS.
WARNUNG
• Schützen Sie das Gerät vor Regen und Feuchtigkeit,
um die Gefahr von Bränden oder Stromschlägen zu
verringern.
ACHTUNG
• Das Gerät darf keinen Tropfen oder Spritzern
ausgesetzt werden. Außerdem dürfen keine mit
Flüssigkeiten gefüllte Behälter, wie beispielsweise
Vasen, darauf abgestellt werden.
• Um das Gerät vom Netz zu trennen, muss der
Netzstecker aus der Steckdose gezogen werden.
Stellen Sie deshalb sicher, dass Sie den Netzstecker
stets leicht erreichen können.
• Dieses Gerät muss stets an geerdete Steckdosen
angeschlossen werden.
• Entfernen Sie den Stecker aus der Steckdose, um das
Gerät vollständig abzuschalten. Aus diesem Grund
sollte sich der Netzstecker in Reichweite befinden. the
mains plug shall be readily operable.
CLASS 1
KLASSE 1
LUOKAN 1
KLASS 1
PRODUCTO
Dieses Symbol weist auf
wichtige Anweisungen im
Begleitmaterial zum Produkt hin.
LASER PRODUCT
LASER PRODUKT
LASER LAITE
LASER APPARAT
LÁSER CLASE 1
LASERPRODUKT DER KLASSE 1
Dieser CD-Player ist ein LASERPRODUKT DER KLASSE 1.
Bei Verwendung von Bedienelementen bzw. Einstellungen
und Vorgängen, die von den hier aufgeführten abweichen,
kann ein Risiko durch gefährliche Strahlung entstehen.
ACHTUNG
INVISIBLE LASER RADIATION WHEN OPEN AND
INTERLOCKS DEFEATED, AVOID EXPOSURE TO BEAM.
| 2 Deutsch
HT-F4200_XU_GER_130206-1.indd 2
2013-02-13 오후 4:35:38
Lagerung und Handhabung der Disks
• Das Gerät keinem Spritz- oder Tropfwasser aussetzen.
Keine mit Flüssigkeit gefüllten Behälter, wie Vasen auf
das Gerät stellen.
• Um das Gerät vollständig auszuschalten, muss der
Netzstecker aus der Steckdose gezogen werden.
Somit muss der Netzstecker immer bequem erreichbar
sein.
• Berühren Sie den Netzstecker nicht mit nassen
Händen. Es besteht die Gefahr eines Stromschlags.
• Schließen Sie nicht mehrere elektrische Geräte
an dieselbe Steckdose an. Eine Überlastung der
Steckdose kann zu Überhitzung und Feuer führen.
• Pflege des Gehäuses
- Bevor Sie andere Geräte an dieses Gerät
anschließen, müssen alle diese Geräte vorher
abgeschaltet werden.
- Wenn Sie das Gerät aus einer kalten in eine warme
Umgebung bringen, kann Feuchtigkeit an den
Geräteteilen und der Linse kondensieren und zu
Fehlern bei der Wiedergabe führen. Falls dieser
Fall eintritt, den Netzstecker ziehen und nach zwei
Stunden den Stecker wieder in die Steckdose
stecken. Legen Sie anschließend die Disk ein, und
versuchen Sie, die Wiedergabe der Disk zu starten.
Hergestellt unter Lizenz von
Dolby Laboratories.
Dolby sowie das Doppel-DSymbol sind ein Warenzeichen
der Dolby Laboratories.
Hergestellt unter Lizenz und USPatentnummern:
5,956,674; 5,974,380; 6,226,616; 6,487,535;
7,392,195; 7,272,567; 7,333,929; 7,212,872 sowie
anderen in den USA und weltweit ausgestellten und
angemeldeten Patenten. DTS-HD, das Symbol, und
DTSHD zusammen mit dem Symbol sind eingetragene
Warenzeichen. DTS-HD Master Audio | Essential ist
ein Warenzeichen von DTS, Inc. Das Produkt enthält
Software. © DTS, Inc. Alle Rechte vorbehalten.
BER DIVX-VIDEO: DivX® ist
ein von DivX entwickeltes
Videoformat, LLC ist ein
Tochterunternehmen der Rovi
Corporation. Hierbei handelt es sich um ein offizielles
DivX Certified®, das DivX Video wiedergeben kann.
Nähere Informationen und Softwareanwendungen
zum Konvertieren Ihrer Videodateien in das DivX Video
Format finden Sie unter www.divx.com.
INFOS ZU DIVX VIDEO-ON-DEMAND: Dieses
DivX®-zertifizierte Gerät muss registriert werden,
damit erworbene Video-On-Demand-Inhalte
(VOD) wiedergegeben werden können. Um den
Registrierungscode zu erhalten, wechseln Sie in den
DivX VOD-Bereich im Setup-Menü des Geräts. Weitere
Informationen über den Abschluss der Registrierung
finden Sie unter vod.divx.com. DivX Certified® für die
Wiedergabe von DivX® -Videos bis hin zu HD 1080p,
einschließlich Premium- Inhalt.
DivX®, DivX Certified® und die dazugehörigen Logos
sind Markenzeichen der Rovi Corporation oder
ihrer Tochterunternehmen und werden unter Lizenz
verwendet. Geschützt durch eines oder mehrere
der folgenden U.S. Patente 7,295,673; 7,460,668;
7,515,710; 7,519,274
Deutsch
HT-F4200_XU_GER_130206-1.indd 3
Sicherheitsinformationen
Vorsichtsmaßnahmen für den Betrieb
Lizenz
01
• Halten der Disks
- Fingerabdrücke oder Kratzer
auf der Disk können zu einer
Verschlechterung der Klangund
Bildqualität oder zu Springen führen.
- Vermeiden Sie die Oberfläche von mit Daten
bespielten Disks zu berühren.
- Halten Sie die Disk mit den Fingerspitzen am Rand
fest damit keine Fingerabdrücke auf der Oberfläche
zurückbleiben.
- Kleben Sie kein Papier oder
Klebeband auf die Disk.
• Reinigen der Disks
- Wenn sich Fingerabdrücke oder
Schmutz auf der Disk befinden,
säubern Sie sie mit einem milden Reinigungsmittel
und einem weichen Tuch.
- Säubern Sie die Disk von innen nach außen.
- Lagerung der Disks
Setzen Sie die Disk keiner direkten
Sonneneinstrahlung aus.
Bewahren Sie die Disk an einem kühlen, gut
belüfteten Ort auf.
Bewahren Sie die Disk in einer Schutzhülle auf
und lagern Sie sie senkrecht.
• Wenn unnormale Geräusche zu hören sind oder sich
ein stechender Geruch bemerkbar macht oder Rauch
entsteht, sofort das Gerät über den Netzschalter
ausschalten und den Netzstecker ziehen. Setzen Sie
sich anschließend mit dem nächsten Kundendienst in
Verbindung um technische Hilfe zu erhalten. Das Gerät
nicht weiter verwenden. Ein Gerät in diesem Zustand
kann einen Brand auslösen oder zu einem Stromschlag
führen.
• Um das Gerät vollständig auszuschalten, muss der
Netzstecker aus der Steckdose gezogen werden. Somit
muss der Netzstecker immer bequem erreichbar sein.
3|
2013-02-13 오후 4:35:39
Sicherheitsinformationen
HDMI, das HDMI-Logo und
der Begriff „High Definition
Multimedia Interface“ sind Marken oder eingetragene
Marken von HDMI Licensing LLC.
DLNA®, das DLNA Logo
und DLNA CERTIFIED®
Warenzeichen,
Dienstleistungsmarken oder Gütezeichen der Digital
Living Network Alliance.
Oracle und Java sind registrierte
Warenzeichen von Oracle und/oder ihrer
Tochterunternehmen. Andere Namen
sind Markenzeichen ihrer entsprechenden
Eigentümer.
Dieses Gerät nutzt eine durch U.S. Patente und
andere Schutz- und Urheberrechte geschützte
Kopierschutztechnologie der Rovi Corporation. Reverse
Engineering und Disassemblierung sind verboten.
Blu-ray Disc™, Blu-ray™, und die Logos sind
Warenzeichen der Blu-ray Disc Association.
Dieses Gerät verwendet die Cinavia Technologie, um die
Verwendung illegaler Kopien von einigen kommerziellen
Filmproduktionen und Videos sowie deren Soundtracks
zu verhindern. Wenn die unzulässige Verwendung einer
illegalen Kopie erkannt wird, erscheint eine Meldung
und die Wiedergabe oder der Kopiervorgang werden
abgebrochen.
Mehr Informationen über die Cinavia Technologie finden
Sie auf dem Online Verbraucherinformationszentrum
unter http:// www.cinavia.com.
Wenn Sie weitere Informationen über Cinavia über
E-Mail erhalten möchten, senden Sie bitte eine
Postkarte mit Ihrer Mail-Adresse an: Cinavia Consumer
Information Centre, P.O. Box 86851, San Diego, CA,
92138, USA.”
Dieses Gerät beinhaltet geschützte Technologie unter
Lizenz der Verance Corporation und ist durch das
U.S. Patent 7.369.677 und andere U.S. und weltweit
ausgestellte oder beantragte Patente sowie das
Urheberrecht und das Betriebsgeheimnis bestimmter
Aspekte dieser Technologie geschützt. Cinavia ist ein
Warenzeichen der Verance Corporation. Copyright
2004-2010 Verance Corporation. Alle Rechte
vorbehalten für Verance. Reverse Engineering und
Disassemblierung sind verboten.
- Open Source Lizenz Hinweis
Im Falle der Verwendung von Open Source Software,
stehen die Open Source Lizenzvereinbarungen im
Produktmenü zur Verfügung.
Verwendung der 3 D Funktion
WICHTIGE GESUNDHEITS UND SICHERHEITSHINWEISE
FÜR 3D BILDER.
Lesen Sie die folgenden Sicherheitshinweise aufmerksam
durch, bevor Sie die 3D Funktion verwenden.
• Bei einigen Zuschauern kann es bei der Betrachtung
von 3D Fernsehen zu einem Unwohlsein, wie
Schwindelgefühl, Übelkeit und Kopfschmerzen
kommen. Wenn Sie solche Symptome wahrnehmen,
unterbrechen Sie das Ansehen von 3D Fernsehen,
setzen Sie die 3D Aktiv Brille ab und ruhen Sie sich aus.
• Das Betrachten von 3D Bildern über einen längeren
Zeitraum kann zu einer Augenüberlastung führen.
Wenn Sie eine Überlastung der Augen wahrnehmen,
unterbrechen Sie das Ansehen von 3D Fernsehen,
setzen Sie die 3D Aktiv Brille ab und ruhen Sie sich aus.
• Zuständige Erwachsene müssen Kinder, welche die
3D Funktion nutzen, regelmäßig überwachen. Wenn
die Kinder über ermüdete Augen, Kopfschmerzen,
Schwindelgefühl oder Übelkeit klagen, müssen die
Kinder das Anschauen von 3D Fernsehen abbrechen
und sich ausruhen.
• Verwenden Sie die 3D Aktiv Brille nicht für andere
Zwecke (wie als normale Brille, Sonnenbrille,
Schutzbrille, usw.)
• Verwenden Sie die 3D Funktion oder die 3D Aktiv Brille
nicht während Sie herumlaufen oder sich bewegen.
Wenn Sie die 3D Funktion oder die 3D Aktiv Brille
verwenden während Sie sich umher bewegen, können
Sie gegen Gegenstände laufen, stolpern und/oder
hinfallen und sich ernsthaft Verletzungen zuziehen.
• Wenn Sie 3D Inhalte erleben möchten, müssen Sie ein
3D Gerät (3D fähiger AV-Receiver oder Fernsehgerät)
an den HDMI OUT Ausgang mit Hilfe eine High-Speed
HDMI-Kabels anschließen. Setzen Sie die 3D Brille auf,
bevor Sie 3D Inhalte wiedergeben.
• Das Gerät gibt 3D Inhalte nur über ein an den HDMI
OUT Ausgang angeschlossenes HDMI-Kabel wieder.
• Da die Videoauflösung im 3D Wiedergabemodus fest
auf die Auslösung der 3D Videoquelle eingestellt ist,
kann die Auflösung nicht an Ihre Vorlieben angepasst
werden.
• Einige Funktionen, wie BD Wise, Einstellung des
Bildformats und die Einstellung der Auflösung können im
3D-Modus unter Umständen nicht richtig funktionieren.
• Für die fehlerfreie Wiedergabe des 3D-Signals müssen
Sie ein High-Speed HDMI-Kabel verwenden.
• Bei der Betrachtung von 3D Bildern sollten Sie einen
Abstand von mindestens 3 Mal der Bildschirmbreite vom
Fernsehgerät einhalten. Zum Beispiel, wenn sie einen 46
Zoll Bildschirm haben, müssen Sie einen Abstand von
3,5 Metern einhalten.
• Für die beste 3D Bildqualität muss der 3D Bildschirm in
Augenhöhe aufgestellt werden.
• Bei einigen angeschlossenen 3D Geräten kann der 3D
Effekt eventuell nicht einwandfrei funktionieren.
• Mit diesem Gerät können 2D Inhalte nicht nach 3D
umgewandelt werden.
• “Blu-ray 3D” und das “Blu-ray 3D” Logo sind
Markenzeichen der Blu-ray Disc Association.
| 4 Deutsch
HT-F4200_XU_GER_130206-1.indd 4
2013-02-13 오후 4:35:40
Copyright
MEDIA PLAY
Inhalt
NETZWERKDIENSTE
SICHERHEITSINFORMATIONEN
2
3.
3
3
4
5
Wiedergabe von Dateien auf einem USB-Gerät
Wiedergabe von selbst aufgenommenen Disks
Wiedergabe von kommerziellen Video Disks
Steuern der Videowiedergabe
Wiedergabe von kommerziellen Audio Disks
Steuern der Musikwiedergabe
Steuern der Fotowiedergabe
Radio hören
Verwenden dem TV Sound-Taste auf der
Fernbedienung
Sicherheitsinformationen
ge.atst
23
23
24
24
25
25
26
27
28
01
© 2013 Samsung Electronics Co.,Ltd.
Alle Rechte vorbehalten. Ohne vorherige schriftliche
Genehmigung von Samsung Electronics Co.,Ltd. ist das
vollständige oder teilweise Reproduzieren oder Kopieren
dieser Bedienungsanleitung nicht
Warnung
Lagerung und Handhabung der Disks
Vorsichtsmaßnahmen für den Betrieb
Lizenz
Verwendung der 3 D Funktion
Copyright
ERSTE SCHRITTE
6
7
Disk und Format Kompatibilität
Logos von Disks, die vom Gerät wiedergegeben
werden können
9 Zubehör
10 Beschreibung
10 Rückseite
11 Fernbedienungl
ANSCHLÜSSE
12 Anschließen der Lautsprecher
14 Anschließen an einen Netzwerk Router
15 Anschluss an ein Fernsehgerät/Externe Geräte
anschließen
29 BD-LIVE™
29 Verwenden von DLNA
ANHANG
30 Zusätzliche Informationen
33 Fehlerbehebung
36 Technische Daten
Die Abbildungen in dieser Anleitung dienen nur
als Referenz und können sich vom aktuellen
Produkt unterscheiden.
Es kann eine Gebühr erhoben werden, wenn:
a. Ein Ingenieur auf Ihre Anfrage bestellt wird
und am Gerät kein Defekt vorliegt (z. B. weil
Sie diese Bedienungsanleitung nicht gelesen
haben)
b. Sie das Gerät in einer Reparaturwerkstatt
abgegeben haben und am Gerät kein
Defekt vorliegt (z. B. weil Sie diese
Bedienungsanleitung nicht gelesen haben).
Die Höhe dieser Gebühr wird Ihnen mitgeteilt,
bevor irgendwelche Arbeiten durchgeführt
werden oder der Hausbesuch erfolgt.
EINSTELLUNGEN
16
17
17
18
20
21
22
Ersteinstellungen konfigurieren
Der Home Bildschirm
Zugriff auf den Einstellungen Bildschirm
Einstellungen Menü Funktionen
Netzwerke und das Internet
Aktualisieren der Software
DLNA einrichten
Deutsch
HT-F4200_XU_GER_130206-1.indd 5
5|
2013-02-13 오후 4:35:41
Erste Schritte
Disk und Format Kompatibilität
Disktypen und Inhalte, die von Ihrem Gerät wiedergegeben werden können
Medium
Disktyp
Blu-ray Disc
3D Blu-ray Disc
VIDEO
DVD-VIDEO, DVD-RW,
DVD-R, DVD+RW,
DVD+R
Details
BD-ROM oder BD-RE/-R Disk aufgenommen im BD-RE Format.
DVD-VIDEO, DVD-RW, DVD-R, DVD+RW, DVD+R DVD-VIDEO,
aufgenommene DVD+RW/DVD-RW(V)/DVD-R/+R Disks, die
aufgenommen und abgeschlossen wurden, oder USB-Speichergeräte
mit DivX, MKV, MP4 Inhalten.
MUSIK
CD-RW/-R,
DVD-RW/-R,
BD-RE/-R
Auf CD-RW/-R, DVD-RW/-R, BD-RE/-R Disks aufgenommene Musiktitel
oder USB-Speichergeräte mit MP3 oder WMA Inhalten.
FOTO
CD-RW/-R,
DVD-RW/-R,
BD-RE/-R
Auf CD-RW/-R, DVD-RW/-R, BD-RE/-R Disks aufgenommene Fotos
oder USB-Speichergeräte mit JPEG Inhalten.
| HINWEIS |
In Abhängigkeit vom Datenträgertyp und den Aufnahmebedingungen können bestimmte CD-RW/-R und DVD-R
möglicherweise nicht vom Gerät wiedergegeben werden.
Wenn eine DVD-RW/-R-Disk nicht korrekt im DVD-Videoformat aufgenommen wurde, kann sie nicht wiedergegeben
werden.
Das Gerät gibt keine Inhalte wieder, die auf DVD-Rs mit einer Bitrate von mehr als 10 Mbps aufgezeichnet wurden.
Das Gerät gibt keine Inhalte wieder, die auf BD-Rs oder USB-Geräten mit einer Bitrate von mehr als 30 Mbps
aufgezeichnet wurden.
Die Wiedergabe kann bei einigen Disktypen oder Verwendung bestimmter Funktionen, wie Blickwinkeländerung und
Bildformat nicht funktionieren Ausführlichere Informationen zu den Disks finden Sie auf der jeweiligen Verpackung.
Lesen Sie diese Informationen bei Bedarf durch.
Wenn Sie einen BD-J Titel wiedergeben, kann das Laden länger dauern als bei einem normalen Titel oder einige
Funktionen werden langsamer ausgeführt.
Disktypen, die von Ihrem Gerät nicht wiedergegeben werden können
• HD DVD
• DVD-ROM/PD/MV-Disk
usw.
• DVD-RAM
• Super Audio-CD
(außer CD-Layer)
• DVD-RW (VR-Modus)
• CVD/CD-ROM/CDV/
CD-G/CD-I/LD(CD-Gs
nur Audiowiedergabe,
keine Grafiken.)
• 3,9 GB DVD-R für
Videoschnittarbeiten
| HINWEIS |
Das Gerät führt möglicherweise nicht alle Bedienungsbefehle aus, da einige Blu-ray-Disks, DVDs und CDs bei der
Wiedergabe nicht alle oder nur bestimmte Funktionen unterstützen. Dies ist keine Fehlfunktion des Players.
Samsung kann nicht garantieren, dass dieses Gerät jede Disk mit einem Blue Ray-Disk, DVD- oder CD-Logo
wiedergibt, da sich die Diskformate ständig weiterentwickeln und bei der Erstellung von Blu-ray Disc, DVD, CDSoftware und/oder bei der Herstellung von Disks Fehler auftreten können.
Wenn Sie Fragen haben, oder bei der Wiedergabe von Blu-ray-Disks, DVDs oder CDs mit diesem Gerät
Probleme auftreten, wenden Sie sich bitte an den SAMSUNG Kundendienst. Weitere Informationen zu den
Wiedergabebeschränkungen finden Sie in diesem Handbuch.
Einige kommerzielle Disks sowie DVDs aus Ländern außerhalb Ihrer Region können unter Umständen mit diesem
Produkt nicht abgespielt werden.
| 6 Deutsch
HT-F4200_XU_GER_130206-1.indd 6
2013-02-13 오후 4:35:42
Regionalcode
Regional
code
Region
A
North America, Central
America, South America,
Korea, Japan, Taiwan, Hong
Kong und Südostasien.
B
Europa, Grönland,
Französische Überseegebiete,
Naher Osten, Afrika, Australien
und Neuseeland
C
Indien, China, Russland,
Zentralund Südasien.
1
USA, US-Territorien und
Kanada
2
Europa, Japan, Naher Osten,
Ägypten, Afrika, Grönland
3
Taiwan, Korea, Philippinen,
Indonesien, Hongkong
4
Mexiko, Südamerika,
Mittelamerika, Australien,
Neuseeland, Pazifische Inseln,
Karibik
5
Russland, Osteuropa, Indien,
Nordkorea, Mongolei
Blu-ray-Disc
DVD-VIDEO
Blu-ray Disc
BD-LIVE
Dolby
DTS
3D Blu-ray Disc
DivX
PAL-Fernsehsystem in
Großbritannien, Frankreich,
Deutschland usw.
Java
Erste Schritte
Disktyp
Logos von Disks, die vom Gerät
wiedergegeben werden können
02
Geräte und Disks sind nach Regionen codiert.
Für die Wiedergabe müssen diese Regionalcodes
zusammenpassen. Wenn dies nicht der Fall ist, kann die
Disk nicht wiedergegeben werden. Der Regionalcode
dieses Geräts ist auf der Geräterückseite angebracht.
Unterstützte Formate
Unterstützte Musikdatei
6
China
Dateierweiterung
Dateierweiterung
Container
Audio
Codec
Frequenzbereich
*.mp3
MP3
MP3
-
WMA
* Samplingraten
sind (in kHz) 8, 11, 16, 22,
32, 44.1, 48
(im kHz)
* Bitraten - alle
Bitraten im
Bereich 5 kbps
zu 384 kbps
| HINWEIS |
Wenn der Regionalcode einer Blu-ray Disk/DVD
nicht dem Regionalcode dieses Geräts entspricht,
kann die Disk nicht vom Gerät wiedergegeben
werden.
*.wma
WMA
Deutsch
HT-F4200_XU_GER_130206-1.indd 7
7|
2013-02-13 오후 4:35:42
Erste Schritte
Unterstützte Musikdatei
Dateierweiterung
Typ
*.jpg
*.jpeg
*.jpe
JPEG
*.png
PNG
Auflösung
15360x8640
Unterstützte Videodatei
Dateierweiterung
Container
Video Codec
Audio Codec
*.avi
AVI
DivX 3.11/4/5/6
MP4v3
H.264 BP/MP/HP
MP3, Dolby Digital, DTS,
WMA, PCM
*.mkv
MKV
VC-1 AP
DivX 5/6
H.264 BP/MP/HP
MP3, Dolby Digital, DTS
*.wmv
WMV (wmv9)
VC-1 AP
VC-1 SM
WMA
*.mp4
MP4
MP4 (mp4v)
H.264 BP/MP/HP
AAC
*.mpg
*.mpeg
PS
MPEG1
MPEG2
H.264 BP/MP/HP
MP1, 2
Dolby Digital, DTS
Auflösung
1920x1080
Einschränkungen
- Auch wenn eine Datei mit einem unterstützten Codec aus der oben aufgeführten Liste kodiert ist, kann die Datei
eventuell nicht wiedergegeben werden, wenn sie einen Fehler enthält.
- Eine normale Wiedergabe wird nicht garantiert, wenn die Informationen im Container falsch sind oder die Datei selbst
beschädigt ist.
- Dateien mit einer höheren Bitrate oder Bildfrequenz als der Standard, können bei der Wiedergabe stottern.
- Die Suchen (Springen) Funktion ist nicht verfügbar, wenn die Indextabelle der Datei beschädigt ist.
Videodecodierer
- Unterstützt H.264 bis Level 4.1 und AVCHD
- H.264 FMO/ASO/RS und VC1 SP/MP/AP L4 werden nicht unterstützt.
- MPEG4 SP, ASP :
Unter 1280 x 720 : max. 60 Bilder
Über 1280 x 720 : max. 30 Bilder
- GMC 2 oder höher wird nicht unterstützt
Audiodecoder
- Unterstützt WMA 7, 8, 9 und STD
- WMA Abtastrate von 22050Hz Mono wird nicht unterstützt.
- AAC: Max. Abtastfrequenz: 96Khz (8, 11, 12, 16, 22,24, 32,44.1, 48, 64, 88.2, 96) Max Bitrate: 320 kbps
Unterstützte DivX Untertitel Dateiformate
*.ttxt, *.smi, *.srt, *.sub, *.txt
| 8 Deutsch
HT-F4200_XU_GER_130206-1.indd 8
2013-02-13 오후 4:35:44
AVCHD (Advanced Video Codec Höchauflösung)
02
Erste Schritte
• Dieses Gerät kann Disks im AVCHD Format wiedergeben. Diese Disks werden normalerweise aufgezeichnet und in
Camcordern verwendet .
• Das AVCHD-Format ist ein hochauflösendes digitales Videokameraformat.
• Das MPEG-4 AVC/H.264 Format komprimiert Bilder effektiver als das konventionelle Bildkomprimierungsformat.
• Einige AVCHD-Disks verwenden das „x.v.Color” Format. Dieses Gerät kann AVCHD Disks wiedergeben, die das "x.v
Colour" Format verwenden.
• „x.v.Color” ist eine Handelsmarke von Sony Corporation.
• „AVCHD” und der AVCHD-Logo sind Handelsmarken von Matsushita Electronic Industrial Co., Ltd. und Sony
Corporation.
| HINWEIS |
Einige Disk im AVCHD DivX-Format können aufgrund der Aufnahmebedingungen eventuelle nicht wiedergegeben
werden.
AVCHD formatierte Disks müssen finalisiert werden.
„x.v.Colour” bietet einen größeren Farbbereich als normale Camcorder DVDs.
Einige Disks im DivX-, MKV- und MP4-Format können möglicherweise aufgrund der Videoauflösung und der
Bildfrequenz nicht wiedergegeben werden.
Hinweise zum USB-Anschluss
•
•
•
•
•
•
•
•
•
•
•
•
•
Ihr Gerät unterstützt USB-Speichergerät, MP3- Player, Digitalkameras und USB-Kartenleser.
Das Gerät unterstützt keine Datei- oder Ordnernamen mit mehr als 128 Zeichen.
Einige USB/Digitalkameras sind eventuell nicht mit dem Gerät kompatibel.
Das Gerät unterstützt die Dateisysteme FAT 16, FAT 32 und NTFS.
Schließen Sie USB-Geräte direkt an den USB-Anschluss Ihres Geräts an. Der Anschluss über ein USB-Kabel kann
Kompatibilitätsprobleme verursachen.
Wenn mehr als ein Speichermedium und einen Multi-Kartenleser eingelegt werden, kann der Kartenleser eventuell
nicht fehlerfrei funktionieren.
Das Gerät unterstützt das PTP-Protokoll nicht.
Das USB-Gerät nicht während des Ladevorgangs abtrennen.
Je größer die Bildauflösung, desto länger braucht das Bild um angezeigt zu werden.
Dieses Gerät kann keine MP3 Dateien mit DRM (Digital Rights Management) wiedergeben, die von kommerziellen
Seiten heruntergeladen wurden.
Ihr Gerät unterstützt nur Video mit einer Bildfrequenz von weniger als 30 BpS.
Sie müssen das USB-Speichergerät sicher entfernen, (führen Sie die „USB sicher entfernen“-Funktion durch) um
die gespeicherten Daten auf Ihrem USB-Gerät nicht zu beschädigen. Drücken Sie HOME um zum Home Menü zu
wechseln und anschließend die GELBE (C) Taste und danach die E Taste.
SAMSUNG übernimmt keine Haftung für die Beschädigung oder den Verlust von Daten.
Zubehör
Überprüfen Sie das Vorhandensein der unten angeführten Zubehörteile.
FUNCTION
VOLUME
-
MUTE
+
RDS DISPLAY
TA
1
2
PTY -
PTY SEARCH
PTY +
4
5
6
7
8
3
9
TITLE MENU
DISC MENU
0
SUBTITLE
POPUP
HOME
REPEAT
TOOLS
INFO
EXIT
RETURN
TUNER
MEMORY MO/ST
A
B
TV SOUND DPS/EQ
C
Netzkabel
Benutzerhandbuch
UKW-Antenne
D
TUNING
DOWN
UP
Fernbedienung/AAA-Batterien
Deutsch
HT-F4200_XU_GER_130206-1.indd 9
9|
2013-02-13 오후 4:35:45
Erste Schritte
Beschreibung
WIEDERGABE/PAUSE
STOPP
ENTER
ÖFFNEN/SCHLIESSEN
LAUTSTÄRKEREGLER
FUNKTION
5V 500mA
ANZEIGE
DISK-LADE
USB-HOST
NETZSCHALTER
FERNBEDIENUNGSSENSOR
| HINWEIS |
Um die Software des Geräts über den USB-Anschluss zu aktualisieren, benötigen Sie ein USB-Speicher Stick.
Wenn das Gerät das Blu-ray-Disk Menü anzeigt, kann der Film nicht durch Drücken der 6 Taste am Gerät oder auf
der Fernbedienung gestartet werden. Um den Film abzuspielen müssen Sie Film Wiedergabe oder Start im Menü der
Disk auswählen und anschließend die E Taste drücken.
Wenn Sie Internetdienste nutzen oder den Inhalt von von USB-Geräten auf dem Fernsehgerät wiedergeben, kann der
BD/DVD Modus nicht mit der FUNCTION Taste ausgewählt werden. Halten Sie zuerst die Wiedergabe des Inhalts
auf dem Fernsehgerät an, um den BD/DVD-Modus auswählen zu können.
Rückseite
LÜFTER
AUX EINGANG
AUX IN
FRONT R
FRONT L
SUBWOOFER
SPEAKERS OUT
NETZKABEL
LAUTSPRECHER
AUSGÄNGE
,03('$1&(ȍ
POWER
* UKW-ANTENNE
HDMI-AUSGANG
FM ANT
L
R
OPTICAL
DIGITAL
AUDIO IN
HDMI OUT
LAN
EXTERNER DIGITAL AUDIO
EINGANG (OPTISCH)
LAN
* Zum Anschließen der UKW-Antenne
1.
2.
Verbinden Sie die mitgelieferte UKW-Antenne mit dem UKW-Anschluss.
Bewegen Sie den Antennendraht langsam hin und her, bis Sie einen guten Empfang haben. Befestigen Sie den
Draht an der Wand oder einer festen Fläche.
| HINWEIS |
Beim Aufstellen des Geräts ist ein Abstand von mindestens 10 cm auf allen Seiten einzuhalten um eine ausreichende
Belüftung zu gewährleisten. Halten Sie den Lüfter und die Belüftungsöffnungen stets frei.
Dieses Gerät empfängt keine MW-Sender.
| 10 Deutsch
HT-F4200_XU_GER_130206-1.indd 10
2013-02-13 오후 4:35:47
Fernbedienung
02
Übersicht der Fernbedienung
FUNCTION
VOLUME
Lautstärke regeln.
-
MUTE
+
RDS DISPLAY
Drücken Sie die Nummerntasten, um
die Optionen zu bedienen.
Zum Ansehen des Diskmenüs diese
Taste drücken.
Zum Vorwärts- oder
Rückwärtsspringen.
Zum Wiedergeben einer Disk.
TA
1
2
3
PTY -
PTY SEARCH
PTY +
4
5
6
7
8
Selects the disc subtitle language.
Rückkehr zum vorherigen Menü.
Diese Tasten werden zur Auswahl
der verschiedenen Menüs auf dem
Gerät und auch mehrere Blu-rayDiskfunktionen.
Drücken, um das Audiosignal über
die Heimkino Lautsprecher oder die
TV-Lautsprecher wiederzugeben.
(Siehe Seite 28)
Wählen Sie den gewünschten DSP/
EQ-Audiomodus.
Zum Öffnen und Schließen des
Diskfachs.
Damit schalten Sie den Ton
vorübergehend aus.
Verwenden Sie die RDS-Funktion für
den UKW-Senderempfang.
9
TITLE MENU
DISC MENU
0
POPUP
Mit dieser Taste wird das PopupMenü/Titelmenü geöffnet.
Zum Vorwärts- oder
Rückwärtsspringen.
Zum Beenden einer Disk.
Drücken, um den Home Bildschirm
aufzurufen.
Mit dieser Taste wird das ExtrasMenü geöffnet.
Zum Auswählen der
Bildschirmmenüpunkte und zum
Ändern der Menüwerte.
Drücken, um den Modus der Blu-ray zu
wählen (BD/DVD, D. IN, AUX, usw.).
Erste Schritte
Schaltet das Heimkino-System ein/
aus.
SUBTITLE
HOME
REPEAT
TOOLS
INFO
EXIT
RETURN
TUNER
MEMORY MO/ST
A
B
TV SOUND DPS/EQ
C
D
TUNING
DOWN
UP
Zum Anhalten der Wiedergabe einer
Disk drücken.
Ermöglicht Ihnen die Wiederholung
eines Titels, eines Kapitels, eines
Tracks oder einer Disk.
Dient der Anzeige der Wiedergabe –
Information einer Blu-ray/DVD-Disk.
Drücken, um das Menü zu verlassen.
Dient zum Einstellen einer
gespeicherten Radiofrequenz.
Stellt MONO oder STEREO für
Radiosendungen ein.
Suche nach verfügbaren UKWSendern und Kanäle umschalten.
Batterien in die Fernbedienung einsetzen
Achten Sie darauf, dass der "+" und "-" Pol der Batterien wie im
Batteriefach angezeigt ausgerichtet sind.
Batteriegröße: AAA
Bei normaler Nutzung des Fernsehers halten die Batterien
ungefähr ein Jahr.
Die Fernbedienung hat eine Reichweite von bis zu ca. 7 Metern
Luftlinie.
Deutsch
HT-F4200_XU_GER_130206-1.indd 11
11 |
2013-02-13 오후 4:35:48
Anschlüsse
In diesem Kapitel werden verschiedene Methoden erläutert, mit denen dieses Gerät an andere externe Komponenten
angeschlossen werden kann.
Bevor Sie das Hauptgerät installieren oder an einer anderen Stelle aufstellen, müssen Sie es ausschalten und den
Netzstecker ziehen.
Anschließen der Lautsprecher
Platzierung des Hauptgeräts
Platzieren Sie das Hauptgerät auf einem
Regal, einer Kommode oder unter dem
Fernsehtisch.
Subwoofer
Front (R)
Gerät
Front (L)
Frontlautsprecher
Subwoofer
Auswahl der Hörposition
Die Hörposition sollte sich in einem
Abstand vom Fernsehgerät befinden,
die das 2,5 bis 3-fache der Größe des
Bildschirms beträgt. Wenn Sie zum
Beispiel über einen 46 Zoll Bildschirm
verfügen, sollte sich die Hörposition
2,92 bis 3,5 m vom Bildschirm entfernt
befinden.
Platzieren Sie diese Lautsprecher vor Ihrer Hörposition so, dass sie nach innen zeigen (in
einem Winkel von ca. 45°) und auf Sie ausgerichtet sind. Platzieren Sie die Lautsprecher so,
dass sich die Hochtöner auf Ohrhöhe befinden.
Die Position des Subwoofers ist nicht wichtig. Sie können ihn beliebig platzieren.
| 12 Deutsch
HT-F4200_XU_GER_130206-1.indd 12
2013-02-13 오후 4:35:50
Anschließen der Lautsprecher
2.
Anschließen der Lautsprecherkabel an die Lautsprecher:
a. Drücken Sie die rote Anschlussklemme auf der Rückseite des Lautsprechers
herunter, führen Sie das rote Kabel ein und lassen Sie die Klemme los.
b. Drücken Sie die schwarze Anschlussklemme auf der Rückseite des Lautsprechers
herunter, führen Sie das schwarze Kabel ein und lassen Sie die Klemme los.
Rot
Schließen Sie die Stecker der Lautsprecherkabel auf der Rückseite des Geräts an,
wobei die Farbe des Steckers mit der Farbe der Anschlussbuchse übereinstimmen muss.
s.
Front-Lautsprecher (R)
FRONT
FRONT
R
L
IMPEDANCE : 3
3.
Schwarz
Anschlüsse
Ordnen Sie jedes Lautsprecherkabel dem entsprechenden Lautsprecher zu, indem Sie
die mit einer bestimmten Farbe gekennzeichneten Stecker den farbigen Aufklebern
am Boden eines jeden Lautsprechers zuordnen.
03
1.
Front-Lautsprecher (L)
SUBWOOFER
SPEAKERS OUT
Subwoofer
R
FRONT
L
IMPEDANCE : 3
AUX
IN
FRONT
SUBWOOFER
SPEAKERS OUT
FM ANT
L
R
OPTICAL
DIGITAL
AUDIO IN
| ACHTUNG |
Wenn Sie die Lautsprecher an der Wand befestigen möchten, bringen Sie die Schrauben oder Nägel fest in der Wand
an und verwenden Sie zum Aufhängen die Öffnungen auf der Rückseite der Lautsprecher. Das Zubehör (Schrauben
oder Nägel) für die Wandinstallation ist nicht im Lieferumfang enthalten.
Achten Sie darauf, dass Kinder nicht mit den Lautsprechern oder in deren Nähe spielen. Sie können durch
umkippende Lautsprecher verletzt werden.
Stellen Sie beim Anschluss der Lautsprecherkabel an die Lautsprecher sicher, dass die Polarität (+/ -) korrekt ist.
Halten Sie den Subwoofer außerhalb der Reichweite von Kindern. Verhindern Sie, dass Kinder ihre Hände oder
Fremdkörper in die Bassreflexöffnung des Subwoofers einführen.
Hängen Sie den Subwoofer nicht an der Bassreflexöffnung an der Wand auf.
| HINWEIS |
Wenn Sie einen Lautsprecher in der Nähe des Fernsehers aufstellen, kann die Farbwiedergabe auf dem Bildschirm
durch die von den Lautsprechern erzeugten magnetischen Felder gestört werden.
Deutsch
HT-F4200_XU_GER_130206-1.indd 13
13 |
2013-02-13 오후 4:35:51
Anschlüsse
Anschließen an einen Netzwerk Router
AUX
IN
FM ANT
FRONT
R
FRONT
L
SUBWOOFER
SPEAKERS OUT
IMPEDANCE : 3
POWER
L
R
OPTICAL
DIGITAL
AUDIO IN
HDMI OUT
LAN
Breitbandmodem
BreitbandDienste
Oder
BreitbandDienste
Breitbandmodem (mit integriertem Router)
Router
| HINWEIS |
Die Richtlinien Ihres Router oder Internetanbieters lassen eventuell den Zugriff auf den Samsung SoftwareAktualisierungsserver nicht zu. Falls dieser Fall eintritt, setzen Sie sich bitte mit Ihrem Internetanbieter in Verbindung,
um weitere Informationen zu erhalten.
Bei Verwendung von DSL muss die Netzwerkverbindung über einen Router hergestellt werden.
Um die DLNA Funktion nutzen zu können, muss Ihr PC, wie in der Abbildung oben dargestellt, mit einem Netzwerk
verbunden sein.
Sie können eine Kabel- oder WLAN-Verbindung herstellen.
| 14 Deutsch
HT-F4200_XU_GER_130206-1.indd 14
2013-02-13 오후 4:35:52
Anschluss an ein Fernsehgerät/Externe Geräte anschließen
03
Anschlüsse
AUX
IN
FM ANT
L
FRONT
R
FRONT
SUBWOOFER
L
IMPEDANCE : 3
AUX
IN
POWER
SPEAKERS OUT
FM ANT
L
R
OPTICAL
DIGITAL
AUDIO IN
HDMI OUT
LAN
R
OPTICAL
DIGITAL
AUDIO IN
Methode 1
R
Rot
W
Weiß
HDMI OUT
LAN
Methode 2
Externe Geräte
OPTICAL OUT
HDMI IN
Anschluss an ein Fernsehgerät
Schließen Sie ein HDMI-Kabel (nicht mitgeliefert) an den HDMI OUT Ausgang auf der Rückseite des Geräts und an den
HDMI IN Eingang an Ihrem Fernsehgerät an. Wenn das Fernsehgerät ARC unterstützt, können Sie den Ton von Ihrem
Fernsehgerät über das Heimkino wiedergeben, indem Sie nur einfach nur dieses Kabel anschließen. Schlagen Sie auf
Seite 19 dieser Anleitung und in dem Kapitel über ARC in der Bedienungsanleitung Ihres Fernsehgeräts nach um weitere
Informationen zu erhalten.
Externe Geräte anschließen
Um den richtigen Modus für ein externes Gerät zu wählen, die FUNCTION Taste drücken. Durch wiederholtes Drücken,
wird der Modus in folgender Reihenfolge umgeschaltet : BD/DVD D. IN AUX FM
Methode 1 AUX EINGANG : Anschließen eines externen Analoggeräts
Mit Hilfe eines RCA Audiokabels (nicht mitgeliefert) den AUDIO Eingang des Geräts an den AUDIO Ausgang des
externen Analoggeräts anschließen. Wählen Sie den AUX Modus.
• Achten Sie darauf, die farbigen Kabelstecker an die Anschlussbuchsen gleicher Farbe anzuschließen.
Methode 2 OPTISCHER : Anschließen eines externen Digitalgeräts
Für den Anschluss von Digitalgeräten mit digitaler Audioausgabe, wie Kabelboxen und Satellitenempfänger (Set-TopBoxen). Mit der Hilfe eines optischen Kabels (nicht mitgeliefert) den optischen Digital Audio Eingang am Gerät mit dem
optischen Digitalausgang am Receiver verbinden. Wählen Sie den D. IN Modus.
| HINWEIS |
Wenn Sie Videobilder über den Kabelanschluss oder den Satellitenempfänger sehen möchten, müssen Sie deren
Videoausgang direkt an das Fernsehgerät anschließen.
Dieses System unterstützt eine digitale Abtastraten von 32 kHz oder höher von externen digitalen Geräten.
Dieses System unterstützt nur DTS und Dolby Digital Audio. MPEG Audio, ein Bitstrom Format, wird nicht unterstützt.
Deutsch
HT-F4200_XU_GER_130206-1.indd 15
15 |
2013-02-13 오후 4:35:54
Einstellungen
4:3 Normal - Für ältere analog Fernsehgeräte mit
Standardbildschirm. Zeigt Bilder im 4:3 Format
im Vollbildmodus und Bilder mit 16:9 Format im
Letterbox Format an, bei dem das Seitenverhältnis
von 16:9 beibehalten wird, jedoch über und unter
dem Bild schwarze Ränder angezeigt werden.
4:3 Passend - Für ältere analog Fernsehgeräte mit
Standardbildschirm. Zeigt Bilder im 4:3 Format im
Vollbildmodus und Bilder im 16:9 Forma im PanScan Format an, bei dem der linke und rechte Rand
des Bildes abgeschnitten und die Mitte des Bildes
vertikal vergrößert wird.
Ersteinstellungen konfigurieren
• Das Home-Menü wird nicht angezeigt wenn die
Ersteinstellungen nicht konfiguriert wurden.
• Die OSD (Bildschirmanzeige) dieses Geräts kann
sich möglicherweise nach Aktualisierung der
Softwareversion ändern.
• Die Schritte für den Zugriff können sich je nach
ausgewähltem Menü unterscheiden.
1.
Schalten Sie das Fernsehgerät ein, nachdem Sie
das Gerät angeschlossen haben und schalten Sie es
ein. Wenn Sie das Gerät das erste Mal einschalten,
zeigt das Gerät automatisch den Bildschirm für die
p
g an.
Spracheinstellung
5 . Der Kabel Netzwerk Bildschirm erscheint.
- Wenn Sie über ein Netzwerk mit dynamischen
IP-Adressen verfügen - wie die meisten Nutzer
- Auto wählen, die E Taste drücken und
anschließend mit Schritt 6 fortfahren.
- Wenn Sie ein Netzwerk mit statischen IPAdressen haben, empfehlen wir diesen Punkt
zu überspringen, indem Sie die BLAUE (D)
Taste drücken. Fahren Sie, nachdem Sie die
Ersteinstellungen abgeschlossen haben mit dem
Kapitel "Konfigurieren Ihrer Netzwerkverbindung"
auf Seite 20 fort.. Im Kapitel "Konfigurieren Ihrer
Netzwerkverbindung" finden Sie eine vollständige
Beschreibung, wie Sie ihr Netzwerk manuell
konfigurieren können.
- Wenn Sie über kein Netzwerk verfügen, pressen
Sie die BLAUE (D) Taste, um diesen Punkt zu
überspringen. Der Bildschirm Ersteinstellungen
abgeschlossen wird angezeigt und anschließend
erscheint der Home Bildschirm.
Initial Settings I On-Screen Language
Select a language for the on-screen displays.
English
Français
Deutsch
Español
Italiano
Nederlands
> Move
2.
3.
" Select
Wählen Sie mit den Tasten ▲▼ die gewünschte
Sprache aus, und drücken Sie anschließend die E
Taste .
Drücken Sie die E Taste, um das Funktion Setup
zu starten.
| HINWEIS |
Wenn Sie die Netzwerkeinrichtung an dieser Stelle
Initial Settings
überspringen oder die Konfiguration nicht fehlerfrei
funktioniert, fahren Sie bitte mit dem Kapitel
"Konfigurieren Ihrer Netzwerkverbindung" auf Seite 20
fort, um die Netzwerkverbindung zu einem späteren
Zeitpunkt
einzurichten.
p
TV Aspect and Network will be set.
Each setting may be changed later under "Settings".
Start
Initial Settings I Network - Wired
Choose the method to configure Internet Protocol (IP).
a Previous
Please make sure that the Ethernet cable is connected.
" Select
Auto : Configure IP automatically.
4.
Der TV Format Bildschirm wird angezeigt. Wählen Sie
mit den ▲▼ Tasten das gewünschte TV-Format aus
und drücken Sie die E Taste.
Es stehen vier Auswahlmöglichkeiten bereit:
16:9 Original - Für Breitbild Fernsehgeräte. Zeigt
Breitbandbilder im originalen 16:9 Format und 4:3
Bilder (das alte Standardformat) im 4:3 Pillarbox
Format mit schwarzen Rändern auf der linken und
rechten Seite an.
16:9 Voll - Für Breitbild Fernsehgeräte. Zeigt Breitbild
Bilder im originalen 16:9 Format an und vergrößert
Bilder im 4:3 Format so, dass der 16:9 Bildschirm
ausgefüllt wird.
Auto
Manual
a Previous d Skip
6.
< Move " Select
Das Gerät überprüft die Netzwerkverbindung und
stellt anschließend eine Verbindung zum Netzwerk
her. Wenn dieser Punkt abgeschlossen ist, die E
Taste drücken. Der Bildschirm Ersteinstellungen
abgeschlossen wird angezeigt und anschließend
erscheint der Home Bildschirm.appears.
| 16 Deutsch
HT-F4200_XU_GER_130206-1.indd 16
2013-02-13 오후 4:35:55
MAC Address (d0:66:7b:dc:28:fc)
IP Address, Subnet Mask, Gateway, DNS Server
| HINWEIS |
Your network is operating properly.
If you still have a network problem, contact your network service provider.
Um Video-, Musik- oder Fototdateien von Ihrem Pc
wiederzugeben bzw. zu betrachten, müssen Sie ihr
Heimkino und den PC mit einem Netzwerk verbinden
und anschließend die DLNA Software herunterladen
und auf Ihrem PC installieren. (Siehe Seite 22.)
OK
" Select
Zugriff auf den Einstellungen
Bildschirm
| HINWEIS |
Wenn Sie den Bildschirm mit den Ersteinstellungen
erneut aufrufen wollen, um Änderungen vorzunehmen,
müssen Sie die Zurücksetzen Option auswählen.
(Siehe Seite 20.)
Wenn Sie ein HDMI-Kabel verwenden, um das Gerät
an ein Anynet+ (HDMI-CEC)-kompatibles SamsungFernsehgerät anzuschließen und 1.) Die Anynet+
(HDMI-CEC) Funktion am Fernsehgerät und dem
Gerät auf Ein gestellt haben und 2.) Das Fernsehgerät
auf eine vom Gerät unterstützte Sprache eingestellt
haben, stellt das Gerät diese Sprache automatisch als
die bevorzugte Sprache ein.
Auf dem Home Bildschirm Einstell. auswählen und
anschließend die E Taste drücken.
Der Einstellungen
g Bildschirm wird angezeigt.
g
g
1.
Settings
Der Home Bildschirm
1
Einstellungen
Gateway Ping
Internet Service Test
04
Um eine Option auf dem Home Bildschirm
auszuwählen, müssen Sie mit Hilfe der ▲▼◄►
Tasten den Cursor bewegen, bis die gewünschte
Option markiert ist und anschließend die E Taste
drücken.
1.
Initial Settings I Network - Wired
Display
3D Settings
Audio
TV Aspect Ratio
: 16:9 Original
Network
BD Wise
: Off
System
Resolution
: Auto
Language
Movie Frame (24 Fs)
: Off
Security
HDMI Color Format
: Auto
General
HDMI Deep Color
: Off
Support
Progressive Mode
: Auto
►
3
Videos
Photos
Music
Settings
Den Zugriff auf die Menüs, Untermenüs und
Optionen, entnehmen Sie bitte der nachfolgenden
Darstellung der Fernbedienung.
2.
4
2
5
App 1
No Disc
App 2
App 3
a Change Device
d View Devices
App 4
" Enter
1
Auswahl von Fotos.
2
Auswahl von Videos.
3
Auswahl von Musiktiteln.
4
Auswahl von Einstellungen.
5
Auswahl von Anwendungen.
6
Zeigt die Tasten an, die Sie auf der
Fernbedienung für den Zugriff auf Funktionen
verwenden können.
6
| HINWEIS |
Wenn nach Betätigung der Stopp Taste des Geräts
das Gerät länger als 5 Minuten nicht benutzt wird,
schaltet sich automatisch der Bildschirmschoner
ein. Wenn sich der Player länger als 20 Minuten im
Bildschirmschonermodu befindet, wird er automatisch
ausgeschaltet.
Im Einstellungen Menü verwendete
Fernbedienungstasten
SUBTITLE
HOME
REPEAT
1
TOOLS
INFO
RETURN
EXIT
3
2
4
TUNER
1
HOME Taste : Drücken, um den Home
Bildschirm aufzurufen.
Deutsch
HT-F4200_XU_GER_130206-1.indd 17
17 |
2013-02-13 오후 4:35:57
Einstellungen
2
RETURN Taste: Rückkehr zum vorherigen
Menü.
3
E (Enter) / RICHTUNGSTASTEN Taste :
• Mit Hilfe der ▲▼◄► Tasten den Cursor
bewegen oder eine Position auswählen.
• Drücken Sie die E Taste, um die
ausgewählte Position zu aktivieren oder um
eine Einstellung zu bestätigen.
4
EXIT Taste: Verlassen des Menüs.
BD Wise
| HINWEIS |
Die E Taste auf der Vorderseite des Geräts kann
für denselben Zweck verwendet werden, wie die E
Taste auf der Fernbedienung.
Auflösung
Ausführliche Funktionsinformationen
Jede Einstellungen Funktion, Menüposition und
individuelle Option wird ausführlich auf dem Bildschirm
erklärt. Um sich eine Erklärung anzeigen zu lassen,
verwenden Sie bitte die ▲▼◄► Tasten, um eine
Funktion, Menüposition oder Option auszuwählen.
Die Erklärung wird für gewöhnlich auf der rechten
Bildschirmseite angezeigt. Eine Kurzbeschreibung für jede
Einstellungen Funktion beginnt auf der nächsten Seite.
Zusätzliche Informationen über einige der Funktionen
befinden sich ebenfalls im Anhang dieser Anleitung.
Einstellungen Menü Funktionen
3D-Einstell.
TV-Format
Mit dieser Funktion kann die
Bildausgabe des Geräts an die
Bildschirmgröße Ihres Fernsehgeräts
angepasst werden. Siehe Seite 16 .
Mit dieser Funktion kann die
Auflösung des HDMI Videosignals
auf BD Wise, Auto, 1080p, 1080i,
720p, 576p/480p. eingestellt
werden. Die Zahl zeigt die Anzahl
der Zeilen des Videos pro Bild an.
Das i und das p stehen für interlace
scan (Zeilensprungverfahren) und
progressive scan (progressive
Abtastung). Je mehr Zeilen, desto
höher die Qualität.
FilmBildfrequenz
(24 fps)
Wenn diese Funktion auf
Auto eingestellt wird, wird die
HDMIAusgabe des Geräts für eine
bessere Bildqualität auf 24 Bilder pro
Sekunde eingestellt, wenn ein 24 fps
fähiges Fernsehgerät angeschlossen
ist.
• Voraussetzung für die Nutzung
der Film-Bildfrequenz Funktion
ist ein Fernsehgerät, das diese
Bildfrequenz unterstützt.
• Film-Bildfrequenz steht nur zur
Verfügung, wenn sich das Gerät
im Modus für die HDMI 1080i oder
1080p Ausgabeauflösung befindet.
HDMI
Farbformat
Hier kann das Farbraumformat
für die HDMI-Wiedergabe an die
Möglichkeiten des angeschlossenen
Geräts (Fernsehgerät, Bildschirm,
usw.) angepasst werden.
HDMI-Deep
Color
Mit dieser Option können Videos
über die HDMI OUT Buchse mit der
Deep Colour Farbtiefe wiedergeben
werden. Deep Color bietet genauere
Farbwiedergabe mit höherer
Farbentiefe.
Progressiver
Modus
Mit dieser Funktion kann die
Bildqualität bei der Wiedergabe von
DVDs verbessert werden.
Lautsprechereinst.
Sie können die folgenden
Lautsprechereinstellungen
vornehmen und zum Testen den
Testton ein- und ausschalten.
Anzeige
Einrichten der 3D Funktionen.
3D Blu-ray-Wiedergabemod.: 3D
Blu-ray Playback Mode (3D Bluray-Wiedergabemod.) Sie können
auswählen, ob eine Blu-ray Disk
mit 3D-Inhalten im 3D-Modus
wiedergeben soll. Wenn Sie zum
Home oder Smart Hub Home
Menü wechseln, während Sie
sich im 3D Modus befinden, wird
automatisch in den 2D Modus
umgeschaltet.
Bildgröße: Geben Sie die Größe
des an das Gerät angeschlossenen
Fernsehgeräts ein. Das Gerät
stellt die 3D Ausgabe automatisch
auf die Bildschirmgröße des
Fernsehgeräts ein.
Wenn Sie ein Samsung Gerät und
ein Samsung-Fernsehgerät mit BD
Wise Funktion über HDMI aneinander
anschließen und BD Wise auf beiden
Geräten aktiviert ist, gibt das Gerät
das Video mit der Videoauflösung
und der Bildfrequenz der BD/ DVDDisk wieder.
Audio
| 18 Deutsch
HT-F4200_XU_GER_130206-1.indd 18
2013-02-13 오후 4:36:01
DigitalAusgang
Dynamikumfangsteuerung
Downmixing
Modus
Mit dieser Einstellung können Sie
Methode zum Heruntermischen
von Mehrkanalton auswählen, die
mit Ihrem. Sie können wählen,
ob auf normales Stereo oder auf
Surround kompatibles Stereo
heruntergemischt werden soll.
Netzwerk
Einstell. für
kabelgeb.
Netzwerk
Für weitere Informationen über
die Netzwerkeinstellungen und
Netzwerkfunktionen siehe "Netzwerke
und das Internet" auf Seite 20.
Netzwerktest
Mit dieser Funktion können Sie
Konfiguration des Internetprotokolls
auf fehlerfreie Funktion prüfen.
Netzwerkstatus
Hier können Sie prüfen, ob eine
Verbindung zu einem Netzwerk und
zum Internet hergestellt wurde.
BD-Live
InternetVerbindung
Hier können Sie die
Internetverbindung für den BD-Live
Dienst erlauben oder untersagen.
System
Ersteinstellung
Mit dieser Funktion können Sie
die Ersteinstellungen erneut
konfigurieren. Siehe Seite 16 für
weitere Informationen.
Anynet+
(HDMI-CEC)
Bei Anynet+ handelt es sich um eine
nützliche Funktion, die den vernetzten
Betrieb mit anderen Samsung
Geräten zur Verfügung stellt, die über
die Anynet+ Funktion verfügen. Um
diese Funktion zu nutzen, müssen Sie
dieses Gerät mit Hilfe eines HDMIKabels an ein Samsung Fernsehgerät
mit Anynet+ Funktion anschließen.
BDDatenmanagment
Mit dieser Funktion können Sie Inhalte
verwalten, die Sie über eine Bluray Disk heruntergeladen haben, die
den BD-LIVE Dienst unterstützt. Sie
können die Informationen über das
von Ihnen verwendete USB-Gerät
oder die BD-Live Datenspeicherung
einschließlich des Speicherplatzes
anzeigen lassen. Sie können ebenfalls
BD-Live Daten löschen und das
Gerät ändern.
Deutsch
HT-F4200_XU_GER_130206-1.indd 19
Einstellungen
Audioausgabekanal
Audio-Sync
Wenn das Gerät an
einen Digitalfernsehgerät
angeschlossen ist, können Sie
die Audioverzögerung einstellen,
so dass die Audiowiedergabe mit
dem Videobild synchron ist. Die
Verzögerungszeit kann 0 und 300
Millisekunden eingestellt werden.
04
Lautsprecher
ausw.
Pegel: Sie können die relative
Lautstärke des Lautsprechers
zwischen +6 bis +6dB einstellen.
Wenn Sie zum Beispiel tiefe Bässe
mögen, können Sie die Lautstärke
des Subwoofers um 6dB erhöhen.
Entfernung: Sie können die relative
Entfernung von jedem Lautsprecher
zur Hörposition auf bis zu 10 m
einstellen. Je größer der Abstand,
desto lauter tönt der Lautsprecher.
Testton: Gibt einen Testton wieder,
sodass Sie die Einstellungen
testen können. Wenn Testton auf
Ein gestellt wird, wird der Testton
wiedergegeben. Bei Aus wird er
ausgeschaltet.
Hier können Sie einstellen, ob Sie die
Lautsprecher des Fernsehgeräts oder
die des Heimkinos aktivieren möchten.
Hier können Sie einstellen, den
Ton vom Fernsehgerät auf die
Lautsprecher des Heimkinos
umzuleiten. Für diese Funktion werden
eine HDMI-Verbindung und ein Audio
Return Channel (ARC) kompatibles
Fernsehgerät benötigt.
• Wann Audio Return Channel auf Ein
gestellt ist, muss ein HDMI-Kabel für
den Anschluss des Geräts an das
Fernsehgerät verwendet werden.
Der optische Eingang funktioniert
dann nicht.
• Wann Audio Return Channel auf Auto
gestellt ist, muss ein HDMI-Kabel für
den Anschluss des Geräts an das
Fernsehgerät verwendet werden.
ARC oder optischer Eingang werden
dann automatisch gewählt.
Mit dieser Funktion können Sie den
Digital-Ausgang an die Möglichkeiten
des an das Gerät angeschlossenen
AV-Receivers anpassen. Für weitere
Einzelheiten, schlagen Sie bitte in der
Auswahltabelle für den Digitalausgang
nach. (Siehe Seite 32.)
Mit dieser Funktion können Sie die
Dynamikumfangsteuerung auf Dolby
Digital, Dolby Digital Plus, und Dolby
TrueHD Audio anwenden.
Auto: Steuert automatisch den
Dynamikumfang von Dolby
TrueHD Audio auf Grundlage der
Informationen im Dolby TrueHD
Soundtrack. Schaltet ebenfalls die
Dynamikumfangsteuerung für Digital
und Dolby Digital Plus ein.
Aus: Der Dynamikumfang wird nicht
komprimiert und Sie hören den
Originalklang.
Ein: Schaltet die
Dynamikumfangsteuerung für alle
drei Dolby Formate ein. Leisere Töne
werden verstärkt und die Lautstärke
von lauten Tönen wird reduziert.
19 |
2013-02-13 오후 4:36:02
Einstellungen
DivX® Videos
auf Abruf
Anzeige von DivX® VODRegistrierungscodes, um DivX®
VOD-Inhalt zu erwerben und
wiedergeben.
Sprache
Sie können die Sprache auswählen in der das
Bildschirmmenü Menü, Disk Menü, usw. angezeigt
werden soll.
• Die Sprache, die Sie für das Diskmenü, Disk Audio
oder die Untertitel ausgewählt haben erscheint nur,
wenn sie von der Disk unterstützt wird.
Sicherheit
Die voreingestellte PIN lautet 0000. Geben Sei
die voreingestellte PIN für den Zugriff auf die
Sicherheitsfunktion ein, wenn Sie keine eigenes
Passwort erstellt haben.
BDSicherungsstufe
DVDSicherungsstufe
PIN ändern
Verhindert die Wiedergabe von
Bluray- Disks mit festgelegter
Altersbeschränkung, bis die PIN
eingegeben wurde.
Verhindert die Wiedergabe
von DVDs mit festgelegter
Altersbeschränkung, bis die PIN
eingegeben wurde.
Ändern der 4-stelligen PIN für den
Zugriff auf Sicherheitsfunktionen.
Netzwerke und das Internet
Wenn Sie dieses Gerät an ein Netzwerk anschließen,
können Sie auf dem Netzwerk basierende Anwendungen
und Funktionen, wie BD-LIVE verwenden sowie die
Software des Geräts aktualisieren.
Konfigurieren Ihrer Netzwerkverbindung
Setzen Sie sich zuerst mit Ihrem Internetanbieter in
Verbindung, um zu erfahren, ob Sie über eine statische
oder dynamische IP-Adresse verfügen. Wenn die Adresse
dynamisch zugewiesen wird, empfehlen wir die im
Folgenden beschriebene automatische Prozedur. Falls
die Adresse statisch zugewiesen wird müssen Sie die im
Anschluss aufgeführte Prozedur befolgen.
• Stellen Sie bevor Sie beginnen sicher, dass das
Gerät über ein Netzwerkkabel an ihren Router
angeschlossen ist.
Automatisch
Um mit dem Konfigurationsprozess zu befolgen, folgen
Sie diesen Schritten:
1.
Im Home Menü Einstell. auswählen und
anschließend die E Taste drücken.
2.
Wählen Sie Netzwerk und drücken Sie
anschließend die E Taste.
3.
Wählen Sie Kabelnetzwerk Einstellungen und
drücken Sie die E Taste. Der Kabelnetzwerk
Einstellungen Bildschirm erscheint.
4.
Drücken Sie die ► Taste im Internet Protokoll Setup
Menü. Mithilfe der ▲▼ Tasten Auto auswählen, und
anschließend die E Taste drücken.
Allgemein
Zeitzone
Sie können die ihrer Region
entsprechende Zeitzone auswählen.
Unterstützung
Softwareaktualisierung
Samsung
kontaktieren
Für weitere Informationen über
die Software Aktualisierung siehe
"Aktualisieren der Software" auf
Seite 21.
Settings
Network
IP Address
Hier erhalten Sie
Kontaktinformationen, wenn Sie
Hilfe für Ihr Gerät benötigen.
System
Subnet Mask
Audio
Rücksetzen
Internet Protocol Setup : Auto
: 0
0
0
0
: 0
0
0
0
Language Gateway
: 0
0
0
0
Security DNS
: Auto
0
0
0
General
: 0
DNS Server
Support
Zeigt die Haftungsausschlussklausel
Vertragsbedingungen bezüglich des Inhalts und der
Dienste Dritter an.
Mit Ausnahme der Netzwerkund Smart Hub Einstellungen
werden alle Einstellungen auf die
Voreinstellungen zurückgesetzt.
Die voreingestellte PIN lautet 0000.
Wired Network Settings
Display
> Move
" Select
' Return
5.
Die Netzwerk Funktion ruft die Werte für die IPAdresse, Subnetzmaske usw. ab und trägt diese
automatisch ein.
6.
Nachdem die Netzwerk Funktion die Netzwerkwerte
ermittelt hat, die RETURN (') Taste drücken.
7.
Wählen Sie Netzwerktest und drücken
Sie dann E. Das Heimkino registriert die
Netzwerkverbindung. Wenn dieser Punkt
abgeschlossen ist, die RETURN (') Taste drücken.
| 20 Deutsch
HT-F4200_XU_GER_130206-1.indd 20
2013-02-13 오후 4:36:03
Manuell
1.
4.
Wired Network Settings
Display
Audio
3.
Internet Protocol Setup : Manual
Network
IP Address
: 0
System
Subnet Mask
: 255 255 255
0
Language Gateway
: 0
Security DNS
: Manual
General
: 0
DNS Server
0
0
0
0
0
0
0
0
0
5.
Einstellungen
Settings
2.
Wählen Sie auf dem Home Bildschirm Einstell., und
drücken Sie die E Taste.
Wählen Sie Unterstützung, und drücken Sie die E
Taste.
Wählen Sie Softwareaktualisierung, und drücken
Sie die E Taste.
Wählen Sie eine der folgenden Methoden:
• Online
• Per USB
• Autom. Info über neue Softwareversion
Drücken Sie die E Taste. Anweisungen für jede
Methode finden Sie im Folgenden.
04
Wenn Sie über eine statische IP-Adresse verfügen oder
die automatische Einstellung nicht funktioniert, müssen
Sie die Netzwerkeinstellung manuell durchführen.
| HINWEIS |
Die Aktualisierung ist beendet, wenn sich das Gerät
Support
> Move
" Select
' Return
Folgen Sie den ersten vier Schritten der
Automatischen Prozedur, wählen Sie jedoch in
Schritt 4 Manuell anstelle von Auto.
2. Drücken Sie ▼ Pfeiltaste, um zum ersten
Eingabefeld zu gelangen (IP-Adresse).
3. Benutzen Sie die Nummerntasten auf Ihrer
Fernbedienung um die Nummern einzugeben.
4. Wenn sie mit dem jeweiligen Feld fertig sind,
verwenden Sie die ► Taste, um zum nächsten
Feld zu gelangen. Sie können auch die anderen
Pfeiltasten verwenden um nach oben, unten und
rückwärts zu wechseln.
5. Geben Sie die IP-Adresse, Subnetzmaske und
das Gateway ein.
6. Drücken Sie ▼, um zu DNS zu gelangen.
7. Betätigen Sie die ▼ Taste, um zum ersten DNS
Eingabefeld zu gehen. Geben Sie die Nummern wie
oben ein. Geben Sie die Nummern wie oben ein.
8. Drücken Sie auf der Fernbedienung die RETURN (')
Taste.
9. Wählen Sie Netzwerktest und drücken Sie dann
E. Nachdem der Test abgeschlossen ist die
RETURN (') Taste drücken, um zum vorherigen
Bildschirm zurückzukehren.
10. Wählen Sie Netzwerkstatus und drücken Sie dann
E.
11. Der Netzwerkstatus-Bildschirm erscheint. Das
Gerät überprüft die Netzwerkverbindung und stellt
anschließend eine Verbindung zum Netzwerk
her. Wenn dies erfolgt ist, OK markieren und
anschließend die E Taste drücken.
1.
Aktualisieren der Software
Mit diesem Menü können Sie Software-Updates
herunterladen, welche die Leistung des Geräts verbessern
oder zusätzliche Dienste zur Verfügung stellen.
• Das Gerät während des Aktualisierungsvorgangs
niemals manuell ein oder ausschalten.
nach dem Neustart abschaltet. Drücken Sie die Taste
POWER (EIN/AUS) um den aktualisierten Blu-ray
Disk-Player einzuschalten. Das Gerät während des
Aktualisierungsvorgangs niemals manuell ein- oder
ausschalten.
Samsung Electronics haftet nicht für Fehlfunktionen
des Geräts, die auf eine instabile Internetverbindung
oder fahrlässiges Handeln des Benutzers während der
Software-Aktualisierung zurückzuführen sind.
Wenn Sie das Upgrade während des Herunterladens
der Software abbrechen möchten, müssen Sie die E
Taste drücken.
Online
Ihr Gerät muss mit dem Internet verbunden sein, um die
Online Funktion nutzen zu können. Entfernen Sie bevor Sie
starten alle Disks aus dem Gerät.
1. Wählen Sie Online, und drücken Sie die E Taste.
Die Mitteilung über den Verbindungsaufbau mit dem
Server erscheint.
2. Wenn eine Aktualisierung verfügbar ist, erscheint
eine Popup-Meldung mit der Frage, ob Sie die
Aktualisierung durchführen wollen. Wenn Sie Ja
auswählen, schaltet sich das Gerät automatisch aus
und wieder ein und beginnt mit der Aktualisierung.
| WICHTIG |
Schalten Sie das Heimkino während einer Aktualisierung
niemals selbst ein oder aus.
3. Ein Popup wird erscheinen und Sie über den
Fortschritt informieren. Wenn die Aktualisierung
abgeschlossen ist, schaltet sich das Gerät erneut
automatisch ab.
4. Drücken Sie die POWER Taste, um den Blu-ray DiskPlayer einzuschalten.
| HINWEIS |
Die Aktualisierung ist beendet, wenn sich das Gerät
nach dem Neustart abschaltet. Drücken Sie die Taste
POWER um den aktualisierten Blu-ray Disk-Player
einzuschalten.
Den Player während des Aktualisierungsvorgangs
niemals manuell ein oder aus schalten.
Samsung Electronics haftet nicht für Fehlfunktionen
des Geräts, die auf eine instabile Internetverbindung
oder fahrlässiges Handeln des Benutzers während der
Software-Aktualisierung zurückzuführen sind.
Deutsch
HT-F4200_XU_GER_130206-1.indd 21
21 |
2013-02-13 오후 4:36:04
Einstellungen
PER USB
1.
2.
3.
4.
5.
6.
7.
8.
9.
10.
11.
12.
13.
Besuchen Sie die Webseite www.samsung.com.
Klicken Sie am oberen Rand der Seite auf
SUPPORT.
Geben Sie die Modellnummer in das Suchfeld
ein. Während der Eingabe der Modellnummer
erscheint eine Klappliste mit den Geräten, die der
Modellnummer entsprechen.
Klicken Sie in der Klappliste mit der linken Maustaste
auf die Modellnummer Ihres Geräts.
Scrollen Sie auf der aufgerufenen Seite nach unten
und klicken Sie auf Firmware Handbücher &
Downloads.
Klicken Sie in der Mitte auf der Seite auf Firmware.
Klicken Sie in der Spalte Datei auf der rechten Seite
auf das ZIP Symbol.
Klicken Send in der ersten Pop-Up erscheint. Klicken
Sie in dem angezeigten Popup-Fenster auf OK, um
die Firmware herunterzuladen und auf Ihrem PC zu
speichern.
Entpacken Sie das Zip-Archiv auf Ihrem Computer.
Sie sollten einen eigenen Ordner mit dem gleichen
Namen wie die Zip-Datei anlegen.
Den Ordner auf ein USB-Flash-Laufwerk kopieren.
Stellen Sie sicher, dass sich keine Disk im Gerät
befindet und stecken Sie das USB-Flash-Laufwerk in
den USB-Anschluss des Geräts.
Im Menü des Geräts nach Einstell. > Unterstützung
> Software-Update wechseln.
Wählen Sie PER USB.
| HINWEIS |
Es darf keine Disk im Gerät eingelegt sein, wenn die
Software über den USB-Anschluss aktualisiert wird.
Den Player während des Aktualisierungsvorgangs
niemals manuell ein oder aus schalten.
Überprüfen Sie nach Abschluss der Aktualisierung im
Menü Software Update die Software Details.
Autom. Info über neue Softwareversion
Wenn Ihr Gerät ein Netzwerk angeschlossen ist und die
Auto Upgrade Benachrichtigung auf Ein einstellen, teilt
Ihnen das Gerät über eine Popup-Meldung mit, dass eine
neue Softwareversion verfügbar ist.
1. Schalten Sie das Gerät ein.
2. Stellen Sie im Software-Update Menü Auto Upgrade
Benachrichtigung auf Ein ein. Das Gerät wird Sie
über mögliche neue Softwareversionen mittels einer
Pop-up-Nachricht informieren.
3. Um die Firmware zu aktualisieren, Ja auswählen.
Das Gerät schaltet sich automatisch aus, wird wieder
gestartet und beginnt dann mit der Aktualisierung.
4. Das Popup mit dem Aktualisierungsfortschritt
wird eingeblendet. Wenn die Aktualisierung
abgeschlossen ist, schaltet sich das Gerät erneut
automatisch ab.
5. Drücken Sie die POWER Taste, um das Gerät
einzuschalten.
| HINWEIS |
Die Aktualisierung ist beendet, wenn sich das Gerät
nach dem Neustart abschaltet. Drücken Sie die
Taste POWER um den aktualisierten Blu-ray DiskPlayer einzuschalten. Das Gerät während des
Aktualisierungsvorgangs niemals manuell ein- oder
ausschalten.
Samsung Electronics übernimmt keine Haftung für
Fehlfunktionen, die durch instabile Internetverbindung
oder fahrlässiges Verhalten des Benutzers während der
Softwareaktualisierung verursacht werden.
DLNA einrichten
DLNA ermöglicht die Wiedergabe von Musik, Videos und
Fotodateien auf Ihrem Gerät. Um DLNA zu verwenden,
müssen Sie eine Verbindung zum PC über das Netzwerk
erstellen (siehe Seiten 14) und den SAMSUNG PC-ShareManager auf dem PC installieren.
Herunterladen der DLNA Software
Um DLNA auf Ihrem PC zu können, müssen Sie die
DLNA Software auf Ihrem PC installieren. Sie können die
PC Software herunterladen und erhalten ausführliche
Anweisungen für die Nutzung von DLNA auf der Webseite
www.samsung.com.
1. Besuchen Sie www.samsung.com.
2. Klicken Sie am oberen Rand der Seite auf SUPPORT.
3. Geben Sie die Modellnummer in das Suchfeld
ein. Während der Eingabe der Modellnummer
erscheint eine Klappliste mit den Geräten, die der
Modellnummer entsprechen.
4. Klicken Sie in der Klappliste mit der linken Maustaste
auf die Modellnummer Ihres Geräts.
5. Scrollen Sie auf der aufgerufenen Seite nach unten
und klicken Sie auf Firmware Handbücher &
Downloads.
6. Klicken Sie auf die Registerkarte Software.
7. Klicken Sie in der Software Karteikarte auf das EXESymbol auf der rechten Seite der DLNA Zeile.
8. Klicken Sie in dem ersten angezeigten PopupFenster auf Senden. In dem zweiten Popup-Fenster
auf Datei speichern klicken.
9. Wechseln Sie in das Downloadverzeichnis mit der
heruntergeladenen Datei und doppelklicken Sie auf
die Datei.
10. In dem angezeigten Popup-Fenster auf Ausführen
klicken. Folgen Sie den Anweisungen auf Ihrem
Bildschirm.
Laden Sie die DLNA Installations-/Bedienungsanleitung
aus dem gleichen Software Tab durch Anklicken des
entsprechenden PDF-Datei Symbols in der Datei Spalte
auf der rechten Seite herunter. Die PDF-Datei wird
heruntergeladen und geöffnet. Sie können die Datei
anzeigen und/oder speichern.
| HINWEIS |
Um DLNA auf Ihrem Smartphone verwenden zu
können, müssen Sie Ihr Heimkino und das Smartphone
mit dem gleichen Router verbinden.
| 22 Deutsch
HT-F4200_XU_GER_130206-1.indd 22
2013-02-13 오후 4:36:05
Media Play
Wiedergabe von Dateien auf
einem USB-Gerät
Photos
Music
Settings
Media Play
Videos
05
Sie können Multimedia Dateien von einem
angeschlossenen USB-Gerät wiedergeben.
1. Wechseln Sie in das Home Menü.
2. Schließen Sie im Stoppmodus das USB-Gerät
an den USB-Anschluss auf der Vorderseite des
Geräts an. Die Meldung „Möchten Sie das Gerät
ändern?" wird angezeigt.
3. Wählen Sie mit den ◄► Tasten die Option Ja, und
drücken Sie die E Taste.
4. Drücken Sie die ROTE (A) Taste.
6-1. Wählen Sie mit den ▲▼ Tasten die Videos,
Musiktitel oder Fotos aus, und drücken Sie
anschließend die E Taste.
-1
7 . Wenn die Dateien auf dem Bildschirm erscheinen, mit
Schritt 8-1 fortfahren. Wenn die Dateiordner auf dem
Bildschirm erscheinen, mithilfe der ▲▼◄► Tasten
eine Ordner auswählen, die E Taste drücken und
dann mit Schritt 8-1 fortfahren.
8-1. Verwenden Sie die ▲▼◄► Tasten, um eine Datei
für die Wiedergabe oder Anzeige auszuwählen und
drücken Sie die E Taste.
| HINWEIS |
Die Wiedergabe von 3D Dateien wird nicht unterstützt.
Um eine eventuelle Beschädigung des USB-Speichers
zu vermeiden, müssen Sie das USB-Speichergerät
mit Hilfe der Funktion “USB sicher entfernen” sicher
entfernen. Drücken Sie die HOME Taste, um zum
Home Menü zu wechseln und wählen Sie anschließend
die GELBE (C) und danach die E Taste.
Wiedergabe von selbst
aufgenommenen Disks
CD
USB Flash Disk
App 2
App 3
a Change Device
CD
App 4
d View Devices
" Enter
Drücken Sie die ▲▼ Tasten, um das USBSpeichergerät oder die Disk auszuwählen und
drücken Sie anschließend die E Taste.
6. Drücken Sie die ▲▼◄► Taste, um die
gewünschten Videos, Musikstücke oder Fotos
auszuwählen, und drücken Sie dann die E Taste.
7. Wenn die Dateien auf dem Bildschirm erscheinen,
mit Schritt 8 fortfahren. Wenn die Dateiordner auf
dem Bildschirm erscheinen, mithilfe der ▲▼◄►
Tasten eine Ordner auswählen, die E Taste
drücken und dann mit Schritt 8 fortfahren.
8. Verwenden Sie die ▲▼◄► Tasten, um eine Datei
für die Wiedergabe oder Anzeige auszuwählen und
drücken Sie die E Taste.
ODER
(
) ((D).
)
4-1. Drücken Sie die Taste BLUE (BLAU)
5.
CD
App 1
USB Flash Disk
App 2
USB Flash Disk
Settings
App 3
App 4
d Home
" Enter
5-1. Drücken Sie die ◄► Tasten, um das USBSpeichergerät oder die Disk auszuwählen und
drücken Sie anschließend die E Taste.
Sie können Multimedia Dateien wiedergeben, die Sie auf
DVDs oder CDs aufgenommen haben.
1. Schalten Sie das Heimkino ein.
2. Offen Sie das Diskfach, legen Sie eine selbst
aufgenommene Disk mit der Aufschrift nach oben in
das Diskfach ein und schließen Sie das Fach.
3. Nachdem die Disk geladen wurde, die ROTE (A)
Taste drücken.
4. Wählen Sie mit den Tasten ▲▼◄► CD oder DVD
aus und drücken Sie dann die E Taste.
5. Drücken Sie die ▲▼ Taste, um die gewünschten
Videos, Fotos oder Musik auszuwählen, und
drücken Sie dann die E Taste.
6. Wenn die Dateien auf dem Bildschirm erscheinen, mit
Schritt 7 fortfahren. Wenn die Dateiordner auf dem
Bildschirm erscheinen, mithilfe der ▲▼◄► Tasten
eine Ordner auswählen, die E Taste drücken und
dann mit Schritt 7 fortfahren.
7. Verwenden Sie die ▲▼◄► Tasten, um eine Datei
für die Wiedergabe oder Anzeige auszuwählen und
drücken Sie die E Taste.
ODER
3-1. Nachdem die Disk geladen wurde, die BLAUE (D)
Taste drücken.
4-1. Wählen Sie mit den Tasten ◄► CD oder DVD aus
und drücken Sie dann die E Taste.
5-1. Wählen Sie mit den ▲▼ Tasten die Videos, Fotos
oder Musik aus, und drücken Sie anschließend die
E Taste.
6-1. Wenn die Dateien auf dem Bildschirm erscheinen, mit
Schritt 7-1 fortfahren. Wenn die Dateiordner auf dem
Bildschirm erscheinen, mithilfe der ▲▼◄► Tasten
eine Ordner auswählen, die E Taste drücken und
dann mit Schritt 7-1 fortfahren.
7-1. Verwenden Sie die ▲▼◄► Tasten, um eine Datei
für die Wiedergabe oder Anzeige auszuwählen und
drücken Sie die E Taste.
Deutsch
HT-F4200_XU_GER_130206-1.indd 23
23 |
2013-02-13 오후 4:36:07
Media Play
Wiedergabe von kommerziellen
Video Disks
Legen Sie eine Disk mit dem Aufdruck nach oben zeigend
in die Disk-Lade ein und schließen Sie die Disk-Lade. Die
Wiedergabe beginnt automatisch. Wenn die Wiedergabe
nicht automatisch startet, wechseln Sie zu Videos im
Home Menü und drücken Sie die E Taste. In den
meisten Fällen zeigen kommerzielle Disks ein Menü an. Um
den Film auf der Disk wiederzugeben Play im Diskmenü
auswählen und dann die E Taste drücken.
2
| HINWEIS |
Für weitere Informationen über die Videowiedergabe
gehen Sie bitte zu "Steuern der Videowiedergabe" auf
dieser Seite.
Steuern der Videowiedergabe
Sie können die Wiedergabe von Videodateien auf Blu-rayDisks, DVDs, CDs oder USB-Geräten steuern. Je nach
Disk können einige in dieser Anleitung beschriebenen
Funktionen nicht zur Verfügung stehen.
Tasten auf der Fernbedienung für die
Videowiedergabe
TITLE MENU
DISC MENU
0
POPUP
2
1
SUBTITLE
1
HOME
REPEAT
Tasten für die Wiedergabe
Während der Suche, Zeitlupen- oder
Einzelbildwiedergabe wird der Ton nicht
wiedergegeben.
• 6 : Beginnt die Wiedergabe.
• 5 : Beendet die Wiedergabe.
• 7 : Zum Anhalten der Wiedergabe.
• Beschleunigte Wiedergabe : Drücken Sie
während der Wiedergabe die 3 oder . Jedes
Mal, wenn Sie die 3 oder Taste drücken,
ändert sich die Wiedergabegeschwindigkeit.
• Wiedergabe in Zeitlupe: Drücken Sie im
Pause-Modus die Taste. Jedes Mal, wenn
Sie die Taste drücken, ändert sich die
Wiedergabegeschwindigkeit.
• Einzelbildwiedergabe : Drücken Sie im PauseModus die 7 Taste. Jedes Mal, wenn Sie
die 7 Taste drücken, wird ein neues Bild
angezeigt.
• Springen : Drücken Sie während der
Wiedergabe die 1 oder 2 Taste. Jedesmal,
wenn Sie die 1 oder 2 Taste drücken, wird
zum nächsten oder vorherigen Kapitel, bzw.
Datei gesprungen.
Bedienen des Disk Menüs, Titel Menüs, Popup
Menüs und der Titelliste
• DISC MENU : Während der Wiedergabe diese
Taste drücken, um das Disk Menü aufzurufen.
• TITLE MENU : Während der Wiedergabe diese
Taste drücken, um das Titel Menü aufzurufen.
- Wenn Ihre Disk über eine Playlist-Funktion
verfügt, drücken Sie die GRÜNE (B) Taste,
um zur Wiedergabeliste zu gelangen.
• POPUP MENU : Während der Wiedergabe
diese Taste drücken, um das Pop-up Menü
aufzurufen.
• DISC MENU oder TITLE MENU : Während
der Wiedergabe diese Taste drücken, um die
Titelliste aufzurufen.
EXTRAS Menü verwenden
Drücken Sie während der Wiedergabe die TOOLS Taste.
Wenn der Film oder das Video über
als einen Titel verfügt, gehen Sie zu
dem gewünschten Titel und wählen
Sie ihn aus.
Wählen Sie diese Option, um zu
der bestimmten Wiedergabestelle
Wiedergabezeit zu springen. Verwenden Sie
die Nummerntasten, um den
Wiedergabepunkt einzugeben.
Mit dieser Option können Sie einen
bestimmten Titel, ein Kapitel (nur bei
Modus wiederh.
BDs/DVDs) oder markierten Abschnitt
wiederholen.
Wählen Sie diese Einstellung, um den
Bildmodus einzustellen.
Benutzer: Sie können die Helligkeit,
Schärfe unsw. einstellen.
Dynamisch: Wählen Sie diese
Einstellung, um die Schärfe zu
Bildeinstellungen
erhöhen.
Standard : Wählen Sie diese
Einstellung für die meisten
Programme.
Filme: Dies ist die beste Einstellung
zum Ansehen von Filmen.
Können Sie die Audioverzögerung
einstellen, so dass die
Audiowiedergabe mit dem Videobild
Audio-Sync
synchron ist. Die Verzögerungszeit
kann 0 und 300 Millisekunden
eingestellt werden.
Titel
Das Menü wird nur angezeigt, wenn eine
BD/DVD wiedergegeben wird
Kapitel
Audio
Wählen Sie diese Option, um zu dem
Kapitel zu springen, dass Sie sich
ansehen möchten.
Wählen Sie diese Option, um
die gewünschte Audiosprache
einzustellen.
| 24 Deutsch
HT-F4200_XU_GER_130206-1.indd 24
2013-02-13 오후 4:36:11
Untertitel
SelecWählen Sie diese Option,
um den gewünschten Bonusview
auszuwählen.
Das Menü wird nur angezeigt, wenn eine
Information
Für weitere Informationen über die Musikwiedergabe,
gehen Sie zu "Steuern der Musikwiedergabe" auf
dieser Seite.
Steuern der Musikwiedergabe
Sie können die Wiedergabe von Musikinhalten auf DVDs,
CDs oder USB-Geräten steuern.
Tasten auf der Fernbedienung für die
Wiedergabe
Datei wiedergegeben wird.
Vollbild
| HINWEIS |
Wählen Sie diese Option, um den
Vollbildmodus einzustellen. Sie können
zwischen Original, Modus1 (größer),
und Modus2 (am größten) wählen.
Prüft die Informationen der Videodatei.
RDS DISPLAY
1
TA
1
2
3
PTY -
PTY SEARCH
PTY +
4
5
6
7
8
| HINWEIS |
Abhängig von der Disk oder dem Speichergerät kann
das Extras Menü abweichen. Eventuell werden nicht
alle Optionen angezeigt.
Eine Video Wiedergabeliste erstellen
Sie können eine Wiedergabeliste von Videodateien
auf ähnliche Weise wie für Musiktitel erstellen. Für
weitere Anweisungen siehe "Erstellen einer Musik
Wiedergabeliste" auf Seite 26.
Wiedergabe von kommerziellen
Audio Disks
Legen Sie eine Audio-CD (CD-DA) oder eine MP3Disk in das Diskfach ein.
• Von einer Audio-CD (CD-DA) wird der erste Titel
automatisch abgespielt. Die Titel werden in der
Reihenfolge abgespielt, in der sie auf der Disk
gespeichert wurden.
• Bei einer MP3-Disk mit den ▲▼ Tasten die
Musiktitel auswählen und dann die E Taste
drücken.
Playlist
TRACK 001
TRACK 001
TRACK 002
04:07
TRACK 004
00:08 / 05:57
3
S
5
6
O
1
Tasten NUMMERNTASTE : Drücken Sie
während der Wiedergabe der Wiedergabeliste die
gewünschte Titelnummer. Das ausgewählte Video
wird wiedergegeben.
2
Überspringen : Während der Wiedergabe die
Taste 1 oder 2 drücken, um zu vorherige
oder nächste Seite der Wiedergabeliste zu
wechseln.
3
5 Taste : Stoppt die Wiedergabe eines
Musiktitels.
4
Schnelle Wiedergabe (nur bei Audio CDs
(CD-DA)) :
Drücken Sie während der Wiedergabe die
3 oder Taste. Jedes Mal, wenn Sie die
3 oder Taste drücken, ändert sich die
Wiedergabegeschwindigkeit.
5
7 Taste : Unterbrechen eines Titels.
6
6 Taste : Wiedergabe des ausgewählten
Musiktitels.
03:17
TRACK 006
" Pause
4
03:41
TRACK 005
CD
POPUP
2
04:27
TRACK 003
+
0
1/12
05:57
9
TITLE MENU
DISC MENU
1.
03:35
Tools
' Return
Deutsch
HT-F4200_XU_GER_130206-1.indd 25
Media Play
BONUSVIEW
Video /
BONUSVIEW
Audio
Um einen bestimmten Titel wiederzugeben, die ▲▼
Tasten auf der Fernbedienung verwenden, um den
Titel auszuwählen und die E Taste drücken.
2.
05
Winkel
Wählen Sie diese Option, um die
gewünschte Untertitelsprache
einzustellen.
Wählen Sie diese Option, um
eine Szene unter einem anderen
Blickwinkel aus zu betrachten. Die
Winkel Option zeigt die Anzahl der
verfügbaren Blickwinkel an (1/1, 1/2,
1/3 usw.).
25 |
2013-02-13 오후 4:36:12
Media Play
Wiederholen von Titeln auf einer Audio
CD
Sie können die Wiedergabe von Fotos auf DVDs, CDs
oder USB-Speichergeräten steuern.
Sie können eine Titelwiederholung einstellen.
1.
Drücken Sie während der Wiedergabe des
Musiktitels die TOOLS Taste.
2.
Mithilfe der ◄► Tasten Aus, Track oder Eina,
Alle oder Zufallswiederg. im Wiederholmod.
auswählen und dann die E Taste drücken.
Eine Musik Wiedergabeliste erstellen
1.
2.
Wenn Sie Musiktitel von einer kommerziellen CD
oder DVD wiedergeben, die 5 oder RETURN
(') Taste drücken. Die Musikliste wird angezeigt.
Wenn Sie eine Wiedergabeliste mit Titeln auf einer
selbst aufgenommenen Disk oder einem USB-Gerät
erstellen, die Musikliste wie unter "Wiedergabe von
Dateien auf einem USB-Gerät" auf Seite 23 oder
"Wiedergabe von selbst aufgenommenen Disks" auf
Seite 23 beschrieben öffnen.
Drücken Sie die ▲▼◄► Tasten, um eine
gewünschte Datei auszuwählen, und drücken
Sie dann auf die Taste GELBE (C) Taste, um sie
auszuwählen. Wiederholen Sie den Vorgang, um
weitere Dateien auszuwählen.
Music
TRACK 002
TRACK 002
05:57
04:27
TRACK 003
TRACK 004
04:07
03:41
TRACK 005
TRACK 006
03:17
03:35
TRACK 007
TRACK 008
03:47
03:49
TRACK 009
TRACK 010
CD
3.
Extras Menü verwenden
Drücken Sie während der Wiedergabe die TOOLS Taste.
Diashow
starten/
anhalten
Startet oder beendet die Diashow.
DiashowGeschw.
Wählen Sie diese Option, um die
Geschwindigkeit der Diashow
einzustellen.
Hintergrundmusik
Wählen Sie diese Option, um während
der Diashow Musik zu hören.
Zoom
Vergrößert das aktuelle Bild.
(bis zu vierfache Vergrößerung.)
Drehen
Dreht das Bild. (Das Bild wird entweder
im Uhrzeigersinn oder gegen den
Uhrzeigersinn gedreht.)
Information
Zeigt die Bildinformation an, inklusive
Name und Größe, usw.
2 files selected 1/2 Page
TRACK 001
03:53
Steuern der Fotowiedergabe
| HINWEIS |
Abhängig von der Disk oder dem Speichergerät kann
03:45
Select Jump page
' Return
Um eine Datei aus der Wiedergabeliste zu
entfernen, zu der Datei gehen und die GELBE (C)
Taste drücken.
4.
Drücken Sie die E Taste, um die ausgewählten
Dateien wiederzugeben. Der Wiedergabeliste
Bildschirm wird angezeigt.
5.
Um zur Musikliste zu gelangen, die 5 oder
RETURN (') Taste drücken.
6.
Um zur Musikliste zurückzukehren, die E Taste
drücken.
das Extras Menü abweichen. Eventuell werden nicht
alle Optionen angezeigt.
Um die Hintergrundmusik Funktion aktivieren zu
können, muss sich die Bilddatei im gleichen Ordner
befinden, wie die Musikdatei. Die Audioqualität kann
durch die Bitrate der MP3-Datei, die Bildgröße und die
Kodierungsmethode beeinträchtigt werden.
Eine Foto Wiedergabeliste erstellen
Sie können eine Wiedergabeliste von Fotos auf
ähnliche Weise wie für Musiktitel erstellen. Für
weitere Anweisungen siehe "Erstellen einer Musik
Wiedergabeliste" auf dieser Seite.
| HINWEIS |
Sie können auf Audio CDs (CD-DA) eine
Wiedergabeliste mit maximal 99 Titeln erstellen.
Wenn Sie von der Wiedergabeliste zur Musikliste
wechseln und wieder zur Wiedergabeliste
zurückkehren, wir die Wiedergabeliste vom Anfang
wiedergegeben.
| 26 Deutsch
HT-F4200_XU_GER_130206-1.indd 26
2013-02-13 오후 4:36:14
Radio hören
Wählen Sie mit der Taste FUNCTION die Option
FM aus.
2.
Stellen Sie den gewünschten Sender ein.
• Gespeicherter Sender 1 : Drücken Sie die
5 Taste, um PRESET auszuwählen und
anschließend die TUNING UP, DOWN Taste, um
den voreingestellten Sender auszuwählen.
- Bevor Sie voreingestellte Sender aufrufen
können, müssen Sie die Sender im Gerät
abspeichern.
• Manuelle Sendersuche : Drücken Sie die
5 Taste, um MANUAL auszuwählen und
anschließend die TUNING UP, DOWN Taste,
um einen auf einer höheren oder niedrigeren
Frequenz ausgestrahlten Sender auszuwählen.
• Automatische Sendersuche : Drücken Sie die
5 Taste, um MANUAL auszuwählen und
anschließend die TUNING UP, DOWN Taste, um
das Frequenzband automatisch zu durchsuchen.
Einstellen des Mono/Stereo-Modus
Drücken die MO/ST Taste.
• Durch Drücken diese Taste wird zwischen STEREO
und MONO umgeschaltet.
• Stellen Sie an Orten mit schwachem Empfang MONO
ein, um einen rauschfreien Empfang zu erhalten.
Sender voreinstellen
Beispiel : Speichern des Senders FM 89.10.
1.
Wählen Sie mit der Taste FUNCTION die Option
FM aus.
2.
Drücken Sie die TUNING UP, DOWN Taste, um
<89.10> auszuwählen.
3.
Drücken Sie die TUNER MEMORY Taste.
• Auf dem Display leuchte NUMBER auf.
Drücken Sie die TUNER MEMORY Taste erneut.
• Drücken Sie die TUNER MEMORY Taste bevor
NUMBER auf der Anzeige ausgeblendet wird.
• Nachdem Sie die TUNER MEMORY Taste
gedrückt haben, wird NUMBER auf dem
Bildschirm ausgeblendet und der Sender ist im
Speicher gespeichert.
4.
5.
Zur Voreinstellung eines anderen Senders
wiederholen Sie bitte Schritte 2 bis 4.
• Um einen gespeicherten Sender einzustellen,
müssen Sie die TUNING UP, DOWN Taste
drücken.
für den Empfang von UKW-Sendern.
RDS ermöglicht es Radiostationen ein zusätzliches Signal
neben den regulären Programmsignalen zu senden.
Dazu gehören beispielsweise Informationen über den
Sendernamen oder die Art des Radioprogramms, wie etwa
Sport oder Musik usw.
Wenn Sie eine Radiostation mit RDS-Dienst gewählt
haben, erscheint das RDS-Symbol auf der Anzeige.
Beschreibung der RDS-Funktion
• PTY (Program Type) : Zeigt den Programmtyp an, der
gerade wiedergegeben wird.
• PS NAME (Program Service
Name(Programmdienstname)) : Zeigt den Namen der
Radiostation an und besteht aus 8 Zeichen.
• RT (Radio Text) : Dekodiert die vom Sender
übertragenen Texte (wenn vorhanden) und besteht aus
maximal 64 Zeichen.
• CT (Clock Time (Uhrzeit)): Dekodiert die Echtzeit aus
der Radiofrequenz. Einige Radiostationen übertragen
eventuelle keine PTY, RT oder CT Informationen.
Deswegen können diese Informationen nicht immer
angezeigt werden.
• TA (Traffic Announcement (Verkehrsdurchsage)): TA ON/
OFF zeigt an, dass die Verkehrsdurchsage gerade läuft.
| HINWEIS |
RDS funktioniert möglicherweise nicht richtig, wenn die
gewählte Station RDS-Signale nicht korrekt übermittelt
oder das Signal schwach ist.
Anzeigen der RDS-Signale
Sie können die von der Station gesendeten RDSSignale
auf dem Display ablesen.
Betätigen Sie die RDS DISPLAY Taste, während sie eine
Radiostation hören.
• Jedes Mal, wenn Sie diese Taste drücken, ändert
sich die auf der Anzeige angezeigte Informationen
in folgender Reihenfolge : PS NAME RT CT Frequenz
Während des Suchvorgangs,
PS
erscheint <PS NAME> und danach
(Program Service werden die Sendernamen angezeigt.
(Programmdienst)) <NO PS> erscheint, wenn kein Signal
gesendet wird.
RT
(RadioText)
Während des Suchvorgangs
erscheint <RT> und anschließend
werden die von der Radiostation
gesendeten Mitteilungen angezeigt.
<NO RT> erscheint wenn kein Signal
gesendet wird.
Frequenz
Senderfrequenz (kein-RDS-Service)
Deutsch
HT-F4200_XU_GER_130206-1.indd 27
Media Play
1.
Verwenden von RDS (Radio Data System)
05
Verwenden der Tasten auf der Fernbedienung
Über RDS-Sender
27 |
2013-02-13 오후 4:36:16
Media Play
Über auf dem Bildschirm angezeigte Zeichen
Wenn auf der Anzeige PS-, oder RT-Signale angezeigt
werden, werden die folgenden Zeichen verwendet.
• Die Anzeige unterscheidet nicht zwischen
Großund Kleinbuchstaben. Es werden immer nur
Großbuchstaben verwendet.
• Die Anzeige kann keine akzentuierten Buchstaben
anzeigen. <A,> kann beispielsweise für akzentuierte
<A’s> wie <À, Â, Ä, Á, Å und Ã.> stehen.
PTY (Program-Typ) Anzeige und
PTY-SUCH-Funktion
Einer der Vorteile des RDS-Service ist dass Sie eine
besondere Art vom Programm von der vor eingestellten
Kanälen durch das Angeben der PTY-Codes ausfindig
machen können.
Programmsuche mithilfe der PTY-Codes
Bevor Sie beginnen!
• Die PTY-Suche steht nur für gespeicherte Stationen zur
Verfügung.
• Um den Suchvorgang vorzeitig abzubrechen, während
der Suche die 5 Taste drücken.
• Es existiert eine Zeitbegrenzung für die folgenden
Schritte. Wenn die Einstellung vor ihrer Beendigung
abgebrochen wird, starten Sie nochmals mit Schritt 1.
• Wenn Sie die Tasten auf der Hauptfernbedienung
drücken, vergewissern Sie sich, dass Sie die UKWSender mit Hilfe der Hauptfernbedienung ausgewählt
haben.
+
RDS DISPLAY
TA
1
2
3
PTY -
PTY SEARCH
PTY +
4
5
6
1.
Wählen Sie während Sie einen UKW-Sender hören
die PTY SEARCH aus.
2.
Drücken Sie die PTY- oder PTY+ Taste, bis
der gewünschte PTY-Code auf dem Bildschirm
angezeigt wird.
• Die beschriebenen PTY-Codes werden auf der
rechten Seite der Anzeige angezeigt.
3.
Drücken Sie die Taste PTY SEARCH erneut,
während der gewünschte PTY-Code noch auf dem
Bildschirm angezeigt wird.
• Das Gerät durchsucht die 15 voreingestellten
UKW-Sender und hält an, wenn der ausgewählte
Sender gefunden wird und stellt ihn ein.
Verwenden dem TV Sound-Taste
auf der Fernbedienung
TV SOUND
TV Sound
Mit der TV SOUND Taste können Sie den Ton über
die Heimkinolautsprecher oder die TV-Lautsprecher
wiedergeben.
1. Schließen Sie das HDMI-Kabel an das Fernsehgerät
und das Heimkino an. (Siehe Seite 15)
2. Stellen Sie am angeschlossenen Heimkino und am
Fernsehgerät Anynet+ (HDMI-CEC) auf Ein ein
3. Drücken Sie die TV SOUND taste auf der
fernbedienung.
4. Jedes Mal, wenn Sie die TV SOUND Taste drücken,
erscheint kurz TV SOUND ON/OFF auf der Anzeige
auf der Gerätevorderseite und wechselt dann auf
D.IN.
- TV SOUND EIN : Klangwiedergabe über die
Heimkinolautsprecher
- TV SOUND AUS : Klangwiedergabe über
die über Anynet+ angeschlossenen TVLautsprecher.
Verwenden wenn:
1) Sie den Klang über die Heimkinolautsprecher
wiedergeben möchten während Sie Fernsehen
schauen.
2) Sie den Klang des an das Fernsehgerät
angeschlossene USB-Gerät über die
Heimkinolautsprecher wiedergeben möchten
Informationen über die Unterstützung von TV
SOUND ON/OFF
Angeschlossenes
Fernsehgerät
Fernsehgerät
mit Anynet+
(HDMI-CEC)
Unterstützung
Fernsehgerät
ohne Anynet+
(HDMI-CEC)
Unterstützung
Anynet+
(HDMI-CEC)
Einstellung
TV
Sound
EIN
TV
Sound
AUS
EIN
O
O
AUS
O
X
Betrieb nicht
möglich
O
X
| 28 Deutsch
HT-F4200_XU_GER_130206-1.indd 28
2013-02-13 오후 4:36:17
Netzwerkdienste
BD-LIVE™
2.
Die Netzwerkeinstellungen konfigurieren.
(Siehe Seiten 20 - 21)
Sobald das Gerät mit dem Netzwerk verbunden ist,
können sie verschiedene filmbezogene Serviceinhalte,
unter Benutzung einer BD-Live konformen Disk, genießen.
1.
Schließen Sie einen USB Speicherstick an die
USB-Buchse auf der Vorderseite des Geräts an
und prüfen Sie den zur Verfügung stehenden
Speicherplatz. Das Speichergerät muss zumindest
1 GB freien Speicherplatz für die BD-LIVE-Service
haben.
Mit DLNA können Sie auf Dateien zugreifen, die sich
auf Ihrem PC befinden und diese über Ihr Heimkino
wiedergeben.
Folgen Sie den Anweisungen in der DLNA
Bedienungsanleitung, um DLNA auf Ihrem Computer
einzurichten und Ordner und Dateien zu kennzeichnen,
die Sie mit dem Heimkino teilen möchten.
Um auf die Dateien auf Ihrem PC zuzugreifen und diese
wiederzugeben, nachdem Sie DLNA eingerichtet haben,
sind die folgenden Schritte auszuführen:
1.
Schalten Sie Ihren PC, das Fernsehgerät und das
Heimkino ein.
2.
Stellen Sie sicher, dass der DLNA Shared Server auf
Ihrem PC ausgeführt wird.
3.
Drücken Sie auf Ihrem Heimkino die BLAUE (D)
Taste (Geräte anzeigen).
4.
Mithilfe der ◄► Tasten den PC in der Geräteliste
auswählen.
Wählen Sie BD-Datenmanagement, und drücken
Sie die E Taste.
Wählen Sie Gerät wechseln, und drücken Sie die
E Taste.
Wählen Sie USB Flash Disk, und drücken Sie dann
die E Taste.
5.
Wählen Sie die Art der anzuzeigenden oder
wiederzugebenden Dateien aus (Videos, Fotos,
Musik) und drücken Sie die E Taste.
Mithilfe der ▲▼◄► Tasten den Ordner mit der Art
der ausgewählten Dateien auswählen und die E
Taste drücken. Die Dateiliste wird angezeigt.
7.
Legen Sie eine Blue-ray Disk ein, die BD-LIVE
unterstützt.
7.
8.
Wählen Sie eine Position der vom Disk- Hersteller
zur Verfügung gestellten BD-LIVEInhalte aus.
2.
Auf dem Home Bildschirm Einstell. auswählen und
anschließend die E Taste drücken.
3.
4.
Wählen Sie System, und drücken Sie die E Taste.
5.
6.
| HINWEIS |
Wie Sie BD-LIVE und dessen Funktionen nutzen
können, kann je nach Disk variieren.
6.
Wählen Sie die anzuzeigende oder
wiederzugebende Datei und drücken Sie die E
Taste.
| HINWEIS |
Sie können Wiedergabelisten von Dateien auf Ihrem
PC in derselben Art und Weise erstellen, wie Sie
Wiedergabelisten von Dateien auf USB-Geräten und
Disks erstellen.
Mit einigen Ausnahmen könne Sie die Wiedergabe der
Dateien auf Ihrem PC in der gleichen Art und Weise
steuern, wie sie die Wiedergabe von Dateien auf USBGeräten oder Disks steuern.
Sie können ebenfalls auf Dateien auf Ihrem PC
zugreifen, indem Sie zuerst im Home Bildschirm
Videos, Fotos oder Musik auswählen und anschließend
Ihren PC aus der angezeigten Geräteliste auswählen.
Deutsch
HT-F4200_XU_GER_130206-1.indd 29
Netzwerkdienste
So schließen Sie den Blu-ray Disk-Player ans
Netzwerk an. (Siehe Seite 14.)
06
1.
Verwenden von DLNA
29 |
2013-02-13 오후 4:36:19
Anhang
Zusätzliche Informationen
Hinweis
Anschlüsse
HDMI-AUSGANG
• Je nach Fernsehgerät stehen für den HDMI-Ausgang
bestimmte Auflösungen möglicherweise nicht zur
Verfügung.
• Sie müssen eine HDMI-Verbindung verwenden, um
Videos mit 3D-Technik zu genießen.
• Ein langes HDMI-Kabel kann Bildrauschen
verursachen. Wenn dieser Fall eintritt, HDMI-Deep
Color im Menü auf Aus stellen.
Einstell.
3D-Einstell.
• Bei einigen 3D Disks muss zum Anhalten des Films
währen einer 3D Wiedergabe die 5 Taste einmal
gedrückt werden. Der Film wird angehalten und
der 3D-Modus wird deaktiviert. Um eine 3D Option
während der Wiedergabe eines 3D-Films zu ändern,
die 5 Taste einmal drücken. Das Blu-ray Menü wird
angezeigt. Drücken Sie die 5 Taste erneut und
wählen Sie anschließend die 3D-Einstellungen im
Blu-ray-Menü aus.
• Je nach Inhalt und Position des Bildes auf Ihrem
Fernsehbildschirm, können senkrechte schwarze
Balken auf der linken oder rechten Seite, bzw. auf
beiden Seiten angezeigt werden.
TV-Bildformat
• Einige Bildformate sind nicht bei allen Disks verfügbar.
• Wenn Sie ein Bildformat und eine Option wählen,
welche sich vom Bildformat Ihres Fernsehgeräts
unterscheidet, kann das Bild verzerrt erscheinen.
• Wenn Sie 16:9 Original einstellen, kann Ihr
Fernsehgerät das Format 4:3 Pillarbox (schwarze
Streifen an den Bildschirmrändern) anzeigen.
BD Wise (nur bei Samsung Produkten)
• Wenn BD Wise aktiviert ist, wird die Auflösung
automatisch auf BD Wise gesetzt und es wird BD
Wise im Menü Auflösung angezeigt.
• Wenn dieses Gerät an ein Gerät angeschlossen ist,
das BD Wise nicht unterstützt, können Sie die BD
Wise-Funktion nicht verwenden.
• Damit BD Wise richtig funktioniert, muss die BD
Wise-Funktion im Gerät und Fernsehgerät auf Ein
gestellt werden.
Digital-Ausgang
• Achten Sie darauf, den richtigen Digitalausgang
auszuwählen, da andernfalls kein Ton oder ein
Störgeräusch zu hören ist.
• Falls das HDMI-Gerät (Empfänger, TV) komprimierte
Formate (Dolby digital, DTS) nicht unterstützt, wird
das Audiosignal als PCM wiedergegeben.
• Reguläre DVDs haben keinen BONUSVIEW-Audio
und keine Navigationssoundeffekte.
• Einige Blu-ray-Disks haben keinen BONUSVIEWAudio und keine Navigationssoundeffekte.
• Diese Einstellung der Digitalausgabe hat keinen
Einfluss auf die analoge (L/R) Audio oder HDMI Audio
Ausgabe an Ihren Fernseher. Beeinflusst die optische
und HDMI Audio Wiedergabe, wenn Ihr Gerät an
einen AV-Receiver angeschlossen ist.
• Bei der Wiedergabe von MPEG- Soundtracks, wird
das Audiosignal, unabhängig von der Digitalausgang
Einstellung, als PCM (PCM oder Bitstrom)
wiedergeben.
• Die Digitalausgabe kann aktiviert werden, wenn
Lautsprecher ausw. auf TV-Lautsprecher
eingestellt ist.
BD-LIVE- Internet-Verbindung
• Die Internetverbindung kann während der Nutzung
der BD-LIVE-Inhalte eingeschränkt sein.
Anynet+ (HDMI-CEC)
• Je nach Fernsehgerät stehen für den HDMI-Ausgang
bestimmte Auflösungen möglicherweise nicht zur
Verfügung. Informationen dazu finden Sie in der
Bedienungsanleitung Ihres Fernsehgeräts.
• Diese Funktion steht nicht zur Verfügung wenn CEC
vom HDMI-Kabel nicht unterstützt wird.
• Wenn sich ein Anynet+ Logo auf Ihrem SamsungFernsehgerät befindet, wird die Anynet+-Funktion
unterstützt.
BD-Datenmanagement
• Die Wiedergabe einer Disk kann im externen
Speichermodus angehalten werden, wenn das USBGerät während der Wiedergabe entfernt wird.
• Es werden nur USB-Geräte mit einem FATDateisystem (DOS 8.3 Datenträgerbezeichnung)
unterstützt. Es wird die Verwendung eines USBGeräts mit USB 2.0-Protokoll Unterstützung und
einer Lese-/ Schreibgeschwindigkeit von 4 MB/Sek.
oder mehr empfohlen.
• Nach dem Formatieren des Speichergeräts
funktioniert die Funktion Wiedergabe fortsetzen
möglicherweise nicht.
• Die gesamte für das BD-Datenmanagement zur
Verfügung stehende Speicherkapazität kann je nach
vorliegenden Bedingungen abweichen.
| 30 Deutsch
HT-F4200_XU_GER_130206-1.indd 30
2013-02-13 오후 4:36:21
• Für weitere Informationen über DivX(R) VOD
besuchen Sie bitte die Webseite "http://vod.divx.
com".
• Je nach Blu-ray Disc / DVD können Sie den
gewünschten Untertitel im Disk-Menü einstellen.
Drücken Sie die DISC MENU Taste.
• Diese Funktion hängt von der Auswahl der Untertitel
ab, die auf der Disk codiert sind und können nicht auf
allen Blu-ray Discs/DVDs zur Verfügung stehen.
• Informationen über den Hauptfunktion/BONUSVIEWModus werden auch dann angezeigt, wenn die Bluray Disk über einen BONUSVIEW-Bereich verfügt.
• Diese Funktion wechselt gleichzeitig sowohl die
primären als auch sekundären Untertitel.
• Es wird entsprechend die Gesamtanzahl der
primären oder sekundären Untertitel angezeigt.
Lautsprechereinst.
• Wenn Lautsprecher ausw. auf TV-Lautsprecher,
eingestellt ist, wird der Ton über die Lautsprecher des
Fernsehgeräts wiedergegeben.
HDMI audio
• Wenn der HDMI/Ton über den Fernsehlautsprecher
wiedergegeben wird, wird er automatisch auf 2
Kanäle heruntergemischt.
Anhang
Untertitelsprache wählen
07
DivX® Video On Demand
JPEG-Dateien wiedergeben
Audioausgabekanal
• Wenn Anynet+ (HDMI-CEC) auf Aus eingestellt ist,
steht die Audioausgabekanal Funktion nicht zur
Verfügung.
• Bei der Verwendung von HDMI-Kabeln ohne
ARC (Audio Return Channel) Zertifikat, kann es zu
Kompatibilitätsproblemen kommen.
• Die ARC-Funktion ist nur verfügbar, wenn ein ARCfähiges Fernsehgerät angeschlossen ist.
Wiedergabe
Wiedergabe einer Videodatei
• Videodateien mit hohen Bitraten von 20Mbps oder
mehr beanspruchen das Gerät stark und können zu
einer Unterbrechung der Wiedergabe führen.
Audiosprache wählen
• Die ◄► Anzeige wird nicht auf dem Bildschirm
angezeigt, wenn der BONUSVIEW Bereich keine
Einstellungen für BONUSVIEW-Audio enthält.
• Die über die Audiosprache Funktion zur Verfügung
stehenden Sprachen hängen von den auf der Disk
kodierten Sprachen ab. Diese Funktion oder einige
Sprachen können nicht zur Verfügung stehen.
• Bei einigen Blu-ray-Disks können Sie entweder den
englischsprachigen PCM oder Dolby Digital Audio
auswählen.
• Sie können den Untertitel und die PG-Grafik im
Vollbildschirmmodus nicht vergrößern.
Media Play
Verwenden der TOOLS Taste während der
Wiedergabe von Bildern.
• Wenn das System an ein BD Wise kompatibles
Fernsehgerät angeschlossen ist, bei dem BD Wise
aktiviert ist, wird das Bild Einstellungen Menü nicht
angezeigt.
• Die Hintergrundmusik Funktion funktioniert nicht,
wenn sich die Fotodatei und die Musikdatei nicht
auf demselben Speichermedium befinden. Die
Tonqualität kann durch die Bitrate der MP3- Datei, die
Bildgröße und die Kodierungsmethode beeinträchtigt
werden.
Wiedergabe eines USB-Speichergeräts
• Sie müssen das USB-Speichergerät sicher entfernen,
(führen Sie die „USB sicher entfernen“ -Funktion
durch) um die gespeicherten Daten auf Ihrem USBGerät nicht zu beschädigen. Drücken Sie die HOME
Taste, um zum Home Menü zu wechseln und wählen
Sie anschließend die GELBE (C) und danach die E
Taste.
Deutsch
HT-F4200_XU_GER_130206-1.indd 31
31 |
2013-02-13 오후 4:36:22
Anhang
Auswahl des Digitalausgangs
Einstellung
PCM
Verbindung
Bis zu PCM 7.1ch
PCM
Dolby Digital
Bis zu PCM 2.1ch
Dolby Digital
Dolby Digital
Plus
Bis zu PCM 2.1ch
Dolby Digital Plus
Bis zu PCM 2.1ch
Dolby TrueHD
Bis zu PCM 5.1ch
DTS
Bis zu PCM 7.1ch
DTS-HD
(Hochauflösender
Audio)
Bis zu PCM 7.1ch
DTS-HD Master
Audio
DTS-HD
Master Audio
Blu-ray Disk
Definition
Bitstream
(DTS Re-encoded)
Bitstream
(Dolby D Reencoded)
HDMI-fähiger AV Receiver
PCM
Audiostrom Dolby TrueHD
auf der BluDTS
ray Disc
DTS-HD
(Hochauflösender
Audio)
Audiostrom
auf
DVD
Bitstream
(Unverarbeitet)
DTS re-encoded
Dolby D.
Re-encoded *
PCM
Bis zu PCM 2ch
PCM 2-Kanalton
PCM 2-Kanalton
PCM 2-Kanalton
Dolby Digital
Bis zu PCM 2.1ch
Dolby Digital
Dolby Digital
Dolby Digital
DTS
Bis zu PCM 5.1ch
DTS
DTS
DTS
Jegliche
Gibt nur den
Decodiert den
Haupttonspur
Decodiert den
Hauptaudio und
Decodiert den
wieder, sodass
Hauptaudio und
BONUSVIEW Audio
Hauptaudio und
Ihr AV-Receiver
BONUSVIEW Audio
Strom zusammen
BONUSVIEW Audio
das Audiosignal
Strom zusammen
in PCM Audio, fügt
Strom zusammen in
decodieren kann.
in PCM Audio, fügt
Navigationssoundeffekte
Sie können keinen Navigationssoundeffekte
PCM Audio und fügt
hinzu und codiert PCMNavigationssoundeffekte
BONUSVIEW
hinzu und codiert PCMAudio erneut in den
Ton oder
hinzu.
Audio erneut in den
Dolby Digital-Bitstrom
Navigationstöne
DTS-Bitstrom.
oder PCM.
hören.
Wenn es sich bei dem Ursprungssignal um ein 2 Kanal oder Mono Signal handelt, wird die "Re-encoded Dolby D"
Einstellung nicht verwendet. Die Wiedergabe erfolgt im PCM 2 Kanal Modus.
Blu-ray Discs können drei Audio-Ströme enthalten :
- Haupt-Audio : Haupt Audio-Soundtrack.
- BONUSVIEW A0udio : Zusätzlicher Soundtrack wie Kommentare von Regisseuren und Schauspielern.
- Navigationssoundeffekte : Bei der Auswahl von einigen Menünavigationsoptionen können Navigationssoundeffekte zu
hören sein. Die Navigationssoundeffekte sind je nach Blu-ray-Disk unterschiedlich.
| 32 Deutsch
HT-F4200_XU_GER_130206-1.indd 32
2013-02-13 오후 4:36:22
Auflösung nach Wiedergabemodus
Einstellung
BD Wise
HDMI-Modus
E-contents/Digital
contents
HDMI-Modus
Blu-ray Disc
Auflösung der BlurayDisk
1080p@60F
480i
Anhang
Ausgang
DVD-Wiedergabe
07
Bei der Wiedergabe von Blu-ray Disk/E-content/Digital Content
Max. Auflösung des TVEingangs
Automatisch
Max. Auflösung des TV-Eingangs
1080p@60F
1080p@60F
-
1080p
-
1080p
Film-Bildfrequenz : Auto
(24BpS)
1080p@24F
-
1080i
1080i
1080i
720p
720p
720p
576p/480p
576p/480p
576p/480p
Fehlerbehebung
Schlagen Sie in der nachfolgenden Liste nach, wenn das Gerät nicht ordnungsgemäß funktioniert. Falls ihr Problem
unten nicht aufgelistet oder die Problemlösung nicht hilfreich ist, das Gerät abschalten, den Netzstecker ziehen und
setzen Sie sich mit dem nächstgelegenen autorisierten Händler oder dem Samsung Electronics-Servicecenter in
Verbindung.
Symptom
Überprüfen/Beheben
Die Disk wird nicht
ausgeworfen.
• Ist der Netzstecker sicher angeschlossen?
• Schalten Sie das Gerät aus und wieder ein.
Disk wird nicht
wiedergegeben.
• Überprüfen Sie den Regionalcode der Blu-ray/DVD-Disk. Im Ausland gekaufte
Blu-ray/ DVDs können möglicherweise mit diesem Produkt nicht wiedergegeben
werden.
• CD-ROMs und DVD-ROMs können mit diesem Gerät nicht wiedergegeben
werden.
• Überprüfen Sie den Rating-Niveau der Disk.
Wiedergabe startet nicht
sofort, wenn die Taste
Play/ Pause betätigt wird.
• Verwenden Sie eine verformte oder zerkratzte Disk?
• Reinigen Sie die Disk.
Kein Ton hörbar.
• Das Heimkino gibt bei der schellen Wiedergabe, der Zeitlupenwiedergabe und der
Einzelbildwiedergabe keinen Ton wieder.
• Sind die Lautsprecher richtig angeschlossen? Sind die Lautsprechereinstellungen
korrekt?
• Ist die Disk schwer beschädigt?
Deutsch
HT-F4200_XU_GER_130206-1.indd 33
33 |
2013-02-13 오후 4:36:23
Anhang
Symptom
Überprüfen/Beheben
Die Fernbedienung
funktioniert nicht
• Verwenden Sie die Fernbedienung innerhalb der Reichweite der Fernbedienung
und in richtigen Winkel zum Empfangssensor?
• Überprüfen Sie, ob die Batterien leer sind.
• Die Disk dreht sich, es
wird jedoch kein Bild
angezeigt.
• Die Bildqualität ist
schlecht, und das Bild
ist instabil.
•
•
•
•
Die Audio-Sprache sowie
die Untertitel funktionieren
nicht.
• Nicht alle Disks enthalten Audio-Sprache oder Untertitel.
Der Menü-Bildschirm wird
nicht angezeigt, auch
wenn die Menü-Funktion
ausgewählt wird.
• Verwenden Sie eine Disk, die keine Menüs enthält?
Das Bildformat kann nicht
geändert werden.
• Sie können 16:9 Blu-ray/DVD Disks im 16:9 Voll, 4:3 Letter Box Modus oder
4:3 Passend Modus wiedergeben, 4:3 Blu-ray/DVD Disks werden nur im 4:3
Bildformat wiedergegeben. Greifen Sie auf die Informationen an der Blu-ray
Diskhülle zurück und wählen Sie die entsprechende Funktion.
Das Gerät funktioniert
nicht.
• Drücken Sie die Taste 5 der Fernbedienung im STANDBY Modus und halten Sie
sie 5 Sekunden lang gedrückt.
- Durch Verwendung der RESET-Funktion gehen alle gespeicherten Einstellungen
verloren.
Verwenden Sie diese Funktion nur wenn notwendig.
Sie haben das Passwort für
die Altersfreigabe wurde
vergessen.
• Ohne Disk im Gerät die Taste 5 des Geräts drücken und länger als 5 Sekunden
gedrückt halten. Auf dem Bildschirm erscheint INIT, und alle Einstellungen
werden auf die Werkseinstellungen zurückgesetzt. Drücken Sie anschließend die
NETZSCHALTER Taste.
- Durch Verwendung der RESET-Funktion gehen alle gespeicherten Einstellungen
verloren Verwenden Sie diese Funktion nur wenn notwendig.
Der Radioempfang
funktioniert nicht.
• Ist die UKW-Antenne richtig angeschlossen?
• Installieren Sie bei einem schwachen Antennensignal eine externe UKW-Antenne
an einem Ort mit gutem Empfang.
Die Wiedergabe des
Fernsehtons über das
Gerät funktioniert nicht.
• Wenn Sie die Taste ÖFFNEN/SCHLIESSEN ^ drücken, während der Fernsehton
über D.IN oder AUX wiedergegeben wird, so werden die Blu-ray-/DVD-Funktionen
eingeschaltet und der Fernsehton ausgeschaltet.
„Nicht verfügbar“ erscheint
auf dem Bildschirm.
• Die Funktionen oder Option ist zurzeit aus folgenden Gründen nicht verfügbar:
1. Die Software der Blu-ray/DVD Disk lässt die Funktion oder Option nicht zu.
2. Die Blu-ray/DVD-Software unterstützt die Option (z. B. Kamerawinkel) nicht.
3. Die Option ist zurzeit nicht verfügbar.
4. Sie haben einen Titel, ein Kapitel oder eine Abtastzeit außerhalb des zulässigen
Bereichs gewählt.
Wenn der HDMI-Ausgang
mit einer Auflösung
eingestellt ist, die Ihr
Fernsehgerät nicht
unterstützt (z. B. 1080p),
wird möglicherweise kein
Bild wiedergegeben.
• Drücken Sie ohne eine Disk im Gerät die 5 Taste auf dem vorderen Bedienfeld
für mindestens 5 Sekunden. Alle Einstellungen werden auf die Werkseinstellungen
zurückgesetzt.
Ist das Fernsehgerät eingeschaltet?.
Sind die Videokabel korrekt angeschlossen?
Ist die Disk schmutzig oder beschädigt?
Eine Disk mit Fabrikationsfehlern kann ggf. nicht korrekt wiedergegeben werden.
| 34 Deutsch
HT-F4200_XU_GER_130206-1.indd 34
2013-02-13 오후 4:36:24
Symptom
Überprüfen/Beheben
Ungewöhnliche
HDMIWiedergabe.
• Wenn auf dem Bildschirm nur Rauschen erscheint, bedeutet dies, dass der
Fernseher HDCP (High-bandwidth Digital Content Protection) nicht unterstützt.
Anhang
• Prüfen Sie die Verbindung zwischen dem Fernsehgerät und dem HDMI-Anschluss
des Geräts.
• Überprüfen Sie, ob Ihr Fernsehgerät die HDMI-Eingangsauflösungen
576p/480p/720p/1080i/1080p unterstützt.
07
Keine HDMI-Wiedergabe
DLNA Funktion
Ich kann durch DLNA
veröffentlichte Ordner
sehen, nicht aber die
Dateien.
• DLNA zeigt nur Video, Foto und Musik Dateien an. Andere Dateiarten werden
nicht angezeigt.
Unterbrechungen bei
Videowiedergabe.
• Überprüfen Sie die Stabilität des Netzwerks.
• Anschluss des Netzwerkkabels überprüfen und ob das Netzwerk überlastet ist.
Die DLNA Verbindung
zwischen dem
Fernsehgerät und dem PC
ist nicht stabil.
• IP-Adressen im selben Netzwerk sollten einzigartig sein, ansonsten können
Adresskonflikte ein solches Phänomen verursachen.
• Überprüfen Sie, ob ein Firewall aktiv ist. Wenn ja, deaktivieren Sie die FirewallFunktion.
BD-LIVE
Keine Verbindung zum BDLIVE Server.
• Prüfen Sie mit Hilfe der Netzwerk Status Funktion, ob eine Netzwerkverbindung
besteht.
• Überprüfen Sie, ob das USB-Speichergerät an das Gerät angeschlossen ist.
• Das Speichergerät benötigt mindestens 1 GB freien Speicher um BD-LIVE-Service
zu ermöglichen. Die verfügbare Speichermenge ist in der BD-Daten- Verwaltung
überprüfbar. (Siehe Seite 30.)
• Überprüfen Sie, ob die BD-Live Internetverbindungsoption auf Zulassen (Alle)
eingestellt ist.
• Wenn oben genannten Maßnahmen fehlschlagen, setzen Sie sich mit dem
Anbieter des Inhalts in Verbindung oder aktualisieren Sie auf die neueste Firmware
Version.
Fehler während der
Benutzung von BDLIVEService.
• Das Speichergerät benötigt mindestens 1 GB freien Speicher um BD-LIVE-Service
zu ermöglichen. Die verfügbare Speichermenge ist in der BD-Daten- Verwaltung
überprüfbar. (Siehe Seite 30.)
| HINWEIS |
Wenn die Werkseinstellungen wieder hergestellt werden, werden alle gespeicherten BD-Daten gelöscht.
Deutsch
HT-F4200_XU_GER_130206-1.indd 35
35 |
2013-02-13 오후 4:36:24
Anhang
Technische Daten
Gewicht
2,3 kg
Dimensions
430 (B) x 55 (H) x 250 (T) mm
Abmessungen
+5°C bis +35°C
Betriebstemperaturbereich
10 % bis 75 %
Signal/Rauschabstand
55 dB
Verwendbare Empfindlichkeit
12 dB
Klirrfaktor
(Total Harmonic Distortion)
0,5 %
Video
1080p, 1080i, 720p, 576p/480p
Audio
PCM Mehrkanal-Audio, Audio-Bitstrom, PCM-Audio
Ausgangsleistung der FrontLautsprecher
75W x 2(3)
Ausgangsleistung des
Subwoofers
100W(3)
Allgemein
UKW-Tuner
HDMI
Analog-Eingang : 20Hz~20kHz (±3dB)
Verstärke
Frequenzgang
Digitaleingang : 20Hz~40kHz (±4dB)
Signal-Rauschabstand
70dB
Kanaltrennung
60dB
Eingangsempfindlichkeit
(AUX)500mV
| 36 Deutsch
HT-F4200_XU_GER_130206-1.indd 36
2013-02-13 오후 4:36:25
2,1-Kanal Lautsprechersystem
Lautsprecher-System
Subwoofer
Impedanz
3
3
Frequenzbereich
140Hz~20kHz
40Hz ~ 160Hz
Schalldruck- Ausgabe
87dB/W/M
88dB/W/M
Eingangs-Bewertung
75W
100W
Maximale Eingangsleistung
150W
200W
Abmessungen (B x H x T)
(Maßeinheit : mm)
950 x 1160 x 740
1550 x 3000 x 2855
Gewicht
(Maßeinheit : kg)
0,34
3,76
07
Front
Anhang
Lautsprecher
•
•
•
•
•
Netzwerkgeschwindigkeiten von 10Mbps oder weniger werden nicht unterstützt.
Samsung Electronics Co., Ltd behält sich das Recht auf unangekündigte Änderungen vor.
Gewicht und Abmessungen können von den Angaben abweichen.
Das Design und die Technischen Daten können ohne vorherige Ankündigung geändert werden.
Informationen bezüglich der Netzspannung und Stromaufnahme könne Sie dem Typenschild am Gerät entnehmen.
Deutsch
HT-F4200_XU_GER_130206-1.indd 37
37 |
2013-02-13 오후 4:36:26
Wenden Sie sich an SAMSUNG WORLD WIDE
Wenn Sie Fragen oder Anmerkungen zu Produkten von Samsung haben, wenden
Sie sich an den Kundendienst von SAMSUNG.
Area
` Europe
Contact Centre
Austria
0810 - SAMSUNG (7267864,
€ 0.07/min)
Belgium
02-201-24-18
Bosnia
Bulgaria
Croatia
051 133 1999
07001 33 11 normal tariff
062 SAMSUNG (062 726 786)
800-SAMSUNG (800-726786)
Samsung Electronics Czech and Slovak,
s.r.o., Oasis Florenc, Sokolovská
394/17, 180 00, Praha 8 till 8.2.2013
: From 8.2.2013: Samsung Electronics
Czech and Slovak, s.r.o. V Parku
2343/24, 148 00 - Praha 4
70 70 19 70
030 - 6227 515
01 48 63 00 00
0180 5 SAMSUNG bzw.
0180 5 7267864* (*0,14 €/Min.
aus dem dt. Festnetz, aus dem
Mobilfunk max. 0,42 €/Min.)
8009 4000 only from landline
(+30) 210 6897691 from
mobile and land line
80111-SAMSUNG (80111 726
7864) only from land line
(+30) 210 6897691 from mobile
and land line
06-80-SAMSUNG (726-7864)
800-SAMSUNG (726-7864)
Czech
Denmark
Finland
France
Germany
Cyprus
Greece
Hungary
Italia
Web Site
www.samsung.com
www.samsung.com/
be (Dutch)
www.samsung.com/
be_fr (French)
www.samsung.com
www.samsung.com
www.samsung.com
Area
Luxemburg
Montenegro
Netherlands
Norway
Poland
Portugal
www.samsung.com
Rumania
Serbia
www.samsung.com
www.samsung.com
www.samsung.com/fr
Slovakia
www.samsung.com
Spain
Sweden
www.samsung.com
www.samsung.com
www.samsung.com
www.samsung.com
Contact Centre
261 03 710
020 405 888
0900-SAMSUNG (09007267864) (€ 0,10/Min)
815-56 480
0 801-1SAMSUNG(172-678) *
lub +48 22 607-93-33 **
* (całkowity koszt połączenia
jak za 1 impuls według taryfy
operatora)
** (koszt połączenia według
taryfy operatora)
808 20-SAMSUNG (808 20 726-7)
08008 SAMSUNG (08008 726
7864)
TOLL FREE No.
+381 11 321 6899
(old number still active 0700
7267864)
0800-SAMSUNG (0800-726786)
902-1-SAMSUNG (902 172 678)
0771 726 7864 (SAMSUNG)
Switzerland
0848-SAMSUNG (7267864,
CHF 0.08/min)
U.K
Eire
Lithuania
Latvia
Estonia
0330 SAMSUNG (7267864)
0818 717100
8-800-77777
8000-7267
800-7267
Web Site
www.samsung.com
www.samsung.com
www.samsung.com
www.samsung.com
www.samsung.com/pl
www.samsung.com
www.samsung.com
www.samsung.com
www.samsung.com
www.samsung.com
www.samsung.com
www.samsung.com/ch
(German)
www.samsung.com/
ch_fr/(French)
www.samsung.com
www.samsung.com
www.samsung.com/lt
www.samsung.com/lv
www.samsung.com/ee
Korrekte Entsorgung der Batterien dieses Produkts
(Gilt für Länder mit Abfalltrennsystemen)
Die Kennzeichnung auf der Batterie bzw. auf der dazugehörigen Dokumentation oder Verpackung gibt
an, dass die Batterie zu diesem Produkt nach seiner Lebensdauer nicht zusammen mit dem normalen
Haushaltsmüll entsorgt werden darf. Wenn die Batterie mit den chemischen Symbolen Hg, Cd oder
Pb gekennzeichnet ist, liegt der Quecksilber-, Cadmium- oder Blei-Gehalt der Batterie über den in der
EG-Richtlinie 2006/66 festgelegten Referenzwerten. Wenn Batterien nicht ordnungsgemäß entsorgt
werden, können sie der menschlichen Gesundheit bzw. der Umwelt schaden.
Bitte helfen Sie, die natürlichen Ressourcen zu schützen und die nachhaltige Wiederverwertung von
stofflichen Ressourcen zu fördern, indem Sie die Batterien von anderen Abfällen getrennt über Ihr örtliches
kostenloses Altbatterie-Rücknahmesystem entsorgen.
Korrekte Entsorgung von Altgeräten (Elektroschrott)
(Gilt für Länder mit Abfalltrennsystemen)
Die Kennzeichnung auf dem Produkt, Zubehörteilen bzw. auf der dazugehörigen Dokumentation gibt
an, dass das Produkt und Zubehörteile (z. B. Ladegerät, Kopfhörer, USB-Kabel) nach ihrer Lebensdauer
nicht zusammen mit dem normalen Haushaltsmüll entsorgt werden dürfen. Entsorgen Sie dieses Gerät
und Zubehörteile bitte getrennt von anderen Abfällen, um der Umwelt bzw. der menschlichen Gesundheit
nicht durch unkontrollierte Müllbeseitigung zu schaden. Helfen Sie mit, das Altgerät und Zubehörteile
fachgerecht zu entsorgen, um die nachhaltige Wiederverwertung von stofflichen Ressourcen zu fördern.
Private Nutzer wenden sich an den Händler, bei dem das Produkt gekauft wurde, oder kontaktieren
die zuständigen Behörden, um in Erfahrung zu bringen, wo Sie das Altgerät bzw. Zubehörteile für eine
umweltfreundliche Entsorgung abgeben können.
Gewerbliche Nutzer wenden sich an ihren Lieferanten und gehen nach den Bedingungen des
Verkaufsvertrags vor. Dieses Produkt und elektronische Zubehörteile dürfen nicht zusammen mit anderem
Gewerbemüll entsorgt werden.
HT-F4200_XU_GER_130206-1.indd 38
2013-02-13 오후 4:36:27
HT-F4200
Sistema Home Entertainment
Blu-ray™ 2.1 canali
manuale utente
immagina le possibilità
Grazie per avere acquistato questo prodotto Samsung.
Per ricevere un servizio più completo,
registrare il prodotto all'indirizzo
www.samsung.com/register
HT-F4200_XU_ITA_130208-1.indd 1
2013-02-13 오후 4:38:20
Informazioni sulla Sicurezza
Avvertenza
PER RIDURRE IL RISCHIO DI SCOSSE ELETTRICHE, NON RIMUOVERE IL COPERCHIO (O LA PARTE POSTERIORE).
ALL'INTERNO NON VI SONO PARTI RIPARABILI DALL'UTENTE. PER LA MANUTENZIONE RIVOLGERSI AL
PERSONALE DI ASSISTENZA QUALIFICATO.
ATTENZIONE
RISCHIO DI SCOSSE ELETTRICHE
NON APRIRE
Questo simbolo indica la presenza
di "tensione pericolosa" all'interno
del prodotto, che comporta il
rischio di scosse elettriche o lesioni.
ATTENZIONE: PER EVITARE SCOSSE
ELETTRICHE, INSERIRE A FONDO LO
SPINOTTO PIÙ LARGO DELLA SPINA NELLA
RELATIVA PRESA.
AVVERTENZA
• Per ridurre il rischio di incendio o di scosse elettriche, non
esporre questo apparecchio alla pioggia o all'umidità.
ATTENZIONE
• Non schizzare o sgocciolare liquidi sull'apparecchio e
non porre su di esso oggetti contenenti liquidi, come
ad esempio vasi.
• Poiché la presa di rete viene utilizzata per scollegare
l'apparecchio, deve essere facilmente accessibile in
qualsiasi momento.
• Questa apparecchiatura deve essere sempre collegata
a una presa di rete con collegamento a terra.
• Per scollegare l'apparecchio dalla corrente è
necessario estrarre la spina dalla presa; perciò la presa
dovrà essere facilmente accessibile.
CLASS 1
KLASSE 1
LUOKAN 1
KLASS 1
PRODUCTO
Questo simbolo indica
istruzioni importanti che
accompagnano il prodotto.
LASER PRODUCT
LASER PRODUKT
LASER LAITE
LASER APPARAT
LÁSER CLASE 1
PRODOTTO LASER CLASSE 1
Questo lettore CD è classificato come prodotto
LASER DI CLASSE 1.
L'utilizzo di comandi, regolazioni o funzioni che si
riferiscono a procedure diverse da quelle specificate può
provocare l'esposizione a radiazioni pericolose.
ATTENZIONE
UN RAGGIO LASER INVISIBILE VIENE EMESSO NEL
CASO IN CUI L'APPARECCHIO VENGA APERTO CON
IL SISTEMA DI INTERBLOCCO NON FUNZIONANTE IN
MODO CORRETTO, O ESCLUSO. EVITARE LA DIRETTA
ESPOSIZIONE AL RAGGIO LASER.
| 2 Italiano
HT-F4200_XU_ITA_130208-1.indd 2
2013-02-13 오후 4:38:28
Conservazione e gestione dei dischi
• Non schizzare o sgocciolare liquidi sull'apparecchio.
Non sistemare oggetti pieni di liquidi, come dei vasi,
sull'apparecchio.
• Per spegnere completamente l'apparecchio, estrarre
la spina di alimentazione dalla presa di rete. Di
conseguenza, la spina di alimentazione deve essere
facilmente e prontamente accessibile in qualsiasi
momento.
• Non toccare la spina di alimentazione con le mani
bagnate. Rischio di scossa elettrica.
• Non collegare più dispositivi elettrici alla stessa presa
di rete. Una presa sovraccarica può surriscaldarsi,
provocando un incendio.
• Prima di collegare altri componenti a questo prodotto,
controllare che siano spenti.
• Se il prodotto viene spostato improvvisamente da un
luogo freddo a uno caldo, si può formare condensa
sulle parti in funzione e sull'obiettivo, con il rischio
di provocare una riproduzione anomala del disco. In
questo caso, scollegare l'alimentazione dal prodotto
e attendere due ore prima di collegare la spina alla
presa di corrente. Inserire quindi il disco e provare
nuovamente ad avviare la riproduzione.
Prodotto su licenza di Dolby
Laboratories.
Dolby e il simbolo della doppia
D sono marchi registrati di
Dolby Laboratories.
Prodotto su licenza, brevetto USA n.: 5,956,674;
5,974,380; 6,226,616; 6,487,535; 7,392,195;
7,272,567; 7,333,929; 7,212,872 e altri brevetti USA
e mondiali registrati/in attesa di registrazione. DTSHD, il simbolo e DTS-HD e il simbolo insieme sono
marchi registrati e DTSHD Master Audio| Essential è
un marchio di DTS, Inc. Il prodotto include il software.
© DTS, Inc. Tutti i diritti riservati.
INFORMAZIONI SUI VIDEO
DIVX: DivX® è un formato
video digitale creato da
DivX, LLC, una consociata di Rovi Corporation.
Questo è un dispositivo ufficiale DivX Certified® che
riproduce video DivX. Per ulteriori informazioni e per
gli strumenti software per la conversione dei file in
video DivX, visitare il sito divx.com. INFORMAZIONI
SUI DIVX VIDEO ON DEMAND: Questo dispositivo
DivX Certified® deve essere registrato per consentire
la riproduzione dei film DivX video on demand (VOD)
acquistati. Per ottenere il codice di registrazione,
individuare la sezione DivX VOD nel menu di
impostazione del dispositivo. Visitare il sito vod.divx.
com per ulteriori informazioni su come completare la
registrazione.
DivX Certified® per riprodurre video DivX® fino a HD
1080p, compresi i contenuti premium. DivX®, DivX
Certified® e i loghi ad essi associati sono marchi
di Rovi Corporation o delle sue consociate e sono
utilizzati su licenza. Protetto da uno o più dei seguenti
brevetti USA : 7,295,673; 7,460,668; 7,515,710;
7,519,274
Italiano
HT-F4200_XU_ITA_130208-1.indd 3
Informazioni sulla Sicurezza
Precauzioni per la manipolazione
Licenza
01
• Manipolazione dei dischi
- Impronte o graffi sul disco possono
ridurre la qualità dell'audio e
dell'immagine o far "saltare" il disco.
- Evitare di toccare la superficie di un disco in cui sono
stati registrati dei dati.
- Tenere il disco per i bordi, senza toccare la superficie
con le dita.
- Non incollare carta o nastro adesivo sul disco.
• Pulizia dei dischi
- Se sul disco sono presenti impronte
o sporcizia, pulirlo con un detergente
delicato diluito in acqua e asciugarlo
con un panno morbido.
- Pulire delicatamente il disco
dall'interno verso l'esterno.
- Conservazione dei dischi
Non conservare alla luce diretta del sole.
Conservare in un luogo fresco e ventilato.
Conservare in una custodia di protezione pulita e
archiviare in posizione verticale.
• Se si sente un rumore insolito, odore di bruciato o si
vede del fumo, spegnere immediatamente l'interruttore
di alimentazione e scollegare la spina dalla presa a
muro. Quindi contattare il centro di assistenza clienti
più vicino. Non utilizzare il prodotto. L'utilizzo del
prodotto in queste condizioni può provocare incendi o
scosse elettriche.
• Per spegnere completamente l'apparecchio, estrarre la
spina di alimentazione dalla presa di rete.
Di conseguenza, la spina di alimentazione deve essere
facilmente e prontamente accessibile in qualsiasi
momento.
3|
2013-02-13 오후 4:38:29
Informazioni sulla Sicurezza
HDMI, il logo HDMI e
l'espressione "High
Definition Multimedia Interface" sono marchi
commerciali o marchi registrati di HDMI Licensing
LLC.
DLNA®, il logo DLNA e DLNA
CERTIFIED® sono marchi,
marchi di servizio o marchi di
certificazione di Digital Living Network Alliance.
Oracle e Java sono marchi registrati
di Oracle e/o delle sue filiali. Altri nomi
possono essere marchi dei rispettivi
proprietari.
Questo prodotto è dotato di una tecnologia di
protezione dalla copia tutelata da brevetti U.S.A. e da
altri diritti di proprietà intellettuale di Rovi Corporation.
Sono vietati il reverse engineering o lo smontaggio.
Blu-ray Disc™, Blu-ray™ e i loghi sono marchi di Bluray Disc Association.
Questo prodotto utilizza tecnologia Cinavia per limitare
l'uso di copie non autorizzate di film e video commerciali
e delle relative tracce audio. Se viene rilevato l'uso
proibito di una copia non autorizzata, viene visualizzato
un messaggio che interrompe la riproduzione o la copia.
Per maggiori informazioni sulla tecnologia Cinavia
consultare il centro online di informazioni ai consumatori
di Cinavia all'indirizzo http:// www.cinavia.com. Per
richiedere maggiori informazioni su Cinavia per e-mail
inviare un messaggio con il proprio indirizzo a: Centro di
informazioni ai consumatori di Cinavia, casella
postale 86851, San Diego, CA, 92138, USA." Questo
prodotto è dotato di tecnologia proprietaria su licenza
di Verance Corporation ed è protetto dal brevetto
U.S.A. 7.369.677 e da altri brevetti U.S.A. e di altri
Paesi registrati e in attesa di registrazione, di una
protezione del copyright e del segreto aziendale per
alcuni aspetti di tale tecnologia. Cinavia è un marchio di
Verance Corporation. Copyright 2004-2010 di Verance
Corporation. Verance. Tutti i diritti riservati. Sono vietati
- Avviso di licenza open source
In caso di utilizzo di software open source, sono
disponibili licenze open source nel menu del prodotto.
Utilizzo della funzione 3D
INFORMAZIONI IMPORTANTI SULLA SALUTE E LA
SICUREZZA PER IMMAGINI 3D.
Leggere e assimilare le seguenti informazioni sulla
sicurezza prima di utilizzare la funzione 3D.
• Alcuni utenti possono provare malessere nel guardare
la TV con funzione 3D, accusando sintomi quali
confusione, nausea e cefalea. In presenza di questi
sintomi, interrompere la visione della TV in 3D, togliere
gli occhiali 3D e lasciar riposare gli occhi.
• La visione di immagini 3D per un periodo prolungato
può provocare affaticamento oculare. In presenza di
sintomi di affaticamento, interrompere la visione della
TV in 3D, togliere gli occhiali 3D e lasciar riposare gli
occhi.
• I bambini che utilizzano la funzione 3D devono essere
controllati regolarmente da un adulto responsabile. Se
riporta sintomi di affaticamento degli occhi, cefalea,
confusione o nausea, il bambino deve interrompere la
visione della TV in 3D e lasciar riposare gli occhi.
• Non utilizzare gli occhiali 3D per altri scopi (ad esempio
come normali occhiali da vista, occhiali da sole,
occhiali protettivi ecc.)
• Non utilizzare la funzione 3D o gli occhiali 3D quando si
è in movimento o ci si sposta. Se si utilizza la funzione
3D o gli occhiali 3D mentre ci si sposta si può urtare
contro oggetti, inciampare e/o cadere, provocando
lesioni.
• Per vedere un contenuto 3D, collegare un dispositivo
3D (ricevitore AV 3D o televisore 3D) alla porta HDMI
OUT del prodotto con un cavo HDMI ad alta velocità.
Indossare gli occhiali per la visione in 3D prima di
riprodurre il contenuto 3D.
• Il prodotto emette i segnali 3D esclusivamente
attraverso il cavo HDMI collegato alla porta HDMI OUT.
• Nel modo di riproduzione in 3D la risoluzione del
video è fissa sulla risoluzione del video 3D originale,
quindi non può essere impostata secondo le proprie
preferenze.
• Alcune funzioni come BD Wise (BD Wise), la
regolazione delle dimensioni dello schermo e la
regolazione della risoluzione potrebbero non funzionare
correttamente nel modo di riproduzione in 3D.
• Per una corretta trasmissione del segnale 3D utilizzare
un cavo HDMI ad alta velocità.
• Allontanarsi dal televisore di almeno tre volte la
larghezza dello schermo quando si guardano delle
immagini 3D. Ad esempio, se lo schermo è da 46
pollici, allontanarsi di 3,5 metri dallo schermo.
• Per una visione ottimale dell'immagine 3D, posizionare
lo schermo del video 3D a livello degli occhi.
• Quando il prodotto è collegato ad alcuni dispositivi 3D,
l'effetto 3D potrebbe non funzionare correttamente.
• Questo prodotto non converte i contenuti 2D in 3D.
• "Blu-ray 3D" e il logo "Blu-ray 3D" sono marchi di Bluray Disc Association.
| 4 Italiano
HT-F4200_XU_ITA_130208-1.indd 4
2013-02-13 오후 4:38:30
Copyright
RIPRODUZIONE MULTIMEDIALE
SERVIZI DI RETE
INFORMAZIONI SULLA SICUREZZA
2
3
3
3
4
5
Avvertenza
Conservazione e gestione dei dischit
Precauzioni per la manipolazione
Licenza
Utilizzo della funzione 3D
Copyright
GUIDA INTRODUTTIVA
6
7
9
10
10
11
Compatibilità dei dischi e dei formati
Loghi dei dischi riproducibili
Accessori
Pannello anteriore
Pannello posteriore
Telecomando
CONNESSIONI
12 Collegamento degli altoparlanti
14 Collegamento a un televisore/dispositivi esterni
15 Collegamento a un router di rete
IMPOSTAZIONI
16
17
17
18
20
21
22
Informazioni sulla Sicurezza
Indice
23 Riproduzione di file su dispositivo USB
23 Riproduzione di un disco con contenuti registrati
dall'utente
24 Riproduzione di DVD commerciali
24 Controllo della riproduzione video
25 Riproduzione di un disco audio commerciale
preregistrato
25 Controllo della riproduzione musicale
26 Controllo della riproduzione foto
27 Ascolto della radio
28 Utilizzo il pulsante TV Sound sul telecomando
01
© 2013 Samsung Electronics Co., Ltd.
Tutti i diritti riservati; è vietata la riproduzione o la copia
di una parte o dell'intero manuale utente senza previa
autorizzazione scritta di Samsung Electronics Co., Ltd
Procedura di impostazione iniziale
La schermata iniziale
Accesso alla schermata di impostazione
Funzioni del menu Impostazioni
Le reti e Internet
Aggiornamento del software
Configurazione di DLNA
29 BD-LIVE™
29 Utilizzo di DLNA
APPENDICE
30 Informazioni aggiuntive
33 Risoluzione dei problemi
36 Specifiche
Le figure e le illustrazioni di questo manuale
utente sono fornite soltanto come riferimento.
Possono differire rispetto all'aspetto effettivo
del prodotto.
È possibile che vengano addebitate delle spese
amministrative nei seguenti casi
a. L'uscita del tecnico in seguito a una
chiamata non rileva difetti nel prodotto (per
es. nel caso l'utente abbia omesso di leggere
il presente manuale)
b. L'utente ha portato l'unità presso un centro
di riparazione che non rileva difetti nel
prodotto (per es. nel caso l'utente abbia
omesso di leggere il presente manuale).
L'importo di tale quota amministrativa verrà
comunicato all'utente prima di eseguire una
visita a domicilio o un eventuale intervento di
manutenzione.
Italiano
HT-F4200_XU_ITA_130208-1.indd 5
5|
2013-02-13 오후 4:38:31
Guida Introduttiva
Compatibilità dei dischi e dei formati
Tipi di dischi e contenuti riproducibili
Supporto
VIDEO
Tipo di disco
Dettagli
Disco Blu-ray
Disco Blu-ray 3D
Disco BD-ROM o BD-RE/-R registrato in formato BD-RE.
DVD-VIDEO,
DVD-RW, DVD-R,
DVD+RW, DVD+R
DVD-VIDEO, DVD+RW/DVD-RW(V)/DVD-R/+R registrati e finalizzati, o
supporti di memorizzazione USB contenenti file DivX, MKV, MP4.
MUSICA
CD-RW/-R,
DVD-RW/-R,
BD-RE/-R
Musica registrata su CD-RW/-R, DVD-RW/-R, BD-RE/-R o supporti USB
contenenti file MP3 o WMA.
FOTO
CD-RW/-R,
DVD-RW/-R,
BD-RE/-R
Foto registrate su CD-RW/-R, DVD-RW/-R, BD-RE/-R o supporti USB
contenenti file JPEG.
| NOTA |
Il prodotto potrebbe non riprodurre determinati CD-RW/-R e DVD-R a causa del tipo di disco o delle condizioni di
registrazione.
I dischi DVD-RW/-R non registrati correttamente in formato DVD Video non possono essere riprodotti.
Il prodotto non riproduce i contenuti registrati su un DVD-R ad una velocità di trasmissione superiore a 10 Mbps.
Il prodotto non riproduce i contenuti registrati su un BD-R o su un dispositivo USB ad una velocità di trasmissione
superiore a 30 Mbps.
La funzione di riproduzione potrebbe non essere disponibile con alcuni tipi di disco oppure quando si eseguono
operazioni specifiche, come la modifica dell'angolo di visualizzazione o del formato. Informazioni dettagliate sui dischi
sono stampate sulla custodia. Consultarle qualora necessario.
Quando si riproduce un titolo BD-J, il caricamento può richiedere più tempo rispetto a un titolo normale o alcune
funzioni potrebbero essere rallentate.
Tipi di dischi non riproducibili
• HD DVD
• DVD-ROM/PD/MV ecc.
• DVD-RAM
• Super Audio
CD(eccetto layer CD)
• DVD-RW(modo VR)
• CVD/CD-ROM/CDV/
CD-G/CD-I/LD (per i
CD-G viene riprodotto
solo l'audio, non le
immagini).
• DVD-R da 3,9 GB per
authoring.
| NOTA |
È possibile che questo prodotto non risponda a tutti i comandi perché alcuni dischi Blu-ray, DVD e CD consentono
di effettuare operazioni specifiche o limitate e offrono solo alcune funzioni durante la riproduzione. Si noti che non si
tratta di un difetto del prodotto.
Samsung non può garantire che questo prodotto sia in grado di riprodurre tutti i dischi contrassegnati dal logo Bluray, DVD o CD; i formati dei dischi si evolvono e potrebbero verificarsi problemi ed errori nella creazione dei software
Blu-ray, DVD, CD e/o nella fabbricazione dei dischi.
Per eventuali domande o in caso di difficoltà nella riproduzione di dischi Blu-ray, DVD o CD con questo prodotto,
contattare il Centro assistenza clienti SAMSUNG. Inoltre, fare riferimento al resto di questo manuale utente per
ulteriori informazioni sulle restrizioni per la riproduzione.
Alcuni dischi commerciali e alcuni dischi DVD acquistati all'estero potrebbero non essere riproducibili con questo
prodotto.
| 6 Italiano
HT-F4200_XU_ITA_130208-1.indd 6
2013-02-13 오후 4:38:32
Codice regionale
Loghi dei dischi riproducibili
A
Disco
Blu-ray
BD-LIVE
Dolby
DTS
Disco Blu-ray 3D
DivX
Sistema di trasmissione PAL
in UK, Francia, Germania,
ecc.
Java
Area
America del Nord, America
centrale, America del Sud,
Corea, Giappone, Taiwan,
Hong Kong e Sud-est
asiatico.
B
Europa, Groenlandia, territori
francesi, Medio Oriente, Africa,
Australia e Nuova Zelanda.
C
India, Cina, Russia, Asia
centrale e meridionale.
1
USA, territori USA e Canada
2
Europa, Giappone, Medio
Oriente, Egitto, Africa,
Groenlandia
3
Taiwan, Corea, Filippine,
Indonesia, Hong Kong
4
Messico, America del Sud,
America centrale, Australia,
Nuova Zelanda, Isole del
Pacifico, Caraibi
5
Russia, Europa orientale,
India, Corea del Nord,
Mongolia
DVD-VIDEO
Disco Blu-ray
Guida Introduttiva
Codice
Tipo di disco
regiona
02
I prodotti e i dischi sono codificati in base alla regione.
Per poter riprodurre un disco, i codici regionali devono
corrispondere. Se i codici non corrispondono, il disco non
viene riprodotto.
Il codice regionale di questo prodotto è indicato sul
pannello posteriore del prodotto.
6
Formati supportati
File musicali supportati
Estensione
file
Contenitore
Codec
audio
*.mp3
MP3
MP3
-
WMA
* Frequenze di
campionamento
(in kHz) - 8, 11,
16, 22, 32, 44.1,
48
* Bit rate - Tutti i
bit rate compresi
tra 5 kbps e 384
kbps
Cina
*.wma
| NOTA |
Se il codice regionale di un disco Blu-ray/DVD non
corrisponde a quello del prodotto, il prodotto non
può riprodurre il disco.
WMA
Intervallo
supportato
Italiano
HT-F4200_XU_ITA_130208-1.indd 7
7|
2013-02-13 오후 4:38:33
Guida Introduttiva
File foto supportati
Estensione file
Tipi
*.jpg
*.jpeg
*.jpe
JPEG
*.png
PNG
Risoluzione
15360x8640
File video supportati
Estensione file
Contenitore
Codec video
Codec audio
*.avi
AVI
DivX 3.11/4/5/6
MP4v3
H.264 BP/MP/HP
MP3, Dolby Digital, DTS,
WMA, PCM
*.mkv
MKV
VC-1 AP
DivX 5/6
H.264 BP/MP/HP
MP3, Dolby Digital, DTS
*.wmv
WMV (wmv9)
VC-1 AP
VC-1 SM
WMA
*.mp4
MP4
MP4 (mp4v)
H.264 BP/MP/HP
AAC
*.mpg
*.mpeg
PS
MPEG1
MPEG2
H.264 BP/MP/HP
MP1, 2
Dolby Digital, DTS
Risoluzione
1920x1080
Limitazioni
- Anche se il file è codificato con un codec supportato elencato sopra, potrebbe non essere riprodotto se il contenuto è
danneggiato.
- La normale riproduzione non è garantita se le informazioni del contenitore del file sono errate o se il file stesso è
danneggiato.
- La riproduzione dei file con un numero di bit/fotogrammi superiore alla norma potrebbe avanzare a scatti.
- La funzione di ricerca (salto) non è disponibile se la tabella degli indici del file è danneggiata.
Decoder video
- Supporta fino a H.264 livello 4.1 e AVCHD
- Non supporta H.264 FMO/ASO/RS e VC1 SP/MP/AP L4
- MPEG4 SP, ASP:
Al di sotto di 1280 x 720: Max. 60 fotogrammi
Al di sopra di 1280 x 720: Max. 30 fotogrammi
- Non supporta GMC 2 o superiore
Decoder audio
- Supporta WMA 7, 8, 9 e Standard
- Non supporta la frequenza di campionamento WMA mono 22.050 Hz.
- AAC: Frequenza di campionamento max: 96Khz (8, 11, 12, 16, 22, 24, 32, 44.1, 48, 64, 88.2, 96) Bit rate max:
320kbps
❏ Formati file supportati per i sottotitoli DivX
*.ttxt, *.smi, *.srt, *.sub, *.txt
| 8 Italiano
HT-F4200_XU_ITA_130208-1.indd 8
2013-02-13 오후 4:38:35
AVCHD (Advanced Video Codec High Definition)
02
• Questo prodotto può riprodurre dischi AVCHD. Questi dischi sono registrati e utilizzati normalmente nelle
videocamere.
• AVCHD è un formato per videocamere digitali ad alta definizione.
• Il formato MPEG-4 AVC/H.264 comprime le immagini con maggiore efficienza rispetto al formato di compressione
tradizionale.
• Alcuni dischi in formato AVCHD utilizzano il formato "x.v.Colour". Questo prodotto può riprodurre dischi in formato
AVCHD che utilizzano il formato "x.v.Colour".
• "x.v.Colour" è un marchio di Sony Corporation.
• "AVCHD" e il logo AVCHD sono marchi di Matsushita Electronic Industrial Co., Ltd. e di Sony Corporation.
Guida Introduttiva
| NOTA |
Alcuni dischi AVCHD non si possono riprodurre, a seconda delle condizioni di registrazione.
I dischi AVCHD devono essere finalizzati.
"x.v.Colour" offre una gamma di colori più ampia di quella dei normali dischi per videocamere DVD.
È possibile che alcuni dischi in formato DivX, MKV e MP4 non vengano riprodotti a seconda della risoluzione video e
della frequenza dei fotogrammi.
Note sul collegamento USB
•
•
•
•
•
•
•
•
•
•
•
•
•
Il prodotto è compatibile con supporti di memorizzazione USB, lettori MP3, videocamere digitali e lettori schede USB.
Il prodotto non supporta nomi di file o cartelle di lunghezza superiore a 128 caratteri.
Alcuni dispositivi USB/videocamere digitali possono non essere compatibili con il prodotto.
Il prodotto supporta sistemi file FAT 16, FAT 32 e NTFS.
Collegare i dispositivi USB direttamente alla porta USB del prodotto. Se si utilizza un cavo USB per il collegamento
possono verificarsi problemi di compatibilità.
Se si inserisce più di un dispositivo di memoria in un lettore multischeda, possono verificarsi problemi di
funzionamento.
Il prodotto non supporta il protocollo PTP.
Non scollegare il dispositivo USB durante il processo di "caricamento".
Maggiore è la risoluzione dell'immagine, maggiore è il ritardo nella visualizzazione.
Questo prodotto non riproduce file MP3 con DRM (Digital Rights Management) scaricato da siti commerciali.
Il prodotto supporta solo video inferiori a 30 fps (frequenza fotogrammi).
È necessario rimuovere in sicurezza il dispositivo di memorizzazione USB (eseguendo la funzione "Rimoz. sicura
USB") per evitare possibili danni alla memoria USB. Premere il tasto HOME per passare al menu principale, quindi
premere il tasto GIALLO (C) e il tasto E.
SAMSUNG non è responsabile per danni ai file o perdite di dati.
Accessori
Controllare di seguito gli accessori forniti.
FUNCTION
VOLUME
-
MUTE
+
RDS DISPLAY
TA
1
2
PTY -
PTY SEARCH
4
5
3
PTY +
6
8
7
9
TITLE MENU
DISC MENU
0
SUBTITLE
POPUP
HOME
REPEAT
TOOLS
INFO
EXIT
RETURN
TUNER
MEMORY MO/ST
A
B
TV SOUND DPS/EQ
C
Cavo di alimentazione
Manuale utente
Antenna FM
D
TUNING
DOWN
UP
Telecomando/batterie (formato AAA)
Italiano
HT-F4200_XU_ITA_130208-1.indd 9
9|
2013-02-13 오후 4:38:36
Guida Introduttiva
Pannello anteriore
RIPRODUZIONE/PAUSA
INVIO
ARRESTO
APERTURA/CHIUSURA
REGOLAZIONE DEL VOLUME
FUNZIONE
5V 500mA
DISPLAY
VANO DEL DISCO
PORTA USB
ACCENSIONE
SENSORE
TELECOMANDO
| NOTA |
Per aggiornare il software del prodotto attraverso la porta USB, è necessario utilizzare una memoria USB.
Quando il prodotto visualizza il menu del disco Blu-ray, non è possibile avviare il filmato premendo il tasto 6 sul
prodotto o sul telecomando. Per riprodurre il filmato, è necessario selezionare Riproduci filmato o Avvio nel menu del
disco, quindi premere il tasto E.
Se si utilizza il servizio Internet o si riproducono i contenuti del dispositivo USB sulla TV, non è possibile selezionare il modo
BD/DVD con il tasto FUNCTION. Arrestare la riproduzione dei contenuti sulla TV prima di selezionare il modo BD/DVD.
Pannello posteriore
INGRESSO
AUX
VENTOLA DI
RAFFREDDAMENTO
AUX IN
FRONT R
FRONT L
SUBWOOFER
,03('$1&(ȍ
POWER
USCITA HDMI
FM ANT
L
R
SPEAKERS OUT
PCAVO DI
ALIMENTAZIONE
* ANTENNA FM
CONNETTORI DI
USCITA DIFFUSORI
OPTICAL
DIGITAL
AUDIO IN
HDMI OUT
LAN
INGRESSO AUDIO DIGITALE
ESTERNO(OTTICO)
LAN
* Collegamento dell'antenna FM
1.
2.
Collegare l'antenna FM fornita al relativo connettore.
Muovere lentamente il filo dell'antenna finché non si trova una posizione con una buona ricezione, quindi fissarlo a
un muro o a un'altra superficie rigida.
| NOTA |
Verificare che su tutti i lati del sistema home cinema ci siano almeno 10 centimetri di spazio libero per garantire una
ventilazione adeguata. Non ostruire la ventola di raffreddamento e i fori di ventilazione.
Questo prodotto non riceve le trasmissioni AM.
| 10 Italiano
HT-F4200_XU_ITA_130208-1.indd 10
2013-02-13 오후 4:38:41
Telecomando
02
Descrizione del telecomando
Guida Introduttiva
Accende e spegne il prodotto.
Per selezionare il modo Blu-ray
(BD/DVD, D. IN, AUX, ecc.).
FUNCTION
VOLUME
Per regolare il volume.
-
MUTE
+
RDS DISPLAY
Premere i tasti numerici per attivare le
opzioni.
TA
1
2
3
PTY -
PTY SEARCH
PTY +
4
5
6
7
8
Per disattivare temporaneamente
l'audio.
Usa la funzione RDS per ricevere le
stazioni FM.
9
TITLE MENU
DISC MENU
Per visualizzare il menu del disco.
0
POPUP
Per saltare in avanti o indietro.
Per accedere al menu popup/ titolo.
Per eseguire la ricerca avanti o
indietro.
Per arrestare un disco.
Per mettere in pausa un disco.
Per riprodurre un disco.
Per selezionare la lingua dei sottotitoli
del disco.
Apre e chiude il vano del disco.
SUBTITLE
HOME
REPEAT
Per ripetere un titolo, un capitolo, una
traccia o un disco.
Per passare alla schermata iniziale.
TOOLS
INFO
Per visualizzare le informazioni sulla
riproduzione durante la visione di un
disco Blu-ray/DVD.
RETURN
EXIT
Per uscire dal menu.
Per utilizzare il menu Tools (Strumenti).
Per selezionare e modificare le voci
del menu a video.
Per tornare al menu precedente.
Questi tasti vengono usati sia per
i menu del prodotto sia per varie
funzioni dei dischi Blu-ray.
TUNER
MEMORY MO/ST
A
B
C
TUNING
TV SOUND DPS/EQ
Il segnale audio può essere emesso dai
diffusori dell'Home Theater o della TV.
(Vedere a pagina 28)
DOWN
Per impostare una frequenza radio.
D
UP
Selezionare MONO o STEREO per le
trasmissioni radio.
Per cercare le stazioni FM attive e
cambiare canale.
Selezionare il modo audio DSP/EQ
desiderato.
Inserimento delle batterie nel telecomando
Assicurarsi che la batteria venga posta con i poli positivo
e negativo in corrispondenza dei simboli "+" e "-" riportati
nell'apposito vano.
Se impiegate per la TV in modo standard, le batterie durano circa
un anno.
Il telecomando ha una portata di circa 7 metri dal prodotto in linea
d'aria.
Tipo batterie: AAA
Italiano
HT-F4200_XU_ITA_130208-1.indd 11
11 |
2013-02-13 오후 4:38:42
Connessioni
Questa sezione descrive vari metodi per collegare il prodotto ad altri componenti esterni.
Prima di spostare o installare il prodotto, spegnere l'apparecchio e staccare il cavo di alimentazione.
Collegamento degli altoparlanti
Posizionamento del prodotto
Sistemarlo su un supporto, sul ripiano di
un mobile o nel mobile sotto la TV.
Subwoofer
Anteriori (D)
Prodotto
Anteriori (S)
Selezione della posizione di ascolto
La posizione di ascolto deve essere
situata, rispetto al televisore, ad una
distanza pari a circa 2,5 - 3 volte il
formato del televisore. Ad esempio, se
lo schermo è da 46 pollici, collocare la
posizione di ascolto ad una distanza dallo
schermo compresa tra 2,92 e 3,5 metri
dallo schermo.
Altoparlanti
anteriori ei
Posizionare questi altoparlanti davanti alla posizione di ascolto; devono essere rivolti verso
l'interno (di circa 45°), in direzione dell'ascoltatore. Posizionare gli altoparlanti in modo che i
tweeter si trovino all'altezza dell'orecchio dell'ascoltatore.
Subwoofer
La posizione del subwoofer non è molto rilevante. Posizionarlo dove si preferisce.
| 12 Italiano
HT-F4200_XU_ITA_130208-1.indd 12
2013-02-13 오후 4:38:48
Collegamento dei diffusori
Abbinare ciascun fascio di cavi al rispettivo diffusore facendo corrispondere i colori
delle spine dei cavi agli adesivi in basso sui connettori dei diffusori.
2.
Per collegare ciascun filo al relativo diffusore:
a. Premere verso il basso la linguetta rossa dietro il diffusore, inserire il filo rosso, quindi
rilasciare la linguetta.
b. Premere verso il basso la linguetta nera dietro il diffusore, inserire il filo nero, quindi
rilasciare la linguetta.
Nero
Rosso
Connessioni
Collegare le spine dei fili dei diffusori sul retro del prodotto facendo corrispondere i
colori delle spine con i connettori dei diffusori.
Diffusore anteriore (S)
FRONT
FRONT
R
L
IMPEDANCE : 3
3.
03
1.
Diffusore anteriore (D)
SUBWOOFER
SPEAKERS OUT
Subwoofer
R
FRONT
L
IMPEDANCE : 3
AUX
IN
FRONT
SPEAKERS OUT
FM ANT
L
SUBWOOFER
R
OPTICAL
DIGITAL
AUDIO IN
| ATTENZIONE |
Se si desidera installare il prodotto su una parete, fissare in modo stabile le viti o i chiodi nella parete e utilizzare i fori
sul retro del diffusore per montarlo contro la parete. Gli accessori (chiodi o viti) necessari per il montaggio non sono
forniti in dotazione di fabbrica.
Non lasciar giocare i bambini con i diffusori o nelle loro vicinanze. La caduta di un diffusore potrebbe provocare
lesioni.
Per collegare i cavi agli altoparlanti, rispettare la polarità (+/ –).
Tenere il subwoofer lontano dalla portata dei bambini per impedire che mettano le mani o introducano oggetti nel
condotto (foro) dello stesso.
Non appendere il subwoofer alla parete dal condotto (foro).
| NOTA |
Se si colloca un diffusore vicino al televisore, i colori dello schermo potrebbero apparire distorti a causa del campo
magnetico.
Italiano
HT-F4200_XU_ITA_130208-1.indd 13
13 |
2013-02-13 오후 4:38:50
Connessioni
Collegamento a un router di rete
AUX
IN
FM ANT
FRONT
R
FRONT
SUBWOOFER
SPEAKERS OUT
L
IMPEDANCE : 3
POWER
L
R
OPTICAL
DIGITAL
AUDIO IN
HDMI OUT
LAN
Modem a
banda larga
Servizio a
banda larga
o
Servizio a
banda larga
Modem a banda larga (Con router integrato)
Router
| NOTA |
Le caratteristiche del router o del provider di servizi Internet potrebbero impedire al prodotto di accedere al server
di aggiornamento del software Samsung. In questo caso, per ulteriori informazioni contattare il provider di servizi
Internet (ISP).
Gli utenti DSL devono utilizzare un router per collegarsi alla rete.
Per utilizzare la funzione DLNA è necessario collegare il PC alla rete come mostrato nelle figure in alto.
La connessione può essere cablata o wireless.
| 14 Italiano
HT-F4200_XU_ITA_130208-1.indd 14
2013-02-13 오후 4:38:51
Collegamento a un televisore/dispositivi esterni
03
Connessioni
AUX
IN
FM ANT
L
FRONT
R
FRONT
SUBWOOFER
SPEAKERS OUT
L
IMPEDANCE : 3
AUX
IN
POWER
FM ANT
L
R
OPTICAL
DIGITAL
AUDIO IN
HDMI OUT
LAN
R
OPTICAL
HDMI OUT
DIGITAL
AUDIO IN
Metodo 1
R
Rosso
W
Bianco
LAN
Metodo 2
Dispositivi esterni
OPTICAL OUT
HDMI IN
Collegamento a un televisore
Collegare un cavo HDMI (non fornito) tra il connettore HDMI OUT sulla parte posteriore del prodotto e il connettore HDMI
IN sul televisore. Se la TV supporta la funzione ARC, è possibile ascoltare l'audio della TV attraverso il sistema Home
Cinema semplicemente collegando questo cavo. Per ulteriori informazioni vedere a pagina 19 di questo manuale e nella
sezione relativa alla funzione ARC nel manuale utente del televisore.
Collegamento a dispositivi esterni
Per selezionare il modo corretto per un dispositivo esterno, premere il tasto FUNCTION. Ogni volta che si preme il tasto,
il modo cambia in questo ordine : BD/DVD D. IN AUX FM
Due metodi di connessione di dispositivi esterni per il vostro home cinema sono illustrate di seguito.
Metodo 1 INGRESSO AUX : Collegamento di un componente analogico esterno
Utilizzando un cavo audio RCA (non fornito), collegare il connettore AUDIO IN sul prodotto al connettore AUDIO OUT sul
componente analogico esterno. Selezionare il modo AUX.
• Assicurarsi di abbinare correttamente i colori dei connettori del cavo ai rispettivi connettori di ingresso e di uscita.
Metodo 2 OTTICO : Collegamento di un componente audio digitale esterno
Per collegare l'uscita audio digitale dei componenti con segnale audio digitale quali ricevitori via cavo e via satellite (SetTop box).
Utilizzando un cavo ottico digitale (non fornito), collegare il connettore di ingresso ottico digitale sul prodotto al
connettore di uscita ottico digitale del dispositivo digitale esterno. Selezionare il modo D. IN.
| NOTA |
Per vedere il video di un ricevitore per TV via cavo/ricevitore satellitare è necessario collegare la relativa uscita video
direttamente a un televisore.
Questo sistema supporta frequenze di campionamento digitale di 32 kHz o superiori di apparecchi digitali esterni.
Questo sistema supporta solo l'audio DTS e Dolby Digital. L'audio MPEG, un formato bitstream, non è supportato.
Italiano
HT-F4200_XU_ITA_130208-1.indd 15
15 |
2013-02-13 오후 4:38:53
Impostazioni
4:3 Letter Box - per vecchi televisori analogici con
schermo standard. Visualizza immagini in 4:3 a
schermo intero e immagini in 16:9 in formato Letter
box che mantiene il formato 16:9 e applica bande
nere sopra e sotto l'immagine.
4:3 Pan-Scan - Per vecchi televisori analogici
con schermo standard. Visualizza immagini in 4:3
a schermo intero e immagini in 16:9 in formato
Pan-Scan che riempie lo schermo, ma taglia i lati
a sinistra e a destra dell'immagine e ingrandisce
verticalmente la parte centrale.
Procedura di impostazione iniziale
• Il menu principale non appare se non si configurano
le impostazioni iniziali.
• L'OSD (On Screen Display) del prodotto potrebbe
cambiare dopo l'aggiornamento della versione del
software.
• I passi da eseguire per accedere possono variare a
seconda del menu selezionato.
1.
Accendere il televisore dopo aver collegato il
prodotto, quindi accendere il prodotto. Quando si
attiva il prodotto per la prima volta, viene visualizzata
automaticamente la schermata Lingua delle
impostazioni
iniziali.
p
5 . Viene visualizzata la schermata Rete – Su cavo.
- Se si dispone di una rete con indirizzi IP
dinamici, come la maggior parte delle persone,
selezionare Auto, premere il tasto E, quindi
procedere al passo 6.
- Se si dispone di una rete con indirizzi IP statici,
vi suggeriamo di selezionare Salta premendo il
tasto BLU (D), quindi andare a "Configurazione
del collegamento alla rete" a pagina 20 dopo il
completamento della procedura di impostazione
iniziale. "Configurazione del collegamento alla
rete" fornisce una spiegazione esaustiva per la
configurazione manuale del collegamento alla
rete.
- Se non si dispone di una rete, selezionare Salta
premendo il tasto BLU (D). Viene visualizzata la
schermata Initial Settings Complete (Impostazioni
iniziali completate), quindi viene visualizzata la
schermata iniziale.
Initial Settings I On-Screen Language
Select a language for the on-screen displays.
English
Français
Deutsch
Español
Italiano
Nederlands
> Move
2.
3.
" Select
Premere i tasti ▲▼ per selezionare la lingua
desiderata , quindi premere il tasto E.
Premere il tasto E per avviare la configurazione
delle funzioni.
| NOTA |
Se si salta la configurazione della rete o la
Impostazione iniziale
configurazione non funziona correttamente, andare a
"Configurazione del collegamento alla rete" a pagina
20 per impostare in seguito il collegamento alla rete
del prodotto.
p
Saranno impostati Aspetto TV e Rete.
Ogni impostazione può essere modificata in un secondo
momento sotto "Impostazioni".
Impostazione iniziale | Rete – Su cavo
Inizio
Scegliere il metodo di configurazione del protocollo Internet (IP).
Verificare che il cavo Ethernet sia connesso.
Auto: Configura l’IP automaticamente.
a Precedente
4.
" Seleziona
Viene visualizzata la schermata TV Aspect (Formato
TV). Premere i tasti ▲▼ per selezionare un formato
TV desiderato, quindi premere il tasto E.
Sono disponibili quattro scelte:
16:9 originale - per televisori panoramici. Visualizza
le immagini a schermo largo nel formato originale in
16:9 e le immagini 4:3 (vecchio formato standard) in
formato 4:3 pillarbox con bande nere a sinistra e a
destra.
16:9 Pieno - per televisori panoramici. Visualizza le
immagini a schermo largo nel formato originale in
16:9 e espande le immagini in 4:3 per riempire lo
schermo in 16:9.
6.
Auto
Manuale
a Precedente
d Salta
< Sposta " Seleziona
Il prodotto verifica la connessione, quindi si collega
alla rete. Al termine, premere il tasto E. Viene
visualizzata la schermata Initial Settings Complete
(Impostazioni iniziali completate), quindi viene
visualizzata la schermata iniziale.
| 16 Italiano
HT-F4200_XU_ITA_130208-1.indd 16
2013-02-13 오후 4:38:54
Indirizzo MAC (d0:66:7b:dc:28:fc)
Indirizzo IP, Maschera sottorete, Gateway, Server DNS
| NOTA |
Per riprodurre o visualizzare video, musica o foto
La rete funziona correttamente.
Per ulteriori problemi contattare il provider dei servizi di rete.
che si trovano sul PC, è necessario collegare l'home
theater e il PC a una rete domestica e scaricare,
installare e configurare il software DLNA sul PC.
(Vedere a pagina 22)
OK
" Seleziona
Accesso alla schermata di
impostazione
| NOTA |
Per visualizzare nuovamente la schermata Initial
Setting (Impostazione iniziale) ed effettuare le
modifiche, selezionare l'opzione Reset (Ripristina).
(Vedere a pagina 20)
Se si utilizza un cavo HDMI per collegare il prodotto a
un televisore Samsung compatibile Anynet+ (HDMICEC) e 1). La funzione Anynet+ (HDMI-CEC) è stata
impostata su On sia nel televisore che nel prodotto e 2).
Per il televisore è impostata una lingua supportata dal
prodotto, il prodotto imposta automaticamente tale
lingua come lingua preferita.
Selezionare Impostazioni nella schermata iniziale,
quindi premere E. Viene visualizzata la schermata
Impostazioni.
1.
Impostazioni
Display
La schermata iniziale
1
Impostazioni
Gateway Ping
Test dei servizi Internet
04
Per selezionare un'opzione nella schermata iniziale,
spostare il cursore utilizzando i tasti ▲▼◄► per
selezionare l'opzione scelta, quindi premere il tasto
E.
1.
Impostazione iniziale | Rete – Su cavo
Impostazioni 3D
Audio
Formato TV
: 16:9 originale
Rete
BD Wise
: Off
Sistema
Risoluzione
: Auto
Lingua
Fotogramma Video(24Fs) : Off
Sicurezza
Formato colore HDMI
: Auto
General
HDMI Profondità colori
: Off
Supporto
Modo progressivo
: Auto
►
3
Video
Foto
Musica
Impostazioni
4
2
Per accedere ai menu, ai sottomenu e alle opzioni
della schermata Impostazioni, vedere la figura del
telecomando in basso.
2.
| NOTA |
5
App 1
No disco
App 2
a Cambia dispos
App 3
App 4
d Visual. dispos. " Conferma
1
Seleziona le foto.
2
Seleziona i video.
3
Seleziona la musica.
4
Seleziona le impostazioni.
5
Seleziona le applicazioni.
6
Se si lascia il prodotto in modo di arresto per oltre 5
minuti, sul televisore appare un salvaschermo. Se il
salvaschermo viene lasciato in funzione per oltre 20
minuti, l'unità si spegne automaticamente.
Tasti del telecomando utilizzati per il
menu Impostazioni
SUBTITLE
REPEAT
1
TOOLS
INFO
RETURN
EXIT
3
2
6
HOME
Visualizza i tasti del telecomando che si
possono utilizzare per accedere alle funzioni.
4
TUNER
1
Tasto HOME: Per passare alla schermata
iniziale.
Italiano
HT-F4200_XU_ITA_130208-1.indd 17
17 |
2013-02-13 오후 4:38:58
Impostazioni
2
Tasto RETURN: Per tornare al menu
precedente.
3
Tasto E (Invio) / DIREZIONE:
• Premere ▲▼◄► per spostare il cursore o
selezionare una voce.
• Premere il tasto E per attivare la voce
correntemente selezionata o confermare
un'impostazione.
4
Tasto EXIT: Premere per uscire dal menu
corrente.
BD Wise
BD Wise è la funzione di
interconnettività Samsung di ultima
generazione.
Quando si collegano tra loro un
prodotto Samsung e un televisore
Samsung con BD Wise tramite
HDMI, e BD Wise è attivo sia sul
prodotto che sul televisore, il prodotto
trasmette i video con la risoluzione
video e la frequenza di fotogrammi
del disco Blu-ray/DVD.
Risoluzione
Consente di impostare risoluzione
di uscita del segnale video HDMI
su BD Wise, Auto, 1080p, 1080i,
720p, 576p/480p. Il numero indica
il numero di linee del video per
fotogramma. "i" e "p" indicano,
rispettivamente, la scansione
interlacciata e progressiva. Maggiore
è il numero di linee, maggiore è la
qualità.
Fotogramma
Video(24Fs)
Impostando la funzione Fotogramma
Video(24Fs) su Auto, il prodotto
regola automaticamente la propria
uscita HDMI su 24 fotogrammi al
secondo per migliorare la qualità
dell'immagine se collegato a un
televisore compatibile 24Fs.
• Questa funzione può essere
utilizzata soltanto sui televisori che
supportano questa frequenza di
fotogrammi.
• Fotogramma video può essere
selezionato solo se il prodotto è nei
modi di risoluzione 1080i o 1080p
dell'uscita HDMI.
Formato
colore HDMI
Consente di impostare il formato
dello spazio colore per l'uscita HDMI
in base alla capacità del dispositivo
collegato (televisore, monitor, ecc.).
HDMI
Profondità
colori
Consente di impostare sul prodotto la
trasmissione del video dal connettore
HDMI OUT con profondità colori.
La profondità colori consente una
riproduzione più fedele con una
maggiore profondità dei colori.
Modo
progressivo
Consente di migliorare la
qualità dell'immagine durante la
visualizzazione dei DVD.
| NOTA |
Il tasto E sul pannello anteriore del prodotto
può avere la stessa funzione del tasto E sul
telecomando.
Informazioni dettagliate sulle funzioni
Ogni funzione, voce menu o singola opzione della
schermata Impostazioni è spiegata in dettaglio a video.
Per visualizzare la spiegazione, utilizzare i tasti ▲▼◄►
per selezionare la funzione, la voce di menu o l'opzione.
La spiegazione appare di solito sulla destra della
schermata. Per una breve descrizione di ogni funzione di
Impostazioni, vedere alla pagina successiva. Per ulteriori
informazioni su alcune funzioni vedere anche l'appendice
del manuale.
Funzioni del menu Impostazioni
Display
Impostazioni
3D
Formato TV
Imposta le funzioni 3D.
Riproduzione 3D Blu-ray:
Selezionare se riprodurre un
disco Blu-ray con contenuti 3D
in modo 3D. Se si passa alla
schermata iniziale o al menu
principale di Smart Hub mentre si
è in modo 3D, il prodotto passa
automaticamente a 2D.
Dim. schermo: Inserire la
dimensione del televisore collegato
al prodotto. Il prodotto regola
automaticamente l'uscita 3D
in base alla dimensione dello
schermo del televisore.
Consente di regolare l'uscita del
prodotto in base alla dimensione
dello schermo del televisore. Vedere
pagina 16.
Audio
Imposta
altoparlanti
Permette di regolare le seguenti
impostazioni dei diffusori e di
accendere e spegnere il tono di test
in modo da testare i diffusori.
| 18 Italiano
HT-F4200_XU_ITA_130208-1.indd 18
2013-02-13 오후 4:39:07
Canale ritorno
audio
Permette di selezionare se attivare
i diffusori del televisore o dell'home
theatre.
Permette di direzionare il suono
dal televisore ai diffusori dell'Home
Cinema. Richiede una connessione
HDMI e un televisore compatibile con
la funzione di canale di ritorno audio
(ARC).
• Quando la funzione Canale ritorno
audio è su On, utilizzare il cavo
HDMI per collegare il prodotto
al televisore. A questo punto,
l'ingresso ottico non funziona.
• Quando la funzione Canale ritorno
audio è su Auto, utilizzare il cavo
HDMI per collegare il prodotto al
televisore. A questo punto vengono
selezionati automaticamente ARC e
ingresso ottico.
Uscita
Digitale
Permette di impostare l'uscita digitale
in base alle capacità del ricevitore
AV collegato al prodotto. Per ulteriori
dettagli, fare riferimento alla tabella di
selezione delle uscite digitali. (Vedere a
pagina 32)
Controllo
gamma
dinamica
Consente di applicare il controllo
gamma dinamica sull'audio Dolby
Digital, Dolby Digital Plus e Dolby
TrueHD.
Auto: Controlla automaticamente la
gamma dinamica dell'audio Dolby
TrueHD, in base alle informazioni
fornite dalla colonna sonora Dolby
TrueHD. Attiva anche il controllo
della gamma dinamica per Dolby
Digital e Dolby Digital Plus.
Off: Lascia la gamma dinamica non
compressa, permettendo di sentire
il suono originale.
On: Attiva il controllo della gamma
dinamica per tutti e tre i formati
Dolby. Il volume dei suoni bassi
viene alzato e quello dei suoni alti
viene abbassato.
Modalità
Downmixing
Consente di selezionare il metodo
di downmix multicanale compatibile
con l'impianto stereo. È possibile
scegliere di eseguire il downmix del
prodotto su stereo normale o su
stereo compatibile con surround.
Impostazioni
di rete cablata
Per ulteriori informazioni sulle
impostazioni di rete e le funzioni di
rete, vedere "Le reti e Internet " a
partire da pagina 20.
Rete
Test di rete
Permette di verificare se la
configurazione del protocollo
Internet funziona correttamente.
Stato della
rete
Permette di controllare se è stata
stabilita una connessione alla rete e
a Internet.
Connessione
Internet BDLive
Permette di autorizzare o bloccare
una connessione Internet per il
servizio BD-Live.
Impostazione
iniziale
Consente di eseguire nuovamente la
procedura di impostazione iniziale.
Vedere a pagina 16 per i dettagli.
Anynet+
(HDMI-CEC).
Anynet+ è una comoda funzione
che permette di sintonizzare più
prodotti Samsung dotati di Anynet+
e di comandarli con un telecomando
Samsung. Per attivare questa
funzione, collegare questo prodotto
ad un televisore Samsung dotato
di funzione Anynet+ utilizzando un
cavo HDMI.
Gestione dei
dati BD
Consente di gestire i contenuti
scaricati da un disco Bluray che
supporta il servizio BD-Live.
È possibile visualizzare le informazioni
sul dispositivo USB utilizzato
per la memorizzazione dei dati
BD Live, compreso lo spazio di
memorizzazione. È anche possibile
eliminare i dati BD Live e cambiare il
dispositivo.
Sistema
Italiano
HT-F4200_XU_ITA_130208-1.indd 19
Impostazioni
Selez.
altoparlante
Sincronia
audio
Quando il prodotto è collegato a
un televisore digitale, permette di
regolare il ritardo audio in modo che
l'audio sia sincronizzato con il video.
È possibile impostare il ritardo tra 0
e 300 millisecondi.
04
Livello: Consente di regolare il livello
sonoro relativo di ciascun diffusore
da 6 a -6 db. Se si gradiscono ad
esempio i bassi profondi, è possibile
aumentare il livello sonoro del
subwoofer di 6 db.
Distanza: Permette di regolare la
distanza relativa di ciascun diffusore
dalla posizione di ascolto fino a 10
metri. Maggiore è la distanza, più
forte risulterà il suono del diffusore.
Test Tone : Permette di eseguire
la funzione Test Tone (Tono di
test) in modo da poter testare le
regolazioni. Impostando Test Tone
su On si attiva questa funzione.
Impostandolo su Off la si disattiva.
19 |
2013-02-13 오후 4:39:07
Impostazioni
Video On
Demand
DivX®
Vedere i codici di registrazione
DivX® VOD per acquistare e
riprodurre contenuti DivX® VOD.
Lingua
È possibile selezionare la lingua preferita per il menu a
video, il menu del disco, i sottotitoli, ecc.
• La lingua selezionata per il menu del disco, l'audio del
disco o i sottotitoli appare solo se supportata sul disco.
Sicurezza
Il PIN predefinito è 0000. Inserire il PIN predefinito per
accedere alla funzione di sicurezza se non è stata
ancora creata una propria password.
Grado Blocco
Can. BD
Grado Blocco
Can. DVD
Cambia PIN
Se non viene inserito il PIN,
impedisce la riproduzione di dischi
Blu-ray con classificazione uguale o
superiore a quella di un'età specifica
inserita.
Se non viene inserito il PIN,
impedisce la riproduzione di DVD
con classificazione superiore ad una
specifica classificazione numerica
selezionata.
Modificare il PIN a quattro cifre
utilizzato peraccedere alle funzioni
di sicurezza.
Le reti e Internet
Quando si collega questo prodotto a una rete, è possibile
utilizzare applicazioni e funzioni basate su una rete come
BD-LIVE e aggiornare il software del prodotto attraverso il
collegamento alla rete.
Configurazione del collegamento alla
rete
Prima di iniziare, contattare l'ISP per sapere se il proprio
indirizzo IP è statico o dinamico. Se è dinamico, si
consiglia di utilizzare la seguente procedura automatica.
Se è statico, è necessario utilizzare la seguente procedura
manuale.
• Prima di cominciare, confermare che il prodotto è
collegato al router con un cavo di rete.
❏ Automatico
Per avviare il processo di configurazione, seguire i passi
riportati di seguito:
1.
Nel menu iniziale, selezionare Impostazioni, quindi
premere il tasto E.
2.
3.
Selezionare Rete, quindi premere il tasto E.
4.
Premere il tasto ► nel menu di configurazione
del protocollo Internet. Usare il tasto ▲▼ per
selezionare Auto e quindi premere il tasto E
E.
Generale
Fuso orario
È possibile specificare il fuso orario
in vigore nella propria area.
Selezionare Impostazioni di rete cablata, quindi
premere il tasto E. Viene visualizzata la schermata
Impostazioni di rete cablata.
Impostazioni
Impostazioni di rete cablata
Display
Supporto
Aggiornamento
software
Per ulteriori informazioni sulla
funzione Aggiornamento software,
vedere "Aggiornamento del
software" a pagina 21.
Contattare
Samsung
Fornisce le informazioni di contatto
per l'assistenza sul prodotto.
Condiz.
Contratto
assistenza
Visualizzare l'esclusione di
responsabilità generale riferita ai
contenuti e ai servizi di terze parti.
Reset
Tutte le impostazioni vengono
riportate ai valori predefiniti, ad
eccezione delle impostazioni di rete.
La password di sicurezza predefinita
è 0000.
Audio
Impostazione IP
: Auto
Rete
Indirizzo IP
: 0
0
0
0
Sistema
Maschera sottorete : 0
0
0
0
Lingua
Gateway
: 0
0
0
0
0
0
0
SicurezzaDNS
General DNS Server
: Auto
: 0
Supporto
> Sposta " Seleziona
' Ritorna
5.
La funzione rete acquisisce e compila
automaticamente i valori per l'indirizzo IP, la
Maschera sottorete, ecc.
6.
Al termine dell'acquisizione dei valori di rete,
premere il tasto RETURN (').
7.
Selezionare Test di rete, quindi premere E. Il
sistema Home Theater verifica la connessione alla
rete. Al termine, premere il tasto RETURN (').
| 20 Italiano
HT-F4200_XU_ITA_130208-1.indd 20
2013-02-13 오후 4:39:08
1.
2.
3.
Impostazioni di rete cablata
Display
Audio
Impostazione IP
Rete
Indirizzo IP
Sistema
Maschera sottorete : 255 255 255
Lingua
Gateway
SicurezzaDNS
General DNS Server
: Manuale
: 0
: 0
0
0
0
0
0
0
0
0
0
: Manuale
: 0
0
Supporto
> Sposta " Seleziona
' Ritorna
1.
Seguire i primi quattro passi nella procedura
automatica, selezionando Manuale anziché Auto al
passo 4.
2.
Premere il tasto freccia ▼ per selezionare il primo
campo (Indirizzo IP).
3.
Utilizzare i tasti numerici del telecomando per
inserire i numeri.
4.
Una volta terminato di completare un campo, usare
il tasto ► per passare al campo successivo.
È anche possibile utilizzare gli altri tasti con le frecce
per spostarsi in su, in giù e indietro.
5.
Inserire i valori per Indirizzo IP, Maschera
sottorete e Gateway.
6.
7.
Premere il tasto ▼ per passare a DNS.
8.
9.
Premere il tasto RETURN (') sul telecomando.
Premere il tasto ▼ per andare al primo campo DNS.
Inserire i numeri come indicato sopra.
Selezionare Test di rete, quindi premere E.
Quando il test è completato, premere il tasto
RETURN (') per tornare alla schermata precedente.
10. Selezionare Stato della rete, quindi premere E.
11. Viene visualizzata la schermata Network Status
(Stato rete). Il prodotto verifica la connessione,
quindi si collega alla rete. Al termine, selezionare
OK, quindi premere E.
Aggiornamento del software
Il menu Aggiornamento software permette di aggiornare
il software del prodotto per ottimizzarne le prestazioni o
aggiungere nuovi servizi.
• Mai spegnere e riaccendere il prodotto
manualmente durante il processo di aggiornamento.
5.
| NOTA |
L'aggiornamento è completato quando il prodotto
si spegne dopo il riavvio. Premere il tasto di
ALIMENTAZIONE per accendere il prodotto aggiornato
per l'uso. Non accendere o spegnere il prodotto
manualmente durante il processo di aggiornamento.
Samsung Electronics non si assume alcuna
responsabilità legale in caso di malfunzionamento del
prodotto dovuto all'instabilità della connessione Internet
o alla negligenza del cliente durante l'aggiornamento
del software.
Per annullare l'aggiornamento mentre si sta scaricando
l'aggiornamento del software, premere il tasto E.
Online
Per utilizzare la funzione Online, il prodotto deve essere
collegato a Internet. Rimuovere tutti i dischi prima di
cominciare.
1. Selezionare Online, quindi premere il tasto E. Viene
visualizzato il messaggio di connessione al server in
corso.
2. Se è disponibile un aggiornamento, appare un
messaggio che richiede se si desidera eseguire
l'aggiornamento. Se si seleziona Sì, il prodotto si
spegne automaticamente, si riavvia e quindi inizia
l'aggiornamento.
| IMPORTANTE|
Non spegnere o accendere l'Home Cinema
manualmente durante un aggiornamento software.
3. Si apre la finestra di avanzamento dell'aggiornamento.
Al termine dell'aggiornamento, il prodotto si spegne
di nuovo automaticamente.
4. Premere il tasto di ALIMENTAZIONE per accendere
il prodotto.
| NOTA |
L'aggiornamento è completato quando il prodotto
si spegne dopo il riavvio. Premere il tasto di
ALIMENTAZIONE per accendere il prodotto aggiornato
per l'uso.
Non accendere o spegnere mai il prodotto
manualmente durante il processo di aggiornamento.
Samsung Electronics non si assume alcuna
responsabilità legale in caso di malfunzionamento del
prodotto dovuto all'instabilità della connessione Internet
o alla negligenza del cliente durante l'aggiornamento
del software.
Italiano
HT-F4200_XU_ITA_130208-1.indd 21
Impostazioni
4.
Impostazioni
Nel menu principale, selezionare Impostazioni,
quindi premere il tasto E.
Selezionare Supporto, quindi premere il tasto E.
Selezionare Aggiornamento software, quindi
premere il tasto E.
Selezionare uno dei seguenti metodi :
• Online
• Tramite USB
• Notifica aggiorn. autom.
Premere il tasto E.
Di seguito sono riportate le informazioni relative a
ciascun metodo.
04
❏ Manuale
Se si dispone di un indirizzo IP statico o se la procedura
automatica non funziona, i valori per le impostazioni di
rete devono essere impostati manualmente.
21 |
2013-02-13 오후 4:39:10
Impostazioni
Tramite USB
1.
2.
3.
4.
5.
6.
7.
8.
9.
10.
11.
12.
13.
Accedere al sito www.samsung.com.
Fare clic su SUPPORT in alto a destra nella pagina.
Inserire il codice del modello del prodotto nel
campo di ricerca. Dopo aver inserito il codice del
modello, un menu a discesa visualizza i prodotti che
corrispondono a quel codice.
Fare clic con il tasto sinistro del mouse sul codice
modello del prodotto all'interno dell'elenco a discesa.
Nella pagina visualizzata, scorrere verso il basso e
fare clic su Manuali e download del firmware.
Fare clic su Firmware al centro della pagina.
Fare clic sull'icona dello ZIP nella colonna File a
destra nella pagina.
Fare clic su Invia nel popup visualizzato. Fare clic su
OK nel popup visualizzato per scaricare e salvare il
file del firmware sul PC.
Decomprimere il file zip sul computer. Deve
comparire una sola cartella con lo stesso nome del
file zip.
Copiare la cartella su un'unità flash USB.
Assicurarsi che non vi siano dischi nel prodotto,
quindi inserire l'unità flash USB nella porta USB del
prodotto.
Nel menu del prodotto, selezionare Impostazioni >
Supporto > Aggiornamento software.
Selezionare Tramite USB.
| NOTA |
Quando si aggiorna il software attraverso la porta USB,
non deve essere inserito nessun disco nel prodotto.
Non accendere o spegnere mai il prodotto
manualmente durante il processo di aggiornamento.
Al termine dell'aggiornamento del software, verificare
i dettagli del software nel menu Aggiornamento
software.
Notifica aggiorn. autom.
Se il prodotto è collegato alla rete e la notifica di
aggiornamento automatico è attivata, per il prodotto
verranno inviate notifiche se sarà disponibile una nuova
versione del software.
1. Accendere il prodotto.
2. Nel menu di aggiornamento del software, impostare
Notifica aggiorn. autom. su On. Se è disponibile
una nuova versione del software, verrà inviata una
notifica con un messaggio popup.
3. Per aggiornare il firmware, selezionare Sì. Il prodotto
si spegne automaticamente, si riavvia e quindi inizia
l'aggiornamento.
4. Si apre la finestra di avanzamento dell'aggiornamento.
Quando l'aggiornamento è completo, il prodotto si
spegne di nuovo automaticamente.
5. Premere il tasto di ALIMENTAZIONE per accendere
l'apparecchio.
| NOTA |
L'aggiornamento è completato quando il prodotto
si spegne dopo il riavvio. Premere il tasto
ALIMENTAZIONE per accendere il prodotto su cui
è stato effettuato l'aggiornamento e utilizzarlo. Non
accendere o spegnere il prodotto manualmente
durante il processo di aggiornamento.
Samsung Electronics non si assume alcuna
responsabilità legale in caso di malfunzionamento
del prodotto dovuto all'instabilità della connessione
Internet o a negligenza del cliente durante
l'aggiornamento del software.
Configurazione di DLNA
DLNA consente di riprodurre musica, video e foto sul PC
utilizzando il prodotto. Per utilizzare DLNA, è necessario
collegare il prodotto al PC attraverso la rete (vedere a
pagina 14) e installare SAMSUNG PC Share Manager sul
PC.
Come scaricare il software DLNA
Per utilizzare DLNA con il PC, è necessario installare il
software DLNA sul PC. Per scaricare il software per PC e
ottenere istruzioni dettagliate sull'uso di DLNA, visitare il
sito Web Samsung.com.
Accedere al sito www.samsung.com.
Fare clic su SUPPORT in alto nella pagina.
Inserire il codice del modello del prodotto nel
campo di ricerca. Dopo aver inserito il codice del
modello, un menu a discesa visualizza i prodotti che
corrispondono a quel codice.
4. Fare clic con il tasto sinistro del mouse sul codice
modello del prodotto all'interno dell'elenco a discesa.
5. Nella pagina visualizzata, scorrere verso il basso e
fare clic su Manuali e download del firmware.
6. Fare clic sulla scheda Software.
7. Nella scheda Software, fare clic sull'icona EXE a
destra della riga DLNA.
8. Nel primo popup visualizzato, fare clic su Invia. Nel
secondo popup, fare clic su Salva File.
9. Trovare il file di installazione di DLNA sul disco e farvi
doppio clic sopra.
10. Nel popup visualizzato, fare clic su Esegui, quindi
seguire le istruzioni sulla schermata.
1.
2.
3.
Scaricare il manuale di installazione/istruzioni di DLNA
sempre dalla scheda Software facendo clic sul simbolo
del file PDF corrispondente nella colonna File a destra. Il
file, in formato PDF, viene scaricato e aperto. È possibile
visualizzare e/o salvare il file.
| NOTA |
Per utilizzare DLNA su uno smartphone, è necessario
collegare l'impianto e lo smartphone allo stesso router.
| 22 Italiano
HT-F4200_XU_ITA_130208-1.indd 22
2013-02-13 오후 4:39:12
Riproduzione di file su dispositivo
USB
3.
4.
Andare al menu principale.
In modo di arresto, collegare il dispositivo di
memorizzazione USB alla porta USB sul pannello
anteriore del prodotto. Viene visualizzato il
messaggio "Accedere al dispositivo?".
Premere il tasto ◄► per selezionare Sì, quindi
premere il tasto E.
Premere il tasto ROSSO (A).
Video
Foto
Musica
Impostazioni
1.
2.
04
È possibile riprodurre i file multimediali memorizzati su un
dispositivo USB collegato.
6-1. Premere i tasti ▲▼ per selezionare Video, Foto o
Musica, quindi premere il tasto E.
7-1. Se sulla schermata vengono visualizzati i file
procedere al passo 8-1. Se sulla schermata vengono
visualizzate le cartelle dei file, utilizzare i tasti
▲▼◄► per selezionare una cartella, premere E,
quindi procedere al passo 8-1.
-1
8 . Utilizzare i tasti ▲▼◄► per selezionare un file da
riprodurre o visualizzare, quindi premere il tasto E.
| NOTA |
La riproduzione file 3D non è supportata.
Per evitare di danneggiare la memoria USB, è
necessario rimuovere in sicurezza il dispositivo di
memorizzazione USB utilizzando la funzione “Rimoz.
sicura USB”. Premere il tasto HOME per passare
al menu principale, selezionare il tasto GIALLO (C),
quindi premere il tasto E.
Impostazioni
Riproduzione di un disco con
contenuti registrati dall'utente
CD
USB Flash Disk
6.
7.
App 3
a Cambia dispos
CD
5.
App 2
App 4
d Visual. dispos. " Conferma
Premere i tasti ▲▼ per selezionare USB Flash Mem
(Mem flash USB) o Disk (Disco) quindi premere il
tasto E.
Premere i tasti ▲▼◄► per selezionare Video,
Musica o Foto, quindi premere il tasto E.
Se sulla schermata vengono visualizzati i file
procedere al passo 8. Se sulla schermata vengono
visualizzate le cartelle dei file, utilizzare i tasti
▲▼◄► per selezionare una cartella, premere E,
quindi procedere al passo 8.
È possibile riprodurre i file multimediali registrati su dischi
DVD o CD.
1.
2.
3.
4.
5.
6.
Utilizzare i tasti ▲▼◄► per selezionare un file da
riprodurre o visualizzare, quindi premere il tasto E.
OPPURE
8.
7.
4-1. Premere il tasto BLU (D).
CD
App 1
USB Flash Disk
App 2
USB Flash Disk
Impostazioni
App 3
App 4
d Home " Conferma
5-1. Premere i tasti ◄► per selezionare USB Flash Mem
(Mem flash USB) o Disk (Disco) quindi premere il
tasto E.
Accendere l'Home Theater.
Aprire il vano del disco, inserire un disco registrato
dall'utente nell'apposito vano con l'etichetta rivolta
verso l'alto, quindi chiudere il vano.
Dopo il caricamento del disco, premere il tasto
ROSSO (A).
Premere i tasti ▲▼◄► per selezionare CD o DVD,
quindi premere il tasto E.
Premere i tasti ◄► per selezionare Video, Musica
o Foto, quindi premere il tasto E.
Se sulla schermata vengono visualizzati i file,
procedere al passo 7. Se sulla schermata vengono
visualizzate le cartelle dei file, utilizzare i tasti
▲▼◄► per selezionare una cartella, premere E,
quindi procedere al passo 7.
Utilizzare i tasti ▲▼◄► per selezionare un file da
riprodurre o visualizzare, quindi premere il tasto E.
OPPURE
3-1. Dopo il caricamento del disco, premere il tasto BLU
(D).
4-1. Premere i tasti ◄► per selezionare CD o DVD,
quindi premere il tasto E.
5-1. Premere i tasti ▲▼ per selezionare Video, Musica
o Foto quindi premere il tasto E.
6-1. Se sulla schermata vengono visualizzati i file
procedere al passo 7-1. Se sulla schermata vengono
visualizzate le cartelle dei file, utilizzare i tasti
▲▼◄► per selezionare una cartella, premere E,
quindi procedere al passo 7-1.
7-1. Utilizzare i tasti ▲▼◄► per selezionare un file da
riprodurre o visualizzare, quindi premere il tasto E.
Italiano
HT-F4200_XU_ITA_130208-1.indd 23
23 |
2013-02-13 오후 4:39:12
Impostazioni
Riproduzione di DVD commerciali
Inserire un disco nell'apposito vano con l'etichetta
rivolta verso l'alto e quindi chiudere il vano del disco.
La riproduzione si avvia automaticamente. Se non si
riproduce automaticamente, passare a Video nel menu
principale e premere il tasto E. Nella maggior parte dei
casi, i dischi commerciali presentano un menu principale.
Per riprodurre il film sul disco, selezionare Riproduzione
sul menu del disco, quindi premere E.
2
| NOTA |
Per ulteriori informazioni sulla riproduzione video, vedere
"Controllo della riproduzione video" in questa pagina.
Controllo della riproduzione video
È possibile controllare la riproduzione dei file video
memorizzati su dischi Blu-ray, DVD e CD e su dispositivi
di memorizzazione USB. A seconda del disco, alcune
funzioni descritte in questo manuale potrebbero non
essere disponibili.
Tasti del telecomando utilizzati per la
riproduzione video
0
POPUP
2
1
1
Utilizzo del menu Strumenti
Durante la riproduzione, premere il tasto TOOLS.
Titolo
Se il film o video ha più di un titolo,
selezionare il titolo desiderato.
Tempo Esec.
Selezionare questa opzione per
passare al punto di riproduzione
specifico. Utilizzare i tasti numerici
per inserire il punto di riproduzione.
Modalità Ripeti
Selezionarlo per ripetere un titolo, un
capitolo (solo dischi BD/DVD) o una
sezione contrassegnata specifici.
Impostaz.
immagine
Selezionarlo per impostare il modo
immagine.
- Modalità :
Utente : Permette di regolare la
luminosità, la brillantezza ecc.
Dinamico : Selezionare questa
impostazione per aumentare la
nitidezza.
Normale : Selezionare questa
impostazione per la maggior parte
delle applicazioni.
Film : Questa è l'impostazione
migliore per guardare i film.
TITLE MENU
DISC MENU
SUBTITLE
Utilizzo del menu del disco, dei titoli e di
scelta rapida e dell'elenco dei titoli
• DISC MENU : Durante la riproduzione,
premere questo tasto per visualizzare il menu
del disco.
• TITLE MENU : Durante la riproduzione,
premere questo tasto per visualizzare il menu
dei titoli.
- Se il disco contiene una playlist, premere il
tasto VERDE (B) per passare alla playlist.
• POPUP MENU : Durante la riproduzione,
premere questo tasto per visualizzare il menu
di scelta rapida.
• DISC MENU o TITLE MENU : Durante
la riproduzione, premere questo tasto per
visualizzare l'elenco dei titoli.
HOME
REPEAT
Tasti relativi alla riproduzione
Il prodotto non riproduce l'audio nel modo
ricerca, riproduzione rallentata o fotogramma per
fotogramma.
• 6 : Avvia la riproduzione.
• 5 : Arresta la riproduzione.
• 7 : Mette in pausa la riproduzione.
• Riproduzione veloce : Durante la riproduzione,
premere il tasto 3 o .
Ogni volta che si preme il tasto 3 o , la
velocità di riproduzione cambia.
• Riproduzione rallentata : Nel modo pausa,
premere il tasto . Ogni volta che si preme il
tasto , la velocità di riproduzione cambia.
• Riproduzione fotogramma per fotogramma
: Nel modo pausa, premere il tasto 7. Ogni
volta che si preme il tasto 7, viene visualizzato
un nuovo fotogramma.
• Riproduzione a salti : Durante la riproduzione,
premere il tasto 1 o 2. Ogni volta che
si preme il tasto 1 o 2, il disco passa al
capitolo o al file precedente o successivo.
Permette di regolare il ritardo audio
in modo che l'audio sia sincronizzato
Sincronia audio
con il video. È possibile impostare il
ritardo tra 0 e 300 millisecondi.
Menu visualizzati solo durante la
riproduzione di dischi BD/DVD
Capitolo
Selezionarlo per passare al capitolo
che si desidera guardare.
Audio
Selezionarlo per impostare la lingua
desiderata per l'audio.
| 24 Italiano
HT-F4200_XU_ITA_130208-1.indd 24
2013-02-13 오후 4:39:16
Angolo
Per visualizzare la scena da un'altra
angolazione. L'opzione Angolo
visualizza il numero di angolazioni
disponibili per la visualizzazione (1/1,
1/2, 1/3, ecc.).
Video
BONUSVIEW
/ Audio
BONUSVIEW
Selezionarlo per impostare l'opzione
bonusview desiderata.
Menu visualizzati solo durante la
Per riprodurre una traccia particolare, utilizzare i tasti
▲▼ sul telecomando per selezionare la traccia, quindi
premere il tasto E.
2.
| NOTA |
Per ulteriori informazioni sulla riproduzione musicale,
vedere "Controllo della riproduzione musicale" in
questa pagina.
Controllo della riproduzione
musicale
È possibile controllare la riproduzione dei contenuti
musicali memorizzati su DVD, CD o dispositivi di
memorizzazione USB.
riproduzione di un file
Schrm inter
Selezionarlo per impostare il
formato schermo intero desiderato.
È possibile selezionare Originale,
Modalità1 (più grande) o Modalità2
(grandezza massima).
Informazioni
Per controllare le informazioni del file
video.
Tasti del telecomando utilizzati per la
riproduzione musicale
RDS DISPLAY
1
| NOTA |
Il menu Strumenti può variare in base al disco o al
È possibile creare una playlist di file video in modo quasi
identico a quello utilizzato per creare una playlist di file
musicali. Per le istruzioni, vedere "Creazione di una
playlist musicale" a pagina 26.
Riproduzione di un disco audio
commerciale preregistrato
Inserire un CD audio (CD-DA) o un disco MP3 nel
vano del disco.
• Per i CD audio (CD-DA), viene riprodotta
automaticamente la prima traccia. I brani di un
disco vengono riprodotti nell'ordine in cui sono
stati registrati sul disco.
• Per i dischi MP3, premere i tasti ▲▼ per
selezionare la Musica, quindi premere il tasto E.
Sequenza brani
TRACCIA 001
04:27
TRACCIA 003
04:07
TRACCIA 004
00:08 / 05:57
" Pausa
PTY -
PTY SEARCH
PTY +
4
5
6
7
8
9
TITLE MENU
POPUP
4
3
S
5
6
O
1
Tasti NUMERICI : durante la riproduzione di una
playlist, premere il numero corrispondente alla
traccia desiderata. Viene riprodotta la traccia
selezionata.
2
Salta : Durante la riproduzione, premere il tasto
1 o 2 per passare alla traccia precedente o
successiva nell'elenco.
3
Tasto 5 : per arrestare una traccia.
4
Riproduzione veloce (solo CD audio (CD-DA))
: Durante la riproduzione, premere il tasto 3 o
. Ogni volta che si preme il tasto 3 o , la
velocità di riproduzione cambia.
5
Tasto 7 : per mettere in pausa una traccia.
6
Tasto 6 : per riprodurre la traccia selezionata al
momento.
03:41
TRACCIA 005
03:17
TRACCIA 006
CD
3
0
1/12
05:57
TRACCIA 002
+
2
2
Creazione di una playlist
TRACCIA 001
TA
1
DISC MENU
dispositivo di memorizzazione. È possibile che non
vengano visualizzate tutte le opzioni.
1.
03:35
Strumenti
' Ritorna
Italiano
HT-F4200_XU_ITA_130208-1.indd 25
Impostazioni
Selezionarlo per impostare la lingua
desiderata per i sottotitoli.
04
Sottotitolo
25 |
2013-02-13 오후 4:39:21
Impostazioni
Ripetizione delle tracce di un CD audio
È possibile impostare la ripetizione delle tracce nel
prodotto.
1.
Durante la riproduzione audio, premere il tasto
STRUMENTI.
2.
Usare il tasto ◄► per selezionare Off, Traccia o
Uno, Tutto o Rip casual in Modalità Ripeti, quindi
premere il tasto E.
Creazione di una playlist musicale
1.
2.
Se si riproducono file musicali da un CD o DVD
commerciale, premere il tasto 5 o RETURN (').
Si apre la schermata dell'elenco dei file musicali.
Se si sta creando una playlist musicale da un
disco creato dall'utente o da un dispositivo USB,
accedere all'elenco dei file musicali come descritto
in "Riproduzione di file su dispositivo USB" a pagina
23 o "Riproduzione di un disco con contenuti
registrati dall'utente" a pagina 23.
Premere i tasti ▲▼ ◄► per passare al file
desiderato, quindi premere il tasto GIALLO (C)
per selezionarlo. Ripetere questa procedura per
selezionare altri file.
Musica
TRACCIA 002
È possibile controllare la riproduzione di foto memorizzate
su DVD, CD e dispositivi di memorizzazione USB.
Utilizzo del menu Strumenti
Durante la riproduzione, premere il tasto TOOLS.
Avvia / Arresta Selezionare questa opzione per
proiezione
riprodurre/mettere in pausa la
presentazione.
diapositive
Velocità slide Selezionarlo per impostare la velocità
show
della presentazione.
Musica di
sottof
Selezionarlo per ascoltare la musica
durante la visualizzazione della
presentazione.
Zoom
Selezionarlo per ingrandire l'immagine
corrente. (Ingrandisce fino a 4 volte
l'immagine)
Ruota
Selezionarlo per ruotare l'immagine.
(L'immagine viene fatta ruotare in
senso orario o antiorario).
Informazioni
Mostra informazioni sull'immagine,
quali il nome, le dimensioni, ecc.
2 File selez 1/2 Pagina
TRACCIA 001
TRACCIA
TRACC
IA 00
0022
05:57
04:27
TRACCIA 003
TRACCIA 004
04:07
03:41
TRACCIA 005
TRACCIA 006
03:17
03:35
TRACCIA 007
TRACCIA 008
03:47
03:49
TRACCIA 009
TRACCIA 010
03:53
CD
Controllo della riproduzione foto
| NOTA |
Il menu Strumenti può variare in base al disco o al
03:45
Seleziona Vai a pag.
' Ritorna
3.
Per rimuovere un file dalla playlist, passare al file,
quindi premere il tasto GIALLO (C).
4.
Premere il tasto E per riprodurre i file selezionati.
Viene visualizzata la schermata Playlist.
5.
Per andare all'elenco dei file musicali, premere il
tasto 5 o RETURN (').
6.
Per tornare alla playlist, premere il tasto E.
dispositivo di memorizzazione. È possibile che non
vengano visualizzate tutte le opzioni.
Per abilitare la funzione di musica di sottofondo, il
file della foto deve trovarsi sullo stesso supporto di
memorizzazione del file musicale. Tuttavia, sulla qualità
del suono possono influire il bit rate del file MP3, la
dimensione della foto e il metodo di codifica.
Creazione di una playlist di foto
È possibile creare una playlist di foto in modo quasi
identico a quello utilizzato per creare una playlist di file
musicali. Per le istruzioni, vedere "Creazione di una
playlist musicale" in questa pagina.
| NOTA |
Sui CD audio (CD-DA), è possibile creare una playlist
contenente fino a 99 tracce.
Se si passa dalla playlist all'elenco dei file musicali,
quindi si torna alla playlist, viene avviata di nuovo
dall'inizio la riproduzione della playlist.
| 26 Italiano
HT-F4200_XU_ITA_130208-1.indd 26
2013-02-13 오후 4:39:25
Ascolto della radio
Selezionare la stazione desiderata.
• Sintonizzazione preimpostata 1 : Premere il tasto
5 per selezionare PRESET quindi premere il
tasto TUNING UP, DOWN per selezionare la
stazione preimpostata.
- Prima di potersi sintonizzare su una stazione
preimpostata, questa deve essere aggiunta
alla memoria del prodotto.
• Sintonizzazione manuale : Premere il tasto 5
per selezionare MANUAL quindi premere il tasto
TUNING UP, DOWN per sintonizzarsi su una
frequenza precedente o successiva.
• Sintonizzazione automatica : Premere il tasto 5
per selezionare MANUAL quindi tenere premuto
il tasto TUNING UP, DOWN per ricercare
automaticamente la banda.
Impostazione mono/stereo
Premere il tasto MO/ST.
• Ogni volta che si preme il tasto, l'audio passa da
STEREO a MONO e viceversa.
• Nelle zone con scarsa ricezione, selezionare MONO
per una trasmissione chiara e priva di interferenze.
Memorizzazione delle stazioni
Esempio: memorizzazione della stazione FM 89.10.
1.
2.
3.
4.
5.
ricevere le stazioni FM
Premere il tasto FUNCTION per selezionare FM.
Premere il tasto FUNCTION per selezionare FM.
Premere il tasto TUNING UP, DOWN per
selezionare <89.10>.
Premere il tasto TUNER MEMORY.
• Il numero lampeggia sul display.
Premere di nuovo il tasto TUNER MEMORY.
• Premere il tasto TUNER MEMORY prima che il
numero scompaia dal display.
• Dopo aver premuto il tasto TUNER MEMORY, il
numero scompare dal display e la stazione viene
salvata in memoria.
Per memorizzare un'altra stazione, ripetere i passi
da 2 a 4.
• Per sintonizzarsi su una stazione preimpostata,
premere il tasto TUNING UP, DOWN.
L'RDS consente alle stazioni FM di inviare un segnale
aggiuntivo insieme ai normali segnali dei programmi.
Ad esempio, le stazioni inviano i loro nomi e informazioni
sul tipo di programma che stanno trasmettendo, ad
es. sport, musica, ecc. Quando la radio si sintonizza su
una stazione FM che offre il servizio RDS, sul display si
accende la spia RDS.
Descrizione della funzione RDS
• PTY (Tipo di programma) : Visualizza il tipo di
programma attualmente trasmesso.
• PS NAME (Nome del servizio di programma) : Indica il
nome della stazione ed è composto da 8 caratteri.
• RT (Testo radio) : Decodifica l'eventuale testo
trasmesso da una stazione, composto da un massimo
di 64 caratteri.
• CT (Orologio) : Decodifica l'ora esatta dalla frequenza
FM. Alcuni stazioni potrebbero non trasmettere le
informazioni PTY, RT o CT, pertanto potrebbero non
essere visualizzate in tutti i casi.
• TA (Annuncio sul traffico) : TA ON/OFF mostra che
l'annuncio sul traffico è in corso.
| NOTA |
L'RDS potrebbe non funzionare correttamente se la
stazione selezionata non trasmette il segnale RDS
correttamente o se il segnale è debole.
Per visualizzare i segnali RDS
È possibile visualizzare sul display i segnali RDS inviati
dalle stazioni.
Premere il tasto RDS DISPLAY durante l'ascolto di una
stazione FM.
• Ogni volta che si preme il tasto, il display mostra in
sequenza le seguenti informazioni: PS NAME RT
CT Frequenza
PS
(Servizio di
programma)
Durante la ricerca, viene visualizzato
<PS NAME>, quindi vengono
visualizzati i nomi delle stazioni. Viene
visualizzato <NO PS> se non viene
inviato nessun segnale.
RT
(Testo radio)
Durante la ricerca, viene visualizzato
<RT>, quindi vengono visualizzati
i messaggi di testo inviati dalla
stazione. Viene visualizzato <NO RT>
se non viene inviato nessun segnale.
Frequenza
Frequenza stazione (servizio non
RDS)
Italiano
HT-F4200_XU_ITA_130208-1.indd 27
Riproduzione Multimediale
1.
2.
Utilizzo di RDS (Radio Data System) per
05
Utilizzo dei tasti del telecomando
Trasmissione RDS
27 |
2013-02-13 오후 4:39:30
Riproduzione Multimediale
Caratteri utilizzati sul display
Quando il display mostra i segnali PS o RT, vengono usati
i caratteri seguenti.
• La finestra del display non è in grado di fare differenza
tra maiuscole e minuscole, pertanto usa sempre le
lettere maiuscole.
• La finestra del display non è in grado di visualizzare i
caratteri accentati, <A,> ad esempio potrebbe indicare
le lettere accentate <A's>, <À, Â, Ä, Á, Å e Ã.>
Indicazione PTY (Tipo programma) e
Utilizzo il pulsante TV Sound sul
telecomando
TV SOUND
Audio TV
Il tasto TV SOUND consente di ascoltare l'audio dai
diffusori home theatre o dai diffusori TV
1.
Collegare il cavo HDMI alla TV e al sistema Home
Cinema. (Vedere a pagina 15)
2.
Impostare il sistema Home Cinema e la TV collegati
su Anynet+ (HDMI-CEC) On.
Premere il tasto TV SOUND del telecomando.
funzione PTY-SEARCH
Uno dei vantaggi del servizio RDS è che è possibile
individuare un particolare tipo di programma nei canali
preimpostati specificando i codici PTY.
3.
4.
Per ricercare un programma usando i codici PTY
❏ Prima di cominciare
• La funzione di ricerca PTY è applicabile soltanto alle
stazioni memorizzate.
• Per interrompere la ricerca in qualsiasi momento
durante il processo, premere il tasto 5 durante la
ricerca.
• È previsto un limite di tempo per eseguire le operazioni
indicate di seguito. Se l'impostazione viene annullata
prima di aver terminato, iniziare di nuovo dal passo 1.
• Prima di premere i tasti sul telecomando principale,
assicurarsi di aver selezionato la stazione FM usando il
telecomando principale.
+
RDS DISPLAY
Ogni volta che si preme il tasto TV SOUND, TV
SOUND ON/OFF lampeggia brevemente nella zona
del display del pannello anteriore, poi cambia in
D.IN.
- TV SOUND ON : L'audio viene emesso dai
diffusori Home theatre.
- TV SOUND OFF : L'audio viene emesso dai
diffusori TV collegati su Anynet+.
❏ Utilizzare in questo caso:
1) Per ascoltare l'audio dai diffusori Home Cinema
mentre si guarda la TV.
2) Per ascoltare l'audio da un supporto USB collegato
alla TV attraverso i diffusori Home Cinema.
❏ Specifica di supporto per AUDIO TV ON/OFF
TA
1
2
3
PTY -
PTY SEARCH
PTY +
4
5
6
1.
Premere il tasto PTY SEARCH durante l'ascolto di
una stazione FM.
2.
Premere il tasto PTY- o PTY+ finché sullo schermo
viene visualizzato il codice PTY desiderato.
• Il display mostra i codici PTY descritti a destra.
3.
Premere di nuovo il tasto PTY SEARCH mentre il
codice PTY selezionato al passo precedente si trova
ancora sul display.
• L'unità centrale ricerca 15 stazioni memorizzate,
si arresta quando trova quella selezionata, quindi
si sintonizza su tale stazione.
TV collegata
TV con funzione
Anynet+ (HDMICEC)
TV senza funzione
Anynet+ (HDMICEC)
Impostazione
Anynet+
(HDMI-CEC)
Audio
TV ON
Audio
TV OFF
ON
O
O
OFF
O
X
Non funziona
O
X
| 28 Italiano
HT-F4200_XU_ITA_130208-1.indd 28
2013-02-13 오후 4:39:31
Servizi di Rete
BD-LIVE™
2.
Configurare le impostazioni di rete.
(Vedere le pagine 20~21)
Quando il prodotto è collegato alla rete, è possibile fruire
di diversi contenuti di servizi relativi ai film disponibili su
dischi compatibili con BD-LIVE.
1.
Collegare una memoria USB alla porta USB sul
pannello anteriore del prodotto, quindi verificare
lo spazio disponibile in memoria. Il dispositivo di
memoria deve avere almeno 1 GB di spazio libero
per poter installare i servizi BD-LIVE.
DLNA consente di aprire e riprodurre i file contenuti
sul PC mediante il sistema Home Cinema. Seguire le
indicazioni della guida utente DLNA per configurare DLNA
sul PC e contrassegnare le cartelle e i file da condividere
con il sistema Home Cinema. Per aprire a e riprodurre i
file contenuti sul PC dopo aver configurato DLNA, seguire
i passi riportati di seguito:
1.
2.
Accendere il PC, la TV e il sistema Home Cinema.
3.
Sul sistema Home Cinema, premere il tasto BLU (D)
(Visual. dispos.).
4.
Utilizzare il tasto ◄► per selezionare il PC
nell'elenco dei dispositivi.
5.
Selezionare il tipo di file da visualizzare o riprodurre video, foto o musica - quindi premere E.
6.
Utilizzare il tasto ▲▼◄► per selezionare la cartella
con il tipo dei file selezionati, quindi premere E.
Viene visualizzato l'elenco dei file.
Selezionare il file da visualizzare o riprodurre, quindi
premere E.
Assicurarsi che sul PC sia in esecuzione il server
condiviso DLNA.
2.
Selezionare Impostazioni nella schermata iniziale,
quindi premere il tasto E.
3.
4.
Selezionare Sistema, quindi premere il tasto E.
5.
Selezionare Cambia dispos, quindi premere il tasto
E.
7.
6.
Selezionare USB Flash Disk, quindi premere il tasto
E.
| NOTA |
7.
8.
Inserire un disco Blu-ray che supporti BDLIVE.
È possibile creare playlist dai file sul PC in modo
Selezionare una voce tra i diversi contenuti del
servizio BD-LIVE forniti dal produttore del disco.
simile a quello utilizzato per creare playlist dai file su
dispositivi USB e dischi.
Tranne in alcuni casi, è possibile controllare la
riproduzione di file sul PC nello stesso modo in cui
si controlla la riproduzione di file su dispositivi USB e
dischi.
È possibile accedere ai file sul PC selezionando i
video, le foto o i file musicali nella schermata iniziale
e quindi selezionando il PC dall'elenco dei dispositivi
disponibili.
Selezionare Gestione dei dati BD, quindi premere il
tasto E.
| NOTA |
La modalità di utilizzo di BD-LIVE e i contenuti forniti
possono variare a seconda del produttore del disco.
Italiano
HT-F4200_XU_ITA_130208-1.indd 29
Servizi di Rete
Collegare il prodotto alla rete.
(Vedere a pagina 14)
06
1.
Utilizzo di DLNA
29 |
2013-02-13 오후 4:39:36
Appendice
Informazioni aggiuntive
Nota
Connessioni
HDMI OUT
• A seconda del televisore, alcune risoluzioni di uscita
HDMI potrebbero non essere utilizzabili.
• Per poter vedere video in 3D, è necessaria una
connessione HDMI.
• In questo caso, impostare HDMI Profondità colori
su Off nel menu.
Impostazioni
Impostazioni 3D
• Per alcuni dischi 3D, per arrestare un film durante la
riproduzione in 3D, premere una volta il tasto 5.
Il film si arresta e l'opzione modo 3D si disattiva. Per
cambiare la selezione di un'opzione 3D durante la
riproduzione di un film 3D, premere una volta il tasto
5. Viene visualizzato il menu Blu-ray. Premere di
nuovo il tasto 5 quindi selezionare Impostazioni
3D nel menu Blu-ray.
• A seconda del contenuto e della posizione
dell'immagine sullo schermo del televisore, si
possono vedere delle bande nere verticali sul lato
sinistro, sul lato destro o su entrambi i lati.
Formato TV
• A seconda del tipo di disco, è possibile che alcuni
formati non siano disponibili.
• Se si selezionano un formato e un'opzione diversi
dal formato del televisore, l'immagine potrebbe
apparire distorta.
• Selezionando 16:9 originale, è possibile che il
televisore visualizzi il formato 4:3 Pillarbox (bande
nere ai lati dell'immagine).
BD Wise (solo prodotti Samsung)
• Se la funzione BD Wise è attivata, la risoluzione
viene impostata automaticamente su BD Wise e nel
menu Risoluzione viene visualizzato BD Wise.
• Se il prodotto è collegato a un dispositivo che non
supporta la funzione BD Wise, non è possibile
utilizzare questa funzione.
• Per un corretto funzionamento della funzione BD
Wise, impostare l'opzione BD Wise su On sia sul
prodotto che sul televisore.
Uscita Digitale
• Assicurarsi di selezionare l'opzione di uscita digitale
corretta, altrimenti l'audio non verrà emesso o
risulterà molto disturbato.
• Se il dispositivo HDMI (ricevitore AV, televisore) non
è compatibile con i formati compressi (Dolby Digital,
DTS), il segnale audio viene emesso come PCM.
• I normali DVD non dispongono di audio
BONUSVIEW ed effetti sonori di navigazione.
• Alcuni dischi Blu-ray non dispongono di audio
BONUSVIEW ed effetti sonori di navigazione.
• Questa impostazione dell'uscita digitale non influisce
sull'uscita audio analogica (S/D), né sull'uscita audio
HDMI verso il televisore. Influisce, invece, sull'uscita
audio HDMI e ottica se il prodotto è collegato a un
ricevitore AV.
• Se vengono riprodotte tracce audio MPEG,
il segnale audio viene emesso come PCM
indipendentemente dall'uscita digitale selezionata
(PCM o bitstream).
• L'uscita digitale può essere attivata solo se Selez.
altoparlante è impostato su Altoparlante TV.
Connessione Internet BD-Live
• La connessione a Internet potrebbe essere limitata
durante l'utilizzo di contenuti BD-LIVE.
Anynet+ (HDMI-CEC)
• Su alcuni televisori, alcune risoluzioni di uscita HDMI
potrebbero non essere utilizzabili. Consultare il
manuale utente del televisore.
• Questa funzione non è disponibile se il cavo HDMI
non supporta CEC.
• Il televisore Samsung supporta la funzione Anynet+
se su di esso è presente il logo Anynet+.
Gestione dei dati BD
• Nel modo memoria esterna, la riproduzione
del disco può essere interrotta se si scollega il
dispositivo USB durante la riproduzione.
• Sono supportati solo i dispositivi USB formattati nel
file system FAT (etichetta di volume DOS 8.3). Si
consiglia di usare dispositivi USB che supportano il
protocollo USB 2.0, con velocità di lettura/ scrittura
di 4 MB/sec o superiore.
• La funzione Riprendi Riproduzione potrebbe non
funzionare dopo aver formattato il dispositivo di
memorizzazione.
• La memoria totale disponibile per Gestione dei dati
BD può differire, a seconda delle condizioni.
| 30 Italiano
HT-F4200_XU_ITA_130208-1.indd 30
2013-02-13 오후 4:39:37
• Per ulteriori informazioni su DivX(R) VOD, visitare il
sito "http://vod.divx.com".
• Su alcuni dischi Blu-ray/DVD è possibile cambiare la
lingua dei sottotitoli nel menu del disco. Premere il
tasto DISC MENU.
• Questa funzione dipende dalla selezione dei
sottotitoli codificati sul disco, quindi potrebbe non
essere disponibile su tutti i dischi Blu-ray/DVD.
• Se il disco Blu-ray ha una sezione BONUSVIEW,
vengono visualizzate anche le informazioni sul modo
BONUSVIEW principale.
• Questa funzione modifica contemporaneamente
sottotitoli primari e secondari.
• Vengono visualizzati rispettivamente il numero totale
di sottotitoli primari e secondari.
Imposta altoparlanti
• Se viene selezionato Selez. altoparlante su
Altoparlante TV, l'audio è prodotto attraverso i
diffusori TV.
Audio HDMI
• Quando l'audio HDMI viene emesso dai diffusori del
televisore, viene convertito automaticamente in 2
canali.
Canale ritorno audio
• Quando Anynet+ (HDMI-CEC) è su Off, la funzione
Canale ritorno audio non è disponibile.
• L'uso di un cavo HDMI non certificato per ARC
(Audio Return Channel(Canale ritorno audio)) può
causare problemi di compatibilità.
• La funzione ARC (ARC) è disponibile solo se è
collegato un televisore compatibile ARC.
Riproduzione
Riproduzione di file video
• I file video con frequenze di bit elevate, pari o
superiori a 20 Mbps, forzano le capacità del
prodotto e potrebbero arrestarsi durante la
riproduzione.
Selezione della lingua dell'audio
• L'indicatore ◄► non viene visualizzato sulla
schermata se la sezione BONUSVIEW non contiene
impostazioni audio BONUSVIEW.
• Le lingue disponibili attraverso la funzione Lingua
audio dipendono dalle lingue codificate sul disco.
Questa funzione o alcune lingue potrebbero non
essere disponibili.
• Con alcuni dischi Blu-ray è possibile selezionare
tracce audio LPCM o Dolby Digital in inglese.
Riproduzione di file JPEG
• Non è possibile ingrandire il campo di sottotitoli e
PG nel modo schermo intero.
Riproduzione Multimediale
Utilizzo del tasto TOOLS durante la riproduzione
delle immagini
• Se il sistema è collegato a un televisore che
supporta la funzione BD Wise e BD Wise è
impostato su On, il menu Impostazioni immagini
non viene visualizzato.
• La funzione di musica di sottofondo funziona solo
se il file musicale e il file della foto sono sullo stesso
supporto di memorizzazione. La qualità del suono
può anche essere influenzata dal bit rate del file
MP3, dalla dimensione delle foto e dal metodo di
codifica.
Riproduzione da un dispositivo di memorizzazione
USB
• È necessario rimuovere in sicurezza il dispositivo di
memorizzazione USB (eseguendo la funzione “Rimoz.
sicura USB” ) per evitare possibili danni alla memoria
USB. Premere il tasto HOME per passare al menu
principale, selezionare il tasto GIALLO (C), quindi
premere il tasto E.
Italiano
HT-F4200_XU_ITA_130208-1.indd 31
Appendice
Selezione della lingua dei sottotitoli
07
DivX® Video On Demand
31 |
2013-02-13 오후 4:39:38
Appendice
Selezione dell'uscita digitale
Conf.
PCM
Connessione
PCM
Streaming
audio su
disco Bluray
Streaming
audio su
DVD
Definizione
per disco
Blu-ray
Bitstream
(non elaborato)
PCM
Dolby Digital
Dolby Digital
Fino a PCM 2,1 can.
Plus
Dolby Digital Plus
Dolby
TrueHD
Fino a PCM 2,1 can.
Dolby TrueHD
DTS
Fino a PCM 5,1 can.
DTS
Audio DTSHD ad alta
risoluzione
Fino a PCM 7,1 can.
Audio DTS-HD ad
alta risoluzione
DTS-HD
Master
Audio
Fino a PCM 7,1 can.
Audio master DTSHD
PCM
Fino a PCM 2 can.
Dolby Digital Fino a PCM 2,1 can.
Qualsiasi
Bitstream (Dolby D
ricodificato)
Ricevitore AV con supporto HDMI
Fino a PCM 7,1 can.
Dolby Digital Fino a PCM 2,1 can.
DTS
Bitstream
(DTS ricodificato)
Fino a PCM 5,1 can.
Decodifica il flusso
audio principale
e il flusso audio
BONUSVIEW
combinandoli
nell'audio PCM
ed aggiunge
effetti sonori di
navigazione.
DTS ricodificato
Dolby Digital
ricodificato *
PCM 2 can.
PCM 2 can.
PCM 2 can.
Dolby Digital
Dolby Digital
Dolby Digital
DTS
DTS
DTS
Emette solo il flusso
audio principale
in modo che il
ricevitore AV possa
decodificare il
bitstream audio.
Non si udiranno
l'audio BONUSVIEW
o gli effetti sonori di
navigazione.
Decodifica il flusso
audio principale
e il flusso audio
BONUSVIEW
combinandoli
nell'audio PCM
ed aggiunge
effetti sonori di
navigazione, quindi
ricodifica l'audio
PCM in bitstream
DTS.
Decodifica il flusso
audio principale
e il flusso audio
BONUSVIEW
combinandoli
nell'audio PCM
ed aggiunge
effetti sonori di
navigazione, quindi
ricodifica l'audio
PCM in bitstream
Dolby Digital o PCM.
Se il flusso sorgente è 2 canali o mono, l'impostazione "Dolby D ricodificato" non viene applicata. L'uscita è PCM 2
canali
I dischi Blu-ray possono comprendere tre flussi audio:
- Audio principale: la traccia audio principale.
- Audio BONUSVIEW: traccia audio aggiuntiva, come i commenti del regista o degli attori.
- Effetti sonori di navigazione: durante la navigazione nei menu è possibile udire i relativi effetti sonori. Gli effetti sonori di
navigazione sono differenti per ciascun disco Blu-ray.
| 32 Italiano
HT-F4200_XU_ITA_130208-1.indd 32
2013-02-13 오후 4:39:39
Risoluzione in base al modo di uscita
Riproduzione di DVD
Conf.
BD Wise
E-Content/Contenuti
digitali
Modo HDMI
Disco Blu-ray
Risoluzione max.
dell'ingresso TV
1080p@60F
480i
Appendice
Modo HDMI
Uscita
07
Riproduzione di dischi Blu-ray/e-Content/contenuti digitali
Risoluzione max. dell'ingresso
TV
Auto
Max. Resolution of TV input
1080p@60F
1080p@60F
-
1080p
-
1080p
Fotogramma video: auto
(24Fs)
1080p@24F
-
1080i
1080i
1080i
720p
720p
720p
576p/480p
576p/480p
576p/480p
Risoluzione dei problemi
Se il prodotto non funziona correttamente, consultare la tabella che segue. Se il problema non è elencato nella tabella o
se le istruzioni fornite non portano a una soluzione, spegnere il prodotto, scollegare il cavo di alimentazione e contattare
il rivenditore autorizzato più vicino o il Centro di assistenza di Samsung Electronics.
Sintomo
Controlli/Rimedi
Non si riesce ad estrarre il
disco.
• Il cavo di alimentazione è ben collegato alla presa?
• Spegnere l'unità, quindi riaccenderla.
La riproduzione non si
avvia.
• Controllare il codice regionale del disco Blu-ray/DVD. È possibile che i DVD
acquistati all'estero non siano riproducibili.
• I CD-ROM e i DVD-ROM non possono essere riprodotti con questo prodotto.
• Assicurarsi che il livello di protezione sia corretto.
La riproduzione non si
avvia immediatamente
quando viene premuto
il tasto di riproduzione/
pausa.
• Il disco è deformato o ha la superficie graffiata?
• Pulire il disco.
L'audio non viene
riprodotto.
• Il sistema Home Cinema non riproduce l'audio durante la riproduzione veloce, la
riproduzione rallentata e la riproduzione fotogramma per fotogramma.
• I diffusori sono collegati correttamente? La configurazione dei diffusori è
personalizzata correttamente?
• Il disco è gravemente danneggiato?
Italiano
HT-F4200_XU_ITA_130208-1.indd 33
33 |
2013-02-13 오후 4:39:39
Appendice
Sintomo
Controlli/Rimedi
Il telecomando non
funziona
• Il telecomando è utilizzato entro le distanze ammesse e con una corretta
angolazione rispetto al sensore?
• Le batterie sono scariche?
• Il disco gira, ma non
viene riprodotta nessuna
immagine.
• La qualità dell'immagine
è scarsa e l'immagine è
tremolante.
•
•
•
•
La lingua dell'audio e i
sottotitoli non funzionano.
• La lingua dell'audio e i sottotitoli non funzionano se il disco non li contiene.
Il menu non viene
visualizzato neanche
quando viene selezionata
la funzione menu.
• Si sta usando un disco che non contiene menu?
Il formato non può essere
cambiato.
• È possibile riprodurre i dischi Blu-ray/DVD 16:9 in modo 16:9 Pieno, 4:3 Letter
Box o 4:3 Pan-Scan, ma i dischi Blu-ray/DVD 4:3 possono essere visti soltanto in
formato 4:3. Selezionare la funzione appropriata in base alla copertina del disco
Blu-ray.
Il prodotto non funziona
• Tenere premuto il tasto 5 sul telecomando per 5 secondi in modo STANDBY.
- Utilizzando la funzione RESET vengono cancellate tutte le impostazioni
memorizzate. Utilizzarla solo se strettamente necessario.
Non si ricorda la password
del livello di protezione
bambini.
• Senza dischi inseriti nel prodotto, tenere premuto il tasto 5 del prodotto per più
di 5 secondi. Sullo schermo viene visualizzato INIT e tutte le impostazioni ritornano
ai valori predefiniti.
Premere quindi il tasto ACCENSIONE
- Utilizzando la funzione RESET vengono cancellate tutte le impostazioni
memorizzate. Utilizzarla solo se strettamente necessario.
La radio non funziona.
• L'antenna è collegata correttamente?
• Se il segnale di ingresso dell'antenna è debole, installare un'antenna FM esterna in
un'area con una buona ricezione.
Se si ascolta l'audio del
televisore attraverso
il prodotto, non viene
emesso nessun suono.
• Se si preme il tasto di APERTURA/CHIUSURA ^ mentre si ascolta l'audio
del televisore usando le funzioni D.IN o AUX, le funzioni del disco Blu-ray/DVD
vengono attivate e l'audio del televisore viene disattivato..
Sullo schermo viene
visualizzato il messaggio
"Non disponibile".
• In questo momento non è possibile completare le funzioni o le operazioni perché:
1. L'operazione non è consentita dal software del disco Blu-ray/DVD.
2. La funzione (ad es. di angolatura) non è supportata dal software del disco Bluray DVD.
3. La funzione al momento non è disponibile.
4. Sono stati richiesti un numero di titolo o di capitolo o un tempo di ricerca fuori
gamma.
Se per l'uscita HDMI è
impostata una risoluzione
non supportata dal
televisore (ad esempio
1080p), è possibile che
l'immagine non venga
riprodotta sul televisore.
• Tenere premuto il tasto 5 sul pannello anteriore per più di 5 secondi senza dischi
inseriti. Tutte le impostazioni vengono riportate ai valori predefiniti.
Il televisore è acceso?
I cavi video sono collegati correttamente?
Il disco è sporco o danneggiato?
I dischi di scarsa qualità potrebbero non essere riproducibili.
| 34 Italiano
HT-F4200_XU_ITA_130208-1.indd 34
2013-02-13 오후 4:39:40
Sintomo
Controlli/Rimedi
Schermata di uscita HDMI
anomala.
• Se l'immagine appare disturbata, significa che il televisore non supporta la
funzione HDCP (High-bandwidth Digital Content Protection).
Appendice
• Controllare il collegamento tra il televisore e il connettore HDMI del prodotto.
• Verificare che il televisore supporti le risoluzioni di ingresso HDMI
576p/480p/720p/1080i/1080p.
07
Nessuna uscita HDMI.
Funzione DLNA
Si vedono le cartelle
condivise in DLNA,
ma non i file.
• DLNA visualizza soltanto file video, foto e musicali. Tutti gli altri tipi di file non
vengono visualizzati.
Il video viene riprodotto in
modo intermittente.
• Verificare che la rete sia stabile.
• Verificare che il cavo di rete sia collegato correttamente e che la rete non sia
sovraccarica.
La connessione DLNA
tra il televisore e il PC è
instabile.
• L'indirizzo IP all'interno della stessa subnet deve essere univoco, altrimenti la
presenza di più IP uguali può provocare fenomeni di questo tipo.
• Verificare se vi è un firewall abilitato.
In questo caso, disabilitare la funzione firewall.
BD-LIVE
Non è possibile collegarsi
al server BD-LIVE.
• Verificare che la connessione di rete sia stata stabilita utilizzando il menu Stato
rete.
• Verificare che al prodotto sia collegato un dispositivo di memoria USB.
• Il dispositivo di memoria deve avere almeno 1 GB di spazio libero per poter
installare il servizio BD-LIVE. È possibile controllare lo spazio disponibile in
Gestione dei dati BD. (Vedere a pagina 30)
• Verificare che l'opzione della connessione Internet BD-LIVE sia impostata su
Consenti(Tutto).
• Se la procedura precedente non riesce, contattare il fornitore dei contenuti oppure
aggiornare il firmware.
Quando si utilizza il servizio
BD-LIVE, si verifica un
errore.
• Il dispositivo di memoria deve avere almeno 1 GB di spazio libero per poter
installare il servizio BD-LIVE. È possibile controllare lo spazio disponibile in BD
Data Management (Gestione dei dati BD). (Vedere a pagina 30)
| NOTA |
Quando vengono ripristinate le impostazioni predefinite, tutti i dati BD utente memorizzati vengono eliminati.
Italiano
HT-F4200_XU_ITA_130208-1.indd 35
35 |
2013-02-13 오후 9:42:24
Appendice
Specifiche
Peso
2,3 kg
Dimensioni
430 (W) x 55 (A) x 250 (P) mm
Temperatura di esercizio
da +5°C a +35°C
Umidità di esercizio
da 10 % a 75 %
Rapporto segnale/rumore
55 dB
Generale
Sintonizzatore FM
Sensibilità utile
12 dB
Distorsione armonica totale
0,5 %
Video
1080p, 1080i, 720p, 576p/480p
Audio
Audio multicanale PCM, bitstream audio, audio PCM
HDMI
Uscita diffusore anteriore
75W x 2(3)
Uscita diffusore subwoofer
100W(3)
Ingresso analogico : 20Hz~20kHz (±3dB)
Risposta in frequenza
Amplificatore
Ingresso digitale: 20Hz~40kHz (±4dB)
Rapporto S/N
70dB
Separazione canali
60dB
Sensibilità di ingresso
(AUX)500mV
| 36 Italiano
HT-F4200_XU_ITA_130208-1.indd 36
2013-02-13 오후 4:39:42
07
Sistema di altoparlanti a 2,1 canali
Altoparlante
•
•
•
•
•
Appendice
Sistema di altoparlanti
Parte anteriore
Subwoofer
Impedenza
3
3
Gamma di frequenze
140Hz~20kHz
40Hz ~ 160Hz
Livello di pressione sonora di
uscita
87dB/W/M
88dB/W/M
Ingresso nominale
75W
100W
Ingresso massimo
150W
200W
Dimensioni (L x A x P)
(Unità : mm)
950 x 1160 x 740
1550 x 3000 x 2855
Pesi
(Unità : kg)
0,34
3,76
Velocità di rete uguali o inferiori a 10 Mbps non sono supportate.
Samsung Electronics Co., Ltd si riserva il diritto di modificare le specifiche senza preavviso.
Peso e dimensioni sono approssimativi.
Le caratteristiche e le specifiche sono soggette a modifiche senza preavviso.
Per l'alimentazione e il consumo di energia, vedere l'etichetta attaccata al prodotto
Italiano
HT-F4200_XU_ITA_130208-1.indd 37
37 |
2013-02-13 오후 4:39:42
Contatta SAMSUNG WORLD WIDE
Se avete commenti o domande sui prodotti Samsung, contattate il Servizio Clienti
Samsung.
Area
` Europe
Austria
Contact Centre
0810 - SAMSUNG (7267864,
€ 0.07/min)
Belgium
02-201-24-18
Bosnia
Bulgaria
Croatia
051 133 1999
07001 33 11 normal tariff
062 SAMSUNG (062 726 786)
800-SAMSUNG (800-726786)
Samsung Electronics Czech and Slovak,
s.r.o., Oasis Florenc, Sokolovská
394/17, 180 00, Praha 8 till 8.2.2013
: From 8.2.2013: Samsung Electronics
Czech and Slovak, s.r.o. V Parku
2343/24, 148 00 - Praha 4
70 70 19 70
030 - 6227 515
01 48 63 00 00
0180 5 SAMSUNG bzw.
0180 5 7267864* (*0,14 €/Min.
aus dem dt. Festnetz, aus dem
Mobilfunk max. 0,42 €/Min.)
8009 4000 only from landline
(+30) 210 6897691 from
mobile and land line
80111-SAMSUNG (80111 726
7864) only from land line
(+30) 210 6897691 from mobile
and land line
06-80-SAMSUNG (726-7864)
800-SAMSUNG (726-7864)
Czech
Denmark
Finland
France
Germany
Cyprus
Greece
Hungary
Italia
Web Site
www.samsung.com
www.samsung.com/
be (Dutch)
www.samsung.com/
be_fr (French)
www.samsung.com
www.samsung.com
www.samsung.com
Area
Luxemburg
Montenegro
Netherlands
Norway
Poland
Portugal
www.samsung.com
Rumania
www.samsung.com
www.samsung.com
www.samsung.com/fr
www.samsung.com
www.samsung.com
www.samsung.com
www.samsung.com
www.samsung.com
Serbia
Slovakia
Spain
Sweden
Contact Centre
Web Site
261 03 710
020 405 888
0900-SAMSUNG (09007267864) (€ 0,10/Min)
815-56 480
0 801-1SAMSUNG(172-678) *
lub +48 22 607-93-33 **
* (całkowity koszt połączenia
jak za 1 impuls według taryfy
operatora)
** (koszt połączenia według
taryfy operatora)
808 20-SAMSUNG (808 20 726-7)
08008 SAMSUNG (08008 726
7864)
TOLL FREE No.
+381 11 321 6899
(old number still active 0700
7267864)
0800-SAMSUNG (0800-726786)
902-1-SAMSUNG (902 172 678)
0771 726 7864 (SAMSUNG)
Switzerland
0848-SAMSUNG (7267864,
CHF 0.08/min)
U.K
Eire
Lithuania
Latvia
Estonia
0330 SAMSUNG (7267864)
0818 717100
8-800-77777
8000-7267
800-7267
www.samsung.com
www.samsung.com
www.samsung.com
www.samsung.com
www.samsung.com/pl
www.samsung.com
www.samsung.com
www.samsung.com
www.samsung.com
www.samsung.com
www.samsung.com
www.samsung.com/ch
(German)
www.samsung.com/
ch_fr/(French)
www.samsung.com
www.samsung.com
www.samsung.com/lt
www.samsung.com/lv
www.samsung.com/ee
Corretto smaltimento delle batterie del prodotto
(Applicabile nei Paesi con sistemi di raccolta differenziata)
Il simbolo riportato sulla batteria o sulla sua documentazione o confezione indica che le batterie di
questo prodotto non devono essere smaltite con altri rifiuti al termine del ciclo di vita. Dove raffigurati,
i simboli chimici Hg, Cd o Pb indicano che la batteria contiene mercurio, cadmio o piombo in
quantità superiori ai livelli di riferimento della direttiva UE 2006/66. Se le batterie non vengono smaltite
correttamente, queste sostanze possono causare danni alla salute umana o all'ambiente.
Per proteggere le risorse naturali e favorire il riutilizzo dei materiali, separare le batterie dagli altri tipi di
rifiuti e utilizzare il sistema di conferimento gratuito previsto nella propria area di residenza.
Corretto smaltimento del prodotto (rifiuti elettrici ed elettronici
(Applicabile nei Paesi con sistemi di raccolta differenziata)
Il simbolo riportato sul prodotto, sugli accessori o sulla documentazione indica che il prodotto e i relativi
accessori elettronici (quali caricabatterie, cuffia e cavo USB) non devono essere smaltiti con altri rifiuti al
termine del ciclo di vita. Per evitare eventuali danni all'ambiente o alla salute causati dallo smaltimento
dei rifiuti non corretto, si invita l'utente a separare il prodotto e i suddetti accessori da altri tipi di rifiuti,
conferendoli ai soggetti autorizzati secondo le normative locali.
Gli utenti domestici sono invitati a contattare il rivenditore presso il quale è stato acquistato il prodotto
o l’autorità competente per tutte le informazioni relative alla raccolta differenziata di questo tipo di
materiali.
Gli utenti professionali (imprese e professionisti) sono invitati a contattare il proprio fornitore e verificare
i termini e le condizioni del contratto di acquisto. Questo prodotto e i relativi accessori elettronici non
devono essere smaltiti unitamente ad altri rifiuti commerciali.
AH68-02578E
HT-F4200_XU_ITA_130208-1.indd 38
2013-02-13 오후 4:39:43