1
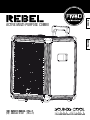
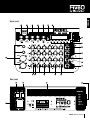
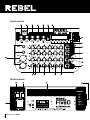
English
italiano
ACTIVE MULTI-PURPOSE COMBO
[EN] owner’s manual (pag. 2)
[IT] Manuale d’uso (pag. 13)
Important Precautions
WARNING
CAUTION
In order to protect your own and others’ safety
and to avoid invalidation of the warranty of
this product, please read this section carefully
before operating this product.
This product does not contain user serviceable parts. In order
to prevent fire and/or electrical shock, never disassemble it.
For maintenance and servicing always refer to the official
FiveO by Montarbo® Distributor in your Country or to qualified
personnel specifically authorised by the Distributor.
•Read all documentation before operating your equipment.
•Retain all documentation for further reference.
•Mains voltage must correspond to rear unit label.
•Damages caused by connecting to improper AC voltage are
not covered by any warranty.
•Always operate the unit with the AC ground wire connected
to the electrical system ground. Precautions should be taken
to avoid equipment faulty, improper or inefficient grounding.
•After connection to a.c. power, several components and the
battery charge circuits are already powered.
•Make sure the signal is correctly connected to unit input
channel following this manual input explanations.
•Please turn off the power switch before extracting the
power cord.
•Do not obstruct the ventilation ports.
To reduce the risk of electric shock, do not remove
cover (or back). No user serviceable parts inside.
Refer servicing to qualified personnel.
The lighting flash with arrowhead symbol within an equilateral
triangle, is intended to alert the user to the presence of uninsulated
’dangerous voltage’ within the product’s enclosure, that may be of
sufficient magnitude to constitute a risk of electric shock to humans.
The exclamation point within an equilateral triangle, is intended
to alert the user to the presence of important operating and
maintenance (servicing) instructions.
Owner’s manual | REBEL
2
WEEE | Waste from Electrical and Electronic Equipment
Attention!
The crossed out wheeled bin symbol that can be found
on this product means that the product is covered by the
Waste from Electrical and Electronic Equipment Directive.
The symbol is intended to indicate that waste from
electrical and electronic equipment must be subject to a selective
collection. For more details on available collection facilities please
contact your local government office or the retailer where you purchased this product. The solid bar underneath indicates that the
product has been put on the market after 13th August 2005.
INFORMATION ON PROPER DISPOSAL
Information on Disposal for Users (private households)
In the European Union | Attention: If you want to dispose of
this equipment, please do not use the ordinary dust bin! Used
electrical and electronic equipment should not be disposed of via
the normal household waste stream but must be treated separately and in accordance with legislation that requires proper treatment, recovery and recycling of used electrical and electronic
equipment. Following the implementation by member states, private households within the EU states may return their used electrical and electronic equipment to designated collection facilities
free of charge*. In some countries* your local retailer may also
take back your old product free of charge if you purchase a similar
new one. *Please contact your local authority for further details.
In other Countries outside the EU | If you wish to dispose of
this product, please contact your local authorities and ask for the
correct method of disposal.
In Switzerland | Used electrical or electronic equipment can be
returned free of charge to the dealer, even if you don’t purchase
a new product. Further collection facilities are listed on the homepage of www.swico.ch or www.sens.ch.
Information on Disposal for Professional Users
In the European Union | If the product is used for business purposes and you want to discard it: please contact your FiveO by
Montarbo® dealer who will inform you about the take-back of the
product. You might be charged for the costs arising from takeback and recycling. Small products (and small amounts) might be
taken back by your local collection facilities.
In Spain | Please contact the established collection system or your
local authority for takeback of your used products.
In other Countries outside the EU | Please contact your local
authorities and ask for the correct method of disposal.
English
CONTENTS
Important precautions
2
Contents
3
Introduction4
Features
4
Installation5
Operations5
Tips
5
Description6
Input channels 7
Master section
7
MP3 Player section 8
Connectors
8
Power supply
9
Ventilation ports
9
Front panel speakers
9
Technical specifications
10
®
Bluetooth iOS procedure
11
PACKAGE CONTENTS
Portable PA unit
Remote control
Power cable (3m)
Owner’s manual
Warranty certificate
REBEL | Owner’s manual
3
INTRODUCTION
First of all, thank you for choosing a product FiveO by Montarbo®. REBEL portable PA unit has been designed for those
who want to set-up a portable and very user friendly audio sound system with excellent performances. We manufactured
the REBEL to assure you satisfying and reliable operation over many years.
REBEL is a portable multi-purpose unit, which perfectly suits the needs of small bands, rehearsal rooms and all the application
where AC power is not available. In order to give you a creative effect, we included a Reverb/Chorus section. To provide you
further versatility for music playback, our engineers added a useful MP3 player, with USB port and SD reader, and a useful
Bluetooth® remote control section.
Please, in order to enjoy each feature of your new portable unit thus achieving the best sonic results, take a few moments
to carefully read these instructions.
For further information about your portable PA unit, please check our website www.fiveo.it, or send an email to: [email protected]
Features
The unit as been designed to successfully work in several applications. The microphone preamplifier, equipped with REBEL
Mic Preamps, have a good signal-to-noise ratio providing you the needed sound quality.
Your REBEL portable PA unit sound will give you great sonic satisfactions. Furthermore the built-in rechargeable battery will
supply you hours of sound even in places without a. c. power. Then the handy retractable handle and the wheels will simplify
the transport and utilization. The built-in battery will provide over than 4 hours of use with all volumes pushed at maximum
levels, while MP3 is playing! Reliability and toughness will make REBEL your faithful sound mate for years…
∙∙ 2 Mic/Line inputs featuring COMBO balanced connectors.
∙∙ 2 Mic/Line inputs featuring 6.35mm (¼”) unbalanced connectors.
∙∙ MP3 input section, with USB port and SD reader, with independent knob level control
∙∙ Remote control for MP3 section.
∙∙ Embedded Bluetooth® system for reproduction signals management by smartphones or tablets.
∙∙ 2 way system - Class D amplifier with 80 Watts of total Power Output.
∙∙ 205mm (8”) woofer and 25,4mm (1”) driver with horn.
∙∙ Long lasting 12V 17Ah built-in battery, allowing you to play even without AC power supply.
∙∙ DC power switch to preserve battery charge.
∙∙ Rugged retractable handle and wheels for easy and reliable transport.
∙∙ Wide positioning possibilities, thanks to bottom 36 mm standard hole (for pole mounting) and the provided feet tilting the
unit of 17 degrees (useful when placing REBEL on the ground)
Effect section
Your REBEL compact powered portable PA unit features a digital effects section, allowing you to choose between Reverb
and Chorus effects. Reverb adds ambiance to original sound, simulating the natural reverberation, while Chorus adds small
and short delays, simulating more sound sources.
MP3 PLAYER
In order to add versatility and to answer to customer needs, we provided our REBEL with an MP3 player section, with inputs
for SD card and a USB port for generic multipurpose devices. On REBEL right top corner there’s a display with full function
keys. The remote control will allow you to easily use the REBEL for background music, karaoke nights, etc.
BLUETOOTH®
For your convenience and to add further versatility, we embedded in your multi-purpose combo a Bluetooth® wireless system
for reproduction of signals from any smart-phone and tablet. To do that, your sound source must be tuned to REBEL
Bluetooth® receiver. The unit can properly work with any OS (Android™, BlackBerry®, Windows 7 & 8) unit, please check the
iOS Bluetooth® procedure chapter (page 11).
Android™ logo, and other trademarks are property of Google Inc.
BlackBerry® and related trademarks, names, and logos are the property of Research In Motion Limited and are registered and/or used in the U.S. and countries around the world.
Owner’s manual | REBEL
4
English
INSTALLATION
Since your REBEL contains a power amp, please leave enough space around the unit for cooling purposes. Don’t place your
portable PA unit close to high-temperature devices such as radiators or exposed to direct sunlight. REBEL is connected to
the mains via the supplied cable, even for built-in battery recharge. First connect the mains cable to the unit, then connect
the cable plug to the mains, finally turn on your REBEL.
Please note that all units of your sound system must be properly grounded. For your own safety, you should never remove
any ground connector/device from electrical devices or power cables, or make them inactive. Please ensure that only
qualified people install and operate the portable PA unit.
OPERATIONS
All REBEL level knobs should be at minimum, at “0”. If a LEVEL is raised please move it to “0” position, preventing in
this way any noise which could damage your REBEL speakers. Set EQ knobs at center-detent position. With your MASTER
LEVEL at “0”, start making connections.
Using an XLR balanced cable, connect your microphone and using unbalanced 6.35mm (¼”) TS cable connect your guitar,
or any other electric instrument.
Plug your SD card and/or your USB player to digital ports.
Now you can turn on your REBEL and raise MASTER level knob to 12 o’clock position. In order to achieve the best signalto-noise ratio for all inputs, we suggest you the following procedure: set the VOLUME knob at 12 o’clock position, then
raise the GAIN knob until when louder signals drive PEAK LED to flash.
Now you can begin to set each input VOL (volume) knobs to obtain the needed balance of all inputs. If a channel signal
is too hot, turn the VOL knob counter-clockwise; if the signal is too weak, turn the knob clockwise. USB port and SD card
use the MP3 VOL level control, and Digital Effects section has EFF overall EFF VOL control.
A very important feature is the built-in rechargeable battery, allowing you to use your REBEL in any application and/or
mobile installation.
TIPS
We strongly suggest you to avoid exposition to loud music for prolonged periods, you risk to seriously damage your hearing.
In order to avoid overload, please carefully check each channel PEAK LED; hearing even a small saturation, please turn
counter-clockwise the MASTER knob, or the VOL knob of the distorting channel.
Avoid to use extreme EQ settings, which could overload that channel as well its EFF send to Digital Effects section and
even the MASTER section. We suggest you to use the EQ to emphasize sound nuances and details, even cutting EQ on
other channels!
In order to avoid internal Digital Effects section overload, please carefully check each channel EFF knob.
In order to prevent speakers switch-on thump, please turn the MASTER LEVEL knob to “0” after every session, and check
the MASTER LEVEL knob “0” position before any new session.
Check the BATTERY LEVEL 5 LEDs, in this way you’ll be warned when built-in battery level is LOW or if the unit battery is
“in CHARGE”.
REBEL | Owner’s manual
5
description
Dimensions [mm]
26
Owner’s manual | REBEL
6
28
17° max
27
English
Upper panel
15
16
17
18
19
20
12
14
13
7
8
1
9
10
11
2
3
4
5
6
Rear panel
21
22
25
24
23
REBEL | Owner’s manual
7
Input channels
1 Mic/Line input connector
Input channels 1-2 feature an unbalanced 6.35mm (¼”) connector, while input channels 3-4 feature a balanced COMBO connector.
Please note that you can connect any level signal to unbalanced 6.35mm connector, while the XLR section of COMBO connector could
be used for microphone signal only.
2 GAIN knob
Use the GAIN control to adjust the input gain to obtain a good signal-to-noise ratio, while avoiding input distortion. In order to avoid
unpleasant noise to your sound system, this control should always be turned fully counter-clockwise when connecting or disconnecting
a signal source to the input.
3 peak LED
This LED warns you when the GAIN is set too high; in this case slightly turn counter-clockwise the GAIN to reduce input signal distortion.
The best GAIN setting is when the LED flashes on musical peaks only.
4 Eq section knob
All input channels feature a 3-band equalizer; all bands provide boost or cut of up to 15 dB. In knob central position, the equalizer
is inactive. All the channels have 12kHz HIGH “shelving” and 80Hz LOW “shelving” controls. Shelving means that the circuit boosts
or cuts all the frequencies starting from the tuning frequency. HIGH frequency control affects most instruments higher harmonics and
transients. LOW frequency control affects kick drum, bass guitar and lower octaves of piano and synths. The 2.5kHz MID is a “peaking”
control. Peaking means that the circuit boosts or cuts shaping an hill around that frequency. MID eq affects the higher frequencies of
most musical instruments and most singers voice. To obtain a good vocal result, try even to cut other channel(s) mid.
5 EFF send knob
The EFF SEND knob enables you to feed signals, through each channel knob, to the internal EFF (effect) device. EFF send is configured
post-fader, i.e. the amount of each channel send is determined by each channel EFF send as well as from each channel VOL knob setting.
6 VOL knob
The VOL knob determines the level of the channel signal in the main mix. As stated before, VOL setting affects even EFF send level.
MASTER section
7 MP3 VOL knob
This knob adjusts the volume of MP3 player section, described in 1.3 MP3 PLAYER section.
8 AUX OUT VOL knob
This knob adjust overall level of signal(s) sent to AUX OUT 6.35mm (¼”) connector. Please note that AUX signal is identical to MASTER
signal, therefore this knob is useful to send the overall REBEL sound to monitoring devices (wedge monitors, headphones, etc.) or to a
different sound system for further zone diffusion.
9 EFF VOL knob
This knob adjust overall level of signal(s) sent to internal EFF section. The signal comes from each channel EFF send knob, which depends
also on each channel VOL knob setting. Please see the related description in input channel section.
10 EFF SELECT switch
This switch selects between Reverb and Chorus, allowing you to choose the appropriate effect for each song. Reverb reproduces a
collection of reflected echoes from an environment; reverb is ideal for the singers and most instruments. Chorus creates “copies” of the
original sound slightly modified in timbre and in pitch; Chorus is ideal to “fatten” a voice or to enliven a guitar.
11 MASTER knob
The MASTER knob adjusts the overall volume of your REBEL. This control determines even the level to PHONES output. In order to avoid unpleasant
and dangerous noises to your sound system, this control should always be turned fully counter-clockwise when turning on and off your REBEL.
Owner’s manual | REBEL
8
English
MP3 PLAYER section
12 USB/SD DIGITAL PLAYER
This section allows you to manage the signals from the connected USB port and/or SD card input. Please note that you can adjust this
section volume using the MP3 VOL knob in Master section or using the provided remote control.
The 2 row 16-characters display allows you to carefully check all the content of the digital device.
You can remotely control your REBEL using the provided remote control, or other devices like smart-phones.
13 KEYS
MODE
PLAY/PAUSE
STOP
REPEAT
PREV
NEXT
it displays “S” for SD card playback, “U” for USB playback, or “Connected” for Bluetooth connection.
By pressing this key for three seconds, the player will be turned off!
it allows you to play the player; pressing two times this key, the player will be paused
it stops player playback
press this key to repeat all songs in numbering order
to move the player to previous song
to move the player to next song
14 USB/SD
The upper slot is for SD card. The lower port is for USB device connection.
connectors
15 RETURN MAIN IN
This 6.35mm (¼”) connector can be used for any external sound source, which will be directly addressed to MASTER section. Please
note that there’s no level control, so you must adjust the level from the output of the source.
You can connect here the output of a external digital effects unit, or the signal from a sub-mixer which manages further signals to be
blended with Rebel mixer, thus being amplified by your REBEL.
16 PRE SEND OUT
This 6.35mm (¼”) unbalanced connector can be used to send your REBEL mix to any external device. Please note that overall level will
be adjusted by MASTER knob.
You can connect this output to any external unit, like a recorder or a different sound system which will diffuse your REBEL mix in
different rooms.
17 EFFECT F. SWITCH
This 6.35mm (¼”) connector allows you to switch on/off the effect section, allowing you to remotely do an “hand-free” operation.
Connecting a foot-switch is very useful when playing an instrument or when you’re far from the mixer.
18 AUX OUT 0dB
This 6.35mm (¼”) connector can be used to send your Rebel mix to any external sound device. Please note that this output level is
adjusted by AUX OUT VOL knob.
You can connect this output to any external unit, like an external effects unit, a recorder or a different sound system which will diffuse
your Rebel mix in different rooms.
19 PHONES
This stereo 6.35mm (¼”) connector can be used to connect your headphones to check Rebel mix. Please note that your headphones
level will be adjusted by MASTER knob.
20 IR LED
This LED detects the provided remote control signal, allowing you to do several MP3 player operations, please see the relevant chapter
(page 4).
REBEL | Owner’s manual
9
power supply
21 AC mains switch
This switch allows you to turn on/off the mains a.c..
In “1” position your Rebel is ON, while in “0” position your Rebel is OFF.
Before turning ON or OFF the unit, please be sure that MASTER knob is in “0” position.
Even when using your REBEL with a.c. power, the DC switch must be in “1” position.
Please note that any time your REBEL is connected to mains, despite this switch position, the internal battery is recharged.
22 DC battery switch
This switch allows you to turn on the internal battery; it’s very useful to avoid wasting your battery life.
In “1” position your Rebel is ON, while in “0” position your Rebel is OFF.
During battery operation, always check the BATTERY LEVEL LEDs.
23 100 ÷ 230 V ~ 50/60Hz - F 2A L 250V socket
It’s a standard IEC power receptacle, which contains also a fuse-holder.
This fuse holder contains a standard fuse, which is used to protect the unit from damages.
If the unit is connected to power supply and AC and/or DC switches are in “1” position, but the unit doesn’t work, please check the
fuse status.
If you find that the fuse is blown, you must replace it with an identical fuse.
24 BATTERY LEVEL LEDs
This 5-LEDs section shows you the way your Rebel built-in battery is working.
LEDs 3 - 2 - 1 are green, and are lit when the battery is charge. LOW LED is red, warning you about battery low power.
Orange CHARGE LED is lit when the built-in battery is charging, the LED is unlit when the battery is totally charged.
VENTILATION PORTS
25 Ventilation slots
NEVER block these slots, otherwise internal power amp could be damaged by internally developed overheat, despite internal fan.
FRONT PANEL SPEAKERS
26 25.4 mm compression driver
This 25,4mm (1”) driver has a 25,4mm (1”) exit directly connected to the horn to diffuse the sound, covering a wide angle.
27 205mm (8”) woofer
This custom high excursion woofer develops high sound pressure levels.
28 Dual leveling feet
This system allows a 17° maximum tilt angle
Owner’s manual | REBEL
10
English
TECHNICAL SPECIFICATIONS
INPUTS
Connectors (inputs 1-2)
Balanced 6.35 mm (¼”) jack
Connectors (inputs 3-4)
Balanced COMBO – XLR + 6.35 mm (¼”) jack
EQ
Low
80 Hz, ±15 dB, shelving type
Mid
2.5 kHz, ±15dB, peaking type
High
12 kHz, ±15 dB, shelving type
DIGITAL EFFECTS
Type
Switchable Reverb or Chorus
Volume control
EFF VOL knob
Effect F. SWITCH
Turns ON/OFF the effect
MP3 PLAYER
Connections
USB port, SD card slot
Volume control
BLUETOOTH
Using MP3 VOL knob and remote control
®
Connection
Bluetooth® wireless
Volume control
By sound source
OUTPUTS
AUX OUT 0dB
6.35 mm (¼”) TS connector, unbalanced, line level
PHONES
6.35 mm (¼”) stereo connector, unbalanced, phones level
Power amp
SEND PRE OUT
6.35 mm (¼”) TS connector, unbalanced, line level
RETURN MAIN IN
6.35 mm (¼”) TS connector, unbalanced, line level
Technology
Class D Amp
Continuous power
50W
Maximum power
80W
Transducers
LF transducer
205mm (8”) speaker with 38mm (1.5”) voice coil
HF transducer
25.4 mm (1”) compression driver, with 25.4 mm (1”) exit
HF horn coverage
80° x 50°
Crossover type
Passive, 2nd order, 12dB/oct.
Frequency response
50 Hz ÷ 18 kHz
CONSTRUCTION
Cabinet type
Bass-reflex
Cabinet material
15 mm MDF
Grill
1.2 mm perforated steel
Finishing
Black Tolex
Built-in battery
Discharge time
Around 4 hours
Stand-by
36 hours
Battery type
Lead Acid 12V/17Ah
Power supply
100 V ÷ 240 V ~ 50/60 Hz
Fuse
F 2A L 250V
Dimensions (W x H x D)
390 x 510 x 340 mm (15.4” x 20” x 13.4”)
Weight
25 kg (55.1 pds)
REBEL | Owner’s manual
11
BLUETOOTH® iOS procedure
iPhone® – iPad® procedure
[1] From the Settings menu > activate bluetooth® on your Apple® device > ‘I’ > Devices > Looking for ...
[2] Set the potentiometers and MP3 Master Volume in central position. It’s necessary to listen the tones issued by MP3/BLUETOOTH section.
[3] Switch on the REBEL unit by pressing the DC switch to “I” (if the unit is connected to 220/240V AC, please press even the AC switch to “I”).
[4] Pressing the MODE button (by default the MP3 player is turned on) the REBEL display shows the message “Bluetooth Initializing ...”.
A tone (bup) is issued, and the detection procedure starts.
[5]When the external device is identified, the REBEL emits a sequence of two tones (bup - bup) and your iPhone® or iPad® “Devices” menu
shows BLUETOOTH (in upper case). It means that the Apple® device is synced with the REBEL. In this case, proceed to the connection as
explained in step [11].
[6] If the REBEL display shows “Unconnected”, please repeat steps [4] and [5].
[7] If after 3 attempts the REBEL display still shows “Unconnected” turn off the REBEL placing the DC switch to “0”.
[8] Before turning on again the REBEL, delete or ignore other bluetooth devices already present on the Apple® unit.
Menu “Devices” > blue arrow
click “Forget this Device”.
[9] Wait for 5 seconds, then power on again your REBEL pressing the DC switch to “I” position.
[10] Repeat the steps [4] and [5].
[11] To connect both devices press “not connected” from the external device. Once connected, the REBEL emits a tone (beep) and display
shows the message “Connected”.
[12] Now you can send any signal to REBEL through the Bluetooth® connection.
Apple®, iPad® and iPhone® are trademarks of Apple Inc., registered in the U.S. and other countries.
The Bluetooth® word mark and logos are registered trademarks owned by Bluetooth SIG, Inc. and any use of such marks by Elettronica Montarbo srl is under license.
Owner’s manual | REBEL
12
AVVERTENZE
Nell’interesse della propria e della altrui
sicurezza, e per non invalidare la garanzia,
si raccomanda una attenta lettura di questa
sezione prima di utilizzare il prodotto.
•Leggete tutta la documentazione prima di utilizzare
l’apparecchiatura.
•Conservate tutta la documentazione per ogni ulteriore
consultazione.
•La tensione di rete deve corrispondere all’etichetta posteriore.
•Danni causati da errata connessione a tensione alternata
non sono coperti da garanzia.
•Utilizzate sempre l’unità con il cavo di massa di corrente
collegato alla terra dell’impianto elettrico.
•Dovete prendere precauzioni per evitare una messa a terra
difettosa, scorretta o inefficiente.
•Dopo il collegamento dell’alimentazione alcuni componenti
al suo interno sono già accesi.
•Non collegate un’uscita amplificata a qualsiasi canale di
ingresso.
•Assicuratevi che il segnale sia collegato correttamente a
ciascuna sezione di ingresso.
•Spegnete l’apparecchio prima di estrarre il cavo di
alimentazione e il cavo (o i cavi) di segnale.
•Per inviare un segnale a più di un amplificatore, vi suggeriamo
di usare un distributore di segnale.
•Non ostruite le porte di entrata e di uscita per l’aria di
raffreddamento.
Questo apparecchio non contiene parti interne
destinate all’intervento diretto da parte
dell’utilizzatore. Per evitare il rischio di incendio
e/o folgorazione, non smontarlo e non rimuovere
eventuali pannelli protettivi.
Il lampo con la freccia inserito in un triangolo equilatero avvisa
l’utilizzatore della presenza di tensione pericolosa, senza
isolamento, all’interno dell’apparecchio che potrebbe essere
sufficientemente alta da generare il rischio di scossa elettrica.
nota bene
Per qualsiasi intervento di manutenzione
o riparazione, rivolgetevi alla Elettronica
Montarbo srl e/o a personale altamente qualificato specificamente segnalato da questa.
Direttiva RAEE
AttenzionE!
Il prodotto è contrassegnato da questo simbolo che
segnala di non smaltire le apparecchiature elettriche ed
elettroniche tramite la normale procedura di smaltimento
dei rifiuti domestici. Per questi prodotti è previsto un sistema
di raccolta differenziato in conformità alla legislazione che richiede
il trattamento, il recupero e il riciclaggio adeguato dei suddetti
prodotti. Per maggiori informazioni si prega di contattare l’autorità
locale competente. La barra nera sotto il simbolo indica che il
prodotto è stato immesso sul mercato dopo il 13 agosto 2005.
INFORMAZIONI PER UN CORRETTO SMALTIMENTO
Per gli utenti privati
Nell’Unione europea | Attenzione: Per smaltire il presente
dispositivo, non utilizzare il normale bidone della spazzatura! Le
apparecchiature elettriche ed elettroniche usate devono essere
gestite a parte e in conformità alla legislazione che richiede il
trattamento, il recupero e il riciclaggio adeguato dei suddetti
prodotti. In seguito alle disposizioni attuate dagli Stati membri,
i privati residenti nella UE possono conferire gratuitamente
le apparecchiature elettriche ed elettroniche usate a centri di
raccolta designati*. In alcuni paesi (*), anche il rivenditore locale
può ritirare gratuitamente il vecchio prodotto se l’utente acquista
un altro nuovo di tipologia simile. *Per maggiori informazioni si
prega di contattare l’autorità locale competente.
In paesi che non fanno parte dell’UE | Contattare le autorità
locali e informarsi sul metodo di smaltimento corretto.
In Svizzera | Le apparecchiature elettriche o elettroniche usate
possono essere restituite gratuitamente al rivenditore, anche se
non si acquista un prodotto nuovo. Altri centri di raccolta sono
elencati sulle homepage di www.swico.ch o di www.sens.ch.
Per gli utenti professionali
Nell’Unione europea | Attenzione: Se il prodotto è impiegato
a scopi professionali, procedere come segue per eliminarlo:
contattare il proprio rivenditore FiveO by Montarbo® che fornirà
informazioni circa il ritiro del prodotto. Potrebbero essere
addebitate le spese di ritiro e riciclaggio. Prodotti piccoli (e
quantitativi ridotti) potranno essere ritirati anche dai centri di
raccolta locali.
In Spagna | Contattare il sistema di raccolta ufficiale o l’ente
locale preposto al ritiro dei prodotti usati.
In paesi che non fanno parte dell’UE | Contattare le autorità
locali e informarsi sul metodo di smaltimento corretto.
italiano
attenzione
Il punto esclamativo inserito in un triangolo equilatero avvisa
l’utilizzatore della presenza di importanti istruzioni per l’utilizzo
e per la manutenzione.
REBEL | Manuale
utente
13
CONTENUTI
Avvertenze12
Contenuti13
Introduzione14
Caratteristiche14
Installazione15
Operazioni15
Suggerimenti15
Descrizione16
Canali di ingresso 17
Master section
17
Sezione lettore MP3 18
Connettori
18
Alimentazione
19
Aperture di ventilazione
19
Altoparlanti pannello anteriore
19
Caratteristiche tecniche
20
®
Procedura Bluetooth iOS
21
CONTENuti imballo
Unità PA portatile
Telecomando
Cavo di alimentazione (3m)
Manuale utente
Certificato di garanzia
Manuale utente | REBEL
14
INTRODUZIONE
Innanzitutto, grazie per aver scelto un prodotto FiveO by Montarbo®. L’unità PA portatile REBEL è stata progettata per
coloro che vogliono configurare un sistema audio semplice da utilizzare e con ottime prestazioni. Abbiamo progettato il
REBEL per assicurarvi un funzionamento soddisfacente ed affidabile per molti anni.
REBEL è un’unità portatile PA che si adatta perfettamente alle esigenze di piccoli gruppi, sale prova e tutte le applicazioni
in cui l’alimentazione di rete non sia disponibile. Per favorire al massimo la creatività abbiamo inserito una sezione Reverb /
Chorus. Infine, per offrire ulteriore versatilità nella riproduzione musicale, i nostri progettisti hanno aggiunto un utile lettore
MP3, con porta USB e lettore di SD, e la possibilità di controllo a distanza tramite il telecomando fornito in dotazione o via
Bluetooth®.
Al fine di utilizzare al meglio ogni caratteristica della vostra nuova unità portatile PA ed ottenete così i migliori risultati sonori,
dedica qualche minuto a leggere con attenzione queste istruzioni.
italiano
Per ulteriori informazioni sul vostro REBEL, consultate il nostro sito www.fiveo.it, oppure inviare una mail a [email protected].
CARATTERISTICHE
Il vostro REBEL è stato progettato per lavorare con successo in diverse applicazioni. Il preamplificatore microfonico vanta un
buon rapporto segnale-rumore e fornisce una pregevole qualità audio.
Il vostro sistema vi darà grandi soddisfazioni sonore. Inoltre, la batteria ricaricabile incorporata vi fornirà ore di suono anche
in assenza di alimentazione in corrente alternata (rete). La pratica maniglia retraibile e le ruote ne semplificheranno sia il
trasporto che l’utilizzo. La batteria integrata fornirà più di 4 ore di utilizzo con tutti i volumi ai massimi livelli, anche durante
la riproduzione via MP3! Affidabilità e robustezza renderanno REBEL il vostro fedele compagno sonoro per anni...
∙∙ 2 ingressi Mic / Line dotati di connettori bilanciati COMBO.
∙∙ 2 ingressi Mic / Line dotati di connettori jack da 6.35 mm (¼ “) sbilanciati.
∙∙ Sezione di ingresso MP3, con porta USB e lettore di SD, con manopola per il controllo indipendente del livello
∙∙ Telecomando per la sezione MP3.
∙∙ Sistema Bluetooth® incorporato per la gestione dei segnali di riproduzione da smartphone o tablet.
∙∙ Sistema a 2 vie - amplificatore Classe D con 80 watt di potenza totale.
∙∙ Woofer da 205 mm (8 “) e tweeter da 25,4 mm (1”) a tromba.
∙∙ Batteria integrata 17Ah 12V di lunga durata, che permette l’utilizzazione anche in assenza di alimentazione in c. a..
∙∙ Interruttore di alimentazione D.C. per preservare la carica della batteria.
∙∙ Robusta maniglia a scomparsa e ruote per un trasporto facile ed affidabile.
∙∙ Ampie possibilità di posizionamento, grazie al foro standard da 36 mm sul fondo (per il montaggio su palo) ed ai piedini in
dotazione i quali consentono un’inclinazione massima di 17° (utile quando si posiziona REBEL a terra).
Sezione Effect
Il vostro sistema dispone di una unità di effetti digitali che consente di scegliere tra Reverb e Chorus. Il riverbero aggiunge
ambienza al suono originale, simulando la riverberazione naturale, mentre il Chorus aggiunge piccoli e brevi ritardi, simulando
il suono tipico di un coro.
Lettore MP3
Per aggiungere versatilità e per rispondere alle esigenze più recenti degli utilizzatori abbiamo fornito il nostro REBEL di una
sezione di lettore MP3, con ingressi per schede SD e una porta USB per dispositivi multiuso generici. Nell’angolo in alto a
destra del REBEL c’è un display con tasti funzione completi. Il telecomando permette di usare facilmente il REBEL per la
musica di sottofondo, serate karaoke, ecc
BLUETOOTH®
Per la vostra comodità e per aggiungere ulteriore versatilità, abbiamo incorporato nel vostro versatile combo un sistema wireless
Bluetooth® che consente la riproduzione di segnali da qualsiasi smartphone e tablet. Per fare ciò, la vostra sorgente sonora deve
essere sincronizzata al ricevitore Bluetooth® del vostro REBEL. L’unità può funzionare correttamente con unità con qualsiasi
sistema operativo (Android™, BlackBerry®, Windows 7 & 8), leggete il capitolo (pag. 21) con la procedura per Bluetooth® iOS.
Android™ è un marchio registrato di Google Inc.
Il marchio BlackBerry® è di proprietà di Research In Motion Limited ed è registrato negli Stati Uniti e potrebbe essere registrato o in attesa di registrazione in altri Paesi. Elettronica Montarbo srl non è
appoggiata, sponsorizzata, affiliata con o diversamente autorizzata da Research In Motion Limited.
REBEL | Manuale
utente
15
INSTALLAZIONE
Dato che il vostro REBEL contiene un amplificatore di potenza, lasciate spazio sufficiente intorno all’unità per il raffreddamento.
Non posizionate l’unità vicino ad oggetti che sviluppano alte temperature, come termosifoni, né esponetela alla luce
solare diretta. Il sistema è collegato alla rete elettrica mediante il cavo in dotazione, utile anche per la ricarica della batteria
incorporata. Prima collegate il cavo di alimentazione all’unità, quindi collegate la spina del cavo alla presa elettrica, infine
accendete il REBEL.
È consigliabile che tutte le unità del vostro sistema audio siano correttamente collegate a terra. Per motivi di sicurezza
non dovete mai rimuovere o rendere inattivo qualsiasi connettore/dispositivo di messa a terra dai dispositivi elettrici o dai
cavi di alimentazione. Vi preghiamo di controllare che l’installazione del REBEL sia effettuata solo da persone qualificate.
OPERAZIONI
All’accensione tutte le manopole VOL dell’unità dovrebbero essere al minimo, a “0”. Se un livello è alzato, spostatelo in
posizione “0”, evitando in questo modo qualsiasi rumore di accensione che potrebbe danneggiare gli altoparlanti. Regolate
le manopole EQ in posizione centrale. Con il livello MASTER a “0”, iniziate a fare i collegamenti.
Utilizzando un cavo XLR bilanciato, collegate il microfono e usando un cavo sbilanciato da 6,35 mm (¼ “) collegate la
chitarra o qualsiasi altro strumento elettrico.
Inserite la scheda SD e/o la penna USB nelle porte digitali.
Ora è possibile accendere il REBEL e portare la manopola MASTER nella posizione “ore 12”. Al fine di ottenere il miglior
rapporto segnale/rumore per tutti gli ingressi, vi consigliamo la seguente procedura: impostate la manopola del volume a
“ore 12”, quindi sollevate la manopola GAIN finché sui segnali più forti il LED PEAK inizi a lampeggiare.
A questo punto potete iniziare ad impostare tutte la manopole VOL (volume) per ottenere l’equilibrio desiderato di tutti
gli ingressi. Se il segnale presente in un canale è troppo forte, ruotate la manopola VOL in senso antiorario, se il segnale è
troppo debole, ruotate la manopola in senso orario. La porta USB e la scheda SD utilizzano il controllo di livello MP3 VOL,
mentre la sezione effetti digitali ha il controllo di volume complessivo EFF VOL.
Una caratteristica molto importante è la batteria ricaricabile integrata che consente di utilizzare il vostro REBEL in qualsiasi
applicazione e/o installazione mobile.
SUGGERIMENTI
Evitate l’esposizione a musica ad alto volume per periodi prolungati, rischiate di danneggiare seriamente l’udito.
Per evitare la saturazione dei canali di ingresso, controllate attentamente il LED di picco di ogni canale; ascoltando anche
una minima saturazione, girate in senso antiorario la manopola MASTER, o la manopola di volume del canale che distorce.
Evitate di utilizzare impostazioni estreme di EQ, che possono sovraccaricare il canale e la sua mandata EFF alla sezione di
effetti digitali ed anche la sezione Master. Vi suggeriamo di utilizzare l’equalizzatore per enfatizzare le sfumature sonore
ed i dettagli, anche riducendo l’EQ di altri canali!
Per non sovraccaricare la sezione interna degli effetti digitali, controllate attentamente la manopola EFF di ogni canale.
Al fine di prevenire un forte rumore agli altoparlanti durante l’accensione, ruotate la manopola di livello MASTER su “0”
dopo ogni sessione e controllate che la posizione della manopola MASTER sia a “0” prima di ogni nuova sessione.
Controllate i 5 LED del livello della batteria, in questo modo saprete quando il livello della batteria incorporata è basso o
se la batteria dell’unità è in carica.
Manuale utente | REBEL
16
descrizione
Dimensioni [mm]
italiano
26
28
17° max
27
REBEL | Manuale
utente
17
Pannello superiore
15
16
17
18
19
20
12
14
13
7
8
1
9
10
11
2
3
4
5
6
Pannello posteriore
21
23
Manuale utente | REBEL
18
22
25
24
Canali di ingresso
1 Connettore di ingresso Mic / Line
I canali di ingresso 1 e 2 dispongono di un connettore da 6,35 millimetri (¼ “) sbilanciato, mentre i canali di ingresso 3 e 4 sono dotati
di un connettore COMBO bilanciato. Si prega di notare che è possibile collegare segnali di qualsiasi livello al connettore jack da 6,35
millimetri sbilanciato, mentre la sezione XLR del connettore COMBO può essere utilizzata solo per il segnale di livello microfonico.
2 Manopola GAIN
Utilizzate il controllo GAIN per regolare il guadagno in ingresso in modo tale da ottenere un buon rapporto segnale/rumore, evitando
distorsioni di ingresso. Al fine di evitare forti rumori, dannosi per il vostro impianto audio, questo controllo deve essere sempre girato
completamente in senso antiorario prima di collegare o scollegare una sorgente di segnale all’ingresso.
italiano
3 Led “peak” (picco)
Questo LED avverte quando il guadagno è troppo alto, in questo caso girate in senso antiorario la manopola GAIN per ridurre la
distorsione del segnale di ingresso. Per ottenere il milgior segnale/rumore la manopola di GAIN deve essere regolata in modo che questo
led lampeggi esclusivamente sui picchi musicali.
4 Manopole della sezione EQ
Tutti i canali di ingresso sono dotati di un equalizzatore a 3 bande, per ogni banda è possibile intervenire fino a 15 dB di esaltazione/
attenuazione. Con la manopola in posizione centrale l’equalizzatore non è attivo. Tutti i modelli hanno EQ HIGH @ 12kHz e LOW @
80Hz di tipo “shelving”, ossia il circuito aumenta o taglia tutte le frequenze a partire dalla frequenza di base. Il controllo delle frequenze
alte influenza la maggior parte delle armoniche superiori e dei transitori degli strumenti. Il controllo delle frequenze basse influenza la
cassa, il basso e le ottave inferiori di pianoforte e synth. Il controllo MID @ 2,5 kHz è tipo “a campana”, ossia gli interventi in esaltazione
o attenuazione creano una campana intorno alla frequenza base. L’EQ MID influenza le frequenze superiori della maggior parte degli
strumenti musicali e delle voci. Per ottenere un buon risultato per le voci, provate anche provare ad attenuare la manopola MID degli
altri canali.
5 Manopola mandata EFF
La manopola EFF SEND di ogni canale permette di inviare i segnali all’unità effetti interna. La mandata EFF è configurata post-fader, cioè
la quantità di ciascun canale è determinata dalla mandata EFF e dall’impostazione della relativa manopola VOL.
6 Manopola VOL
La manopola VOL stabilisce il livello del segnale del canale nel mix complessivo. Come detto prima, l’impostazione VOL influenza anche
il livello della mandata EFF.
MASTER section
7 Manopola MP3 VOL
Questa manopola regola il volume della sezione lettore MP3, descritto nella sezione 1.3 LETTORE MP3.
8 Manopola AUX OUT VOL knob
Questa manopola regola il livello complessivo del segnale (dei segnali) inviato all’uscita AUX OUT, con connettore JACK da 6,35 millimetri
(¼“). Notate che il segnale AUX è identico al segnale MASTER, quindi questa manopola è utile anche per inviare il suono complessivo
REBEL ad un impianto audio diverso.
9 Manopola EFF VOL knob
Questa manopola regola il livello complessivo del segnale (dei segnali) inviato all’unità interna EFF. Il segnale proviene dalla manopola di
mandata EFF di ogni canale ed anche dal controllo VOL di ogni canale. Consultate la relativa descrizione nella sezione del canale di ingresso.
10 Interruttore EFF SELECT
Questo interruttore seleziona i due effetti disponibili tra Reverb e Chorus, consentendo di scegliere l’effetto appropriato per ogni
canzone. Rev (Riverbero) riproduce una raccolta di echi riflessi da un ambiente; il riverbero è l’ideale per i cantanti e la maggior parte
degli strumenti. Chorus (Coro) crea “copie” del suono originale leggermente modificate nel timbro e nel tono; il Chorus è l’ideale per
“ingrandire” una voce o per “animare” una chitarra.
REBEL | Manuale
utente
19
11 Manopola MASTER
La manopola MASTER regola il volume generale del vostro REBEL. Questo controllo determina anche il livello di uscita PHONES. Per
evitare rumori sgradevoli e pericolosi per l’impianto audio, questo controllo deve essere sempre girato completamente in senso antiorario
accendete e spegnete il vostro REBEL.
Sezione lettore MP3
12 USB/SD DIGITAL PLAYER
Questa sezione permette di gestire i segnali dalla porta USB collegata e/o ingresso della scheda SD. Vi ricordiamo che è possibile regolare
il volume sezione utilizzando la manopola VOL MP3 nella sezione Master o utilizzando il telecomando in dotazione. Il display a 2 righe
con 16 caratteri permette di controllare nel dettaglio tutto il contenuto del dispositivo digitale. Potete gestire la sezione MP3 anche a
distanza usando il telecomando fornito in dotazione, o altri apparecchi come smartphones.
13 tasti
MODE
PLAY/PAUSE
STOP
REPEAT
PREV
NEXT
mostra “S” per la riproduzione della scheda SD o “U” per la riproduzione USB, o “Connected” per la connessione Bluetooth.
Premendo questo tasto per tre secondi, il lettore si spegne.
permette attivare la riproduzione, premendo due volte questo tasto il player sarà in pausa.
arresta la riproduzione del lettore
questo tasto attiva la ripetizione di tutti i brani in ordine di numerazione
sposta il lettore al brano precedente
sposta il lettore al brano successivo
14 USB/SD
Lo slot superiore è per la scheda SD. La porta inferiore è per il collegamento del dispositivo USB.
conneTtorI
15 RETURN MAIN IN
Questo connettore jack da 6,35 millimetri (¼ “), può essere utilizzato per qualsiasi fonte sonora esterna, che sarà indirizzata direttamente
alla Sezione Master. Notate che non c’è nessun controllo di livello, quindi è necessario regolare il livello di uscita della sorgente.
È possibile collegare qui l’uscita di un apparecchio esterno di effetti digitali, o il segnale da un sub-mixer che gestisce ulteriori segnali
per essere miscelati con il mixer del vostro REBEL, per essere quindi amplificato dal REBEL.
16 PRE SEND OUT
Questo connettore sbilanciato jack da 6,35 millimetri (¼ “) può essere utilizzato per inviare il mix del vostro REBEL a qualsiasi dispositivo
esterno. Si prega di notare che il livello generale sarà regolato tramite la manopola MASTER.
È possibile collegare questa uscita a qualsiasi unità esterna, come un registratore o un impianto di amplificazione diverso, per diffondere
il mix del tuo REBEL in ambienti diversi.
17 EFFECT F. SWITCH
Questo connettore jack da 6,35 millimetri (¼ “) consente di attivare/disattivare la sezione effetti, per fare a distanza interventi “a mano
libera”. Il collegamento ad un pedale risulta molto utile quando si suona uno strumento o quando siete lontani dal mixer.
18 AUX OUT 0dB
Questo connettore jack da 6,35 millimetri (¼”) può essere utilizzato per inviare il mix del tuo REBEL a qualsiasi dispositivo audio esterno.
Notate che il livello di questa uscita è regolato da AUX OUT VOL. È possibile collegare questa uscita a qualsiasi unità esterna, come un
apparecchio per effetti esterno, un registratore o ad un diverso impianto di amplificazione che diffonda il mix del tuo REBEL in stanze diverse.
19 PHONES
Potete usare questo connettore jack stereo da 6,35 millimetri (¼ “) per collegare le cuffie per controllare il mix del REBEL. Notate che il
vostro livello di cuffie viene regolato dal controllo MASTER.
20 IR LED
Questo LED rileva il segnale del telecomando fornito in dotazione, consentendovi di effettuare diverse operazioni con il lettore MP3,
che sono descritte nel relativo capitolo (pag. 14).
Manuale utente | REBEL
20
alimentazione
21 Interruttore di alimentazione AC
Questo interruttore consente di attivare la corrente elettrica alternata, dalla presa .
Nella posizione “1” il vostro REBEL è acceso, mentre nella posizione “0” il vostro Rebel è spento.
Prima di accendere o spegnere l’unità, assicuratevi che la manopola MASTER sia in posizione “0”.
Anche quando utilizzate il vostro REBEL con alimentazione da rete, l’interruttore DC deve essere nella posizione “1”.
Notate che ogni volta che il vostro REBEL è collegato alla rete, nonostante la posizione di questo interruttore, la batteria interna è ricaricata.
italiano
22 Interruttore della batteria DC
Questo interruttore consente di attivare la batteria interna ed è molto utile per evitare di ridurre la durata della batteria.
In posizione “1” il vostro REBEL è acceso, mentre nella posizione “0” il vostro REBEL è spento.
Durante il funzionamento a batteria, controllate sempre i LED del livello della batteria.
23 Presa 100 ÷ 230 V ~ 50/60Hz - F 2A L 250V
è una presa di alimentazione standard IEC che contiene anche un porta-fusibile.
Nel caso in cui l’unità sia collegata alla rete elettrica e gli interruttori AC e/o DC sono in posizione “1” ma l’apparecchio non funziona,
controllate la condizione del fusibile.
Se il fusibile è bruciato è necessario sostituirlo con uno identico.
24 LED BATTERY LEVEL
Questa sezione con 5 led consente di monitorare la carica della batteria integrata.
I LED verdi 3 - 2 - 1 mostrano il livello della batteria, quello rosso LOW si accende quando la batteria inizia a scaricarsi
Il LED arancione CHARGE si accende quando il batteria interna è in carica.
APERTURE DI VENTILAZIONE
25 Slot di ventilazione
MAI bloccare queste slot altrimenti l’amplificatore di potenza potrebbe essere danneggiato dal surriscaldamento che si sviluppa
internamente nonostante la ventola di raffreddamento.
ALTOPARLANTI PANNELLO ANTERIORE
26 Driver a compressione da 25.4 mm
Questo driver da 25,4 mm (1”) termina con una gola da 25,4 mm (1“) collegata direttamente alla tromba per la diffusione del suono,
che ha un’ampia dispersione.
27 Woofer da 205mm (8”)
Questa woofer custom ad alta escursione sviluppa alti livelli di pressione sonora.
28 Doppi piedini di livellamento
Il sistema permette un’inclinazione massima di 17°.
26
17° max
27
28
REBEL | Manuale
utente
21
CARATTERISTICHE TECNICHE
INGRESSI
Connettori (ingressi 1-2)
Prese jack bilanciate da 6,35mm (¼”)
Connettori (ingressi 3-4)
Prese bilanciate COMBO – XLR + jack da 6,35mm (¼”)
EQ
Low
80Hz, ±15dB, tipo shelving
Mid
2.5kHz, ±15dB, tipo “campana”
High
12 kHz, ±15dB, tipo shelving
EFFETTI DIGITALI
Tipo
Reverb or Chorus
Controllo di volume
Manopola EFF VOL
Interruttore Effetto F.
Attiva/disattiva effetto
MP3 PLAYER
Connessioni
USB port, SD card slot
Controllo di volume
BLUETOOTH
Using MP3 VOL knob and remote control
®
Connessioni
Bluetooth® wireless
Controllo di volume
Dalla sorgente sonora
USCITE
AUX OUT 0dB
Connettore da 6,35 mm (¼”) sbilanciato, di livello linea
PHONES
Connettore stereo da 6,35 mm (¼”) sbilanciato, di livello cuffia
Power amp
SEND PRE OUT
Connettore da 6,35 mm (¼”) sbilanciato, di livello linea
RETURN MAIN IN
Connettore da 6,35 mm (¼”) sbilanciato, di livello linea
Tecnologia
Amplificatore in Classe D Amp
Potenza continua
50 W
Potenza massima
80 W
Trasduttori
Trasduttore per le frequenze basse
Altoparlante da 205 mm (8”) con bobina mobile da 38mm (1.5”)
Trasduttore per le frequenze alte
Driver a compressione da 25,4 mm (1”), con uscita da 25,4 mm (1”)
Dispersione
80° x 50°
Tipo di crossover
Passivo, 2° ordine, 12 dB/ott.
Risposta in frequenza
50 Hz ÷ 18 kHz
costruzione
Tipologia di caricamento
Bass reflex
Materiale
MDF da 15 mm
Griglia di protezione anteriore
Acciaio perforato da 1,2 mm
Finitura
Tolex nero
batteria
Durata
Circa 4 ore
Stand-by
36 ore
Tipo di batteria
Accumulatore 12 V / 17 Ah
Alimentazione
100 ÷ 230 V ~ 50/60 Hz
Fusibile
F 2A L 250V
Dimensioni (L x H x P)
390 x 510 x 340 mm (15.4” x 20” x 13.4”)
Peso
25 kg (55.1 pds)
Manuale utente | REBEL
22
PROCEDURA BLUETOOTH® iOS
iPhone® – iPad®
[1] Dal menù Impostazioni > attivate bluetooth® sul dispositivo Apple > “I” > Dispositivi > Cerco…
[2] Portate il potenziometri Master e MP3 Volume al centro. Ciò è importante per sentire i toni di riconoscimento emessi dalla sezione
MP3/BLUETOOTH
[3] Accendete l’unità REBEL > Interruttore DC > “I” (se REBEL è collegato alla presa 220/240V premete su “I” anche l’interruttore AC)
italiano
[4] Premete il tasto MODE (di default l’unità accende l’MP3) > sul display del REBEL compare la scritta bluetooth Initializing… e si sente un
tono (bup). Inizio del riconoscimento.
[5] Il Rebel emette due toni in sequenza (bup – bup) quando riconosce il dispositivo esterno. Dal menù “Dispositivi” dell’iPhone® o iPad®
è possibile visualizzare la scritta BLUETOOTH (in maiuscolo). Significa che il dispositivo Apple® è in sync con il REBEL. In tal caso procedete
alla connessione.
Andate direttamente al punto [11].
[6] Nel caso in cui nel display del REBEL appaia la scritta “Unconnected”, ripetete i passi [4] e [5] della procedura, per fare un nuovo tentativo.
[7] Nel caso in cui dopo 3 tentativi appaia ancora la scritta “Unconnected” spegnete il REBEL mettendo l’interruttore DC su “0”.
[8] Prima di riaccendere il REBEL cancellate o ignorate gli altri dispositivi bluetooth® presenti sui dispositivi Apple®.
Menù “Dispositivi “ > freccia blu
clic su “Ignora questo dispositivo”
[9] Attendete 5 secondi e riaccendete l’unita. DC “I”.
[10] Ripetete i passi [4] e [5] della procedura.
[11] Per connettere i dispositivi premere “non connesso” sul device esterno. A connessione avvenuta il REBEL emette un tono (bip) e
visualizza la scritta “Connected” sul display.
[12] Da questo momento potete mandare qualsiasi sorgente sonora al REBEL attraverso la connessione bluetooth®.
Il logo Apple®, iPhone® e iPad® sono marchi di Apple Inc., registrati negli USA e in altri Paesi.
Il marchio e il logo Bluetooth® è un marchio registrato di proprietà di Bluetooth SIG, Inc. e qualsiasi uso da parte di Elettronica Montarbo srl è soggetto a licenza.
REBEL | Manuale
utente
23
The information contained in this manual have been carefully drawn up and checked. However no responsibility will be assumed
for any incorrectness. This manual cannot cover all the possible contingencies which may arise during the product installation and
use. Should further information be desired, please contact us or our local distributor. Elettronica Montarbo srl can not be considered
responsible for damages which may be caused to people and things when using this product. Specifications and features are subject to
change without prior notice.
Le informazioni contenute in questo manuale sono state attentamente redatte e controllate. Tuttavia non si assume alcuna responsabilità per
eventuali inesattezze. Questo manuale non può contenere una risposta a tutti i singoli problemi che possono presentarsi durante l’installazione e l’uso
dell’apparecchio. Siamo a vostra disposizione per fornirvi eventuali ulteriori informazioni e consigli. Elettronica Montarbo srl non può essere ritenuta
responsabile per danni o incidenti a cose o persone, causati o connessi all’utilizzazione o malfunzionamento dell’apparecchio.
The product is made in China under license of Elettronica Montarbo srl.
The product is compliant with the EU legislation.
© Elettronica Montarbo srl | Printed in China
Prodotto in Cina per conto di Elettronica Montarbo srl.
Prodotto conforme alle normative della Comunità Europea.
Elettronica Montarbo srl
via G. di Vittorio 13 | 40057 Cadriano Granarolo Emilia (BO) ITALY
T +39 051 6047711
F +39 051 765226
@ [email protected]
www.fiveo.it
Company under the control of EKO Music Group SpA


![[en] owner`s manual](http://vs1.manualzilla.com/store/data/006162832_1-909017f8e41cb525dbc302a6f278af8f-150x150.png)