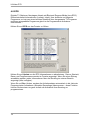
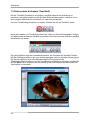
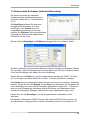
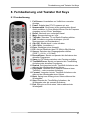
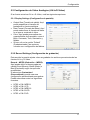
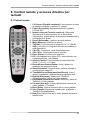
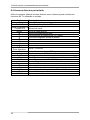
1
FlyDVB-T
User Manual
Animation Technologies Inc.
www.lifeview.com
Ver: 1.9
Copyright and Trademark Notice
©2005 by Animation Technologies Inc. All rights reserved.
Information in this document is subject to change without notice. No part of this
document may be reproduced or transmitted in any form or by any means, electronic
or mechanical without prior written permission of Animation Technologies Inc.
Animation Technologies Inc. makes no representation or warranties with respect to
the contents hereof and specifically disclaims any implied warranties of
merchantability or fitness for any particular purpose. Animation Technologies Inc.
reserves the right to revise this manual and to make changes in its content without
obligation to notify any person or organization of such revision or change. In no event
shall Animation Technologies Inc. be liable to you or any third party for any
consequential, incidental, direct, indirect, special, punitive, or other damages
(including without limitation, damages for loss of profits, interruptions, loss of
information, pecuniary loss, etc.), even if Animation Technologies Inc. has been
advised of the possibility of such damages arising from any defect or error in this
manual or product.
Updates to this documentation can be obtained from our website:
http://www.lifeview.com.
Windows® is a trademark of Microsoft Corporation. All other brand names used in this
document are registered trademarks of their respective companies.
CE Statement: This equipment has been tested and complies with EN 55022, EN
55024, EN 61000-3-2, EN 61000-3-3, EN 61000-4-2, EN 61000-4-3, EN 61000-4-4,
EN 61000-4-5, 61000-4-6, EN 61000-4-8, EN 61000-4-11 standards.
Contents
1. Getting Started ................................................................. 1
1.1 Introduction................................................................................................... 1
1.2 Features ....................................................................................................... 1
1.3 Package Contents ........................................................................................ 1
1.4 System Requirements .................................................................................. 2
2. Input & Output Connections ........................................... 3
2.1 FlyDVB-T Connections ................................................................................. 3
3. Installation ........................................................................ 4
3.1 DirectX.......................................................................................................... 4
3.2 Installing the FlyDVB-T ................................................................................. 5
3.3 Driver Installation for Windows 2000 / Windows XP ..................................... 6
3.4 Installation of LifeView DTV.......................................................................... 7
4. LifeView DTV .................................................................... 8
4.1 DTV Interface Overview................................................................................ 8
4.2 Scanning for TV Channels (Digital)............................................................... 9
4.3 Choosing your source................................................................................. 11
4.4 Channel list................................................................................................. 12
4.5 Volume controls .......................................................................................... 12
4.6 Signal Strength Meter ................................................................................. 12
4.7 Teletext....................................................................................................... 13
4.8 EPG ............................................................................................................ 14
5. Settings ........................................................................... 15
5.1 DVB Settings .............................................................................................. 15
5.2 Analog Video Settings (AV-In/S-Video) ...................................................... 17
6. PIP (Picture-In-Picture) and TWIN Mode ...................... 21
7. Recording ....................................................................... 23
7.1 The Recording Button................................................................................. 23
7.2 The TimeShift Button .................................................................................. 24
7.3 Schedule Recording ................................................................................... 25
7.4 Snapshots................................................................................................... 26
7.5 Play Mode................................................................................................... 26
8. The Remote Control and Keyboard Shortcuts ............ 27
8.1 Remote Control .......................................................................................... 27
8.2 Keyboard Shortcuts .................................................................................... 28
9. Technical Support.......................................................... 29
9.1 Contact Us.................................................................................................. 29
Getting Started
1. Getting Started
1.1 Introduction
Thank you for choosing the FlyDVB-T TV tuner and video capture card. This product
turns your PC into a powerful desktop multimedia system quickly and easily. Capture
video and still images and experience real-time MPEG-1/2/4 recording. Watch both
digital TV and analog video at the same time, on the same screen, thanks to LifeView’s
exclusive MST technology! The FlyDVB-T provides you with a high quality TV viewing
experience with true stereo sound!
1.2 Features
•
•
•
•
•
•
•
•
•
•
Antenna ready DVB-T Silicon Tuner
S-Video/composite video inputs
PIP (Picture in Picture)
Real-time recording from Digital TV and Analog inputs
LifeView’s exclusive MST lets you watch both Digital TV and input analog video
simultaneously
Watch TV in a resizable window or full-screen
TimeShifting functions
Capture still images
Listen to DVB radio
Compatible with Windows® 2000 and XP
1.3 Package Contents
When removing the contents of the package, please inspect all items to ensure no
damage was sustained during shipping. The following items should be included in the
package:
•
•
•
•
•
•
•
•
FlyDVB-T card
PAL/NTSC connection adapter
A/V-Cable
Remote control
IR sensor cable
Installation CD-ROM
Quick Installation Guide
Portable antenna (optional)
1
Getting Started
1.4 System Requirements
To successfully use the FlyDVB-T solution, please ensure that your system meets the
following requirements:
•
•
•
•
•
•
•
•
•
•
•
•
2
Pentium® 4 or AMD Athlon 2.0 GHz or faster, 2.4GHz or faster recommended
256 MB RAM (minimum), 512 MB RAM recommended
Microsoft Windows 2000/XP
100 MB available hard disk space for installation, additional space required for
recording or TimeShifting
CD-ROM or DVD drive
VGA chipset with full DirectX 9.0 support
DirectX 9.0c or higher installed
AC97 compatible sound card for audio
Speakers for audio output
Available IRQ
Available PCI slot
TV antenna or cable for digital TV
Input & Output Connections
2. Input & Output Connections
2.1 FlyDVB-T Connections
The FlyDVB-T card supports S-Video, and composite video input. See the diagram
below for connection details.
1
2
3
4
5
6
8
7
1. S-Video:
2. Composite Video:
S-Video input for external devices like VCRs or camcorders
Composite video input for external devices like VCRs or
camcorders
3. Audio (R):
Connects to the right audio channel of an external audio
device
4. Audio (L):
Connects to the left audio channel of an external audio
device
5. DVB-T:
Connects to your home or room antenna for Digital
Terrestrial TV
6. AV Cable:
Connect the AV Cable to the 9-pin connector of the
FlyDVB-T
7. Remote:
Connects to the IR remote cable
8. A/V Box Connector: Connects to optional A/V input box (optional)
3
Installation
3. Installation
The following sections provide step-by-step instructions on installing and configuring
the card, accessories and software.
3.1 DirectX
Before installing your the FlyDVB-T, it is necessary to install DirectX 9.0c or higher.
Insert the installation CD and an installation menu should load automatically.
If the Autostart program does not appear automatically
when you insert your LifeView Installation CD, start it
manually by running the InstallCD.exe file located on
the LifeView Installation CD, or by clicking the Start
button, choosing Run…, and typing in
D:\InstallCD.exe. (if D: is your CD-ROM drive)
Click on DirectX 9.0 and follow the
prompts to install DirectX. After the
installation is completed, shut down
the computer.
4
Installation
3.2 Installing the FlyDVB-T
1. Switch off your PC and all connected peripheral devices such as your printer and
monitor. Leave the AC power cable connected for the time being, so that your
computer is still grounded.
2. Touch the metal chassis at the rear of the PC to ground and to discharge static.
Now unplug the cord from the AC power socket.
3. Remove the cover from the case of your PC.
4. Look for a free PCI expansion slot. When selecting the PCI slot, note that DVB-T
cards should not be plugged into PCI slot 1 in conjunction with an AGP graphics
card because PCI slot 1 is very frequently assigned to the same interrupts as the
AGP slot. This would give both cards the same interrupt, which can lead to crashes
during operation!
(This is usually the PCI slot closest to the AGP slot, but always check your
mainboard manual).
5. Carefully remove the card from its packaging and pick it up by the edges with one
hand while your other hand is touching a metal part of the PC. This will ensure that
your body is completely discharged via your computer without damaging the TV
card.
6. Align the holder at the rear of the TV card in the expansion slot in such a way that
the card’s connectors are directly in line with the slot’s socket.
7. Push the TV card firmly into the slot, ensuring good contact.
8. Fasten the TV card with an appropriate screw.
9. Reinstall the cover of your PC case.
10. Connect the antenna cable (which you would normally connect to the antenna
input terminal on your television) to the TV antenna terminal on the TV card.
Reconnect the AC power cable as well as all other cables. Make sure that your
speakers are set to low volume.
5
Installation
3.3 Driver Installation for Windows 2000 / Windows XP
Windows 2000 / XP will
automatically detect the FlyDVB-T
card and brings up the Found New
Hardware Wizard window.
If you have not already done so,
place the Installation CD into your
CD-ROM drive.
Select Install from a list or
specific location (Advanced) and
click Next.
Now select Search for the best
driver in these locations, make
sure “Search removable media is
checked, and click Next.
Windows will now find the drivers on
the Installation CD and install them
automatically. After installing the
driver, Windows will inform you that
it has done so successfully. Click
Finish.
6
Installation
3.4 Installation of LifeView DTV
Install the LifeView DTV software by
clicking on LifeView DTV. Just follow
the prompts to install the software.
7
LifeView DTV
4. LifeView DTV
4.1 DTV Interface Overview
1
25
2
3
4
5
6
7
8
9
10
11
12 13 14 15
16 17
18
1. Change Skin
2. Switch to composite video in
3. Switch to S-Video in
4. Switch to DVB TV
5. Start/Stop PIP mode
6. Start/Stop Twin mode
7. Open Scan settings
8. Switch to Play mode
9. Swap main and second window
(in PIP mode)
10. Teletext
11. Open EPG window
12. Rewind
13. TimeShift Start/Play/Pause
8
19
20 21
22
23
24
14. Record Start
15. Stop
16. Skip to beginning
17. Skip to end
18. Mute on/off
19. Volume bar
20. Show/hide channel list
21. Snapshot button
22. Signal Strength Meter
23. Toggle fullscreen/windowed viewing mode
24. Fast Forward
25. Channel list
LifeView DTV
4.2 Scanning for TV Channels (Digital)
Before you can watch digital TV,
you have to scan for available
channels in your area.
On the Menu Bar, click on Tool,
then click on Scan. You can
also click on the Scan button on
the left side of the screen.
Receiving Setup:
This shows the current reception standards the DTV application is set to.
Services Information:
This shows information about the currently selected channel when available. During a
scan, this will show information on the status of the scan
Channel Scan:
There are two ways to scan for available channels, Auto Scan and Transponder Scan.
1. Auto Scan:
Select Auto Scan, then select your country
from the drop-down box and click Scan.
2. Transponder Scan:
If you want to manually enter a frequency,
select Transponder Scan, type in the
Frequency in kHz and click Scan.
9
LifeView DTV
Found channels will be displayed in a
window, and here you can customize your
channel list.
You can sort your channel list by Channel
Name, Frequency, Network Provider,
Transponder ID, and Audio type by
clicking on the button at the top of each
column. Clicking on the Audio type of a
channel allows you to change the audio
stream received when viewing that
channel.
You can uncheck a channel so it does not appear in your channel list, or you can
select it and click Delete to remove the channel entirely. You can also import channel
lists into your current list by clicking Import, you can load another channel list by
clicking Load, and you can save your channel list by clicking Save As… To save your
changes, click OK. To cancel your changes, click Cancel.
Updates for the region frequencies will be available regularly on the LifeView website
(www.lifeview.com).
10
LifeView DTV
4.3 Choosing your source
Your FlyDVB-T is not limited to digital TV reception – you can also view analog
sources.
On the left side of the interface, you will find buttons that let you access different
sources.
Switches to an external device connected to the composite video
input
Switches to an external device connected to the S-Video input
Switches to Digital Terrestrial TV (selected by default)
Turns on and off PIP Mode, which lets you watch both digital TV and
an analog input at the same time in separate windows
Turns on and off Twin Mode, which lets you watch digital TV and an
analog input at the same time side by side
Brings up the Scan Settings dialog
Enters Play Mode, and lets you view snapshots you have taken and
watch video you have captured
Swaps video between the main window and second window (in PIP
or Twin mode)
Opens Teletext window (when available)
Opens EPG window
11
LifeView DTV
4.4 Channel list
On the right side of the interface is the channel
list. Here you will see available On the right side
of the interface is the channel list. Here you will
see available channels for DVB if you are in DVB
mode. Simply click on a channel to switch to it, or
press the K or L arrow keys to switch channels. In
DVB mode, you can select DVB Radio by clicking
on the dropdown box and choosing Radio.
Right-clicking on a channel will give you the
option to sort the list by Name, Frequency,
Network Provider, or Transponder ID
Note: DTV CA lists conditional access channels.
These channels are not free-to-view, and cannot
be viewed in the DTV application.
However, some TV stations misidentify their free-to-view channels as conditional
access channels, and will channels be listed under the DTV CA list; these channels
can still be viewed in the DTV application.
4.5 Volume controls
At the bottom of the interface is the volume bar. Click on the bar to set the volume to
that level, or press the I or J arrow keys to decrease or increase the volume. Click
on the speaker icon to mute the audio.
4.6 Signal Strength Meter
The signal strength meter indicates how strong the signal is for the current channel.
Green lights indicate good reception, yellow lights indicate fair reception, and red lights
indicate poor reception.
12
LifeView DTV
4.7 Teletext
Simply clicking the Tx button opens the Teletext window. Not all TV stations provide
Teletext service. Everyday, however, competent editorial offices provide a selection of
quickly and easily accessible information, which you can access for free, since it is
constantly transferred along with the TV picture via the so-called vertical blanking
interval of the picture signal. Surfing through the pages is conveniently easy thanks to
the preloaded text tables. Use the arrow buttons (on the software interface, the PC
keyboard or the remote control) to navigate from one page to another or enter a page
number directly. You can also click a page reference directly to call up its content,
practically with no delay.
For further information about using Teletext, click on Help at the top right of your
screen to read the Help file.
13
LifeView DTV
4.8 EPG
Digital TV stations often broadcast Electonic Program Guide, or EPG information.
This information includes information about upcoming programs and their playing
times, and can be used to see what shows will be playing later in the day and record
them.
Click the EPG button to open the EPG window:
Click on Update to update the EPG information. Date, start time, duration and
program name will appear in the table. Selecting an entry will show extended
information about the program(if available).
Clicking on Rec. will schedule a recording of that program automatically using the
EPG information – you can use this to easily schedule recordings of your favorite
programs.
14
Settings
5. Settings
To access the Setting window, on the menu bar, click on
Tools -> Setting.
Depending on your current source, there will be different
settings available to you.
5.1 DVB Settings
When you have DVB-T as your source, you will see the following options:
5.1.1 Directory Settings
Working Directory
Here you can change the directory used
for saved files. Either type in the path, or
click “Browse”, go to the folder you want,
and click OK.
Capture Size Setting
When checked, this will split recorded
files into parts at the size entered as the
File split size. This is useful if you want
to save long recordings in more
manageable files. For example, setting
the file split size to 650 MB would make
the files easy to burn to CDs. Snapshot
picture format lets you choose whether
you want to save snapshots as BMP or
JPG files.
Always on top
You can also choose to always have the DTV window on top of other applications by
checking “Always on top”.
VGA hardware acceleration
This enables VGA hardware acceleration. Please note that not all graphics cards
support this feature.
Full Screen Setting
This allows you to choose whether to display video in its original aspect ratio or
stretched to fit your screen when watching TV in full screen mode.
15
Setting
5.1.2 Schedule Recording
Here you find programs scheduled
to be recorded.
Please refer to Chapter 7.3 for a
description how to use Scheduled
Recording.
16
Settings
5.2 Analog Video Settings (AV-In/S-Video)
If your current source is AV-in or S-Video, you will see the following options:
5.2.1 Display Settings
•
•
•
•
Output Size: Here you can specify the
display size of the analog source.
Data Format: Here you can choose the
data format to display video in.
Color: Customize here the Color of the
display characteristics like Brightness,
Contrast, Hue, Saturation and
Sharpness.
Clicking on “Default” will put the
settings back to the factory default.
5.2.2 Record Settings
Record Settings let you adjust how you record files from the AV-in and S-Video
sources.
Record - MPEG:
Here you can define whether you want to
record at Good, Better or Best quality
according to predefined settings.
When you choose Customized, you can
make a custom setting to record with.
You can choose between the following
formats:
•
•
•
•
•
NTSC or PAL MPEG-1
NTSC or PAL VCD
NTSC or PAL MPEG-2
NTSC or PAL SVCD
NTSC or PAL DVD
17
Setting
The Profiles… - Button is also available when Customized is selected, and it opens
the following screen:
Here you can Create a new profile,
Modify an existing one, Duplicate a
profile, and Remove one or all of the
existing profiles.
Create Profile
General:
Here, enter a name for the profile, and a comment to
help identify it. Select MPEG-1 or MPEG-2 to use
with the profile.
System:
Depending on the Mode selected in “General”, select
what Bitstream mode you want to use with the profile.
18
Settings
Video:
Here, choose the video format, the output size, and the
Bit Rate you wish to use.
When you click on Advanced, another window will open
where you can select the Frame Rate, the Encoder level
and whether the recording should be Inverted,
Deinterlaced and/or Off Line.
Audio:
Here you can choose the Bit Rate, Sample Rate, and
how many Channels to use for recorded audio.
(1=mono, 2=stereo)
Record – SYSTEM
By selecting SYSTEM in the Record Setting
window, you can access the codecs already
installed in your system. Depending on the
codec, you can access the properties of the
codec, and modify their settings by clicking on
the Property button. (not available with all
codecs)
19
Setting
5.2.3 Directory Settings
Working Directory
Here you can change the directory used for
saved files. Either type in the path, or click
“Browse”, go to the folder you want, and click
OK.
Capture Size Setting
When checked, this will split recorded files into
parts at the size entered as the File split size.
This is useful if you want to save long recordings
in more manageable files. For example, setting
the file split size to 650 MB would make the files
easy to burn to CDs. Snapshot picture
format lets you choose whether you
want to save snapshots as BMP or JPG
files.
Always on top
You can also choose to always have the DTV window on top of other applications by
checking “Always on top”.
VGA hardware acceleration
This enables VGA hardware acceleration. Please note that not all graphics cards
support this feature.
Full Screen Setting
This allows you to choose whether to display video in its original aspect ratio or
stretched to fit your screen when watching TV in full screen mode.
5.2.4 Schedule Recording
Here you find programs scheduled to be
recorded.
Please refer to Chapter 7.3 for a description how
to use the Scheduled Recording.
20
PIP (Picture-In-Picture) and TWIN Mode
6. PIP (Picture-In-Picture) and TWIN Mode
The PIP/TWIN functions can be accessed from the toolbar on the left.
When you click on the PIP Button, you will see a second live stream at the bottom
right. When you are in PIP-Mode, you can switch between DVB-T for your digital
source, and between S-Video, and AV in for your analog source.
You can move the window anywhere on the desktop, and you can resize it by dragging
it on its edges.
21
PIP (Picture-In-Picture) and TWIN Mode
Clicking on Twin will show the two video streams side by side in identical windows. In
this mode, the windows will be locked, and cannot be individually resized or moved.
Clicking on the Swap button will swap the main and second windows, so digital TV will
be in the second window and your analog source will be in the main window.
To end PIP mode, click on the PIP button again to return to normal viewing. You
cannot TimeShift or record when in PIP mode.
22
Recording
7. Recording
7.1 The Recording Button
By clicking the record button, you can record video displayed in the
main window. When recording video, then you will see • REC above
the play controls.
In DVB-T mode, you record the pure MPEG-2 Audio and Video signal.
In analog mode (S-Video or AV-In) you record the signal in the format that you have
specified in Record Settings. (Chapter 5.2.2) In all modes, recorded files will be saved
to the working directory, which can be specified in Directory Settings. (Chapter 5.1.1
and Chapter 5.2.3) You can watch the movies you have recorded by entering Play
Mode. (Chapter 7.5) When recording from DVB, you can view/listen to another source
(AV in/S-Video) while your program continues recording in the background. Also,
when recording from AV in/S-Video, you can watch DVB TV.
When you are done recording, click the Stop button.
23
Recording
7.2 The TimeShift Button
With the TimeShift function, you can pause live TV, leave, and come back and watch
your program right where you left it. You can then also fast forward past commercials,
or rewind to see a particular scene again.
To begin TimeShifting, simply click the TimeShift button.
The TimeShift button will then turn into a Pause/Play button, letting you pause the
video. Clicking it again will begin playback right where you left it.
You will see a green bar at the bottom of the screen, with a slider that shows your
current position. You can rewind or fast forward by using the buttons at the left and
right side of the bar, or by dragging the slider left and right. You can also click on the
Skip to Beginning button to go to the beginning of the TimeShifted file, and click on
Skip to End to move back to what is currently showing. When you want to stop
TimeShifting, click on the Stop button. You cannot change channels or video sources
while TimeShifting.
24
Recording
7.3 Schedule Recording
You can access Schedule Recording from
the Settings Menu as described in Chapter
5.1.2 and Chapter 5.2.4. Here you can see
a list of items scheduled to record.
By clicking on the Add Button, you are able
to add a new scheduled recording, the
Delete button cancels the highlighted
scheduled recording and the Edit button
lets you change the settings of a scheduled
recording.
The Add and Edit buttons open a second menu:
First, select the Schedule Type from the right side of the screen. Click “One time” if
this is a one-time only recording. To make a weekly recording, click on the days you
want the program to record on. Select the Source you want to record from, then the
Channel if you are recording from a TV source. Select the Date if this is a one time
recording. Enter the Start Time and Duration of the program you want to record.
Finally, enter a File Name for the recorded file – if this is a weekly recording, a number
will be added to this name for each recording. (Example: FileName01.mpg,
FileName02.mpg, etc.)
Click on the Add button to finish scheduling the recording.
You can also schedule recordings on digital TV using EPG information. For more
details, refer to section 4.8.
25
Recording
7.4 Snapshots
You can take still image snapshots of video and save them to your hard drive. To take
a snapshot, click on the Snapshot button, and the current video image will be saved to
your hard drive in the working directory specified in Directory Settings. (Chapter 5.1.1
and Chapter 5.2.3) You can see the snapshots you have taken by entering Play Mode.
(Chapter 7.5)
7.5 Play Mode
You can see the files you have already recorded by clicking on Play on the left side of
the interface. Here you can select the file you wish to view on the right, and it will
display in the main window. If the file is an image, it will be displayed. If the file is a
movie clip, it will begin to play. You can pause/play or stop the movie using the
Pause/Play and Stop buttons at the bottom of the interface. You can also click on
Explorer… and you will open your saved files working directory specified in Directory
Settings. (Chapter 5.2.3)
26
The Remote Control and Keyboard Shortcuts
8. The Remote Control and Keyboard Shortcuts
8.1 Remote Control
1. Full Screen: Switches between full screen mode and a
normal TV display.
2. Power: Turns on/off the LifeView DTV Program.
3. Numeric Keypad: Selects the desired channel directly. In
Scan Mode you can type in the frequency directly and
confirm with “Enter”.
4. Recall: Switches to the previously viewed channel.
5. Mute: Mutes the Audio.
6. TV/Radio: Switches between TV and Radio reception.
7. SAP: Switches to a Second Audio Program (if available).
8. CH+/CH-: Switches to the next/previous channel.
9. VOL-/VOL+: Decreases/increases the volume.
10. Enter: Confirms a selection.
11. PIP: Enables/disables the PIP Mode and to switch
between the main and second window.
12. Source: Switch between the different sources.
(DVB -> AV-In -> S-Video)
13. Record/Pause: Starts and stops the recording of the
current program.
14. Swap: Swaps main and secondary windows when in PIP
mode
15. TimeShift/Pause: Starts and pauses the TimeShifting of
the current program.
16. Rewind: Rewinds current TimeShift or recorded video.
17. Play/Pause: Resumes and pauses TimeShift or recorded
video.
18. Forward: Moves forward through TimeShift or recorded
video.
19. Back: Skips to the beginning of a recorded video.
20. Stop: Stops TimeShifting, playback, or recording.
21. End: Skips to the end of a recorded video during playback.
27
The Remote Control and Keyboard Shortcuts
8.2 Keyboard Shortcuts
Use the following Hot-Key table for reference to conveniently control TV functions
using a keyboard.
Keyboard
F
Ctrl-Alt-T
Number keys 0-9 /
NumPad 0-9
BackSpace
M
T
A
©
ª
¨
§
Enter /
NumPad Enter
P
I
Ctrl-R
S
Ctrl-T
W
Space
E
Q
Ctrl-S
R
Ctrl-P
28
Description
Full Screen Mode On / Off
Open / Close the DTV application
Channel Number
Recall Previous Channel
Mute on / off
Switch between TV / Radio reception
Switch to Second Audio Language
Channel Up
Channel Down
Volume Up
Volume Down
Enter / Confirm
Enable/disables PIP mode
Input Source (DVB, AV-in, S-Video in)
Start Recording
Swaps main and secondary windows during PIP mode
Start / Pause TimeShift
Rewind
Play / Pause
Fast Forward
Skip to beginning
Stop Playback / Recording / TimeShifting
Skip to end
Snapshot
Technical Support
9. Technical Support
9.1 Contact Us
If you have attempted to resolve any problems with your FlyDVB-T and still require
assistance, contact us by e-mail at [email protected]. You can also see our
technical support page on our website at www.lifeview.com, where driver updates will
be posted and available for download.
29
FlyDVB-T
Guide de l’utilisateur
Animation Technologies Inc.
www.lifeview.com
Ver: 1.9
Copyright et marques déposées
©2004 par Animation Technologies Inc.. Tous droits réservés.
Les informations contenues dans ce mode d’emploi peuvent faire l’objet de
modifications sans préavis. Aucune partie de ce document ne peut être reproduite ou
transmise sous aucune forme ou par aucun moyen, électronique ou mécanique, sans
la permission écrite et au préalable de la société Animation Technologies Inc..
La société Animation Technologies Inc. n'accorde aucune représentation ni garantie,
qu'elle soit explicite ou implicite, quant au contenu des présentes, et en particulier se
dégage de toute responsabilité concernant la valeur commerciale ou la convenance
pour un usage particulier. En outre, la société Animation Technologies Inc. se réserve
le droit de réviser le contenu du présent manuel et d'y apporter des modifications de
temps à autre, sans pour autant être tenue d'informer qui que ce soit de ces révisions
ou modifications. En aucun cas la société Animation Technologies Inc. ne sera tenue
responsable envers vous ou un tiers partie de tout remboursement consécutif, fortuit,
direct, indirect, spécial, punitif ou autre (incluant, sans s’y limiter, les pertes de profit,
arrêts de travail, interruptions, pertes de données, pertes pécuniaires, etc.), même s’il
s’avère que la société Animation Technologies Inc. a été préalablement avertie de la
possibilité de tels dommages résultants de problèmes ou de défauts dans la
conception de l’appareil ou du manuel.
Une version plus récente de ce manuel peut être obtenue dans notre site Web :
www.lifeview.com.
Windows® est une marque déposée de Microsoft Corporation. Toutes les autres
marques utilisées dans ce manuel sont des marques déposées.
Avertissement de la CE : Cet appareil a été testé et déclaré conforme aux normes EN
55022, EN 55024, EN 61000-3-2, EN 61000-3-3, EN 61000-4-2, EN 61000-4-3, EN
61000-4-4, EN 61000-4-5, 61000-4-6, EN 61000-4-8 et EN 61000-4-11.
Table des matières
1. Démarrage ........................................................................ 1
1.1 Introduction................................................................................................... 1
1.2 Caractéristiques............................................................................................ 1
1.3 Contenu de la boîte ...................................................................................... 1
1.4 Configuration du système ............................................................................. 2
2. Entrées, sorties et connexions ....................................... 3
2.1 Connexion de la carte TV FlyDVB-T............................................................. 3
3. Installation ........................................................................ 4
3.1 DirectX.......................................................................................................... 4
3.2 Installation de la carte FlyDVB-T .................................................................. 5
3.3 Installation des pilotes de la carte sous Windows 2000/XP .......................... 6
3.4 Installation de LifeView DTV......................................................................... 7
4. LifeView DTV .................................................................... 8
4.1 Aperçu de l’interface graphique de DTV ....................................................... 8
4.2 Recherche de chaînes (TV numérique) ........................................................ 9
4.3 Choisir la source vidéo ............................................................................... 11
4.4 Liste des chaînes........................................................................................ 12
4.5 Réglage du volume..................................................................................... 12
4.6 Mètre de Force du Signal ........................................................................... 12
4.7 Télétexte..................................................................................................... 13
4.8 Guide électronique de programme ............................................................. 14
5. Réglages ......................................................................... 15
5.1 DVB Settings (Configuration DVB) ............................................................. 15
5.2 Configuration de la Vidéo analogique (AV-In/S-Vidéo) ............................... 17
6. Mode PIP (Image sur image) et mode TWIN (Double
écran) .................................................................................. 21
7. Enregistrement............................................................... 23
7.1 Touche Recording (Enregistrement)........................................................... 23
7.2 Touche TimeShift (Décalage temporel) ...................................................... 24
7.3 Schedule Recording (Programmer l’enregistrement).................................. 25
7.4 Clichés........................................................................................................ 26
7.5 Mode Play (Lecture) ................................................................................... 26
8. Raccourci-clavier ........................................................... 27
8.1 Télécommande ........................................................................................... 27
8.2 Raccourcis clavier....................................................................................... 28
9. Aide technique ............................................................... 29
9.1 Comment nous contacter............................................................................ 29
Démarrage
1. Démarrage
1.1 Introduction
Merci d’avoir acheté la carte d’acquisition TV et de saisie vidéo FlyDVB-T. Cet
appareil transforme rapidement et facilement votre PC en un système multimédia
multifonctions. Saisissez des images fixes, des clips vidéo et faites des
enregistrements en temps réel MPEG-1 et MPEG-2. Regardez la télévision
numérique et vidéo analogique simultanément et sur le même écran ! La carte
FlyDVB-T offre une qualité vidéo de pointe avec des sons stéréo incroyables !
1.2 Caractéristiques
•
•
•
•
•
•
•
•
•
•
Antenne DVB-T portable
Entrées video S et composite
PIP (Image en image)
Enregistrement en temps réel de la TV numérique et en utilisant les entrées
analogiques
Regardez la TV numérique et vidéo analogique simultanément
Changez le format de la fenêtre TV ou regardez la TV au format plein écran
Fonctions TimeShifting
Saisissez des images fixes
Ecoutez la radio numérique DVB
Compatible avec Windows® 2000 et XP
1.3 Contenu de la boîte
Veuillez vérifier le contenu de la boîte, que toutes les pièces soient présentes et
qu’aucune pièce n'ait été endommagée pendant le transport. La boîte devrait contenir
les pièces suivantes :
•
•
•
•
•
•
•
•
CARTE TV FlyDVB-T
Convertisseur PAL/NTSC
Câble A/V
Une télécommande
Câble du capteur infrarouge
CD-ROM d’installation
Guide d’installation rapide
Antenne portative (optional)
1
Démarrage
1.4 Configuration du système
Pour utiliser avec succès la carte FlyDVB-T, vérifiez la configuration de votre
ordinateur :
•
•
•
•
•
•
•
•
•
•
•
•
2
Pentium® 4 ou AMD Athlon 2.0 GHz ou supérieur, 2.4GHz ou plus rapide
recommandé
256 Mo de mémoire vive (minimum), 512 Mo de mémoire vive recommandé
Microsoft Windows 2000/XP
100 Mo d’espace disque disponible pour l’installation et espace supplémentaire
requis pour l’enregistrement ou le décalage temporel
Lecteur CD-ROM ou DVD
Jeu de puces VGA avec support DirectX 9.0 intégral
DirectX 9.0c ou supérieur installé
Carte son compatible AC97 pour l’audio
Haut-parleurs pour la sortie audio
Demande d’interruption disponible
Fente PCI disponible
Antenne TV ou câble TV pour la TV numérique
Entrées, sorties et connexions
2. Entrées, sorties et connexions
2.1 Connexion de la carte TV FlyDVB-T
La carte TV FlyDVB-T supporte les entrées vidéo S, composite et analogique. Voir le
schéma ci-dessous pour les connexions.
1
2
3
4
5
6
8
7
Schéma des connexions
1. S-Video :
Entrée vidéo S pour brancher un appareil externe
(magnétoscope ou caméscope par exemple)
2. Composite Video :
Entrée vidéo composite pour brancher un appareil
externe (magnétoscope ou caméscope par
exemple)
3. Audio (R) :
A brancher sur le canal audio droit d’un appareil
externe
4. Audio (L) :
A brancher sur le canal audio gauche d’un appareil
externe
5. DVBT :
Pour brancher votre antenne de TV numérique
6. AV-Cable :
Branchez le câble AV sur le connecteur à 9 fiches
de la carte FlyDVB-T
7. Entrée du câble d’extension: Pour brancher le câble d’extension du capteur IR.
8. Connecteur du boîtier AV : Pour brancher le boîtier AV en utilisant un câble AV.
(optional)
3
Installation
3. Installation
Les sections suivantes expliquent en détail l’installation et la configuration de la carte,
des accessoires et des pilotes.
3.1 DirectX
Avant d’installer votre carte TV FlyDVB-T, vous devrez installer DirectX 9.0c ou une
version plus récente sur votre ordinateur. Insérez le CD d’installation et le menu
d’installation devrait apparaître automatiquement.
Si le menu d’installation n’apparaît pas
automatiquement lorsque vous insérez le CD
d’installation dans le lecteur CD-ROM de votre
ordinateur, double-cliquez sur le fichier de démarrage
InstallCD.exe du CD ; vous pouvez aussi cliquer sur le
bouton Start, choisir Run… et taper D:\InstallCD.exe.
(si D: correspond à votre lecteur CD-ROM)
Cliquez sur DirectX et suivez les
instructions pour installer DirectX. Lorsque
l’installation est terminée, redémarrez
votre ordinateur.
4
Installation
3.2 Installation de la carte FlyDVB-T
1. Eteignez votre PC et tous les appareils auxiliaires, comme votre imprimante ou
moniteur. Ne débranchez pas le cordon d’alimentation, de manière à laisser votre
ordinateur à la masse.
2. Touchez le boîtier métallique à l’arrière de votre PC pour le mettre à la masse et
décharger l’électricité statique. Débranchez ensuite le cordon d’alimentation de
votre PC.
3. Ouvrez le boîtier de votre ordinateur.
4. Choisissez une fente PCI qui n'est pas encore utilisée. Lorsque vous choisissez
une fente PCI, veuillez noter que les cartes DVB-T ne doivent pas être branchées
sur la fente PCI 1 de votre ordinateur lorsqu'une carte graphique AGP est utilisée,
ceci parce que la fente PCI 1 est souvent assignée à la même interruption que la
carte AGP. Les deux cartes auraient alors la même interruption et l’ordinateur
pourrait se planter!
(La fente PCI est, en général, la fente la plus proche de l’AGP, mais vérifiez
toujours le manuel de votre carte mère).
5. Déballez soigneusement la carte de son emballage, tenez-la par une main sur les
cotés et touchez avec l’autre main la surface métallique de votre ordinateur. Ceci
est nécessaire pour décharger votre corps de toute électricité statique sans
endommager la carte TV.
6. Alignez les crochets à l’arrière de la carte TV dans la fente de manière à ce que les
connecteurs de la carte soient directement en ligne avec la carte.
7. Enfoncez la carte doucement mais fermement dans la fente, jusqu’à ce qu’elle ne
bouge plus.
8. Vissez la carte TV en utilisant une vis de bonne taille.
9. Refermez le boîtier de votre ordinateur.
10. Branchez le câble d’antenne TV (celui que vous utilisez normalement pour
brancher l’antenne sur votre télévision) sur la prise TV de la carte. Rebranchez le
cordon d’alimentation et les autres câbles de l’ordinateur. Vérifiez que le volume
des haut-parleurs est au minimum.
5
Installation
3.3 Installation des pilotes de la carte sous Windows 2000/XP
Windows 2000/XP détectera
automatiquement la présence de la
carte TV LifeView et une fenêtre
Nouveau matériel
détecté s’ouvrira.
Si vous ne l’avez pas encore fait,
veuillez insérer le CD d’installation
dans votre lecteur CD-ROM.
Choisissez Installer d’une liste ou
d’un emplacement (Avancé) et
cliquez sur Suivant.
Maintenant, choisissez Chercher le
pilote approprié dans…, vérifiez
que Chercher dans disque
amovible est coché et cliquez sur
Suivant.
Windows cherchera les pilotes sur le
CD d’installation et les installera
automatiquement. Lorsque les
pilotes sont installés, Windows vous
avertit que l’installation a été
complétée. Cliquez sur Terminer.
6
Installation
3.4 Installation de LifeView DTV
Installez le programme LifeView DTV
en cliquant sur LifeView DTV. Suivez
les instructions pour installer le
programme.
7
LifeView DTV
4. LifeView DTV
4.1 Aperçu de l’interface graphique de DTV
1
25
2
3
4
5
6
7
8
9
10
11
12 13 14 15
16 17
18
19
1.
2.
3.
4.
5.
Changer l’habillage
Basculer vers l’entrée vidéo composite
Basculer vers l’entrée S-Vidéo
Basculer vers la TV DVB-T
Commencer/arrêter le mode PIP (Image sur
image)
6. Commencer/arrêter le mode Twin (Double écran)
7. Ouvrir les paramètres Scan (Rechercher)
8. Basculer vers le mode Play (Lecture)
9. Permuter entre la fenêtre principale et la fenêtre
secondaire (en mode PIP (Image sur image)
10. Télétexte
11. Ouvrir la fenêtre EPG (Guide électronique de
programme)
12. Rembobinage
13. Démarrage/lecture/pause du décalage temporel
8
20 21
22
23
24
14. Démarrer l’enregistrement
15. Arrêt
16. Passer au début
17. Passer à la fin
18. Activer/désactiver la sourdine
19. Barre de volume
20. Afficher/masquer la liste des chaînes
21. Touche Snapshot (Cliché)
22. S-mètre
23. Basculer entre le mode plein écran et
le mode mosaïque
24. Avance rapide
25. Liste des chaînes
LifeView DTV
4.2 Recherche de chaînes (TV numérique)
Avant de pouvoir regarder la TV
numérique DVB-T, vous devez
rechercher les chaînes
disponibles dans votre région.
Sélectionnez d’abord la source
DVB-T. Sur la barre de Menu,
cliquez sur Tool (Outils), puis
cliquez sur Scan (Rechercher).
Vous pouvez aussi cliquer sur la
touche Scan (Rechercher) à
gauche de l’écran.
Receiving Setup (Configuration de la réception):
Cela affiche les normes de réception en vigueur en vertu desquelles l’application TV
est réglée.
Services Information (Information des services):
Cela affiche les renseignements sur la chaîne actuellement sélectionnée le cas
échéant. Pendant une recherche, cela affiche les renseignements sur l’état de la
recherche.
Channel Scan (Recherche des chaînes):
Il y a deux moyens de rechercher les chaînes disponibles, la recherche automatique et
la recherche par transpondeur.
1. Auto Scan (Recherche automatique):
Sélectionnez Auto Scan (Recherche
automatique), puis sélectionnez votre pays
dans la zone de liste déroulante et cliquez
sur Scan (Recherche).
2. Transponder Scan (Recherche par
transpondeur):
Si vous voulez saisir une fréquence
manuellement, sélectionnez Transponder
Scan (Recherche par transpondeur),
tapez la fréquence en kHz et cliquez sur
Scan (Recherche).
9
LifeView DTV
Les chaînes trouvées s’affichent dans une
fenêtre dans laquelle vous pouvez
personnaliser votre liste de chaînes.
Vous pouvez classer votre liste de chaînes
par Channel Name (Nom de chaîne),
Frequency (Fréquence), Network
Provider (Fournisseur réseau),
Transponder ID (Code transpondeur), et
type Audio (Audio) en cliquant sur la
touche située en haut de chaque colonne.
Vous pouvez décocher une chaîne de façon à ce qu’elle ne figure pas sur votre liste de
chaînes, ou vous pouvez la sélectionner et cliquer sur Delete (Supprimer) pour
supprimer complètement la chaîne. Vous pouvez aussi importer des listes de chaînes
dans votre liste actuelle en cliquant sur Import (Importer), vous pouvez charger une
autre liste de chaînes en cliquant sur Load (Charger), et vous pouvez également
enregistrer votre liste de chaînes en cliquant sur Save As… (Enregistrer sous…).
Pour enregistrer vos changements, cliquez sur OK (Accepter). Pour annuler vos
changements, cliquez sur Cancel (Annuler).
Les mises à jour des fréquences régionales seront régulièrement disponibles sur le
site Web de LifeView (www.lifeview.com).
10
LifeView DTV
4.3 Choisir la source vidéo
Votre carte FlyDVB Trio ne se limite pas à la réception de la TV numérique – vous
pouvez aussi visualiser les sources analogiques.
A gauche de l’interface, vous trouverez des touches qui vous permettent d’accéder
aux différentes sources.
Bascule vers un périphérique externe connecté à l’entrée vidéo
composite
Bascule vers un périphérique externe connecté à l’entrée S-Vidéo
Bascule vers la TV numérique de Terre (DVB-T)
Active et désactive le mode PIP (Image sur image), ce qui vous
permet de regarder simultanément la TV numérique et une entrée
analogique dans des fenêtres séparées
Active et désactive le mode Twin (Double écran), ce qui vous permet
de regarder simultanément la TV numérique et une entrée
analogique côte à côte
Affiche la boîte de dialogue des paramètres Scan (Rechercher)
Entre dans le mode Play (Lecture), ce qui vous permet de visualiser
les clichés que vous avez pris et la vidéo que vous avez capturée
Bascule la vidéo entre la fenêtre principale et la fenêtre secondaire
(en mode PIP (Image sur image) ou Twin (Double écran))
Ouvre la fenêtre Télétexte (le cas échéant)
Ouvre la fenêtre EPG (Guide électronique de programme)
11
LifeView DTV
4.4 Liste des chaînes
Sur la droite de l’interface se trouve la liste de
chaînes. Ici, vous verrez les chaînes disponibles
pour le DVB si vous êtes dans le mode DVB. Il
vous suffit de cliquer sur une chaîne pour passer
dessus ou pressez les touches K ou L pour
changer de chaîne. Dans le mode DVB, vous
pouvez sélectionner la Radio DVB en cliquant sur
la boîte abaissable et en choisissant Radio.
Cliquez avec le bouton droit sur une chaîne pour
classer la liste selon Nom, Fréquence,
Fournisseur de Réseau ou ID du Transpondeur.
Attention: DTV CA énumère les canaux
conditionnels d'accès. Ces canaux ne sont pas
gratuits et ne peuvent pas être regardés dans
l'application de DTV.
Toutefois, quelques stations de TV interprètent mal leurs canaux gratuits en tant que
canaux conditionnels d'accès et ces canaux seront énumérés sous la liste de DTV CA,
ces canaux peuvent aussi être regardés dans l'application de DTV.
4.5 Réglage du volume
A la base de l’interface se trouve la barre du volume. Cliquez sur la barre pour
programmer le volume à ce niveau ou pressez les touches de flêche I ou J pour
augmenter ou réduire le volume. Cliquez sur l’icône des haut-parleurs pour couper le
son de l’audio.
4.6 Mètre de Force du Signal
Le mètre de force du signal indique la force du signal pour la chaîne actuelle. La
lumière verte indique une bonne réception, les lumières jaunes indiquent une
réception moyenne et les lumières rouges indiquent une mauvaise réception.
12
LifeView DTV
4.7 Télétexte
En cliquant simplement sur la touche Tx, la fenêtre de télétexte s’ouvre. Les stations
TV n’offrent pas toutes un service télétexte. Chaque jour, cependant, les bureaux
éditoriaux compétents offrent une sélection de données rapidement et facilement
accessibles, auxquelles vous pouvez accéder gratuitement, puisqu’elles sont
constamment transférées avec l’image TV par ce que l’on appelle l’intervalle de
suppression verticale du signal d’image. La navigation d’un page à l’autre est pratique
grâce aux tables de texte préinstallées. Utilisez les touches directionnelles (sur
l’interface du logiciel, le clavier du PC ou la télécommande) pour naviguer d’une page
à l’autre ou saisissez directement un nombre de page. Vous pouvez aussi cliquer
directement sur une référence de page pour solliciter son contenu, sans délai ou
presque.
Pour de plus amples renseignements sur l’utilisation du télétexte, cliquez sur Help
(Aide) dans le coin supérieur droit de votre écran pour lire de fichier d’aide.
13
LifeView DTV
4.8 Guide électronique de programme
Les stations de TV numérique diffusent souvent un guide EPG (Guide électronique de
programme). Ce guide contient des renseignements sur les programmes à venir et
leurs heures de diffusion, et il peut server à voir ce qui sera diffusé plus tard dans la
journée à des fins d’enregistrement.
Cliquez sur la touche EPG pour ouvrir la fenêtre EPG:
Cliquez sur Update (Mettre à jour) pour mettre à jour le guide EPG. La date, l’heure
de début, la durée et le nom du programme s’afficheront dans le tableau. Sélectionnez
une entrée pour afficher les données détaillées du programme (le cas échéant).
Cliquez sur Rec. pour programmer automatiquement un enregistrement de ce
programme à l’aide du guide EPG – vous pouvez l’utiliser pour programmer facilement
les enregistrements de vos programmes favoris.
14
Réglages
5. Réglages
Pour afficher la fenêtre Réglages, cliquez sur Outils ->
Réglages dans la barre de menu.
Les paramètres s’afficheront à l’écran et dépendront du
mode.
5.1 DVB Settings (Configuration DVB)
Si votre source est DVB-T, vous verrez les options suivantes:
5.1.1 Directory Settings (Configuration du répertoire)
Working Directory (Répertoire actif)
Ici, vous pouvez changer le répertoire utilisé
pour les fichiers enregistrés. Vous pouvez
soit taper le chemin, soit cliquer sur
“Browse” (« Parcourir »), aller au dossier de
votre choix et cliquer sur OK (Accepter).
Capture Size Setting (Paramètre de taille
de capture)
Lorsque cette fonction est cochée, les
fichiers enregistrés seront fractionnés selon
la taille entrée comme File split size (taille
de fractionnement des fichiers). Cela est
utile si vous voulez enregistrer de longs
enregistrements dans des fichiers plus
gérables. Par exemple, si vous sélectionnez
une taille de fractionnement des fichiers de
650 Mo, vous pourrez plus facilement graver
les fichiers sur des CD.
Always on top (Toujours visible)
Vous pouvez aussi choisir de rendre la fenêtre TVN toujours visible, au-dessus des
autres applications, en cochant “Always on top” (« Toujours visible »).
VGA hardware acceleration (Accélération du matériel VGA)
Cela active l’accélération du matériel VGA. Notez que les cartes graphiques ne sont
pas toutes compatibles avec cette fonction.
Full Screen Setting : (Le plein écran)
Ceci vous permet de choisir entre l’affichage de la vidéo dans son allongement original
et etirée pour adapter votre écran en regardant la TV en mode de plein écran.
15
Réglages
5.1.2 Schedule recording (Programmer l’enregistrement)
Vous trouvez ici des programmes
programmés à des fins d’enregistrement.
Veuillez vous référer au Chapitre 7.3 pour
obtenir une description de l’utilisation de la
fonction Scheduled Recording
(Programmer l’enregistrement).
16
Réglages
5.2 Configuration de la Vidéo analogique (AV-In/S-Vidéo)
Si votre source actuelle est AV-In, ou S-Vidéo, vous verrez les options suivantes:
5.2.1 Display Settings (Paramètres d’affichage)
•
•
•
•
Output Size (Taille de sortie): ici, vous
pouvez préciser la taille d’affichage de
la source analogique.
Data Format (Format des données): ici,
vous pouvez choisir le format de
données pour l’affichage video.
Color (Couleur): personnalisez ici la
couleur des caractéristiques de
l’affichage telles que Brightness
(Luminosité), Contrast (Contraste),
Hue (Teinte), Saturation (Saturation) et
Sharpness (Netteté).
Cliquez sur “Default” (« Par défaut »)
pour rétablir les paramètres d’usine.
5.2.2 Paramètres d’enregistrement
Les paramètres d’enregistrement vous
permettent d’ajuster votre façon
d’enregistrer des fichiers à partir des
sources AV-In et S-Vidéo.
Record – MPEG (Enregistrement –
MPEG):
Ici, vous pouvez choisir d’enregistrer à une
qualité Good (Bonne), Better (Meilleure)
ou Best (Supérieure) en fonction des
paramètres prédéfinis.
Lorsque vous sélectionnez Customized
(Personnalisé), vous pouvez enregistrer
avec une configuration personnalisée.
Vous pouvez choisir parmi les formats suivants:
•
•
•
•
•
NTSC ou PAL MPEG-1
NTSC ou PAL VCD
NTSC ou PAL MPEG-2
NTSC ou PAL SVCD
NTSC ou PAL DVD
17
Réglages
La touche Profiles… (Profils) est aussi disponible lorsque Customized
(Personnalisé) est sélectionné, et elle ouvre l’écran suivant:
Ici, vous pouvez créer un nouveau profil
(Create), modifier un profil existant
(Modify), dupliquer un profil (Duplicate) et
supprimer un des profils existants ou
l’ensemble des profils existants
(Remove).
Create Profile (Créer un profil)
General (Général):
Ici, saisissez un nom (Name) pour le profil, et un
commentaire (Comment) permettant de l’identifier.
Sélectionnez le mode MPEG-1 ou MPEG-2 à utiliser
avec le profil.
System (Système):
En fonction du mode sélectionné dans “General”
(« Général »), sélectionnez le mode Bitstream (Flux
binaire) que vous voulez utiliser avec le profil.
18
Réglages
Video (Vidéo):
Ici, sélectionnez le format vidéo (Video Format), la taille
de sortie (Output Size) et le débit binaire (Bit Rate) que
vous voulez utiliser.
Lorsque vous cliquez sur Advanced (Avancé), une
autre fenêtre s’ouvre, dans laquelle vous pouvez
sélectionner la fréquence de trames (Frame Rate), le
niveau du codeur (Encoder level) et un enregistrement
inversé (Inverted), désentrelacé (Deinterlaced) et/ou
autonome (Off Line).
Audio (Audio):
Ici, vous sélectionnez le débit binaire (Bit Rate), la
fréquence d’échantillonnage (Sample Rate) et le
nombre de chaînes (Channel) à utiliser pour la vidéo
enregistrée. (1=mono, 2=stéréo)
Record – SYSTEM (Système d’enregistrement))
En sélectionnant SYSTEM (Système)
dans la fenêtre de configuration (Setting)
de l’enregistrement, vous pouvez accéder
aux codecs déjà installés dans votre
système. Selon le codec, vous pouvez
accéder aux propriétés du codec et
modifier ses paramètres en cliquant sur la
touche Property (Propriété) (pas
disponible avec tous les codecs).
Vous pouvez télécharger gratuitement des
codecs sur Internet, tels que DivX sur
www.divx.com. Pour un support
concernant ces codecs, contactez le
fabricant de codecs ou faites une recherche
sur Internet.
19
Réglages
5.2.3 Directory Settings (Paramètres du répertoire)
Working Directory (Répertoire actif)
Ici vous pouvez changer le répertoire utilisé pour
les fichiers enregistrés. Tapez dans la fenêtre du
chemin ou cliquez sur “Browse” (« Parcourir »),
allez au dossier de votre choix et cliquez sur OK
(Accepter).
Capture Size Setting (Paramètre de taille de
capture)
Lorsque cette fonction est cochée, les fichiers
enregistrés seront fractionnés selon la taille
entrée comme File split size (taille de
fractionnement des fichiers). Cela est utile si
vous voulez enregistrer de longs enregistrements
dans des fichiers plus gérables. Par exemple, si
vous sélectionnez une taille de fractionnement
des fichiers de 650 Mo, vous pourrez plus
facilement graver les fichiers sur des CD.
Always on top (Toujours visible)
Vous pouvez aussi choisir de rendre la fenêtre TVN toujours visible, au-dessus des
autres applications, en cochant “Always on top” (« Toujours visible »).
VGA hardware acceleration (Accélération du matériel VGA)
Cela permet une accélération du matériel VGA. Veuillez noter que les cartes
graphique ne sont pas toutes compatibles avec cette fonction.
Full Screen Setting : (Le plein écran)
Ceci vous permet de choisir entre l’affichage de la vidéo dans son allongement original
et etirée pour adapter votre écran en regardant la TV en mode de plein écran.
5.2.4 Schedule Recording (Programmer l’enregistrement)
Vous trouvez ici des programmes programmés à
des fins d’enregistrement.
Veuillez vous référer au Chapitre 7.3 pour obtenir
une description de l’utilisation de la fonction
Scheduled Recording (Programmer
l’enregistrement).
20
PIP (Image en image)
6. Mode PIP (Image sur image) et mode TWIN
(Double écran)
Les fonctions PIP (Image sur image)/TWIN (Double écran) sont accessibles àa
partir de la barre d’outils à gauche.
Lorsque vous cliquez sur la touche PIP (Image sur image), vous verrez un deuxième
flot réel en bas à droite. En mode PIP (Image sur image), vous pouvez basculer entre
les sources numériques DVB-T et les sources analogiques, S-Vidéo et AV-In.
Vous pouvez ici déplacer la fenêtre sur le bureau et la redimensionner en tirant sur les
bords.
21
PIP (Image en image)
Si vous cliquez sur Twin (Double écran), vous aurez les deux volets vidéo côte à côte
dans des fenêtres identiques. Dans ce mode, les fenêtres seront verrouillées et ne
peuvent pas être redimensionnées ou déplacées individuellement.
Cliquez sur la touche Swap (Basculer) pour basculer entre la fenêtre principale et la
fenêtre secondaire de façon à ce que la TV numérique soit dans la fenêtre secondaire
et à ce que la source analogique soit dans la fenêtre principale.
Pour quitter le mode PIP (Image sur image), cliquez de nouveau sur la touche PIP
(Image sur image) pour revenir en visualisation normale. Vous ne pouvez pas faire
de décalage temporel ou enregistrer en mode PIP(Image sur image).
22
Enregistrement
7. Enregistrement
7.1 Touche Recording (Enregistrement)
En cliquant sur la touche Record (Enregistrement), vous pouvez
enregistrer la vidéo affichée dans la fenêtre principale. Lors de
l’enregistrement de la vidéo, vous verrez le symbole • REC
(ENREGISTREMENT) s’afficher au-dessus des commandes de lecture.
En mode DVB-T, vous enregistrez le signal audio et vidéo MPEG-2 pur.
En mode analogique (S-Vidéo ou AV-In), vous enregistrez le signal dans un format
que vous avez précisé dans les paramètres d’enregistrement (chapitre 5.2.2).
Dans tous les modes, les fichiers enregistrés seront sauvegardés dans le répertoire
de travail, qui peut être précisé dans la section Directory Settings (Paramètres du
répertoire) (chapitre 5.1.1 et chapitre 5.2.3). Vous pouvez regarder les films que vous
avez enregistrés en entrant dans le mode Play (Lecture) (chapitre 7.5).
Lorsque vous avez fini d’enregistrer, cliquez sur la touche Stop (Arrêt).
23
Enregistrement
7.2 Touche TimeShift (Décalage temporel)
Grâce à la fonction TimeShift (Décalage temporal), vous pouvez pauser la TV en
direct, partir et revenir, puis regarder votre programme exactement là où vous l’aviez
pausé. Vous pouvez donc aussi faire une avance rapide sur les pages de publicité ou
rembobiner pour revoir une scène en particulier.
Pour commencer le décalage temporel, il vous suffit de cliquer sur la touche TimeShift
(Décalage temporel).
La touche TimeShift (Décalage temporel) se transforme ensuite en touche Pause/Play
(Pause/lecture), ce qui vous permet de pauser la vidéo. Cliquez de nouveau dessus
pour reprendre la lecture là où vous l’aviez pausée.
Vous verrez une barre verte en bas de l’écran, avec une barre de défilement qui
indique la position actuelle. Vous pouvez rembobiner ou faire une avance rapide en
utilisant les touches à gauche et à droite de la barre, ou en faisant glisser la barre de
défilement vers la gauche et vers la droite. Vous pouvez aussi cliquer sur la touche
Skip to Beginning (Passer au début) pour aller directement au début du fichier
TimeShift (Décalage temporel), et cliquer sur la touche Skip to End (Passer à la fin)
pour aller directement au point actuel de l’émission. Lorsque vous voulez arrêter la
function TimeShift (Décalage temporal), cliquez sur la touche Stop (Arrêt). Vous ne
pouvez pas changer les chaînes ou les sources vidéo en mode TimeShift (Décalage
temporel).
24
Enregistrement
7.3 Schedule Recording (Programmer l’enregistrement)
Vous pouvez accéder à Schedule Recording
(Programmer l’enregistrement) à partir du
Settings Menu (Menu des paramètres) aux
chapitres 5.1.2 et 5.2.4. Ici, vous pouvez voir
une liste d’articles programmés à des fins
d’enregistrement.
En cliquant sur la touche Add (Ajouter), vous
pourrez ajouter un nouvel enregistrement
programmé; la touche Delete (Effacer)
annule l’enregistrement en surbrillance et la
touche Edit (Editer) vous permet de changer
les paramètres d’un enregistrement
programmé.
Les touches Add (Ajouter) et Edit (Editer) ouvrent un deuxième menu:
Sélectionnez d’abord l’option Schedule Type (Type de programmation) sur le côté
droit de l’écran. Cliquez sur “One time” (« Une fois ») s’il s’agit d’un enregistrement
unique. Pour faire un enregistrement hebdomadaire, cliquez sur les jours auxquels
vous voulez enregistrer le programme. Sélectionnez le paramètre Source (Source) à
partir de laquelle vous voulez enregistrer, puis le paramètre Channel (Chaîne) si
vous enregistrez à partir d’une source TV. Sélectionnez le paramètre Date (Date) s’il
s’agit d’un enregistrement unique. Entrez les paramètres Start Time (Heure de
début) et Duration (Durée) du programme que vous voulez enregistrer. Enfin, entrez
le paramètre File Name (Nom de fichier) pour le fichier enregistré – s’il s’agit d’un
enregistrement hebdomadaire, un numéro sera ajouté à ce nom pour chaque
enregistrement. (Exemple: FileName01.mpg, FileName02.mpg, etc.)
Cliquez sur la touche Add (Ajouter) pour terminer la programmation de
l’enregistrement.
Vous pouvez aussi programmer des enregistrements sur la TV numérique en utilisant
le guide EPG. Pour plus de détails, reportez-vous à la section 4.11.
25
Enregistrement
7.4 Clichés
Vous pouvez prendre des clichés d’images fixes de vidéo et les enregistrer sur votre
disque dur. Pour prendre un cliché, cliquez sur la touche Snapshot (Cliché) pour
enregistrer l’image vidéo actuelle sur votre disque dur dans le répertoire de travail
précisé dans les paramètres du répertoire (chapitre 5.1.1 et chapitre 5.2.3). Vous
pouvez voir les clichés que vous avez pris en entrant dans le mode Play (Lecture)
(chapitre 7.5)
7.5 Mode Play (Lecture)
Vous pouvez voir les fichiers que vous avez déjà enregistrés en cliquant sur Play
(Lecture) à gauche de l’interface. Ici, vous pouvez sélectionner le fichier que vous
voulez visualiser à droite, et il s’affichera dans la fenêtre principale. Si le fichier est une
image, celle-ci sera affichée. Si le fichier est une séquence filmée, celle-ci
commencera à se dérouler. Vous pouvez pauser/lire ou arrêter le film à l’aide des
touches Pause/Play (Pause/lecture) et Stop (Arrêt) situées en bas de l’interface. Pour
ouvrir le répertoire courant des fichiers enregistrés, spécifié dans le paramétrage du
répertoire, vous pouvez aussi cliquer sur Explorer… (Explorateur…) (chapitre 5.2.3).
26
Raccourci-clavier
8. Raccourci-clavier
8.1 Télécommande
1. Full Screen (Plein écran): bascule entre le mode plein
écran et l’affichage TV normal.
2. Power (Alimentation): allume/éteint le programme TVN
LifeView.
3. Pavé numérique: sélectionne directement la chaîne
souhaitée. En mode Scan (Rechercher), vous pouvez
saisir directement la fréquence et confirmer à l’aide de la
touche “Enter” (« Entrée »).
4. Recall (Rappel): bascule vers la chaîne précédemment
visualisée.
5. Mute (Sourdine): met l’audio en sourdine.
6. TV/Radio (TV/Radio): bascule entre la réception TV et la
réception radio.
7. SAP (DPA): bascule vers un deuxième programme audio
(le cas échéant).
8. CH+/CH- (CH+/CH-): bascule vers la chaîne
suivante/précédente.
9. VOL-/VOL+ (VOL-/VOL+): augmente/diminue le volume.
10. Enter (Entrée): confirme une sélection.
11. PIP (Image sur image): active/désactive le mode PIP
(Image sur image) entre la fenêtre principale et la fenêtre
secondaire.
12. Source (Source): bascule entre les différentes sources.
(DVB-T -> AV-In -> S-Vidéo)
13. Record/Pause (Enregistrement/Pause): commence et
arête l’enregistrement du programme en cours.
14. Swap (Permutation): permute entre la fenêtre principale
et la fenêtre secondaire en mode PIP (Image sur image).
15. TimeShift/Pause (Décalage temporel/Pause):
Commence et pause le décalage temporel du programme
en cours.
16. Rewind (Rembobinage): rembobine le décalage
temporel ou la vidéo enregistrée.
17. Play/Pause (Lecture/Pause): reprend et pause
TimeShifting ou la vidéo enregistrée.
18. Forward (Avance): fait une avance rapide dans le
décalage temporel ou la vidéo enregistrée.
19. Back (Retour): passe au début de la vidéo enregistrée.
20. Stop (Arrêt): arrête le décalage temporel, la lecture ou
l’enregistrement.
21. End (Fin): passé à la fin de la vidéo enregistrée pendant la
lecture.
27
Raccourci-clavier
8.2 Raccourcis clavier
Utilisez le tableau de raccourcis clavier suivant à des fins de référence pour
commander de façon pratique les fonctions TV à l’aide d’un clavier.
Clavier
F
Ctrl-Alt-T
Touches 0-9
NumPad 0-9
Retour
M
T
A
©
ª
¨
§
Entrer /
Entrer NumPad
P
I
Ctrl-R
S
Ctrl-T
W
Espace
E
Q
Ctrl-S
R
Ctrl-P
28
Description
Affichage plein écran On/Off
Ouverture/fermeture du DTV
Chaîne +/Retourner à la chaîne précédente
Fonction Muet on/off
Basculer entre la télévision et la radio
Pour activer la deuxième langue audio
Augmenter d’une chaîne
Descendre d’une chaîne
Volume +
Volume Entrer / Valider
Activer/désactiver le mode PIP
Changer la source d’entrée (DVB, AV-IN, Vidéo S)
Débuter l’enregistrement
Changer entre la fenêtre principale et la fenêtre secondaire
(mode PIP)
Activer/désactiver la fonction Timeshift
Retourner rapidement en arrière
Lecture / Pause
Avance rapide
Retour au début
Arrêt de la lecture/ enregistrement / Fonction TimeShift
Avance à la fin
Cliché
Aide technique
9. Aide technique
9.1 Comment nous contacter
Si vous avez un problème avec votre carte TV FlyDVB-T et que vous avez besoin
d’aide, veuillez nous contacter par email : [email protected] Vous pouvez
aussi accéder à la section Aide technique dans notre site Web www.lifeview.com; les
pilotes mis à jour peuvent aussi être téléchargés depuis notre site Web.
29
FlyDVB-T
Bedienungsanleitung
Animation Technologies Inc.
www.lifeview.com.tw/de
Ver: 1.9
Copyright and Trademark Notice
©2005 by Animation Technologies Inc. All rights reserved.
Information in this document is subject to change without notice. No part of this
document may be reproduced or transmitted in any form or by any means, electronic
or mechanical without prior written permission of Animation Technologies Inc.
Animation Technologies Inc. makes no representation or warranties with respect to
the contents hereof and specifically disclaims any implied warranties of
merchantability or fitness for any particular purpose. Animation Technologies Inc.
reserves the right to revise this manual and to make changes in its content without
obligation to notify any person or organization of such revision or change. In no event
shall Animation Technologies Inc. be liable to you or any third party for any
consequential, incidental, direct, indirect, special, punitive, or other damages
(including without limitation, damages for loss of profits, interruptions, loss of
information, pecuniary loss, etc.), even if Animation Technologies Inc. has been
advised of the possibility of such damages arising from any defect or error in this
manual or product.
Updates to this documentation can be obtained from our website:
www.lifeview.com.tw/de.
Windows® is a trademark of Microsoft Corporation. All other brand names used in this
document are registered trademarks of their respective companies.
CE Statement: This equipment has been tested and complies with EN 55022, EN
55024, EN 61000-3-2, EN 61000-3-3, EN 61000-4-2, EN 61000-4-3, EN 61000-4-4,
EN 61000-4-5, 61000-4-6, EN 61000-4-8, EN 61000-4-11 standards.
Inhalt
1. Vorbereitung..................................................................... 1
1.1 Einleitung...................................................................................................... 1
1.2 Eigenschaften............................................................................................... 1
1.3 Verpackungsinhalt ........................................................................................ 1
1.4 System Anforderungen ................................................................................. 2
2. Ein- und Ausgänge .......................................................... 3
2.1 FlyDVB-T-Anschlüsse................................................................................... 3
3. Installation ........................................................................ 4
3.1 DirectX.......................................................................................................... 4
3.2 Einbau der FlyDVB-T.................................................................................... 5
3.3 Treiber Installation für Windows 2000 / Windows XP ................................... 6
3.4 Installation von LifeView DTV ....................................................................... 7
4. LifeView DTV .................................................................... 8
4.1 DTV Bedienfeld ............................................................................................ 8
4.2 TV Kanäle suchen (DVB-T) .......................................................................... 9
4.3 Videoquelle auswählen............................................................................... 11
4.4 Kanalliste .................................................................................................... 12
4.5 Lautstärke................................................................................................... 12
4.6 Signalstärke................................................................................................ 12
4.7 Teletext....................................................................................................... 13
4.8 EPG ............................................................................................................ 14
5. Einstellungen.................................................................. 15
5.1 DVB Einstellungen...................................................................................... 15
5.2 Analoge TV/Video Einstellungen (TV/AV-In/S-Video)................................. 17
6. PIP (Bild-In-Bild) und Doppel Modus ........................... 21
7. Aufnahme........................................................................ 23
7.1 Die Aufnahme Taste ................................................................................... 23
7.2 Zeitversetzte Aufnahme (TimeShift) ........................................................... 24
7.3 Zeitversetzte Aufnahme (Schedule Recording) .......................................... 25
7.4 Schnappschuss .......................................................................................... 26
7.5 Wiedergabe ................................................................................................ 26
8. Fernbedienung und Tastatur Hot Keys........................ 27
8.1 Fernbedienung ........................................................................................... 27
8.2 Tastatur Bedienung .................................................................................... 28
9. Technischer Support ..................................................... 29
9.1 Kontakt ....................................................................................................... 29
Vorbereitung
1. Vorbereitung
1.1 Einleitung
Herzlichen Glückwunsch zum Kauf Ihrer FlyDVB-T-Karte mit TV-Tuner und
Videoerfassungsmöglichkeiten. Diese Karte verwandelt Ihren PC in ein
leistungsstarkes Multimedia-System – schnell und einfach. Nehmen Sie Videos und
Standbilder auf und erleben Sie MPEG1- und MPEG-2-Aufnahmen in Echtzeit.
Schauen Sie Digital- und Videos gleichzeitig – auf einem Bildschirm! Die FlyDVB-T
bietet Ihnen ein hochqualitatives TV-Erlebnis mit echtem Stereoklang!
1.2 Eigenschaften
•
•
•
•
•
•
•
•
•
•
Anschlussfertiger DVB-T Silicon Tuner
S-Video-/Composite-Videoeingänge
BiB (Bild-im-Bild)
Echtzeitaufnahme über Digital-TV-, und Analogeingänge
Gleichzeitige Darstellung von Digital-TV und Analog-Video
TV-Genuss im Fenster bei freier Größe oder als Vollbild
Funktionen zur zeitversetzten Wiedergabe
Erfassung von Standbildern
DVB-Radio-Empfang
Kompatibel mit Windows® 2000 und XP
1.3 Verpackungsinhalt
Schauen Sie sich alle Teile genau an, wenn Sie sie aus der Packung nehmen und
achten Sie darauf, dass diese nicht durch den Transport beschädigt wurden.
Folgendes sollte im Paket enthalten sein:
•
•
•
•
•
•
•
•
FlyDVB-T Karte
PAL / NTSC Verbindungsadapter
AV Kabel
Fernbedienung
IR Sensor Kabel
Installations CD-ROM
Installationsanleitung
Portable Antenne für DVB-T Empfang (optional)
1
Vorbereitung
1.4 System Anforderungen
Um die FlyDVB-T nutzen zu können, vergewissern Sie sich das Ihr System die
folgenden Anforderungen erfüllt:
•
•
•
•
•
•
•
•
•
•
•
•
2
Pentium® 4 oder AMD Athlon 2.0 GHz oder schneller, 2.4GHz oder schneller wird
empfohlen
256 MB RAM (minimum), 512 MB RAM empfohlen
Microsoft Windows 2000 (SP4) / XP (SP2)
100 MB verfügbarer Speicherplatz auf der Festplatte für die Installation und
weiteren Speicherplatz für Aufnahmen
CD-ROM oder DVD Laufwerk
VGA Chipsatz mit DirectX 9.0 Unterstützung
DirectX 9.0c oder höher
AC97 kompatible Soundkarte
Audio Lautsprecher
Verfügbarer IRQ
Verfügbarer PCI Slot
TV Antenne für digitales TV (DVB-T)
Anschlüsse für Eingang & Ausgang
2. Ein- und Ausgänge
2.1 FlyDVB-T-Anschlüsse
Die FlyDVB-T-Karte bietet S-Video- und Composite-Eingänge. Anschlussdetails
finden Sie in der nachstehenden Abbildung.
1
2
3
4
5
6
8
7
1. S-Video:
S-Video-Eingang für externe Geräte wie Videorecorder oder
Camcorder
2. Videoeingang:
Composite-Videoeingang für externe Geräte wie
Videorecorder oder Camcorder
3. Audio (R):
Zum Anschluss des rechten Tonkanals eines externen
Audiogerätes
4. Audio (L):
Zum Anschluss des linken Tonkanals eines externen
Audiogerätes
5. Digital-TV-Antenne: Zum Anschluss Ihrer Haus- oder Zimmerantenne für
terrestrisches Digital-TV
6. AV-Kabel:
Das AV-Kabel wird mit dem 9-poligen Steckverbinder der
FlyDVB-T verbunden
7. IR-Empfänger:
Integrierter IR-Empfänger für die Verwendung mit der
Fernbedienung.
8. A/V Box-Anschluss: Nimmt das A/V Box-Verbindungskabel auf:
3
Installation
3. Installation
Der folgende Abschnitt erklärt Schritt-für-Schritt die Installation und Konfiguration der
Karte, des Zubehörs und der Software.
3.1 DirectX
Bevor Sie die FlyDVB-T Karte installieren, ist es notwendig DirectX 9.0c oder eine
höhere Version zu installieren. Legen Sie hierfür die Installations CD ein, das Menü
startet automatisch.
Falls das Menü nicht automatisch erscheinen sollte
nachdem Sie die CD eingelegt haben, so starten Sie es
manuell mit der Datei InstallCD.exe auf der
Installations CD, oder indem Sie auf Start klicken und
auf Ausführen, und dort D:\InstallCD.exe eingeben
(nur falls sich unter D: Ihr CD-ROM Laufwerk befindet)
Klicken Sie auf DirectX 9.0 und folgend Sie
den Anweisungen um DirectX zu installieren.
Starten Sie den PC nach der Installation neu.
4
Installation
3.2 Einbau der FlyDVB-T
1. Schalten Sie Ihren PC aus und entfernen Sie alle angeschlossenen Kabel. Lassen
Sie während dieser Zeit das Stromkabel am PC eingesteckt, so dass dieser
geerdet ist.
2. Berühren Sie mit einer Hand das Gehäuse des PCs um statische Aufladungen zu
vermeiden und entfernen Sie mit der anderen Hand das Stromkabel des PCs.
3. Entfernen Sie das Gehäuse Ihres PCs.
4. Suchen Sie nach einem freien PCI Slot. Bitte beachten Sie hierbei dass die TV
Karte nicht direkt im Slot neben der Grafikkarte eingesteckt werden sollte, da dies
zu Problemen führen könnte.
5. Nehmen Sie die Karte vorsichtig an deren Seiten aus der Verpackung und
berühren Sie dabei einen Metall Teil des PCs, um statische Aufladungen an der
Karte und evt. Schäden zu vermeiden.
6. Stecken Sie die TV Karte in den freien Slot und vergewissern Sie sich das diese
richtig eingesteckt ist.
7. Befestigen Sie die Karte mit einer Schraube an der Leiste.
8. Befestigen Sie wieder das Gehäuse am PC.
9. Verbinden Sie nun alle Videoquellen mit der Karte:
- die DVB-T Antenne mit dem DVB-T Eingang
- analoge externe Videoquellen (Composite / S-Video) mit dem 9 Pin AV Eingang
10. Schließen Sie das Stromkabel und allen anderen Kabel wieder an den PC an und
stellen Sie sicher das die Lautstärke der Lautsprecher auf Leise gestellt ist.
5
Installation
3.3 Treiber Installation für Windows 2000 / Windows XP
Windows 2000 und XP erkennen
automatisch die FlyDVB-T Karte, es
erscheint das Neue Hardware
gefunden Fenster.
Falls Sie es noch nicht getan haben,
legen Sie bitte die Installations CD
in das CD-ROM oder DVD
Laufwerk.
Wählen Sie Software von einer
Liste oder bestimmten Quelle
installieren und klicken Sie auf
Weiter.
Wählen Sie nun Diese Quellen
nach dem zutreffendsten Treiber
durchsuchen und machen Sie ein
Häkchen bei Wechselmedien
durchsuchen, klicken Sie dann auf
Weiter.
Windows findet nun die Treiber auf
der Installations CD und installiert
sie automatisch. Nach der
erfolgreichen Installation klicken Sie
auf Fertig.
6
Installation
3.4 Installation von LifeView DTV
Installieren Sie die LifeView DTV
Software indem Sie auf LifeView DTV
klicken. Folgen Sie den Anweisungen
um die Software zu installieren.
7
LifeView DTV
4. LifeView DTV
4.1 DTV Bedienfeld
1
25
2
3
4
5
6
7
8
9
10
11
12 13 14 15
16 17
18
1. Ansicht ändern
2. Composite Video
3. S-Video (S-VHS)
4. DVB-T TV
5. Start/Stop Bild-in-Bild
6. Start/Stop Doopel Modus
7. Scan Einstellungen
8. Wiedergabe
9. Im Bild-in-Bild Modus zwischen den
Fenstern wechseln
10. Teletext
11. EPG
12. Zurückspulen
13. TimeShift Start/Wiedergabe/Pause
8
19
20 21
22
23
24
14.Aufnahme
15. Stop
16. Zum Anfang springen
17. Zum Ende springen
18.Stummschaltung An / Aus
19. Lautstärkeanzeige
20. Kanalliste zeigen / verstecken
21. Schnappschuss
22. Anzeige für Signalstärke
23. Zwischen Vollbild und normaler
Ansicht wechseln
24. Vorspulen
25. Kanalliste
LifeView DTV
4.2 TV Kanäle suchen (DVB-T)
Bevor Sie DVB-T digital TV
sehen können, müssen Sie
zuerst nach verfügbaren
Kanälen in Ihrem Gebiet
scannen.
Wählen Sie zunächst DVB-T als
Quelle.
Klicken Sie dann auf der oberen
Leiste auf Extras und auf
Scannen. Sie können auch in
der linken Auswahlleiste direkt
auf Scan klicken.
Empfangseinstellungen:
Zeigt die aktuelle Einstellung der DTV Anwendung an.
Service Informationen:
Zeigt Informationen über den derzeit ausgewählten Kanal an. Während des Scans
werden Informationen über den Scan-Status angezeigt.
Kanalsuche:
Es gibt zwei Möglichkeiten um Kanäle zu suchen, Automatische Suche und
Transponder Suche.
1. Automatische Suche:
Wählen Sie Automatische Suche und das
Gebiet aus der Liste aus, klicken Sie dann
auf Scan.
2. Transponder Suche:
Falls Sie manuell eine Frequenz scannen
möchten, wählen Sie Transponder Suche
und geben Sie dort die Frequenz in kHz ein,
klicken Sie dann auf Scan.
9
LifeView DTV
Gefundene Kanäle werden in der Liste
angezeigt, diese können durch klicken
auf der oberen Liste der einzelnen
Spalten sortiert werden nach Service
Name, Frequenz, Netzwerk Anbieter,
Transponder ID, und Audio.
Klicken Sie auf einen Kanal so können
Sie diesen umbenennen, in der Spalte
Audio können Sie (falls vorhanden)
einen anderen Audiostream wählen.
Wird das Häkchen eines Kanals
entfernt, so erscheint dieser nicht in der
Kanalliste – durch drücken der Löschen
Taste wird dieser komplett gelöscht. Zur
bestehenden Liste können auch weitere
Kanäle importiert werden, klicken Sie
hierzu auf Importieren. Um eine neue
Kanalliste zu laden klicken Sie auf Laden
und um eine Liste abzuspeichern auf
Speichern als. Mit OK bestätigen Sie
die Änderungen, mit Abbrechen werden
die verworfen.
10
LifeView DTV
4.3 Videoquelle auswählen
Die FlyDVB-T ist nicht nur auf den digitalen TV Empfang beschränkt – analoges TV
kann ebenso empfangen und externe Videoquellen angeschlossen werden.
Auf der linken Seite der Anwendung können Sie die gewünschte Videoquelle
auswählen.
Externe Videoquelle am Composite Anschluss
Externe Videoquelle am S-Video (S-VHS) Anschluss
Digitales Terrestrisches TV (DVB-T)
Aktiviert / deaktiviert Bild-in-Bild (gleichzeitige Darstellung von digital
TV und analog TV / Video in separaten Fenstern)
Gleichzeitige Darstellung von digital TV und analog TV / Video zur
gleichen Zeit in zwei gleichgroßen Fenstern nebeneinander
Kanalsuche (DVB-T)
Wiedergabemodus für Schnappschüsse und aufgenommene
Videos.
Ermöglicht das hin-und-her schalten der TV Bildschirme im
Bild-in-Bild und Doppel Modus
Teletext (falls verfügbar)
EPG (falls verfügbar)
11
LifeView DTV
4.4 Kanalliste
Auf der rechten Seite des Interfaces befindet sich
die Kanalliste. Hier können Sie die für DVB
verfügbaren Sender sehen, falls Sie sich im
DVB-Modus befinden. Klicken Sie einfach auf
einen Kanal, um auf diesen zu gelangen oder
drücken Sie die Pfeiltasten K oder L , um den
Kanal zu wechseln. Im DVB-Modus können Sie
das DVB-Radio auswählen, indem Sie auf die
Drop-down-Box klicken und Radio auswählen.
Wenn Sie mit rechts auf eine Kanal klicken,
haben Sie die Möglichkeit, die Liste nach Namen,
Frequenzen,
Netzwerkanbieter
oder
Transponder-ID zu sortieren.
Anmerkung: In DTV CA sind die Kanäle mit Conditional Access aufgelistet. Diese
Kanäle sind nicht frei empfangbar und können in der DTV Anwendung nicht dargestellt
werden.
Trotz allem kann es sein, das einige TV Sender frei zu empfangen sind aber das CA
Signal fälschlicherweise mit ausstrahlen und unter DTV CA zu finden sind; diese
Kanäle können weiterhin gesehen werden.
4.5 Lautstärke
Im unteren Teil befindet sich die Lautstärkenanzeige. Klicken Sie auf die Leiste um die
Lautstärke festzulegen, oder drücken Sie I oder J auf Ihrer Tastatur um die
Lautstärke anzuheben oder zu senken. Klicken Sie auf das Lautsprechersymbol um
die Stummschaltung zu aktivieren oder zu deaktivieren.
4.6 Signalstärke
Die Signalstärke zeigt an wie stark das empfangene Signal für den jeweiligen Kanal
ist. Grün: sehr guter Empfang, Gelb: guter Empfang, Rot: Schwacher Empfang.
12
LifeView DTV
4.7 Teletext
Klicken Sie auf Tx um das Teletext Fenster zu öffnen - Nicht alle TV Stationen bieten
den Teletext Service an. Die Teletext Informationen können kostenlos mit dem
ausgewählten Programm empfangen werden. Um bestimmte Seiten anzeigen zu
lassen, geben Sie die gewünschte Seiten Nummer ein, oder benutzen Sie die
Pfeiltasten auf dem Bedienfeld (der Tastatur oder der Fernbedienung), um zwischen
den Seiten zu blättern.
Für weitere Information über die Benutzung von Teletext, klicken Sie auf Help auf der
oberen rechten Leiste.
13
LifeView DTV
4.8 EPG
Digitale TV Stationen übertragen oftmals ein Electonic Program Guide (kurz EPG).
Dieses beinhaltet Informationen (Laufzeit, Inhalt) über laufende und folgende
Programme, so hat man einen leichten Überblick über das gesamte TV Programm
und kann ausgewählte Programme gleich in die Programmierte Aufnahme
übernehmen.
Klicken Sie auf EPG um das Fenster zu öffnen:
Klicken Sie auf Update um die EPG Informationen zu aktualisieren. Datum, Startzeit,
Dauer und Programmname werden im Fenster angezeigt. Wenn Sie einen Eintrag
auswählen werden weiter Informationen über die Sendung im unteren Bereich
angezeigt (falls verfügbar).
Wenn Sie auf Rec. klicken, werden die Aufnahmedaten automatisch in die Liste der
Programmierten Aufnahmen (Schedule Recordings) übernommen – diese Funktion
können Sie benutzen um ganz einfach die Aufnahme Ihrer Sendung zu
programmieren.
14
Einstellungen
5. Einstellungen
Um zu den Einstellungen zu gelangen, klicken Sie auf der
oberen Leiste auf Extras -> Einstellungen.
Die Einstellungsoptionen sind abhängig von der Video
Quelle die gewählt wurde.
5.1 DVB Einstellungen
Wurde DVB-T als Quelle gewählt, so stehen Ihnen folgende Einstellungsoptionen zur
Verfügung:
5.1.1 Verzeichnis Einstellungen
Arbeitsverzeichnis
Hier können Sie den Ordner für die
gespeicherten Dateien festlegen. Geben Sie das
Verzeichnis des Ordners manuell ein oder
klicken Sie auf Durchsuchen, bestätigen Sie
dann mit OK.
Aufnahmegröße
Wurde diese Funktion angewählt, werden alle
aufgenommenen Dateien in die angegebene
Größe aufgeteilt. Dies ist hilfreich falls Sie eine
längere Aufnahme in kleine Dateien aufteilen
möchten.
Beispiel: geben Sie als Wert z.B. 650 ein, so wird nach 650 MB eine neue
Aufnahmedatei erstellt – die Dateien lassen sich somit viel einfacher auf jeweils 1 CD
brennen.
Schnappschuss Format
Hier können Sie wählen ob die gespeicherten Schnappschüsse im JPG oder BMP
Format abgespeichert werden sollen.
Immer im Vordergrund
Wird hier ein Häkchen gesetzt so bleibt die DTV Anwendung immer im Vordergrund
auf dem Desktop.
VGA-Hardware beschleunigen.
Damit kann man die VGA-Hardware beschleunigen. Bitte beachten Sie, daß nicht alle
Graphikkarten diese Funktion unterstützen.
Vollbild Einstellungen
Sie können wählen zwischen Auf Bildschirmgröße anpassen oder
Originalseitenverhältnis.
15
Einstellungen
5.1.2 Geplante Aufnahmen
Hier werden alle programmierten
Aufnahmen aufgelistet.
Weitere Informationen über Geplante
Aufnahmen (Schedule Recording) finden
Sie im Abschnitt 7.3.
16
Einstellungen
5.2 Analoge Video Einstellungen (AV-In/S-Video)
Wurde AV-in oder S-Video als Quelle gewählt, so stehen Ihnen folgende
Einstellungsoptionen zur Verfügung:
5.2.1 Anzeige
•
•
•
•
Bildgröße: Die Anzeigegröße kann hier
verändert werden.
Datei Format: Hier kann das Video
Format festgelegt werden.
Farbe: hier können alle
Farbeinstellungen wie Helligkeit,
Kontrast, Farbton, Sättigung und
Schärfe verändert werden.
Mit “Standard” werden alle Werte
wieder auf Werkseinstellung
zurückgesetzt.
5.2.2 Aufnahme
Hier lassen sich die Aufnahmeeinstellungen für die an AV-in und S-Video
angeschlossenen Video Quellen vornehmen.
MPEG Aufnahme:
Hier können Sie die Aufnahmequalität
festlegen: Gut, Besser, Am Besten.
Mit Eigene Einstellungen, können Sie die
Aufnahmeinstellungen selber festlegen.
Sie können zwischen folgenden Formaten
wählen:
•
•
•
•
•
NTSC oder PAL MPEG-1
NTSC oder PAL VCD
NTSC oder PAL MPEG-2
NTSC oder PAL SVCD
NTSC oder PAL DVD
17
Einstellungen
Die Option Profiles ist anwählbar sobald Sie Eigene Einstellungen ausgewählt
haben, es öffnet sich folgendes Fenster:
Hier können Sie neue Aufnahmeprofile
erstellen, verändern, löschen und
kopieren.
Erstellen eines Profils
Allgemein:
Geben Sie einen Namen für das Profil ein und ein
Kommentar (z.B. für welche Zwecke das Profil
erstellt wurde). Wählen Sie MPEG-1 oder MPEG-2.
System:
Abhängig von den Einstellungen bei Allgemein,
können Sie hier den Bitstream Modus auswählen den
Sie für das Profil benutzen möchten.
18
Einstellungen
Video:
Einstellungen für das Video Format, Breite x Höhe und
die Bitrate.
Mit Erweitert, öffnet sich ein weiteres Fenster, hier
können Sie weitere Einstellungen für die
Wiederholungsrate und die Enkoder Stufe vornehmen.
Audio:
Einstellungen für Bit Rate, Sample Rate und Stereo /
Mono (1=Mono, 2=Stereo)
Aufnahme - System
Wenn Sie im Aufnahme Menü System
auswählen, erscheinen alle Codecs die
auf Ihrem System installiert sind.
Abhängig vom Codec können Sie deren
Einstellungen verändern, indem Sie den
Codec auswählen und auf Eigenschaften
klicken. (nicht bei allen Codecs möglich)
Kostenlose Codecs finden Sie im Internet,
wie z.B. DivX von www.divx.com. Bei
Fragen oder Probleme wenden Sie sich
bitte an den jeweiligen Codec Hersteller
oder suchen Sie im Internet.
19
Einstellungen
5.2.3 Arbeitsverzeichnis
Arbeitsverzeichnis
Hier können Sie den Ordner für die
gespeicherten Dateien festlegen. Geben Sie das
Verzeichnis des Ordners manuell ein oder
klicken Sie auf Durchsuchen, bestätigen Sie
dann mit OK.
Aufnahmegröße
Wurde diese Funktion angewählt, werden alle
aufgenommenen Dateien in die angegebene
Größe aufgeteilt. Dies ist hilfreich falls Sie eine
längere Aufnahme in kleine Dateien aufteilen
möchten.
Beispiel: geben Sie als Wert z.B. 650 ein, so wird nach 650 MB eine neue
Aufnahmedatei erstellt – die Dateien lassen sich somit viel einfacher auf jeweils 1 CD
brennen.
Schnappschuss Format
Hier können Sie wählen ob die gespeicherten Schnappschüsse im JPG oder BMP
Format abgespeichert werden sollen.
Immer im Vordergrund
Wird hier ein Häkchen gesetzt so bleibt die DTV Anwendung immer im Vordergrund
auf dem Desktop.
VGA-Hardware beschleunigen.
Damit kann man die VGA-Hardware beschleunigen. Bitte beachten Sie, daß nicht alle
Graphikkarten diese Funktion unterstützen.
Vollbild Einstellungen
Sie können wählen zwischen Auf Bildschirmgröße anpassen oder
Originalseitenverhältnis.
5.2.4 Geplante Aufnahme (Schedule Recording)
Hier werden alle programmierten Aufnahmen
aufgelistet.
Weitere Informationen über Geplante
Aufnahmen (Schedule Recording) finden Sie im
Abschnitt 7.3.
20
PIP (Bild-In-Bild) und Doppel Modus
6. PIP (Bild-In-Bild) und Doppel Modus
Die PIP/Doppel Funktion kann in der linken Liste ausgewählt werden.
Wenn Sie auf die PIP Taste klicken, erscheint unten rechts ein zweites kleines
Videofenster. Hier können Sie zwischen DVB-T für die digitalen Quellen wählen und
bei den analogen Quellen zwischen S-Video oder AV in.
Das Fenster kann überall auf dem Desktop verschoben werden, durch anklicken der
Ecken kann auch die Größe verändert werden.
21
PIP (Bild-In-Bild) und Doppel Modus
Bei der Doppel Funktion erscheinen zwei Video Fenster nebeneinander – diese
können nicht verschoben oder in der Größe verändert werden.
Mit der Wechsel Taste können Sie zwischen den beiden Bildschirmen hin und her
schalten.
Um den Bild-in-Bild Modus zu beenden, klicken Sie erneut auf PIP. Die Aufnahmeund TimeShift-Tasten sind während des Bild-in-Bild Modus nicht aktiviert.
22
Aufnahme
7. Aufnahme
7.1 Die Aufnahme Taste
Wenn Sie die Aufnahme Taste angeklickt haben so wird das
eingeschaltete Programm aufgenommen. Während der Aufnahme
erscheint • REC über dem Bedienfeld.
Im DVB-T Modus wird das reine MPEG-2 Audio und Video Signal aufgenommen.
Im analogen Modus (S-Video oder AV-In) wird in dem Format aufgenommen, welches
Sie in den Aufnahme Einstellungen ausgewählt haben. (Abschnitt 5.2.2)
Im Radio Modus wird die aufgenommene Datei im WAV Format abgespeichert.
Alle aufgenommenen Dateien werden in dem ausgewählten Arbeitsverzeichnis
(Abschnitt 5.1.1 und Abschnitt 5.2.3) abgespeichert. Die darin enthaltenen Dateien
(Videos und Schnappschüsse) können im Wiedergabemodus (Abschnitt 7.5)
abgespielt werden.
Um eine Aufnahme zu beenden, klicken Sie auf die Stop Taste.
23
Aufnahme
7.2 Zeitversetzte Aufnahme (TimeShift)
Mit der TimeShift Funktion ist es möglich, das Bild während der Aufnahme zu
pausieren und später wieder an der gleichen Stelle wiederzugeben. Natürlich ist es
auch möglich während der Aufnahme vor- oder zurückzuspulen.
Um eine TimeShifting Aufnahme zu starten, klicken Sie auf die TimeShift Taste.
Nach dem starten von TimeShift wechselt die Taste zur Pause/Wiedergabe Funktion,
um während der Aufnahme das Bild anzuhalten und durch erneutes anklicken das Bild
weiterlaufen zu lassen.
Der grüne Balken zeigt den Aufnahmefortschritt, der Schieber die aktuelle Position.
Mit den Pfeiltasten können Sie zum Anfang springen oder zur aktuellen Übertragung,
Sie können natürlich auch den Schieber direkt auf die gewünschte
Wiedergabe-Position setzen. Um die TimeShifting Aufnahme zu beenden, klicken Sie
auf die Stop Taste. Während der Aufnahme ist es nicht möglich den Kanal oder die
Videoquelle zu wechseln.
24
Aufnahme
7.3 Zeitversetzte Aufnahme (Schedule Recording)
Sie können die Liste der geplanten
Aufnahmen über das Einstellungsmenü
erreichen (Abschnitt 5.1.2 und Abschnitt
5.2.4).
Mit Hinzufügen können Sie eine neue
programmierte Aufnahme zur Liste
hinzufügen, mit Löschen wird eine
ausgewählte Aufnahme aus der Liste
entfernt. Die Editieren Taste ermöglicht das
nachträgliche Ändern einer bestehenden
Aufnahme aus der Liste.
Mit den Tasten Hinzufügen und Editieren gelangen Sie in ein weiteres Menü:
Zunächst sollten Sie auf der rechten Seite den Typ der Aufnahme auswählen. Wählen
Sie „einmalig“, falls die Aufnahme nur einmal erfolgen soll. Falls die Aufnahme einmal
in der Woche erfolgen soll, wählen Sie den Wochentag.
Geben Sie nun die Quelle an, von der aufgenommen werden soll (DVB-T, S-Video,
AV In) und dann den Kanal (falls Sie von einer TV Quelle aufnehmen möchten).
Das Datum kann nur ausgewählt werden falls es sich um eine „einmalige“ Aufnahme
handelt. Tragen Sie nun den Beginn und die Dauer der Aufnahme ein und geben Sie
einen Dateinamen an unter der die Aufnahme gespeichert werden soll – handelt es
sich um eine Wöchentliche Aufnahme wird eine Nummer zum Dateinamen jeder
Aufnahme hinzugefügt. (Beispiel: Dateiname01.mpg, Dateiname02.mpg, usw.)
Klicken Sie nun auf Hinzufügen, um die Programmieren zu beenden und zu
aktivieren.
Bei digitalen Videoquellen (DVB-T) können Sie auch die EPG Funktion nutzen, um
eine Aufnahme zu programmieren. Weiter Information finden Sie im Abschnitt 4.11.
25
Aufnahme
7.4 Schnappschuss
Sie können Schnappschüsse der angezeigten Videos machen und diese auf
Festplatte speichern. Um einen Schnappschuss zu machen, klicken Sie auf die
Schnappschuss Taste und das derzeit angezeigte Bild wird in dem angegebenen
Ordner im JPG oder BMP Format abgespeichert (Abschnitt 5.1.1 und Abschnitt 5.2.3)
Die bereits gemachten Schnappschüsse können Sie im Wiedergabe Modus ansehen
(Abschnitt 7.5)
7.5 Wiedergabe
Im Wiedergabe Modus werden Sie bereits aufgenommen Dateien auf der rechten
Seite angezeigt. Auf dem Bildschirm werden die ausgewählten Videodateien
wiedergegeben und die Bilddateien angezeigt. Mit den unteren Bedientasten kann die
die Wiedergabe pausiert oder angehalten werden.
Wenn Sie auf Explorer klicken, öffnet sich das Arbeitsverzeichnis welches Sie für die
gespeicherten Dateien angegeben haben (Abschnitt 5.2.3)
26
Fernbedienung und Tastatur Hot Keys
8. Fernbedienung und Tastatur Hot Keys
8.1 Fernbedienung
1. Full Screen: Umschalten von Vollbild zur normalen
Anzeige.
2. Power: Schaltet das DTV Programm an/ aus.
3. Nummernfeld: Sie können einen gewünschten Kanal
direkt anwählen. In Scan Modus können Sie die Frequenz
eingeben und mit “Enter” bestätigen.
4. Recall: Wechselt zum vorherigen Kanal.
5. Mute: Stummschaltung an / aus.
6. TV/Radio: Zwischen TV und Radio Empfang wählen.
7. SAP: Schaltet zur zweiten Audiospur (nur bei
Übertragungen mit Zweikanalton)
8. CH+/CH-: Kanäle hoch / runter schalten.
9. VOL-/VOL+: Lautstärke +/-.
10. Enter: Bestätigen einer Auswahl.
11. PIP: Aktivier/Deaktiviert den PIP (Bild-in-Bild) Modus
12. Source: Zwischen den Eingangsquellen wählen.
(DVB-T -> AV-In -> S-Video)
13. Record/Pause: Startet und pausiert die Aufnahme des
aktuellen Programms.
14. Swap: Im PIP Modus zwischen den Fenstern schalten.
15. TimeShift/Pause: Startet und pausiert die TimeShifting
Aufnahme des aktuellen Programms.
16. Rewind: Zurückspulen bei der TimeShift Aufnahme oder
während der Wiedergabe eines Videos.
17. Play/Pause: Anhalten und Fortfahren während einer
TimeShift – oder normalen Aufnahme.
18. Forward: Vorspulen bei der TimeShift Aufnahme oder
während der Wiedergabe eines Videos.
19. Back: Springt zum Anfang eines Videos während der
Wiedergabe.
20. Stop: Beendet die TimeShifting Aufnahme, die
Wiedergabe oder die normale Aufnahme.
21. End: Springt zum Ende eines Videos während der
Wiedergabe.
27
Fernbedienung und Tastatur Hot Keys
8.2 Tastatur Bedienung
Benutzen Sie die Hot-Keys um die TV Funktionen auch mit Ihrer Tastatur zu steuern.
Tastatur
F
Ctrl-Alt-T
Number keys 0-9 /
NumPad 0-9
BackSpace
M
T
A
©
ª
¨
§
Enter /
NumPad Enter
P
I
Ctrl-R
S
Ctrl-T
W
Space
E
Q
Ctrl-S
R
Ctrl-P
28
Beschreibung
Vollbild Ein / Aus
Öffnet / Schließt die DTV Anwendung
Kanal Nummern
Zum vorherigen Kanal
Stummschaltung Ein / Aus
Umschalten zwischen TV / Radio Empfang
Umschalten zum zweiten Audio Kanal (falls vorhanden)
Kanal +
Kanal Lautstärke +
Lautstärke Bestätigen
Öffnet / Schließt Bild-in-Bild Modus
Eingangsquellen (DVB, AV-in, S-Video in)
Startet Aufnahme
Umschalten zwischen den Bildschirmen im Bild-in-Bild Modus
Start / Pause TimeShift
Zurückspulen
Wiedergabe / Pause
Vorspulen
Zum Anfang springen
Stop Wiedergabe / Aufnahme / TimeShifting
Zum Ende springen
Schnappschuss
Technical Support
9. Technischer Support
9.1 Kontakt
Falls Sie Fragen haben oder Hilfe bei der Installation benötigen, so können Sie uns
auch per Mail kontaktieren über [email protected]
Auf unsere Homepage www.lifeview.com.tw/de finden Sie immer die aktuellsten
Treiber und Software.
29
FlyDVB-T
Manuale utente
Animation Technologies Inc.
www.lifeview.com
Ver: 1.9
Copyright e Informazioni sui Marchi Registrati
Copyright © 2005 della Animation Technologies Inc.
Tutti i diritti riservati.
Le specifiche e le informazioni riportate nel presente manuale sono fornite a scopo esclusivamente
informativo, e sono soggette a cambiamenti senza preavviso, e ciò non deve essere inteso come un
impegno assunto dalla Animation Technologies Inc. Animation Technologies Inc. non assume alcuna
responsabilità per errori o imprecisioni che possono essere contenute nel presente manuale. Non è
possibile riprodurre o trasmettere parti del presente documento, in qualsiasi forma o con qualsiasi
mezzo, elettronico o meccanico, senza aver ricevuto il consenso scritto da parte della Animation
Technologies Inc.
Animation Technologies Inc. non rilascia garanzie in relazione ai contenuti qui riportati, e diniega in
modo esplicito qualsiasi garanzia relativa alla commercializzazione o alla idoneità per usi specifici.
Animation Technologies Inc. si riserva il diritto di revisionare il presente manuale e di modificarne i
contenuti senza avere l’obbligo di informare individui o enti di tali modifiche. In nessun caso Animation
Technologies Inc. potrà essere considerata responsabile nei confronti dell’utente o di terzi per qualsiasi
danno indiretto, accessorio, diretto, indiretto, speciale, punitivo, o altri danni (compresi, ma senza alcun
limite, i danni derivanti da perdita di utili, per interruzioni, dovuti alla perdita di informazioni, perdite in
denaro, ecc.), anche nei casi in cui Animation Technologies Inc. sia stata informata della possibilità del
verificarsi di tali danni, derivanti da difetti o errori nel manuale o del prodotto.
Gli aggiornamenti di questa documentazione sono disponibili sul sito Internet : http://www.lifeview.com.
Windows® è un marchio registrato di proprietà della Microsoft Corporation. Tutti gli altri nomi di marchi
utilizzati nel presente documento sono di proprietà delle rispettive società.
Contents
1. Avviamento....................................................................... 1
1.1 Introduzione.................................................................................................. 1
1.2 Caratteristiche .............................................................................................. 1
1.3 Contenuto della confezione .......................................................................... 1
1.4 Requisiti del sistema..................................................................................... 2
2. Collegamenti Input e output............................................ 3
2.1 Collegamenti di FlyDVB-T ............................................................................ 3
3. Installazione...................................................................... 4
3.1 DirectX.......................................................................................................... 4
3.2 Installazione di FlyDVB-T ............................................................................ 5
3.3 Installazione dei driver per Windows 2000 / Windows XP ............................ 6
3.4 Installazione di LifeView DTV ....................................................................... 7
4. LifeView DTV .................................................................... 8
4.1 Panoramica sull’interfaccia DTV ................................................................... 8
4.2 Scansione dei canali TV (digitale)................................................................. 9
4.3 Scelta della fonte ........................................................................................ 11
4.4 Lista canali.................................................................................................. 12
4.5 Controlli volume .......................................................................................... 12
4.6 Misuratore di intensità del segnale ............................................................. 12
4.7 Teletext....................................................................................................... 13
4.8 EPG ............................................................................................................ 14
5. Impostazioni ................................................................... 15
5.1 Impostazioni DVB ....................................................................................... 15
5.2 Impostazioni Analogiche Video (AV-In/S-Video)......................................... 17
6. PIP (Picture-In-Picture) e TWIN Mode .......................... 21
7. Registrazione.................................................................. 23
7.1 Il pulsante registrazione.............................................................................. 23
7.2 Il pulsante Timeshift (differita)..................................................................... 24
7.3 Registrazione programmata ....................................................................... 25
7.4 Istantanee................................................................................................... 26
7.5 Play Mode (Modalità di esecuzione) ........................................................... 26
8. Il telecomando e i collegamenti della tastiera ............. 27
8.1 Il telecomando ............................................................................................ 27
8.2 Collegamenti della tastiera ......................................................................... 28
9. Supporto tecnico............................................................ 29
9.1 Contatti ....................................................................................................... 29
Avviamento
1. Avviamento
1.1 Introduzione
Congratulazioni per la scelta della scheda sintonizzatore TV ed acquisizione video
FlyDVB-T. Questo prodotto trasforma in modo rapido e semplice il PC in un potente
sistema multimediale. Acquisisce video ed immagini ed esegue registrazioni MPEG-1
e MPEG-2 in tempo reale. Si può guardare, al contempo e sullo stesso schermo, sia
TV digitale sia video analogico! FlyDVB-T procura un’esperienza di visione televisiva
d’alta qualità con audio stereo reale!
1.2 Caratteristiche
•
•
•
•
•
•
•
•
•
•
Sintonizzatore DVB-T Silicon con preparato per antenna
Ingressi video S-Video/composito
PIP (Picture in Picture: immagine nell’immagine)
Registrazione in tempo reale da TV digitale, ed ingressi analogici
Si può guardare simultaneamente sia TV digitale sia video analogico
Si può guardare il televisore sia in una finestra ridimensionabile sia a schermo
intero
Funzioni della differita
Acquisizione di fotografie
Ascolto della radio DVB
Compatibile con Windows® 2000 e XP
1.3 Contenuto della confezione
Quando si rimuovono i contenuti della confezione, ispezionare tutti gli elementi per
accertarsi che non abbiano subito danni durante la spedizione. Nella confezione
devono essere inclusi i seguenti elementi:
•
•
•
•
•
•
•
•
FlyDVB-T card
Adattatori per PAL/NTSC
Cavo AV
Telecomando
Cavo sensore IR
CD-ROM di installazione
Guida di installazione rapida
Antenna portatile per la ricezione DVB-T(optionelle)
1
Avviamento
1.4 Requisiti del sistema
Per utilizzare con successo la soluzione FlyDVB-T, assicuratevi che il vostro sistema
possieda I seguenti requisiti:
• Pentium® 4 o AMD Athlon 2.0 GHz o superiori, 2.4GHz o superiori raccomandati
• 256 MB RAM (minimo), 512 MB RAM raccomandati
• Microsoft Windows 2000/XP
• 100 MB di spazio libero su Hard disk per l’installazione e ulteriore spazio richiesto
per la registrazione e il Timeshifting.
• CD-ROM o DVD drive
• VGA chipset with full DirectX 9.0 support
• DirectX 9.0c o superiore installato
• Scheda audio compatibile AC97 per l’audio
• Casse per l’uscita audio
• IRQ disponibile
• PCI slot disponibile
• TV antenna o cavo per la TV digitale
2
Collegamenti Input e output
2. Collegamenti Input e output
2.1 Collegamenti di FlyDVB-T
La scheda FlyDVB-T supporta ingresso S-Video ed Composito. Fare riferimento alla
seguente figura per i dettagli sul collegamento.
1
2
3
4
5
6
8
7
Schema di collegamento dei cavi
1. S-Video:
Ingresso S-Video per dispositivi esterni come
videoregistratori o videocamere
2. Ingresso video:
Ingresso video composito per dispositivi esterni come
videoregistratori o videocamere
3. Audio (R):
Collega al canale audio destro di un dispositivo audio
esterno
4. Audio (S):
Collega al canale audio sinistro di un dispositivo audio
esterno
5. Antenna TV digitale:
Collega all’antenna di casa o dell’abitazione per la
ricezione della TV digitale
6. Cavo AV:
Collegare il cavo AV al connettore a 9 pin di FlyDVB-T
7. Ingresso cavo telecomando: Per il collegamento al cavo degli infrarossi.
8. Connettore per box A/V: Per il collegamento al cavo di collegamento del box A/V
3
Installazione
3. Installazione
La seguente sezione fornisce le istruzioni per l’installazione passo dopo passo e per la
configurazione della scheda, degli accessory e del software.
3.1 DirectX
Prima di installare la Fly Dvb-t trio è necessario installare DirectX 9.0c o superiori.
Inserire il Cd di installazione ed il menu di installazione dovrebbe caricarsi
automaticamente.
Se il programma non appare automaticamente quando
si inserisce il CD di installazione Lifeview, avviarlo
manualmente eseguendo il file InstallCD.exe che si
trova nel CD di installazione oppure ciccando su Start,
Run…, e scrivendo D:\InstallCD.exe. (se D: è la tua
unità CD ROM)
Fare click su DirectX 9.0 e seguire le
istruzioni per installare DirectX. Non appena
l’installazione è terminata spegnere il
computer.
4
Installazione
3.2 Installazione di FlyDVB-T
1. Spegnere il PC e tutte le periferiche collegate, quail stampante e monitor. Lasciare
il cavo di alimentazione CA collegato, in modo che il computer abbia il
collegamento a terra.
2. Toccare il telaio metallico del PC per scaricare a terra la carica.
3. Togliere il coperchio dal case del computer.
4. Cercare uno slot pci libero. Nella scelta dello slot PCI, fare attenzione che le
schede DVB-T non devono essere collegate allo slot PCI1 insieme ad una scheda
grafica AGP poichè allo slot PCI1 vengono solitamente assegnati gli stessi
interrupt dello slot AGP. In questo caso entrambe le schede avrebbero lo stesso
interrupt, con conseguenti possibili blocchi del sistema durante il funzionamento.
(Solitamente si tratta dello slot PCI più vicino allo slot AGP, verificare comunque
sempre il manuale della scheda madre).
5. Togliere con attenzione la scheda dalla confezione e prenderla dai bordi con una
mano, mentre l’altra si tocca una parte metallica del PC. In questo modo si
garantisce che il corpo sia isolato attraverso il telaio del computer senza
danneggiare la scheda.
6. Allineare il support nella parte posteriore della scheda TV nello slot di espansione
in modo che I connettori della scheda siano direttamente in linea con il socket dello
slot.
7. Inserire la scheda Tv nello slot, in modo che aderisca perfettamente.
8. Fissare la scheda TV con le viti corrette
9. Rimontare il case del PC.
10. Collegare l’antenna digitale alla porta DVB-T. Verificare che il volume degli
altoparlanti sia basso.
5
Installazione
3.3 Installazione dei driver per Windows 2000 / Windows XP
Windows 2000 / XP will rileverà
automaticamente la scheda
FlyDVB-T e farà apparire la finestra
Found New Hardware Wizard.
Collocare il Cd di installazione
nell’unità CD-ROM se non è ancora
stato fatto.
Selezionare Install from a list or
specific location (Advanced) e
cliccare su Next.
Selezionare Search for the best
driver in these locations, poi
accertarsi che “Search removable
media sia selezionato e fare click su
Next.
Windows ora troverà I driver nel CD
di installazione e li installerà
automaticamente. Dopo aver
installato il driver, Windows informerà
che l’installazione è riuscita. Fare
click su Finish.
6
Installazione
3.4 Installazione di LifeView DTV
Installare il software Lifeview DTV
cliccando LifeView DTV. Basta
seguire le istruzioni su schermo per
installare il software.
7
LifeView DTV
4. LifeView DTV
4.1 Panoramica sull’interfaccia DTV
1
25
2
3
4
5
6
7
8
9
10
11
12 13 14 15
16 17
1. Cambia interfaccia
2. Passa a composite video in
3. Passa a S-Video in
4. Passa a DVB-T TV
5. Start/Stop modalità PIP
6. Start/Stop Modalità Twin
7. Apri impostazioni di scansione
8. Passa alla modalità Play
9. Passa da finestra principale a
secondaria (in modalità PIP)
10. Teletext
11. Apri finestra EPG
12. Rewind
13. TimeShift Start/Play/Pause
8
18
19
20 21
22
23
14. Avvio registrazione
15. Stop
16. Vai all’inizio
17. Vai alla fine
18. Muto on/off
19. Barra Volume
20. Mostra/nascondi lista canali
21. tasto cattura Immagine
22. Misuratore dell’intensità del segnale
23. Passa da modalità a tutto schermo a
finestra
24. Avanza velocemente
25. Lista canali
24
LifeView DTV
4.2 Scansione dei canali TV (digitale)
Prima di poter guardare la Tv
digitale bisogna eseguire la
scansione dei canali disponibili
nella propria zona.
Nella barra dei menu fare click
su Tool, e poi su Scan. Puoi
anche cliccare sul tasto Scan a
sinistra dello schermo
Receiving Setup (Setup di ricezione):
Mostra gli standard attuali di ricezione sui quail è impostata l’applicazione.
Services Information:
Mostra informazioni sul canale selezionato se disponibili. Durante la scansione mostra
lo stato della scansione.
Channel Scan (Scansione canali):
Ci sono due modi per fare la scansione, Auto Scan e Transponder Scan.
1. Auto Scan:
Seleziona Auto Scan, poi seleziona il tuo
paese/continente e clicca su Scan.
2. Transponder Scan:
Se vuoi inserire manualmente una
frequenza seleziona Transponder Scan,
digita la frequenza type in the Frequency in
kHz e clicca su Scan.
9
LifeView DTV
I canali trovati saranno visualizzati in una
finestra e qui potrai personalizzare la
lista dividendoli per nome Channel
Name,frequenza Frequency, gestore di
rete Network Provider, Transponder
ID, e Audio cliccando la parte superiore
di ciascuna colonna.
Cliccando sul nome del canale potrai rinominarlo e cliccando sulla lingua potrai
scegliere fra le lingue disponibile (nella sezione Audio) Puoi anche bloccare un canale
se non vuoi che appai nella lista. O puoi selezionarlo e poi cliccando su Delete
rimuoverlo completamente dalla lista. Puoi anche importare la lista canali intera
cliccando su Import, o puoi caricare una nuova lista canali cliccando su Load, puoi
salvare la lista canali cliccando su Save As… Per salvare I cambiamenti conferma
cliccando su OK. Per cancellare le modifiche seleziona Cancel.
Aggiornamenti per le frequenze sono disponibili sul nostro sito (www.lifeview.com).
10
LifeView DTV
4.3 Scelta della fonte
Il FlyDVB-T non si limita alla ricezione Tv digitale terrestre- si possono vedere anche
le fonti analogiche.
Sulla sinistra dell’interfaccia si trovano I pulsanti che permettono di accedere ad origini
diverse.
Passa ad un dispositivo esterno collegato all’input ingresso AV
(giallo)
Passa ad un dispositivo esterno collegato all’input S-Video
Passa a TV digitale terrestre (DVB-T)
Attiva e disattiva la modalità PIP,che crea un’immagine
nell’immagine e permette di guardare la TV digitale e l’origine
analogica.
Attiva e disattiva la modalità Twin, che vi permette di guardare
parallelemente la Tv digitale e la Tv analogica.
Fa apparire la finestra di dialogo Scan Settings (Impostazioni
scansione)
FA accedere alla modalità esecuzione che permette di prendere
visione delle istantanee e dei video acquisiti
Cambia il video tra la finestra principale e quella secondaria (in PIP o
Twin)
Apre la finestra Teletext dove disponibile
Apre la finestra EPG
11
LifeView DTV
4.4 Lista canali
Sulla destra dell’interfaccia si trova l’elenco
canali. Qui troverete i cancali disponibili per DVB,
se siete in modalità DVB. Cliccare
semplicemente su un canale per avviarlo, o
premere le frecce K o L per cambiare canale. In
modalità DVB, potete selezionare DVB Radio
cliccando sulla finestra a cascata e scegliendo
Radio. Cliccando col tasto destro del mouse su
un canale vi permette di selezionare l’elenco per
Nome, Frequenza, Provider di Rete o
Transponder ID.
Nota bene: DTV CA elenca I canali con accesso
controllato. Questi sono i canali a pagamento che
non possono essere visualizzati dalla nostra
applicazione DTV
Talvolta, alcune emittenti televisive identificano in modo scorretto i canali free to view
ponendoli come canali ad accesso controllato. Questi saranno catalogati
dall’applicazione nella lista DTV CA ma potranno però essere visualizzati senza
problemi.
4.5 Controlli volume
In basso sull’interfaccia c’è la barra del volume, Fare click sulla barra per impostare il
volume a quel livello, oppure premere la freccia I o J per diminuire o alzare il volume.
Fare doppio click sull’icona dell’altoparlante per disattivare l’audio.
4.6 Misuratore di intensità del segnale
Il misuratore di intensità del segnale indica quanto forte è il segnale per il canale
selezionato. Luci verdi indicano buona ricezione, luce gialla indica media ricezione,
mentre la luce rossa indica una bassa ricezione.
12
LifeView DTV
4.7 Teletext
Basta selezionare il tasto Tx per aprire la finestra di Teletext. Non tutte le stazioni TV
forniscono la funzione del televideo. Quotidianamente i canali TV forniscono
informazioni utilissime e gratis che vengono trasferite tramite il normale segnale TV.
Puoi utilizzare il televideo tramite telecomando, tasti della tastiera e frecce per
navigare da una pagina all’altra. Puoi anche ciccare sulla pagine che ti interessa e
automaticamente verrà visualizzata.
Per ulteriori informazioni sul teletext clicca su Help in alto a destra per leggere il file di
aiuto in merito.
13
LifeView DTV
4.8 EPG
I canali digitali spesso offrono il servizio di Electronic Program Guide, o informazioni
EPG. Sono informazioni in merito ai programmi attuali e quelli in arrivo, la loro durata
e la programmazione dei giorni successivi.
Basta premere il tasto EPG per aprire la finestra EPG.
Clicca su Update per aggiornare le informazioni EPG. Data, ora di inizio, durata e
nome del programma appariranno nella tabella. Selezionando uno dei programmi
potrete ottenere se disponibili ulteriori informazioni in merito.
Cliccando su Rec. programmerete una registrazione automatica del programma
tramite informazioni EPG in modo più semplice e veloce.
14
Impostazioni
5. Impostazioni
Per accedere alla finestra Setting (Impostazioni), nella
barra del menu fare click su Tool (strumenti) -> Settino
(Impostazioni).
In base all’origine corrente, ci saranno a disposizione
diverse impostazioni.
5.1 Impostazioni DVB
Quando l’origine è DVB -T potrai vedere le seguenti opzioni.
5.1.1 Impostazioni di directory
Directory di lavoro
Qui potete cambiare la directory usata per i
file salvati. Digitate nella casella o cliccate
“Browse”, andate al folder che desiderate e
cliccate OK.
Impostazioni di misura file
Quando sezionato, esso dividerà i file
registrati in varie parti nella misura scelta in
Scissione di File. Questa funzione è utile
se volete salvare registrazioni
particolarmente lunghe in file più facilmente
gestibili. Per esempio, impostare la misura di
divisione file a 650 MB renderà più facile
masterizzare i file su CD.
Il formato dell'immagine consente di scegliere se si desidera salvare le foto come file
BMP o come JPG.
Sempre in cima
Potete anche scegliere di avere sempre la finestra DTV sopra altre applicazioni
selezionando “Sempre in cima”.
Accelerazione hardware VGA
Permette l’accelerazione dell’hardware VGA. Vogliate notare che non tutte le carte
grafiche supportano questa funzione.
Impostazioni “ Schermo intero/full screen”
Questa funzione vi permette di scegliere se vedere le immagini a grandezza naturale o
ridimensionare la finestra come volete anche a tutto schermo.
15
Impostazioni
5.1.2 Schedule Recording
Qui trovi I canali pianificati per la
registrazione.
Fare riferimento al capitolo 7per una
descrizione di come usare la registrazione
programmata.
16
Impostazioni
5.2 Impostazioni Analogiche Video (AV-In/S-Video)
Se la tua fonte corrente è AV-in, o S-Video, si vedranno le seguenti opzioni:
5.2.1 Scheda display
•
•
•
•
Output Size(dimensioni output):Qui si
possono specificare le dimensioni di
schermo dell’origine analogica.
Data Format(formato dati): qui si può
scegliere il formato dei dati con il quale
visualizzare il video.
Color (Colore): qui si possono
personalizzare I colori dello schermo
come Brightness (luminosità), contrast
(contrasto), HUE (tonalità), saturation
(saturazione e sharpness (nitidezza).
Selezionando “Default” (predefiniti) le
impostazioni saranno riportate sui
valori predefiniti.
5.2.2 Impostazioni di registrazione
Le impostazioni di registrazione
permettono di impostare I file registrati
dalle origini ingresso AV e S-Video.
Record - MPEG:
Qui si può definire la qualità di
registrazione scegliendo fra Good
(Buona), better (migliore) o best (ottima) in
base alle impostazioni predefinite.
Quando si sceglie Customized,
(personalizzata) si può creare
un’impostazione personalizzata con la
quale registrare:
•
•
•
•
•
NTSC o PAL MPEG-1
NTSC o PAL VCD
NTSC o PAL MPEG-2
NTSC o PAL SVCD
NTSC o PAL DVD
17
Impostazioni
Quando è selezionata l’opzione Customized (personalizzata) è anche disponibile il
pusance Profiles… che apre la seguente schermata:
Qui si può creare un nuovo profilo,
modificarne uno esistente, duplicare un
profili oppure rimuoverne uno o tutti I
profili esistenti.
Pulsate Create (crea)
General (sheda generale):
Nel campo Name (nome) qui va inserito il nome per il
profilo e nel campo Comment (commento) un
commento che aiuti ad identificarlo. Selezionare
MPEG-1 o MPEG-2 da utilizzare con il profilo.
Scheda System (sistema):
In base alla modalità selezionata nella scheda
“General” (generale), selezionare la modalità
Bitstream (flusso bit) che si vuole utilizzare con il
profilo.
18
Impostazioni
Video:
Qui va scelto il formato video, le dimensioni di
rendimento e la velocità bit che si vuole utilizzare.
Quando si fa click su Advanced (Avanzate), appare
un’altra finestra nella quale si può selezionare Frame
Rate (velocità fotogrammi), Encoder level (livello
codificatore) e se la registrazione deve essere
Inverted (invertita), Deinterlaced (deinterlacciata) e/o
Off line (non in linea).
Audio:
Qui si può scegliere Bit rate (velocità bit), samples rate
(velocità di campionatura) e Channels (canali) da
utilizzare per l’audio registrato.
(1=mono, 2=stereo)
Scheda Record – SYSTEM
Selezionando SYSTEM nella scheda
Record, si può accedere ai Codec già
installati sul sistema. In base al Codec si
può accedere alle loro proprietà e
modificarne le impostazioni facendo click
sul pulsante Properties (proprietà).
(disponibile solamente con Codec
selezionati)
Puoi scaricare gratuitamente codec da
internet come ad esempio DivX
www.divx.com. Per supporto codec
contatta il produttore o cerca su internet.
19
Impostazioni
5.2.3 Impostazioni directory
Directory di lavoro
Qui potete cambiare la directory usata per i file
salvati. Digitate nella casella o cliccate “Browse”,
andate al folder che desiderate e cliccate OK.
Impostazioni di misura file
Quando sezionato, esso dividerà i file registrati
in varie parti nella misura scelta in Scissione di
File. Questa funzione è utile se volete salvare
registrazioni particolarmente lunghe in file più
facilmente gestibili. Per esempio, impostare la
misura di divisione file a 650 MB renderà più
facile masterizzare i file su CD.
Il formato dell'immagine consente di scegliere se si desidera salvare le foto come file
BMP o come JPG.
Sempre in cima
Potete anche scegliere di avere sempre la finestra DTV sopra altre applicazioni
selezionando “Sempre in cima”.
Accelerazione hardware VGA
Permette l’accelerazione dell’hardware VGA. Vogliate notare che non tutte le carte
grafiche supportano questa funzione.
Impostazioni “ Schermo intero/full screen”
Questa funzione vi permette di scegliere se vedere le immagini a grandezza naturale o
ridimensionare la finestra come volete anche a tutto schermo.
5.2.4 Schedule Recording
Qui trovi I canali pianificati per la registrazione.
Fare riferimento al capitolo 7.3 per una
descrizione di come usare la registrazione
programmata.
20
PIP (Picture-In-Picture) e TWIN Mode
6. PIP (Picture-In-Picture) e TWIN Mode
Si può accedere alle funzioni PIP/TWIN dalla barra degli strumenti sulla sinistra.
Quando si fa click sul pulsante PIP, in basso a destra si vedrà un secondo flusso
video del vivo. Quando si è in modalità PIP, si può passare tra le origini S-video ed
ingresso AV in base al collegamento che si vuole vedere nella finestra.
La finestra può essere spostata ovunque sul desktop e può essere ridimensionata
trascinandone I lati.
21
PIP (Picture-In-Picture) e TWIN Mode
Cliccando su Twin disporrà due segnali video uno di fianco all’altro in due finestre di
dimensioni identiche. LE dimensioni sono fisse e non possono essere ridimensionate.
Facendo click sul pulsante Swap si passerà dalla finestra principale alla secondaria,
così la TV digitale passerà nella seconda finestra e l’origine analogica passerà nella
finestra principale.
Per terminare la modalità PIP, fare click di nuovo sul pulsante PIP per tornare alla
visualizzazione normale. Quando si è in modalità PIP non si può eseguire la differita o
registrata.
22
Registrazione
7. Registrazione
7.1 Il pulsante registrazione
Cliccando sul tasto registrazione puoi registrare ciò che è
visualizzato sulla finestra principale. Durante la registrazione del
video sopra i controlli d’esecuzione si vedrà la dicitura • REC
In modalità DVB-T si registrano i puri segnali audio e video MPEG-2. In modalità
analogica (S-Video o ingresso AV) si registra il segnale nel formato che è stato
specificato nella scheda Record (registrazione). (capitolo 5.2.2) In entrambe le
modalità, i file registrati saranno salvati nella directory di rete , che può essere
specificata nella scheda directory. (capitolo 5.1.1 e capitolo 5.2.3) i film registrati
possono essere guardati accedendo alla modalità d’esecuzione. (Capitolo 7.5)
Una volta completata la registrazione, fare click sul pulsante Stop.
23
Registrazione
7.2 Il pulsante Timeshift (differita)
Timeshift (Differita) si può mettere in pausa una trasmissione differita dal vivo e
tornare a guardarla dal punto in cui è stata lasciata. Poi si può avanzare rapidamente
per saltare la pubblicità oppure retrocedere per guardare di nuovo una scena
particolare.
Il pulsante Differita diventa pulsante Pausa/Esecuzione, permettendo di mettere in
pausa il video. Facendo di nuovo click sul pulsante la riproduzione si avvierà da dove
è stata interrotta.
In basso sullo schermo si vedrà una barra di colore verde, con un dispositivo di
scorrimento che mostra la posizione corrente. Si può retrocedere o avanzare
rapidamente utilizzando i tasti a sinistra e destra della barra,oppure trascinando il
dispositivo di scorrimento verso sinistra o destra. Si può anche fare click sul pulsante
“Va all’inizio” per andare all’inizio del file Differita, oppure cliccare sul pulsante “Va alla
fine” per riportarsi alla trasmissione corrente. Quando si vuole fermare la Differita, fre
click sul pulsante Stop.In modalità Timeshifting (differita) non si possono cambiare i
canali o le origini video.
24
Registrazione
7.3 Registrazione programmata
Si può accedere alla Scheda Schedule
recording (registrazione programmata) del
menu Settings (Impostazioni) come
descritto nel capitolo 5.1.2 e Capitolo
5.2.4.Qui si può vedere un elenco di
elementi pianificati per la registrazione.
Facendo click sul pulsante Add (aggiungi),
si è in grado di aggiungere una nuova
registrazione programmata; il pulsante
Delete (Elimina) cancella la registrazione
pianificata evidenziata; il pulsante Edit
(modifica) permette di cambiare le
impostazioni di una registrazione pianificata.
Il pulsante Add (aggiungi) e Edit (Modifica) aprono un secondo menu:
Per prima cosa selezionare il tipo di programmazione dalla casella Schedule Type
(tipo di programmazione) sulla destra dello schermo. Fare click su “One Time” (una
volta) se questa è una registrazione unica. Per creare una registrazione settimanale,
fare click sui giorni della settimana in cui si vuole registrare il programma. Selezionare
l’origine da cui si vuole registrare nel campo Source (origine) e poi il canale nel campo
Channel (canale) se si sta registrando da una origine TV. Selezionare la data nel
campo Date (Data) se questa è una registrazione unica. Inserire l'orario di inizio nel
campo Start Time (orario di inizio) e la durata nel campo Duration (durata) del
programma che si vuole registrare. Infine, inserire un nome per il file registrato nel
campo File Name (nome file); se questa è una registrazione settimanale a questo
nome sarà aggiunto un numero per ciascuna registrazione (Esempio: nome
file01.mpg, FileName02.mpg, ecc.)
Fare click sul tasto Add (Aggiungi) per terminare la programmazione della
registrazione.
Puoi anche registrare la TV digitale accedendo dalla funzione EPG. Per ulteriori
dettagli fai riferimento alla sezione 4.1.1.
25
Registrazione
7.4 Istantanee
Si possono scattare fotografie dei video e salvarle sul disco rigido. Per scattare
un’istantanea, fare click sul tasto Istantanea e l’immagine corrente sarà salvata sul
disco rigido nella directory di rete specificata nella cartella Directory. (capitolo 5.1.1 e
Capitolo 5.2.3) Si può prendere visione delle istantanee acquisite accedendo alla
modalità di esecuzione. (capitolo 7.5)
7.5 Play Mode (Modalità di esecuzione)
Si può prendere visione dei file già registrati, facendo click sul pulsante Play (esegui
sulla sinistra dell’interfaccia. Qui, sulla destra, si può selezionare il file che si vuole
vedere che sarà poi visualizzato sulla finestra principale. Se il file è un’immagine. Sarà
visualizzato. Se il file è una sequenza filmata, ne inizierà l’esecuzione. Il filmato può
essere messo in pausa, eseguito o fermato utilizzando i pulsanti Pausa/esegui e Stop
che si trovano in basso sull’interfaccia.
26
Il telecomando e i collegamenti della tastiera
8. Il telecomando e i collegamenti della tastiera
8.1 Il telecomando
1. Full Screen Schermo intero): cambia tra la modalità
schermo intero e un normale schermo TV.
2. Power (Alimentazione): Accende/spegne il programma
Lifeview DTV Program.
3. Numeric Keypad (tastierino numerico): selezione
diretta del canale desiderato. In modalità di scansione si
può inserire direttamente la frequenza e confermare con il
tasto “Enter”.
4. Recall (richiama): passa al canale visto in precedenza.
5. Mute(muto): disattiva l’audio.
6. TV/Radio: Passa tra ricezione TV e radio.
7. SAP(secondo programma audio): passa ad un secondo
programma Audio se disponibile.
8. CH+/CH-: passa a canale successivo/precedente.
9. VOL-/VOL+: Diminuisce/aumenta il volume
10. Enter: conferma selezione
11. PIP: abilita/disabilita la modalità PIP; fa passare tra la
finestra principale e secondaria.
12. Source (origine): passa tra le varie origini. (DVB-T ->
AV-In -> S-Video)
13. Record/Pause(registra/Pausa): avvia e termina la
registrazione del programma corrente.
14. Swap (cambio): passa tra la finestra principale e
secondaria in modalità PIP.
15. TimeShift/Pause(differita/pausa): Avvia e termina la
differita del programma corrente.
16. Rewind (retrocessione):fa retrocedere la differita o il
video corrente registrato.
17. Play/Pause(esecuzione/pausa): riprende o mette in
pausa la differita o il video registrato.
18. Forward (avanzamento): fa avanzare la differita o il video
registrato.
19. Back(Inizio): passa all’inizio di un video registrato.
20. Stop: Ferma la differita, riproduzione o registrazione.
21. End(fine): passa alla fine di un video registrato durante la
registrazione.
27
Il telecomando e i collegamenti della tastiera
8.2 Collegamenti della tastiera
Utilizzare come riferimento la seguente tavola di tasti di scelta per controllare
comodamente le funzioni Tv con la tastiera.
Tastiera
F
Ctrl-Alt-T
Tasti numerici 0-9 /
Tastierino numerico
0-9
BackSpace
M
T
A
©
ª
¨
§
Enter/Enter del
tastierino numerico
P
I
Ctrl-R
S
Ctrl-T
W
Barra spaziatrice
E
Q
Ctrl-S
R
Ctrl-P
28
Descrizione
Attiva/disattiva la modalità schermo intero
Apre/chiude l’applicazione DTV
Numero del canale
Richiama il canale precedente
Attiva/disattiva la funzione Mute
Cambia tra ricezione TV/radio
Passa a seconda lingua audio
Canale su
Canale giu
Aumenta volume
Diminuisci volume
Enter/conferma
Abilita/disabilita la modalità PIP
Origine Input (DVB, AV-in, S-Video in)
Avvio registrazione
Passa tra finestra principale e secondaria inmodalità PIP
Avvia/pausa differita
Retrocessione
Esecuzione/ Pausa
Avanzamento rapido
Va all’inizio
Ferma riproduzione / Registrazione/ Differita
VA alla fine
Istantanea
Technical Support
9. Supporto tecnico
9.1 Contatti
Per risolvere qualsiasi problema con la tua scheda FlyDVB-T contatta via mail
l’indirizzo [email protected] o visita la nostra pagina di supporto tecnico
www.lifeview.com, dove sono disponibili aggiornamenti driver da scaricare
gratuitamente.
29
FlyDVB-T
Manual del usuario
Animation Technologies Inc.
www.lifeview.com
Versión: 1.9
Nota sobre derechos de copia y marcas registradas
©2005 por Animation Technologies Inc. Todos los derechos reservados.
La información contenida en este documento puede ser sometida a cambios sin aviso
previo. No podrá reproducirse todo o parte de este documento, no ser transmitido por
ningún medio o ninguna forma, electrónica o mecánica, sin permiso previo por escrito
de Animation Technologies Inc.
Animation Technologies Inc. no representa ni garantiza los contenidos de este manual
y no acepta especialmente la responsabilidad de cualquier garantía de
comercialización o ajuste a ningún propósito particular. Animation Technologies Inc.
se reserva el derecho de revisar este manual y realizar cambios en su contenido sin
obligación de notificar a ninguna persona u organización de tales revisiones o
cambios. En ningún caso, Animation Technologies Inc. será responsable ante usted o
alguna tercera parte por daños consecuentes, accidentales, directos, indirectos,
especiales, punitivos o de otro tipo (incluyendo sin limitación, daños por pérdida de
beneficios, interrupciones, pérdida de información, pérdidas pecuniarias, etc.), incluso
si Animation Technologies ha sido advertido de la posibilidad de que surjan tales
posibilidades por cualquier defeco o error en este manual o producto.
Puede obtener las actualizaciones de este documento en nuestra página web:
www.lifeview.com.
Windows® es una marca registrada de Microsoft Corporation. Todos los demás
nombres de marcas utilizados en este documento son marcas registradas de sus
respectivos propietarios.
Declaración CE: Este equipo ha sido probado, cumpliendo con las normativas EN
55022, EN 55024, EN 61000-3-2, EN 61000-3-3, EN 61000-4-2, EN 61000-4-3, EN
61000-4-4, EN 61000-4-5, 61000-4-6, EN 61000-4-8, EN 61000-4-11.
Índice
1. Comenzar.......................................................................... 1
1.1 Introducción .................................................................................................. 1
1.2 Características.............................................................................................. 1
1.3 Contenidos de la caja ................................................................................... 1
1.4 Requisitos del sistema.................................................................................. 2
2. Conexiones de entrada y salida ..................................... 3
2.1 Conexiones de FlyDVB-T ............................................................................. 3
3. Instalación ........................................................................ 4
3.1 DirectX.......................................................................................................... 4
3.2 Instalación de FlyDVB-T ............................................................................... 5
3.3 Instalación de controladores para Windows 2000 / Windows XP ................. 6
3.4 Instalación de LifeView DTV......................................................................... 7
4. LifeView DTV .................................................................... 8
4.1 Visión general de la interfaz DTV ................................................................. 8
4.2 Explorar canales de TV (DVB-T) .................................................................. 9
4.3 Seleccione la fuente ................................................................................... 11
4.4 Lista de canales.......................................................................................... 12
4.5 Controles de volumen................................................................................. 12
4.6 Medidor de fuerza de señal ........................................................................ 12
4.7 Teletexto..................................................................................................... 13
4.8 EPG ............................................................................................................ 14
5. Configuración................................................................. 15
5.1 DVB Settings (Configuración DVB)............................................................. 15
5.2 Configuración de Vídeo Analógico (AV-In/S-Video) ................................... 17
6. Modos PIP (Imagen en imagen) y TWIN....................... 21
7. Grabación ....................................................................... 23
7.1 El botón de grabación................................................................................. 23
7.2 El botón TimeShift (Desplazamiento) ......................................................... 24
7.3 Grabación programada............................................................................... 25
7.4 Capturas de pantalla................................................................................... 26
7.5 Modo Play (Reproducción) ......................................................................... 26
8. Control remoto y accesos directos por teclado.......... 27
8.1 Control remoto............................................................................................ 27
8.2 Accesos directos por teclado...................................................................... 28
9. Soporte técnico .............................................................. 29
9.1 Contacte con nosotros................................................................................ 29
Comenzar
1. Comenzar
1.1 Introducción
Gracias por escoger la tarjeta de bus FlyDVB-T de sintonización de TV y captura de
vídeo. Este producto convierte su PC en un sistema multimedia potente de forma
rápida y fácil. Capture imágenes sin movimiento y de vídeo y disfrute de la grabación
en MPEG-1 y MPEG-2 a tiempo real. ¡Vea TV digital y análoga vídeo al mismo tiempo
y en la misma pantalla! La tarjeta de bus FlyDVB-T le proporciona una gran calidad
de TV con sonido estéreo de verdad.
1.2 Características
•
•
•
•
•
•
•
•
•
•
Dial DVB-T de antena
Entradas de vídeo S-Video/composite
PIP (imagen sobre imagen)
Grabación a tiempo real de TV digital y entradas análogas
Vea TV digital TV y análoga vídeo simultáneamente
Vea la TV en una ventana adaptable o en pantalla completa
Funciones de adaptación temporal
Captura de imágenes sin movimiento
Escucha de radio DVB
Compatible con Windows® 2000 y XP
1.3 Contenidos de la caja
Cuando extraiga el contenido del envase, inspeccionelo para asegurarse de que no
ha sufrido ningún daño durante el envío. Los elementos siguientes deben estar
incluidos en el envase:
•
•
•
•
•
•
•
•
Tarjeta FlyDVB-T
Adaptadores de conexión PAL/NTSC
Cable AV
Control remoto
Cable de sensor IR
CD-ROM de instalación
Guía de instalación rápida
Antena portátil para recepción de DVB-T (opcional)
1
Comenzar
1.4 Requisitos del sistema
Para utilizar correctamente la solución FlyDVB-T, asegúrese de que su sistema
satisface los siguientes requisitos:
•
•
•
•
•
•
•
•
•
•
•
•
2
Pentium® 4 o AMD Athlon 2.0 GHz o superior, 2.4GHz o superior recomendado
256 MB RAM (mínimo), 512 MB RAM recomendado
Microsoft Windows 2000/XP
100 MB de disco duro disponible para instalación, espacio adicional necesario
para grabación o desplazamiento
Unidad de CD-ROM o DVD
Chipset VGA con soporte para DirectX 9.0
DirectX 9.0c o superior instalado
Tarjeta de sonido compatible con AC97 para sonido
Altavoces para salida de sonido
IRQ disponible
Ranura PCI disponible
Antena TV o cable para TV digital
Conexiones de entrada y salida
2. Conexiones de entrada y salida
2.1 Conexiones de FlyDVB-T
La tarjeta FlyDVB-T es compatible con entradas de S-Video y Composite. Consulte
el diagrama a continuación para ver los detalles de la conexión.
1
2
3
4
5
6
8
7
1. S-Video:
Entrada de S-Video para dispositivos externos
como vídeos o cámaras
2. Video In:
Entrada de Composite video para dispositivos
externos como vídeos o cámaras
3. Audio (D):
Conecta el canal de audio derecho de un
dispositivo de audio externo
4. Audio (I):
Conecta el canal de audio izquierdo de un
dispositivo de audio externo
5. Antena de TV digital:
Conexión de su hogar o antena de habitación para
TV digital terrestre
6. Cable AV:
Conecte el cable AV al conector de 9 clavijas de
FlyDVB-T
7. Entrada del cable para
Permite conectar el cable del sensor de
comunicación remota:
infrarrojos.
8. Conector del equipo de A/V: Permite conectar el cable del equipo de A/V
(opcional)
3
Instalación
3. Instalación
Las secciones siguientes le ofrecen instrucciones paso a paso sobre la instalación y
configuración de la tarjeta, los accesorios y programas.
3.1 DirectX
Antes de instalar FlyDVB-T, será necesario que instale DirectX 9.0c o posterior.
Inserte el CD de instalación. El menú de instalación debe cargarse automáticamente.
Si el programa de inicio automático no aparece
automáticamente al insertar LifeView Installation CD
(CD de Instalación de LifeView), inícielo manualmente
ejecutando el archivo InstallCD.exe que se encuentra
en LifeView Installation CD (CD de Instalación de
LifeView), o haciendo clic en el botón Start (Inicio),
seleccionando Run… (Ejecutar…), y escribiendo
D:\InstallCD.exe. (Si D: es su unidad de CD-ROM)
Haga clic en DirectX 9.0 y siga las
instrucciones en pantalla para instalar
DirectX. Después de completar la
instalación, apague su ordenador.
4
Instalación
3.2 Instalación de FlyDVB-T
1. Apague su ordenador y todos los dispositivos periféricos, como impresoras o
monitor. Deje el cable de alimentación AC conectado durante este tiempo, de
forma que su ordenador tenga una toma de tierra.
2. Toque el chasis metálico en la parte posterior de su ordenador para descargar la
electricidad estática acumulada en su cuerpo. A continuación, desconecte el cable
de alimentación del enchufe AC.
3. Retire la carcasa de su PC.
4. Busque una ranura de expansión PCI. Al seleccionar la ranura de expansión PCI,
tenga en cuenta que algunas tarjetas de TV no deben conectarse a la ranura PCI 1
junto con la tarjeta gráfica AGP a esta ranura suelen asignarse las mismas
interrupciones que a la ranura AGP. Esto otorgaría a ambas tarjetas la misma
interrupción, lo cual puede provocar errores durante el funcionamiento.
(Suele ser la ranura PCI más cercana a la ranura AGP, pero siempre deberá
comprobar el manual de su placa base).
5. Retire con cuidado la tarjeta de su embalaje y cójala por los lados con una mano
mientras con la otra mano toca una parte metálica de su ordenador. Así se
asegurará que su cuerpo está totalmente descargado a través de su ordenador y
no dañará la tarjeta de TV.
6. Alinee la tarjeta de TV con la ranura de expansión de tal forma que los conectores
de la tarjeta se encuentren en línea con la ranura.
7. Presione la tarjeta de TV firmemente sobre la ranura, asegurándose de que hace
bien contacto.
8. Asegure la tarjeta de TV con un tornillo adecuado.
9. Vuelva a instalar la cubierta de su PC.
10. Conecte su antena digital al puerto DVB-T. Vuelva a conectar el cable de
alimentación AC así como los demás cables. Asegúrese de que ha bajado el
volumen de sus altavoces.
5
Instalación
3.3 Instalación de controladores para Windows 2000 / Windows XP
Windows 2000 / XP detectará
automáticamente la tarjeta
FlyDVB-T y abrirá la ventana Found
New Hardware Wizard (Asistente
para nuevo hardware).
Si aún no lo ha hecho, coloque el
CD de instalación en su unidad de
CD-ROM.
Seleccione Install from a list or
specific location (Advanced)
(Instalar desde una lista o
ubicación específica (Avanzado))
y haga clic en Siguiente.
A continuación, seleccione Search
for the best driver in these
locations (Buscar el mejor
controlador en estas
ubicaciones), asegúrese de que la
opción Search removable media
(Buscar en medios extraíbles)
está seleccionada, y haga clic en
Siguiente.
Windows buscará ahora los
controladores en el CD de
Instalación y los instalará
automáticamente. Después de
instalar el controlador, Windows le
informará del resultado de la
instalación. Haga clic en Finish
(Finalizar).
6
Instalación
3.4 Instalación de LifeView DTV
Instale el programa LifeView DTV
haciendo clic en LifeView DTV Setup
(Instalar LifeView DTV). Siga las
instrucciones para instalar el
programa.
7
LifeView DTV
4. LifeView DTV
4.1 Visión general de la interfaz DTV
1
25
2
3
4
5
6
7
8
9
10
11
12 13 14 15
16 17
18
19
20 21
22
23
1. Cambiar piel
14. Iniciar grabación
2. Conmutar a entrada de vídeo compuesto
3. Conmutar a entrada S-Video
15. Parada
16. Saltar al inicio
4. Conmutar a TV DVB-T
17. Saltar al final
5. Inicio / Fin modo PIP
6. Inicio / Fin modo Twin
18. Silencio activado/desactivado
19. Barra de volumen
7. Abrir configuración de exploración
20. Mostrar/ocultar lista de canales
8. Conmutar al modo de reproducción
21. Botón de instantánea
9. Cambiar entre ventana principal y secundaria
(en modo PIP)
10. Teletexto
24
22. Medidor de fuerza de señal
11. Abrir ventana EPG
23. Cambiar entre el modo de visión a pantalla
completa / en ventana.
24. Avance rápido
12. Rebobinar
25. Lista de canales
13. Inicio/Reproducción/Pausa desplazamiento
8
LifeView DTV
4.2 Explorar canales de TV (DVB-T)
Antes de poder ver TV digital DVB-T,
deberá explorar los canales de su
zona.
En primer lugar, seleccione como
fuente DVB-T. En la barra de menú,
haga clic en Tool (Herramientas), y
después en Scan (Explorar).
También puede hacer clic en el
botón Scan (Explorar) en el lado
izquierdo de la pantalla.
Configuración de recepción:
Aquí se muestra la normativa de recepción actual de la aplicación DTV.
Información de servicios:
Aquí se muestra información acerca del canal seleccionado actualmente si está
disponible. Durante una exploración, aquí se mostrará información sobre el estado de
la exploración.
Exploración de canales:
Existen dos formas de explorar los canales disponibles, Auto Scan (Exploración
automática) y Transponder Scan (Exploración por transpondedor).
1. Auto Scan (Exploración automática):
Seleccione Auto Scan (Exploración
Automática), y después seleccione su país
en la lista desplegable. Después haga clic en
Scan (Explorar).
2. Transponder Scan (Exploración por
transpondedor):
Si desea introducir manualmente una
frecuencia, seleccione Transponder Scan
(Exploración por transpondedor), escriba
la frecuencia en kHz y haga clic en Scan
(Explorar).
9
LifeView DTV
Los canales encontrados se mostrarán
en una ventana, en la que podrá
personalizar la lista de canales.
Puede ordenar la lista de canales por
los campos Channel Name (Nombre
de canal), Frequency (Frecuencia),
Network Provider (Proveedor de red),
Transponder ID (ID de
Transpondedor) y tipo de Audio
(Sonido) y haciendo clic después en el
botón superior de cada columna.
Puede quitar la marca de un canal para que no aparezca en su lista de canales, o
seleccionarlo y hacer clic en Delete (Eliminar) para eliminar completamente el canal.
También puede importar listas de canales a su lista actual haciendo clic en Import
(Importar), puede cargar otra lista de canales haciendo clic en Load (Cargar), y
puede guardar la lista de canales haciendo clic en Save As… (Guardar como…).
Para guardar los cambios, haga clic en OK (Aceptar). Para cancelar los cambios,
haga clic en Cancel (Cancelar).
Puede encontrar las actualizaciones de frecuencias de su región regularmente en la
página web de LifeView (www.lifeview.com).
10
LifeView DTV
4.3 Seleccione la fuente
Su tarjeta FlyDVB-T no está limitada a la recepción de TV digital; también puede ver
fuentes analógicas.
En el lado izquierdo de la interfaz encontrará botones que le permitirán acceder a las
distintas fuentes.
Conmuta a un dispositivo externo conectado a la entrada de vídeo
compuesto
Conmuta a un dispositivo externo conectado a la entrada S-Video
Conmuta a TV satélite digital (DVB-T)
Activa y desactiva el Modo PIP, lo cual le permite ver TV digital y
analógica al mismo tiempo en ventanas diferentes
Activa y desactiva el Modo Twin, lo cual le permite ver TV digital y
analógica al mismo tiempo en ventanas adyacentes
Abre el cuadro de diálogo Scan Settings (Configuración de
exploración)
Entra en el modo Play (Reproducir), y le permite ver capturas de
pantalla realizadas y videos capturados
Conmuta la fuente de vídeo entre la ventana principal y secundaria
(en los modos PIP o Twin)
Abre la ventana de Teletexto (si está disponible)
Abre la ventana EPG
11
LifeView DTV
4.4 Lista de canales
En el lado derecho de la interface está la lista de
canal. Aquí podrá ver los canales disponibles
para DVB si estuvier en modo DVB.
Simplemente haga clic en un canal para pasar a
él, o presione las teclas de flechas K o L para
cambiar canales. En modo DVB, se puede
seleccionar Radio DVB haciendo clic en el
cuadro desplegable y escogendo Radio.
Haciendo clic en el botón derecho del ratón sobre
un canal le dará la opción de clasificar la lista por
Nombre, Frecuencia, Proveedor de Red, o ID del
Transmisor.
Nota: DTV CA lista los canales de acceso
condicional . Estos canales no son de acceso
gratuito, y no pueden ser vistos en la aplicación
DTV.
Sin embargo, algunas estaciones de TV identifican incorrectamente sus canales de
acceso libre como canales de acceso condicional y estos canales serán listados bajo
la lista de DTV CA, aun así estos canales podrán ser vistos en la aplicación DTV.
4.5 Controles de volumen
En la parte inferior de la interfaz se encuentra la barra de volumen. Haga clic en la
barra para fijar el nivel de volumen a ese nivel, o presione los botones con forma de
flecha I o J para aumentar o reducir el volumen. Haga clic en el icono del altavoz
para silenciar el sonido.
4.6 Medidor de fuerza de señal
El medidor de fuerza de señal indica lo fuerte que es la señal del canal actual. Una luz
verde indica que la recepción es buena, una luz amarilla indica que la recepción es
correcta, y una luz roja indica una mala recepción.
12
LifeView DTV
4.7 Teletexto
Sólo tiene que hacer en el botón Tx para abrir la ventana de teletexto. No todas las
emisoras de TV ofrecen servicio de Teletexto. Diariamente, sin embargo, las oficinas
editoriales ofrecen una selección de información rápida y fácilmente accesible a la
que podrá acceder de forma gratuita, dado que es transferida constantemente junto
con la imagen de TV a través del llamado intervalo de borrado vertical de la señal de
imagen. La navegación a través de las páginas es muy sencilla, gracias a las tablas
de texto cargadas previamente. Utilice los botones de flecha (en la interfaz de
software, el teclado de PC o el control remoto) para navegar de una página a otra o
entrar directamente en un número de página. También puede hacer clic en una
referencia de página para abrir directamente su contenido, prácticamente sin retraso.
Para más información acerca del uso del Teletexto, haga clic en Help (Ayuda) en la
esquina superior derecha de su pantalla para abrir el archivo de Ayuda.
13
LifeView DTV
4.8 EPG
Las emisoras de TV Digital suelen emitir información EPG (Guía de programas
electrónica). Esta información presenta datos acerca de los programas que siguen al
actual y sus horas de reproducción, y se puede utilizar para ver que programas se
emitirán más tarde y grabarlos.
Haga clic en el botón EPG para abrir la ventana EPG:
Haga clic en Update (Actualizar) para actualizar la información EPG. La fecha, la
hora de inicio, la duración y el programa aparecerán en la tabla. Si selecciona una
entrada se mostrará información extendida acerca del programa (si estuviese
disponible).
Si hace clic en Rec. Programará una grabación de ese programa automáticamente
utilizando su información EPG; puede utilizar esta función para programar
grabaciones de sus programas favoritos fácilmente.
14
Configuración
5. Configuración
Para acceder a la ventana Setting (Configuración), en la
barra de menú, haga clic en Tools (Herramientas) ->
Setting (Configuración).
Según su fuente actual, tendrá varias configuraciones
disponibles.
5.1 DVB Settings (Configuración DVB)
Si tiene DVB-T como fuente, verá las siguientes opciones:
5.1.1 Directory Settings (Configuración de directorio)
Working Directory (Directorio activo)
Aquí puede cambiar el directorio utilizado para
guardar archivos. Puede escribir la ruta o hacer
clic en “Browse”(Buscar) para dirigirse a la
carpeta que desee y hacer clic en OK (Aceptar).
Capture Size Setting (Configuración de
tamaño de captura)
Si está marcada, esta opción dividirá los
archivos grabados en partes con el tamaño
introducido como File split size (Tamaño de
división de archivo). Esta opción es útil si
desea guardar grabaciones largas en
archivos más manejables. Por ejemplo, si fija
el tamaño de división de archivo en 650 MB le
resultará más sencillo pasar los archivos a
CD.
Always on top (Siempre en primer plano)
Puede seleccionar esta opción para que la ventana DTV esté “Always on top“(siempre
encima) de cualquier otra aplicación.
VGA hardware acceleration (Aceleración hardware VGA)
Esta opción habilita la aceleración de hardware VGA. Tenga en cuenta que no todas
las tarjetas gráficas soportan esta función.
Full Screen Setting: (Ajuste de Pantalla Completa)
Le permite escoger si mostrar el vídeo en su proporción original de pantalla o
extendido para fijarlo a su pantalla cuando vea la televisión en modo de pantalla
completa.
15
Configuración
5.1.2 Schedule Recording (Programar grabación)
Aquí encontrará los programas cuya
grabación ha sido programada.
Consulte el Capítulo 7.3 para obtener más
detalles sobre el uso de la Grabación
Programada.
16
Configuración
5.2 Configuración de Vídeo Analógico (AV-In/S-Video)
Si su fuente actual es AV-in o S-Video, verá las siguientes opciones:
5.2.1 Display Settings (Configuración de pantalla)
•
•
•
•
Output Size (Tamaño de salida): Aquí
puede especificar el tamaño de
pantalla de la fuente analógica.
Data Format (Formato de datos): Aquí
puede seleccionar el formato de datos
en el que se mostrará el vídeo.
Color: Aquí puede personalizar las
características de la pantalla, como el
Brillo, Contraste, Tono, Saturación y
Nitidez.
Si hace clic en la opción “Default”
(Predeterminado), las opciones
volverán a su configuración de fábrica.
5.2.2 Record Settings (Configuración de grabación)
Esta sección le permite ajustar cómo se grabarán los archivos provenientes de las
fuentes AV-in y S-Video.
Record – MPEG (Grabación – MPEG):
Aquí puede definir si desea grabar en
calidad Good (Buena), Better (Mejor) o
Best (Excelente) según las opciones
predefinidas.
Si selecciona Customized
(Personalizado), podrá crear una
configuración personalizada para grabar.
Puede seleccionar entre los siguientes
formatos:
•
•
•
•
•
NTSC o PAL MPEG-1
NTSC o PAL VCD
NTSC o PAL MPEG-2
NTSC o PAL SVCD
NTSC o PAL DVD
17
Configuración
El botón Profiles… (Perfiles…) también está disponible si selecciona la opción
Customized (Personalizado), y abre la pantalla siguiente:
Aquí puede Crear un perfil nuevo,
Modificar uno existente, Duplicar un perfil
o Eliminar uno o todos los perfiles
existentes.
Create Profile (Crear Perfil)
General:
Aquí debe introducir un nombre para el perfil y un
comentario para identificarlo. Seleccione MPEG-1 o
MPEG-2 para utilizar el formato con el perfil.
System (Sistema):
Según el Modo seleccionado en “General”, seleccione
qué modo Bitstream desea utilizar para este perfil.
18
Configuración
Video:
En esta sección debe seleccionar el formato de vídeo, el
tamaño de salida y la Tasa de Bit que desee utilizar.
Si hace clic en Advanced (Avanzadas), se abrirá una
nueva ventana en la que podrá seleccionar las
opciones Frame Rate (Velocidad de fotograma),
Encoder level (Nivel de codificador) y si la grabación
debe ser Inverted (Invertida), Deinterlaced
(Desentrelazada) y/u Off Line (Sin conexión).
Sonido:
Aquí puede seleccionar las opciones Bit Rate (Tasa de
bit), Sample Rate (tasa de muestra) y cuántos Channels
(Canales) desea utilizar para el sonido grabado.
(1=mono, 2=estéreo)
Record – SYSTEM (Sistema de grabación)
Si selecciona SYSTEM (Sistema)en la
ventana Record Setting (Configuración de
grabación), podrá acceder a los códecs
instalados en su sistema. Según el códec,
podrá acceder a las propiedades del
códec y modificarlas haciendo clic en el
botón Properties (Propiedades). (No
disponible en todos los códecs)
Puede descargar códecs de forma gratuita
desde Internet, como el códec DivX,
desde www.divx.com . Para obtener
soporte para estos códecs, póngase en
contacto con el fabricante de códec o
busque en Internet.
19
Configuración
5.2.3 Directory Settings (Configuración de directorio)
Working Directory (Directorio activo)
Aquí puede cambiar el directorio utilizado para
guardar archivos. Puede escribir la ruta o hacer
clic en “Browse”(Buscar) para dirigirse a la
carpeta que desee y hacer clic en OK (Aceptar).
Capture Size Setting (Configuración de
tamaño de captura)
Si está marcada, esta opción dividirá los
archivos grabados en partes con el tamaño
introducido como File split size (Tamaño de
división de archivo). Esta opción es útil si
desea guardar grabaciones largas en archivos
más manejables. Por ejemplo, si fija el tamaño de
división de archivo en 650 MB le resultará más
sencillo pasar los archivos a CD.
Always on top (Siempre en primer plano)
Puede seleccionar esta opción para que la ventana DTV esté “Always on top“(siempre
encima) de cualquier otra aplicación.
VGA hardware acceleration (Aceleración hardware VGA)
Esta opción habilita la aceleración de hardware VGA. Tenga en cuenta que no todas
las tarjetas gráficas soportan esta función.
Full Screen Setting: (Ajuste de Pantalla Completa)
Le permite escoger si mostrar el vídeo en su proporción original de pantalla o
extendido para fijarlo a su pantalla cuando vea la televisión en modo de pantalla
completa.
5.1.2 Schedule Recording (Programar grabación)
Aquí encontrará los programas cuya grabación
ha sido programada.
Consulte el Capítulo 7.3 para obtener más
detalles sobre el uso de la Grabación
Programada.
20
Modos PIP (Imagen en imagen) y TWIN
6. Modos PIP (Imagen en imagen) y TWIN
Se puede acceder a las funciones PIP/TWIN desde la barra de herramientas de la
izquierda.
Si hace clic en el botón PIP, verá una segunda emisión en directo en la esquina
inferior derecha. Mientras se encuentre en el modo PIP, podrá cambiar entre DVB-T
como fuentes digitales, y entre las fuentes S-Video y AV-in.
Puede mover la ventana a cualquier lugar de su escritorio o redimensionarla
arrastrándola por los lados.
21
Modos PIP (Imagen en imagen) y TWIN
Si hace clic en Twin (Gemelo) se mostrarán dos emisiones de vídeo una junto a otra
en ventas idénticas. En este modo las ventanas se bloquearán y no podrán ser
redimensionadas o desplazadas individualmente.
Si hace clic en el botón Swap (Intercambiar) podrá cambiar entre las ventanas
principal y secundaria, de forma que la TV digital pueda verse en la ventana
secundaria y la fuente analógica pueda verse en la ventana principal.
Para finalizar el modo PIP, haga clic en el botón PIP de nuevo para volver al modo de
visualización normal. No podrá aplicar la función TimeShift (Desplazamiento)
mientras se encuentre en el modo PIP.
22
Grabación
7. Grabación
7.1 El botón de grabación
Si hace clic en el botón de grabación podrá grabar el vídeo que se
muestra en la ventana principal. Mientras graba vídeo, verá el
símbolo • REC (GRABACIÓN) sobre los controles de reproducción.
En el modo DVB-T puede grabar señal de Audio y vídeo MPEG-2 pura.
En el modo analógico (S-Vídeo o AV-In) podrá grabar la señal en el formato que haya
especificado en la Configuración de Grabación. (Capítulo 5.2.2). En cualquier modo,
los archivos grabados se guardarán en el directorio activo, que puede especificarse
en la sección Directory Settings (Configuración de directorios). (capítulos 5.1.1 y
5.2.3) Puede ver las películas grabadas entrando en el modo Play (Reproducción).
(Capítulo 7.5)
Cuando haya finalizado la grabación, haga clic en el botón Stop (Detener).
23
Grabación
7.2 El botón TimeShift (Desplazamiento)
Con la función TimeShift (Desplazamiento), puede detener la televisión en directo,
irse, y volver a seguir viendo el programa donde lo dejó. Puede también avanzar
rápidamente para pasar los anuncios, o rebobinar para ver de nuevo una escena
concreta.
Para iniciar la función TimeShifting (Desplazamiento), sólo tiene que hacer clic en el
botón TimeShift (Desplazamiento).
El botón TimeShift (Desplazamiento) se convertirá entonces en un botón Pause
(Pausa) / Play (Reproducción), permitiéndole pausar el vídeo. Si hace clic de nuevo
en el botón se iniciará la reproducción en el punto en el que lo dejó.
Vera una barra verde en la parte inferior de la pantalla, con una barra deslizante que le
muestra la posición actual. Puede rebobinar o avanzar rápidamente utilizando los
botones situados en los lados izquierdo y derecho de la barra, o arrastrando la barra
deslizante a la izquierda y la derecha. También puede hacer clic en el botón Skip to
Beginning (Saltar al inicio) para ir directamente al inicio del archivo TimeShift
(Desplazamiento), o hacer clic en el botón Skip to End (Saltar al final) para ir
directamente al punto de emisión actual. Si desea detener la función TimeShift, haga
clic en el botón Stop (Detener). No podrá cambiar canales o fuentes de vídeo mientras
se encuentre utilizando la función TimeShift.
24
Grabación
7.3 Grabación programada
Puede acceder a la Grabación Programada
desde el menú Settings (Configuración) de la
forma que se detalla en los capítulos 5.1.2 y
5.2.4. Aquí podrá ver una lista de elementos
programados para su grabación.
Si hace clic en el botón Add (Añadir), podrá
añadir nuevas grabaciones programadas. El
botón Delete (Eliminar) cancela la grabación
programada y el botón Edit (Editar) le
permite cambiar la configuración de una
grabación programada.
Los botones Add (Añadir) y Edit (Editar) abren un segundo menú:
En primer lugar, seleccione la opción Schedule Type (Tipo de programación) en el
lado derecho de la pantalla. Haga clic en “One time” (“Una vez”) si se trata de una
grabación puntual. Para crear una grabación semanal, haga clic en los días en los
que desee que se grabe el programa. Seleccione la opción Source (Fuente) desde la
que desee grabar, y después la opción Channel (Canal) si desea grabar desde una
fuente de TV. Seleccione la opción Date (Fecha) si se trata de una grabación puntual.
Introduzca las opciones Start Time (Fecha de inicio) y Duration (Duración) del
programa que desee grabar. Finalmente, introduzca la opción File Name (Nombre
de archivo) para el archivo guardado; si se trata de una grabación semanal, se
añadirá un número a este nombre para cada grabación. (Por ejemplo:
NombreArchivo01.mpg, NombreArchivo02.mpg, etc.)
Haga clic en el botón Add (Añadir) para terminar de programar la grabación.
También puede programar grabaciones de TV digital utilizando la información EPG.
Para más detalles, consulte la sección 4.11.
25
Grabación
7.4 Capturas de pantalla
Puede capturar imágenes fijas del vídeo y guardarlas en su disco duro. Para realizar
una captura, haga clic en el botón Snapshot (Captura), para guardar la imagen actual
en su disco duro, en el directorio activo fijado en la sección Directory Settings
(Configuración de directorio). (Capítulos 5.1.1 y 5.2.3) Puede ver las películas
grabadas entrando en el modo Play (Reproducción). (Capítulo 7.5)
7.5 Modo Play (Reproducción)
Puede ver los archivos que ya ha grabado haciendo clic en el botón Play en el lado
izquierdo de la interfaz. Aquí podrá seleccionar el archivo que desee ver a la derecha,
y se mostrará en la ventana principal. Si el archivo es una imagen, se mostrará. Si el
archivo es una película, comenzará su reproducción. Puede pausar/reproducir o
detener la película utilizando los botones Pause/Play (Pausa/Reproducir) y Stop
(Detener) en la parte inferior de la interfaz. Puede hacer clic en Explorer…
(Explorador…) para abrir el directorio activo de archivos guardados especificado en
la sección Directory Settings (Configuración de directorio). (Capítulo 5.2.3)
26
Control remoto y accesos directos por teclado
8. Control remoto y accesos directos por
teclado
8.1 Control remoto
1. Full Screen (Pantalla completa): Conmuta entre el modo
de pantalla completa y ventana TV normal.
2. Power (Encendido): Activa/desactiva el Programa
LifeView DTV.
3. Numeric Keypad (Teclado numérico): Selecciona
directamente el canal deseado. En el Modo Scan
(Exploración), puede escribir la frecuencia directamente y
confirmarla con “Enter”.
4. Recall (Rellamada): Conmuta al canal anterior.
5. Mute (Silencio): Desactiva el sonido.
6. TV/Radio: Conmuta entre la recepción de TV y Radio.
7. SAP: Conmuta a un Programa de audio secundario (si
está disponible).
8. CH+/CH-: Conmuta al canal anterior/siguiente.
9. VOL-/VOL+: Reduce/aumenta el volumen.
10. Enter (Entrar): Confirma una selección.
11. PIP: Activa/desactiva el Modo PIP y conmuta entre las
ventanas principal y secundaria.
12. Source (Fuente): Conmuta entre fuentes diferentes.
(DVB-T -> AV-In -> S-Video)
13. Record/Pause(Grabar/Pausa): Inicia y detiene la
grabación del programa actual.
14. Swap(Conmutar): Conmuta entre ventana principal y
secundaria en modo PIP
15. TimeShift/Pausa (Desplazamiento/Pausa): Inicia y
detiene la grabación desplazada del programa actual.
16. Rewind (Rebobinar): Rebobina el TimeShift
(Desplazamiento) actual o el vídeo grabado.
17. Play/Pausa (Reproducir/Pausa): Continúa y pausa el
TimeShift o vídeo grabado.
18. Forward (Avanzar): Avanza rápidamente a través del
vídeo grabado o TimeShift.
19. Back (Atrás): Salta al comienzo de un vídeo grabado.
20. Stop (Parada): Detiente la reproducción, grabación o
TimeShift (Desplazamiento).
21. End (Fin): Salta al final de un vídeo grabado durante su
reproducción.
27
Control remoto y accesos directos por teclado
8.2 Accesos directos por teclado
Utilice la siguiente tabla de accesos directos como referencia para controlar las
funciones de TV utilizando un teclado.
Tecla
Descripción
F
Activar / Desactivar pantalla completa
Ctrl-Alt-T
Abre / Cierra la aplicación DTV
Teclas numéricas 0-9
Número de canal
/ Teclado 0-9
Borrar
Volver al canal anterior
M
Silencio activado/desactivado
T
Conmuta entre la recepción de TV y Radio.
A
Conmuta al segundo idioma de sonido
©
Aumentar canal
ª
Reducir canal
¨
Aumentar volumen
§
Reducir volumen
Enter /
Entrar / Confirmar
Enter Numérico
P
Activa / desactiva el modo PIP
I
Fuente de entrada (DVB, AV-in, Entrada S-Video)
Ctrl-R
Iniciar grabación
S
Cambiar entre ventana principal y secundaria (en modo PIP)
Ctrl-T
Inicia / Pausa la función TimeShift (Desplazamiento)
W
Rewind (Rebobinar)
Espacio
Reproducir/Pausa
E
Avance rápido
Q
Saltar al inicio
Ctrl-S
Detener reproducción / grabación / Timeshift (Desplazamiento)
R
Saltar al final
Ctrl-P
Captura de pantalla
28
Soporte técnico
9. Soporte técnico
9.1 Contacte con nosotros
Si ha intentado resolver un problema con su FlyDVB-T y aún necesita ayuda,
póngase en contacto con nosotros a través de correo electrónico en
[email protected]. También puede consultar nuestra página de soporte
técnico en nuestra página web www.lifeview.com, donde podrá descargar
actualizaciones de controladores.
29