1
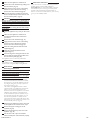
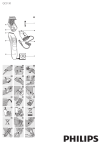
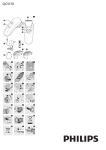
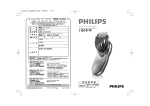
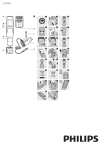
QC5170
1
E
A
B
RGE
G
1
5
F
CHA
2
4
3
3
H
C
I
J
K
D
2
3
4
5
6
7
90º
45º
0º
18
0º
45º
90º
8
9
10
11
12
13
14
15
16
17
18
19
20
21
22
ENGLISH
Introduction
Congratulations on your purchase and welcome
to Philips! To fully benefit from the support that
Philips offers, register your product at www.philips.
com/welcome.
Your new Philips hair clipper with new ergonomic
design and 180° adjustable cutting element allows
you to clip your own hair easily. You can move
the clipper over all areas of your head as easily as
running your fingers through your hair. To enjoy
using the hair clipper, we advise you to read the
following information.
General description (Fig. 1)
A On/off slide
B Charging light
C Adapter (2.5V)
D Precision trimmer
E Cutting element
F Swivel head
G Length setting indication window
H Length selector
I Cleaning brush
J Large comb attachment (13-21mm)
K Small comb attachment (3-11mm)
Important
Read this user manual carefully before you use the
appliance and save it for future reference.
-
-
-
-
Danger
Make sure the adapter does not get wet.
Warning
Check if the voltage indicated on the adapter
and on the appliance corresponds to the
local mains voltage before you connect the
appliance.
The adapter contains a transformer. Do not cut
off the adapter to replace it with another plug,
as this causes a hazardous situation.
This appliance is not intended for use by
persons (including children) with reduced
physical, sensory or mental capabilities, or lack
of experience and knowledge, unless they
have been given supervision or instruction
concerning use of the appliance by a person
responsible for their safety.
Children should be supervised to ensure that
they do not play with the appliance.
Caution
Never immerse the appliance nor rinse it
under the tap.
Do not use the appliance in the bath or in the
shower.
Use, charge and store the appliance at a
temperature between 15°C and 35°C.
Only use the adapter supplied to charge the
appliance.
If the adapter is damaged, always have it
replaced with one of the original type in order
to avoid a hazard.
Do not use the appliance when the clipping
attachment or one of the comb attachments is
damaged or broken, as this may cause injury.
This appliance is only intended for clipping
human scalp hair. Do not use it for any other
purpose.
If the appliance is subjected to a major change
in temperature, pressure or humidity, let the
appliance acclimatise for 30 minutes before you
use it.
Compliance with standards
This Philips appliance complies with all standards
regarding electromagnetic fields (EMF). If handled
properly and according to the instructions in this
4203.000.5531.3
user manual, the appliance is safe to use based on
scientific evidence available today.
Charging
A fully charged appliance has a cordless clipping
time of up to one hour.
Using the swivel head
,
Do not charge the appliance for more than 24
hours.
The ideal charging time is 8 hours.
1 Charge the appliance for 8 hours before
you use it for the first time.
Make sure the appliance is switched off when you
charge it.
2 Insert the appliance plug into the appliance
and insert the adapter into the wall
socket. (Fig. 2)
, The charging light goes on to indicate that the
appliance is charging.
Note:The charging light does not indicate when the
appliance is fully charged.
1 Set the cutting element to the desired
position by turning the swivel head (‘click’). (
Fig. 8)
Always adjust the position of the cutting element
with the swivel head. Do not turn the cutting
element or the comb attachment.
Do not turn the swivel head more than 90° to
the left or right.
,
-
Corded clipping
Only run the appliance from the mains when the
battery is empty.
-
1 Switch off the hair clipper.
2 Connect the hair clipper to the mains and
wait a few seconds before you switch it on.
If the batteries are completely empty, wait a few
minutes before you switch on the appliance.
Using the appliance
Make sure your hair is clean and dry. Do not use
the appliance on freshly washed hair.
1 Comb your hair with a styling comb in the
direction of hair growth (Fig. 3).
Clipping with comb attachment
Use the small or large comb attachment,
depending on the desired hair length. The
remaining hair length after cutting is indicated
in mm on the comb attachments. The selected
hair length setting (1-5) is shown in the two
length setting indication windows on both
sides of the length selector (Fig. 4).
See the table below for an overview of the length
settings and the corresponding hair lengths of each
comb attachment.
,
Small
comb
Large
comb
setting
hair length
setting
hair length
1
3mm/0.12in
1
13mm/0.51in
2
5mm/0.20in
2
15mm/0.59in
3
7mm/0.28in
3
17mm/0.67in
4
9mm/0.35in
4
19mm/0.75in
5
11mm/0.43in
5
21mm/0.83in
1 Attach the comb attachment to the swivel
head (‘click’) (Fig. 5).
Make sure the comb attachment locks properly
into position.
2 Set the comb attachment to the desired hair
length. To do this, press the release button on
the length selector (1) and slide it to the left
or right (2). (Fig. 6)
Do not slide the length selector beyond the
highest hair length setting (5).
3 Switch on the appliance.
From its starting position of 0° (pointing
forwards), you can turn the swivel head 45°
or 90° to the left or right. In this way, you
can adjust the position of the cutting element
to the part of your head you are clipping.
This makes it much easier to clip your own
hair. (Fig. 7)
-
The swivel head allows you to hold and
use the appliance like a brush. (Fig. 9)
Tips
We advise you to start clipping at the highest
setting of the large comb attachment and to
reduce the hair length setting gradually.
If a lot of hair has accumulated in the comb
attachment, remove it from the clipper
and blow and/or shake the hair out of it. When
you remove the comb attachment, the hair
length setting does not change.
Write down the hair length settings you use
to create a certain hairstyle as a reminder for
future clipping sessions.
1 Move the clipper through the hair slowly.
, The hair on different parts of your head
grows in different directions.You may want
to try different clipping directions (upwards,
downwards and across) (Fig. 10).
, To clip in the most effective way, move the
appliance against the direction of hair growth.
2 Turn the swivel head to the position that is
most comfortable for your arm when clipping
the different parts of your head.
3 Make sure that the flat part of the comb
attachment is fully in contact with the scalp to
obtain an even cutting result.
Clipping without comb attachment
You can use the clipper without comb attachment
to clip your hair very close to the skin (0.8mm) or
to contour the neckline and the area around the
ears.
Note:When you use the hair clipper without a comb
attachment, the clipper cuts the hair very close to the
skin.
1 Remove the comb attachment by pulling it off
the swivel head (Fig. 11).
Never pull at the flexible top of the comb
attachment. Always pull at the bottom part.
2 When you contour the hair around the ears,
only cut the hair ends. The hairline should be
close to the ear (Fig. 12).
3 To contour the neckline and the sideburns,
turn the clipper and make downward
strokes (Fig. 13).
4 Move slowly and smoothly. Just follow the
natural hairline.
5 Adjust the position of the swivel head to
make contouring easier.
Using the precision trimmer
You can use the appliance with the precision
trimmer to contour the neckline and the area
around the ears more easily and more precisely.
2/9
1 Make sure the appliance is switched off.
2 Remove the comb attachment by pulling it off
the swivel head. (Fig. 11)
3 Apply pressure to the centre of the cutting
element to open it. Remove the cutting
element from the swivel head (Fig. 14).
4 Insert the lug of the precision trimmer into
the slot and push the precision trimmer onto
the swivel head (‘click’). (Fig. 15)
Guarantee and service
If you need service or information or if you have a
problem, please visit the Philips website at
www.philips.com or contact the Philips Consumer
Care Centre in your country (you find its phone
number in the worldwide guarantee leaflet). If
there is no Consumer Care Centre in your country,
go to your local Philips dealer.
Cleaning
Do not use abrasives, scourers or liquids such as
alcohol, petrol or acetone to clean the appliance.
Only clean the appliance and the adapter with the
brush supplied.
Be careful that the cutting element does not fall
on the floor.
1 Clean the appliance every time you have used
it.
2 Make sure the appliance is switched off
and disconnected from the mains before
you clean it.
3 Remove the comb attachment (Fig. 11).
4 Apply pressure to the centre of the cutting
element to open it. Remove the cutting
element from the swivel head (Fig. 14).
5 Clean the cutting element with the brush
supplied (Fig. 16).
6 Clean the swivel head with the brush
supplied (Fig. 17).
7 Insert the lug of the cutting element into the
slot and push the cutting element back onto
the swivel head (‘click’) (Fig. 18).
The appliance does not need any lubrication.
Replacement
Only replace a worn or damaged cutting
element with an original Philips cutting element.
Environment
Removing the batteries
Only remove the batteries when you discard the
appliance. Make sure the batteries are completely
empty when you remove them.
Do not connect the appliance to the mains again
after the batteries have been removed.
-
-
Do not throw away the appliance with the
normal household waste at the end of its life,
but hand it in at an official collection point for
recycling. By doing this, you help to preserve
the environment (Fig. 19).
The built-in rechargeable batteries contain
substances that may pollute the environment.
Always remove the batteries before you
discard and hand in the appliance at an official
collection point. Dispose of the batteries at
an official collection point for batteries. If you
have trouble removing the batteries, you can
also take the appliance to a Philips service
centre. The staff of this centre will remove the
batteries for you and will dispose of them in an
environmentally safe way (Fig. 20).
1 Disconnect the appliance from the mains and
let the appliance run until the motor stops.
2 Remove the upper housing part of the
appliance (Fig. 21).
3 Remove the batteries. Pry them out of the
appliance. (Fig. 22)
4 Cut the wires with a pair of household
scissors and dispose of the batteries properly.
4203.000.5531.3
3/9
ITALIANO
Introduzione
Congratulazioni per l’acquisto e benvenuti
in Philips! Per trarre il massimo vantaggio
dall’assistenza Philips, registrate il vostro prodotto
su www.philips.com/welcome.
Grazie all’esclusivo design ergonomico e al blocco
lame regolabile di 180°, il nuovo regolacapelli
Philips è lo strumento più semplice per tagliare i
capelli. Basta far scorrere l’apparecchio su tutte le
zone delle testa come quando si passano le dita
tra i capelli. Per utilizzare al meglio il regolacapelli, vi
consigliamo di leggere le seguenti istruzioni.
Descrizione generale (fig. 1)
A Cursore on/off
B Spia di ricarica
C Adattatore (2,5 V)
D Rifinitore di precisione
E Gruppo lame
F Testina girevole
G Display di indicazione della lunghezza impostata
H Selettore lunghezza
I Spazzolina per la pulizia
J Pettine grande (13 - 21 mm)
K Pettine piccolo (3 - 11 mm)
Importante
Prima di utilizzare l’apparecchio, leggete
attentamente il presente manuale e conservatelo
per eventuali riferimenti futuri.
-
-
-
-
-
Pericolo
Evitate assolutamente il contatto della spina
con l’acqua.
Avvertenza
Prima di collegare l’apparecchio, controllate
che la tensione indicata sull’adattatore e
sull’apparecchio corrisponda a quella locale.
L’adattatore contiene un trasformatore. Non
tagliate l’adattatore per sostituirlo con un’altra
spina onde evitare situazioni pericolose.
L’apparecchio non è destinato a persone
(inclusi bambini) con capacità mentali, fisiche
o sensoriali ridotte, fatti salvi i casi in cui
tali persone abbiano ricevuto assistenza o
formazione per l’uso dell’apparecchio da una
persona responsabile della loro sicurezza.
Adottate le dovute precauzioni per evitare che
i bambini giochino con l’apparecchio.
Attenzione
Non immergete l’apparecchio nell’acqua e non
risciacquatelo sotto l’acqua corrente.
Non utilizzare l’apparecchio nella vasca da
bagno o nella doccia.
Utilizzate, ricaricate e riponete l’apparecchio a
una temperatura compresa tra 15°C e 35°C.
Per ricaricare l’apparecchio, utilizzate solo
l’adattatore in dotazione.
Nel caso in cui l’adattatore fosse danneggiato,
dovrà essere sostituito esclusivamente con un
adattatore originale al fine di evitare situazioni
pericolose.
Non utilizzate l’apparecchio quando il
regolacapelli o uno dei pettini è danneggiato o
rotto, per evitare il rischio di lesioni.
Questo apparecchio è stato realizzato
unicamente per tagliare i capelli delle persone.
Non utilizzatelo per altri scopi.
Se l’apparecchio è sottoposto a un forte sbalzo
di temperatura, pressione o umidità, attendete
30 minuti prima di utilizzarlo.
Conformità agli standard
Questo apparecchio Philips è conforme a tutti gli
standard relativi ai campi elettromagnetici (EMF).
Se utilizzato in modo appropriato seguendo le
istruzioni contenute nel presente manuale utente,
4203.000.5531.3
l’apparecchio consente un utilizzo sicuro come
confermato dai risultati scientifici attualmente
disponibili.
Come ricaricare l’apparecchio
Un apparecchio completamente carico ha
un’autonomia di taglio di circa un’ora.
Non caricate l’apparecchio per più di 24 ore.
Il tempo di ricarica consigliato è di 8 ore.
1 Prima di utilizzare l’apparecchio per la prima
volta, ricaricatelo per 8 ore.
Prima di ricaricare l’apparecchio, verificate che sia
spento.
2 Inserite lo spinotto nell’apparecchio e
l’adattatore nella presa di corrente a
muro. (fig. 2)
, Quando l’apparecchio viene ricaricato, si
accende la spia di ricarica.
Nota la spia di ricarica non indica quando
l’apparecchio è completamente carico.
Come tagliare i capelli con
l’apparecchio collegato alla presa di
corrente
se la batteria è scarica, utilizzate l’apparecchio
collegato alla presa di corrente.
1 Spegnete il regolacapelli.
2 Collegate il regolacapelli alla presa di
corrente e attendete qualche istante prima di
accenderlo.
Se le batterie sono completamente scariche,
attendete qualche minuto prima di accendere
l’apparecchio.
Modalità d’uso dell’apparecchio
assicuratevi che i capelli siano puliti e asciutti. Non
utilizzate l’apparecchio con i capelli ancora bagnati.
1 Pettinate i capelli nella direzione di
crescita (fig. 3).
Come tagliare i capelli usando il pettine
regolacapelli
Scegliete il pettine da usare in base alla
lunghezza dei capelli desiderata. La lunghezza
ottenuta dopo il taglio viene indicata in mm
sul pettine regolacapelli. La lunghezza dei
capelli selezionata (1-5) viene visualizzata
sui display di indicazione della lunghezza su
entrambi i lati del selettore (fig. 4).
Consultate la tabella riportata in basso per un
riepilogo delle impostazioni e della lunghezza
corrispondente per ciascun pettine.
,
Pettine
piccolo
Pettine
grande
impostazione
lunghezza
capelli
impostazione
lunghezza
capelli
1
3
mm/0,12”
1
13
mm/0,51”
2
5
mm/0,20”
2
15
mm/0,59”
3
7
mm/0,28”
3
17
mm/0,67”
4
9
mm/0,35”
4
19
mm/0,75”
5
11
mm/0,43”
5
21
mm/0,83”
1 Inserite il pettine sulla testina girevole
(“clic”) (fig. 5).
Assicuratevi che il pettine scatti correttamente in
posizione.
2 Impostate la lunghezza dei capelli desiderata
premendo il pulsante di sgancio del selettore
lunghezza (1) e ruotandolo verso sinistra o
destra (2). (fig. 6)
Non ruotate il selettore lunghezza oltre
l’impostazione massima (5).
3 Accendete l’apparecchio.
Uso della testina girevole
,
Rispetto alla posizione iniziale di 0° (rivolta
in avanti), potete ruotare la testina di 45° o
90° verso destra o sinistra. In questo modo,
è possibile dirigere la posizione del blocco
lame verso i capelli da tagliare facilitando
l’operazione. (fig. 7)
1 Impostate il blocco lame sulla posizione
desiderata ruotando la testina girevole fino a
farla scattare in posizione. (fig. 8)
Regolate la posizione del blocco lame sempre in
combinazione con la testina girevole. Non ruotate
il blocco lame o il pettine.
non ruotate la testina girevole oltre i 90° verso
destra o sinistra.
,
-
La testina girevole consente di impugnare
e utilizzare l’apparecchio come una
spazzola. (fig. 9)
Consigli
Si consiglia di iniziare a tagliare i capelli con il
pettine grande, riducendo progressivamente la
lunghezza.
Estraete il pettine regolacapelli per rimuovere
i capelli accumulatisi. Rimuovendo il pettine, la
lunghezza impostata viene modificata.
Prendete nota delle impostazioni di lunghezza
utilizzate per un determinato taglio come
promemoria per le sessioni successive.
1 Passare il regolacapelli con movimenti lenti.
, I capelli crescono in direzioni differenti a
seconda della zona della testa. È possibile
che sia necessario utilizzare il regolacapelli in
diverse direzioni (verso l’alto, verso il basso o
trasversalmente) (fig. 10).
, Per ottenere un risultato ottimale, utilizzate
l’apparecchio in senso opposto rispetto alla
crescita dei peli.
2 Ruotate la testina girevole nella posizione più
comoda a seconda della zona interessata.
3 Per ottenere un taglio uniforme, assicuratevi
che la parte piatta del pettine regolacapelli sia
sempre a contatto con il cuoio capelluto.
Come tagliare i capelli senza pettine
regolacapelli
Potete utilizzare il regolacapelli senza il pettine per
ottenere capelli molto corti (0,8 mm) o rifinire i
contorni della nuca e la zona intorno alle orecchie.
Nota utilizzando il regolacapelli senza il pettine, i
capelli verranno tagliati molto vicino al cuoio capelluto.
1 Togliete il pettine estraendolo dalla testina
girevole (fig. 11).
Non tirate mai la parte flessibile del pettine ma
estraetelo dalla parte inferiore.
2 Quando rifinite la zona intorno alle orecchie,
tagliate solo le punte dei capelli (fig. 12).
3 Per rifinire il contorno della nuca e le basette,
ruotate il regolacapelli e passatelo dall’alto
verso il basso (fig. 13).
4 Effettuate movimenti lenti e uniformi
seguendo la linea naturale dei capelli.
5 Regolate la posizione della testina girevole
per rifinire i contorni più facilmente.
4/9
Uso del rifinitore di precisione
Il rifinitore di precisione consente di definire
i contorni della nuca e della zona intorno alle
orecchie in maniera più semplice e precisa.
1 Controllate che l’apparecchio sia spento.
2 Togliete il pettine estraendolo dalla testina
girevole. (fig. 11)
3 Esercitate una lieve pressione al centro del
blocco lame per aprirlo. Estraete il gruppo
lame dalla testina girevole (fig. 14).
4 Inserite la linguetta del rifinitore di precisione
nella fessura e premete il rifinitore sulla
testina girevole (“clic”). (fig. 15)
3 Rimuovete le batterie estraendole
dall’apparecchio. (fig. 22)
4 Tagliate i cavi con un comune paio di forbici
e smaltite correttamente le batterie.
Garanzia e assistenza
Per assistenza o informazioni e in caso di
problemi, visitate il sito Web Philips all’indirizzo
www.philips.com oppure contattate il Centro
Assistenza Clienti Philips del vostro paese (per
conoscere il numero di telefono consultate
l’opuscolo della garanzia). Se nel vostro paese non
esiste un Centro Assistenza Clienti, rivolgetevi al
vostro rivenditore Philips.
Pulizia
non pulite l’apparecchio con detergenti abrasivi,
spugnette o liquidi come alcool, benzina o
acetone.
pulite l’apparecchio e l’adattatore solo con la
spazzola fornita in dotazione.
Fate attenzione a non far cadere il blocco lame a
terra.
1 Pulite l’apparecchio dopo ogni utilizzo.
2 Verificate che l’apparecchio sia spento e
scollegato dalla presa di corrente prima di
pulirlo.
3 Rimuovete il pettine regolacapelli (fig. 11).
4 Esercitate una lieve pressione al centro del
blocco lame per aprirlo. Estraete il gruppo
lame dalla testina girevole (fig. 14).
5 Pulite il blocco lame con la spazzola fornita in
dotazione (fig. 16).
6 Pulite la testina girevole con la spazzola
fornita in dotazione (fig. 17).
7 Inserite la linguetta del gruppo lame nella
fessura e premete il gruppo lame sulla testina
girevole (“clic”) (fig. 18).
L’apparecchio non necessita di lubrificazione.
Sostituzione
Sostituite il blocco lame danneggiato o usurato solo
con un pezzo originale Philips.
Tutela dell’ambiente
Rimozione delle batterie
rimuovete le batterie solo al momento dello
smaltimento dell’apparecchio. Prima di rimuoverle,
assicuratevi che siano completamente scariche.
dopo aver rimosso le batterie, non collegate
l’apparecchio alla presa di corrente.
-
-
Per contribuire alla tutela dell’ambiente,
non smaltite l’apparecchio insieme ai rifiuti
domestici ma consegnatelo a un centro di
raccolta ufficiale (fig. 19).
Le batterie ricaricabili integrate contengono
sostanze potenzialmente nocive per l’ambiente.
Rimuovete sempre le batterie prima di smaltire
l’apparecchio e consegnarlo a un centro di
raccolta ufficiale. Smaltite le batterie in un
apposito centro di raccolta. In caso di difficoltà
durante la rimozione delle batterie, consegnate
l’apparecchio a un centro di assistenza Philips,
che si occuperà della rimozione e del corretto
smaltimento dell’apparecchio (fig. 20).
1 Scollegare l’apparecchio dalla presa di
corrente e lasciarlo in funzione fino al
completo arresto.
2 Rimuovete la parte superiore
dell’alloggiamento dell’apparecchio (fig. 21).
4203.000.5531.3
5/9