1
Bluetooth Car-Kit
HCC-250
Bedienungsanleitung
User Manual
Mode d'emploi
Manual de instrucciones
Gebruiksaanwijzing
Instruções
Manuale d'uso
•
Deutsch
•
English
•
Français
•
Español
•
Nederlands
•
Português
•
Italiano
BEDIENUNGSANLEITUNG
Bluetooth Car-Kit HCC-250
INHALT
1.
2.
3.
Einführung ....................................................................................................................... 2
Lieferumfang ..................................................................................................................... 2
Benutzung des HCC-250 Car-Kits.................................................................................. 3
2.1. Laden des Akku........................................................................................................
2.2. Installation Ihres HCC-250 Car-Kits........................................................................ 4
2.3. Ein- und Ausschalten des HCC-250 Car-Kit ........................................................... 4
2.4. Koppeln und Verbinden des Car-Kit’s mit einem anderen Bluetooth Gerät ............ 5
2.4.1 Koppeln (Pairen) Ihres HCC-250 mit einem Bluetooth Mobiltelefon ........... 5
(oder anderes Gerät) ............................................................................................ 5
2.4.2 Löschen aller Kopplungsinformationen........................................................ 5
2.4.3 Verbinden des HCC-250 Car-Kit mit dem Bluetooth Gerät......................... 5
2.5. Anruf-Funktionen .................................................................................................... 6
2.5.1. Standard Anruf Funktionen .......................................................................... 6
2.5.2. Stummschaltung (Mute)............................................................................... 6
2.5.3. Übertragen eines Gesprächs zwischen Car-Kit und Mobiltelefon ................ 6
2.5.4. Sprachwahl .................................................................................................. 6
2.5.5. Erweiterte Anruffunktionen........................................................................... 6
2.6
Audiowiedergabe (A2DP Profil) .............................................................................. 6
2.6.1 Verbinden eines Mobiltelefons mit A2DP Profil ............................................ 7
2.6.2 Fernbedienungs-Funktionen (AVRCP Profil) ................................................ 7
2.7 Einstellen der Lautstärke .............................................................................. 7
2.8 Koppeln und Verbinden des Car-Kits mit anderen Bluetooth Geräten.......... 7
Kurzanleitung .................................................................................................................. 7
3.1 LED Statusanzeige ....................................................................................... 7
3.2 Kurzanleitung................................................................................................ 8
Fehlerbehebung .............................................................................................................. 11
Zusätzlicher Hinweis ....................................................................................................... 11
Sicherheitshinweise......................................................................................................... 12
Seite 2
1. EINFÜHRUNG
Bluetooth Car-Kit
Dieses Bluetooth Car-Kit wurde entwickelt, um Telefonate mit Ihrem Handy führen zu können, ohne das Mobiltelefon am Ohr zu halten. Durch die
Verwendung der Bluetooth Technologie verbindet sich das Car-Kit drahtlos mit Ihrem Mobiltelefon oder PDA. Das Car-Kit kann auch außerhalb des
Fahrzeugs, z.B. in einer Büroumgebung als mobile Freisprecheinrichtung eingesetzt werden und lässt sich auch für Voice over IP Anwendungen (VoIP) wie
beispielsweise Skype in Verbindung mit einem PC verwenden.
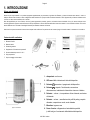
Bitte überprüfen Sie zunächst, ob alle nachfolgenden Komponenten im Lieferumfang enthalten waren. Falls nicht, kontaktieren Sie umgehend den Fachhändler,
bei dem Sie das Produkt erworben haben.
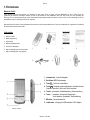
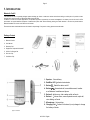
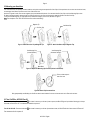
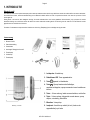
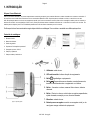
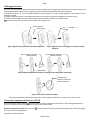
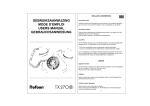
Lieferumfang
1. Bluetooth Car-Kit
2. Bedienungsanleitung
3. Garantiekarte
4. Beiblatt (WichtigeHinweise)
5. 12/24V KFZ Ladeadapter
6. Klipp zur Befestigung an der Sonnenblende
1.
2.
3.
4.
7. Klipp zur Befestigung am Lüftungsschlitz
5.
6.
7.
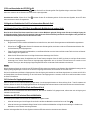
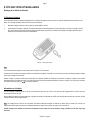
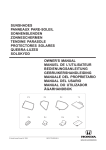
1. Lautsprecher:Audio-Wiedergabe
2. Rote/blaue LED: Statusanzeige
3. Taste :Car-Kit ein-/ausschalten
4. Taste
: Gespräch annehmen/beenden, verbinden/trennen,
Gespräch zwischen Telefon und Car-Kit wechseln
5. Taste ╋:Lautstärke, Wahlwiederholung, Stummschaltung
6. Taste ━:Lautstärke, löschen aller Kopplungen,
Anruf ablehnen, Sprachwahl, Stummschaltung
7. Mikrofon:Nimmt Sprache auf
8. Ladebuchse:Eingang für USB-Ladekabel / KFZ-Adapter
Abbildung 1: Übersicht
Deutsch – HCC-250
Seite 3
2. BENUTZUNG DES HCC-250 CAR-KITS
Laden und Verwendung des Akku
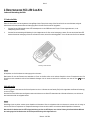
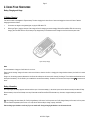
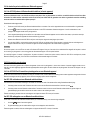
2.1 Laden des Akku
Dieses Car-Kit wird über einen fest eingebauten, leistungsfähigen Lithium-Polymer Akku versorgt. Wenn Sie das Car-Kit zum ersten Mal laden, beträgt die
Ladezeit etwa vier Stunden; danach dauert der Ladevorgang etwa 2-3 Stunden. Der Akku wird wie folgt geladen:
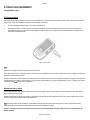
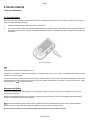
1.
Verbinden Sie das USB Ladekabel mit dem KFZ Ladeadapter oder mit der USB Buchse eines PCs (der PC muss eingeschaltet sein, um die
Ladespannung liefern zu können).
2.
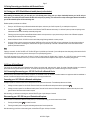
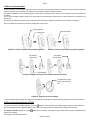
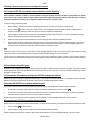
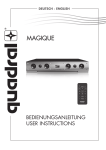
Verbinden Sie das Ladekabel gemäß Abbildung 2 mit der Ladebuchse des Car-Kits, um den Ladevorgang zu starten. Die rote und die blaue Status LED
leuchten während des Ladevorgangs. Wenn die rote Status-LED erlischt, ist der Akku vollständig geladen. Trennen Sie dann das Car-Kit vom Ladekabel.
Abbildung 2: Laden des Akkus
Hinweis:
Wir empfehlen, das Car-Kit während des Ladevorgangs nicht zu benutzen.
Bitte beachten Sie, dass das Einstecken des Ladekabels ein “Reset” des Car-Kits auslöst und ein laufendes Gespräch in diesem Fall unterbrochen wird. Das
gedrückt
Gespräch wird dann automatisch zurück auf das Mobiltelefon übertragen. Um sich wieder mit dem Car-Kit zu verbinden, muss kurz die Taste
werden.
Akku Information
Mit dem voll geladenen Akku bietet das Car-Kit eine Sprechzeit von bis zu 14 Stunden oder eine Standby Zeit (Car-Kit eingeschaltet ohne Bluetooth Verbindung)
von bis zu 25 Tagen.
Wenn das Car-Kit alle 20 Sekunden einen Signalton sendet und die blaue und rote Status LED abwechselnd alle 3 Sekunden aufleuchten, muss der Akku wie
oben beschrieben wieder neu aufgeladen werden.
Hinweis:
Übermäßiges Laden des Akkus reduziert dessen Kapazität und Lebensdauer. Wenn ein vollgeladener Akku nicht benutzt wird, reduziert sich die Ladung im
Laufe der Zeit. Extreme Temperaturen und Temperaturschwankungen können dem Akku schaden und reduzieren ebenfalls Kapazität und Lebensdauer.
Bitte laden Sie Ihr Headset bzw. Ihre KFZ Freisprecheinrichtung nur über den KFZ-Adapter, wenn sich das Fahrzeug im Stillstand befindet. Während
des Ladevorgangs darf das Headset bzw. die KFZ Freisprecheinrichtung nicht eingeschaltet sein.
Deutsch – HCC-250
Seite 4
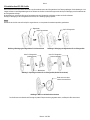
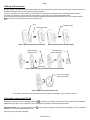
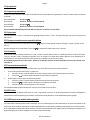
2.2 Installation Ihres HCC-250 Car-Kits
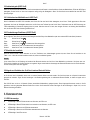
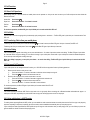
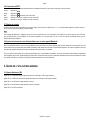
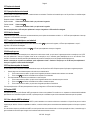
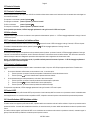
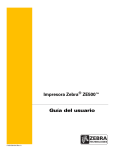
Das HCC-250 Car-Kit lässt sich einfach und schnell an der Sonnenblende oder an den Lüftungsschlitzen Ihres Fahrzeugs befestigen. Wie die Abbildungen 3 und
4 zeigen, befinden sich zwei Magnethalterungen auf der Rückseite des Car-Kits. An diese Halterungen werden die Klips zur Befestigung an der Sonneblende oder
den Lüftungsschlitzen befestigt.
Wir empfehlen Ihnen, zunächst den Klipp an der Sonnenblende oder den Lüftungsschlitz zu befestigen und dann das Car-Kit aufzusetzen.
Den Klipp zur Befestigung an den Lüftungsschlitzen können Sie, wie in Abbildung 5 gezeigt, anpassen.
Hinweis:
Das Mikrofon des Car-Kits sollte auf Ihren Kopf hin ausgerichtet sein, um eine optimale Kommunikationsqualität zu gewährleisten.
Magnethalter
Klip für Lüftungsschlitz
Klip für Sonnenblende
Abbildung 3: Befestigung des Magnethalters für die Sonnenblende
Halter für Lüftungsschlitz
(vertikal anpassen)
Abbildung 4: Befestigung des Magnethalters für den Lüftungsschlitz
Halter für Lüftungsschlitz
(horizontal anpassen)
Metallschiene
Abbildung 5: Anpassung des Halters für den Lüftungsschlitz (Vertikal oder horizontal)
Etwas nach vorne ziehen
und dann herunter drücken
Abbildung 6: Halter von der Metallschiene abnehmen
Das Car-Kit kann auch außerhalb des Fahrzeugs als portable Freisprecheinrichtung eingesetzt werden, zum Beispiel im Büro oder zuhause.
Deutsch – HCC-250
2.3 Ein- und Ausschalten des HCC-250 Car-Kit
Einschalten des Car-Kit’s: Drücken Sie die Taste
und halten Sie diese für drei Sekunden gedrückt. Zwei Signaltöne erklingen und die blaue LED blinkt
dreimal kurz und danach alle drei Sekunden einmal. Das Car-Kit ist jetzt eingeschaltet.
Ausschalten des Car-Kit’s: Drücken Sie die Taste
dreimal und danach ist das Car-Kit ausgeschaltet.
und halten Sie diese für drei Sekunden gedrückt. Sie hören dann zwei Signaltöne, die rote LED blinkt
2.4 Koppeln und Verbinden des Car-Kit’s mit einem anderen Bluetooth Gerät
2.4.1 Koppeln (Pairen) Ihres HCC-250 mit einem Bluetooth Mobiltelefon (oder anderes Gerät)
Bevor Sie das Car-Kit zum Telefonieren nutzen können, muss es mit dem Mobiltelefon gekoppelt (Pairing) werden. Dies ist ein einmaliger Vorgang, der
die Verbindung zwischen Telefon und Car-Kit autorisiert. Dabei speichert das Telefon die Kennung des HCC-250 und ermöglicht so eine gesicherte und
verschlüsselte Verbindung zwischen dem Car-Kit und Ihrem Telefon.
Die Kopplung wird wie folgt vorgenommen:
1.
Bringen Sie das HCC-250 in die Nähe des Mobiltelefons und stellen Sie sicher, dass das Car-Kits ausgeschaltet und das Mobiltelefon eingeschaltet ist.
2.
und halten Sie diese für mindestens sechs Sekunden gedrückt, bis die blaue und die rote LED abwechselnd aufleuchten. Das
Drücken Sie die Taste
Car-Kit befindet sich jetzt im Kopplungsmodus.
3.
Folgen Sie jetzt den Anweisungen Ihres Mobiltelefons, um nach Bluetooth Geräten zu suchen. Nach einer Weile wird das Telefon eine Liste von Bluetooth
Geräten anzeigen, die es gefunden hat.
4.
Wählen Sie HCC-250 aus dieser Liste aus und folgen Sie den weiteren Anweisungen Ihres Telefons.
5.
Im Laufe der Installation werden Sie aufgefordert einen PIN oder Passkey einzugeben. Geben Sie “0000” (Vier Nullen) ein und folgen Sie den weiteren
Anweisungen Ihres Telefons. Danach sollte der Kopplungsvorgang abgeschlossen sein und die blaue LED blinkt dreimal kurz innerhalb von zwei
Sekunden. Dies zeigt an, dass die Kopplung erfolgreich abgeschlossen wurde und die beiden Geräte miteinander verbunden sind.
Hinweis:
Wenn die Kopplung erfolgreich war, erlischt die rote LED. Die blaue LED blinkt dreimal kurz innerhalb von zwei Sekunden. Wenn Ihr Mobiltelefon anzeigt, dass die
Kopplung (Pairing) fehlgeschlagen ist und sich das Car-Kit noch im Kopplungsmodus befindet, dann wiederholen Sie die Schritte 3 bis 5.
Das Car-Kit verbleibt etwa zwei Minuten im Kopplungsmodus. Wenn die Kopplung nicht innerhalb von zwei Minuten abgeschlossen ist, wechselt das HCC-250 in
den Standby-Modus (ohne Bluetooth Verbindung). Um das Car-Kit wieder in den Kopplungsmodus zu versetzen, müssen Sie es zunächst ausschalten und dann
die Schritte 2-5 wiederholen.
2.4.2 Löschen aller Kopplungsinformationen
Dieses Car-Kit kann mit bis zu 8 Bluetooth Geräten gekoppelt werden. Um alle Kopplungsinformationen zu löschen, drücken Sie die – Taste für mindestens drei
Sekunden, während sich das Car-Kit im Kopplungsmodus befindet. Der Kopplungsmodus wird dann beendet und die blaue LED blinkt einmal alle drei Sekunden.
2.4.3 Verbinden des HCC-250 Car-Kit mit dem Bluetooth Gerät
Wenn das Car-Kit mit einem Bluetooth Gerät benutzt werden soll, dass über das Handsfree Profil gekoppelt wurde, müssen diese nach der Kopplung auch
miteinander verbunden werden.
Verbinden des HCC-250 mit einem Bluetooth Mobiltelefon
Die Verbindung kann entweder vom Car-Kit oder vom Mobiltelefon aus aufgebaut werden:
.
1.
Aufbau der Verbindung vom Car-Kit: Bringen Sie das Car-Kit in die Nähe des Mobiltelefons und drücken Sie kurz die Taste
2.
Aufbau der Verbindung vom Mobiltelefon: Bringen Sie das Car-Kit in die Nähe des Mobiltelefons und folgen Sie den Anweisungen im Handbuch des
Mobiltelefons, um eine Bluetooth Verbindung aufzubauen.
Nach dem Verbindungsaufbau hören Sie einen Signalton und die blaue LED blinkt dreimal kurz innerhalb von zwei Sekunden.
Seite 6
Trennen der Verbindung zwischen HCC-250 und dem Mobiltelefon
Wenn das Car-Kit mit dem Telefon verbunden ist, lässt sich diese Verbindung wie folgt trennen:
und halten Sie diese für mindestens drei Sekunden gedrückt.
1.
Vom Car-Kit: Drücken Sie die Taste
2.
Vom Mobiltelefon: Folgen Sie den Anweisungen im Handbuch des Mobiltelefons.
Das Trennen der Verbindung wird durch einen Signalton bestätigt und die blaue LED blinkt einmal in drei Sekunden.
2.5 Anruf-Funktionen
2.5.1 Standard Anruf Funktionen
Überprüfen Sie, dass Ihr Mobiltelefon und das HCC-250 Car-Kit eingeschaltet sind, bevor Sie es zum Telefonieren verwenden. Beide Geräte müssen über
Bluetooth miteinander verbunden sein (siehe 2.4.3).
Rufannahme: Drücken Sie kurz die Taste
.
Anruf abweisen: Drücken Sie die Taste – und halten Sie diese für mindestens drei Sekunden gedrückt.
Anruf beenden: Drücken Sie kurz die Taste
.
Wahlwiederholung: Drücken Sie die Taste + und halten Sie diese für mindestens drei Sekunden gedrückt.
Während der oben beschriebenen Funktionen leuchtet die blaue LED dreimal kurz innerhalb von zwei Sekunden und die rote LED bleibt aus.
2.5.2 Stummschaltung (Mute)
Sie können während eines Gespräch durch kurzes gleichzeitiges Drücken der + und – Taste die Stummschaltung aktivieren. Drücken Sie die beiden Tasten
nochmals, um die Stummschaltung wieder aus zuheben.
2.5.3 Übertragen eines Gesprächs zwischen Car-Kit und Mobiltelefon
Um ein laufendes Gespräch vom Car-Kit auf das Telefon zu übertragen, drücken Sie die Taste
Die blaue LED blinkt einmal alle drei Sekunden und die rote LED bleibt dunkel.
Um ein laufendes Gespräch vom Mobiltelefon auf das Car-Kit zu übertragen, drücken Sie die Taste
Sekunden.
und halten Sie diese für mindestens drei Sekunden gedrückt.
. Die blaue LED leuchtet dreimal kurz innerhalb von zwei
2.5.4 Sprachwahl
Wenn das verbundene Mobiltelefon die Funktion Sprachwahl unterstützt, dann können Sie diese durch Drücken der Taste – für mindestens drei Sekunden
aktivieren. Die blaue LED leuchtet dann dreimal kurz innerhalb von zwei Sekunden. Bevor Sie die Sprachwahl verwenden können, müssen Sie zunächst die
Sprachbefehle in Ihrem Mobiltelefon aktiviert haben. Folgen Sie dazu den Anweisungen im Handbuch Ihres Mobiltelefons.
Wenn Sie die Sprachwahl unterbrechen wollen, dann drücken Sie kurz die Taste – .
2.5.5 Erweiterte Anruffunktionen
Wenn Ihr Mobiltelefon und Ihr Provider/Carrier die Konferenz-Schaltung (3-way call) unterstützen, dann können Sie diese ebenfalls mit Ihrem HCC-250 Car-Kit
nutzen:
1.
Wenn während eines Gesprächs ein weiterer Anruf hereinkommt:
1)
Drücken Sie die Taste + für mindestens drei Sekunden, um das erste Gespräch zu halten und das zweite Gespräch anzunehmen.
, um den ersten Anruf zu beenden und das zweite Gespräch anzunehmen.
2)
Drücken Sie die Taste
2.
Wenn zwei Anrufe gleichzeitig geführt werden und eines aktiv und das andere wartend/stumm geschaltet (hold/Mute) ist, dann können Sie die folgenden
Funktionen nutzen:
und halten Sie diese für mindestens drei Sekunden gedrückt, um zwischen den beiden Gesprächen zu wechseln.
1)
Drücken Sie die Taste
, um das aktive Gespräch zu beenden und auf das wartende Gespräch zu wechseln.
2)
Drücken Sie Taste
3)
Drücken Sie die Taste – für mindestens drei Sekunden, um eine Konferenz zu beginnen.
Deutsch – HCC-250
Seite 7
2.6 Audiowiedergabe (A2DP Profil)
Dieses Car-Kit unterstützt das Bluetooth A2DP Profil und kann dadurch Audio-Dateien in hoher Qualität von Quellen wie Mobiltelefonen, PDAs oder MP3-Playern
wiedergeben. Da das Car-Kit nur über einen Lautsprecher verfügt, erfolgt die Wiedergabe in Mono. Die Audio Quelle muss ebenfalls über das A2DP Profil
(Source) verfügen.
2.6.1 Verbinden eines Mobiltelefons mit A2DP Profil
Wenn Ihr Mobiltelefon das A2DP Profil unterstützt, dann können Sie über das Car-Kit Musik wiedergeben, die auf Ihrem Telefon gespeichert ist. Bei einem
eingehenden Anruf wird die Wiedergabe unterbrochen und Sie können das Telefonat über das Car-Kit führen. Üblicherweise wird die A2DP Verbindung vom
Telefon selbstständig im Rahmen der Kopplung (siehe 2.4) erstellt. Sollte dies nicht der Fall sein, dann schlagen Sie bitte in der Anleitung Ihres Mobiltelefons
nach, wie Sie eine A2DP Audio Verbindung erstellen können.
2.6.2 Fernbedienungs-Funktionen (AVRCP Profil)
Mit den folgenden Tasten können Sie während der Wiedergabe den Musik-Player Ihres Mobiltelefons (oder einer anderen A2DP Audio Quelle) fernsteuern:
Play:
Drücken Sie die Taste
Pause:
Stopp:
Drücken Sie die Taste
Halten Sie die Taste
.
Vorlauf:
Rücklauf:
Halten Sie die Taste + für mindestens drei Sekunden gedrückt.
Halten Sie die Taste – für mindestens drei Sekunden gedrückt.
.
für mindestens drei Sekunden gedrückt.
2.7 Einstellen der Lautstärke
Wenn das Car-Kit mit dem Telefon verbunden ist und zum Telefonieren bzw. Audiowiedergabe genutzt wird, dann können Sie die Lautstärke mit den
Tasten + und – . Wenn die maximale Lautstärke erreicht wird, ertönt ein zusätzlicher Signalton.
Hinweis:
In den meisten Fällen ist die Einstellung der Lautstärke über Bluetooth zwischen dem Car-Kit und Ihrem Mobiltelefon synchronisiert. Sie können dann vom
Telefon aus die Lautstärke des Car-Kits einstellen und umgekehrt. Wegen unterschiedlicher Umsetzungen des Bluetooth Standards durch die Telefon-Hersteller
ist diese Funktion jedoch nicht immer gegeben.
2.8 Koppeln und Verbinden des Car-Kits mit anderen Bluetooth Geräten
Ihr Car-Kit kann über Ihr Mobiltelefon hinaus auch mit anderen Bluetooth Geräten verbunden werden. Das Car-Kit wird dazu wie in Kapitel 2.4 beschrieben
gekoppelt und verbunden. Folgen Sie den Anweisungen in der Bedienungsanleitung des zu verbindenden Bluetooth Gerätes, um dieses zu koppeln und zu
verbinden.
Das HCC-250 kann mit bis zu 8 Bluetooth Geräten (einschließlich Mobiltelefonen) gekoppelt werden. Diese Kopplungs-Informationen werden im Car-Kit
gespeichert. Jedes der gekoppelten Bluetooth Geräte kann mit dem Car-Kit verbunden werden. Bitte folgen Sie den Anweisungen in Kapitel 2.4.3, um eine
Bluetooth Verbindung aufzubauen.
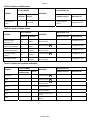
3. KURZANLEITUNG
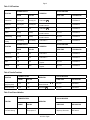
3.1 LED Statusanzeige
z
LED Blinkfolge 1: Blaue LED blinkt einmal in drei Sekunden, rote LED ist aus.
z
LED Blinkfolge 2: Blaue LED blinkt dreimal kurz innerhalb von zwei Sekunden, rote LED ist aus.
z
LED Blinkfolge 3: Blaue und rote LED blinken abwechselnd.
z
LED Blinkfolge 4: Blaue und rote LEDs blinken abwechselnd alle drei Sekunden.
z
LED Blinkfolge 5: Alle LEDs sind aus.
Deutsch – HCC-250
Seite 8
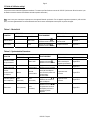
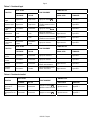
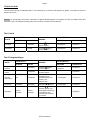
3.2 Kurzanleitung
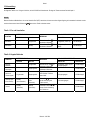
Die folgenden Tabellen 1 bis 7 zeigen in Kurzform, wie Ihr HCC-250 Car-Kit bedient wird. Die Lage der Tasten entnehmen Sie bitte Kapitel 1.
Hinweis:
Bluetooth Geräte und Mobiltelefone, die nur das Handsfree Profil (HFP) unterstützen, können trotz vorher erfolgter Kopplung nicht automatisch verbunden werden
sondern müssen manuell durch Drücken der
Taste mit dem Telefon verbunden werden.
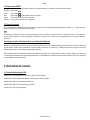
Tabelle 1: Ein- und Ausschalten
BETRIEBSZUSTAND
HCC-250 STATUS MELDUNGEN
FUNKTION
BEDIENUNG
TELEFON
HCC-250
SIGNALTON
LED STATUS
Einschalten
Ausgeschaltet
für
Drücken Sie die Taste
mindestens 3 Sekunden.
2 Signaltöne (Power Up)
LED Blinkfolge 1
Ausschalten
Standby
für
Drücken Sie die Taste
mindestens 3 Sekunden.
2 Signaltöne (Power
Down)
LED Blinkfolge 5
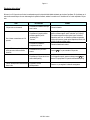
Tabelle 2: Koppeln/Verbinden
FUNKTION
BETRIEBSZUSTAND
TELEFON
Kopplung
aktivieren
Löschen aller
Kopplungen
Car-Kit mit
Telefon koppeln
BEDIENUNG
HCC-250
Ausgeschaltet
Kopplungsmode
Eingeschaltet
Kopplungsmode
Verbinden (CarKit mit Telefon)
Standby
(nicht verbunden)
Standby
(nicht
verbunden)
Trennen
Standby
(verbunden)
Standby
(verbunden)
für
Drücken Sie die Taste
mindestens 6 Sekunden.
Drücken Sie die Taste – für
mindestens 3 Sekunden
Folgen Sie dem Handbuch
Ihres Telefons. PIN Code
lautet “0000”
oder bauen
Drücken Sie
Sie die Verbindung vom
Telefon aus auf.
für
Drücken Sie die Taste
mindestens 3 Sekunden oder
trennen Sie die Verbindung
vom Telefon aus.
Deutsch – HCC-250
HCC-250 STATUS MELDUNGEN
SIGNALTON
LED STATUS
2 Signaltöne (Power Up) und
1 Kopplungssignal
LED Blinkfolge 3
LED Blinkfolge 1
1 Kopplungssignal
LED Blinkfolge 2
1 Verbindungssignal
LED Blinkfolge 2
LED Blinkfolge 1
Seite 9
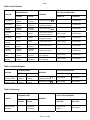
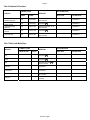
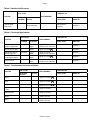
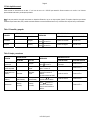
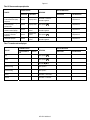
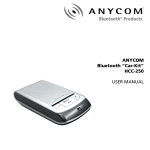
Tabelle 3: Anruf-Funktionen
BETRIEBSZUSTAND
HCC-250 STATUS MELDUNGEN
FUNKTION
BEDIENUNG
TELEFON
HCC-250
Ruf annehmen
Eingehendes
Telefonat
Eingehendes
Telefonat
Drücken Sie die Taste
SIGNALTON
LED STATUS
LED Blinkfolge 2
Ruf abweisen
Eingehendes
Telefonat
Eingehendes
Telefonat
Drücken Sie die Taste ━ für
mindestens 3 Sekunden
LED Blinkfolge 2
Telefonat
beenden
Laufendes
Telefonat
Laufendes
Telefonat
Drücken Sie die Taste
LED Blinkfolge 2
Wahlwiederholung
Standby
Standby
Drücken Sie die Taste + für
mindestens 3 Sekunden
Tasten / Wahlton
LED Blinkfolge 2
Sprachwahl
Standby
Standby
Drücken Sie die Taste ━ für
mindestens 3 Sekunden
Tasten / Wahlton
LED Blinkfolge 2
Sprachwahl
abbrechen
Wählen
Wählen
Drücken Sie die Taste ━
Tasten / Wahlton
LED Blinkfolge 2
Lautstärke
erhöhen
Laufendes
Telefonat
Laufendes
Telefonat
Drücken Sie die Taste +
Lautstärke
reduzieren
Laufendes
Telefonat
Laufendes
Telefonat
Drücken Sie die Taste ━
Stummschaltung
(Mute)
Laufendes
Telefonat
Laufendes
Telefonat
Drücken Sie die Tasten ━
und + gleichzeitig
Tasten / Wahlton
LED Blinkfolge 2
Stummschaltung
beenden
Laufendes
Telefonat
Stumm
geschaltet
Drücken Sie die Tasten ━
und + gleichzeitig
Tasten / Wahlton
LED Blinkfolge 2
LED Blinkfolge 2
LED Blinkfolge 2
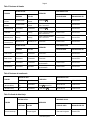
Tabelle 4: Gespräche übergeben
BETRIEBSZUSTAND
FUNKTION
Gespräch übergeben
(Car-Kit an Telefon)
Gespräch übergeben
(Telefon an Car-Kit)
HCC-250 STATUS MELDUNGEN
BEDIENUNG
TELEFON
HCC-250
Laufendes
Telefonat
Laufendes
Telefonat
Laufendes
Telefonat
Laufendes
Telefonat
Drücken Sie die Taste
mindestens 3 Sekunden
Drücken Sie die Taste
für
SIGNALTON
LED STATUS
Tasten / Wahlton
LED Blinkfolge 1
Tasten / Wahlton
LED Blinkfolge 2
Tabelle 5: Akku-Anzeige
BETRIEBSZUSTAND
FUNKTION
TELEFON
Warnung: Niedriger
Akku-Stand
HCC-250 STATUS MELDUNGEN
BEDIENUNG
HCC-250
SIGNALTON
LED STATUS
Eingeschaltet
oder Standby
Signalton alle 20
Sekunden
LED Blinkfolge 4
Deutsch – HCC-250
Seite 10
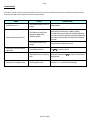
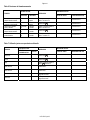
Tabelle 6: Erweiterte Anruffunktionen
BETRIEBSZUSTAND
FUNKTION
Laufendes Gespräch
halten, eingehendes
Gespräch annehmen
Laufendes Gespräch
beenden, eingehendes
Gespräch annehmen
Wechseln zwischen den
beiden Gesprächen
Laufendes Gespräch
beenden und wartendes
Gespräch annehmen
Konferenzschaltung
HCC-250 STATUS MELDUNGEN
BEDIENUNG
TELEFON
TELEFON
SIGNALTON
LED STATUS
Laufendes
Telefonat
Eingehendes
Gespräch
wartet
Eingehendes
Gespräch
wartet
Ein Gespräch
wartet (Hold)
Laufendes
Telefonat
Ein Gespräch
wartet (Hold)
Drücken Sie die Taste
LED Blinkfolge 2
Laufendes
Telefonat
Ein Gespräch
wartet (Hold)
Drücken Sie die Taste – für
mindestens 3 Sekunden
LED Blinkfolge 2
Laufendes
Telefonat
Laufendes
Telefonat
Drücken Sie die Taste + für
mindestens 3 Sekunden
LED Blinkfolge 2
Drücken Sie die Taste
LED Blinkfolge 2
Drücken Sie die Taste + für
mindestens 3 Sekunden
LED Blinkfolge 2
Tabelle 7: Fernbedienung für Audio Player
BETRIEBSZUSTAND
HCC-250 STATUS MELDUNGEN
FUNKTION
BEDIENUNG
AUDIOPLAYER
Play
HCC-250
SIGNALTON
Keine Wiedergabe
Drücken Sie die Taste
Pause
Wiedergabe
Drücken Sie die Taste
Stopp
Wiedergabe
Drücken Sie die Taste
mindestens 3 Sekunden
Lautstärke erhöhen
Wiedergabe
Drücken Sie die Taste +
Lautstärke reduzieren
Wiedergabe
Drücken Sie die Taste –
Vorlauf
Wiedergabe
Rücklauf
Wiedergabe
Drücken Sie die Taste +
für 3 Sekunden
Drücken Sie die Taste –
für 3 Sekunden
Deutsch – HCC-250
für
LED STATUS
Seite 11
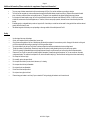
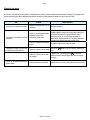
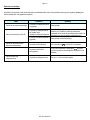
Fehlerbehebung
Falls Probleme beim Betrieb Ihres Car-Kit auftreten, dann folgen Sie bitte den nachstehenden Hinweisen. Sollten sich die Probleme damit nicht beheben lassen,
dann kontaktieren Sie bitte die Verkaufsstelle, bei der Sie das Car-Kit erworben haben oder unseren technischen Support.
Status
Car-Kit lässt sich nicht einschalten
Car-Kit lässt sich nicht benutzen
Koppeln (Pairen) zwischen Car-Kit und
Mobiltelefon nicht möglich
Lautsprecher zu laut oder zu leise
Überprüfen
Korrektur-Maßnahme
Überprüfen Sie, ob der Akku
geladen ist
Laden Sie das Car-Kit über den KFZ-Adapter.
Prüfen Sie, ob Ihr Mobiltelefon eine
Bluetooth Schnittstelle hat, diese
eingeschaltet ist und ob die Profile
“Handsfree” oder “Headset” unterstützt
werden.
Lesen Sie die entsprechenden Information in der
Bedienungsanleitung Ihres Mobiltelefons nach, schalten Sie ggfs. die
Bluetooth Schnittstelle ein
Überprüfen Sie, ob der Akku
geladen ist
Laden Sie das Car-Kit über den KFZ-Adapter.
Prüfen Sie, ob das Car-Kit
eingeschaltet ist
Drücken Sie
Prüfen Sie, ob sich das Car-Kit im
Kopplungsmodus befindet
Schalten Sie das Car-Kit aus und halten Sie dann die Taste
Sekunden gedrückt
Überprüfen Sie die Einstellung der
Lautstärke
Drücken Sie kurz + oder - um die Lautstärke anzupassen
für 3 Sekunden
für 6
Zusätzliche Hinweise (Beachten Sie unbedingt auch das Beiblatt „Wichtige Hinweise“)
•
•
•
•
•
Die maximale Reichweite beträgt 10 Meter und kann durch Hindernisse weiter eingeschränkt werden.
Das Car-Kit kann nur mit Mobiltelefonen verbunden werden, die das Bluetooth Headset oder Handsfree Profil unterstützen.
Da Bluetooth den ISM Frequenzbereich verwendet der auch von zahlreichen andere Geräten wie z.B. WLAN, Medizintechnik oder MikrowellenHerde genutzt wird, kann es zu Störungen in der Nähe solcher Geräte kommen.
Der Akku ist auf eine lange Betriebszeit ausgerichtet. Ein neuer Akku oder ein Akku, der für eine längere Zeit nicht genutzt worden ist, können zu
Beginn etwas kürzere Sprechzeiten haben.
Die Sprechzeit hängt unter anderem von der gewählten Lautstärke, der Umgebungstemperatur und der Qualität der Verbindung ab.
Deutsch – HCC-250
Seite 12
Sicherheitshinweise
•
•
Verwenden Sie ausschließlich den Ladeadapter, der mit dem Car-Kit geliefert wurde.
Achtung: Es besteht Explosionsgefahr, wenn Änderungen am Akku vorgenommen werden oder dieser nicht durch einen autorisierten
Servicepartner gewechselt wird.
•
Befolgen Sie immer die geltenden Vorschriften für die Verwendung von Mobiltelefonen, Headsets und Freisprecheinrichtungen. Richten Sie
immer Ihre gesamte Aufmerksamkeit auf den Straßenverkehr und lassen Sie sich nicht durch Telefonate ablenken.
•
Halten Sie das Car-Kit fern von kleinen Kindern. Sie könnten möglicherweise Kleinteile verschlucken, die sich vom Car-Kit lösen oder auch
andere Weise verletzt werden.
•
Dieses Car-Kit ist mit einem Lithium-Polymer Akku ausgestattet. Setzen Sie den Akku nicht hohen Temperaturen oder Feuer aus, weil dieser
möglicherweise explodieren könnte.
•
•
Beachten Sie die geltenden Vorschriften für die Entsorgung von elektronischen Geräten.
Bitte schalten Sie das Car-Kit unbedingt aus, wenn Sie sich in einer Umgebung mit explosiven Gasen befinden. Wie alle elektrischen Geräte
könnte das Car-Kit Funken erzeugen, die zu einer Explosion führen könnten.
•
Lassen Sie das Car-Kit nicht aus größerer Höhe fallen.
•
Verändern, öffnen oder reparieren Sie das Car-Kit nicht.
•
Setzen Sie das Car-Kit keinen Flüssigkeiten aus und verwenden Sie keine aggressiven Reinigungsmittel.
•
Halten Sie das Car-Kit fern von hohen Temperaturen, Feuer oder Flammen.
•
Halten Sie das Car-Kit fern von Feuchtigkeit, Rauch und Staub.
•
Stellen Sie keine schweren Gegenstände auf das Car-Kit.
•
Bitte laden Sie Ihr Headset bzw. Ihre KFZ Freisprecheinrichtung nur über den KFZ-Adapter, wenn sich das Fahrzeug im Stillstand befindet.
Während des Ladevorgangs darf das Headset bzw. die KFZ Freisprecheinrichtung nicht eingeschaltet sein.
Deutsch – HCC-250
USER MANUAL
Bluetooth Car-Kit HCC-250
CONTENT
1.
2.
3.
Introduction................................................................................................ 2
Package Content ......................................................................................... 2
Using your Handsfree................................................................................ 3
2.1. Battery Charging .............................................................................. 3
2.2. Mounting your Handsfree ................................................................. 4
2.3. Turn On/Off Handsfree...................................................................... 4
2.4. Pairing/Connecting your Handsfree with Bluetooth Device ............... 5
2.4.1. Pairing your Handsfree with Bluetooth handset ....................... 5
2.4.2. Erase all Paired Records .......................................................... 5
2.4.3. Connecting/Disconnecting your Handsfree
with Bluetooth Device ......................................................................... 5
2.5 Call Functions .................................................................................... 6
2.5.1 Basic Call Operations ............................................................... 6
2.5.2 Call Mute................................................................................... 6
2.5.3 Transferring Calls to/from your Handset.................................... 6
2.5.4 Voice Dialing............................................................................. 6
2.5.5 Advanced Call Functions .......................................................... 6
2.6 AV-Functions ..................................................................................... 6
2.6.1 Using Handset AV Function ...................................................... 6
2.6.2 AV Operations .......................................................................... 7
2.7 Volume Adjustment............................................................................ 7
2.8 Pairing/Connecting your Handsfree with Other Bluetooth Device....... 7
Quick User Guide....................................................................................... 7
3.1. LED Indicator Patterns ...................................................................... 7
3.2. Quick User Guide.............................................................................. 8
Troubleshooting ......................................................................................... 11
Additional Information ............................................................................... 11
Safety ........................................................................................................ 12
Page 2
1. INTRODUCTION
Bluetooth Car-Kit
This Bluetooth Car-Kit is a specially designed product allowing car drivers to make and receive calls without holding a mobile phone. It provides a clean
wireless audio connection with your Bluetooth mobile phone and PDA.
In addition to vehicle environment applications, this portable equipment, supported by an internal rechargeable Li-ion battery, can also be used in office
environment as normal handsfree equipment to make/receive phone calls without bothering holding the mobile handset. It can also be placed beside a
Bluetooth-enabled PC to make voice calls over the Internet.
Ensure that the items mentioned below are all included in the package. If any item is missing, please contact the dealer.
Package Content
1. Bluetooth Car-Kit
2. User Manual
3. Warranty Card
4. Supplement “Important Information”
5. 12/24V Car Charger Set
6. Sun-visor Clip
1.
2.
3.
4.
7. Vent Mount Clip
5.
6.
7.
1. Speaker:Voice delivery.
2. Red/Blue LED:Indicate device status.
3. Button
:Switch the device on/off.
4. Button
:Answer/end call, connect/disconnect, transfer
a call between handsfree and phone.
5. Button ╋:Volume up, last number redial, call mute.
6. Button ━:Volume down, erase all paired records, reject call,
voice dialing, call mute
7. Microphone:Voice pick-up
8. Charging Port:Connect to the travel (or car) charger to charge
the battery of device
Figure: 1 Overview
HCC-250 - English
Page 3
2. USING YOUR HANDSFREE
Battery Charging and Usage
2.1 Battery Charging
This Car-Kit contains a rechargeable Li-Polymer battery. First-time charging time is about 4 hours. Later-on recharging time is around 2-3 hours. Detailed
charging procedures as follows:
1.
Connect the car charger to the cigarette lighter, or plug the USB cable in PC.
2.
Referring to Figure 2, plug the connector of the charger to Car-Kit´s charging port to start charging. Both the Red and Blue LEDs will be on during
charging. Once the Red LED turns off, the battery is fully charged and you should disconnect the charger from the Car-Kit and the power outlet.
Figure: 2 Battery Charging
Note:
It is recommended to charge your Car-Kit when it is not in use.
Please note that “inserting” charger will cause a device reset. However, when the Car-Kit is in charging (the charger has been inserted), the Car-Kit is in normal
operation.
During a call, the existing connection between the Car-Kit and the mobile phone will be reset after “inserting” the charger. The call will be transferred back to the
to reconnect the
mobile phone momentary. The Car-Kit will try to re-establish the connection automatically. Sometimes, the user needs to short-push button
device.
Battery Information
Once fully charged, the battery supports continuous talk time up to 14 hours and standby (i.e. the device is power on but without connection) time about 25 days.
When the battery is low, the Car-Kit beeps once every 20 seconds and the Blue and Red LEDs alternate every 3 seconds, charge the battery as described
above.
Note: Over-charging will reduce battery life. If a fully charged battery is left unused, it will lose power over If a fully charged battery is left unused, it will lose power
over time. Extreme temperature (either too hot or too cold) will also affect its ability to charge, capacity, and lifetime.
Please recharge your headset or car-kit only if your car stands still. During recharging the headset or car-kit cannot be used.
HCC-250 - English
Page 4
2.2 Mounting your Handsfree
The HCC-250 Car-Kit can be easily mounted inside the car by either using the companion Sun-Visor Clip to fix the product on the sun-visor over the driver’s seat,
or inserting the Vent Mount Clip into the vent in front of the driver’s seat.
As shown in Figures 3 and 4, there are two magnetic tips on the backside of the device. You can attach the Sun-Visor Clip or the Vent Mounting Clip to them.
For better mounting the device, please clip the Sun-Visor Clip to the sun visor first, and then properly attach the Car-Kit to the Sun-Visor Clip.
To use the Vent Mounting Clip, you may adjust the clip direction according to your car vent, as shown in Figure 5.
Note: The microphone of the HCC-250 Car-Kit must aim at the sound bearing.
Magnetic Tip
Vent Mount Clip
Sun-Visor Clip
Figure 3: Attach Sun-visor Clip to Magnetic Tips
Figure 4: Attach Vent Mount Clip to Magnetic Tips
Vent Mounting Clip
(Vertical Direction)
Vent Mounting Clip
(Horizontal Direction)
Metal Base
Figure 5: Adjust Vent Mounting Clip Direction (Vertical or Horizontal)
Pull out a little and push
down from here
Figure 6: Detach Clip from metal base
With great portability and flexibility, this Car-Kit can also be used outside of such car environment such as in office and/or at home.
2.3 Turn On/Off the HCC-250 Car-Kit
Turn on the Handsfree: Press and hold button
for at least 3 seconds, you will hear 2 power-up tones, the Blue LED gives 3 quick blinks following by 1 blink per
3 seconds; the Red LED is off. This indicates the handsfree is power on.
Turn off the HCC-250: Press and hold button
for at least 3 seconds, you will hear 2 power-down tones, the Red LED will blink 3 times then all LEDs are off.
This indicates the Car-Kit is power off.
HCC-250 - English
Page 5
2.4 Pairing/Connecting your Handsfree with Bluetooth Device
2.4.1 Pairing your HCC-250 with Bluetooth mobile phone (or other device)
Before making and answering calls, you must pair your HCC-250 and phone. Paring sets up a unique relationship between your Car-Kit and your
mobile phone. The mobile phone will memorize the HCC-250`s unique ID (or passkey). This ensures that a unique and encrypted wireless link between
your Car-Kit and mobile phone will be used during calls.
Detailed operation procedures are as follows:
1.
Place your HCC-250 close to your Bluetooth enabled mobile phone, and ensure your Car-Kit is power off, your mobile phone is power on
2.
for at least 6 seconds until the Blue and Red LEDs alternate continuously. You will hear 2 power-up tones and a pairing tone to
Press and hold button
indicate that the Car-Kit has successfully entered the paring mode
3.
Following your phone user guide to active Bluetooth device search on the phone side, on your phone screen you will see a list of Bluetooth equipment
found by the phone at the end of the searching process.
4.
Select this Bluetooth Car-Kit HCC-250 from the list and initiate pairing following handset’s on-screen prompts.
5.
Continue to follow on-screen prompts to enter passkey “0000” and confirm to pair the HCC-250 with your mobile phone. Once the pairing procedure is
completed, you will hear a connecting tone, and then Blue LED gives 3 quick blinks per 2 seconds. It indicates that the Car-Kit device and the mobile
phone are paired and connected.
Note:
If pairing is successful, Car-Kit`s Red LED is off. The Blue LED gives 3 quick blinks per 2 seconds. If your mobile phone shows that paring is failed and the Car-Kit
is still in the paring mode, you need to go back to above steps 3-5 to repeat the paring process.
Your Car-Kit will remain in the pairing mode for about 2 minutes. If paring cannot be finished within 2 minutes, the HCC-250 will enter into the standby
mode (without Bluetooth connection in this case). You need to turn the Car-Kit off and then repeat the above steps 2-5 to restart the pairing process.
2.4.2 Erase all Paired Records
This Car-Kit can be paired with up to 8 Bluetooth devices. When in the paring mode, press and hold – button for at least 3 seconds will allow you to erase all
paired bluetooth device profiles stored in the Car-Kit. The Car-Kit will then quit from the pairing mode. The Blue LED will give 1 blink per 3 seconds.
2.4.3 Connecting/Disconnecting your HCC-250 Car-Kit with a Bluetooth Device
When the Car-Kit communicates with a Bluetooth equipment thru Handsfree Profile, the Bluetooth connection between two equipments shall be established in
advance. If two Bluetooth equipments have been paired once, you can simply reconnect them.
Connecting your HCC-250 with a Bluetooth mobile phone
Initiating a request from either the Car-Kit or the mobile phone can set up Bluetooth connection. The detailed operations are as follows:
.
1.
Initiating connection request from the Car-Kit: Place the Car-Kit close to the Bluetooth mobile phone and then press button
2.
Initiating connection request from the Bluetooth mobile phone: Place the Car-Kit close to the Bluetooth mobile phone and then follow the phone`s user
guide to find the Car-Kit and send connection request.
After connecting, you will hear a connecting tone, and then Blue LED gives 3 quick blinks per 2 seconds
Disconnecting your HCC-250 from your Bluetooth mobile phone:
When the Car-Kit is connected with Bluetooth mobile phone (or in the connected mode), you can disconnect them as follows:
for at least 3 seconds.
1.
Pressing and holding button
2.
Following the mobile phone`s user guide and initiating disconnection from the phone side.
After disconnecting, you will hear a disconnecting tone, and then Blue LED gives 1 blink per 3 seconds.
HCC-250 - English
Page 6
2.5 Call Functions
2.5.1 Basic Call Operations
Before dialing, both your HCC-250 Car-Kit and mobile phone must be powered on. And you also need to ensure your Car-Kit and phone has been linked with
Bluetooth connection.
Answer Call:
Press button
Reject Call:
Press and hold button – for at least 3 seconds.
.
End Call:
Press button
Redial:
Press and hold button + for at least 3 seconds
.
For the above operations, the Blue LED gives 3 quick blinks per 2 seconds and the Red LED is off.
2.5.2 Call Mute
You can mute or un-mute an ongoing call by simultaneously quick pressing button + and button –. The Blue LED gives 3 quick blinks per 2 seconds and the Red
LED is off.
2.5.3 Transferring Calls to/from your mobile phone
Transferring calls to your mobile phone: Press and hold button
Transferring calls from your mobile phone: Press button
for at least 3 seconds, the Blue LED gives 1 blink per 3 seconds; Red LED is off.
, and the Blue LED gives 3 quick blinks per 2 seconds.
2.5.4 Voice Dialing
If the connected phone supports voice dialing, you can press and hold button – for at least 3 seconds to activate voice dialing. The Blue LED gives 3 quick blinks
per 2 seconds. Before using voice dialing, you must record voice tags in your mobile phone. Please refer to your mobile phone manual for detailed descriptions
on how to set up voice dialing and recording voice tags.
When voice dialing is progress, you can quick press button – to cancel voice dialing. The Blue LED gives 3 quick blinks per 2 seconds and the Red
LED is off.
2.5.5 Advanced Call Functions
If your mobile phone has call waiting/conference functions, your HCC-250 Car-Kit can support the function by following operations:
1.
2.
When a new call comes in while you are in talk:
1)
Press and hold button + for at least 3 seconds to hold active call and accept incoming call.
2)
Press button
to end active call and answer new call.
When two calls in progress, one is active and the other is on hold:
1)
Press and hold button + for at least 3 seconds to toggle hold call and active call.
2)
Press button
to end active call and accept hold call.
3)
Press and hold button – for at least 3 seconds to make conference.
For the above operations, the Blue LED gives 3 quick blinks per 2 seconds and the Red LED is off.
2.6 A2DP Functions
This Car-Kit supports the Bluetooth A2DP Profile to play back music in high quality. When connecting with a Bluetooth-enabled multimedia/music player or a
mobile phone with A2DP compatibility, the product allows users to enjoy and remotely play stereo music from the player.
2.6.1 Using mobile phone`s A2DP Function
For mobile phones supporting Bluetooth A2DP profiles, you can establish an audio connection between the mobile phone and the Car-Kit to enjoy music played by
the phone. Depending on the phone`s capability, the audio connection could be established automatically when you start playing music.
If your mobile phone does support Bluetooth A2DP profiles but you fail to get an audio connection when you start playing music, you must follow your phone user
guide to establish an Aaudio connection before playing music.
HCC-250 - English
Page 7
2.6.2 AVRCP Operations
The following operations can be used for remotely control your Bluetooth capable phone or media player to play music:
Play:
Pause:
Press button
Press button
.
.
Stop:
Press and hold button
Forward:
Backward :
Press and hold button + for at least 3 seconds.
Press and hold button – for at least 3 seconds.
for at least 3 seconds.
2.7 Volume Adjustment
When in the connected or talk/play mode, you can adjust sound volume up or down by pressing buttons + or – , respectively. You can repeat the above operation
until the speaker volume reaches at a desirable level.
Note:
For most Bluetooth volume control of the Car-Kit will synchronize with the phone. That is, the sound volume of your HCC-250 can be controlled by your phone
and vice versa. However, this may not be always true due to variations on implementations chosen by different phone manufactures.
2.8 Pairing/Connecting your Handsfree with Other Bluetooth Device
In addition to Bluetooth phone, your Car-Kit can also pair with other Bluetooth devices for realizing short distance wireless communications. Similar pairing
procedures described in the previous Section 2.4 can be used. You can also follow the user guide of the Bluetooth device to complete paring operations on the
device side.
This Car-Kit can be paired with up to 8 Bluetooth devices (including mobile phones). The corresponding 8 sets of pairing information are recorded by the Car-Kit.
Each paired device can wireless communicated with the Car-Kit after setting up a Bluetooth connection. Please check Section 2.4.3 on procedures to set up a
Bluetooth connection.
3. QUICK USER GUIDE
3.1 LED Indicator Patterns
LED Pattern 1: Blue LED gives 1 blink per 3 seconds; Red LED is off.
LED Pattern 2: Blue LED gives 3 quick blinks per 2 seconds; Red LED is off.
LED Pattern 3: Blue and Red LEDs alternate continuously.
LED Pattern 4: Blue and Red LEDs alternate every 3 seconds.
LED Pattern 5: All LEDs are off.
HCC-250 - English
Page 8
3.2 Quick User Guide
You can follow the instructions listed in Table 1-7 below to operate your HCC-250 Car-Kit devices. (Please refer to section 1 for details of key and key press
duration definitions.)
Note: Your Car-Kit devices can only talk to paired Bluetooth devices. For devices supporting only the Handsfree Profile (HFP), you also need to establish
Bluetooth connection between your Car-Kit and your phone before making and answering calls.
Table 1: Power on/off
CURRENT STATUS
HCC-250 INDICATOR
FUNCTION
OPERATION
PHONE
HCC-250
AUDIO TONE
LED INDICATOR
Turn On
Power Off
Press and hold button
least 3 seconds
for at
2 power-up tones
LED Pattern 1
Turn Off
Standby
Press and hold button
least 3 seconds
for at
2 power-down tones
LED Pattern 5
Table 2: Pairing/Connections
FUNCTION
CURRENT STATUS
PHONE
Enter pairing
mode
Erase all paired
profiles
OPERATION
HCC-250
Power Off
Paring Mode
Pair Car-Kit with
phone
Power on
Paring mode
Connect (CarKit
with phone)
Standby
(disconnected)
Standby
(disconnected)
Disconnect
Standby (connect)
Standby
(connect)
for
Press and hold button
at least 6 seconds
Press and hold button – for at
least 3 seconds
Follows your phone`s user
guide to complete pairing
procedure.
Passkey is “0000”
Press button
or set up
connection from the phone
for
Press and hold button
at least 3 seconds or refer to
phone manual to initiate the
connection from the phone
side.
HCC-250 - English
HCC-250 INDICATOR
AUDIO TONE
LED INDICATOR
2 power-up tones, and then 1
pairing tone
LED Pattern 3
LED Pattern 1
1 connecting tone
LED Pattern 2
1 connecting tone
LED Pattern 2
LED Pattern 1
Page 9
Table 3: Call Functions
CURRENT STATUS
HCC-250 INDICATOR
FUNCTION
OPERATION
PHONE
HCC-250
AUDIO TONE
LED INDICATOR
Answer Call
Incoming call
Incoming call
Press button
LED Pattern 2
Reject Call
Incoming call
Incoming call
Press and hold button ━ for
at least 3 seconds
LED Pattern 2
End Call
Talk
Talk
Press button
Redial
Standby
Standby
Press and hold button + for
at least 3 seconds
Key Tone
LED Pattern 2
LED Pattern 2
Key Tone
LED Pattern 2
Key Tone
LED Pattern 2
Voice Dialing
Standby
Standby
Press and hold button ━ for
at least 3 seconds
Cancel Voice
Dialing
Voice Dialing
Voice Dialing
Press button ━
CURRENT STATUS
HCC-250 INDICATOR
FUNCTION
OPERATION
PHONE
HCC-250
Volume up
Talk
Talk
Press button +
Volume down
Talk
Talk
Press button ━
Mute
Talk
Talk
Press button ━ and button +
Together
Key Tone
LED Pattern 2
Mute
Press button ━ and button +
Together
Key Tone
LED Pattern 2
Unmute
Talk
AUDIO TONE
LED INDICATOR
LED Pattern 2
LED Pattern 2
Table 4: Transfer Functions
CURRENT STATUS
FUNCTION
Call Transfer
(Car-Kit to phone)
Call Transfer
(Phone to Car-Kit)
HCC-250 INDICATOR
OPERATION
PHONE
HCC-250
AUDIO TONE
Talk
Talk
Press and hold button
at least 3 seconds
Talk
Talk
Press button
for
LED INDICATOR
Key Tone
LED Pattern 1
Key Tone
LED Pattern 2
Table 5: Low Power Indication
CURRENT STATUS
FUNCTION
PHONE
Low Power Warning
HCC-250 INDICATOR
OPERATION
HCC-250
AUDIO TONE
LED INDICATOR
Except power off
Beep every 20 seconds
LED Pattern 4
HCC-250 - English
Page 10
Table 6: Advanced Call Functions
CURRENT STATUS
HCC-250 INDICATOR
FUNCTION
Held Active Call and
Accept Incoming Call
End Active Call and
Answer New Call
Toggle Held Call and
Active Call
End Active Call and Accept
Hold Call
Conference Calls
OPERATION
PHONE
PHONE
AUDIO TONE
Talk
Call Waiting
Press and hold button + for at
least 3 seconds
LED INDICATOR
LED Pattern 2
Talk
Call Waiting
Press button
LED Pattern 2
Talk
Call On Hold
Press and hold button + for at
least 3 seconds
LED Pattern 2
Talk
Call On Hold
Press button
LED Pattern 2
Talk
Call On Hold
Press and hold button – for at
least 3 seconds
LED Pattern 2
Table 7: Work in with Media Player
CURRENT STATUS
HCC-250 INDICATOR
FUNCTION
OPERATION
PHONE/PLAYER
Play
HCC-250
AUDIO TONE
Press button
Pause
Press button
Stop
Press and hold button
at least 3 seconds
Volume up
Press button +
Volume down
Press button –
Forward
Backward
Press and hold button +
for 3 seconds
Press and hold button – for
3 seconds
HCC-250 - English
for
LED INDICATOR
Page 11
Troubleshooting
In case the Car-Kit does not function correctly, please follow the corrective action given in the table below. If the problem is not solved even after performing the
corrective actions, please contact the dealer from whom Car-Kit was purchased.
Status
Car-Kit does not turn on
Unable to communicate using Car-Kit
Unable to pair Car-Kit with a Bluetooth
mobile phone
Extremely low or loud speaker volume
To Check
Corrective Action
Check whether the battery of Car-Kit is
charged
Charge the battery
Check whether your mobile phone
supports the “headset” and/or
“hands-free” profile(s)
In order to use the Car-Kit, it is essential that your mobile phone
should support the “headset” and/or “hands-free” profile(s)
(You might need to search for option such as headset, audio device,
etc in case your mobile phone does not contain the hands-free option;
these options however are subject to the model of the mobile phone
being used)
Check whether the battery is fully
charged
Charge the battery if the battery power is low
Check whether Car-Kit is on
Press
Check whether Car-Kit is in the pairing
mode
With power off, press and hold
the pairing mode
Check the speaker volume
Press either + or - to control the volume accordingly
HCC-250 - English
for 3 s to turn on Car-Kit
for at least 6 s to place Car-Kit in
Page 12
Additional Information (Please read also the supplement “Important Information”
•
•
The cover range of wireless communication is within a maximum range of 30 feet (10 m) and the conditions vary according to obstacles.
The Car-Kit can be connected only to those mobile phones that support the Bluetooth headset or hands-free profile(s). (Subject to different models of mobile
phone, it will show you different options such as audio device etc.) This product is not compatible with the standard cordless phones used in homes.
As it operates in the same frequency range, the Car-Kit can be affected by the devices that operate in the ISM band (2.402 GHz ~ 2.480 GHz), for example,
wireless LAN, microwave devices, medical appliances, etc. Therefore, in order to ensure proper operation, the hands-free car kit should be away from these
devices.
If handled properly, a rechargeable battery can have a long service life. A new battery or one that has not been used for a long period of time could have reduced
capacity the first few times it is used.
The standard usage time of the battery can vary depending on the usage condition of the mobile phone and Car-Kit.
•
•
•
Safety
•
•
•
•
•
•
•
Use the charger that comes with package.
Caution, risk of explosion if battery is replaced by an incorrect type.
Check the laws and regulations on the use of mobile phones and hands-free equipment in the areas where you drive. Always give full attention to driving and
pull off the road and park before making or answering a call if driving conditions require.
Do not allow children to play with your Car-Kit since it contains small parts that could become detached and create a choking hazard.
This device contains a Li-polymer battery. Please keep it away from fire anytime (including discarding the device) or the battery may explode.
The Car-Kit, especially the embedded battery must be properly disposed or may be recycled, contacts your local recycling centres for disposal methods.
Please turn off your Car-Kit in an area with a potentially explosive atmosphere (oil warehouse, explosive warehouse, etc.). In rare occurrences, this product
could generate sparks. This could lead to an explosion or fire, which could result in bodily injury. Therefore follow the warning notices in those areas carefully.
•
Do not drop this unit from a height.
•
Do not modify, repair or take apart this unit.
•
Do not expose this unit directly to water, alcohol, benzene, etc, for cleaning.
•
Do not expose this unit directly to flammables.
•
Do not place this unit near flammables.
•
Protect this unit from humidity and dust.
•
Do not place a heavy object on this unit.
•
Please recharge your headset or car-kit only if your car stands still. During recharging the headset or car-kit cannot be used.
HCC-250 - English
MANUEL DE L'UTILISATEUR
Kit auto Bluetooth HCC-250
SOMMAIRE
1.
2.
3.
Introduction................................................................................................ 2
Contenu de l'emballage ............................................................................... 2
Utiliser votre kit mains-libres.................................................................... 3
2.1. Batterie Recharge ............................................................................. 3
2.2. Monter votre kit mains-libres ............................................................. 4
2.3. Mettre en marche/arrêt votre kit mains-libres .................................... 4
2.4. Connecter votre kit mains-libres à un appareil Bluetooth ................. 5
2.4.1. Connecter votre kit mains-libres à un appareil Bluetooth ......... 5
2.4.2. Effacer tous les enregistrements synchronisés......................... 5
2.4.3. Etablir/couper la connexion de votre kit mains-libres
avec l'appareil Bluetooth ........................................................... 5
2.5 Fonctions d'appel............................................................................... 6
2.5.1 Opérations basiques de communication ................................... 6
2.5.2 Sourdine ................................................................................... 6
2.5.3 Transférer des appels vers/depuis votre téléphone................... 6
2.5.4 Numérotation vocale ................................................................. 6
2.5.5 Fonctions d'appel avancées...................................................... 6
2.6 Fonctions AV ..................................................................................... 6
2.6.1 Fonction AV de votre téléphone ............................................... 6
2.6.2 Opérations AV .......................................................................... 7
2.7 Réglage du volume ........................................................................... 7
2.8 Connecter votre kit mains-libres à d'autres appareils Bluetooth ......... 7
Guide de l'utilisateur abrégé ..................................................................... 7
3.1. Signaux lumineux à DEL................................................................... 7
3.2. Guide de l'utilisateur abrégé ............................................................. 8
Elimination des pannes...............................................................................11
Compléments d'information ........................................................................12
Précautions à prendre.................................................................................12
Page 2
1. INTRODUCTION
Kit auto Bluetooth
Ce kit auto Bluetooth est un produit spécialement conçu pour permettre aux conducteurs automobiles de passer et recevoir des appels sans avoir à tenir en main
un téléphone portable. Il offre un connexion audio sans fil de bonne qualité avec votre téléphone portable Bluetooth ou votre PDA. Outre l'utilisation dans un
véhicule, ce produit peut également servir au bureau ou à domicile.
Outre les applications relatives à l'environnement d'un véhicule, cet appareil portable supporté par une batterie Li-Ion interne rechargeable peut également être
utilisé dans un bureau, comme un appareil mains-libres normal pour passer/recevoir des appels sans devoir tenir le combiné portable. Il peut aussi être placé à
proximité d'un PC compatible Bluetooth pour passer des appels par le biais d'Internet.
Assurez-vous que les éléments indiqués ci-dessous sont tous compris dans l'emballage. Si un élément est manquant, veuillez contacter le vendeur.
Contenu de l’emballage
1. Bluetooth Car-Kit
2. Manuel de l'utilisateur
3. Carte de garantie
4. Supplément « Informations importantes »
5. Chargeur véhicule 12/24 V
1.
2.
3.
4.
6. Clip pare-soleil
7. Clip ventilation
5.
6.
7.
1. Haut-parleur : sortie vocale.
2. DEL rouge/bleue : indique l'état de l'appareil.
3. Bouton
: met l'appareil en marche/à l'arrêt.
4. Bouton
: décroche/raccroche, connecte/déconnecte, transfère
les appels entre le kit mains-libres et le téléphone.
5. Bouton + : augmente le volume, répète le dernier numéro composé,
met en sourdine.
6. Bouton - : diminue le volume, efface tous les enregistrements
synchronisés, rejette les appels, effectue la numérotation vocale,
met en sourdine
Illustration : 1 Vue d'ensemble
7. Microphone : entrée vocale
8. Port de charge : se branche sur le chargeur de voyage (ou du
véhicule) afin de recharger la batterie de l'appareil
HCC-250 - Français
Page 3
2. UTILISER VOTRE KIT MAINS-LIBRES
Recharge de la batterie et utilisation
2.1 Recharger la batterie
Ce kit mains-libres contient une batterie rechargeable Li-Po. La première recharge dure environ 4 heures. La durée de recharge ultérieure est d'environ 2 à 3
heures. Pour recharger la batterie, veuillez suivre les instructions ci-dessous :
1.
Branchez le chargeur véhicule sur l'allume-cigare ou le câble USB sur votre PC.
2.
Conformément à l'illustration 2, branchez le connecteur du chargeur au port d'alimentation du kit mains-libres pour commencer à recharger. Les deux
DEL rouge et bleue sont allumées pendant la recharge. Quand le témoin rouge s'éteint, la batterie est complètement rechargée, débranchez alors le
chargeur du kit mains-libres et de la source d'alimentation.
Illustration : 2 Recharge de la batterie
Note :
Il est recommandé de recharger le kit mains-libres quand il n'est pas en cours d'utilisation.
Veuillez noter que l'introduction du chargeur entraîne une réinitialisation de l'appareil. Cependant, le kit mains-libres fonctionne normalement pendant la recharge
(une fois que le chargeur a été introduit).
Pendant un appel, la connexion existant entre le mains-libres et le téléphone portable est rétablie après l'introduction du chargeur. L'appel est alors transféré
momentanément vers le téléphone portable. Le kit mains-libres essaye ensuite automatiquement d'établir à nouveau la connexion. Il peut arriver que l'utilisateur
pour reconnecter l'appareil.
doive presser brièvement le bouton
Informations sur la batterie
Une fois rechargée, la batterie permet une durée de communication continue de 14 heures et une durée de veille (l'appareil étant en marche mais sans
communication) d'environ 25 jours.
Quand la batterie est faible, le kit mains-libres émet un signal sonore toutes les 20 secondes et les DEL bleue et rouge alternent toutes les 3 secondes. Veuillez
recharger la batterie comme indiqué ci-dessus.
Note : une surchage réduit la durée de vie de la batterie. Une batterie entièrement rechargée qui demeure non utilisée perd du courant au fil du temps. Les
températures extrêmes (trop chaud ou trop froid) affectent également sa capacité à se recharger, sa puissance et sa durée de vie.
Veuillez recharger votre oreillette ou votre kit auto uniquement si votre voiture est à l'arrêt. Pendant la charge, l'oreillette ou le kit auto ne peut pas
être utilisé.
HCC-250 - Français
Page 4
2.2 Monter votre kit mains-libres
Le car-kit HCC-250 se monte facilement à l'intérieur de la voiture, soit à l'aide du clip pare-soleil permettant de fixer le produit sur le pare-soleil situé au-dessus de
la place du conducteur soit en introduisant le clip ventilation dans la ventilation située devant le siège de l'utilisateur.
Deux pastilles magnétiques se trouvent au dos de l'appareil, comme indiqué sur les illustrations 3 et 4. Vous pouvez fixer le clip pare-soleil ou le clip ventilation sur
ces pastilles.
Pour un meilleur montage de l'appareil, veuillez fixer le clip pare-soleil sur le pare-soleil dans un premier temps, puis fixer correctement le kit mains-libres sur le
clip pare-soleil.
Pour utiliser le clip ventilation, vous pouvez orienter la direction du clip en fonction de la ventilation de votre véhicule, comme indiqué sur l'illustration 5.
Note : le microphone du kit mains-libres HCC-250 doit être dirigé vers la source sonore.
Pastille magnétique
Clip ventilation
Clip pare-soleil
Illustration 3 : Fixation du clip pare-soleil aux pastilles magnétiques
Illustration 4 : Fixation du clip ventilation aux pastilles magnétiques
Clip ventilation
(sens vertical)
Clip ventilation
(sens horizontal)
Socle métallique
Illustration 5 : Réglage de la direction du clip ventilation (verticale ou horizontale)
Tirez légèrement le clip puis
pousser vers le bas à partir
de là.
Illustration 6 : Dépose du clip du socle métallique
Grâce à sa grande mobilité et flexibilité, ce kit mains-libres peut également être utilisé hors d'un véhicule, comme par exemple dans un bureau et/ou à domicile.
2.3 Mise en marche/arrêt du kit auto HCC-250
Pour mettre en marche le kit mains-libres : appuyez sur le bouton
pendant au moins 3 secondes. Vous entendez 2 signaux de mise en marche, la DEL bleue
émet 3 brefs clignotements puis 1 clignotement toutes les 3 secondes; la DEL rouge est éteinte. Ceci indique que le kit mains-libres est en marche.
Pour éteindre le HCC-250 : appuyez sur le bouton
toutes les DEL s'éteignent.
Ceci indique que le kit mains-libres est éteint.
pendant environ 3 secondes. Vous entendez 2 signaux d'arrêt, la DEL rouge émet 3 clignotements puis
HCC-250 - Français
Page 5
2.4 Synchroniser/connecter le kit mains-libres à un appareil Bluetooth
2.4.1 Connecter un HCC-250 à votre téléphone portable Bluetooth (ou autre appareil)
Avant de passer ou prendre des appels, vous devez connecter votre HCC-250 au téléphone. Cette connexion établit une relation unique entre votre kit
auto et votre téléphone portable. Le téléphone portable mémorise l'ID unique du HCC-250 (ou la clé). Ceci permet d'assurer qu'une connexion sans fil
unique et cryptée entre votre kit auto et votre téléphone portable est utilisée pendant les communications.
Veuillez suivre les instructions ci-dessous :
1.
Placez votre HCC-250 à proximité du téléphone portable Bluetooth, veillez à ce que le kit auto soit hors tension et à ce que votre téléphone portable soit
allumé.
2.
et maintenez le pendant au moins 6 secondes jusqu'à ce que les DEL bleue et rouge alternent en continu. Vous entendez les 2
Appuyez sur le bouton
signaux de mise en marche et le signal de connexion indiquant que le kit auto a réussi à passer en mode de synchronisation.
3.
Suivez les instructions du guide de l'utilisateur de votre portable pour activer la recherche de Bluetooth sur le téléphone puis vous verrez une liste
d'appareils Bluetooth détectés par le téléphone au terme de la recherche.
4.
Sélectionnez ce kit auto HCC-250 Bluetooth dans la liste et lancez la synchronisation en suivant les instructions figurant sur l'écran du combiné.
5.
Suivez les instructions apparaissant sur l'écran pour entrer la clé “0000” et confirmez pour synchroniser le HCC-250 avec votre téléphone portable. Une
fois la procédure de synchronisation terminée, vous entendez un signal de connexion et la DEL bleue émet 3 clignotements rapides toutes les 2
secondes. Ce indique que le kit mains-libres et le téléphone portable sont synchronisés et connectés.
Note :
Si la synchronisation a réussi, la DEL rouge du kit mains-libres est éteinte. La DEL bleue émet 3 clignotements rapides toutes les 2 secondes. Si votre téléphone
portable indique que la synchronisation a échoué et si le car-kit est encore en mode de synchronisation, revenez aux étapes 3 à 5 ci-dessus et recommencer le
processus de synchronisation.
Votre kit auto reste en mode de synchronisation pendant environ 2 minutes. Si la synchronisation n'est pas encore terminée au bout de 2 minutes, le HCC-250 se
met en mode de veille (sans connexion Bluetooth dans ce cas). Eteignez alors le kit auto et répétez les étapes 2 à 5 ci-dessus pour recommencer le processus de
synchronisation.
2.4.2 Effacer tous les enregistrements synchronisés
Ce kit auto peut être synchronisé avec 8 appareils Bluetooth. Quand il est en mode de synchronisation, appuyez sur le bouton et maintenez le pendant au moins 3
secondes pour effacer tous les profils d'appareils Bluetooth synchronisés enregistrés dans kit. Le kit auto quitte alors le mode de synchronisation. La DEL bleue
émet un clignotement toutes les 3 secondes.
2.4.3 Connecter/déconnecter le kit auto HCC-250 à un/d'un appareil Bluetooth
Pour que le kit auto communique avec un équipement Bluetooth par le biais du profil mains-libres, la connexion Bluetooth entre les deux équipements doit être
établie à l'avance. Si les équipements Bluetooth ont été déjà été synchronisés une fois, vous pouvez les reconnecter simplement.
Connecter votre HCC-250 à un téléphone portable Bluetooth
Le fait d'initier une demande depuis le car-kit ou le téléphone portable permet d'établir la connexion Bluetooth. Veuillez suivre les instructions ci-après :
.
1.
Pour initier une demande de connexion à partir du kit auto : placez le kit auto à proximité du téléphone portable Bluetooth et appuyez sur
2.
Pour initier une demande de connexion à partir du téléphone portable Bluetooth: placez le kit auto à proximité du téléphone portable Bluetooth puis suivez
les instructions du guide de l'utilisateur pour trouver le kit auto et envoyer une demande de connexion.
Une fois la connexion établie, vous entendrez un signal de connexion et la DEL bleue émet 3 clignotements toutes les 2 secondes.
Déconnecter votre HCC-250 de votre téléphone portable Bluetooth :
Quand le kit auto est connecté à un téléphone portable Bluetooth (ou en mode connecté), vous pouvez les déconnecter comme suit :
pendant au moins 3 secondes.
1.
Appuyez sur le bouton
2.
Suivez les instructions du guide de l'utilisateur du téléphone portable et initiez la déconnexion à partir du téléphone.
Après la déconnexion, vous entendez un signal de déconnexion et la DEL bleue émet un clignotement toutes les 3 secondes.
HCC-250 - Français
Page 6
2.5 Fonctions d'appel
2.5.1 Opérations basiques de communication
Avant de numéroter, votre kit auto HCC-250 ainsi que votre téléphone portable doivent être en marche. Et vous devez également vous assurer que le kit auto et
le téléphone sont reliés par une connexion Bluetooth.
Répondre à un appel :
Appuyez sur le bouton
Rejeter un appel :
Appuyez sur le bouton - pendant au moins 3 secondes.
.
Terminer un appel :
Appuyez sur le bouton
Renuméroter :
Appuyez sur le bouton + pendant au moins 3 secondes
.
Lors des opérations ci-dessus, la DEL bleue émet 3 clignotements toutes les 2 secondes et la DEL rouge est éteinte.
2.5.2 Sourdine
Vous pouvez mettre en sourdine puis rétablir le son d'un appel en cours en appuyant brièvement et simultanément sur les boutons + et -. Le témoin bleu émet 3
clignotements toutes les 2 secondes et le témoin rouge est éteint.
2.5.3 Transférer des appels vers/depuis votre téléphone portable
Pour transférer des appels sur votre téléphone portable : appuyez sur le bouton
secondes ; la DEL rouge est éteinte.
Pour transférer des appels depuis votre téléphone portable : appuyez sur
pendant au moins 3 secondes, la DEL bleue émet 1 clignotement toutes les 3
, la DEL bleue émet 3 clignotements rapides toutes les 2 secondes.
2.5.4 Numérotation vocale
Si le téléphone connecté supporte la numérotation vocale, appuyez sur - pendant environ 3 secondes pour activer la numérotation vocale. La DEL bleue émet 3
clignotements rapides toutes les 2 secondes. Avant d'utiliser la numérotation vocale, enregistrez des codes de reconnaissance vocale dans votre téléphone
portable. Veuillez vous reporter au manuel de votre téléphone portable pour savoir comment régler la numérotation vocale et enregistrer des codes vocaux.
Quand la numérotation vocale est en cours, vous pouvez l'annuler en appuyant brièvement sur le bouton - . La DEL bleue émet 3 clignotements toutes
les 2 secondes et la DEL rouge est éteinte.
2.5.5 Fonctions d'appel avancées
Si votre téléphone portable possède des fonctions d'attente/de conférence, votre kit auto HCC-250 peut supporter ces fonctions en suivant les instructions ciaprès :
1.
2.
Quand un nouvel appel entre pendant une conversation :
1)
Appuyez sur + et maintenez pendant environ 3 secondes pour maintenir l'appel en cours et accepter l'appel entrant.
2)
Appuyez sur
pour terminer l'appel en cours et répondre à un nouvel appel.
Quand deux appels sont en cours, l'un est actif et l'autre est en attente :
1)
Appuyez sur le bouton + pendant au moins 3 secondes pour basculer entre l'appel actif et l'appel en attente.
2)
Appuyez sur le bouton
pour terminer l'appel actif et prendre l'appel en attente.
3)
Appuyez sur le bouton - pendant au moins 3 secondes pour passer en mode conférence.
Lors des opérations indiquées ci-dessus, la DEL bleue émet 3 clignotements toutes les 2 secondes et la DEL rouge est éteinte.
2.6 Fonctions A2DP
Ce kit auto supporte le profil A2DP Bluetooth permettant de passer de la musique avec une excellente qualité. S'il est connecté à un lecteur multimédia Bluetooth
ou à un téléphone portable compatible A2DP, le produit permet aux utilisateurs de passer de la musique en stéréo à partir du lecteur.
2.6.1 Utilisation de la fonction A2DP du téléphone portable
Pour les téléphones portables supportant les profils A2DP Bluetooth, vous pouvez établir une connexion audio entre le téléphone portable et le kit auto pour
profiter de la musique émise par le téléphone. Selon la puissance de votre téléphone, la connexion audio peut être établie automatiquement quand vous lancez la
lecture musicale.
Si votre téléphone portable supporte les profils Bluetooth A2DP et si vous ne parvenez pas à établir une connexion audio au démarrage de la lecture musicale,
suivez les instructions du guide de l'utilisateur pour établir une connexion audio avant la lecture musicale.
HCC-250 - Français
Page 7
2.6.2 Opérations AVRCP
Les opérations suivantes permettent de télécommander votre téléphone à Bluetooth ou votre lecteur média pour la lecture musicale :
Lecture :
Pause :
Appuyez sur
Appuyez sur
.
.
Stop :
Appuyez sur
pendant au moins 3 secondes.
Avance :
Retour :
Appuyez sur le bouton + pendant au moins 3 secondes.
Appuyez sur le bouton - pendant au moins 3 secondes.
2.7 Réglage du volume
En mode connecté ou communication/lecture, vous pouvez régler le volume sonore en appuyant sur + ou -. Vous pouvez répéter l'opération ci-dessus jusqu'à ce
que le volume du haut-parleur atteigne le niveau souhaité.
Note :
Avec la plupart des Bluetooth, le réglage de volume du kit auto se synchronise avec celui du téléphone. Cela signifie que le volume sonore de votre HCC-250
peut être réglé à partir de votre téléphone et inversement. Cependant, ceci n'est pas toujours le cas en raison de variantes d'installation choisies par les
différents fabricants de téléphone.
2.8 Synchroniser/connecter votre kit mains-libres avec un autre appareil Bluetooth
Outre votre téléphone Bluetooth, votre kit auto peut également être synchronisé avec d'autres appareils Bluetooth pour réaliser des communications sans fil à
courte distance. Des procédures de synchronisations similaires à celles décrites dans la section 2.4 précédente s'appliquent. Vous pouvez également suivre les
instructions de l'appareil Bluetooth pour terminer les opérations de synchronisation sur l'appareil.
Ce kit auto peut être synchronisé avec jusqu'à 8 appareils Bluetooth (y compris téléphones portables). Les 8 sets d'informations synchronisées correspondants
sont enregistrés par le kit auto. Chaque appareil synchronisé peut communiquer sans fil avec le kit auto après l'établissement d'une connexion Bluetooth. Veuillez
vous reporter à la section 2.4.3 relative aux procédures permettant d'établir une connexion Bluetooth.
3. GUIDE DE L'UTILISATEUR ABREGE
3.1 Signaux lumineux à DEL
Signal DEL 1 : La DEL bleue émet un clignotement toutes les 3 secondes, la DEL rouge est éteinte.
Signal DEL 2 : La DEL bleue émet 3 brefs clignotements toutes les 2 secondes, la DEL rouge est éteinte.
Signal DEL 3 : Les DEL bleue et rouge alternent en continu.
Signal DEL 4 : Les DEL bleue et rouge alternent toutes les 3 secondes.
Signal DEL 5 : Les DEL sont éteintes.
HCC-250 - Français
Page 8
3.2 Guide de l'utilisateur abrégé
Vous pouvez suivre les instructions figurant dans le tableau 1-7 ci-dessous pour faire fonctionner votre car-kit HCC-250. (Veuillez vous référer à la section 1 pour
les détails concernant les touches et les définitions de durée de pression des touches.)
Note : votre kit auto peut communiquer uniquement avec des appareils Bluetooth synchronisés. Pour les appareils supportant uniquement le profil main-libre
(HFP), vous devez également établir la connexion Bluetooth entre votre kit auto et votre téléphone avant de passer ou prendre des appels.
Tableau 1 : Marche/Arrêt
ETAT ACTUEL
TEMOIN HCC-250
FONCTION
FONCTIONNEMENT
TELEPHONE
HCC-250
SIGNAL AUDIO
DEL
Mise en marche
Mise à l'arrêt
Appuyez sur le bouton
pendant au moins 3 secondes
2 signaux sonores de
mise en marche
Signal DEL 1
Mise à l'arrêt
Veille
Appuyer sur le bouton
pendant au moins 3 secondes
2 signaux d'extinction
Signal DEL 5
Tableau 2 : Synchronisation/Connexions
FONCTION
ETAT ACTUEL
TELEPHONE
FONCTIONNEMENT
HCC-250
Activation du mode
de synchronisation
Mise à l'arrêt
Appuyer sur le bouton
pendant au moins 6 secondes
Effacer tous les
profils synchronisés
Mode de
synchronisation
Appuyer sur le bouton pendant au moins 3 secondes.
Suivez les instructions du
manuel de votre téléphone
pour effectuer la procédure de
synchronisation.
La clé est "0000”
ou
Appuyez sur le bouton
établissez une connexion à
partir du téléphone
Appuyez sur le bouton
pendant au moins 3 secondes
ou reportez-vous au manuel
du téléphone pour initier la
connexion à partir du
téléphone.
Kit auto
synchrornisé avec
un téléphone
Marche
Mode de
synchronisation
Connexion (entre kit
auto et téléphone)
Veille
(déconnecté)
Veille
(déconnecté)
Déconnexion
Veille (connexion)
Veille
(connexion)
HCC-250 - Français
TEMOIN HCC-250
SIGNAL AUDIO
TEMOIN LUMINEUX
2 signaux sonores de
mise en marche puis 1
signal de synchronisation
Signal DEL 3
Signal DEL 1
1 signal sonore de
connexion
Signal DEL 2
1 signal sonore de
connexion
Signal DEL 2
Signal DEL 1
Page 9
Tableau 3 : Fonctions d'appel
ETAT ACTUEL
TEMOIN HCC-250
FONCTION
FONCTIONNEMENT
TELEPHONE
HCC-250
Prendre un
appel
Appel entrant
Appel entrant
Appuyer sur le bouton
Signal DEL 2
Rejeter un appel
Appel entrant
Appel entrant
Appuyer sur le bouton - et le
maintenir pendant au moins 3
secondes
Signal DEL 2
Terminer un
appel
Conversation
Conversation
Appuyer sur le bouton
Signal DEL 2
Veille
Veille
Appuyer sur le bouton +
pendant au moins 3 secondes
Signal de touche
Signal DEL 2
Veille
Veille
Appuyer sur le bouton pendant au moins 3 secondes
Signal de touche
Signal DEL 2
Numérotation
vocale
Numérotation
vocale
Appuyer sur le bouton -
Signal de touche
Signal DEL 2
Renuméroter
Numérotation
vocale
Annuler la
numérotation
vocale
SIGNAL AUDIO
ETAT ACTUEL
TEMOIN DEL
TEMOIN HCC-250
FONCTION
FONCTIONNEMENT
TELEPHONE
HCC-250
Augmentation du
volume
Conversation
Conversation
Appuyer sur le bouton +
SIGNAL AUDIO
TEMOIN DEL
Baisse du
volume
Conversation
Conversation
Appuyer sur le bouton -
Sourdine
Conversation
Conversation
Appuyez simultanément sur le
bouton - et sur le bouton +
Signal de touche
Signal DEL 2
Couper la
sourdine
Conversation
Sourdine
Appuyer simultanément sur le
bouton - et le bouton +
Signal de touche
Signal DEL 2
Signal DEL 2
Signal DEL 2
Tableau 4 : Fonctions de transfert
ETAT ACTUEL
TEMOIN HCC-250
FONCTION
FONCTIONNEMENT
TELEPHONE
Transfert d'appel
(du kit auto au
téléphone)
Transfert d'appel
(du téléphone au carkit)
HCC-250
Conversation
Conversation
Appuyer sur le bouton
pendant au moins 3 secondes
Conversation
Conversation
Appuyer sur le bouton
HCC-250 - Français
SIGNAL AUDIO
TEMOIN DEL
Signal de la touche
Signal DEL 1
Signal de la touche
Signal DEL 2
Page 10
Tableau 5: Indication de faible courant
ETAT ACTUEL
TEMOIN HCC-250
FONCTION
FONCTIONNEMENT
TELEPHONE
Avertissement de
faible courant
HCC-250
SIGNAL AUDIO
TEMOIN DEL
Sauf courant coupé
Bip toutes les 20
secondes
Signal DEL 4
Tableau 6 : Fonctions d'appel avancées
ETAT ACTUEL
TEMOIN HCC-250
FONCTION
Maintenir un appel actif et
accepter un appel entrant
Eteindre l'appel actif et
répondre au nouvel appel
Basculer entre l'appel en
attente et l'appel actif
Terminer l'appel actif et
prendre l'appel en attente
Appels conférence
FONCTIONNEMENT
TELEPHONE
TELEPHONE
Conversatio
n
Conversatio
n
Conversatio
n
Conversatio
n
Conversatio
n
Attente
d'appel
Attente
d'appel
Appel en
attente
Appel en
attente
Appel en
attente
SIGNAL AUDIO
TEMOIN DEL
Appuyer sur le bouton +
pendant au moins 3 secondes
Signal DEL 2
Appuyer sur le bouton
Signal DEL 2
Appuyer sur le bouton +
pendant au moins 3 secondes
Signal DEL 2
Appuyer sur le bouton
Signal DEL 2
Appuyer sur le bouton pendant au moins 3 secondes.
Signal DEL 2
Tableau 7 : Fonctionnement avec lecteur multi-média
ETAT ACTUEL
FONCTION
Lecture
TELEPHONE/
LECTEUR
TEMOIN HCC-250
FONCTIONNEMENT
HCC-250
SIGNAL AUDIO
Appuyer sur le bouton
Pause
Appuyer sur le bouton
Stop
Appuyer sur le bouton
pendant au moins 3 secondes
Augmentation du
volume
Baisse du volume
Avance
Retour
Appuyer sur le bouton +
Appuyer sur le bouton Appuyer sur le bouton +
pendant 3 secondes
Appuyer sur le bouton pendant 3 secondes
HCC-250 - Français
TEMOIN DEL
Page 11
Elimination des pannes
Si le kit auto ne fonctionne pas correctement, veuillez prendre les mesures correctives indiquées dans le tableau ci-dessous. Si le problème n'est
toujours pas résolu même après l'application des mesures correctives, veuillez contacter le vendeur qui vous a vendu le kit auto .
Etat
Le kit auto ne se met pas en marche
Impossible de communiquer au moyen
du kit auto
Impossible de coupler le kit auto avec
un téléphone portable Bluetooth
Volume du haut-parleur extrêmement
élevé ou faible
A vérifier
Action corrective
Vérifiez si la batterie du kit auto est
rechargée
Rechargez la batterie
Vérifiez si votre téléphone portable
supporte le casque et/ou
le(s) profil(s) mains-libres
Pour utiliser le kit auto , il est essentiel que votre téléphone
portable supporte le casque et/ou le(s) profil(s) mains-libres
(Vous devez rechercher les options telles que casque,
périphérique audio, etc. si votre téléphone portable ne
comporte pas d'option mains-libres. Ces options dépendent
cependant du modèle de téléphone portable utilisé.)
Vérifiez si la batterie est rechargée
à fond
Rechargez la batterie si sa charge est faible
Vérifiez si le kit auto est en marche
Appuyez sur
auto
Vérifiez si le kit auto est en mode
de couplage
et maintenez
L'appareil étant à l'arrêt, appuyez sur
pendant au moins 6 sec pour placer le kit auto en mode de
couplage
Vérifiez le volume du haut-parleur
Appuyez soit sur + soit sur - pour régler le volume en fonction
HCC-250 - Français
pendant 3 sec pour mettre en marche le kit
Page 12
Compléments d'information (Veuillez lire le supplément « Informations importantes »)
La portée des communications sans fil est de maximum 30 pieds (10 m) et les conditions varient selon les obstacles.
Le kit auto peut être connecté uniquement aux téléphones portables qui supportent le casque Bluetooth ou les profils mains-libres.
(Selon les différents modèles de téléphone portable, différentes options s'affichent, comme périphérique audio, etc.) Ce produit n'est
pas compatible avec les téléphones portables sans fil standard utilisés à domicile.
Comme il fonctionne à la même gamme de fréquence, le kit auto peut être affecté par les appareils qui fonctionnent à la bande ISM
(2.402 GHz ~ 2.480 GHz), par exemple, LAN sans fil, appareils micro-ondes, appareils médicaux, etc. Pour en assurer le bon
fonctionnement, le kit auto mains-libres doit être éloigné de ces appareils.
Si elle est manipulée correctement, une batterie rechargeable peut avoir une longue vie. Une nouvelle batterie ou une batterie qui
n'a pas été utilisée pendant une longue période peuvent avoir une capacité réduite les premières fois qu'elles sont utilisées.
La durée d'utilisation standard de la batterie peut varier en fonction des conditions d'utilisation du téléphone portable et du kit auto .
•
•
•
•
•
Précautions à prendre
•
Utilisez le chargeur fourni dans l'emballage.
•
Attention, risque d'explosion si la batterie est remplacée par une batterie de type incorrect.
•
Veuillez vérifier les lois et règlements en vigueur relatifs à l'usage des téléphones portables et de l'équipement mains-libres dans
les zones où vous conduisez. Consacrez toujours votre pleine attention à la conduite et garez-vous avant de passer ou recevoir
des appels si les conditions de conduite l'exigent.
•
Ne permettez pas aux enfants de jouer avec votre kit auto car il contient de petites pièces susceptibles de se détacher et ils
pourraient s'étrangler en les avalant.
•
Cet appareil contient une batterie Li-Po. Veuillez toujours le conserver éloigné du feu (y compris quand vous jetez le kit auto) car
la batterie risquerait d'exploser.
•
Ce kit auto , et en particulier la batterie intégrée, doivent être jetés conformément aux normes ou recyclés. Veuillez contacter le
centre de recyclage compétent pour en savoir plus sur les méthodes d'élimination.
•
Veuillez éteindre votre kit auto dans une zone dont l'atmosphère est potentiellement explosive (conteneurs de pétrole, entrepôts
d'explosifs, etc.) Dans de rares cas, ce produit peut générer des étincelles. Ceci peut causer une explosion ou un incendie et
entraîner des blessures corporelles. Veuillez vous tenir strictement aux avertissement dans ces zones.
•
Ne laissez pas choir cet appareil de haut.
•
Ne modifiez pas, ne réparez pas et ne démontez pas l'appareil.
•
N'exposez pas cet appareil directement à l'eau, à l'alcool, au benzène, etc. pour le nettoyage.
•
N'exposez pas l'appareil aux produits inflammables.
•
Ne placez pas l'appareil à proximité de produits inflammables.
•
Protégez l'appareil de l'humidité et de la poussière.
•
Ne placez pas d'objet lourd sur l'appareil.
•
Veuillez recharger votre oreillette ou votre kit auto uniquement si votre voiture est à l'arrêt. Pendant la charge, l'oreillette ou le kit
auto ne peut pas être utilisé.
HCC-250 - Français
MANUAL DEL USUARIO
Kit Bluetooth HCC-250 para automóvil
CONTENIDO
1.
2.
3.
Introducción ............................................................................................... 2
Contenido del paquete................................................................................. 2
Utilización del kit manos libres................................................................. 3
2.1. Carga de la batería ........................................................................... 3
2.2. Montaje del kit manos libres.............................................................. 4
2.3. Encendido y apagado del kit manos libres ........................................ 4
2.4. Acople (pairing) y conexión del kit manos libres al
dispositivo Bluetooth ......................................................................... 5
2.4.1. Acople del kit manos libres a auriculares Bluetooth ............... 5
2.4.2. Borrado de todos los registros de acople ............................... 5
2.4.3. Conexión y desconexión del kit manos libres al
dispositivo Bluetooth ............................................................. 5
2.5 Funciones de llamada ........................................................................ 6
2.5.1 Operaciones de llamada básicas .............................................. 6
2.5.2 Silenciamiento de llamada ........................................................ 6
2.5.3 Transferencia de llamadas al/del auricular................................ 6
2.5.4 Marcado por voz ....................................................................... 6
2.5.5 Funciones de llamada avanzadas............................................. 6
2.6 Funciones AV .................................................................................... 6
2.6.1 Utilización de la función AV del auricular .................................. 6
2.6.2 Operaciones AV........................................................................ 7
2.7 Ajuste del volumen............................................................................. 7
2.8 Acople y conexión del kit manos libres a otro
dispositivo Bluetooth .......................................................................... 7
Guía rápida de usuario .............................................................................. 7
3.1. Pautas de indicación por LEDs ......................................................... 7
3.2. Guía rápida de usuario ..................................................................... 7
Subsanación de problemas ........................................................................11
Información adicional ..................................................................................12
Seguridad ...................................................................................................12
Página 2
1. INTRODUCCIÓN
Kit Bluetooth para automóvil
El kit Bluetooth para automóvil es un producto especialmente diseñado para que los conductores puedan hacer y recibir llamadas con su teléfono móvil sin tener
que sostener éste con la mano. Le ofrecerá una clara conexión de audio inalámbrica a su móvil Bluetooth y PDA. Además de en el coche, podrá usarlo asimismo
en su casa o en la oficina.
Este equipo portátil, alimentado por una batería recargable de ion-litio, puede usarse tanto en el automóvil como en la oficina, donde podrá aplicarlo como un kit
manos libres que le permitirá hacer/recibir llamadas sin tener que ocupar su mano en sostener el teléfono. También podrá colocarlo junto a un PC con capacidad
Bluetooth para hacer llamadas telefónicas vía Internet.
Asegúrese de que todos los elementos mencionados abajo estén incluidos en el paquete. Si falta alguno de ellos, diríjase por favor a su proveedor.
Contenido del paquete
1. Bluetooth Car-Kit
2. Manual del usuario
3. Tarjeta de garantía
4. Anexo "Información importante"
5. Cargador 12/24 V para automóvil
6. Presilla para parasol
1.
2.
3.
4.
7. Presilla para rejilla
5.
6.
7.
1. Altavoz: salida de voz.
2. LED rojo/azul: indicador de estado.
3. Botón
: encender/apagar el dispositivo.
4. Botón
: responder/finalizar llamadas, conectar/desconectar,
transferir llamadas entre manos libres y teléfono.
5. Botón +: subir volumen, rellamada, silenciación.
6. Botón -: bajar volumen, borrar todos los registros de acople,
rechazar llamadas, marcado por voz, silenciación
7. Micrófono: entrada de voz
Figura 1: Vista general
8. Puerto de carga: para conectar al cargador portátil (o al
automóvil) y cargar la batería del dispositivo
HCC-250 - Español
Página 3
2. UTILIZACIÓN DEL KIT MANOS LIBRES
Batería: Carga y Utilización
2.1 Carga de la batería
Este kit para automóvil tiene una batería recargable de polímero-litio. La primera vez deberá cargarse unas 4 horas. En adelante necesitará 2-3 horas para
cargarse. Para la carga, proceda del siguiente modo:
1.
Conecte el cargador a la toma del encendedor de cigarrillos, o enchufe el cable USB a su PC.
2.
Tal y como se ve en la fig. 2, enchufe el conector del cargador al puerto de carga de su kit manos libres para comenzar a cargar. Durante la carga, los
LEDs rojo y azul estarán encendidos. Cuando el LED rojo se apague, la batería estará totalmente cargada y debería desconectarse el cargador tanto del
kit mismo como de la toma de corriente.
Figura 2: Carga de la batería
Nota:
Es recomendable cargar el kit cuando no se tiene en uso.
Observe que al enchufar el cargador se producirá un reset. No obstante, el kit estará en modo normal durante el proceso de carga (con el cargador enchufado).
Durante una llamada, la conexión existente entre el kit y el teléfono móvil se reseteará tras enchufar el cargador. La llamada se transferirá momentáneamente
para
de vuelta al teléfono móvil. El kit intentará reestablecer la conexión automáticamente. Algunas veces, el usuario tendrá que pulsar brevemente el botón
reconectar el dispositivo.
Información de la batería
Cuando está totalmente cargada, la batería permite tiempos de conversación continua hasta 14 horas y tiempos de stand-by (kit encendido, pero sin establecer
conexión) de unos 25 días.
Cuando la batería tiene poca carga, el kit pita una vez cada 20 segundos y los LEDs rojo y azul se encienden alternativamente cada 3 segundos. Cargue
entonces la batería tal y como se ha descrito más arriba.
Nota: Las sobrecargas acortan la vida útil de la batería. Una batería plenamente cargada se va descargando con el tiempo, aun cuando no se use. Las
temperaturas extremas (mucho calor o frío) afectan asimismo a su aptitud de recarga, capacidad y vida útil.
Recargue su auricular inalámbrico o su kit para automóviles sólo estando su automóvil parado. El auricular inalámbrico o kit para automóviles no se
puede usar mientras se recarga.
HCC-250 - Español
Página 4
2.2 Montaje del kit manos libres
El kit para automóvil HCC-250 puede montarse fácilmente dentro del vehículo con ayuda de la presilla para fijar al parasol sobre el asiento del conductor, o
insertando la presilla para rejilla de ventilación delante del asiento del conductor.
Como se ve en las figuras 3 y 4, hay dos imanes en la cara trasera del kit. Podrá pegar ahí la presilla para parasol o la presilla para rejilla de ventilación.
Para montar mejor el dispositivo, enganche primero la presilla al parasol y luego fije bien el kit a la presilla ya enganchada al parasol.
Si usa la presilla para rejilla, podrá ajustar la dirección de la presilla para adaptarse a la rejilla de ventilación de su coche, tal y como se muestra en la figura 5.
Nota: El micrófono del kit HCC-250 debe apuntar hacia la fuente de sonido.
Imán
Presilla para rejilla
Presilla para parasol
Figura 3: Fijación de presilla de parasol a imanes
Figura 4: Fijación de presilla de rejilla a imanes
Presilla para rejilla
(dirección vertical)
Presilla para rejilla
(dirección horizontal)
Base de metal
Figura 5: Ajuste de dirección (horizontal o vertical) de presilla de rejilla
Tirar un poco y empujar
luego aquí hacia abajo
Figura 6: Separación de presilla y base de metal
Por ser portátil y de uso flexible, este kit para automóvil puede usarse también en otros lugares, p.ej. en el hogar o en la oficina.
2.3 Encendido y apagado del kit HCC-250
Encendido del kit manos libres: pulse y mantenga pulsado el botón
al menos durante 3 segundos y escuchará 2 pitidos de encendido, el LED azul parpadeará
rápidamente 3 veces y luego 1 vez por 3 segundos; el LED rojo está apagado. Esto indica que el kit manos libres está encendido.
Apagado del HCC-250: pulse y mantenga pulsado el botón
rápidamente 3 veces y luego se apagarán todos los LEDs.
al menos durante 3 segundos y escuchará 2 pitidos de apagado, el LED rojo parpadeará
Esto indica que el kit manos libres está apagado.
HCC-250 - Español
Página 5
2.4 Acople (pairing) y conexión del kit manos libres al dispositivo Bluetooth
2.4.1 Acople del HCC-250 a un teléfono móvil (u otro dispositivo) Bluetooth
Para hacer/recibir llamadas, primero deberá acoplar (pairing) el HCC-250 y el teléfono. Con el acople se establece una correspondencia unívoca entre
el kit y el teléfono móvil. El teléfono móvil memorizará el ID único (o clave de acceso) del HCC-250. Esto garantiza que durante las llamadas se usará
un enlace inalámbrico único y cifrado entre el kit y el teléfono móvil.
Para esta operación, proceda del siguiente modo:
1.
Coloque su HCC-250 cerca de su teléfono móvil con capacidad Bluetooth y asegúrese de que su kit esté apagado y su teléfono encendido.
2.
al menos durante 6 segundos hasta que los LEDs rojo y azul alternen continuamente. Escuchará 2 pitidos de
Pulse y mantenga pulsado el botón
encendido y un tono de acople (pairing) que le indicarán que el kit está en modo para acople.
3.
Siguiendo la guía de usuario de su teléfono para activar la búsqueda de dispositivos Bluetooth en el teléfono, en la pantalla del mismo podrá ver una lista
de los equipos Bluetooth encontrados por el teléfono una vez concluido el proceso de búsqueda.
4.
Seleccione este kit Bluetooth HCC-250 en la lista e inicie el acople siguiendo las instrucciones que aparecerán en la pantalla del teléfono.
5.
Prosiga según las instrucciones en pantalla escribiendo la clave "0000" y confirme ésta para acoplar el HCC-250 a su teléfono móvil. Una vez se haya
completado el proceso de acople, escuchara un pitido de conexión y el LED azul parpadeará rápidamente 3 veces durante 2 segundos. Esto indica que el
kit y el teléfono móvil están acoplados y conectados.
Nota:
Si el acople es correcto, el LED rojo del kit estará apagado. El LED azul parpadeará rápidamente 3 veces durante 2 segundos. Si su teléfono móvil indica que el
acople ha resultado fallido y el kit sigue en el modo para acople (pairing), deberá repetir los pasos del 3 al 5 para realizar el acople.
Su kit permanecerá en modo para acople durante unos 2 minutos. Si el acople no se ha realizado antes de que pasen 2 minutos, el HCC-250 adoptará el modo
stand-by (es decir, sin conexión Bluetooth en tal caso). Tendrá que apagar el kit y repetir los pasos del 2 al 5 para reiniciar el proceso de acople.
2.4.2 Borrado de todos los registros de acople
Este kit puede acoplarse hasta a 8 dispositivos Bluetooth. Una vez en el modo para acople, pulse y mantenga pulsado el botón "-" al menos durante 3 segundos
para poder borrar todos los perfiles de dispositivos Bluetooth registrados en el kit. El kit saldrá entonces del modo para acople. El LED azul parpadeará
rápidamente 1 vez durante 3 segundos.
2.4.3 Conexión y desconexión del kit HCC-250 al dispositivo Bluetooth
Para que el kit de automóvil comunique con un equipo Bluetooth mediante perfil manos libres, deberá haberse establecido antes la conexión Bluetooth entre
ambos equipos. Si dos equipos Bluetooth ya han sido acoplados ("paired") antes, podrá reconectarlos sencillamente.
Conexión del HCC-250 a un teléfono móvil Bluetooth
El inicio de una solicitud desde el kit o el teléfono móvil puede restablecer la conexión Bluetooth. Proceda como se indica a continuación:
.
1.
Inicio de solicitud de conexión desde el kit: coloque el kit cerca de su teléfono móvil Bluetooth y pulse el botón
2.
Inicio de solicitud de conexión desde el teléfono móvil Bluetooth: coloque el kit cerca de su teléfono móvil Bluetooth y siga las instrucciones de la guía del
usuario del teléfono para hallar el kit y envíe una solicitud de conexión.
Cuando se establezca la conexión, escuchará un pitido de conexión y el LED azul parpadeará rápidamente 3 veces durante 2 segundos.
Desconexión del HCC-250 de su teléfono móvil Bluetooth:
Cuando el kit está conectado al teléfono móvil Bluetooth (o está en modo conectado), podrá desconectarlo como se indica a continuación:
al menos 3 segundos.
1.
Pulsando y manteniendo pulsado el botón
2.
Siguiendo las instrucciones de la guía del usuario del teléfono móvil y desconectando desde el teléfono.
Cuando se desconecte, escuchará un pitido de conexión y el LED azul parpadeará rápidamente 1 vez durante 3 segundos.
HCC-250 - Español
Página 6
2.5 Funciones de llamada
2.5.1 Operaciones de llamada básicas
Antes de marcar, el kit HCC-250 y el teléfono móvil deberán estar encendidos. Y no debe olvidarse haber enlazado el kit y el teléfono mediante Bluetooth.
Responder llamadas:
pulse el botón
Rechazar llamadas:
pulse el botón - y téngalo pulsado al menos 3 segundos.
.
Finalizar llamadas:
pulse el botón
Rellamada:
pulse el botón + y téngalo pulsado al menos 3 segundos
.
En las operaciones arriba citadas, el LED azul parpadeará rápidamente 3 veces durante 2 segundos y el LED rojo estará apagado.
2.5.2 Silenciación de llamadas
Podrá silenciar (o "desilenciar") una llamada entrante pulsando simultáneamente los botones "+" y "-". El LED azul parpadeará rápidamente 3 veces durante 2
segundos y el LED rojo estará apagado.
2.5.3 Transferencia de llamadas al/del teléfono móvil
Transferencia de llamadas al teléfono móvil: pulse y mantenga pulsado el botón
3 segundos; el LED rojo estará apagado.
Transferencia de llamadas del teléfono móvil: pulse el botón
al menos durante 3 segundos; el LED azul parpadeará rápidamente 1 vez en
, y el LED azul parpadeará rápidamente 3 veces durante 2 segundos.
2.5.4 Marcado por voz
Si el teléfono conectado dispone de marcado por voz, podrá pulsar y mantener pulsado el botón "-" (al menos 3 segundos) para activar la función de marcado
por voz. El LED azul parpadeará rápidamente 3 veces durante 2 segundos. Para poder usar el marcado por voz, primeramente deberá haber guardado archivos
de voz en su teléfono móvil. En el manual de su teléfono móvil hallará instrucciones más detalladas sobre cómo configurar el marcado por voz y guardar
archivos de voz.
Cuando el marcado por voz está en curso, podrá cancelarse la llamada pulsando brevemente el botón "-". El LED azul parpadeará rápidamente 3
veces durante 2 segundos y el LED rojo estará apagado.
2.5.5 Funciones de llamada avanzadas
Si su teléfono móvil tiene funciones de llamada en espera y multiconferencia, podrá hacer uso de éstas en el kit HCC-250 de la siguiente manera:
1.
2.
Cuando entra una nueva llamada mientras Vd. está hablando:
1)
Pulse el botón + y téngalo pulsado al menos 3 segundos para retener la llamada activa y aceptar la llamada entrante.
2)
Pulse el botón
para finalizar la llamada activa y responder la llamada entrante.
Cuando hay dos llamadas en curso, una estará activa y la otra retenida:
1)
Pulse el botón + y téngalo pulsado al menos 3 segundos para cambiar entre la llamada activa y la retenida.
2)
Pulse el botón
para finalizar la llamada activa y aceptar la retenida.
3)
Pulse el botón "-" y téngalo pulsado al menos 3 segundos para hacer una multiconferencia.
En las operaciones arriba citadas, el LED azul parpadeará rápidamente 3 veces durante 2 segundos y el LED rojo estará apagado.
2.6 Funciones A2DP
Este kit es compatible con el perfil Bluetooth A2DP de reproducción musical de alta calidad. Cuando se conecta a un reproductor musical/multimedia Bluetooth o
a un teléfono móvil con compatibilidad A2DP, este producto permite el disfrute y reproducción remota en estéreo desde un reproductor.
2.6.1 Utilización de la función A2DP del teléfono móvil
En los teléfonos móviles compatibles con perfiles Bluetooth A2DP, podrá establecerse una conexión de audio entre el teléfono móvil y el kit para automóvil y
disfrutar así de la música que reproduce el teléfono. Según las prestaciones del teléfono, la conexión de audio podrá establecerse automáticamente cada vez que
empiece a reproducirse música.
Si, a pesar de ser su teléfono móvil compatible con perfiles Bluetooth A2DP, no consigue establecer una conexión de audio al reproducir música, deberá consultar
la guía del usuario de su teléfono para establecer una conexión de audio antes de reproducir música.
HCC-250 - Español
Página 7
2.6.2 Operaciones AVRCP
Las siguientes operaciones sirven para controlar remotamente su teléfono Bluetooth o su reproductor a la hora de reproducir música:
Reproducir: pulse el botón
Pausa:
pulse el botón
.
.
Stop:
pulse el botón
Avance:
Retroceso:
pulse el botón + durante al menos 3 segundos.
pulse el botón - durante al menos 3 segundos.
y téngalo pulsado al menos 3 segundos.
2.7 Ajuste del volumen
En los modos conectado o de llamada/reproducción, podrá subir o bajar el volumen del sonido pulsando respectivamente los botones "+" o "-". Podrá repetir esta
operación hasta que en el altavoz tenga el volumen deseado.
Nota:
En la mayoría de los Bluetooth, el control de volumen del kit para automóvil se sincroniza con el teléfono. Es decir, el volumen de sonido de su HCC-250 puede
controlarse desde su teléfono y viceversa. Sin embargo, es posible que no siempre sea así, debido a las diversas implementaciones de los distintos fabricantes
de teléfonos.
2.8 Acople y conexión del kit manos libres a otro dispositivo Bluetooth
Además de a un teléfono Bluetooth, este kit para automóvil puede acoplarse asimismo a otros dispositivos Bluetooth para obtener una comunicación inalámbrica
de corta distancia. Pueden usarse procedimientos de acople similares a los descritos en la sección 2.4. También podrá consultar en la guía del usuario del
dispositivo Bluetooth cómo realizar el acople (pairing) desde el dispositivo.
Este kit puede acoplarse hasta a 8 dispositivos Bluetooth (incluidos teléfonos móviles). Los correspondientes 8 registros de acople se guardan en la memoria del
kit. Cada dispositivo acoplado puede comunicar inalámbricamente con el kit estableciendo una conexión Bluetooth. Sírvase consultar la sección 2.4.3 que trata de
cómo se establece una conexión Bluetooth.
3. GUÍA RÁPIDA DE USUARIO
3.1 Pautas de indicación por LEDs
Pauta de LED 1: LED azul parpadea 1 vez durante 3 segundos, LED rojo apagado.
Pauta de LED 2: LED azul parpadea rápidamente 3 veces 2 segundos, LED rojo apagado.
Pauta de LED 3: LEDs rojo y azul alternan continuamente.
Pauta de LED 4: LEDs rojo y azul alternan cada 3 segundos.
Pauta de LED 5: Todos los LEDs apagados.
HCC-250 - Español
Página 8
3.2 Guía rápida de usuario
Podrá consultar las instrucciones de la tabla 1-7 a la hora de usar su kit
HCC-250 para automóvil. Sírvase consultar en la sección 1 las funciones
pormenorizadas de las teclas y sus tiempos de pulsación.
Nota: Su kit para automóvil sólo podrá comunicarse con dispositivos Bluetooth a los que se haya acoplado ("paired"). En aquellos dispositivos que admitan
meramente el perfil manos libres (HFP), también necesitará establecer una conexión Bluetooth entre su kit y su teléfono antes de poder hacer y recibir llamadas.
Tabla 1: Encendido y apagado
ESTADO ACTUAL
INDICADOR HCC-250
FUNCIÓN
OPERACIÓN
TELÉFONO
HCC-250
Encendido
Apagado
Apagado
Stand-by
Pulsar y mantener pulsado el
botón
al menos 3 s.
Pulsar y mantener pulsado el
botón
al menos 3 s.
PITIDO DE AUDIO
INDICADOR POR LED
2 pitidos de encendido
Pauta de LED 1
2 pitidos de apagado
Pauta de LED 5
Tabla 2: Acople y conexiones
FUNCIÓN
ESTADO ACTUAL
TELÉFONO
Entrada a modo
para acople
Borrar todos los
perfiles acoplados
OPERACIÓN
HCC-250
Apagado
Modo para
acople
Acople del kit a un
teléfono
Encendido
Modo para
acople
Conectar (kit a un
teléfono)
Stand-by
(desconectado)
Stand-by
(desconectado)
Desconectar
Stand-by
(conectar)
Stand-by
(conectar)
Pulsar y mantener pulsado el
al menos 6 s.
botón
Pulsar y mantener pulsado el
botón - al menos 3 s.
Para completar el acople siga
la guía de usuario de su
teléfono.
La clave de acceso es "0000”
Pulsar botón
o establecer
conexión desde el teléfono
Pulsar y mantener pulsado el
al menos 3 s. o
botón
consultar el manual para
iniciar la conexión desde el
teléfono.
HCC-250 - Español
INDICADOR HCC-250
PITIDO DE AUDIO
INDICADOR POR LED
2 pitidos de encendido y
1 de acople
Pauta de LED 3
Pauta de LED 1
1 pitido de conexión
Pauta de LED 2
1 pitido de conexión
Pauta de LED 2
Pauta de LED 1
Página 9
Tabla 3: Funciones de llamada
ESTADO ACTUAL
INDICADOR HCC-250
FUNCIÓN
OPERACIÓN
TELÉFONO
HCC-250
Responder
llamada
Llamada entrante
Llamada
entrante
Pulsar botón
PITIDO DE AUDIO
Pauta de LED 2
INDICADOR POR LED
Rechazar
llamada
Llamada entrante
Llamada
entrante
Pulsar y mantener pulsado el
botón - al menos 3 s.
Pauta de LED 2
Finalizar llamada
Conversación
Conversación
Pulsar botón
Pauta de LED 2
Rellamada
Stand-by
Stand-by
Pulsar y mantener pulsado el
botón + al menos 3 s.
Sonido de tecla
Pauta de LED 2
Marcado por voz
Stand-by
Stand-by
Pulsar y mantener pulsado el
botón - al menos 3 s.
Sonido de tecla
Pauta de LED 2
Marcado por voz
Pulsar botón -
Sonido de tecla
Pauta de LED 2
Cancelar
marcado por voz
Marcado por voz
ESTADO ACTUAL
INDICADOR HCC-250
FUNCIÓN
OPERACIÓN
TELÉFONO
HCC-250
PITIDO DE AUDIO
Subir volumen
Conversación
Conversación
Pulsar botón +
Pauta de LED 2
Bajar volumen
Conversación
Conversación
Pulsar botón -
Pauta de LED 2
Sonido de tecla
Pauta de LED 2
Sonido de tecla
Pauta de LED 2
Silenciación
Conversación
Conversación
Pulsar botón - y botón +
simultáneamente
De-silenciación
Conversación
Silenciación
Pulsar botón - y botón +
simultáneamente
INDICADOR POR LED
Tabla 4: Funciones de transferencia
ESTADO ACTUAL
FUNCIÓN
Transferir llamada
(del kit al teléfono)
Transferir llamada
(del teléfono al kit)
INDICADOR HCC-250
OPERACIÓN
TELÉFONO
Conversaci
ón
Conversaci
ón
HCC-250
PITIDO DE AUDIO
INDICADOR POR LED
Conversación
Pulsar y mantener pulsado el
al menos 3 s.
botón
Sonido de tecla
Pauta de LED 1
Conversación
Pulsar botón
Sonido de tecla
Pauta de LED 2
Tabla 5: Indicador de batería baja
ESTADO ACTUAL
FUNCIÓN
TELÉFONO
Aviso de batería baja
INDICADOR HCC-250
OPERACIÓN
HCC-250
Excepto apagado
HCC-250 - Español
PITIDO DE AUDIO
INDICADOR POR LED
Pitido cada 20 segundos
Pauta de LED 4
Página 10
Tabla 6: Funciones de llamada avanzadas
ESTADO ACTUAL
INDICADOR HCC-250
FUNCIÓN
Retener llamada activa y
aceptar llamada entrante
Finalizar llamada activa y
responder nueva llamada
Cambiar entre llamada
activa y retenida
Finalizar llamada activa y
aceptar llamada retenida
Llamadas en
multiconferencia
OPERACIÓN
TELÉFONO
TELÉFONO
Conversaci
ón
Conversaci
ón
Conversaci
ón
Conversaci
ón
Conversaci
ón
Llamada en
espera
Llamada en
espera
Llamada
retenida
Llamada
retenida
Llamada
retenida
PITIDO DE AUDIO
INDICADOR POR LED
Pulsar y mantener pulsado el
botón + al menos 3 s.
Pauta de LED 2
Pulsar botón
Pauta de LED 2
Pulsar y mantener pulsado el
botón + al menos 3 s.
Pauta de LED 2
Pulsar botón
Pauta de LED 2
Pulsar y mantener pulsado el
botón - al menos 3 s.
Pauta de LED 2
Tabla 7: Utilización junto con reproductor multimedia
ESTADO ACTUAL
FUNCIÓN
Reproducir
TELÉFONO /
REPRODUCTOR
INDICADOR HCC-250
OPERACIÓN
HCC-250
PITIDO DE AUDIO
Pulsar botón
Pausa
Pulsar botón
Stop
Pulsar y mantener pulsado el
al menos 3 s.
botón
Subir volumen
Pulsar botón +
Bajar volumen
Avance
Retroceso
Pulsar botón Pulsar y mantener pulsado 3
segundos el botón +
Pulsar y mantener pulsado 3
segundos el botón -
HCC-250 - Español
INDICADOR POR LED
Página 11
Subsanación de problemas
En caso de que el kit para automóviles no funcione correctamente, proceda con la medida de corrección especificada en la siguiente tabla. Si el
problema no se soluciona con ello, diríjase por favor al proveedor del que adquirió su kit para automóviles.
Estado
El kit para automóviles no se enciende
No puede establecerse comunicación
usando el kit
No puede acoplarse el kit con un
teléfono móvil Bluetooth
Volumen de altavoz extremadamente
alto o bajo
A comprobar
Medida correctiva
Compruebe si la batería del kit
para automóviles está cargada
Cargue la batería
Compruebe si su teléfono móvil es
compatible con los perfiles
"auricular inalámbrico"
y/o "manos libres"
Para poder usar el kit para automóviles es esencial que su
teléfono móvil sea compatible con los perfiles "auricular
inalámbrico" y/o "manos libres"
(Puede que tenga que buscar otras opciones tales como
auricular inalámbrico, dispositivo de audio etc. en el caso de
que su teléfono móvil no disponga de opción manos libres;
estas opciones, no obstante, dependen del modelo de teléfono
móvil que se esté usando)
Compruebe si la batería está
completamente cargada
Cargue la batería si su nivel de carga es bajo
Compruebe si el kit para automóvil
está encendido
Pulse
Compruebe si el kit para automóvil
está en modo de acople
Con el dispositivo apagado, pulse y mantenga presionado
durante al menos 6 seg. para llevar el kit para automóviles al
modo de acople (pairing)
Compruebe el volumen del altavoz
Pulse + o - para regular adecuadamente el volumen
HCC-250 - Español
durante 3 seg. para encender el kit
Página 12
Información adicional (Lea también el anexo "Información importante")
•
El rango de alcance de la comunicación inalámbrica es de un máximo de 10 metros (30 pies) y las condiciones pueden variar en
función a los obstáculos.
El kit para automóviles puede conectarse únicamente a aquellos teléfonos móviles compatibles con los perfiles de auricular inalámbrico
Bluetooth o manos libres. (Según los diferentes modelos de teléfono móvil, le mostrará distintas opciones, como dispositivo de audio
etc.) Este producto no es compatible con los teléfonos estándar sin cable utilizados en el ámbito doméstico.
Puesto que trabaja con el mismo espectro de frecuencias, el kit para automóviles puede verse afectado por dispositivos que operen en
la banda ISM (2,402 GHz ~ 2,480 GHz), p.ej. LAN inalámbrico, microondas, aplicaciones médicas etc. Por tanto, para garantizar un
funcionamiento correcto debería mantenerse el kit de manos libres para automóvil lejos de dichos dispositivos.
Si se maneja con propiedad, una batería recargable puede tener una larga vida útil. Una batería nueva o una que no haya sido utilizada
durante mucho tiempo pueden presentar una capacidad reducida las primeras veces en que se usen.
El tiempo estándar de uso de la batería puede variar dependiendo de las condiciones de utilización del teléfono móvil y del kit para
automóvil.
•
•
•
•
Seguridad
•
Use el cargador incluido en el paquete.
•
¡Atención! Riesgo de explosión si la batería se sustituye por otra del tipo incorrecto.
•
Tenga en cuenta las leyes y reglamentos de uso de teléfonos móviles y equipos de manos libres en las zonas en que circule con
su vehículo. Concéntrese siempre en la conducción y salga de la carretera y estacione antes de hacer o responder una llamada si
es que las condiciones de conducción así lo requieren.
•
No permita que los niños jueguen con el kit para automóviles, ya que éste contiene pequeñas piezas que podrían soltarse y
causarles asfixia.
•
Este kit tiene una batería de polímero-litio. Manténgala alejada del fuego en todo momento (también cuando se deseche el
dispositivo) porque de lo contrario la batería podría explotar.
•
El kit para automóviles, en especial su batería, deberá desecharse debidamente o reciclarse. Consulte en los centros de reciclaje
de su localidad a este respecto.
•
Por favor, desconecte su kit
para automóviles en áreas con atmósferas potencialmente explosivas (almacenes de aceite o
explosivos etc.). En casos excepcionales, este producto podría generar chispas, lo que podría a su vez provocar una explosión o
un incendio resultando en lesiones personales. Atienda por tanto cuidadosamente las indicaciones de advertencia en dichas áreas.
•
No deje caer de altura esta unidad.
•
No modifique, repare o desmonte esta unidad.
•
No exponga esta unidad a contacto directo con agua, alcohol, gasolina etc. para limpiarla.
•
No exponga esta unidad a contacto directo con llamas.
•
No coloque esta unidad cerca de material inflamable.
•
Proteja esta unidad de la humedad y el polvo.
•
No ponga ningún objeto pesado sobre esta unidad.
•
Recargue su auricular inalámbrico o su kit para automóviles sólo estando su automóvil parado. El auricular inalámbrico o kit para
automóviles no se puede usar mientras se recarga.
HCC-250 - Español
GEBRUIKSHANDLEIDING
Bluetooth carkit HCC-250
INHOUD
1.
2.
3.
Introductie .................................................................................................. 2
Leveromvang ............................................................................................... 2
Uw handsfree gebruiken ........................................................................... 3
2.1. Batterij Opladen ................................................................................ 3
2.2. Uw handsfree bevestigen.................................................................. 4
2.3. Handsfree in-/uitschakelen................................................................ 4
2.4. Uw handsfree pairen/verbinden met Bluetooth-apparaat .................. 5
2.4.1. Uw handsfree pairen met Bluetooth-handset ............................ 5
2.4.2. Alle gepairde records wissen .................................................... 5
2.4.3. Uw handsfree verbinden/ontkoppelen via Bluetooth ................. 5
2.5 Oproepfuncties................................................................................... 6
2.5.1 Algemene bediening ................................................................. 6
2.5.2 Mute.......................................................................................... 6
2.5.3 Oproepen overzenden naar/van uw handset ............................ 6
2.5.4 Voicedialing .............................................................................. 6
2.5.5 Geavanceerde oproepfuncties .................................................. 6
2.6 AV-functies ........................................................................................ 6
2.6.1 Handset AV-functie gebruiken .................................................. 6
2.6.2 AV-bediening ............................................................................ 7
2.7 Volume-instelling................................................................................ 7
2.8 Uw handsfree pairen/verbinden met ander
Bluetooth-apparaat ............................................................................ 7
Quick User Guide....................................................................................... 7
3.1. LED-indicatiepatronen ...................................................................... 7
3.2. Quick User Guide.............................................................................. 8
Oplossen van storingen ......................................................... ....................11
Aanvullende informatie .......................................................... ....................11
Veiligheid .............................................................................. ....................12
Pagina 2
1. INTRODUCTIE
Bluetooth carkit
Deze Bluetooth carkit is een speciaal ontworpen product waarmee autobestuurders mobiel kunnen telefoneren zonder de mobiele telefoon te moeten vasthouden.
Het verschaft een zuivere, snoerloze audioverbinding met uw Bluetooth mobiele telefoon en PDA. Het product kan behalve in de auto ook op kantoor of thuis
worden gebruikt.
Naast gebruik in de auto kan deze draagbare uitrusting, die wordt ondersteund door een interne oplaadbare lithium-ionbatterij, ook op kantoor als normale
handsfree-uitrusting om te telefoneren zonder de telefoon te moeten vasthouden worden gebruikt. De uitrusting kan ook naast een PC met Bluetooth worden
gepositioneerd om te telefoneren via internet.
Controleer of onderstaande componenten deel uitmaken van de levering. Raadpleeg bij een onvolledige levering uw dealer.
Leveromvang
1. Bluetooth Car-Kit
2. Gebruikshandleiding
3. Garantiekaart
4. Aanhangsel “Belangrijke informatie”
5. Zonneklepclip
6. Ventilatorclip
1.
2.
3.
4.
7. Zonneklepclip
5.
6.
7.
1. Luidspreker: Voicedelivery.
2. Rode/blauwe LED: Tonen apparaatstatus.
3. Toets
: Apparaat in-/uitschakelen.
4. Toets
: Oproep beantwoorden/beëindigen,
aansluiten/ontkoppelen, oproep overzenden tussen handsfree en
telefoon.
5. Toets +: Volume omhoog, laatste nummer herhalen, mute bellen.
6. Toets -: Volume omlaag, alle gepairde records wissen, oproep
afwijzen, voicedialing, mute bellen
7. Microfoon: Voicepick-up
Afbeelding: 1 Overzicht
8. Laadpoort: Aansluiten op mobiele (of auto-) lader om de
apparaatbatterij op te laden
HCC-250 - Nederlands
Pagina 3
2. UW HANDSFREE GEBRUIKEN
Batterij opladen en gebruiken
2.1 Batterij opladen
Deze carkit bevat een oplaadbare li-polymeerbatterij. De eerste keer opladen duurt ongeveer 4 uur. Later duurt dit ongeveer 2-3 uur. Gedetailleerde
oplaadprocedure:
1.
Sluit de auto-oplader aan op de sigarettenaansteker, of steek de USB-kabel in de PC.
2.
Zie afbeelding 2, steek de connector van de oplader in de handsfree-oplaadpoort om met opladen te beginnen. Zowel de rode als de blauwe LED brandt
tijdens opladen. Als de rode LED uitgaat, is de batterij helemaal opgeladen en kunt u de oplader van de carkit en de stroomuitgang scheiden.
Afbeelding: 2 Batterij Opladen
Opmerking:
Het is raadzaam om uw carkit op te laden als deze niet wordt gebruikt.
“Insteken” van de oplader leidt tot een apparaatreset. Maar als de carkit bezig is met opladen (oplader is ingestoken) werkt de carkit normaal.
Tijdens een oproep wordt de bestaande verbinding tussen de carkit en de mobiele telefoon gereset na “insteken” van de oplader. De oproep wordt tijdelijk
drukken
"teruggezet" naar de mobiele telefoon. De verbinding probeert de verbinding automatisch weer te maken. Eventueel moet de gebruiker kort op toets
om het apparaat weer te verbinden.
Batterij Informatie
Een volledig geladen batterij ondersteunt ononderbroken spreektijd tot 14 uur en stand-by (bijvoorbeeld als het apparaat zonder verbinding is ingeschakeld)
gedurende ongeveer 25 dagen.
Als de batterij bijna ontladen is, piept de carkit ongeveer elke 20 seconden en gaan de blauwe en rode LED's om de 3 seconden afwisselend branden; laad dan
de batterij op zoals hierboven beschreven.
Opmerking: Overladen verkort de levensduur van de batterij. Als een geheel opgeladen batterij niet wordt gebruikt, verliest deze na verloop van tijd vermogen.
Extreme temperatuur (te heet of te koud) beïnvloedt eveneens de laadprestaties en de levensduur.
Headset of carkit alleen opladen terwijl de auto stil staat. Tijdens het opladen kan de headset of carkit niet worden gebruikt.
HCC-250 - Nederlands
Pagina 4
2.2 Uw handsfree bevestigen
De HCC-250 Car-Kit kan eenvoudig in een auto worden bevestigd met de zonneklepclip om het product op de zonneklep boven de bestuurdersstoel of met de
ventilatorbevestigingsclip te bevestigen.
Zoals te zien in afbeeldingen 3 en 4 beschikt het apparaat aan de achterkant over twee magnetische clips. Hieraan kan de zonneklepclip of de ventilatorclip
worden bevestigd. Voor goede montage is het verstandig om eerst de zonneklepclip aan de zonneklep te bevestigen, en dan de carkit aan de zonneklepclip.
Om de ventilatorclip te gebruiken kunt u de cliprichting aan uw autoventilator aanpassen, zoals te zien in afbeelding 5.
Opmerking: De microfoon van de HCC-250 Car-Kit moet naar de geluidsbron gericht zijn.
Magneetpunt
Ventilator Bevestiging Clip
Zonneklepclip
Afbeelding 3: Zonneklepclip op magneetpunten bevestigen
Afbeelding 4: Ventilator bevestigen Bevestiging Clip aan magneetpunten
Ventilatorclip
(horizontale richting)
Ventilatorclip
(verticale richting)
Metalen Basis
Afbeelding 5: Richting van ventilatorclip instellen (verticaal of horizontaal)
Iets uittrekken en dan
omlaag duwen
Afbeelding 6: Clip van metalen basis losmaken
Door zijn grote mobiliteit en flexibiliteit kan deze carkit ook in andere omgevingen dan in een auto worden gebruikt.
2.3 HCC-250 Car-Kit in-/uitschakelen
Handsfree inschakelen: Houd toets
minstens 3 seconden ingedrukt tot 2 inschakeltonen klinken, de blauwe LED 3 keer kort knippert en dan 1 keer per 3
seconden; de rode LED is uit. Dit duidt erop dat de handsfree is ingeschakeld.
De HCC-250 uitschakelen: Houd toets
zijn.
minstens 3 seconden ingedrukt tot 2 uitschakeltonen klinken, de rode LED 3 keer knippert en vervolgens alle LED's uit
Dit duidt erop dat de carkit is uitgeschakeld.
HCC-250 - Nederlands
Pagina 5
2.4 Uw handsfree pairen/verbinden met Bluetooth-apparaat
2.4.1 Uw HCC-250 pairen via Bluetooth mobiele telefoon (of ander apparaat)
Alvorens te telefoneren moet u uw HCC-250 en telefoon eerst pairen. Door ze pairen worden uw carkit en uw mobiele telefoon exclusief met elkaar
verbonden. De mobiele telefoon onthoudt de unieke ID (of sleutel) van de HCC-250. Dit garandeert een unieke en gecodeerde snoerloze verbinding
tussen uw carkit en uw mobiele telefoon tijdens oproepen.
Gedetailleerde bedieningsprocedure:
1.
Positioneer uw HCC-250 dicht bij uw Bluetooth-mobiele telefoon en controleer of uw carkit is uitgeschakeld en de uw mobiele telefoon is ingeschakeld
2.
minstens 6 seconden ingedrukt tot de blauwe en rode LED's onderbroken afwisselend knipperen. U hoort 2 inschakeltonen en een
Houd toets
pairingtoon die aangeven dat de carkit in pairingmodus is
3.
Lees in de gebruiksaanwijzing van uw telefoon hoe u het zoeken naar een Bluetooth-apparaat vanuit uw telefoon kunt starten; op het scherm verschijnt
dan een lijst met Bluetooth-apparaten die door de telefoon zijn gevonden.
4.
Selecteer deze Bluetooth-carkit HCC-250 uit de lijst en start het pairen volgens de aanwijzingen op het scherm.
5.
Voer de sleutel “0000” in, en bevestig het pairen van de HCC-250 met uw mobiele telefoon. Zodra het pairen is voltooid, klinkt een verbindingstoon en
knippert de blauwe LED 3 keer per 2 seconden. Dit geeft aan dat het carkitapparaat en de mobiele telefoon zijn gepaired.
Opmerking:
Na succesvol pairen is de rode LED van de carkit uit. De blauwe LED knippert 3 keer per 2 seconden. Als uw mobiele telefoon aangeeft dat het pairen is mislukt
en de carkit nog in pairingmodus is, moet u teruggaan naar bovenstaande stappen 3-5 en het pairen herhalen.
Uw carkit blijft ongeveer 2 minuten in pairingmodus. Als pairen niet binnen 2 minuten kan worden voltooid, schakelt de HCC-250 in stand-bymodus (zonder
Bluetooth-verbinding in dit geval). U kunt de carkit nu uitschakelen en bovenstaande stappen 2-5 herhalen.
2.4.2 Alle gepairde records wissen
Deze carkit kan worden gepaired met tot 8 Bluetooth-apparaten. Als de carkit in pairingmodus is, kunnen door minstens 3 seconden ingedrukt houden van de toets alle in de carkit opgeslagen gepairde Bluetooth-apparaatprofielen worden gewist. De carkit verlaat dan de pairingmodus. De blauwe LED knippert 1 keer per
3 seconden.
2.4.3 Uw HCC-250 Car-Kit aansluiten op/ontkoppelen van een Bluetooth-apparaat
Als de carkit communiceert met een Bluetooth-uitrusting via Handsfree Profile, wordt de Bluetooth-verbinding tussen de twee apparaten eerst gemaakt. Als twee
Bluetooth-uitrustingen eenmaal zijn gepaired, kunnen deze eenvoudigweg opnieuw worden aangesloten.
Uw HCC-250 verbinden met een Bluetooth mobiele telefoon
Voor het maken van een Bluetooth-verbinding is het initiatief van een ofwel de carkit of de mobiele telefoon nodig. Gedetailleerde beschrijving:
.
1.
Verbinding maken vanuit de carkit: Positioneer de carkit in de buurt van de Bluetooth mobiele telefoon en druk dan op toets
2.
Verbinding maken vanuit de Bluetooth mobiele telefoon: Positioneer de carkit in de buurt van de Bluetooth mobiele telefoon en ga dan volgens de
gebruiksaanwijzing van de telefoon te werk om de carkit te vinden en de verbinding te maken.
Zodra de verbinding is gemaakt, klinkt een verbindingstoon en knippert de blauwe LED 3 keer per 2 seconden
Uw HCC-250 ontkoppelen van uw Bluetooth mobiele telefoon:
Als de carkit is verbonden met de Bluetooth mobiele telefoon (of in verbonden modus), kunt u deze als volgt ontkoppelen:
minstens 3 seconden ingedrukt.
1.
Houd toets
2.
De gebruiksaanwijzing van de mobiele telefoon volgen en de ontkoppelen vanuit de telefoon.
Zodra ontkoppelen is voltooid, klinkt een verbindingstoon en knippert de blauwe LED 1 keer per 3 seconden.
HCC-250 - Nederlands
Pagina 6
2.5 Oproepfuncties
2.5.1 Algemene oproepbediening
Voordat u een nummer kunt kiezen moeten zowel uw HCC-250 Car-Kit als uw mobiele telefoon zijn ingeschakeld. En uw carkit en telefoon moeten zijn verbonden
via Bluetooth.
Oproep beantwoorden:
Druk op toets
Oproep afwijzen:
Houd toets - minstens 3 seconden ingedrukt.
Oproep beëindigen:
Druk op toets
Nummer herhalen:
Houd toets + minstens 3 seconden ingedrukt
.
.
Voor bovenstaande bediening knippert de blauwe LED 3 keer kort per 2 seconden en is de rode LED uit.
2.5.2 Oproep mute
Tijdens een gesprek kunt u "mute" in- of uitschakelen door gelijktijdig indrukken van toets + en toets -. De blauwe LED knippert 3 keer kort per 2 seconden en de
rode LED is uit.
2.5.3 Oproepen overzenden naar/van uw mobiele telefoon
Oproepen overzenden naar/van uw mobiele telefoon: Houd toets
LED is uit.
Oproepen overzenden van uw mobiele telefoon: Druk op toets
minstens 3 seconden ingedrukt, de blauwe LED knippert 1 keer per 3 seconden; de rode
, en de blauwe LED knippert 3 keer kort per 2 seconden.
2.5.4 Voicedialing
Als de verbonden telefoon voicedialing ondersteunt, kunt u toets - minstens 3 seconden ingedrukt houden om voicedialing te activeren. De blauwe LED knippert
3 keer per 2 seconden. Voordat u voicedialing kunt gebruiken, moet u de voicetags in uw mobiele telefoon hebben opgenomen. Zie de handleiding van uw
mobiele telefoon voor een nauwkeurig beschrijving over het activeren van voicedialing en het opnemen van voicetags.
Als voicedialing is geactiveerd, kunt u kort op toets - drukken om voicedialing af te breken. De blauwe LED knippert 3 keer kort per 2 seconden en de
rode LED is uit.
2.5.5 Geavanceerde oproepfuncties
Als uw mobiele telefoon beschikt over wachten/conferentie functies, kan uw HCC-250 Car-Kit de functie als volgt ondersteunen:
1.
2.
Als een nieuwe oproep binnenkomt terwijl u in gesprek bent:
1)
Houd toets + minstens 3 seconden ingedrukt om de actieve oproep te houden en de binnenkomende oproep te accepteren.
2)
Druk op toets
om de actieve oproep te beëindigen de nieuwe oproep te beantwoorden.
Bij twee oproepen is de ene actief en wordt de andere gehouden:
1)
Houd toets + minstens 3 seconden ingedrukt of wissel tussen actieve oproep en houdoproep.
2)
Druk op toets
om de actieve oproep te beëindigen en de houdoproep te accepteren.
3)
Houd toets - minstens 3 seconden ingedrukt voor een conferentie.
Voor bovenstaande bediening knippert de blauwe LED 3 keer kort per 2 seconden en is de rode LED uit.
2.6 A2DP Functies
Deze carkit ondersteunt het Bluetooth A2DP profiel om muziek in hoge kwaliteit af te spelen. Als een Bluetooth-geactiveerd multimedia-/muziekapparaat of
mobiele telefoon met A2DP-ondersteuning wordt verbonden, kan stereomuziek worden beluisterd en met de afstandsbediening worden geregeld.
2.6.1 A2DP-functie van de mobiele telefoon gebruiken
Voor mobiele telefoon die Bluetooth A2DP profielen ondersteunen, kunt u een audioverbinding tussen de mobiele telefoon en de carkit worden gemaakt om naar
muziek van de telefoon te luisteren. Afhankelijk van de telefooneigenschappen kan de audioverbinding automatisch worden gemaakt als de muziek wordt gestart.
Als uw mobiele telefoon Bluetooth A2DP profielen ondersteunt, maar geen audioverbinding kan worden opgebouwd als de muziekweergave wordt gestart, kunt u
de gebruiksaanwijzing van uw telefoon raadplegen over het maken van een audioverbinding.
HCC-250 - Nederlands
Pagina 7
2.6.2 AVRCP bediening
De volgende bedieningsaanwijzingen kunnen worden toegepast om uw Bluetooth telefoon of mediaplayer te regelen voor het luisteren naar muziek:
Play:
Pauze:
Druk op toets
Druk op toets
.
.
Stop:
Houd toets
Vooruit:
Achteruit :
Houd toets + minstens 3 seconden ingedrukt.
Houd toets - minstens 3 seconden ingedrukt.
minstens 3 seconden ingedrukt.
2.7 Volume-instelling
Indien verbonden of in spreek-/afspeelmodus kunt u het geluidsvolume verhogen of verlagen door indrukken van toetsen + respectievelijk - . U kunt bovenstaande
handeling herhalen tot de luidspreker het gewenste volume heeft bereikt.
Opmerking:
Meestal wordt de Bluetooth-volumeregeling van de carkit gesynchroniseerd met de telefoon. Dit betekent dat het volume van uw HCC-250 kan worden geregeld
met uw telefoon en omgekeerd. Dit is echter niet bij alle fabrikanten altijd het geval.
2.8 Uw handsfree pairen/verbinden met een ander Bluetooth-apparaat
Naast de Bluetooth telefoon kan uw carkit ook worden gepaired met andere Bluetooth-apparaten voor het maken van snoerloze verbindingen in de directe
omgeving. De procedures die worden beschreven in bovenstaand gedeelte 2.4 kunnen hiervoor worden gebruikt. U kunt ook de gebruiksaanwijzing van het
Bluetooth-apparaat opvolgen om pairen vanuit de apparaatzijde te starten.
Deze carkit kan worden gepaired met tot 8 Bluetooth-apparaten (inclusief mobiele telefoons). De bijbehorende 8 sets met pairinginformatie worden geregistreerd
door de carkit. Elk gepaird apparaat kan na het opbouwen van een Bluetooth verbinding snoerloos worden verbonden met de carkit. Lees gedeelte 2.4.3 over
procedures om een Bluetooth-verbinding te maken.
3. QUICK USER GUIDE
3.1 LED indicatiepatronen
LED patroon 1: Blauwe LED knippert 1 keer per 3 seconden; rode LED is uit.
LED patroon 2: Blauwe LED knippert 3 keer kort per 2 seconden; rode LED is uit.
LED patroon 3: Blauwe en rode LED's knipperen afwisselend.
LED patroon 4: Blauwe en rode LED's afwisselend elke 3 seconden.
LED patroon 5: Alle LED's zijn uit.
HCC-250 - Nederlands
Pagina 8
3.2 Quick User Guide
U kunt de instructies opvolgen uit onderstaande tabel 1-7 voor de bediening van uw HCC-250 Car-Kit apparaten. (zie gedeelte 1 voor details over de toets en
indrukduur van de toets.)
Opmerking: Uw carkit-apparaten kunnen alleen communiceren met gepairde Bluetooth-apparaten. Voor apparaten die alleen het Handsfree Profile (HFP)
ondersteunen, moet u ook de Bluetooth-verbinding maken tussen uw carkit en uw telefoon alvorens te telefoneren.
Tabel 1: Aan/uit
HUIDIGE STATUS
HCC-250 INDICATOR
FUNCTIE
BEDIENING
TELEFOON
Inschakelen
Uitschakelen
HCC-250
AUDIOTOON
LED-INDICATOR
Uitschakelen
minstens 3
Houd toets
seconden ingedrukt
2 inschakeltonen
LED patroon 1
Stand-by
Houd toets
minstens 3
seconden ingedrukt
2 uitschakeltonen
LED patroon 5
Tabel 2: Pairing/aansluitingen
FUNCTIE
HUIDIGE STATUS
TELEFOON
Pairingmodus
selecteren
Wis alle gepairde
profielen
BEDIENING
HCC-250
Uitschakelen
Paringmodus
Carkit met
telefoon pairen
Aan
Paringmodus
Aansluiten (carkit
met telefoon)
Stand-by
(ontkoppeld)
Stand-by
(ontkoppeld)
Ontkoppelen
Stand-by
(verbinden)
Stand-by
(verbinden)
minstens 6
Houd toets
seconden ingedrukt
Houd toets - minstens 3
seconden ingedrukt
Neem voor de
pairingprocedure de
gebruiksaanwijzing van uw
telefoon in acht.
Sleutel is “0000”
Druk op toets
of maak de
verbinding vanuit de telefoon
minstens 3
Houd toets
seconden ingedrukt, of zie
anders de gebruiksaanwijzing
van de telefoon om de
verbinding vanuit de telefoon
op te bouwen.
HCC-250 - Nederlands
HCC-250 INDICATOR
AUDIOTOON
LED-INDICATOR
2 inschakeltonen, en dan
1 pairingtoon
LED patroon 3
LED patroon 1
1 verbindingstoon
LED patroon 2
1 verbindingstoon
LED patroon 2
LED patroon 1
Pagina 9
Tabel 3: Oproepfuncties
HUIDIGE STATUS
HCC-250 INDICATOR
FUNCTIE
BEDIENING
TELEFOON
HCC-250
Oproep
beantwoorden
Binnenkomende
oproep
Binnenkomende
oproep
Druk op toets
AUDIOTOON
LED-INDICATOR
LED patroon 2
Oproep afwijzen
Binnenkomende
oproep
Binnenkomende
oproep
Houd toets - minstens 3
seconden ingedrukt
LED patroon 2
Oproep
beëindigen
Spreken
Spreken
Druk op toets
LED patroon 2
Nummer
herhalen
Stand-by
Stand-by
Houd toets + minstens 3
seconden ingedrukt
Toetstoon
LED patroon 2
Voicedialing
Stand-by
Stand-by
Houd toets - minstens 3
seconden ingedrukt
Toetstoon
LED patroon 2
Voicedialing
afbreken
Voicedialing
Voicedialing
Druk op toets -
Toetstoon
LED patroon 2
HUIDIGE STATUS
HCC-250 INDICATOR
FUNCTIE
BEDIENING
TELEFOON
HCC-250
AUDIOTOON
Volume omhoog
Spreken
Spreken
Druk op toets +
LED patroon 2
Volume omlaag
Spreken
Spreken
Druk op toets -
LED patroon 2
Toetstoon
LED patroon 2
Toetstoon
LED patroon 2
Mute
Spreken
Spreken
Druk tegelijkertijd op toets en toets +
Unmute
Spreken
Mute
Druk tegelijkertijd op toets en toets +
LED-INDICATOR
Tabel 4: Overzendfuncties
HUIDIGE STATUS
FUNCTIE
Oproep overzenden
(carkit naar telefoon)
Oproep overzenden
(telefoon naar carkit)
HCC-250 INDICATOR
BEDIENING
TELEFOON
HCC-250
Spreken
Spreken
Spreken
Spreken
AUDIOTOON
LED-INDICATOR
minstens 3
Houd toets
seconden ingedrukt
Toetstoon
LED patroon 1
Druk op toets
Toetstoon
LED patroon 2
Tabel 5: Aanduiding weinig voeding
HUIDIGE STATUS
FUNCTIE
TELEFOON
Waarschuwing weinig
voeding
HCC-250 INDICATOR
BEDIENING
HCC-250
AUDIOTOON
LED-INDICATOR
Behalve
uitgeschakeld
Elke 20 seconden piepen
LED patroon 4
HCC-250 - Nederlands
Pagina 10
Tabel 6: Geavanceerde oproepfuncties
HUIDIGE STATUS
HCC-250 INDICATOR
FUNCTIE
Actieve oproep gehouden
en binnenkomende oproep
accepteren
Actieve oproep beëindigen
en nieuwe oproep
beantwoorden
Wisselen tussen oproep
houden en actieve oproep
Actieve oproep beëindigen
en oproep in de wacht
accepteren
Conferentie oproepen
BEDIENING
TELEFOON
TELEFOON
Spreken
Oproep wacht
AUDIOTOON
LED-INDICATOR
Houd toets + minstens 3
seconden ingedrukt
LED patroon 2
LED patroon 2
Spreken
Oproep wacht
Druk op toets
Spreken
Oproep in de
wacht
Houd toets + minstens 3
seconden ingedrukt
LED patroon 2
Spreken
Oproep in de
wacht
Druk op toets
LED patroon 2
Spreken
Oproep in de
wacht
Houd toets - minstens 3
seconden ingedrukt
LED patroon 2
Tabel 7: Inwerken met mediaplayer
HUIDIGE STATUS
FUNCTIE
Play
TELEFOON/PLAY
ER
HCC-250 INDICATOR
BEDIENING
HCC-250
AUDIOTOON
Druk op toets
Pauze
Druk op toets
Stop
minstens 3
Houd toets
seconden ingedrukt
Volume omhoog
Druk op toets +
Volume omlaag
Druk op toets -
Vooruit
Houd toets + 3 seconden
Achteruit
Houd toets - 3 seconden
HCC-250 - Nederlands
LED-INDICATOR
Pagina 11
Oplossen van storingen
Als deCar-Kit niet juist werkt, neem dan de instructies in onderstaande tabel in acht. Als het probleem hierna nog niet is opgelost, raadpleeg dan
deCar-Kit dealer waar u het apparaat heeft gekocht.
Status
Car-Kit kan niet worden ingeschakeld
Kan niet communiceren metCar-Kit
KanCar-Kit niet pairen met een
Bluetooth-mobiele telefoon
Extreem hoog of laag
luidsprekervolume
Controleren
Oplossing
Controleer of de batterij vanCar-Kit
is opgeladen
Batterij opladen
Controleer of uw mobiele telefoon
de "headset" en/of
"handsfree" profiel(en) ondersteunt
Als u deCar-Kit wilt gebruiken, moet uw mobiele telefoon de
"headset" en/of "handsfree" profiel(en) ondersteunen
(afhankelijk van het model van de mobiele telefoon heeft u de
beschikking over optie als headset, audioapparaat etc.)
Controleer of de batterij helemaal is
opgeladen
Batterij opladen, als deze bijna leeg is
Controleer of deCar-Kit aan is
Druk 3 seconden op
Controleer of deCar-Kit in
pairingmodus is
Houd, terwijl het apparaat is ingeschakeld,
minstens 6
seconden ingedrukt om de pairingmodus van deCar-Kit in te
schakelen
Controleer het luidsprekervolume
Druk op + of - om het volume te regelen
HCC-250 - Nederlands
om deCar-Kit in te schakelen
Pagina 12
Aanvullende informatie (Lees ook het aanhangsel “Belangrijke informatie”)
Het bereik voor snoerloze communicatie bedraagt 10 meter (30 feet); hierbij hangen de omstandigheden af van de hindernissen.
DeCar-Kit kan alleen worden verbonden met mobiele telefoons die de Bluetooth-headset of handsfreeprofiel(en) ondersteunen.
(door verschillende telefoonmodellen kunnen verschillende opties voorhanden zijn, zoals audioapparatuur etc.) Dit product is niet
compatibel met de standaard snoerloze telefoons voor thuisgebruik.
Omdat deCar-Kit op de ISM-band (2.402 GHz ~ 2.480 GHz) werkt, kan deze worden beïnvloed door apparaten die op dezelfde
golflengte werken, bijvoorbeeld snoerloos LAN, magnetron, medische toepassingen etc. Houd de handsfree-carkit tijdens gebruik
dus uit de buurt van deze apparaten.
Als een oplaadbare batterij juist worden behandeld, kan deze een lange levensduur hebben. Een nieuwe batterij of een batterij die
lange tijd niet gebruikt is kan bij het eerste gebruik met verminderde capaciteit werken.
De standaard gebruikstijd van de batterij is afhankelijk van de gebruikstoestand van de mobiele telefoon en deCar-Kit.
•
•
•
•
•
Veiligheid
•
Gebruik alleen de bijgeleverde oplader.
Waarschuwing; explosierisico als de batterij wordt vervangen door een verkeerd type.
Controleer de wetten en bepalingen over het gebruik van mobiele telefoons en handsfreeuitrusting in het gebied waarbinnen u
rijdt. Houd uw aandacht steeds volledig bij het rijden en parkeer de auto alvorens te telefoneren indien de omstandigheden dit
vereisen.
Laat kinderen niet met uwCar-Kit spelen; deze bevat kleine delen die los kunnen raken en kunnen leiden tot stikken.
Dit apparaat bevat een li-polymeerbatterij. Houd deze uit de buurt van vuur (ook als u het apparaat weggooit), anders kan de
batterij exploderen.
DeCar-Kit, in het bijzonder de batterij ervan, moet volgens de voorschriften worden afgevoerd; raadpleeg hiervoor uw plaatselijke
recyclinginstituut.
Schakel uwCar-Kit altijd uit in een omgeving die explosiebevaarlijk is (olieopslag, explosieve stoffen etc.). Het product kan in enkele
gevallen vonken veroorzaken. Dit kan leiden tot explosie of vuur en letsel. Neem daarom de waarschuwingen in deze omgevingen
in acht.
Laat het product niet valle.
•
Wijzig, repareer of demonteer het product niet.
•
Reinig het product niet met water, alcohol, benzine etc.
•
Stel het product niet bloot aan ontvlambare stoffen.
•
Houd het product uit de buurt van ontvlambare stoffen.
•
Houd het product uit de buurt van vocht en stof.
•
Plaats geen zware voorwerpen op het product.
•
Headset of carkit alleen opladen terwijl de auto stil staat. Tijdens het opladen kan de headset of carkit niet worden gebruikt.
•
•
•
•
•
•
•
HCC-250 - Nederlands
MANUAL
Kit para Carros Bluetooth HCC-250
CONTEÚDO
1.
2.
3.
Introdução .................................................................................... 2
Conteúdo da embalagem............................................................... 2
Usar o seu equipamento ............................................................. 3
2.1. Carregar bateria.................................................................. 3
2.2. Montar o seu equipamento ................................................. 4
2.3. Ligar/desligar o equipamento.............................................. 4
2.4. Emparelhar/conectar o seu equipamento com
dispositivo Bluetooth ........................................................... 5
2.4.1. Emparelhar o seu equipamento com telefone
handset Bluetooth.............................................................. 5
2.4.2. Excluir todos os registos emparelhados ..................... 5
2.4.3. Conectar/desconectar o seu equipamento com
dispositivo Bluetooth.......................................................... 5
2.5 Funções de chamada .......................................................... 6
2.5.1 Operações básicas de chamada................................. 6
2.5.2 Silenciar chamada ...................................................... 6
2.5.3 Transferir chamada de/para o seu telefone handset ... 6
2.5.4 Marcação por voz ....................................................... 6
2.5.5 Funções avançadas de chamada ............................... 6
2.6 Funções AV ......................................................................... 6
2.6.1 Usar função AV do telefone handset........................... 6
2.6.2 Operações AV ............................................................ 7
2.7 Ajuste de volume ................................................................. 7
2.8 Emparelhar/conectar o seu equipamento com outro
dispositivo Bluetooth ................................................................... 7
Guia prático do utilizador............................................................ 7
3.1. Padrões de indicação dos LEDs ......................................... 7
3.2. Guia prático do utilizador .................................................... 8
Solução de problemas ................................................................. 11
Informações adicionais ................................................................ 11
Segurança ................................................................................... 12
Página 2
1. INTRODUÇÃO
Kit para Carros Bluetooth
Este Kit para Carros Bluetooth é um produto especialmente concebido para permitir aos motoristas efectuar e receber chamadas sem manusear o telemóvel. O
kit proporciona uma conexão clara de áudio sem fio com seu telemóvel Bluetooth e PDA. O produto pode ser utilizado no veículo, no escritório ou em casa.
Além das aplicações dentro do veículo, este equipamento portátil, que funciona com bateria interna de iões de lítio recarregável, também pode ser utilizado no
ambiente de escritório como equipamento "mãos livres" normal para efectuar/receber chamadas telefónicas sem o incómodo do contacto com as mãos. Ele
também pode ser disposto junto a um PC habilitado para Bluetooth a fim de efectuar chamadas por voz via internet.
Confirme que todos os itens mencionados a seguir estejam incluídos na embalagem. Favor contactar o revendedor caso faltem quaisquer itens.
Conteúdo da embalagem
1. Bluetooth Car-Kit
2. Manual do utilizador
3. Cartão de garantia
4. Suplemento "Informações importantes"
5. Carregador p/ carros 12/24 V
1.
2.
3.
4.
6. Grampo p/ quebra-sol
7. Grampo da base p/ saída de ar
5.
6.
7.
1. Altifalante: saída do som.
2. LED azul/vermelho: Indica a situação do equipamento.
3. Botão
: Ligar/desligar o equipamento.
4. Botão
: Responder/encerrar chamada, conectar/desconectar,
transferir uma chamada entre o equipamento e o telefone.
5. Botão +: Aumentar o volume, remarcar último número, silenciar
chamada.
6. Botão -: Diminuir o volume, excluir todos os registos emparelhados,
rejeitar chamada, marcação por voz, silenciar chamada
7. Microfone: entrada do som
Figura: 1 Aspectos gerais
8. Entrada para o carregador: conexão ao carregador móvel (ou do
carro) para carregar a bateria do equipamento
HCC-250 - Português
Página 3
2. USAR O SEU EQUIPAMENTO
Carregar bateria e usar
2.1 Carregar a bateria
Este Kit para Carros contém uma bateria de polímero de lítio recarregável. Na primeira vez, a bateria carrega por cerca de 4 horas. Posteriormente, o tempo de
recarga é de 2-3 horas. Os procedimentos detalhados para carregar são os seguintes:
1.
Conecte o carregador veicular ao isqueiro, ou conecte o cabo USB no PC.
2.
De acordo com a figura 2 , conecte o conector na entrada para carregador do equipamento para iniciar a carga. Os LEDs azul e vermelho ficarão
acesos durante a carga. Assim que o LED vermelho apagar-se, a bateria estará com plena carga e já será possível desconectar o carregador do Kit
para Carros e da saída de energia.
Figura: 2 Carregar a bateria
Nota:
Recomenda-se carregar seu Kit para Carros quando estiver fora de uso.
Favor observar que introduzir o carregador causará o reinício ("reset") do equipamento. Porém, quando o Kit para Carros estiver a carregar (o carregador foi
introduzido), estará em operação normal.
Durante uma chamada, a conexão existente entre o Kit para Carros e o telemóvel será reiniciada ("reset") após a introdução do carregador. A chamada será
momentaneamente transferida de volta ao telemóvel. O Kit para Carros tentará restabelecer a conexão automaticamente. Às vezes, o utilizador precisa premir
para reconectar o equipamento.
rapidamente o botão
Informações sobre a bateria
Quando estiver com plena carga, a bateria suportará até 14 horas de conversação contínua e cerca de 25 dias em modo de espera (ou seja, o equipamento
está energizado mas sem conexão).
Quando a bateria estiver com pouca carga, haverá um sinal sonoro do Kit para Carros a cada 20 segundos e os LEDs azul e vermelho alternar-se-ão a cada 3
segundos; carregue então a bateria conforme a descrição acima.
Nota: A sobrecarga diminui a vida útil da bateria. Se uma bateria com plena carga não for usada, perderá energia com o tempo. Temperaturas extremas
(demasiado quente ou fria) também afectarão a capacidade de carga, a funcionalidade e a vida útil.
Por favor, recarregue seu auricular ou Kit para Carros apenas com o seu automóvel parado. Durante a recarga, o auricular ou Kit para Carros não
pode ser utilizado.
HCC-250 - Português
Página 4
2.2 Montar o seu equipamento
O Kit para Carros HCC-250 pode ser facilmente montado dentro do carro com o grampo p/ quebra-sol ou com o grampo da base p/ saída de ar, ambos à frente
do condutor.
Conforme as figuras 3 e 4, há duas pontas imantadas na parte de trás do equipamento. Nestas pontas, é possível prender o grampo p/ quebra-sol ou o grampo
da base p/ saída de ar. Para facilitar a montagem do dispositivo, favor prender primeiro o grampo p/ quebra-sol no quebra-sol, depois conectar devidamente o Kit
para Carros no grampo p/ quebra-sol.
Para usar o grampo da base p/ saída de ar, é possível ajustar a direcção do grampo de acordo com a saída de ar do seu carro, conforme mostra a figura 5.
Nota: O microfone do Kit para Carros HCC-250 deve estar direccionado ao emissor do som.
Ponta imantada
Grampo p/ quebra-sol
Grampo da base p/ saída
de ar
Figura 3: Conectar grampo p/ quebra-sol nas pontas imantadas Figura 4: Conectar grampo da base p/ saída de ar nas pontas imantadas
Grampo da base p/ saída de ar
(direcção vertical)
Grampo da base p/ saída de ar
(direcção horizontal)
Base metálica
Figura 5: Ajustar direcção do grampo da base p/saída de ar (vertical ou horizontal)
Puxar um pouco e
pressionar para baixo a
partir daqui
Figura 6: Separar o grampo da base metálica
Com excelentes portabilidade e flexibilidade, este Kit para Carros também pode ser usado fora do espaço do carro, como em escritórios e/ou em casa.
2.3 Ligar/desligar o Kit para Carros HCC-250
Ligar o equipamento: Premir e assim manter o botão
por pelo menos 3 segundos, soarão 2 tons de aviso, o LED azul pisca rapidamente 3 vezes e a seguir 1
vez por 3 segundos, o LED vermelho fica desligado. Isto indica que o equipamento foi activado.
Desligar o HCC-250: Premir e assim manter o botão
o LED azul fica desligado.
Isto indica que o Kit para Carros foi desactivado.
por pelo menos 3 segundos, 2 tons de aviso de desligamento soarão, o LED vermelho piscará 3 vezes e
HCC-250 - Português
Página 5
2.4 Emparelhar/conectar o seu equipamento com dispositivo Bluetooth
2.4.1 Emparelhar o seu HCC-250 com telemóvel Bluetooth (ou outro dispositivo)
Antes de efectuar e responder chamadas, é necessário emparelhar seu HCC-250 com o telefone. O emparelhamento estabelece uma relação exclusiva
entre seu Kitr para Carros e o seu telemóvel. O telemóvel irá memorizar o ID exclusivo (ou a chave) do HCC-250. Isto assegura um elo de comunicação
sem fio encriptado e exclusivo entre o seu Kit para Carros e o telemóvel durante as chamadas.
Os procedimentos detalhados de operação são os seguintes:
1.
Coloque seu HCC-250 perto de seu telemóvel habilitado para Bluetooth, com o seu Kit para Carros desligado e o seu telemóvel ligado
2.
por pelo menos 6 segundos, até os LEDS azul e vermelho alternarem-se continuamente. Soarão 2 tons de activação
Prima e assim mantenha o botão
e um tom de emparelhamento para indicar que o Kit para Carros entrou com êxito no modo de emparelhamento
3.
Siga o guia do utilizador do seu telefone para activar o dispositivo Bluetooth no lado do telefone; no ecrã de seu telefone surgirá uma lista dos
equipamentos Bluetooth encontrados pelo telefone ao final do processo de pesquisa.
4.
Seleccione este Kit para Carros Bluetooth HCC-250 da lista e inicie o emparelhamento conforme as instruções no ecrã do telefone handset.
5.
Continue a seguir as instruções no ecrã para entrar com a chave “0000” e confirmar o emparelhamento do HCC-250 com seu telemóvel. Quando o
processo de emparelhamento for concluído, soará um tom de conexão e o LED azul piscará rapidamente 3 vezes por 2 segundos. Isto indica que o Kit
para Carros e o telemóvel estão emparelhados e conectados.
Nota:
Se o emparelhamento for bem sucedido, o LED vermelho do Kit para Carros fica desligado. O LED azul pisca rapidamente 3 vezes por 2 segundos. Se o
telemóvel acusar falha no emparelhamento e o Kit para Carros ainda estiver no modo de emparelhamento, será necessário voltar aos passos 3-5 acima e repetir
o processo.
Seu Kit para Carros permanece no modo de emparelhamento por 2 segundos. Se o emparelhamento não puder ser concluído em 2 minutos, o HCC-250 entrará
no modo de espera (neste caso, sem a conexão Bluetooth). Será necessário desligar o Kit para Carros e depois repetir os passos 2-5 para reiniciar o processo de
emparelhamento.
2.4.2 Excluir todos os registos emparelhados
Este Kit para Carros pode ser emparelhado com até 8 dispositivos Bluetooth. No modo de emparelhamento, premir e assim manter o botão por pelo menos 3
segundos permitirá excluir todos os perfis de dispositivo Bluetooth emparelhados armazenados no Kit para Carros. A seguir, o Kit para Carros sairá do modo de
emparelhamento. O LED azul piscará 1 vez por 3 segundos.
2.4.3 Conectar/desconectar o seu Kit para Carros HCC-250 com um dispositivo Bluetooth
Quando o Kit para Carros comunica-se com um equipamento Bluetooth via perfil "mãos livres", a conexão Bluetooth entre dois equipamentos deverá ser
antecipadamente estabelecida. Se dois equipamentos Bluetooth já foram emparelhados uma vez, é possível simplesmente reconectá-los.
Conectar o seu HCC-250 com telemóvel Bluetooth
Solicitar a conexão a partir tanto do Kit para Carros como do telemóvel pode estabelecer a conexão Bluetooth. As operações detalhadas são as seguintes:
.
1.
Solicitar conexão a partir do Kit para Carros: coloque o Kit para Carros perto do telemóvel Bluetooth e prima o botão
2.
Solicitar conexão a partir do telemóvel Bluetooth: coloque o Kit para Carros perto do telemóvel Bluetooth e a seguir oriente-se pelo guia do utilizador do
telefone para encontrar o Kit para Carros e enviar a solicitação de conexão.
Após a conexão, soará um tom de conexão e o LED azul piscará rapidamente 3 vezes por 2 segundos
Descontectar o seu HCC-250 do seu telemóvel Bluetooth:
Quando o Kit para Carros está conectado ao telemóvel Bluetooth (ou no modo de conexão), é possível desconectá-los da seguinte maneira:
por pelo menos 3 segundos.
1.
Prima e assim mantenha o botão
2.
Siga o guia do utilizador do telemóvel e inicie a desconexão a partir do telefone.
Após a desconexão, soará um tom de desconexão e o LED azul pisca 1 vez por 3 segundos.
HCC-250 - Português
Página 6
2.5 Funções de chamada
2.5.1 Operações básicas de chamada
Antes de marcar, o Kit para Carros HCC-250 e o telemóvel devem ser activados. E também será necessário que o seu Kit para Carros e o telefone estejam
ligados pela conexão Bluetooth.
Responder chamada: Prima o botão
Rejeitar chamada:
.
Prima e assim mantenha o botão - por pelo menos 3 segundos.
Finalizar chamada:
Prima o botão
Remarcar:
Prima e assim mantenha o botão + por pelo menos 3 segundos
.
Para as operações acima, o LED azul pisca rapidamente 3 vezes por 2 segundos e o LED vermelho fica desligado.
2.5.2 Silenciar chamada
É possível silenciar ou reverter o silêncio de uma chamada activa ao premir rápida e simultaneamente os botões + e -. O LED azul pisca rapidamente 3 vezes por
2 segundos e o LED vermelho fica desligado.
2.5.3 Transferir chamada de/para o seu telemóvel
Transferir chamada para o seu telemóvel: prima e assim mantenha o botão
segundos, o LED vermelho fica desligado.
Transferir chamada do seu telemóvel: prima o botão
por pelo menos 3 segundos, o LED azul pisca rapidamente 1 vez por 3
, o LED azul pisca rapidamente 3 vezes por 2 segundos.
2.5.4 Marcação por voz
Se o telefone conectado suportar marcação por voz, basta premir e assim manter o botão - por pelo menos 3 segundos para activar a marcação por voz. O LED
azul pisca rapidamente 3 vezes por 2 segundos. Antes de usar a marcação por voz, é necessário gravar identificações de voz em seu telemóvel. Favor
consultar o manual do seu telemóvel para descrições detalhadas do processo de marcação por voz e de gravação de identificações de voz.
Quando a marcação por voz estiver em andamento, premir rapidamente o botão - cancelará a marcação por voz. O LED azul pisca rapidamente 3
vezes por 2 segundos e o LED vermelho fica desligado.
2.5.5 Funções avançadas de chamada
Se o seu telemóvel tiver as funções de conferência/chamada em espera, seu Kit para Carros HCC-250 pode suportar a função para as seguintes operações:
1.
2.
Quando chega uma nova chamada enquanto você está em uma chamada activa:
1)
Prima e assim mantenha o botão + por pelo menos 3 segundos para manter a chamada activa e aceitar a nova chamada.
2)
Prima o botão
para finalizar a chamada activa e responder à nova chamada.
Com duas chamadas em andamento, uma está activa e a outra em espera:
1)
Prima e assim mantenha o botão + por pelo menos 3 segundos alternar entre a chamada em espera e a activa.
2)
Prima o botão
para finalizar a chamada activa e aceitar a chamada em espera.
3)
Prima e assim mantenha o botão - por pelo menos 3 segundos para efectuar a conferência.
Para as operações acima, o LED azul pisca rapidamente 3 vezes por 2 segundos e o LED vermelho fica desligado.
2.6 Funções A2DP
O Kit para Carros suporta o perfil Bluetooth A2DP para reproduzir música em alta qualidade. Em conexão com um reprodutor de música/multimídia habilitado
para Bluetooth ou um telemóvel compatível com A2DP, o produto permite que os utilizadores ouçam música executada remotamente a partir do reprodutor.
2.6.1 Usar a função A2DP do telemóvel
Para telemóveis que suportam os perfis Bluetooth A2DP, é possível estabelecer uma conexão de áudio entre o telemóvel e o Kit para Carros para ouvir música
reproduzida pelo telefone. Conforme a capacidade do telefone, a conexão de áudio pode ser automaticamente estabelecida quando você começa a reproduzir
música.
Se o seu telemóvel suporta os perfis Bluetooth A2DP, mas não é possível obter uma conexão de áudio no início da reprodução da música, é necessário seguir o
guia de utilizador do seu telefone para conseguir uma conexão de áudio antes de executar a música.
HCC-250 - Português
Página 7
2.6.2 Operações AVRCP
As seguintes operações podem ser usadas para o controlo remoto de seu telefone compatível com Bluetooth ou reprodutor para executar música:
Executar:
Prima o botão
.
Pausa:
Prima o botão
.
Parar:
Avançar:
Prima e assim mantenha o botão
por pelo menos 3 segundos.
Prima e assim mantenha o botão + por pelo menos 3 segundos.
Recuar :
Prima e assim mantenha o botão - por pelo menos 3 segundos.
2.7 Ajuste de volume
No modo conectado ou em conversar/executar, é possível aumentar ou diminuir o volume de som premindo respectivamente os botões + ou -. É possível repetir
a operação acima até o altifalante atingir o volume desejável.
Nota:
Para a maioria dos dispositivos Bluetooth, o controlo de volume do Kit para Carros irá sincronizar com o telefone. Isto significa que o volume do seu HCC-250
pode ser controlado pelo seu telefone e vice-versa. Porém, esta possibilidade varia conforme as implementações escolhidas por diferentes fabricantes de
telefones.
2.8 Emparelhar/conectar o seu equipamento com outro dispositivo Bluetooth
Além do telefone Bluetooth, seu Kit para Carros também pode emparelhar-se com outros dispositivos Bluetooth para comunicações sem fio de curta distância.
Podem ser usados os procedimentos de emparelhamento similares descritos na Secção 2.4. É possível também seguir o guia do utilizador do dispositivo
Bluetooth para efectuar as operações de emparelhamento a partir do dispositivo.
Este Kit para Carros pode ser emparelhado com até 8 dispositivos Bluetooth (inclusivé telemóveis). Os 8 grupos correspondentes de informações de
emparelhamento são registados pelo Kit para Carros. Cada dispositivo emparelhado pode comunicar-se sem fio com o Kit para Carros após a configuração de
uma conexão Bluetooth. Favor verificar a Secção 2.4.3 de procedimentos para configurar uma conexão Bluetooth.
3. GUIA PRÁTICO DO UTILIZADOR
3.1 Padrões de indicação dos LEDs
Padrão 1 do LED: LED azul pisca 1 vez por 3 segundos, LED vermelho desligado.
Padrão 2 do LED: LED azul pisca rapidamente 3 vezes por 2 segundos, LED vermelho desligado.
Padrão 3 do LED: LEDS azul e vermelho alternam-se continuamente.
Padrão 4 do LED: LEDS azul e vermelho alternam-se a cada 3 segundos.
Padrão 5 do LED: Todos os LEDs desligados.
HCC-250 - Português
Página 8
3.2 Guia prático do utilizador
É possível seguir as instruções na Tabela 17 abaixo para operar seus dispositivos do Kit para Carros HCC-250. (Favor consultar a seção 1 para detalhes sobre
definições de teclas e por quanto tempo premi-las.)
Nota: Seus dispositivos do Kit para Carros só podem se comunicar com dispositivos Bluetooth emparelhados. Para dispositivos que suportam apenas o perfil
"mãos livres" (HFP), também é necessário estabelecer uma conexão Bluetooth entre seu Kit para Carros e seu telefone antes de efectuar e receber chamadas.
Tabela 1: Ligar/desligar energia
SITUAÇÃO ACTUAL
INDICADOR HCC-250
FUNÇÃO
OPERAÇÃO
TELEFONE
HCC-250
TOM DE ÁUDIO
INDICADOR DE LED
Padrão 1 do LED
Padrão 5 do LED
Prima e assim mantenha o
Ligar
Desligar
por pelo menos 3
botão
segundos
Prima e assim mantenha o
2 tons de activação
Desligar
Espera
por pelo menos 3
botão
segundos
2 tons de desactivação
Tabela 2: Emparelhamento/conexões
FUNÇÃO
SITUAÇÃO ACTUAL
TELEFONE
OPERAÇÃO
HCC-250
Prima e assim mantenha o
Entrar no modo
de
emparelhamento
Excluir todos os
perfis
emparelhados
Desligar
Modo de
emparelhamento
Emparelhar Kit
para Carros com
telefone
Energia ligada
Modo de
emparelhamento
Conectar (Kit
para Carros com
telefone)
Espera
(desconectado)
Espera
(desconectado)
Desconectar
Espera (conectar)
Espera
(conectar)
por pelo menos 6
botão
segundos
Prima e assim mantenha o
botão - por pelo menos 3
segundos
Consulte o guia de utilizador
do seu telefone para
emparelhar.
A chave é "0000”
ou
Prima o botão
estabeleça a conexão a partir
do telefone
Prima e assim mantenha o
por pelo menos 3
botão
segundos ou consulte o
manual do telefone para
iniciar a conexão a partir do
telefone.
HCC-250 - Português
INDICADOR HCC-250
TOM DE ÁUDIO
INDICADOR DE LED
2 tons de activação,
depois 1 tom de
emparelhamento
Padrão 3 do LED
Padrão 1 do LED
1 tom de conexão
Padrão 2 do LED
1 tom de conexão
Padrão 2 do LED
Padrão 1 do LED
Página 9
Tabela 3: Funções de chamada
SITUAÇÃO ACTUAL
INDICADOR HCC-250
FUNÇÃO
Responder
chamada
OPERAÇÃO
TELEFONE
HCC-250
TOM DE ÁUDIO
Nova chamada
Nova chamada
Prima o botão
Padrão 2 do LED
Padrão 2 do LED
Rejeitar
chamada
Nova chamada
Nova chamada
Prima e assim mantenha o
botão - por pelo menos 3
segundos
Finalizar
chamada
Conversar
Conversar
Prima o botão
Remarcar
Espera
Espera
Marcação por
voz
Espera
Espera
Marcação por voz
Marcação por
voz
Cancelar
marcação por voz
Prima e assim mantenha o
botão - por pelo menos 3
segundos
Prima e assim mantenha o
botão - por pelo menos 3
segundos
Prima o botão -
SITUAÇÃO ACTUAL
INDICADOR DE LED
Padrão 2 do LED
Tom de tecla
Padrão 2 do LED
Tom de tecla
Padrão 2 do LED
Tom de tecla
Padrão 2 do LED
INDICADOR HCC-250
FUNÇÃO
OPERAÇÃO
TELEFONE
HCC-250
Aumentar
volume
Conversar
Conversar
Prima o botão +
Diminuir volume
Conversar
Conversar
Prima o botão -
Silencioso
Conversar
Conversar
Prima o botão - e o botão +
juntos
Tom de tecla
Padrão 2 do LED
Silencioso
Prima o botão - e o botão +
juntos
Tom de tecla
Padrão 2 do LED
Não silencioso
Conversar
TOM DE ÁUDIO
INDICADOR DE LED
Padrão 2 do LED
Padrão 2 do LED
Tabela 4: Funções de transferência
SITUAÇÃO ACTUAL
FUNÇÃO
Transferir chamada
(Kit para Carros ao
telefone)
Transferir chamada
(Telefone ao Kit para
Carros)
INDICADOR HCC-250
OPERAÇÃO
TELEFONE
HCC-250
Conversar
Conversar
Prima e assim mantenha o
por pelo menos 3
botão
segundos
Conversar
Conversar
Prima o botão
HCC-250 - Português
TOM DE ÁUDIO
INDICADOR DE LED
Tom de tecla
Padrão 1 do LED
Tom de tecla
Padrão 2 do LED
Página 10
Tabela 5: Indicação de bateria fraca
SITUAÇÃO ACTUAL
INDICADOR HCC-250
FUNÇÃO
OPERAÇÃO
TELEFONE
Aviso de bateria fraca
HCC-250
TOM DE ÁUDIO
INDICADOR DE LED
Excepto desligado
Bipe a cada 20 segundos
Padrão 4 do LED
Tabela 6: Funções de chamada avançadas
SITUAÇÃO ACTUAL
INDICADOR HCC-250
FUNÇÃO
Manter chamada activa e
aceitar nova chamada
Finalizar chamada activa e
responder nova chamada
Alternar entre chamada em
espera e chamada activa
OPERAÇÃO
TELEFONE
TELEFONE
TOM DE ÁUDIO
Conversar
Chamada em
espera
Prima e assim mantenha o
botão + por pelo menos 3
segundos
INDICADOR DE LED
Padrão 2 do LED
Conversar
Chamada em
espera
Prima o botão
Padrão 2 do LED
Prima e assim mantenha o
botão + por pelo menos 3
segundos
Padrão 2 do LED
Conversar
Aceder à
espera
Finalizar chamada activa e
aceitar chamada em
espera
Conversar
Aceder à
espera
Prima o botão
Padrão 2 do LED
Chamadas em conferência
Conversar
Aceder à
espera
Prima e assim mantenha o botão
- por pelo menos 3 segundos
Padrão 2 do LED
Tabela 7: Funcionar com reprodutor de mídia
SITUAÇÃO ACTUAL
FUNÇÃO
TELEFONE/REPR
ODUTOR
INDICADOR HCC-250
OPERAÇÃO
HCC-250
TOM DE ÁUDIO
Executar
Prima o botão
Pausa
Prima o botão
Parar
Prima e assim mantenha o
botão
por pelo menos 3
segundos
Aumentar volume
Prima o botão +
Diminuir volume
Prima o botão -
Avançar
Recuar
Prima e assim mantenha o
botão + por 3 segundos
Prima e assim mantenha o
botão - por 3 segundos
HCC-250 - Português
INDICADOR DE LED
Página 11
Solução de problemas
Caso o Kit P/ Carros não funcione correctamente, favor seguir as acções correctivas descritas na tabela abaixo. Se os problemas não forem
solucionados mesmo depois das acções correctivas, favor entrar em contacto com o revendedor onde o Kit P/ Carros foi adquirido.
Estado
O Kit P/ Carros não liga
Não é possível comunicação com o Kit
P/ Carros
Não é possível emparelhar o Kit P/
Carros com um telemóvel Bluetooth
Volume do altifalante muito alto ou
muito baixo
Verificar
Acção correctiva
Verifique se há carga na bateria do
Kit P/ Carros
Carregar bateria
Verifique se o seu telemóvel
suporta o(s) perfil(fis) "headset"
e/ou
"mãos livres"
Para usar o Kit P/ Carros, é essencial que o seu telemóvel
suporte o(s) perfil(fis) "headset" e/ou "mãos livres"
(Poderá ser necessário procurar opções como "headset",
dispositivo de áudio, etc. caso o seu telemóvel não tenha a
opção "mãos livres"; porém, estas opções dependem do
modelo de telemóvel que está em uso)
Verifique se há plena carga na
bateria
Carregue a bateria se esta estiver fraca
Verifique se o Kit P/ Carros está
ligado
Prima
Verifique se o Kit P/ Carros está em
modo de emparelhamento
Com a energia desligada, prima e mantenha
por pelo
menos 6 s para colocar o Kit P/ Carros em modo de
emparelhamento
Verifique o volume do altifalante
Prima + ou - para controlar adequadamente o volume
HCC-250 - Português
por 3 s para ligar o Kit P/ Carros
Página 12
Informações adicionais (Por favor, leia também o suplemento "Informações importantes")
O alcance da comunicação sem fio é de no máximo 10 m (30 pés) e as condições variam de acordo com obstáculos.
O Kit P/ Carros pode ser conectado somente a telemóveis que suportem o(s) perfil(fis) "headset" e "mãos livres". (A depender dos
diferentes modelos de telemóveis, abrir-se-ão diferentes opções como dispositivos de áudio, etc.) Este produto não é compatível
com telefones fixos sem fio convencionais.
Por operar na mesma faixa de frequência, o Kit P/ Carros pode ser afectado por dispositivos que operam na banda ISM (2.402 GHz
~ 2.480 GHz), por exemplo, rede local sem fio, dispositivos de microondas, equipamentos médicos, etc. Portanto, o Kit P/ Carros
"mãos livres" deve estar afastado de tais dispositivos para a correcta operação.
Favor desligar o seu Kit P/ Carros em áreas com atmosfera potencialmente explosiva (depósitos de combustíveis, de explosivos,
etc.). Eventualmente, este equipamento pode gerar faíscas. Estas podem causar explosões ou incêndios que arriscam a
integridade física. Portanto, siga com atenção os avisos de alerta em tais áreas.
O tempo de uso padrão de uma bateria pode variar conforme as condições de uso do telemóvel e do Kit P/ Carros.
•
•
•
•
•
Segurança
•
Use somente o carregador que acompanha o conjunto.
Cuidado, risco de explosão se a bateria for substituída por um tipo incorrecto.
Verifique as leis e normas para o uso de telemóveis e equipamentos "mãos livres" nas áreas por onde dirige. Sempre preste a
máxima atenção ao conduzir o veículo, saia da via e estacione antes de efectuar ou responder a uma chamada caso as condições
exijam.
Não permita que crianças brinquem com seu Kit P/ Carros, uma vez que contém peças pequenas que podem ser destacadas e
causar asfixia.
Este dispositivo contém uma bateria de polímero de lítio. Favor mantê-la sempre longe do fogo (inclusivé ao descartar o
equipamento) ou a bateria poderá explodir.
O Kit P/ Carros, especialmente a bateria embutida, deve ser descartado adequadamente ou pode ser reciclado; entre em contacto
com os centros de reciclagem locais para conhecer os métodos de descarte.
Uma bateria recarregável pode ter longa vida útil caso manuseada correctamente. Uma bateria nova, ou uma que tiver longo
tempo ocioso, terá reduzida capacidade de carga em seus primeiros usos.
Evite quedas da unidade
•
Não modifique, repare ou desmonte esta unidade.
•
Não exponha esta unidade directamente a álcool, benzina, etc. p/ limpar.
•
Não exponha esta unidade directamente a inflamáveis.
•
Não coloque esta unidade próxima a inflamáveis.
•
Proteja esta unidade contra humidade e pó.
•
•
•
•
•
•
•
•
Não coloque objectos pesados sobre a unidade.
•
Por favor, recarregue seu auricular ou Kit para Carros apenas com o seu automóvel parado. Durante a recarga, o auricular ou Kit
para Carros não pode ser utilizado.
HCC-250 - Português
MANUALE UTENTE
Kit per auto Bluetooth HCC-250
SOMMARIO
1.
2.
3.
Introduzione ............................................................................................... 2
Contenuto della confezione ......................................................................... 2
Uso del vivavoce........................................................................................ 3
2.1. Carica della batteria .......................................................................... 3
2.2. Montaggio del vivavoce .................................................................... 4
2.3. Accensione / spegnimento del vivavoce............................................ 4
2.4. Pairing / connessione del vivavoce con un
dispositivo bluetooth ......................................................................... 5
2.4.1. Pairing del vivavoce con un telefono bluetooth ......................... 5
2.4.2. Cancellazione dei profili di pairing ............................................ 5
2.4.3. Connessione / disconnessione del vivavoce a un
dispositivo bluetooth ................................................................ 5
2.5 Funzioni di chiamata .......................................................................... 6
2.5.1 Funzioni di chiamata di base..................................................... 6
2.5.2 Mute chiamata .......................................................................... 6
2.5.3 Trasferimento di chiamata al / dal telefono................................ 6
2.5.4 Composizione vocale................................................................ 6
2.5.5 Funzioni di chiamata avanzate.................................................. 6
2.6 Funzioni AV ....................................................................................... 6
2.6.1 Uso delle funzioni AV del telefono............................................. 6
2.6.2 Funzioni AV .............................................................................. 7
2.7 Regolazione del volume..................................................................... 7
2.8 Pairing / connessione del vivavoce a un altro
dispositivo bluetooth .......................................................................... 7
Guida rapida per l'utente........................................................................... 7
3.1. Configurazioni dell'indicatore LED .................................................... 7
3.2. Guida rapida per l'utente................................................................... 8
Risoluzione dei problemi.............................................................................11
Informazioni supplementari.........................................................................11
Sicurezza....................................................................................................12
Pagina 2
1. INTRODUZIONE
Kit per auto bluetooth
Questo kit per auto bluetooth è un prodotto progettato appositamente per permettere ai guidatori di effettuare e ricevere chiamate senza tenere in mano un
telefono cellulare. Esso fornisce un buon collegamento audio cordless con il proprio telefono cellulare bluetooth o PDA. L'apparecchio può essere utilizzato anche
in ufficio o a casa, oltre che all'interno di un veicolo.
Oltre alle applicazioni per l'uso all'interno di veicoli, questo apparecchio portatile, grazie a una batteria interna ricaricabile Li-ion, può essere utilizzato come
normale apparecchio vivavoce anche all'interno di uffici per effettuare o ricevere chiamate telefoniche senza dover tenere in mano il telefono cellulare. Può anche
essere affiancato a un PC dotato di tecnologia bluetooth per effettuare chiamate via Internet.
Assicurarsi che i pezzi menzionati in basso siano compresi nella confezione. Se qualcuno di essi manca si prega il cliente di mettersi in contatto con il rivenditore.
Contenuto della confeziona
1. Bluetooth Car-Kit
2. Manuale utente
3. Scheda di garanzia
4. Supplemento "Informazione importante"
5. Set caricabatteria per auto 12 / 24 V
1.
2.
3.
4.
6. Clip per parasole
7. Clip di montaggio su bocchetta
5.
6.
7.
1. Altoparlante: uscita voce.
2. LED rosso / blu: indicazione di stato del dispositivo.
3. Pulsante
: accensione / spegnimento del dispositivo.
4. Pulsante
: risposta / fine chiamata, connessione
disconnessione, trasferimento chiamata tra vivavoce e telefono.
5. Pulsante +: volume +, ricomposizione ultima chiamata, esclusione
di chiamata.
6. Pulsante -: volume -, cancellazione dei profili di pairing, respinta
chiamata, composizione vocale, mute chiamata
7. Microfono: ingresso voce
Figura: 1 Panoramica
8. Presa di carica: collegamento al caricabatteria portatile
(o dell'auto) per il caricamento della batteria del dispositivo
HCC-250 - Italiano
Pagina 3
2. USO DEL VIVAVOCE
Carica e uso della batteria
2.1 Carica della batteria
Questo kit per auto contiene una batteria ricaricabile al polimero di litio. La durata della prima carica è di circa 4 ore. In seguito la durata di carica è circa 2-3 ore.
Per caricare la batteria procedere come segue.
1.
Collegare il caricabatteria dell'auto all'accendino oppure il cavo USB al PC.
2.
Come in figura 2, inserire la spina del caricabatteria nella presa di carica del vivavoce per iniziare la carica. Durante la carica entrambi i LED rosso e blu
sono accesi. Quando il LED rosso si spegne, la batteria sarà completamente carica e il caricabatteria dovrà essere scollegato dal kit per auto e dalla
presa elettrica.
Figura: 2 Carica della batteria
Nota:
Si raccomanda di caricare il kit per auto quando non è in uso.
L'inserimento del caricabatteria causerà un reset del dispositivo. In ogni caso, quando il kit per auto è in carica (il caricabatteria è stato inserito), si trova in
condizioni di funzionamento normale.
Nel corso di una chiamata, la connessione presente tra il kit per auto e il telefono cellulare subirà un reset dopo l'inserimento del caricabatteria. La chiamata sarà
momentaneamente ritrasferita al telefono cellulare. Il kit per auto proverà a ristabilire automaticamente la connessione. In qualche caso l'utente deve premere
per riconnettere il dispositivo.
brevemente il pulsante
Informazioni sulla batteria
A piena carica, la batteria ha una durata massima di 14 ore in conversazione continua e una durata in stand-by (ovvero il dispositivo è acceso ma privo di
connessione) di circa 25 giorni.
Quando la carica della batteria è bassa, il kit per auto emette un segnale acustico ogni 20 secondi e i LED blu e rosso lampeggiano alternativamente ogni 3
secondi. Caricare la batteria secondo le istruzioni precedenti.
Nota: Sovraccaricare la batteria ne riduce la durata in esercizio. Una batteria a piena carica inutilizzata perderà potenza col tempo. Anche le temperature
estreme (troppo caldo o troppo freddo) avranno effetti sulla capacità di carica, sulla potenza e sulla durata in esercizio.
Ricaricare l'auricolare o il kit per auto solo ad auto ferma. Non usare l'auricolare o il kit per auto durante la ricarica.
HCC-250 - Italiano
Pagina 4
2.2 Montaggio del vivavoce
Il kit per auto HCC-250 può essere montato facilmente all'interno dell'auto utilizzando sia la clip di aggancio per parasole per fissare il prodotto sul parasole sopra
il sedile del guidatore oppure inserendo la clip di montaggio su bocchetta dell'aria nella bocchetta posta di fronte al sedile del guidatore.
Come illustrato nelle figure 3 e 4, ci sono due piastrine magnetiche sul retro del dispositivo. Su di esse è possibile agganciare la clip per parasole o la clip di
montaggio su bocchetta.
Per il miglior montaggio del dispositivo, si raccomanda di fissare prima la clip per parasole sul parasole e quindi agganciare il kit per auto sulla clip.
Per utilizzare la clip di montaggio su bocchetta, questa deve essere direzionata secondo la bocchetta, come illustrato in figura 5.
Nota: Il microfono del kit per auto HCC-250 deve essere orientato verso la sorgente sonora.
Piastrina magnetica
Clip di
bocchetta
Clip per parasole
Figura 3: Aggancio della clip per parasole alle piastrine magnetiche
Clip di montaggio su bocchetta
(direzione verticale)
montaggio
su
Figura 4: Aggancio della clip di montaggio su bocchetta alle piastrine
magnetiche
Clip di montaggio su bocchetta
(direzione orizzontale)
Base metallica
Figura 5: Regolazione della direzione della clip di montaggio su bocchetta (verticale od orizzontale)
Tirare leggermente
all'esterno e premere verso
il basso da questo punto
Figura 6: Distacco della clip dalla base metallica
Grazie all'ottima trasportabilità e flessibilità, questo kit per auto può essere utilizzato anche all'esterno di un veicolo, come in ufficio e/o a casa.
2.3 Accensione / spegnimento del kit per auto HCC-250
Accensione del vivavoce: premere il pulsante
per almeno 3 secondi. Si sentiranno 2 segnali acustici di accensione; il LED blu lampeggia rapidamente per 3
volte e poi una volta per 3 secondi. Il LED rosso è spento. Ciò significa che il vivavoce è acceso.
Spegnimento del dispositivo HCC-250: Premere il pulsante
per 3 volte e quindi tutti i LED si spegneranno.
per almeno 3 secondi. Si sentiranno 2 segnali acustici di spegnimento; il LED rosso lampeggerà
Ciò significa che il kit per auto è spento.
HCC-250 - Italiano
Pagina 5
2.4 Pairing / connessione del vivavoce con un dispositivo bluetooth
2.4.1 Pairing dell' HCC-250 con un telefono cellulare bluetooth (o un altro dispositivo)
Prima di effettuare o rispondere a chiamate, è necessario effettuare il pairing del dispositivo HCC-250 e del telefono. Il pairing definisce un rapporto
unico tra il kit per auto e il telefono cellulare. Il telefono cellulare memorizzerà il singolo ID del dispositivo HCC-250 (o chiave di accesso). Ciò assicura
che durante le chiamate sarà utilizzato un unico collegamento criptato tra il kit per auto e il telefono cellulare.
Per eseguire il pairing, procedere come segue.
1.
Mettere il dispositivo HCC-250 vicino al telefono cellulare bluetooth e assicurarsi che il kit per auto sia spento e il cellulare acceso
2.
per almeno 6 secondi fino a quando i LED blu e rosso lampeggiano in modo intermittente. Si sentiranno 2 segnali acustici di
Premere il pulsante
accensione e un segnale di pairing per indicare che il kit per auto è entrato correttamente in modalità pairing
3.
Seguire la guida per l'utente del telefono per attivare la ricerca dei dispositivi bluetooth da parte del cellulare, sul cui schermo comparirà un elenco degli
apparecchi bluetooth trovati dal telefono al termine del processo di ricerca.
4.
Selezionare il kit per auto bluetooth HCC-250 dall'elenco e avviare il pairing seguendo le indicazioni visualizzate sullo schermo.
5.
Seguire le istruzioni successive visualizzate sullo schermo per inserire la chiave di accesso "0000" e confermare il pairing del dispositivo HCC-250 con il
telefono cellulare. Quando la procedura di pairing è completata, si sentirà un segnale acustico di connessione e il LED blu lampeggerà rapidamente 3
volte ogni 2 secondi. Ciò significa che il kit per auto e il telefono cellulare sono in pairing e connessi.
Nota:
Se il pairing è avvenuto, il LED rosso del kit per auto è spento. Il LED blu lampeggia rapidamente 3 volte ogni 2 secondi. Se il telefono cellulare indica che il pairing
è fallito e il kit per auto è ancora nella modalità pairing, è necessario ritornare ai precedenti passaggi 3-5 e ripetere la procedura.
Il kit per auto rimane in modalità pairing per circa 2 minuti. Se il pairing non può essere completato entro 2 minuti, il dispositivo HCC-250 entrerà in modalità di
stand-by (in questo caso senza connessione bluetooth). Per riavviare il processo di pairing è necessario spegnere il kit per auto e ripetere i precedenti passaggi 25.
2.4.2 Cancellazione dei profili di pairing
Questo kit per auto è predisposto per il pairing di 8 dispositivi bluetooth al massimo. In modalità pairing, tenendo premuto il pulsante - per almeno 3 secondi è
possibile cancellare tutti i profili di pairing dei dispositivi bluetooth memorizzati nel kit per auto. A quel punto il kit per auto uscirà dalla modalità pairing. Il LED blu
lampeggerà 1 volta ogni 3 secondi.
2.4.3 Connessione / disconnessione del kit per auto HCC-250 a un dispositivo bluetooth
Quando il kit per auto comunica con un apparecchio bluetooth tramite il profilo vivavoce, la connessione bluetooth tra i due apparecchi dovrà già essere stata
effettuata. Se due apparecchi bluetooth sono già stati posti in pairing una volta, è possibile semplicemente riconnetterli.
Connessione dell' HCC-250 con un telefono cellulare bluetooth
Una connessione bluetooth può essere impostata richiedendola sia partendo dal kit per auto che dal telefono cellulare. Procedere come segue.
.
1.
Se la richiesta di connessione parte dal kit per auto, avvicinare il kit al telefono cellulare bluetooth e premere il pulsante
2.
Se la richiesta di connessione parte dal telefono cellulare bluetooth, avvicinare il kit al telefono cellulare bluetooth e seguire le indicazioni della guida per
l'utente del telefono per individuare il kit per auto e inviare la richiesta di connessione.
Eseguita la procedura di connessione, si sentirà un segnale acustico di connessione e il LED blu lampeggerà rapidamente 3 volte ogni 2 secondi.
Disconnessione dell' HCC-250 da un telefono cellulare bluetooth
Quando il kit per auto è connesso con un telefono cellulare bluetooth (o si trova in modalità connessione), per effettuare la disconnessione procedere come segue.
per almeno 3 secondi.
1.
Premere il pulsante
2.
Seguire la guida per l'utente del telefono cellulare e iniziare la disconnessione partendo dal telefono.
Eseguita la procedura di disconnessione, si sentirà un segnale acustico di disconnessione e il LED blu lampeggerà rapidamente 1 volta ogni 3 secondi.
HCC-250 - Italiano
Pagina 6
2.5 Funzioni di chiamata
2.5.1 Funzioni di chiamata di base
Prima di comporre un numero, sia il kit per auto HCC-250 che il telefono cellulare devono essere accesi. Assicurarsi inoltre che entrambi siano stati collegati con
una connessione bluetooth.
Per rispondere a una chiamata: premere il pulsante
Per respingere una chiamata:
.
premere il pulsante - per almeno 3 secondi.
Per finire una chiamata:
premere il pulsante
Per ricomporre una chiamata:
premere il pulsante + per almeno 3 secondi.
.
Per le operazioni sopra descritte, il LED blu lampeggia rapidamente 3 volte ogni 2 secondi e il LED rosso è spento.
2.5.2 Mute chiamata
È possibile mettere o togliere il mute a una chiamata in corso premendo simultaneamente i pulsanti + e -. Il LED blu lampeggia rapidamente 3 volte ogni 2 secondi
e il LED rosso è spento.
2.5.3 Trasferimento chiamate al / dal telefono cellulare
Per trasferire le chiamate al telefono cellulare, premere il pulsante
per almeno 3 secondi. Il LED blu lampeggia 1 volta ogni 3 secondi, il LED rosso è spento.
Per trasferire le chiamate dal telefono cellulare, premere il pulsante
. Il LED blu lampeggia rapidamente 3 volte ogni 2 secondi.
2.5.4 Composizione vocale
Se il telefono connesso supporta la composizione vocale, per attivarla premere il pulsante - per almeno 3 secondi. Il LED blu lampeggia rapidamente 3 volte ogni
2 secondi. Prima di utilizzare la composizione vocale è necessario memorizzare il riconoscimento vocale nel telefono cellulare. Fare riferimento al manuale del
telefono cellulare per le descrizioni dettagliate di impostazione della composizione vocale e registrazione del riconoscimento vocale.
Quando si sta effettuando una composizione vocale, è possibile annullarla premendo brevemente il pulsante -. Il LED blu lampeggia rapidamente 3
volte ogni 2 secondi e il LED rosso è spento.
2.5.5 Funzioni di chiamata avanzate
Se il telefono cellulare ha le funzioni di chiamata in attesa / conversazione multipla, il kit per auto HCC-250 può supportare queste funzioni. Procedere come
segue.
1.
2.
Se una nuova chiamata si verifica durante una conversazione in corso, ci sono due opzioni.
1)
Premere il pulsante + per almeno 3 secondi per sospendere la chiamata attiva e ricevere alla chiamata in arrivo.
2)
Premere il pulsante
per finire la chiamata attiva e rispondere alla nuova chiamata.
Se due chiamate avvengono contemporaneamente, una è attiva e l'altra rimane sospesa.
1)
Premere il pulsante + per almeno 3 secondi per alternare la chiamata sospesa e quella attiva.
2)
Premere il pulsante
per finire la chiamata attiva e ricevere quella sospesa.
3)
Premere il pulsante - per almeno 3 secondi per attivare la conversazione multipla.
Per le operazioni sopra descritte, il LED blu lampeggia rapidamente 3 volte ogni 2 secondi e il LED rosso è spento.
2.6 Funzioni A2DP
Questo kit per auto supporta il profilo bluetooth A2DP per la riproduzione di musica ad alta qualità. Se connesso con un riproduttore musicale / multimediale dotato
di tecnologia bluetooth o con un telefono cellulare compatibile con A2DP, il dispositivo consente di riprodurre musica stereofonica proveniente dal riproduttore.
2.6.1 Uso della funzione A2DP del telefono cellulare
Per telefoni cellulari che supportano profili bluetooth A2DP, è possibile stabilire una connessione audio tra il telefono cellulare e il kit per auto per ascoltare musica
riprodotta dal telefono. A seconda delle caratteristiche del telefono, la connessione audio può essere stabilita automaticamente avviando la riproduzione della
musica.
Se il telefono cellulare supporta i profili bluetooth A2DP ma non si stabilisce una connessione audio avviando la riproduzione musicale, è necessario seguire la
guida per l'utente del telefono per stabilire la connessione prima di riprodurre la musica.
HCC-250 - Italiano
Pagina 7
2.6.2 Funzioni AVRCP
Le funzioni seguenti possono essere utilizzate per comandare a distanza il telefono o il riproduttore multimediale bluetooth per la riproduzione di musica.
Riproduzione: premere il pulsante
Pausa:
premere il pulsante
.
.
Stop:
premere il pulsante
per almeno 3 secondi.
Avanti:
Indietro:
premere il pulsante + per almeno 3 secondi.
premere il pulsante - per almeno 3 secondi.
2.7 Regolazione del volume
In modalità connessione o conversazione / riproduzione, è possibile regolare il volume del suono aumentandolo o abbassandolo premendo rispettivamente i
pulsanti + o -. È possibile ripetere la regolazione fino a raggiungere il livello desiderato di volume dell'altoparlante.
Nota:
Per la maggior parte dei bluetooth, la regolazione volume del kit per auto si sincronizzerà a quello del telefono. Ciò significa che il volume del suono dell' HCC250 può essere regolato dal telefono e viceversa. Questo non è però sempre vero, a causa delle variazioni nelle caratteristiche scelte dai differenti produttori di
apparecchi telefonici.
2.8 Pairing / connessione del vivavoce a un altro dispositivo bluetooth
Oltre che con un telefono bluetooth, il kit per auto può essere messo in pairing con un altro dispositivo bluetooth per effettuare comunicazioni cordless a breve
distanza. È possibile utilizzare le stesse procedure per il pairing descritte nella precedente sezione 2.4. È possibile anche seguire la guida per l'utente del
dispositivo bluetooth per completare il pairing partendo dal dispositivo.
Questo kit per auto è predisposto per il pairing con 8 dispositivi bluetooth al massimo (telefoni cellulari inclusi). Le 8 impostazioni corrispondenti delle informazioni
di pairing vengono memorizzate dal kit per auto. Ogni dispositivo in pairing può comunicare via radio con il kit per auto dopo l'impostazione di una connessione
bluetooth. Consultare la sezione 2.4.3 per le procedure di impostazione di una connessione bluetooth.
3. GUIDA RAPIDA PER L'UTENTE
3.1 Configurazioni dell'indicatore LED
Configurazione LED 1: il LED blu lampeggia 1 volta ogni 3 secondi; il LED rosso è spento.
Configurazione LED 2: il LED blu lampeggia rapidamente 3 volte ogni 2 secondi; il LED rosso è spento.
Configurazione LED 3: i LED blu e rosso si alternano in modo intermittente.
Configurazione LED 4: i LED blu e rosso si alternano ogni 3 secondi.
Configurazione LED 5: tutti i LED sono spenti.
HCC-250 - Italiano
Pagina 8
3.2 Guida rapida per l'utente
Seguire le istruzioni contenute nelle seguenti tabelle 1-7 per azionare i dispositivi del kit per auto HCC-250. (Fare riferimento alla sezione 1 per informazioni
dettagliate sui tasti e sulla durata di azionamento degli stessi.)
Nota: Il kit per auto può effettuare conversazioni solo con dispositivi bluetooth in pairing. Per dispositivi che supportano solo il profilo vivavoce (HFP), è necessario
stabilire una connessione bluetooth tra il kit per auto e il telefono prima di effettuare o rispondere a chiamate.
Tabella 1: Spegnimento / accensione
STATO CORRENTE
INDICATORE HCC-250
FUNZIONE
OPERAZIONE
TELEFONO
HCC-250
SEGNALE ACUSTICO
INDICATORE LED
Accensione
Spento
Premere il pulsante
almeno 3 secondi
per
2 segnali di accensione
Configurazione LED 1
Spegnimento
Stand-by
Premere il pulsante
almeno 3 secondi
per
2 segnali di spegnimento
Configurazione LED 5
Tabella 2: Pairing / connessione
FUNZIONE
STATO CORRENTE
TELEFONO
Ingresso
modalità pairing
Cancellazione
dei profili di
pairing
INDICATORE HCC-250
OPERAZIONE
HCC-250
per
Spento
Premere il pulsante
almeno 6 secondi
Modalità pairing
Premere il pulsante - per
almeno 3 secondi
Pairing kit per
auto / telefono
Acceso
Modalità pairing
Connessione (kit
per auto /
telefono)
Stand-by
(disconnesso)
Stand-by
(disconnesso)
Disconnessione
Stand-by
(connesso)
Stand-by
(connesso)
Seguire la guida per l'utente
del telefono per completare la
procedura di pairing.
La chiave di accesso è "0000”
o
Premere il pulsante
impostare la connessione dal
telefono
per
Premere il pulsante
almeno 3 secondi o consultare
il manuale del telefono per
iniziare la connessione dal
telefono.
HCC-250 - Italiano
SEGNALE ACUSTICO
INDICATORE LED
2 segnali di accensione e
1 segnale di pairing
Configurazione LED 3
Configurazione LED 1
1 segnale di connessione
Configurazione LED 2
1 segnale di connessione
Configurazione LED 2
Configurazione LED 1
Pagina 9
Tabella 3: Funzioni di chiamata
STATO CORRENTE
INDICATORE HCC-250
FUNZIONE
OPERAZIONE
TELEFONO
HCC-250
Risposta
chiamata
Chiamata in arrivo
Chiamata in
arrivo
Premere il pulsante
Configurazione LED 2
Respinta
chiamata
Chiamata in arrivo
Chiamata in
arrivo
Premere il pulsante - per
almeno 3 secondi
Configurazione LED 2
Fine chiamata
Conversazione
Conversazione
Premere il pulsante
Configurazione LED 2
Stand-by
Stand-by
Premere il pulsante + per
almeno 3 secondi
Segnale tasto
Configurazione LED 2
Stand-by
Stand-by
Premere il pulsante - per
almeno 3 secondi
Segnale tasto
Configurazione LED 2
Composizione
vocale
Composizione
vocale
Premere il pulsante -
Segnale tasto
Configurazione LED 2
Ricomposizion
e
Composizione
vocale
Annullamento
composizione
vocale
SEGNALE ACUSTICO
STATO CORRENTE
INDICATORE LED
INDICATORE HCC-250
FUNZIONE
OPERAZIONE
TELEFONO
HCC-250
SEGNALE ACUSTICO
INDICATORE LED
Volume +
Conversazione
Conversazione
Premere il pulsante +
Configurazione LED 2
Volume -
Conversazione
Conversazione
Premere il pulsante -
Configurazione LED 2
Segnale tasto
Configurazione LED 2
Segnale tasto
Configurazione LED 2
Mute
Conversazione
Conversazione
Premere i pulsanti - e +
contemporaneamente
Unmute
Conversazione
Mute
Premere i pulsanti - e +
contemporaneamente
Tabella 4: Funzioni di trasferimento
STATO CORRENTE
FUNZIONE
Trasferimento
chiamata
(da kit per auto a
telefono)
Trasferimento
chiamata
(da telefono a kit per
auto)
INDICATORE HCC-250
OPERAZIONE
TELEFONO
HCC-250
Conversazi
one
Conversazione
Premere il pulsante
almeno 3 secondi
Conversazi
one
Conversazione
Premere il pulsante
HCC-250 - Italiano
per
SEGNALE ACUSTICO
INDICATORE LED
Segnale tasto
Configurazione LED 1
Segnale tasto
Configurazione LED 2
Pagina 10
Tabella 5: Indicazione di batteria scarica
STATO CORRENTE
INDICATORE HCC-250
FUNZIONE
OPERAZIONE
TELEFONO
Avviso di batteria
scarica
HCC-250
SEGNALE ACUSTICO
INDICATORE LED
Non spento
Segnale bip ogni 20
secondi
Configurazione LED 4
Tabella 6: Funzioni di chiamata avanzate
STATO CORRENTE
INDICATORE HCC-250
FUNZIONE
Sospensione chiamata
attiva e ricevimento
chiamata in arrivo
Fine chiamata attiva e
risposta a nuova chiamata
Commutazione chiamata
sospesa e chiamata attiva
Fine chiamata attiva e
ricevimento chiamata
sospesa
Conversazione multipla
OPERAZIONE
TELEFONO
TELEFONO
Conversazi
one
Chiamata in
attesa
Conversazi
one
Conversazi
one
Chiamata in
attesa
Chiamata
sospesa
Conversazi
one
Conversazi
one
SEGNALE ACUSTICO
INDICATORE LED
Premere il pulsante + per
almeno 3 secondi
Configurazione LED 2
Premere il pulsante
Configurazione LED 2
Premere il pulsante + per
almeno 3 secondi
Configurazione LED 2
Chiamata
sospesa
Premere il pulsante
Configurazione LED 2
Chiamata
sospesa
Premere il pulsante - per
almeno 3 secondi
Configurazione LED 2
Tabella 7: Operazioni con riproduttore multimediale
STATO CORRENTE
FUNZIONE
TELEFONO /
RIPRODUTTORE
INDICATORE HCC-250
OPERAZIONE
HCC-250
SEGNALE ACUSTICO
Riproduzione
Premere il pulsante
Pausa
Premere il pulsante
Stop
Premere il pulsante
almeno 3 secondi
Volume +
Premere il pulsante +
Volume -
Premere il pulsante -
Avanti
Indietro
per
Premere il pulsante + per 3
secondi
Premere il pulsante - per 3
secondi
HCC-250 - Italiano
INDICATORE LED
Pagina 11
Risoluzione dei problemi
Nel caso in cui il kit per auto non funzioni correttamente seguire le istruzioni della tabella sottostante per risolvere il problema. Se il problema non è
stato risolto neanche dopo che sono state eseguite le operazioni indicate, mettersi in contatto con il rivenditore da cui è stato acquistato il kit per
auto.
Stato
Il kit per auto non si accende
Non si riesce a comunicare con il kit
per auto
Impossibilità di esecuzione del pairing
tra kit per auto e telefono cellulare
bluetooth
Volume dell'altoparlante estremamente
basso o alto
Da controllare
Rimedio
Controllare se la batteria del kit per
auto è carica
Caricare la batteria
Controllare se il proprio telefono
cellulare supporta il profilo
"auricolare" e/o
"vivavoce"
Per poter utilizzare il kit per auto, è essenziale che il proprio
telefono cellulare supporti i profili "auricolare" e/o "vivavoce"
(Può essere necessario cercare opzioni come "auricolare"
"dispositivo audio" ecc., se il telefono cellulare non presenta
l'opzione del vivavoce; queste opzioni dipendono, tuttavia, dal
modello di telefono cellulare usato)
Controllare se la batteria è
completamente carica
Caricare la batteria se è scarica
Controllare se il kit per auto è
acceso
Premere
Controllare se il kit per auto si trova
nella modalità pairing
per
Con il dispositivo spento, premere e tenere premuto
almeno 56 s per portare il kit per auto nella modalità pairing
Controllare il volume
dell'altoparlante
Premere + o - per regolare il volume di conseguenza
HCC-250 - Italiano
per 3 s per accendere il kit per auto
Pagina 12
Informazioni supplementari (Leggere anche il supplemento "Informazione importante")
•
La comunicazione wireless è limitata entro un massimo di 10 metri (30 piedi) e le condizioni di copertura variano a seconda degli
ostacoli.
Il kit per auto può essere connesso soltanto a quei telefoni cellulari che supportano i profili dell'auricolare bluetooth o del vivavoce.
(A seconda dei vari modelli di telefono cellulare vengono visualizzate opzioni differenti, come ad es. dispositivo audio, ecc.) Questo
prodotto non è compatibile con i telefoni cordless standard usati negli edifici.
Poiché funziona nella stessa gamma di frequenza, il kit per auto può subire l'interferenza dei dispositivi che funzionano nella
gamma ISM (2.402 GHz ~ 2.480 GHz), ad esempio di LAN wireless, dispositivi a microonde, apparecchiature mediche e così via.
Per garantire un funzionamento corretto il kit per auto vivavoce deve quindi essere installato lontano da questi dispositivi.
Se usata in modo corretto, una batteria ricaricabile può avere una lunga durata di funzionamento. La capacità di una batteria nuova
o che non è stata usata per lungo tempo può essere ridotta le prime volte che la si usa.
Il tempo di impiego standard della batteria può variare a seconda delle condizioni d'impiego del telefono cellulare e del kit per auto.
•
•
•
•
Sicurezza
•
•
•
•
•
•
•
Utilizzare il caricatore fornito con l'apparecchio.
Attenzione. Sussiste il rischio di esplosione in caso di sostituzione della batteria con un tipo di batteria non corretto.
È necessario conoscere le leggi e i regolamenti sull'utilizzo dei telefoni cellulari e degli apparecchi vivavoce nelle zone in cui si
guida. Prestare sempre la massima attenzione alla guida. Accostare l'auto al bordo della strada e sostare prima di effettuare o
rispondere a una chiamata se le condizioni del traffico lo richiedono.
Non permettere a bambini di giocare con il kit per auto, poiché contiene pezzi minuti che potrebbero staccarsi e rappresentare un
pericolo di soffocamento.
Questo dispositivo contiene una batteria a polimero di litio. Tenerla sempre lontano dal fuoco (anche in caso di dismissione del
dispositivo) per evitare che esploda.
Il kit per auto e in particolare la batteria incorporata devono essere smaltiti o riciclati correttamente. Contattare i centri di
riciclaggio locali per le modalità di smaltimento.
Spegnere il kit per auto in aree con atmosfera potenzialmente esplosiva (depositi di prodotti petroliferi, depositi di sostanze
esplosive ecc.). In casi rari questo prodotto può generare scintille. Questo può provocare esplosioni o incendi con conseguenti
lesioni fisiche. Osservare quindi accuratamente gli avvertimenti forniti in queste aree.
•
Non far cadere quest'unità dall'alto
•
Non modificare, riparare né smontare questa unità
•
Non esporre questa unità direttamente all'azione dell'acqua, dell'alcool, del benzene ecc. per pulirla
•
Non esporre quest'unità all'azione di sostanze infiammabili
•
Non collocare quest'unità in prossimità di sostanze infiammabili
•
Proteggere quest'unità dall'umidità e dalla polvere
•
Non collocare oggetti pesanti su quest'unità
•
Ricaricare l'auricolare o il kit per auto solo ad auto ferma. Non usare l'auricolare o il kit per auto durante la ricarica.
HCC-250 - Italiano
Revision 1