1
BARBECUE
IT
Installazione - Uso - Manutenzione
BARBECUE
Installation - Use - Maintenance
GB
Complimenti
Complimenti e grazie per aver scelto il nostro
barbecue integrato. Siamo sicuri che sarà per
voi un piacere usare il nostro nuovo barbecue.
Prima di usare il barbecue, raccomandiamo di
leggere tutto il manuale utente, che fornisce
la descrizione del barbecue e delle relative
funzioni. Per evitare quei rischi sempre presenti
durante l’uso di un apparecchio a gas, è
importante installarlo correttamente e leggere
attentamente le istruzioni per la sicurezza, al
fine di evitare usi impropri e pericoli.
Raccomandiamo di conservare questo libretto
di istruzioni per consultazioni future e di
consegnarlo ad eventuali proprietari successivi.
Dopo aver tolto il barbecue dall’imballaggio,
controllare che non sia danneggiato. In caso
di dubbio, non usare l’apparecchio e contattare
il più vicino centro di assistenza clienti Fulgor
Milano.
I
Italiano
GB English
Sommario
Asticella di sicurezza del coperchio /
Pulizia e cura ..................................................20
Descrizione del prodotto..................................4
Componenti.................................................... 5
Manutenzione ................................................ 21
Istruzioni importanti per la sicurezza...............6
Garanzia ........................................................ 22
Montaggio del barbecue................................. 8
Caratteristiche del gas................................... 9
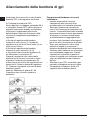
Informazioni di sicurezza della bombola del
gas ................................................................ 10
Suggerimento per l’ambiente
Avvertenze per l’installazione /
Istruzioni di installazione................................. 11
Informazioni sullo
per gli utilizzatori
Requisiti del gas / Preparazione del barbecue15
Allacciamento della bombola di gpl.................16
•
Applicazione del coperchio sottile o della
cappa di cottura ............................................. 17
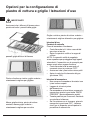
Opzioni per la configurazione di piastre di
cottura e griglie / Istruzioni d’uso ................... 18
•
Applicazione del coperchio sottile o della
cappa di cottura ............................................. 19
3
smaltimento
La maggior parte dei materiali di imballaggio
è riciclabile. Questi materiali vanno smaltiti
tramite l’apposito centro di riciclaggio locale o
mettendoli in contenitori di raccolta adeguati.
Se si desidera gettare il prodotto, contattare
gli uffici locali competenti e informarsi sulla
modalità di smaltimento corretta.
I
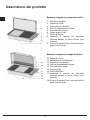
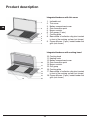
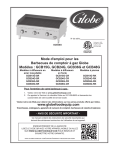
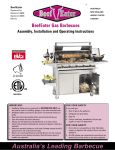
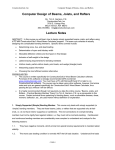
Descrizione del prodotto
Barbecue integrato con coperchio sottile
I
1.
2.
3.
4.
5.
6.
7.
8.
Asticella reclinabile
Coperchio sottile
Coperchio vano batteria
Punto di allacciamento del gas
Comandi dei bruciatori
Gruppi griglie (2 set)
Piastra di cottura
Vaschetta di raccolta olio amovibile
collocata davanti al piano cottura (non
illustrata)
9. Diffusori di fiamma (2 pz.) collocati sotto le
griglie (non illustrati)
1
2
3
4
5
6
7
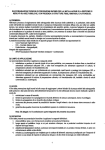
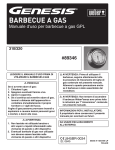
Barbecue integrato con cappa di cottura
10.Cappa di cottura
11.Rastrelliere di riscaldamento
12.Coperchio vano batteria
13.Punto di allacciamento del gas
14.Comandi dei bruciatori
15.Gruppo griglia
16.Piastra di cottura
17.Vaschetta di raccolta olio amovibile
collocata davanti al piano cottura (non
illustrata)
18.Diffusori di fiamma (2 pz.) collocati sotto le
griglie (non illustrati)
10
11
12
13
14
15
15
16
4
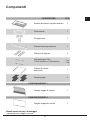
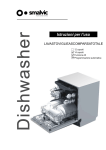
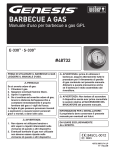
Componenti
DESCRIZIONE
QTÀ
Scatola bruciatori e profilo esterno
1
Guarnizione
1
Portagomma
1
Piastra termica posteriore
1
Diffusori di fiamma
2
Vaschette per l’olio
(1 lato sinistro e 1 lato destro)
1 sx
1 dx
Piastra di cottura
massiccia
1
Gruppi griglie
2
CONFIGURAZIONE 1
Gruppo cappa di cottura
1
CONFIGURAZIONE 2
Gruppo coperchio sottile
Utensili necessari per il montaggio:
- cacciavite con intaglio a croce
5
1
I
Istruzioni importanti per la sicurezza
I
Utilizzazione
Per la propria sicurezza, l’utente è tenuto a
leggere questo manuale prima di mettere
in funzione il barbecue.
Leggere attentamente il manuale utente e
conservarlo in un luogo a portata di mano per
esigenze di consultazione futura.
Viene mostrato qui di seguito il significato dei
simboli usati in questo manuale:
ATTENZIONE
L’apparecchio DEVE essere installato
e riparato solamente da personale
qualificato e autorizzato.
L’installazione, la modifica delle
regolazioni o la manutenzione effettuate
in modo improprio possono causare
lesioni o danni a cose.
Contattare il più vicino centro assistenza
Fulgor Milano per ulteriori informazioni
o assistenza in merito agli installatori
autorizzati.
NOTA PER L’INSTALLATORE
IL PRESENTE MANUALE DEVE
RESTARE AL PROPRIETARIO PER
CONSULTAZIONE FUTURA
ATTENZIONE
Questo simbolo segnala informazioni
relative alla sicurezza personale
dell’utente
AVVERTENZA
Questo simbolo segnala informazioni sul
modo di evitare danni all’apparecchio
SUGGERIMENTI E
INFORMAZIONI
Questo simbolo segnala suggerimenti e
informazioni sull’uso dell’apparecchio
ATTENZIONE
SUGGERIMENTO PER
L’AMBIENTE
SE SI SENTE ODORE DI GAS, non
cercare di accendere il barbecue.
Localizzare la fuga e riserrare il raccordo
che perde. Eseguire la procedura di
prova fughe descritta in questo manuale.
Se la fuga persiste, chiudere
l’alimentazione di gas e chiamare
l’assistenza Fulgor Milano o un
manutentore autorizzato di impianti a
gas.
Questo simbolo segnala informazioni
per un uso economico ed ecologico
dell’apparecchio
Questo simbolo segnala il divieto
di compiere un’azione
6
Non piegarsi sul barbecue durante
l’accensione.
Non tenere mai una bombola di gas
di ricambio vicino al barbecue
Non lasciare il barbecue incustodito
quando è acceso.
Non ritardare l’accensione una volta
aperto il gas.
Questo dispositivo raggiunge temperature elevte. Prestere particolare
attenzione in presenza di bambini o
anziani
Non tenere o usare bombolette
spray in prossimità del barbecue.
Non spostare l’apparecchio quando
è acceso
Non tenere liquidi infiammabili in
prossimità del barbecue.
Indossare guanti di protezione durante l’utilizzo del babecue
Non usare detergenti a base caustica o abrasiva sul barbecue.
Non mettere in funzione il barbecue
con sopra la copertura.
Non cercare di smontare o sistemare
le valvole di comando.
Non cercare di smontare o sistemare
il regolatore.
Non verificare la presenza di fughe
con una fiamma libera.
Non modificare la struttura dell’apparecchio e non modificare le dimensioni dell’orificio degli iniettori.
Non ostruire le aperture di ventilazione del barbecue.
Non permettere ai bambini di
mettere in funzione il barbecue o di
giocare vicino ad esso
Non utilizzare il barbecue se nel
raggio di circa 60 cm dalla parte
superiore, inferiore, posteriore o
laterale del dispositivo si trovano
materiali infiammabili.
Tenere eventuali cavi elettrici e tubi
di alimentazione carburante lontano
dalle siuperfici calce
7
I
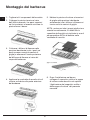
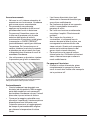
Montaggio del barbecue
I
5. Mettere la piastra di cottura e le sezioni
di griglia nelle posizioni desiderate
accertandosi che i diffusori di fiamma si
trovino sotto le sezioni di griglia
1. Togliere tutti i componenti dalla scatola.
2. Collegare la piastra termica al retro
dell’unità inserendo i tre perni superiori
nei fori posteriori e facendo scivolare la
piastra verso il basso.
NOTA: assicurarsi che i gruppi griglie siano
orientati correttamente, in modo che la
superficie della griglia sia inclinata in avanti
per permettere all’olio di defluire nelle
vaschette di raccolta.
3. Collocare i diffusori di fiamma nelle
posizioni desiderate (sotto i punti nei
quali verranno messe le sezioni di
griglia) e attaccare il bordo posteriore
del diffusore di fiamma al retro del
corpo del barbecue.
griglia assemblata
retro
fronte
6. Dopo l’installazione nel banco,
collegare il coperchio sottile o la cappa
di cottura come descritto nel capitolo
“Applicazione del coperchio sottile o
della cappa di cottura” del presente
manuale.
4. Applicare le vaschette di raccolta olio di
sinistra e di destra alla parte anteriore
del barbecue.
8
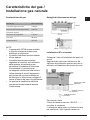
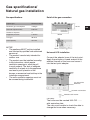
Caratteristiche del gas /
Installazione gas naturale
Caratteristiche del gas
Dettaglio di allacciamento del gas
Tipo di gas
GPL universale
Consumo di gas massimo
1106 g/h
Diametro dell’orificio degli iniettori
0,95 mm
Numero di iniettori
4
Pressione del regolatore
2,75 kPa
Gas GPL
30 mbar
Portata termica
15,2 Kw
NOTE
• L’apparecchio DEVE essere installato
e riparato solamente da personale
qualificato e autorizzato.
• Il prodotto è destinato esclusivamente
all’uso esterno.
• Il prodotto deve essere installato
seguendo le istruzioni, che richiedono
delle aperture di ventilazione per
permettere al barbecue di funzionare
correttamente. La mancanza di
un’adeguata ventilazione che fornisca
l’alimentazione di aria all’apparecchio
può portare ad una scarsa efficienza
dei bruciatori o all’eccessivo sviluppo di
calore all’interno del vano di installazione.
• Le aperture di ventilazione dell’unità
non devono essere coperte durante
l’installazione.
Installazione GPL universale
Collegare il tubo all’adattatore del punto di
prova.
Applicare del nastro per filettature o del
sigillante alla filettatura esterna del tubo e
avvitarlo nell’adattatore del punto di prova.
ingresso gas del
barbecue
rondella di tenuta
ermetica
rondella di tenuta
ermetica
Per mercato Italia:
Il tubo dev’essere marcato UNI-CIG ……..
con data di scadenza
L’utilizzatore deve poter controllare la data
per cambiare il tubo quando necessita.
9
I
Informazioni di sicurezza
della bombola del gas
I
Informazioni di sicurezza della bombola
del gas
Procedura di prova fughe
• Accertarsi che tutte le valvole del gas
siano in posizione ‘OFF’.
• In un piccolo contenitore, mescolare
una soluzione di acqua e detergente o
sapone.
• Dopo il collegamento del tubo, aprire
la valvola sulla bombola del gas o
eventualmente la valvola di rete.
• Usando un pennello, applicare la
soluzione sui punti di collegamento del
gas e controllare se c’è formazione di
bolle.
• La presenza di bolle indica una fuga.
• Chiudere la valvola e riserrare il raccordo.
Ripetere la prova fughe.
• Se la fuga persiste, chiudere il gas con
le valvole di isolamento e contattare un
manutentore autorizzato di impianti a gas
per rimediare alla fuga.
• L’apparecchio, una volta fatta la
conversione per l’uso di GPL universale,
è progettato per utilizzare una bombola di
gas da 6 kg.
• La bombola del gas deve essere
fabbricata e marcata in accordo alle
specifiche per le bombole di GPL
• La valvola di isolamento deve essere
chiusa quando l’apparecchio non viene
usato.
• Le bombole di gas devono essere tenute
in un alloggiamento approvato fuori della
portata dei bambini.
• Quando si scollega la bombola del
gas, assicurarsi che tutte le valvole di
comando siano in posizione ‘OFF’.
• Prima di scollegarla, togliere la bombola
dall’alloggiamento in cui eventualmente
si trova.
• Quando si ricollega il tubo alla bombola,
assicurarsi che tutti i collegamenti siano a
tenuta prima di riposizionarla nell’apposito
compartimento.
• Eseguire un controllo delle fughe
come descritto di seguito dopo ogni
collegamento di una bombola.
Punti di
prova fughe
10
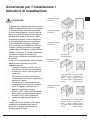
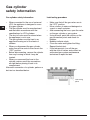
Avvertenze per l’installazione /
Istruzioni di installazione
Superficie esterna
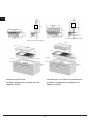
esempio 1
ATTENZIONE
• L’apparecchio deve essere usato soltanto
sopra la superficie del suolo, in condizioni
di aria aperta con ventilazione naturale
e senza aree stagnanti, dove le fughe di
gas e i prodotti di combustione vengono
rapidamente dispersi dal vento o dalla
convezione naturale. Questo barbecue
è stato progettato solo per uso esterno.
Fare riferimento ai disegni sottostanti.
• Non installare mai il barbecue all’interno
di edifici, garage, baracche o passaggi
coperti oppure all’interno di imbarcazioni,
camper o caravan. Ciò serve a prevenire
il possibile sviluppo di incendi o di
monossido di carbonio con effetti tossici o
di asfissia.
• Il vano in cui l’apparecchio viene installato
deve essere conforme ad uno dei
seguenti requisiti:
•
Un vano con pareti su tutti i lati, ma
con almeno un’apertura permanente
a livello del suolo e senza copertura
superiore.
•
All’interno di un vano parziale che
comprende una chiusura superiore e
non più di 2 pareti.
•
All’interno di un vano parziale che
comprende una copertura superiore
e più di 2 pareti; in questo caso si
applica il seguente principio:
•
Almeno il 25% della superficie totale
delle pareti è completamente aperto
e almeno il 30% della superficie
rimanente delle pareti è aperto e
libero
• In caso di balconi, almeno il 20% della
superficie totale delle pareti laterali,
posteriori e anteriori deve essere e
restare aperto e libero.
I
Superficie esterna
esempio 2
Superficie esterna
esempio 3
entrambe le
estremità aperte
Superficie esterna
esempio 4
lato aperto per
almeno il 25%
della superficie totale delle
pareti
in totale il 30%
o più della superficie restante delle pareti è
aperto e libero
lato aperto per
almeno il 25%
della superficie totale delle
pareti
in totale il 30%
o più della superficie restante delle pareti è
aperto e libero
Superficie esterna
esempio 5
11
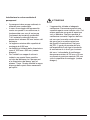
I
Scelta del punto di collocazione
struttura di metallo o su laterizi.
• L’apparecchio richiede la presenza di
aperture di ventilazione nella parete
anteriore del vano. Si veda il disegno
sottostante per i dettagli.
• L’apparecchio può essere montato sia
in un banco tipo isola che in un banco
dotato di paraspruzzi. Leggere i requisiti
specifici per ciascun tipo di montaggio.
• L’apparecchio non deve essere installato
su materiale combustibile. La distanza
minima da materiali combustibili è di 450
mm (18”).
• L’altezza libera sopra il piano cottura
rispetto a materiali combustibili deve
essere di almeno 600 mm.
• L’apparecchio deve essere installato in
conformità alle norme e in accordo con le
autorità locali.
• Durante l’uso di GPL all’interno di un vano
deve essere garantita la ventilazione. Il
gas è altamente esplosivo e può causare
gravi lesioni e danni a cose se lo si lascia
accumulare e poi si infiamma.
• Il barbecue è destinato ad essere
montato in un banco con un’altezza
minima di 600 mm.
• Evitare le posizioni esposte al vento
poiché potrebbero risentirne la cottura e
l’efficienza dei bruciatori. Se non si può
evitare una simile posizione, possono
essere necessari degli schermi.
Installazione stile isola
• Se l’apparecchio viene installato in una
montatura ad isola, può essere collocato
in posizione centrale. Fare particolare
attenzione alle dimensioni d’ingombro del
top dell’isola tenendo conto della cappa di
cottura aperta e della sporgenza. Vedere
sotto.
• Le dimensioni richieste della sfinestratura
sono di 1025 mm x 502 mm (vedere
disegno).
ATTENZIONE
Vano di installazione
• L’apparecchio richiede un’adeguata
ventilazione. Deve essere prevista una
superficie aperta come indicato sotto. Può
essere applicata una grata di aerazione
se lo si desidera. Questa superficie di
ventilazione consente l’ingresso dell’aria
nel vano per la corretta combustione
dei gas e per la corretta aspirazione
dei prodotti di combustione. Nel caso
del GPL, il gas è più pesante dell’aria;
nell’eventualità di una fuga la bocchetta
di ventilazione fa sì che il gas fuoriesca
dal vano. La bocchetta di ventilazione
deve essere minimo di 700 mm x 25 mm
e collocata in posizione centrale 135 mm
sotto la superficie di montaggio. (vedere
disegno).
• Il barbecue richiede una barriera non
combustibile sotto di esso per impedire
che si raggiunga una temperatura
eccessiva. Il pannello che funge da
barriera deve essere posizionato 30 mm
al di sotto della base dell’unità. Esistono
distanziatori adatti per il fondo dell’unità
allo scopo di impedire che il pannello
sia troppo vicino alla base del barbecue.
Fare riferimento al disegno alla pagina
successiva.
• Il vano di installazione deve essere
realizzato con materiali non combustibili.
Tra i materiali adatti per la costruzione
vi sono muratura, granito, marmo,
Hardiplank®, Villaboard®, utilizzati su una
12
Installazione in un banco dotato di
paraspruzzi
ATTENZIONE
• Il paraspruzzi deve essere realizzato in
materiale non combustibile.
• In caso di montaggio dell’apparecchio
contro una parete o una recinzione, è
fondamentale aver cura di assicurare
l’isolamento dei materiali combustibili.
Tutti i materiali combustibili devono
essere tenuti almeno 450 mm lontano dal
barbecue.
• La larghezza minima della superficie di
montaggio è di 600 mm
• Le dimensioni richieste della sfinestratura
sono di 1025 mm x 502 mm (vedere
disegno).
• Per i modelli con cappa di cottura è
richiesto una spazio libero specifico
sul retro del barbecue tra il paraspruzzi
e la sfinestratura del banco, pari ad
almeno 73 mm. Questo affinché la cappa
disponga dello spazio libero necessario
per aprirsi.
• L’apparecchio richiede un’adeguata
ventilazione. Deve essere prevista una
superficie aperta come indicato sotto. Può
essere applicata una grata di aerazione
se lo si desidera. Questa superficie di
ventilazione consente l’ingresso dell’aria
nel vano per la corretta combustione
dei gas e per la corretta aspirazione
dei prodotti di combustione. Nel caso
del GPL, il gas è più pesante dell’aria;
nell’eventualità di una fuga la bocchetta
di ventilazione fa sì che il gas fuoriesca
dal vano. La bocchetta di ventilazione
deve essere minimo di 700 mm x 25 mm
e collocata in posizione centrale 135 mm
sotto la superficie di montaggio. (vedere
disegno).
13
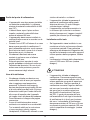
I
I
parete
wall
538 mm
wall
parete
589 mm
562 mm
453mm 601mm
larghezza banco 600 mm min.
553 mm
211 mm
banco
42 mm
banco
banco
banco
177 mm
177 mm
73 mm min.
dalla sfinestratura
25 mm
73 mm min.
dalla sfinestratura
25 mm
464 mm
56 mm
distanza minima dalla parete posteriore
distanza minima dalla parete posteriore
925 mm
553 mm
943 mm
538 mm
526 mm
538 mm
1058 mm
1058 mm
600 mm min.
135 mm
135 mm
sfinestratura
1025 mm x 502
25 mm
700 mm
paraspruzzi
sfinestratura 1025 mm
600 mm min.
sfinestratura 1025 mm
sfinestratura
502 mm
Installazione stile isola
(esempio raffigurante un barbecue con
coperchio sottile)
sfinestratura
1025 mm x 502
25 mm
700mm
sfinestratura
502 mm
Installazione in un banco con paraspruzzi
(esempio raffigurante un barbecue con
cappa di cottura)
14
Requisiti del gas /
Preparazione del barbecue
Requisiti GPL universale
Dimensioni della bombola
Altezza max 465 mm
Larghezza 289 mm - (sezione rettangolare)
o 318 mm (sezione circolare) massimo
B) Capacità della bombola max 6 kg
Sono disponibili diversi modelli di bombole
di dimensioni approvate (2).
ATTENZIONE
• La bombola di GPL nel vano sotto
l’unità barbecue, deve essere isolata
dalla stessa per mezzo di un pannello
non combustibile. Il vano deve essere
conforme ai requisiti della EN 484.
• I requisiti di ventilazione previsti dalla EN
484 per il ricovero delle bombole sono:
• In caso di struttura in lamiera o struttura
simile impenetrabile, devono esserci
aperture di ventilazione sulla parte
superiore e sul fondo del vano o della
cavità, ognuna delle quali deve fornire
una superficie libera di almeno 200 cm2
per ogni bombola alloggiata.
AVVERTENZA: se la bombola di GPL
acquistata non presenta le dimensioni
richieste, non tentare di collegarela
bombola all’interno del vano portaoggetti.
Fissare labombola sulla staffa oppure
posizionarla a terra. Il mancato rispetto di
queste istruzioni potrebbe danneggiare il
tubocon conseguenti incendi o esplosioni e
causare lesioni gravi o mortali e danni alle
cose.
tagliare un foro nella barriera
non combustibile solo per il tubo
210 mm
parte frontale del vano rimossa
per chiarezza
barriera non combustibile
necessaria sotto il barbecue
almeno 30 mm di spazio libero tra
il fondo del barbecue e la barriera
Preparazione del barbecue
Installazione all’interno del vano portaoggetti
La bombola di GPL puo essere collegata
all’interno del vano portaoggetti del
barbecuesolo se ha le dimensioni indicate
nelle linee guida (1). L’utilizzo sicuro di una
bombolaall’interno del vano portaoggetti
del barbecue dipende da diversi fattori:
A) La base della bombola deve essere
inserita correttamente tra le piastre
e trovarsi inposizione orizzontale sul
pannello di base.
15
I
Allacciamento della bombola di gpl
I
Preparazione del barbecue nel vano di
installazione
• Insieme al manuale di istruzioni,
il barbecue è stato provvisto di un
portafiammiferi con catenella attaccata.
Serve per l’accensione manuale nel
caso in cui l’accensione automatica non
funzioni. L’estremità libera della catenella
deve essere fissata in modo permanente
all’impianto in un punto che permetta
al portafiammiferi di raggiungere tutti i
bruciatori (fare riferimento alla pagina 9
per le istruzioni di accensione manuale).
• Dopo aver predisposto il vano come
descritto a pagina 6, posizionare il
barbecue assemblato nella sfinestratura.
• Verificare che il barbecue sia orizzontale
e sia saldamente supportato. Quando
il barbecue è orizzontale la piastra di
cottura e le griglie sono inclinate in avanti
verso la parte anteriore per il deflusso
dell’olio.
• Allacciare il gas (GPL universale o gas
naturale) ed eseguire una prova fughe.
• Per applicare il coperchio sottile o la
cappa di cottura vedere a destra.
Avvertenza: Assicurarsi che la valvola della
bombola GPL o del regolatore sia chiusa.
A) Collegare la bombola di GPL.
Alcuni regolatori si collegano premendo ON e
si scollegano tirando OFF, mentre altri tipi di
regolatori sono muniti di dado con filettatura
sinistra per il collegamento alla valvola
della bombola. Seguire le illustrazioni delle
istruzioni di collegamento specifiche per il
regolatore.
a) Avvitare il regolatore alla bombola
ruotando in senso orario (1). Installare il
regolatore in modo che il foro di sfiato (2) sia
rivolto verso il basso.
b) Avvitare il regolatore alla bombola
ruotando in senso antiorario (3) (4).
c) Assicurarsi che la leva del regolatore (5)
sia abbassata o in posizione off.
Premere il regolatore sulla valvola della
bombola fino a che non si avverte lo scatto
che indica l’avvenuto posizionamento (6).
d) Assicurarsi che la leva del regolatore sia in
posizione off. Alzare la ghiera del regolatore
(7). Premere il regolatore sulla valvola della
bombola e tenere
premuto. Abbassare la ghiera (8). Se
il regolatore non si blocca, ripetere la
procedura.
16
Applicazione del coperchio sottile o
della cappa di cottura
Applicazione del coperchio sottile
• Togliere il coperchio sottile
dall’imballaggio.
• Rimuovere le viti laterali dal profilo
esterno del barbecue usando la chiave a
brugola fornita in dotazione.
• Applicare i tasselli al profilo esterno con le
stesse viti.
• Applicare il coperchio sui tasselli.
IMPORTANTE
• Date le dimensioni della cappa di cottura,
si consiglia che venga messa in posizione
da due persone.
• Durante il posizionamento del gruppo
cappa di cottura, fare particolare
attenzione ad evitare di graffiare il profilo
esterno.
• Una volta posizionato, fissare il gruppo
cappa di cottura al profilo esterno con le
stesse viti.
Applicazione della cappa di cottura
• Togliere la cappa di cottura
dall’imballaggio.
• Rimuovere le viti laterali e posteriori dal
profilo esterno del barbecue usando la
chiave a brugola fornita in dotazione.
17
I
Opzioni per la configurazione di
piastre di cottura e griglie / Istruzioni d’uso
I
IMPORTANTE
Assicurarsi che i diffusori di fiamma siano
posizionati sotto i pannelli delle griglie
Griglia a sinistra, piastra di cottura a destra –
orientamento migliore alternativo per grigliare
Istruzioni d’uso
Funzioni di controllo
Prima di accendere il barbecue:
• Controllare che tutti i tubi e raccordi del
gas siano a tenuta.
• Aprire il coperchio sottile o la cappa di
cottura.
NOTA: Il coperchio sottile è progettato
come copertura per proteggere dagli agenti
atmosferici. Il coperchio non è concepito per
essere usato come cappa di cottura.
• Controllare che tutte le manopole di
comando siano in posizione ‘OFF’.
• Assicurarsi che i piani cottura siano puliti.
• Aprire la valvola di isolamento del gas
(posizione ‘ON’).
pannelli griglie diffusori di fiamma
Piastra di cottura a sinistra, griglia a destra –
orientamento migliore per grigliare
Istruzioni di accensione
• Non cercare di accendere i bruciatori con
i piani cottura coperti.
• Leggere le istruzioni prima
dell’accensione.
• Per accendere un bruciatore, premere la
manopola e girarla in posizione ‘RAPID
PREHEAT’ (preriscaldamento rapido).
• Tenerla premuta per 3 secondi, rilasciarla
e controllare la fiamma.
• Se il bruciatore non si è acceso, girare la
manopola in posizione ‘OFF’. Lasciare
che il gas si disperda, quindi ripetere la
procedura di accensione.
Mezza griglia sinistra, piastra di cottura
centrale, mezza griglia a destra –
orientamento migliore per arrostire
18
• I test hanno dimostrato che si può
abbassare la fiamma dei bruciatori per
una cottura soddisfacente.
• Se il barbecue è dotato di un coperchio
sottile, è consigliabile rimuoverlo in
presenza di vento.
• Se l’unità non funziona correttamente,
consultare il capitolo “Risoluzione dei
problemi”.
• Se si lascia che i bruciatori si
surriscaldino, si svilupperà fumo in
eccesso durante la fase di cottura, con
conseguente bruciatura del cibo che
viene cucinato. Questo può comportare
anche una bruciatura eccessiva del
grasso che le vivande rilasciano.
• Per arrostire con la cappa di cottura
chiusa basta che i 2 bruciatori più esterni
siano a fiamma bassa per cuocere in
modo soddisfacente
Accensione manuale
• Nel caso in cui il sistema automatico di
accensione non funzionasse, il barbecue
può essere acceso manualmente.
• Per accenderlo manualmente,
applicare un fiammifero da 40 mm sul
portafiammiferi fornito in dotazione.
Far passare il fiammifero acceso tra
le fessure di ispezione sotto la parte
anteriore delle piastre di cottura,
avvicinandolo al bruciatore, quindi girare
la manopola su ‘RAPID PREHEAT’
(preriscaldamento rapido) per effettuare
l’accensione. Se l’accensione non si
verifica, chiudere la valvola di comando
e attendere per alcuni minuti che il gas
si disperda prima di tentare di nuovo di
accendere il barbecue.
• Una volta acceso un bruciatore, ripetere
la procedura per gli altri se necessario.
Per spegnere il bruciatore
• Quando la cottura è terminata, girare
completamente la manopola in senso
orario in modo che l’indice sulla manopola
sia in posizione ‘off’.
far passare il portafiammiferi tra le fessure di ispezione
nella parte anteriore sotto le piastre di cottura
Preriscaldamento
• Questo barbecue è equipaggiato con
bruciatori ad alta potenza. Nella maggior
parte delle condizioni sarà necessario
preriscaldare il barbecue solo per 5 minuti
prima che si possa iniziare la cottura.
• Come per la maggior parte delle cose,
attraverso l’esperienza l’utente acquisisce
dimestichezza con l’efficacia e con
l’intervallo necessario al raggiungimento
del tempo di preriscaldamento migliore
per ottenere la temperatura di cottura
ideale.
19
I
Asticella di sicurezza del coperchio /
Pulizia e cura
I
Asticella di sicurezza del coperchio – solo
con coperchio sottile
ATTENZIONE
Per far sì che l’utilizzatore si ricordi di
escludere il gas prima di chiudere il
coperchio, è stata prevista un’asticella di
sicurezza reclinabile
IL COPERCHIO SOTTILE NON DEVE
ESSERE CHIUSO QUANDO I BRUCIATORI
SONO IN FUNZIONE.
Se il coperchio viene chiuso mentre i
bruciatori sono in funzione si può provocare
lo scolorimento e il danneggiamento del
coperchio e del barbecue.
asticella di sicurezza reclinabile
Pulizia e cura dell’apparecchio
Il barbecue integrato Fulgor Milano è stato
costruito partendo da acciaio inossidabile
di grado selezionato che, se non curato,
può scolorire nel tempo. Perché il barbecue
mantenga l’aspetto originario si consiglia di
pulire i piani cottura dopo ogni utilizzo.
ATTENZIONE
Quando il coperchio viene chiuso, l’asticella
di sicurezza si reclina in avanti e poggia
contro la superficie del profilo impedendo
al coperchio di chiudersi. Dopo essersi
assicurati di aver escluso il gas, per chiudere
completamente il coperchio bisogna girare
l’asticella all’indietro.
Assicurarsi che il barbecue sia spento e si
sia raffreddato prima di eseguire le istruzioni
riportate di seguito.
Pulizia delle parti in acciaio inossidabile
Piastra di cottura e griglia
• Togliere dalla griglia e dalla piastra di
cottura tutti i materiali solidi e il grasso
in eccesso usando un raschietto o una
spazzola metallica
• Per facilitare la pulizia, le due metà della
griglia possono essere rimosse con la
piastra di cottura. Per le macchie ostinate,
immergere semplicemente le parti
della griglia e la piastra in acqua calda
saponata prima di risciacquarle con cura
• Assicurarsi che tutte le superfici vengano
asciugate con un panno pulito e asciutto
asticella di sicurezza reclinabile
20
Altre superfici in acciaio inossidabile
Pulizia delle vaschette di raccolta olio
Il barbecue integrato ha un sistema unico di
gestione dell’olio, che usa canali sovrapposti
per convogliare tutto l’olio verso la parte
anteriore in vaschette di raccolta facilmente
amovibili, che devono essere pulite dopo ogni
utilizzo.
• Per estrarre le vaschette, tirarle verso
l’alto dalla parte anteriore del barbecue;
smaltire poi il contenuto raccolto in modo
responsabile. Sciacquare le vaschette di
raccolta olio in acqua tiepida saponata.
Le vaschette possono essere messe in
lavastoviglie se lo si desidera.
AVVERTENZA
Non usare detergenti abrasivi o caustici,
pagliette o raschietti metallici su queste
superfici in acciaio inossidabile, perché
possono graffiare e danneggiare in
permanenza il barbecue.
• Lavare tutte le parti in acciaio
inossidabile, compresi il coperchio sottile,
la cappa di cottura e le manopole di
comando, con uno strofinaccio morbido
usando acqua calda saponata
• L’interno del barbecue può essere pulito
con un panno morbido bagnato in acqua
calda saponata. Il pannello posteriore
dell’interno è asportabile per una facile
pulizia
• Assicurarsi che tutte le superfici vengano
asciugate con un panno pulito e asciutto
SUGGERIMENTI E INFORMAZIONI
Nota speciale sulla “colorazione tè”
Talvolta le superfici di acciaio inossidabile
sono affette da un’alterazione cromatica
chiamata “colorazione tè”. Questa si verifica
solitamente nelle zone in cui si impiega un
calore molto forte e può essere facilmente
rimossa usando detergenti specifici per
l’acciaio inossidabile. Per ottenere i risultati
migliori, si consiglia di usare regolarmente
detergenti specifici su tutte le parti in
acciaio inossidabile. Questi detergenti sono
disponibili in quasi tutti i negozi di ferramenta.
AVVERTENZA
Fare particolare attenzione (in special modo
quando si pulisce sulle manopole e attorno
ad esse) ad evitare che acqua e residui di
sapone entrino nel pannello di controllo in
cui si trovano le valvole o nei bruciatori. Fare
attenzione anche a non toccare l’elettrodo di
accensione. Tra l’elettrodo e i bruciatori deve
essere mantenuta una distanza di 5 mm
(vedere disegno sottostante).
SUGGERIMENTI E INFORMAZIONI
Nota speciale sull’acciaio inossidabile
I pannelli di acciaio inossidabile possono
deformarsi durante l’uso ma riprendono la
forma normale una volta raffreddati.
21
I
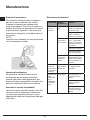
Manutenzione
I
Risoluzione dei problemi
Sistema di accensione
Per cambiare la batteria girare il coperchio
del vano in senso antiorario per svitarlo.
Sollevare il coperchio per accedere alla
molla e alla batteria. Tirare fuori la molla e la
batteria. Sostituirla con una batteria AA nuova
e riposizionare il coperchio. Fare una prova
premendo la manopola; si dovrebbe udire un
clic sonoro.
NOTA
Accertarsi che la batteria sia stata posizionata
con l’orientamento corretto.
PROBLEMA
CAUSA
POSSIBILE
RIMEDIO
Il barbecue non si
accende
Assenza di
gas
Controllare che la
valvola di isolamento
sia aperta (ON)
Bombola del gas
vuota - riempire o
cambiare la bombola
Il sistema di
accensione
non funziona
Controllare la batteria – si dovrebbe
udire un clic sonoro
quando si preme la
manopola
Sostituire la batteria
Accendere il barbecue manualmente
Aperture di ventilazione
Le aperture di ventilazione del vano di
installazione devono essere controllate
prima di ogni utilizzo dell’apparecchio, per
assicurarsi che non presentino ostruzioni che
possono ostacolare il libero flusso dell’aria.
Elettrodo di
accensione
bagnato o
sporco
Pulire e asciugare
delicatamente l’elettrodo assicurandosi
che la posizione sia
corretta
Fumo
eccessivo
emesso dalla superficie
di cottura
Valvola del
gas regolata
troppo alta
Abbassare il gas
o spegnere alcuni
bruciatori
Odore di gas
NON
CERCARE
DI ACCENDERE
L’PPARECCHIO
Fuga di gas
Chiudere il gas con
le valvole di isolamento
Verificare se ci sono
fughe, stringere i
raccordi
Se il problema
persiste chiamare
l’assistenza Fulgor
Milano
Bruciatori in acciaio inossidabile
I bruciatori vanno controllati almeno una volta
all’anno e puliti se necessario. Ispezionare
i bruciatori per accertarsi che non si siano
depositati dei residui e che gli attacchi del gas
siano liberi.
22
DICHIARAZIONE DEL PRODUTTORE
Con la presente il produttore dichiara che i prodotti di questo catalogo rispondono, a secondo delle tipologie,
ai requisiti fondamentali richiesti dalle Direttive Europee e perciò il prodotto è stato contrassegnato col
marchio CE e per esso è stata emessa la dichiarazione di conformità, a disposizione degli organi preposti al
controllo del mercato.
SMALTIMENTO DEGLI APPARECCHI USATI
Al termine del periodo di utilizzo è vietato smaltire questi apparecchi elettrodomestici con i normali rifiuti
urbani, deve bensì essere consegnato al punto di raccolta e riciclaggio delle apparecchiature elettriche ed
elettroniche. Ne informa il simbolo riportato sul prodotto, sul manuale di istruzioni o sull’imballaggio.
I materiali impiegati nell’apparecchio possono essere riutilizzati in conformità alla loro destinazione.
Grazie al riutilizzo, al riciclo dei materiali o ad altre forme di riutilizzo degli apparecchi inservibili,
darete il Vostro contributo alla protezione del nostro ambiente naturale.
Le informazioni relative ai punti di smaltimento degli apparecchi inservibili vi saranno fornite dalle competenti
autorità territoriali.
Il produttore declina ogni responsabilità per inesattezze contenute nel presente catalogo a causa di errori
tipografici. Ci riserviamo il diritto di apportare delle modifiche migliorative o indispensabili ai prodotti senza
alterarne le specifiche essenziali. I prodotti possono subire delle modifiche a seguito di richieste migliorative
e normative CE.
Congratulations
Congratulations and thanks for choosing our
integrated barbecue. We are confident that it will
be a pleasure for you to use our new barbecue.
Before using the barbecue, we recommend
reading the entire user guide, which provides
a description of the barbecue and its functions.
To avoid those risks that are always present
when using a gas appliance, it is important
to install it correctly and carefully read the
safety instructions in order to avoid misuse
and hazards. We recommend you keep this
instruction booklet for future reference and pass
it to any subsequent owners.
After removing the barbecue from its packaging,
check to see that it is not damaged. If in doubt,
do not use the appliance and contact your
nearest Fulgor Milano customer service centre.
I
Italian
GB English
Contents
Product description......................................... 26
Maintenance................................................... 44
Components....................................................27
Warranty..........................................................45
Important safety instructions........................... 28
Assembling the barbecue............................... 30
Gas specifications / Natural gas installation....31
Gas cylinder safety information.......................32
Other installation notices /
Installation instructions................................... 33
Suggestion
environment
Gas requirements /
Preparation of the barbecue............................37
for
the
Disposal information for users
Connection of the LPG cylinder...................... 38
•
Application of the thin cover or cooking hood 39
Configuration options cooking plate and grill/
Usage instructions.......................................... 40
•
Cover safety rod/Cleaning and care................42
25
Most of the packaging material is recyclable.
These materials should be disposed of through
a local recycling centre or by putting them in
appropriate collection containers.
If you want to discard the product, contact
your local authorities and ask about the correct
method of disposal.
GB
Product description
Integrated barbecue with thin cover
1.
2.
3.
4.
5.
6.
7.
8.
Inclinable rod
Thin cover
Battery compartment cover
Gas connection point
Burner controls
Grill groups (2 sets)
Cooking plate
Removable oil collection drip plan located
in front of the cooking surface (not shown)
9. Flame diffusers (2 pcs.) located under the
grills (not shown)
1
GB
2
3
4
5
6
7
Integrated barbecue with cooking hood
10.Cooking hood
11.Heating racks
12.Battery compartment cover
13.Gas connection point
14.Burner controls
15.Grill group
16.Cooking plate
17.Removable oil collection drip plan located
in front of the cooking surface (not shown)
18.Flame diffusers (2 pcs.) located under the
grills (not shown)
10
11
12
13
14
15
15
16
26
Components
DESCRIPTION
Burner box and external profile
QTY
1
GB
Gasket seals
1
Hose union
1
Rear heating plate
1
Flame diffusers
2
Oil drip plans
(1 left and 1 right side)
1 left
1
right
Cooking plate
plate
1
Grill groups
2
CONFIGURATION 1
Cooking hood group
1
CONFIGURATION 2
Thin cover group
Tools needed for assembly:
- Phillips screwdriver
27
1
Important safety instructions
Use
For your own safety, you should read this
manual before operating the barbecue.
Carefully read the user manual and keep it in
a handy place for future reference.
Below, we explain the meaning of the symbols
GB
used in this manual:
ATTENTION
The appliance MUST only be installed
and serviced by qualified and authorized
personnel.
Improper installation, modification,
adjustment or maintenance can cause
personal injury or property damage.
Contact the nearest Fulgor Milano
service centre for more information or
assistance with regard to the authorized
installers.
NOTE FOR THE INSTALLER
THIS MANUAL MUST BE LEFT
WITH THE OWNER FOR FUTURE
REFERENCE
ATTENTION
This symbol indicates information relating
to the user's personal safety
WARNING
This symbol indicates information on how
to prevent damage to the appliance
TIPS AND
INFORMATION
This symbol indicates tips and
information about the use of the
appliance
ATTENTION
SUGGESTION FOR
THE ENVIRONMENT
IF YOU SMELL GAS, do not try to light
the barbecue. Locate the leak and
tighten the leaking fitting. Perform the
leak test procedure described in this
manual.
If the leak persists, turn off the gas
supply and call Fulgor Milano service or
an authorized gas system maintenance
technician.
This symbol indicates information for the
economical and ecological use of the
appliance
This symbol indicates a prohibited
action
28
Do not lean over barbecue while
lighting.
Do not leave the barbecue unattended when it is on.
This appliance reaches high temperatures. Be especially careful
when children and elderly persons
are present.
Do not delay ignition once the gas is
opened.
Do not move the barbecue when it
is on.
Do not store or use aerosol sprays
near the barbecue.
Wear protective gloves when using
the barbecue.
Do not store inflammable liquids
near the barbecue.
Do not use abrasive or caustic detergents on the barbecue.
Do not operate the barbecue with
the cover closed.
Do not attempt to disassemble or
adjust the control valves.
Do not attempt to disassemble or
adjust the regulator.
Do not use an open flame to check
for leaks.
Do not modify the structure of the
appliance and do not modify the
dimensions of the injector orifice.
Do not obstruct the ventilation openings of the barbecue.
Do not allow children to operate the
barbecue or play near it.
Do not use the barbecue if inflammable materials are within a radius
of about 60 cm from the top, bottom,
rear or sides of the appliance.
Keep electrical wires and fuel hoses
away from hot surfaces.
Never store a spare gas cylinder
near the barbecue.
29
GB
Assembling the barbecue
5. Place the cooking plate and grill
sections in the desired positions,
making sure that the flame diffusers are
under the grill sections.
1. Remove all components from the box.
2. Connect the heating plate to the back
of the unit by inserting the three upper
pins into the holes in the rear and
sliding the plate downwards.
GB
NOTE: make sure that the grill groups are
correctly oriented so that the surface of the
grill is tilted forward to allow the oil to drain
into the drip pans.
3. Place the flame diffusers in the desired
positions (under the points at which the
grill sections will be placed) and attach
the rear edge of the flame diffuser to
the rear of the body of the barbecue.
assembled grid
back
front
6. After installation in the counter, connect
the thin cover or cooking hood area as
described in the chapter "Application of
the thin cover or cooking hood" in this
manual.
4. Apply the left and right oil drip pans to
the front of the barbecue.
30
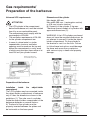
Gas specifications/
Natural gas installation
Gas specifications
Detail of the gas connection
Type of gas
Universal LPG
Maximum gas consumption
1106 g/h
Diameter injector orifice
0.95 mm
Number of injectors
4
Regulator pressure
2.75 kPa
LPG gas
30 mbar
Heat capacity
15.2 Kw
GB
NOTES
• The appliance MUST only be installed
and serviced by qualified and authorized
personnel.
• The product is exclusively intended for
outdoor use.
• The product must be installed according
to the instructions, which require
ventilation openings to allow the grill
to work properly. The lack of adequate
ventilation to supply air to the appliance
can lead to poor operation of the
burners or excessive heat build-up in the
installation compartment.
• The unit's ventilation openings must not
be covered during installation.
Universal LPG installation
Connect the adapter hose of the test point.
Apply thread tape or thread sealant to the
external threads of the hose and screw it
into the test point adapter.
gas inlet of the
barbecue
hermetic seal washer
hermetic seal washer
For Italy:
The hose must be marked UNI-CIG ........
with expiration date
The user must be able to check the date to
change the hose when necessary.
31
Gas cylinder
safety information
Leak testing procedure
Gas cylinder safety information
• Make sure that all the gas valves are in
the "OFF" position.
• Mix a solution of water and detergent or
soap in a small container.
• After connecting the hose, open the valve
on the gas cylinder or gas system.
• Using a brush, paint the solution on the
gas connection points and check for
bubbles.
• Bubbles indicate a leak.
• Close the valve and tighten the fitting.
Repeat the leak test.
• If the leak persists, turn off the gas
with the shut-off valves and contact an
authorized gas system maintenance
technician to repair the leak.
• When converted for the use of universal
LPG, the appliance is designed to use a
6-kg gas cylinder.
GB
• The gas cylinder must be manufactured
and marked in accordance with the
specifications for LPG cylinders.
• The shut-off valve must be closed when
the appliance is not in use.
• The gas cylinders must be kept in an
approved housing out of the reach of
children.
• When you disconnect the gas cylinder,
make sure all the control valves are in the
"OFF" position.
• Before disconnecting, remove the cylinder
from any housing in which it may be
located.
• When you reconnect the hose to the
cylinder, make sure all the connections
are tight before placing it back in its
compartment.
After each connection of a cylinder, perform a
leak test as described below.
Leak testing
points
32
Other installation notices /
Installation instructions
External surface
area example 1
ATTENTION
• The appliance must only be used above
ground level, in open air and natural
ventilation without stagnant areas where
leaking gas and combustion products are
rapidly dispersed by the wind or natural
convection. This barbecue is designed
exclusively for outdoor use. Refer to the
drawings below.
• Never install the barbecue inside
buildings, garages, sheds or covered
walkways, or in a boat, camper or
caravan. This prevents the creation of
fires or carbon monoxide with toxic effects
or asphyxiation.
• The compartment in which the appliance
is installed must conform to one of the
following requirements:
•
A compartment with walls on all
sides, but with at least one permanent
opening at ground level and without
upper cover.
•
In a partial compartment that has
a top cover and not more than two
walls.
•
In a partial compartment that has a
top cover and more than two walls;
in this case, the following principle
applies:
•
At least 25% of the total area of the
walls is completely open and at least
30% of the remaining area of the
walls is open and free.
• In the case of balconies, at least 20% of
the total area of the side, front and rear
walls must be and remain open and free.
GB
External surface
area example 2
External surface
area example 3
both
ends open
External surface
example 4
open side for
at least 25% of
the total area of
the walls
in total 30%
or more of
the remaining
surface of the
walls is open
and free
open side for
at least 25% of
the total area of
the walls
in total 30%
or more of
the remaining
surface of the
walls is open
and free
External surface
example 5
33
Selection of the point of installation
compartment. See the drawing below for
the details.
• The appliance unit can be mounted in an
island counter or a counter with splash
guard. Read the specific requirements for
each type of mounting.
• The appliance must not be installed on
combustible materials. The minimum
distance from combustible materials is
GB
450 mm (18”).
• The free space above the cooking surface
with respect to combustible materials
must be at least 600 mm.
• The appliance must be installed in
accordance with standards and local
regulations.
• When using LPG, ventilation must be
ensured in the compartment. The gas is
highly explosive and can cause serious
personal injury and property damage if it
is left to accumulate and then ignited.
• The barbecue is designed to be mounted
in a counter with a minimum height of 600
mm.
• Avoid locations exposed to the wind as
this may affect cooking and the efficiency
of the burners. If you cannot avoid such a
location, screens may be necessary.
Island-mounted
• If the appliance is installed in an island, it
can be placed in the centre. Pay particular
attention to the overall dimensions of the
top of the island, taking into account the
open cooking hood and its projection. See
below.
• The required dimensions of the cutout are
1025 mm x 502 mm (see drawing).
ATTENTION
The appliance requires adequate ventilation.
An open area must be provided as shown
below. A ventilation grate can be applied,
if desired. This ventilation surface allows
air to enter the compartment for the proper
combustion of the gas and aspiration of the
combustion products. In the case of LPG, the
gas is heavier than air; in the event of a leak
the vent allows the gas to leave the compartment. The air vent must be at least 700 mm
x 25 mm and placed in a central position
135 mm below the mounting surface. (See
drawing).
Installation compartment
• The barbecue requires a non-combustible
barrier beneath it to prevent reaching an
excessive temperature. The panel that
acts as a barrier must be positioned 30
mm below the base of the unit. Spacers
are available for the bottom of the unit to
prevent the panel from being too close
to the base of the barbecue. Refer to the
drawing on the next page.
• The installation compartment must be
made of non-combustible materials.
Materials suitable for its construction
include brick, granite, marble,
Hardiplank® and Villaboard® on a metal
or brick structure.
• The appliance requires ventilation
openings in the front wall of the
34
Installing in a counter with splash guard.
ATTENTION
• The splash guard must be made of noncombustible material.
• When mounting the appliance against a
wall or a fence, it is essential to insulate
combustible materials. All combustible
materials must be kept at least 450 mm
away from the barbecue.
• The minimum width of the mounting
surface is 600 mm.
• The required dimensions of the cutout are
1025 mm x 502 mm (see drawing).
• Models with cooking hood require a
specific free space on the back of the
barbecue between the splash guard and
the cutout of the counter of at least 73
mm. This, so that the hood has the free
space needed to open.
• The appliance requires adequate
GB
ventilation. An open area must be
provided as shown below. A ventilation
grate can be applied, if desired. This
ventilation surface allows air to enter the
compartment for the proper combustion of
the gas and aspiration of the combustion
products. In the case of LPG, the gas
is heavier than air; in the event of a
leak the vent allows the gas to leave
the compartment. The air vent must be
at least 700 mm x 25 mm and placed
in a central position 135 mm below the
mounting surface. (See drawing).
35
bench width
parete
589 mm
wall
538 mm
562 mm
wall
wall
GB
453mm 601mm
600 mm min.
553 mm
211 mm
banco
42 mm
banco
banco
banco
177 mm
177 mm
73 mm min.
from the cutout
25 mm
73 mm min.
from the cutout
25 mm
464 mm
56 mm
minimum distance from the rear wall
minimum distance from the rear wall
925 mm
553 mm
943 mm
538 mm
526 mm
538 mm
1058 mm
1058 mm
600 mm min.
135 mm
600 mm min.
cutout 1025 mm
135 mm
cutout
1025 mm x 502
25 mm
700 mm
cutout
502 mm
splash guard
cutout 1025 mm
cutout
1025 mm x 502
25 mm
700mm
Island-mounted
(example showing a barbecue with thin
cover)
cutout
502 mm
Installation in a counter with splash guard.
(example showing a barbecue with cooking
hood)
36
Gas requirements/
Preparation of the barbecue
Universal LPG requirements
Dimensions of the cylinder
Max height 465 mm
Max width 289 mm - (rectangular section)
or 318 mm (circular section)
B) Capacity of the cylinder, 6 kg max
There are several models of cylinders with
approved dimensions (2).
ATTENTION
• The LPG cylinder in the compartment
below the barbecue unit, must be isolated
from it by a non-combustible panel.
The compartment must comply with the
requirements of EN 484.
• The ventilation requirements of EN 484
for the cylinder compartment are:
• In case of a sheet metal, or similar
impenetrable, structure, ventilation
openings must be made on the top and
bottom the compartment or cavity, each
of which must provide a free surface of at
least 200 cm² per cylinder housed.
WARNING: if the LPG cylinder purchased
does not have the required dimensions, do
not attempt to connect it inside the objectholder compartment. Fix the cylinder to
the bracket or rest it on the floor. Failure
to follow these instructions could damage
the hose and cause fire or explosion,
with serious injury or death and property
damage.
tagliare un foro nella barriera
non combustibile solo per il tubo
210 mm
parte frontale del vano rimossa
per chiarezza
barriera non combustibile
necessaria sotto il barbecue
almeno 30 mm di spazio libero tra
il fondo del barbecue e la barriera
Preparation of the barbecue
Installation
inside
the
object-holder
compartment
The LPG cylinder may be connected inside
the object-holder compartment of barbecue
only if it has the dimensions shown in the
guidelines (1). The safe use of a cylinder
inside the object-holder compartment of the
barbecue depends on several factors:
A) The base of the cylinder must be
properly inserted between the plates and
be horizontal on the base panel.
37
GB
Connection of the LPG cylinder
Preparation of the barbecue in the
installation compartment
• Along with the instruction manual, the
barbecue is supplied with a match-holder
and attached chain. This is used for
manual lighting if the automatic ignition
does not work. The free end of the
chain must be permanently fasted to
the installation at a point that allows the
match-holder to reach all the burners
(refer to page 9 for manual ignition
instructions).
• After preparing the compartment
as described on page 6, place the
assembled barbecue in the cutout.
• Make sure the barbecue is horizontal and
is firmly supported. When the barbecue is
horizontal the cooking plate and grills are
tilted forward to drain the oil.
• Connect the gas (universal LPG or
natural gas) and perform a leak test.
• To apply the thin cover or cooking hood,
see on the right.
Note: Make sure the LPG cylinder valve or
regulator is closed.
A) Connect the LPG cylinder.
Some regulators are connected by pushing
GB ON and are disconnected by pulling OFF,
while other types of regulators have a nut
with left hand thread for connecting to the
cylinder valve. Follow the illustrations in the
instructions for the specific connection of the
regulator.
a) Screw the regulator to the cylinder by
turning it clockwise (1). Install the regulator so
that the vent hole (2) is facing downward.
b) Screw the regulator to the cylinder by
turning it counter-clockwise (3).
c) Make sure that the regulator lever (5) is in
the lowered or off position.
Press the regulator on the cylinder valve until
you hear a click indicating that it is in position
(6).
c) Make sure that the regulator lever is in the
OFF position. Lift the bezel of the regulator
(7). Press the regulator onto the cylinder
valve and hold it
pressed. Lower the bezel (8). If the regulator
does not lock, repeat the procedure.
38
Application of the thin cover or
cooking hood
Application of the thin cover
• Remove the thin cover from the
packaging.
• Remove the side screws from the
external profile of the barbecue outside
profile using the Allen wrench provided.
• Attach the anchors to the external profile
with the same screws.
• Apply the cover on the anchors.
IMPORTANT
• Given the dimensions of the cooking
hood, we recommend that two people
position it.
• During positioning the cooking hood
group, take special care to avoid
scratching the external profile.
• After it is positioned, fasten the cooking
hood to the external profile with the same
screws.
Application of the cooking hood
• Remove the cooking hood from the
packaging.
• Remove the side screws from the
external profile of the barbecue outside
profile using the Allen wrench provided.
39
GB
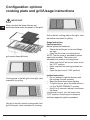
Configuration options
cooking plate and grill/Usage instructions
IMPORTANT
GB
Make sure that the flame diffusers are
positioned flame under the panels of the grills
Grill to the left, cooking plate to the right - best
alternative orientation for grilling
Usage instructions
Control functions
Before lighting the barbecue:
• Check that all the gas hoses and fittings
are tight.
• Open the thin cover or cooking hood.
NOTE: The thin cover is intended to protect
against the weather. The cover is not
intended to be used as a cooking hood.
• Make sure that all the control knobs are in
the "OFF" position.
• Make sure that the cooking surfaces are
clean.
• Open the gas shut-off ("ON" position).
grills panels flame diffusers
Ignition instructions
• Do not attempt to light the burners with
the cooking surfaces covered.
• Read the instructions before lighting.
• To light a burner, press the knob and turn
it to the "RAPID PREHEAT" position.
• Hold it for 3 seconds, release it and check
the flame.
If the burner is not lit, turn the knob to the
"OFF" position. Allow the gas to disperse,
Cooking plate to the left, grill to the right - best
orientation for grilling
and then repeat the ignition procedure.
Half-grill to the left, central cooking plate, halfgrill to the right - best orientation for roasting
40
• If you let the burners overheat, there will
be excessive smoke during cooking and
the food will burn. This can also result an
excessive burning of the fat released by
the food.
• To roast with the cooking hood closed
just set the outside 2 burners to low for
satisfactory cooking.
Manual lighting
• If the automatic ignition system is not
working, the barbecue can be lit manually.
• To light it manually, use a 40-mm match
on the match-holder provided. Pass the lit
match between the inspection slits under
the front of the cooking plates, bringing
it close to the burner and then turn the
knob to "RAPID PREHEAT" to light it. If it
does not light, close the control valve and
wait a few minutes for the gas to disperse
before trying to light the barbecue again.
• Once one burner is lit, repeat the
procedure for the others, if necessary.
To turn off the burner
• When cooking is complete, turn the knob
fully clockwise so that the mark on the
knob is in the "OFF" position.
pass the match-holder between the inspection slits in the
front under the cooking plates
Pre-heating
• The barbecue is equipped with highpower burners. Under most conditions,
it will only be necessary to pre-heat
the barbecue for just 5 minutes before
starting to cook.
• As with most things, experience will
teach the user the effectiveness and
interval necessary for reaching the best
pre-heating time for obtaining the ideal
cooking temperature.
• Tests have shown that you can reduce
the heat of the burners for satisfactory
cooking.
• If the barbecue has a thin cover, you
should remove it in the presence of wind.
• If the appliance is not working properly,
refer to the chapter "Troubleshooting".
41
GB
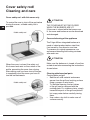
Cover safety rod/
Cleaning and care
Cover safety rod - with thin cover only
ATTENTION
To remind the user to shut-off the gas before
closing the cover, a tiltable safety rod is
provided.
GB
THE COVER MUST NOT BE CLOSED
WHEN THE BURNERS ARE LIT.
If the cover is closed while the burners are
lit, the cover and barbecue can be discolored
and damaged.
tiltable safety rod
Care and cleaning of the appliance
The Fulgor Milano integrated barbecue is
made of select grade stainless steel that,
if not cared for, can discolor over time.
To preserve its original appearance, we
recommend cleaning the cooking surfaces
after each use.
ATTENTION
Make sure the barbecue is turned off and has
cooled down before executing the instructions
shown below.
When the cover is closed, the safety rod
tilts forward and rests on the surface of the
profile, preventing the cover from closing.
After making sure you have shut-off the gas,
to completely close the cover you have to
turn the bar backwards.
Cleaning stainless steel parts
Cooking plate and grill
• Remove all solid material and excess
grease from the grill and cooking surface
using a scraper or wire brush.
• To facilitate cleaning, the two halves
of the grill can be removed with the
cooking plate. For stubborn stains, simply
immerse the parts of the grill and plate in
hot soapy water before carefully rinsing
them.
• Use a clean, dry cloth to make sure all
surfaces are dry.
tiltable safety rod
42
Other stainless steel surfaces
Cleaning the grease drip pans
The integrated barbecue has a unique oil
management system that uses overlapping
channels to convey all the oil towards the
front to easily removable drip pans, which
must be cleaned after each use.
• To remove the drip pans, pull them
upwards from the front of the barbecue;
dispose of their contents in a responsible
way. Rinse the oil drip pans in warm
soapy water. The drip pans can be put in
the dishwasher, if desired.
WARNING
Do not use caustic or abrasive detergents,
steel wool or metal scrapers on these
stainless steel surfaces because they can
scratch and permanently damage the
barbecue.
• Wash all stainless steel parts, including
the thin cover, the cooking hood and
control knobs, with a soft cloth and warm
soapy water.
• The inside of the barbecue can be
cleaned with a soft cloth soaked in warm
soapy water. The rear panel on the inside
is removable for easy cleaning.
• Use a clean, dry cloth to make sure all
surfaces are dry.
SUGGESTIONS AND
INFORMATION
Special note on "tea staining”
Sometimes stainless steel surfaces are
affected by a color change called "tea
staining”. This usually occurs in areas high
heat is used and can be easily removed
using specific detergents for stainless steel.
For best results, we recommend that you
regularly use specific detergents on all
stainless steel parts. These detergents are
available in almost all hardware stores.
WARNING
Pay particular attention (especially when
cleaning the knobs and around them) to
avoid water and soap residue from entering
the control panel containing the valves or in
the burners. Also, be careful not to touch the
ignition electrode. There must be 5 mm of
space between the electrode and the burners
(see drawing below).
SUGGESTIONS AND
INFORMATION
Special note on stainless steel
Stainless steel panels can be deformed
during use but return to their normal shape
when cooled.
43
GB
Maintenance
Troubleshooting
Ignition system
To change the battery, turn the compartment
cover counter-clockwise to unscrew it. Lift the
cover to access the spring and battery. Pull
out the spring and battery. Replace with a
GB
new AA battery and replace the cover. Do a
test by pressing the knob, you should hear a
clicking sound.
NOTE
Make sure the battery is placed in the correct
polarity.
PROBLEM
POSSIBLE
CAUSE
SOLUTION
The barbecue doesn’t
light
No gas
Check that the shutoff valve is open
(ON)
Gas cylinder empty
- refill or change the
cylinder
The ignition
system is not
working
Check the battery
- you should hear a
clicking sound when
you press the knob
Replace the battery
Light the barbecue
manually
Ventilation openings
The ventilation openings of the installation
compartment must be inspected before each
use of the appliance to make sure that there
are no obstructions that could impede the
free flow of air.
Ignition
electrode wet
or dirty
Delicately clean and
dry the electrode,
making sure its
position is correct
Excessive
smoke from
the cooking
surface
Gas valve
set too high
Lower the gas
or turn off some
burners
Odor of gas
DO NOT
TRY TO
LIGHT THE
APPLIANCE
Gas leak
Close the gas with
the shut-off valve
Check for leaks,
tighten the fittings
If the problem persists, call the Fulgor
Milano Service
Department
Stainless steel burners
The burners should be checked at least once
a year and cleaned if necessary. Inspect
the burners to make sure that no residue
deposits and that the gas connections are
free.
44
GB
MANUFACTURER'S DECLARATION
The manufacturer declares that, depending on their type, the products in this catalogue conform to the
fundamental requirements of European Directives and, for this reason, the product bears the CE mark, for
which this declaration of conformity was issued and made available to market supervisory bodies.
DISPOSAL OF USED APPLIANCES
At the end of their useful life, these appliances may not be disposed of with normal urban waste but must be
given to an electronic and electrical equipment collection and recycling point. This is indicated by the symbol
shown on the product, in the instruction manual or on the packing materials.
The materials used in this appliance can be reused in conformity with their intended use.
Thanks to the reuse, recycling or other forms of
recovery of unusable appliances, you will make a contribution to protecting our natural environment.
You can obtain information about the disposal points for unusable appliances from your local authorities.
The manufacturer will not be liable for inaccuracies in this manual due to typographic errors. We reserve
the right to make improvements or indispensable modifications to products without altering their essential
specifications. Products can be modified following requests for improvements and CE standards.
45
Cod. 1.008.67.0