1
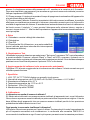
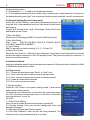
Gima S.p.A. - Via Monza, 102 - 20060 Gessate (MI) Italy
Italia: tel. 199 400 401 - fax 199 400 403
Export: tel. +39 02 953854209/221/225 fax +39 02 95380056
[email protected] - [email protected]
www.gimaitaly.com
Etilometro Professionale
Professional Breath Alcohol Analyzer
M24490-M-Rev.I-G.06.09
MANUALE D’USO E MANUTENZIONE
USE AND MAINTENANCE BOOK
ATTENZIONE: Gli operatori devono leggere e capire completamente questo manuale
prima di utilizzare il prodotto.
ATTENTION: The operators must carefully read and completely understand the present
manual before using the product.
ITALIANO
2
IMPORTANTE: Molti fattori (es. residui di gas nell’ambiente, fumo, vari odori del cavo
orale, ecc.) possono influire sul livello di concentrazione dell’alcol nel sangue (BAC),
quindi tenere presente che le letture sono solamente indicative.
Nè il rivenditore nè il costruttore sono responsabili per l’utilizzo del congegno: NON
bere prima di guidare!
Grazie per aver acquistato l’etilometro digitale a batterie GIMA. Il nostro etilometro fornisce
un’indicazione digitale sul contenuto di alcol dell’alito e in questo modo la possibile concentrazione
nel sangue. Per ottenere la massima precisione, l’utente deve leggere attentamente il presente
manuale. Inoltre ogni utilizzo dell’etilometro richiede la completa comprensione e la stretta
osservanza di queste istruzioni.
Responsabilità per il corretto funzionamento e i danni
Non smontare l’etilometro Gima svitando le viti. La garanzia decade se si svitano le viti o se si
rompe il tagliando di garanzia. Allo stesso modo se l’apparecchio viene riparato o viene a esso
prestata assistenza da personale non autorizzato dal costruttore, oppure se viene utilizzato in
maniera non conforme all’uso per cui esso è progettato.
Manutenzione
Le riparazioni all’etilometro devono essere effettuate solo da personale specializzato.
Si raccomanda di rivolgersi ad un centro assistenza autorizzato dal costruttore.
Per la manutenzione devono essere utilizzate solo parti di ricambio originali fornite dal costruttore
dell’etilometro.
Uso normalmente previsto
- Non esporre l’apparecchio ad alte temperature, alta umidità o tenerlo in ambiente molto polveroso.
- Evitare colpi all’apparecchio, in particolar modo evitare di premere con forza il TFT-LCD.
- Non smontare i componenti ne utilizzare alcol neppure se diluito o benzene per pulire le superfici
dell’apparecchio o dei suoi componenti.
- Non utilizzare in aree dove è proibito l’uso di apparecchi senza fili.
- Non utilizzare in ambiente infiammabile o esplosivo.
- Utilizzare l’apposita penna per la calibrazione del touch screen.
- Prima dell’uso ricaricare l’apparecchio con il carica batterie fornito all’acquisto.
Condizioni generali
- Utilizzare un nuovo boccaglio per ogni persona che effettua il test.
- Evitare che nell’aria siano presenti alcol o vapori di solventi (disinfettanti).
- Evitare che una consistente concentrazione alcolica raggiunga il sensore. Per esempio dopo
aver appena bevuto alcol, mangiato cibo contenente alcol o dopo aver effettuato sciacqui alla
bocca con disinfettanti o collutori contenenti alcol.
- Tenere lontano l’apparecchio da antenne di telefoni portatili o trasmettitori.
Condizioni delle persone da testare
Innanzitutto sciacquare la bocca con acqua o bevande analcoliche prima di utilizzare l’etilometro.
Evitare di fumare (per 10 minuti) e bere (per almeno 15 minuti) prima del test. Eventuali residui
di alcol in bocca possono aumentare i valori della misurazione. Questo può succedere anche
con bevande aromatiche (ad esempio succhi di frutta), disinfettanti o spray orali, medicinali,
nonché a causa di rutti o vomito.
Respirare regolarmente e normalmente prima del test.
3
ITALIANO
IMPORTANTE:
Non mangiare, bere o fumare per 20 minuti prima di effettuare il test per evitare di
ottenere risultati errati o di danneggiare l’apparecchio.
RICORDA: NON bere e guidare - l’unico livello alcolico
sicuro è zero!
Istruzioni d’uso
(l’utente può utilizzare sia il touch screen che i tasti normali per
comandare l’apparecchio)
Accensione
1) installare le batterie ricaricabili (Nokia standard) nell’apposito
alloggiamento.
2) Premere il pulsante “OK” per 3 secondi per accendere
l’etilometro, quindi accedere all’interfaccia principale. Premere il
pulsante “OK” per alcuni secondi (più di 3 secondi) per spegnere il
tester.
1. Quick Start
1.1 Inserire un nuovo boccaglio con il corretto
orientamento.
1.2 Premere l’icona “Quick Start” del menù principale.
Durante il riscaldamento, sull’LCD apparirà la scritta
“Discharging” e quindi “Please wait” con il timer. Quando
appare sull’LCD la scritta “Ready”, l’utente può iniziare il
test. Inserire il boccaglio nel proprio alloggiamento. Soffiare
con costanza nel boccaglio per circa 6 secondi, e un suono
continuo sarà emesso come avviso.
1.3 Se il flusso di respiro è troppo forte o troppo debole, a
display appare il messaggio corrispondente. Una volta letto il messaggio premere “OK” per
tornare al menù principale.
1.4 Se il campione di respiro è stato raccolto con successo appare immediatamente sul display
la scritta “Analizing & Please wait”. L’apparecchio analizzerà il campione e mostrerà il risultato
del test con il relativo numero.
1.5 Premere sull’icona “Continue” per procedere con un altro test o
sull’icona “Return” per tornare al menù principale. Infine per
controllare il dettagli delle misurazioni, premere “Record”.
1.6 Sostituire il boccaglio con uno nuovo dopo ogni test.
2. Alcohol Menu
2.1 Test Alcol: Il test formale richiede tutte le informazioni dettagliate
(per esempio: tester utilizzato dalle forze di polizia).
L’utente può inserire il nome dell’utente e il numero del veicolo prima
di effettuare il test.
2.1.1 Selezionare “Alcohol test” dal menù principale e accedere
alla modalità del test alcol.
2.1.2 Inserire il nome dell’utente premendo i tasti della tastiera che
appare sull’LCD o utilizzando il tasto di comando e premendo “OK”
per selezionare le lettere.
ITALIANO
4
2.1.3 Inserire il numero del veicolo alla stessa maniera che per il nome utente.
2.1.4 Dopo aver inserito le informazioni l’apparecchio avvia la procedura di test.
2.1.5 Effettuare il test procedendo come descritto nei punti 1.1 - 1.62.1.6 La lettura contiene il numero del test, la data, la concentrazione, il nome dell’analizzatore,
ecc. Se l’apparecchio è collegato alla stampante, premere sull’icona “Print” per stampare i
risultati del test in modalità “Record”.
2.2 Impostazioni (solo personale autorizzato)
Selezionare il menù “Alcohol Setting” e inserire la password
necessaria per accedervi Apparirà il menù con i sottomenù seguenti:
Alcohol Unit, Alcohol Alert, “mg/L: Permillage”, Reset Test Times
and Maximum Test Times,
1) Impostazione etilometro
Impostare le quantità per mille (‰ BAC) e per cento (% BAC) e i
mg/L dell’apparecchio.
2) Impostazione livelli di allarme
Livello di allarme: BAC2 (0.2 ‰ BAC), BAC3 (0.3 ‰ BAC), BAC5
(0.5 ‰ BAC) e BAC8 (0.8 ‰ BAC).
3) Impostazione “mg/L”
Impostazione convenzionali per mg/L: 2.0, 2.1, 2.2 e 2.3.
4) Reset del numero dei test
Dopo aver effettuato la calibrazione, il numero del test viene azzerato e il test dell’alcol può
essere effettuato nuovamente. Se sull’LCD appare la scritta “The period of validity is overtimes!”,
è necessario azzerare il numero dei test.
2.4 Calibrazione Alcol
Accedere alla modalità di calibrazione inserendo la password necessaria. Questa operazione
deve essere effettuata solo da personale autorizzato.
2.5 Registrazione test
2.5.1 Rivedere tutte le registrazioni premendo le icone “Back” o “Next”.
2.5.2 Goto: inserire il numero del test per cercarne i risultati.
2.5.3 Print: collegare l’apparecchio alla stampante per poter stampare i test.
2.5.4 Clean All: per cancellare tutte le registrazioni
2.5.5 Exit: per uscire e tornare al menù precedente.
3. Impostazioni del sistema
Premere il pulsante “OK” per accedere alla modalità di impostazione
del sistema. Tale modalità è dotata di 6 sottomenù:
Premendo i pulsanti con le frecce verso l’alto e verso il basso, e
quindi confermando tramite il pulsante “OK” si accede ai sottomenù.
Premendo il pulsante “Return” si torna al menù principale.
3.1 Date&Time Setting: L’utente può impostare la data e l’ora e
confermare premendo il pulsante “OK”.
3.2 Display Setting: L’utente può impostare il colore e l’immagine
dello sfondo del display.
3.3 Language: L’utente può scegliere tra inglese o cinese.
3.4 Set user password: L’utente può impostare una password a
5
ITALIANO
piacere. La lunghezza minima della password è di 1 carattere e la massima è di 8 caratteri.
Dopo aver impostato una password, per accedere a ogni menù essa verrà richiesta (eccezion
fatta per la password 00000000).
3.5 Power manage: L’utente può impostare il tempo di spegnimento automatico dell’apparecchio
e la retroilluminazione dello stesso.
3.6 Touch screens Calibrate: Quando le impostazioni del touch screen si modificano, è possibile
effettuare una ricalibrazione premendo lo schermo e tenendolo premuto per circa 5 secondi in
modalità di regolazione del sistema. Si accederà così automaticamente al menù di calibrazione
del touch screen. Il simbolo “+” rosso mostra l’alternanza sullo schermo bianco, seguire e
toccare i cinque simboli “+”. Alla fine dell’impostazione l’apparecchio torna automaticamente al
menù principale.
4. Extra
4.1 Calendario: mostra i dettagli del calendario
4.2 Calcolatrice
4.3 Test GUI
4.4 Download del file (Attenzione: se questa modalità di
lavoro è attivata, può esser interrotta solo interrompendo
l’alimentazione elettrica)
5. Registrazione Test
Utilizzando la penna in dotazione per selezionare “Test record” e premere “OK” e quindi accedere
a questa modalità. Premere i pulsanti “Back” e “Next” sull’LCD o premere i pulsanti con le
frecce verso destra e sinistra per richiamare tutte le registrazioni dei test. Se si desidera stampare
qualsiasi record è sufficiente premere il pulsante “Print” sulla destra.
6. Aggiornamento del software ( solo per personale autorizzato)
Collegare il PC alla rete e aggiornare la nuova versione del software. L’utente normale non può
utilizzare questa funzione.
7. Specifiche
1. LCD: TFT 2.4” TFT QVGA display con pannello touch screen
2. Intervallo di misurazione: da 0.0 ‰ BAC a 5.0 ‰ BAC, Precisione: +/-0.1 ‰ BAC
3. Alimentazione: Batterie al litio 3.7 V
4. Temperatura operativa: da -10°C a +40 °C
5. Dimensioni: 128 x 62 x 30 mm
6. Marchiatura di qualità: CE/EMC
8. Calibrazione
L’etilometro necessita di essere ricalibrato?
SI. Mentre alcuni etilometri non possono essere ricalibrati, gli apparecchi seri, come l’etilometro
Gima, devono e possono essere ricalibrati per poter assicurare una precisione migliore. L’utente
deve diffidare degli apparecchi che non possono essere ricalibrati perché la loro precisione
probabilmente tende a diminuire con l’uso.
Ogni quanto è necessario ricalibrare l’etilometro?
L’etilometro Gima rimane preciso per 6 mesi di utilizzo. Ovviamente più è usato frequentemente
più di frequente necessiterà una ricalibrazione. In conformità alla normativa D/N31051 si
raccomanda la ricalibrazione ogni 6 mesi o più spesso per assicurare la massima precisione.
ITALIANO
6
N.B.: E’ importante osservare la raccomandazione di 20 minuti di pausa senza consumo di
alcol, sigarette o altro prima del test. Ignorando questa raccomandazione si accorcia la vita utile
del sensore. In tal caso, il sensore potrebbe essere danneggiato permanentemente o necessitare
calibrazioni più frequenti. Questo manuale utente deve essere letto attentamente per le
informazioni riguardo alla cura dell’apparecchio.
Smaltimento: Il prodotto non deve essere smaltito assieme agli altri rifiuti domestici.
Gli utenti devono provvedere allo smaltimento delle apparecchiature da rottamare
portandole al luogo di raccolta indicato per il riciclaggio delle apparecchiature elettriche
ed elettroniche.
Per ulteriori informazioni sui luoghi di raccolta, contattare il proprio comune di
residenza, il servizio di smaltimento dei rifiuti locale o il negozio presso il quale è
stato acquistato il prodotto. In caso di smaltimento errato potrebbero venire applicate
delle penali, in base alle leggi nazionali.
CONDIZIONI DI GARANZIA GIMA
Ci congratuliamo con Voi per aver acquistato un nostro prodotto. Questo prodotto risponde a
standard qualitativi elevati sia nel materiale che nella fabbricazione. La garanzia è valida per il
tempo di 12 mesi dalla data di fornitura GIMA. Durante il periodo di validità della garanzia si
provvederà alla riparazione e/o sostituzione gratuita di tutte le parti difettose per cause di
fabbricazione ben accertate, con esclusione delle spese di mano d’opera o eventuali trasferte,
trasporti e imballaggi. Sono esclusi dalla garanzia tutti i componenti soggetti ad usura.
La sostituzione o riparazione effettuata durante il periodo di garanzia non hanno l’effetto di
prolungare la durata della garanzia. La garanzia non è valida in caso di: riparazione effettuata da
personale non autorizzato o con pezzi di ricambio non originali, avarie o vizi causati da negligenza,
urti o uso improprio. GIMA non risponde di malfunzionamenti su apparecchiature elettroniche o
software derivati da agenti esterni quali: sbalzi di tensione, campi elettromagnetici, interferenze
radio, ecc.
La garanzia decade se non viene rispettato quanto sopra e se il numero di matricola (se presente)
risulti asportato, cancellato o alterato. I prodotti ritenuti difettosi devono essere resi solo e soltanto
al rivenditore presso il quale è avvenuto l’acquisto. Spedizioni inviate direttamente a GIMA verranno
respinte.
7
ENGLISH
IMPORTANT: Many factors (e.g. environment gas residue, smoke & various smell in
human mouth, etc…) may affect the Blood Alcohol Concentration (BAC) level, so the
Readings are For Reference Only.
Neither the reseller nor manufacturer accept any liability arising from the use of this
unit
DO NOT drink before you drive!
Thanks for purchasing our Professional Breath Alcohol Analyzer. Professional Breath Alcohol
Analyzer gives you a digital indication of your breath alcohol content and thus your possible
concentration of intoxication. To achieve the high accuracy, user should study this manual carefully
and any use of the Professional Breath Alcohol Analyzer requires full understanding and strict
observation of these instructions.
Liability for proper function or damage
Never unscrew the Professional Breath Alcohol Analyzer Warranty not valid if any screws had
being loosened or warranty label had being broken. Serviced or repaired by personnel not
employed by GIMA Service centre or authorized by GIMA or if the instrument is used in a manner
not conforming to its intended use.
Maintenance
Repair of the Professional Breath Alcohol Analyzer should only be carried out by trained service
personnel.
We recommend an authorized GIMA professional breath alcohol tester Service Center.
Only authentic GIMA spare parts may be used for maintenance.
Intended Use
* Don’t put this product in high temperature, high humidity or high dust environment.
* Don’t knock this product, especially not pressing the TFT-LCD by force.
* Don’t dismantle the important parts and use the alcohol, thinner or benzene to clean the
surface of the product and its components.
* Not use in the area prohibiting using of wireless devices.
* Not use in the flammable and explosive environment.
* Please use the touch pen when doing the touch screen calibration
* Before use, please charge up the Handset by provided accessory charger.
General Conditions
- Use a new mouthpiece for each person being tested.
- No alcohol and solvent vapors (disinfectants) in the ambient air.
- Do not allow a high alcohol concentration to reach the sensor. For instance, from drinking
alcohol, eating alcohol containing foods or rinsing the mouth with alcohol mouth washer just
before measurement.
- Keep away from the antenna of mobile phones or transmitters.
Conditions for Tested Person
To begin, rinse out your mouth with water or non-alcoholic drinks before using the unit. Abstain
from smoking (for 10 minutes) or drinking (for at least 15 minutes.) Actual residues of alcohol in
the mouth may enhance the measured values. This may also occur by aromatic drinks (e.g.
fruit juices), alcoholic mouthwashes or mouth sprays, medicines and drops, as well as by burping
and vomiting. Breathe evenly and normally before the test.
ENGLISH
8
IMPORTANT:
DO NOT EAT, DRINK, OR SMOKE FOR 20 MINUTES PRIOR TO UNDERTAKING A
TEST. FAILURE TO DO SO MAY IMPAIR RESULTS AND
DAMAGE THE UNIT.
REMEMBER: NEVER DRINK & DRIVE – THE ONLY SAFE
LEVEL IS ZERO
Operation instructions
(User can use either normal keys or touch screen for key operation)
Power up
1) Install the rechargeable battery (Nokia standard) into the battery
compartment.
2) Press the “OK” key 3 seconds to turn ON the tester, than enter
into the main interface. Press the “OK” key few seconds (above 3
seconds) to turn OFF the tester.
1. Quick Start
1.1 Eventually insert a new mouthpiece in correct
orientation.
1.2 Press the “Quick Start” icon on the main menu, The
LCD will shows
“Discharging” and then shows “Please wait” together with
timer while warming up. The LCD shows “Ready”, user
can start the alcohol test. Insert the mouthpiece into
chamber inlet. Blow evenly into the mouth piece for about
6 seconds and a continuous sound tone will be heard for
announcement.
1.3 If the breath sample flow is too hard or too soft, a respective message will be shown on the
display. Acknowledge the message by pressing the button "OK" and then return the main menu.
1.4 If the breath sample is taken successfully, “Analyzing” & “Please wait” will show on the
display immediately. The machine will analyze the sample. It will then show the test result together
with the number the test after sample analyzing..
1.5 Press “continue” icon to start another test or press “return” icon to return back into the main
menu; Press “Record” icon to check record details.
1.6 Remove and change a new mouthpiece after each test.
2. Alcohol Menu
2.1 Alcohol Test: Formal test requires all detailed information (for
example, police used tester)
User can input the user name and Vehicle number before the alcohol
testing.
2.1.1 Select the “Alcohol Test” in the main manual and enter into
the alcohol test mode.
2.1.2 Input the user name by clicking the alphabet on the LCD or
use navigating keys & “OK” key to select
2.1.3 Input the vehicle number by clicking the alphabet/number on
the LCD or use navigating keys & “OK” key to select
2.1.4 After input all the information. The tester will enter into the
9
ENGLISH
alcohol test procedure.
2.1.5 Repeat the 1.1 – 1.6 and do the breath alcohol test.
2.1.6 The reading contains the test number, date, concentration, tester name etc. If connect to
the desired printer, press “print” icon to print out the test record under the “record” review mode.
2.2 Alcohol Setting (Service Center only):
Select the “Alcohol Setting ” menu but a supervisor password is
required. Key in the password and it will then show the sub-menu
as following:
Alcohol Unit, Alcohol Alert, “mg/L: Permillage”, Reset Test Times
and Maximum test Times.
1) Alco Unit Setup
Set the unit to Permillage (‰BAC), Percent (%BAC)and mg/L.
2) Alco Alert Setup
Alert level:
BAC2(0.2‰BAC),BAC3(0.3‰BAC),BAC5
(0.5‰BAC) and BAC8 (0.8‰BAC)
3) “mg/L” Setup
Mg/L vs promile convention setting: 2.0, 2.1, 2.2 and 2.3.
4) Reset Test Times
Reset the test times to 0. After done the calibration, the number of test will reset to zero and
alcohol test can be continued. If the LCD display shows "The period of validity is overtimes!", it
need to reset the test times.
2.4 Alcohol Calibrate
enter the calibration mode by input the supervisor password. Only perform this function by GIMA
or GIMA Authorized service center
2.5 Test record
2.5.1. Review all records by press “Back” or “Next” icon.
2.5.2. Goto: input the test number to search the test result
2.5.3. Print: connect to the printer to print out the test record.
2.5.4. Clean all: delete all the records.
2.5.5. Exit: return to previous menu.
3. System setting
Press the “OK” enter to the system setting mode. 6 sub-menus
under system setting mode:
Press arrow up & arrow down to select the sub menu,then press
the “OK” key enter into these sub menu. It will return to the main
menu when touch “return” on
the LCD.
3.1 Date & Time Setting:
User can set the date and time and confirm by press OK
3.2 Display Setting: User can set the background color and
background image.
3.3 Language: English and Chinese option.
3.4 Set User Password: User can set the user password. The
minimum of the user password setup is one digit
ENGLISH
10
and the maximum as eight digit. After setting the password, all menus require the password to
access (except password is 00000000).
3.5 Power Manage: set the power auto off time and backlight
3.6 Touch Screens Calibrate:
When the touch screen setting shift, it can be re-calibrated. If the touch-screen has been corrupted,
press and hold the screen for about 5 seconds in the system adjustment mode, it will automatically
enter the touch screen calibration menu. The red “+” tag shows alternation in the white screen,
follows and touches the five "+" tag. After setting the machine will automatic return to main
manual.
4. Extra
4.1 Calendar: Shows Calendar details
4.2 Calculator
4.3 GUI Test.
4.4 File Download(Caution: if this mode work is activated,
it can only be terminated by cutting off the main power.)
5. Test Record
Using the provided pen to move the”Test Record” and press the”OK” key enter into this mode..
Press the”Back” and“Next” key on LCD or press the “?”and “?”key to recall all test record. If you
need the print any record only touch the “Print” on the right.
6. Software Update (only suitable for GIMA service centre)
Linking the PC with the connecting wire and updating to the new software version. The normal
user can’t use this function. Caution: exit this faction, can’t support the touch faction.
7. Specification
1. LCD: TFT 2.4” TFT QVGA display with touch panel
2. Range: 0.0‰BAC to 5.0‰BAC ,Accuracy :±0.1‰BAC
3. Voltage: 3.7V Li-battery.
4. Temperature Range: From -10°C to +40°C, for optimum operation
5. Dimension: 128 x 62 x 30 mm
6. Agency approved: CE/EMC
8. Calibration
Does the GIMA tester require calibration?
Yes. While some ‘novelty’ breathalyzers cannot be recalibrated, serious devices such as the
GIMA tester must and can be recalibrated to ensure consistent accuracy. Consumers should
be wary of units that cannot be calibrated as their accuracy will eventually waver.
How often should I re-calibrate the GIMA tester?
The GIMA tester can remain accurate for 6 months of use. The more frequent the use, the more
the unit will need to be calibrated. According to D/N31051, we recommend recalibration on a 6
monthly (or earlier) basis to ensure maximum accuracy.
NB: It is important to observe the recommended 20 minute pause without consuming any alcohol,
cigarettes or anything else before testing. Failure to do this can shorten the life of the sensor. In
such cases, the sensor can be permanently damaged or may need more frequent calibration.
This user manual should be read carefully for information on caring for the unit.
11
ENGLISH
Disposal: The product must not be disposed of along with other domestic waste.
The users must dispose of this equipment by bringing it to a specific recycling point
for electric and electronic equipment.
For further information on recycling points contact the local authorities, the local
recycling center or the shop where the product was purchased. If the equipment is
not disposed of correctly, fines or penalties may be applied in accordance with the
national legislation and regulations.
GIMA WARRANTY CONDITIONS
Congratulations for purchasing a GIMA product.
This product meets high qualitative standards both as regards the material and the production.
The warranty is valid for 12 months from the date of supply of GIMA.
During the period of validity of the warranty, GIMA will repair and/or replace free of charge all the
defected parts due to production reasons. Labor costs and personnel traveling expenses and
packaging not included.
All components subject to wear are not included in the warranty.
The repair or replacement performed during the warranty period shall not extend the warranty.
The warranty is void in the following cases: repairs performed by unauthorized personnel or
with non-original spare parts, defects caused by negligence or incorrect use.
GIMA cannot be held responsible for malfunctioning on electronic devices or software due to
outside agents such as: voltage changes, electro-magnetic fields, radio interferences, etc.
The warranty is void if the above regulations are not observed and if the serial code (if available)
has been removed, cancelled or changed.
The defected products must be returned only to the dealer the product was purchased from.
Products sent to GIMA will be rejected.
12