1
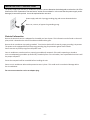
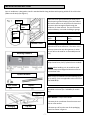
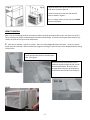
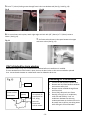
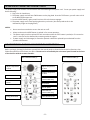
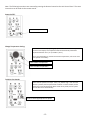
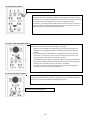
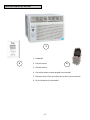
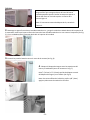
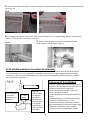
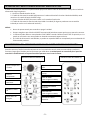
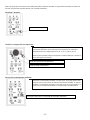
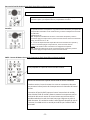
TABLE OF CONTENTS Introduction ........................................................................................................................................... 2 What’s In the Box ................................................................................................................................... 3 Warnings ............................................................................................................................................... 4 Cautions ................................................................................................................................................. 5 Important Safety Instructions ................................................................................................................. 6 Installation Instructions .......................................................................................................................... 7 Operation of Power Cord Current Device .............................................................................................. 11 Air Conditioner Features and Operation Instructions ............................................................................ 11 Care and Cleaning ................................................................................................................................. 16 Additional Things You Should Know ...................................................................................................... 17 Troubleshooting Tips ............................................................................................................................ 19 CONTENIDO Introducción ......................................................................................................................................... 22 Que hay dentro de la Caja ..................................................................................................................... 23 Advertencias ......................................................................................................................................... 24 Precauciones ........................................................................................................................................ 25 Instrucciones de Seguridad Importantes ............................................................................................... 26 Instrucciones de Instalación .................................................................................................................. 27 OPERACIÓN DEL CABLE DE ALIMENTACIÓN DEL APARATO ACTUAL ...................................................... 31 Características de Acondicionador de Aire e Instrucciones de operación .............................................. 31 Cuidado y Limpieza ............................................................................................................................... 36 Cosas Adicionales que Debe Saber ....................................................................................................... 37 Consejos de Solución de Problemas ...................................................................................................... 39 INTRODUCTION Congratulations on your purchase of the IMPECCA™ Electronic Controlled Compact Window Air Conditioner. Before using this product, it is recommended that you familiarize yourself with the features, functions, and operating procedures described in this manual. Inside you will find many helpful hints on how to use and maintain your air conditioner properly. Just a little preventive care on your part can save you a great deal of time and money over the lifespan of your air conditioner. You will find many answers to common problems in the chart of troubleshooting tips. If you review our chart of Troubleshooting Tips first, you may not need to call for service at all. Features at a Glance Whisper Quiet Operation 24 hour Timer Energy Saver Function (some models) Eco-Friendly Refrigerant Remote Control with LED Dripless Technology Personal Mapping Temperature Sensor (some Clean Filter indicator models) * * NOTE: Model # 1WA-10KR does not support PMTS PRECAUTIONS To prevent injury and/or property damage, please familiarize yourself with the following instructions and safety precaution. Failure to comply with the instructions and cautions mentioned in this manual may cause harm or damage. The seriousness is classified by the following indications: This symbol indicates the possibility of serious injury or death. This symbol indicates the possibility of injury and/or damage to property. Never do this. Always do this. IMPORTANT: Always contact an authorized service technician for repair or maintenance of this unit. This air conditioner is not intended for use by young children or infirm persons without supervision. Young children should be advised not to operate the air conditioner. If the power cord is to be replaced, replacement work should only be performed by certified or authorized technicians. All electrical work must be performed in accordance with the national wiring standards and should only be performed by authorized personnel. Due to slight modifications in production, the instructions, features, and/or descriptions found in this manual might be slightly different from your product. -2- WHAT’S IN THE BOX 1 3 2 1. AC Unit 2. Remote control 3. User’s Guide 4. Remote control user’s guide (not shown) 5. Air Freshening Carbon Filter instructions (not shown) 6. Window Installation Kit (not shown) -3- WARNINGS Plug in power plug properly. Failure to do so may cause electric shock or fire due to excess heat generation. Do not modify power cord length or share the outlet with other appliances. Failure to do so may cause electric shock or fire due to excess heat generation. Always ensure effective grounding of the power plug. Incorrect grounding may cause electric shock. Unplug the unit if you notice strange sounds, smells, or smoke coming from it. Doing so may cause fire and/or electric shock. Keep firearms and or explosives away from the unit. Do not start or stop the unit by inserting or pulling out the power plug. Doing so may cause electric shock or fire due to surges. Never attempt to handle the power cord or operate the unit with wet hands or in a damp environment. Serious or deadly injury may occur due to shock. Equipment may be damaged due to shortcircuiting. Do not allow water to run into internal electric parts. Doing so may cause failure of the unit and/or electric shock. Do not use the socket if it is loose or damaged. Doing so may cause fire and/or electric shock. Do not use the power cord close to heating appliances. Do not use a damaged or unspecified power cord. If the power cord is damaged, it must be replaced by the manufacturer or an authorized service center or a similarly qualified person in order to avoid a hazard. Do not direct airflow directly at room occupants. Continued exposure to direct airflow can cause damage to health. Always install circuit breaker and a dedicated power circuit. Incorrect installation may cause fire and/or electric shock. Do not open the unit during operation. Doing so may cause electric shock. Do not use the power cord near flammable gas or combustible liquids such as benzene, thinner, gasoline, etc. Fire and/or explosion may Fire may occur due to Fire and/or explosion may occur due to excessive heat. excessive heat. occur due to exposure to excessive heat. Do not disassemble or modify unit. Ventilate room before operating air conditioner if there is a gas leakage from another appliance. Failure to ventilate room may cause explosion Doing so may cause failure and/or electric shock. or fire. -4- CAUTIONS When the air filter is to be removed, do not touch the metal parts of the unit. Injury may occur. When the unit is to be cleaned, switch off the unit, unplug the unit or turn off the circuit breaker. Failure to do so may cause electric shock or fire due to excess heat generation. Stop operation of this unit during storms or hurricanes. Failure to do so may result in damage as water may seep in or electrical overload may occur. Ensure that the installation bracket is not damaged due to prolonged exposure to outdoor elements. If the bracket is damaged, the unit may not be supported properly and could fall. Do not place heavy objects on power cord. Always ensure that the cord is not compressed. Fire and/or electric shock may occur. Do not clean the air conditioner with water. Ventilate the room well when used together with a stove, etc. Water may enter the unit and degrade the insulation. Electric shock may occur. Do not put a pet or house plant where it will be exposed to direct airflow. Failure to do so may result in an oxygen shortage. Serious or deadly injury may occur due to continuous exposure of direct airflow. When removing the plug from an electrical outlet, power down the unit first and do not pull by the cord. Failure to turn off unit first may result in shock. Doing so may cause failure of appliance and/or fire due to overheating. Always turn off the main power switch when not using the unit for extended periods of time. Always insert the filters securely. Clean filter routinely. Do not use strong detergents, waxes, or thinners to clean. Use a soft cloth instead. Operation without filters may cause failure. Dirty or clogged filters will reduce efficiency and performance. Do not drink or allow pets to drink water drained from the air conditioner. Appearance may be altered due to color change or deterioration of the surface. Do not place obstacles around air-inlets or inside of air-outlet. Doing so will help preserve the lifespan of this unit. Always use caution when unpacking and installing. Water that is discharged from Sharp edges could cause injury. the air conditioner contains harmful contaminants that could cause illness or fatality. If water enters the unit, turn off unit, switch off the circuit breaker, and unplug. Contact a qualified service technician. Do not operate again until the unit has been services or inspected. -5- IMPORTANT SAFETY INSTRUCTIONS The power supply cord with this air conditioner contains a current detection device designed to reduce the risk of fire. Please refer to the “Operation of Current Device” section for more details. In the event that the power supply cord is damaged, it cannot be repaired. It must be replaced with a new cord. Power supply cord with 3-prong grounding plug and current detection device Never cut, remove, or bypass the grounding prong. Electrical Information Be sure the electrical service is adequate for the model you have chosen. This information can be found on the serial plate, which is located on the side of the cabinet and behind the grille. Be sure the air conditioner is properly grounded. To minimize shock and fire hazards, proper grounding is important. The power cord is equipped with a three-prong grounding plug for protection against shock hazards. Do not remove any of the prongs from the power cord. Your air conditioner must be used in a properly grounded wall receptacle. If the wall receptacle you intend to use is not adequately grounded or protected by a time delay fuse or circuit breaker, have a qualified electrician install the proper receptacle. Ensure the receptacle will be accessible before installing the unit. Do not run air conditioner without side protective cover in place. This could result in mechanical damage within the air conditioner. Do not use an extension cord or an adapter plug. -6- INSTALLATION INSTRUCTIONS Your air conditioner is designed to install in standard double hung windows with opening widths of 23 to 36 inches (584mm to 914mm) (See Figure 1). Lower sash must open sufficiently to allow a clear vertical opening of the following sizes (see Table 1). Side louvers and the rear of the AC must have clear air space to allow enough airflow through the condenser, for heat removal. The rear of the unit must be outdoors, not inside a building or garage. OFFSET EXTERIOR WALL INNER WINDOW SILL TABLE 1 Output in Btu/h Size INTERIOR WALL 8000 Btu/h 14” (356mm) 10000~12000 Btu/h 15-1/2” (394mm) WINDOW LAYOUT Note: Save original carton and these installation instructions for future reference. The carton is the best way to store the unit during winter (or when the unit will not be used for an extended period of time). Mounting Hardware TOOLS NEEDED: Phillips Screw Driver, Drill (if pilot holes are needed) Caution: When handling unit, be careful to avoid cuts from sharp metal edges and aluminum fins on front and rear coils. Top Rail Hardware Note: The top rail hardware and the following Fig. A, Fig. B, and Fig. C are not applicable to the units more than 10000 Btu/h. 3/8” Screws Top Rail Note: Before installing unit, the top rail must be assembled on the unit (For <10000 Btu/h models only). Figure A TOOLS NEEDED: Phillips Screw Driver 1: Remove the air conditioner from the carton and place on a flat surface. Packaging Top Rail 2: Remove top rail from the rear of the packaging material as shown in Figure A. -7- 3: Align the hole in the top rail with those in the top of the unit as shown in Figure B. 4: Secure the top rail to the unit with the 3/8” screws as shown in Figure C. Note: For safety reasons, all four (4) screws MUST be securely fastened. HOW TO INSTALL Note: Top rail and Sliding Panels at each side are offset to provide the proper pitch to the rear of the unit (5/16”). This is necessary for proper condensed water utilization and drainage. IF you are not using the Side Panels for any reason, this pitch to the rear must be maintained. 1. Place unit on the floor, a bench, or a table. There is a Left and Right Window Filler Panel – be sure to use the proper panel for each side. When installed, the flange for securing the panel in place to the windowsill will be facing into the room. Hold the Accordion Panel in one hand and gently pull back the center to free the open end. See Figure 2 Slide the free end of the panel into the cabinet as shown in Figure 3A, 3B, and 3C. Slide the panel down. Be sure to leave enough space to slip the top and bottom of the frame into the rails on the cabinet. FIG.3C -8- FIGURE 4 Once the panel has been installed on the side of the cabinet, make sure it sits securely inside the frame channel by making slight adjustments. Slide the top and bottom ends of the frame into the top and bottom rails of the cabinet. Figure 4 Note: If storm window blocks AC, see Figure 13 2. Keep a firm grip on the air conditioner, and carefully place the unit into the window opening so that the bottom of the air conditioner frame is against the windowsill (See Fig. 5). Carefully close the window behind the top rail of the unit. 3. Extend the side panels out against the window frame (See Fig. 6). 4. Place the frame lock between the frame extensions and the windowsill (as shown in Fig. 7). Drive ¾” (19mm) or ½”(13mm) locking screws through the frame lock and into the sill ( See Fig. 8). Note: To prevent windowsill from splitting, drill 1/8” (3mm) pilot holes before driving screws. -9- 5. Drive ½” (13mm) locking screws through frame holes into window sash (See Fig. 9 and Fig. 10). Fig. 9 Fig.10 6. To secure lower sash in place, attach right angle sash lock with 3/4” (19mm) or ½” (13mm) screw as Shown. (See Fig.11). 7. Cut foam seal and insert in the space between the upper Fig. 11 and lower sashes (See Fig. 12) . If AC is blocked by storm window Add wood as shown in Fig. 13, or remove storm window before air conditioner is installed. If storm window frame must remain in place, be sure the drain holes or slots are not caulked or painted shut. Accumulated rainwater or condensation must be allowed to drain out. Removing AC from Window Sash Storm window frame or other obstruction 1 ½” Min (38mm) Board thickness as required, for proper pitch to rear, along entire sill. Fasten with nails or screws. - 10 - Turn AC off and disconnect power cord. Remove sash seal from between windows and unscrew safety lock. Remove screws installed through frame and frame lock. Close (slide) side panels into frame. Keeping a firm grip on air conditioner, raise sash and carefully “rock” air conditioner backward to drain any condensated water in the base of the unit. Be careful not to spill any remaining water while lifting unit from the window. OPERATION OF POWER CORD CURRENT DEVICE The power supply cord contains a current device that senses damage to the power cord. To test your power supply cord do the following: 1. Plug in the Air Conditioner. 2. The power supply cord will have TWO buttons on the plug head. Press the TEST button, you will notice a click as the RESET button pops out. 3. Press the RESET button, again you will notice a click as the button engages. 4. The power supply cord is now supplying electricity to the unit. (On some products this it also indicated by a light on the plug head.) NOTES: Do not use the current device to turn the unit on or off. Always make sure the RESET button is pushed in for correct operation. The power supply must be replaced if it fails reset when either the TEST button is pushed, or if it cannot be reset. A new one can be obtained by contacting technical support. If power supply cord is damaged, it cannot be repaired. It MUST be replaced by one obtained from the product manufacturer. AIR CONDITIONER FEATURES AND OPERATION INSTRUCTIONS Before you begin, thoroughly familiarize yourself with the control panels as shown below and all its functions, then follow the symbol for the functions you desire. The unit can be controlled by the unit control panel located on the front of the device or with the remote controller. UNIT CONTROL PANEL (1) Adjusts Temperature or Time UNIT CONTROL PANEL (2) Adjusts Temperature or Time Displays Temperature or Time Activates Timer Clean Air Mode (some models only) Check Filter Reset button Sleep Mode Set Fan Speed PMTS Indicator (some models only) Sets Mode Energy Saver Mode Turns Unit On or Off PMTS PMTS - 11 - Note: The following instructions are accessed by pressing the buttons located on the Unit Control Panel. The same instructions can be used via the remote control. Power On/Off: Press the On/Off button PMTS Change Temperature Setting: Press or hold either Left () or Right () button until the desired temperature is seen on the display. This temperature will be automatically maintained anywhere between 62° F (17° C) and 86° F (30° C). If you want the display to read the actual room temperature, refer to the note “To Operate on Fan Only”. Press to Raise Temperature Press to Lower Temperature To Adjust Fan Speeds: Select the Fan Speed in four steps: Auto, Low, Med or High. Each time the button is pressed, the fan speed mode is shifted. For some models, the fan speed can not be adjusted under HEAT mode. On Dry mode, the fan speed is controlled at Low automatically. Press to select appropriate fan speed PMTS - 12 - To Select the Operating Mode: To choose operating mode, press the Mode button. Each time you press the button, a mode is selected in a sequence that goes from AUTO, COOL, DRY, and FAN. The indicator light beside will be illuminated and will remain on once the mode is selected. Press the Mode Button To operate on Auto Feature: When you set the air conditioner in AUTO mode, it will automatically select cooling, heating (some models), or fan only operation, depending on the current room temperature and the target temperature you have set. The air conditioner will control room temperature automatically. In this mode, the fan speed cannot be adjusted. PMTS To operate on Fan Only: Use this function only when cooling is not desired, such as for room air circulation or to exhaust stale air (on some models). Remember to open the vent during this function, but keep it closed during cooling for maximum cooling efficiency. You can choose any fan speed you prefer. During this function, the display will show the actual room temperature, not the set temperature as in the cooling mode. In Fan Only mode, the temperature is not adjusted. To operate on Dry mode: In this mode, the air conditioner will generally operate in the form of a dehumidifier. Since the conditioned space is a closed or sealed area, some degree of cooling will continue. To Use the Energy Saver Feature: Energy Saver Feature: This function is available on COOL mode. The fan will continue to run for 3 minutes after the compressor shuts off. The fan then cycles on for 2 minutes at 10-minute intervals until the room temperature is above the set temperature, at which time the compressor turns back on and Cooling Starts. Press the Energy Saver Button PMTS - 13 - To Use the Sleep Feature: Press the Sleep Button Sleep Feature: In this mode the selected temperature will increase by 2°F (or 2°C) 30 minutes after the mode is selected. The temperature will then increase by another 2°F (or 2°C) after an additional 30 minutes. This new temperature will be maintained for 6 hours before it returns to the originally selected temperature. This ends the Sleep mode and the unit will continue to operate as originally programmed. The Sleep mode program can be cancelled at any time during operation by pressing the Sleep button again. PMTS To Use the Timer Start/Stop Feature: When the unit is on or off, press the Timer button. The TIMER ON indicator light illuminates. It indicates the Auto Start program is initiated. -When the time of TIMER ON is displayed, press the Timer button again, the TIMER OFF indicator light illuminates. It indicates the Auto Stop program is initiated. -Press or hold the UP or DOWN button to change the Auto time by 0.5 hour increments, up to 10 hours, then at 1 hour increments up to 24 hours. The control will count down the time remaining until start. -The selected time will register in 5 seconds, and the system will automatically revert back to display the previous temperature setting or room temperature when the unit is on(when the unit is off, there is no display). -Turning the unit ON or OFF at any time or adjusting the timer setting to 0.0 will cancel the Auto Start/Stop timed program. To Use the Check Filter Feature: This feature is a reminder to clean the Air Filter for more efficient operation. The LED (light) will illuminate after 250 hours of operation. To reset after cleaning the filter, press the Check Filter button and the light will go off. Press the Check Filter Button - 14 - To Use the Clean Air Feature (Only available on some models): Press the Clean Air Button Press the Clean Air button. The ion generator is energized and will help to remove pollen and impurities from the air, trapping them in the filter. Displays The display panel shows the set temperature in Celsius or Fahrenheit and the Autotimer settings. While in Fan Only mode, it shows the current room temperature. Error Codes: AS – Room temperature sensor error - Unplug the unit and plug it back in. If error repeats, call for service. Note: In Fan Only mode, it will display “LO” or “HI”. ● – Evaporator temperature sensor error-Unplug the unit and plug it back in. If error repeats, call for service. NOTE: ● is displayed as shown in the left picture. HS – Electric heating sensor error-Unplug the unit and plug it back in. If error repeats, call for service. PMTS – Personal Mapping Temperature Sensor (E-Star models only) Light flashes on control panel when activated. PMTS NOTE: This feature can only be activated from the remote control. When activated, the remote control serves as a remote thermostat allowing for the precise temperature control at the location of the remote control. To activate the PMTS feature, point the remote control towards the unit and press the PMTS button. The remote displays the actual temperature at the location of the remote control. The remote control will send this signal to the air conditioner every 3 minutes until the PMTS button is pressed again. If the unit does not receive the PMTS signal after more than 7 minutes, the unit will beep to indicate that the PMTS mode has ended. - 15 - CARE AND CLEANING CAUTION Clean your air conditioner occasionally to keep it looking new. Be sure to unplug the unit before cleaning to prevent shock or fire hazards. Air Filter Cleaning (E-star Models only) The air filter should be checked at least once a month to see if cleaning is necessary. Trapped particles in the filter can build up and cause an accumulation of frost on the cooling coils. Push the vent handle to the Vent Closed position (where applicable). Open the front panel. Grasp the filter by the center and pull up and out. Wash the filter using liquid dishwashing detergent and warm water. Rinse filter thoroughly. Gently shake excess water from the filter. Be sure the filter is thoroughly dry before replacing. Note: Instead of washing you may vacuum the filter clean. Note: Never use hot water over 40° C (104° F) to clean the air filter. Never attempt to operate the unit without the air filter. Cabinet Cleaning Be sure to unplug the air conditioner to prevent shock or fire hazard. The cabinet and front may be dusted with an oil-free cloth or washed with a cloth dampened in a solution of warm water and mild liquid dishwashing detergent. Rinse thoroughly and wipe dry. Never use harsh cleaners, wax or polish on the cabinet front. Be sure to wring excess water from the cloth before wiping around the controls. Excess water in or around the controls may cause damage to the air conditioner. Plug in air conditioner. Winter Storage If you plan to store the air conditioner during the winter, remove it carefully from the window according to the installation instructions. Cover it with plastic or return it to the original carton. - 16 - ADDITIONAL THINGS YOU SHOULD KNOW Now that you have mastered the operating procedure, here are more features in your control that you should become familiar with. The Cool circuit has an automatic 3 minute time delayed start if the unit is turned off and on quickly. This prevents overheating of the compressor and possible circuit breaker tripping. The fan will continue to run during this time. The control is capable of displaying temperature in degrees Fahrenheit or degrees Celsius. To convert from one to the other, press and hold the Left and Right Temp/Timer buttons at the same time, for 3 seconds. Normal Operating Sounds High Pitched Chatter High efficiency compressors may have a high pitched chatter during the cooling cycle. Sound of Rushing Air At the front of the unit, you may hear the sound of rushing air being moved by the fan. Vibration Unit may vibrate and make noise because of poor wall or window construction or incorrect installation. Gurgle/Hiss Gurgling or hissing noise may be heard due to refrigerant passing through evaporator during normal operation. Pinging or Switching Droplets of water hitting condenser during normal operation may cause pinging or switching sounds. NOTE: This air conditioner is designed to be operatd under the following conditions: Cooling Operation Outdoor Temp: Indoor Temp: 18°- 43°C (T1 Environment) 17°- 32°C (T1 Environment) 21° - 52°C (T3 Environment) 17°- 32°C (T3 Environment) Heating Operation Outdoor Temp: Indoor Temp: -5°- 24°C (T1 Environment) 0°- 27°C (T1 Environment) -7°- 24°C (T3 Environment) 0°- 30°C (T3 Environment) Performance may be reduced if unit is operated above or below these operating temperature ranges. - 17 - Fresh Air Vent Control (On some models) : The Fresh Air Vent allows the air conditioner to: 1. Recirculate inside air –Vent Closed (See Figure 1). 2. Draw fresh air into the room – Vent Open (See Figure 2). 3. Exchange air from the room and draws fresh air into the room – Vent and Exhaust Open (See Figure 3). Figure 1 (Vent Closed) Figure 2 (Vent Open) Figure 3 (Vent and Exhaust Open) Air Directional Louvers The louvers will allow you to direct air flow UP or Down (on some models) and Left or Right throughout the room as needed. Pivot horizontal louvers until the desire Up/Down direction is obtained. Levers Move the Levers from side to side until the desired Left/Right direction is obtained. Levers - 18 - TROUBLESHOOTING TIPS Before calling for service, review this list. It may save you time and expense. This list includes common occurrences that are not the result of defective workmanship or materials in this appliance. PROBLEM SOLUTION Air conditioner does not start. 1. Wall plug may be disconnected. Push plug firmly into outlet. 2. House fuse blown or circuit breaker tripped. Replace fuse with time delay type of fuse or reset circuit breaker. 3. Plug Current Device tripped. Press the RESET button. 4. Control is OFF. Turn Control ON and set to desired setting. Air from unit does not feel cold enough. 1. Room temperature below 17°C (62° F). Cooling may not occur until room temperature rises above 17° C (62° F). 2. Temperature sensing element touching cold coil, located behind air filter. Straighten tube away from coil. 3. Reset to a Lower temperature. 4. Compressor shut-off by changing modes. Wait approximately 3 minutes and listen for compressor to restart when in the COOL mode. Air conditioner cooling, but room is too warm-ice forming on cooling coil behind decorative front panel. 1. Outdoor temperature below 18°C (64°F). To defrost the coil, set to FAN ONLY mode. 2. Air filter may be dirty. Clean filter. Refer to Care and Cleaning section. 3. Thermostat set too cold for night-time cooling. To defrost the coil set to Fan Only mode and then set temperature to a higher setting. Air conditioner cooling, but room is too warm- NO ice forming on cooling coil behind decorative front panel. 1. Dirty air filter-air restricted. Clean air filter. Refer to Care and Cleaning section. 2. Temperature is set too high. Set temperature to a lower setting. 3. Air directional louvers positioned improperly. Position louvers for better air distribution. 4. Front of unit is bloked by drapes, blinds, furniture, etc. – restricts air distribution. Clear blockage from the front of the unit. Air conditioner turns on and off rapidly. 1. Dirty air filter-air restricted. Clean air filter. Refer to Care and Cleaning section. 2. Outside temperature extremely hot. Set FAN speed to a higher setting to bring air past cooling coils more frequently. - 19 - Noise when unit is cooling. 1. Air movement sound. This is normal. If noise is too loud, set to a lower FAN setting. 2. Window vibration - poor installation. Refer to installation instructions or check with installer. Water dripping INSIDE when unit is cooling. 1. Improper installation. Tilt air conditioner slightly to the outside to allow water drainage. Refer to installation instruction or check with installer. Water dripping OUTSIDE when unit is cooling. 1. Unit removing large quantity of moisture from humid room. This is normal during excessively humid days. Remote sensing (PMTS/Personal Mapping Temperature Sensor) deactivating prematurely. 1. Remote control not located within range. Place remote control within 20 feet and 180° radius of the front of the unit. 2. Remote control signal obstructed. Remove obstruction. 1. Temperature setting is too low. Increase the temperature setting. Room too cold. If you experience any issues that are not listed above, or if you are unable to resolve your issue after trying the methods and solutions described above, please contact our technical support team: Email: [email protected] Telephone: 1-866-954-4440 Or, visit our website : http://www.impeccausa.com - 20 - TABLE OF CONTENTS Introduction ........................................................................................................................................... 2 What’s In the Box ................................................................................................................................... 3 Warnings ............................................................................................................................................... 4 Cautions ................................................................................................................................................. 5 Important Safety Instructions ................................................................................................................. 6 Installation Instructions .......................................................................................................................... 7 Operation of Power Cord Current Device .............................................................................................. 11 Air Conditioner Features and Operation Instructions ............................................................................ 11 Care and Cleaning ................................................................................................................................. 16 Additional Things You Should Know ...................................................................................................... 17 Troubleshooting Tips ............................................................................................................................ 19 CONTENIDO Introducción ......................................................................................................................................... 22 Que hay dentro de la Caja ..................................................................................................................... 23 Advertencias ......................................................................................................................................... 24 Precauciones ........................................................................................................................................ 25 Instrucciones de Seguridad Importantes ............................................................................................... 26 Instrucciones de Instalación .................................................................................................................. 27 OPERACIÓN DEL CABLE DE ALIMENTACIÓN DEL APARATO ACTUAL ...................................................... 31 Características de Acondicionador de Aire e Instrucciones de operación .............................................. 31 Cuidado y Limpieza ............................................................................................................................... 36 Cosas Adicionales que Debe Saber ....................................................................................................... 37 Consejos de Solución de Problemas ...................................................................................................... 39 - 21 - INTRODUCCIÓN Felicitaciones por su compra del Acondicionador de Aire Compacto de Ventana Controlado Electrónicamente IMPECCA™. Antes de usar este producto se recomienda que usted se familiarice con las características, funciones, y procedimientos de operación descritos en este manual. Dentro encontrará muchas sugerencias que servirán de ayuda sobre cómo usar y mantener su acondicionador de aire de manera apropiada. Solo un poquito de cuidado preventivo de su parte le puede ahorrar mucho tiempo y dinero a lo largo de la vida de su acondicionador de aire. Encontrará muchas respuestas a problemas comunes en el cuadro de consejos de solución de problemas. Si revisa nuestro cuadro de Solución de Problemas primero, posiblemente no necesite llamar por servicio. Características de un Vistazo Operación silenciosa como Susurro Temporizador 24 horas Función de Ahorro Energético Refrigerante Eco-Amigable Control Remoto con LED Tecnología Sin Goteo Sensor de Temperatura de Mapeo Personal * Indicador de Filtro Limpio * NOTE: Model # 1WA-10KR does not support PMTS PRECAUCIONES Para prevenir lesión y/o daño a la propiedad, favor familiarizarse con las siguientes Instrucciones y precauciones de seguridad. El no cumplir con las Instrucciones y precauciones mencionadas en este manual podrían causar lesión o daño. La seriedad es clasificada por las siguientes indicaciones: Este símbolo indica la posibilidad de lesión seria o muerte. Este símbolo indica la posibilidad de lesión y/o daño a la propiedad. Nunca haga esto. Siempre haga esto. IMPORTANTE: Siempre contacte un técnico autorizado para reparación o mantenimiento de esta unidad. Este acondicionador de aire no es para uso de niños pequeños o personas enfermas sin supervisión. Niños pequeños deben ser advertidos de no operar el acondicionador de aire. Si hay que reemplazar el cable de alimentación, el trabajo de cambio debe ser efectuado por técnicos certificados o autorizados. Todo trabajo eléctrico debe ser ejecutada de acuerdo a los estándares nacionales de alambrado y solo debe ser efectuado por personal autorizado. Debido a leves modificaciones en producción, las instrucciones, características, y/o descripciones encontradas en este manual podrían ser levemente diferentes a su producto. - 22 - QUE HAY DENTRO DE LA CAJA 1 1. Unidad AC 3 2. Control remoto 2 3. Guía de Usuario 4. Control de usuario remoto de guía (no mostrado) 5. Refrescar el aire Filtro de carbón instrucciones (no se muestra) 6. Kit de Instalación (no mostrado) - 23 - ADVERTENCIAS Conectar cable de alimentación de manera apropiada. El no hacerlo puede causar shock eléctrico o fuego debido a generación excesiva de calor. No encienda o apague la unidad insertando o halando el cable de alimentación. El hacerlo podría causar shock eléctrico o incendio debido a sobretensiones. No modificar el largo del cable de alimentación o compartir el tomacorriente con otros aparatos. Nunca trate de manipular el cable de alimentación u operar la unidad con manos mojadas o en un ambiente húmedo. El no hacerlo puede causar shock eléctrico o fuego debido a generación excesiva de calor. Siempre asegúrese que el cable de alimentación esta aterrizado. Conexión a tierra incorrecta puede causar shock eléctrico. Desenchufe la unidad si usted nota sonidos, olores raros, o humo saliendo del mismo. El hacerlo puede causar fuego y/o shock eléctrico. Mantenga armas de fuego y/o explosivos lejos de la unidad. No use un cable de alimentación dañado o no especificado. Si el cable de alimentación se daña, debe ser reemplazado por el fabricante o un centro de servicio autorizado o una persona calificada similar para evitar un peligro. No dirija el flujo de aire directamente a las personas en la habitación. Lesión seria o fatal puede ocurrir debido a shock. El equipo puede dañarse debido a corto circuito. Exposición continua a un flujo de aire directo puede causar daño a la salud. No permita que agua corra dentro de las partes eléctricas internas. El hacerlo puede causar fallo de la unidad y/o shock eléctrico. Siempre instale cortacircuitos y un circuito de alimentación dedicado. Instalación incorrecta puede causar fuego y/o shock eléctrico. No abra la unidad durante operación. No use el enchufe si esta flojo o dañado. El hacerlo puede causar fuego y/o shock eléctrico. No use el cable de alimentación cerca de aparatos de calor. El hacerlo puede causar shock eléctrico. No use el cable de alimentación cerca de gas inflamable o líquidos combustibles tales como benceno, diluyente, gasolina, etc. Fuego y/o calor puede ocurrir por exposición a calor excesiva. Fuego y/o explosión Fuego puede ocurrir por calor pueden ocurrir por calor excesiva. excesiva. No desarme o modifique la unidad. Ventile la habitación antes de operar el acondicionador de aire si hay fuga de gas de otro aparato. El no ventilar la habitación puede causar El hacerlo puede causar fallo y/o shock eléctrico. explosión o incendio. - 24 - PRECAUCIONES Al remover el filtro de aire, no toque las partes metálicas de la unidad. No limpie el acondicionador de aire con agua. Ventile la habitación bien cuando se use junto con una estufa, etc. Puede ocurrir una lesión. Agua puede entrar en la unidad y degradar el aislamiento. Shock eléctrico puede ocurrir. El no hacerlo puede resultar en falta de oxigeno. Cuando se va limpiar la unidad, apague la unidad, desenchufe la unidad o apague el cortacircuitos.. No ponga una mascota o planta donde estará expuesta a flujo directo de aire. No ponga obstáculos alrededor de entradas de aire o dentro de salidas de aire. El no hacerlo puede causar shock eléctrico o fuego por generación excesiva de calor. Lesión seria o mortal puede ocurrir por exposición contínua a flujo de aire directo. El hacerlo puede causar fallo del aparato y/o fuego por sobrecalentamiento. No opere esta unidad durante tormentas o huracanes. Al quitar el enchufe de un tomacorriente, primero apague la unidad y no hale del cable. Siempre apague el interruptor principal cuando no esté usando la unidad por periodos de tiempo extensos. El no hacerlo puede resultar en daño ya que se puede meter el agua o puede ocurrir una sobrecarga eléctrica. El no apagar la unidad primero puede resultar en shock. El hacerlo ayudara a preservar la vida de esta unidad. Asegúrese que el soporte de instalación no está dañado por exposición prolongada a elementos al aire libre. Siempre inserte los filtros con seguridad. Limpie el filtro periódicamente. No use detergentes fuertes, ceras, o diluyentes para limpiar. Use manta de tela suave mejor. Si el soporte está dañado, la unidad no estará soportada adecuadamente y se podría caer. Operación sin filtro puede causar fallo. Filtros sucios u obstruidos reducirán la eficiencia y desempeño. La apariencia puede ser alterada por cambio de color o deterioro de la superficie. No ponga objetos pesados sobre el cable de alimentación. Siempre asegúrese que el cable no esta comprimido. No beba o permita mascotas tomar agua drenada del acondicionador de aire. Siempre use precaución al desempacar o instalar. Puede ocurrir un fuego y/o shock eléctrico. Agua descargada del acondicionador de aire contiene contaminantes dañinos que pudieran causar enfermedad o muerte. Bordes afilados podrían causar lesión. Si entra agua en la unidad, apague la unidad, apague los cortacircuitos, y desconecte. Contacte un técnico calificado. No opere la unidad de nuevo hasta que haya sido reparada o inspeccionada. - 25 - INSTRUCCIONES DE SEGURIDAD IMPORTANTES El cable de alimentación de este acondicionador de aire contiene un aparato de detección de corriente diseñado para reducir el riesgo de fuego. Favor referirse a la sección “Operación de Aparato Actual” para más detalles. En caso de que el cable de alimentación está dañado, no puede ser reparado. Debe ser reemplazado con un cable nuevo. Cable de alimentación con enchufe de conexión a tierra de 3 terminales y aparato de detección de corriente. Nunca corte, remueva o elimine la terminal a tierra. Información Eléctrica Asegúrese que el servicio eléctrico es adecuado para el modelo que usted ha escogido. Esta información se puede encontrar en la placa de serie, ubicada en el lado del gabinete y detrás de la parrilla. Asegúrese que el acondicionador de aire está conectado a tierra. Para minimizar el shock y peligros de incendio, la conexión a tierra es importante. El cable de alimentación está equipado con un enchufe de tres terminales para protección contra peligros de shock. No remueva ninguna de las terminales del cable de alimentación. Su acondicionador de aire debe usarse en un receptáculo de pared con conexión a tierra. Si el receptáculo que usted pretende usar no está conectado a tierra adecuadamente o protegido por un fusible de retardo de tiempo o cortacircuitos, haga que un electricista calificado le instale un receptáculo apropiado. Asegúrese que el receptáculo estará accesible antes de instalar la unidad. No encienda el acondicionador de aire sin el cobertor lateral en su lugar. Esto podria resultar en daño mecanico dentro del acondicionador de aire. No use un cable de extensión o enchufe adaptador. - 26 - INSTRUCCIONES DE INSTALACIÓN Su acondicionador de aire esta diseñado para instalarse en ventanas dobles de guillotina estándar con anchos de apertura de 23 a 36 pulgadas (584mm to 914mm) (Vea Figura 1). El marco inferior debe abrirse lo suficiente para permitir una abertura vertical de los tamaños siguientes (ver Tabla 1). Rejillas laterales y la parte posterior de la CA deben tener un espacio libre de aire para permitir suficiente flujo de aire a través del condensador, para eliminar el calor. La parte trasera de la unidad debe estar al aire libre, no dentro de un edificio o en el garaje. OFFSET EXTERIOR WALL INNER WINDOW SILL TABLA 1 INTERIOR WALL Salida en Btu/h Tamaño WINDOW LAYOUT 8000 Btu/h 14” (356mm) 10000~12000 Btu/h 15-1/2” (394mm) Nota: Guarde la caja original y las instrucciones de instalación para referencia futura. La caja es la mejor forma de almacenar la unidad durante el invierno (o cuando la unidad no se utiliza durante un período de tiempo prolongado). Mounting Hardware HERRAMIENTAS NECESARIAS: Phillips Destornillador, taladro (si son necesarios orificios guía) Precaución: Al manejar la unidad, tenga cuidado para evitar cortarse con los bordes afilados de metal y aletas de aluminio en bobinas frontal y posterior. Top Rail Hardware Nota: El hardware riel superior y la figura siguiente. A, fig. B, y la fig. C no son aplicables a las unidades de más de 10000 Btu / h. 3/8” Screws Top Rail Nota: Antes de instalar la unidad, el carril superior debe ser montado en la unidad (para <10,000 Btu / h modelos). Figure A HERRAMIENTAS NECESARIAS: destornillador Phillips 1: Retire el acondicionador de aire de la caja de cartón y colóquelo sobre una superficie plana. Packaging 2: Eliminar carril superior de la parte posterior del material de embalaje, como se muestra en la Figura A. Top Rail - 27 - 3: Alinear el orificio en el riel superior con los de la parte superior de la unidad como se muestra en la figura B. 4: Asegure el riel superior a la unidad con los 3/8 "tornillos como se muestra en la figura C. Nota: Por razones de seguridad, los cuatro (4) tornillos deben estar bien sujetos. COMO INSTALAR Nota: Riel superior y Paneles Deslizantes en cada lado se compensan para brindar la inclinación adecuada la parte trasera de la unidad (5/16”). Esto es necesario para la utilización adecuada de agua condensada y drenaje. Si usted no está usando los Paneles laterales por alguna razón, esta inclinación hacia atrás debe mantenerse. 1. Ponga la unidad en el piso, una banca, o una mesa. Hay un Panel de relleno Izquierdo y Derecho – asegúrese de usar el panel apropiado para cada lado. Al ser instalado, la brida para fijar el panel al antepecho estará de cara a la habitación. Sujete el panel de acordeón en una mano y tire suavemente el centro para liberar el extremo abierto. Véase la Figura 2 Deslizar el extremo libre del panel en la carcasa como se muestra en la Figura 3A, 3B y 3C. Deslice el panel hacia abajo. Asegúrese de dejar espacio suficiente como para deslizar la parte superior e inferior del marco en los rieles de la cabina. FIG.3C - 28 - FIGURA 4 Una vez que el panel ha sido instalado en el lado de la caja, asegurarse de que se asegure dentro del canal del marco haciendo pequeños ajustes. Deslice los extremos superior e inferior del marco en los rieles superior e inferior de la carcasa. Figura 4 Nota: Si la tormenta ventana de bloques de CA, consulte la Figura 13. 2. Mantenga un agarre firme sobre el acondicionador de aire, y ponga la unidad con cuidado dentro de la apertura de la ventana de manera que la parte inferior del marco del este acondicionador de aire este contra el antepecho (See Fig. 5). Cierre cuidadosamente la ventana detrás del riel superior de la unidad. 3. Extienda los paneles laterales contra el marco de la ventana (Ver Fig. 6). 4. Coloque el bloqueo de imagen entre las extensiones del marco y el windowsill (como se muestra en la fig. 7). Drive ¾ "(19 mm) o ½" (13mm) tornillos de bloqueo a través del bloqueo de imagen y en el alféizar (Ver fig. 8). Nota: Para evitar alféizar de la división, perfore 1/8 "(3mm) agujeros piloto antes de conducir los tornillos. - 29 - 5. Inserte tornillos de bloqueo de ½” (13mm) a través de los hoyos del marco dentro de la guillotina de la ventana (Ver Fig. 9 y Fig. 10). Fig. 9 Fig.10 6. Para asegurar la guillotina inferior en su lugar, instale un bloqueo con un ángulo de 90 grados con tornillo de 3/4” (19mm) o ½” (13mm) como se muestra. (Ver Fig.11). 7. Cortar el sello de espuma e insertar en el espacio entre las Fig. 11 cintas superior e inferior (véase la fig. 12). Si AC está bloqueado por la ventana de tormentas Añadir madera como se muestra en la figura. 13, o quitar la ventana de tormentas antes de acondicionador de aire está instalado. Si el marco tormenta ventana debe permanecer en su lugar, asegúrese de que los orificios de drenaje o ranuras no están calafateado o con pintura. Acumulado agua de lluvia o de condensación se debe permitir que drene hacia fuera. Removing AC from Window • Gire AC y desconecte el cable de alimentación. • Eliminar sello de la banda de bloqueo entre las ventanas y desenroscar la seguridad. • Retire los tornillos instalados a través del marco y cerradura de marco. • Close (diapositiva) en los paneles laterales del marco. • Mantenga firme en el acondicionador de aire, levante con cuidado la hoja y el "rock" acondicionador de aire al revés para drenar el agua condensada en la base de la unidad. Tenga cuidado de no derramar el agua restante mientras se levanta la unidad de la ventana. marco de ventana Storm marco de la ventana o cualquier otro obstáculo. 1 ½” Min (38mm) Junta de espesor según se requiera, para el tono adecuado a la parte posterior, a lo largo de toda la solera. Fijar con clavos o tornillos. - 30 - OPERACIÓN DEL CABLE DE ALIMENTACIÓN DEL APARATO ACTUAL El cable de alimentación contiene un aparato actual que percibe daño al cable de alimentación. Para probar el cable de alimentación haga lo siguiente: 1. Conecte el Acondicionador de Aire. 2. El cable de alimentación tendrá DOS botones en la cabeza del enchufe. Pruebe el botón de PRUEBA, usted notará un clic cuando el botón de RESET salga. 3. Oprima el botón de RESET, de nuevo notará un clic cuando el botón sale. 4. El cable de alimentación ahora brinda electricidad a la unidad. (En algunos productos esto es también indicado por una luz en la cabeza del enchufe.) NOTAS: No use el aparato actual para encender o apagar la unidad. Siempre asegúrese que el botón de RESET este oprimido hacia dentro para que haya una operación correcta. La fuente de poder debe ser reemplazada si falla el RESET cuando el botón el botón TEST es oprimido, o si no puede ser reiniciado. Uno nuevo puede ser obtenido contactando soporte técnico. Si el cable de alimentación está dañado, no puede ser reparado. DEBE ser reemplazado por uno obtenido del fabricante del producto. CARACTERÍSTICAS DEL ACONDICIONADOR DE AIRE E INSTRUCCIONES DE OPERACIÓN Antes de comenzar, familiarícese exhaustivamente con los paneles de control como se muestra abajo y todas sus funciones, luego siga el símbolo para las funciones que usted desea. La unidad puede ser controlada por el panel de control de la unidad ubicado en la parte frontal del aparato o con el control remoto. UNIDAD DE PANEL DE CONTROL (1) Ajusta la temperatura o la hora Ajusta la temperatura o la hora Muestra la temperatura o el tiempo Activa el temporizador Clean Air Mode (sólo en algunos modelos) Compruebe botón Reset Filter Modo de reposo Ajuste de velocidad del ventilador Establece el modo de Modo Ahorro de Energíae UNIDAD DE PANEL DE CONTROL (2) PMTS Indicador (sólo en algunos modelos) PMTS Enciende la unidad o desactivar - 31 - PMTS Nota: Las siguientes instrucciones se accede pulsando los botones situados en el panel de control de la unidad. Las mismas instrucciones se puede utilizar con el mando a distancia. Encendido / Apagado: Pulse el botón On / Off PMTS Cambiar la configuración de temperatura: Pulse o mantenga presionado Izquierda () o Derecha () hasta que la temperatura deseada se ve en la pantalla. Esta temperatura se mantendrá automáticamente en cualquier lugar entre 62 ° F (17 ° C) y 86 ° F (30 ° C). Si desea que la pantalla indique la temperatura real de la habitación, consulte la nota "para operar en Fan Only". Pulse para aumentar la temperatura Pulse para Baja Temperatura Para ajustar la velocidad del ventilador: Seleccione la velocidad del ventilador en cuatro pasos: Auto, Bajo, Medio o Alto. Cada vez que se pulsa el botón, el modo de velocidad del ventilador. En algunos modelos, la velocidad del ventilador no se puede ajustar en el modo HEAT. En el modo seco, la velocidad del ventilador se controla a bajo automáticamente. Pulse para seleccionar la velocidad del ventilador adecuado. PMTS - 32 - Para seleccionar el modo de funcionamiento: Para elegir el modo de funcionamiento, pulse el botón Mode. Cada vez que se pulsa el botón, se seleccionará un modo en una secuencia que va desde AUTO, COOL, DRY y FAN. La luz indicadora junto se iluminará y permanecerá encendida una vez que el modo seleccionado. Pulse el botón de modo PMTS Para operar en Función Auto: Cuando se configura el aire acondicionado en modo AUTO, se seleccionará automáticamente la calefacción de enfriamiento, (algunos modelos), o el funcionamiento del ventilador solamente, en función de la temperatura ambiente actual y la temperatura objetivo que ha fijado. El aire acondicionado controla automáticamente la temperatura ambiente. En este modo, la velocidad del ventilador no se puede ajustar. Para hacer funcionar el ventilador solamente: Utilice esta función sólo cuando el enfriamiento no es deseable, como para la circulación del aire ambiente o para extraer el aire viciado (en algunos modelos). Recuerde abrir el respiradero durante esta función, pero mantenerlo cerrado durante el enfriamiento para máxima eficiencia de enfriamiento. Usted puede elegir cualquier velocidad del ventilador que prefiera. Durante esta función, la pantalla mostrará la temperatura real de la habitación, no la temperatura como en el modo de refrigeración. En el modo Fan Only, la temperatura no está ajustado. Para operar en modo seco: En este modo, el acondicionador de aire generalmente funcionará en la forma de un deshumidificador. Dado que el espacio acondicionado es un área cerrada o sellada, un cierto grado de enfriamiento seguirá. Para usar la función de ahorro de energía: Energía función ahorro de energía: Esta función está disponible en el modo COOL. El ventilador continuará funcionando durante 3 minutos después de que el compresor se apaga. El ventilador entonces ciclos durante 2 minutos a intervalos de 10 minutos hasta que la temperatura ambiente es superior a la temperatura del sistema, momento en el cual el compresor se vuelve a encender y comienza a refrigerar. Pulse el botón de ahorro de energía PMTS - 33 - Para usar la función del sueño: Pulse el botón Sleep PMTS Dormir Característica: En este modo la temperatura seleccionada se incrementará en 2 ° F ( 2 ° C) 30 minutos después de que el modo seleccionado. Después, la temperatura se incrementará en otro 2 ° F (2 ° C) después de 30 minutos adicionales. Esta nueva temperatura se mantuvo durante 6 horas antes de que vuelva a la temperatura seleccionada originalmente. Esto termina el modo de suspensión y la unidad seguirá funcionando como se había programado. El programa de modo de reposo se puede cancelar en cualquier momento durante la operación pulsando de nuevo el botón de reposo. Para usar la Función de Temporizador Iniicar/Parar: Cuando la unidad está encendida o apagada, presione el botón del temporizador. El temporizador en la luz indicadora se ilumina. Se indica que el programa de inicio automático se inicia. -Cuando el tiempo de TIMER ON en la pantalla, pulse el botón TIMER de nuevo, el Temporizador luz indicadora se ilumina. Se indica que el programa Auto Stop es iniciado. -Pulse o mantenga pulsado el botón UP o DOWN para cambiar el tiempo de Auto por 0,5 horas incrementos, hasta 10 horas, después a intervalos de 1 hora hasta 24 horas. La control de la cuenta regresiva del tiempo restante hasta comenzar. -El tiempo seleccionado se registrará en 5 segundos, y el sistema automáticamente volverá a mostrar la temperatura anterior o temperatura ambiente cuando la unidad está encendida (cuando la unidad está apagada, la pantalla está apagada). -Apagado de la unidad o desactivar en cualquier momento o ajustar el temporizador a 0,0 se cancelará la función Auto Start / Stop programa asignado. Para usar la Función de Comprobar Filtro: Esta función es un recordatorio para limpiar el filtro de aire para un funcionamiento más eficiente. El LED (luz) se iluminará después de 250 horas de funcionamiento. Para poner a cero después de limpiar el filtro, pulse el botón Check Filter y la luz se apagará. Pulse el botón de revisión del filtro. - 34 - Para usar la Función de Aire Limpio (Solo disponible en algunos modelos): Presione el Botón de Aire Limpio Pulse el botón de Aire Limpio. El generador de iones está energizado y ayudará a eliminar el polen y las impurezas del aire, atrapándolos en el filtro. Pantallas La pantalla muestra la temperatura en grados Celsius o Fahrenheit y los ajustes del temporizador automático. En el modo Fan Only, muestra la temperatura actual de la habitación. Códigos de error: AS - Temperatura ambiente error sensor - Desconecte el aparato y vuelva a conectarlo pulg Si se repite el error, llame al servicio técnico. Nota: En el modo Fan Only, se mostrará "LO" o "HI". ● - sensor de temperatura del evaporador de errores Desconecte el aparato y vuelva a conectarlo pulg Si se repite el error, llame al servicio técnico. NOTA: ● Se visualiza como se muestra en la imagen de la izquierda. HS - Calefacción eléctrica sensor de errores Desconecte el aparato y vuelva a conectarlo pulg Si se repite el error, llame al servicio técnico. PMTS – Sensor de Mapeo Personal de Temperatura (Solo disponible en algunos modelos) La luz parpadea en el panel de control cuando se activa. PMTS NOTA: Esta función sólo se puede activar desde el mando a distancia. Cuando se activa, el control remoto sirve como un termostato a distancia que permite el control preciso de la temperatura en la ubicación del control remoto. Para activar la función PMTS, apunte el control remoto hacia la unidad y pulse el botón PTMS. El mando a distancia muestra la temperatura real en la ubicación del control remoto. El control remoto enviará esta señal al acondicionador de aire cada 3 minutos hasta que el Sígueme se pulsa el botón de nuevo. Si la unidad no recibe la señal Sígueme después de más de 7 minutos, la unidad emitirá un sonido para indicar que el modo PTMS ha terminado. - 35 - CUIDADO Y LIMPIEZA PRECAUCIÓN Limpie el acondicionador de aire de vez en cuando para mantener su aspecto nuevo. Asegúrese de desenchufar la unidad antes de limpiarla para evitar descargas eléctricas o peligro de incendio. Filtro de aire de limpieza El filtro de aire debe ser revisado por lo menos una vez al mes para ver si la limpieza es necesaria. Las partículas atrapadas en el filtro pueden acumularse y causar una acumulación de escarcha en los serpentines de enfriamiento. • Empuje la palanca a la posición de ventilación de ventilación cerrado (en su caso). • Abra el panel frontal. • Sujete el filtro por el centro y tire hacia arriba y hacia fuera. • Lave el filtro con detergente líquido para lavar platos y agua tibia. • Enjuague bien el filtro. • Sacuda suavemente el exceso de agua del filtro. Asegúrese de que el filtro esté completamente seco antes de colocarlo. Nota: En lugar de lavado puede aspirar el filtro limpio. Nota: Nunca use agua caliente sobre 40 ° C (104 ° F) para limpiar el filtro de aire. Nunca trate de operar la unidad sin el filtro de aire. Gabinete de limpieza • Asegúrese de desconectar el acondicionador de aire para evitar descargas eléctricas o peligro de incendio. El gabinete y frontal pueden sacudirse con un paño libre de aceites o lavarse con un paño humedecido en una solución de agua tibia y jabón líquido suave. Enjuague bien y seque. • Nunca use limpiadores abrasivos, ceras o pulimentos en la parte frontal del gabinete. • Asegúrese de escurrir el exceso de agua del paño antes de limpiar alrededor de los controles. El exceso de agua en o alrededor de los controles puede causar daños en el acondicionador de aire. • Enchufe el acondicionador de aire. Almacenaje durante el invierno Si va a guardar el acondicionador de aire durante el invierno, eliminar cuidadosamente de la ventana de acuerdo con la instrucciones de instalación. Cubrir con plástico o devuélvalo a la caja de cartón original. - 36 - COSAS ADICIONALES QUE DEBE SABER Ahora que usted ya domina el procedimiento operativo, aquí hay más características en su control con las que se debe familiarizar. El circuito Frio tiene un arranque retardado de 3 minutos si la unidad es apagada y encendida rápidamente. Esto previene sobrecalentamiento del compresor y posible disparo de cortacircuitos. El abanico continuará operando durante este tiempo. El control es capaz de mostrar temperatura en grados Fahrenheit o grados Celsius. Para convertir de uno al otro, oprima y mantenga oprimido los botones Temp/Timer izquierdo y derecho al mismo tiempo, por 3 segundos. Sonidos de Operación Normal Monto de tono alto Compresores de alta eficiencia puede tener una charla agudo durante el ciclo de enfriamiento. Sonido de ráfagas de aire En la parte frontal de la unidad, puede oír el sonido de ráfagas de aire que son movidas por el ventilador. Vibración La unidad puede vibrar y hacer ruido debido a la pobre pared o ventana de construcción o instalación incorrecta. Gurgle / Hiss Gorgoteo o silbido puede ser escuchado por el tránsito de refrigerante a través del evaporador durante el funcionamiento normal. Haciendo ping o conmutación Las gotas de agua que caen sobre el condensador durante el funcionamiento normal puede causar ping o cambiar los sonidos. NOTA: Este acondicionador de aire esta diseñado para ser operado bajo las siguientes condiciones: Operación de Enfriamiento Temp Aire libre: Temp Interna: 18°- 43°C (T1 Ambiente) 17°- 32°C (T1 Ambiente) 21° - 52°C (T3 Ambiente) 17°- 32°C (T3 Ambiente) Operación de Calefacción Temp Aire libre: Temp Interna: -5°- 24°C (T1 Ambiente) 0°- 27°C (T1 Ambiente) -7°- 24°C (T3 Ambiente) 0°- 30°C (T3 Ambiente) Rendimiento puede ser reducido si la unidad es operada arriba o debajo de estos rangos de temperatura operativa. - 37 - Control de Ventanilla de Aire Fresco (En algunos modelos) : La ventilación de aire fresco permite que el aire acondicionado: 1. Recirculación de aire en el interior de Cerrado-Vent (Ver Figura 1). 2. Aspire aire fresco en la habitación - Vent abrirá (ver Figura 2). Figura 1 (Ventanilla Cerrada) 3. Intercambio de aire de la habitación y extrae el aire fresco en la habitación - Vent y de escape abierta (ver Figura 3). Figura 2 (Ventanilla Abierta) Figura 3 (Ventanilla y Escape Abiertos) Rejillas Direccionales de Aire Las rejillas le permiten dirigir el flujo de aire hacia arriba o hacia abajo (en algunos modelos) e Izquierda o Derecha en toda la sala como sea necesario. Pivotes horizontales persianas hasta que el deseo de dirección arriba / abajo se obtiene. Palancas Mueva las palancas de lado a lado hasta que aparezca la izquierda / derecha dirección se obtiene. Palancas - 38 - CONSEJOS DE SOLUCIÓN DE PROBLEMAS Antes de llamar solicitando servicio, repase esta lista. Puede ahorrarle tiempo y gasto. Esta lista incluye ocurrencias comunes que no son el resultado de mano de obra o materiales defectuosos en este aparato. PROBLEMA SOLUCIÓN Acondicionador de aire no enciende. 1. Enchufe de pared puede estar desconectado. Presione el enchufe firmemente dentro del tomacorriente. 2. Fusible de la casa fundido o cortacircuitos disparado. Reemplace fusible con uno con retardo de tiempo o reinicie el cortacircuito. 3. Conecte el Aparato Actual disparado. Oprima el botón de RESET. 4. Control está APAGADO. Encienda el Control y ajuste a la posición deseada. Aire de la unidad no se siente suficientemente frio. 1. Temperatura ambiente debajo de 17°C (62° F). Enfriamiento no sucederá hasta que la temperatura ambiente suba arriba de 17° C (62° F). 2. El elemento sensor de temperatura está tocando una bobina fría, ubicada detrás del filtro de aire. Enderece el tubo lejos de la bobina. 3. Ajuste a una temperatura más baja. 4. Compresor se apago en cambio de modos. Espere aproximadamente 3 minutos y escuche por el reinicio del compresor en el modo FRIO. Acondicionador de aire está enfriando, pero la habitación está demasiado caliente-hielo se está formando en bobina de enfriamiento detrás de panel frontal decorativo. 1. Temperatura al aire libre debajo de 18°C (64°F). Para descongelar la bobina ponga en modo FAN ONLY. 2. Filtro de aire podría estar sucio. Limpie el filtro. Referirse a la sección de Cuidado y Limpieza. 3. Termostato ajustado demasiado frio para enfriamiento nocturno. Para descongelar la bobina ponga en modo Fan Only y luego ajuste la temperatura una posición más alta. Acondicionador de aire está enfriando, pero la habitación está demasiado caliente-hielo NO se está formando en bobina de enfriamiento detrás de panel frontal decorativo. 1. Filtro de aire sucio – aire restringido. Limpie el filtro de aire. Referirse a la sección de Cuidado y Limpieza. 2. Temperatura está demasiado alta. Ajuste temperatura a una posición más baja. 3. Rejillas direccionales de aire no posicionadas de manera apropiada. Posicione las rejillas para lograr mejor distribución de aire. 4. Unidad frontal esta bloqueada por cortinas, muebles, etc. – restringe distribución de aire. Quite la obstrucción de la parte frontal de la unidad. - 39 - Acondicionador de aire se enciende y apaga rápidamente. 1. Filtro de aire sucio – aire restringido. Limpie el filtro de aire. Referirse a la sección de Cuidado y Limpieza. 2. Temperatura aire libre extremadamente caliente. Ponga velocidad de ABANICO a una posición más alta para pasar el aire por los tubos de enfriamiento con más frecuencia. Ruido cuando la unidad está enfriando. 1. Sonido de movimiento de aire. Esto es normal. Si el ruido es demasiado alto ajuste a una posición de ABANICO más baja. 2. Vibración de ventana – mala instalación. Referirse a instrucciones de instalación o consultar con instalador. Agua gotea por DENTRO cuando la unidad esta enfriando. 1. Mejorar instalación. Incline el acondicionador de aire levemente hacia afuera para permitir el drenaje del agua. Referirse a instrucción de instalación o consultar con el instalador. 1. La unidad esta removiendo gran cantidad de humedad de la habitación. Esto es normal en días excesivamente húmedos. Agua goteando por FUERA cuando la unidad está enfriando. Sensor Remoto (PMTS/Personal Mapping Temperature Sensor) se desactiva prematuramente. Habitación demasiado fría. 1. Control Remoto no encontrado dentro de rango. Ponga control remoto dentro de un radio de 20 pies y 180° de la parte frontal de la unidad. 2. Señal de control remoto obstruida. Remover obstrucción. 1. Ajuste de temperatura demasiado bajo. Incrementar ajuste de temperatura. Si usted experimenta problemas que no están listados arriba, o si usted no puede resolver su problema después de intentar los métodos y soluciones descritas arriba, favor contactar nuestro equipo de soporte técnico: Correo electrónico: [email protected] Tel: 1-866-954-4440 O, visite nuestro sitio web: http://www.impeccausa.com - 40 -