1
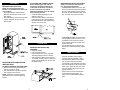
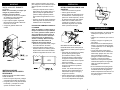
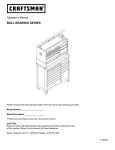
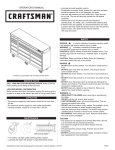
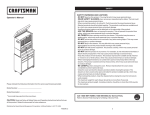
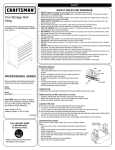
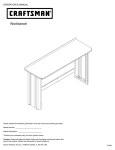
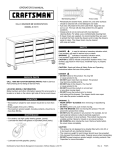
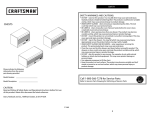
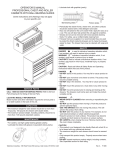
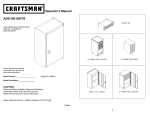
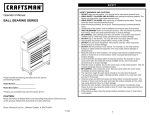
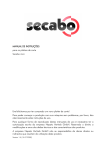
SAFETY SAFETY WARNINGS AND CAUTIONS: DO NOT stand on this product. You may fall which may cause personal injury. WEAR SAFETY GLASSES when removing or repositioning the slides. The tool could slip which may cause personal injury. BE CAREFUL when opening more than one drawer. The product may become unstable and tip, which may cause personal injury or product damage. DO NOT mount this product on a truck bed or any other moving object. This may cause personal injury or product damage. DO NOT step in the drawers. You may fall which may cause personal injury. Appropriately secure this product before moving it with a forklift. DO NOT tow with power equipment. The product could tip, which may cause personal injury or product damage. DO NOT alter this product in any manner. For example, do not weld external lockbars or attach electrical equipment. This may cause product damage or personal injury. A heavy duty side cabinet must be used on an equally heavy duty cart. Keep the product on level surfaces. The product may become unstable and tip if stored or moved on an un-level surface, which may cause personal injury or product damage. Lock the door before moving this product. The or door could come open and make the product unstable and tip, which may cause personal injury or product damage. The maximum weight for each drawer should be no more than 100 pounds. The maximum weight for side cabinet should be no more than 400 pounds. LOCKERS LOCPlease indicate the following information from the service part draw ing provided. Model Number :____________________ Model Description :__________________ Call 1-800-366-7278 for Service Parts CAUTION: Refer to Service Parts Drawing for full listing of Service Parts Read and follow all Safety Rules and Operating Instructions before first use of this product. Retain this document for future reference. HARDWARE: Sears, Roebuck and Co., Hoffman Estates, IL 60179 USA F1850 2 ATTACHING SIDE CABINET TO UNIT: Before installing the side cabinet, remove the handle by following the side handle instructions. The chest must be moved for side cabinet attachment. Reattach chest to cabinet before moving the unit. C Using adequate help hang the side cabinet on the unit. C Place the bottom bracket over the the bottom flange of the unit and attach to the underside of the side cabinet using 3/8-16 x 3/4" hex screws. ASSEMBLY BRACKET INSTALLATION: NOTE: The hanging brackets and bumpers can be mounted to either side of the cabinet. C Attach the adhesive-backed rubber bumpers at the bottom corners of the side cabinet. C Attach the bracket to the side of the side cabinet using two 3/8-16 x 3/4" pan head screws. OPERATION REMOVING AND INSTALLING DRAWERS: C Empty the drawer. C Fully extend the drawer. C Lift the release lever on the right side, while depressing the lever on the left side and pull the drawer out to remove. C To reinstall, carefully align the slides and slowly push the drawer into the unit until the drawer stops. REVERSIBLE DOOR MOUNTING INSTRUCTIONS: TO MOUNT DOOR ON OPPOSITE SIDE: C Remove door and hinge assembly by removing screws on hinge. C Turn upside down and refit to opposite side using the same screws. NOTE: Adjust door to assure optimum performance prior to wrench tightening screws. 3 REMOVING AND INSTALLING SLIDES: NOTE: To remove the slide from the unit, first remove the drawer. C To remove the slide from the unit, first remove the drawer (follow the procedure above). Lift and hold the spring retainer, and push the slide toward the rear of the unit. The slide may now be removed. C To reinstall the slide, place the slide in the appropriate position in the unit. Pull it toward the front of the unit until the spring retainer snaps into position and secures the slide. C For smooth operation, make sure the drawers are matched wtih their original slides. MAINTENANCE C Lubricate the slides, (twice yearly). C Lubricate lock with graphite, (yearly). C Periodically the drawer fronts, drawer trim, and other surfaces should be cleaned with a mild detergent and water. C Auto wax will preserve the storage unit’s luster finish. Apply the wax as to a car. The wax will also help protect the unit against scratches. C Grease and oil can be removed with most standard cleaning fluids. For safety, use a nonflammable cleaning fluid. 4 SEGURIDAD ADVERTENCIAS Y PRECAUCIONES DE SEGURIDAD: NO se pare sobre este producto. Se puede caer y lesionarse. USE GAFAS DE SEGURIDAD al quitar o volver a situar las correderas. Se podría resbalar la herramienta y causar lesiones personales. TENGA MUCHO CUIDADO al abrir varias gavetas. El producto podría quedar inestable y volcarse, lo cual podría causar lesiones personales o daños al producto. NO instale este producto sobre la plataforma de un camión ni sobre ningún otro objeto móvil. Esto podría causar le siones personales o daños al producto. NO se pare en las gavetas. Se puede caer y lesionarse. Antes de mover este producto con un montacargas, asegúrelo de manera adecuada. NO remolque el producto con un equipo motorizado. Se puede volcar y causar lesiones personales o daños al producto. NO modifique este producto de ninguna forma. Por ejemplo, no suelde barras de bloqueo externas ni fije equipos eléctricos. Esto podría causar daños al producto o lesiones personales. Un gabinete lateral extrafuerte se debe usar en un carro que también sea extrafuerte. Mantenga el producto sobre superficies niveladas. Si se guarda sobre una superficie desnivelada, o se mueve a ella, el producto podría quedar inestable y volcarse, lo cual podría causar lesiones personales o daños al producto. Asegure las gavetas y puertas antes de mover este producto. Estas se podrían abrir y hacer que el producto quede inestable y se vuelque, lo cual podría causar lesiones personales o daños al producto. El peso máximo en cada gaveta no debe ser mayor de 100 libras. El peso máximo en el gabinete lateral, no debe ser mayor de 400 libras. El peso máximo del producto, incluyendo su contenido, no debe ser mayor de 1.180 libras para las cajas deslizables. LOCKERS Sírvase indicar la siguiente información que encontrará en el dibujo suministrado de la pieza de servicio. Número de modelo: _____________________ Descripción del modelo: _________________ Para solicitar piezas de repuesto, llame al 1-800-659-7084 CUIDADO: Antes de utilizar este producto por primera vez, lea y observe todos los reglamentos de seguridad y las instrucciones de operación. Guarde este documento para referencia futura. Consulte el Dibujo de piezas de servicio para obtener un listado completo de las piezas de servicio QUINCALLERIA: Sears, Roebuck and Co., Hoffman Estates, IL 60179, EE.UU. F1850 2 NOTA: Ajuste la posición de la puerto para asegurar su funcionamiento óptimo antes de apretar los tornillos con una llave. C Coloque el soporte inferior sobre la aleta inferior de la unidad y fijelo a la parte de abajo del gabinete lateral (véase wl dibujo ampliado) usando dos tornillos hexagonales de 14-10 x 5/8. C Vuelva a colocar la manija al gabinete lateral siguiendo las instrucciones de instalación de la manija lateral. MONTAJE INSTALACION DEL BABINETE LATERAL: NOTA: Los corchetes y los topes que cuelgan se pueden montar a cualquier cara de la cabina. C Pegue la tira de caucho con respaldo de adhesive a lo largo del borde inferior del gabinete lateral. C Fije el soporte superior al gabinete lateral usando dos tornillo cabeza de botón de 14-10 x 5/8. C Cuelgue el gabinete lateral a la unidad. FIJACIÓN DEL ARMARIO LATERAL A LA UNIDAD: Antes de instalarlo, se debe quitar la manija. Si hubiera una caja instalada en el carro, primero se debe quitar la caja siguiendo las instrucciones de instalación de la misma o moverla a una posición que no obstruya wl acceso a la manija. Quite la manija siguiendo las instrucciones de instalación de la manija lateral. C Mediante la ayuda adecuada, cuelgue el armario lateral en la unidad. C Coloque la fijación inferior sobre el saliente inferior de la unidad y fíjela a la parte inferior del armario mediante tornillos hexagonales de 3/8-16 x 3/4". INSTRUCCIONES DE INSTALACIóN DE LA PUERTA REVERSIBLE: PARA INSTALAR LA PUERTA EN EL LADO OPUESTO: C Retire el conjunto de puerto y bisagra quintandos las tornillos de la bisagra. C Ponga la puerto con la parte de arriba hacia abajo y colóquela en el lado opuesto los mismos tornillos. 3 OPERACION RETIRO E INSTALACION DE LAS GAVETAS: C Vacíe el contenido de la gaveta. C Abra la gaveta del todo. C Suba la palanca de desenganche en el lado derecho, mientras oprime la palanca en el lado izquierdo y tire de la gaveta hacia afuera para quitarla. C Para volver a instalar, alinee con cuidado las correderas y empuje lentamente la gaveta en la unidad hasta que ésta se detenga. MANTENIMIENTO C Para las ruedecillas, use grasa de alta calidad para cojinetes, (una vez al año). C Lubrique las correderas, (dos veces al año). C Lubrique el seguro con grafito, (una vez al año). C Periódicamente se deben limpiar los frentes y las molduras de las gavetas, y otras superficies, con un detergente suave y agua. C La cera para autos preservará el acabado lustroso de las unidades de almacenaje. Aplique cera como a un auto. Esta también ayudará a proteger la unidad contra arañazos. C La grasa y el aceite se pueden eliminar con la mayoría de líquidos normales de limpieza. Por seguridad, utilice un líquido de limpieza no inflamable. C Si se suministran forros para gaveta, se recomienda usarlos para proteger el acabado dentro de las gavetas y facilitar la limpieza de las mismas. Los forros de gaveta se pueden limpiar con jabón y agua. QUITANDO E INSTALACIÓN DE DIAPOSITIVAS: NOTA: Para quitar la diapositiva de la unidad, primero quite el cajón. C Para quitar la corredera de la unidad, primero quite la gaveta (siga el procedimiento anterior). Suba y mantenga subido el retén flexible y empuje la corredera hacia la parte trasera de la unidad. Ahora se podrá quitar la corredera. C Para volver a instalar la corredera, ponga la corredera en la posición correcta en la unidad. Tire de ella hacia la parte delantera de la unidad hasta que el retén flexible encaje en su lugar y asegure la corredera. C Para la operación lisa, cerciórese de que los cajones estén correspondidos con con sus diapositivas del orginal. 4