1
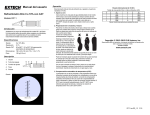
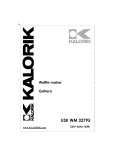
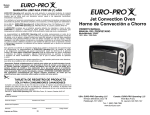
TABLE OF CONTENTS Important Safeguards....................................................................................................... 2 - 3 Additional Important Safeguards............................................................................................3 Notes on the Plug..................................................................................................................3 Notes on the Cord.................................................................................................................3 Getting to Know Your Waffle Stick Maker...............................................................................4 Before Using for the First Time...............................................................................................5 Introduction to Waffle Sticks...................................................................................................5 To Bake Waffle Sticks............................................................................................................6 Waffle Sticks Baking Tips.......................................................................................................6 User Maintenance Instructions...............................................................................................7 Care & Cleaning Instructions..................................................................................................7 Storing Instructions................................................................................................................7 Recipes............................................................................................................................ 8-11 Warranty...............................................................................................................................12 ÍNDICE Medidas de seguridad importantes......................................................................................13 Medidas de seguridad importantes adicionales....................................................................14 Notas sobre el cable............................................................................................................14 Notas sobre el enchufe........................................................................................................14 Datos sobre la máquina para hacer gofres bastón...............................................................15 Antes de usar el producto por primera vez...........................................................................16 Presentación de los gofres bastón.......................................................................................16 Para hornear gofres bastón..................................................................................................17 Sugerencias para hornear gofres bastón..............................................................................17 Instrucciones de mantenimiento para el usuario...................................................................18 Instrucciones de cuidado y limpieza.....................................................................................18 Instrucciones de almacenamiento........................................................................................18 Fórmulas........................................................................................................................ 19-23 Garantía...............................................................................................................................24 SO-309150_13575 BELLA Waffle Stick Maker IM Interior_R2.indd 1 12-07-16 9:38 AM IMPORTANT SAFEGUARDS WARNING: When using electrical appliances, basic safety precautions should always be followed, including the following: 1. Read all instructions before using appliance. 2. Do not touch hot surfaces. Use handles or knobs. 3. To protect against risk of electric shock, do not immerse or partially immerse the cord,plugs, or the entire unit in water or any other liquid. 4. This appliance is not intended for use by persons (including children) with reduced physical, sensory or mental capabilities, or lack of experience and knowledge, unless they have been given supervision or instruction concerning use of the appliance by a person responsible for their safety. 5. Close supervision is necessary when any appliance is used by or near children. 6. Unplug from wall outlet when not in use and before cleaning. Allow to cool before cleaning or storing this appliance. 7. Never yank the cord to disconnect the appliance from the outlet. Instead, grasp the plug and pull to disconnect. 8. Do not operate any appliance with a damaged cord or plug or after the appliance malfunctions, or has been damaged in any manner. Return appliance to the nearest authorized service facility for examination, repair or adjustment. 9. The use of accessories attachments not recommended by the appliance manufacturer may cause fire, electrical shock or injuries. 10. Do not use outdoors. This is for household only. 11. Do not use for commercial purposes. 12. Do not let the electrical cord hang over the edge of the table or counter, or touch hot surfaces. 13. Do not place on or near a hot gas or electric burner or in a heated oven. 14. Use on a heat-resistant, flat level surface only. 15. Extreme caution must be used when moving an appliance containing hot food, hot water, hot oil or other hot liquids. 16. This appliance has a polarized plug (one blade is wider than the other). To reduce the risk of electric shock, this plug is intended to fit into a polarized outlet only one way. If the plug does not fit fully into the outlet, reverse the plug. If it still does not fit, contact a qualified electrician. Do not attempt to modify the plug in any way. 17. The cord to this appliance should be plugged into a 120V AC electrical outlet only. 18. A short power-supply cord is to be provided to reduce the risk resulting from becoming entangled in or tripping over a longer cord. 19. Longer extension cords are available and may be used if care is exercised in their use. 20. If an extension cord is used: a. The marked electrical rating of the detachable power-supply cord or extension cord should be at least as great as the electrical rating of the appliance. b.If the appliance is of the grounded type, the extension cord should be a grounding type 3-wire cord. c. The longer cord should be arranged so that it will not drape over the counter top or table top where it can be pulled on by children or tripped over unintentionally. 21. To disconnect, remove plug from outlet. 22. Always unplug after use. The appliance will remain ON unless unplugged. 23. CAUTION HOT SURFACES: This appliance generates heat during use. Proper precautions must be taken to prevent the risk of burns, fire or other damage to persons or property. 24. When using this appliance, provide adequate ventilation above and on all sides for air circulation. Do not allow this appliance to touch curtains, wall coverings, clothing, dish towels or other flammable materials during use. 2 SO-309150_13575 BELLA Waffle Stick Maker IM Interior_R2.indd 2 12-07-16 9:38 AM 25. Use with wall receptacle only. 26. Do not use appliance for other than intended use. FOR HOUSEHOLD USE ONLY SAVE THESE INSTRUCTIONS Additional Important Safeguards CAUTION: This appliance is hot during operation and retains heat for some time after turning OFF. Always use oven mitts when handling hot materials and allow metal parts to cool before cleaning. Do not place anything on top of the appliance while it is operating or while it is hot. 1. All users of this appliance must read and understand this Instruction Manual before operating or cleaning this appliance. 2. Do not leave this appliance unattended during use. Notes on the Plug This appliance has a polarized plug (one blade is wider than the other). To reduce the risk of electric shock, this plug will fit in a polarized outlet only one way. If the plug does not fit fully into the outlet, reverse the plug. If it still does not fit, contact a qualified electrician. Do not modify the plug in any way. Notes on the Cord The provided short power-supply cord (or detachable power-supply cord) should be used to reduce the risk resulting from becoming entangled in or tripping over a longer cord. Plasticizer Warning CAUTION: To prevent Plasticizers from migrating to the finish of the counter top or table top or other furniture, place NON-PLASTIC coasters or place mats between the appliance and the finish of the counter top or table top. Failure to do so may cause the finish to darken; permanent blemishes may occur or stains can appear. Electric Power If the electrical circuit is overloaded with other appliances, your appliance may not operate properly. It should be operated on a separate electrical circuit from other appliances. 3 SO-309150_13575 BELLA Waffle Stick Maker IM Interior_R2.indd 3 12-07-16 9:38 AM GETTING TO KNOW YOUR waffle stick MAKER Product may vary slightly from illustrations. Figure 1 Lid Handle with Locking Latch Lid Non-Stick Upper and Lower Cooking Plates with 6 Waffle Stick Molds Polarized Plug Non-skid Feet (Not Shown) Figure 1A Orange POWER ON Light Green READY Light 4 SO-309150_13575 BELLA Waffle Stick Maker IM Interior_R2.indd 4 12-07-16 9:38 AM Before Using for the First Time 1. 2. 3. Carefully unpack the waffle maker and remove all packaging and materials. Before using your Waffle Stick Maker for the first time, wipe the cooking plates with a damp cloth to remove all dust, and then dry. Wipe outer surfaces with a slightly damp, soft cloth or sponge. CAUTION: Take care to prevent water from running into the appliance. NEVER IMMERSE WAFFLE STICK MAKER BODY IN WATER OR ANY OTHER LIQUIDS! Set the appliance on a dry, clean and flat surface. Keep the Waffle Stick Maker closed until use. To Bake Waffle Sticks 1. 2. Lift the top lid to the open position. Before baking the first waffle sticks of the day, brush the upper and lower cooking plates with vegetable oil, spread with an absorbent kitchen towel and wipe the excess oil. Close the lid. 3. Plug unit into a 120V AC electrical outlet. The orange POWER ON light will illuminate as the Waffle Stick Maker preheats. NOTE: When your Waffle Stick Maker is heated for the first time, it may emit slight smoke or odor. This is normal and should disappear after 1 or 2 uses. This does not affect the safety of the appliance. However, as it may affect the flavor of the first waffle sticks prepared in the Waffle Stick Maker, it is recommended that these be discarded. 4. While preheating, prepare waffle batter. 5. After approximately 3 to 4 minutes, the green READY light will illuminate, indicating the unit is preheated and is ready for use. 6. IMPORTANT: Never use non-stick cooking spray on the non-stick plates as this will cause residue buildup on your plates. 7. Recipes will vary in cook time and brownness; batters with more sugar will brown quicker. Note the perfect bake times for each batter recipe for future use. 8. Depending on the batter, pour 1/2 to 3/4 cup waffle batter onto the center of the lower cooking plate. If necessary, spread slightly to fill the entire area. Try not to overfill, batter will expand when cooked. 9. Using the handle, close the lid. The handle latch will lock the lid into place. 10. Allow the Waffle Stick Maker to bake for 3 to 4 minutes, according to recipe directions. NOTE: The green READY light will cycle on and off as the unit maintains baking temperatures. 11. Wipe the outside with a clean paper towel or cleaning cloth as necessary. 12. At the end of the cook time, lift the top lid gently; if it pulls, continue cooking for 30 seconds and test again. If the waffle sticks need to bake to a darker finish, close the lid and continue baking until the desired color is achieved. 13. Remove waffle sticks from the cooking plates using a wooden or plastic spatula. CAUTION: To avoid damage to the non-stick surface, never use any sharp, pointed or metal objects. WARNING: Cooking surfaces are hot, do not touch; use caution until cooking plates are cool. NOTE: If additional waffle sticks are to be baked, keep the Waffle Stick Maker closed to retain heat. Always wait until the green READY light illuminates before baking more waffle sticks. NOTE: Waffle sticks made later will bake faster because extra heat has been retained. It may be necessary to adjust to a shorter cooking time to accommodate. 14. When baking is complete, after waffle sticks have been removed, unplug the power cord from electric outlet. Lift the top lid to expose the cooking plates and allow unit to cool. 15. Do not clean until unit has been fully cooled. 5 SO-309150_13575 BELLA Waffle Stick Maker IM Interior_R2.indd 5 12-07-16 9:38 AM Waffle Sticks Baking Tips • • • • • • • • Do not open the Waffle Stick Maker during the first minute of baking or the waffle will separate. Completely bake the waffle before removing. When waffle sticks are done, the top lid should lift easily. Lift gently; if it pulls, continue cooking for 1 minute and test again. When preparing waffle batter, do not over-mix or waffle sticks will be tough. Stir batter only until large lumps of dry ingredients disappear. The optimal amount of batter to produce a full-shaped waffle, without overflowing, will vary with different waffle batters. For more evenly shaped waffle sticks, spread thick batters to the outer edge of the lower cooking plate using a heat-proof rubber spatula or other non-metallic utensil before closing the lid. To retain crispness, move baked waffle sticks to a paper napkin or a wire cooling rack to absorb any condensation. To keep waffle sticks hot, place in an ovenproof dish on an oven rack and warm at about 200-250°F (90-120°C). Waffles sticks will keep for about 15 minutes before they begin to dry out. Cooled waffle sticks can be re-warmed and re-crisped individually by returning to hot Waffle Stick Maker. Place waffle sticks on lower cooking plate to match molds; close lid and heat for 1 minute, watching carefully to prevent burning. Baked waffle sticks freeze well. Cool waffle sticks completely on a wire rack. Store in a plastic freezer bag or in a covered container, separating each waffle stick with wax paper. Reheat frozen waffle sticks in a toaster oven or oven, until hot and crisp. 6 SO-309150_13575 BELLA Waffle Stick Maker IM Interior_R2.indd 6 12-07-16 9:38 AM USER MAINTENANCE INSTRUCTIONS This appliance requires little maintenance. It contains no user serviceable parts. Do not try to repair it yourself. Contact a qualified appliance repair technician if the product requires servicing. Care & Cleaning Instructions CAUTION: Unplug from electrical outlet and allow to cool thoroughly before cleaning or storing. 1. The Waffle Stick Maker does not disassemble for cleaning. 2. Never immerse appliance in water or other liquids. Never place Waffle Stick Maker in dishwasher. 3. The waffle stick cooking plates should be cleaned and conditioned before each heating. 4. Brush cooking plates with a clean, soft pastry brush or cloth. To condition plates, lightly coat the cooking surfaces with solid vegetable shortening or vegetable oil. Carefully follow suggested cleaning procedures below. After a time, if waffle sticks show signs of sticking, recondition as needed. 5. To protect the non-stick surfaces, use only plastic, nylon or wooden utensils. 6. To remove any batter baked onto the cooking plates, pour a small amount of cooking oil onto the hardened batter. Allow to set for 5 minutes, then wipe softened batter off with a paper towel or soft cloth. Remove stubborn stains with a plastic mesh puff or pad. For best results, use only products with directions stating they are safe for cleaning non-stick cooking surfaces. Do not use steel wool or coarse scouring pads. 7. The exterior finish should be cleaned with a non-abrasive cleaner and a soft, damp cloth. Dry thoroughly. Storing Instructions 1. 2. 3. 4. Make sure unit is unplugged and fully cooled. WARNING: Never store Waffle Stick Maker while it is hot or still plugged in. Use the cord wrap on the bottom of the Waffle Stick Maker to store the cord. Do not place any stress on cord where it enters unit, as this could cause cord to fray and break. Store Waffle Stick Maker in its box, in a cool dry area. 7 SO-309150_13575 BELLA Waffle Stick Maker IM Interior_R2.indd 7 12-07-16 9:38 AM RECETAS Strawberry Waffle Sticks 4 tablespoons strawberry preserves 6 tablespoons unsalted butter 2 large eggs 1/2 cup milk 1 (6 oz) strawberry yogurt 1/2 teaspoon pure vanilla extract 1 cup all-purpose flour 3 tablespoons cornstarch 2 tablespoons granulated sugar 1 tablespoon baking powder 1. Place butter and preserves in a microwave-safe bowl. Heat on HIGH power for 1 minute. Remove from oven and stir. Cut solid remaining butter into smaller pieces and mix. Set aside, allow to cool. 2. In a medium bowl, combine dry ingredients and whisk to combine. 3. In a small bowl, combine liquid ingredients and (not hot) melted butter mixture. Whisk to combine. 4. Pour the liquid ingredients into the dry. Whisk together until just mixed. Batter should be thick, but pourable. Add milk to thin batter if necessary. 5. Pour a scant 3/4 cup batter into the center of the waffle plate. Use a knife to spread batter to all corners of the mold. Bake waffle sticks for 3 to 4 minutes or until golden brown. 5. Repeat with remaining batter. Dip these precious waffle sticks in strawberry sauce. Enjoy with fresh strawberries and whipped cream. Serve with your favorite ice cream, whipped cream or chocolate sauce. 8 SO-309150_13575 BELLA Waffle Stick Maker IM Interior_R2.indd 8 12-07-16 9:39 AM Chocolate Waffle Sticks 6 tablespoons unsalted butter, melted 2 large eggs 1 cup buttermilk 1/2 teaspoon pure vanilla extract 1 tablespoon dark corn syrup 1 cup all-purpose flour 3 tablespoons cornstarch 3/4 cup granulated sugar 1/2 cup cocoa 1 tablespoon baking powder 6 tablespoons mini chocolate chips 1. Place butter in a microwave-safe bowl. Heat on HIGH power for 1 minute. Remove from oven and stir. Cut solid remaining butter into smaller pieces and mix. Set aside, allow to cool. 2. In a medium bowl, combine dry ingredients and whisk to combine. 3. In a small bowl, combine liquid ingredients and (not hot) melted butter. Whisk to combine. 2. Pour the liquid ingredients into the dry. Whisk together until just mixed. Batter should be thick, but pourable. Add buttermilk to thin batter if necessary. 4. Pour a scant 3/4 cup batter into the center of the waffle plate. Use a knife to spread batter to all corners of the mold. Bake waffle sticks for 3 to 4 minutes or until golden brown. 5. Repeat with remaining batter. 9 SO-309150_13575 BELLA Waffle Stick Maker IM Interior_R2.indd 9 12-07-16 9:39 AM Orange Craisins® and Pecan Waffles 3 eggs 1 cup milk 1/2 cup fresh orange juice 1/2 cup vegetable oil 1 teaspoon orange extract 1-3/4 cups all-purpose flour 2 teaspoons baking powder 1/2 teaspoon salt 4 tablespoons orange marmalade 2 tablespoons sugar 1 cup craisins® (sweetened dried cranberries) 1 cup chopped pecans zest of 1 orange 1. Sift all dry ingredients together in a large bowl, 2. In a small bowl, combine liquid ingredients. Whisk to combine. 3. Pour the liquid ingredients into the dry. Whisk together until just mixed. Batter should be thick, but pourable. Add orange juice to thin batter if necessary. 4. Pour a scant 3/4 cup batter into the center of the waffle plate. Use a knife to spread batter to all corners of the mold. Bake waffle sticks for 3 to 4 minutes or until golden brown. 4. Repeat with remaining batter. 10 SO-309150_13575 BELLA Waffle Stick Maker IM Interior_R2.indd 10 12-07-16 9:39 AM Whole Wheat Banana Waffle Sticks 1 cup all-purpose flour 2 teaspoons baking powder 1/2 teaspoon salt 2 eggs 4 tablespoons maple syrup 1 teaspoon vanilla 1-1/2 cups buttermilk 1/4 cup butter, melted 2 medium bananas, mashed 1. Sift all dry ingredients together in a large bowl, 2. In a small bowl, combine liquid ingredients. Whisk to combine. 3. Pour the liquid ingredients into the dry. Whisk together until just mixed. Batter should be thick, but pourable. Add buttermilk to thin batter if necessary. 4. Pour a scant 3/4 cup batter into the center of the waffle plate. Use a knife to spread batter to all corners of the mold. Bake waffle sticks for 3 to 4 minutes or until golden brown. 5. Repeat with remaining batter. –––––––––––––––––––––––––––––––––––––––––––––––––––––––––––––––––– Peanut Butter Waffles Sticks 1 cup all-purpose flour 2 teaspoons baking powder 1/2 teaspoon salt 2 tablespoons brown sugar 1/2 cup peanut butter (smooth or crunchy) 2 tablespoons dark corn syrup 1/2 teaspoon vanilla 1 egg 1 cup milk 1/2 tablespoon vegetable oil 1. Sift all dry ingredients together in a large bowl, 2. Use a hand mixer to combine peanut butter with liquid ingredients. 3. Pour the liquid ingredients into the dry. Whisk together until just mixed. Batter should be thick, but pourable. Add milk to thin batter if necessary. 4. Pour a scant 3/4 cup batter into the center of the waffle plate. Use a knife to spread batter to all corners of the mold. Bake waffle sticks for 3 to 4 minutes or until golden brown. 5. Repeat with remaining batter. 11 SO-309150_13575 BELLA Waffle Stick Maker IM Interior_R2.indd 11 12-07-16 9:39 AM LIMITED ONE-YEAR WARRANTY SENSIO Inc. hereby warrants that for a period of ONE YEAR from the date of purchase, this product will be free from mechanical defects in material and workmanship, and for 90 days in respect to non-mechanical parts. At its sole discretion, SENSIO Inc. will either repair or replace the product found to be defective, or issue a refund on the product during the warranty period. Any refund to the customer will be at a pro-rated value based on the remaining period of the warranty. The warranty is only valid for the original retail purchaser from the date of initial retail purchase and is not transferable. Keep the original sales receipt, as proof of purchase is required to obtain warranty validation. Retail stores selling this product do not have the right to alter, modify, or in any way revise the terms and conditions of the warranty. EXCLUSIONS: The warranty does not cover normal wear of parts or damage resulting from any of the following: negligent use of the product, use of improper voltage or current, improper routine maintenance, use contrary to the operating instructions, disassembly, repair, or alteration by anyone other than qualified SENSIO Inc. personnel. Also, the warranty does not cover Acts of God such as fire, floods, hurricanes, or tornadoes. SENSIO Inc. shall not be liable for any incidental or consequential damages caused by the breach of any express or implied warranty. Apart from the extent prohibited by applicable law, any implied warranty of merchantability or fitness for a particular purpose is limited in time to the duration of the warranty. Some states, provinces or jurisdictions do not allow the exclusion or limitation of incidental or consequential damages, or limitations on how long an implied warranty lasts, and therefore, the above exclusions or limitations may not apply to you. The warranty covers specific legal rights which may vary by state, province and/or jurisdiction. HOW TO OBTAIN WARRANTY SERVICE: You must contact Customer Service at our toll-free number: 1-866-832-4843. A Customer Service Representative will attempt to resolve warranty issues over the phone. If the Customer Service Representative is unable to resolve the problem, you will be provided with a case number and asked to return the product to SENSIO Inc. Attach a tag to the product that includes: your name, address, daytime contact telephone number, case number, and description of the problem. Also, include a copy of the original sales receipt. Carefully package the tagged product with the sales receipt, and send it (with shipping and insurance prepaid) to SENSIO Inc.’s address. SENSIO Inc. shall bear no responsibility or liability for the returned product while in transit to SENSIO Inc.’s Customer Service Center. 12 SO-309150_13575 BELLA Waffle Stick Maker IM Interior_R2.indd 12 12-07-16 9:39 AM MEDIDAS DE SEGURIDAD IMPORTANTES Cada vez que utilice artefactos eléctricos, tenga en cuenta las precauciones de seguridad básicas, incluidas las siguientes: 1. LEA TODAS LAS INSTRUCCIONES ANTES DE USAR EL ARTEFACTO. 2. El cable de este artefacto debe enchufarse únicamente a un tomacorriente eléctrico de 120 V de CA. 3. A fin de evitar descargas eléctricas, no sumerja el cable, el enchufe ni la unidad de cocción en agua u otros líquidos. 4. No toque las superficies calientes. Use los mangos. 5. Este artefacto no debe ser usado por personas (incluidos los niños) con capacidades físicas, sensoriales o mentales reducidas, o personas sin experiencia ni conocimiento, a menos que sean supervisadas o hayan recibido instrucciones sobre el uso del artefacto de parte de una persona responsable de su seguridad. 6. Se debe supervisar a los niños para asegurarse de que no jueguen con el artefacto. 7. Desenchufe el artefacto del tomacorriente de pared cuando no lo use o antes de limpiarlo. Antes de limpiar o guardar este artefacto, espere a que se enfríe. 8. Nunca jale con fuerza del cable para desconectar la unidad de cocción del tomacorriente; en cambio, tome el enchufe y tire para desconectarlo. 9. No utilice ningún artefacto si presenta un cable dañado. No utilice este artefacto si la unidad se ha averiado, se ha caído o se ha dañado de algún modo. Devuelva el artefacto al centro de servicio autorizado más cercano para que lo examinen, reparen o hagan ajustes eléctricos o mecánicos. 10. El uso de accesorios no recomendados por el fabricante del artefacto puede ocasionar incendios, descargas eléctricas o lesiones. 11. No lo use en exteriores o con fines comerciales. 12. No use este artefacto para ningún otro fin que no sea para el que fue diseñado. 13. No permita que el cable eléctrico cuelgue por el borde de la mesa o encimera, ni toque las superficies calientes. 14. No lo coloque sobre quemadores de gas o eléctricos calientes ni cerca de ellos, ni dentro de un horno caliente. 15. Úselo únicamente sobre una superficie plana, nivelada y resistente al calor. 16. Tenga extremo cuidado cuando traslade cualquier artefacto que contenga alimento, agua, aceite u otros líquidos calientes. 17. Para desconectarlo, quite el enchufe del tomacorriente. 18. Siempre desenchúfelo luego de usarlo. El artefacto permanecerá ENCENDIDO, a menos que se lo desenchufe. 19. PRECAUCIÓN. SUPERFICIES CALIENTES: Este artefacto genera calor durante el uso. Deben tomarse las precauciones adecuadas para evitar el riesgo de quemaduras, incendios u otros daños a las personas o la propiedad. 20. Cuando use este artefacto, procure que haya una ventilación adecuada por encima de él y a los lados, para que circule el aire. No permita que este artefacto tenga contacto con cortinas, revestimientos de pared, ropa, paños de cocina u otros materiales inflamables durante el uso. 21. Úselo únicamente con un tomacorriente de pared. PARA USO DOMÉSTICO ÚNICAMENTE GUARDE ESTAS INSTRUCCIONES 13 SO-309150_13575 BELLA Waffle Stick Maker IM Interior_R2.indd 13 12-07-16 9:39 AM MEDIDAS DE SEGURIDAD IMPORTANTES ADICIONALES PRECAUCIÓN: Este artefacto está caliente durante el uso y permanece caliente algún tiempo luego de apagarlo. Siempre use manoplas para horno cuando manipule materiales calientes y deje enfriar las piezas metálicas antes de limpiarlas. No coloque ningún objeto sobre el artefacto cuando este está en uso o mientras está caliente. 1. Todos los usuarios de este artefacto deben leer y comprender este manual de instrucciones antes de usar o limpiar esta máquina para hacer pizza. 2. No deje este artefacto sin supervisión durante el uso. NOTAS SOBRE EL CABLE Se aconseja usar el cable de alimentación corto que aquí se incluye (o cable de alimentación separable) para evitar enredarse o tropezarse con un cable más largo. No utilice un cable de extensión con este producto. NOTAS SOBRE EL ENCHUFE Este artefacto cuenta con un enchufe polarizado (una clavija es más ancha que las otras). Para evitar descargas eléctricas, el enchufe entrará en el tomacorriente polarizado de una sola manera. Si el enchufe no entra por completo en el tomacorriente, dé vuelta el enchufe. Si de esta manera tampoco entra, comuníquese con un electricista calificado. No modifique el enchufe de ningún modo. ADVERTENCIA SOBRE LOS PLASTIFICANTES PRECAUCIÓN: Para evitar que se transfieran sustancias plastificantes a la superficie de la encimera, la mesa o cualquier otro mueble, coloque posavasos o manteles individuales QUE NO SEAN DE PLÁSTICO entre el artefacto y la superficie de la encimera o la mesa. De lo contrario, la superficie podría oscurecerse y podrían aparecer manchas permanentes. ALIMENTACIÓN ELÉCTRICA Si el circuito eléctrico está sobrecargado con otros artefactos, es posible que el artefacto no funcione correctamente. Debe utilizarse en un circuito eléctrico separado del que está ocupado con otros artefactos. 14 SO-309150_13575 BELLA Waffle Stick Maker IM Interior_R2.indd 14 12-07-16 9:39 AM DATOS SOBRE LA MÁQUINA PARA HACER GOFRES BASTÓN El producto puede diferir levemente de las ilustraciones. Figura 1 Mango de la tapa con pestillo de bloqueo Tapa Platos de cocción superior e inferior antiadherentes con 6 moldes para gofres bastón Enchufe polarizado Patas antideslizantes (no se muestran) Figura 1A Luz anaranjada de ENCENDIDO Luz verde de LISTO 15 SO-309150_13575 BELLA Waffle Stick Maker IM Interior_R2.indd 15 12-07-16 9:39 AM Antes de usar el producto por primera vez 1. 2. 3. Desempaque cuidadosamente la gofrera y extraiga todos los embalajes y materiales. Antes de usar la máquina para hacer gofres bastón por primera vez, limpie los platos de cocción con un paño húmedo para eliminar todo el polvo y, luego, séquelos. Limpie las superficies externas con un paño suave o una esponja apenas húmedos. PRECAUCIÓN: Tenga cuidado para evitar que el agua ingrese al artefacto. NUNCA SUMERJA EL CUERPO DE LA MÁQUINA PARA HACER GOFRES BASTÓN EN AGUA U OTROS LÍQUIDOS. Coloque el artefacto sobre una superficie, seca, limpia y plana. Mantenga la máquina para hacer gofres bastón cerrada hasta usarla. Para hornear gofres bastón 1. 2. 3. 4. 5. 6. 7. 8. 9. 10. 11. 12. 13. Levante la tapa hasta abrirla. Antes de hornear los primeros gofres bastón del día, agregue aceite vegetal en los platos de cocción superior e inferior con una brocha, desparrame el aceite con un paño de cocina absorbente y limpie cualquier exceso. Cierre la tapa. Enchufe la unidad a un tomacorriente eléctrico de 120 V de CA. La luz anaranjada de ENCENDIDO se ilumina mientras la máquina para hacer gofres bastón se precalienta. NOTA: Cuando la máquina para hacer gofres bastón se calienta por primera vez, es posible que emita un leve humo u olor. Esto es normal y debe cesar luego de 1 o 2 usos. De ningún modo afecta la seguridad del artefacto. No obstante, dado que puede afectar el sabor de los primeros gofres bastón que se preparan en la máquina para hacer gofres bastón, se recomienda desechar estos últimos. Mientras se precalienta la máquina, prepare la masa. Luego de aproximadamente 3 a 4 minutos, la luz verde de LISTO se iluminará, lo que indicará que la unidad está precalentada y lista para usarse. IMPORTANTE: Nunca aplique un aerosol antiadherente para cocinar en los platos antiadherentes, ya que esto podría facilitar la acumulación de residuos en ellos. El tiempo de cocción y el oscurecimiento variarán según las fórmulas; las masas que contienen más azúcar se dorarán más rápido. Anote los tiempos de horneado perfectos de cada fórmula de masa para usarlos en el futuro. Dependiendo de la masa, vierta 1/2 a 3/4 de taza de masa para gofres en el centro del plato de cocción inferior. Si es necesario, desparrame levemente la masa para ocupar el área en su totalidad. Trate de no llenar el área en exceso, ya que la masa se expandirá cuando se cocine. Con el mango, cierre la tapa. El pestillo del mango trabará la tapa correctamente. Permita que la máquina para hacer gofres bastón cocine durante 3 o 4 minutos, de acuerdo con las instrucciones de la fórmula. NOTA: La luz verde de LISTO se encenderá intermitentemente mientras la unidad mantiene las temperaturas de horneado. Limpie la parte externa con una servilleta de papel limpia o un paño de limpieza según sea necesario. Cuando finalice el tiempo de cocción, levante la tapa cuidadosamente. Si siente que esta tira, permita que la cocción continúe durante 30 segundos y pruebe nuevamente. Si los gofres bastón deben hornearse para adquirir una terminación más oscura, cierre la tapa y permita que se cocinen hasta alcanzar el color deseado. Extraiga los gofres bastón de los platos de cocción con una espátula de madera o plástico. PRECAUCIÓN: Para evitar ocasionar daños a la superficie no adherente, nunca use objetos afilados, puntiagudos ni metálicos. ADVERTENCIA: Las superficies de cocción están calientes: no las toque. Sea precavido hasta que los platos se enfríen. 16 SO-309150_13575 BELLA Waffle Stick Maker IM Interior_R2.indd 16 12-07-16 9:39 AM NOTA: Si horneará gofres bastón adicionales, mantenga la máquina para hacer gofres bastón cerrada para mantener el calor. Siempre espere hasta que se ilumine la luz verde de LISTO antes de hornear más gofres bastón. NOTA: Los gofres bastón que cocine más tarde se hornearán más rápido, ya que la máquina retuvo calor adicional. Es posible que sea necesario disminuir el tiempo de cocción para compensar. 14. Cuando finalice el horneado y luego de extraer los gofres bastón, desenchufe el cable de alimentación del tomacorriente eléctrico. Levante la tapa para exponer los platos de cocción y permita que la unidad se enfríe. 15. No limpie la unidad hasta que se haya enfriado por completo. Sugerencias para hornear gofres bastón • • • • • • • • No abra la máquina para hacer gofres bastón durante el primer minuto de horneado o el gofre se partirá. Hornee completamente el gofre antes de extraerlo. Cuando los gofres bastón estén listos, la tapa debería abrirse sin problemas. Levántela cuidadosamente; si siente que tira, permita que la cocción continúe durante 1 minuto y pruebe nuevamente. Cuando prepare la masa para gofres, no la mezcle en exceso o los gofres bastón se endurecerán. Mezcle la masa hasta eliminar los grumos grandes de ingredientes secos. La cantidad óptima de masa para producir un gofre de tamaño completo, sin desbordar el plato, variará de acuerdo con las diferentes masas para gofres. Para obtener gofres bastón más uniformes, desparrame masas finas hacia el borde externo del plato de cocción inferior mediante una espátula de goma resistente a altas temperaturas u otro utensilio no metálico antes de cerrar la tapa. Para conservar los gofres bastón crocantes, trasládelos a una servilleta de papel o a una rejilla de alambre para enfriamiento, a fin de absorber las condensaciones. Para mantener los gofres bastón calientes, colóquelos en un plato de horno o en una rejilla de horno y caliéntelos a una temperatura aproximada de 90 °C a 120 °C (200 °F a 250 °F). Los gofres bastón se mantendrán frescos durante aproximadamente 15 minutos y luego comenzarán a secarse. Los gofres bastón fríos pueden recalentarse y retostarse individualmente si los vuelve a colocar en la máquina para hacer gofres bastón caliente. Coloque los gofres bastón en el plato de cocción inferior de modo que los moldes coincidan; cierre la tapa y caliente durante 1 minuto; observe atentamente para evitar que se quemen. Los gofres bastón horneados se conservan bien congelados. Permita que los gofres bastón se enfríen por completo en una rejilla de alambre. Almacénelos en una bolsa plástica para congelador o en un envase cubierto, y separe cada gofre bastón con papel de cera. Recaliente los gofres bastón congelados en un horno tostador o un horno común, hasta que estén calientes y crocantes. 17 SO-309150_13575 BELLA Waffle Stick Maker IM Interior_R2.indd 17 12-07-16 9:39 AM INSTRUCCIONES DE MANTENIMIENTO PARA EL USUARIO Este artefacto necesita poco mantenimiento. No contiene piezas que el usuario pueda reparar. No intente repararlo usted mismo. Comuníquese con un técnico de reparación de artefactos calificado si el producto necesita servicio de mantenimiento. INSTRUCCIONES DE CUIDADO Y LIMPIEZA PRECAUCIÓN: Desenchufe el artefacto del tomacorriente eléctrico y permita que se enfríe por completo antes de limpiarlo o almacenarlo. 1. La máquina para hacer gofres bastón no se desarma para limpiarla. 2. Nunca sumerja el artefacto en agua u otros líquidos. Nunca coloque la máquina para hacer gofres bastón en el lavavajillas. 3. Los platos de cocción de gofres bastón deben limpiarse y acondicionarse antes de ser calentados. 4. Cepille los platos de cocción con una brocha de pastelería o un paño suaves y limpios. Para acondicionar los platos, aplique una fina capa de margarina sólida o aceite vegetal sobre las superficies de cocción. Siga minuciosamente los procedimientos de limpieza sugeridos a continuación. Luego de un tiempo, si los gofres bastón muestran indicios de adherencia, reacondicione la máquina para hacer gofres bastón, según sea necesario. 5. Para proteger las superficies antiadherentes, use únicamente utensilios de plástico, nilón o madera. 6. Para eliminar la masa que se horneó en los platos de cocción, vierta una pequeña cantidad de aceite comestible sobre la masa endurecida. Permita que se asiente durante 5 minutos; luego, limpie la masa ablandada con una servilleta de papel o un paño suave. Quite las manchas difíciles con una esponja de malla o una almohadilla plásticas. Para obtener mejores resultados, use únicamente productos cuyas instrucciones indiquen que son seguros para limpiar las superficies de cocción antiadherentes. No use lana de acero ni esponjas desengrasantes gruesas. 7. El acabado externo debe limpiarse con un limpiador no abrasivo y un paño suave y húmedo. Seque el artefacto minuciosamente. INSTRUCCIONES DE ALMACENAMIENTO 1. 2. 3. 4. Procure que la unidad esté desenchufada y se haya enfriado por completo. ADVERTENCIA: Nunca almacene la máquina para hacer gofres bastón si está caliente o enchufada. Use la envoltura del cable que está en la parte inferior de la máquina para hacer gofres bastón para almacenar el cable. No tense el cable en el punto donde se conecta con la unidad, ya que podría pelarse -o romperse. Guarde la máquina para hacer gofres bastón en un lugar fresco y seco. 18 SO-309150_13575 BELLA Waffle Stick Maker IM Interior_R2.indd 18 12-07-16 9:39 AM RECETAS GOFRES BASTÓN DE FRESA 4 cucharadas de mermelada de fresa 6 cucharadas de mantequilla sin sal 2 huevos grandes 1/2 taza de leche 1 (6 oz) yogurt de fresa 1/2 cucharadita de esencia de vainilla pura 1 taza de harina común 3 cucharadas de almidón de maíz 2 cucharadas de azúcar granulada 1 cucharada de polvo de hornear 1. Coloque la mantequilla y la mermelada en un recipiente apto para horno de microondas. Caliente en potencia ALTA durante 1 minuto. Retire del horno y revuelva. Corte el trozo restante de mantequilla en pequeños pedazos y mezcle. Deje aparte y permita que se enfríe. 2. En un recipiente mediano, mezcle los ingredientes secos y bátalos hasta que se unan. 3. En un recipiente pequeño, mezcle los ingredientes líquidos con la preparación de mantequilla derretida (no debe estar caliente). Bata hasta unir. 4. Vierta los ingredientes líquidos sobre los secos. Proceda a batir hasta unirlos. La masa debe ser firme, pero su consistencia debe permitir el vertido. Agregue leche para hacer la masa menos espesa, si fuera necesario. 5. Vierta apenas 3/4 de taza de masa en el centro del plato para gofres. Con un cuchillo, desparrame la masa hacia todas las esquinas del molde. Hornee los gofres bastón durante 3 o 4 minutos, o hasta que se doren. 5. Repita el procedimiento con el resto de la masa. Unte estos lindos gofres bastón con salsa de fresa. 19 SO-309150_13575 BELLA Waffle Stick Maker IM Interior_R2.indd 19 12-07-16 9:39 AM GOFRES BASTÓN DE CHOCOLATE 6 cucharadas de mantequilla sin sal, derretida 2 huevos grandes 1 taza de suero de mantequilla 1/2 cucharadita de esencia de vainilla pura 1 cucharada de jarabe de maíz oscuro 1 taza de harina común 3 cucharadas de almidón de maíz 3/4 taza de azúcar granulada 1/2 taza de cacao 1 cucharada de polvo de hornear 6 cucharadas de chispitas de chocolate 1. Coloque la mantequilla en un recipiente apto para horno de microondas. Caliente en potencia ALTA durante 1 minuto. Retire del horno y revuelva. Corte el trozo restante de mantequilla en pequeños pedazos y mezcle. Deje aparte y permita que se enfríe. 2. En un recipiente mediano, mezcle los ingredientes secos y bátalos hasta que se unan. 3. En un recipiente pequeño, mezcle los ingredientes líquidos con la mantequilla derretida (no debe estar caliente). Bátalos hasta unirlos. 2. Vierta los ingredientes líquidos sobre los secos. Proceda a batir hasta unirlos. La masa debe ser firme, pero su consistencia debe permitir el vertido. Agregue suero de mantequilla para hacer la masa menos espesa, si fuera necesario. 4. Vierta apenas 3/4 de taza de masa en el centro del plato para gofres. Con un cuchillo, desparrame la masa hacia todas las esquinas del molde. Hornee los gofres bastón durante 3 o 4 minutos, o hasta que se doren. 5. Repita el procedimiento con el resto de la masa. 20 SO-309150_13575 BELLA Waffle Stick Maker IM Interior_R2.indd 20 12-07-16 9:39 AM GOFRES CRAISINS® DE NARANJA Y NUEZ 3 huevos 1 taza de leche 1/2 taza de jugo de naranja natura 1/2 taza de aceite vegetal 1 cucharadita de esencia de naranja 1-3/4 tazas de harina común 2 cucharaditas de polvo de hornear 1/2 cucharadita de sal 4 cucharadas de mermelada de naranja 2 cucharadas de azúcar 1 taza de craisins® (arándanos secos dulces) 1 taza de nueces picadas Ralladura de 1 naranja 1. Pase por el tamiz todos los ingredientes secos en un recipiente grande. 2. En un recipiente pequeño, mezcle los ingredientes líquidos. Bata hasta unir. 3. Vierta los ingredientes líquidos sobre los secos. Proceda a batir hasta unirlos. La masa debe ser firme, pero su consistencia debe permitir el vertido. Agregue jugo de naranja para hacer la masa menos espesa, si fuera necesario. 4. Vierta apenas 3/4 de taza de masa en el centro del plato para gofres. Con un cuchillo, desparrame la masa hacia todas las esquinas del molde. Hornee los gofres bastón durante 3 o 4 minutos, o hasta que se doren. 4. Repita el procedimiento con el resto de la masa. 21 SO-309150_13575 BELLA Waffle Stick Maker IM Interior_R2.indd 21 12-07-16 9:39 AM GOFRES BASTÓN DE TRIGO INTEGRAL Y BANANA 1/2 taza de harina de trigo integral 1 taza de harina común 2 cucharaditas de polvo de hornear 1/2 cucharadita de sal 2 huevos 4 cucharadas de jarabe de arce 1 cucharadita de esencia de vainilla 1-1/2 tazas de suero de mantequilla 1/4 taza de mantequilla, derretida 2 bananas medianas, pisadas 1. Pase por el tamiz todos los ingredientes secos en un recipiente grande. 2. En un recipiente pequeño, mezcle los ingredientes líquidos. Bata hasta unir. 3. Vierta los ingredientes líquidos sobre los secos. Proceda a batir hasta unirlos. La masa debe ser firme, pero su consistencia debe permitir el vertido. Agregue suero de mantequilla para hacer la masa menos espesa, si fuera necesario. 4. Vierta apenas 3/4 de taza de masa en el centro del plato para gofres. Con un cuchillo, desparrame la masa hacia todas las esquinas del molde. Hornee los gofres bastón durante 3 o 4 minutos, o hasta que se doren. 5. Repita el procedimiento con el resto de la masa. 22 SO-309150_13575 BELLA Waffle Stick Maker IM Interior_R2.indd 22 12-07-16 9:39 AM GOFRES BASTÓN DE MANTECA DE CACAHUETE 1 taza de harina común 2 cucharaditas de polvo de hornear 1/2 cucharadita de sal 2 cucharadas de azúcar rubia 1/2 taza de manteca de cacahuete (suave o con grumos) 2 cucharadas de jarabe de maíz oscuro 1/2 cucharadita de esencia de vainilla 1 huevo 1 taza de leche 1/2 cucharada de aceite vegetal 1. Pase por el tamiz todos los ingredientes secos en un recipiente grande. 2. Con un batidor manual, mezcle la manteca de cacahuete con los ingredientes líquidos. 3. Vierta los ingredientes líquidos sobre los secos. Proceda a batir hasta unirlos. La masa debe ser firme, pero su consistencia debe permitir el vertido. Agregue leche para hacer la masa menos espesa, si fuera necesario. 4. Vierta apenas 3/4 de taza de masa en el centro del plato para gofres. Con un cuchillo, desparrame la masa hacia todas las esquinas del molde. Hornee los gofres bastón durante 3 o 4 minutos, o hasta que se doren. 5. Repita el procedimiento con el resto de la masa. 23 SO-309150_13575 BELLA Waffle Stick Maker IM Interior_R2.indd 23 12-07-16 9:39 AM GARANTÍA LIMITADA DE UN AÑO SENSIO Inc. garantiza mediante la presente que por el periodo de UN AÑO a partir de la fecha de compra, este producto estará libre de defectos en materiales y mano de obra y por 90 días para las piezas no mecánicas. A su sola discreción, SENSIO Inc. reparará o reemplazará cualquier producto que resultara defectuoso, o emitirá un reembolso sobre el producto durante el periodo de garantía. Cualquier reembolso al cliente será a valor prorrateado con base en el periodo restante de la garantía. Esta garantía es válida únicamente para el comprador original al detal y no es transferible. Conserve el recibo original de compra ya que se requiere la prueba de compra para obtener la validación de la garantía. Las tiendas de ventas al detal que venden este producto no tienen el derecho de alterar, modificar o cambiar de ninguna manera los términos y condiciones de esta garantía. EXCLUSIONES: Esta garantía no cubre el desgaste normal de piezas ni daños resultantes de cualquiera de los siguientes aspectos: uso negligente de este producto, uso de voltaje o corriente inadecuada, mantenimiento de rutina inadecuada, uso contrario a las instrucciones de operación, desmontaje; reparación o alteración por personas distintas del personal calificado de SENSIO Inc. La garantía tampoco cubre Actos de Dios, como incendios, inundaciones, huracanes o tornados. SENSIO Inc. no será responsable de ningún daño inherente ni resultante causado por el incumplimiento de ninguna garantía expresa o implícita. Excepto hasta el alcance prohibido por la ley vigente, cualquier garantía implícita de mercabilidad o conveniencia para un fin particular está limitada en tiempo a la duración de la garantía. Algunos estados, provincias o jurisdicciones no permiten la exclusión o limitación de daños inherentes o resultantes o limitaciones sobre cuánto tiempo dura una garantía implícita, y en consecuencia, puede que las limitaciones o las exclusiones estipuladas arriba no se apliquen a su caso. La garantía cubre derechos legales específicos que pueden variar según el estado, la provincia y/o jurisdicción. CÓMO OBTENER SERVICIO BAJO GARANTÍA: Ud. Debe ponerse en contacto con el Servicio al cliente en el número: 1-866-832-4843. Un representante de Servicio al cliente tratará de resolver los problemas de garantía por teléfono.Si el Representante de servicio al cliente no logra resolver el problema, se le dará un número de caso y se le solicitará devolver el producto a SENSIO Inc. Coloque una etiqueta en el producto que incluye: su nombre, dirección, número de teléfono para contacto de día, número de caso y descripción del problema. También, incluya una copia de recibo de venta original. Empaque cuidadosamente el producto etiquetado con el recibo de venta y envíelo (con envío y seguro prepagados) a la dirección de SENSIO Inc. SENSIO Inc.no asumirá ninguna responsabilidad respecto al producto devuelto durante el tránsito al Centro de servicio al cliente de SENSIO Inc. 24 SO-309150_13575 BELLA Waffle Stick Maker IM Interior_R2.indd 24 12-07-16 9:39 AM