1
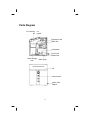
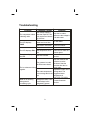
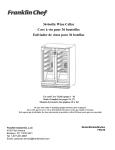
®
Countertop Ice Maker
Máquina de hielo de mostrador
User’s Guide
Guía del usuario
FRANKLIN INDUSTRIES, L.L.C.
4100 First Avenue
Brooklyn NY 11232-3321
Tel.: 1-888-424-8278
Website: www.franklinchef.com
Models/Modelos FIM12
FIM12SS
Table of Contents
Important Safeguards · · · · · · · · · · · · · · · · · · · · · · · 1 - 3
Parts Diagram · · · · · · · · · · · · · · · · · · · · · · · · · · · · 4
Technical Information · · · · · · · · · · · · · · · · · · · · · · · · 5
Before Your First Use · · · · · · · · · · · · · · · · · · · · · · · · 5
Operating Instructions · · · · · · · · · · · · · · · · · · · · · · 6 - 7
Cleaning and Maintenance · · · · · · · · · · · · · · · · · · · · · · 8
Troubleshooting · · · · · · · · · · · · · · · · · · · · · · · · · · · 9
Limited Warranty · · · · · · · · · · · · · · · · · · · · · · · · · · 10
Spanish Version of this Manual · · · · · · · · · · · · · · · · 11 - 21
IMPORTANT SAFEGUARDS
Before the ice maker is used, it must be properly positioned and installed as
described in this manual, so read the manual carefully. The warranty may be
affected or voided by an incorrect installation. To reduce the risk of fire,
electrical shock or injury when using the ice maker, follow basic precautions,
including the following:
• Plug into a grounded 3-prong outlet; do not remove grounding prong,
and do not use an adapter. The use of an extension cord is not
recommended..
• It is recommended that a separate circuit, serving only your ice maker,
be provided. Use receptacles that cannot be turned off by a switch or
pull chain.
• Do not connect or disconnect the electric plug when your hands are wet.
• Never unplug the ice maker by pulling on the power cord. Always grip
the plug firmly and pull straight out from the outlet.
• Never clean ice maker parts with flammable fluids. Do not store or use
gasoline or other flammable vapors and liquids in the vicinity of this or
any other appliance. The fumes can create a fire hazard or explosion.
• Before proceeding with cleaning and maintenance operations, make
sure the power line of the unit is disconnected.
• Before operating, put all panels back into place.
• Never allow children to operate or play with the ice maker.
• Do not touch the evaporator with your hand when the machine is
operating.
• Unplug the ice maker or disconnect power before cleaning or servicing.
Failure to do so can result in electrical shock or death.
• Do not attempt to repair or replace any part of your ice maker unless it
is specifically recommended in this manual. All other servicing should
be referred to a qualified technician.
1
• To ensure proper ventilation for your ice maker, the front of the unit
must be completely unobstructed. Choose a well-ventilated area with
temperatures above 50ºF (10ºC) and below 100ºF (38ºC). This unit is
suitable for both indoor and outdoor operation.
• The ice maker should not be located next to ovens, grills or other
sources of high heat.
• The ice maker must be installed with all electrical connections in
accordance with state and local codes. A standard electrical supply
(120 VAC only, 60 Hz, 15 A), properly grounded in accordance with the
National Electrical Code and local codes and ordinances is required.
• Do not kink or pinch the power supply cord between the ice maker and
its enclosure.
• The fuse (or circuit breaker) size should be 15 amperes.
• It is important for the ice maker to be leveled in order to work properly.
You may need to make several adjustments to level it.
• Check for leaks after connection.
• Although the unit has been tested at the factory, due to long-term
transit and storage, the first batch of cubes must be discarded.
• Remove the packing materials and clean the ice maker before using.
• Except to take ice from the unit, keep the door closed in order to
reduce ice melting and to promote proper ice formation.
• If the ice maker will not be used for a long time, before the next use it
must be thoroughly cleaned. Follow carefully any cleaning instructions
provided. Do not leave any solution inside the ice maker after cleaning.
• DO NOT use solvent-based cleaning agents or abrasives on the
interior. These cleaners may transmit taste to the ice cubes, or damage
or discolor the interior.
• Do not use this apparatus for other than its intended purpose.
SAVE THESE INSTRUCTIONS
2
Electrical Connection
Do not, under any circumstances, cut or remove the third (ground) prong from
the power cord. For personal safety, this appliance must be properly
grounded. The power cord of this appliance is equipped with a 3-prong
grounding plug that mates with a standard 3-prong grounding wall outlet to
minimize the possibility of electric shock hazard from the appliance. Have the
wall outlet and circuit checked by a qualified electrician to make sure the outlet
is properly grounded. When a standard 2-prong wall outlet is encountered, it is
your responsibility and obligation to have it replaced with a properly grounded
3-prong wall outlet. The ice maker should always be plugged into its own
individual electrical outlet which has a voltage rating that matches the rating
label on the appliance. This provides the best performance and also prevents
overloading house wiring circuits which could cause a fire hazard from
overheated wires. Never unplug your ice maker by pulling on the power cord.
Always grip the plug firmly and pull straight out from the outlet. Repair or
replace immediately all power cords that have become frayed or otherwise
damaged. Do not use a cord that shows cracks or abrasion damage along its
length or at either end. When moving the ice maker, be careful not to damage
the power cord.
Extension Cord
Because of potential safety hazards under certain conditions, it is strongly
recommended that you do not use an extension cord with this ice maker
because the cord may overheat and cause a risk of fire. However, if you must
use an extension cord, the cord should be No. 16 AWG minimum size and
rated no less than 1800W.
3
Parts Diagram
Ice collecting
bin
Ice
pusher
Evaporator rods
Water box
Compressor
Power cord
Rubber foot
Water storage
tank
Water pump
Lid
Control panel
Water outlet
stopper
4
Technical Specifications
Model No.:
Power Input:
Output:
Capacity:
Unit Dimensions:
FIM12 (white)
FIM12SS (stainless steel)
120V AC ~ 60Hz ~ 2.3A
12 cubes in as little as 7 minutes
2.64 lbs of ice
15.7”W x 14.2”D x 16.0”H
Unit Weight:
42.9 lbs.
Refrigerant:
R134a
Before Your First Use
1. When moving the unit, never tilt it more than 45º. Never turn it upside
down. This could cause improper operation of the compressor or
refrigeration system.
2. The ice maker should be placed on a level, stable surface away from any
heat source or corrosive gas. If the ice maker is not level, turn each foot
clockwise to raise the foot, or counter-clockwise to lower it. Continue this
with all feet until the unit is level and stable. At least six inches of
clearance should be left around the ice maker to ensure proper ventilation.
3. Before using the ice maker for the first time, wait about 12 hours after
positioning it in its final location.
4. Clean the inside of the ice maker thoroughly. Wipe the inner surfaces, ice
collecting bin, water box, ice pusher and evaporator rods.
5
Operating Instructions
NOTE: This unit is suitable for both indoor and outdoor use.
1. Raise the lid and fill the water storage tank with drinkable (i.e., tap, purified
or bottled) water. Make sure the water level is not higher than the bottom
of the ice collecting bin.
2. Plug the unit into a grounded electrical outlet.
a. Press the
button on the control panel to start the machine. Pressing
this button a second time will stop operation.
b. Press the
button to select the desired thickness with the LED
display:
or
or
. The setting
indicates the thickest
ice cubes and each ice-making cycle will take up to 9 minutes. If a
thickness is not selected, the default setting
is used.
c. If desired, press the
button to set a delayed
start time. (See next page.)
3. The ice-making process is as follows:
a. Water is pumped into the water box from the
water storage tank. This can take up to 45
seconds.
b. The ice-making cycle begins when the
evaporator rods are dipped into the water box
to start making ice.
c. It takes 7 to 9 minutes to complete the icemaking cycle depending on the cube thickness
selected. When the cycle is finished, the water
box tilts backward and the remaining water flows
back to the water storage tank through the water
leakage grooves. The evaporator rods release
the ice cubes.
d. Approximately 60 seconds later, the ice pusher
pushes the ice into the ice storage bin. After the
water box flips back to its level position, the next
ice-making cycle will begin.
6
4. Check the water level during the water-filling procedure. When the ice
maker display shows POUR, this is an indication that the water level in the
storage tank is very low. However, the unit will continue to work until there
is very little water left. At this time, you will hear a buzzing sound and the
ice maker will cease operation. When more water is added, the ice maker
will start to make ice again.
5. When the maximum capacity of ice cubes is collected, the ice will touch
the temperature sensor and the ice maker will stop operating. The LED
will read FULL. When you remove the ice and the temperature sensor is
freed, the unit will start making ice again.
6. There are three thicknesses of ice cubes available. The greater the
thickness selected, the more time is needed to make ice. When room
temperature is low (less than 59ºF), we suggest you choose the small or
medium size cubes. This should keep the cubes from fusing together.
7. When removing ice cubes and reinstalling the bin, push the bin downward
to its original position to ensure the temperature sensor is above the bin.
This helps keep the machine operating properly.
8. If the compressor stops for any reason (shortage of water, too much ice,
power off, etc.), don’t restart the machine right away. Wait at least 3
minutes before restarting the machine.
To set the ice maker for a delayed start:
To preset the machine to make ice at a later time, use the
button.
Follow steps 1 and 2 of the Operating Instructions on the previous page. Each
time the
button is pressed, the time shown on the LED increases by 30
minutes. So if you want to start making ice in an hour and a half from now, for
example, press the button 3 times. The display will read 01:30. It will begin
counting down in minutes until it reaches 00:00. At that time, the machine will
begin the first ice-making cycle. The LED will display the thickness setting you
chose.
This feature of the FIM12 ice maker allows you to delay the start of the
ice-making process by up to 12 hours.
7
Cleaning and Maintenance
1. To ensure the cleanliness of the ice cubes, the water in the water storage
tank must be replaced every 24 hours.
2. The strainer (located at the bottom right of the water storage tank) must be
cleaned regularly so that impurities in the water do not go into the water
pump and affect the normal operation of the machine. The strainer may be
cleaned with a small, flexible brush.
3. Unscrew the drainage plug to drain the remaining water in the tank when
the ice maker will not be used for an extended period of time.
4. Clean the ice maker regularly. When cleaning, disconnect the power and
remove the ice cubes. Using a soft towel or sponge dampened with a
solution of a mild detergent in water, wipe clean the inside and outside
surfaces of the unit. Do not spray any liquids onto the unit. Avoid using
strong cleaning agents such as acids or gasoline.
5. When plugging or unplugging the unit, pull on the plug itself and not the
cord.
6. If the power cord is damaged, contact Customer Service.
7. To avoid forming a scale on the inside surfaces of the unit, don’t delay
draining off the water remaining after making ice, and clean the unit at
least once a week.
8
Troubleshooting
Problem
The compressor makes
a buzzing noise.
The LED displays
POUR.
Possible Causes
Solution
The voltage supply is
Stop the ice maker.
less than required. This
Make sure the voltage is
unit requires a minimum
120 and restart.
of 120 volts.
This is no water, or the
water level is too low.
Fill with water.
The strainer is blocked.
Clean the strainer.
There is too much ice.
Remove some ice.
The LED displays FULL. The temperature is too
low.
Place the ice maker in a
warmer place.
There is no display on
the LED.
The fuse is blown.
Contact Customer
Service.
Too great an ice-cube
thickness was chosen.
Stop the machine and
reset the ice-cube
thickness. Start the
machine after the ice
block melts.
The ice cubes are fusing
together.
Water is not freezing
during normal
ice-making cycle.
Replace the water in the
The water temperature storage tank. The
in the storage tank is too suggested water
low.
temperature is
45ºF-77ºF (7ºC-25ºC).
Refrigerant leaks. There
Contact Customer
is a blockage in the
Service.
refrigerating system.
9
Limited Warranty
Franklin Industries, L.L.C., warrants this product to be free from defects in materials
and workmanship for a period of one year from the date of the original purchase or
delivery. Any parts that are determined to be defective will be replaced or repaired, at
its sole discretion, by Franklin Industries, L.L.C., at no charge as long as it has been
determined that the unit was operated in accordance with the instructions attached or
furnished with the product. If the unit proves to be defective, your first course of action
should be to follow the retailer’s return policy.
This warranty covers units only in the continental United States and does not cover the
following:
• Damage from improper voltage or installation
•
•
•
•
•
Damage in shipping
•
•
•
Improper or incorrectly performed maintenance or repairs
Defects other than manufacturing defects
Any installation expenses that may be incurred
Labor or repairs after the initial 12-month period
Damage from abuse, misuse, accident, alteration or lack of
proper care or maintenance
Use of parts not recommended by Franklin Industries, L.L.C.
Damage due to acts of God.
This limited warranty is given in lieu of all other warranties expressed or implied. This
warranty does not cover incidental or consequential damages. Some States do not
allow the exclusion or limitation of incidental or consequential damages, so the above
limitation or exclusion may not apply to you.
This warranty provides you with specific legal rights and you may have other rights
which vary from State to State. Consult the written materials accompanying your
product for the safe and proper operation.
This warranty may not be assigned.
For warranty service, contact:
Franklin Industries, L.L.C.
4100 First Avenue
Brooklyn, NY 11232-3321
Tel.: 1-888-424-8278
E-mail: [email protected]
When service is required, have on hand the Model and Serial numbers found on the
rating label on the back of the unit, as well as proof of purchase such as a sales or gift
receipt.
10
Indice
Precauciones importantes · · · · · · · · · · · · · · · · · · · 12 - 14
Diagrama de piezas · · · · · · · · · · · · · · · · · · · · · · · · · 15
Especificaciónes técnicas· · · · · · · · · · · · · · · · · · · · · · 16
Antes de usarse por primera vez · · · · · · · · · · · · · · · · · · 16
Instrucciones de operación· · · · · · · · · · · · · · · · · · · 17 - 19
Limpieza y mantenimiento · · · · · · · · · · · · · · · · · · · · · 19
Identificación y resolución de problemas · · · · · · · · · · · · · · 20
Garantía limitada · · · · · · · · · · · · · · · · · · · · · · · · · · 21
11
PRECAUCIONES IMPORTANTES
Antes de usar la máquina de hielo, debe posicionarse e instalarse correctamente según se describe en este manual, así que lea cuidadosamente el
manual. La garantía podrá ser afectada o anulada debido a la instalación
incorrecta. Para reducir el riesgo de incendio, shock eléctrico o lesión al usar
la máquina de hielo, siga precauciones básicas, entre ellas las siguientes:
• Enchufe la unidad en un tomacorriente puesta a tierra de tres patas; no
quite la pata de puesta a tierra y no use un adaptador. No se
recomienda el uso de un cable de extensión.
• Se recomienda proporcionar un circuito por separado que sólo
alimenta a su máquina de hielo. Use un receptáculo que no puede
apagarse con un interruptor o cadena de halar.
• No conecte ni desconecte el enchufe eléctrico con las manos mojadas.
• Nunca hale el cable eléctrico para desenchufar la máquina de hielo.
Siempre agarre firmemente el enchufe y sáquelo directamente de la pared.
• Nunca limpie las piezas de la máquina de hielo con líquidos inflamables.
No guarde ni use gasolina u otros vapores y líquidos inflamables
alrededor de este o cualquier otro aparato electrodoméstico. Los
humos pueden ocasionar un peligro de incendio o explosión.
• Antes de proceder con las operaciones de limpieza y mantenimiento,
cerciórese de que se haya desconectado la línea eléctrica de la unidad.
• Antes de hacer funcionar la máquina, vuelva a colocar todos los paneles.
• Nunca permita a los niños que operen ni jueguen con la máquina de hielo.
• No toque el evaporador con la mano cuando la unidad está en operación.
• Desenchufe la máquina de hielo o desconecte la corriente antes de
limpiar o dar servicio a la unidad. La falta de hacerlo podrá conducir a
shock eléctrico o muerte.
• No intente reparar o reemplazar cualquier pieza de su máquina de
hielo, salvo que se recomienda específicamente hacerlo en este
manual. Todo el servicio restante debe referirse a un técnico calificado.
12
• Para asegurar la ventilación apropiada de su máquina de hielo, la
parte delantera de la unidad debe estar totalmente sin obstrucción.
Seleccione un área bien ventilada con temperaturas superiores a 50ºF
(10ºC) e inferiores a 100ºF (38ºC). Esta unidad es apropiada para
operación adentro y a la intemperie.
• La máquina de hielo no debe situarse al lado de hornos, parrillas u
otras fuentes de calor alto.
• La máquina de hielo debe instalarse con todas las conexiones
eléctricas de acuerdo con los códigos estatales y locales. Se requiere
la alimentación eléctrica estándar (120 VCA solamente, 60 Hz, 15 A),
debidamente puesta a tierra de acuerdo con el Código Eléctrico
Nacional y los códigos y ordenanzas locales.
• No doble ni pellizque el cable eléctrico entre la máquina de hielo y su recinto.
• El tamaño del fusible (o interruptor) debe ser de 15 amperios.
• Es importante que la máquina de hielo se nivele para que funcione
debidamente. Es posible que tenga que hacer varios ajustes para nivelarla.
• Compruebe la presencia de fugas después de la conexión.
• Si bien la unidad ha sido probada en fábrica, debido al tránsito y almacenamiento prolongado, debe desecharse el primer lote de cubitos de hielo.
• Quite los materiales de envasado y limpie la máquina de hielo antes de usarla.
• Excepto para sacar hielo de la unidad, mantenga la puerta cerrada a
fin de reducir el derretimiento de hielo y promover la formación
correcta de hielo.
• Si la máquina de hielo no se va a usar durante un período prolongado,
antes del próximo uso debe limpiarse minuciosamente. Siga
cuidadosamente las instrucciones de limpieza provistas. No deje
solución dentro de la máquina de hielo después de limpiarla.
• NO use agentes de limpieza a base de disolvente ni abrasivos en el
interior. Estos limpiadores pueden transmitir sabor a los cubitos de
hielo o dañar o descolorar el interior.
• Sólo use esta unidad para los fines destinados.
GUARDE ESTAS INSTRUCCIONES
13
Conexión eléctrica
Bajo ninguna circunstancia corte ni quite la tercera pata (a tierra) del cable
eléctrico. Para fines de seguridad personal, este aparato debe estar
debidamente puesto a tierra. El cable eléctrico de este aparato está dotado de
un enchufe de puesta a tierra de 3 patas que coincide con un tomacorriente
de puesta a tierra estándar de 3 patas para reducir al mínimo la posibilidad de
shock eléctrico del aparato. Haga que un electricista calificado compruebe el
tomacorriente de pared y circuito para asegurar que el tomacorriente esté
debidamente puesto a tierra. Cuando hay un tomacorriente de pared de 2
patas, usted tiene la responsabilidad y la obligación de hacerlo reemplazar
con un tomacorriente de pared de 3 patas debidamente puesto a tierra. La
máquina de hielo siempre debe enchufarse en su propio tomacorriente
eléctrico individual con un voltaje nominal que coincide con el voltaje en el
aparato. Esto propicia el mejor desempeño y también evita la sobrecarga de
los circuitos de alambrado de la residencia que podría ocasionar un peligro de
incendio debido a cables sobrecalentados. Nunca hale el cable eléctrico para
desenchufar su máquina de hielo. Siempre agarre el enchufe firmemente y
sáquelo directamente del tomacorriente. Repare o reemplace inmediatamente
todos los cables eléctricos deshilachados o de otra manera dañados. No use
un cable que tiene grietas o daños de abrasión a su largo o en cualquier
extremo. Al mover la máquina de hielo, tenga cuidado de no dañar el cable
eléctrico.
Cable de extensión
Debido a los potenciales peligros de seguridad bajo ciertas condiciones, se
recomienda enfáticamente que no use un cable de extensión con esta
máquina de hielo, ya que el cable podría sobrecalentarse y ocasionar un
riesgo de incendio. No obstante, si resulta necesario usar un cable de
extensión, el cable debe ser de tamaño mínimo N 16 AWG con vataje nominal
mínimo de 1800W.
14
Diagrama de piezas
Cubo colector
de hielo
Expulsor
de hielo
Varillas del evaporador
Caja de agua
Compresor
Cable eléctrico
Pata de goma
Tanque de almaBomba de agua
cenamiento de agua
Tapa
Panel de control
Tapón de orificio
de salida de agua
15
Especificaciones técnicas
Modelo Nº:
Alimentación de entrada:
Salida:
Capacidad:
Dimensiones de la unidad:
Peso de la unidad:
Refrigerante:
FIM12 (blanco)
FIM12SS (en acero inoxidable)
120 V CA ~ 60 Hz ~ 2.3A
12 cubitos en tan sólo 7 minutos
Más de 1,1 kg de hielo
39,9 cm An x 36,1 cm F x 40,6 cm Al
19,5 kg
R134a
Antes de usarse por primera vez
1. Al mover la unidad, nunca inclínela más de 45º. Nunca invierta la unidad.
Esto podría ocasionar la operación incorrecta del compresor o sistema de
refrigeración.
2. La máquina de hielo debe colocarse sobre una superficie nivelada y
estable, alejada de cualquier fuente de calor o gas corrosivo. Si la
máquina de hielo no está nivelada, gire cada pata hacia la derecha para
levantar la pata, o hacia la izquierda para bajarla. Siga esta operación con
todas las patas hasta que la unidad esté nivelada y estable. Debe dejarse
un espacio libre de por lo menos seis pulgadas alrededor de la máquina
de hielo para asegurar la ventilación apropiada.
3. Antes de usar la máquina de hielo por primera vez, espere unas 12 horas
después de posicionarla en su lugar final.
4. Limpie minuciosamente el interior de la máquina de hielo. Limpie las
superficies interiores, cubo colector de hielo, caja de agua, expulsor de
hielo y varillas del evaporador.
16
Instrucciones de operación
NOTA: Esta unidad es apropiada para uso adentro y a la intemperie.
1. Levante la tapa y llene el tanque de almacenamiento de agua con agua
potable (es decir, del grifo, purificada o embotellada). Cerciórese de que
el nivel de agua no esté por arriba del fondo del cubo colector de hielo.
2. Enchufe la unidad en un tomacorriente eléctrico puesto a tierra.
a. Presione el botón
en el panel de control para encender la máquina.
Apriete este botón por segunda vez para detener la operación.
b. Presione el botón
para seleccionar el grosor deseado con la pantalla
LED: o
o
. El ajuste
indica los cubitos de hielo más
gruesos y cada ciclo de producción de hielo tardará hasta 9 minutos.
Si no se selecciona un grosor, se usa el ajuste prefijado
.
c. Si se desea, presione el botón
para ajustar una hora de inicio
demorada (véase la siguiente página).
3. El proceso de producción de hielo es el siguiente:
a. Se bombea agua dentro de la caja de agua
desde el tanque de almacenamiento de agua.
Esto podrá tardar hasta 45 segundos.
b. El ciclo de producción de hielo comienza cuando
las varillas del evaporador se sumergen dentro
de la caja de agua para empezar a hacer hielo.
c. Tarda entre 7 y 9 minutos para completar el ciclo
de producción de hielo, dependiendo del grosor
de cubitos seleccionado. Cuando el ciclo se haya
terminado, la caja de agua se inclina hacia atrás
y el agua restante regresa al tanque de almacenamiento de agua a través de las ranuras de
fuga de agua. Las varillas del evaporador sueltan
cubitos de hielo.
d. Aproximadamente 60 segundos más tarde, el
expulsor de hielo empuja el hielo dentro del cubo
de almacenamiento. Después que la caja de
agua regrese a su posición nivelada, comenzará
el siguiente ciclo de producción de hielo.
17
4. Compruebe el nivel del agua durante el procedimiento de llenado de
agua. Cuándo la pantalla de la máquina muestra POUR (VERTER), esto
es una indicación que el nivel de agua en el tanque de almacenamiento
está muy bajo. Sin embargo, la unidad continuará funcionar hasta que hay
un muy poco de agua. En este tiempo, usted oirá un zumbido y la
máquina dejará de funcionar. Cuándo más agua se agrega, la máquina
comenzará a hacer hielo de nuevo.
5. Una vez que se haya acumulado la capacidad máxima de hielo, el hielo
tocará el detector de temperatura y la máquina de hielo dejará de operar.
La pantalla LED indicará FULL (LLENO). Cuando usted quita el hielo y el
sensor de la temperatura se desatasca, la unidad comenzará a hacer
hielo de nuevo.
6. Hay tres grosores de cubitos de hielo disponibles. Mientras mayor sea el
grosor seleccionado, más tiempo se necesita para hacer hielo. Cuando la
temperatura ambiental es baja (inferior a 59ºF), sugerimos que seleccione
cubitos de tamaño pequeño o mediano. Esto debe evitar que los cubitos
se fusionen.
7. Al quitar los cubitos de hielo y reinstalar el cubo, empuje el cubo hacia
abajo a su posición original a fin de asegurar que el detector de
temperatura quede por arriba del cubo. Esto ayuda a mantener la
operación correcta de la unidad.
8. Si el compresor deja de funcionar por cualquier motivo (falta de agua,
demasiado hielo, corriente apagada, etc.), no encienda de nuevo la
unidad inmediatamente. Espere por lo menos 3 minutos antes de
encender de nuevo la unidad.
Para ajustar la máquina de hielo para un comienzo demorado:
Para preajustar la unidad para hacer hielo a una hora más tarde, use el botón
.
Siga los pasos 1 y 2 de las Instrucciones de Operación en la página anterior.
Cada vez que se presione el botón
, la hora que aparece en la pantalla
LED aumenta por 30 minutos. Por ejemplo, si desea comenzar a hacer hielo
18
dentro de una hora y media, presione el botón 3 veces. La pantalla indicará
01:30. Comenzará a contar los minutos hasta que llegue a 00:00. En ese
momento, la unidad comenzará el primer ciclo de producción de hielo. La
pantalla LED mostrará el grosor del hielo que usted seleccionó.
Esta característica de la máquina de hielo FIM12 le permite demorar el
comienzo del proceso de producción de hielo por un período hasta de 12
horas.
Limpieza y mantenimiento
1. A fin de asegurar la pureza de los cubitos de hielo, el agua en el tanque
de almacenamiento de agua debe reemplazarse cada 24 horas.
2. El colador (situado en la parte inferior derecho del tanque de almacenamiento de agua) debe limpiarse regularmente para evitar que entren
impurezas en la bomba de agua y que afecten la operación normal de la
unidad. El colador podrá limpiarse con un cepillo pequeño y flexible.
3. Desenrosque el tapón de purga para vaciar el agua restante en el tanque
cuando la máquina de hielo no será usada durante un período prolongado.
4. Limpie la máquina de hielo regularmente. Durante la limpieza, desconecte
la corriente y quite los cubitos de hielo. Usando una toalla suave o
esponja humedecida con una solución de detergente suave en agua,
limpie las superficies interiores y exteriores de la unidad. No rocíe ningún
tipo de líquido sobre la unidad. Evite el uso de agentes de limpieza
fuertes, tales como ácidos o gasolina.
5. Al enchufar o desenchufar la unidad, hale el enchufe mismo y no el cable
eléctrico.
6. Si el cable eléctrico está dañado, comuníquese con Servicio a Clientes.
7. Para evitar la formación de escamas en las superficies interiores de la
unidad, no demore el drenaje del agua restante después de hacer hielo y
limpie la unidad por lo menos una vez por semana.
19
Identificación y resolución de problemas
Problema
El compresor hace un
ruido de zumbido.
Posibles causas
Solución
El voltaje es insuficiente.
Esta unidad requiere un
voltaje mínimo de 120
voltios.
Apague la máquina de
hielo. Cerciórese de que
el voltaje sea de 120 y
enciéndala de nuevo.
No hay agua, o el nivel
Llene la unidad con
La pantalla LED muestra de agua está demasiado agua.
bajo.
POUR (VERTER).
El colador está obturado. Limpie el colador.
Hay demasiado hielo.
Quite hielo.
La pantalla LED muestra
La temperatura es
FULL (LLENO).
demasiado baja.
Ponga la máquina de
hielo en un lugar más
caliente.
La pantalla LED está en El fusible se ha
blanco.
disparado.
Contacte el Servicio a
clientes.
Los cubitos de hielo se
están fusionando.
El agua no se congela
durante el ciclo normal
de producción de hielo.
El grosor de los cubitos
de hielo escogido era
demasiado grande.
Apague la unidad y
reajuste el grosor de los
cubitos de hielo. Encienda
de nuevo la máquina
después de que el bloque
de hielo se derrita.
La temperatura del agua
en el tanque de almacenamiento es
demasiado baja.
Reemplace el agFua en el
tanque. La temperatura de
agua sugerida es 45ºF 77ºF (7ºC - 25ºC).
Hay fugas del
refrigerante. Hay una
Comuníquese con
obstrucción en el
Servicio a Clientes.
sistema de refrigeración.
20
Garantía limitada
Franklin Industries, L.L.C., garantiza este producto contra defectos de materiales y
fabricación, por un período de un año a partir de la fecha original de compra o de
entrega del producto. Toda parte que se probara que es defectuosa será cambiada o
reparada en su única discreción por Franklin Industries, L.L.C., sin cargos para el
usuario, siempre y cuando se determine que la máquina fue usada de acuerdo con las
instrucciones proporcionadas con el producto. Si la unidad resulta defectuosa, su
primera línea de acción debe ser de seguir la norma de devolución del detallista.
Esta garantía es válida únicamente en territorio continental de Estados Unidos y no
abarca los siguientes casos:
•
Daños por conexión al voltaje incorrecto para la máquina o defectos de
instalación
•
•
•
•
•
Daños sufridos durante el transporte
•
•
•
Conservación o reparaciones impropias o ejecutadas inexactamente
Defectos no relacionados con la fabricación
Cualquier gastos de instalación que se pueden contraer
Mano de obra ni reparaciones después de los primeros 12 meses de uso
Daños causados por maltrato, uso indebido, accidentes, modificaciones
y/o falta de cuidado y mantenimiento adecuados
Uso de piezas no recomendadas por Franklin Industries, L.L.C.
Daños debidos a actos de la naturaleza.
Esta garantía limitada se ofrece en reemplazo de cualquier otra garantía, sea expresa
o implícita, y no cubre perjuicios directos ni indirectos. Algunos estados no permiten
imponer la exclusión o limitación de daños incidentales o consiguientes, por lo tanto la
limitación o excepción anterior no puede ser aplicable.
Esta garantía le confiere derechos establecidos por ley, pero usted también podría
tener otros derechos que varían de un/una estado/provincia a otro/otra. Consulte las
materias escritas que acompañan su producto para la operación segura y apropiada.
Esta garantía no se puede asignar.
Para solicitar servicios cubiertos por la garantía, comunicarse con:
Franklin Industries, L.L.C.
4100 First Avenue
Brooklyn, NY 11232-3321
Tel.: 1-888-424-8278
E-mail: [email protected]
Para solicitar servicios de garantía, es necesario tener los números de Modelo y de
Serie, que se pueden encontrar en la etiqueta de datos en la parte de atrás de la
máquina, así como también una prueba de la compra tal como un recibo de ventas o
de obsequio.
21
FIM12 OM- ES-2
Printed in China