1
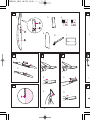
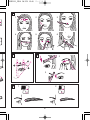
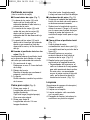
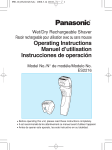
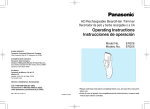
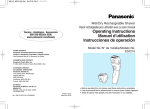
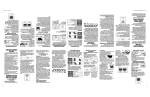
ES2113_USA 08.2.21 15:48 ページ 1
R
Facial Trimmer
Perfilador Facial
Operating Instructions
Instrucciones de operación
Model No.
ES2113
Modelo No.
BBefore operating this unit, please read these instructions completely.
BAntes de operar este aparato, lea este instructivo en su totalidad.
ES2113_USA 08.2.21 15:48 ページ 2
6
1
1
3
4
1
2
A
5
2
6
3
1
B
4
7
4
1
1
2
2
7
2
5
9
3
3
2
ES2113_USA 08.2.21 15:48 ページ 3
6
1
2
3
4
5
6
B
7
8
2
1
①
②
③
3
9
1
2
B
A
3
ES2113_USA 08.2.21 15:48 ページ 4
A
11
S L
10
12
13
INDEX
ENGLISH .....................Page 5
ESPAÑOL .................Pagina 8
4
ES2113_USA 08.2.21 15:48 ページ 5
Parts identification (Fig. 1)
2. Attach by inserting the projection at
the tip of the facial trimmer into the
hole of the blade.
3. Slide the blade release button in
the direction of the arrow.
1. Main Unit
F
A Switch
F
B Battery cover
2. Blade on Rear Side
F
C Downy hair blade
F
D Blade release button
3. Eyebrow blade
4. Eyebrow comb
5. Cap
6. Cleaning brush
7. Soft carrying case
Trimming downy hair
(Use the downy hair blade)
■ Holding the blade to the skin
(Fig. 5)
• Lay the blade against the skin.
• Slowly move the blade against the
flow of the hair.
Inserting the battery (Fig. 2)
■ How to trim (Fig. 6)
Slowly move the facial trimmer in the
direction of the arrow for the areas to
be trimmed.
1. Above the eyebrows
Move from the hairline to the center
of the forehead.
Then back to the hairline.
2. Cheek
Move outward from the center of
the face.
3. Upper lip
Stretch your upper lip and move up
and down.
4. Sideburns
Decide on the length of the
sideburns and trim downward.
5. Below the eyes
Hold the skin with your fingers and
move outward from the center.
6. Nape
Hold the skin with your fingers and
move upward.
(Battery sold separately.)
Be sure to remove the battery cover
only after the switch is off.
1. Insert one AAA alkaline battery.
Note: Insert the battery in the
correct polarity.
2. Attach the battery cover.
Attaching and removing
the blade (Figs. 3 and 4)
(Attach the downy hair blade or
eyebrow blade according to the area
to be trimmed.)
■ Removing the blade (Fig. 3)
1. Support the head of the trimmer
with your finger so that it does not
swing excessively.
2. Slide the blade release button in
the direction of the arrow.
3. Remove the blade in the direction
of the arrow.
■ Attaching the blade (Fig. 4)
1. Support the head of the trimmer
with your finger so that it does not
swing excessively.
5
ES2113_USA 08.2.21 15:49 ページ 6
■ Attaching the comb (Fig. 10)
• Support the head of the trimmer
with your finger so that it does not
swing excessively.
• Select the trimming length and
align the L (long) or S (short) mark
with the groove in the eyebrow
comb. Insert the eyebrow comb to
the eyebrow blade until it clicks in.
Trimming your eyebrows
(Use the eyeblow blade)
■ Basic eyebrow shape (Fig. 7)
A ) is within the
1 The eyebrow base (F
lines extending from the inner side
and outer side of the nose.
2 The eyebrow crest (F
C ) is above the
eyebrow arch (F
B ) within the lines
extending from the outer edge of
the eye and the iris.
3 The eyebrow tip (F
D ) is within the
line extending from and connecting
the outer side of the nose and the
outer edge of the eye.
■ How to use (Fig. 11)
• Use the eyebrow comb by holding it
close to your skin (F
A ).
The blade is at the position of the
line (F
B ).
1. Align the comb with your eyebrow
and move from the end to the
beginning of the eyebrow. (Fig. 12)
2. Repeat until the eyebrow is
trimmed to a desired length.
• Depending on individuals, the hair
at the eyebrow base may be
pointing upward. In this case, it is
recommended the comb be moved
against the flow of the hair, in the
direction from the forehead to the
nose. (Fig. 13)
■ Using the facial trimmer on
the eyebrows (Fig. 8)
Slowly move the facial trimmer in the
direction of the arrow along the hair
sticking out of the outline.
1. Above the eyebrow
Stop at about 2-3 mm on the side
of the eyebrow.
2. Below the eyebrow
Trim while holding the eyelid and
stretching the skin.
3. The brow
Trim while changing your grip.
Cleaning
(Be sure to turn off the switch)
1. Remove the blade.
2. Clean with brush.
3. Wipe off any trimmed hair with a
dry cloth.
4. After cleaning, attach the blade to
its original position.
Eyebrow comb (Fig. 9)
1. Eyebrow comb A
Trimming length: 6~8 mm
Finished image:
Overall long eyebrow (even length)
For a natural eyebrow
2. Eyebrow comb B
Trimming length: 2~4 mm
Finished image:
Overall short eyebrow (even length)
Eyebrow becomes easier to draw.
6
ES2113_USA 08.2.21 15:49 ページ 7
Caution
•
•
•
•
•
•
•
•
To prevent the risk of personal injury,
observe the following safety instructions.
• Only use on bare skin.
Care should be exercised when
Using the product when soap,
using this product to prevent injury
cream or lotions have been applied
to the eye or face.
may lead to malfunctions.
Keep out of reach of children. Do not
• When the trimmer begins losing
leave this product within easy reach
power, replace the battery. The
of children. The blades and combs
battery may leak if not replaced
are small parts that could present a
promptly when it reaches the end of
choking hazard for a small child.
its life span.
Do not clean the product in water.
• Do not clean the product with
The following people should not
alcohol, benzine, etc.
use the product.
Wipe with a dry cloth or a cloth
- People with sensitive skin
which has been moistened with a
- People with allergies
dilute soap solution.
- In areas where there are pimples
• Only use AAA alkaline battery.
or acne.
Since other battery is not as
Do not use other than on the face
powerful, the time for which the
or neckline.
product can be used is dramatically
Do not modify, disassemble or
reduced.
repair.
Since the blade is precision
machine, handle it carefully.
Always check the blades and other
parts and accessories for damage
before each use. Do not use product
if it has been dropped or damaged.
Keep cap in place after each use.
Specifications
Power supply: Battery
Battery size: 1 AAA alkaline battery
(Sold separately)
Weight:
32 g (including battery)
7
ES2113_USA 08.2.21 15:49 ページ 8
Identificación de partes (Fig. 1)
2. Adose insertando la proyección en
la punta del perfilador facial dentro
en el espacio de la cuchilla.
3. Deslice el botón de soltar la
cuchilla en la dirección de la flecha.
1. Aparato principal
F
A Interruptor
F
B Cubierta de la pila
2. Cuchilla en el Lado Posterior
F
C Cuchilla blanda
F
D Botón de soltar la cuchilla
3. Cuchilla de cejas
4. Peine de cejas
5. Tapa
6. Cepillo de limpieza
7. Estuche blando para transporte
Perfilando el vello
(Use la cuchilla de vello blando)
■ Sosteniendo la cuchilla contra
la piel (Fig. 5)
• Coloque la cuchilla contra la piel.
• Lentamente mueva la cuchilla
contra el flujo del vello.
Insertando la pila (Fig. 2)
■ Cómo perfilar (Fig. 6)
Lentamente mueva el perfilador facial
en la dirección en las áreas a ser
perfiladas siguiendo las flechas de la
fig. 6.
1. Sobre las cejas
Mueva desde la línea del cabello
hacia el centro de la frente.
Luego de nuevo a la línea del
cabello.
2. Mejilla
Mueva hacia afuera desde el
centro de la cara.
3. Labio superior
Estire su labio superior y deslicelo
de arriba abajo.
4. Patillas
Una vez decidida la longitud de las
patillas recorte hacia abajo.
5. Debajo de los ojos
Sostenga la piel con sus dedos y
muévalo hacia afuera desde el
centro.
6. Nuca
Sostenga la piel con sus dedos y
muévalo hacia arriba.
(La pila se vende por separado.)
Asegúrese de retirar la cubierta de la
pila sólo después de que el interruptor
esté apagado.
1. Inserte una pila alcalina AAA .
Nota: Inserte la pila en la polaridad
correcta.
2. Vuelva a colocar la cubierta de la
pila.
Introducir y extraer la
cuchilla (Figs. 3 y 4)
(Introduzca la cuchilla específica
según el área que va a ser perfilada.)
■ Extracción de la cuchilla (Fig. 3)
1. Sostenga el cabezal del perfilador
con su dedo de modo que no se
balancee excesivamente.
2. Deslice el botón de soltar la
cuchilla en la dirección de la flecha.
3. Saque la cuchilla siguiendo la
dirección de la flecha.
■ Introducción de la cuchilla (Fig. 4)
1. Sostenga el cabezal del perfilador
con su dedo de modo que no se
balancee excesivamente.
8
ES2113_USA 08.2.21 15:49 ページ 9
Perfilando sus cejas
Ceja total corta (longitud pareja)
La ceja se hace más fácil de dibujar.
(Use la cuchilla de cejas)
■ Introducción del peine (Fig. 10)
• Sostenga el cabezal del perfilador
facial con su dedo de modo que no
se balancee excesivamente.
• Seleccione la longitud de recorte y
alinee la marca L (largo) o S (corto)
con la ranura en el peine de cejas.
Inserte el peine de cejas en la
cuchilla de cejas hasta que se oiga
un clic.
■ Forma básica de cejas (Fig. 7)
1 La base de las cejas (F
A ) está
dentro de las líneas que se
extienden desde el lado interior y
exterior de la nariz.
2 La cresta de las cejas (F
C ) está
arriba del arco de las cejas (F
B)
dentro de las líneas que se
extienden del filo de afuera del ojo
y del iris.
3 La punta de las cejas (F
D ) está
dentro de la línea que se extiende
desde y que conecta el lado de
afuera de la nariz y el filo de afuera
del ojo.
■ Cómo utilizar el perfilador facial
(Fig. 11)
• Use el peine de cejas
sosteniéndolo cerca de su piel (F
A ).
La cuchilla está en la posición de la
línea (F
B ).
1. Alinee el peine con su ceja y
muévalo desde el final hasta el
comienzo de la ceja. (Fig. 12)
2. Repita hasta que la ceja esté
recortada a la longitud deseada.
• Dependiendo de la persona, el
vello en la base de la ceja puede
que esté apuntando hacia arriba.
En este caso, se recomienda
mover el peine contra el flujo del
vello, en la dirección desde la
frente hacia la nariz. (Fig. 13)
■ Usando el perfilador facial en las
cejas (Fig. 8)
Lentamente mueva el perfilador facial
en la dirección de la flecha a lo largo
del vello que sobresale del contorno.
1. Por encima de la ceja
Deténgase a unos 2-3 mm del lado
de la ceja.
2. Debajo de la ceja
Recorte al tiempo que sostiene el
párpado y estira la piel.
3. La frente
Perfile mientras cambia la posición
de la mano.
Limpieza
(Asegúrese de apagar el interruptor)
1. Saque la cuchilla.
2. Limpie con el cepillo.
3. Limpie cualquier vello recortado
con un paño seco.
4. Después de limpiar, introduzca la
cuchilla en su posición original.
Peine para cejas (Fig. 9)
1. Peine para cejas A
Longitud de recorte: 6-8 mm
Imagen Acabada:
Ceja total larga (longitud pareja)
Para una ceja natural
2. Peine para cejas B
Longitud de recorte: 2-4 mm
Imagen Acabada:
9
ES2113_USA 08.2.21 15:49 ページ 10
Advertencia
•
•
•
•
•
•
•
Para prevenir el riesgo de herida personal, siga
las siguientes instrucciones de seguridad.
• Siempre verifique si las cuchillas y
Deberá tener cuidado cuando use
las otras partes y accesorios están
este producto para prevenir heridas
dañados antes de cada uso. No use
en el ojo o la cara.
el producto si lo han dejado caer o
Manténgalo lejos del alcance de los
si lo han dañado. Mantenga la tapa
niños. No deje este producto en
en su lugar después de cada uso.
donde los niños lo alcancen
• Sólo úselo en la piel desnuda.
fácilmente. Las cuchillas y los
El usarlo cuando jabón, crema o
peines son pequeñas partes que
lociones hayan sido aplicados puede
podrían convertirse en un riesgo de
provocar errores en el perfilado.
asfixia para un niño pequeño.
• Cuando el perfilador facial
No limpie el producto en el agua.
comienza a perder potencia,
Las siguientes personas no
reemplace la pila. La pila puede
deberían usar el producto.
tener fugas si no es reemplazada
- Personas de piel sensible
prontamente cuando llega al fin de
- Personas con propensión a las
su vida útil.
alergias
• No limpie el producto con alcohol,
- En áreas dónde hubieran granitos
ni disolventes, etc.
o acné.
Límpielo con un paño seco o un
No lo use en áreas que no sean la
paño que ha sido mojado en una
cara o la línea del cuello.
solución diluida con jabón.
No lo modifique, desarme ni
• Se recomienda la utilización de una
repare.
pila alcalina AAA. Ya que las otras
Ya que la cuchilla es una máquina
pilas pueden reducir la potencia y
de precisión, manéjela con
cuidado.
duración del perfilador facial.
Especificaciones
Fuente de alimentación: Pila
Tamaño de la pila:
1 pila alcalina AAA
(Vendida por separado)
Peso: 32 grs. (incluyendo la pila)
10
ES2113_USA 08.2.21 15:48 ページ 1
ServiceAAssistanceAAccessories
800-338-0552(In USA)
www.panasonic.com/beauty
IN USA CONTACT:
Panasonic Consumer Electronics Company
Division of Panasonic Corporation of North America
One Panasonic Way 2F-3 Secaucus, NJ 07094
IN PUERTO RICO CONTACT:
Panasonic Puerto Rico, Inc.
P.O.Box 2036, Carolina, Puerto Rico 00984 U.S.A.
En México:
Panasonic de México, S.A de C.V.
México D.F.
Amores 1120, Col. del Valle, 03100
Tel: 54 88 10 00
No.1 EN ES (U.S.A.)
Printed in China
Impreso en China