Transcript
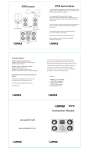
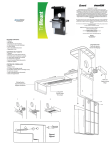
CONTENU DU PACK:
• Sacoche de transport
• Lecteur de cartes SD USB
• Chargeur de voiture
• Ecouteurs bouton
• 1 Petit stylet de précision
• 1 Grand stylet de précision
• Dragonne
• Une paire de housses pour écran
• Guide d'utilisation/Carte de garantie
• Carte d’enregistrement
SACOCHE DE TRANSPORT :
1. Ouvrez la sacoche de transport et mettez le DSi XL à l'intérieur.
2. Enroulez les deux rubans élastiques autour du DSi XL.
3. Les poches en filet peuvent contenir des jeux DS et des cardes
SD (Jeux et cartes sont vendus à part).
4. La poche du grand stylet est située au dessus des poches en
filet.
5. Fermez la sacoche de transport à l'aide de sa fermeture éclair
pour bien fixer le DSi XL.
6. Attachez le mousqueton à un objet solide tel qu'un anneau de
ceinture pour le transporter, ou faites passer votre ceinture à
travers l'anneau.
LECTEUR DE CARTES SD USB :
1. Retirez le capot arrière du lecteur de cartes SD pour dégager la
fente pour cartes SD.
2. Insérez une carte SD dans la fente du lecteur (cartes SD
vendues à part).
3. Retirez le capot avant du lecteur de cartes SD pour dégager le
port USB.
4. Insérez la prise USB dans un port USB alimenté pour voir ou
transférer des fichiers.
5. Après avoir regardé ou transféré des fichiers, débranchez le
lecteur de cartes SD du port USB.
REMARQUE : Reportez-vous au guide d'utilisation de votre dispositif
pour savoir comment débrancher le lecteur de cartes SD en toute sécurité.
PACKAGE CONTENTS:
• Carrying Case
• USB SD Card Reader
• Car Charger
• Earbuds
• 1 Small Precision Stylus
• 1 Large Precision Stylus
• Wrist Strap
• 2 Sets of Screen Protectors
• User’s Guide/Warranty Card
• Registration Card
CARRYING CASE:
1. Unzip the Carrying Case and insert the DSi XL into the Carrying Case.
2. Wrap the 2 elastic bands around the DSi XL.
3. The mesh pockets are able to store DS games and SD cards
(games and cards sold separately).
4. The Large Stylus pocket located above the mesh pockets can
store 1 Large Stylus.
5. Zip up the Carrying Case to secure the DSi XL.
6. Clip the carabiner onto any secure item such as a belt loop or
back pack for portability, or thread your belt through the belt
loop if desired.
USB SD CARD READER:
1. Pull off the back cover of the SD Card Reader, exposing the
opening for an SD Card.
2. Insert an SD Card into the back of the SD Card Reader and
replace the back cover (SD card sold separately).
3. Pull off the front cover of the SD Card Reader, exposing the USB plug.
4. Insert the USB plug into any powered USB port to view or
transfer files.
5. After viewing or transferring files, remove the SD Card Reader
from the USB port.
6. Retirez la carte SD du lecteur de cartes SD.
7. Insérez la carte SD dans le DSi XL.
CHARGEUR DE VOITURE :
1. Branchez le chargeur de voiture à l'entrée CC du DSi XL.
2. Branchez le chargeur de voiture dans une prise de voiture. Le
DSi XL se charge automatiquement.
ECOUTEURS :
1. Insérez l'extrémité 3,5mm des écouteurs dans la prise pour
casque située sur le DSi XL.
2. Vous pouvez régler le volume à l'aide des boutons du DSi XL.
STYLET DE PRÉCISION :
1. Effleurez ou glissez le petit stylet de précision sur l'écran tactile
du DSi XL.
2. N'utilisez le stylet que sur la partie inférieure de l'écran tactile.
3. Ne pas appuyez plus qu'il en faut. Une pression trop forte
endommagerait l'écran tactile.
REMARQUE : N'utilisez aucun stylet cassé. Lorsqu'il n'est pas
utilisé, remettez le stylet dans son support situé sur le côté droit du
DSi XL.
HOUSSE D'ÉCRAN :
1. Décollez les autocollants rouge et blanc de la housse d'écran.
2. Une fois vous dégagez la housse d'écran, la partie rouge et
blanche vont protéger l'écran.
3. La partie adhésive du côté que vous placez sur l'écran.
DRAGONNE :
Attachez la dragonne à la sacoche de transport ou directement au
DSi XL.
This warranty does not cover normal wear and tear, abusive use or
misuse, modification, tampering or by any other cause not related to
either materials or workmanship. This warranty does not apply to
products used for any industrial, professional or commercial purposes.
For service on any defective product under the 120-day warranty
policy, please contact Consumer Support
to obtain a Return Authorization Number.
NOTE: dreamGEAR will not process any defective claims without
a Return Authorization Number.
Consumer Support Hotline:
877-999-DREAM (3732) (U.S. and Canada only) or
310-222-1045 (International)
Consumer Support Email: [email protected]
POUR ASSISTANCE TECHNIQUE
VEUILLEZ CONTACTER : 1-877-999-DREAM
Ou [email protected]
CAR CHARGER:
1. Connect the Car Charger to the DSi XL’s DC input.
2. Plug the Car Charger into your car’s power outlet. The DSi XL
will begin charging automatically.
EARBUDS:
1. Insert the 3.5mm end of the Earbuds into the headphone jack
located on the DSi XL.
2. Volume is adjusted by the volume control on the DSi XL.
PRECISION STYLUS:
1. Lightly touch or slide the Small Precision Stylus across the
touch screen of the DSi XL.
2. Use the stylus only on the lower touch screen.
3. Use only enough pressure to operate the game. Excessive
pressure may damage the touch screen.
NOTE: Do not use either stylus if it is broken. Replace the small
stylus in the stylus holder located on the right side of the DSi XL
when not in use.
SCREEN PROTECTOR:
1. Peel the top off the Screen Protector by pulling the red and
white sticker to the right.
2. Once you peel the Screen Protector apart, the part with the red
and white sticker belongs on the screen.
3. The sticky part of the side that you place onto the screen.
WRIST STRAP:
Attach to the Carrying Case or directly to the DSi XL.
NOTE: Please refer to your device’s User’s Guide on how to safely
remove the SD Card Reader.
6. Remove the SD Card from the SD Card Reader.
7. Insert the SD Card into the DSi XL.
All dreamGEAR/i.Sound products come with a limited warranty and
have been subjected to a thorough series of tests to ensure the highest
level of dependability and compatibility. It is unlikely that you will
experience any problem, but if a defect should become apparent
during the use of this product, dreamGEAR warrants to the original
consumer purchaser that this product will be free from defects in
material and workmanship for a period of 120 days from the date of
your original purchase. If a defect covered by this warranty occurs,
dreamGEAR, at its option, will repair or replace the product purchased
at no charge. If a replacement is necessary and your product is no
longer available, a comparable product may be substituted at the sole
discretion of dreamGEAR.
FOR TECHNICAL SUPPORT
PLEASE CONTACT: 1-877-999-DREAM
or [email protected]
Websites:
www.dreamgear.net
www.isound.net
CONTENIDO DEL PAQUETE:
• Estuche
• Lector de tarjetas SD USB
• Cargador para el automóvil
• Auriculares
• 1 lápiz táctil de precisión pequeño
• 1 lápiz táctil de precisión grande
• Correa de muñeca
• 2 juegos de protectores de pantalla
• Guía del usuario/Tarjeta de garantía
• Tarjeta de registro
7. Coloque la tarjeta SD dentro de la DSi XL.
CARGADOR PARA EL AUTOMÓVIL:
1. Conecte el cargador para el auto en la entrada CC de la DSi XL.
2. Enchufe el cargador en una toma eléctrica de su automóvil. La
DSi XL iniciará la carga automáticamente.
AURICULARES:
1. Introduzca la clavija de 3.5mm de los auriculares en el conector
para auriculares de la DSi XL.
2. El volumen se ajusta usando el control de volumen de la DSi XL.
ESTUCHE:
1. Abra la cremallera del estuche e introduzca la DSi XL en el estuche.
2. Envuelva la DSi XL con las 2 bandas elásticas.
3. Los bolsillos de malla pueden almacenar juegos DS y tarjetas
SD (los juegos y las tarjetas se venden por separado).
4. El bolsillo para el lápiz táctil grande situado sobre los bolsillos
de malla puede guardar 1 lápiz táctil grande.
5. Cierre la cremallera del estuche para asegurar la DSi XL.
6. Asegure el mosquetón sobre cualquier objeto como un cinturón
o mochila para transportarlo, o engarce la banda en el cinturón
su lo desea.
LÁPIZ TÁCTIL DE PRECISIÓN:
1. Toque ligeramente o deslice el lápiz táctil de precisión pequeño
a través de la pantalla táctil de la DSi XL.
2. Use el lápiz táctil solamente en la pantalla táctil inferior.
3. Use solamente la presión necesaria para que funcione el juego.
Si ejerce demasiada presión puede provocar daños en la
pantalla táctil.
LECTOR DE TARJETAS SD USB:
1. Retire la tapa trasera del Lector de tarjetas SD, para mostrar la
ranura para una tarjeta SD.
2. Introduzca una tarjeta SD en la parte trasera del Lector de
tarjetas SD (la tarjeta SD se vende por separado).
3. Retire la tapa frontal del Lector de tarjetas SD, mostrando el
conector USB.
4. Introduzca el conector USB en cualquier puerto USB con
alimentación para ver o transferir archivos.
5. Después de ver o transferir archivos, retire el Lector de tarjetas
SD del puerto USB.
PROTECTOR DE PANTALLA:
1. Levante la parte superior del protector de pantalla tirando de la
pegatina roja y blanca hacia la derecha.
2. Una vez separado el protector, la parte con la pegatina roja y
blanca se coloca sobre la pantalla.
3. La cara con pegamento es la cara que hay que colocar sobre la
pantalla.
NOTA: Por favor, lea la guía del usuario de su dispositivo para ver
cómo quitar de forma segura el Lector de tarjetas SD.
6. Saque la tarjeta SD del Lector de tarjetas SD.
NOTA: NO use el lápiz táctil si está roto. Vuelva a guardar el Lápiz
Táctil en su receptáculo situado en el lado derecho de la DSi XL
cuando no lo esté usando.
CORREA DE MUÑECA:
Fíjela al estuche o directamente a la DSi XL.
PARA SOPORTE TÉCNICO
CONTACTE AL: 1-877-999-DREAM
o [email protected]