1
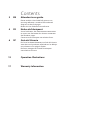
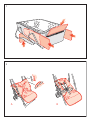
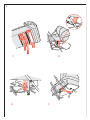
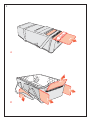
techno xlr soft carry cot
maclarenbaby.com
Contents
2
EN
Attendant user guide
Please read this User Guide fully prior to use
ensuring reference is made to the numbered
diagrams on the final pages.
Retain this User Guide for future reference.
4
FR
Notice du fabriquant
Avant l’utilisation, lire attentivement cette notice
en ayant soin d’examiner les schemas numerates
des dernières pages.
Conserver cette notice pour consultation future.
6
SP
Guía del Usuario
Por favor lea detenidamente esta Guía del Usuario
antes de usar el producto, refriéndose a los dibujos
con números en las páginas finales.
Por favor, retenga esta Guía del Usuario para
consultaria en el futuro.
12
Operation Illustrations
17
Warranty Information
1
2
A
B
2
C
E
D
F
3
A
B
Safety
WARNING:
FAILURE TO FOLLOW THESE WARNINGS AND INSTRUCTIONS COULD RESULT IN
SERIOUS IN JURY OR DEATH.
NEVER LEAVE CHILD UNATTENDED.
THIS PRODUCT IS ONLY SUITABLE FOR A CHILD WHO CANNOT SIT UP
UNAIDED, ROLL OVER AND CANNOT PUSH ITSELF UP ON ITS HANDS AND
KNEES. MAXIMUM WEIGHT OF THE CHILD: 20LB / 9KG.
READ THESE INSTRUCTIONS CAREFULLY BEFORE USE AND KEEP THEM FOR
FUTURE REFERENCE.
CAUTION
Never leave child unattended.
Do not let other children play unattended near the
Carry Cot.
Do not use if any part is broken, torn or missing and
only use replacement parts supplied and approved
by the manufacturer.
FALL HAZARD
To help prevent falls, do not use this product when
the infant begins to push up on hands and knees or
has reached manufacturer’s recommended maximum
weight, whichever comes first.
SUFFOCATION HAZARD
Infants can suffocate on soft bedding. NEVER add a
mattress, pillow, comforter or padding. Use only the
product provided.
• Use only use on firm ground which is horizontal, level
and dry.
• Be aware of the risk of open fire and other sources of
strong heat, such as electric bar fires, gas fires etc. in the
near vicinity of the Carry Cot.
• Never use this Carry Cot on a stand.
• If a sheet is to be used use one suited to the size of the
Soft Carry Cot.
• Inspect product (particularly the handles and bottom)
regularly for signs of damage and wear.
• Strings can cause strangulation! Do not place items with
a string around a child’s neck, such as hood strings or
pacifier cords. Do not suspend strings over the Carry Cot
or attach strings to toys.
• To reduce the risk of SIDS, pediatricians recommend
healthy infants be placed on their backs to sleep, unless
otherwise advised by your physician.
• Soft Carry Cot should not be used for sleeping for long
periods.
• Soft Carry Cot must be connected to the buggy by the
two side clips before placing your child in it.
• The Carry Cot must not be used without all stiffeners
installed.
• Use a harness when transporting your child in this Soft
Carry Cot (Harness purchased separately) and the cover
should always be zipped into place when carrying
the child.
• Do not allow the carry-straps to fall inside the Soft
Carry Cot.
• Take care to hold the Soft Carry Cot by BOTH handles.
• The Soft Carry Cot should NOT be used to transport your
child in a car. It is NOT designed as an Infant Car Seat.
General Information
WASHING AND CARE
• The Soft Carry Cot may be washed by following the directions
on the care label attached to the item. Ensure all items are dried
thoroughly before replacing or using them on the product.
Failure to dry the fabrics thoroughly could lead to the formation
of mildew.
• The Soft Carry Cot may be washed by unfastening the adjustable
straps on the 5 stiffener pockets – remove the stiffeners – wash
the fabric body following the directions on the fabric care label
affixed to the fabric. The padding may still be wet when the face
fabric feels dry. When thoroughly dry, insert the stiffeners into
the pockets and seal the pockets with the Velcro®.
The Carry Cot must not be used without all stiffeners installed.
2
Maclaren reserves the right to make design changes to any of their
products as part of their continuous development programme.
The Soft Carry Cot is designed and manufactured to comply with
EN1466:2004 / EN1888:2003
Only to be fitted to chassis manufactured Jan 2009 onward.
Instructions
en
IMPORTANT:
READ THESE INSTRUCTIONS CAREFULLY BEFORE USE AND KEEP THEM FOR FUTURE REFERENCE.
YOUR CHILDREN’S SAFETY MAY BE AFFECTED IF YOU DO NOT FOLLOW THESE INSTRUCTIONS.
This Maclaren Soft Carry Cot must only be used with
the Techno XLR.
1 ASSEMBLY INSTRUCTIONS
Detach Velcro® strips and insert side stiffeners into
the side pockets noting tapered end positions.
Zip hood and apron to Soft Carry Cot rim.
2 FITTING INSTRUCTIONS
WARNING:
CHECK THAT THE SOFT CARRY
COT ATTACHMENT DEVICES ARE
CORRECTLY ENGAGED BEFORE USE
AND THAT THE SOFT CARRY COT
IS SECURE; FAILURE TO DO SO WILL
ENDANGER YOUR CHILD’S SAFETY.
A Fully recline the seat. Remove all soft accessories
(i.e., liner, headhuggers, etc.). Release the fabric
seat and unclip wings and unclip retaining straps.
Fold fabric seat wings into seat base.
B Stow fabric seat wings under the harness.
This allows the buggy to be folded without obstructing
the mechanism.
C BEFORE PLACING BABY IN SOFT CARRY COT:
Look below Soft Carry Cot and flip down support legs and
remove straps from pockets.
D BEFORE PLACING BABY IN SOFT CARRY COT:
Lower Soft Carry Cot onto the seat ensuring support legs
rest on the seat pivots.
E Pull down both securing straps and locate on the
pegs each side.
F Reach below seat for under seat strap and clip
buckles together. Lift the Soft Carry Cot to check for
a secure fitting.
IMPORTANT: This strap and slip must be used at all times
when the Soft Carry Cot is in use.
3 WASHING INSTRUCTIONS
The hood, apron and cot fabric may be machine washed
(see Washing Instructions). The cot stiffeners and baseboard
must be removed from Soft Carry Cot.
A Unzip hood and apron and remove from Soft Carry
Cot. Detach Velcro® strap and slide base board
from pocket.
B Detach Velcro® straps and remove end and side stiffeners
from their pockets. After washing, reverse
above procedure.
NOTE: The tapered end position when replacing the side
stiffeners and the size difference when replacing the
end stiffeners.
3
Sécurité
MISE EN GARDE :
L’INOBSERVATION DE CES AVERTISSEMENTS ET DE CES INSTRUCTIONS
POURRAIT ENTRAÎNER DES BLESSURES GRAVES OU MORTELLES.
NE LAISSEZ JAMAIS VOTRE ENFANT SANS SURVEILLANCE.
CE PRODUIT CONVIENT UNIQUEMENT POUR UN ENFANT NE POUVANT PAS
S’ASSEOIR SEUL, SE TOURNER ET SE POUSSER SUR SES MAINS ET SES GENOUX.
POIDS MAXIMUM DE L’ENFANT : 20LB / 9KG.
LIRE ATTENTIVEMENT LA NOTICE D’EMPLOI AVANT USAGE ET LA CONSERVER
POUR CONSULTATION FUTURE.
ATTENTION
Ne laissez jamais votre enfant sans surveillance.
Ne laissez pas d’autres enfants jouer près de la nacelle
sans surveillance.
N’utilisez pas si une pièce est cassée, déchirée ou
manquante et n’utilisez que des pièces de rechange
fournies et approuvées par le fabricant.
RISQUE DE CHUTES
Pour éviter les chutes, n’utilisez pas ce produit si votre
enfant commence à se pousser sur les mains et les
genoux, ou s’il a atteint le poids maximum recommandé
par le fabricant.
RISQUE D’ÉTOUFFEMENT
Les enfants peuvent s’étouffer sur des literies souples.
N’ajoutez JAMAIS de matelas, d’oreiller, d’édredon ou
de rembourrage. Utilisez uniquement le produit fourni.
• Utilisez une surface plane ferme et sèche.
• Faites attention au risque d’exposition au feu et aux
autres sources de chaleur intense, comme les radiateurs
à barres électriques, les appareils de chauffage à gaz,
etc., tout près de la nacelle.
• N’utilisez jamais cette nacelle sur un support.
• Si vous utilisez un drap, choisissez-le à la taille de la nacelle.
• Inspectez régulièrement le produit (en particulier les
sangles de transport et le fond) pour repérer d’éventuels
signes d’endommagement et d’usure.
• Les cordons peuvent étrangler! Ne mettez pas d’article
avec un cordon autour du cou d’un enfant, comme des
cordons de capuche ou de tétine. Ne suspendez pas de
cordons au-dessus de la nacelle ou n’attachez pas de
ficelles aux jouets.
• Afin de réduire le risque de syndrome de MSN, les
pédiatres recommandent de mettre les enfants en bonne
santé sur le dos pour dormir, sauf contreindication de
votre médecin.
• N’utilisez pas la nacelle pour de longues périodes
de sommeil.
• La nacelle doit être installée sur la poussette à l’aide
des deux attaches latérales avant de mettre votre
enfant dedans.
• Vous ne devez pas utiliser la nacelle avant d’avoir installé
tous les raidisseurs.
• Utilisez un harnais lorsque vous transportez votre enfant
dans cette nacelle (harnais vendu séparément) et vérifiez
que le tablier est correctement fermé lorsque vous
portez l’enfant.
• Ne laissez pas tomber les sangles de transport à
l’intérieur de la nacelle.
• Assurez-vous de porter la nacelle avec les DEUX sangles
de transport.
• N’utilisez PAS la nacelle pour transporter votre enfant
dans une voiture. Elle n’est pas conçue pour cet usage.
Information générale
INSTRUCTIONS DE LAVAGE
• Vous pouvez nettoyer la nacelle en suivant les instructions de
lavage sur l’étiquette cousue sur le produit. Assurez-vous que
tous les éléments soient bien secs avant de les replacer ou les
utiliser sur le produit. Si vous ne laissez pas les tissus sécher
complètement, de la moisissure pourrait apparaître.
• Vous pouvez nettoyer la nacelle en ouvrant les bandes
autoadhésives des 5 poches des raidisseurs pour les enlever,
puis nettoyer la structure en tissu en suivant les instructions
de lavage de l’étiquette. Le rembourrage peut encore être
humide même si le tissu du dessus est sec au toucher. Une fois
bien sec, insérez les raidisseurs dans les poches et fermez-les
avec les bandes autoadhésives. N’utilisez pas la nacelle avant
d’avoir installé tous les raidisseurs.
4
Maclaren se réserve le droit d’apporter des modifications de design
sur ses produits dans le cadre de son programme de développement
continu.
La nacelle est conçu et fabriqué selon les normes EN1466:2004/
EN1888:2003. À installer uniquement sur les châssis fabriqué à partir
de janvier 2009.
Notice d’emploi
fr
IMPORTANT :
LIRE ATTENTIVEMENT LA NOTICE D’EMPLOI AVANT USAGE ET LA CONSERVER POUR CONSULTATION FUTURE.
SI VOUS NE SUIVEZ PAS CES CONSIGNES, LA SÉCURITÉ DE VOTRE ENFANT PEUT ÊTRE COMPROMISE.
À installer uniquement sur le Techno XLR.
1 INSTRUCTIONS D ’ASSEMBLAGE
Détachez les bandes réglable et insérez les raidisseurs de
côté dans les poches de côté en notant les positions des
extrémités effilées.
Détachez les bandes réglable et insérez les raidisseurs des
extrémités dans les poches aux extrémités en notant la
différence de taille.
Attachez la capote et la housse sur le bord du porte-bébé.
2 INSTRUCTIONS DE MONTAGE
MISE EN GARDE :
AVANT SON UTILISATION, VÉRIFIER
QUE LES DISPOSITIFS DE FIXATION
DE LA NACELLE SONT BIEN
INSTALLÉS ET QUE LA NACELLE
EST STABLE; LE FAIT D’IGNORER
CETTE CONSIGNE COMPROMET LA
SÉCURITÉ DE L’ENFANT.
A Baissez complètement le siège. Détachez les côtés en
tissu du siège et les lanières de fixation. Suppression de
tous les produits du siège (par exemple “Headhuggers”,
liners, jouets, etc). Repliez les côtés en tissu sous le fond
du siège.
B Mettez les côtés en tissu du siège sous le harnais.
Cela permet de replier la poussette sans obstruer
le mécanisme.
C Avant de mettre votre bébé dans le porte-bébé. Regardez
sous le porte-bébé, ouvrez les pattes de soutien et
enlevez les lanières des poches.
D Avant de mettre votre bébé dans le porte-bébé. Baissez
le porte-bébé sur le siège en vérifiant que les pattes de
soutien soient posées sur les pivots du siège.
E Rabattez les deux lanières de fixation et placez-les sur les
attaches de chaque côté.
F Passez sous le siège pour attacher la ceinture et attachez
les boucles. Soulevez le porte-bébé pour vérifier qu’il est
bien attaché.
IMPORTANTÊ: Vous devez toujours utiliser ces lanières et
cette attache lorsque vous utilisez le porte-bébé.
3 INSTRUCTIONS DE LAVAGE
Lavage du tissu du porte-bébé. Le tissu de la capote, de la
housse et du porte-bébé peuvent se laver en machine
(voir Instructions de lavage). Vous devez d’abord enlever
les raidisseurs et le support de la base du porte-bébé.
A Détachez la capote et la housse et enlevez-les du portebébé. Détachez la bande réglable et enlevez le support
de base de sa poche.
B Détachez les bandes réglable et enlevez les raidisseurs
des extrémités et de côté de leurs poches. Après lavage,
inversez la procédure ci-dessus.
NOTEZ: La position des extrémités effilées lorsque vous
replacez les raidisseurs de côté et la différence de taille
lorsque vous replacez les raidisseurs des extrémités.
5
Seguridad
ADVERTENCIA:
EL INCUMPLIMIENTO DE ESTOS AVISOS E INSTRUCCIONES PODRÍA PRODUCIR
LESIONES GRAVES E, INCLUSO, LA MUERTE.
NUNCA DEJE A UN NIÑO DESATENDIDO.
ESTE PRODUCTO ES APROPIADO SÓLO PARA UN NIÑO QUE NO PUEDA
SENTARSE SIN AYUDA, DARSE LA VUELTA O LEVANTARSE CON AYUDA DE
LAS MANOS O LAS RODILLAS. PESO MÁXIMO DEL NIÑO: 20LB / 9KG.
LEA LAS INSTRUCCIONES ATENTAMENTE ANTES DE SU USO Y GUÁRDELAS PARA
FUTURA REFERENCIA.
PRECAUCIÓN
Nunca deje a un niño desatendido.
No deje que otros niños jueguen sin vigilancia cerca
del capazo.
No utilice el capazo si hay alguna pieza rota, desgarrada
o perdida y utilice sólo piezas de repuesto suministradas
y aprobadas por el fabricante.
PELIGRO DE CAÍDA
Para evitar caídas, no utilice este producto cuando el
niño empiece a empujar con las manos o las rodillas o
cuando haya alcanzado el peso máximo recomendado
por el fabricante de 9 Kg, lo que se produzca antes.
PELIGRO DE ESTRANGULACIÓN
Los niños podrían sofocarse con la ropa de cama. Nunca
añada un colchón, almohada, colcha o almohadillas.
Utilice sólo los productos proporcionados.
• Sea consciente del riesgo de fuegos y otras fuentes de
calor fuerte, como estufas eléctricas, fuegos de gas, etc.
en las proximidades de la silla.
• Nunca utilice este capazo sobre un soporte.
• Si se va a utilizar una sábana, úsese una apropiada al
tamaño de la silla.
• Inspeccione el producto (principalmente las asas y la
base) de forma regular en busca de posibles señales de
daños o desgaste.
• Los cordones pueden causar estrangulación. No coloque
artículos con un cordón alrededor del cuello del niño,
como por ejemplo cordones de capuchas o de chupetes.
No suspenda cordones sobre el capazo ni ate cordones a
los juguetes.
• Para reducir el riesgo del Síndrome de Muerte Infantil
Súbita, los pediatras recomiendan colocar a los niños
sanos sobre sus espaldas; de lo contrario, siga los
consejos de su médico.
• El capazo no debería usarse para dormir durante largos
períodos.
• El capazo deberá conectarse a la silla por medio de los
dos clips laterales antes de colocar al niño en su interior.
• El capazo no deberá usarse sin tener todos los
contrafuertes instalados.
• Utilice las correas cuando transporte al niño en este
capazo (las correas se compran por separado) y la
cubierta siempre debería estar con la cremallera cerrada
cuando se lleve al niño.
• No deje que las correas de transporte caigan en el
interior del capazo.
• Tenga cuidado de sujetar el capazo por AMBAS asas.
• El capazo NO debería usarse para transportar al bebé en el
coche. NO está diseñado como asiento infantil para coche.
Información General
INSTRUCCIONES DE LAVADO Y CUIDADO
• El capazo podría lavarse siguiendo las direcciones de la etiqueta
acoplada al artículo. Asegúrese que todos los elementos estén
bien secos antes de volver a colocarlos o usarlos sobre el
producto. Si no se secan los tejidos a fondo podría formarse
moho.
• El capazo puede lavarse soltando las correas regulables de los
cinco bolsillos de los contrafuertes. Suelte los contrafuertes
y lave el tejido siguiendo las instrucciones de la etiqueta de
la prenda. El almohadillado podría estar todavía húmedo,
aún cuando el exterior parezca estar seco. Cuando estén
completamente secos, inserte los contrafuertes en los bolsillos y
séllelos con el adhesivo de la tela. El capazo no debería utilizarse
sin tener todos los contrafuertes instalados.
8
Maclaren se reserva el derecho de realizar cambios de diseño en
cualquiera de sus productos como parte de su continuo programa de
desarrollo.
El capazo está diseñado y fabricado para conformarse a las normativas
EN1466:2004/EN1888:2003.
Solo deberá acoplarse a los chasis fabricados a partir de enero del 2009.
Instrucciones
sp
IMPORTANTE:
LEA ESTAS INSTRUCCIONES DETENIDAMENTE ANTES DE USAR EL VEHÍCULO Y RETÉNGALAS PARA CONSULTAS FUTURAS.
LA SEGURIDAD DE SU NIÑO PODRÍA SER AFECTADA SI NO CONFORMA CON ESTAS INSTRUCCIONES.
Solo deberá acoplarse a le Techno XLR.
1 INSTRUCCIONES DE MONTAJE
Suelte las tiras ajustable e inserte los contrafuertes en
los bolsillos laterales, teniendo en cuenta las posiciones
de los extremos ahusados.
Suelte las tiras ajustable e inserte los contrafuertes en
los bolsillos de los extremos, teniendo en cuenta
la diferencia de tamaño.
Fije la capota y el cubrepiés al borde del capazo con
sus cremalleras correspondientes.
2 INSTRUCCIONES DE MONTAJE
ADVERTENCIA:
COMPRUEBE QUE LOS MECANISMOS
DE UNIÓN DEL CARRICOCHE ESTÉN
CORRECTAMENTE COLOCADOS
ANTES DE USAR EL PRODUCTO Y QUE
EL CARRICOCHE ESTÉ SEGURO. DE LO
CONTRARIO, SE PODRÍA AFECTAR LA
SEGURIDAD DE SU NIÑO.
A Recline el asiento por completo. Quite todos los productos
del asiento (i.e. “Headhuggers”, de trazadores de líneas, de
los juguetes, del etc). Suelte las tiras de tela del asiento y
desabroche las correas de retención. Doble las tiras de tela
sobre la base del asiento.
B Recoja las tiras de tela del asiento por debajo del arnés.
Esto permitirá que la silla pueda doblarse sin obstruir el
mecanismo.
C Antes de colocar al bebé en el capazo, mire por debajo
del mismo, baje las patas de soporte y saque las correas
de los bolsillos.
D Antes de colocar al bebé en el capazo, coloque éste sobre
el asiento asegurándose de que las patas de soporte
descansen sobre los pivotes del asiento.
E Tire hacia debajo de las correas de seguridad y fíjelas en
las clavijas de cada lado.
F Busque por debajo del asiento la correa inferior del mismo
y sujete las hebillas. Levante el capazo para asegurarse de
que esté bien montado.
IMPORTANTE: Deberá utilizarse esta correa y hebilla siempre
que se use el capazo.
3 INSTRUCCIONES DE LAVADO
La capota, cubrepiés y tela del capazo pueden lavarse a máquina
(véanse las instrucciones de lavado). Antes deberán sacarse del
capazo los contrafuertes y tabla de base.
A Abra la cremallera y quite el cubrepiés y la capota del
capazo. Suelte la tira de ajustable y saque la tabla de base
del bolsillo.
B Suelte las tiras de ajustable y saque los contrafuertes
laterales y los de los extremos de sus bolsillos. Después de
lavarse, repita el procedimiento descrito anteriormente en
orden inverso.
NOTA: Tenga en cuenta la posición del extremo ahusado a la
hora de volver a insertar los contrafuertes laterales y la diferencia
de tamaño a la hora de volver a insertar los contrafuertes de los
extremos.
9
Limited Warranty
Your Maclaren product is warranted to be free from
manufacturing defects for a period of one year from the
date of purchase under normal use and in compliance with
the operating instructions. This warranty extends only to
the original retail purchaser and is only valid when supplied
with proof of purchase, or if received as a gift, when the
registration card is on file with Maclaren USA Inc.
Maclaren will either repair, or at our option replace, free
of charge, any parts necessary to correct defects in material
or workmanship during the warranty period. The above
warranty is complete and exclusive. The warranty expressly
disclaims liability for incidental, special and consequential
damages of any nature. (Some states do not allow the
exclusion or limitation of incidental or consequential
damages, so the above may not apply to you.)
Any implied warranty arising by operation of law shall
be limited in operation to the term of this warranty.
(Some states do not allow limitations on how long an
implied warranty lasts, so the above limitations may
not apply to you.)
This warranty gives you specific legal rights, and you
may have other rights which vary from state to state.
For warranty service
Should repair be needed during the warranty period and
under the conditions of the limited warranty, contact the
retailer you purchased the product from. If your retailer
cannot perform the warranty repair, please contact
Maclaren direct at 1-877-442-4622.
If you need to return your product for service or repair,
return the unit freight prepaid in the original or other
similar protective packaging. If you do not have the
original box one can be secured from a local baby specialty
store, mass merchant, sporting goods store, moving
company or UPS. For the fastest and most economical
shipping we suggest shipping UPS.
When sending in the product for repair, include a note
with a daytime telephone number, receipt for proof of
purchase, return address, and specifically describe what is
wrong with the product.
IMPORTANT – WARRANTY WILL BE VOID IF INFORMATION DEFACED
OR REMOVED FROM BUGGY, CARTON OR THIS INSTRUCTION
LEAFLET
“Did you really read the instructions?
It’s for your child’s safety!”
PLEASE HELP US SUPPORT THE ENVIRONMENT
BY RECYCLING
Maclaren is committed to safeguarding the environment by adhering
to the principles of: reduce, reuse and recycle.
Maclaren encourages consumers to recycle their old Maclaren
Buggys. Maclaren buggys can be dropped off, or shipped at owner’s
expense, to any of Maclaren’s recycling locations below.
CUSTOMER SERVICE
Station Works, Long Buckby
Northamptonshire NN 6 7PF
United Kingdom
maclarenbaby.com
The words MACLAREN and TECHNO XLR and associated logos are trade marks. © Maclaren. All Rights Reserved.
* Velcro® is a trademark of its respective owner.
MS09405 XLR.07.10.US


![Quest EU 5 [Converted]](http://vs1.manualzilla.com/store/data/006169303_1-4c0a803fa9fc37f0da1ccf4ba868612d-150x150.png)